

Zanussi ZCM5200W User Manual

INSTRUCTIONS FOR THE USE AND CARE
MIXED FUEL
GB
ZANUSSI
COOKER
ZCM 5200 W
ZCM 5200 B
Appliances class 2 sub class 1 and class 1
2

WARNINGS
It is most important that this instruction book should be retained with the appliance for future
reference. Should the appliance be sold or transferred to another owner, or should you move
house and leave the appliance, always ensure that the book is supplied with the appliance in
order that the new owner can be acquainted with the functioning of the appliance and the
relevant warnings.
THESE WARNINGS ARE PROVIDED IN THE INTEREST OF SAFETY. YOU MUST READ THEM
CAREFULLY BEFORE INSTALLING OR USING THE APPLIANCE.
This appliance is designed to be operated by adults.
Children should not be allowed to tamper with the
controls or play with the product.
This appliance is heavy and care must be taken when
moving it.
Any installation work must be undertaken by a
competent, authorised installer in accordance with the
Gas Safety (Installation and Use) Regulations 1984
and the relevant codes of practice.
In the UK, C.O.R.G.I. registered installers (including
regions of British Gas) undertake the work to safe and
satisfactory standards.
Any electrical work required to install the appliance
should be carried out by a qualified or competent
person.
It is dangerous to alter the specifications or modify the
product in any way.
This appliance should be serviced by an authorised
Zanussi Network Service Centre, and only genuine
Zanussi spare parts should be used.
Cookers become very hot with use, and retain their
heat for a long period after use. Children should be
supervised at all times and should not be allowed to
touch the hot surfaces or be in the vicinity when in use
or until the appliance has cooled after use.
Always ensure that the control knobs are in the "off"
position when not in use.
The lid is designed as a dust cover when closed, and
as a splash-back when open. Do not use for any other
purpose.
After using the cooker, the glass lid fitted MUST NOT
be closed until the hob and oven are completely cold.
If you lower the glass lid when the hob or oven are still
hot or warm, the glass may shatter and could cause
injury.
Always remove any spillage from the surface of the
cover before removal or opening (if applicable), and
the appliance should be allowed to cool before
replacing or closing the cover.
For hygiene and safety reasons, this appliance should
be kept clean at all times. A build-up of fats or
foodstuffs could result in a fire.
This appliance has been designed for cooking edible
foodstuffs only, and must not be used for any other
purposes.
Never line any part of the oven with aluminium foil.
Unstable or misshapen pans should not be used on
the burner as unstable pans can cause an accident by
tipping or spillage.
Easy clean liners should never be cleaned with any
other than detergent water (see Cleaning Instructions).
Before any maintenance or cleaning work is carried
out on the appliance, always take out the plug from the
wall socket.
Ensure that the oven shelves are put in place in the
correct way (see instructions).
All gas appliances require adequate ventilation. Failure
to provide this could result in a lack of oxygen. Your
installer will advise if in doubt.
Always ensure that the oven vent which is located at
the centre back of the hob is left unobstructed to
ensure ventilation of the oven cavity.
The storage drawer located beneath the oven may
become hot whilst the oven is in use, only oven-proof
dishes should be stored in the drawer and care should
be taken when removing any items. Do not store
combustible materials in the drawer.
Under no circumstances should you attempt to repair
the appliance yourself. Repairs carried out by
inexperienced persons may cause injury or more
serious malfunctioning. Refer to your local Zanussi
Service Centre. Always insist on genuine Zanussi
spare parts.
Read the Instruction book before installing and using
the appliance.
3
CONTENTS
Installation Page 4
Technical Data Page 5
Use and Care Page 5-6
Use and Operation Page 7
Cooking Chart Page 10
Electronic Minute Minder Page 13-14
Maintenance and Cleaning Page 15
Removing the Oven Door Page 17
Oven lamp replacement Page 17
What Happens if Something Goes Wrong Page 18
Zanussi Guarantee Conditions Page 19
Warning
Please remember that an appliance used for cooking
does get hot, so make sure that children are kept
well away.
Important
Where the cooker is fitted with a lid, the lid must be
completely raised before the cooker will function.
Note:
If you require service, you must quote the model
number (see front cover), and the serial number,
refer to your supplier or local Zanussi Service Force
Centre.
This appliance complies with the following E.E.C. Directives:
• 73/23 - 90/683 (Low Voltage Directive);
• 89/336 (Electromagnetical Compatibility Directive);
• 90/396 (Gas Appliances Directive);
• 93/68 (General Directives)
and subsequent modifications.
CLASS APPLIANCE: 2 sub class 1 and class 1
APPLIANCE CATEGORY: I 2H
APPLIANCE GAS SUPPLY: Natural gas G20 20mbar
These instructions are only for the countries stated by the nation
mark printed on the front cover of this instruction book.
INSTALLATION
It is mandatory that all operations required for the
installation be carried out by a Competent Gas
Installer (Corgi registered installers normally meet
this criteria), and in accordance with existing rules
and regulations.
The relevant instructions are to be found in the
separate installation manual.
Please ensure that when the appliance is installed, it
is easily accessible for the engineer in the event of a
breakdown.
WARNING:
THIS APPLIANCE MUST BE EARTHED.
When the appliance is first installed
Once the oven has been installed, it is important to
remove the protective materials, which were put on in
the factory.
Before using your oven
Switch the oven to MAX. and leave it to run empty,
for 30 minutes to remove any unpleasant new smells.
4
TECHNICAL DATA
Model Number: ZCM 5200 W
ZCM 5200 B
Dimensions
Height 900 mm
Depth 595 mm
Width 597 mm
Oven Capacity 1.9 Cu. ft
Hob
Rear left heat area (N) 2,0 kW
Front left heat area (R) 3,0 kW
Rear right heat area (N) 2,0 kW
Front right heat area (S) 1,0 kW
N = Normal burner
R = Rapid burner
S = Simmer burner
BURNER RAPID NORMAL SIMMER
GAS
TYPE OF
CHARACTERISTICS
3
POSITION MAX MIN MAX MIN MAX MIN
NOMINAL THERMAL
POWER kW 3,0 0,65 2,0 0,45 1,05 0,33
Oven
Traditional oven element rating 1880 W
Grill element rating 1830 W
Double grill element rating 2665 W
Convection oven element rating 2090 W
Oven lamp 15 W
Convection fan rating 30 W
Maximum power absorbed 2680 W
Power supply (50 Hz) 230-240 V
Total appliance rating (gas + electric) 10,68 kW
NOMINAL FLOW
20 mbar
NATURAL GAS
POWER lt/h 15°C 286 57 190 38 95 28
GROSS HEAT
NOZZLE REFERENCE 119 Adjusted 96 Adjusted 70 Adjusted
VALUE 37.78 MJ/ m
1/100 mm
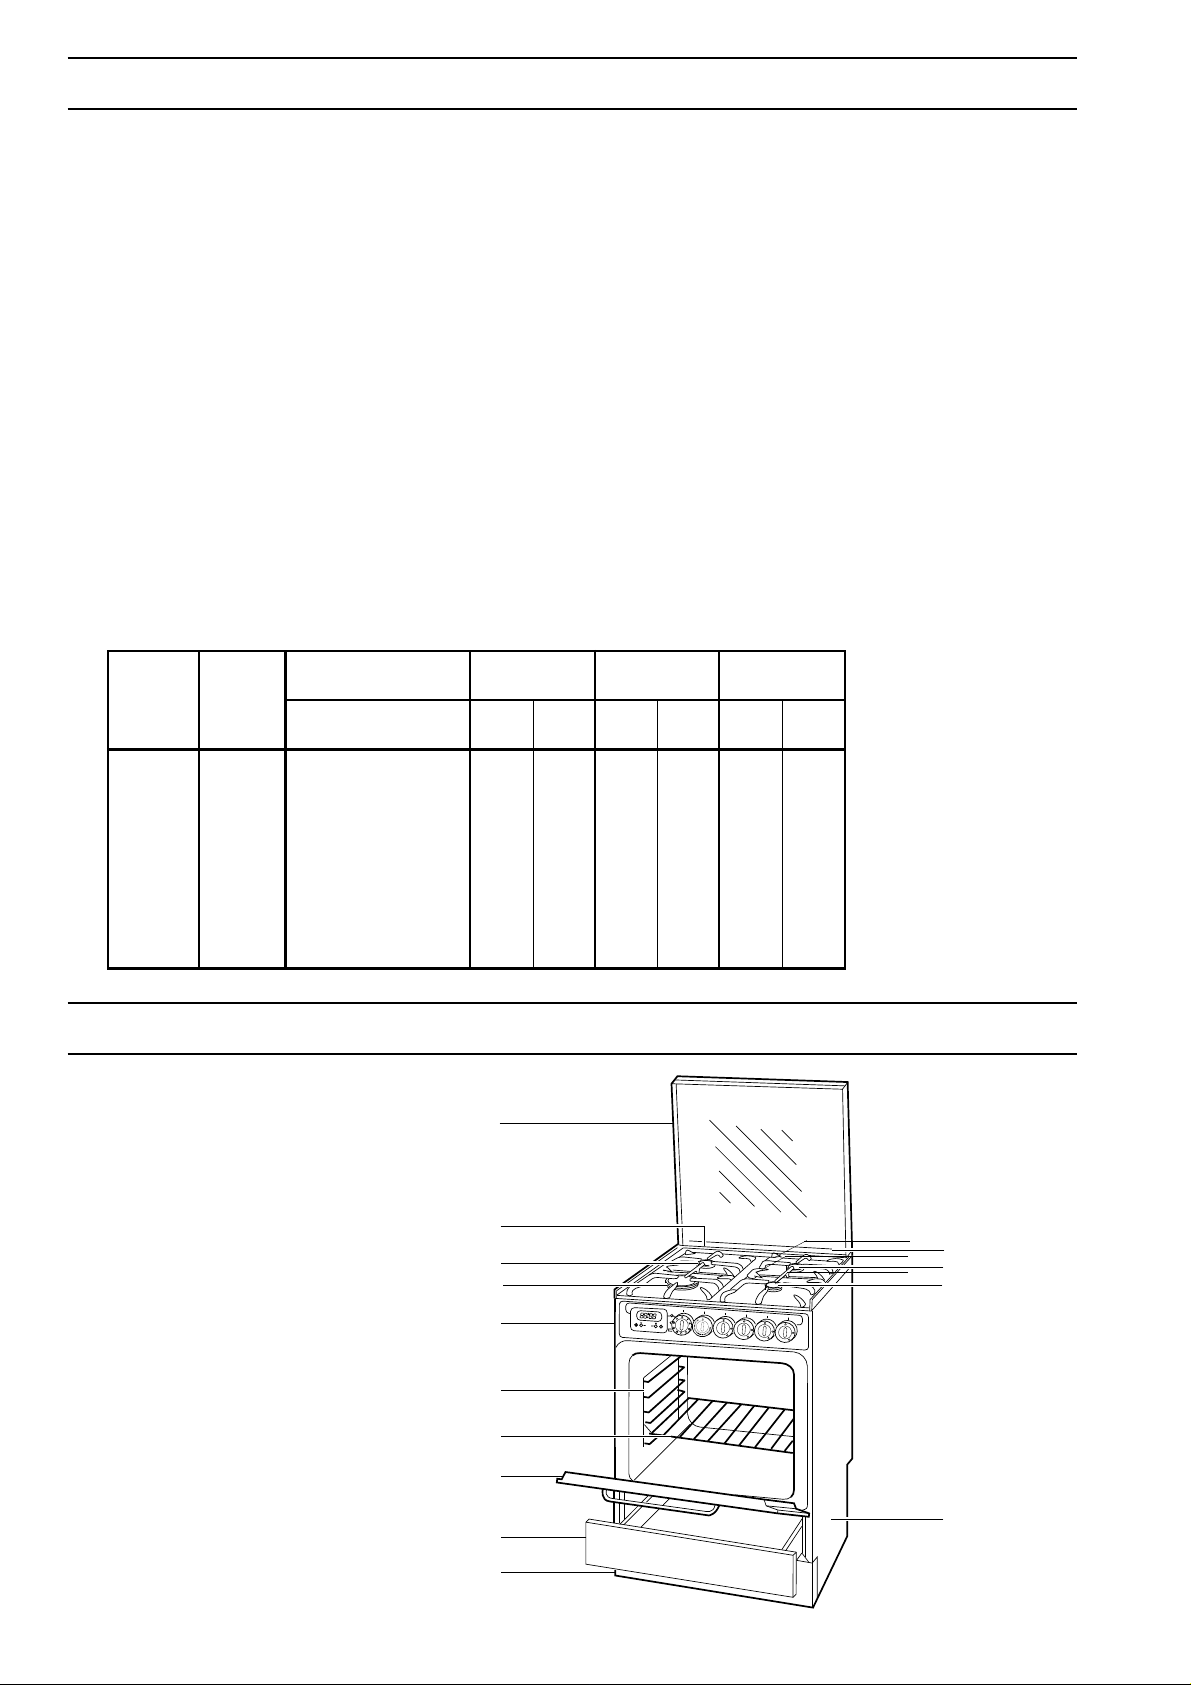
COOKER FEATURES
A. Glass lid
B. Safety cut-off
C. Semi-Rapid burner
D. Rapid burner
E. Control panel
F. Shelf support
G. Shelves
H. Oven door
I. Removable drawer
J. Front panel
K. Base
L. Baking tray
M. Auxiliary burner
N. Semi-Rapid burner
0
A
B
C
D
SET
TIME
E
F
G
H
I
J
STOP
ZANUSSI
ZCM 5200
N
M
L
K
5

STOP
SET
TIME
PUSH
BOTH
-
+
STOP
SET
TIME
PUSH
BOTH
-
+
0
100
150
200
50
CONTROL PANEL
2
1
1. Electronic Minute Minder
2. Thermostat control light
3. Ignition button
4. Mains-on light
5. Oven selector knob
6. Oven thermostat knob
7. Semi-rapid burner knob
8. Rapid burner knob
9. Auxiliary burner knob
10. Semi-rapid burner knob
O. Grill/roasting pan, large
P. Reversible grill trivet
Q. Removable handles (2)
4
10987653
O
P
Q
OVEN
6
R
S
T
U
V
R. Grill
S. Oven light
T. Fan
U. Filter
V. Oven liners
OPERATION
Safety cut off
Your cooker is fitted with a safety cut off device
which is actuated when the lid is lowered. This cuts
the electricity and gas supply to the whole appliance,
and prevents the lid being lowered onto the burners
when they are still on. When the lid is raised again,
the electricity supply to the oven is automatically
restored. The gas supply to the hob must be restored
manually by depressing the pushbutton on the rear
left hand corner of the hob surface.
There are two important points to remember; firstly
the lid must be in the raised position for any part of
the cooker to function. Secondly, you must
remember to return all the controls to their off
positions when you have finished using the cooker. If
you have for instance left the oven on, when the lid is
raised it will automatically come on again.
Obviously if you manually restore the gas supply and
of the burner controls have not been returned to their
off positions, the gas will escape.
Safety cut off switch
Important
Be very careful when frying food in hot oil or fat as the
overheated splashes could easily flare up.
NOTE: "the use of a gas cooker produces heat and
damp in the room where it is installed. Ensure a good
airing of the room keeping the natural ventilation
holes open or installing an aspiration hood with
exhaust pipe".
NOTE: "A long and intensive use of the machinery
can require further airing, for example the opening of
a window, or a more efficient ventilation, increasing
the mechanic suction power, when existing".
Do not tamper with or attempt to adjust the safety
cut-off switch. Any adjustment must be made by a
qualified engineer.
The switch is designed to prevent the hob or oven
being turned on when the lid is closed.
Tampering with the switch may enable the heat to be
turned on with the glass lid in the down position. The
heat would cause the glass lid to shatter which could
result in injury. Should you find the switch not
functioning correctly, contact your local authorised
Zanussi Service Centre.
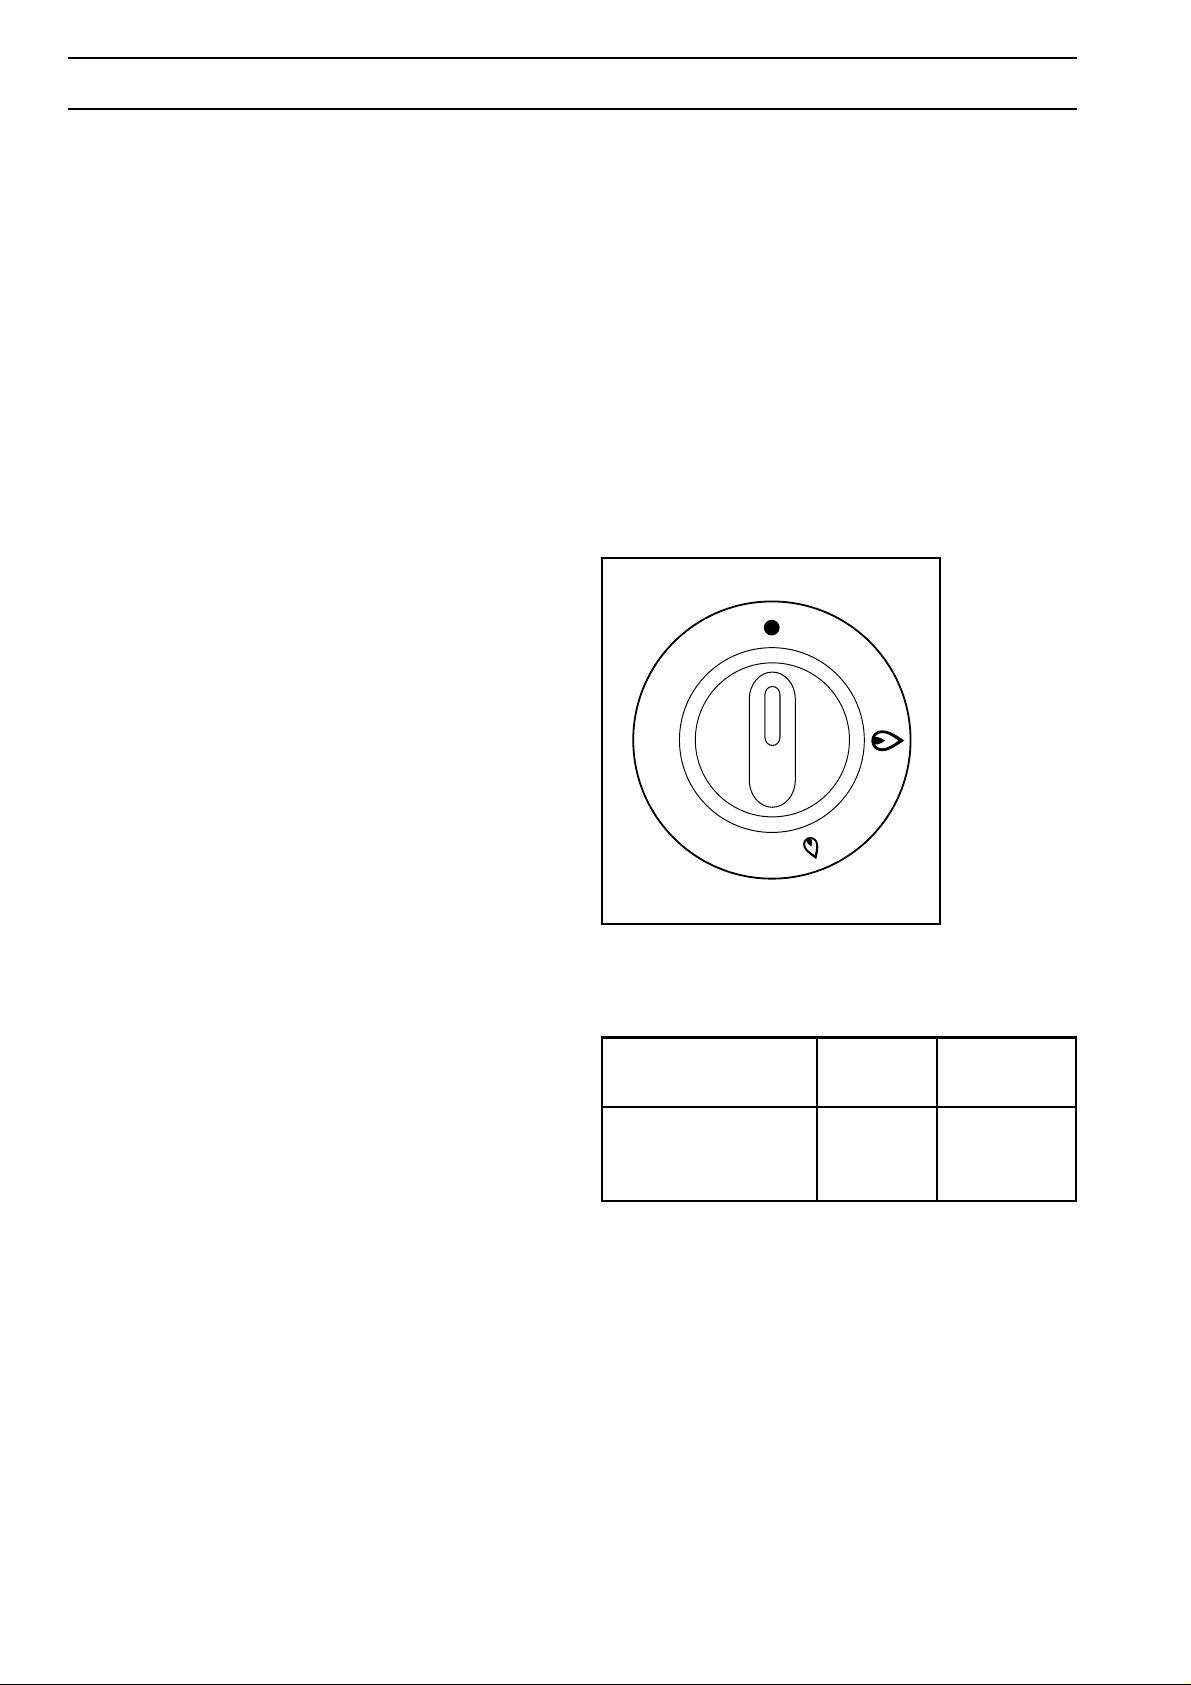
HOB BURNERS (Fig. 1)
The control panel incorporates knobs to operate the
four gas burners.
To light a worktop burner, turn the relevant knob (Fig.
1) to the large flame symbol which corresponds to
the maximum setting.
Depress the ignition pushbutton on the fascia panel.
Once the burner is alight adjust the flame as
required. The smaller flame symbol is a simmer
setting.
It is important that pans with a base fitting the size of
the burner be used so that the flame does not spread
beyond the bottom of the pan.
NOTE:
"In case of accidental extinction of the burner flames,
turn the handle control off and do not try to turn it on
unless at least 1 minute has elapsed".
FO 0839
Table of containers to be used
(flat bottom only)
Burner Ø Min. Ø Max
(mm) (mm)
Rapid 160 260
S/Rapid 120 220
Auxiliary 80 160
Fig. 1
MULTIFUNCTION OVEN
The multifunction oven makes it possible to carry out
various types of cooking, depending on the nature of
the food and its volume.
All cooking must be done with the oven door closed.
The oven light remains on with all cooking functions.
The oven control knob symbols are listed together
with a brief description of the functions (a more
detailed explanation of the functions and how to use
them are given in the "ZANUSSI COOKBOOK"
book).
7
 Loading...