

Zanussi ZCB990 User Manual

Operating
instructions
Steam
oven
ZCB 990
Contents
For your safety 3
Description of oven 5
Electronic programmer 6
Using the appliance for the first time 7
The cooking functions 10
Programming the oven 11
Special functions 13
Steam cooking 17
How to use steam cooking 19
Advice on using the oven 21
Guide to using the instructions
These symbols will help you quickly find the
most important information.
Safety information
Shelf supports 27
Cooking tables 28
Cleaning and maintenance 34
What to do if something
does not work 41
Technical specifications 43
Installation 44
Technical assistance and spare parts 47
)
Step-by-step instructions
Practical advice and tips
Information on protecting
the environment
MANUFACTURER:
ELECTROLUX ITALIA S.p.A.
C.so Lino Zanussi, 30
33080 PORCIA (PN) - Italy
2
This appliance complies with the
following EEC Directives:
- 2006/95 (Low voltage);
- 89/336 (Electromagnetic
Compatibility);
- 93/68 (General Standards) and
subsequent amendments.

Warnings and important safety advice
This new appliance is easy to use.
However, make sure to read this handbook before installing and using it for the first time. In
this way you can obtain best performance, avoid incorrect operations, use the appliance in
complete safety and respect the environment.
Installation
• Modifying or attempting to change the
characteristics of this product is hazardous.
• Appliance installation and connection to the
power supply must only be carried out by
qualified personnel. Before carrying out
any operation, make sure the appliance is
disconnected from the power supply.
• After unpacking the appliance, make sure it is
not damaged and that the power cable is in
perfect condition. Otherwise, contact the dealer
before using the appliance.
• The manufacturer declines any liability
if the accident-prevention regulations
are not respected.
For your safety
• This appliance must only be used by adults.
Make sure children do not touch the
controls or play with the equipment.
• This appliance is not intended for use by
children or other persons whose physical,
sensory or mental capabilities or lack of
experience and knowledge prevent them
from using the appliance safely without
instruction or supervision of a responsible
person.
• The exposed parts of this appliance become
hot during cooking and remain hot for some
time, even after the appliance is turned off.
Keep children away until it has cooled.
During use
• This product is designed for nonprofessional use to cook edible foodstuffs
only. Do not use it for any other
purpose.
• When using a power socket near this appliance,
make sure the cords of any electrical appliances
being used do not touch it and are far enough
away from its hot parts.
• The parts of this appliance become hot
during cooking and stay so for some time,
even after it is switched off. Avoid
touching the heating elements inside
the oven.
• Beware of the hot air coming from the
oven when opening the door during or
at the end of cooking.
• After using the appliance, make sure all the
controls are in the “CLOSED” or “OFF”
position.
• DO NOT use the switched off oven as a
space for placing food or containers:
damage or accidents could occur if it is
unintentionally switched on.
Cleaning and Maintenance
• Before carrying out any maintenance or
cleaning operation, make sure the appliance
is disconnected from the power supply.
3

• Always keep the appliance clean.
A build-up of grease of other foodstuffs may
cause a fire hazard.
• Do not use steam or steam appliances to
clean the oven.
• Do not use harsh abrasive cleaners or sharp
metal scrapers to clean the oven door glass
since they can scratch the surface, which may
cause the glass to shatter.
• In case of faults, never try to repair the
appliance on your own. Repairs carried out
by unqualified persons can cause damage or
personal injury. Consult this handbook. If you
do not find the necessary information, contact
the nearest Assistance Centre. Assistance
for this appliance must be carried out by an
authorised Technical Assistance Centre.
Always demand the use of original spare
parts.
Advice for safeguarding the
environment
Packing
• All the materials used are environmentally
friendly and recyclable. Please make your
contribution to safeguarding the environment
by using the special differentiated waste
collection channels.
Appliances in disuse
• Discarded or unusable appliances are not
worthless waste. Through ecological disposal,
various materials used in manufacturing your
appliance can be recovered.
• Find out about the possibilities of disposal from
your specialized dealer or local Council.
• When disposing of the appliance, make
it unusable by cutting off the power
cable.
• The symbol on the product or the
packaging indicates that the product should
not be treated as normal household waste but
must be taken to an appropriate collection point
for the recycling of electrical and electronic
equipment. Correct disposal of this appliance
will help prevent possible negative
consequences for the environment and the
health of persons.
For more detailed information about the
recycling of this product, contact your local
council office or waste disposal service, or the
shop where you purchased the product.
This instruction handbook must be
kept with the appliance for any
future consultation. If the appliance
is sold or given to another person,
make sure the handbook goes with
it, so that the new user can know
how to use the appliance with the
relative instructions.
4
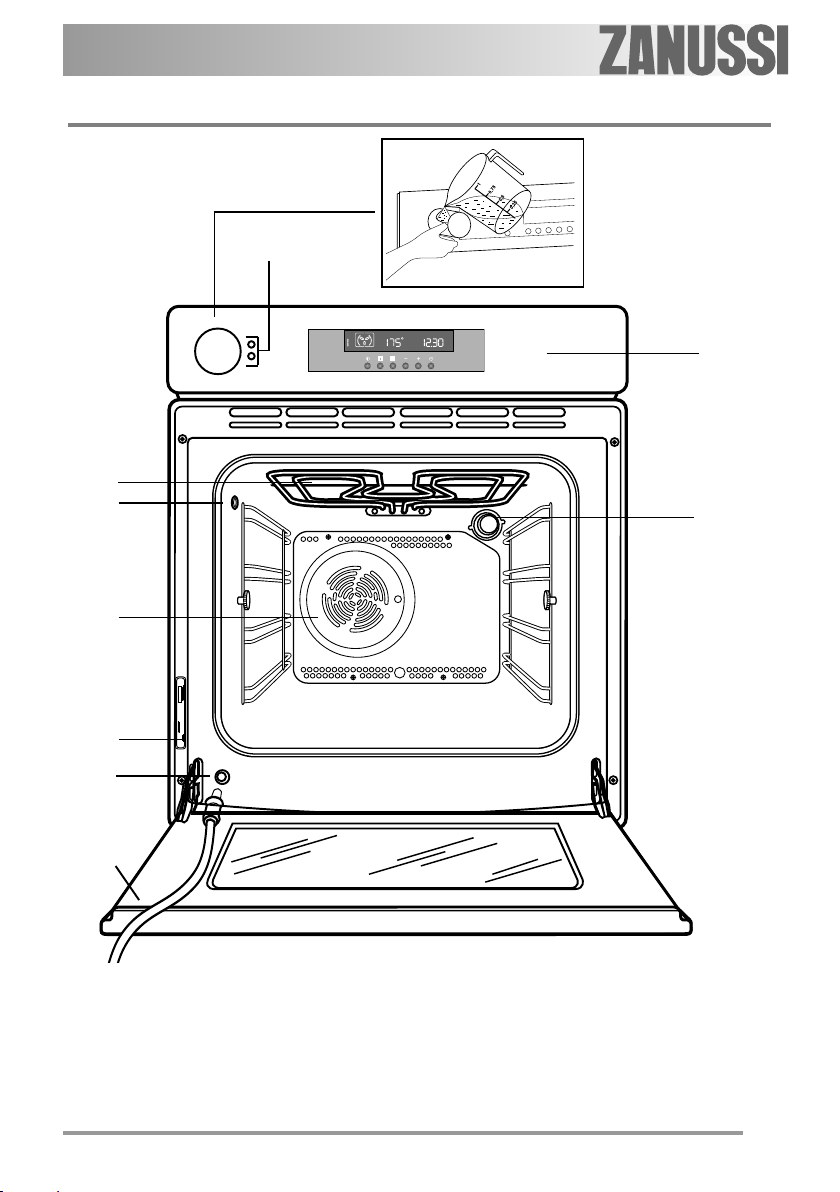
Description of oven
6
3
8
4
7
1
2
5
9
10
1. Control Panel
2. Oven Light
3. Grill
4. Fan
5. Oven dataplate
6. Steam cooking warning lights
7. Water loading drawer
8. Steam intake
9. Water outlet valve
10. Water outlet probe
5
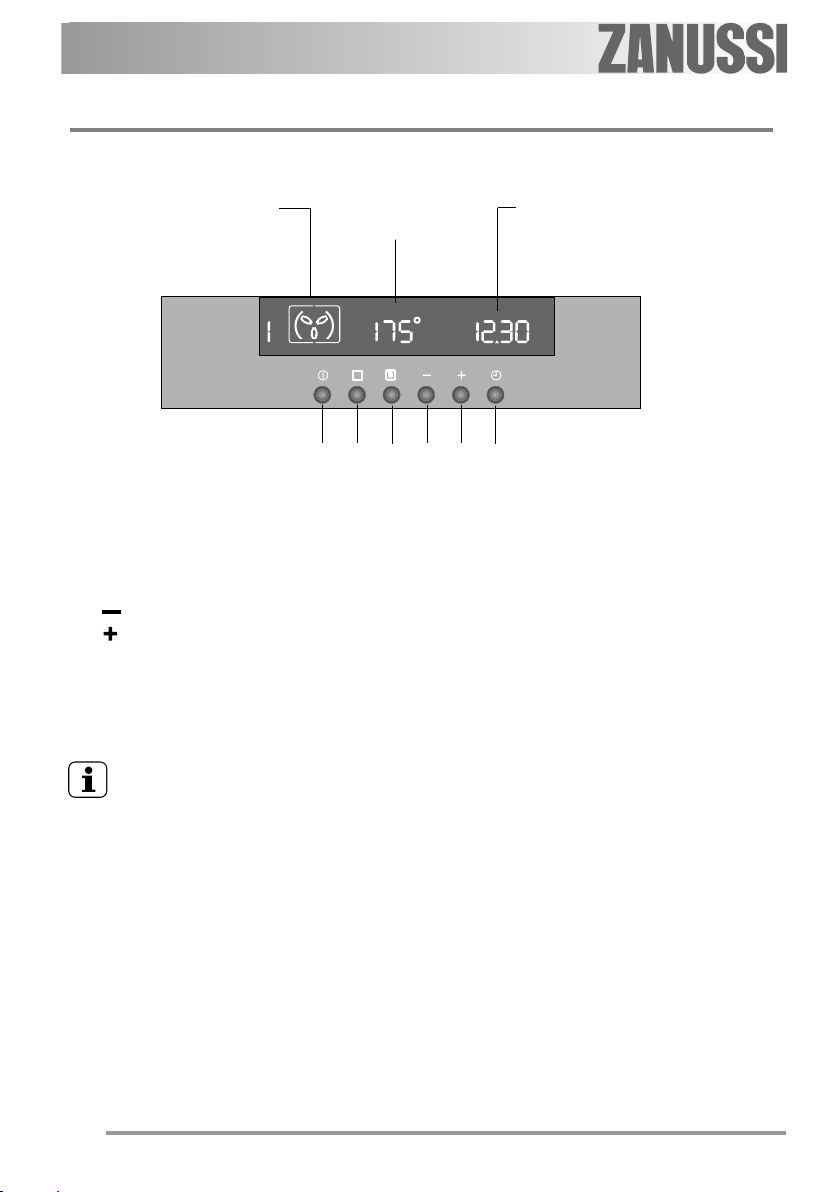
Electronic programmer
COOKING
FUNCTIONS
DISPLAY
TEMPERATURE
CLOCK DISPLAYDISPLAY
1 2 3 4 5 6
1. ON/OFF switch
2. Button for the selection of the cooking functions
3. Button to select the fast heat function
4. “ ” button (back)
5. “ ” button (forward)
6. Button to set the Minute Minder, Cooking Time and End of Cooking Time
CAUTION
If the electrical supply should fail, the
programmer retains all the settings in its
memory for approximately 3 minutes. Once
this time has elapsed, the data is wiped
The cooking functions are controlled by an
electronic programmer.
You can select any combination of cooking
function, temperature and time.
clean and all the settings will have to
introduced once more when the power
returns.
6
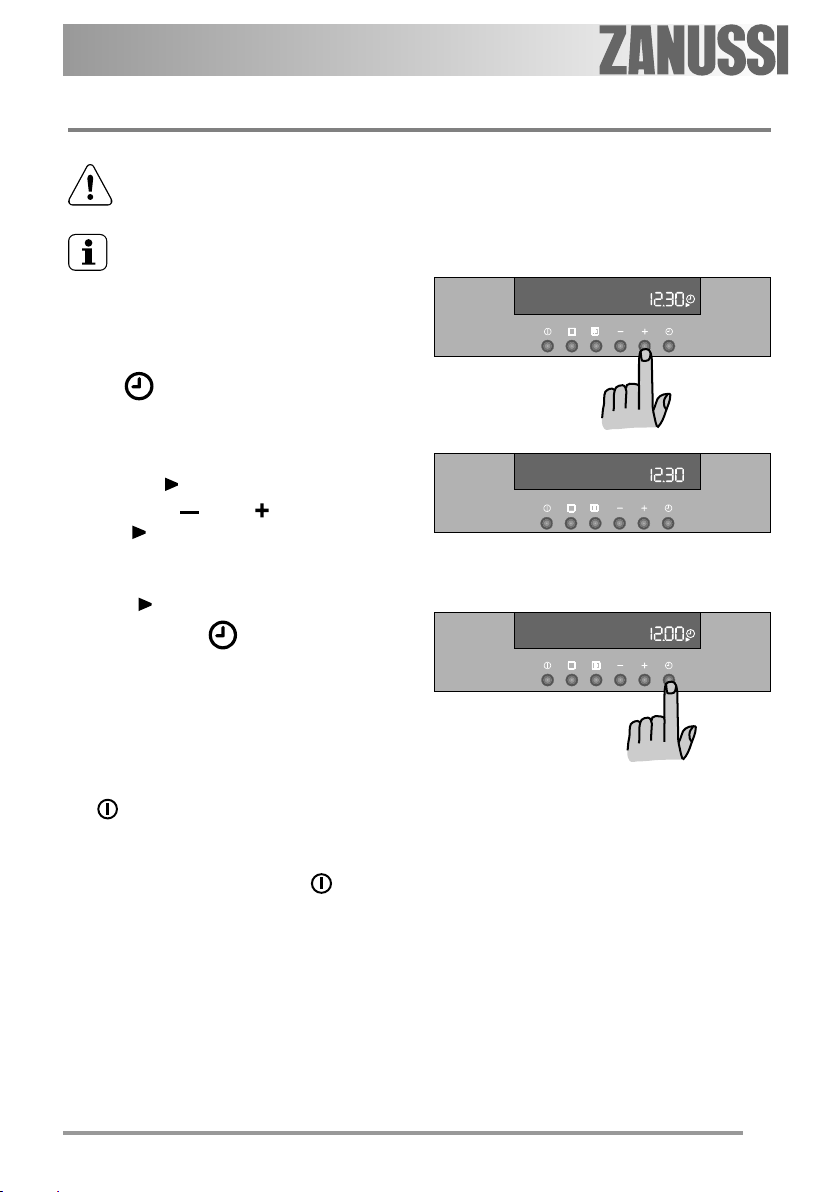
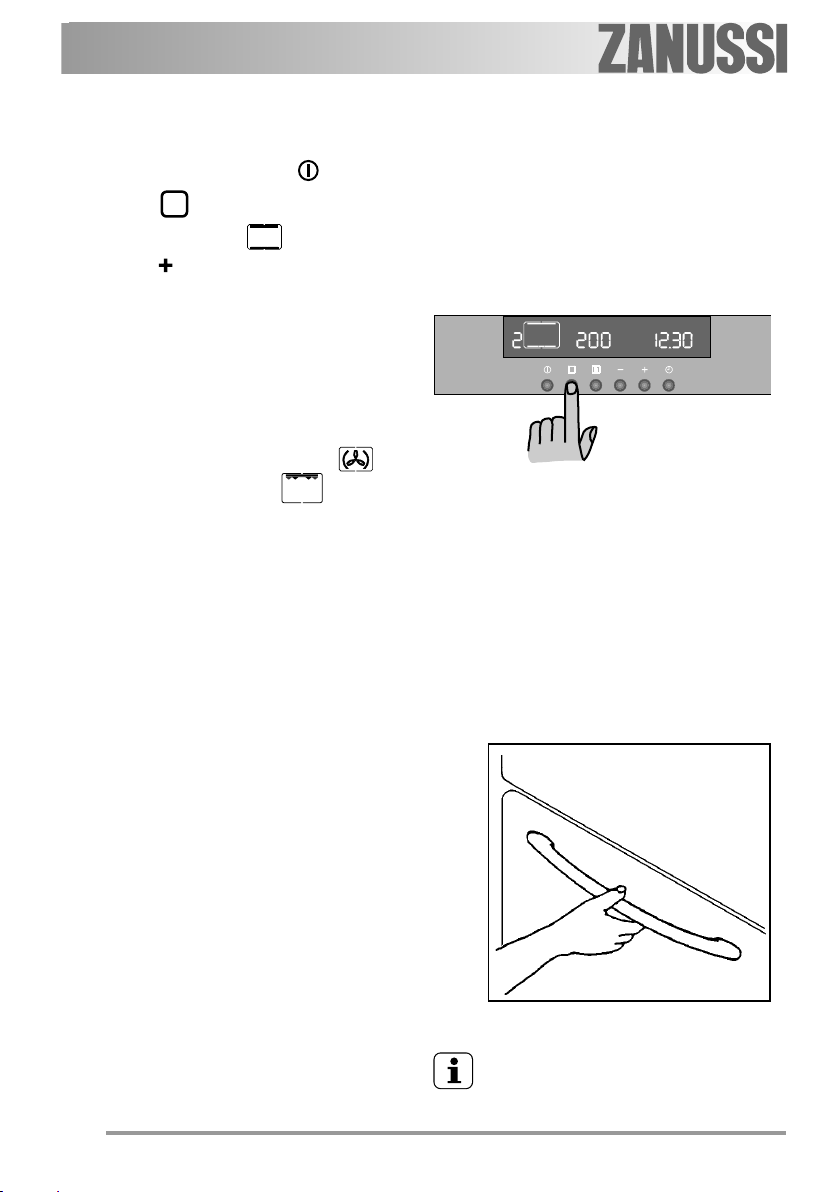
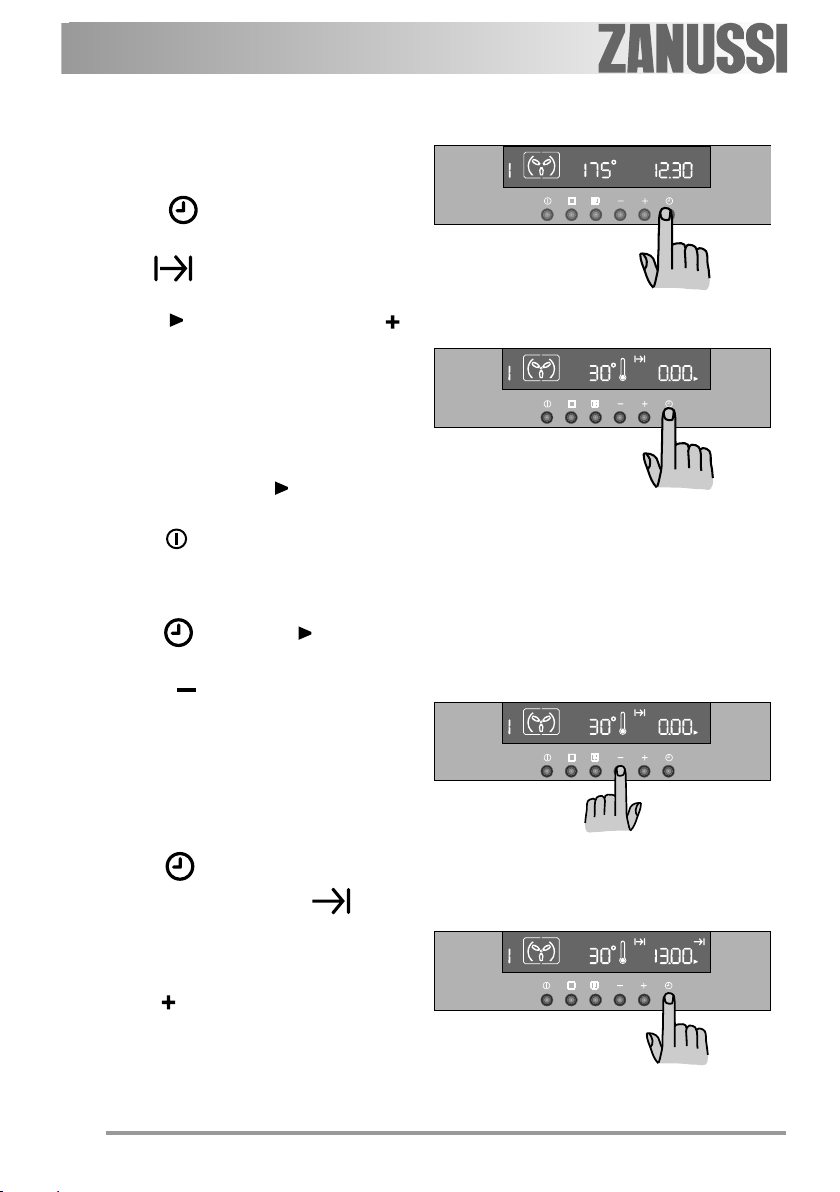
Using the appliance for the first time
Remove all packaging materials from
your oven, including the advertising
stickers and any protective films.
Before cooking for the first time, carefully
wash the accessories located inside the
oven.
When the oven is connected to the electrical
mains for the first time or when power is restored
after a power cut, “12.00” appears on the display
and the symbol flashes.
You have to set the current time before using
the oven.
)
a) while the symbol is flashing, set the hour
b) if the symbol does not flash any longer,
)
— The oven must be on to select the cooking
— To turn the oven off, press the button: all
ABSOLUTELY NORMAL if the oven produces
unpleasant odors and fumes. This is due to
heating of the insulation and manufacturing
residues.
To set current time on the clock:
using the “ ” and “ ” buttons (Fig. 1).
The symbol disappears approximately
5 seconds after the last time you set the correct
time (Fig. 2).
lightly press the button twice.
Then proceed as described at point “a”
(Fig. 3).
How to turn the oven on and off
function/program. Every time you press the
button, the oven symbol appears on the
display and the oven light turns on.
The oven may be turned off at any time.
the cooking functions/programs are
interrupted, the oven light goes out and the
current time appears on the display.
During the first minutes of operation, IT IS
Fig. 1
Fig. 2
Fig. 3
7
This is why we suggest that you heat your
oven EMPTY before beginning to use it normally.
To do so, proceed as follows.
)
— switch on the oven using the button.
— press the button twice to select the function
‘Traditional Cooking’ (Fig. 4).
— use the “ ” button to adjust the temperature
to 250°C.
— allow the oven to operate EMPTY for about
45 minutes. If you prefer, program the oven to
operate for 45 minutes.
— ensure the room is well ventilated during the
entire operation.
It is advisable to repeat the above procedure
selecting the function ‘Fan Cooking” and
the function “Large Grill” for about
5-10 minutes.
After 45 minutes, allow the oven to cool, then
clean the interior with warm water and delicate
detergent.
Fig. 4
Fig. 5
To open the oven door, always grip
the handle in the middle.
8
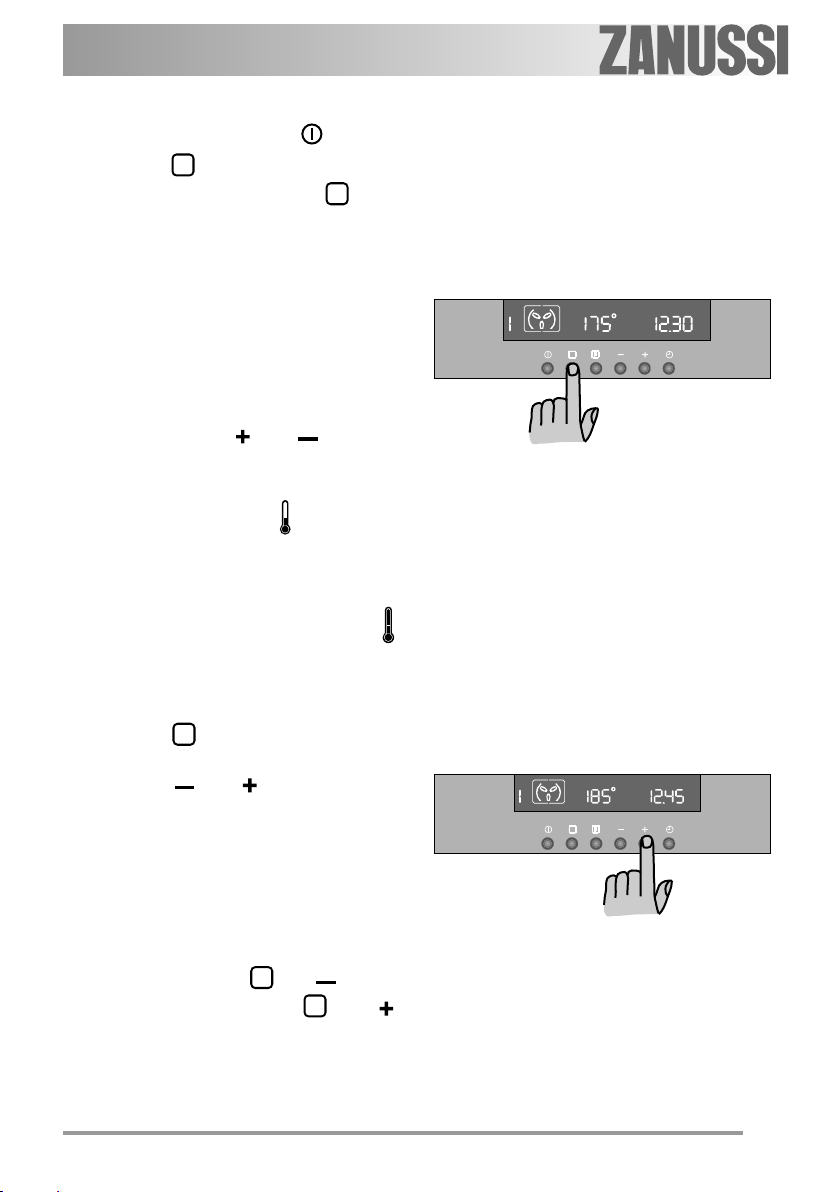
)
— Switch the oven on using the button.
— Press the button to select the desired
— For every cooking function, the display will
— The thermometer symbol “ ” shows that the
chosen heat, the programmer emits a short
acoustic signal and the thermometer symbol “ ”
stops flashing.
Selecting a cooking function
function. Each time you press the button,
the symbol of the selected cooking function
appears, indicating which function is activated
at that moment.
The corresponding cooking function number
appears to the left of the currently selected
cooking function symbol (Fig. 6).
show the preset temperature.
If the preset temperature is not the one you
require, press the “ ” and “ ” buttons to
adjust the temperature by five degree
intervals.
temperature inside the oven is increasing.
When the oven temperature reaches the
Fig. 6
How to adjust the temparture
)
— Press the button; the display will show
the temperature.
Using the “ ” and “ ” buttons, adjust the
preset temperature while the “°” symbol is
flashing (Fig. 7). The maximum temperature
that can be set is 250°C.
Special functions
)
One may select the following functions by
pressing two buttons at the same time:
— Child lock: press the “ ” and “ ” buttons;
— ‘Beep’ signal: press the and “ ”
buttons;
— ‘Demo’ Function: to activate this function,
follow the instructions given on page 14.
Fig. 7
Fig. 7
9
The cooking functions
1
2
3
4
5
Fan Cooking- The heat is distributed
uniformly thanks to the action of a fan.
The preset temperature is 175°C.
Traditional Cooking - The heat
comes from above and below. The
preset temperature is 200°C.
Simple Grill - The oven emits heat
only from above. The preset
temperature is 250°C.
You can adjust the temperature
between 200°C and 250°C.
Ventilated grill - The heat comes
only from above and is distributed by
the fan. The preset temperature is
180°C. The maximum adjustable
temperature is 200°C.
Pizza - The combined action of the
heat coming from below and the air
distributed by the ventilator allows a
uniform cooking of pizzas and
savoury pastries. The preset
temperature is 175°C.
8
9
10
Top heat -The oven emits a moderate
heat only from above. The preset
temperature is 250°C.
Defrosting - The fan circulates the
cold air inside the oven, helping to
defrost frozen food.
Steam cooking -The dishes
are steamed.
The preset temperature is
140°C.
6
7
10
Large grill - The oven emits intense
heat only from above. The preset
temperature is 250°C.
You can adjust the temperature
between 200°C and 250°C.
Bottom heat - The oven emits a
moderate heat only from below. The
preset temperature is 250°C.
Programming the oven
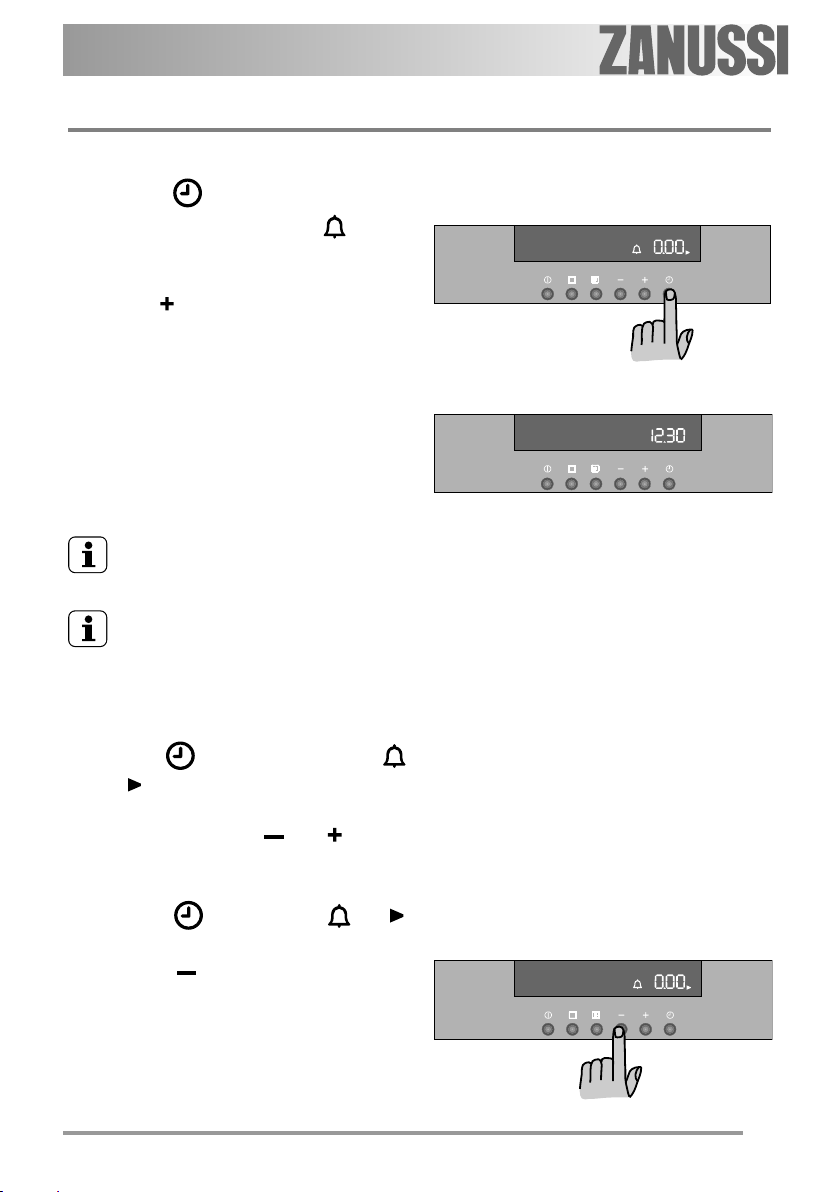
How to use the Minute Minder
)
— Press the button to select the Minute
Minder function (Fig. 8). The symbol
flashes and the digits “0.00” appear on the
display.
— Use the “ ” button to select the desired time.
The maximum time that can be set is 23 hours
59 minutes.
— Once the time has been set, the Minute Minder
waits about 3 seconds, then begins the
countdown.
— At the end of the time, an acoustic signal sounds.
To turn off the acoustic signal, press any button.
It will go off automatically after one minute
(Fig. 9).
IMPORTANT: The counter function
does NOT turn the oven off
automatically, if it is on.
It is impossible to set the Counter
function when the oven is in stand-
by mode.
Fig. 8
Fig. 9
To access or modify the counter setting:
— Press the button repeatedly, until the
and symbols appear on the display.
At this point you can change the counter
settings by pressing the “ ” and “ ” buttons.
To cancel the Minute Minder:
— Press the button until the and
symbols start to flash on the display.
Press the “ ” button until the digits “0.00”
appear on the display (Fig. 10).
Fig. 10
11
How to program your oven to switch
)
off
— Place your dish in the oven, select the cooking
function and the desired temperature (Fig. 11).
— Press the button to select the “Cooking
time” function (Fig. 12). The “Cooking time”
symbol flashes and the digits “0.00”
appear on the display
— While the symbol flashes, press the “ ”
button to set the desired time. The maximum
time that can be set is 23 hours 59 minutes.
— Once the time has been set, the programmer
waits 3 seconds, then begins the countdown.
— At the end of the time, the oven switches off
automatically and an acoustic signal sounds.
The digits “0.00” and the symbol flash on
the display.
— Press the button to switch off the acoustic
signal.
To cancel the cooking time:
— Press the button until the symbol starts
to flash on the display.
— Press the “ ” button until the digits “0.00”
appear on the display (Fig. 13).
Fig.11
Fig. 12
How to program your oven to switch
)
on and off
— Set the “Cooking time” as described on the
previous page.
— Press the button and select the “Cooking
time” function indicated by the symbol
that starts to flash. The end time appears on
the display (that is the current time plus the
cooking time set - Fig. 14).
— Use the “ ” button to adjust the desired end
of cooking time.
— Once the time has been set, the programmer
waits 3 seconds, then begins the countdown.
12
Fig. 13
Fig. 14

— The oven comes on and turns off automatically,
indicating the end of the cooking with an
acoustic alarm. To switch off the acoustic alarm,
press the button.
To cancel the cooking time, follow the
instructions given in the previous
paragraph.
Special functions
Automatic turn off feature
If you forget to turn you oven off, it will turn off
automatically after a certain amount of time,
depending on the temperature set (Fig. 15).
If the temperature the oven switches
is: off after:
250° 3 hours
from 200 to 245° 5.5 hours
from 120 to 195° 8.5 hours
less than 120° 12 hours
Residual heat utilization
If you program your oven to switch off
automatically, it will actually switch off a few minutes
earlier. In this way the residual heat inside the oven
will complete the cooking, allowing you to save
energy. The indications on the display will in any
case remain on right up to the end of the cooking
time set.
This special function is not active if the cooking
time set is lower than 15 minutes.
Child safety look
The child safety look allows the oven to be
protected from inconsiderate use.
Fig. 15
13
— If the oven is on, switch it off using the button.
— Press and hold the and “ ” buttons
simultaneously for at least 3 seconds. A brief
acoustic signal sounds and the word ‘SAFE’
appears on the display (Fig. 16).
— Now the oven is protected. No cooking function
can be selected.
To eliminate the safety lock: press and hold the
and “ ” buttons simultaneously for at least 3
seconds. A brief acoustic signal sounds, the word
‘SAFE’ disappears from the display and (Fig. 17).
You an now use the oven again.
Demo mode
This function can be used to show the oven
functions in shops and show rooms without any
energy waste, with the exception of the oven light
and the fan.
To activate this function, the device must be in its
first use mode, meaning when the oven is
connected for the first time to the mains power or
when power is restored after a power cut.
To select the demo mode, wait until “12.00”
appears and the symbol flashes on the
display.
Then proceed as follows:
1. Press the button for about 2 seconds
(Fig.18). The system emits a short acoustic
alarm.
2. Press the and “ ” buttons simultaneously.
The system emits a short acoustic signal and
“12.00” appears on the display (Fig.19).
Fig. 16
Fig. 17
Fig. 18
3. Holding down the button, the symbol
appears permanently on the display to show
that the demo function is on.
All oven functions can be selected.
14
Fig. 19
To deactivate the ‘demo’ function: ensure that
the equipment is in stand-by mode and repeat the
operations described above.
The demo function remains active
even when the power returns after a
power cut.
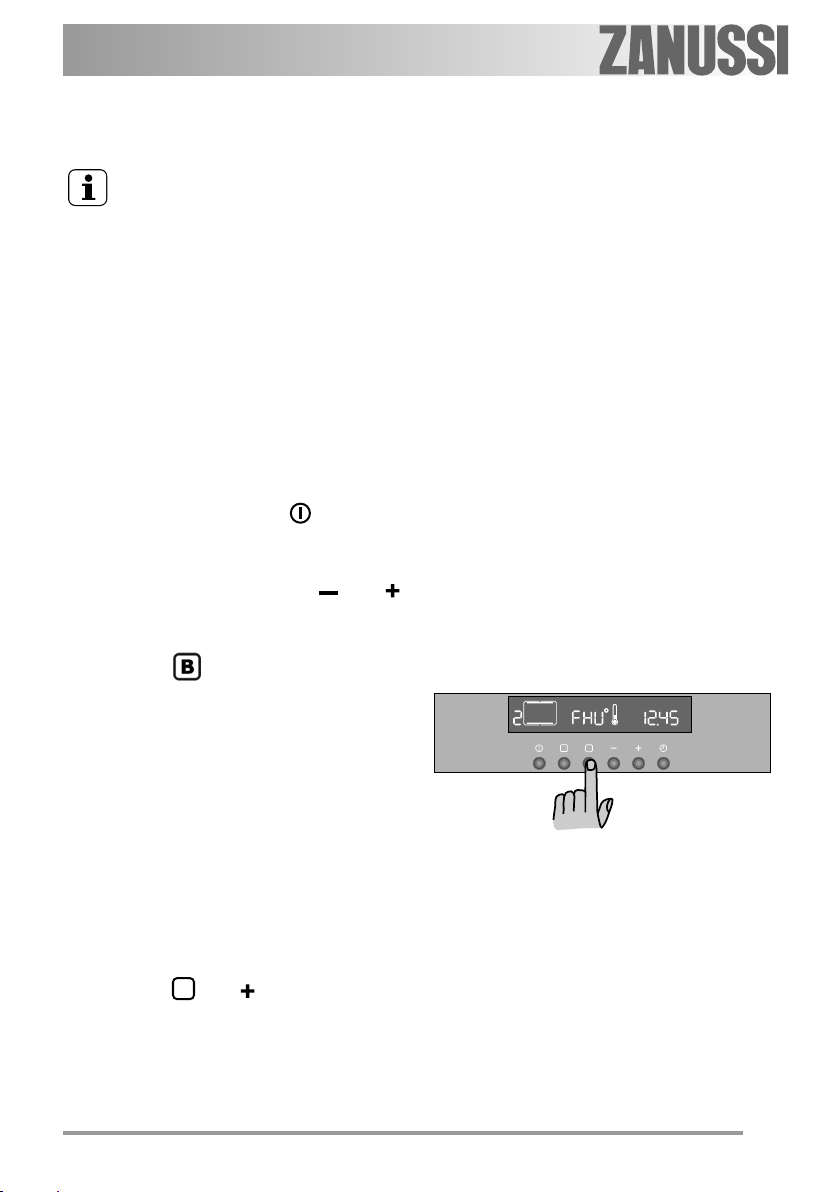
Fast Warm Up
After having selected the desired cooking
function and having set the cooking temperature,
the oven will begin to heat up until it reaches the
set temperature.
The oven heating stage takes around 10 to
15 minutes, depending on the cooking function
selected and the temperature set.
If you wish the oven to reach the set
temperature sooner, you can use the “Fast Heat
Up” function.
1. Turn the oven on using the button;
2. Select the cooking function as described in the
previous pages;
3. Set the temperature using the “ ” and “ ”
buttons. The temperature flashes on the
display;
4. Press the button. The lettering “FHU”
appears on the display (Fig. 20);
5. When the oven temperature reaches the level
set, the programmer emits a short acoustic
signal and the indication of the temperature
level set appears on the display.
This function can be used having first selected
any cooking function and temperature.
“Beep” signal
This function is used to activate a short
acoustic signal every time one presses a button.
To activate this function, the appliance must be
in stand-by mode.
— Press the and “ ” buttons for about 3
seconds. The system emits a short acoustic
alarm.
At this point the ‘Beep’ signal is on.
To deactivate the “beep” signal, repeat the
operations indicated above.
B
Fig. 20
15
 Loading...