

Page 1

Hints on rectifying minor fauits
Minor faults which you can rectify yourself :
The machine is not working
■ Is the machine properly plugged in?
■ Is the door closed properly ?
■ Is the program properly set ?
■ Is the condensate container emptied or properly
inserted? (if NOT, the “Condensate” indicator
lamp shows).
The machine does not dry satisfactorily
■ Has the correct time been set.
GB
Has the gentle program been selected for drying,
although full heating should be used for drying ?
In this case, the program duration is prolonged.
Has the condensate container been emptied?
(If the container was full, the program was inter
rupted during operation).
Has the lint filter been cleaned ?
(if NOT, the program overruns; on the time pro
gram, the set time is insufficient).
ZANUSSI
Wäschetrockner
What to do in case of a fault
Good quality and a design matching the require
ments of modern technology ensure the trouble-free
operation of your tumble dryer. Should a fault ever
occur, however, please initially check that you have
followed all the Instructions and hints given in these
Instructions for use. Only a minor fault may well be
the cause of the malfunction.
If these Instructions are no help in locating a fault,
our own well-equipped after-sales sen/ice covering
the whole of West German and West Berlin is
naturally available to take care of your machine.
You nearest service centre is given in the attached
guarantee information.
Important!
Electrical appliances should only be repaired by a trained electrician, since improperly per
formed repairs may result in serious follow-on damage.
Änderungen Vorbehalten
Constructiewijzigingen voorbehouden
Tous droits de modifikation réservés
We reserve the right to make technical changes without prior notice
Our after-sales service must charge you for any
checks or elimination of defects even during the
guarantee period.
When calling our after-sales service, always state
your full adress, telephone number with dialling
code, and the order and F-No. of your machine.
The order and F-No. are given on the rating plate
(see Fig. 1).
These numbers enable the after-sales service to
make precise identification on the required spare
part so that your appliance can be repaired at the
engineer’s first visit.
You will thus save yourself additional costs due to
any possible repeated trips by the service engineer.
12599 - 7550 - 456789101112/93
247 258 600 - 0590
HWT
Trommeldrog^er
Sèche-linge
Tumble dryer
Z 300 CD
Bedienungsanleitung
Gebmiksaanwijzing
Mode d’emploi Operating instructions
Page 2
Mit dem Wäschetrockner
haben Sie ein Gerät erworben, das Ihnen bei der Wäschepflege bald unentbehrlich
sein wird. Diese Anweisung soll Ihnen helfen, mit Ihrem Wäschetrockner vertraut zu
werden.
Beachten Sie bitte unsere Hinweise und Empfehlungen. Sie werden dann überrascht
feststellen, wie schnell Ihre Haushaltswäsche wieder trocken ist und wie wenig Mühe
damit verbunden war.
Mevrouw, Mijnheer,
Met de keuze en de aanschaf van dit apparaat heeft u een uitstekende kwaliteit in huis
gehaald. De bediening en het gebrik zijn eenvoudig; wij raden u echter aan dit boekje
geheel te lezen alvorens u uw nieuwe aanwinst in bedrijf stelt en in gebruik neemt.
In dit boekje vindt u aanwijzingen voor de installatie, de bediening, het gebruik en
het onderhoud. Wij danken u voor de aandacht die u hieraan wilt schenken en wensen
u een plezierig gebruik van dit nuttige apparaat toe.
Avec le sèche-linge
Vous êtes devenu propriétaire d’un appareil qui vous deviendra bientôt indispensable,
pour le soin de votre linge. Le présent mode d’emploi se propose de vous aider à faire
connaissance avec votre sèche-linge.
Veuillez donc observer nos instructions et nos recommandations. Vous constaterez
alors avec étonnement la rapidité avec laquelle vous pourrez sécher tout votre linge
de maison et le peu d’effort que ce travail vous donnera.
Maintenance and care
Always de-energize (unplug) the appliance !
1. Cleaning the dryer housing and drum with
soap-suds or with commercially available sol
vent-free (mild) household cleaner.
This also applies to cleaning of control panel and
plastic and rubber parts.
Should a coating appear on the drum after
a prolonged period of use, this should be
occasionally wiped away with vinegar.
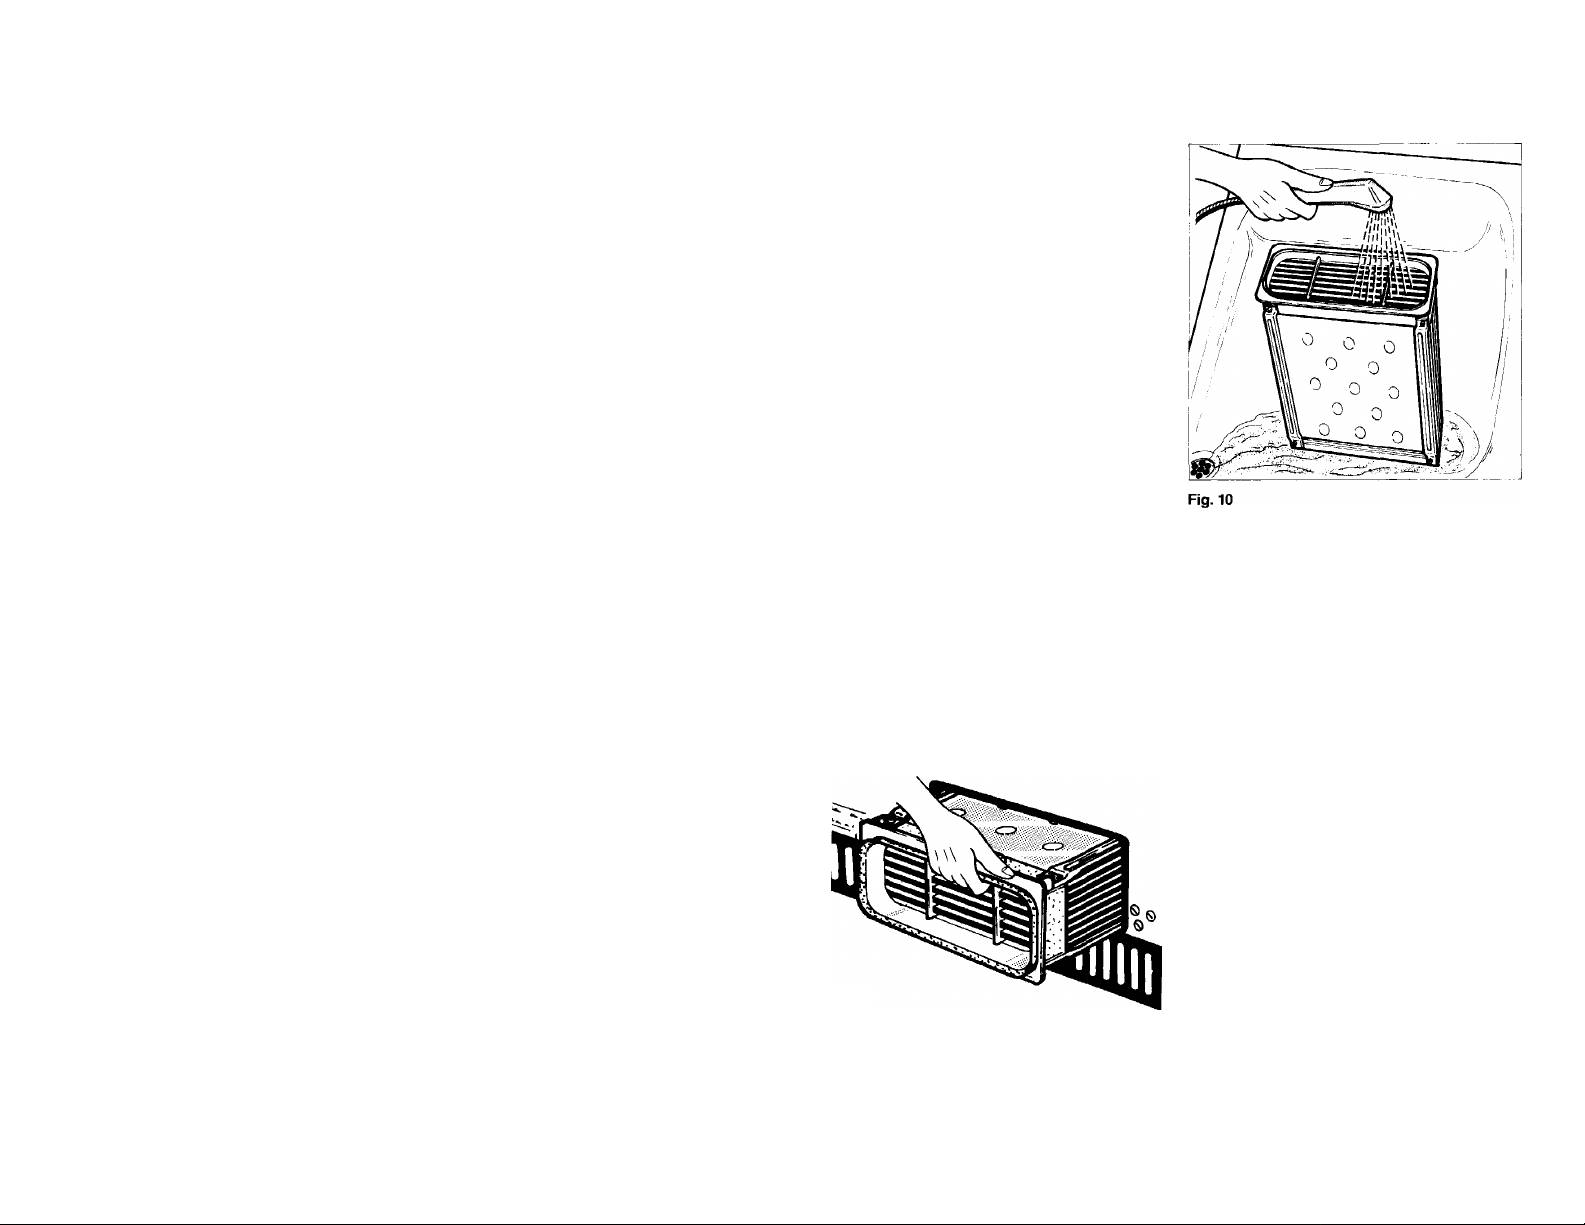
2. Cleaning the air condenser (Fig. 9) from time
to time. If you use your dryer very frequently,
3-4 times per year.
Pull out box on upper handle recess and clean
free of lint. Clean with brush and possibly rinse
with hand shower attachment or the like (Fig. 10).
Also wipe outside of condenser and remove any
lint.
GB
With your tumble dryer
you have acquired an appliance which will soon be indispensable in taking care of your
laundry. These instructions are intended to make you familiar with your tumble dryer.
Please take note of our instructions and recommandations. You will then be surprised
at how quickly your household wash is dry again and how little trouble has gone into
drying it.
Fig. 9
3. Cleaning the rubber seals of front-loading
opening and air condenser immediately after
drying with damp cloth.
51
Page 3

General instructions
Lint
After the first use of your tumble dryer, you may well
be amazed at the amount of collected lint. This,
however, is due to the perfectiy normai wear pro
cess of your laundry and not to any additional
loading imposed on the laundry by your tumble
dryer. During wearing and washing, whether by hand
in in an automatic washing machine, fibres and
fabric are worn off, remaining loosely adhered to the
surface of the wash. During drying on a washing
line, the lint is blown away by the wind. In a tumble
dryer, the lint is collected and becomes heavily
swollen by the drying process. By the weight of the
lint, you can tell how small this proportion is in
relation to the dried wash quantity.
Laundry shrinkage
Depending on their quality, chiefly woven textiles
(knitwear) are differently susceptible to shrinkage.
This is chiefly attributable to the fact that, in contrast
to line drying, garments treated in a tumble dryer
GB
are dried whilst suspended in air, i.e. are not
subjected to any stresses. By pulling and wearing,
shrinkage of such textiles is largely equalized. When
you make new purchases of such textiles, we re
commend you to consider these shrinkage features
when selecting sizes.
Starched laundry
Starched laundry can also be dried in a tumble dryer.
To achieve good application, however, you should
choose only one program setting which guarantees
you a specific degree of residual dampness, i.e.
“iron-dry” or “wringer-dry”. After completion of the
program, wipe out the internal drum with damp cloth
and wipe dry to remove any possible traces of starch.
Program times and power consumption
The energy requirement and drying time depend on
the quantity of laundry, degree of dampness (residual
moisture content of the spin-dried laundry), garment
size, type of fabric, room temperature, required
degree of dryness, etc.
Inhaltsverzeichnis D
Technische Daten/Abmessungen.................................................................................................................Seite 3
Gerätebeschreibung .....................................................................................................................................Seite 4
Aufstellung ....................................................................................................................................................Seite 5
Unterbauen ...........................................................................................................................................Seite 5
Wechsel des Türanschlags ..................................................................................................................Seite 6
Dekorfläche ...........................................................................................................................................Seite 7
Wasch-/Trockensäule ...........................................................................................................................Seite 7
Anschluß eines Ablaufschlauches .......................................................................................................Seite 7
Elektrischer Anschluß ..................................................................................................................................Seite 7
Wichtige Hinweise ........................................................................................................................................Seite 8
Fassungsvermögen ............................................................................................................................ Seite 8
Wäschegewichte ..................................................................................................................................Seite 8
Unser Tip zum Energiesparen.............................................................................................................Seite 8
Nicht in den Trockner geben ................................................................................................................Seite 8
Bedienelemente, Signallampen usw............................................................................................................ Seite 9
Bedienung/Handgriffe...................................................................................................................................Seite 9
Flusensieb reinigen ..............................................................................................................................Seite 10
Wasserbehälter entleeren ....................................................................................................................Seite 10
Allgemeine Hinweise ....................................................................................................................................Seite 11
Vorbereitungen zum Trocknen .....................................................................................................................Seite 11
Programmübersicht ......................................................................................................................................Seite 12
Wartung und Pflege ......................................................................................................................................Seite 13
Hinweise zur Behebung kleiner Störungen .................................................................................................Seite 14
Preparing the wash
Sort the laundry according to type of fabric (see care
markings in the garment concerned) and required
degree of dryness and place loosely in the drum.
Close zip-fasteners, tie together apron strings, etc.
The laundry must be thoroughly spin-dried
before drying. Spin-drying speed of automatic
washing-machine min. 800 rpm. For spin-dryers,
min. 2800 rpm.
50
You should also spin-dry easy-care laundry,
e.g. shirts before drying (depending on crease
sensitivity, 10-30 s or in a special short-spin
sequence in your automatic washing-machine).
Overfilling impairs the drying result and leads to
heavy creasing. An excessively small wash load is
uneconomical.
Quilt covers and pillow-cases should be buttoned up
so that any small objects cannot “accumulate” in
them.
Technische Daten/Abmessungen
Nennspannung 220 V~
Gesamtanschluß
Antriebsmotor 250 W
Lüftermotor
Heizung
Absicherung 16 A
Füllgewicht 4,5 kg
Gewicht 45 kg
Abmessungen
Mit Abdeckplatte:
Höhe 850 mm
Breite 597 mm
Tiefe 600 mm, Platte versetzbar bis 20 mm
2730 W
2380 W
50 Hz
100 W
Dieses Gerät entspricht der EG-Richtlinie
82/499/EWG für Funkentstörung.
Ohne Arbeitsplatte:
Höhe 820 mm
Breite 597 mm
Tiefe 570 mm
Tiefe bei geöffneter Tür 1200 mm
Page 4

Gerätebeschreibung
1 2 34 5 6
Drying times
The drying time to be set depends on the type and
quantity of laundry, whether the laundry was spindried, and what degree of dryness is required.
The time switch scale Is divided into:
Cy3 = Cotton (full heating)
^ = Cooling
Boiled items and coloureds 20 to 120 min.
- Normal program
(full heating)
/\ = Easy-care (reduced heating)
^ = Cooling
Easy-care laundry 20 to 80 min.
(green lettering)
- Gentle program
(reduced heating)
Approximat time settings, based on dry weight of laundry
The end of each drying program is followed by
a cooling sequence to prevent creasing especially
of synthetic fabrics.
If the set time should ever be inadequate, you can
always set the time switch to a further short redrying
time - at least 10 minutes.
For mixed fabrics, please note the manufacturer’s
instructions in each case. Dry temperature-sensitive
laundry with the gentle program.
GB
Abb. 1
1 Arbeitspläne
2 % Kontrollampe »Betrieb«
3 -”C Taste für reduzierte Heizung Im
Normalprogramm
4 Tür-Taste
5 Signallampe für Wasserbehälter
6 Zeitschalter, gleichzeitig Hauptschalter
7 Programmblende
4
10 11
12 13
8 Flusensleb
9 Türverschluß
10 Typenschlld
11 Lüftungsgitter
12 Luftkondensator
13 Kondensatbehälter
14 Schraubfüße
Laundry type
Cottons
boiled
laundry-coloureds
Easy-care
cotten/synthetics
fine laundry
Degree of dryness
storage-dry
iron-dry
wringer-dry
storage-dry
Laundry
quantity
4,5 kg
2,0 kg 35-45 30-40
4,5 kg 50-70 35-50
2,0 kg
4,5 kg 40-60 30-35
2,0 kg 25-35 20-25
2,0 kg
1,0 kg
Drying time according to spinning speed min '
800-1000 2800
80-90 60-70
CV5
(full
heating)
(reduced
heating)
30-40 25-30
30-40 25-30
25-30
20-25
49
Page 5
Operation / handles
Set time switch clockwise (to the right). Two pro
gram selection options are available:
= Cottons
= Easy-care
Set time switch clockwise (to the right). For tempera
ture-sensitive fabrics, select “easy-care program”
green lettering).
“Operation” pilot lamp shows. Tumble drying be
gins.
Programs sequence
The dryer then tumbles with a reversible tumbling
action. When program setting ^ is reached, the
heating is automatically switched off and the wash
cooled. The program sequence ends after around
10 minutes.
Open door and take out wash.
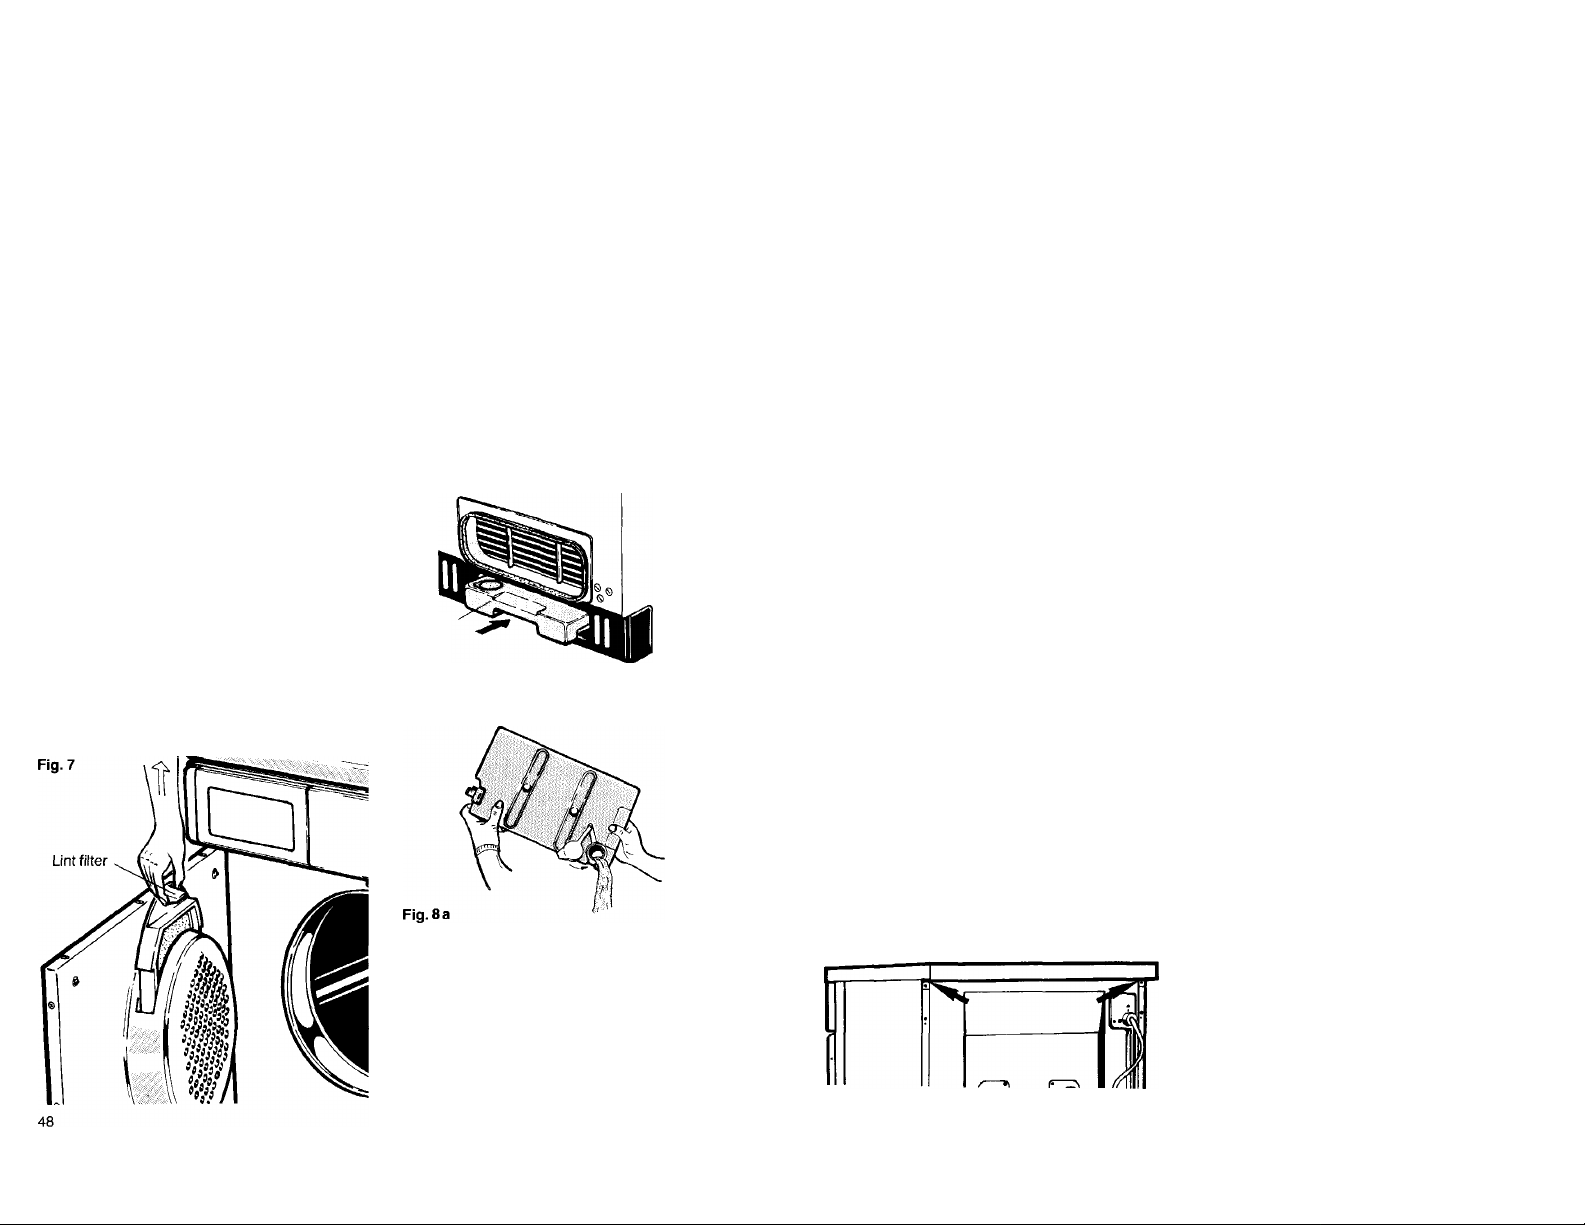
Clean lint filter (Fig. 7).
The lint filter located inside the door must be cleaned
after every drying process.
Pull out filter by its handle, clean, and re-insert.
Empty condensate container (Fig. 8) (also
possible during program sequence).
GB
The water extracted from the laundry is condensed
in the dryer and collected in the condensate con
tainer.
The condensate container must be cleaned after
every drying process so that trouble-free drying of
the laundry is assured in the following program.
If emptying is forgotten, the overflow safety device
responds. The “Condensate” indicator lamp in the
control panel shows, the program is automatically
interrupted, and the laundry remains wet.
Emptying the water container during program
sequence:
Grasp the trough from below and slowly remove
the container.
Fig. 8
Aufstellung
Dieser Wäschetrockner kann ohne besonderen
Aufwand und ohne Sonderinstallation in Betrieb ge
nommen werden. Beim Aufstellen und Anschließen
des Gerätes sind jedoch die nachfolgend aufge
führten Hinweise und ggf. die Vorschriften des zu
ständigen Elektrizitätswerkes zu beachten.
Der Trockner kann auf jedem ebenen Fußboden
aufgestellt werden. Durch Neustellen der Schraub
füße lassen sich Bodenunebenheiten bzw. Schräg
lagen ausgleichen. Das Gerät muß waagrecht
stehen; am besten mit einer Wassenwaage ausrichten,
Einschraubfüße nicht entfernen. Die Bodenfreiheit
nicht durch hochflorigen Teppichboden, Leisten o. ä
einschränken. Es könnte ein Wärmestau eintreten,
der den Motor in seiner Funktion beeinträchtigt
oder beschädigt.
Für einwandfreie Funktion ist eine gute und stau
ungsfreie Luftzufuhr bzw, Warmluftabführung sicher
zustellen. Bitte die Lüftungsschlitze vorne, unten im
Sockel des Trockners freihalten.
Hinweis:
■ Die vom Trockner abgegebene Warmluft kann
bis zu 60°C betragen - Aufstellung nicht auf
empfindlichen Teppichböden.
■ Die Raumtemperatur sollte auch während des
Betriebes + 35“ nicht übersteigen, andernfalls
Tür oder Fenster öffnen.
■ Der Raum um den Trockner muß von Flusen
freigehalten werden.
Push the container right in.
Tip:
The collected condensate can be used for steam
ironing, etc. For this purpose, filter condensate
(e.g. via coffee filter).
Unterbauen
Das Gerät kann auch in Einbauküchen eingeglie
dert werden. Nach Abnahme der Arbeitsplatte unter
baufähig.
Hierzu ist foigendes zu beachten:
■ Netzstecker ziehen.
■ Die Befestigungsschrauben der Arbeitsplatte
auf der Geräterückseite herausschrauben
(s. Abb. 2).
■ Die Abdeckplatte hinten etwas anheben, nach
vorne schieben und abnehmen.
Abb. 2
Wenn für den Unterbau in Möbelzeilen die GeräteArbeitsplatte entfernt wird, muß der Einbau so
erfolgen, daß weder spannungsführende Teile
noch betriebsisolierte Leitungen berührbar sind.
Der Berührungsschutz der spannungsführenden
Teile usw. ist nach Abnahme der Geräte-Arbeits-
platte durch ein anzubringendes Abdeckblech
gewährleistet. Das Abdeckblech kann durch den
Kundendienst bezogen werden.
Damit der Spritzwasserschutz sichergestellt bleibt,
sind im Gesamtumfang des Abdeckbleches
Schaumstoff-Dichtstreifen aufzukleben bzw. anzu
bringen.
Page 6

Wechsel des Türanschlags
Wechsel des Türanschlags von links nach rechts
(s. Abb. 3 u. 3a).
Falls der Türanschlag (links) den örtlichen Ver
hältnissen nicht entspricht, dann ist es möglich,
die Tür auf Rechtsanschlag zu ändern.
Handgriffe (s. Abb. 3):
1. Türstopper A aus Türbefestigung a aushaken
und aus Loch b durch 90°-Drehung heraus
lösen.
2. Kunststoffteil aus Loch c durch 90°-Drehung
entfernen und in Loch b befestigen.
3. Scharnier B abschrauben (die 2 Schrauben
lösen, dabei Tür festhalten), Tür unten ausfahren.
4. Zapfen F von der Tür oben und unten jeweils
auf gegenüberliegende Seite umstecken.
5. Türverschluß C durch Zusammendrücken der
beiden Laschen lösen (s. kleines Bild).
6. Gegenüberliegendes Kunststoffteil D wie Pos. 5
lösen (evtl. Hilfswerkzeug - Schraubendreher
o.ä. - verwenden).
7. Teile C und D gegeneinander austauschen und
einsetzen.
8. Schrauben E lösen und mitgeliefertes Scharnier
zunächst lose anschrauben.
9. Tür einhängen:
■ Zuerst mit dem oberen Zapfen einführen,
■ dann mit den unteren Zapfen in das Scharnier
einfahren.
■ Vor dem Festschrauben des Scharniers Tür
ausrichten.
■ Scharnier festschrauben.
10. Stopfen aus Loch d herausziehen und in Loch A
befestigen.
11. Türstopper A in Loch c durch 90°-Drehung be
festigen.
12. Türstopper A in Loch d einhaken.
Controls, indicator lamps, etc.
1 The pilot lamp indicates the operating status.
2 Button-t
(special button for easy-care, temperaturesensitive textiles). You should press this button
if you want your laundry to be especially gently
and sparingly dried. Your tumble dryer operates
with reduced heating capacity.
Operation / handles
Open door
Press button ^ .
Insert laundry
Sort laundry and place loosely in drum.
GB
3 Door release button
- press door release button to open the door.
4 Water container indicator lamp
Shows if the water container is full or improperly
fitted. Program is interrupted.
5 Time switch, simultaneousiy main switch.
Close door
Press door closed, ensuring that no garments have
been trapped.
Set time (according to table on page 49).
47
Page 7

Electrical connection
Your tumble dryer is equipped as standard with
a connection cable and plug for a mains voltage
of 220 V.
The connection may only be made to a 220 V a. c.
regulation protective contact socket.
Important hints
Wash loads
Cotton
Easy-care fabrics
max. 4.5 kg
max. 2.0 kg
Laundry weights
Item
Bath robe
Quilt cover
Bed-sheet
Blouse
Lady’s overall 300
Lady’s nightdress 200
Lady's underwear 100
Towel 200
Dishcloth
Gentleman’s overall 600
Gentleman’s shirt 200
Gentleman’s pyjamas 500
Gentleman’s vest 100
Gentleman’s underpants, short
Gentleman’s underpants, long 250
Pillow-case 200
Table-napkin 100
Handkerchief
Tablecloth
These laundry items refer to those made of cotton.
The listed weight indications are only intended as
guidance.
Approx.
weight in g;
1200
700
500
100
100
100
20
250
Before first use
It is recommended that you load your tumble dryer
with a few damp cloths and to allow it to run for
around 15 minutes. This ensures that no dust and
dirt remains in the drum.
46
GB
A 16 amp. fuse is required.
The special regulations of the local electricity supp
lier must also be noted.
Tips on energy-saving
All tumble dryers require energy for drying. This
tumble dryer, however, is especially energy-saving
and economical to run if you only use it for drying of
thoroughly spin-dried laundry.
When using a low-speed washing-machines
(e.g. 500 rpm), you unnecessarily consume around
50% more energy with a full load of towels than is
the case when this wash is spin-dried in a high
speed washing machine (800-1000 rpm or spin-
dryer).
Consider this carefully - your tumble dryer must not
be a heavy energy consumer!
What is not allowed in the tumble dryer
You shouid not use your tumble dryer for drying of
especially delicate fabrics, e.g. curtains made of
synthetic fibres, woollens, silk, textiles with metal
inlays, nylon stockings, and garments chiefly consistling of foam rubber-like material, - pillows,
cushions, etc.
Important:
Never dry gaments treated with flammable cleaners
and solvents (petrol, alcohol, paint-stripper, etc.) in
a tumble dryer. This may cause the risk of fire.
Therefore only dry textiles washed in water!
Dekorfläche
Zur farblichen Angleichung an Küchenmöbel etc.
kann eine Dekorplatte auf die Vortür montiert wer
den.
Es empfiehlt sich, diesen Zuschnitt vom Möbelher
steller zu besorgen. Nur dann ist die beste farbliche
Zuordnung gewährleistet. Folgende Abmessungen
sind genau einzuhalten:
Höhe 588 mm
Breite 588 mm
Plattendicke 1 bis max. 4 mm
Der hierfür notwendige Dekorrahmen kann bei
Ihrem Fachgeschäft oder beim Kundendienst be
stellt werden.
Wasch-/Trockensäule
Der Aufbau zur platzsparenden Waschsäule ist mit
allen Waschvollautomaten von 60 cm Breite und
Frontbeschickung möglich.
Den dazu notwendigen Montagesatz erhalten Sie
über Ihr Fachgeschäft oder über den Kundendienst.
Abb. 4
Elektrischer Anschluß
Der Wäschetrockner ist serienmäßig für Nenn
spannung 220 V mit Anschlußkabel und Stecker
ausgerüstet.
Der Anschluß darf nur über eine vorschriftsmäßig
installierte Schutzkontakt-Steckdose an 220 V
Wechselstrom erfolgen.
Die Montage ist einfach:
■ Tür öffnen.
■ Schrauben lösen und entfernen.
■ Das große Dekorrahmenteil zuerst so anbringen,
daß der Zapfen im Scharnier in die Aussparung
paßt, und zunächst lose verschrauben.
■ Frontplatte seitlich einschieben und dann Dekor
rahmen fest verschrauben.
■ Den anderen Teil des Dekorrahmens aufsetzen
(Zapfen in Aussparung) und festschrauben.
Anschluß eines Ablaufschlauches
Befindet sich am Aufstellungsort des Gerätes ein
Abflußbecken o.ä., kann das kondensierte Wasser
auch direkt über einen Ablaufschlauch abgeleitet
werden.
Die erforderliche Absicherung beträgt 16 Amp.
Besondere Vorschriften des örtlichen Elektrizitäts
werkes sind gegebenenfalls zu beachten.
Page 8

Wichtige Hinweise
Fassungsvermögen
Baumwolle
Pflegeleicht
Wäschegewichte
Teil
Bademantel
Bettbezug
Bettuch
Bluse
Damenberufskittel
Damennachthemd
Damenschlüpfer
Frottiertuch
Geschirrtuch
Herrenberufskittel
Herrenoberhemd
Herrenschlafanzug
Herrenunterhemd
Herrenunterhose kurz
Herrenunterhose lang
Kissen bezug
Serviette
Taschentuch
Tischtuch
max. 4,5 kg
max. 2,0 kg
Gewicht in g:
ca.
1200
700
500
100
300
200
100
200
100
600
200
500
100
100
250
200
100
20
250
Unser Tip zum
Energiesparen
Alle Trockner benötigen zum Trocknen Energie.
Dieser Trockner ist damit besonders sparsam und
deshalb auch wirtschaftlich, wenn Sie immer nur
gut ausgeschleuderte Wäsche einlegen.
Zum Beispiel verbrauchen Sie bei einer vollen Be
ladung des Trockners mit Frotteewäsche aus einer
niedrigtourigen Waschmaschine (500 UpM) 50%
mehr Energie, als bei einer Ladung aus einer hoch
tourigen Waschmaschine (800-1000 UpM).
Decorative trims
If you wish to match the front panel of your tumble
dryer to the decor of your kitchen furniture, a decor
ative panel can be fitted to the front of your tumble
dryer door.
It is recommended that you obtain this from your fur
niture supplier, since only by this means is complete
matching assured. The following dimensions must
be accurately complied with :
Height 588 mm
Width 588 mm
Panel thickness 1 to max. 4 mm
The decor frame necessary for this purpose can be
ordered from the service centre.
Tumble dryer/washing machine stacking
Vertical stacking to obtain a space-saving washing
and tumble drying system is possible with all front
loading fully automatic washing-machines of 60 cm
width.
For this purpose, you need the stacking frame avail
able from the service center.
GB
Fitting is simple:
■ Open door.
■ Loosen and remove screws.
■ First arrange the large part of the decor frame
so that the pin in the hinge fits the recess and
initially screw together loosely.
■ Insert front panel laterally and securely screw
on decor frame.
■ Apply the other part of the decor frame (pin in
recess) and firmly screw together.
Connecting a drainage hose
If a drainage facility is available where the appliance
is installed, the condensate can be directly dischar
ged via a drainage hose.
Bei diesen Wäschestücken handelt es sich um
Teile aus Baumwolle. Die Gewichts-Angabe kann
jedoch nur als Richtwert dienen.
Vor der ersten
Inbetriebnahme
empfiehlt es sich den Trockner mit einigen feuchten
Tüchern zu beschicken und ca. 15 Minuten laufen
zu lassen. Hierdurch ist sichergestellt, daß sich
kein Staub und Schmutz mehr in der Trommel
befindet.
8
Nicht in den Trockner geben
Besonders empfindliche Gewebe, z. B. Gardinen
aus synthetischen Fasern, Wollsachen, Seide,
Textilien mit Metalleinlagen, Nylonstrümpfe sowie
Wäschestücke, die überwiegend Schaumgummi
oder gummiähniiches Materiai enthaiten, dürfen
im Trockner nicht getrocknet werden. Ebenso
Federkissen oder Poister.
Achtung:
Mit feuergefährlichen Reinigungs- und Lösungs
mitteln (Waschbenzin, Alkohol, Fleckenent
ferner etc.) behandelte Wäschestücke dürfen
nie in einem Trockner getrocknet werden. Es
besteht Brandgefahr. Also nur in Wasser ge
waschene Textilien trocknen!
Fig. 4
Page 9

Rehingeing the door
Rehingeing the door from left to right (Fig. 3
and 3 a).
If the door mounting (left) does not suit local condi
tions, it is possible to rehinge the door at the right.
Handles (see Fig. 3):
1. Unhook door stopper A from door mounting a and
loosen from hole b by 90° rotation.
2. Remove plastic part from hole c by 90° rotation
and fix in hole b.
3. Unscrew hinge B (loosen the 2 screws, holding
the door securely), and detach door below.
4. Re-insert pin G from door above and below on
opposite side respectively.
GB
Fig. 3 a
5. Loosen door relase C by pressing together both
lugs (see small illustration).
Bedienelemente, Signallampen usw.
1 Die Kontrollampe zeigt den Betriebszustand an.
2 —“C -Taste
(Spezial-Taste für pflegeleichte, temperaturemp
findliche Te^ilien) drücken, wenn Sie im Normal
progamm ^ besonders schonend und sparsam
trocknen wollen. Der Wäschetrockner arbeitet
dann auch in diesem Programm mit reduzierter
Heizleistung.
3 Türtaste
- öffnen der Tür durch Drücken der Taste.
4 Signallampe Wasserbehälter
- leuchtet auf, wenn der Wasserbehälter voll oder
nicht richtig eingesetzt ist. Programm wird unter
brochen.
5 Zeitschalter, gleichzeitig Hauptschalter
Im Uhrzeigersinn (rechtsherum) die gewünschte
Zeit einstellen.
6. Loosen opposite plastic part D as under point 5
(possibly using tool to assist - screwdriver or
the like).
7. Interchange and insert parts C and D.
8. Loosen screws F and initiallly loosely screw on
hinge supplied.
9. Mount door:
■ First locate with upper pin,
■ then locate in hinge with lower pin.
■ Align door before tightening hinge.
■ Tighten hinge.
10. Remove plug from hole d and fix in hole A.
11. Fix door stopper A in hole c by 90° rotation.
12. Hook door stopper A in hole d.
Bedienung/Handgriffe
Tür öffnen
Dazu Türtaste drücken.
Wäsche einlegen
Wäsche sortieren und gut aufgelockert in die Trom
mel einlegen.
Tür schließen
Tür zudrücken und darauf achten, daß keine Wä
schestücke eingeklemmt werden.
Zeitschalter einstellen (entsprechend Tabelle auf
Seite 12).
Zwei Möglichkeiten stehen für die Programmwahl
zur Verfügung;
= Koch- und Buntwäsche
^ = Pflegeleichte Gewebe (automatisch ge
ringere Heizung).
Das Gerät wird dabei gleichzeitig eingeschaltet,
die Lampe »Betrieb« leuchtet auf, das Trocknen
beginnt.
Eventuell -°C -Taste drücken.
Programmablauf
Die Trommel dreht nach rechts und nach links.
Ist die Programmstellung ^ erreicht, wird auto
matisch die Heizung abgeschaltet und die Wäsche
abgekühlt. Nach etwa 10 Minuten ist der Programm
ablauf beendet (Lampe »Betrieb« erlischt).
Tür öffnen, Wäsche möglichst sofort entnehmen,
um Knitterbildung zu vermeiden.
9
Page 10

Bedienung/Handgriffe
Flusensieb reinigen (Abb. 7).
Das in der Türinnenseite befindliche Fiusensieb
muß unbedingt nach jedem Trocknen gereinigt
werden,
Sieb an seinem Griff nach oben herausziehen,
reinigen und wieder einsetzen.
Abb. 7
Fiusensieb
Kondensatbehäiter entieeren (Abb. 8), (ist auch
während des Programmablaufs möglich).
Das der Wäsche entzogene Wasser wird innerhalb
des Trockners kondensiert und im Kondensat
behäiter aufgefangen.
Der Kondensatbehälter muß nach jedem Trocknen
entleert werden, damit auch im darauffolgenden
Programm die Wäsche einwandfrei getrocknet
wird.
Wird das Entieeren vergessen, spricht die Über
laufsicherung an. Die Signaiiampe »Kondensat«
in der Bedienbiende leuchtet auf, das Programm
wird automatisch unterbrochen, die Wäsche ist
noch naß.
Abb. 8
Installation
This tumble dryer can be installed without any
special expenditure or special equipment, though
the instructions given below and where necessary
the regulations of the competent electricity supplier
must be noted during installation and connection of
the appliance.
The tumble dryer can be installed on any level floor.
It must stand horizontally, i. e. possibly be aligned
with the aid of a spirit-level. Through adjustment of
the height-adjustable feet, uneven floor conditions
can be compensated. To assure trouble-free ope
ration of the tumble dryer, a good continuous air
supply and hot air discharge through the venting
slots located in the plinth at the front of the tumble
dryer must be available.
Do not remove the height-adjustable feet. The
tumble dryer should not be installed on long-pile
GB
carpets or the freedom on the floor around it reststricted by strips and the like. This could lead to a build-up
of heat which could impair operation of the motor or
even damage it.
Important note :
■ The hot air discharged from the tumble dryer
may reach a temperature of 60°C. This should
be noted if your tumble dryer is installed on
sensitive carpeted floors.
■ The room temperature should not exceed -l-35°C
during operation, otherwise open door or
window.
■ The space around the tumble dryer must be
kept free of lint.
Building-under
The appliance can also be integrated in fitted kitchens
or installed as a build-under unit after removal of
the worktop.
For this purpose, please note the following:
■ Unplug the appliance.
■ Unscrew the mounting screws at the rear of the
appliance (Fig. 2).
■ Pull the worktop back and lift it.
Behälter wieder ganz einschieben.
Tip:
Das aufgefangene Kondenswasser kann für das
Dampfbügeieisen verwendet werden. Dazu Kon
denswasser filtern (z. B. über Kaffeefilter).
Fig. 2
10
If the worktop is removed for incorporation of the
appliance in kitchen furniture runs, installation must
be accomplished in such a manner that neither
live parts nor operationally insulated lines are
accessible.
Protection against access to live parts, etc. after
removal of the appliance worktop is assured by
appropriate arrangement of a cover sheet. The cover
sheet can be ordered from the service centre.
To ensure that the splash protection is retained,
foam sealing strips are to be stuck or arranged
around the whole periphery of the cover sheet.
43
Page 11

Appi ¡canee description
1 2 34 5 6
GB Allgemeine Hinweise
Flusen
Nach dem ersten Gebrauch Ihres Trockners sind
Sie vielleicht über die angesammelte Flusenmenge
erstaunt. Dabei handeit es sich aber um die ganz
normaie Abnutzungserscheinung der Wäsche. Dies
ist keine Überbeanspruchung, die durch den
Trockenvorgang hervorgerufen wird. Beim Tragen
und Waschen (ob bei Handwäsche oder im Wasch
automaten) werden Fasern und Gewebe abge
rieben und haften iose auf der Wäscheoberfläche.
Beim Trocknen auf der Leine trägt der Wind die
Flusen fort. Im Trockner werden die Flusen ge
sammelt und durch den Trocknungsvorgang stark
aufgebauscht. Gemessen am Gewicht der Flusen
zum Gewicht der Wäsche ist erkennbar, wie gering
dieser Anteil ist.
Solche Textilien möglichst im Programm »Bügel-
trocken« trocknen. Durch Ziehen und durch das
Tragen wird das Einlaufen solcher Textilien weit
gehend ausgeglichen. Beim Kauf dieser Textilien
empfehlen wir, deren Einlaufeigenheifen bei der
Größenwahl zu berücksichtigen.
Wäsche mit Stärke
Gestärkte Wäsche läßt sich auch im Trockner be
handeln. Um jedoch einen guten Appretureffekt zu
erzielen, sollten Sie jeweils nur eine Programmein
stellung wählen, die Ihnen einen bestimmten Rest
feuchtigkeitsgrad garantiert, also »bügel-« oder
»mangelfeucht«. Nach Ablauf des Programms
Innentrommel feucht auswischen und trockenreiben,
um damit eventuelle Stärkespuren zu entfernen.
Fig. 1
1 Worktop
2 “Operation” pilot lamp
3 Button for reduced heating for easy-care fabrics
4 Door release button
5 Indicator lamp for water container
6 Time switch, simultaneously main switch
7 Program panel
42
8 Lint filter
9 Door release
10 Rating plate
11 Ventilator grille
12 Air condenser
13 Water container
14 Height-adjustable feet
Einlaufen der Wäsche
Vor allem gewirkte Textilien (Trikotwäsche) neigen
je nach Qualität unterschiedlich stark zum Einlaufen.
Dies ist in erster Linie darauf zurückzuführen, daß
Wäschestücke im Trockner im Gegensatz zur Leine
schwebend, also spannungsfrei getrocknet werden.
Vorbereitungen zum Trocknen
Die Wäsche nach Textilarten (s. Pflegekennzeichen
in dem jeweiligen Wäschestück) und gewünschtem
Trocknungsgrad sortieren und locker In die Trommel
legen. Reißverschlüsse schließen, lose Schürzen
bänder usw. zusammenbinden.
Die Wäsche muß vor dem Trocknen gut aus
geschleudert sein. Schleuderdrehzahl des Wasch
automaten mind. 800 UpM, bei Wäscheschleudern
mind. 2800 UpM.
Programmzeiten und Stromverbrauch
Der Energiebedarf und die Trockenzeit sind von
Wäschemenge, Feuchtigkeitsgrad (Restfeuchtig
keit der geschleuderten Wäsche), Wäschegröße,
Textilart, Raumtemperatur und dem gewünschten
Trocknungsgrad usw. abhängig.
Auch pflegeleichte Wäsche, z. B. Oberhemden,
sollten Sie vor dem Trocknen anschleudern üe
nach Knitterempfindlichkeit 10 bis 30 Sek. bzw. in
einem speziell dafür vorgesehenen Kurzschleuder
gang Ihres Waschvollautomaten).
Eine Überfüllung beeinträchtigt das Trockener
gebnis und führt zu starker Knitterbildung. Eine zu
geringe Wäschefüllung ist unwirtschaftlich.
Bettbezüge und Kissen sollten zugeknöpft werden,
damit Kleinteile sich darin nicht »sammeln« können.
11
Page 12

Trocknungszeiten
Die einzustellende Trockenzeit richtet sich nach der
Wäscheart, der Wäschemenge, ob die Wäsche
hochtourig geschleudert wurde und welcher Trock
nungsgrad gewünscht wird.
Die Zeitschalter-Skala ist unterteilt in :
Cy5 = Baumwolle (volle Heizung)
^ = Abkühlen
Koch- und Buntwäsche 20 bis 120 Min.
- Normalprogramm
(volle Heizung)
= Pflegeleicht (reduzierte Heizung)
^ = Abkühlen
Pflegeleichte Wäsche 20 bis 80 Min.
- Schonprogramm
(reduzierte Heizung)
Richtwerte, bezogen auf trockene Haushaltswäsche
Wäscheart Trockengrad
Füllmenge
Am Ende des jeweiligen Trockenprogramms schließt
sich eine Abkühlphase an, welche der Knitter
bildung, besonders bei Synthetiks, vorbeugt.
Reicht einmal die eingestellte Zeit nicht aus, stellen
Sie mit dem Zeitschalter bitte noch eine kurze
Nachtrockenzeit ein - jedoch mindestens 20 Minu
ten.
Bei Mischgeweben in jedem Fall die Herstelleran
gaben beachten. Temperaturempfindliche Wäsche
im Schonprogramm trocknen.
Zeitwahl je nach Schleuderzahl min '
800-1000 2800
Contents GB
Technical data/dimensions........................................................................................................................... page 41
Applicance description ................................................................................................................................. page 42
Installation .................................................................................................................................................... page 43
Building-under....................................................................................................................................... page 43
Rehingeing the door ............................................................................................................................. page 44
Decorative trims.................................................................................................................................... page 45
Tumble dryer/washing machine stacking ............................................................................................ page 45
Connecting a drainage hose ................................................................................................................ page 45
Electrical connection .................................................................................................................................... page 45
Important hints ............................................................................................................................................. page 46
Wash loads ........................................................................................................................................... page 46
Laundry weights ................................................................................................................................... page 46
Before first use ..................................................................................................................................... page 46
Tips on energy-saving .......................................................................................................................... page 46
What is not allowed in the tumble dryer ............................................................................................... page 46
Controls ........................................................................................................................................................ page 47
Operation/handles ........................................................................................................................................ page 47
Clean lint filter ...................................................................................................................................... page 48
Empty water container.......................................................................................................................... page 48
Drying times ................................................................................................................................................. page 49
General instructions ..................................................................................................................................... page 50
Preparing the wash ...................................................................................................................................... page 50
Maintenance and care ................................................................................................................................. page 51
Hints on rectifying minor faults .................................................................................................................... page 52
What to do in case of a fault ....................................................................................................................... page 52
Baumwolle
Koch-und
Buntwäsche
Pflegeleicht
Baumwolle/Synthetik
Feinwäsche
12
Schranktrocken
Bügeltrocken
Mangeltrocken
Schranktrocken
4,5 kg
2,0 kg
4,5 kg
2,0 kg 30-40 25-30
4,5 kg 40-60 30-35
2,0 kg 25-35 20-25
2,0 kg
1,0 kg 25-30
V)
(volle
Heizung)
(reduzierte
Heizung)
80-90 55-65
40-50
65-75 45-55
30-40 25-35
30-40
20-25
Technical data/dimensions
Nominal voltage 220 V-
Total connected load 2730 W
Drive motor 250 W
Fan motor
Heating
Fusing
Wash load 4.5 kg
Weight 45 kg
Dimensions
With worktop:
Height 850 mm
Width 597 mm
Depth 600 mm, worktop adjustable to 20 mm
100 W
2380 W
16 A
•50 Hz
This appliance complies with the radiointerference suppression requirements of
EEC Code 82/449/ECC.
Without worktop:
Height 820 mm
Width 597 mm
Depth 570 mm
Depth with open door 1200 mm
41
Page 13

Indications pour remédier à de petits dérangements
Il s’agit bien souvent de futilités, auxquelles vous
pouvez rennédier vous-même.
L’appareil ne fonctionne pas
■ Avez-vous bien branché le connecteur (prise
mâle) dans la prise de courant du secteur?
■ Est-ce que le fusible ou le coupe-circiut auto
matique de votre appartement est en ordre?
■ Avez-vous bien fermé la porte ?
■ Avez-vous réglé le programme correctement?
■ Est-ce que le pot de condensation est vide ou
correctement positionné? (dans la NEGATIVE,
la lampe témoin «condensât» s’éclaire).
Le résultat de séchage n’est pas satisfaisant
■ Avez-vous sélectionné le programme qui con
vient au linge à sécher?
Est-ce que le séchage a été effectué en appuyant
sur la touche pour ménagement du linge, bien
qu’il doivent être réalisé avec le chauffage maxi
mal.
Dans ce cas, la durée du programme est pro
longée.
N’avez-vous pas oublié de vider le pot du con
denseur? (Quand il est plein, le programme
s’interrompt pendant le fonctionnement.)
Est-ce que le tamis à peluches (ou à bouts de
fils) a été nettoyé?
(Dans la NEGATIVE, le programme dure trop
longtemps, tandis que lors d’un programme
contrôlé par le temps, celui-ci ne suffit pas.)
Que faire en cas de fonctionnement?
Une bonne qualité et une construction répondant
aux notions de la technique la plus moderne garan
tissent un excellent fonctionnement de l'appareil.
S’il se produisait malgré tout un non fonctionnement,
vérifiez d’abord si vous avez bien observé les indi
cations et conseils figurant dans le présent mode
d’emploi. Il se peut qu'un petit rien soit à l’origine du
dérangement.
Si vous ne trouvez, dans le présent mode d’emploi,
aucune indication concernant le non fonctionne
ment, vous pouvez naturellement faire appel à notre
service technique après vente, parfaitement équipé
pour la maintenance de votre sèche-linge, sis à pro
ximité de votre domicile.
Vous le trouverez dans l’information ci-jointe ac
compagnant le bon de garantie.
Toutefois, notre service après vente devra vous
facturer la vérification des causes et la réparation
de défauts précités, même pendant la période de
garantie.
Quand vous l’appelez, communiquez-lui toujours:
votre adresse complète, votre numéro de télé
phone avec l’indicatif local, ainsi que le numéro «E»
et «F» de votre sèche-linge.
Vous trouverez ces numéros sur la plaque signalétique de l’appareil (voir fig. 1).
Leur indication facilite la préparation des pièces de
rechange qui conviennent à votre sèche-linge, qui
pourra être réparé lors de la première visite du
technicien compétent.
Vous écnomisez ainsi les frais supplémentaires
engendrés éventuellement par plusieurs visites de
ce technicien.
Wartung und Pflege
In jedem Fall Stromzufuhr abschalten. (Geräte
stecker aus der Steckdose ziehen)!
1. Reinigen von Trockengehäuse und Trommel
mit Seifenwasser oder mit mildem Haushalts
reiniger (lösungsmittelfrei).
Dies gilt auch für die Reinigung von Bedien
blende, Kunststoff- und Gummiteilen.
Zeigt sich nach längerer Zeit ein Belag auf der
Trommel, so sollte dieser gelegentlich mit Essig
ausgewischt werden.
2. Reinigen des Luftkondensators (Abb. 9)
von Zeit zu Zeit, bei sehr häufiger Benützung des
Trockners 3 bis 4 mal jährlich.
Kasten an oberer Griffmulde herausziehen und
von Flusen befreien. Mit einer Bürste reinigen
und evtl, mit der Handbrause o.ä. durchspülen
(Abb. 10).
Auch das Außere des Kondensators abwischen
und evtl. Flusen entfernen.
Attention !
Les appareils électriques ne doivent être réparés que par des électriciens qualifiés, car les
réparations effectuées incorrectement risquent de causer des dommages considérables.
40
Abb. 9
Reinigen der Gummidichtungen von Ein
füllöffnung und Luftkondensator gleich nach
dem Trocknen mit einem feuchten Tuch.
13
Page 14

Hinweise zur Behebung kleiner Störungen
Es liegt oft nur an Kleinigkeiten, die Sie seibst
beheben können.
Das Gerät arbeitet nicht
■ Ist der Stecker richtig in die Steckdose einge
steckt?
■ Ist der Sicherungsautomat in der Wohnung in
Ordnung?
■ Ist die Tür richtig zu?
■ Ist das Programm richtig eingestellt ?
■ Ist der Kondensatbehälter entleert bzw. richtig
eingesetzt worden? (Wenn NEIN, leuchtet die
Signallampe »Kondensat« auf).
Störung - was tun ?
Gute Qualität und eine Konstruktion, die dem mo
dernen Stand der Technik entspricht, sorgen für eine
einwandfreie Funktion des Garâtes. Sollte trotzdem
einmal eine Störung auftreten, prüfen Sie bitte
zunächst, ob Sie auch alle in dieser Gebrauchs
anweisung enthaltenen Hinweise und Ratschläge
beachtet haben. Möglicherweise ist nur eine Kleinig
keit die Ursache für die Störung.
Wenn Sie für eine Störung keinen Hinweis in der
Gebrauchsanleitung finden, steht Ihnen selbstver
ständlich für die Betreuung Ihres Gerätes ein eigener,
gut ausgerüsteter technischer Kundendienst im
gesamten Bundesgebiet und Westberlin zur Ver
fügung.
Das Trockenergebnis ist nicht zufriedensteiiend
■ Wurde für die zu trocknende Wäsche die richtige
Zeit eingestellt?
■ Wurde im Schongang getrocknet, obwohl mit
voller Heizung getrocknet werden sollte ?
In diesem Fall verlängert sich die Programm
dauer.
■ Wurde der Kondensatbehälter entleert?
(Bei vollem Behälter während des Betriebs wur
de das Programm unterbrochen.)
■ Wurde das Flusensieb gesäubert?
(Wenn NEIN, dauert das Programm zu lange,
beim Zeitprogramm reicht die eingesteilte Zeit
nicht aus.
Prüfung bzw. Beseitigung vorstehender Fehler
ursachen muß Ihnen unser Kundendienst auch
während der Garantiezeit berechnen.
Bitte geben Sie bei einer Meldung immer an:
Vollständige Anschrift, Telefon-Nummer mit Vor
wahl, sowie die E-Nr. und F-Nr. Ihres Gerätes.
Die E-Nr. und F-Nr. finden Sie an Ihrem Gerät auf
dem Typenschild (s. Abb. 1).
Die Angabe der beiden Nummern macht dem
Kundendienst eine gezielte Ersatzteilvorbereitung
möglich, so daß Ihr Gerät bereits beim ersten Tech
niker-Besuch wieder instandgesetzt werden kann.
Es bleiben Ihnen aber zusätzliche Mehrkosten
wegen eventuell mehrfacher Anfahrten des Kunden
diensttechnikers erspart.
Maintenance et entretien
Dans tous les cas, mettre l’appareil hors circuit
(couper le courant en débranchant sa prise de
courant).
Nettoyer le corps du sèche-linge et le tambour
avec de l’eau savonneuse ou un détergent
ménager (doux) vendu dans le commerce et
exempt de solvant.
Ceci concerne aussi le nettoyage du bandeau
de commande et des pièces en caoutchouc
ou en plastique.
Si, à la longue, un revêtement se forme à la sur
face intérieure du tambour, il faut la frotter oc
casionnellement avec un chiffon imbibé de
vinaigre.
2. Nettoyer le condenseur d’air (fig. 9) de temps
en temps. Lors d’un emploi fréquent du sèchelinge, effectuer cette opération 3 à 4 fois par an.
Extraire le coffret le tirant sur sa poignée creuse
et enlever les peluches qui y adhèrent. Le
nettoyer avec une brosse et le rincer éventuelle
ment avec une douche manuelle ou d’une
façon similaire (fig. 10).
Nettoyer aussi l’extérieur du condenseur d’air
et le cas échéant, enlever également les peluches.
Achtung!
Elektrogeräte dürfen nur durch Elektro-Fachkräfte repariert werden. Bei unsachgemäßer
Reparatur können erhebliche Foigeschäden entstehen.
14
3. Nettoyer ies joints en caoutchouc de l’orifice
de rempiissage et du condenseur d’air immé
diatement après chaque séchage avec un chiffon
humide.
39
 Loading...