

Zanussi TCS 675 EW User Manual

TUMBLE DRYER
X
TRACAPACITY
DOOR OPENON-OFF
CONDENSER DRYER
ELECTRONIC SENSOR
A
EXTRA
DRY
B
STORE
DRY
C
LIGHTLY
DAMP
D
IRON
DRY
E
MACHINE
IRON DRY
F
EXTRA
DRY
G
STORE
DRY
H
LIGHTLY
DAMP
COTTON
SYNTHETICS
H
T
C
S
6
7
5
E
W
LOW
TEMP.
START
BUZZER
OFF
IMPORTANT: PLEASE READ THE INSTRUCTION BOOK BEFORE USING THIS APPLIANCE
LOW
TEMP.
START
BUZZER
OFF
AUTOREVERSE
SELECTOR
AUTOREVERSE
TCS 675 EW
125994650
GB
INSTRUCTION BOOKLET

Important Safety Information
It is most important that this instruction book should be retained with the appliance for
future reference. Should the appliance be sold or transferred to another owner, or should
you move house and leave the appliance, always ensure that the book is supplied with the
appliance in order that the new owner can get to know the functioning of the appliance
and the relevant warnings.
These warnings have been provided in the interest of safety. You MUST read them carefully
before installing or using the appliance.
Installation
■
This appliance is heavy. Care should be taken
when moving it.
■
It is dangerous to alter the specifications or
attempt to modify this product in any way.
■
Any electrical work required to install this
appliance should be carried out by a qualified
electrician or competent person.
■
Care must be taken to ensure that the appliance
does not stand on the electrical supply cable.
■
If the machine is situated on a carpeted floor,
please adjust the feet in order to allow air to
circulate freely.
■
If the tumble dryer is placed on top of a washing
machine, it is compulsory to use the stacking kit
(optional accessory).
Child Safety
■
This appliance is designed to be operated by
adults. Children should not be allowed to tamper
with the controls or play with the product.
■
Pets and children have been known to climb into
tumble dryers. Please check your drum before
use.
Keep all packaging well away for children.
■
Use
■
Do not overload the appliance (see programme
chart).
■
Clothes which are dripping wet should not be
placed in the dryer.
■
As some bulky items such as duvets and
eiderdowns should be dried in large commercial
machines because of their bulk, check with the
manufacturer of the item if it is suitable for drying
in a domestic machine, even if the dry weight of
the item is within the limit advised.
■
Do not dry canvas shoes or sports shoes, as they
could get stuck between the door and the drum,
thus blocking the latter.
■
Please make sure that no gas lighters have
accidentally been left in pockets of garments to be
loaded into appliance.
■
Danger of explosion: Never tumble dry items
that have been in contact with inflammable
solvents (petrol, methylated spirits, dry cleaning
fluid and the like). As these substance are volatile,
they could cause an explosion. Tumble dry only
items washed with water.
■
In order to avoid danger of fires caused by
excessive drying, do not use appliance to dry the
following items:
■
Cushions, quilts and the like (these items
accumulate heat).
■
Items containing rubber foam or materials similar
to rubber foam.
■
Leave the door slightly ajar when the appliance is
not being used. This will allow the seal to be
preserved.
■
Clean fluff filter after using tumble dryer. To
prevent fire risks, do not use the appliance if the
fluff filter is damaged or without the filter.
■
Under no circumstances should you attempt to
repair the machine yourself. Repairs carried out
by inexperienced persons may cause injury or
serious malfunctioning. Contact your local
Zanussi Service Centre. Always insist on genuine
Zanussi spare parts.
2

Contents
For the User
Important Safety Information
■
Installation 2
■
Child Safety 2
■
Use 2
Your New Tumble Dryer
Description of the Appliance
The Control Panel
■
Water reservoir 5
■
Mains-on light 5
■
Buttons 5
■
Control lights 5-6
■
Programme selector dial 6
■
Electronic Controlled Programmes 6
■
Timed Programmes 6
Programme Chart
Operating Sequence
■
Load the laundry 8
■
Switch the machine on 8
■
Select the drying time or programme 8
■
Select the required options 8
■
Start the machine 8
■
When drying is completed 8
For the Installer
2
Installation Instructions
Technical Specifications
■
Positioning 17
■
Stacking kit (optional accessory) 17
■
4
4
5
7
8
Door reversal 17
■
Electrical connection 18
16
16
Hints & Tips on Drying
Maintenance and Cleaning
■
External cleaning 11
■
Cleaning fluff filter 11
■
Cleaning the condenser unit 11
■
Emptying the water reservoir 11
Something Not Working
Service and Spare Parts
Customer Care
Guarantee Conditions
Zanussi Service Force
14-15
Guide to use the Instruction Book
The following symbols will be found in the text to guide you throughout the instructions:
Safety instructions
i
Hints and tips
Environmental information
10
11
12
12
12
13
3
i
13
15
16
1245
10
12
14
687
9
11
3
D
O
O
R
O
P
E
N
O
N
O
F
F
C
O
N
D
E
N
S
E
R
D
RY
E
R
E
L
E
C
T
R
O
N
IC
S
E
N
S
O
R
A
E
X
T
R
A
D
R
Y
B
S
T
O
R
E
D
R
Y
C
L
I
G
H
T
L
Y
D
A
M
P
D
I
R
O
N
D
R
Y
E
M
A
C
H
I
N
E
I
R
O
N
D
R
Y
F
E
X
T
R
A
D
R
Y
G
S
T
O
R
E
D
R
Y
H
L
I
G
H
T
L
Y
D
A
M
P
C
O
T
T
O
N
S
Y
N
T
H
E
T
I
C
S
H
T
C
S
6
7
5
E
W
L
O
W
T
E
M
P
.
S
T
A
R
T
B
U
Z
Z
E
R
O
F
F
I
M
P
O
R
T
A
N
T
:
P
L
E
A
S
E
R
E
A
D
T
H
E
I
N
S
T
R
U
C
T
I
O
N
B
O
O
K
B
E
F
O
R
E
U
S
I
N
G
T
H
I
S
A
P
P
L
I
A
N
C
E
L
O
W
T
E
M
P
.
S
T
A
R
T
B
U
Z
Z
E
R
O
F
F
A
U
T
O
R
E
V
E
R
S
E
X
T
R
A
C
A
P
A
C
IT
Y
S
E
L
E
C
T
O
R
A
U
T
O
R
E
V
E
R
S
E
Your New Tumble Dryer
This tumble dryer will give your wash that soft, relaxed feel whatever
the weather.
Extremely high quality standards both during development and
manufacturing guarantee a long service life for your appliance.
Maximum economy in the operation of your dryer is achieved through
very frugal electricity consumption and short drying times.
Energy saving tips
To save energy we recommend that you follow these
hints:
■
Try to load the maximum capacity of the machine
as small loads are uneconomical.
■
Always load well spun laundry. The higher the
spin speed, the lower the electricity consumption
and the shorter the drying times.
■
Do not over-dry laundry, this avoids creasing and
saves energy.
■
Clean the filter regularly to avoid excessive
drying times and high electricity consumption.
■
Ventilate the room well. The room temperature
should not exceed +35°C during drying.
In the interest
of the environment
■
Materials marked with the symbol are
recyclable.
■
Check with your local Council or Environmental
Health Office to see if there are facilities in your
area for re-cycling this appliance.
■
When the appliance is to be scrapped, cut off the
power supply cable and make the door closing
device unusable to prevent young children from
being trapped inside.
■
Help to keep your country tidy - use authorised
disposal sites for your old appliance.
How do we help to protect the
environment? We use recycled paper!
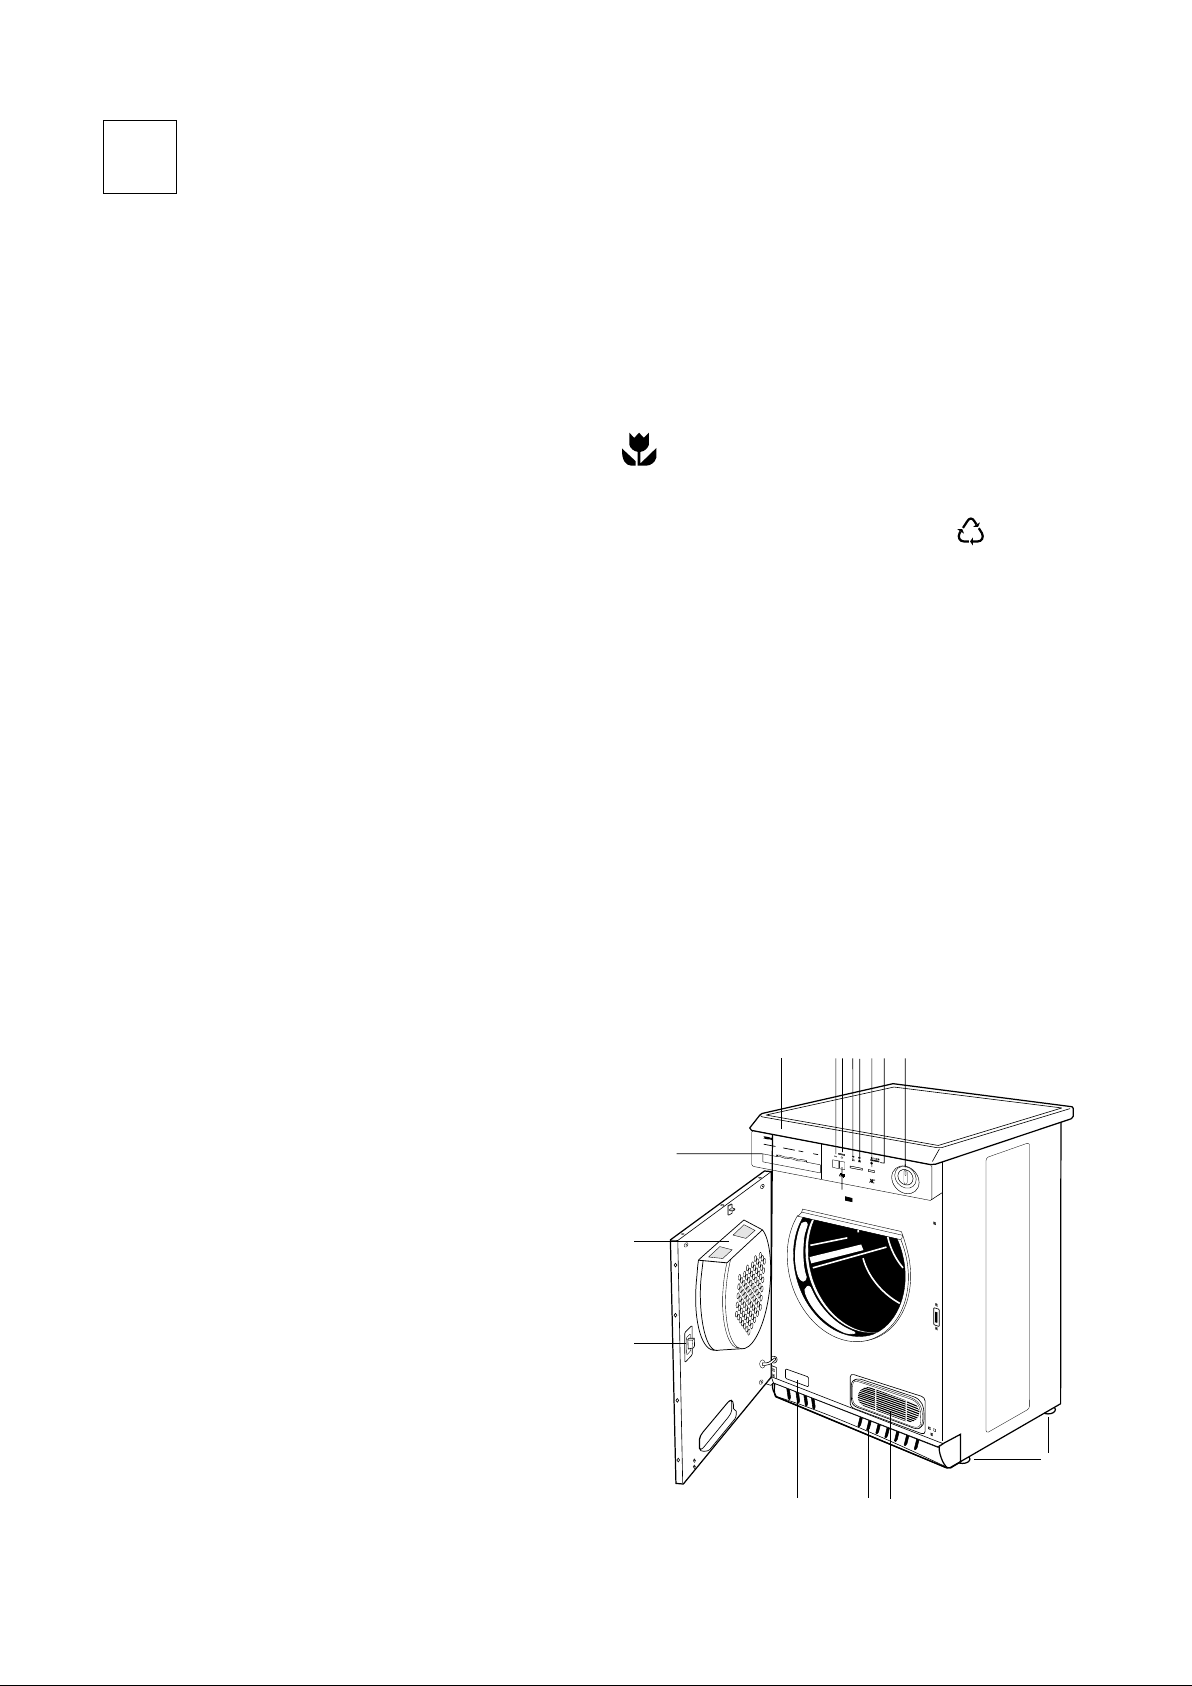
Description of the Appliance
1 Worktop
2 Door Open Button
3 «On-Off » Button
4 Mains-On Light
5 «Low Temperature» Button
6 «Buzzer off» Button
7 «Start» Button
8 Control lights
9 Programme Selector Dial
10 Water reservoir
11 Fluff Filter
12 Door Catch
13 Rating Plate
14 Ventilation Grille
15 Condenser Unit
16 Adjustable Feet
4

XTRACAPACITY
DOOR OPEN ON-OFF
CONDENSER DRYER
ELECTRONIC SENSOR
A
EXTRA
DRY
B
STORE
DRY
C
LIGHTLY
DAMP
D
IRON
DRY
E
MACHINE
IRON DRY
F
EXTRA
DRY
G
STORE
DRY
H
LIGHTLY
DAMP
COTTON
SYNTHETICS
H
T
C
S
6
7
5
EW
LOW
TEMP.
START
BUZZER
OFF
LOW
TEMP.
START
BUZZER
OFF
AUTOREVERSE
SELECTOR
IMPORTANT: PLEASE READ THE INSTRUCTION BOOK BEFORE USING THIS APPLIANCE
AUTOREVERSE
12345681015
79
1112 1314
The Control Panel
1 Water Reservoir
When the tumble dryer is being used, the condensed
water is collected in a special container. To empty the
reservoir, please refer to “Maintenance” chapter.
2 Programme Chart
This will help you to select the correct programme for
drying.
3 Door open button
Depress this button to open the door.
Should the door be opened while appliance is
working, the tumble dryer will stop functioning.
Depress START button to resume drying after closing
the door.
4 ON-OFF Button
This button is used to switch the dryer on. At the end
of the programme, release this button by pressing it
again to switch the dryer off.
5 Mains-On Light
It comes on when the appliance is switched on (ONOFF button pressed down) and goes out when this
button is released.
6 Low Temperature Button
Pressing this button allows drying to be performed at
a lower temperature, for delicate items.
The corresponding pilot light 7 comes on and an
acoustic sound is heard.
This option can also be used for time controlled
drying.
7 Low Temperature Light
It comes on when the low temperature button is
pressed.
8 Buzzer OFF Button
A buzzer sounds when buttons 6-8 and 10 are pressed
and during the anti-creasing phase.
Press this button when selecting the programme if
you wish to switch the buzzer off.
When the water reservoir is full, the buzzer will
sound for 1 minute even if you have depressed
button .
9 Buzzer Off Light
It comes on when you press the corresponding button.
10 Start Button
Press this button for about 1 second to start the dryer
after having selected the drying programme. An
acoustic sound rings.
If the door is opened while the programme is
running, this button must be pressed again after
closing the door in order to re-start the
programme from the point at which it was
interrupted.
This button must also be pressed after a power cut
and after having re-inserted the water reservoir if it
has been emptied in the middle of the programme.
In both cases light or (depending on the phase
in progress) flashes to remind you that the start button
needs to be pressed again.
5

11 “Drying” Light
This light indicates that the machine is performing
the drying phase.
12 “Cooling” Light
This light indicates that the appliance is in the
cooling phase. At the end of drying, there is a 10
minute cooling phase to cool the laundry.
If light or is flashing, this means that the
Start Button needs to be pressed again for the
programme to resume.
3 “End of Programme” Light
1
This light flashes at the end of the cooling phase and
during the anti-creasing phase together with light
14 “Full Tank” Light
This light flashes when the water reservoir is full.
The reservoir can also be emptied during a
programme.
In this case, after having fitted back in place, the start
button must be pressed again for the programme
to resume.
Electronic Controlled
Programmes
These operate by means of dampness sensors.
All you have to do is to set the selector dial for the
programme required and the laundry will be dried to
the selected degree of dryness.
Timed Programmes
They can be used to finish off drying if necessary.
Select the 60 minute programme for cottons or the 30
minute programme for synthetics.
.
15 Programme Selector Dial
It allows you to select electronically controlled or
time controlled drying.
Turn the dial to the required programme or time.
To cancel a programme which is running, turn the
programme selector dial to “0” .
At the end of drying, turn the selector dial to “0”
before removing the laundry.
6
 Loading...