

Zanussi TCS 65W User Manual
INSTRUCTION BOOKLET
TUMBLE DRYER
TCS 65W
822 90 12-93

It is most important that this instruction book should be retained with the appliance for future
reference. Should the appliance be sold or transferred to another owner, or should you move house
and leave the appliance, always ensure that the book is supplied with the appliance in order that the
new owner can get to know the functioning of the appliance and the relevant warnings.
These warnings have been provided in the interest of safety. You MUST read them carefully before
installing or using the appliance.
Installation
■ Any electrical work required to install this appliance
should be carried out by a qualified electrician or a
competent person.
■ It is dangerous to alter the specifications or modify
this product in any way.
■ Care must be taken to ensure that the appliance does
not stand on the electrical supply cable.
■ This appliance must be installed in a clean, dry
environment. Cabinet damage, which is not covered
by guarantee, could result if this recommendation is
not followed.
Child Safety
■ This machine is designed to be operated by adults.
Children must not be allowed to tamper with the
controls or play with the product.
■ Keep all packaging well away for children.
■ Pets and children have been known to climb into
tumble dryers. Check your drum before use.
During Use
■ Always switch off and unplug the appliance after use.
■ Care must be taken when removing or replacing the
condensor as it can be awkward and heavy.
■ This product should be serviced by an authorised
Zanussi Service Centre, and only genuine Zanussi
spare parts should be used.
■ Do not overload the appliance.
■ Never tumble dry items that ha v e had contact with
chemicals such as dry cleaning fluid. These are of a
volatile nature and could cause an explosion.
■ Fluff filter must be cleaned after every use.
■ Do not operate the appliance with a damaged filter or
with no filter at all, as this may cause a fire.
■ Clean the condenser regularly.
■ Do not allow fluff to accumulate around the dryer.
■ As some bulky items such as duvets and eiderdo wns
should be dried in large commercial machines because
of their bulk, check with the manufacturer of the item if
it is suitable for drying in a domestic machine, even if
the dry weight of the item is within the limit advised.
■ Under no circumstances should you attempt to repair
the machine yourself. Repairs carried out by
inexperienced persons may cause injury or serious
malfunctioning. Refer to your local Zanussi Service
Centre. Always insist on genuine Zanussi spare parts.
Environmental Information
■ Materials marked with the symbol are
recyclable.
■ When the appliance is to be scrapped, cut off the
power supply cable and make the door closing
device unusable to prevent young children from
being trapped inside.
■ Help to keep your country tidy - use authorised
disposal sites for your old appliance.
Important Safety Information
- 2 -

- 3 -
For the user
Important safety information 2
Description of the appliance 4-5
Instructions for use
Before you use the dryer for the first time 6
Capacity 6
Examples of laundry item weights 6
Program chart
Which program should I use 7
General washing and drying information
Sorting 8
Spinning (water extraction) 8
Getting the load size right 8
Fluff 8
Shrinkage 8
Items which should not be tumble dried 8
Regular care of your tumble dryer
The filters 9
The condenser 9
Emptying the water tank 10
Something not working 11
Service and spare parts 12
Customer Care 12
Guarantee Conditions 13
For the installer
Installation instructions 14-17
Technical specifications 14
Consumption according to the IEC 1121
international standard 14
Choosing where to install the dryer 15
Worktop installation 15
Electrical supply 15
Wall mounting 16
Electrical connection 17
Guide to use the instruction book
The following symbols will be found in the text to guide you throughout the instructions:
Safety instructions
Step by step instructions
Hints and tips
Contents

11
10
9
8
7
6
5
4
3
2
2
1
Description of the appliance
13
12
- 4 -
20
0
2
1
40
00
1
60
80
80
60
40
20
MADE IN SWEDEN
FD XX
TYPE
XX XX
MOD.
PROD. NO.
SER. NO.
XXX V~ 2020 W 50 Hz
XXXXXXXXX
xxxxxxxx
170 W
M
1850 W
TCS 65W
20
120
40
100
60
80
80
60
40
20
Important;
Please read the instruction book
before using this appliance.
1. Door Latch (push the knob to the right to open)
2. Space for programme chart
(Self-adhesive label)
Choose the language you require and attach the
chart to a suitable place on the dryer.
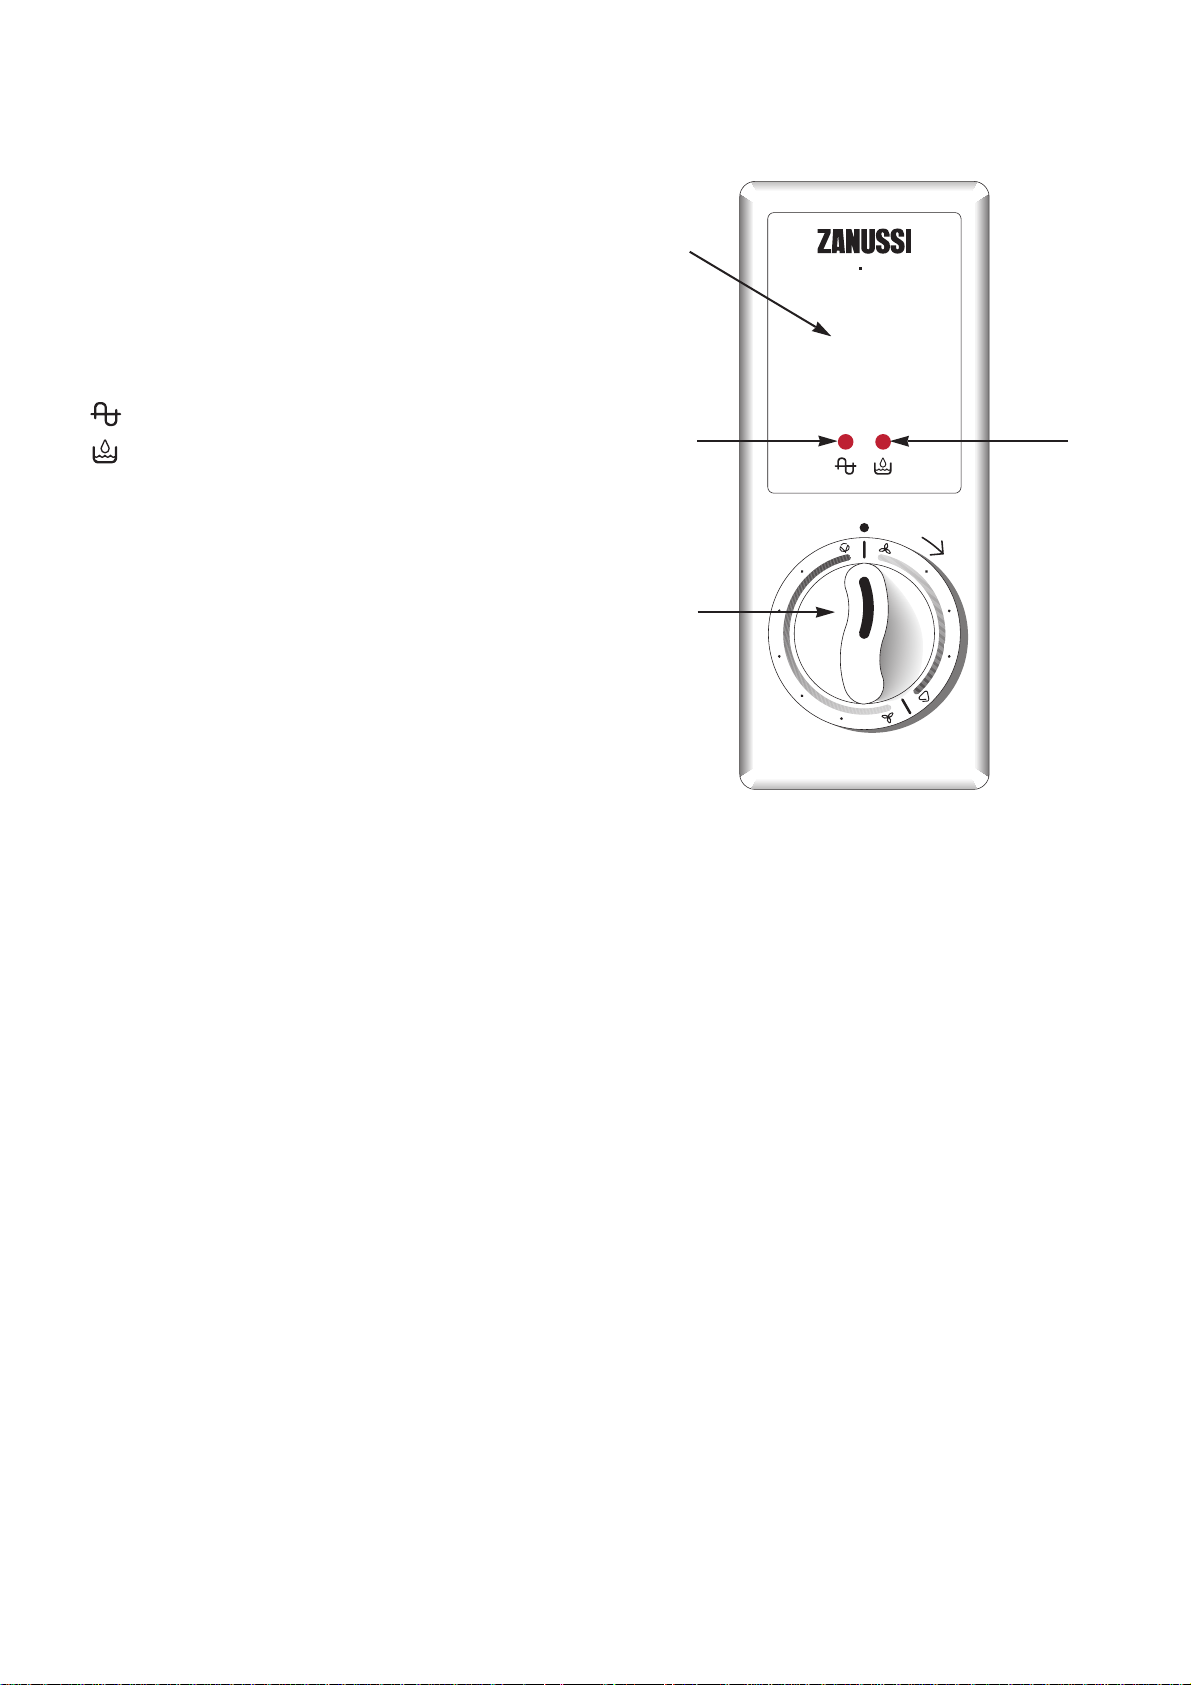
3. Control panel with indicator lights
• Lights
A. Indicates the dryer is running
B. Indicates that the water tank is full
• On/off timer knob
C. Turn this knob in a clockwise direction to start the
dryer and set both the drying time and the drying
temperature.
High heat: The timer indicates 20 mins - 120 mins
for cotton/linen.
Low heat: The time indicates 20 mins - 80 mins
for synthetics.
The last 8 - 12 minutes of each drying cycle is a
cool down phase.
4. Warm air discharge
5. Adjustable feet
If the dryer is not being wall mounted the feet need
to be adjusted so that the dryer is level.
6. Air ducts - These should not be obstructed
7. Filters (The fluff filter is behind the coarse filter.)
Should be cleaned before or after each load. The
fluff filter is behind the coarse filter and can be
removed for cleaning.
8. Condenser
This is built into the door and needs to be cleaned
at regular intervals.
9. Water tank
This fills up with the water condensed by the dryer,
and should be emptied before or after each load.
When the tank is full, warning light (B) will come
on and the dryer will stop automatically. It cannot be
restarted until the tank has been emptied.
10. Drum
11. Rating plate
12. Electrical lead
13. Non-tip device
A
B
C
3
Important;
Please read the instruction book
before using this appliance
- 5 -
TCS 65W
120
100
80
60
40
Important;
Please read the instruction book
before using this appliance.
20
40
60
80
20

- 6 -
Before you use the dryer for the first
time
Dampen some clean pieces of unwanted cloth and dry
them for about 15 minutes the very first time, to mak e sure
that there is no dust or dirt in the dryer.
1. Check that the dryer is connected to the
electrical supply.
2. Open the door by pushing the knob to the right
(A).
3. Check that the lint filter (B) is clean and that the
coarse filter (C) is lowered and has snapped into
place.
4. Check that the water tank (D) is empty and
pushed correctly into place.
5. Put the load for drying into the machine. Make
sure that it is right inside the drum. Do not mix
synthetics with natural materials.
6. Close the door.
7. According to the type of load, turn the on/off
timer knob (E) to start the dryer and choose a
suitable drying time on either the Cotton or the
Synthetics time scale.
Capacity (dry items)
Cotton max. 3.5 kg
Synthetics max. 1.5 kg
Examples of laundry item weights
(dry items)
Here is a list of common laundry items and their
approximate weights
Sheet 700 to 1000g
Pillowcase 100 to 200g
Tablecloth 400 to 500g
Table Napkin 50 to 100g
Kitchen Towel 70 to 120g
Linen Hand Towel 100 to 150g
Hand Towel 150 to 250g
Bath Towel 700 to 1000g
Bathrobe 100 to 1500g
Shirt 200 to 300g
Apron 150 to 200g
The best and most economical load is the maximum
indicated for the different types of fabric.
A
B
C
D
E
Instructions for use
MADE IN SWEDEN
TYPE
MOD.
PROD. NO.
SER. NO.
XXX V~ 2020 W 50 Hz
FD XX
XX XX
XXXXXXXXX
xxxxxxxx
170 W
M
1850 W
TCS 65W
120
100
80
60
40
Important;
Please read the instruction book
before using this appliance.
20
40
60
80
20
 Loading...