

Page 1
TUMBLE DRYER
BUBNOVÁ SUŠIČKA
SUSZARKA DO BIELIZNY
TCE 7124
125993660
GB
CZ
PL
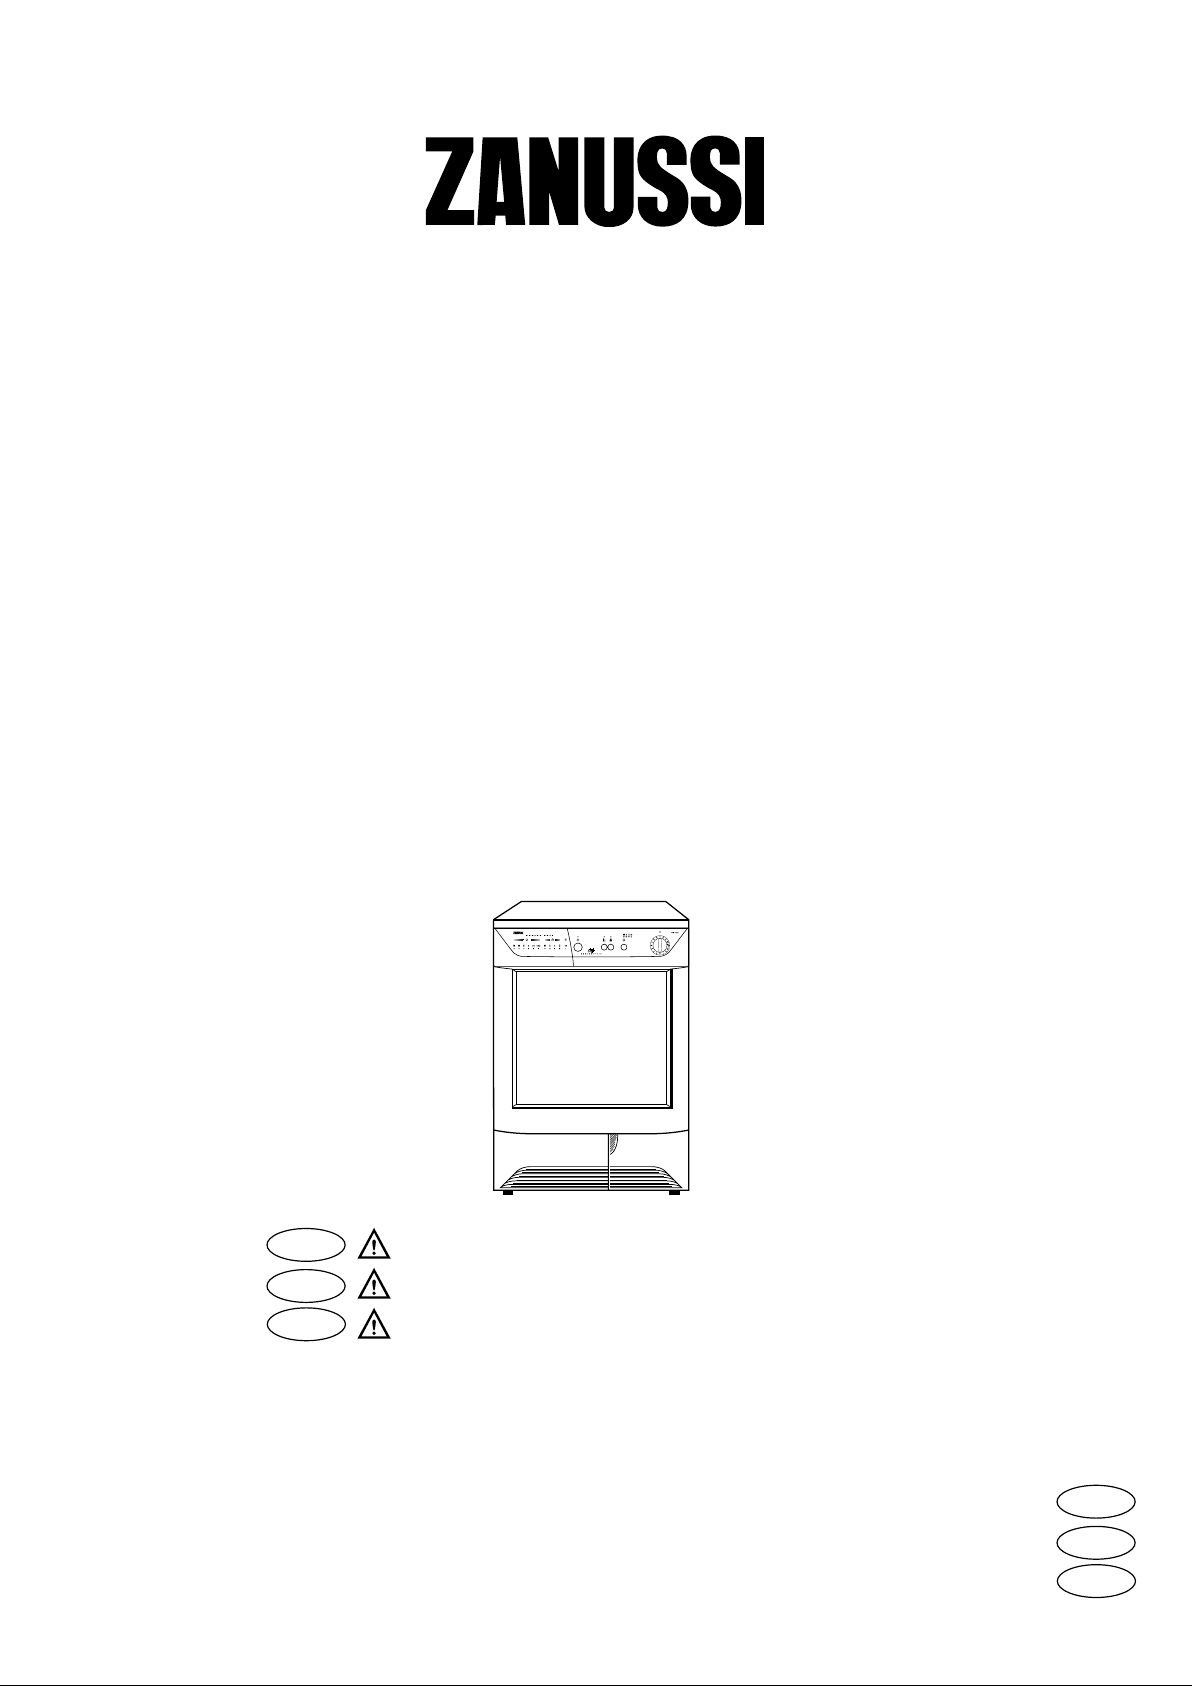
Unpacking: see page 5
Rozbalení: viz str.18
Rozpakowanie: patrz str.32
INSTRUCTION BOOKLET
NÁVOD K OBSLUZE
INSTRUKCJA OBS
⁄
LUGI
GB
CZ
PL
Page 2
Dear customer,
Please read these operating instructions carefully and pay particular attention to the safety notes indicated in
the first pages.
We recommend that you keep this instruction booklet for future reference and pass it on to any future owners.
Transport damages
After unpacking the machine please check it is not damaged. If in doubt, do not start it but contact your local
Service Centre.
The symbols you will see on some paragraphs of this booklet have the following meaning:
The warning triangle emphasize information that is particularly important for your safety or correct
functioning of the appliance.
The information marked with this symbol provides additional instructions and practical tips on the use of
the appliance.
Tips and information about economical and ecological use of the machine are marked with this symbol.
Our contribution to the protection of the
environment: we use recycled paper.
Contents
Important safety information ......................3
Disposal ..............................................................3
Tips for environmental protection ............4
Technical specifications................................4
Description of the appliance ......................4
Installation ..........................................................5
• Unpacking ............................................................5
• Positioning............................................................5
• Electrical connection ............................................5
• Stacking kit ..........................................................5
• Door reversal ........................................................5
• Connecting a drain hose ......................................6
Use ........................................................................7
• The control panel ..............................................7-8
• Programme chart..................................................9
• Operating sequence............................................10
• Useful hints ........................................................11
Maintenance and Cleaning........................12
• External cleaning ................................................12
• Cleaning the door ..............................................12
• Cleaning the filters..............................................12
• Cleaning the condenser unit ..............................12
• Emptying the water reservoir..............................13
• Cleaning the air intake grille................................13
• Cleaning the drum ..............................................13
Something not working? ............................14
2
Page 3

Important safety information
These warnings have been provided in the interest of safety. You MUST read them carefully before installing or
using the appliance.
ENGLISH
Installation
• Any electrical work required to install this
appliance should be carried out by a qualified
electrician or competent person.
• Care must be taken to ensure that the appliance
does not stand on the electrical supply cable.
• If the machine is situated on a carpeted floor,
please adjust the feet in order to allow air to
circulate freely.
Use
• This appliance is designed for domestic use only.
If the machine is used for any other purposes or is
not used correctly, the manufacturer accepts no
responsibility for any damage that might occur.
• Always unplug the appliance after use.
• Clothes which are dripping wet should not be
placed in the dryer.
• Danger of explosion: Never tumble dry items that
have been in contact with inflammable solvents
(petrol, methylated spirits, dry cleaning fluid and
the like). As these substances are volatile, they
could cause an explosion. Tumble dry only items
washed with water.
• Please make sure that no gas lighters have
accidentally been left in pockets of garments to be
loaded into appliance.
• Do not dry canvas shoes or sports shoes, as they
could get stuck between the door and the drum,
thus blocking this latter.
• Leave the door slightly ajar when the appliance is
not being used. This will allow the seal to be
preserved.
• Clean fluff filters after using the tumble dryer. To
prevent fire risks, do not use the appliance if the
fluff filters are damaged or without filters.
• Do not allow fluff to accumulate around the dryer.
General safety
• It is dangerous to alter the specifications or
attempt to modify this product in any way.
• Under no circumstances should you attempt to
repair the machine yourself. Repairs carried out by
inexperienced persons may cause injury or serious
malfunctioning. Contact your local Service Centre.
Always insist on genuine spare parts.
Child safety
• Children are often not aware of how dangerous
electrical appliances can be. When the machine is
working, children should be carefully supervised
and not be allowed to play with the appliance.
• The packaging components (e.g. plastic film,
polystyrene) can be dangerous to children danger of suffocation! Keep them out of children’s
reach.
• Make sure that children or pets do not climb into
the drum.
• When the appliance is to be scrapped, cut off the
electrical supply cable and destroy the plug with
the remaining cable. Disable the door catch in
order to prevent children from becoming trapped
inside while playing.
Disposal
• Packaging materials
The materials marked with the symbol are
recyclable.
This means that they can be recycled by disposing
of them properly in appropriate collection
containers.
• Machine
Use authorised disposal sites for your old appliance.
Help to keep your country tidy!
3
Page 4
Tips for environmental protection
To save energy and to help protect the environment,
we recommend that you follow these hints:
• Try to load the maximum capacity of the machine
as small loads are uneconomical.
• Always load well spun laundry. The higher the spin
speed, the lower the electricity consumption and
the shorter the drying times.
• Do not over-dry laundry, this avoids creasing and
saves energy.
Select the drying programme according to the
type of laundry and the required degree of
dryness.
• To utilize the maximum load, laundry which is to
be dried ready to put away (store dry) can be dried
together with items to be ironed. To do this, select
the programme for iron-dry, remove the iron-dry
items at the end of the programme and then
finish-dry the rest of the load.
• Clean the filters regularly to avoid excessive drying
times and high electricity consumption.
• Ventilate the room well. The room temperature
should not exceed +35°C during drying.
Technical specifications
DIMENSIONS: Height 85 cm
Width 60 cm
Depth 58 cm
ELECTRICAL CONNECTION: 220/230 V/50 Hz
MAX. POWER ABSORBED: 2200 W
MIN. FUSE RATING: 10 A
MAX. DRYING CAPACITY: Cotton, linen 5 kg
Synthetics 2.5 kg
CONSUMPTION: Cotton, linen 3.64 kWh (5 kg store dry)
Cotton, linen 3 kWh (5 kg iron dry)
Synthetics 1.4 kWh (2.5 kg store dry)
NOISE LEVEL 64 dB (A)
This appliance complies with the following E.E.C. Directives:
- 73/23 EEC of 19.2.73 (Low Voltage Directive) and subsequent modifications;
- 89/336 EEC of 3.5.89 (Electromagnetic Compatibility Directive) and subsequent modifications.
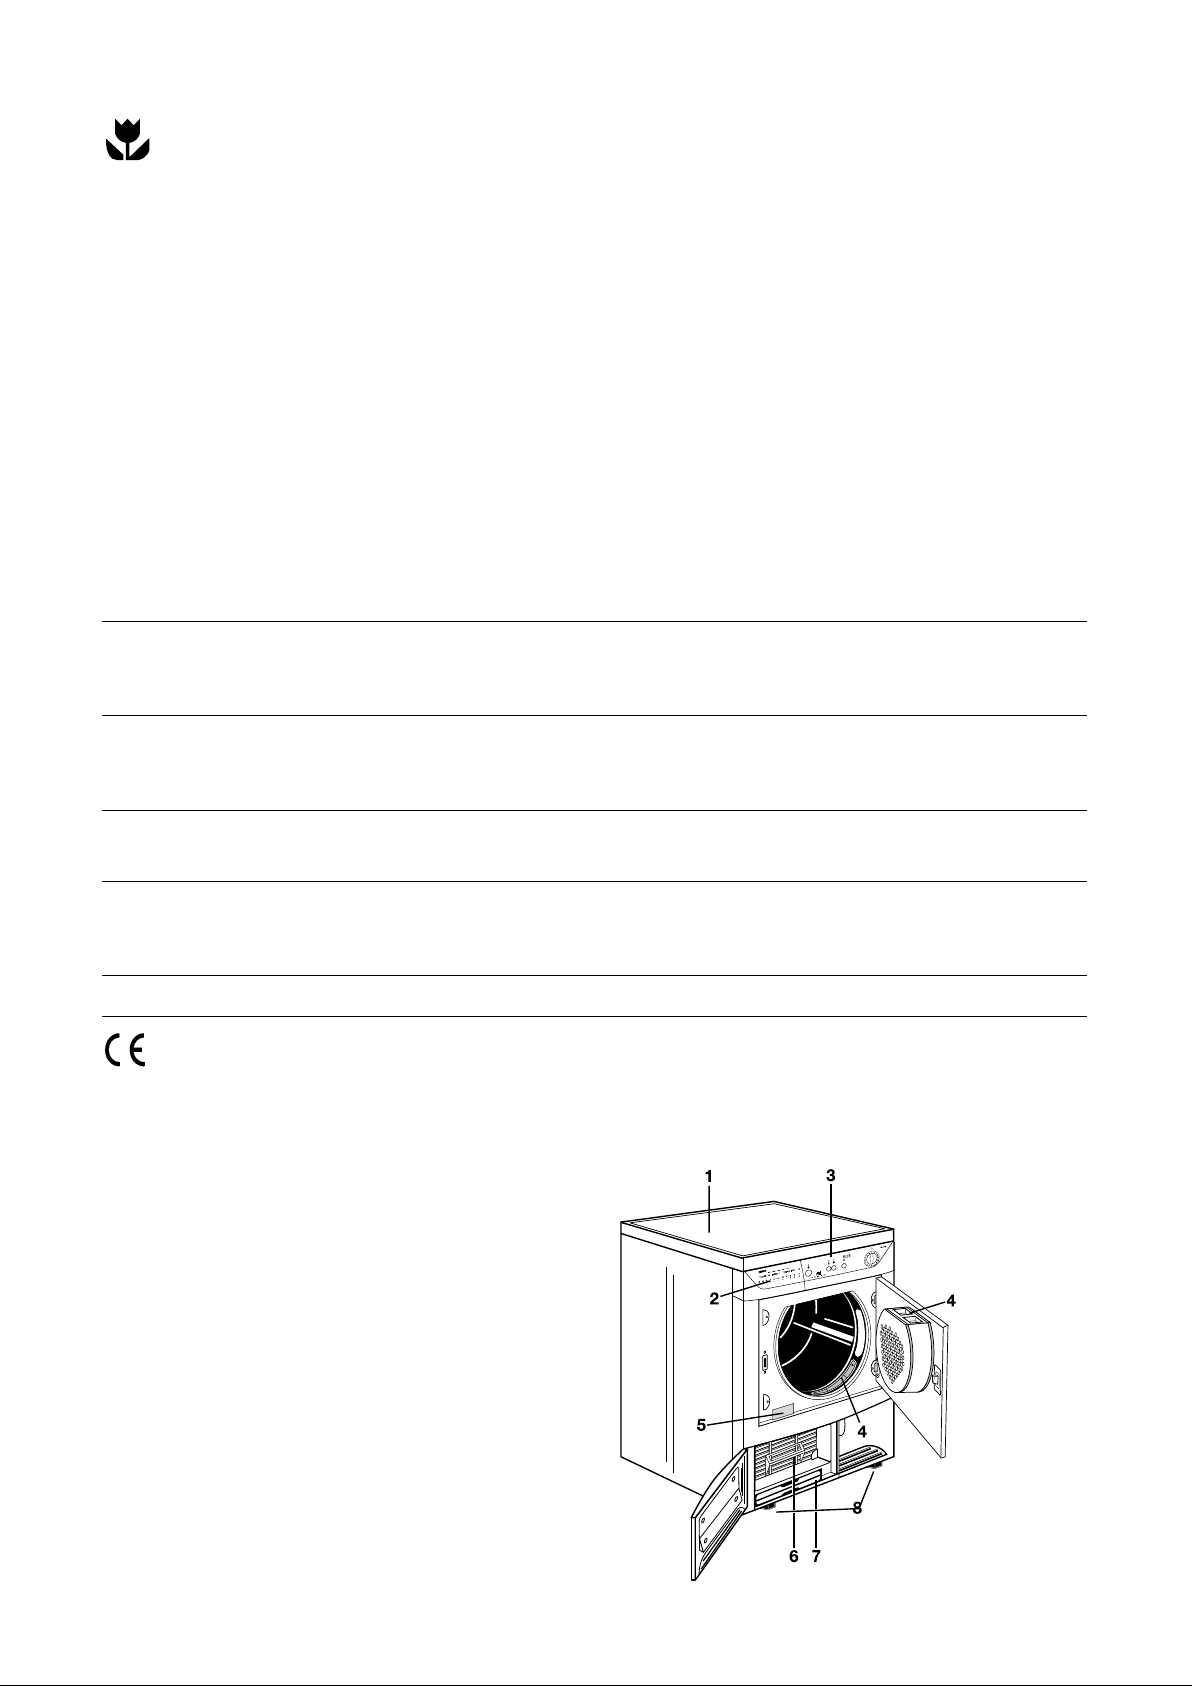
Description of the appliance
1 Table top
2Programme chart
3 Control panel
4 Fluff filters
5 Rating Plate
6 Consenser Unit
7Water reservoir
8 Adjustable feet
4
Page 5
Installation
Warning!
Unpacking
Slide out the polythene bag with the
polystyrene stuffing before using the
appliance.
Should the appliance be moved, it must be
transported vertically.
Positioning
It is recommended that, for your convenience, the
machine is positioned close to your washing
machine.
The tumble dryer must be installed in a clean place,
where dirt does not build up.
Air must be able to circulate freely all round the
appliance. Do not obstruct the front ventilation grille
or the air intake grille at the back of the machine.
To keep vibration and noise to a minimum when the
dryer is in use, it should be placed on a firm, level
surface.
Once in its permanent operating position, check
that the dryer is absolutely level with the aid of a
spirit level. If it is not, raise or lower the feet until
it is.
The feet must never be removed.
Do not restrict the floor clearance through deep-
pile carpets, strips of wood or similar. This might
cause heat build-up which would interfere with
the operation of the appliance.
Important!
The hot air emitted by the tumble dryer can reach
temperatures of up to 60°C. The appliance must
therefore not be installed on floors which are not
resistant to high temperatures.
When operating the tumble dryer, the room
temperature must not be lower than +5°C and
higher than +35°C, as it may affect the performance
of the appliance.
Electrical connection
This machine is designed to operate on a 220-230 V,
single-phase, 50 Hz supply.
Check that your domestic electrical installation can
take the maximum load required (2.2 kW), also
taking into account any other appliances in use.
Connect the machine to an earthed socket, in
accordance with current wiring regulations.
The manufacturer declines any
responsibility for damage or injury
through failure to comply with the
above safety precaution.
Should the appliance power supply
cable need to be replaced, this must
be carried out by our Service
Centre.
Important!
The power supply cable must be accessible after
installing the machine.
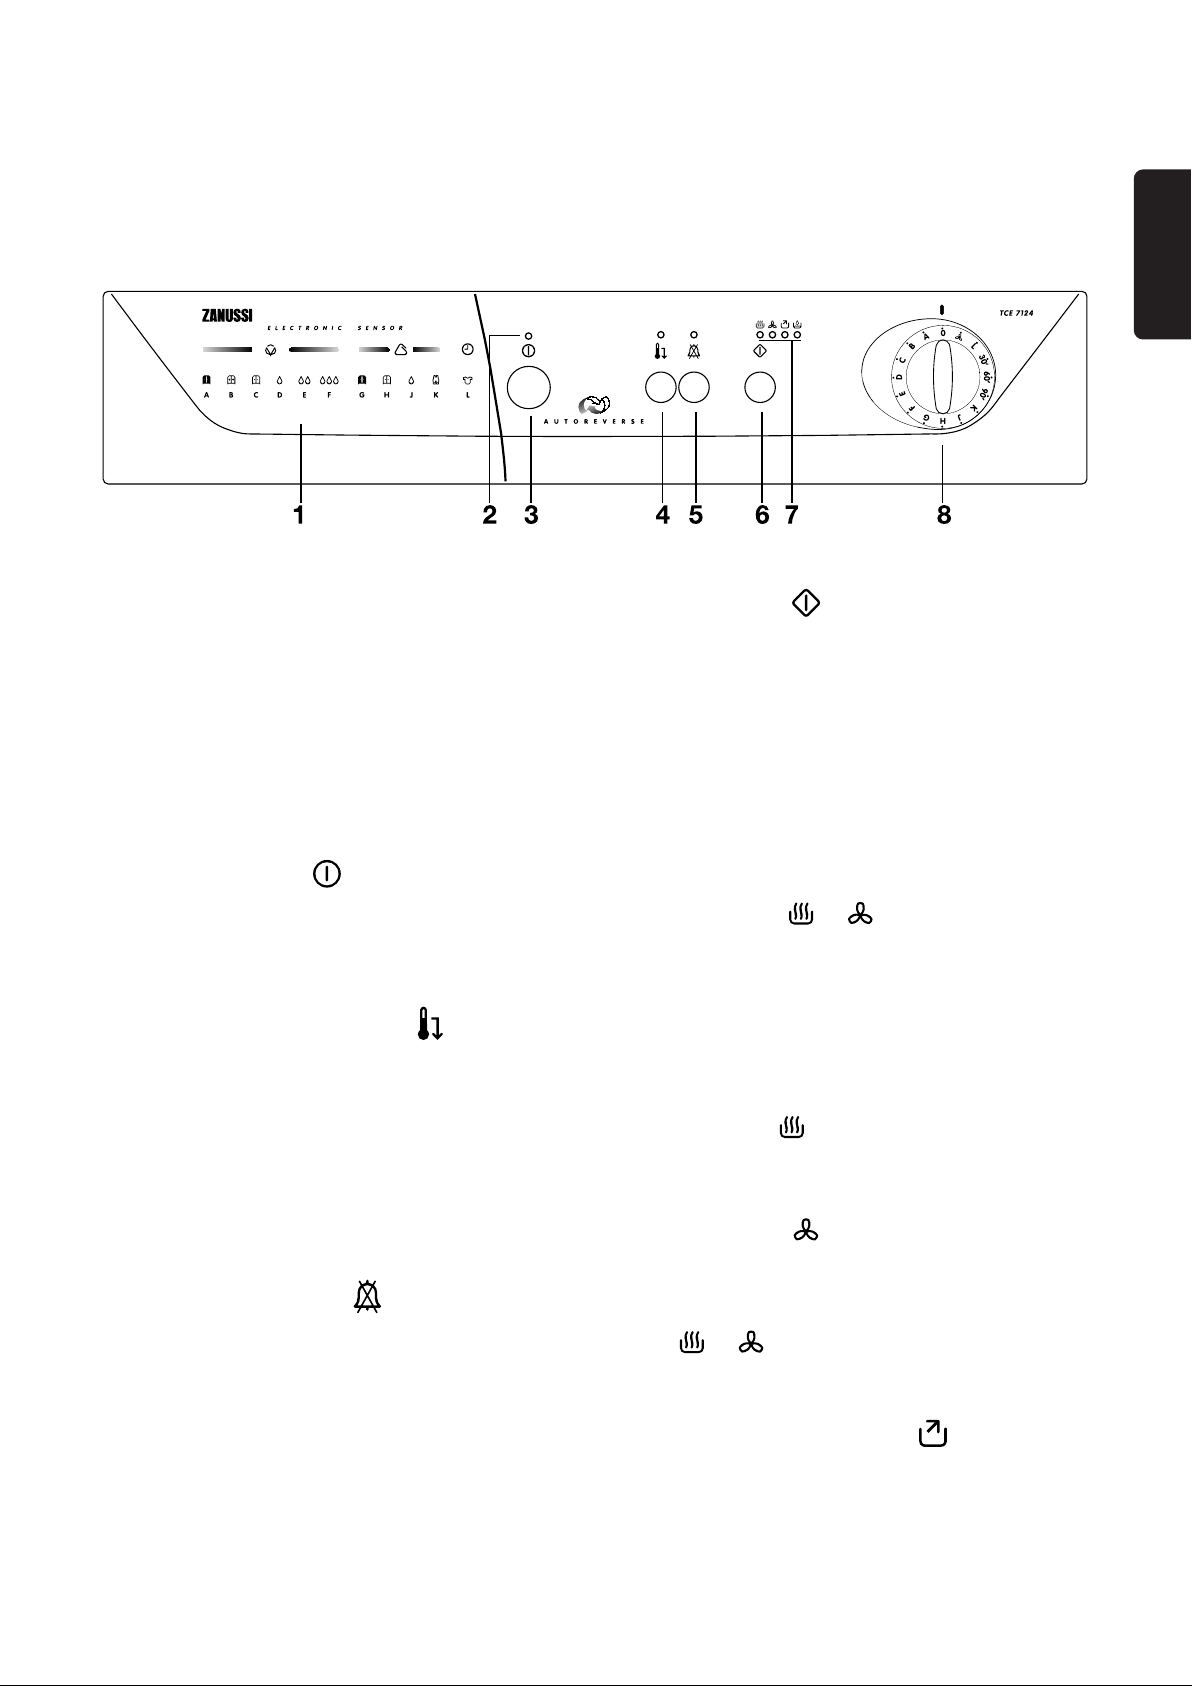
Stacking kit
A special stacking kit is available through your
dealer, to enable the mounting of the dryer on top of
a front loading washing machine with cover’s depth
between 48 und 60 cm.
Read carefully the instructions supplied with the kit
before installing the dryer.
Door reversal
To make it easier to load or unload the laundry the
door can be reversed.
This operation must be carried out by qualified
personnel.
Please contact the nearest Service Centre.
ENGLISH
5
Page 6
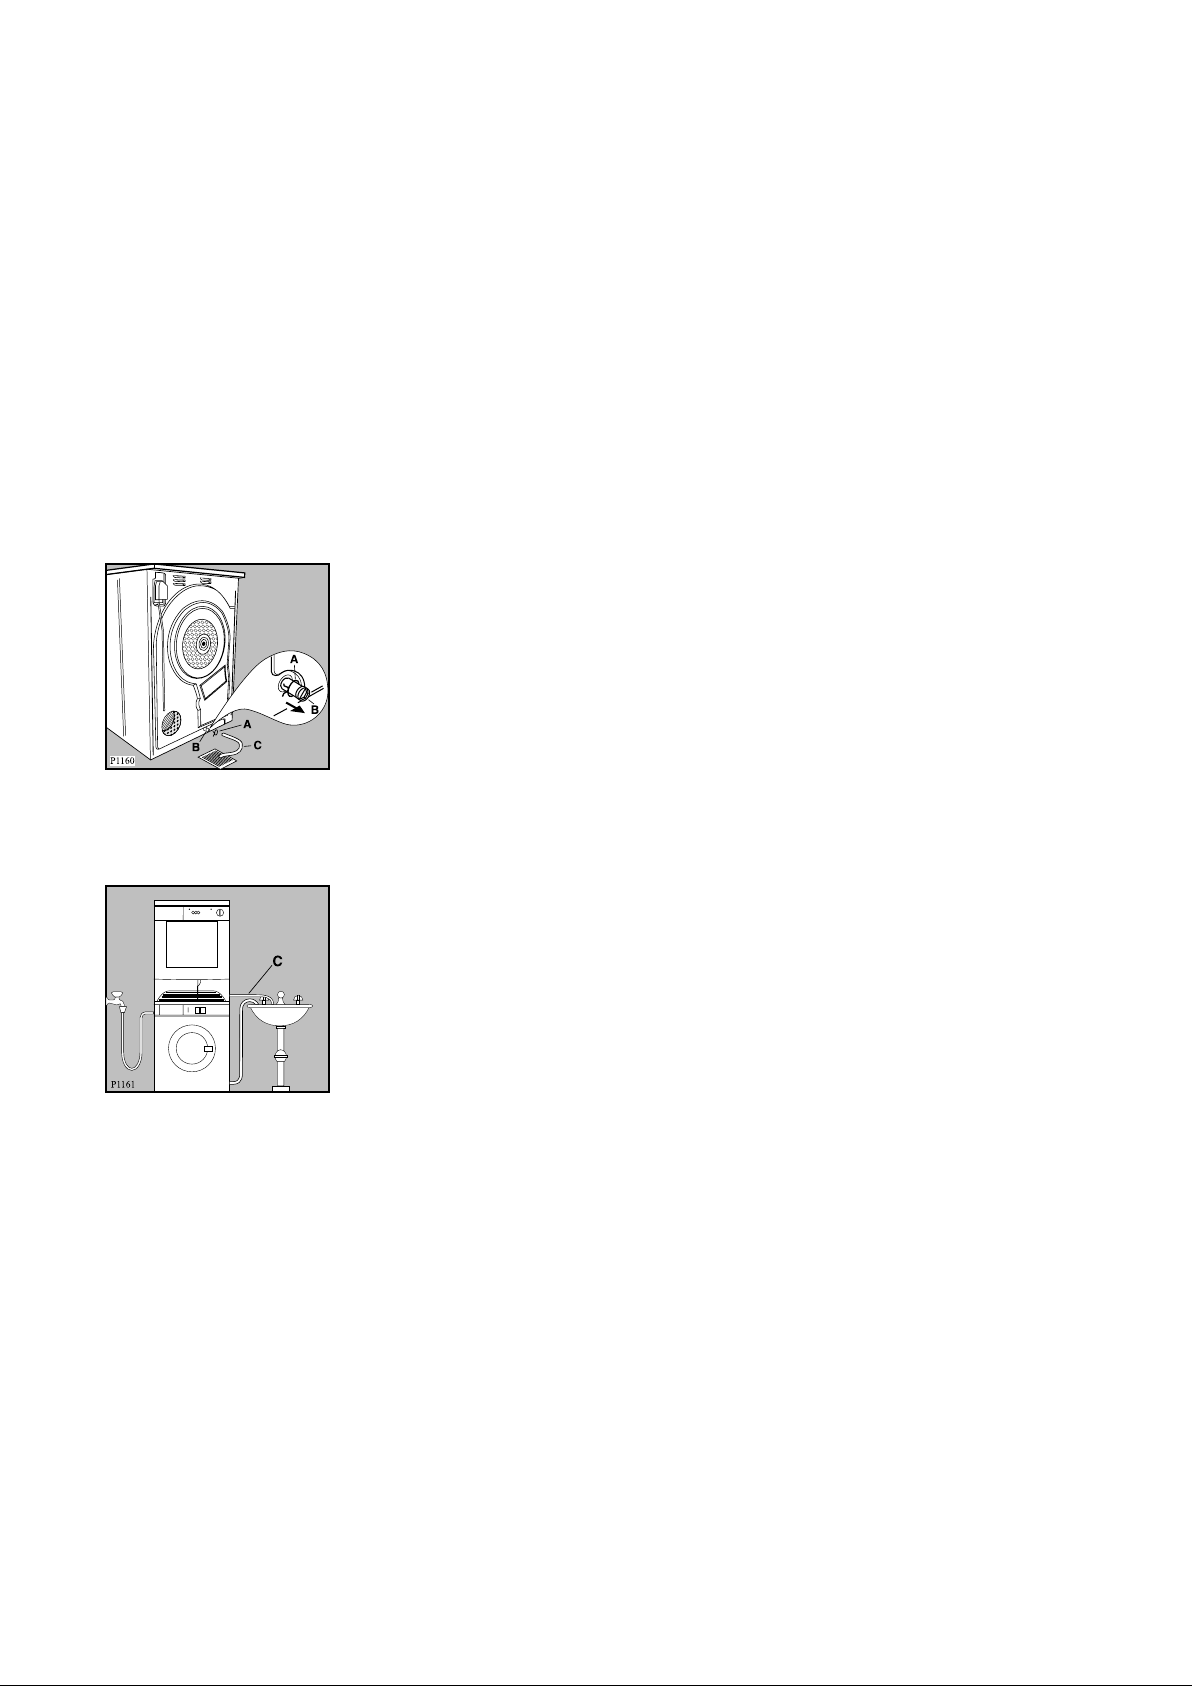
Connecting a drain hose
If there is a sink or drain near the appliance, the
condensed water can be discharged directly
through a hose that is available on the market.
In order to connect the hose to the appliance
proceed as follows:
• Remove the clamp (A)
•
Pull out the plug (B)
• Insert the drain hose (C)
• Fasten the hose (C) to the appliance using the
clamp (A).
If the appliance is stacked on the washing machine,
the condensed water can be discharged through the
hose as shown in figure, but take into account that
the hose (C) must be pointed downwards.
6
Page 7
Use
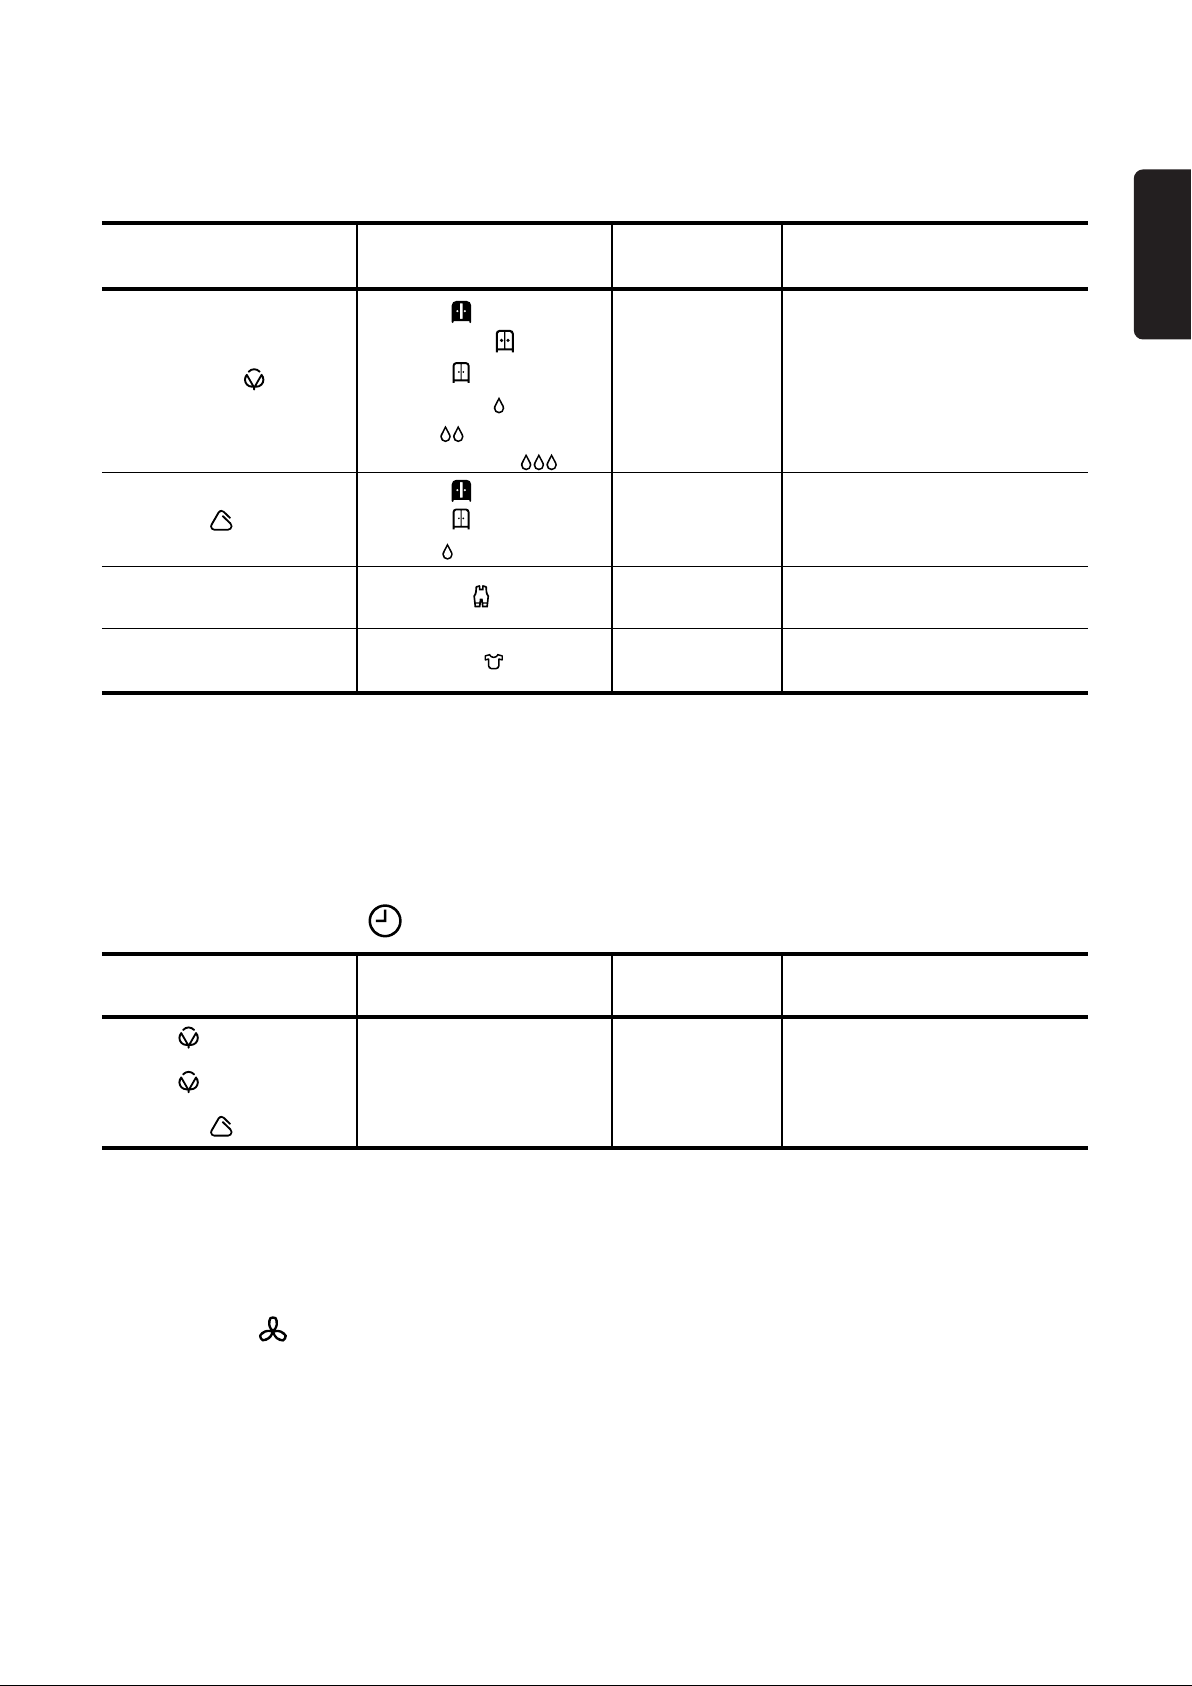
The control panel
ENGLISH
1Programme guide
This will help you to select the correct programme
for drying.
2Mains-ON light
Comes on when the appliance is switched on
(ON/OFF button pressed down) and goes out when
this button is released.
3 ON/OFF button
This button is used to switch the dryer on. At the
end of the programme, release this button by
pressing it again to switch the dryer off.
4 Low temperature button
Pressing this button allows drying to be performed
at a lower temperature, for delicate items.
The corresponding pilot light comes on.
This option can also be used for time controlled
drying.
The dryer heats at 1300 W instead of 2000 W.
If the button is not pressed, drying is performed at
full power (2000 W).
5 Buzzer OFF button
A buzzer sounds by depressing the pushbuttons,
during the anti-creasing phase, at the end of
programme and when the water reservoir is full.
Press this button when selecting the programme if
you wish to switch the buzzer off during the anticreasing phase. The corresponding light illuminates.
6 Start button
Press this button for about 2 seconds to start the
dryer after having selected the programme.
If the door of the appliance or the small door at
the bottom is opened while the programme is
running, this button must be pressed again after
closing the door in order to restart the programme
from the point at which it was interrupted.
This button must be depressed also after a power
failure and after having re-inserted the water
reservoir, if it has been emptied in the middle of a
programme.
In both cases light or (depending on the
phase in progress) flashes to remind you that the
start button needs to be pressed again.
7Programme phase indicator lights
These lights indicate the various phases of the
programme as they are being performed.
“Drying” light
This light indicates that the appliance is in the drying
phase.
“Cooling” light
This light indicates that the appliance is in the
cooling phase. At the end of drying, there is a 10
minute cooling phase to cool the laundry.
If light or is flashing, this means that the
Start button needs to be pressed again for the
programme to resume.
“End of programme” light
This light flashes at the end of the cooling phase
and during the anti-creasing phase.
7
Page 8

“Water reservoir full” light
This light flashes when the reservoir is full.
8Programme/Time selector dial
Allows you to select electronically controlled or time
controlled drying.
Turn the dial to the required programme or time.
Electronically controlled drying
(automatic)
The appliance runs these programmes with the help
of probes which detect the degree of dampness of
the laundry.
Simply select the programme according to the type
of laundry and degree of drying required.
Time controlled drying
Can be used to finish off drying if necessary.
Select the 90 or 60 minute programme for cottons
or the 30 minute programme for synthetics.
To cancel a programme which is running, turn the
programme selector dial to “0”.
At the end of drying, turn the selector dial to “0”
before removing the laundry.
8
Page 9
Programme chart
Automatic drying (electronic programmes)
Type of laundry
Cotton & linen
Synthetics
Jumpers
Jackets, trousers,
dresses, skirts.
(*) According to IEC 61121 Standards.
• Baby cycle “K” is a special programme for jumpers to be dried “ready to wear”.
• Dry cleaning “L” is designed to clean and freshen garments labelled “dry clean only” at home, in your
tumble dryer, using the special product available on the market.
Degree of drying
required
extra dry
ready to wear
store dry
slightly damp
iron dry
machine iron dry
extra dry
store dry
iron dry
Baby cycle
Dry cleaning
Max-load
5 kg
5 kg
5 kg
5 kg
5 kg
5 kg
2.5 kg
2.5 kg
2.5 kg
1 kg
(10 jumpers)
1 - 4 garments
(1)
Programme
A
B
C(*)
D
E(*)
F
G
H(*)
J
K
L
ENGLISH
Time controlled drying
Type of laundry Drying time Max-load
Cotton
Cotton
Synthetics
(1) Never overfill the drum (do not load large quilts, for example).
Drying times vary according to:
• The type of laundry
• The size of the load
• The degree of spinning prior to drying.
90 min
60 min
30 min
(1)
5 kg
5 kg
2.5 kg
Programme
selector dial position
90’
60’
30’
Fresh & Cool
This position on programme selector dial can be used to freshen the laundry (e.g. to remove a persistent
odour of moth-balls).
Load
It is often difficult to estimate the weight of items to be dried. We therefore recommend that you adopt the
following guidelines:
• cotton, linen: drum full but not too tightly packed;
• synthetics: drum no more than half full;
• delicate fabrics: drum no more than one third full.
9
Page 10
Operating sequence
Before using your tumble dryer for the first time, we
recommend to place a few damp cloths inside the
appliance and dry for 30 minutes.
There may be dust inside a brand new tumble dryer.
Turn the programme selector dial to “0”; lights
and go out.
Release the ON/OFF button (the mains-ON light
goes out) and immediately remove the laundry.
After each use
Drying
1. Connect the appliance.
2. Open the door.
3. Load the items one at a time, shaking them out
loosely.
4. Close the door. Please check the laundry does
not get caught between the door and filter.
5. Press the ON/OFF button : the mains-ON light
comes on.
6. Select the drying programme or time.
7. If required, press the low temperature button
and/or the buzzer OFF button .
8. Press the Start button for 2 seconds: light
comes on and drying starts.
The drum turns alternately in both directions
during drying.
All drying programmes end with a 10 minute
cooling phase (light is on).
You may remove the laundry after this phase.
9. If the laundry is not removed at the end of the
cycle, the dryer performs an anti-creasing
phase (duration: 30 minutes maximum).
The buzzer sounds every 10 seconds (if the
button has not been pressed).
Lights and flash alternately.
If you do not remove the laundry, the dryer will
stop automatically at the end of the anti-creasing
phase.
Lights and flash and the mains-ON light
stays on.
• Clean the filters (see page 12).
• Empty the water reservoir (see page 13).
Important!
If the drying programme has to be stopped before it
reaches the end, we recommend that you turn the
programme selector dial to position (cooling)
and wait until the end of this phase before removing
the laundry. This will avoid a build-up of heat inside
the appliance.To do this first turn the dial to “0” and
then to and depress Start button
Modifying the programme
To change a programme which is running, first
cancel it by turning the programme selector dial to
“0”. Select the new programme and press the Start
button .
.
10
Page 11
Useful hints
• Try to load to the maximum capacity of the
machine as small loads are uneconomical.
For information, here is a list of the average
weights of some common laundry items.
Sheet 700 - 1000 g
Tablecloth 400 - 500 g
Kitchen towel 70 - 120 g
Table napkin 50 - 100 g
Towelling hand towel 150 - 250 g
Bathrobe 1000 - 1500 g
Man’s shirt 200 - 300 g
Pillowcase 100 - 200 g
Man’s pyjamas 400 - 500 g
Ladies’ nightdress 200 - 250 g
• Never tumble dry the following:
Particularly delicate items such as net curtains,
woollen, silk, fabrics with metal trim, nylon tights,
bulky materials such as anoraks, blankets,
eiderdowns, sleeping bags, feather quilts and any
items containing rubber foam or materials similar
to rubber foam.
• Always follow the instructions on garment labels:
• Avoid drying dark clothes with light coloured fluffy
items such as towels as they could attract the
fluff.
• The laundry must be thoroughly spun before
tumble drying.
• Easy-care items, too, e.g. shirts, should be
briefly pre-spun before drying (depending on
crease resistance approx. 30 seconds or using the
special brief spin programme of your washing
machine).
• Knitted textiles (knitted underwear) may shrink a
little during drying. Please do not overdry items of
this type. It is advisable to allow for shrinkage
when choosing the size of new purchases.
• You can also put starched items into your dryer.
However, to achieve the desired starched effect,
choose the programme “iron dry”. To remove any
starch residues, wipe out the internal drum after
drying with a moist cloth and then rub it dry.
• To avoid a static charge when drying is
completed, use either a fabric softener when you
are washing the laundry or a fabric conditioner
specifically for tumble dryers.
• Remove the laundry when the dryer has finished
drying.
• If individual items are still damp after drying, set a
brief post-drying time, but at least 30 minutes.
This will be necessary particularly for multilayered
items (e.g. collars, pockets, etc.).
ENGLISH
may be tumble dried
normal drying (high temperature)
delicate drying (low temperature)
do not tumble dry
• Close pillowcases and covers with fasteners to
prevent small laundry items getting tangled inside
them. Close press studs, zips and hooks and tie
belts and apron strings.
• Sort laundry according to type and degree of
drying required.
• Do not over-dry laundry, this avoids creasing and
saves energy.
11
Page 12
Maintenance and Cleaning
You must disconnect the appliance from the
electricity supply, before you can carry out any
cleaning or maintenance work.
External cleaning
Use only soap and water and then dry thoroughly.
Important: do not use methylated spirit, diluents or
similar products.
Cleaning the door
Clean periodically the interior part of the door to
remove any fluff from the seals around the filter.
Accurate cleaning ensures correct drying.
After a while a withish patina forms on the filters due
to detergent residue on laundry. This can be
eliminated by washing the filters with warm water
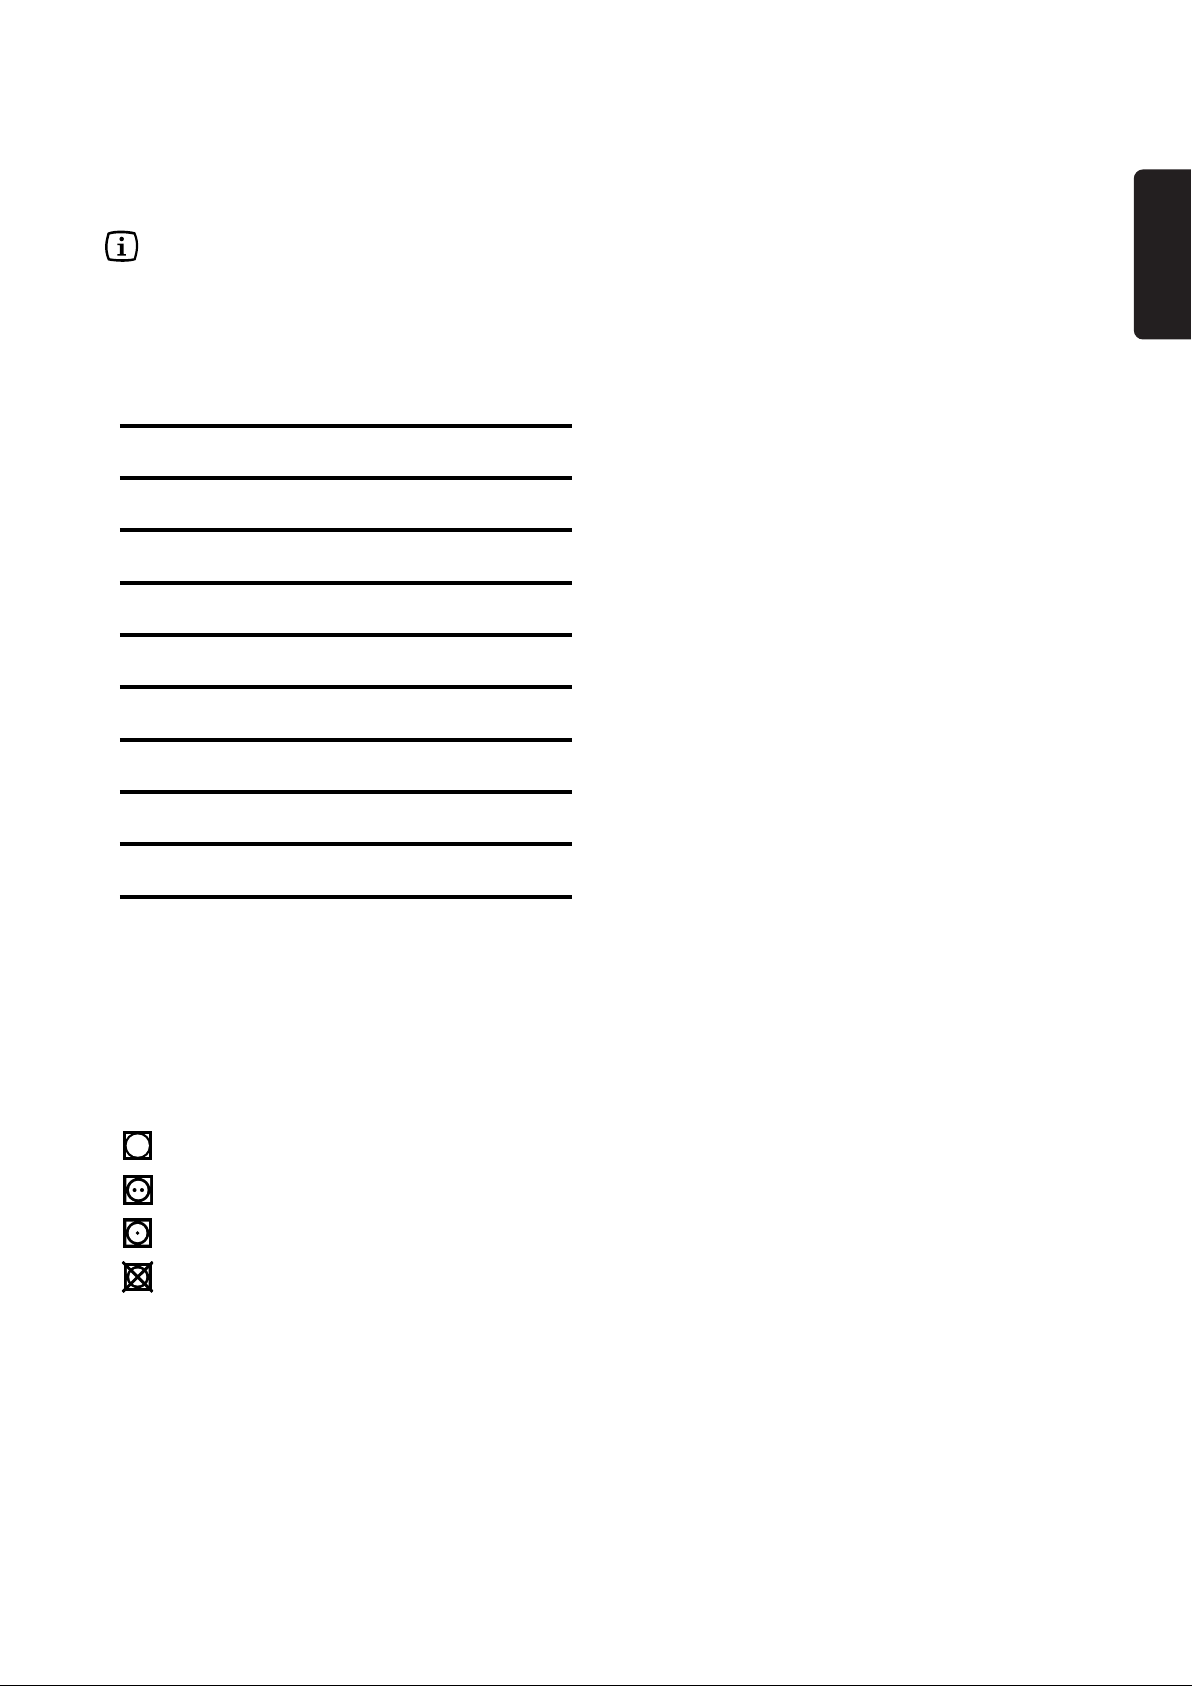
and a brush. In this case remove the filter in the
door opening as per picture (it can be positioned
with the tooth facing to the left or to the right).
Do not use the appliance without filters.
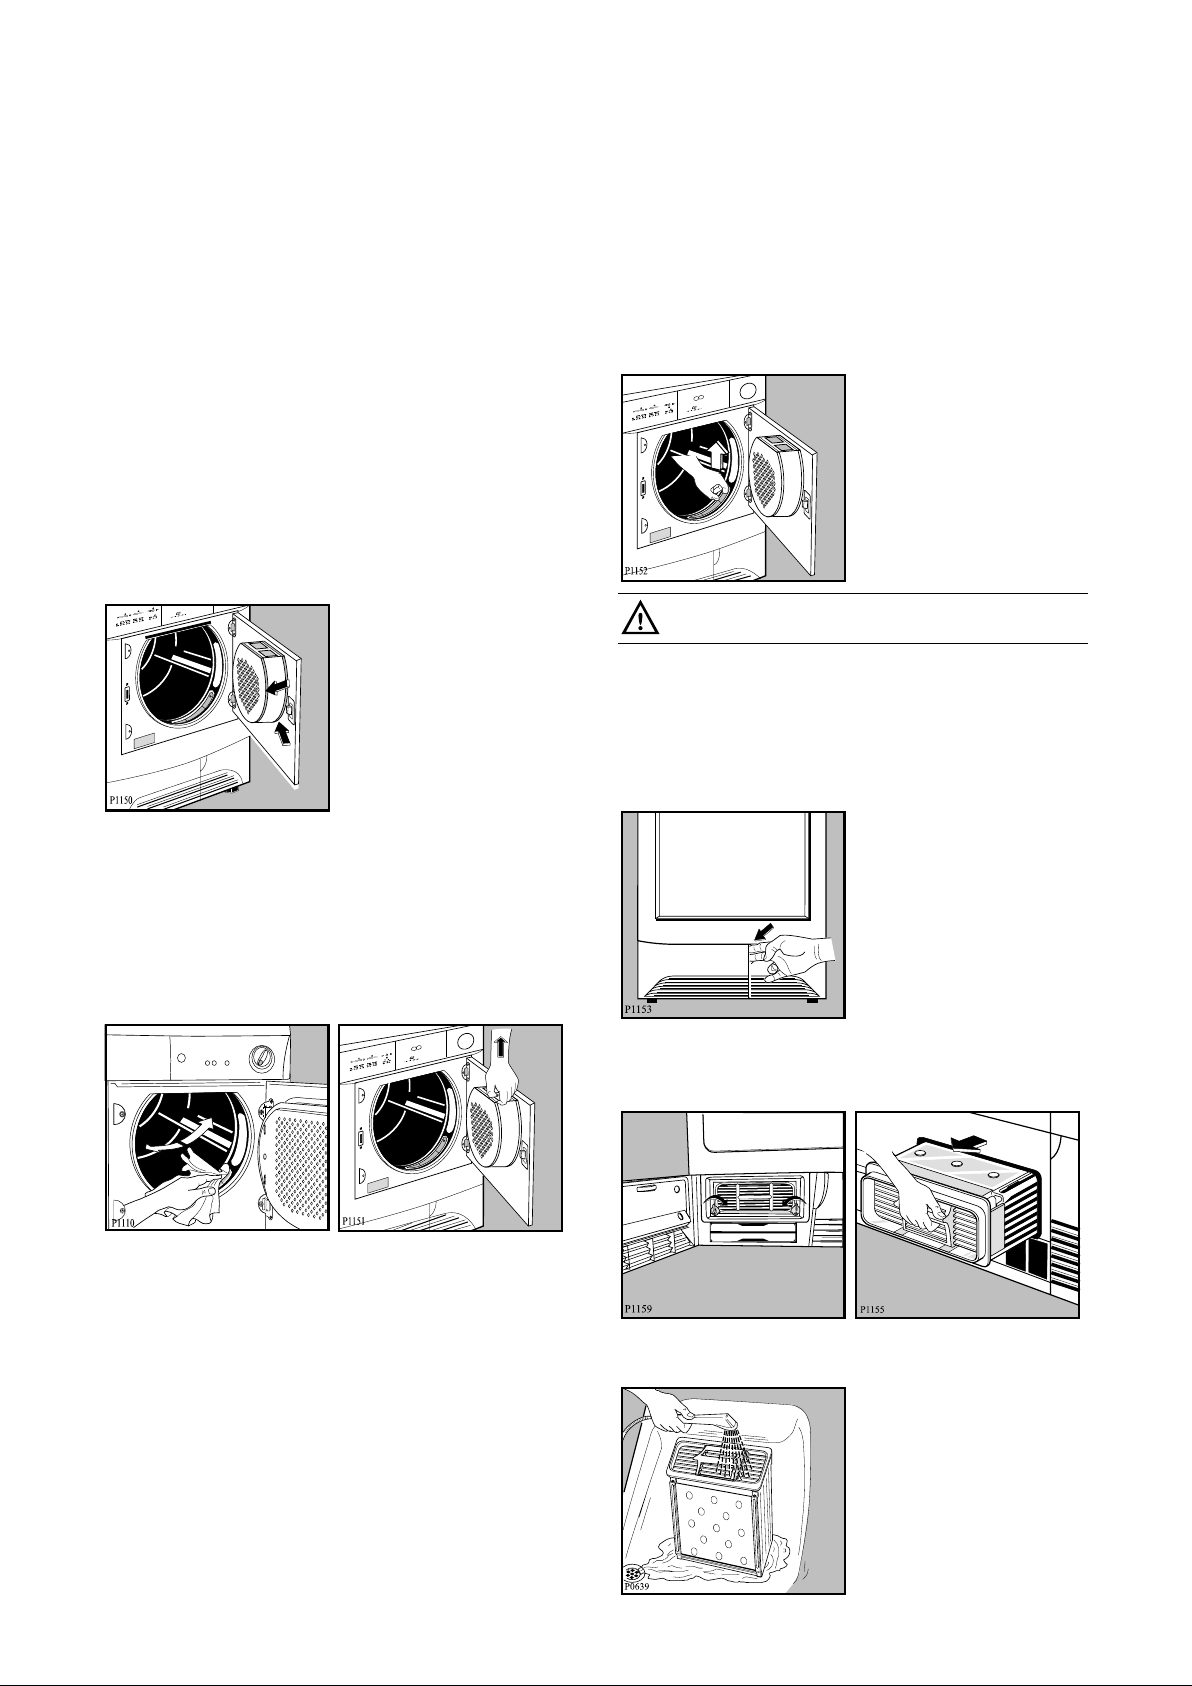
Cleaning the condenser unit
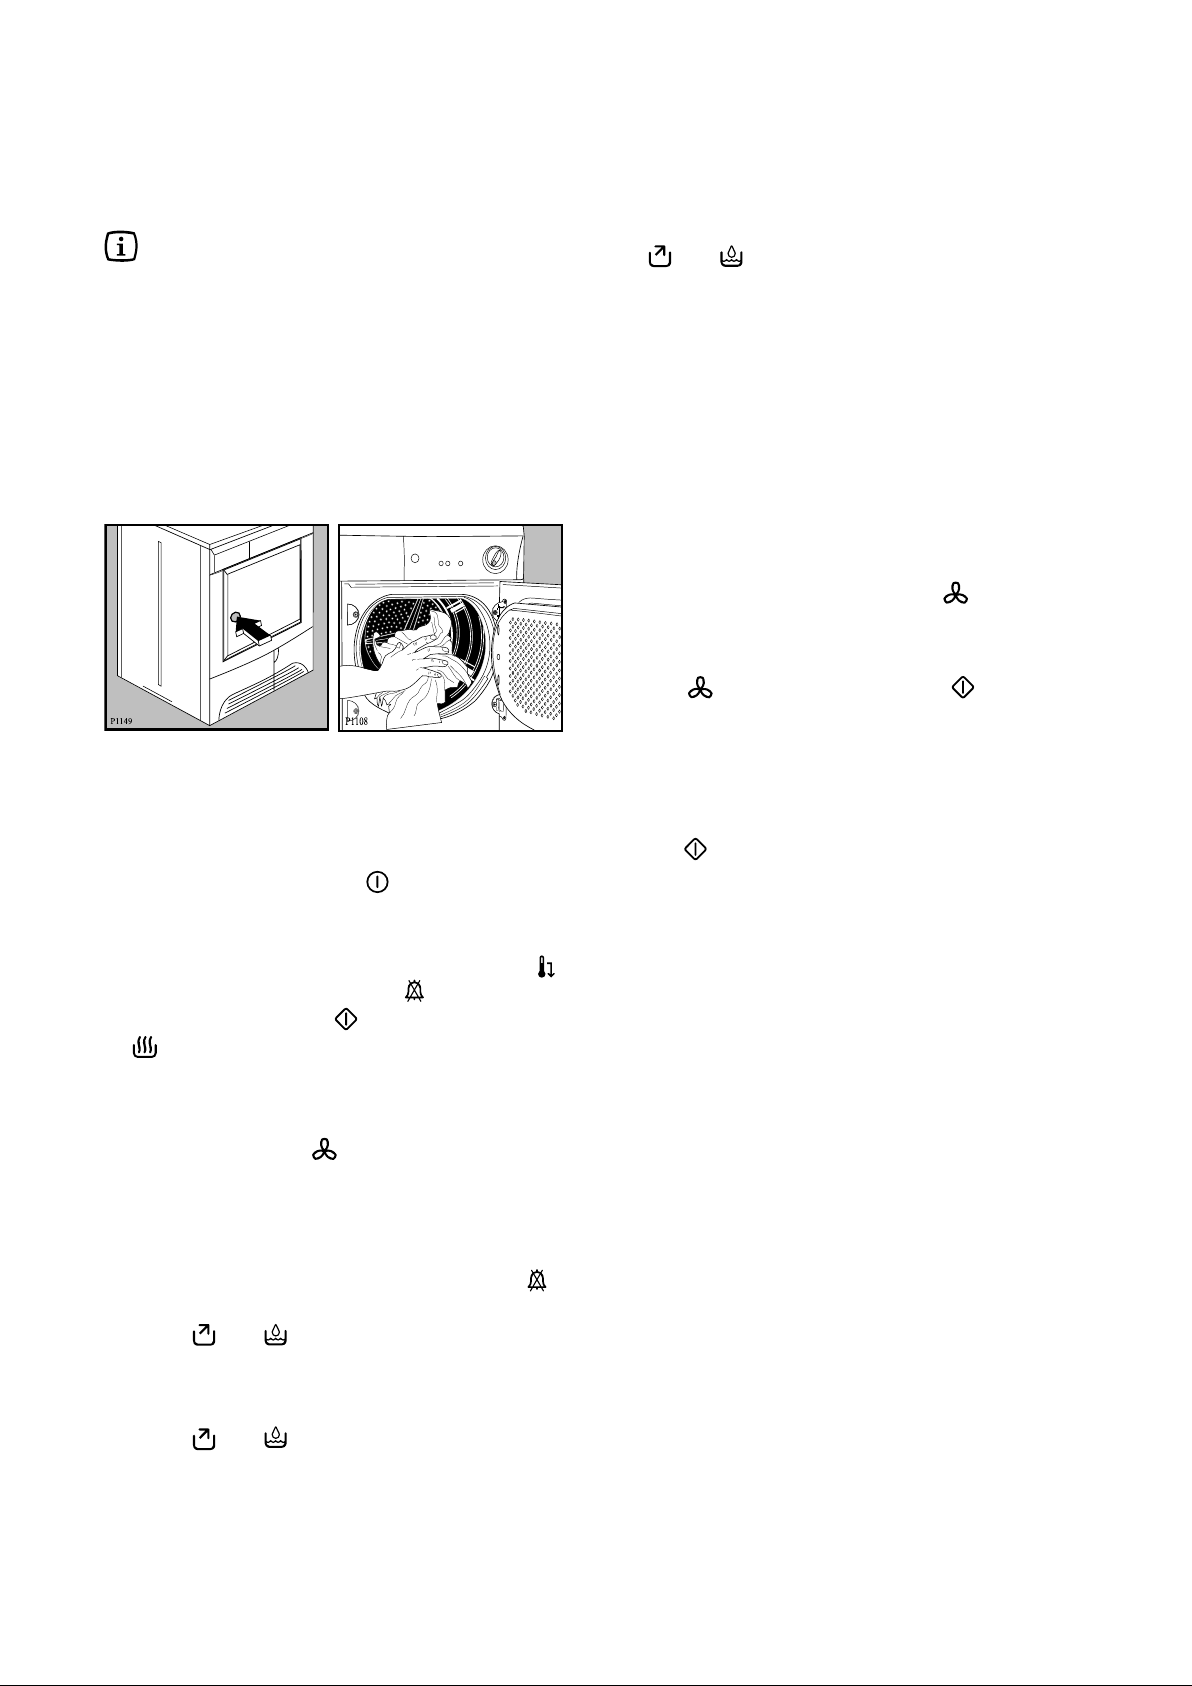
Clean the air condenser periodically, 3 or 4 times a
year depending on how frequently the dryer is used.
The condenser is situated at the lower part of the
cabinet behind a small door. To open the door,
push the catch as per picture.
Cleaning the filters
Your dryer will only function well if the filters are
clean.
The filters collect all the fluff which accumulates
during drying and they must therefore be cleaned
at the end of each programme, before removing the
laundry, with a damp cloth.
The filter in the inner door must be removed for
cleaning.
Do not be alarmed by the amount of fluff. It is not
due to excessive wear caused by the dryer. All
fabric loses fluff when drying but it goes un-noticed
in the air. In a tumble dryer it simply collects in the
filter.
To pull out the condenser, first turn the two red
stops downwards and then remove the condenser
unit holding it at the handle.
Clean it with a brush and rinse it under the shower if
necessary.
12
Page 13
Also clean the outside, removing all fluff.
Clean the rubber seal round the condenser cabinet
and in the inner part of the small door with a damp
cloth.
Re-fit the condenser, turn the red stops upwards
and close the door.
Important! Do not use pointed objects or utensils to
clean the spaces between the plates, as this could
damage the condenser and make it permeable.
Do not use this appliance if the condenser
has not been fitted.
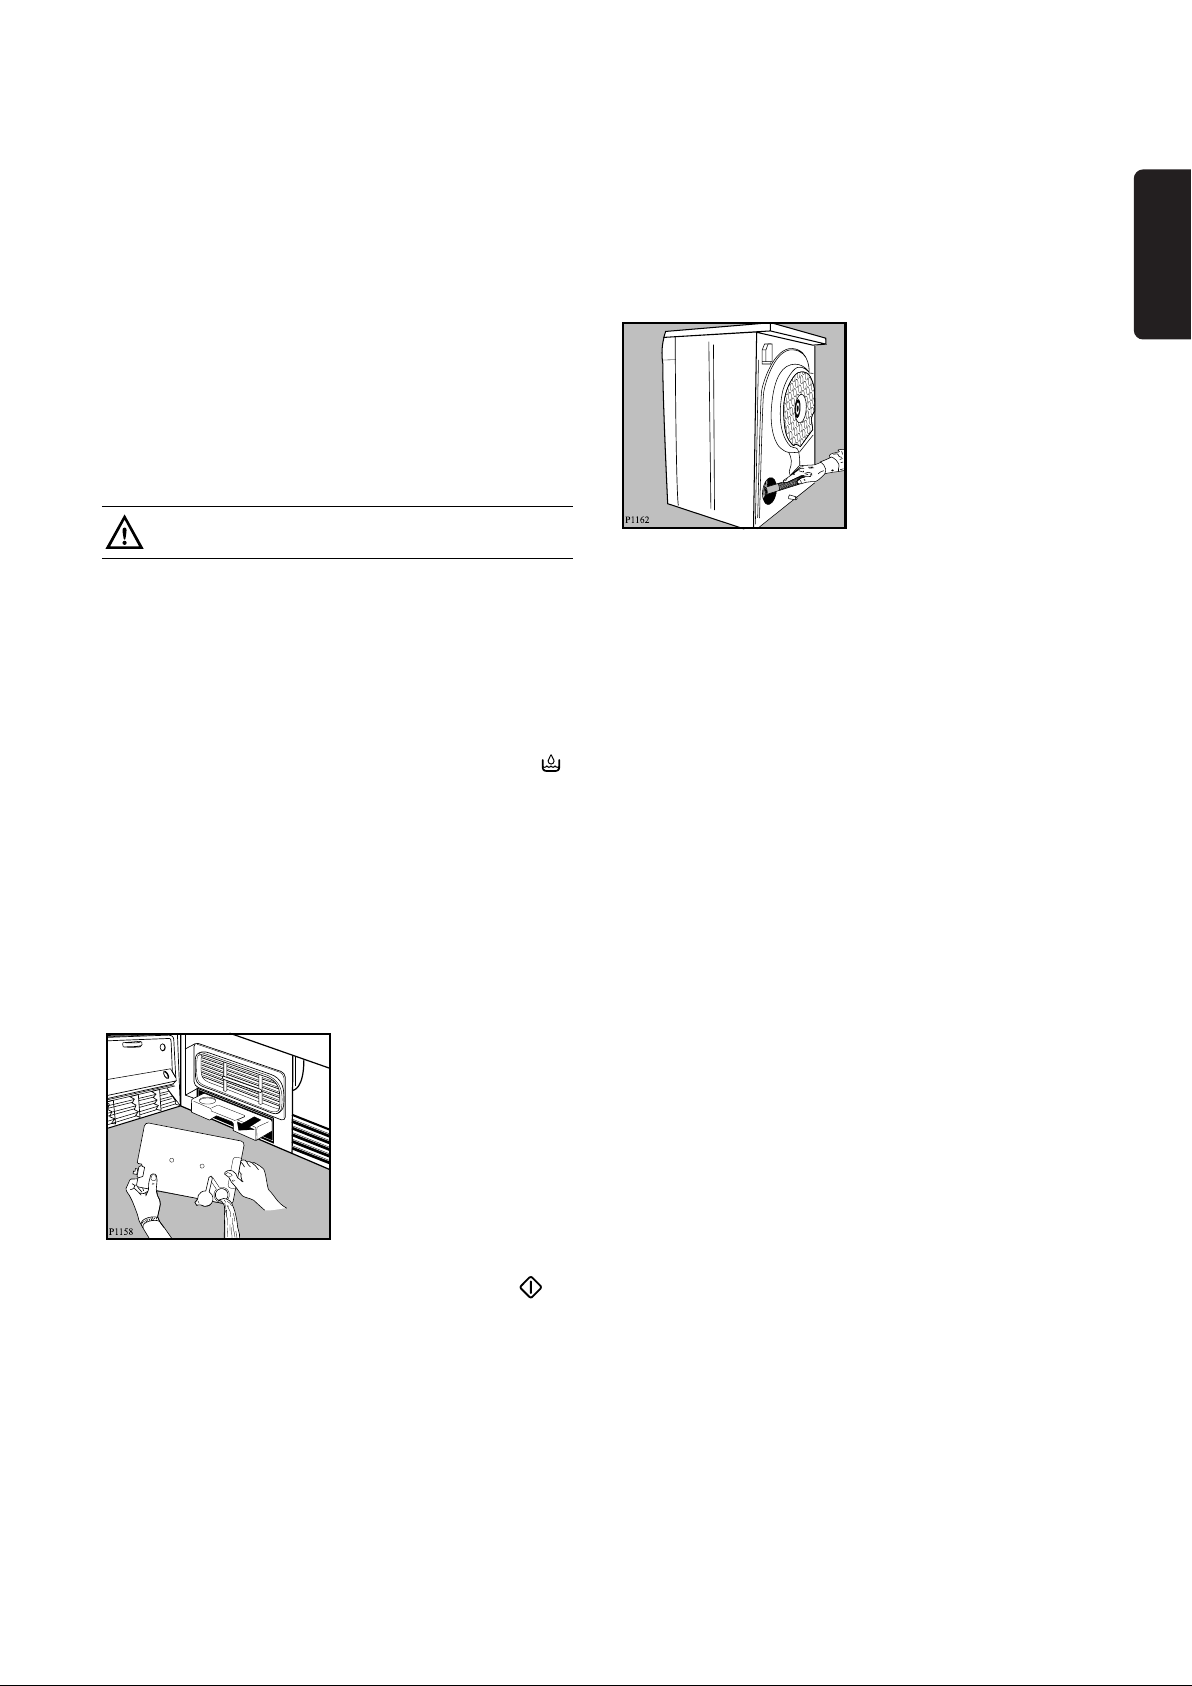
Cleaning the air intake grille
Using a vacuum cleaner remove the fluff from the air
intake grille at the back of the appliance.
Cleaning the drum
ENGLISH
Emptying the water reservoir
Water extracted from the laundry condenses inside
the machine and is collected in a reservoir.
The reservoir must be emptied after each drying
cycle to ensure efficient operation when the
machine is next used.
If this is not done a safety device trips: pilot light
on the control panel comes on and the programme
stops, leaving the laundry damp. The buzzer will
sound for 1 minute.
The reservoir can be emptied even in the middle of
a programme.
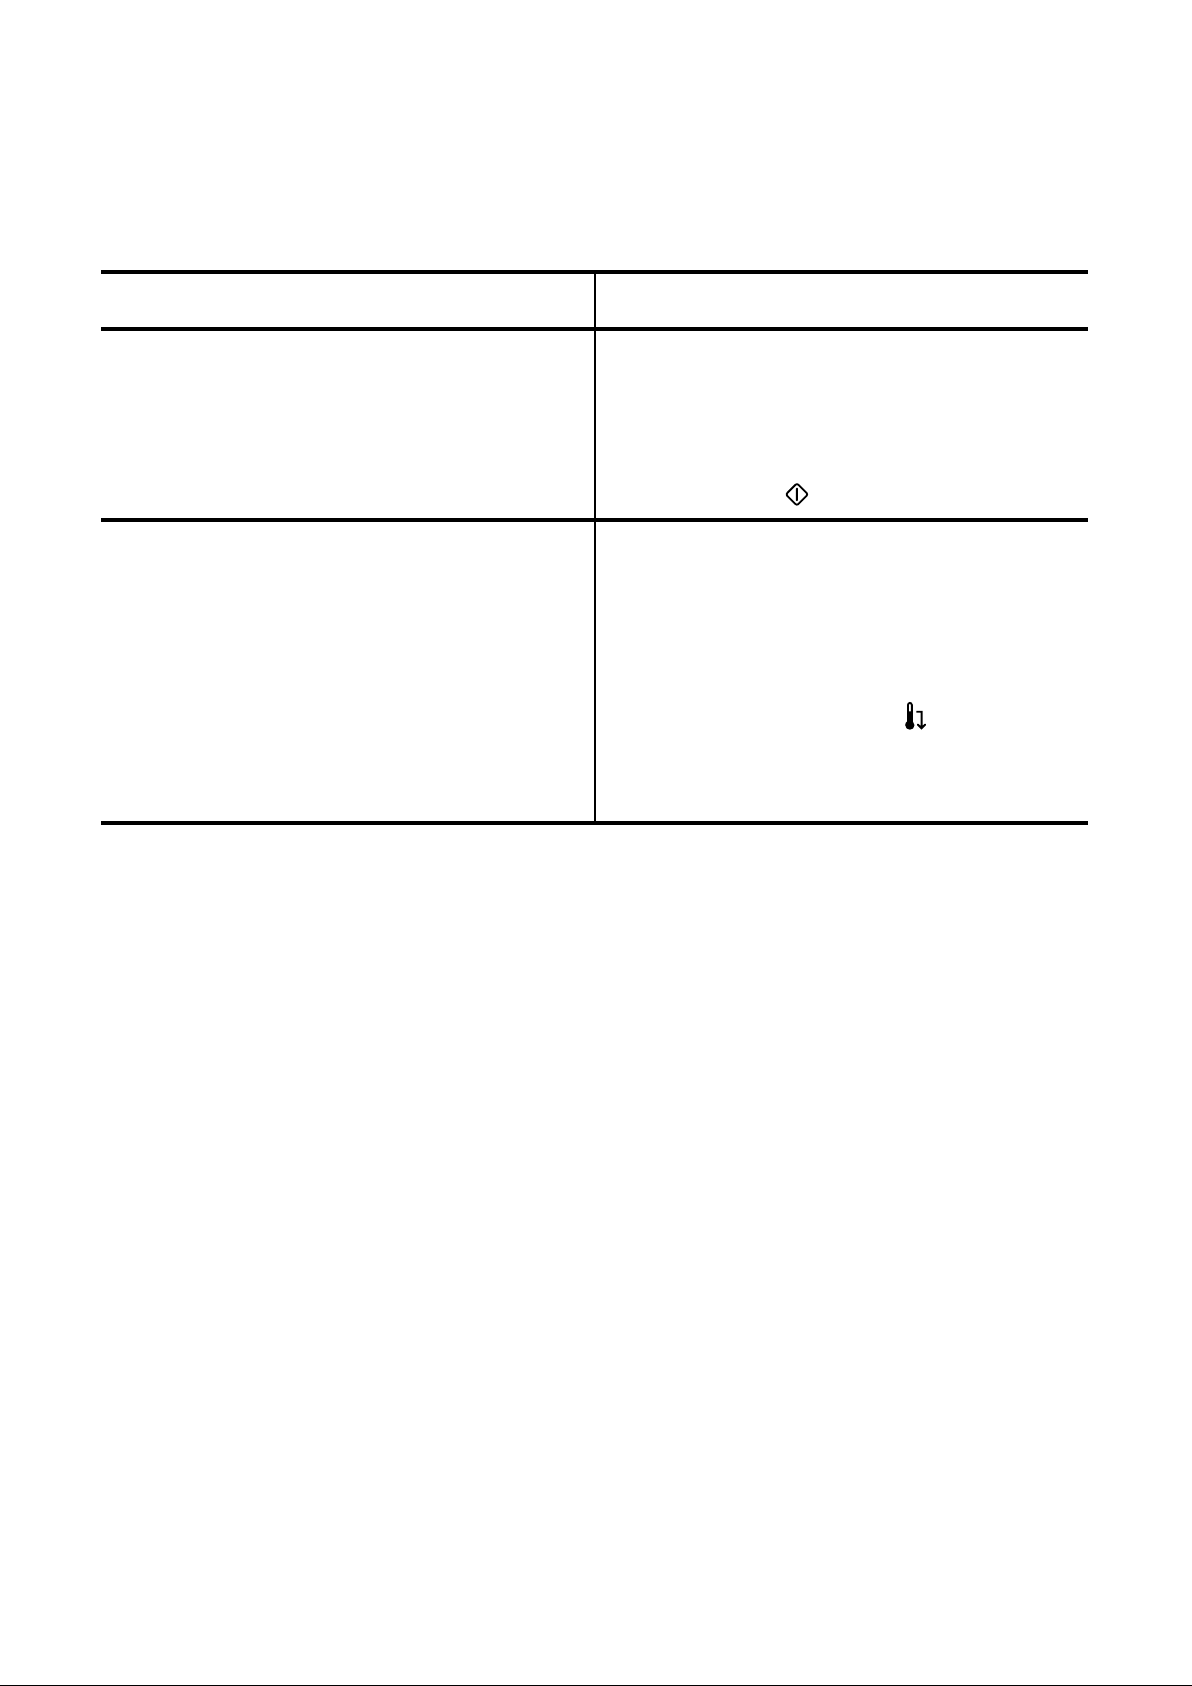
Proceed as follows:
•Pull out the reservoir
•Open the small cover and let water flow down
•
Re-fit the reservoir
When your laundry does not reach the desired
degree of dryness, in other words, when it turns out
either too dry or too damp, we advise you to clean
the inside of the drum with a cloth soaked with
vinegar.
This will eliminate the slight patina that has formed
in the drum (due to residues of detergent and
softeners used in the washing, and to the lime
contained in the water), which prevents the probes
from detecting the correct degree of dryness.
The reservoir must be re-inserted correctly.
After inserting the reservoir the START-button
has to be depressed again to allow the programme
to continue.
Handy tip: The condensed water may be used in a
steam iron or to top up a battery, etc. In this case it
must be filtered (e.g. through a coffee filter).
13
Page 14
Something not working?
Before contacting your local Service Centre, please make the following checks:
Problem Possible cause
• The dryer does not work:
• The dryer does not dry properly:
If, after the above checks, there is still a fault, call
your local Service Centre.
Please make sure you give the model and serial
number of the appliance.
• The door(s) is(have) open.
• The plug is not fitted into the wall socket.
• There is no electricity supply from the wall socket.
• The selector dial is not set correctly.
• The water reservoir is full or not correctly inserted.
• The start button has not been depressed.
• The filters are clogged.
• The condenser is clogged.
• The water reservoir is full.
• The selected cycle is not suitable for the laundry.
• Insufficient drying time.
• The laundry has not been spun properly.
• The low temperature function has been
selected.
• Excessive laundry load.
• The dryer is not correctly installed.
This information can be found on the rating plate
(see picture on page 4 ).
14
Page 15

Vázení zákazníci,
prosíme vás, abyste si pozorn™ precetli tento návod a zam™rili svou pozornost predevsím na bezpecnostní
predpisy uvedené na prvních stránkách. Doporucujeme návod uschovat, abyste do n™ho mohli nahlédnout i
kdykoli v budoucnosti, a eventuáln™ ho predat novému majiteli v prípad™ prodeje tohoto spotrebice.
Skody zp√sobené pri doprav™
Když spotřebič vybalíte, zkontrolujte, zda není poškozen. Jestliže máte nějaké pochybnosti, spotřebič
nepoužívejte a kontaktujte servisní středisko.
Symboly, použité u některých odstavců této příručky, mají následující význam:
Trojúhelníkovou znackou anebo upozorñovacími vyrazy (Pozor! nebo Upozorn™ní!) jsou vyznaceny
pokyny zvlást d√lezité pro vasi bezpecnost a pro správné fungování prístroje. Prosíme vás o jejich
dodrzování.
Informace s tímto symbolem slouzí jako dodatek k pokyn√m pro praktické pouzití prístroje.
Tulipán oznacuje rady a doporucení k hospodárnému vyuzívání spotrebice s ohledem na zivotní
prostredí.
Náš příspěvek k ochraně životního prostředí:
používáme recyklovaný papír.
ČESKY
Obsah
Důležité informace
Likvidace
.........................................................16
Rady pro ochranu zivotního
prostredí
..........................................................17
Technická specifikace
Popis spotřebiče
Instalace
• Rozbalení ........................................................18
• Umístění..........................................................18
• Elektrické zapojení..........................................18
• Instalace spotřebičů nad sebou .....................18
• Změna směru otevírání dvířek ........................18
•Pripojení vypoust™cí hadice............................19
..........................................................18
......................................16
...............................17
..........................................17
Použití ..............................................................20
• Ovládací panel ................................................20
• Tabulka programů...........................................22
• Pracovní postup..............................................23
• Užitečné rady..................................................24
Čištění a údržba...........................................25
•Vn™jsí cist™ní...................................................25
• Cist™ní dvírek ..................................................25
• Cist™ní filtr√ .....................................................25
• Čištění kondenzatóru......................................25
• Vyprazdňování sběrné nádoby .......................26
• Cist™ní vnitrní cásti bubnu ..............................26
• Cist™ní zadní mrízky........................................26
Když něco nefunguje správně ...............27
Záruka, servis a náhradní díly
................28
15
Page 16

Důležité informace
Následující upozornění poskytujeme v zájmu celkové bezpečnosti. Před instalací spotřebiče a jeho používáním si je
musíte pečlivě přečíst.
Instalace
• Jsou-li potrebné úpravy existujícího domácího
rozvodu elektrického proudu, je potrebné obrátit
se na specializovaného technika.
• Po instalaci zarízení se ujist™te, ze není postaveno
na sítovém kabelu.
• Jestlize je zarízení umíst™no na podlaze pokryté
kobercem, je potrebné nastavit nozky tak, aby
bylo umozn™no volné proud™ní vzduchu mezi
spotrebicem a podlahou.
Pouzití
• Toto zarízení je urceno pro pouzití v domácnosti.
Vyrobce neodpovídá za skody, které by mohli
vzniknout nesprávnym pouzitím anebo jinym
pouzitím nez, pro které bylo zarízení vyrobeno.
• Po kazdém pouzití vytáhn™te zástrcku ze zásuvky.
• Nevkládejte do zarízení prádlo, které je pouze
odkapané.
• Nebezpecí vybuchu: v zarízení nesuste prádlo
chemicky znecist™né (napr. prádlo znecist™né
prostredky pro chemické cist™ní), protoze by
mohlo dojít k vybuchu. Zarízení pouzívejte pouze
na susení prádla vypraného ve vod™.
•Vzdycky zkontrolujte, zda se v kapsách prádla
urceného na vysusení nenacházejí zapalovace
cigaret.
• Do zarízení nevkládejte tenisky, protoze by se
mohli zachytit mezi dvírky a bubnem a zablokovat
ho.
• Po ukoncení susení nechejte pootevrená dvírka,
aby bylo umozn™né vyv™trání zarízení.
• Filtry musí byt vycist™ny po kazdém pouzití.
V rámci prevence pozáru nepouzívejte zarízení
sposkozenymi filtry anebo bez filtr√.
• Nedovolte, aby se kolem zarízení nahromadilo
chmyrí.
Bezpečnost obecně
• Je nebezpecné provád™t jakékoli úpravy
technickych vlastností zarízení.
• Nepokousejte se sami opravovat zarízení. Opravy
vykonané nezkusenymi osobami mohou vést ke
vzniku skod. V prípad™ potreby se pokazdé
obratte na autorizované servisní stredisko Zanussi
a vyzadujte pouzití originálních náhradních díl√.
Bezpecnost d™tí
•D™ti neznají nebezpecí spojená s elektrickymi
spotrebici. B™hem fungování prístroje je nutno d™ti
hlídat a nenechat je hrát se spotrebicem - mohlo
by se stát, ze se do susicky zavrou.
• Cásti obalu (fólie, polystyren) mohou byt pro d™ti
nebezpecné. Nebezpecí udusení! Drzte je proto z
dosahu d™tí.
• Zajist™te, aby se d™ti ani malá domácí zvírata
nedostaly do bubnu susicky.
•V prípad™ vyrazení prístroje do odpadu vytáhn™te
zástrcku z el. sít™, odrízn™te prívodní kabel a kabel
i se zástrckou vyhodte. Poskodte zavírací
mechanismus dvírek, aby se hrající si d™ti nemohly
v susicce zavrít a z√stat v ní uv™zn™né.
Likvidace
Obalové materiály
Materiály oznacené symbolem jsou
recyklovatelné.
>PE<=polyethylen
>PS<=polystyren
>PP<=polypropylen
K jejich druhotnému vyuzití musí byt tyto materiály
vhozeny do príslusnych kontejner√.
Prístroj
Pri vyrazení vaseho starého prístroje pouzijte jen
autorizované skládky. Pomozte nám udrzet vase
m™sto cisté!
16
Page 17

Rady pro ochranu zivotního prostredí
Doporucujeme vám rídit se pri pouzívání zarízení
následujícími pokyny, které vám umozní usetrit
elektrickou energii a chránit zivotní prostredí:
•Pred pouzitím zarízení zcela naplñte buben. Malé
nápln™ jsou neekonomické.
•Pred susením prádlo rádn™ vyzdímejte. Pokles
spotreby elektrické energie a zkrácení doby susení
je prímo úm™rny zvysení rychlosti otácení pri
odstredování.
• Doporucuje se nesusit prádlo prílis dlouho, aby
nedoslo ke vzniku záhyb√ a k nadm™rné spotreb™
elektrické energie. Zvolte druh programu a dobu
susení podle druhu pouzitého prádla a
pozadovaného stupn™ vysusení.
• Aby bylo mozné zcela vyuzít maximální kapacitu
zarízení, je mozné susit spolu prádlo “suché
k uskladn™ní“ a prádlo “suché k zehlení”. Zvolte
program pro susení “suché k zehlení” a po jeho
ukoncení vyberte príslusnou cást prádla. Po
následné volb™ doby susení vhodné pro prádlo
“suché k uskladn™ní” pokracujte v susení
• Po kazdém cyklu susení d√sledn™ vycist™te filtry.
Takhle osetrená susicka bude vykazovat mensí
spotrebu elektrické energie.
• Zabezpecte dokonalé v™trání pracovního prostoru.
Teplota prostredí v okolí susicky b™hem její
cinnosti by nem™la prekrocit +35 °C.
Technická specifikace
ROZMĚRY Výška 85 cm
Šířka 60 cm
Hloubka 60 cm
NAPÁJECÍ NAPĚTÍ A FREKVENCE 220-230V/50Hz
MAX. INSTALOVANÝ VÝKON 2200 W
JIŠTĚNÍ 10 A
ČESKY
MAXIMÁLNÍ DOPORUČENÁ NÁPLŇ Bavlna a len 5 kg
Syntetické tkaniny 2,5 kg
SPOTŘEBA Bavlna a len 3,64 kWh (5 kg suché k uskladnění)
Syntetické tkaniny 3 kWh (5 kg suché k žehlení)
Syntetické tkaniny 1,4 kWh (5 kg suché k uskladnění)
HLUČNOST 64 db(A)
Tento spotřebič odpovídá následujícím předpisům EEC:
73/23/EEC z 19.2.73 - Předpis ohledně nízkého napětí.
89/336/EEC ze 3.5.89 - Předpis o elektromagnetické kompatibilitě.
Popis spotrebice
1 Pracovní deska
2 Tabulka program√
3 Ovládací panel
4 Filtry
5 Typovystítek
6 Kondenzátor
7Sb™rná nádoba
8 Nastavitelné nozky
17
Page 18

Instalace
Upozorn™ní!
Rozbalení
Pred pouzitím zarízení stáhn™te polyetylenovy
sácek obsahující vyplñovy kus z polystyrénu.
V prípad™ následné prepravy, musí byt
zarízení prepravováno ve vertikální poloze.
Elektrické zapojení
Prístroj m√ze fungovat pri 220-230 V a 50 Hz.
Ov™rte si, ze vás domácí elektricky rozvod unese
maximální zatízení spotrebice (2,2 kW) plus prípadné
jiné soucasn™ zapnuté domácí elektrospotrebice.
Spotrebic zapojte na zásuvku s uzemn™ním.
Vyrobce se zríká jakékoli zodpov™dnosti za
skody nebo poran™ní způsobená nedodrzením
vyse uvedeného bezpecnostního predpisu.
Kdybyste potrebovali vym™nit prívodní kabel,
vym™na musí byt provedena nasím
technickym servisem.
D√lezité: Prívodní kabel musí z√stat prístupny i
po instalaci prístroje.
Instalace spotřebičů nad sebou
U vaseho prodejce najdete speciální soupravu, která
vám umozní instalaci susicky nad pracku s predním
pln™ním s hloubkou v rozmezí od 48 do 60 cm.
Umíst™ní
Z praktického hlediska je pro pouzití susicky
vhodné, aby se nacházela v blízkosti pracky.
Pro její správnou cinnost je potrebné, aby bylo okolí
udrzováno v cistém stavu (zbaveno prachu a
textilních vláken).
Musí byt zabezpeceno také volné proud™ní vzduchu
kolem susicky. Za tímto úcelem musí nasávací
mrízky na prední i na zadní stran™ zarízení z√stat
volné.
Zarízení m√ze byt ulozeno na libovolny druh ploché
podlahy. Musí se nacházet v dokonalé horizontální
poloze (pri kontrole m√zete pouzít vodováhu).
Prostrednictvím vyskov™ nastavitelnych nozek je
mozné vykompenzovat nerovnosti a sklon podlahy.
Neodstrañujte nozky zarízení. Nesnizujte
vzdálenost zarízení od podlahy pouzitím koberc√
anebo vysokych koberc√. Mohlo by to negativn™
ovlivnit cinnost zarízení.
D√lezitá informace!
Horky vzduch vypoust™ny ze susicky m√ze
dosahovat teploty az 60 °C. Zarízení proto nesmí
byt instalováno na podlaze, která nesnásí vysoké
teploty.
Pro správnou cinnost zarízení teplota prostredí
v jeho blízkosti nesmí byt nizsí nez +5 °C a vyssí
nez +35 °C, a to i v prípad™, kdy zarízení není
v provozu.
Pri montázi presn™ dodrzujte pokyny pro montáz,
které jsou soucástí soupravy.
Zm™na sm™ru otevírání dvírek
V prípad™ potreby zm™nit sm™r otevírání dvírek se
obratte na autorizované servisní stredisko Zanussi.
18
Page 19

Připojení vypouštěcí hadice
Jestliže je v blízkosti výlevka nebo odpad, je možné
zkondenzovanou vodu vypouštět přímo hadicí, která
je k dostání na trhu.
Aby bylo možné hadici připojit na spotřebič,
postupujte následovně:
• Sejměte sponku (A).
• Vyjměte zátku (B).
• Nasuňte vypouštěcí hadici (C).
• Hadici (C) připevněte ke spotřebiči svorkou (A).
Jestliže je spotřebič postaven na automatickou
pračku, zkondenzovaná voda se může vypouštět
hadicí tak, jak ukazuje obrázek, ale je nutné, aby
hadice (C) směřovala dolů.
ČESKY
19
Page 20

Použití
Ovládací panel
1Tabulka program√
Pom√ze vám pri volb™ správného programu susení.
2 Hlavní provozní kontrolka
Rozsvítí se po zapnutí zarízení (stlacením tlacítka
zapnuto/vypnuto) a zhasne po uvoln™ní tohoto
tlacítka.
3 Tlacítko zapnuto/vypnuto
Toto tlacítko slouzí k zapnutí susicky. Vypnutí susicky
se vykonává po ukoncení programu susení, a to tak,
ze se stisknuté tlacítko uvolní op™tovnym stlacením.
4 Tlacítko nízké teploty
Po stlacení tohoto tlacítka bude susení provád™no
pri nizsí teplot™. Tato funkce slouzí zejména pro
susení choulostivého prádla.
Její aktivace je provázena zapnutím príslusné
kontrolky. Tato funkce m√ze byt pouzita také pri
casov™ ohraniceném susení.
Je-li uvedená funkce aktivována, bude susící vykon
1300 W namísto 2000 W. V prípad™, kdyz toto
tlacítko není stlaceno, susení bude provád™no pri
plném vykonu (2000 W).
5 Tlacítko vyloucení akustické
signalizace
Za normálních okolností, kdyz dojde ke stlacení
n™kterého z tlacítek b™hem fáze zabezpecující
zabrán™ní krcení suseného prádla, po ukoncení
programu je napln™ní sb™rné nádoby signalizováno
pomocí bzucáku. Stlacení tohoto tlacítka pri volb™
programu vám umozní vyloucení cinnosti bzucáku
b™hem fáze zabezpecující zabrán™ní krcení.
Vyloucení bzucáku je signalizováno prostrednictvím
príslusné kontrolky.
6 Tlacítko start
Stlacení tohoto tlacítka na dobu priblizn™ 2 sekundy
zp√sobí, v prípad™, ze byl zvoleny program susení,
start susicky.
Vprípad™, ze dojde k otevrení hlavních dvírek na
zarízení anebo k otevrení malych dvírek
nacházejících se ve spodní cásti, b™hem cinnosti
zarízení, op™tovné uvedení zarízení do cinnosti je
mozné pouze po op™tovném stlacení tohoto
tlacítka. Program bude pokracovat v susení od
bodu, ve kterém doslo k jeho prerusení.
Toto tlacítko musí byt stlaceno také po vyskytu
poruchy napájení a po op™tovném ulození sb™rné
nádoby na své místo, byla li vyprázdn™na b™hem
programu.
Vobou prípadech svítí (zálezí na aktuální fázi
programu) bliká príslusná kontrolka anebo ,
upozorñující na potrebu op™tovného stlacení tlacítka
start.
7 Kontrolky indikátoru fáze
Tyto kontrolky slouzí k indikaci jednotlivych fází
cinnosti zarízení b™hem programu susení.
Kontrolka “Susení”
Tato kontrolka poukazuje na to, ze zarízení se
nachází ve fáze susení.
Kontrolka “Chlazení”
Tato kontrolka poukazuje nato, ze zarízení se
nachází ve fáze chlazení. Po ukoncení susení
následuje fáze chlazení prádla trvající 10 minut.
Blikající kontrolka anebo upozorñuje na
potrebu op™tovného stlacení tlacítka Start.
20
Page 21

Kontrolka “Ukoncení programu”
Tato kontrolka bliká b™hem fáze chlazení a b™hem
fáze zabezpecující zabrán™ní krcení.
Kontrolka “Sb™rná nádoba plná”
Tato kontrolka bliká po napln™ní sb™rné nádoby.
8 Volic program√/doby susení
Umozñuje volbu mezi elektronicky rízenym susením
anebo casov™ ohranicenym susením.
Otácejte knoflíkem az do bodu odpovídajícího
pozadovanému programu anebo pozadované dob™
susení.
Elektronické susení (automatické)
V tomto rezimu je cinnost zarízení ovládána na
základ™ stupn™ vlhkosti prádla zjistovaného
prostrednictvím príslusnych sond.
Volba programu se vykonává podle druhu prádla a
pozadovaného stupn™ vysusení.
Trvání sušení
M√ze byt pouzito, dle potreby, na dosusení prádla.
Pri susení bavln™ného prádla anebo prádla ze
syntetickych vláken zvolte program s dobou susení
90 anebo 60 minut.
Vynulování aktuálního programu se vykonává
pootocením volice program√ az do bodu “0”.
Po ukoncení susení, pred vyjmutím vysuseného
prádla je treba pretocit volic program√ az do polohy
“0”.
ČESKY
21
Page 22

Tabulka program√
Elektronické sušení
Druh prádla
Bavlna a len
Syntetika
Kojenecké oblecení
Kabáty, kalhoty, kostymy,
kosile.
(*) Podle norem IEC 61121
• Cyklus Baby “K” je speciální program urceny na susení kojeneckého oblecení “suchého k oblecení”.
• Chemické cist™ní “L” je urceno na cist™ní a provzdusn™ní od™v√ oznacenych “cistit chemicky” doma, ve
vasí bubnové susicce, s pouzitím specielních produkt√, dostupnych na trhu.
Pozadovany stupeñ
vysusení
extra suché
suché k oblecení
suché k uskladn™ní
lehce vlhké
suché k zehlení
vlhké k strojovému zehlení
extra suché
suché k uskladn™ní
suché k zehlení
Cyklus Baby
Chemické cist™ní
Maximální
1 kg (10 kojeneckych
1- 4 kus√ od™vu
náplñ
5 kg
5 kg
5 kg
5 kg
5 kg
5 kg
2.5 kg
2.5 kg
2.5 kg
oblecení)
(1)
Program
A
B
C(*)
D
E(*)
F
G
H(*)
J
K
L
Trvání susení
Druh prádla
Bavlna
Bavlna
Syntetika
(1) Nikdy nepreplñujte buben (nevkládejte do n™j napr. prosívané prikryvky).
Doba susení se m™ní v závislosti od:
• Druhu prádla
• Velikosti nápln™
• Stupn™ vlhkosti pred susením
Doba susení
90 min
60 min
30 min
Maximální
náplñ
5 kg
5 kg
2.5 kg
(1)
Poloha
volice program√
90’
60’
30’
Provzdusn™ní a ochlazení
Tato poloha volice program√ slouzí k provzdusn™ní prádla (napr. pri odstrañování silného zápachu naftalínu).
Velikost náplně
Prádlo není nutné vážit, když se dodrží následující pokyny:
• Bavlna, len: plný buben, ale nepřetěžovat.
• Syntetika: půl bubnu.
• Obzvláště jemné tkaniny: buben nenaplňujte více jak do 1/3.
22
Page 23

Pracovní postup
Pred prvním uvedením vasí bubnové susicky do
provozu vám doporucujeme umístit dovnitr n™kolik
vlhkych kus√ látky a susit je po dobu priblizn™ 30
minut.
V nové susicce by se totiz mohl nacházet prach.
Kontrolka a strídav™ svítí a bliká a hlavní
provozní kontrolka z√stává rozsvícena.
Otocte volic program√ do polohy “0”. Dojde k
vypnutí kontrolek a .
Op™tovn™ stlacte tlacítko zapnuto/vypnuto
(dojde k zhasnutí provozní kontrolky) a
bezprostredn™ poté vyjm™te prádlo.
Susení
1. Zapojte zarízení.
2. Otevrete dvírka.
3. Naplñte buben prádlem a rovnom™rn™ jej
rozlozte.
4. Zavrete dvírka. Dbejte pritom, aby mezi dvírky a
filtrem nez√stal zablokován n™jaky kus od™vu.
5. Stiskn™te tlacítko zapnuto/vypnuto : provozní
kontrolka se rozsvítí
6. Zvolte príslusny program anebo pozadovanou
dobu susení.
7. Dle potreby stlacte tlacítko nízké teploty
a/anebo tlacítko vyloucení akustické signalizace
.
8. Stlacte tlacítko Start na dobu 2 sekund:
dojde k rozsvícení kontrolky a zahájení
susení.
B™hem susení se buben otácí strídav™ v obou
sm™rech.
Vsechny programy susení koncí 10 minutovou
fází ochlazování (kontrolka se rozsvítí).
Po ukoncení této fáze m√zete prádlo vybrat.
9. V prípad™, ze po ukoncení cyklu nedojde
k vyjmutí prádla, susicka vykoná fázi slouzící
k zabrán™ní krcení prádla (trvání: maximáln™ 30
minut).
Kazdych 10 sekund dochází k zapnutí bzucáku
(není-li stlaceno tlacítko jeho vyloucení).
Kontrolka a strídav™ svíti a bliká.
Vprípad™, ze nevyjmete prádlo, susicka se
automaticky zastaví na konci fáze slouzící
k zabrán™ní krcení.
Po kazdém pouzití
•Vycist™te filtry (viz strana 25)
• Vyprázdn™te sb™rnou nádobu (viz strana 26)
D√lezitá informace!
Kdyz dojde k zastavení programu susení jest™ pred
jeho ukoncením, doporucujeme vám pootocit volic
program√ do polohy odpovídající chladící fázi a
pred vyjmutím prádla vyckat ukoncení této fáze.
Tímto zp√sobem dojde k prerusení ohrevu vzduchu
uvnitr zarízení. Tato volba se vykonává pootocením
volice do polohy “0” a pak do polohy a
následním stlacením tlacítka Start .
Zm™na programu
Pri zm™n™ aktuálního programu susení je treba
nejdríve pootocit volic program√ do polohy “0”.
Následn™ je mozné zvolit novy program a stlacit
tlacítko Start .
ČESKY
23
Page 24

Užitečné rady
• Snažte se buben plnit na maximální kapacitu
spotřebiče, protože malé náplně jsou
neekonomické.Pro informaci, zde je seznam
průměrných hmotností některých běžných
položek prádla.
prostěradlo 700 - 1000 g
ubrus 400 - 500 g
utěrka 70 - 120 g
ubrousek 50 - 100 g
ručník 150 - 250 g
koupelový pláš 1000 - 1500 g
pánská košile 200 - 300 g
polštářový povlak 100 - 200 g
pánské pyžamo 400 - 500 g
dámská noční košile 200 - 250 g
• Nikdy nesušte v bubnové sušičce dále uvedené
prádlo: obzvláště choulostivé kusy jako záclony,
vlnu, hedvábí, tkaniny s kovovým dekorem,
nylonové punčocháče, objemné materiály, jako
jsou větrovky, prostěradla, prošívané přikrývky,
spací pytle, pérové prikryvky a jakékoli kusy,
které obsahují molitan nebo materiál podobný
pěnové gumě.
• Vždycky dodržujte pokyny obsažené na visačce
oděvů.
• Zkontrolujte visacky na prádle:
Najdete zde uvedeny dovoleny druh susení.
Jist™ vsak zde nenajdete informaci
poukazující na volbu vhodného druhu
teploty – normální anebo snízené.
• Snadno ošetřovatelné kusy prádla, např. košile,
by se měly před sušením krátce odstředit, (podle
nemačkavosti přibližně 30 sekund, nebo s použitím
speciálního programu krátkého odstřeování na
vaší automatické pračce).
• Pletené prádlo (pletené spodní prádlo) se může
během sušení mírně srazit. Prosím, prádlo tohoto
druhu nepřesušujte. Doporučuje se na srážlivost
pamatovat při nákupu prádla a koupit větší.
• Do vaší bubnové sušičky můžete vložit škrobené
prádlo. Aby však účinek škrobení byl dosažen,
zvolte si program "Suché pro žehlení". Aby nikde
nezůstaly zbytky škrobu, vytřete vnitřní buben po
sušení vlhkým hadrem a pak ho vytřete do
sucha.
• Aby nedocházelo k vytváření statického náboje
když je sušení u konce, použijte při praní aviváže
nebo prostředky na úpravu tkanin speciálně
určené pro sušení v bubnové sušičce.
• Když sušička ukončí sušení, prádlo vyjměte.
• Jestliže některé kusy prádla jsou po sušení stále
vlhké, nastavte si krátké dodatečné sušení,
nejméně 30 minut. To bude nutné zejména u
prádla s větším počtem vrstev látky (např. límce,
kapsy, a pod.).
normální sušení v sušičce (vysoká teplota)
jemné sušení v sušičce (nízká teplota)
nesušit v bubnové sušičce
• Zapněte povlaky polštářů a pokrývek, aby se do
nich nezamotaly malé kusy prádla. Uzavřete
stiskací knoflíky a patenty, zipy a háčky a
utáhněte řemínky a šňůry zástěr.
• Vytřite prádlo podle druhu a stupně
požadovaného vysušení.
• Nepřeplňujte sušičku. Předejdete tak mačkání a
uspoříte energii.
• Vyhýbejte se sušení tmavých oděvů se světlými,
chlupatými kusy jako jsou ručníky, protože by se
na ně nachytaly chlupy.
• Prádlo musí být před sušením řádně odstředěno.
24
Page 25

Čištění a údržba
Pred jakoukoli operací cist™ní anebo údrzby
zarízení je treba odpojit elektrické napájení.
Vn™jsí cist™ní
Ocist™te susicku zvencí prostrednictvím vody se
saponátem a d√kladn™ ji vytrete do sucha.
D√lezitá informace: pri susení nepouzívejte
alkohol, redidla anebo podobné produkty.
Cist™ní dvírek
Pravidelné cist™ní vnitrní cásti dvírek umozñuje
odstranit chmyrí z t™sn™ní filtru.
Dokonalé vycist™ní umozñuje správné susení.
Cist™ní filtr√
Nezbytnym predpokladem pro správnou cinnost
zarízení je dokonalé vycist™ní filtr√.
Filtry zachytávají chmyrí, které se ukládá uvnitr
susicky b™hem susení a proto je treba je odstranit
mokrym hadrem po ukoncení kazdého programu
susení a to jest™ pred vyjmutím prádla.
B™hem delsí doby se na filtrech m√ze vytvorit bíly
povlak zp√sobeny zbytky pracího prostredku
pouzitého v pracce. Jeho odstran™ní se provádí
kartácem, za pouzití teplé vody. Vyjmutí filtru
z dvírek se vykonává podle návodu na obrázku. Filtr
musí byt umíst™n tak, aby byl jazycek otocen nalevo
anebo napravo.
ČESKY
V zádném prípad™ nepouzívejte zarízení
bez filtr√.
Cist™ní kondenzátoru
Chmyrí z kondenzátoru odstrañujte pravideln™,
podle pouzití susicky a podle druhu suseného
prádla. Cist™ní by se m™lo provést pokazdé, kdy je
usazené chmyrí viditelné.
Kondenzátor se nachází ve predu, ve spodní cásti
zarízení, za ochrannymi dvírky.
Pri cist™ní je treba postupovat následovn™:
• otevrít dvírka stlacením vnitrního tlacítka, jak je
znázorn™no na obrázku;
Filtr nacházející se na vnitrní stran™ dvírek je treba
pred cist™ním vytáhnout.
Mnozství nahromad™ného chmyrí vás nesmí
prekvapit: v zádném prípad™ není d√sledkem
nadm™rného mechanického p√sobení susicky na
prádlo.
Ze vsech druh√ tkanin se b™hem susení uvolñuje
chmyrí, avsak v prípad™, kdyz tento proces probíhá
venku, je odváté v™trem. V susicce dochází k jejich
nahromad™ní ve filtru.
•otocit oba cervené disky sm™rem dovnitr;
25
Page 26

• vytáhnout kondenzátor prostrednictvím drzadla,
kterym je opatren;
•vycistit ho kartácem a prípadn™ opláchnout
sprchovou hadicí.
•Vycistit také jeho vn™jsí cást a t™sn™ní v prední i
v zadní cásti. Pomocí mokrého hadru vycistit
t™sn™ní uvnitr dvírek.
Vyprázdn™ní nádoby je mozné uskutecnit také
b™hem programu susení:
• pomalu vytáhnout nádobu prostrednictvím
príslusného drzadla;
• otevrít vícko a vyprázdnit vodu.
• zavrít vícko, zasunout nádobu na p√vodní místo a
zatlacit ji na doraz.
• zahájit program op™tovnym stlacením tlacítka
START.
Rada: Zkondenzovaná voda m√ze byt pouzita
v naparovací zehlicce, v akumulátoru atd. V tomto
prípad™ musí byt prefiltrována (napr.
prostrednictvím filtru na kávu).
Cist™ní vnitrní cásti bubnu
Pri cist™ní kondenzátoru nepouzívejte ostré
predm™ty, které by jej mohli poskodit.
• Zasuñte kondenzátor na p√vodní místo, zajist™te
jej prostrednictvím dvou cervenych disk√ a to tak,
ze je pootocíte sm™rem ven a na záv™r zavrete
ochranná dvírka.
V zádném prípad™ neuvád™jte zarízení do
cinnosti bez kondenzátoru.
Vyprázdñování sb™rné nádoby
Voda, která je uvoln™na z prádla kondenzuje uvnitr
zarízení a je zachytávána do príslusné nádoby,
umíst™né ve predu, ve spodní cásti, pod
kondenzátorem.
Po kazdém cyklu susení je bezpodmínecn™
nutné ji vyprázdnit, aby susení b™hem
následujícího cyklu mohlo prob™hnout
predepsanym zp√sobem.
Vprípad™, ze nebude vykonána tato operace, dojde
k zásahu bezpecnostního zarízení: na ovládacím
panelu se rozsvítí kontrolka a ozve se akusticky
vystrazní signál v délce 1 minuty. Dojde
k automatickému prerusení programu a prádlo
z√stane vlhké.
Vprípad™, kdy prádlo není vysuseno na pozadovany
stupeñ, to znamená, ze je prílis suché anebo prílis
vlhké, doporucujeme vám vycistit vnitrní cást bubnu
hadrem namocenym v octu. Uvnitr bubnu se vytvárí
tém™r neviditelná vrstva usazenin, tvorená zbytky
pracích prostredk√, prípadn™skrobu a aviváze
nacházejících se v prádle, a také prípadnymi zbytky
vodního kamene nacházející se ve vod™ pouzité pri
praní. Tyto usazeniny zabrañují správné cinnosti
sond, které zjistují stupeñ vlhkosti prádla.
Cist™ní zadní mrízky
Prostrednictvím vysavace odstrañte z mrízky prach
a chmyrí.
26
Page 27

Kdyz n™co nefunguje správn™
Dříve než budete kontaktovat Vaše nejbližší autorizované servisní středisko, prosím, zkontrolujte následující:
Problém
• Sušička se nezapne
• Sušička nesuší správně
Možná příčina
• Hlavní dvírka a/anebo spodní dvírka jsou otevreny.
• Zástrcka není rádn™ zasunuta do zásuvky.
•Vzásuvce není elektricky proud.
• Volic program√ není správn™ nastaven.
• Tlacítko START není stlaceno.
•Sb™rná nádoba nebyla vyprázdn™na anebo nebyla
správn™ ulozena na své místo.
• Filtry a/anebo kondenzátor jsou ucpány.
•Sb™rná nádoba je plná vody.
• Zvoleny program neodpovídá druhu suseného
prádla.
• Prádlo nebylo patricn™ vyzdímáno.
• Bylo stlaceno tlacítko “nízké teploty” .
• Buben je pretízen.
•Susicka nebyla správn™ nainstalována.
ČESKY
Jestliže po výše uvedených kontrolách závada stále
existuje, zavolejte vaše nejbližší autorizované
servisní středisko.
Prosím, přesvědčte se, že znáte model a sériové
číslo spotřebiče. Tyto informace naleznete na
typovém štítku (viz str. 17).
27
Page 28

Záruka, servis a náhradní díly
Prect™te si tento návod k obsluze a dodrzujte v n™m
uvedené rady a pokyny. V mnoha prípadech si
budete moci vyjasnit jakékoli pochybnosti sami a
tudíz vyhnout se zbytecnym voláním do servisu.
Predchozí cásti nazvané "Jestlize n™co nefunguje
správn™" a "Servis" obsahují doporucení, co by se
m™lo zkontrolovat dríve, nez zavoláte servisního
technika.
Jestlize po t™chto kontrolách závada stále
existuje, zavolejte vase nejblizsí autorizované
servisní stredisko.
Ujist™te se, ze m√zete sd™lit model a seriové císlo
spotrebice. Tyto informace naleznete na datovém
stítku prístroje.
Originální náhradní díly lze koupit od autorizovanych
stredisek servisu ZANUSSI.
dopraven, je na zodpov™dnosti a na náklady
vlastníka. M√ze byt vyzadován doklad o koupi.
Model............................................................
Císlo vyrobku (Prod. No.)............................
Seriové císlo (Serial. No.)...........................
eventueln™ KD ... ... ... / ...
Bezpecnost
Prect™te si tento návod a varovná upozorn™ní na
zacátku tohoto návodu. Vyrobce nezodpovídá za
vady zp√sobené nesprávn™ pouzívanym vyrobkem
nebo vyrobkem pouzívanym pro jiné úcely nez jsou
úcely specifikované v tomto návodu.
Podmínky záruky
My, vyrobce, zarucujeme, ze jestlize b™hem 24
m™síc√ od data zakoupení tohoto spotrebice
ZANUSSI se tento spotrebic nebo jakákoli jeho cást
ukázou jako vadné pouze z d√vodu vadného
zpracování nebo vadného materiálu, provedeme
podle naseho uvázení bud opravu nebo vym™nu
téhoz bez placení za práci, materiál nebo prepravu
za predpokladu, ze
- spotrebic byl správn™ instalován a pouzíván pouze
na nap™tí uvedené na stítku jmenovitych hodnot
- spotrebic byl pouzíván pouze pro normální domácí
úcely a v souladu s pokyny vyrobce pro provoz a
údrzbu na spotrebici neprovád™la servis, údrzbu ani
opravu jiná nez námi autorizovaná osoba
- vsechny servisní práce podle této záruky musí
provád™t servis ZANUSSI nebo jím autorizované
stredisko
- kazdy vym™n™ny spotrebic nebo vym™n™ná vadná
soucást se stanou nasím vlastnictvím
- tato záruka platí vedle vasich zákonnych nebo
jinak právn™ podlozenych práv
Vyjimky - tato záruka se nevztahuje na:
- poskození nebo pozadavky vzniklé v d√sledku
prepravy, nesprávného pouzití nebo nedbalosti,
vym™ny zárovek a snímatelnych cástí ze skla
nebo plastickych hmot
- náklady spojené s pozadavky na odstran™ní závad
spotrebice, ktery je nesprávn™ instalován
- spotrebice, které jsou pouzívány v komercním
prostredí vcetn™ pronajímanych
- zem™ Evropského spolecenství. Lze pouzít
standardní záruku, ale zajist™ní, ze spotrebic splñuje
normy platné v príslusné zemi, kam byl spotrebic
Technické zm™ny vyrobku vyhrazeny.
V prípad™ problému volejte zdarma
800/16 00 16.
28
Page 29

Szanowni Panstwo,
Prosimy o uwaqne przeczytanie niniejszej instrukcji obslugi i zwrócenie szczególnej uwagi na podane na
pierwszych stronach zasady bezpieczenstwa. Radzimy zachowa© instrukcje, aby móc korzysta© z niej w
przyszloßci oraz przekaza© kolejnemu uqytkownikowi pralki, w razie jej odstapienia.
Bezpieczenstwa
Po rozpakowaniu urządzenia należy sprawdzić, czy nie jest ono uszkodzone. Jeśli mają Państwo wątpliwości
prosimy o kontakt z autoryzowanym zakładem serwisowym.
Symbole pojawiające się w niniejszej instrukcji obsługi mają następujące znaczenie:
Trójkat ostrzegawczy i okreßlenia sygnalizacyjne (Uwaga! Ostrzeqenie! Upomnienie!) maja na celu
zwrócenie szczególnej uwagi na wskazówki niezwykle waqne dla zapewnienia Panstwa bezpieczenstwa
i niezawodnej pracy urzadzenia. Prosimy o ich przestrzeganie.
Informacje poprzedzone tym symbolem stanowia uzupelnienie instrukcji funkcjonowania i
praktycznego uqywania urzadzenia.
Symbol tulipan oznacza zalecenia i wskazówki dotyczace oszczednego korzystania z urzadzenia w
sposób przyjazny dla ßrodowiska.
POLSKI
Oto nasz wkład w ochronę środowiska: używamy
papieru pochodzącego z recyklingu.
Spis treści
Ważne informacje
Utylizacja
........................................................30
Zalecenia w zakresie ochrony
środowiska
.....................................................31
Dane techniczne
Opis urządzenia
Instalacja
• Rozpakowanie ..................................................32
• Ustawienie ........................................................32
• Podłączenie do zasilania elektrycznego ...........32
• Podkladka pod suszarkę..................................32
• Przeloqenie drzwi .............................................32
• Podłączenie rury odprowadzającej...................33
........................................................32
.......................................30
.........................................31
...........................................31
Eksploatacja..................................................34
• Panel sterujący ...............................................34
• Tabela programów..........................................36
• Kolejność czynności ......................................37
• Praktyczne wskazówki....................................38
Czyszczenie i konserwacja.....................39
• Czyszczenie elementów zewnetrznych ............39
• Czyszczenie drzwi ............................................39
• Czyszczenie filtrów ...........................................39
• Czyszczenje kondensatora pary.......................39
• Opróżnianie pojemnika na wodę ......................40
• Czyszczenie wnetrza bebna .............................40
• Czyszczenie tylnej kratki wlotowej....................40
Co zrobić, jeśli urządzenie nie dziala .....
Punkty Serwisowe ...................................
41
42-43
29
Page 30

Ważne informacje
Przed przystąpieniem do podłączenia i eksploatacji pralki powinni Państwo dokładnie zapoznać się z instrukcją obsługi.
Instalacja
•W przypadku, gdyby domowa instalacja
elektryczna wymagala modyfikacji niezbednych do
podlaczenia urzadzenia, prace te winny by©
przeprowadzone przez wyspecjalizowanego
technika.
• Po zainstalowaniu urzadzenia naleqy upewni© sie,
qe nie stoi ono na przewodzie zasilajacym.
•Jeqeli urzadzenie ustawione zostalo na
wykladzinie podlogowej, naleqy wyregulowa©
nóqki w taki sposób, by zapewni© swobodna
cyrkulacje powietrza pomiedzy urzadzeniem a
podloga.
Eksploatacja
• Urzadzenie przeznaczone jest do uqytku domowego.
Producent nie ponosi qadnej odpowiedzialnoßci za
ewentualne szkody powstale w wyniku uqywania
urzadzenia do celów niezgodnych z przeznaczeniem,
dla którego zostalo zaprojektowane lub w razie jego
nieprawidlowego uqytkowania.
• Po kaqdorazowym uqyciu, naleqy wyja© wtyczke z
gniazda.
• Do urzadzenia nie naleqy wklada© bielizny
zaledwie odsaczonej.
• Niebezpieczenstwo eksplozji: nie wolno suszy©
w urzadzeniu bielizny po uprzednim wywabianiu z
niej plam za pomocaßrodków chemicznych (np.
takich, które uqywane sa do czyszczenia na
sucho), poniewaq moglyby one spowodowa©
wybuch. Naleqy suszy© wylacznie odzieq uprana w
wodzie.
• Sprawdzi©, czy w kieszeniach odzieqy
przeznaczonej do suszenia nie pozostawiono
zapalniczek.
• Nie naleqy wklada© do urzadzenia tenisówek ani
innych butów sportowych, poniewaq moglyby one
utkna© pomiedzy drzwiczkami a bebnem,
powodujac jego blokade.
• Po zakonczeniu programu, naleqy pozostawi©
drzwiczki lekko uchylone w celu wywietrzenia
urzadzenia.
• Filtry powinny by© czyszczone po kaqdorazowym
uqyciu. Aby zapobiec niebezpieczenstwu poqaru,
nie wolno uqywa© urzadzenia pozbawionego
filtrów ani w przypadku uszkodzonych filtrów.
• Nie naleqy dopußci© do nagromadzenia sie
resztek wlókien lub welnianego puchu wokól
urzadzenia.
Bezpieczenstwo ogólne
• Nie naleqy przeprowadza© napraw urzadzenia we
wlasnym zakresie. Wszelkie naprawy wykonane
przez osoby nie posiadajace odpowiednich
kwalifikacji, moga doprowadzi© do uszkodzenia
urzadzenia. Naleqy korzysta© wylacznie z uslug
autoryzowanych punktów serwisowych Zanussi,
wymagajac stosowania jedynie oryginalnych
czeßci zamiennych.
Bezpieczeństwo dzieci
• Dzieci czesto nie zdaja sobie sprawy z
niebezpieczenstwa zwiazanego z urzadzeniami
elektrycznymi. Podczas pracy suszarki dzieci nie
powinny bawi© sie w pobliqu urzadzenia lub
manipulowa© elementami sterujacymi – istnieje
niebezpieczenstwo zamkniecia sie w nich dzieci.
• Elementy opakowania (np. folia, tworzywo) moga
stanowi© zagroqenie dla dzieci. Niebezpieczenstwo
uduszenia sie! Naleqy trzyma© poza zasiegiem dzieci.
• Naleqy upewni© sie, czy dzieci i zwierzeta domowe
nie weszly do bebna suszarki.
•W razie zlomowania urzadzenia naleqy wyja©
wtyczke z gniazdka, odcia© przewód i wyrzuci©
wtyczke z pozostalym odcinkiem przewodu.
Naleqy teq unieruchomi© mechanizm blokujacy
drzwi, aby bawiace sie dzieci nie mogly zamkna©
sie w suszarce.
Utylizacja
Materialy opakowania
Materialy oznaczone symbolem nadaja sie do
ponownego wykorzystania.
>PE<= polietylen
>PS<= styropian
>PP<= polipropylen
Aby materialy te mogly zosta© ponownie
wykorzystane, musza zosta© umieszczone w
wyznaczonych miejscach (lub pojemnikach).
Suszarka
W celu usuniecia Panstwa starego urzadzenia naleqy
korzysta© z wyznaczonych skladowisk odpadów.
Prosimy Panstwa o pomoc w utrzymaniu czystoßci
Waszego miasta!
•Jakakolwiek przeróbka lub próba modyfikacji
wlaßciwoßci technicznych urzadzenia grozi
niebezpieczenstwem.
30
Page 31

Zalecenia w zakresie ochrony ßrodowiska
W celu zaoszczedzenia energii elektrycznej oraz
przestrzegania wymogów ochrony ßrodowiska,
naleqy zastosowa© sie do nastepujacych
wskazówek:
• Wykorzystywa© maksymalna pojemnoß© bebna.
Pranie niewielkich iloßci bielizny jest
nieekonomiczne.
• Dokladnie odwirowa© bielizne przed
przystapieniem do suszenia. Im wyqsza bedzie
predkoß© wirowania, tym krótszy stanie sie czas
suszenia, umoqliwiajac tym samym niqsze zuqycie
energii.
• Odradza sie stosowania zbyt dlugiego cyklu
suszenia, pozwoli to na unikniecie zagniecen i
dodatkowe zaoszczedzenie energii. Wybra©
program oraz czas suszenia optymalnie
dostosowane do rodzaju tkanin i qadanego
stopnia wysuszenia bielizny.
• Aby maksymalnie wykorzysta© pojemnoß© bebna,
moqna suszy© bielizne „do szafy” razem z ta
przeznaczona “do prasowania”. Wybra© w tym
celu program „do prasowania”, a po jego
zakonczeniu wyja© bielizne przeznaczona do
prasowania. Dokonczy© cykl suszenia wybierajac
czas suszenia dobrany do bielizny, która planuje
sie schowa© bezpoßrednio „do szafy”.
• Po kaqdym cyklu suszenia naleqy dokladnie
wyczyßci© filtry. Dzieki temu ograniczona zostanie
iloß© energii elektrycznej zuqywanej przez suszarke.
• Dokladnie przewietrzy© pomieszczenie. W czasie
pracy urzadzenia, temperatura otoczenia nie
powinna przekracza© +35°C .
Dane techniczne
WYMIARY Wysokość 85 cm
Szerokość 60 cm
Głębokość 58 cm
POLSKI
PARAMETRY ELEKTRYCZNE Napięcie 220-230V/50Hz
Maks. pobór mocy 2200 W
Minimalne zabezpieczenie 10 A
MAKSYMALNA ŁADOWNOŚĆ BEBNA Bawełna i len 5 kg
Syntetyki 2,5 kg
ZUQYCIE Bawełna i len 3,64 kWh (5 kg wysuszone do szafy)
Bawełna i len 3 kWh (5 kg wilgotne do prasowania)
Syntetyki 1,4 kWh (2,5 kg wysuszone do szafy)
Urządzenie posiada znak CE i spełnia następujące normy EWG
- 73/23/EWG z 19.02.1973 (niskie napięcia) wraz ze zmianami;
- 89/336/EWG z 03.05.1989 wraz ze zmianami.
Opis urządzenia
1 Blat roboczy
2 Tabela programów
3 Panel sterujacy
4 Filtry
5 Tabliczka znamionowa
6 Kondensator pary
7 Pojemnik na wode
6Nóqki regulacyjne
31
Page 32

Instalacja
Uwaga!
Rozpakowanie
Zanim przystapi sie do uqywania urzadzenia,
naleqy wyciagna© polietylenowe opakowanie
zawierajace blokade z polistyrenu.
Suszarke naleqy przewozi© w pozycji
pionowej.
Ustawienie
podwyqszonych temperatur.
Aby zapewni© niezawodne funkcjonowanie
urzadzenia, temperatura otoczenia nie powinna by©
niqsza niq + 5°C, i nie wyqsza niq + 35°C, równieq w
trakcie pracy suszarki.
Podlaczenie do zasilania elektrycznego
Suszarka jest przystosowana do funkcjonowania
pod napieciem 220-230 V pradu jednofazowego i
50 Hz.
Naleqy sprawdzi©, czy instalacja domowa jest w
stanie znieß© maksymalne obciaqenie urzadzeñiem
(2,2 kW), biorac pod uwage równieq korzystanie z
innych sprzetów gospodarstwa domowego.
Podlaczy© urzadzenie do gniazdka z
uziemieniem.
Producent nie ponosi qadnej
odpowiedzialnoßci za zniszczenia i uszkodzenia spowodowane nieprzestrzeganiem
przepisów bezpieczenstwa.
Wymiany przewodu zasilajacego moqna
dokona© jedynie w autoryzowanym punkcíe
serwísowym.
Dla wygody uqytkowania wskazane byloby
ustawienie suszarki blisko pralki.
W celu zapewnienia prawidlowego funkcjonowania
urzadzenia, jego otoczenie wino by© utrzymywane w
czystoßci (przez regularne uprzatanie kurzu i
gromadzacego sie puchu welnianego). Powinna by©
zapewniona swobodna cyrkulacja powietrza wokól
urzadzenia. Nie wolno zaslania© przedniej kratki
wentylacyjnej ani tylnych kratek wlotowych.
Urzadzenie moqe by© umieszczone na podloqu
dowolnego rodzaju, pod warunkiem, qe bedzie ono
plaskie. Konieczne jest ustawienie w idealnie
poziomym poloqeniu (posluqy© sie w razie potrzeby
poziomnica wodna).
Ewentualne nierównoßci lub nachylenia podlogi
moga by© skorygowane poprzez regulacje
wysokoßci nóqek.
Nie naleqy wymontowywa© nóqek. Wykladzina
lub dywan o wysokim runie redukuja wolna
przestrzen pomiedzy urzadzeniem a posadzka.
Mogloby to spowodowa© nadmierna akumulacje
ciepla uniemoqliwiajac prawidlowe dzialanie
suszarki.
Waqne!
Z suszarki wydobywa sie nagrzane powietrze o
temperaturze dochodzacej nawet do 60 °C.
Niewskazane jest zatem instalowanie urzadzenia na
podloqach nieodpornych na dzialanie
Waqne: po zainstalowaniu urzadzenia przewód
zasilajacy musi by©latwo dostepny.
Podkladka pod suszarke
W autoryzowanych punktach sprzedaqy dostepny
jest specjalny zestaw umoqliwiajacy zainstalowanie
suszarki do bielizny na pralce ladowanej od przodu,
o glebokoßci od 48 do 60 cm.
ficißle stosowa© sie do instrukcji montaqowych
zawartych w nabytym zestawie.
Przeloqenie drzwi
Jeßli zaszlaby koniecznoß© zmiany kierunku
otwierania drzwi, naleqy zwróci© sie do punktu
serwisowego obslugi technicznej Zanussi.
32
Page 33

Podłączenie rury odprowadzającej
Jeżeli suszarka będzie ustawiona w pobliżu
zlewozmywaka lub odpływu, skondensowana woda
może być dprowadzana za pomocą rury, którą
można nabyć w specjalistycznych sklepach.
Aby podłączyć rurę do urządzenia należy wykonać
następujące czynności:
• Zdjąć zacisk (A)
• wycignąć przewód (B)
• włożyć rurę odprowadzającą (C)
• przymocować rurę (C) do urządzenia za pomocą
zacisku (A).
Jeżeli urządzenie będzie ustawione na pralce
automatycznej, skondensowana woda może być
odprowadzana rurą w sposób pokazany na rysunku.
Proszę zauważyć, że rura (C) musi być skierowana
do dołu.
POLSKI
33
Page 34

Eksploatacja
Panel sterujacy
1Tabela programów
Tabela programów pomaga przy wyborze
wlaßciwego programu suszenia.
2 Lampka kontrolna
WLACZONY/WYLACZONY
Lampka zaßwieca sie w momencie uruchomienia
urzadzenia (po wcißnieciu przycisku
wlaczony/wylaczony) i gaßnie w momencie, gdy
przycisk ten zostaje zwolniony.
3 Przycisk WLACZONY/WYLACZONY
Przycisk ten sluqy do uruchamiania suszarki. W celu
wylaczenia suszarki po zakonczeniu programu
suszenia, naleqy zwolni© przycisk poprzez ponowne
jego wcißniecie.
4 Przycisk niskiej temperatury
Wcißniecie tego przycisku umoqliwia suszenie
delikatnych tkanin w niqszej temperaturze.
Zaßwieci sie odnoßna lampka kontrolna.
Opcja ta moqe by© równieq stosowana przy
suszeniu czasowym.
Proces suszenia odbywa sie przy zuqyciu 1300 W
zamiast 2000 W.
Kiedy przycisk ten nie jest wcißniety, suszarka
pracuje na pelnej mocy (2000 W).
kiedy pojemnik na wode jest pelen.
W momencie wyboru programu naleqy wcisna© ten
przycisk w celu wykluczenia sygnalu dΩwiekowego
podczas fazy redukujacej zagniecenia. Zaßwieci sie
odnoßna lampka kontrolna.
6 Przycisk start
Po wybraniu qadanego programu, naleqy trzyma©
ten przycisk wcißniety przez ok. 2 sekundy, co
powoduje uruchomienie cyklu suszenia.
Jeqeli w trakcie pracy urzadzenia zostana
otwarte jego drzwi lub male drzwiczki
umieszczone u spodu, trzeba bedzie po ich
zamknieciu powtórnie wcisna© przycisk start, w
celu wznowienia programu od punku, w którym
zostal on przerwany.
Przycisk ten powinien by© wcißniety równieq po
przerwie w doplywie pradu oraz po wsunieciu na
swoje miejsce pojemnika na wode, jeßli zostal on
opróqniony w trakcie trwania cyklu suszenia.
W obu wyqej opisanych przypadkach lampka
lub (w zaleqnoßci od fazy procesu
suszenia) bedzie migala, by zasygnalizowa©
koniecznoß© ponownego wcißniecia przycisku start.
7 WskaΩniki ßwietlne fazy programu
Specjalne lampki kontrolne sygnalizuja
poszczególne fazy programu odbywajace sie w
danym momencie.
5 Przycisk wylaczenia sygnalu
akustycznego
Sygnalizacja dΩwiekowa uaktywnia sie przy
naciskaniu przycisków, podczas fazy redukujacej
zagniecenia, po zakonczeniu cyklu suszenia oraz
WskaΩnik fazy “Suszenia”
Zaßwiecenie sie tej lampki wskazuje, qe trwa
wlaßnie cykl suszenia.
34
Page 35

WskaΩnik fazy “Schladzania”
Zaßwiecenie sie tej lampki wskazuje, qe odbywa sie
cykl chlodzenia. Pod koniec cyklu suszenia, bielizna
poddawana jest przez 10 minut procesowi
schladzania.
Jeqeli lampka lub pulsuje, oznacza to, qe
naleqy ponownie wcisna© przycisk Start w celu
wznowienia programu.
WskaΩnik “Zakonczenia programu”
Lampka ta pulsuje pod koniec fazy schladzania oraz
podczas fazy redukujacej zagniecenia.
WskaΩnik “Pojemnik na wode pelny”
Gdy pojemnik wypelni sie woda, lampka ta zaczyna
pulsowa©.
8 Przelacznik do ustawiania
programów/czasów suszenia
Pozwala wybra© system sterowania suszeniem:
elektroniczny lub czasowy.
Program i czas suszenia ustawia sie poprzez
obracanie pokretla programatora.
Suszenie elektroniczne (automatyczne)
Programy te dzialaja w oparciu o specjalne sensory
mierzace stopien wilgotnoßci bielizny.
Wystarczy wybra© program dopasowany do rodzaju
tkanin i qadanego stopnia wysuszenia.
Suszenie czasowe
Funkcja ta moqe by© uqywana w celu ewentualnego
dokonczenia suszenia bielizny, jeqeli okazalaby sie
ona zbyt wilgotna.
Nastawi© 90- lub 60-minutowy program do suszenia
bawelny lub 30-minutowy program do tkanin
syntetycznych.
W celu przerwania uruchomionego programu,
naleqy ustawi© pokretlo w pozycji “0”.
Po zakonczeniu cyklu suszenia i przed
przystapieniem do wyjmowania bielizny, naleqy
ustawi© pokretlo programatora w pozycji “0”.
POLSKI
35
Page 36

Tabela programów
Suszenie elektroniczne (automatyczne)
Rodzaj tkaniny
Bawelna & len
Tkaniny syntetyczne
fipioszki niemowlece
Marynarki, spodnie,
sukienki, spódnice.
(*) Zgodnie z normami IEC 61121.
• Cykl Baby “K” stanowi specjalny program do suszenia ßpioszków, tak by byly one natychmiast gotowe do
naloqenia.
• Pranie na sucho “L” to program umoqliwiajacy domowe czyszczenie i odßwieqanie w suszarce bebnowej,
przy uqyciu specjalnego preparatu dostepnego w sprzedaqy, tych sztuk odzieqy, które posiadaja na metce
symbol zalecajacy wylacznie „pranie na sucho”.
Wymagany stopien
wysuszenia
ekstra suche
suche do noszenia
do szafy
lekko wilgotne
do prasowania
wilgotne do prasowalnicy
ekstra suche
do szafy
do prasowania
Cykl Baby
Pranie na sucho
Maks. wsad
5 kg
5 kg
5 kg
5 kg
5 kg
5 kg
2.5 kg
2.5 kg
2.5 kg
1 kg (10 par
ßpioszków)
1 - 4 sztuk
odzieqy
(1)
Program
A
B
C(*)
D
E(*)
F
G
H(*)
J
K
L
Suszenie czasowe
Rodzaj tkaniny Czas suszenia Maks. wsad
Bawelna
Bawelna
Syntetyki
(1) Nie przepelnia© bebna (tj. nie wklada© przykladowo duqych kolder).
Przy ustawianiu czasu suszenia, naleqy uwzgledni©:
• Rodzaj tkanin
• Iloß© bielizny
•Predkoß© z jaka odwirowana zostala bielizna po praniu.
90 min
60 min
30 min
5 kg
5 kg
2.5 kg
(1)
Pozycja pokretla
programatora
90’
60’
30’
Odßwieqanie & Schladzanie
Funkcja ta widoczna na tarczy pokretla programatora sluqy do odßwieqania bielizny (np. w celu usuniecia
uporczywego zapachu ßrodka przeciwmolowego).
Ilość wsadu
Ważenie bielizny nie jest konieczne jeśli wezmiecie Państwo pod uwagę następujące rady:
• Bawełna, len: pełny, lecz nie przeładowany bęben.
• Syntetyki: połowa bębna.
• Szczególnie delikatne tkaniny: maksymalnie do 1/3 bębna.
36
Page 37

Kolejnoß© czynnoßci
Przed pierwszym uqyciem suszarki bebnowej,
wskazane byloby wloqenie kilku wilgotnych
szmatek do urzadzenia i wykonanie 30-minutowego
cyklu suszenia, jako qe w fabrycznie nowej suszarce
moga znajdowa© sie osady kurzu.
Suszenie
1. Podlaczy© urzadzenie.
2. Otworzy© drzwiczki.
3. Wklada© pojedyncze sztuki bielizny jedna po
drugiej, strzepujac je lekko, by nie byly splatane.
4. Zamkna© drzwiczki. Sprawdzi©, czy bielizna nie
zostala przytrzaßnieta pomiedzy drzwiami a
filtrem.
5. Wcisna© przycisk Wlaczony/Wylaczony :
zapali sie glówna lampka kontrolna.
6. Wybra© program lub czas suszenia.
7. Gdy zajdzie taka potrzeba, wcisna© przycisk
niskiej temperatury i/lub przycisk wylaczajacy
sygnal akustyczny .
8. Trzyma© wcißniety przycisk Start przez 2
sekundy: zaßwiecenie sie lampki oznacza
rozpoczecie cyklu suszenia.
Beben suszarki zmienia co jakiß czas kierunek
obrotów.
Pod koniec kaqdego programu suszenia
nastepuje 10-minutowa faza schladzania (ßwieci
sie odnoßna lampka ). Po zakonczeniu fazy
chlodzenia, moqna wyja© bielizne.
9. Jeßli po zakonczeniu cyklu suszenia bielizna nie
zostanie wyjeta, suszarka uruchomi samoczynnie
funkcje redukcji zagniecen (maksymalny czas
trwania: 30 minut).
Co 10 sekund rozlega sie sygnal dΩwiekowy
(chyba, qe zostal uprzednio wcißniety
odpowiedni przycisk wylaczajacy ).
Lampki oraz pulsuja na zmiane.
Jeqeli bielizna nie zostanie wyjeta, suszarka
zatrzyma sie automatycznie po zakonczeniu fazy
redukcji zagniecen.
Lampki oraz pulsuja, podczas gdy
glówna lampka kontrolna nadal sießwieci.
Ustawi© pokretlo programatora w pozycji “0”;
lampki oraz gasna.
Naleqy nastepnie wcisna© przycisk
Wlaczony/Wylaczony (lampka kontrolna
wówczas zgaßnie) i niezwlocznie przystapi© do
wyjmowania bielizny.
Kaqdorazowo po zakonczeniu suszenia
• Naleqy oczyßci© filtry (patrz str. 39).
• Opróqni© pojemnik na wode (patrz str. 40).
Waqne!
Program suszenia nie powinien by© przerywany,
gdyby jednak zaszla taka koniecznoß©, wskazane
jest ustawienie pokretla programatora na (funkcje
schladzania) i odczekanie, aq faza
chlodzenia dobiegnie konca, zanim przystapi sie do
wyjmowania bielizny. Pozwoli to zapobiec
przyrostowi ciepla wewnatrz urzadzenia. Naleqy w
tym celu ustawi© pokretlo najpierw na “0”, a
nastepnie na , po czym wcisna© przycisk Start .
Zmiana programu
By zmieni© program w trakcie pracy urzadzenia,
naleqy przede wszystkim przerwa© uruchomiony
program poprzez ustawienie pokretla programatora
na „0”. Nastepnie naleqy wybra© nowy program i
wcisna© przycisk Start .
POLSKI
37
Page 38

Praktyczne wskazówki
• Zaleca się suszenie z pełnym wsadem bielizny,
gdyż suszenie małej ilości bielizny jest
nieekonomiczne. Podajemy orientacyjną wagę
niektórych sztuk bielizny :
Prześcieradło 700 - 1000 g
Obrus 400 - 500 g
Ścierka 70 - 120 g
Serwetka 50 - 100 g
Ręcznik frotte (mały) 150 - 250 g
Szlafrok kpielowy 1000 - 1500 g
Koszula męska 200 - 300 g
Poszewka 100 - 200 g
Piżama męska 400 - 500 g
Koszula nocna damska 200 - 250 g
• W suszarce nie wolno suszyć:
Odzieży pranej na sucho i czyszczonej
chemicznie, tkanin
wełny, które mogą pod wpływem temperatury
filcować się, angory, tkanin delikatnych (sztuczny
jedwab lub firanki syntetyczne), wyrobów z
dodatkiem gumy piankowej i włókna szklanego.
• Należy przestrzegać wskazówek o sposobie
suszenia zawartych na metkach odzieży.
• Sprawdzi© symbole podane na metkach odzieqy:
wełnianych lub z domieszką
• Tkaniny delikatne należy wstępnie odwirować
przed suszeniem (na 30 sekund lub używać
specjalnych programów krótkiego wirowania w
pralce automatycznej).
• Oddzielać ciemne tkaniny od jasnych tkanin
włóknistych, jak ręczniki, gdyż resztki włókien
mogą osiąść na ubraniach. Szczególnie ostrożnie
obchodzić się z tkaninami robionymi na drutach.
Nie przesuszać tkanin tego rodzaju.
• Do suszarki można także wkładać
wykrochmalone tkaniny. Aby uzyskać pożądany
stopień krochmalenia należy wybrać program
suszenia - do prasowania . Po wysuszeniu tkanin
ewentualne pozostałości krochmalu wewnątrz
bębna wytrzeć wilgotną szmatką.
• Tkaniny syntetyczne, które elektryzują się
podczas suszenia, należy prać z dodatkiem
płynu zmiękczającego. Suszenie w suszarce
powoduje obniżenie działania środków
zmiękczających i należy o tym pamiętać przy ich
dozowaniu.
• Po zakończonym programie suszenia należy
niezwłocznie wyjąć bieliznę z suszarki.
• Jeżeli po zakończeniu suszenia pojedyncze
sztuki odzieży pozostały jeszcze wilgotne należy
ustawić program krótkiego suszenia, nie dłuższy
niż 30 minut. Jest to możliwe w przypadku
ubrań wielowarstwowych (kieszenie w spodniach
itp.).
Dozwolone suszenie mechaniczne.
Jakkolwiek nie precyzuje sie jednak czy w
temperaturze normalnej, czy teq obniqonej.
suszenie w temperaturze normalnej
suszenie delikatne w niskiej temperaturze
nie wolno suszy© mechanicznie
• Przed włożeniem bielizny do suszarki należy
pozapinać guziki, zatrzaski, zamki
przyszyć "luzne" guziki.
• Posortować odzież w zależności od rodzaju
tkaniny oraz pożądanego stopnia wysuszenia.
• Należy zwrócić uwagę, aby nie przesuszać ubrań
. W ten sposób chronicie Państwo tkaniny i
oszczędzacie energię elektryczną.
• Do suszarki powinno się wkładać bieliznę dobrze
odwirowaną, gdyż pozwala to skrócić czas
suszenia, a tym samym zaoszczędzić energię
elektryczną.
błyskawiczne
i
38
Page 39

Czyszczenie i konserwacja
Przed przystapieniem do czyszczenia badΩ
jakichkolwiek czynnoßci konserwacyjnych,
naleqy odlaczy© doplyw pradu do urzadzenia.
Czyszczenie elementów zewnetrznych
Wyczyßci© obudowe zewnetrzna przy uqyciu wody z
dodatkiem lagodnego detergentu i dokladnie ja
osuszy©.
Waqne: Nie naleqy stosowa© spirytusu, rozpuszc-
zalników ani innych produktów o podobnym
dzialaniu.
Czyszczenie drzwi
Wewnetrzna strona drzwi powinna by© okresowo
poddawana czyszczeniu w celu usuniecia resztek
wlókien osadzajacych sie na uszczelkach wokól
filtra.
Skrupulatne przeprowadzenie tego zabiegu stanowi
gwarancje niezawodnego suszenia.
z tym qe podczas suszenia na wolnym powietrzu sa
one rozwiewane przez wiatr. W suszarce natomiast
zbieraja sie na filtrze.
Po dluqszym czasie na filtrach moqe sie pojawi©
bialawy osad. Tworzy sie on pod wplywem
nieznacznych pozostaloßci ßrodków pioracych w
bieliΩnie. Filtry naleqy wyczyßci© w goracej wodzie
przy uqyciu szczoteczki. W celu wyjecia filtra z drzwi
naleqy wysuna© go, tak jak to przedstawiono na
rysunku. Filtr moqna umieszcza© dwustronnie, tj. z
wpustem zwróconym w lewa lub w prawa strone.
POLSKI
Nie naleqy nigdy uqywa© urzadzenia
pozbawionego filtrów.
Czyszczenie filtrów
Staranne czyszczenie filtrów jest niezbedne dla
zagwarantowania prawidlowego dzialania urzadzenia.
Filtry zatrzymuja resztki wlókien gromadzace sie
podczas suszenia, a zatem powinny by©
oczyszczane za pomoca wilgotnej szmatki przed
wyjeciem bielizny, po kaqdorazowym zakonczeniu
programu suszenia.
Czyszczenie kondensatora pary
Regularnie czyścić kondensator pary z wszelkich
pozostałości tkanin. Kondensator pary powinien być
czyszczony również wtedy, gdy są w nim widoczne
zanieczyszczenia.
Kondensator znajduje sie za drzwiczkami w
przedniej dolnej czeßci urzadzenia.
Czyszczenie przeprowadza sie w sposób
nastepujacy:
• otworzy© drzwiczki poprzez nacißniecie
wewnetrznego przycisku, tak, jak to pokazano na
rysunku;
• obróci© dwa czerwone kraqki w strone wewnetrzna;
Natomiast aby wyczyßci© filtr umieszczony na
wewnetrznej stronie drzwi, naleqy go wyciagna©.
Iloß© nagromadzonych na filtrze wlókien moqe sie
wyda© niepokojaca: zjawisko to nie jest jednak
spowodowane zbyt intensywnym dzialaniem
mechanicznym suszarki.
Wszystkie tkaniny traca wlókna w trakcie suszenia,
39
Page 40

• wyciagna© kondensator za pomoca specjalnej
raczki;
• wyczyßci© przy uqyciu szczotki i spluka©:
najwygodniej strumieniem prysznica.
równoczeßnie bedzie rozbrzmiewal sygnal
akustyczny, nieprzerwanie przez 1 minute. Program
zostanie automatycznie przerwany, z wilgotna
bielizna w bebnie.
Pojemnik moqna opróqni© równieq w trakcie
trwajacego juq cyklu:
• wysuna© powoli pojemnik pociagajac za specjalny
uchwyt;
• otworzy© pokrywke i wyla© wode.
• zamkna© i wsuna© pojemnik na miejsce,
dociskajac do oporu.
• wcisna© ponownie przycisk START w celu
wznowienia programu.
• Oczyßci© równieq obudowe zewnetrzna oraz
przednie i tylne uszczelki. Przetrze© wilgotna
szmatka uszczelki znajdujace sie wewnatrz
drzwiczek.
Do czyszczenia kondensatora nie wolno
uqywa©qadnych zaostrzonych przedmiotów,
gdyq mogloby to spowodowa© jego
uszkodzenie.
• Wsuna© z powrotem kondensator do wneki,
zablokowa© poprzez obrócenie dwóch
czerwonych kraqków na zewnatrz, po czym
zamkna© drzwiczki.
Nie uruchamia© urzadzenia, jeßli nie ma w nim
kondensatora.
Opróqnianie pojemnika na wode
Woda, która wyparowuje z bielizny skrapla sie
wewnatrz kondensatora, a nastepnie odprowadzana
jest do specjalnego pojemnika, umieszczonego pod
kondensatorem, w przedniej, dolnej czeßci
urzadzenia.
Pojemnik ten musi by© opróqniany po kaqdym
cyklu suszenia, aby podczas nastepnego cyklu
proces suszenia przebiegal bez zaklócen.
W przypadku niewykonania tej czynnoßci, zadziala
mechanizm bezpieczenstwa: na panelu sterujacym
zaßwieci sie lampka sygnalizacyjna, a
Wskazówka: Skondensowana w pojemniku woda
nadaje sie do wykorzystania do qelazek parowych,
do baterii, itp. Powinna jednak zosta© uprzednio
przefiltrowana (np. przez filtr do kawy).
Czyszczenie wnetrza bebna
Jeqeli bielizna nie osiaga oczekiwanego stopnia
wysuszenia, to znaczy, okazuje sie albo
przesuszona albo zbyt wilgotna, wskazane byloby
oczyszczenie wnetrza bebna przy uqyciu ßciereczki
nasaczonej octem. W bebnie osadza sie ledwie
widoczny nalot, którego przyczyna sa resztki
ßrodków pioracych lub krochmalu i preparatów
zmiekczajacych nie do konca wyplukanych z
bielizny, badΩ teq ewentualnym odkladaniem sie
kamienia obecnego, nawet w ßladowych iloßciach,
w wodzie uqywanej do prania. Osad ten utrudnia
prawidlowe dzialanie sensorów mierzacych stopien
wilgotnoßci bielizny.
Czyszczenie tylnej kratki wlotowej
Usuna© odkurzaczem kurz i drobiny wlókien.
40
Page 41

Co zrobić, jeśli urządzenie nie działa
Przed skontaktowaniem się z autoryzowanym zakładem serwisowym proszę sprawdzić poniższe objawy:
Usterka Prawdopodobna przyczyna
• Suszarka nie działa
• Suszenie nie jest zadawalajace
Jeśli po wykonaniu opisanych czynności
sprawdzających suszarka nadal nie funkcjonuje,
usterkę należy zgłosić w autoryzowanym punkcie
serwisowym. Przy zgłoszeniu usterki należy podać
model, typ i numer seryjny urządzenia. Informacje te
znajdują się na tabliczce znamionowej (patrz str. 31).
• Drzwi i/lub dolne drzwiczki sa otwarte.
• Wtyczka jest niedokladnie wloqona do gniazdka.
•W gniazdku nie ma napiecia.
• Pokretlo programatora nie zostalo ustawione we
wlaßciwej pozycji.
• Nie zostal wcißniety przycisk START.
• Pojemnik na wode jest pelny lub nieprawidlowo
wloqony.
• Filtry i/lub kondensator sa zapchane.
• Pojemnik na wode jest pelen wody.
• Wybrany zostal program nieodpowiedni dla
danego rodzaju bielizny.
• Bielizna nie zostala dostatecznie odwirowana.
• Zostal wcißniety przycisk “niskiej temperatury”
.
•Beben jest przeladowany.
• Suszarka do bielizny zostala zainstalowana
nieprawidlowo.
POLSKI
41
Page 42

Punkty Serwisowe
Miasto Adres Telefon
Bialystok
Bielsko-Biala
Brzeziny
Bydgoszcz Wojska Polskiego 8 (0-52) 371-39-28; 371-12-08
Bytom Kwietniewskiego 5 (0-32) 282-85-22
Chelm
Chojnice Sukienników 3 (0-52) 397-50-98
Czestochowa fiw. Rocha 108
Elblag Lokietka 44
Gdansk
Gdynia Helska 8 (0-58) 663-15-85; 663-15-15
Gdynia J. Unruga 76 (0-58) 625-05-05; 665-00-44
Gliwice
Gorzów Wielkopolski
Grudziadz
Jaroslaw
Jaworzno
Piastowska 11 (0-85) 732-19-55; 664-22-05
Cyniarska 24 (0-33) 828-33-44
Pilsudskiego 2/8
Wieniawskiego 11a (0-82) 565-70-42
Al. Jana Pawla II 5Bbox33A
J. filiwki 34
Moßcickiego 14
Sienkiewicza 17 (0-56) 462-07-41; 462-01-32
Kasztelanska 2
Matejki 24 (0-32) 616-34-56; 751-63-63
(0-46) 874-28-30; 874-37-07
(0-34) 368-16-65; 324-89-60
(0-55) 237-94-05; 232-15-10
(0-58) 346-92-00
(0-32) 279-20-07
(0-95) 729-20-93; 729-35-71
(0-16) 621-09-59
Jelenia Góra Karola Miarki 50 (0-75) 767-82-35
Kalisz Sukiennicza 4 (0-62) 764-50-60
Katowice 1000-lecia 3 (0-32) 254 11 81; 254-02-78
Kielce
Konin 1 Maja 15 (0-63) 242-17-99
Koszalin Szyprów 4 (0-94) 341-66-68
Kraków Os. Willowe 30 (0-12) 644-87-64; 0800-267-675
Kraków
Krosno Legionów 2A (0-13) 432-28-93
Legnica Kasjopei 15 (0-76) 854-48-33
Leszno
Lubin
Lublin
LódΩ
LódΩ
Miedz. Podlaski
Mlawa Dudzinskiego 14
Checinska 14a
Koßciuszki 34
Sulkowskiego 46
Wyszynskiego 10
Leczynska 1
Pomorska 100 (0-42) 678-92-92
Marynarska 42 (0-42) 657-70-02; 657-99-27
Partyzantów 4A (0-83) 371-40-06; 371-72-06
(0-41) 361-38-16
(0-12) 421-50-32, 294-10-15,-16
(0-65) 520-55-70
(0-76) 849-30-40
(0-81) 745-05-15
(0-23) 654-34-75
Nowy Sacz Batalionów Chlopskich 19a
(0-18) 441-11-44
42
Page 43

Miasto Adres Telefon
Nowy Targ Ku Studziankom 6 (0-18) 266-41-18
Olsztyn Barcza 8A (0-89) 542-67-90; 0801 380-509
Opole Szarych Szeregów 23 (0-77) 455-90-93
Ostroleka Qniwna 9
Ostrowiec fiwietokrzyski
Ostrów Wielkopolski Kaliska 42 ( 0-62) 736-82-45
Pila Przemyslowa 5
Piotrków Tryb.
Plock
Poznan Czeßnikowska 1a
Przemyßl
Racibórz Opawska 3 (0-32) 415-26-04; 419-09-32
Radom Sobieskiego 1 (0-48) 345-10-10; 345-97-57
Rybnik
Rzeszów
Siedlce Vogla 41 (0-25) 632-72-08
Sieradz Polna 3/5 (0-43) 827-40-92
Slupsk Pilsudskiego 7/b
Suwalki Litynskiego 1a
Szczecin Chmielewskiego 18 (0-91) 482-11-44
Os. Ogrody 28 ( 0-41) 262-09-38
Slowackiego 70
Hubalczków 7 (0-24) 268-66-20
Mickiewicza 9 (0-16) 678-77-05
M.C. Sklodowskiej 7
Dabrowskiego 44
(0-29) 760-27-87
(0-67) 351-90-25; 35-92-25
(0-44) 647-11-27
(0-61) 867-41-12; 0800 136-400
(0-32) 422-52-97
(0-17) 854-16-15; 0800 135-031
(0-59) 843-54-88
(0-87) 567-29-58
POLSKI
Szczecin
fiwidnica Slotwina 80
fiwierzawa Pl. Wolnoßci 36
Tarnobrzeg
Tarnów Graniczna 8a (0-14) 626-00-99
Torun
Warszawa
Warszawa Giewont 21 (0-22) 644-04-32;644-68-48
Warszawa Blokowa 13 (0-22) 678-61-66
Warszawa
Wejherowo
Wielun
Wloclawek
Wroclaw
Wroclaw Jagiellonczyka 38a
Zamoß©
Zielona Góra Okulickiego 35 (0-68) 326-22-37
Ks. P. ficiegiennego 27
Koßciuszki 24
Wojska Polskiego 43/45 (0-56) 623-15-03; 623-19-02
Powstanców filaskich 106 C/lok.101
Bazylianska 6
Obronców Helu 3
Baranowskiego 5 (0-43) 843-34-15
Okrzei 46 (0-54) 231-22-75
Okulickiego 19A (0-71) 781-31-33
M. Reja 2 (0-84) 641-27-18
(0-91) 485-31-70; 0800 390-960
(0-74) 851-10-99; 853-20-74
(0-75) 713-52-86
(0-15) 822-35-74; 823-53-67
(0-22) 436-36-45; 436-36-55
(0-22) 614-11-00; 811-11-14
(0-58) 672-79-97
(0-71) 321-02-93
43
Page 44

From the Electrolux Group. The world’s No. 1 choice.
The Electrolux Group is the world's largest producer of powered appliances for kitchen, cleaning and outdoor use. More than 55 million
Electrolux Group products (such as refrigerators, cookers, washing machines, vacuum cleaners, chain saws and lawn mowers) are sold
each year to a value of approx. USD 14 billion in more than 150 countries around the world.
 Loading...