

Page 1
TUMBLE DRYER
kg 5
kg 2,5
800 / 900
75'-95'
45'-60'
1000 / 1200
65'-90'
40'-55'
800 / 900
90'-110'
60'-75'
1000 / 1200
85'-105'
55'-70'
650
65'-75'
30'-40'
kg 2,5
kg 1
CONDENSER DRYER
DUAL TEMPERATURE
T
C
7
1
1
4
AUTOREVERSE
0
A
B
C
D
E
F
G
H
J
K
9
0
60
3
0
L
SECHE-LINGE
WÄSCHETROCKNER
TROMMELDROGER
TC 7114
125993231
GB
F
D
NL
Unpacking: see page 5
Débridage: voir page 17
Entfernen der Transportsicherung: s. S. 29
Uitpakken: zie blz. 41
INSTRUCTION BOOKLET
MODE D’EMPLOI
GEBRAUCHSANWEISUNG
GEBRUIKSAANWIJZING
GB
F
D
NL
Page 2
Dear customer,
Please read these operating instructions carefully and pay particular attention to the safety notes indicated in
the first pages.
We recommend that you keep this instruction booklet for future reference and pass it on to any future owners.
Transport damages
After unpacking the machine please check it is not damaged. If in doubt, do not start it but contact your local
Service Centre.
The symbols you will see on some paragraphs of this booklet have the following meaning:
The warning triangle emphasize information that is particularly important for your safety or correct
functioning of the appliance.
The information marked with this symbol provides additional instructions and practical tips on the use of
the appliance.
Tips and information about economical and ecological use of the machine are marked with this symbol.
Our contribution to the protection of the
environment: we use recycled paper.
Contents
Important safety information ......................3
Disposal ..............................................................3
Tips for environmental protection ............4
Technical specifications................................4
Description of the appliance ......................4
Installation ..........................................................5
• Unpacking ............................................................5
• Positioning ............................................................5
• Electrical connection ............................................5
• Stacking kit............................................................5
• Door reversal ........................................................5
• Connecting a drain hose ......................................6
Use ........................................................................7
• The control panel ..................................................7
• Programme Chart..................................................8
• Operating sequence..............................................9
• Useful hints ........................................................10
Maintenance and Cleaning ........................11
• External cleaning ................................................11
• Cleaning the door................................................11
• Cleaning the filters ..............................................11
• Cleaning the condenser unit ..............................11
• Emptying the water reservoir ..............................12
• Cleaning the air intake grille................................12
Something not working? ............................13
2
Page 3
Important safety information
These warnings have been provided in the interest of safety. You MUST read them carefully before installing or
using the appliance.
ENGLISH
Installation
• Any electrical work required to install this appliance
should be carried out by a qualified electrician or
competent person.
• Care must be taken to ensure that the appliance
does not stand on the electrical supply cable.
• If the machine is situated on a carpeted floor,
please adjust the feet in order to allow air to
circulate freely.
Use
• This appliance is designed for domestic use only. If
the machine is used for any other purposes or is
not used correctly, the manufacturer accepts no
responsibility for any damage that might occur.
• Always unplug the appliance after use.
• Clothes which are dripping wet should not be
placed in the dryer.
• Danger of explosion: Never tumble dry items that
have been in contact with inflammable solvents
(petrol, methylated spirits, dry cleaning fluid and
the like). As these substances are volatile, they
could cause an explosion. Tumble dry only items
washed with water.
• Please make sure that no gas lighters have
accidentally been left in pockets of garments to be
loaded into appliance.
• Do not dry canvas shoes or sports shoes, as they
could get stuck between the door and the drum,
thus blocking this latter.
• Leave the door slightly ajar when the appliance is
not being used. This will allow the seal to be
preserved.
• Clean fluff filters after using the tumble dryer. To
prevent fire risks, do not use the appliance if the
fluff filters are damaged or without filters.
• Do not allow fluff to accumulate around the dryer.
General safety
• It is dangerous to alter the specifications or attempt
to modify this product in any way.
• Under no circumstances should you attempt to
repair the machine yourself. Repairs carried out by
inexperienced persons may cause injury or serious
malfunctioning. Contact your local Service Centre.
Always insist on genuine spare parts.
Child safety
• Children are often not aware of how dangerous
electrical appliances can be. When the machine is
working, children should be carefully supervised
and not be allowed to play with the appliance.
• The packaging components (e.g. plastic film,
polystyrene) can be dangerous to children - danger
of suffocation! Keep them out of children’s reach.
• Make sure that children or pets do not climb into
the drum.
• When the appliance is to be scrapped, cut off the
electrical supply cable and destroy the plug with
the remaining cable. Disable the door catch in
order to prevent children from becoming trapped
inside while playing.
Disposal
• Packaging materials
The materials marked with the symbol are
recyclable.
This means that they can be recycled by disposing of
them properly in appropriate collection containers.
• Machine
Use authorised disposal sites for your old appliance.
Help to keep your country tidy!
3
Page 4
2
5
3
4
1
3
6
7
D
R
Y
I
N
G
T
I
M
E
TC 7114 W
C
O
N
D
E
N
S
E
R
D
R
Y
E
R
D
U
A
L
T
E
M
P
E
R
A
T
U
R
E
6
X
T
R
A
C
A
P
A
C
I
T
Y
A
U
T
O
R
E
V
E
R
S
E
8
0
0
/
9
0
0
9
5
'
-1
1
5
'
4
5
'
-6
0
'
1
0
0
0
/
1
2
0
0
8
5
'
-
1
0
5
'
4
0
'
-
5
5
'
8
0
0
/
9
0
0
1
2
0
'
-
1
4
0
'
6
0
'
-
7
5
'
1
0
0
0
/
1
2
0
0
9
5
'
-1
1
5
'
5
5
'
-7
0
'
6
5
0
6
5
'
-7
5
'
3
0
'
-
4
0
'
C
O
T
T
O
N
S
Y
N
T
H
E
T
I
C
S
S
T
O
R
E
D
R
Y
S
p
u
n
a
t
r
p
m
k
g
6
k
g
2
.
5
I
R
O
N
D
R
Y
S
p
u
n
a
t
r
p
m
k
g
2
.
5
k
g
1
S
T
O
R
E
D
R
Y
L
O
W
T
E
M
P
.
C
O
O
L
S
T
A
R
T
O
N
/
O
F
F
Tips for environmental protection
To save energy and to help protect the environment,
we recommend that you follow these hints:
• Try to load the maximum capacity of the machine
as small loads are uneconomical.
• Always load well spun laundry. The higher the spin
speed, the lower the electricity consumption and
the shorter the drying times.
• Do not over-dry laundry, this avoids creasing and
saves energy.
Select the drying time/section according to the type
• To utilize the maximum load, laundry which is to be
dried ready to put away (store dry) can be dried
together with items to be ironed. To do this, select
the time for iron-dry, remove the iron-dry items at
the end of the programme and then finish-dry the
rest of the load.
• Clean the filters regularly to avoid excessive drying
times and high electricity consumption.
• Ventilate the room well. The room temperature
should not exceed +35°C during drying.
of laundry and the required degree of dryness.
Technical specifications
DIMENSIONS: Height 85 cm
Width 60 cm
Depth 58 cm
ELECTRICAL CONNECTION: 220/230 V/50 Hz
MAX. POWER ABSORBED: 2400 W
MIN. FUSE RATING: 16 A
MAX. DRYING CAPACITY: Cotton, linen 5 kg
Synthetics 2.5 kg
CONSUMPTION: Cotton, linen 3.64 kWh (5 kg store dry)
Cotton, linen 3 kWh (5 kg iron dry)
Synthetics 1.4 kWh (2.5 kg store dry)
This appliance complies with the following E.E.C. Directives:
- 73/23 EEC of 19.2.73 (Low Voltage Directive) and subsequent modifications;
- 89/336 EEC of 3.5.89 (Electromagnetic Compatibility Directive) and subsequent modifications.
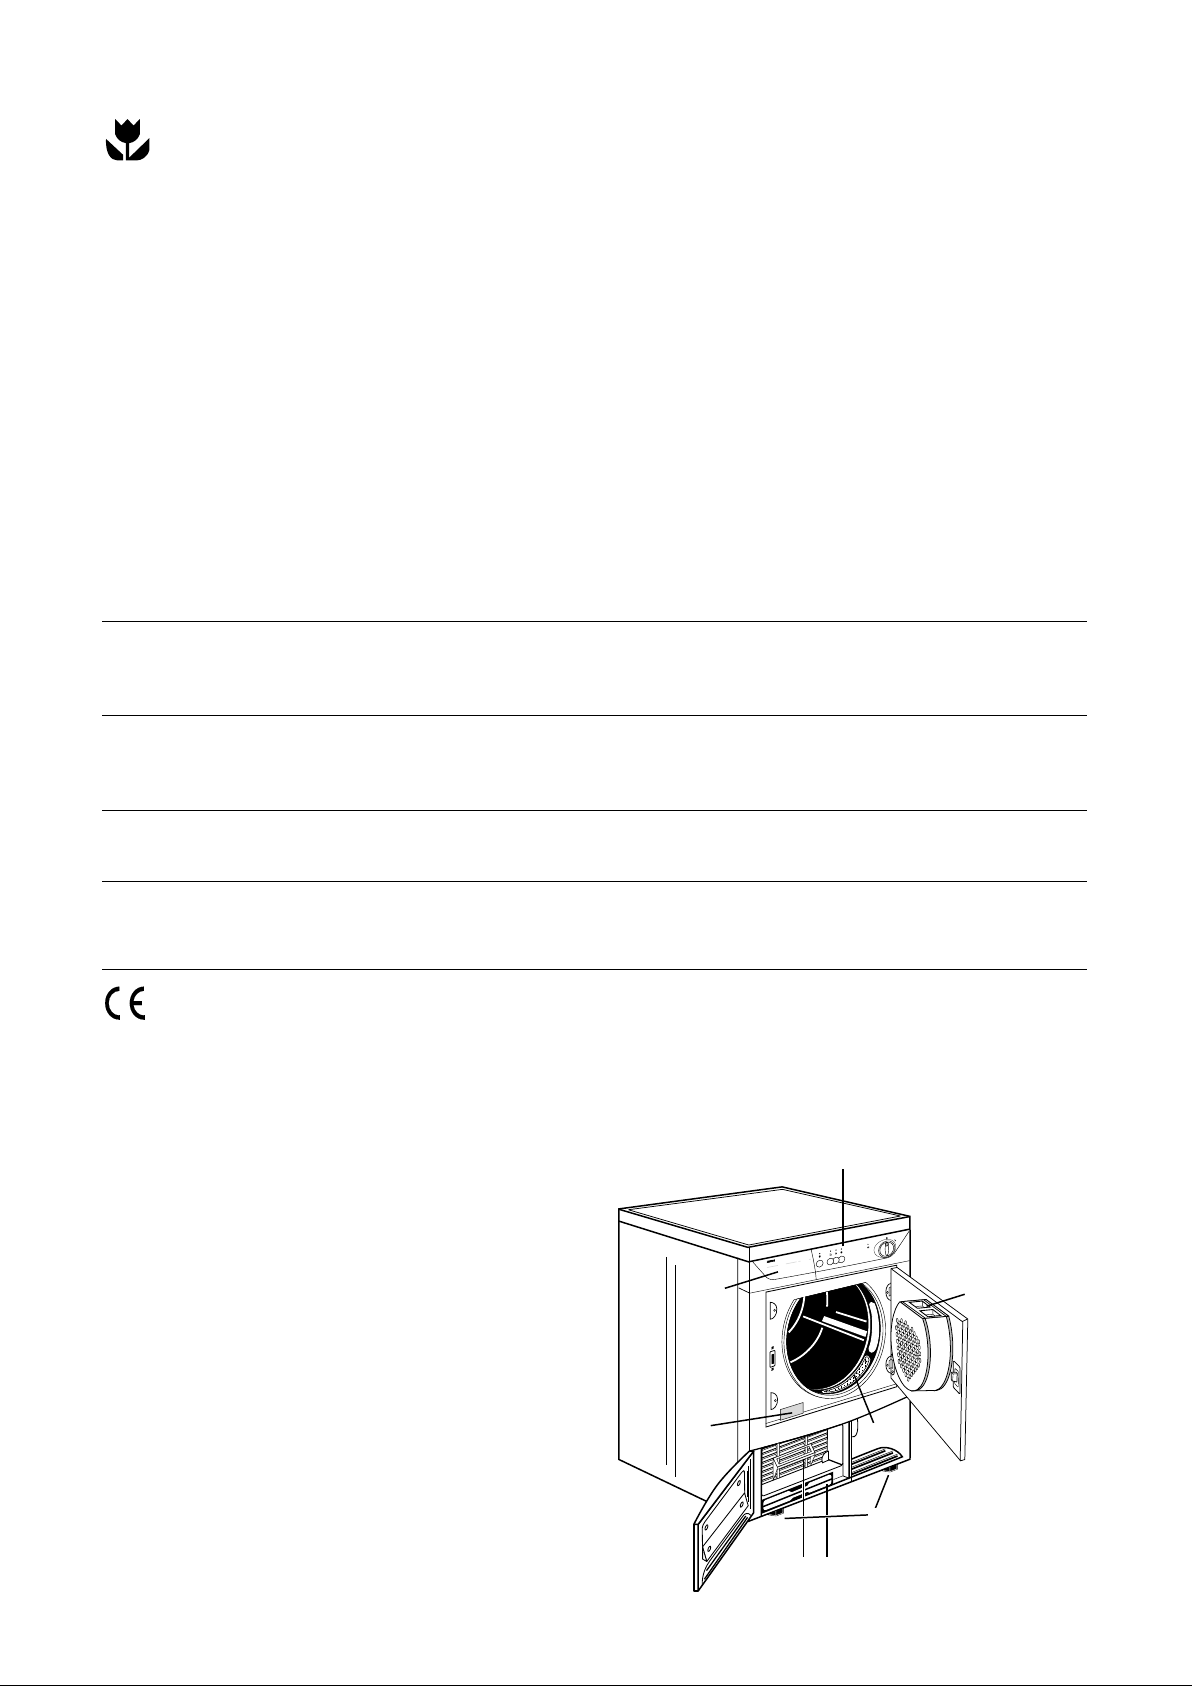
Description of the appliance
1 Control panel
2 Programme guide
3 Fluff filters
4 Rating Plate
5 Consenser Unit
6 Water reservoir
7 Adjustable feet
4
Page 5
Installation
P1106
P1148
Warning!
Unpacking
Slide out the polythene bag with the
polystyrene stuffing before using the appliance.
Should the appliance be moved, it must be
transported vertically.
Positioning
It is recommended that, for your convenience, the
machine is positioned close to your washing
machine.
The tumble dryer must be installed in a clean place,
where dirt does not build up.
Air must be able to circulate freely all round the
appliance. Do not obstruct the front ventilation grille
or the air intake grilles at the back of the machine.
To keep vibration and noise to a minimum when the
dryer is in use, it should be placed on a firm, level
surface.
Once in its permanent operating position, check that
the dryer is absolutely level with the aid of a spirit
level. If it is not, raise or lower the feet until it is.
The feet must never be removed.
Do not restrict the floor clearance through deeppile carpets, strips of wood or similar. This might
cause heat build-up which would interfere with
the operation of the appliance.
Important
The hot air emitted by the tumble dryer can reach
temperatures of up to 60°C. The appliance must
therefore not be installed on floors which are not
resistant to high temperatures.
When operating the tumble dryer, the room
temperature must not be lower than +5°C and higher
than +35°C, as it may affect the performance of the
appliance.
Electrical connection
This machine is designed to operate on a 220-230 V,
single-phase, 50 Hz supply.
Check that your domestic electrical installation can
take the maximum load required (2.4 kW), also
taking into account any other appliances in use.
Connect the machine to an earthed socket, in
accordance with current wiring regulations.
The manufacturer declines any
responsibility for damage or injury
through failure to comply with the
above safety precaution.
Should the appliance power supply
cable need to be replaced, this must
be carried out by our Service
Centre.
Important!
The power supply cable must be accessible after
installing the machine.
Stacking kit
A special stacking kit is available through your
dealer, to enable the mounting of the dryer on top of
a front loading washing machine with cover’s depth
between 48 and 60 cm.
Read carefully the instructions supplied with the kit.
Door reversal
To make it easier to load or unload the laundry the
door can be reversed.
This operation must be carried out by qualified
personnel.
Please contact the nearest Service Centre.
ENGLISH
5
Page 6
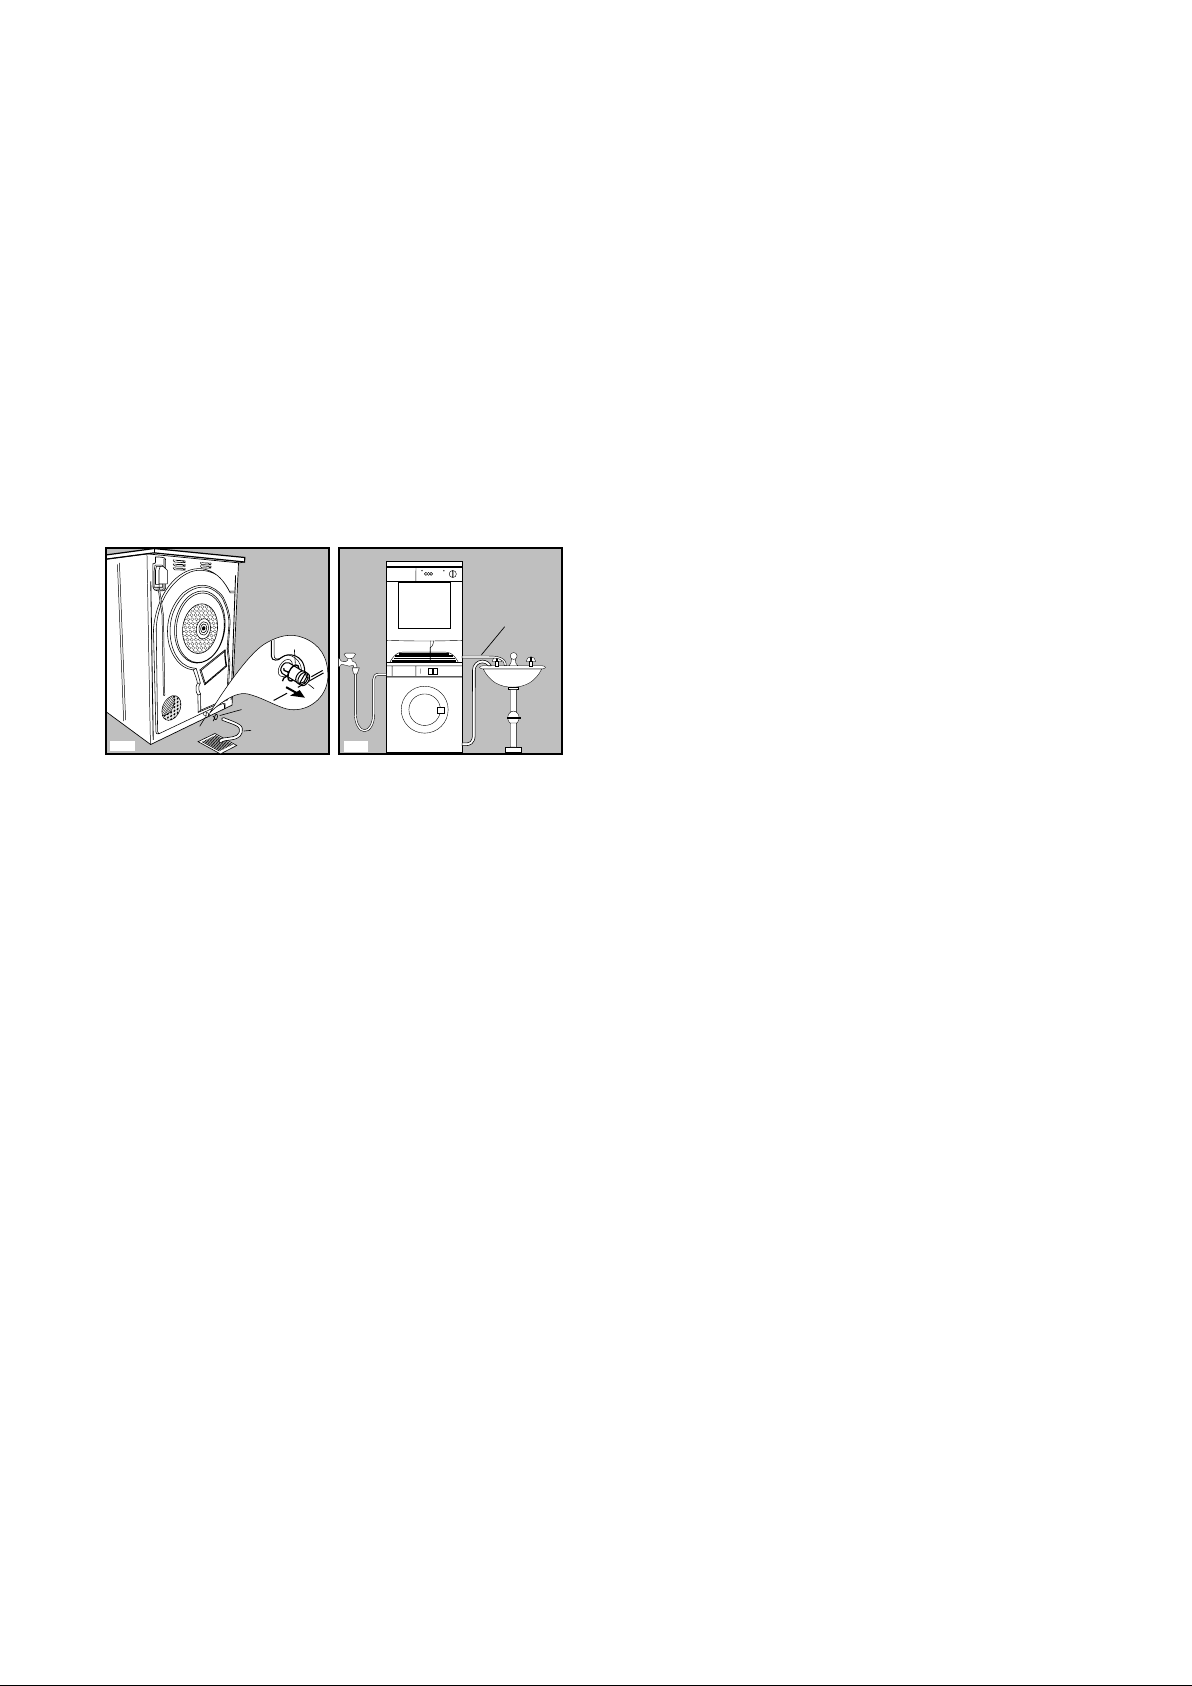
Connecting a drain hose
P1161
C
A
B
A
B
C
P1160
If there is a sink or drain near the appliance, the
condensed water can be discharged directly through
a hose that is available on the market.
In order to connect the hose to the appliance
proceed as follows:
• Remove the clamp (A);
• Pull out the plug (B);
• Insert the drain hose (C);
• Fasten the hose (C) to the appliance using the
clamp (A).
If the appliance is stacked on the washing machine,
the condensed water can be discharged through the
hose C as shown in figure, but take into account that
the hose must be pointed downwards.
6
Page 7

Use
TC
7
114
CONDENSER DRYER
DUAL TEMPERATURE
kg 5
kg 2,5
800 / 900
75'- 95'
45'- 60'
1000 / 1200
65'- 90'
40'- 55'
800 / 900
90'- 110'
60'- 75'
1000 / 1200
85'- 105'
55'- 70'
650
65' - 75'
30' - 40'
kg 2,5
kg 1
12345678
0
2
0
4
0
6
0
80
100
0
20
4
0
60
8
0
1
0
0
1
2
0
150
AUTOREVERSE
The control panel
ENGLISH
1 Programme Guide
This will help you to select the correct time for drying.
2 Mains-ON Light
Comes on when the appliance is switched on
(ON/OFF button pressed down) and goes out when
this button is released.
3 ON/OFF Button
This button is used to switch the dryer on. At the end
of the programme, release this button by pressing it
again to switch the dryer off.
4 Low Temperature Button
Press this button to reduce the temperature when
drying particularly delicate cotton or linen items.
In this case you should select a longer drying time.
5 Cool Tumble Button
By depressing this button the heat is cut off. This is
particularly useful to freshen the laundry (e.g. to
remove a persistent odour of moth balls) or to dry
extremely delicate items.
6 Start Button
Press this button to start the dryer after having
selected the programme.
If the door of the appliance is opened while the
programme is running, this button must be
pressed again after closing the door in order to
restart the programme from the point at which it
was interrupted.
7 Water Full Indicator Light
This light illuminates when the reservoir is full or
improperly fitted.
8 Time Selector Dial
The selector dial incorporates two drying cycles, one
of up to 150 minutes at a high temperature for cotton
and linen, and one of up to 100 minutes at a low
temperature for synthetic fabrics. To set the machine
to the selected time, turn the dial clockwise until the
time you want coincides exactly with the pointer.
NEVER attempt to turn the dial in an
anticlockwise direction.
When selecting the drying time you should
remember that it includes a 10 minute cooling phase
(position on the dial).
This phase should not be shortened, stopped or
avoided, as this could cause skin burns or damages
to the laundry.
7
Page 8
Programme Chart
Cottons and linens
Selector dial up to 150 minutes (high temperature section)
Type of laundry
Degree of drying
Amount
of laundry
Drying time in minutes for
laundry spun at
800/900 rpm 1000/1200 rpm
Cotton
Towelling
Shirts
Sheets
Hand towels
Tablecloths
Table napkins
Store dry
(wardrobe dry)
Iron dry
(not completely dry;
suitable for ironing)
Synthetics
Selector dial up to 100 minutes (low temperature section)
Type of laundry
Synthetics or mixed fabrics
which do not require
ironing.
Degree of drying
Store dry
Amount of laundry
5 kg 90-110
2.5 kg 60-75 55-70
5 kg 75-95 65-90
2.5 kg 45-60 40-55
Drying time in minutes for laundry
spun at a minimum speed of 650 rpm
2.5 kg 65-75
30-401 kg
85-105
Attention! Please follow the instructions on labels when drying mixed fabrics.
Drying times are given as a guide only and vary according to the size of the load, the type of laundry, the
degree of spinning prior to drying and the degree of drying required.
Start by selecting a short drying time. If necessary, perform an additional drying cycle afterwards.
Experience will soon enable you to estimate the drying time needed for your usual laundry loads. It is advisable
to take note of them.
Size of load
It is not necessary to weigh the laundry, if these instructions are followed:
• Cottons, linen: full drum, but not overloaded.
• Synthetics: half drum.
For a mixed load (cotton and synthetics, for example) select the drying time suitable for the most delicate
fabrics and then increase it by approx 10 mins.
8
Page 9
Operating sequence
P1108
P1149
Before using your tumble dryer for the first time, we
recommend to place a few damp cloths inside the
appliance and dry for 20 minutes.
There may be dust inside a brand new tumble dryer.
Drying
1. Connect the appliance.
2. Open the door.
3. Load the items one at a time, shaking them out
loosely.
4. Close the door. Please check the laundry does
not get caught between the door and filter.
5. Press the ON/OFF button : the mains-ON light
comes on.
6. Select the drying time.
7. If required, press the Low Temperature button
or the Cool Tumble button .
8. Press the Start button , the machine starts
operating.
The drum turns alternately in both directions
during drying.
All drying programmes end with a 10 minute
cooling phase (position on selector dial).
The machine stops automatically at the end of
this phase.
9. Release the ON/OFF button (the mains-ON light
goes out) and immediately remove the laundry.
After each use
• Switch the appliance off by releasing the ON/OFF
button . The mains-ON light goes out.
• Clean the filters (see page 11).
• Empty the water reservoir (see page 12).
Important!
If the drying programme has to be stopped before it
reaches the end, we recommend that you turn the
time selector dial to position (cooling) and wait
until the end of this phase before removing the
laundry. This will avoid a build-up of heat inside the
appliance.
Modifying the programme
To change a programme which is running without
opening the door, first depress the ON/OFF button
and then turn the time selector dial to the
required time. Press the ON/OFF button again.
ENGLISH
9
Page 10
Useful hints
• Try to load to the maximum capacity of the
machine as small loads are uneconomical.
For information, here is a list of the average
weights of some common laundry items.
Sheet 700 - 1000 g
Tablecloth 400 - 500 g
Kitchen towel 70 - 120 g
Table napkin 50 - 100 g
Towelling hand towel 150 - 250 g
Bathrobe 1000 - 1500 g
Man’s shirt 200 - 300 g
Pillowcase 100 - 200 g
Man’s pyjamas 400 - 500 g
Ladies’ nightdress 200 - 250 g
• Never tumble dry the following:
Particularly delicate items such as net curtains,
woollen, silk, fabrics with metal trim, nylon tights,
bulky materials such as anoraks, blankets,
eiderdowns, sleeping bags, feather quilts and any
items containing rubber foam or materials similar
to rubber foam.
• Always follow the instructions on garment labels:
• Avoid drying dark clothes with light coloured fluffy
items such as towels as they could attract the fluff.
• The laundry must be thoroughly spun before
tumble drying.
• Easy-care items, too, e.g. shirts, should be briefly
pre-spun before drying (depending on crease
resistance approx. 30 seconds or using the special
brief spin programme of your washing machine).
• Knitted textiles (knitted underwear) may shrink a
little during drying. Please do not overdry items of
this type. It is advisable to allow for shrinkage
when choosing the size of new purchases.
• You can also put starched items into your dryer.
However, to achieve the desired starched effect,
choose the programme “iron dry”. To remove any
starch residues, wipe out the internal drum after
drying with a moist cloth and then rub it dry.
• To avoid a static charge when drying is completed,
use either a fabric softener when you are washing
the laundry or a fabric conditioner specifically for
tumble dryers.
• Remove the laundry when the dryer has finished
drying.
• If individual items are still damp after drying, set a
brief post-drying time, but at least 20 minutes.
This will be necessary particularly for multilayered
items (e.g. collars, pockets, etc.).
may be tumble dried
normal drying (high temperature)
delicate drying (low temperature)
do not tumble dry
• Close pillowcases and covers with fasteners to
prevent small laundry items getting tangled inside
them. Close press studs, zips and hooks and tie
belts and apron strings.
• Sort laundry according to type and degree of
drying required.
• Do not over-dry laundry, this avoids creasing and
saves energy.
10
Page 11
Maintenance and Cleaning
A
U
T
O
R
E
V
E
R
S
E
k
g
5
k
g
2
,
5
8
0
0
/
9
0
0
7
0
'
-
9
0
'
3
5
'
-
5
0
'
1
0
0
0
/
1
2
0
0
6
5
'
-
8
5
'
3
0
'
-
4
5
'
8
0
0
/
9
0
0
8
0
'
-
1
0
0
'
5
5
'
-
7
0
'
1
0
0
0
/
1
2
0
0
7
5
'
-
9
5
'
5
0
'
-
6
5
'
6
5
0
5
0
'
-
6
0
'
3
0
'
-
3
5
'
k
g
2
,
5
k
g
1
P1151
P1110
A
U
T
O
R
E
V
E
R
S
E
k
g
5
k
g
2
,
5
8
0
0
/
9
0
0
7
0
'
-
9
0
'
3
5
'
-
5
0
'
1
0
0
0
/
1
2
0
0
6
5
'
-
8
5
'
3
0
'
-
4
5
'
8
0
0
/
9
0
0
8
0
'
-
1
0
0
'
5
5
'
-
7
0
'
1
0
0
0
/
1
2
0
0
7
5
'
-
9
5
'
5
0
'
-
6
5
'
6
5
0
5
0
'
-
6
0
'
3
0
'
-
3
5
'
k
g
2
,
5
k
g
1
P1150
P1155
P1159
P1177
A
U
T
O
R
E
V
E
R
S
E
k
g
5
k
g
2
,
5
8
0
0
/
9
0
0
7
0
'
-
9
0
'
3
5
'
-
5
0
'
10
0
0
/
1
2
0
0
6
5
'
-
8
5
'
3
0
'
-
4
5
'
8
0
0
/
9
0
0
8
0
'
-
1
0
0
'
5
5
'
-
7
0
'
10
0
0
/
1
2
0
0
7
5
'
-
9
5
'
5
0
'
-
6
5
'
6
5
0
5
0
'
-
6
0
'
3
0
'
-
3
5
'
k
g
2
,
5
k
g
1
P1152
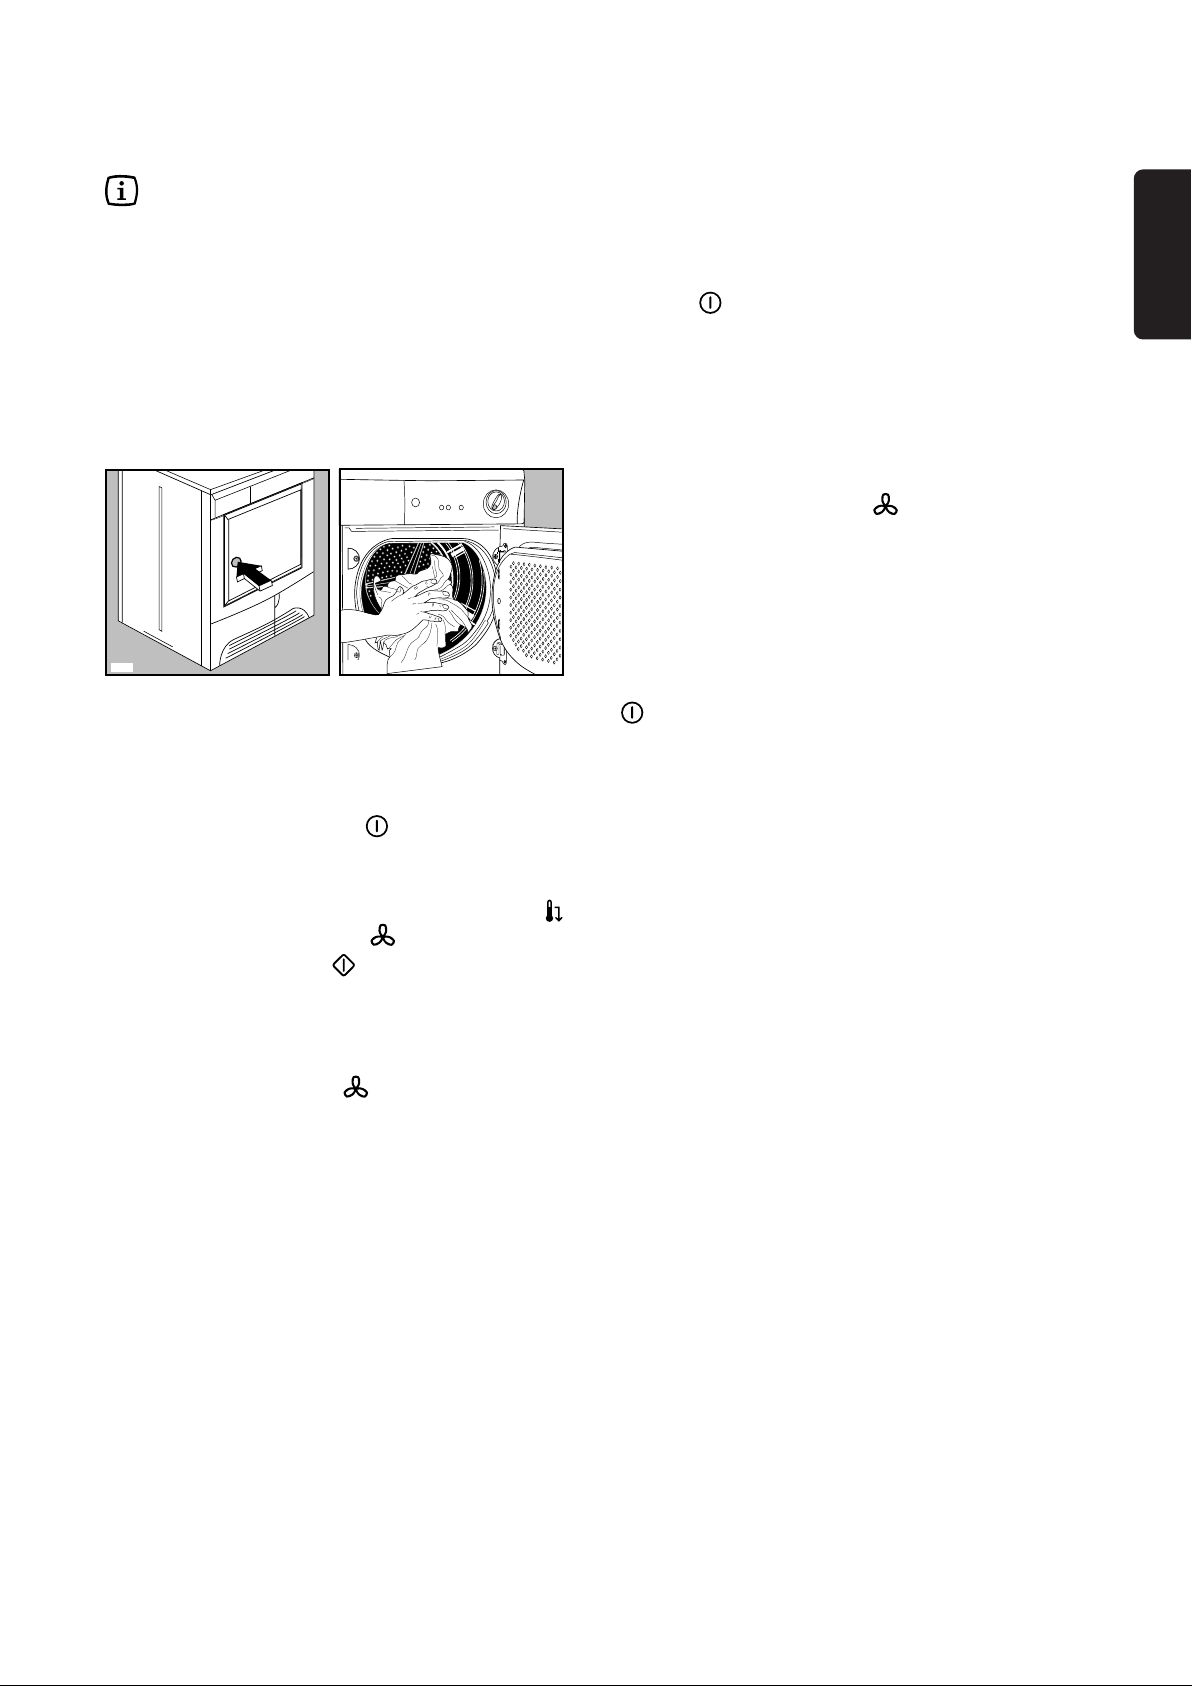
You must disconnect the appliance from the
electricity supply, before you can carry out any
cleaning or maintenance work.
External cleaning
Use only soap and water and then dry thoroughly.
Important: do not use methylated spirit, diluents or
similar products.
Cleaning the door
Clean periodically the interior part of the door to
remove any fluff from the seals around the filter.
Accurate cleaning ensures correct drying.
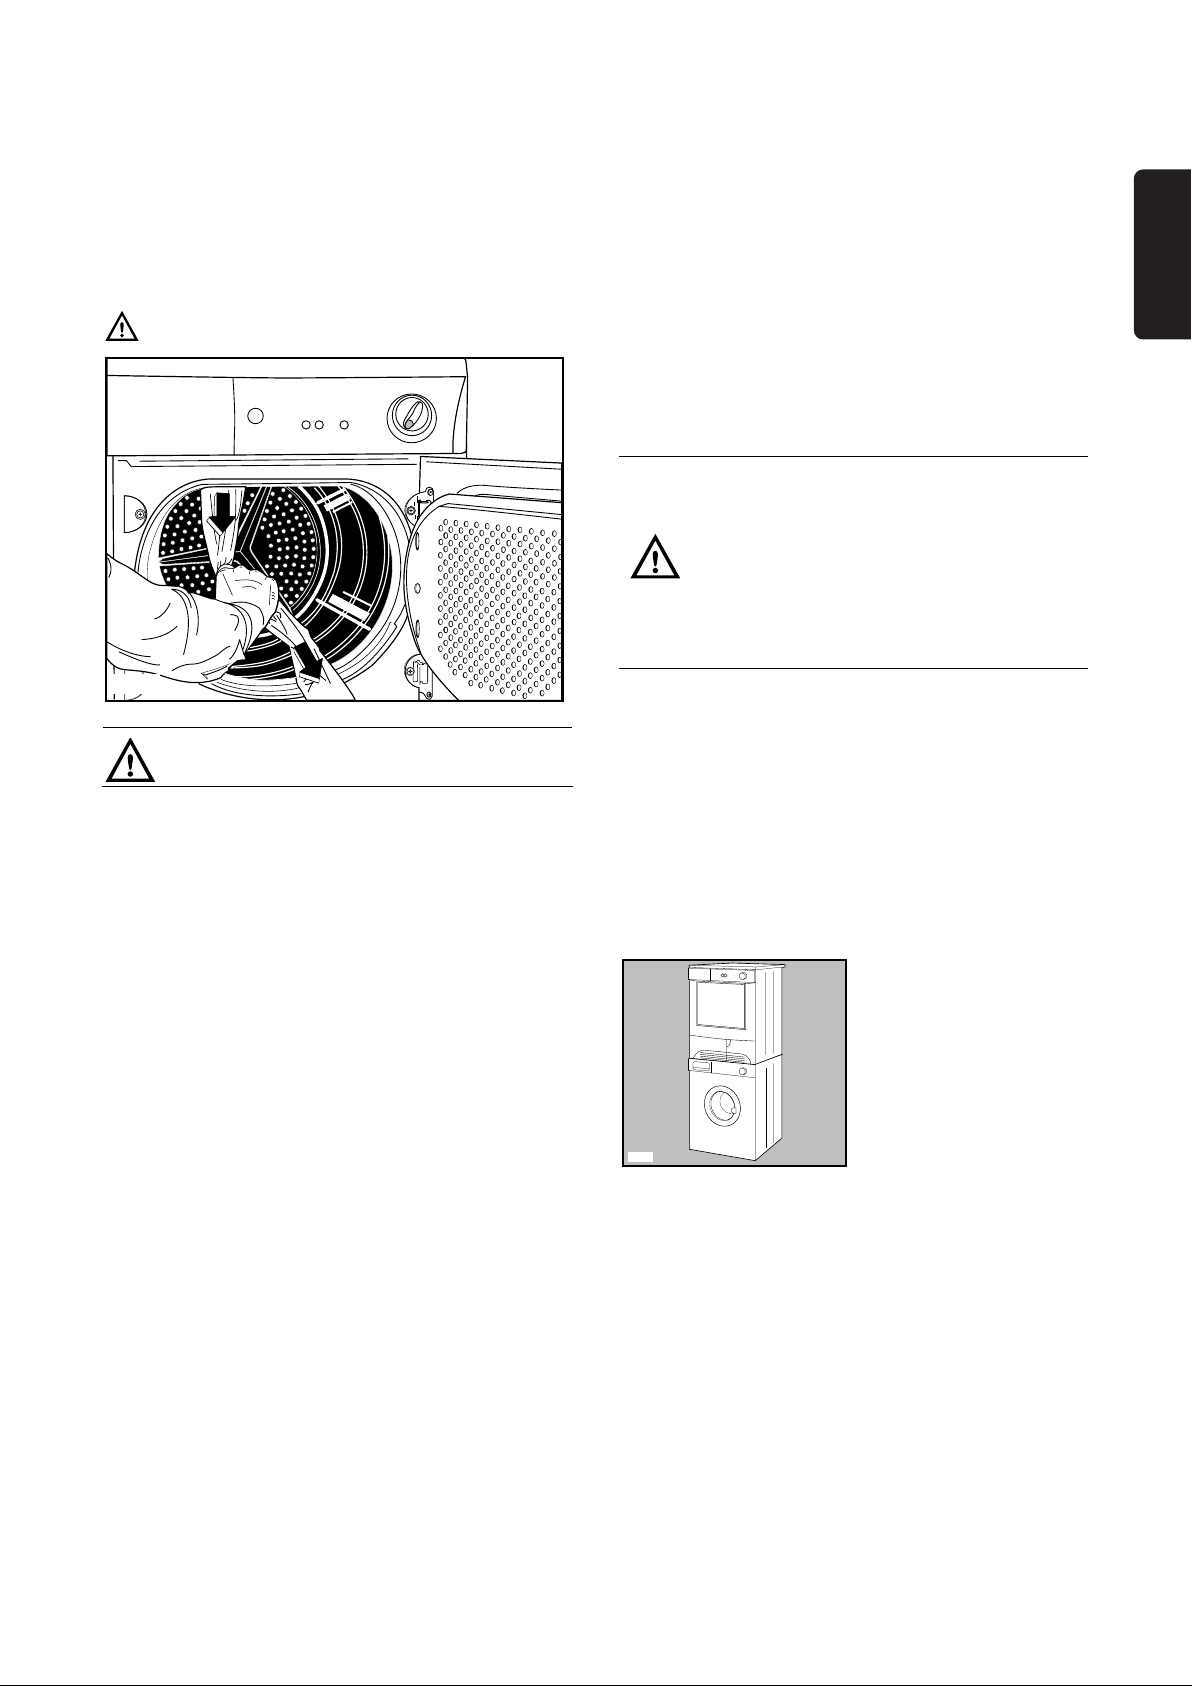
Cleaning the filters
Your dryer will only function well if the filters are
clean.
The filters collect all the fluff which accumulates
during drying and they must therefore be cleaned at
the end of each programme, before removing the
laundry, with a damp cloth.
After a while, a withish patina due to detergent
residue on laundry forms on the filters. When this
occurs, clean the filters (specially the filter in the
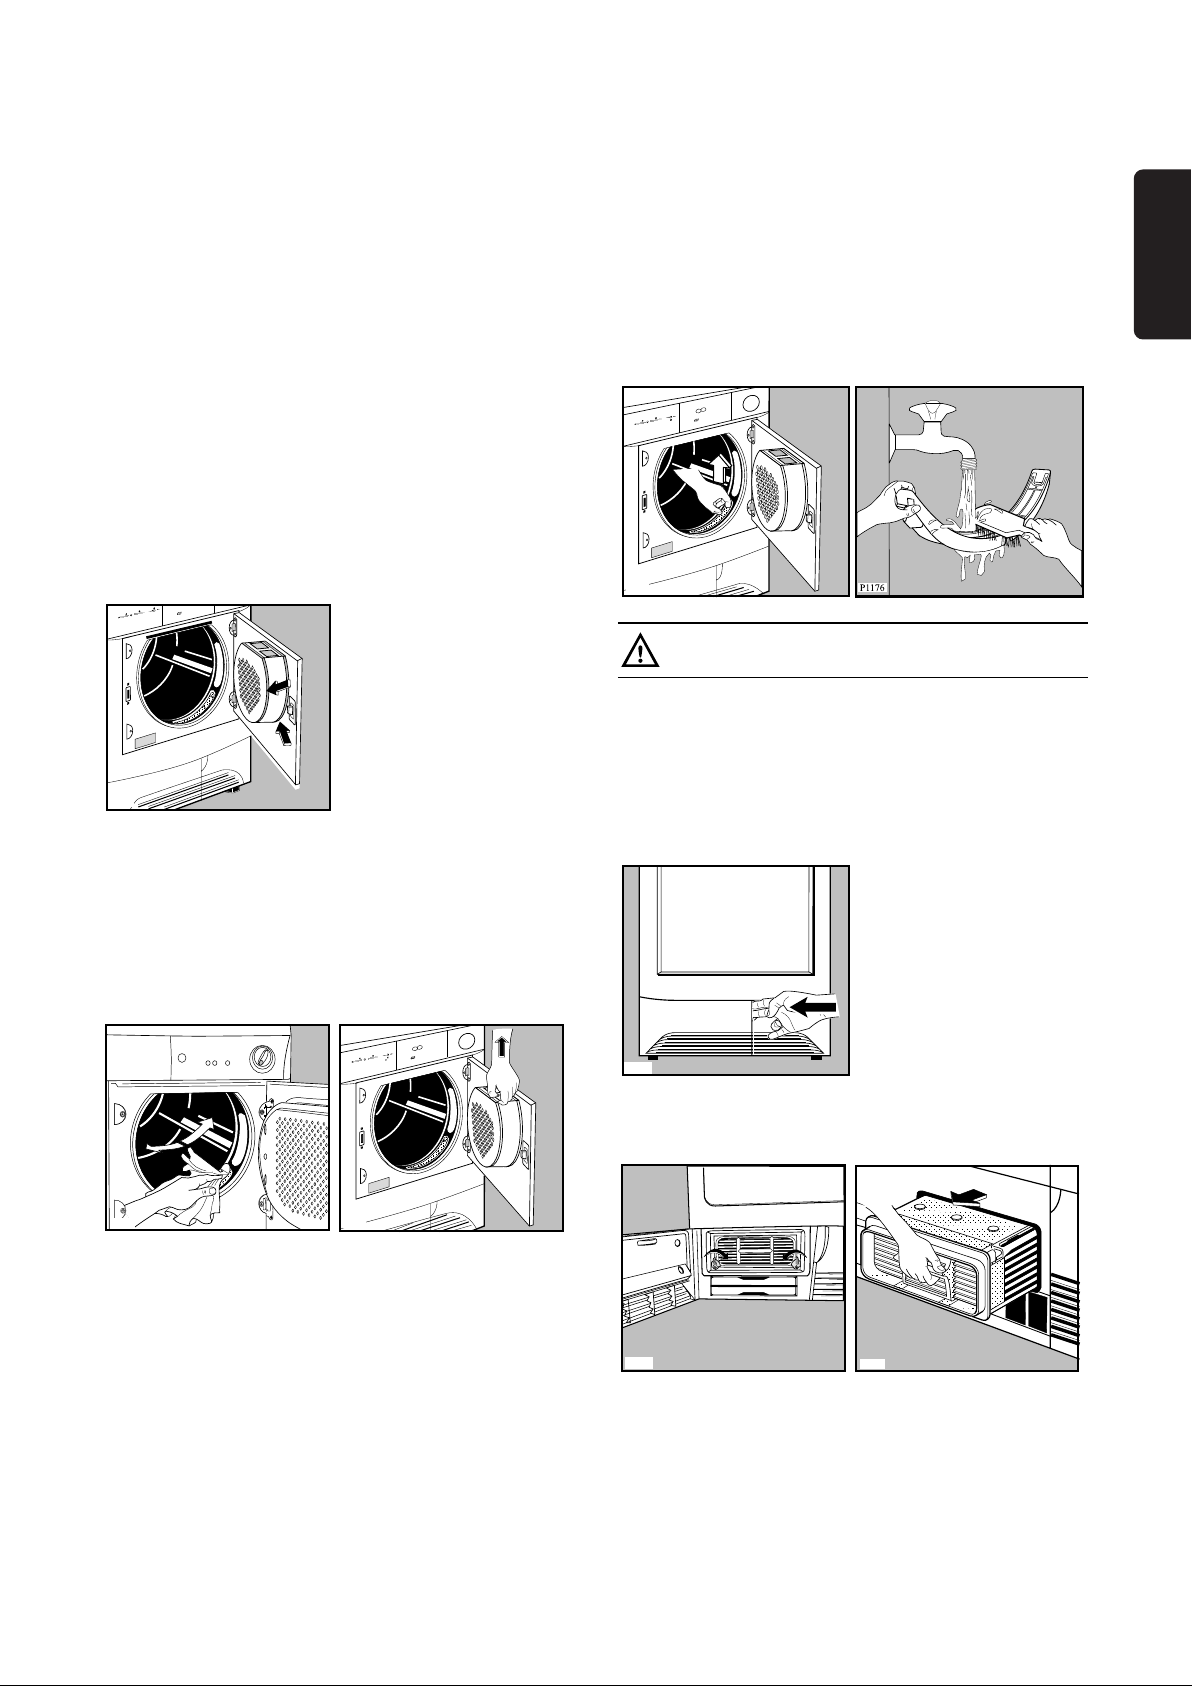
door opening) with warm water using a brush.
Remove it as per picture (it can be positioned with
the tooth facing to the left or to the right).
Do not use the appliance without filters.
Cleaning the condenser unit
Clean the air condenser periodically, 3 or 4 times a
year depending on how frequently the dryer is used.
The condenser is situated at the lower part of the
cabinet behind a small door. To open the door, push
the catch as per picture.
ENGLISH
To pull out the condenser, first turn the two red stops
downwards and then remove the condenser unit
holding it at the handle.
The filter in the inner door must be removed for
cleaning.
Do not be alarmed by the amount of fluff. It is not
due to excessive wear caused by the dryer. All fabric
loses fluff when drying but it goes un-noticed in the
air. In a tumble dryer it simply collects in the filter.
11
Page 12
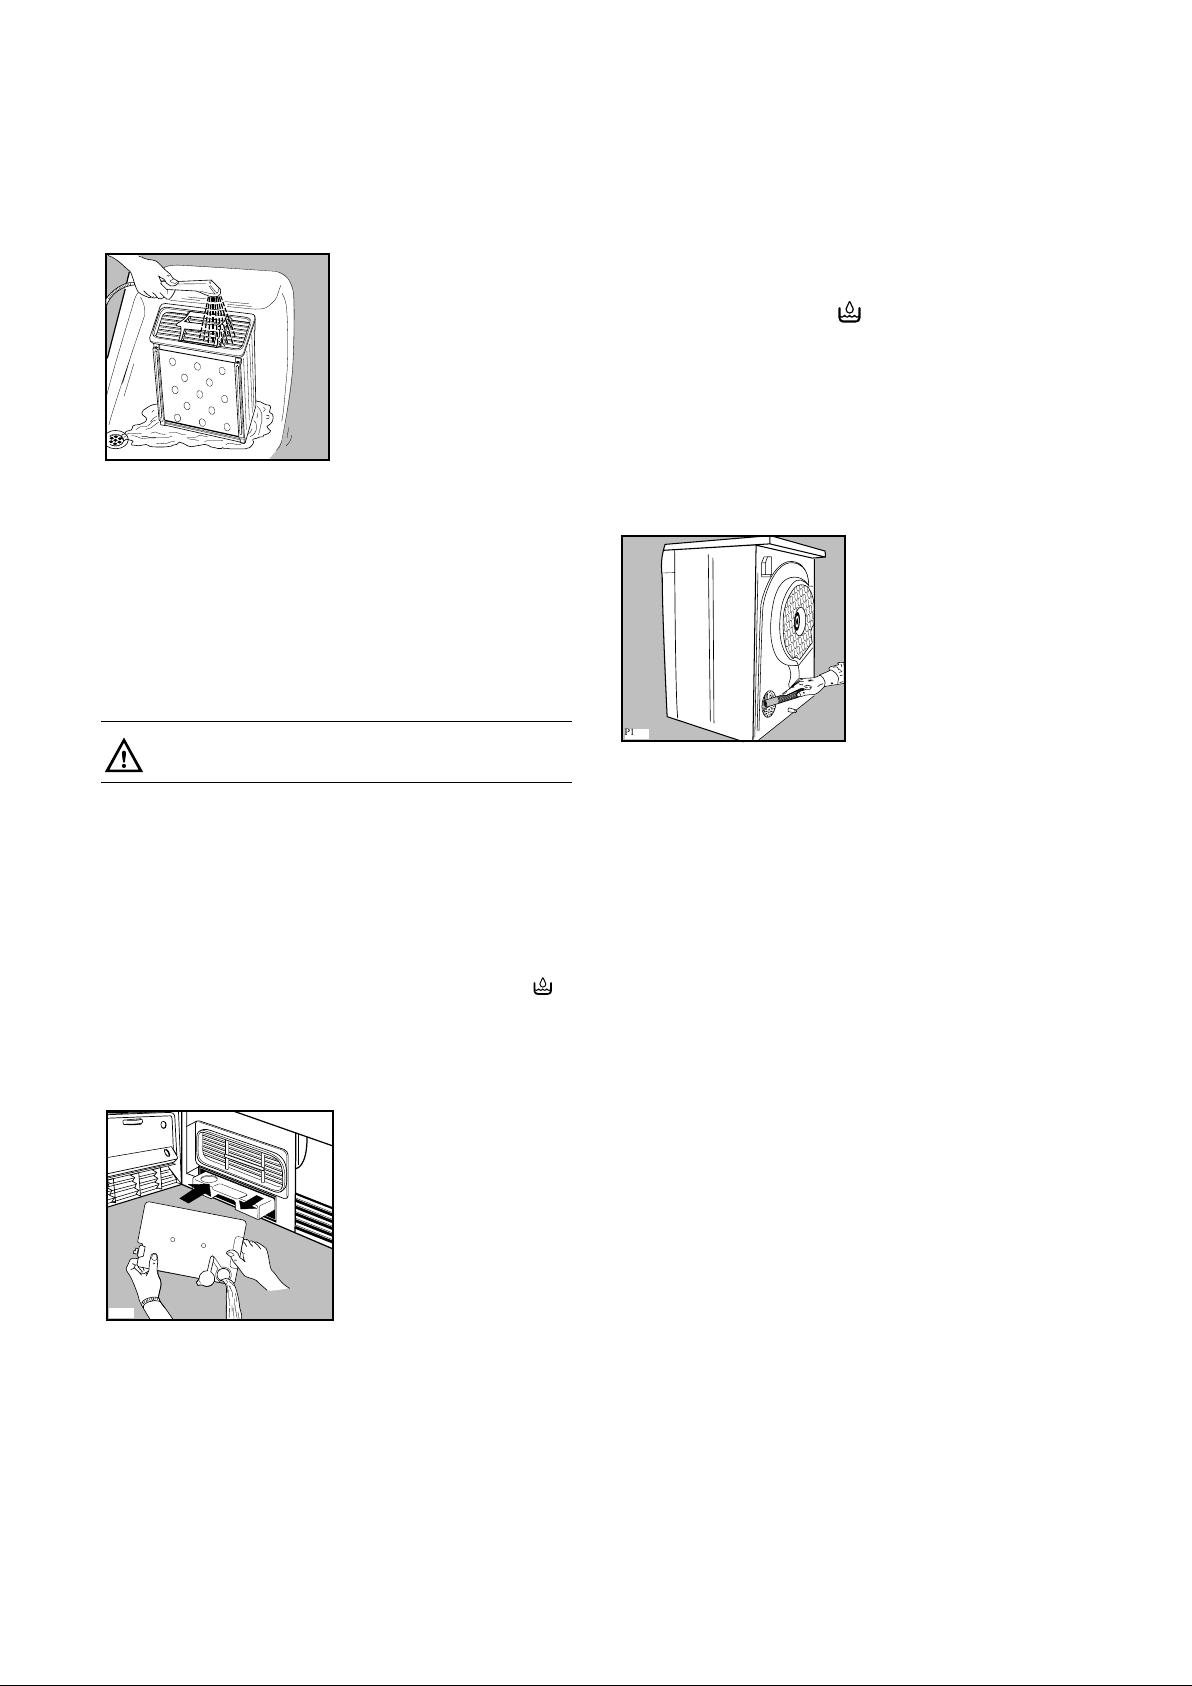
Clean it with a brush and rinse it under the shower if
P1178
P0639
P1162
necessary.
Also clean the outside, removing all fluff.
Clean the rubber seal round the condenser cabinet
and in the inner part of the small door with a damp
cloth.
Important! Do not use pointed objects or utensils to
clean the spaces between the plates, as this could
damage the condenser and make it permeable.
Re-fit the condenser, turn the red stops upwards and
close the door.
Do not use this appliance if the condenser
has not been fitted.
The reservoir must be re-inserted correctly.
Push it until it clicks.
The machine can remain unactive some seconds
before starting the programme and during this period
the water container light remains alight.
Handy tip: The condensed water may be used in a
steam iron or to top up a battery, etc. In this case it
must be filtered (e.g. through a coffee filter).
Cleaning the air intake grille
Using a vacuum cleaner remove the fluff from the air
intake grille at the back of the appliance.
Emptying the water reservoir
Water extracted from the laundry condenses inside
the machine and is collected in a reservoir.
The reservoir must be emptied after each drying
cycle to ensure efficient operation when the machine
is next used.
If this is not done a safety device trips: pilot light
on the control panel comes on and the programme
stops, leaving the laundry damp.
The reservoir can be emptied even in the middle of a
programme.
12
Page 13
Something not working?
Before contacting your local Service Centre, please make the following checks:
Problem Possible cause
• The dryer does not work:
• The dryer does not dry properly:
If, after the above checks, there is still a fault, call
your local Service Centre.
Please make sure you give the model and serial
number of the appliance.
• The door(s) is(are) open.
• The plug is not fitted into the wall socket.
• There is no electricity supply from the wall socket.
• The selector dial is not set correctly.
• The water reservoir is full or not correctly inserted.
• The start button has not been depressed.
FRANÇAIS
• The filters are clogged.
• The condenser is clogged.
• The water reservoir is full.
• The selected cycle is not suitable for the laundry.
• Insufficient drying time.
• The laundry has not been spun properly.
• The low temperature or cool tumble
function has been selected.
• Excessive laundry load.
• The dryer is not correctly installed.
This information can be found on the rating plate
(see picture on page 4 ).
13
Page 14
Chère cliente, Cher client,
veuillez lire attentivement cette notice d’utilisation.
Tenez compte surtout des avertissements importants donnés dans les premières pages de cette notice.
Gardez cette notice d’utilisation pour toute consultation future. Remettez-la à l’acheteur éventuel de votre
appareil.
Dégâts de transport
A la réception de l'appareil, nous vous prions de faire les «réserves d'usage» en présence du livreur (dégâts
esthétiques par exemple).
Comment lire votre notice d’utilisation?
Les symboles suivants vous guideront tout au long de la lecture de votre notice d’utilisation:
Instructions de sécurité
Conseils et recommandations
Informations liées à la protection de l’environnement
Notre contribution à la protection de l’environnement:
nous utilisons du papier recyclé.
Sommaire
Avertissements et conseils
importants
Recyclage . . . . . . . . . . . . . . . . . . . . . . . . . . . . .15
Conseils écologiques . . . . . . . . . . . . . . . . .16
Caractéristiques techniques . . . . . . . . . .16
Description de l’appareil . . . . . . . . . . . . . .16
Installation . . . . . . . . . . . . . . . . . . . . . . . . . . . .17
●
Débridage . . . . . . . . . . . . . . . . . . . . . . . . . . . .17
●
Emplacement . . . . . . . . . . . . . . . . . . . . . . . . . .17
●
Raccordement électrique . . . . . . . . . . . . . . . . .17
●
Installation en colonne . . . . . . . . . . . . . . . . . . .17
●
Réversibilité de la porte . . . . . . . . . . . . . . . . . .17
●
Raccordement d’un tuyau d’évacuation . . . . .18
. . . . . . . . . . . . . . . . . . . . . . . . . . . .15
Utilisation . . . . . . . . . . . . . . . . . . . . . . . . . . . . .19
●
Bandeau de commandes . . . . . . . . . . . . . . . . .19
●
Temps de séchage . . . . . . . . . . . . . . . . . . . . .20
●
Comment faire un séchage? . . . . . . . . . . . . . .21
●
Guide de séchage . . . . . . . . . . . . . . . . . . . . . .22
Entretien . . . . . . . . . . . . . . . . . . . . . . . . . . . . . .23
●
Nettoyage extérieur . . . . . . . . . . . . . . . . . . . . .23
●
Nettoyage de la porte . . . . . . . . . . . . . . . . . . .23
●
Nettoyage des filtres . . . . . . . . . . . . . . . . . . . .23
●
Nettoyage du condenseur d’air . . . . . . . . . . . .23
●
Vidange du bac d’eau de condensation . . . . .24
●
Nettoyage de la grille d’aspiration . . . . . . . . . .24
En cas d'anomalie
de fonctionnement
. . . . . . . . . . . . . . . . . . . .25
14
Page 15

Avertissements et conseils importants
Les avertissements suivants sont donnés pour votre sécurité. Nous vous prions de bien vouloir les lire
attentivement avant d'installer et d'utiliser l'appareil.
Installation
●
Si l'installation électrique de votre habitation
nécessite une modification pour le branchement
de votre appareil faites appel à un électricien
qualifié.
●
Assurez-vous, après avoir installé l'appareil, que
celui-ci ne repose pas sur le câble d'alimentation.
●
Si le sèche-linge est installé sur un sol recouvert
de moquette, réglez les pieds de façon à ce que
l’air puisse circuler librement autour de l’appareil.
Utilisation
●
Votre appareil est destiné à un usage domestique.
Ne l’utilisez pas à des fins commerciales ou
industrielles ou pour d’autres buts que celui pour
lequel il a été conçu.
●
Débranchez toujours l'appareil après son
utilisation.
●
N'introduisez jamais dans l'appareil du linge
simplement égoutté.
●
Ne séchez pas d'articles ayant été traités avec
des produits chimiques, tels que les produits
utilisés pour le nettoyage à sec, car ils pourraient
provoquer une explosion.
●
Contrôlez qu'un briquet n'est pas resté dans une
poche.
●
Ne séchez en aucun cas des chaussures
(tennis,etc.), car elles pourraient s’encastrer
entre le hublot et le tambour, bloquant ce
dernier.
●
Laissez la porte entrouverte lorsque le sèchelinge n'est pas utilisé, mais veillez à ce que les
enfants ne s'enferment pas dans l'appareil.
●
Les filtres doivent être nettoyés après chaque
utilisation. N'utilisez jamais l'appareil avec des
filtres endommagés ou sans filtres. Cela pourrait
provoquer un incendie.
●
Evitez l’accumulation de poussière autour de
l’appareil pour permettre à l’air de circuler
librement.
●
N'essayez jamais de réparer l'appareil vousmême. Les réparations effectuées par du
personnel non qualifié peuvent provoquer des
dommages importants.
Seul un Service Après-Vente recommandé est
habilité à intervenir. En cas d'intervention, exigez
des pièces de rechange certifiées constructeur.
Sécurité des enfants
●
Les enfants ne sont souvent pas en mesure de
reconnaître les risques émanant des appareils
ménagers. Il est donc indispensable de les
garder sous surveillance lorsque l'appareil
fonctionne. Ne les laissez pas jouer avec le
sèche-linge!
●
Les éléments constituant l'emballage (les films
en plastique, les morceaux de styropor par ex.)
peuvent présenter un danger pour les enfants.
Risque d'asphyxie! Gardez les éléments
d'emballage hors de la portée des enfants.
●
Assurez-vous que les enfants ou vos animaux
domestiques ne puissent pas pénétrer dans le
tambour du sèche-linge.
●
Si vous procédez à la mise à la casse de votre
appareil, veillez à mettre hors d'usage ce qui
pourrait représenter un danger: coupez le câble
d'alimentation au ras de l'appareil et détériorez
le dispositif de fermeture de la porte.
Vous éviterez ainsi que les enfants s’y enferment
en se mettant ainsi en danger de mort.
Recyclage
●
Recyclage de l’emballage
Tous les matériaux marqués par le symbole
sont recyclables. Pour qu’ils puissent être
récupérés (recyclés), il est nécessaire de les
déposer dans les déchetteries prévues à cet effet
(renseignez-vous auprès des autorités locales).
FRANÇAIS
Sécurité
●
Il est dangereux de modifier ou d'essayer de
modifier les caractéristiques techniques de cet
appareil.
●
Mise à la casse de l’ancien appareil
Informez-vous auprès de la municipalité au sujet de
l’endroit où déposer l’ancien appareil pour qu’il
puisse être ensuite recyclé ou détruit.
15
Page 16

Conseils écologiques
2
5
3
4
1
3
6
7
D
R
YIN
G
TI
M
E
T
C
7
1
1
4
W
C
O
N
D
E
N
S
E
R
D
R
Y
E
R
D
U
A
L
T
E
M
P
E
R
A
T
U
R
E
6
X
TRA
C
APA
CITY
AU
TO
R
EV
E
R
S
E
8
0
0
/
9
0
0
9
5
'
-1
1
5
'
4
5
'
-6
0
'
10
00
/
12
0
0
8
5
'
-
1
0
5
'
4
0
'
-5
5
'
8
0
0
/
9
0
0
1
2
0
'
-
1
4
0
'
6
0
'
-
7
5
'
1
0
00
/
12
0
0
9
5
'
-
1
1
5
'
5
5
'
-7
0
'
65
0
6
5
'
-7
5
'
3
0
'
-4
0
'
C
O
T
T
O
N
S
Y
N
T
H
E
T
I
C
S
S
TO
R
E D
R
Y
S
p
u
n
a
t
r
p
m
k
g
6
k
g
2
.
5
IR
ON
D
R
Y
S
p
u
n
a
t
r
p
m
k
g
2
.
5
k
g
1
ST
O
R
E
D
R
Y
LO
W
T
EM
P.
C
O
OL
STA
R
T
O
N
/
OF
F
Afin de réaliser des économies d’énergie, nous vous
conseillons de respecter les instructions suivantes:
●
Utilisez si possible l’appareil à pleine capacité;
des charges partielles sont peu économiques.
●
Tout le linge à sécher doit être essoré avant
d'être introduit dans le tambour. Plus la vitesse
d'essorage sera importante, plus courte sera la
durée du séchage d'où économie d'énergie.
●
Evitez de sécher le linge trop longtemps:
choisissez le temps/secteur de séchage en
fonction de la nature des textiles et du degré de
séchage désiré.
●
Pour utiliser l'appareil à pleine capacité vous
pouvez sécher en une fois du linge “prêt à
ranger” avec du linge “prêt à repasser”.
Sélectionnez le temps de séchage pour “prêt à
repasser” et à la fin du programme retirez ce
linge. Complétez le programme en sélectionnant
un temps supplémentaire pour le linge “prêt à
ranger”.
●
Nettoyez régulièrement les filtres pour éviter des
temps de séchage trop longs: vous
économiserez de l’énergie.
●
Pendant le fonctionnement de l’appareil, la
température ambiante ne doit pas dépasser
+ 35°C.
Caractéristiques techniques
DIMENSIONS: hauteur 85 cm
largeur 60 cm
profondeur 58 cm
PUISSANCE DE BRANCHEMENT: 220/230 V/50 Hz
PUISSANCE TOTALE ABSORBEE: 2400 W
FUSIBLE: 16 A
CAPACITE DE SECHAGE: coton, lin 5 kg
synthétiques 2,5 kg
CONSOMMATIONS: coton, lin 3,64 kWh (5 kg prêt à ranger)
coton, lin 3 kWh (5 kg prêt à repasser)
synthétiques 1,4 kWh (2,5 kg prêt à ranger)
Cet appareil est conforme aux Directives Communautaires suivantes:
- 73/23 CEE 19/02/73 (Basse tension) et modifications successives;
- 89/336 CEE 03/05/89 (Compatibilité Electromagnétique) et modifications successives.
Description de l’appareil
1 Bandeau de commandes
2 Guide des programmes
3 Filtres
4 Plaque signalétique
5 Condenseur d’air
6 Bac d’eau de condensation
7 Pieds réglables
16
Page 17

Installation
P1106
P1148
Attention!
Débridage
Enlevez le sachet en polyéthylène avec le
rembourrage en polystyrène avant d’utiliser
l’appareil pour la première fois.
Si l’appareil doit être déplacé par la suite,
il devra être transporté verticalement.
Emplacement
Raccordement électrique
Ce sèche-linge ne peut être branché qu'en
220-230V/ 50 Hz, 16 A.
Vérifiez que le compteur et les fusibles peuvent
supporter l'intensité absorbée par l'appareil (2.4
kW), en tenant compte des autres appareils
électriques branchés.
Utilisez un socle de prise de courant comportant
une borne de mise à la terre qui doit être
obligatoirement raccordée conformément aux
normes en vigueur.
Notre responsabilité ne saurait être
engagée en cas d'incident ou
d'accident provoqué par une mise à la
terre défectueuse ou inexistante.
Le remplacement éventuel du câble
d’alimentation ne devra être effectué
que par notre service après-vente.
Important!
Le câble d’alimentation doit être facilement
accessible après l’installation de l’appareil.
FRANÇAIS
L’installation de votre appareil nécessite un local
convenablement aéré.
Pour que l’appareil fonctionne dans les meilleures
conditions, il est indispensable de le mettre
parfaitement de niveau (emploi d’un niveau à bulle)
en agissant sur les quatre pieds réglables.
Un fonctionnement correct exige une arrivée d’air
exempte de poussière, ainsi qu’une évacuation de
l’air chaud à travers les fentes d’aération situées à
l’avant, en bas, dans le socle du sèche-linge.
Ne démontez pas les pieds, ne limitez pas la
circulation de l’air au sol par des tapis à longs
poils, des moulures, etc. Il pourrait se produire une
accumulation de chaleur qui nuirait au bon
fonctionnement du moteur ou risquerait de
l’endommager.
Remarque:
La chaleur dégagée par le sèche-linge peut
atteindre jusqu’à 60°C. Tenez compte de ce facteur
lors de l’installation de l’appareil sur des
revêtements de sol sensibles.
Pendant le fonctionnement du sèche-linge, la
température ambiante ne doit pas être inférieure à
+5°C ou supérieure à +35°C pour ne pas
compromettre le bon fonctionnement de l’appareil.
L’air doit pouvoir circuler librement à l’arrière de
l’appareil. Les grilles d’aspiration ne doivent pas être
obstruées.
Installation en colonne
Ce sèche-linge peut être installé en colonne sur
certains lave-linge de notre marque à chargement
frontal ayant une profondeur du couvercle entre 48
et 60 cm. La fixation de ces deux appareils
s'effectue à l'aide du kit vendu sur demande. Ce kit
est à commander auprès de votre revendeur. Les
instructions de montage se trouvent dans
l'emballage.
Veuillez les lire attentivement.
Réversibilité de la porte
Si nécessaire, le sens d’ouverture de la porte peut
être changé de droite à gauche.
Cette opération ne doit être effectuée que par un
technicien qualifié.
Pour ce faire adressez-vous au service après-vente
le plus proche de votre domicile.
17
Page 18

Raccordement d’un tuyau d’évacuation
P1161
C
A
B
A
B
C
P1160
Si le lieu d’emplacement est pourvu d’un dispositif
d’évacuation, l’eau condensée peut directement
être évacuée par un tuyau que vous pourrez vous
procurer auprès de votre magasin vendeur.
Suivez les instructions suivantes pour raccorder le
tuyau à l’arrière de l’appareil:
1. ôtez le collier de serrage A;
2. retirez le bouchon de fermeture B;
3. introduisez le tuyau C à fond;
4. fixez le tuyau C à l’aide du collier A.
Cette solution peut être adoptée aussi lorsque le
sèche-linge est installé en colonne sur le lave-linge.
Faites attention à ce que le tuyau C soit orienté vers
le bas (voir croquis ci-dessous).
18
Page 19

Utilisation
TC
7
114
CONDENSER DRYER
DUAL TEMPERATURE
kg 5
kg 2,5
800 / 900
75'- 95'
45'- 60'
1000 / 1200
65'- 90'
40'- 55'
800 / 900
90'- 110'
60'- 75'
1000 / 1200
85'- 105'
55'- 70'
650
65' - 75'
30' - 40'
kg 2,5
kg 1
12345678
0
2
0
4
0
6
0
80
100
0
20
4
0
6
0
8
0
1
0
0
12
0
150
AUTOREVERSE
Le bandeau de commandes
FRANÇAIS
1 Guide des programmes
Il vous aidera à choisir le temps convenant le mieux
à votre linge.
2 Voyant de mise sous tension
Il s'allume lorsque l'appareil est sous tension
(touche marche/arrêt enclenchée) et s’éteint en
faisant ressortir la même touche.
3 Touche marche/arrêt
Cette touche permet de mettre le sèche-linge sous
tension. A la fin du programme, faites ressortir cette
touche pour mettre le sèche-linge hors tension.
4 Touche séchage délicat
L’enclenchement de cette touche permet
d’effectuer un séchage à une température inférieure
pour du linge en coton particulièrement délicat.
Il convient alors de prolonger le temps de séchage.
Si la porte de l’appareil est ouverte en cours de
programme, cette touche doit être enclenchée à
nouveau après fermeture de la porte pour que le
programme démarre là où il a été interrompu.
7 Voyant du bac d’eau de condensation
Il s’allume lorsque le bac d’eau de condensation est
plein, ou s’il n’est pas inséré correctement dans son
logement.
Dans les deux cas, le programme s’interrompt.
8 Minuteur
Gradué jusqu'à 150 minutes pour le coton et jusqu'à
100 minutes pour les synthétiques, il vous permet
d'afficher un temps de séchage en fonction de la
nature et de la quantité de linge à sécher, ainsi que
du niveau de séchage désiré.
Pour afficher le temps choisi, tournez la manette
dans le sens des aiguilles d'une montre jusqu'à ce
que la graduation correspondante coïncide avec le
repère situé sur le bandeau de commandes.
Ne tournez jamais le minuteur dans le sens
inverse des aiguilles d'une montre.
5 Touche séchage naturel
L’enclenchement de cette touche permet
d’effectuer un séchage à température ambiante (les
éléments chauffants sont débranchés) pour du linge
délicat particulièrement fragile ou pour éliminer une
odeur trop prononcée, antimites par exemple.
6 Touche départ
Appuyez sur cette touche pour mettre le sèche-linge
en fonctionnement après avoir sélectionné le temps
de séchage.
Ventilation d'air froid
En fin de séchage, une phase de refroidissement de
10 minutes est prévue pour éviter le froissement du
linge (minuteur en position
).
Vous ne devez pas ouvrir la porte prématurément
pour éviter tout risque de brûlures et de dommages
au linge.
19
Page 20

Temps de séchage
Coton et lin
Minuteur jusqu’à 150 minutes (secteur à haute température)
Type de linge
Degré de
séchage souhaité
Charge maxi
Durée en minutes pour
linge essoré à
800/900 tr/min 1000/1200 tr/min
Peignoir
Serviettes-éponges
Chemises
Linge de lit
Linge de table
Torchons
5 kg 90-110
Prêt à ranger
2.5 kg 60-75 55-70
5 kg 75-95 65-90
Prêt à repasser
2.5 kg 45-60 40-55
85-105
Synthétiques
Minuteur jusqu’à 100 minutes (secteur à température réduite)
Type de linge
Synthétiques ou tissus
mélangés ne nécessitant
pas de repassage
Attention! Conformez-vous aux étiquettes d’entretien du linge pour le séchage des tissus mélangés.
Degré de
séchage souhaité
Prêt à ranger
Charge maxi
2.5 kg 65-75
Durée en minutes pour
linge essoré à 650 tr/min
30-401 kg
Les temps de séchage ne sont donnés qu'à titre indicatif. Seule votre expérience, après quelques utilisations,
vous permettra d'estimer le temps nécessaire au séchage de vos charges habituelles.
Ne sélectionnez pas une durée de séchage trop longue dès la première utilisation. Vous déterminerez le degré
de séchage souhaité en prolongeant progressivement la durée de séchage.
La durée du séchage est variable selon:
- la nature du linge
- l’importance de la charge
- l’intensité de l’essorage
- la degré de séchage souhaité
Charge
Il est souvent difficile d’estimer le poids des articles à sécher. C’est pourquoi nous vous conseillons de remplir
le tambour:
• en totalité mais sans pression excessive, pour le linge en coton, lin, métis;
• à moitié de son volume pour les cotons traités et les fibres synthétiques;
• au tiers environ de son volume pour les articles très fragiles.
Pour une charge de linge comportant des fibres de différentes natures (coton et synthétiques résistants, par
exemple), choisissez le temps de séchage en fonction des fibres les plus fragiles et augmentez-le de 10
minutes env.
20
Page 21

Comment faire un séchage ?
P1108
P1149
Après chaque utilisation
Avant la première utilisation de votre sèche-linge,
faites-le fonctionner pendant 20 minutes environ, en
chargeant le tambour de quelques chiffons humides
(essorés), ceci afin d’éliminer d’éventuelles traces de
poussières ou de graisses.
Pour sécher votre linge:
1. Branchez l’appareil.
2. Ouvrez la porte en appuyant sur le point de
pression marqué sur la porte (voir croquis).
3. Dépliez les pièces de linge une à une et
introduisez-les dans le tambour.
4. Fermez la porte. Assurez-vous que le linge ne
reste pas coincé entre la porte et le filtre.
5. Enfoncez la touche marche/arrêt : le voyant
de fonctionnement s’allume.
6. Sélectionnez le temps de séchage.
7. Enclenchez éventuellement la touche «séchage
délicat» ou la touche “séchage naturel” .
8. Appuyez sur la touche «départ» : le séchage
commence. Durant le séchage le tambour tourne
alternativement dans les deux directions.
Tous les programmes de séchage se terminent par
une phase de refroidissement de 10 minutes
(position du minuteur). L’appareil s’arrête
automatiquement à la fin de cette phase.
9. Faites ressortir la touche marche/arrêt (le voyant
de fonctionnement s’éteint) et sortez le linge
immédiatement.
• Mettez l’appareil hors tension en faisant ressortir
la touche marche/arrêt. Le voyant de
fonctionnement s’éteint.
• Nettoyez les filtres (voir page 23)
• Videz le bac d’eau de condensation (voir page 24)
Important!
Si le programme de séchage doit être arrêté avant
qu’il soit terminé, nous vous conseillons de tourner
la manette du minuteur sur la position
(refroidissement) et d’attendre la fin de cette phase
pour retirer le linge. Cela évitera une accumulation
de chaleur à l’intérieur de l’appareil.
Modification du programme
Pour changer un programme en cours sans ouvrir la
porte, il faut d’abord appuyer sur la touche
marche/arrêt et ensuite tourner le minuteur sur le
temps désiré.
Appuyez de nouveau sur marche/arrêt .
.
FRANÇAIS
21
Page 22

Guide de séchage
●
Ne surchargez pas le tambour de votre sèchelinge (5 kg de linge de coton sec ou 2,5 kg de
linge synthétique sec max.). Pour les articles
particulièrement fragiles, il est recommandé de
réduire encore la charge. Une surcharge du
tambour prolongerait anormalement le temps de
séchage et pourrait être cause du froissement du
linge.
Nous vous donnons à titre indicatif les poids
moyens des pièces les plus communes:
Drap 700-1000 g
Nappe 400-500 g
Torchon 70-120 g
Serviette 50-100 g
Serviette-éponge 150-250 g
Peignoir 1000-1500 g
Chemise d'homme 200-300 g
Taie d'oreiller 100-200 g
Pyjama 400-500 g
Chemise de nuit 200-250 g
Important:
●
Ne faites jamais sécher en machine:
- les lainages, les soieries et les voilages, les
articles en chlorofibres (Thermolactyl etc....).
- les matières caoutchoutées, les tissus plastifiés
et les articles ouatinés (anoraks, couettes etc...)
- les articles ayant été précédemment nettoyés
avec des produits inflammables
- les tissus ayant tendance à s'effilocher.
●
Conformez-vous scrupuleusement aux étiquettes
d'entretien de votre linge et assurez-vous que
l'article peut être séché en machine.
●
Vous obtiendrez un séchage homogène si vous
prenez la précaution de trier chaque catégorie de
linge selon son épaisseur, par exemple séchez
séparément les tissus-éponges.
●
Séchez un par un les articles tels que housses de
couette, draps, draps housse afin d'éviter qu'ils ne
s'enroulent et forment des noeuds.
●
Retournez sur l'envers les articles molletonnés et
pelucheux, ainsi que les poches de pantalon afin
d'éviter les épaisseurs longues à sécher.
●
Tout le linge à sécher doit être essoré avant de
procéder au séchage.
●
Evitez de sécher le linge trop longtemps: vous
économiserez de l'énergie et éviterez également la
formation de faux plis dans le linge.
●
L'adjonction d'assouplissant au dernier rinçage
(en lave-linge) permet de réduire l'électricité
statique sur le linge.
●
Choisissez, pour les tissus en coton épais, un
temps de séchage qui rend le linge prêt au
repassage (c'est-à-dire imprégné de l'humidité
que requiert un repassage immédiat). Si le
repassage ne peut pas se faire immédiatement,
enroulez le linge pour obtenir un degré
d'humidité uniforme.
●
Les articles tissés ont tendance à rétrécir. Un
séchage excessif renforce cet effet. Il faut, par
conséquent, sélectionner une durée de séchage
très courte pour ces textiles. Nous vous
recommandons de tenir compte des possibilités
de rétrécissement de ces textiles lors de
nouvelles acquisitions.
●
Si le linge devait être encore humide à la fin du
séchage, affichez un temps d’au moins 20
minutes pour parfaire le séchage.
Séchage en tambour permis
Séchage en tambour à haute température
Séchage en tambour à température
modérée
Séchage en tambour interdit
●
Fermez les boutons pression et les fermetures à
glissière et recousez les boutons si nécessaire.
●
Veillez à nouer les ceintures et les rubans des
vêtements avant de les introduire dans le
tambour.
22
Page 23

Entretien
A
U
T
O
R
E
V
E
R
S
E
k
g
5
k
g
2
,
5
8
0
0
/
9
0
0
7
0
'
-
9
0
'
3
5
'
-
5
0
'
1
0
0
0
/
1
2
0
0
6
5
'
-
8
5
'
3
0
'
-
4
5
'
8
0
0
/
9
0
0
8
0
'
-
1
0
0
'
5
5
'
-
7
0
'
1
0
0
0
/
1
2
0
0
7
5
'
-
9
5
'
5
0
'
-
6
5
'
6
5
0
5
0
'
-
6
0
'
3
0
'
-
3
5
'
k
g
2
,
5
k
g
1
P1151
P1110
A
U
T
O
R
E
V
E
R
S
E
k
g
5
k
g
2
,
5
8
0
0
/
9
0
0
7
0
'
-
9
0
'
3
5
'
-
5
0
'
1
0
0
0
/
1
2
0
0
6
5
'
-
8
5
'
3
0
'
-
4
5
'
8
0
0
/
9
0
0
8
0
'
-
1
0
0
'
5
5
'
-
7
0
'
1
0
0
0
/
1
2
0
0
7
5
'
-
9
5
'
5
0
'
-
6
5
'
6
5
0
5
0
'
-
6
0
'
3
0
'
-
3
5
'
k
g
2
,
5
k
g
1
P1150
P1177
A
U
T
O
R
E
V
E
R
S
E
k
g
5
k
g
2
,
5
8
0
0
/
9
0
0
7
0
'
-
9
0
'
3
5
'
-
5
0
'
1
0
0
0
/
1
2
0
0
6
5
'
-
8
5
'
3
0
'
-
4
5
'
8
0
0
/
9
0
0
8
0
'
-
1
0
0
'
5
5
'
-
7
0
'
1
0
0
0
/
1
2
0
0
7
5
'
-
9
5
'
5
0
'
-
6
5
'
6
5
0
5
0
'
-
6
0
'
3
0
'
-
3
5
'
k
g
2
,
5
k
g
1
P1152
Débranchez l'appareil avant toute opération
d'entretien.
Nettoyage extérieur
Utilisez de l'eau savonneuse. Rincez et séchez
soigneusement.
Important: N’utilisez jamais de produits abrasifs ou
caustiques.
Nettoyage de la porte
Nettoyez périodiquement l’intérieur de la porte pour
enlever d’éventuelles peluches des joints autour du
filtre. Un nettoyage soigneux est indispensable pour
un séchage correct.
Un frottement des fibres et du tissu se produit
pendant l’utilisation et le lavage du linge provoquant
une formation de peluches. Si le séchage du linge
est effectué sur un séchoir ou un fil ces peluches
s’envolent, tandis qu’à l’intérieur du sèche-linge
elles s’accumulent et se gonflent fortement sous
l’action du séchage.
Si une légère couche blanchâtre due aux résidus de
lessive dans le linge, se forme sur les filtres, ceux-ci
doivent être nettoyés à l’eau chaude à l’aide d’une
brosse. En ce cas, enlevez aussi le filtre situé dans
l’ouverture du hublot comme indiqué dans le
croquis. Il peut être remis en place la languette
tournée à gauche ou à droite.
FRANÇAIS
Nettoyage des filtres
Situés à l’intérieur de la porte et dans l’ouverture du
hublot, les filtres doivent être nettoyés après chaque
utilisation à l’aide d’un chiffon humide avant de
sortir le linge.
Le filtre à l’intérieur de la porte doit être enlevé pour
pouvoir le nettoyer. A cet effet, tirez sur la poignée
vers le haut.
La quantité de peluches recueillies ne doit pas vous
inquiéter, elle est due à une usure normale du linge
et non à un mauvais fonctionnement de l’appareil.
N’utilisez jamais votre sèche-linge sans
filtres.
Nettoyage du condenseur d’air
Nettoyez le condenseur d’air de temps en temps.
Lors d’un emploi fréquent du sèche-linge, effectuez
cette opération 3 à 4 fois par an.
Le condenseur d’air est situé à la partie avant, en
bas, derrière un portillon. Pour ouvrir ce dernier,
pressez la touche se trouvant à l’intérieur, comme
indiqué dans le croquis.
23
Page 24

P1162
P1178
Pour pouvoir sortir le condenseur, tournez d’abord
P0639
P1155
P1159
les deux butées rouges vers le bas et après retirez
le condenseur en le saisissant par sa poignée.
Nettoyez le condenseur avec une brosse et rincez
éventuellement comme indiqué sur la figure.
Nettoyez aussi l’extérieur du condenseur d’air et le
cas échéant, enlevez également les peluches.
Nettoyez le joint autour du condenseur à l’avant et à
l’arrière ainsi que le joint à la partie intérieure du
portillon à l’aide d’un chiffon humide.
Important!
N’utilizez jamais d’objets pointus pour le nettoyage
du condenseur, vous risqueriez de l’endommager.
Vidange du bac d’eau de condensation
Videz le bac d’eau de condensation de manière à
obtenir un séchage correct du linge au cours du
séchage suivant (l’eau extraite du linge pendant le
séchage se condense à l’intérieur du sèche-linge et
est récupérée dans le bac d’eau de condensation).
Pour cela, tirez le bac, videz l’eau et remettez le bac
en place en prenant soin de bien l’engager au
fond de son logement.
L’appareil peut employer jusqu’à 20 secondes avant
de reprendre son fonctionnement. Pendant ce laps
de temps le voyant reste allumé.
Si la vidange du bac d’eau de condensation n’est
pas régulièrement faite, le voyant correspondant
s’allume en cours de programme et celui-ci
s’interrompt automatiquement.
Remarque: L’eau de condensation récupérée peut
s’utiliser dans un fer à repasser à vapeur. Effectuez
alors le filtrage de cette eau (par exemple dans un
filtre à café).
Nettoyage de la grille d’aspiration
Enlevez les peluches et la poussière sur la grille
Remettez le condenseur à sa place, tournez les
deux butées vers le haut et fermez le portillon.
Ne faites jamais fonctionner l’appareil
sans condenseur d’air.
postérieure à l’aide d’un aspirateur.
24
Page 25

En cas d’anomalie de fonctionnement
En cas d'anomalie ou de panne, nous vous conseillons de lire attentivement ce qui suit avant d'appeler votre
service après-vente.
●
Anomalie
●
Le sèche-linge ne démarre pas:
●
Le résultat de séchage n'est pas
satisfaisant
●
Causes possibles
●
Porte et/ou portillon inférieur mal fermés
●
Appareil non branché
●
Mauvais état du fusible au compteur
●
Coupure de courant
●
Touche départ non enclenchée
●
Temps de séchage pas affiché ou pas affiché
correctement
●
Bac d’eau de condensation plein ou pas
correctement positionné
●
Le programme choisi ne convient pas au linge
●
Le temps de séchage est insuffisant
●
Le linge n’a pas été suffisamment essoré après
le lavage
●
Les filtres sont obstrués
●
Le condenseur n’a pas été nettoyé
●
Le bac d’eau de condensation est plein
●
Le tambour est surchargé
●
Vous avez enclenché la touche de séchage
délicat ou la touche de séchage naturel
●
Le sèche-linge n’a pas été installé correctement
FRANÇAIS
Si vous appelez un service après-vente, indiquez-lui
le modèle, le numéro de produit et le numéro de
série de l’appareil. Ces indications figurent sur la
plaque signalétique (voir page 16).
25
Page 26

Sehr geehrte Kundin, sehr geehrter Kunde,
lesen Sie bitte diese Gebrauchsanweisung sorgfältig durch.
Beachten Sie vor allem die Sicherheitshinweise auf den ersten Seiten dieser Gebrauchsanweisung! Bewahren
Sie bitte die Gebrauchsanweisung zum späteren Nachschlagen auf. Geben Sie sie an eventuelle Nachbesitzer
des Geräts weiter.
Transportschaden
Vergewissern Sie sich nach dem Auspacken zunächst, dass das Gerät nicht beschädigt wurde. Nehmen Sie
das Gerät im Zweifelsfall nicht in Betrieb, sondern wenden Sie sich bitte an den Kundendienst.
Einige Passagen in der Gebrauchsanweisung sind besonders gekennzeichnet. Diese Kennzeichnungen haben
folgende Bedeutung:
Hier finden Sie wichtige Informationen über ungeeignete Handhabungen lhres Wäschetrockners, die
technische Schäden verursachen können.
Hier finden Sie Informationen, die für die einwandfreie Funktion des Geräts besonders wichtig sind.
Hier finden Sie wichtige Umweltschutzhinweise.
Unser Beitrag zum Umweltschutz:
Wir verwenden Recycling-Papier.
Inhalt
Wichtige Sicherheitshinweise ..................27
Entsorgung ......................................................27
Umwelttipps ....................................................28
Technische Daten ..........................................28
Gerätebeschreibung ....................................28
Installation........................................................29
● Entfernen der Transportsicherung....................29
● Aufstellung........................................................29
● Elektrischer Anschluss ....................................29
● Wasch-/Trockensäule ......................................29
● Türanschlagwechsel ........................................29
● Anschluss eines Ablaufschlauchs ....................30
Gebrauch ..........................................................31
● Bedienblende ..................................................31
● Trockenzeiten ....................................................32
● Reihenfolge der Arbeitsschritte........................33
● Praktische Tipps ................................................34
Wartung ............................................................35
● Reinigung des Trocknergehäuses....................35
● Reinigung des Siebbereichs ............................35
● Reinigung der Flusensiebe ..............................35
● Reinigung des Luftkondensors ........................35
● Entleerung des Kondensatbehälters ................36
● Reinigung des hinteren Sauggitters ................36
Betriebsstörungen ........................................37
26
Page 27

Wichtige Sicherheitshinweise
Die folgenden Warnhinweise werden im Interesse der allgemeinen Sicherheit gegeben. Lesen Sie diese vor der
Installation oder der Verwendung dieses Gerätes aufmerksam durch!
●
Installation
●
Lassen Sie die beim Elektroanschluss des Geräts
entstehenden Arbeiten von einem fachkundigen
und zugelassenen Installateur ausführen.
●
Stellen Sie sicher, dass das Gerät nicht auf dem
Netzkabel steht.
●
Der Aufstellplatz darf nicht mit textiler
Auslegware, hochflorigem Teppichboden usw.
belegt sein, damit die Belüftung des Motors
gewährleistet ist.
Gebrauch
●
Gerät nur im Haushalt und für den angegebenen
Zweck benutzen.
●
Ziehen Sie nach Gebrauch des Geräts immer den
Netzstecker aus der Steckdose.
●
Nicht geschleuderte Wäsche darf nie im
Wäschetrockner getrocknet werden.
●
Mit feuergefährlichen Reinigungs- und
Lösungsmitteln (Waschbenzin, Alkohol,
Fleckentferner etc.) behandelte Wäschestücke
dürfen nie in diesem Wäschetrockner getrocknet
werden. Es besteht Brandgefahr.
Also nur in Wasser gewaschene Textilien
trocknen!
●
Die Benützer sollten sich immer davon
überzeugen, dass keine Gasfeuerzeuge (auch
nichtfunktionierende) in den Kleidungsstücken
vergessen wurden.
●
Trocknen Sie nie Sportschuhe (z.B.
Tennisschuhe) in diesem Trockner. Diese
könnten zwischen Trommel und Einfülltür
rutschen und dadurch die Trommel blockieren.
●
Lassen Sie die Einfülltür zwischen einem
Trockenvorgang und dem folgenden angelehnt,
damit die Türdichtung auf Dauer wirksam bleibt.
●
Benützen Sie das Gerät nie ohne Flusensiebe
oder mit beschädigten Flusensieben. Es besteht
Brandgefahr.
Der Raum um den Trockner muss von Flusen
●
freigehalten werden.
Allgemeine Sicherheitsvorschriften
●
Es ist gefährlich, Veränderungen am Gerät oder
seinen Eigenschaften vorzunehmen.
Versuchen Sie keinesfalls, das Gerät selbst zu
reparieren. Reparaturen, die nicht von
Fachleuten ausgeführt werden, können zu
schweren Unfällen oder Betriebsstörungen
führen.
●
Das technische Service sollte nur von
autorisierten Kundendienststellen ausgeführt
werden; verlangen Sie nur Original-Ersatzteile.
Sicherheit von Kindern
●
Kinder können Gefahren, die im Umgang mit
Elektrogeräten liegen, oft nicht erkennen. Sorgen
Sie deshalb für die notwendige Aufsicht während
des Betriebs und lassen Sie Kinder nicht mit
dem Wäschetrockner spielen.
●
Verpackungsteile (z.B. Folien, Styropor) können
für Kinder gefährlich sein. Erstickungsgefahr!
Verpackungsteile von Kindern fernhalten.
●
Stellen Sie sicher, dass Kinder oder Kleintiere
nicht in die Trommel des Wäschetrockners
klettern.
●
Bei der Entsorgung des Wäschetrockners:
Ziehen Sie den Netzstecker, schneiden Sie die
elektrische Zuleitung ab und beseitigen Sie den
Stecker mit der Restleitung. Zerstören Sie das
Türschloss: so können spielende Kinder sich
nicht einsperren und nicht in Lebensgefahr
geraten.
Entsorgung
●
Verpackungsentsorgung
Die recyclingfähigen Materialien der Verpackung
sind mit dem Symbol gekennzeichnet und
sollten grundsätzlich der Wiederverwertung
zugeführt werden.
>PE< steht für Polyethylen
>PS< steht für Polystyrol
>PP< steht für Polypropylen
Entsorgung des Altgeräts
Wenn Sie Ihr Gerät eines Tages endgültig außer
Betrieb nehmen, bringen Sie es bitte zum
nächsten Recyclingcenter oder zu Ihrem
Fachhändler, der es gegen einen geringen
Unkostenbeitrag zurücknimmt.
DEUTSCH
27
Page 28

2
5
3
4
1
3
6
7
D
R
Y
I
N
G
T
I
M
E
T
C
7
1
1
4
W
CO
N
D
EN
S
E
R D
R
YER
D
U
A
L
T
E
M
P
E
R
A
T
U
R
E
6
X
T
R
A
C
A
P
A
C
I
T
Y
A
U
T
O
R
E
V
E
R
S
E
8
0
0
/
9
0
0
9
5
'
-1
1
5
'
4
5
'
-
6
0
'
1
0
0
0
/
1
2
0
0
8
5
'
-
1
0
5
'
4
0
'
-
5
5
'
8
0
0
/
9
0
0
1
2
0
'
-
1
4
0
'
6
0
'
-7
5
'
1
0
0
0
/
1
2
0
0
9
5
'
-1
1
5
'
5
5
'
-
7
0
'
6
5
0
6
5
'
-
7
5
'
3
0
'
-4
0
'
C
O
T
T
O
N
S
Y
N
T
H
E
T
I
C
S
S
T
O
R
E
D
R
Y
S
p
u
n
a
t
r
p
m
k
g
6
k
g
2
.
5
I
R
O
N
D
R
Y
S
p
u
n
a
t
r
p
m
k
g
2
.
5
k
g
1
S
T
O
R
E
D
R
Y
L
O
W
T
E
M
P
.
C
O
O
L
S
T
A
R
T
O
N
/
O
F
F
Umwelttipps
Ihr Wäschetrockner arbeitet besonders
wirtschaftlich, wenn Sie folgendes beachten:
●
Die maximale Füllmenge nutzen -entsprechend
der Programmübersicht auf Seite 32. Kleine
Wäschefüllungen sind unwirtschaftlich.
●
Die Wäsche gründlich entwässern. Je höher die
Schleuderdrehzahl, umso kürzer ist die
Trockenzeit und umso geringer ist der
Stromverbrauch.
●
Übertrocknen vermeiden durch sorgfältige
Zeitwahl entsprechend des gewünschten
Trockengrades. Übertrocknete Wäsche lässt sich
zudem schlecht bügeln.
●
Um die maximale Füllmenge auszunutzen, kann
Wäsche, die schranktrocken werden soll, ohne
weiteres mit Bügelwäsche getrocknet werden.
Dazu die Trockenzeit für Bügelwäsche einstellen,
nach Programmende die Bügelwäsche
entnehmen und die restliche Wäsche
anschließend zu Ende trocknen.
●
Wenn Sie die Flusensiebe regelmäßig reinigen,
vermeiden Sie längere Trockenzeiten und
höheren Stromverbrauch.
●
Den Raum gut belüften. Die Raumtemperatur
sollte während des Trocknens + 35°C nicht
übersteigen.
Technische Daten
ABMESSUNGEN: Höhe 85 cm
Breite 60 cm
Tiefe 58 cm
NETZSPANNUNG/FREQUENZ: 220/230 V/50 Hz
GESAMTANSCHLUSSWERT: 2400 W
ABSICHERUNG: 16 A
FASSUNGSVERMÖGEN: Baumwolle, Leinen 5 kg
Pflegeleichte Gewebe 2,5 kg
VERBRAUCHSWERTE: Baumwolle, Leinen 3,64 kWh (5 kg schranktrocken)
Baumwolle, Leinen 3 kWh (5 kg bügelfeucht)
Pflegeleichte Gewebe 1,4 kWh (2,5 kg schranktrocken)
Dieses Gerät entspricht den folgenden EG-Richtlinien:
- 73/23 EWG vom 19.2.73 - Niederspannungsrichtlinie
- 89/336 EWG vom 3.5.89 (einschließlich Änderungsrichtlinie 92/31/EWG) - EMV-Richtlinie.
Gerätebeschreibung
1 Bedienblende
2 Programmübersicht
3 Flusensiebe
4 Typenschild
5 Luftkondensor
6 Kondensatbehälter
7 Schraubfüße
28
Page 29

Installation
P1106
P1148
Achtung!
Entfernen der Transportsicherung
Ziehen Sie den Folienschlauch mit dem
Polystyrolpolster heraus, bevor Sie das Gerät
zum ersten Mal in Betrieb nehmen.
Bei Umzug muss das Gerät senkrecht
transportiert werden.
Aufstellung
Der Trockner kann auf jedem ebenen Fußboden
aufgestellt werden. Er muss waagerecht stehen,
also eventuell mit einer Wasserwaage ausgerichtet
werden. Durch Verstellen der Schraubfüße lassen
sich Bodenunebenheiten bzw. -schräglagen
ausgleichen.
Elektrischer Anschluss
Der Anschluss darf nur über eine vorschriftsmäßig
installierte Schutzkontakt-Steckdose an 220-230 V
(50 Hz) erfolgen.
Der Anschlusswert beträgt ca. 2,4 kW. Erforderliche
Absicherung: 16A - LS-L-Schalter.
Die elektrische Sicherheit des Geräts
ist nur gewährleistet, wenn das
Erdungssystem der Hausinstallation
vorschriftsmäßig installiert ist.
Das Netzkabel darf nur vom
Kundendienst ausgetauscht werden.
Wichtig!
Das Netzkabel muss nach Aufstellung des
Geräts leicht zugänglich sein.
Wasch-/Trockensäule
Der Aufbau zur platzsparenden Wasch-/
Trockensäule ist mit allen Waschvollautomaten mit
Deckeltiefe zwischen 48 und 60 cm und
Frontbeschickung möglich. Hierzu benötigen Sie
einen Bausatz, der bei Ihrem Händler erhältlich ist.
Eine ausführliche Montageanweisung liegt dem
Bausatz bei. Lesen Sie bitte diese sorgfältig durch.
DEUTSCH
Für eine einwandfreie Funktion ist eine gute und
stauungsfreie Luftzufuhr bzw. Warmluftabführung
durch die Lüftungsschlitze vorne, unten im Sockel
des Trockners sicherzustellen.
Schraubfüße nicht entfernen.
Die Bodenfreiheit nicht durch hochflorige
Teppichböden, Leisten u.ä. einschränken.
Es könnte ein Wärmestau eintreten, der das Gerät in
seiner Funktion beeinträchtigt.
Hinweis:
Die vom Trockner abgegebene Warmluft kann bis zu
60°C betragen - Aufstellung nicht auf empfindlichen
Teppichböden .
Die Raumtemperatur sollte nicht niedriger als +5°C
und nicht höher als +35° sein.
Der Raum um den Trockner muss von Flusen
freigehalten werden.
Türanschlagwechsel
Falls erwünscht ist es möglich, die Tür auf
Linksanschlag zu ändern.
Zu diesem Zweck wenden Sie sich bitte an die
nächste Kundendienststelle.
29
Page 30

Anschluss eines Ablaufschlauchs
P1161
C
A
B
A
B
C
P1160
Befindet sich am Aufstellungsort des Geräts ein
Abfluss, kann das kondensierte Wasser auch direkt
über einen Ablaufschlauch abgeleitet werden.
Der Innendurchmesser des Schlauchs
14 mm. Die Länge kann beliebig sein. Der Schlauch
ist im Fachhandel erhältlich.
Die Ablauföffnung befindet sich an der GeräteRückseite unten mittig.
Folgende Handgriffe sind erforderlich
● Schlauchklemme A lösen;
● Verschluss-Kappe B vom Gërat abziehen;
● Ablaufschlauch C aufstecken;
● Ablaufschlauch C mit Klemme A sichern.
beträgt
Das Anbringen eines Ablaufschlauchs ist besonders
sinnvoll, wenn der Trockner mit einer
Waschmaschine zu einer Wasch-/Trockensäule
kombiniert wird.
Der Ablaufschlauch C muss nach unten positioniert
werden (siehe Abb.).
30
Page 31

Gebrauch
TC
7
114
CONDENSER DRYER
DUAL TEMPERATURE
kg 5
kg 2,5
800 / 900
75'- 95'
45'- 60'
1000 / 1200
65'- 90'
40'- 55'
800 / 900
90'- 110'
60'- 75'
1000 / 1200
85'- 105'
55'- 70'
650
65' - 75'
30' - 40'
kg 2,5
kg 1
12345678
0
2
0
4
0
6
0
80
100
0
20
4
0
6
0
8
0
1
0
0
12
0
150
AUTOREVERSE
Bedienblende
1 Programmübersicht
Die Programmübersicht gibt Ihnen einen Überblick
über die zur Verfügung stehenden Programme mit
ihren zugeordneten Trockenzeiten.
2 Betriebskontrolle
Die Betriebskontrolllampe leuchtet, wenn das Gerät
eingeschaltet ist.
3 Ein/Aus-Taste
Durch Drücken der Taste, wird das Gerät
eingeschaltet. Die Betriebskontrolllampe leuchtet.
Nach Beendigung des Trocknungsprogramms,
Taste erneut drücken. Das Gerät schaltet sämtliche
Funktionen ab.
4 Schon-Taste
Drücken, wenn empfindliche Baumwollgewebe
getrocknet wird.
Durch Drücken der Taste wird die Heizleistung von
2400 W auf 1400 W reduziert. Eine längere
trockenzeit sollte gewählt werden.
7 Signallampe für Kondensatbehälter
Die Lampe leuchtet, wenn der Kondensatbehälter voll
oder nicht richtig eingesetzt ist.
Das Programm wird unterbrochen.
8 Zeitwähler
Er ist in zwei Sektoren aufgeteilt:
ein Sektor mit normaler (hoher) Temperatur bis 150
Minuten für Baumwolle und Leinen;
ein Sektor mit reduzierter Temperatur bis 100
Minuten für pflegeleichte Gewebe.
Zeitwähler im Uhrzeigersinn auf die gewünschte
Zeit einstellen.
Versuchen Sie keinesfalls den Wähler entgegen dem
Uhrzeigersinn zu drehen.
Abkühlphase
Bei der Wahl der Trockenzeit beachten Sie bitte,
dass ca. 10 Minuten vor Programmende die
Abkühlphase beginnt (Programmstellung ). Die
Heizung wird automatisch abgeschaltet und die
Wäsche abgekühlt.
DEUTSCH
5
Taste “Lüften”
Durch Drücken der Taste, wird die Heizung
abgeschaltet.
Dies eignet sich besonders zum Lüften von
Kleidungsstücken und zum Glätten von zerknitterten
Textilien.
6 Start-Taste
Durch Drücken der Taste, starten Sie das gewählte
Trocknungsprogramm.
Hinweis! Wird das laufende Trocknungsprogramm
durch Öffnen der Gerätetür unterbrochen, muss,
nachdem die Tür wieder geschlossen wurde, das
Programm neu gestartet werden.
Die Abkühlphase darf auf keinen Fall abgekürzt oder
unterbrochen werden oder ganz entfallen.
Verbrennungsgefahr!
31
Page 32

Trockenzeiten
Baumwolle und Leinen
Zeitwähler bis 150 Minuten (volle Heizleistung)
Art der Wäsche
Gewünschter
Trockengrad
Füllmenge
Trocknungszeit je nach
Schleuderdrehzahl
800/900 U/min
1000/1200
U/min
Bademantel
Frottierhandtücher
Overhemden
Bettwäsche
Tischwäsche
Küchentücher
Schranktrocken
Bügeltrocken
Pflegeleicht
Zeitwähler bis 100 Minuten (reduzierte Heizleistung)
Art der Wäsche
Wäsche aus Synthetik- und
Mischgeweben, die nicht
gebügelt werden soll
Gewünschter
Trockengrad
Schranktrocken
5 kg 90-110
2.5 kg 60-75 55-70
5 kg 75-95
2.5 kg 45-60 40-55
Trocknungszeit für kurz
Füllmenge
2.5 kg 65-75
geschleuderte Wäsche
(650 U/min)
30-401 kg
85-105
65-90
Achtung! Beachten Sie bitte das Wäscheetikett für das Trocknen von Mischgeweben.
Die angeführten Trockenzeiten sind Richtwerte und sind von der Füllmenge, der Gewebeart und der
Restfeuchte der zu trocknenden Wäsche abhängig.
Es empfiehlt sich, eine kurze Trockenzeit zu wählen und im Bedarfsfall eine Nachtrockenzeit einzustellen.
Die Erfahrung wird Ihnen zeigen, welche Trockendauer für die verschiedenen Textilarten Ihnen am
angenehmsten ist; notieren Sie sie sorgfältig.
Füllmenge
Sie brauchen die Wäsche nicht abzuwiegen, wenn Sie sich an folgende Faustregeln halten:
●
Baumwolle, Leinen: volle Trommel, aber nicht überladen.
●
Pflegeleichte Gewebe: Trommel bis zur Hälfte füllen.
●
Besonders empfindliche Gewebe: Trommel nicht mehr als 1/3 füllen.
Bei einer gemischten Ladung (z.B. Baumwolle und pflegeleichte Gewebe) empfehlen wir, die Trockenzeit nach
dem empfindlichsten Gewebe zu wählen und um ca. 10 min zu verlängern.
32
Page 33

Reihenfolge der Arbeitsschritte
P1108
P1149
Vor der ersten Inbetriebnahme empfiehlt es sich,
den Trockner mit einigen feuchten Tüchern zu
beschicken und ca. 30 Minuten laufen zu lassen.
Dadurch wird sichergestellt, dass sich kein Staub
und Schmutz mehr in der Trommel befindet.
1. Gerät anschliessen.
2. Tür durch leichten Druck auf die markierte Stelle
öffnen.
3. Waschgut in die Trommel legen.
4. Tür schließen. Achten Sie darauf, dass keine
Wäschestücke eingeklemmt werden.
Nach dem Trocknen
●
Gerät ausschalten durch Drücken der EIN/AUSTaste, die Betriebskontrollleuchte erlischt.
●
Flusensiebe reinigen (siehe Seite 35)
●
Kondensatbehälter leeren (siehe Seite 36)
Hinweis!
Soll das Trocknungsprogramm vorzeitig beendet
werden, empfehlen wir, um Stauwärme im Gerät zu
vermeiden, grundsätzlich vorher das Programm
ABKÜHLEN einzuschalten. Dazu Zeitwähler im
Uhrzeigersinn auf drehen.
Programmänderung
Um ein laufendes Programm zu ändern, ohne die
Gerätetür zu öffnen, die EIN/AUS-Taste
drücken, neue Trockenzeit wählen und Taste
erneut drücken.
DEUTSCH
5. EIN/AUS-Taste drücken, die
Betriebskontrolllampe leuchtet auf.
6. Trockenzeit wählen.
7. Taste oder eventuell drücken.
8. Start-Taste drücken: Das
Trocknungsprogramm beginnt.
Damit die Wäsche abkühlen kann, wird 10 Minuten
vor Programmende automatisch die Abkühlphase
eingeschaltet. (Zeitwähler auf Stellung
.
)
Nach Ablauf der Abkühlphase ist der
Trockenvorgang beendet. Gerät ausschalten.
33
Page 34

Praktische Tipps
● Überladen Sie das Gerät nicht.
Beachten Sie die maximalen Füllmengen.
Eine Überfüllung beeinträchtigt das
Trockenergebnis und führt zu starker
Knitterbildung. Eine zu geringe Wäschefüllung ist
unwirtschaftlich.
Folgende Gewichtsangaben können als
Richtwerte dienen:
Bettbezug 700-1000 g
Tischtuch 400-500 g
Geschirrtuch 70-120 g
Serviett 50-100 g
Frottiertuch 150-250 g
Bademantel 1000-1500 g
Herrenhemd 200-300 g
Kissenbezug 100-200 g
Herrenschlafanzug 400-500 g
Damennachthemd 200-250 g
Wichtig:
● Besonders empfindliche Gewebe, z.B. Gardinen
aus synthetischen Fasern, Wollsachen, Seide,
Textilien mit Metalleinlagen, Nylonstrümpfe,
großvolumige Textilien, z.B. Anoraks,
Tagesdecken, Steppdecken, Schlafsäcke und
Federbetten, sowie Wäschestücke, die
überwiegend Schaumgummi oder gummiähnliches
Material enthalten, dürfen nicht getrocknet werden.
● Bitte prüfen Sie, ob die Wäsche zum Trocknen im
Wäschetrockner geeignet ist. Einen
Pflegehinweis mit dem entsprechenden Symbol
finden Sie im Wäsche-Etikett.
Die Symbole für das Trocknen und ihre
Bedeutung:
● Bettbezüge und Kissen sollten zugeknöpft
werden, damit Kleinteile sich darin nicht
“sammeln” können.
Reißverschlüsse, Haken und Ösen schließen Sie,
lose Gürtel, Schürzenbänder etc. binden Sie
zusammen.
● Sortieren Sie die Wäsche nach Textilarten und
gewünschtem Trockengrad.
● Die Wäsche muss vor dem Trocknen gut
ausgeschleudert sein.
● Ein Übertrocknen der Wäsche sollte vermieden
werden, um Knitter bzw. unnötigen
Energieverbrauch zu vermeiden.
● Verwenden Sie zum Waschen einen
Weichspüler, um am Ende des
Trockenvorganges statische Aufladungen zu
vermeiden und auch um die Trockenzeiten zu
reduzieren.
● Gewirkte Textilien (Trikotwäsche) können beim
Trocknen etwas einlaufen. Wäsche dieser Art
bitte nicht übertrocknen.
Es ist empfehlenswert, bei Neuanschaffung die
Einlaufeigenschaften bei der Größenwahl zu
berücksichtigen.
● Sind nach dem Trocknen einzelne Wäschestücke
noch zu feucht, dann stellen Sie eine kurze
Nachtrockenzeit ein, jedoch mindestens 20
Minuten. Das wird vor allem bei mehrlagigen
Wäschestücken (z.B. Kragen, Taschen usw.)
erforderlich sein.
Trocknergeeignet
Normales Trocknen (volle Heizleistung)
z.B. für Baumwollwäsche
Schonendes Trocknen (reduzierte
Heizleistung) - für pflegeleichte Wäsche,
z.B. Acryl
Trocknen im Wäschetrockner nicht
möglich - z.B. Wolle und Textilien mit
Wollanteil, Seide
34
Page 35

Wartung
A
U
T
O
R
E
V
E
R
S
E
k
g
5
k
g
2
,
5
8
0
0
/
9
0
0
7
0
'
-
9
0
'
3
5
'
-
5
0
'
1
0
0
0
/
1
2
0
0
6
5
'
-
8
5
'
3
0
'
-
4
5
'
8
0
0
/
9
0
0
8
0
'
-
1
0
0
'
5
5
'
-
7
0
'
1
0
0
0
/
1
2
0
0
7
5
'
-
9
5
'
5
0
'
-
6
5
'
6
5
0
5
0
'
-
6
0
'
3
0
'
-
3
5
'
k
g
2
,
5
k
g
1
P1151
P1110
A
U
T
O
R
E
V
E
R
S
E
k
g
5
k
g
2
,
5
8
0
0
/
9
0
0
7
0
'
-
9
0
'
3
5
'
-
5
0
'
10
0
0
/
1
2
0
0
6
5
'
-
8
5
'
3
0
'
-
4
5
'
8
0
0
/
9
0
0
8
0
'
-
1
0
0
'
5
5
'
-
7
0
'
1
0
0
0
/
1
2
0
0
7
5
'
-
9
5
'
5
0
'
-
6
5
'
6
5
0
5
0
'
-
6
0
'
3
0
'
-
3
5
'
k
g
2
,
5
k
g
1
P1150
P1177
A
U
T
O
R
E
V
E
R
S
E
k
g
5
k
g
2
,
5
8
0
0
/
9
0
0
7
0
'
-
9
0
'
3
5
'
-
5
0
'
1
0
0
0
/
1
2
0
0
6
5
'
-
8
5
'
3
0
'
-
4
5
'
8
0
0
/
9
0
0
8
0
'
-
1
0
0
'
5
5
'
-
7
0
'
1
0
0
0
/
1
2
0
0
7
5
'
-
9
5
'
5
0
'
-
6
5
'
6
5
0
5
0
'
-
6
0
'
3
0
'
-
3
5
'
k
g
2
,
5
k
g
1
P1152
Ziehen Sie vor jeder Reinigungs- oder
Wartungsarbeit den Netzstecker des Geräts aus
der Steckdose.
Reinigung des Trocknergehäuses
Verwenden Sie nur Seifenwasser und trocknen Sie
das Gerät danach sorgfältig.
Wichtig: Alkohol, Lösungsmittel und dgl. dürfen
nicht verwendet werden.
Reinigung des Siebbereichs in der
Innentür
Ein minimaler Anteil der Flusen gelangt trotz des
Flusensiebs in den umgebenden Siebbereich.
Reinigen Sie deshalb von Zeit zu Zeit den gesamten
Siebbereich mit einem feuchten Tuch.
Die angesammelte Flusenmenge ist nicht etwa auf
die Wäschebeanspruchung im Trockner
zurückzuführen; vielmehr handelt es sich um
abgetragene Fasern vom Tragen und Waschen.
Beim Trocknen auf der Leine werden die Flusen
vom Wind fortgetragen, während sie beim
Wäschetrockner im Sieb gesammelt werden. Am
Gewicht der Flusen können Sie feststellen, wie
gering der Anteil im Verhältnis zur getrockneten
Wäschemenge ist.
Durch Waschmittelreste in der Wäsche kann sich an
den Flusensieben ein weißlicher Belag bilden. In
diesem Falle müssen die Siebe, insbesondere das
Sieb in der Einfüllöffnung, mit warmem Wasser und
einer Bürste gereinigt werden.
Das Sieb in der Einfüllöffnung kann auch
herausgenommen werden (siehe Abb.). Beim Wiedereinsetzen kann der Zapfen nach rechts oder links
zeigen.
DEUTSCH
Reinigung der Flusensiebe
Der Wäschetrockner funktioniert nur bei gereinigten
Flusensieben einwandfrei. Deshalb müssen sie nach
jedem Trocknungsprogramm vor der
Wäscheentnahme kontrolliert und ggf. gereinigt
werden. Verwenden Sie dazu ein feuchtes Tuch.
Das Sieb in der Innentür an seinem Griff nach oben
herausziehen, Flusen abstreifen und Sieb wieder
einsetzen.
Benützen Sie das Gerät nie ohne
Flusensiebe.
Reinigung des Luftkondensors
Reinigen Sie den Luftkondensor regelmäßig, d.h. je
nach Benutzungshäufigkeit und Art der zu
trocknenden Wäsche. Spätestens jedoch dann,
wenn Flusenablagerungen erkennbar sind.
Der Luftkondensor ist in der Geräte-Vorderseite
unten eingeschoben.
Gehen Sie wie folgt vor:
●
Die Tür durch Drücken der Taste, wie in der Abb.
angezeigt ist, öffnen.
35
Page 36

●
P0639
P1155
P1159
P1162
P1178
Die zwei roten Sicherungsscheiben nach unten
drehen.
●
Luftkondensor an seinem Griff nach vorne
herausziehen.
●
Luftkondensor mit einer Bürste reinigen und evtl.
mit der Handbrause durchspülen.
●
Luftkondensor an der Außenseite von Flusen
befreien und die Dichtungen vorne und hinten
sowie die Dichtungen in der Innenseite der
Kleinen Tür mit einem feuchten Tuch reinigen.
Achtung!
Benutzen Sie keine spitzen Gegenstände zur
Reinigung, damit die Lamellen nicht beschädigt
werden.
●
Luftkondensor wieder einschieben und verriegeln
(beide Sicherungsscheiben nach oben drehen )
und Tür schließen.
Bei vollem Behälter spricht die Überlaufsicherung an
und die Kontrolllampe leuchtet. Das Programm
wird automatisch unterbrochen, die Wäsche bleibt
nass.
Das Entleeren ist auch während des
Programmablaufs möglich.
Folgende Handgriffe sind erforderlich:
● Zum Entnehmen in die Griffmulde fassen und
Behälter langsam herausziehen.
● Verschlussdeckel öffnen und Behälter entleeren.
● Auslauföffnung wieder verschließen und Behälter
bis zum Anschlag einschieben.
Das Gerät könnte bis 20 Sekunden stillstehen,
bevor der Betrieb wieder anläuft.
Während dieses Zeitraums bleibt die Kontrolllampe
eingeschaltet.
Hinweis
Das aufgefangene Kondenswasser kann für das
Dampfbügeleisen verwendet werden. Davor sollten
Sie es jedoch durch ein feines Sieb oder einen
Kaffeefilter aus Papier gießen. Dadurch werden
kleinste Flusen, die sich im Kondenswasser
befinden können, im Filter zurückgehalten.
Reinigung des hinteren Sauggitters
Das Gitter mit einem Staubsauger von Flusen
befreien.
Ohne Luftkondensor darf das Gerät nicht
betrieben werden.
Entleerung des Kondensatbehälters
Das der Wäsche entzogene Wasser wird innerhalb
des Trockners kondensiert und im
Kondensatbehälter aufgefangen.
Der Kondensatbehälter sitzt in der Gerätefrontseite
im linken unteren Sockelbereich. Dieser Behälter
muss nach jedem Trocknungsgang entleert werden.
36
Page 37

Betriebsstörungen
Einige Hinweise zur Behebung kleiner Störungen, bevor Sie einen Fachmann zu Rate ziehen.
●
Störungen
●
Trockner läuft nicht an:
●
Das Trocknungsergebnis ist
nicht zufriedenstellend:
Sollten Sie mit Ihren Prüfungen zu keinem Resultat
und Erfolg kommen, steht Ihnen für die Betreuung
Ihres Geräts ein gut ausgerüsteter, technischer
Kundendienst zur Verfügung.
Die Anschriften sind im beigepackten Verzeichnis zu
finden.
●
Mögliche Ursachen
●
Ist die Gerätetür oder die untere Tür
geschlossen?
●
Ist die Stromzufuhr unterbrochen?
●
Ist die Sicherung in Ordnung?
●
Ist der Zeitwähler richtig eingestellt?
●
Ist die Start-Taste gedrückt?
●
Haben Sie den Kondensatbehälter entleert und
wieder richtig eingesetzt?
●
Sind die Flusensiebe verstopft?
●
Ist der Luftkondensor eventuell verflust?
●
Kondensatbehälter voll?
●
Haben Sie die richtige Trockenzeit gewählt?
●
Haben Sie die Taste
●
Wurde der Wäschetrockner übermäßig gefüllt?
●
Wurde die Wäsche vorher gut ausgeschleudert?
●
Sind alle Aufstellungshinweise beachtet?
oder
gedrückt?
Bitte geben Sie bei einer Meldung immer an:
vollständige Anschrift, Telefon-Nr. mit Vorwahl,
sowie das Modell und die Produkt- bzw. Serien-Nr.
Ihres Geräts.
Diese Daten sind dem Typschild zu entnehmen (s.S.
28).
DEUTSCH
37
Page 38

Geachte Klant,
Lees deze gebruiksaanwijzing aandachtig door.
Lees vooral de aanwijzingen m.b.t. de veiligheid op de eerste pagina’s van deze gebruiksaanwijzing! Bewaar
de gebruiksaanwijzing goed, zodat u nog eens iets kunt nalezen en geef hem door aan een eventuele
volgende eigenaar van het toestel.
Transportschaden
Indien u tijdens de aflevering schade aan het apparaat vastgesteld hebt, meldt u dit dan, vóór u het toestel
installeert en/of in gebruik neemt, direct aan uw leverancier.
Enkele paragrafen in deze gebruiksaanwijzing zijn voorzien van symbolen die de volgende betekenis hebben:
Met de waarschuwingsdriehoek geven wij aanwijzingen die belangrijk zijn voor uw veiligheid of voor het
functioneren van de machine. Let goed op deze aanwijzingen.
Bij dit symbool vindt u aanvullende informatie m.b.t. bediening en praktisch gebruik van het toestel.
Dit symbool staat voor tips en aanwijzingen m.b.t. economisch en milieuvriendelijk gebruik van het
toestel.
Onze bijdrage aan het beschermen van het milieu:
wij maken gebruik van kringlooppapier.
Inhoud
Aanwijzingen m.b.t. de
veiligheid
Afvalverwerking..............................................39
Energie-spaartips..........................................40
Technische gegevens ..................................40
Beschrijving van de machine....................40
Installatie ..........................................................41
●
Uitpakken ........................................................41
●
Plaatsen............................................................41
●
Elektrische aansluiting......................................41
●
Verbindingsset..................................................41
●
Deurdraairichting..............................................41
●
Aanbrengen afvoerslang ..................................42
..........................................................39
Bediening ..........................................................43
●
Bedieningspaneel ............................................43
●
Droogtijden ......................................................44
●
Gebruik ............................................................45
●
Praktische tips..................................................46
Onderhoud........................................................47
●
De buitenkant ..................................................47
●
Het zeefgedeelte ............................................47
●
De pluizenzeven ..............................................47
●
De luchtcondensor ..........................................47
●
De waterhouder legen ......................................48
●
Het achterste luchtrooster schoonmaken........48
Eenvoudige storingen..................................49
38
Page 39

Aanwijzingen m.b.t. de veiligheid
Deze waarschuwingen zijn bedoeld voor uw en andermans veiligheid. U wordt geacht ze gelezen te hebben,
alvorens u het apparaat installeert en/of in gebruik neemt.
●
Installatie
●
Een eventueel noodzakelijke wijziging aan de
elektrische huisinstallatie ten behoeve van de
installatie van dit apparaat, mag uitsluitend door
een daartoe bevoegd persoon uitgevoerd
worden.
●
Overtuig u ervan dat na de installatie of het
verplaatsen het apparaat niet op het
aansluitsnoer staat.
Gebruik
●
Gebruik het toestel alleen voor het drogen van
huishoudtextiel.
●
Schakel na het gebruik altijd de stroomtoevoer uit
door, afhankelijk van de wijze van installatie, de
stekker uit het stopcontact te nemen of de
badkamertrekschakelaar op de UIT-stand te
schakelen.
●
Druipende (niet gecentrifugeerde) was mag nooit
in de trommeldroger gestopt worden.
●
Met vluchtige stoffen, zoals spiritus, benzine,
terpentine en dergelijke, gereinigde artikelen
mogen niet in de trommeldroger.
●
Let erop dat geen benzine- of gasaansteker in de
kleding achtergebleven is.
●
In het apparaat geen sportschoenen drogen,
deze kunnen tussen de trommel en de deur gaan
zitten waardoor de trommel geblokkeerd wordt.
●
Laat de deur op een kier staan indien het
apparaat niet gebruikt wordt. Dat is beter voor
de rubbermanchet.
●
Het apparaat nooit gebruiken zonder
pluizenzeven of als de pluizenzeven beschadigd
zijn. Dit kan gevaar voor brand opleveren.
●
De ruimte rondom de wasdroger moet zo veel
mogelijk stofvrij gehouden worden.
Algemene veiligheid
●
Het is gevaarlijk om, in welke vorm dan ook, dit
apparaat of de eigenschappen ervan te
veranderen.
●
Tracht in geval van een storing of defect, dit
apparaat niet zelf te repareren. Laat inspectie- en/
of herstelwerkzaamheden uitvoeren door de
servicedienst van de fabrikant of door een door de
fabrikant bevoegd verklaarde servicedienst en laat
geen andere dan originele DISTRIPARTS
onderdelen plaatsen.
39
Reparaties welke door niet-deskundige personen
uitgevoerd worden, kunnen tot schade of letsel
leiden. Raadpleeg ELGROEP FABRIEKSSERVICE.
Veiligheid van kinderen
●
Kinderen zien de gevaren niet die ontstaan door
ondeskundige omgang met elektrische
toestellen. Zorg daarom voor het nodige toezicht
als de machine aanstaat en laat kinderen niet
met de machine spelen - ze zouden zichzelf of
andere kinderen in de machine kunnen
opsluiten.
●
Houd de verpakking uit de buurt van kinderen;
vooral folie en styropor kunnen gevaren
opleveren. Verstikkingsgevaar!
●
Zorg ervoor dat kinderen of kleine huisdieren
niet in de trommel van de wasdrooger kunnen
klimmen.
●
Als u het toestel afdankt, maak het dan dadelijk
onbruikbaar: stekker uit het stopcontact trekken,
aansluitsnoer afsnijden en weggooien. Maak
bovendien het deurslot onbruikbaar. Zo kunnen
kinderen zichzelf of andere kinderen niet in de
machine opsluiten.
Afvalverwerking
Verpakkingsmateriaal
Alle gebruikte verpakkingsmaterialen zijn niet milieuonvriendelijk en kunnen zonder gevaar bij het afval
worden gezet.
De kunststoffen kunnen hergebruikt worden en
hebben de volgende aanduidingen:
>PE<=voor polyethyleen
>PS<=voor polystyreen
>PP<=voor polypropyleen
Het karton kunt u het beste in een container voor oud
papier deponeren.
Oude machine
Informeer bij uw gemeente naar de mogelijkheden
voor afvalverwerking in uw woonplaats.
NEDERLANDS
Page 40

Energie-Spaartips
2
5
3
4
1
3
6
7
D
R
Y
I
N
G
T
I
M
E
T
C
7
1
1
4
W
C
O
N
D
E
N
S
E
R
D
R
Y
E
R
D
U
A
L
T
E
M
P
E
R
A
T
U
R
E
6
X
T
R
A
C
A
P
A
C
I
T
Y
A
U
T
O
R
E
V
E
R
S
E
8
0
0
/
9
0
0
9
5
'
-
1
1
5
'
4
5
'
-
6
0
'
1
0
0
0
/
1
2
0
0
8
5
'
-
1
0
5
'
4
0
'
-5
5
'
8
0
0
/
9
0
0
1
2
0
'
-
1
4
0
'
6
0
'
-
7
5
'
1
0
0
0
/
1
2
0
0
9
5
'
-1
1
5
'
5
5
'
-
7
0
'
6
5
0
6
5
'
-
7
5
'
3
0
'
-
4
0
'
C
O
T
T
O
N
S
Y
N
T
H
E
T
I
C
S
S
T
O
R
E
D
R
Y
S
p
u
n
a
t
r
p
m
k
g
6
k
g
2
.5
I
R
O
N
D
R
Y
S
p
u
n
a
t
r
p
m
k
g
2
.5
k
g
1
S
T
O
R
E
D
R
Y
L
O
W
T
E
M
P
.
C
O
O
L
S
T
A
R
T
O
N
/
O
F
F
U kunt het energieverbruik van de wasdroger zo
laag mogelijk houden, door de volgende regels in
acht te nemen.
● Probeer zo vaak mogelijk de machine met de
maximaal toegestane hoeveelheid wasgoed te
beladen, zie het programma-overzicht op
bladzijde 44. Kleine hoeveelheden drogen is altijd
minder economisch.
● De natte was moet goed gecentrifugeerd
zijn
. Hoe hoger het centrifugeertoerental hoe
korter de benodigde droogtijd en dus ook de
daarvoor benodigde energie.
● Om de maximale capaciteit van de machine te
kunnen benutten, kunt u wasgoed voor kast- en
strijkdroog samen drogen. U stelt dan de
benodigde tijd voor strijkdroog in. Als de tijd
beëindigd is haalt u de strijkdroge was uit de
machine en laat u de rest enige tijd nadrogen.
● Reinigen van de pluizenzeven na iedere
droogbeurt voorkomt te lange droogtijden en een
hoger energieverbruik.
● De temperatuur in het vertrek waar de droger
staat mag, tijdens het in bedrijf zijn, + 35°C niet
overschrijden.
● Vermijdt overdroging door het zorgvuldig kiezen
van de gewenste tijd. Te droog wasgoed laat
zich minder goed strijken.
Technische gegevens
AFMETINGEN: hoogte 85 cm
breedte 60 cm
diepte 58 cm
NETSPANNING/FREQUENTIE: 220/230 V/50 Hz
AANSLUITWAARDE: 2400 W
ZEKEREN MET MINIMAAL: 16 A
CAPACITEIT: katoen en linnen 5 kg
synthetica 2,5 kg
VERBRUIKSWAARDEN: katoen en linnen 3,64 kWh (5 kg kastdroog)
katoen en linnen 3 kWh (5 kg strijkdroog)
synthetica 1,4 kWh (2,5 kg kastdroog)
Dit toestel voldoet aan de EG-richtlijn 89/336 EEG, 73/23 EEG.
Beschrijving van de machine
1 Bedieningspaneel
2 Programmaoverzicht
3 Pluizenzeven
4 Typeplaatje
5 Luchtcondensor
6 Waterhouder
7 Verstelbare voeten
40
Page 41

Installatie
P1148
P1106
Let op!
Uitpakken
Verwijder de polyethylene zak met de
polysterene vulling voordat u het toestel in
gebruik neemt.
Indien het apparaat in de toekomst moet
worden verplaatst dan dient dit altijd
loodrecht te gebeuren.
Elektrische aansluiting
De machine is voor 220-230V / 50Hz gemaakt.
De machine is voorzien van een drie-aderig
aansluitsnoer en stekker met randaarde.
De stekker mag u uitsluitend plaatsen in een
stopcontact met randaarde; de machine dient
deugdelijk geaard te zijn.
Het aansluitsnoer mag u niet verlengen. Indien het
snoer te kort blijkt te zijn, laat uw installateur dan of
een langer snoer aan de machine monteren of het
stopcontact verplaatsen.
Het gebruik van een verlengsnoer of kabelhaspel is
niet toegestaan.
In bad- of doucheruimten moet doorgaans een
zogeheten «vaste aansluiting» gemaakt worden;
raadpleeg uw installateur.
De fabrikant is niet aansprakelijk voor
schade of letsel, ontstaan door het niet
voldoen aan bovenstaande veiligheidsvoorschriften.
Het aansluitsnoer mag uitsluitend door de
ELGROEP FABRIEKSSERVICE vervangen
worden.
Plaatsen
De droger kan op elke soort vloer geplaatst worden.
Hij moet waterpas staan, dus eventueel met een
waterpas uitgericht worden. Daartoe dienen de
verstelbare voeten.
Goede ventilatie is een absolute voorwaarde. Dat is
eenvoudig te bereiken door er voor te zorgen dat
het ventilatierooster in de voorkant en de vrije ruimte
onder de bodem niet door plinten en hoogpolige
vloerbedekking in hun functie belemmerd kunnen
worden.
Zodoende mogen evenmin de voeten verwijderd
worden.
Bij onvoldoende ventilatie kan zich een
opeenhoping
van warmte voordoen, hetgeen schade aan de
motor kan veroorzaken.
Aanwijzing
De door de droger afgegeven warme lucht kan een
temperatuur van 60°C bereiken. Houd daar rekening
mee in verband met uw vloerbedekking.
Voor een juiste werking van het toestel moet de
omgevingstemperatuur minimaal +5°C en maximaal
+35°C bedragen.
De ruimte rondom de droger moet zoveel mogelijk
stofvrij gehouden worden.
Het aansluitsnoer moet gemakkelijk te bereiken
zijn nadat de machine geïnstalleerd is.
Verbindingsset
Uw handelaar kan u een speciale verbindingsset
leveren, waarmee u de droger veilig op een
wasautomaat met een bovenblad-diepte tussen 48
en 60 cm kunt plaatsen. Dat bespaart u aanzienlijk
ruimte.
De montage-instructies worden bij de
verbindingsset geleverd. Lees deze aanwijzing
aandachtig door.
Deurdraairichting
Het wijzigen van de deurdraairichting dient te worden
uitgevoerd door de ELGROEP Fabrieksservice.
NEDERLANDS
41
Page 42

Aanbrengen afvoerslang
P1161
C
A
B
A
B
C
P1160
Staat de machine op een plaats waar zich een
waterafvoer bevindt, dan kan een afvoerslang
aangebracht worden. De waterhouder doet dan
geen dienst meer.
Zo sluit u, volgens figuur, de afvoerslang aan:
●
Slangklem A losnemen
●
Slang B van machinetuit losnemen
●
De afvoerslang C op machinetuit steken
●
Met slangklem A op de machinetuit bevestigen.
Indien de droger bovenop de wasmachine is
geïnstalleerd, kan het condenswater evengoed met
behulp van de afvoerslang uit de tekening afgevoerd
worden; denk erom dat de slang C naar beneden
gericht moet zijn.
42
Page 43

Bediening
TC
7
114
CONDENSER DRYER
DUAL TEMPERATURE
kg 5
kg 2,5
800 / 900
75'- 95'
45'- 60'
1000 / 1200
65'- 90'
40'- 55'
800 / 900
90'- 110'
60'- 75'
1000 / 1200
85'- 105'
55'- 70'
650
65' - 75'
30' - 40'
kg 2,5
kg 1
12345678
0
20
40
60
8
0
100
0
2
0
40
60
80
1
0
0
120
150
AUTOREVERSE
Bedieningspaneel
1 Programmaoverzicht
Wordt gebruikt om de droogtijd te kiezen die het
meest geschikt is voor het type wasgoed en de
gewenste mate van droogheid.
2 Controlelampje
Dit lampje brandt als de machine INgeschakeld is
en gaat uit als de machine UITgeschakeld wordt.
3 Toets “AAN/UIT”
Door het indrukken van deze toets schakelt u de
machine AAN en UIT.
4 Toets “lage temperatuur”
Druk deze toets voortijds in als u kreukherstellend
katoen gaat drogen. In dit geval moet een langere
droogtijd worden gekozen.
5 Toets “luchten”
Door op deze toets te drukken wordt de verwarming
uitgeschakeld. Deze functie kan voor het luchten
van kledingstukken die u anders enige tijd buiten
zou hebben gehangen, of voor het drogen van fijne
was worden gebruikt.
6 Toets “start”
7 Signaallampje waterhouder
Het lampje brandt als de waterhouder vol of niet
goed geplaatst is. Het programma is dan
onderbroken.
8 Droogtijdenknop
De tijdklok is in twee sectoren opgedeeld:
Een sector met een normale (hoge)
droogtemperatuur, instelbaar tot 150 minuten. De
normale temperatuur gebruikt u voor katoen en
linnen.
Een sector met verlaagde droogtemperatuur,
instelbaar tot 100 minuten. De verlaagde temperatuur
gebruikt u voor synthetica en fijne was.
U mag de knop uitsluitend rechtsom draaien. Heeft
u in de verkeerde sector ingesteld, dan niet
terugdraaien maar weer rechtsom.
Afkoelfase
Bij het instellen van korte droogtijden moet u er
rekening mee houden dat de machine de laatste 10
minuten met koude lucht werkt (programmastand ).
Daarmee worden zowel wasgoed als machine
afgekoeld.
De afkoelfase mag in geen geval verkort of
onderbroken of zelfs geheel overgeslagen worden.
Verbrandingsgevaar!
NEDERLANDS
Na instelling van het programma drukt u op deze
toets om het programma te starten.
Indien de deur van het toestel tijdens de
afwerking van het programma geopend wordt,
moet deze toets na het sluiten van de deur weer
ingedrukt worden om het programma voort te
zetten.
43
Page 44

Droogtijden
Katoen en linnen
Kies een tijdsduur in de sector tot 150 minuten (hoge temperatuur)
Belading
Soort textiel
Badmantel
Badhanddoeken
Overhemden
Beddegoed
Tafelgoed
Theedoeken
Droogtegraad
Kastdroog
Strijkdroog
drooggewogen
wasgoed
5 kg 90-110
2.5 kg 60-75 55-70
5 kg 75-95
2.5 kg 45-60 40-55
Synthetica
Kies een tijdsduur in de sector tot 100 minuten (lage temperatuur)
Belading
Soort textiel
Droogtegraad
drooggewogen
wasgoed
Tijdsduur in min voor was
gecentrifugeerd met
800/900 tpm 1000/1200 tpm
85-105
65-90
Tijdsduur in min voor was
gecentrifugeerd met 650 tpm
Synthetica en gemengde
weefsels die “kastdroog”
gedroogd moeten worden
Let op! Controleer de behandelingsetiketten in het wasgoed als u gemengde weefsels moet drogen
De droogtijden in deze tabel zijn slechts een richtlijn om mee te beginnen.
Na enige tijd weet u precies hoeveel tijd nodig is om een bepaalde was naar wens te drogen. Begin met wat te
krappe tijden, anders komt u er nooit achter wat juist goed is. Bovendien is “overdrogen” slecht voor de
textielvezels.
Is het wasgoed na beëindiging van het programma nog te vochtig, dan kan nagedroogd worden. Hiervoor het
droogprogramma opnieuw instellen.
De droogduur hangt af van verschillende factoren:
- soort wasgoed
- vulgewicht
- centrifugetoerental
Kastdroog
2.5 kg 65-75
30-401 kg
Belading
Eigenlijk zou u het wasgoed steeds moeten wegen. Wegen is omslachtig, daarom geven wij u een ander
hulpmiddel:
● katoen en linnen: volle belading, maar niet proppen
● synthetica: halfvolle belading
● fijne was: éénderde van de trommel
Bij een gemengde belading (katoen en synthetica) adviseren wij om de droogtijd 10 minuten langer te kiezen
dan de aanbevolen droogtijd voor synthetica.
44
Page 45

Gebruik
P1108
P1149
Vóór de eerste ingebruikname adviseren wij u de
trommel met enkele licht vochtige, schone doeken
te vullen en de machine circa 20 minuten te laten
werken: AAN/UIT-toets indrukken, 20 min instellen
en Start-toets indrukken. Hierdoor worden
eventuele vettige of stoffige restanten van het
productieproces verwijderd.
Volgorde van handelen
1. Het toestel aansluiten.
2. De deur openen (door op het rode punt te
drukken).
3. Het wasgoed in de machine doen.
4. Deur sluiten en er op toezien dat geen
wasstukken tussen de deur geklemd kunnen
raken.
Na het drogen
●
Toestel uitschakelen (AAN/UIT-toets indrukken),
het betreffende lampje gaat uit.
●
De pluizenzeven reinigen (zie blz. 47)
●
De waterhouder legen (zie blz. 48)
Opmerking!
Wanneer het droogprogramma voortijdig beëindigd
moet worden, kunt u om stuwwarmte in het
apparaat te voorkomen, het beste altijd het
programma “AFKOELEN” inschakelen:
programmakiezer rechtsom op stand draaien.
Programmawijziging
Om een lopend programma te wijzigen, zonder de
deur te openen, drukt u op de AAN/UIT-toets
draait u de keuzeknop
op de gewenste tijd en drukt
u opnieuw op AAN/UIT.
,
NEDERLANDS
5. AAN/UIT-toets indrukken: het betreffende
controlelampje licht op.
6. Droogtijd instellen.
7. Toets “Lage temperatuur” of “Luchten”
eventueel indrukken.
8. START-toets indrukken: het programma
begint.
Opdat het goed kan afkoelen, wordt 10 minuten vóór
beëindiging van het programma automatisch de af-
koelfase ingeschakeld (droogtijdenknop op )
.
De machine stopt automatisch aan het einde van de
afkoelfase.
45
Page 46

Praktische tips
●
Maximaal vulgewicht benutten!
U droogt het zuinigst, als u zich aan de
vulgewichten houdt, die in de programmatabel
vermeld staan.
Een volgepropte trommel leidt tot onregelmatige
droging en te lange droogtijd, waardoor ook het
energieverbruik onnodig toeneemt.
Kleine hoeveelheden drogen is altijd minder
economisch.
Onderstaande aanwijzingen kunnen u daarbij
helpen:
Badjas 1200 g
Beddelaken 500 g
Blouse 100 g
Dekbedovertrek 700 g
Handdoek 200 g
Herenoverhemd 200 g
Kussensloop 200 g
Nachthemd/pyjama 200-500 g
Ondergoed 250 g
Tafellaken 200-300 g
Theedoek 100 g
Werkjas 300-600 g
Belangrijk:
●
Bijzonder tere weefsels, bijv. gordijnen van
synthetische vezels, wol, zijde, textiel met
metalen versieringen, nylons, grote stukken
wasgoed zoals anoraks, doorgestikte dekens,
slaapzakken en dekbedden mogen niet in de
machine gedroogd worden.
Ook artikelen die sponsachtig rubber bevatten
mogen niet in de droger. Hieronder wordt geen
elastisch gemaakte kleding verstaan, maar wel
bijvoorbeeld, de rubberachtige rug van een
kleedje.
Wol en gedeeltelijk wollen artikelen kunnen
krimpen en/of vervilten. Wij adviseren u met klem
deze artikelen niet in de trommeldroger te
drogen.
●
Controleer zorgvuldig of het wasgoed geschikt is
om machinaal gedroogd te worden.
Aanwijzingen daarvoor vindt u op het
textielbehandelingsetiket.
De volgende symbolen zijn van belang voor het
drogen:
mag machinaal gedroogd worden
normaal drogen (normale temperatuur)
voorzichtig drogen (lage temperatuur)
mag niet machinaal gedroogd worden
●
Overtuig u ervan dat borst- of broekzakken leeg
zijn. Keer kleding met borst- en broekzakken met
dikke zomen binnenstebuiten, op deze manier
voorkomt u zoveel mogelijk onregelmatige droging.
●
Dekbedovertrekken en kussenslopen
dichtmaken, anders verzamelen zich hierin
kleinere wasstukken. Ritssluitingen en haakoogsluitingen dichtdoen, losse banden en
ceintuurs samenknopen.
●
Het wasgoed voor het drogen goed
centrifugeren.
●
Sorteer uw wasgoed volgens textielsoort en
droogtegraad.
●
Voorkom overdroging door het zorgvuldig kiezen
van de gewenste droogtegraad. Te droog
wasgoed laat zich minder goed strijken.
●
Om het statisch worden (knetteren en kleven)
van synthetisch wasgoed te voorkomen,
adviseren wij u in de wasautomaat een
wasverzachter te gebruiken.
●
Tricot kan iets krimpen. Deze textielsoort niet
overdrogen. Bij de aanschaf rekening houden
met het feit dat deze textiel, al naar gelang de
kwaliteit, krimpt.
●
Het kan voorkomen dat u, na het drogen, toch
nog vochtige plekken in het wasgoed vindt. Dat
is met name het geval bij dikke kragen,
manchetten en zomen. U kunt deze
kledingstukken nadrogen, hierbij de machine op
minstens 20 minuten instellen.
46
Page 47

Onderhoud
A
U
T
O
R
E
V
E
R
S
E
k
g
5
k
g
2
,
5
8
0
0
/
9
0
0
7
0
'
-
9
0
'
3
5
'
-
5
0
'
1
0
0
0
/
1
2
0
0
6
5
'
-
8
5
'
3
0
'
-
4
5
'
8
0
0
/
9
0
0
8
0
'
-
1
0
0
'
5
5
'
-
7
0
'
1
0
0
0
/
1
2
0
0
7
5
'
-
9
5
'
5
0
'
-
6
5
'
6
5
0
5
0
'
-
6
0
'
3
0
'
-
3
5
'
k
g
2
,
5
k
g
1
P1151
P1110
A
U
T
O
R
E
V
E
R
S
E
k
g
5
k
g
2
,
5
8
0
0
/
9
0
0
7
0
'
-
9
0
'
3
5
'
-
5
0
'
1
0
0
0
/
1
2
0
0
6
5
'
-
8
5
'
3
0
'
-
4
5
'
8
0
0
/
9
0
0
8
0
'
-
1
0
0
'
5
5
'
-
7
0
'
1
0
0
0
/
12
0
0
7
5
'
-
9
5
'
5
0
'
-
6
5
'
6
5
0
5
0
'
-
6
0
'
3
0
'
-
3
5
'
k
g
2
,
5
k
g
1
P1150
P0636
P1159
P1177
A
U
T
O
R
E
V
E
R
S
E
k
g
5
k
g
2
,
5
8
0
0
/
9
0
0
7
0
'
-
9
0
'
3
5
'
-
5
0
'
1
0
0
0
/
12
0
0
6
5
'
-
8
5
'
3
0
'
-
4
5
'
8
0
0
/
9
0
0
8
0
'
-
1
0
0
'
5
5
'
-
7
0
'
1
0
0
0
/
1
2
0
0
7
5
'
-
9
5
'
5
0
'
-
6
5
'
6
5
0
5
0
'
-
6
0
'
3
0
'
-
3
5
'
k
g
2
,
5
k
g
1
P1152
Neem de stekker uit het stopcontact of trek,
indien van toepassing, de trekschakelaar op UIT.
De buitenkant
De buitenkant van de machine kunt u, naar
behoefte, reinigen met een vochtige doek en een
neutraal huishoudschoonmaakmiddel. Moderne
schoonmaakmiddelen drogen doorgaans streeploos
op.
Nalappen met schoon water en daarna
droogzemen.
Belangrijk: Gebruik nooit spiritus, terpentine en
dergelijke oplosmiddelen.
Het zeefgedeelte
Een heel klein gedeelte van de pluizen komt toch
ondanks de pluizenzeef in het omringende
zeefgedeelte terecht. Maak daarom van tijd tot tijd
het gehele zeefgedeelte schoon.
Het wordt door de wind weggeblazen als u het
wasgoed buiten aan de lijn droogt en blijft
eenvoudig in het wasgoed zitten als u binnenshuis
droogt.
Na verloop van tijd kunnen de pluizenzeven een
witachtige aanslag vertonen, die veroorzaakt wordt
door de wasmiddelresten die zich in de was
bevinden. Reinig ze met warm water en een borstel.
De zeef in de deursponning kan verwijderd worden
(zie figuur). Deze zeef kan met het vleugeltje naar
rechts of links gemonteerd worden.
Het apparaat nooit gebruiken zonder zeven.
De pluizenzeven
De pluizenzeven dienen na elke droogbeurt (voor
het uitnemen van het wasgoed) met een vochtige
doek gereinigd te worden.
De pluizenzeef in de deurbinnenkant moet voor
reiniging uitgetrokken worden. Daartoe trekt u de
zeef aan z’n handgreep omhoog uit z’n houder.
Verwijder het viltachtige stof en plaats de zeef weer
terug.
De luchtcondensor
Afhankelijk van het gebruik moet de condensor zelf 3
tot 4 keer per jaar gereinigd worden.
De luchtcondensor bevindt zich achter een deurtje in
het onderste deel van de droger. Het deurtje wordt
geopend door op de toets te drukken (zie
afbeelding).
Om de luchtcondensor uit de machine te nemen,
dienen eerst de twee rode bevestigingsschijfjes naar
beneden te worden gedraaid. Trek de condensor
vervolgens aan de handgreep naar buiten.
NEDERLANDS
Verbaast u zich niet over de hoeveelheid fijn pluis.
Dit pluis ontstaat door het dragen van de kleding of
het gebruiken van de textiel.
47
Page 48

Met een borstel reinigen en van binnen en van buiten
P0639
P1162
P1178
afspoelen onder de douche.
De dichtingen rondom de luchtcondensorhouder en
in de binnenzijde van het deurtje met een vochtige
doek reinigen.
Attentie!
Gebruik geen scherpe voorwerpen om de
condensor te reinigen. Hij zou lek kunnen
worden.
Pas op!
Het apparaat nooit gebruiken zonder
luchtcondensor.
Na deze handeling kan het gebeuren dat de
machine tot een maximum van 20 seconden stil
blijft staan voordat hij opnieuw begint te draaien.
Gedurende deze periode blijft het signaallampje
ingeschakeld.
Tip:
Het condenswater kunt u, na het door middel van
bijvoorbeeld een koffiefilterzakje gefilterd te hebben,
gebruiken als gedestilleerd water voor akku of
strijkbout.
Het achterste luchtrooster schoonmaken
Maak het achterste luchtrooster zorgvuldig schoon
met een stofzuiger.
Waterhouder legen
De aan het wasgoed onttrokken waterdamp wordt
binnen de machine gecondenseerd en als water in
de waterhouder opgevangen.
De waterhouder moet na iedere droogbeurt geleegd
worden. Zoudt u dat vergeten hebben, dan zorgt
een overloopbeveiliging ervoor dat het programma
onderbroken wordt: het betreffende signaallampje
brandt, de machine is gestopt en de was is nog nat.
De waterhouder mag ook tijdens het in bedrijf zijn
geleegd worden:
Trek de houder langzaam uit de machine.
●
Open het deksel en laat al het water weglopen
●
Plaats de waterhouder terug in z’n behuizing tot
●
hij vastklikt.
48
Page 49

Eenvoudige storingen
Het is de moeite waard om vóór u de servicedienst belt even de volgende punten te controleren:
●
Storingen
●
De droger start niet
●
De was wordt niet goed droog
●
Mogelijke oorzaken
● De deur van het toestel of het deurtje in de
sokkel is/zijn niet goed gesloten.
● De groepzekering is defect of uitgeschakeld.
Probeerde u de droger te starten terwijl de
wasautomaat ook (op dezelfde groep) AAN
staat?
Dat kan doorgaans pas zodra de wasautomaat
aan het spoelen toe is.
● Er is geen tijdsduur ingesteld.
● Waterhouder vol of niet goed terruggeschoven.
Signaallampje brandt.
● START-toets niet ingedrukt.
● De pluizenzeven en/of de luchtcondensor zijn
verontreinigd.
● De waterhouder is vol.
● De droogtijd is te krap ingesteld.
● Mogelijk had u toch een ander programma
moeten kiezen.
● De trommel is te vol.
● Had u de toets voor lage temperatuur ingedrukt,
terwijl de betreffende wassoort op vol vermogen
gedroogd had moeten worden?
● De was is niet voldoende gecentrifugeerd.
● De installatie (plaats, afvoer) is niet goed. Zie het
betreffende hoofdstuk.
NEDERLANDS
Kunt u de storing niet zelf lokaliseren en verhelpen,
belt u dan de servicedienst. Houd het modelnummer
en het productnummer bij de hand; de servicedienst
zal u erom vragen.
49
Page 50

From the Electrolux Group.
The Electrolux Group is the world's largest producer of powered appliances for kitchen, cleaning and outdoor
use. More than 55 million Electrolux Group products (such as refrigerators, cookers, washing machines,
vacuum cleaners, chain saws and lawn mowers) are sold each year to a value of approx. USD 14 billion in
more than 150 countries around the world.
The world’s No. 1 choice
.
 Loading...