

Page 1
822 90 13-75
TUMBLE DRYER
TC 180
Page 2

- 2 -
For the user
Safety information 3
Description of the appliance 4-5
Using your appliance 6
- Before you use the dryer for the first time
- Capacity
- Examples of laundry item weights
Programme chart 7
Maintenance and cleaning 8-9
- The filters
- The condenser
- Emptying the water tank
Hints & Tips 10
- Sorting
- Spinning (water extraction)
- Getting the load size right
- Fluff
- Shrinkage
- Items which should not be tumble dried
Something Not Working? 11
Service 12
- Service and Spare Parts
- Customer Care Department
Guarantee Conditions 13
For the installer
Technical specifications 14
Unpacking the machine 15
- Damages
- Accessories
- Identification of materials
Installation 16-18
- Positioning
- Worktop installation
- Wall mounting
- Power supply
Guide to use the instruction book
The following symbols will be found in the text to guide you throughout the instructions:
Safety instructions
Step by step instructions
Hints and tips
Environmental information
Contents
Page 3

Safety information
- 3 -
822 90 13-75
Before installing and first using the tumble dryer, read this instruction booklet carefully, including
its hints and warnings. To avoid unnecessary mistakes and accidents, it is important to ensure that
all people using the dryer are thoroughly familiar with its operation and safety features. Save these
instructions and make sure they remain with the tumble dryer if it is moved or sold, so that
everyone using it through its life can be properly informed on appliance use and safety.
Installation and servicing
■ All installation and service work done on the product
must be carried out by a qualified technician. Work
performed by persons with inadequate knowledge may
adversely affect the satisfactory functioning of the
product and may cause personal injury or damage.
Before any work is carried out on the tumble dryer, it
must be isolated from the electrical supply. To do this
the power plug must be removed from the wall socket.
■ The machine is heavy, so take care when moving it.
■ This appliance must be installed in a clean, dry envi-
ronment. Cabinet damage, which is not covered by
guarantee, could result if this recommendation is not
followed.
■ The power cable must be plugged into an earthed
socket, which must be easily accessible. Permanent
installation must only be carried out by an authorized
electrician.
■ Make sure that the power cable is not nipped or other-
wise damaged when moving the machine in connection
with installation or cleaning etc.
■ The ventilation opening at the bottom of the door should
not be obstructed if the dryer is on a carpeted floor.
■ The adjustable feet must not be removed, these
ensure that the underside of the dryer is ventilated.
■ Servicing and repairs must be carried out by a trained
service technician. Only use genuine spare parts
available from your local Service Force Centre. Never
try to repair the machine yourself.
Child Safety
■ The tumble dryer should be used by adults only. Do not
let children play with the controls or other parts of it.
■ Keep all packaging well away from children.
■ Before loading the machine, check that there are no
foreign objects or pets inside the drum.
During Use
■ This dryer is intended only for normal domestic drying of
laundry and only in accordance with these instructions.
Using it for other purposes could lead to physical injury
or damage to property and invalidate the guarantee.
■ Care must be taken when removing or replacing the
condensor as it can be awkward and heavy.
■ Do not overload the dryer (see “Using your appliance”).
■ Never start the dryer unless the fluff filter is clean and
correctly in place, or if the fluff filter is damaged (this
could cause overheating or damage your laundry).
■ Get into the habit of cleaning the condenser at regular
intervals. Keeping the condenser as clean as possible
makes the dryer more efficient and means shorter
drying times.
■ Do not allow fluff to accumulate around the dryer.
■ As some bulky items such as duvets and eiderdowns
should be dried in large commercial machines because
of their bulk, check with the manufacturer of the item if
it is suitable for drying in a domestic machine, even if
the dry weight of the item is within the limit advised.
■ Laundry which has been in contact with chemicals such
as dry cleaning fluid and similar, should not be dried in
the machine, since volatile chemicals can be a fire risk.
■ The following items/materials should not be dried in
the machine either:
– Pillows, cushions, down-filled items etc. (these
cause a build-up of heat and can make the dryer
overheat)
– Wool, on account of its tendency to mat
– Especially sensitive textiles, such as synthetic
curtains, silk etc.
– Garments made of foam rubber or rubber-like
materials must not be dried in the machine.
■ Make sure that the machine is disconnected from the
power supply during cleaning and maintenance work.
■ Always switch off and unplug the appliance after use.
When removing the electrical plug, grip the plug, not
the lead.
Conservation
- packaging:
All materials used in packaging this appliance are environmentally-friendly. The various plastics used are identified
and can be recycled.
- old appliances:
At the end of the appliance's useful life, disconnect the
electrical plug from the power supply, then cut the electrical
cable at the point where it enters the appliance. Disable
any door locks and ensure that children will not be able to
play with it.
Page 4
- 4 -
11
10
9
8
7
6
5
4
3
2
2
1
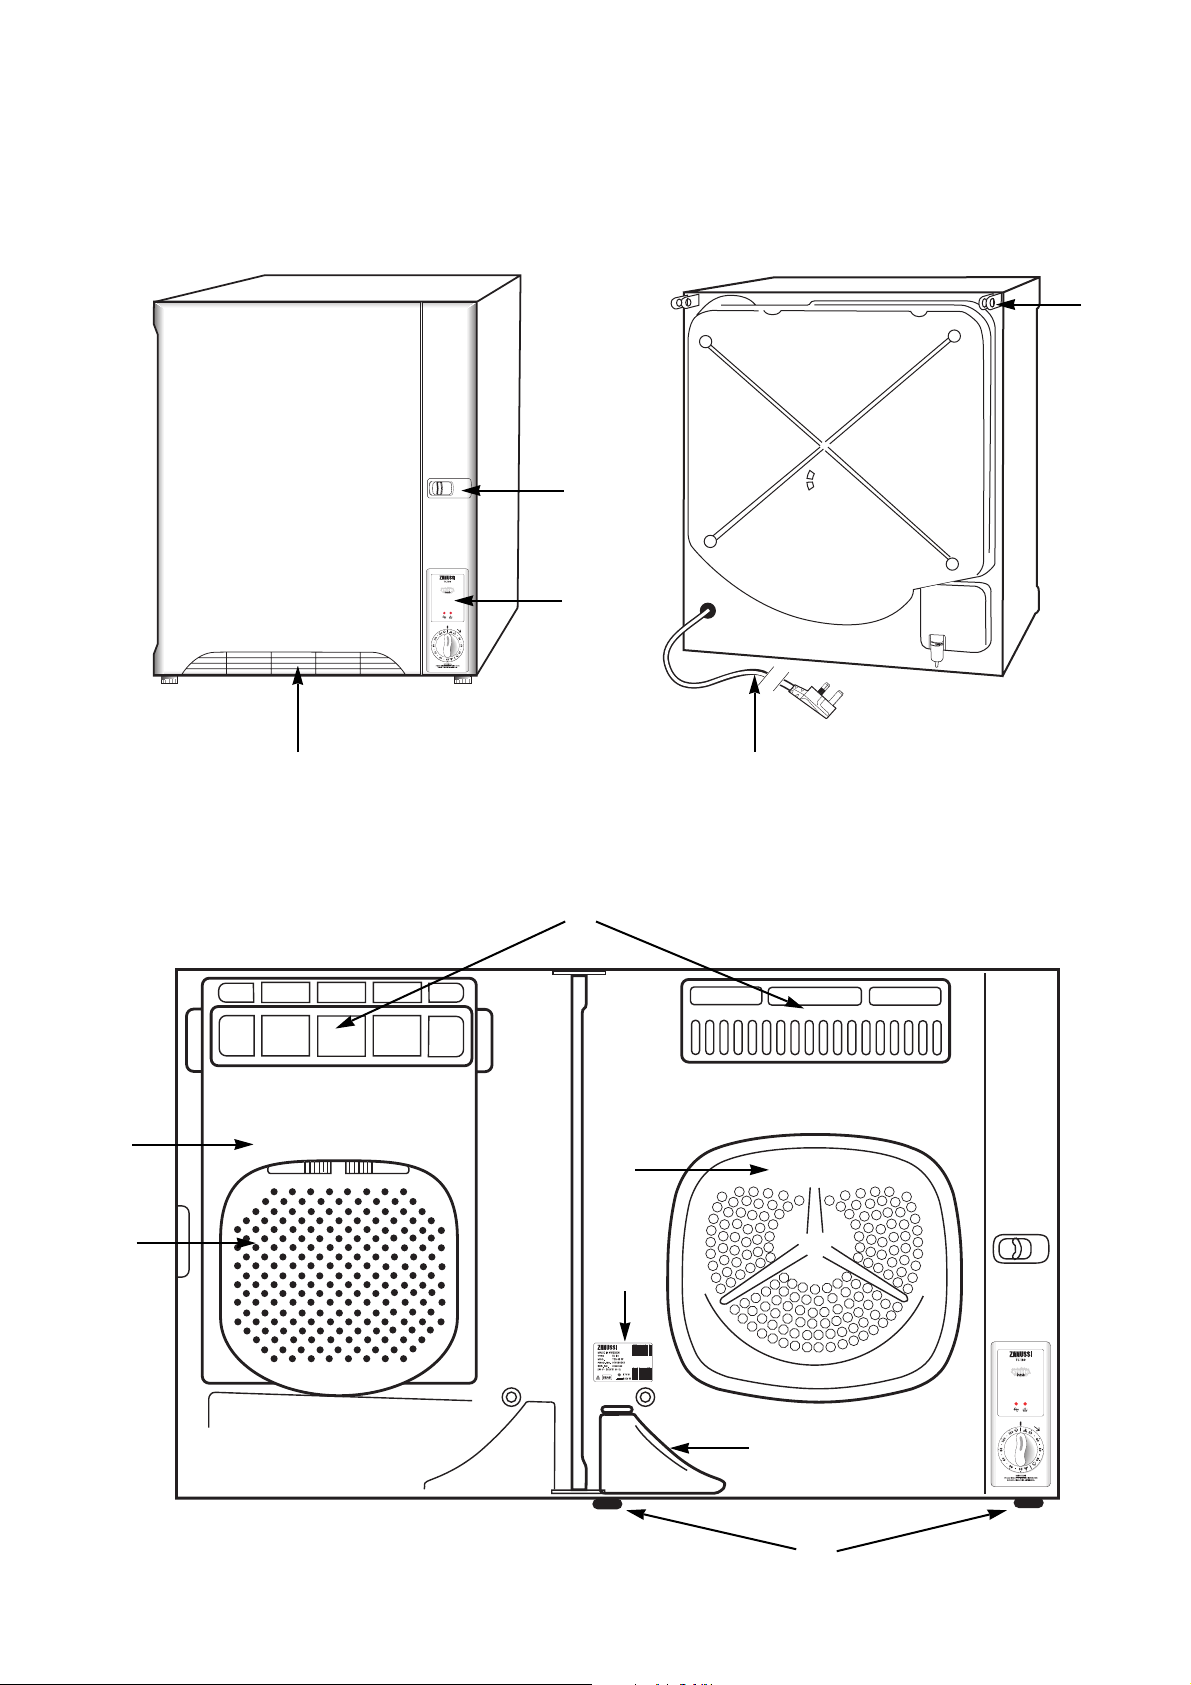
Description of the appliance
13
12
Page 5
- 5 -
1. Door Latch
(push the knob to the right to open)
2. Space for programme chart
(Self-adhesive label)
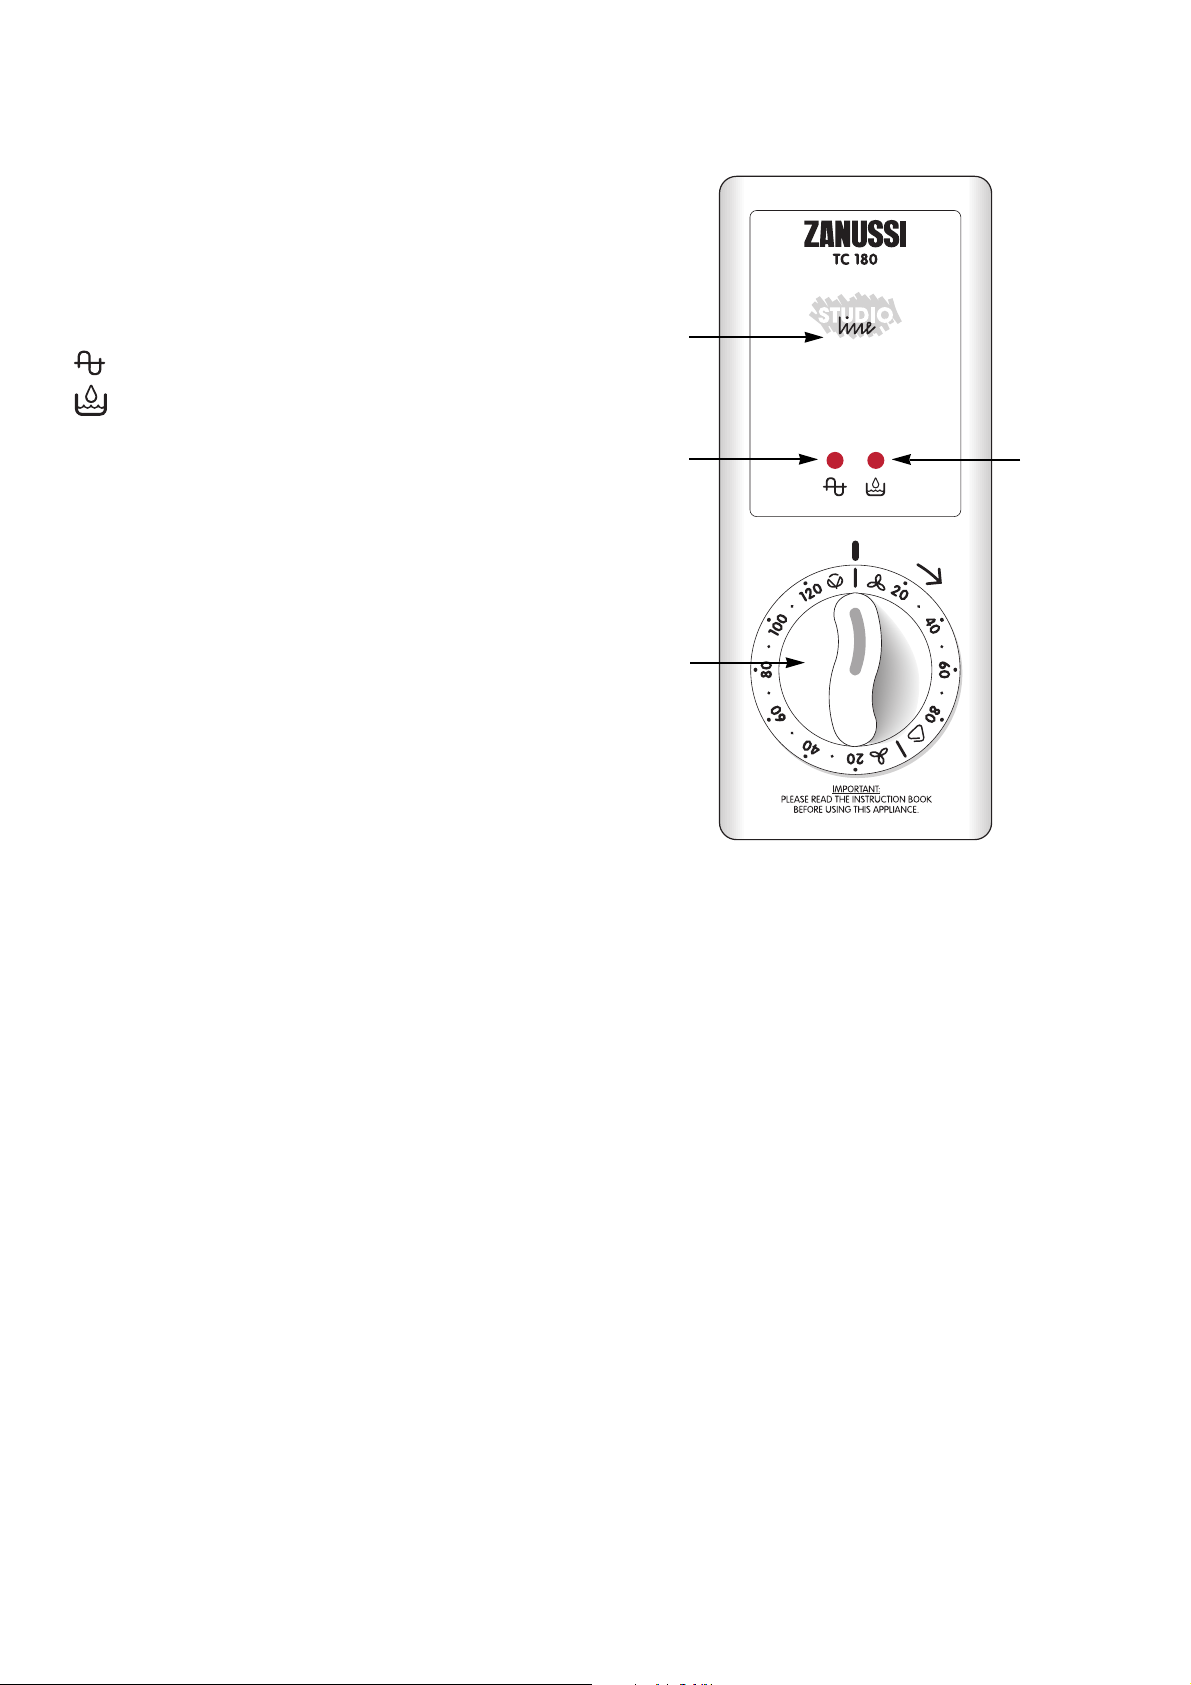
3. Control panel with indicator lights
• Lights
A.Indicates the dryer is running
B.Indicates that the water tank is full
• On/off timer knob
C. Turn this knob in a clockwise direction to start the
dryer and set both the drying time and the drying
temperature.
High heat: The timer indicates up to 120 mins for
cotton/linen.
Low heat: The time indicates up to 80 mins for
synthetics.
The last 8 - 12 minutes of each drying cycle is a cool
down phase.
4. Warm air discharge
5. Adjustable feet
If the dryer is not being wall mounted the feet need
to be adjusted so that the dryer is level.
6. Air ducts - These should not be obstructed.
7. Filters
Should be cleaned before or after each load.
The fluff filter is behind the coarse filter and can
be removed for cleaning.
8. Condenser
This is built into the door and needs to be cleaned
at regular intervals.
9. Water tank
This fills up with the water condensed by the dryer,
and should be emptied before or after each load.
When the tank is full, warning light (B) will come on
and the dryer will stop automatically. It cannot be
restarted until the tank has been emptied.
10. Drum
11. Rating plate
12. Electrical supply cable
13. Non-tip device
A
B
C
3
Page 6
Before using the dryer for the fir st time
Dampen some clean pieces of unwanted cloth and dry
them for about 15 minutes the very first time, to make
sure that there is no dust or dirt in the dryer.
1. Check that the dryer is connected to the
electrical supply.
2. Open the door by pushing the knob to the
right (A).
3. Check that the fluff filter (B) is clean and that
the coarse filter (C) is lowered and has
snapped into place.
4. Check that the water tank (D) is empty and
pushed correctly into place.
5. Put the load for drying into the machine. Make
sure that it is right inside the drum. Do not mix
synthetics with natural materials.
6. According to the type of load, turn the on/off
timer knob (E) and choose a suitable drying
time on either the
Cotton
or the
Synthetics
time scale.
7. Close the door and the machine starts.
It is advisable not to open the door during a
programme as this could cause water to leak
from the machine.
Capacity (dry items)
Cotton max. 3.4 kg
Synthetics max. 1.5 kg
Examples of laundry item weights
(dry items)
Here is a list of common laundry items and their
approximate weights
Sheet 700 to 1000g
Pillowcase 100 to 200g
Tablecloth 400 to 500g
Table Napkin 50 to 100g
Kitchen Towel 70 to 120g
Linen Hand Towel 100 to 150g
Hand Towel 150 to 250g
Bath Towel 700 to 1000g
Bathrobe 100 to 1500g
Shirt 200 to 300g
Apron 150 to 200g
The best and most economical load is the maximum
indicated for the different types of fabric.
- 6 -
A
B
C
D
E
Using your appliance
Page 7

Which programme should I use?
Timed drying
This programme chart is designed to help you dry your laundry correctly. The programme/timer knob has two different
sections, each with its own drying temperature and time scale:
is used to represent cotton. Here you can set the dryer for up to 120 minutes, because cotton and
thick non-synthetic fabrics need longer to dry.
is used to represent synthetic fabrics and delicate items. Because these are more sensitive than
cotton, they need a lower drying temperature. Here you can set the dryer for up to 80 minutes.
Do not overdry your laundry. It can make it difficult to iron and harsher to the touch, as well as wasting energy.
During the last 8-12 minutes of each programme, the load is cooled to reduce the risk of creasing.
COTTON DRYING TIME max 120 min
Spun at approx. 800 rpm
Type of laundry How dry? before drying
Cottons Cupboard dry 3,4 kg 95 - 110 min
Towelling (Terry) 2,0 kg 70 - 80 min
Sheets 1,0 kg 50 - 60 min
Towels
Iron dry 3,4 kg 80 - 95 min
2,0 kg 55 - 75 min
1,0 kg 45 - 55 min
SYNTHETICS DRYING TIME max 80 min
Short spun
Type of laundry How dry? before drying
Items which need a reduced
drying temperature
Delicate items Cupboard dry 1,5 kg 65 - 75 min
Heat-sensitive items 1,0 kg 45 - 55 min
(see garment care label) 0,7 kg 40 - 50 min
Iron dry 1,5 kg 50 - 60 min
1,0 kg 35 - 40 min
0,7 kg 30 - 35 min
If the laundry is spun at less than 800 rpm, the residual dampness will be higher and consequently the drying time
should be increased. If the laundry is spun at 1000 rpm or higher the residual dampness will be lower and consequently
the drying time can be reduced.
- 7 -
Programme chart
Page 8

- 8 -
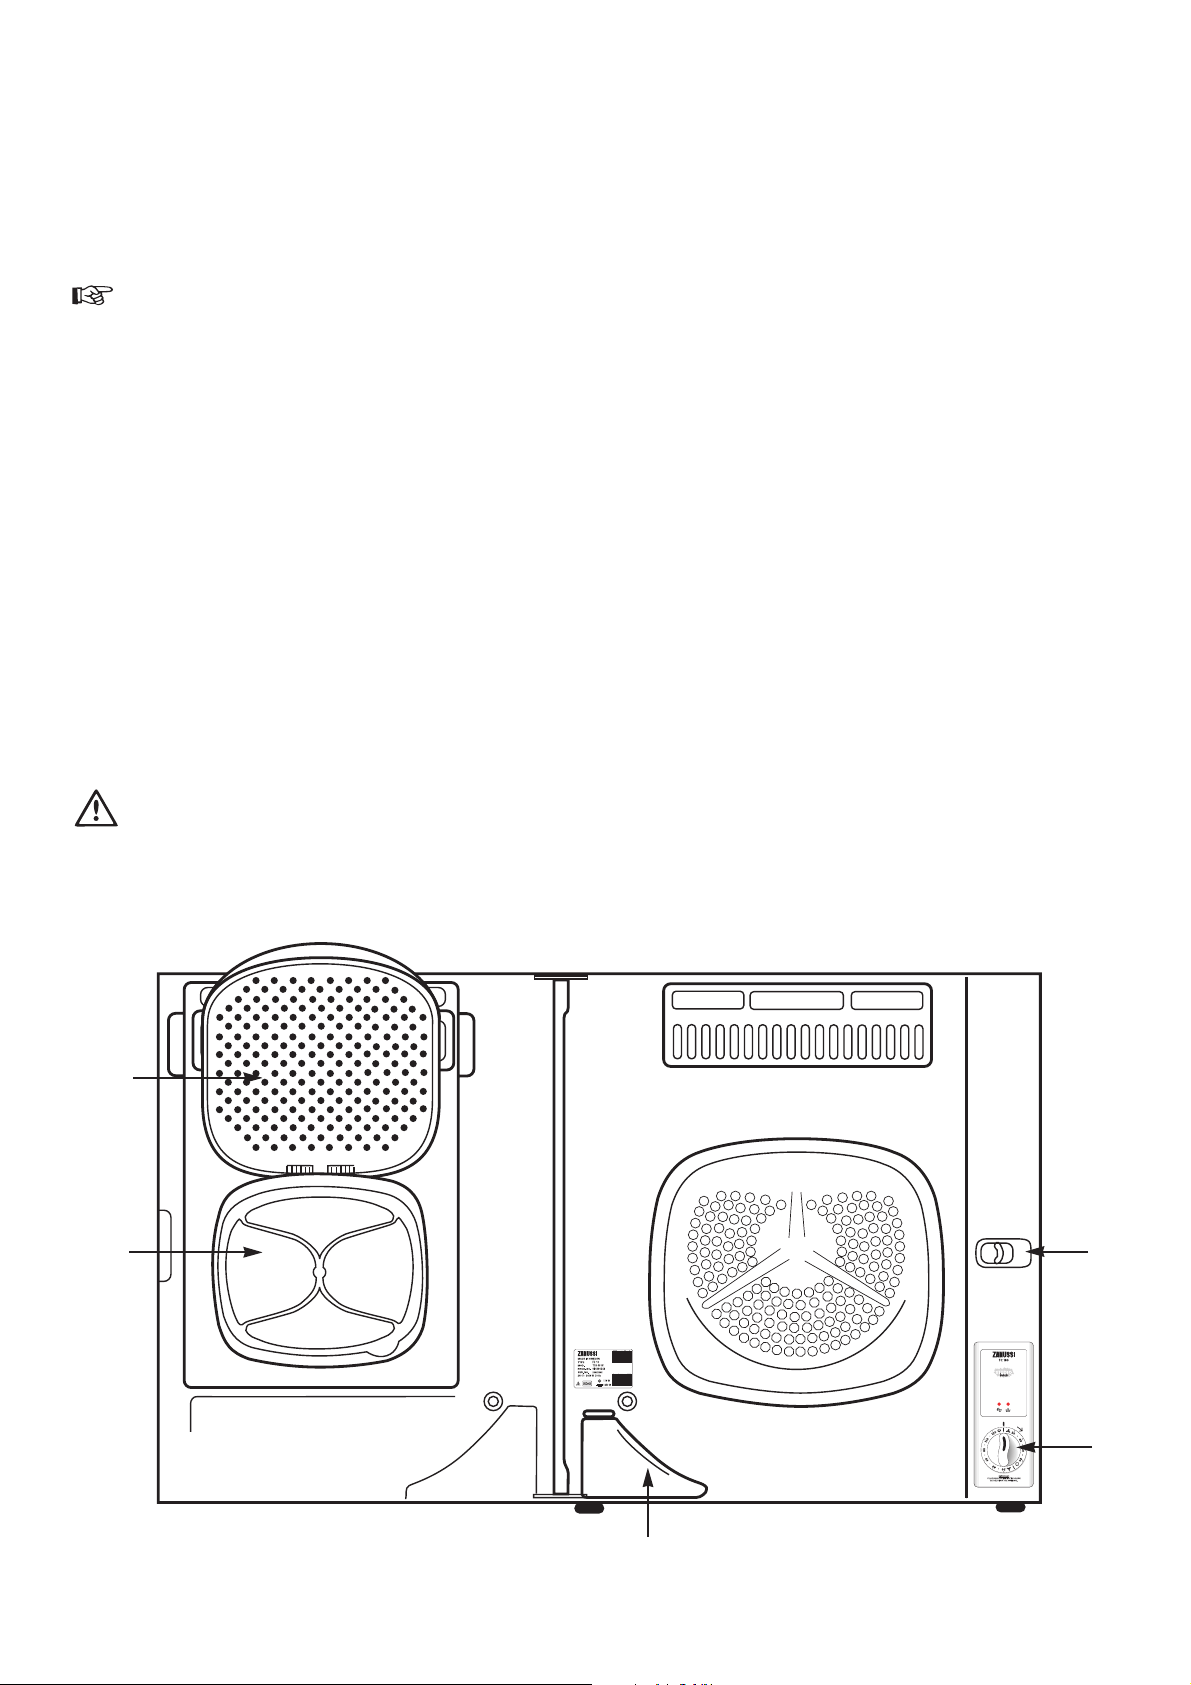
The filters
For your tumble dryer to function correctly, the filters need
to be cleaned before or after every load dried.
To clean them:
1. Open the door.
2. Open the coarse filter upwards (Fig. A).
3. Brush the fluff off the fluff filter, which is under the
coarse filter (Fig. B). Sometimes you may need to
remove the fluff filter to clean it on both sides.
Make sure that you put the fluff filter back correctly
after cleaning, before closing the coarse filter.
Never start the dryer unless the fluff filter
is clean and correctly in place, or if the
fluff filter is damaged (this could cause
overheating).
The condenser
As in all types of tumble dryer, the air circulated through the
dryer picks up fluff. As a result, some fluff will accumulate
in the condenser, so it needs to be cleaned occasionally.
To clean the condenser:
1. Open the door and open the coarse filter upwards.
2. Remove the fluff filter and close the coarse filter
again.
3. Grasp the recesses at the top of the condenser
with your fingers and use your thumbs to press
against the door (Fig. C & D).
The condenser will come free, allowing you to lift
it outwards/upwards. Be careful not to damage
the sensitive aluminium section.
4. Turn it upside down and clean it on both sides,
using a vacuum cleaner. Remove the red drain
plug on the lower edge of the condenser (Fig E).
Lay the condenser flat and fill it with water through
the filter opening. Now leave the condenser to
soak in water for about 5 minutes, then shower
both sides with hot water. (Fig. F).
Dry the condenser carefully afterwards. Don’t
forget to put back the red drain plug (Fig. G).
5. Put the condenser back in the dryer. Make sure
that its base is lined up in the slots in the condenser
cavity inside the dryer door.
Press the condenser carefully into place until you
feel and hear a gentle “snap”. Put back the fluff
filter and close the coarse filter.
A
B
C
D
E
F
G
Maintenance and cleaning
Page 9

- 9 -
Emptying the water tank
A warning light on the control panel will come on when
it is time to empty the water tank. If it is operating when
this happens, the dryer will stop automatically until the
tank is emptied. It is a good idea to get into the habit of
emptying the tank either before or after each load.
To empty the tank:
1. Open the door.
2. Pull out the tank (Fig. A).
3. Open the tank lid and pour the water out
(Fig. B).
4. Close the lid and push the tank back into
place. Press it home until you can feel that
it is properly in place.
A
B
Page 10

- 10 -
Sorting
Always sort loads for drying according to the type of fabric
(check the care labels) and how much you want to dry them.
Load items loosely into the drum. Do up zip fasteners and
tie loose ribbons, tapes or fabric belts. Close any tapes
or fasteners on duvet covers and pillow cases to prevent
smaller items from getting trapped inside.
Spinning (water extraction)
Loads should be well spun. The higher the spin speed,
the faster your tumble dryer will dry the load and the more
energy-efficient the whole process will be. Do not tumble
dry dripping wet garments.
Getting the load size right
An overloaded tumble dryer will cause creasing. Drying
loads which are too small is uneconomical.
Fluff
The first time you use the tumble dryer, you will probably
be surprised at the amount of fluff produced. This is
perfectly normal, and does not mean that your tumble
dryer is wearing out your clothes. When garments are
worn and washed by hand or machine, fibres and fluff are
released, but remain on the surface of the material.
If dried outdoors on a line these fibres will be blown away
by the wind. In a tumble dryer the fluff is collected in the
filter and accumulates through the drying process.
Shrinkage
To avoid shrinking, garments should not be overdried.
Always check the care labels on your fabrics.
Items which should not be tumble dried
Items which are especially delicate, such as curtains of
synthetic fabric, woollen garments, silk, textiles with a
metal component, nylon socks/stockings. Garments made
mostly from foam rubber or rubber-like materials must
NOT be dried in the tumble dryer.
Obviously, you must not dry garments in the
machine which are unsuitable for tumble
drying. These are usually labelled with this
symbol.
Garments which have been treated with
flammable liquids (benzine, alcohol, stain
removal products) should not be dried in the
tumble dryer on account of the risk of fire.
Always follow the recommendations of the
garment/item manufacturer.
Tumble drying beneficial
Dry flat
Hints & Tips
Page 11

- 11 -
Something Not Working?
The machine will not start.
The load is not drying properly, or is
taking long time to dry.
The area around the dryer is hot.
■ Is the door closed properly?
■ Is there power to the machine?
■ Has the fuse blown? (Start with fuse in electrical plug).
■ Have you set the program/timer knob properly?
■ Is the water tank full?
■ Was the time set not long enough?
■ Is the load too large?
Cotton max 3,4 kg
Synthetics max 1,5 kg
■ Is the fluff filter clogged?
■ Is the condenser clogged?
■ Was the load not spun enough in the washing machine?
■ Have you been using the ”Synthetics” setting (on the timer)
(lower drying temperature)?
■ Is the temperature in the room too high?
Must not exceed +35° C.
■ Is the room too small? (Improve the room ventilation, open
a door or window or choose another site for the dryer).
Fault Check
Before calling out an engineer, please check through the details below because some faults can be rectified easily
without the need to call out an engineer. If an engineer is called to resolve a problem listed below or to repair a
fault caused by incorrect installation or mis-use a charge will be made, even if the appliance is under guarantee.
Never attempt to repair the tumble dryer yourself.
Repairs carried out by unauthorised or inexperienced
persons can cause injury or serious malfunctioning.
This appliance complies with the following E.E.C. directives:
– 73/23/EEC, dated 19.02.1973 – low-voltage directive.
– 89/336/EEC, dated 03.05.1989 (incl. amendment
– 92/31/EEC) – directive on electromagnetic compatibility.
Page 12

- 12 -
Service
Service and Spare Parts
In the event of your appliance requiring service, or if you
wish to purchase spare parts, please contact your local
Service Force Centre by telephoning:
08705 929929
Your telephone call will be automatically routed to the
Service Force Centre covering your post code area.
For the address of your local Service Force Centre and
further information about Service Force, please visit the
website at www.serviceforce.co.uk
Before calling out an engineer, please ensure you have
read the details under the heading ”In the event of a fault”.
When you contact the Service Force Centre you will need
to give the following details:
1. Your name, address and post code
2. Your telephone number
3. Clear and concise details of the fault
4. The model and serial number of the appliance
(found on the rating plate)
5. The purchase date
Please note that a valid purchase receipt or guarantee
documentation is required for in-guarantee service calls.
Customer Care Department
For general enquiries concerning your Zanussi appliance
or for further information on Zanussi products, please
contact our Customer Care Department by letter or
telephone at the address below or visit our website at
www.zanussi.co.uk
Customer Care Department
Zanussi
55-77 High Street
Slough
Berkshire
SL1 1DZ
Tel: 08705 727727 *
* call to this number may be recorded for training purposes.
Page 13

- 13 -
Guarantee Conditions
Standard guarantee conditions
We, Zanussi, undertake that if within 12 months of the date of the purchase this Zanussi appliance or any part thereof
is proved to be defective by reason only of faulty workmanship or materials, we will, at our option repair or replace the
same FREE OF CHARGE for labour, materials or carriage on condition that:
• The appliance has been correctly installed and used only on the electricity supply stated on the rating plate
• The appliance has been used for normal domestic purposes only, and in accordance with the manufacturer’s
instructions
• The appliance has not been serviced, maintained repaired, taken apart or tampered with by any person not
authorised by us
• All service work under this guarantee must be undertaken by a Zanussi Service Force Centre
• Any appliance or defective part replaced shall become the Company’s property
• This guarantee is in addition to your statutory and other legal rights
Home visits are made between 8.30am and 5.30pm Monday to Friday. Visits may be available outside these hours in
which case a premium will be charged.
Exclusions
This guarantee does not cover:
• Damage or calls resulting from transportation, improper use or neglect, the replacement of any light bulbs or
removable parts of glass or plastic
• Costs incurred for calls to put right an appliance which is improperly installed or calls to appliances outside the
United Kingdom
• Appliances found to be in use within a commercial environment, plus those which are the subject to rental
agreements
• Products of Zanussi manufacture which are not marketed by Zanussi
European Guarantee
If you should move to another country within Europe then your guarantee moves with you to your new home subject
to the following qualifications:
• The guarantee starts from the date you first purchased your product
• The guarantee is for the same period and to the same extent for labour and parts as exists in the new country
of use for this brand or range of products
• This guarantee relates to you and cannot be transferred to another user
• Your new home is within the European Community (EC) or European Free Trade Area
• The product is installed and used in accordance with our instructions and is only used domestically, i.e. a
normal household
• The product is installed taking into account regulations in your new country
Before you move please contact your nearest Customer Care centre, listed below, to give them details of your new
home. They will then ensure that the local Service Organisation is aware of your move and able to look after you and
your appliances.
France Senlis +33 (0)3 44 62 29 99
Germany Nurnberg +49 (0)800 234 7378
Italy Pordenone +39 (0)0434 39 4700
Sweden Stockholm +46 (0)8 672 53 90
UK Slough +44 (0)1753 219897
Page 14

- 14 -
Installation instructions
DIMENSIONS Height 686 mm
Overall Width 605 mm
Depth 420 mm (with door closed)
Depth 900 mm (with door opened 90°)
WEIGHT (net) 32 kg
CAPACITY Cotton 3,4 kg
Synthetics/Delicate 1,5 kg
ELECTRICAL DATA Power supply 230 V - 50 Hz
Fuse 13 A
Motor 170 W
Power rating 2170 W
Technical specifications
Any electrical work required to install this appliance
should be carried out by a qualified electrician or
competent person.
Consumption according to the EN 61121 European standard
Energy 2,78 kWt/3,4 kg cotton
The consumer information on the energy declaration is in accordance with directive EEC 92/75
and refers to the 104 minute programme.
Page 15

- 15 -
Damages
If the dryer has been damaged during transport, you
should immediately notify the company responsible for
delivering it.
Check that the dryer is undamaged. If you discover any
damage, faults or that anything is missing, you should
notify the dealer immediately.
Never leave packaging material in a place
where children may play with it.
Accessories
Console for wall mounting
Non-tip device consisting of:
1 wall hook
1 plastic wall plug
Identification of materials
All materials used in packaging the dryer are
environmentally-friendly. The various plastics
used are identified and can be recycled:
• PE stands for polyethylene, which is used for the
bag around the dryer and the bag in which these
instructions were supplied.
• PS stands for (moulded) polystyrene, which is used
for the sections of packaging needed to cushion the
dryer.
The cardboard components of the packaging are made
from recyclable paper and should be taken to a collection
point for recycling.
The dryer contains plastic and rubber components.
These have identifying marks to show what they are made
from, so they can be recycled or disposed of properly at
the end of the dryer’s life.
The materials are identified according to international
standards.
Unpacking the machine
Page 16

- 16 -
Positioning
You can install this dryer in a number of different ways.
We will show you the most suitable of these. Whichever
way you install it, here are some points to bear in mind:
• Always ensure that the dryer is level for optimum
functioning.
• The temperature in the room should not exceed
+35° C when the dryer is operating. If it does,
open a door or window while the dryer is on. The
dryer uses the air in the room for cooling.
• The area around the dryer should be as dust-free
as possible.
• If you install the dryer with its door hinge side
towards a wall, or next to a cupboard or wall unit
which is more than 370 mm deep, you will need
to leave a space on the hinge side at least 30 mm
wide. This is to allow the door to open wide enough
for removing the water tank.
• Ensure the air ducts are not obstructed.
Worktop installation
If you prefer to install your dryer on a worktop, you must
anchor it at the top rear to prevent it from tipping forwards.
Method:
1. Begin by placing the dryer on the worktop in the
position where it is to be installed.
2. Level the dryer with the aid of its adjustable feet.
3. Mark the position for the hook on the wall. The
correct place is opposite the centre of the lefthand bracket on the top rear of the dryer.
Drill a hole for a 8 mm diameter plastic wall plug.
4. Screw the hook (1) into place. Once in place, the
“eye” (aperture) of the hook needs to be 40 mm
from the wall.
5. Position the dryer so that the eye is correctly
aligned in the bracket.
6. Fit the pin (2) through bracket and eye and lock it
in place with the split-pin (3).
The adjustable feet must not be removed,
they ensure that there is adequate ventilation
underneath the dryer.
1
2
3
40 mm
Installation
Page 17

- 17 -
Wall mounting
Different wall materials require different types of mounting
hardware. Purchase mounting hardware suited to the walls
in your home. Use a minimum of 3 suitable fasteners to
attach your mounting console to the wall.
Before deciding on the wall mounting site, it is important
to check that the electrical lead will reach the wall socket
once the dryer is in place.
All electrical work performed on the dryer
should be done by a qualified electrician or
competent person.
If you are installing the dryer between wall-mounted cupboards, you should use the wall mounting console. If the
adjacent cupboards are more than 370 mm deep, don’t
forget to leave a space at least 30 mm wide on the left of
the dryer so that the door can open wide enough.
There should be a clear space at least 200 mm high between the top of the dryer and the ceiling or any cupboard
above the dryer, to ensure adequate ventilation at the top.
3
Page 18

Power supply
The dryer is supplied with a lead and electrical plug
for connection to a 230 V, 13 A earthed wall socket.
Before any work is carried out on the dryer, it must
be isolated from the electric mains supply, for
example by removing the plug from the wall socket.
Permanent electrical installation must be
carried out by an authorised electrician or
competent person.
WARNING: THIS APPLIANCE MUST BE EARTHED.
The manufacturer declines any liability should
this safety measure not be observed.
If the plug that is fitted to your appliance is not
suitable for your socket outlet, it must be cut off and
the appropriate plug fitted.
Remove the fuse from the cut off plug.
The cut off plug should then be disposed of to prevent
the hazard of shocks in case it should be plugged
into a 13 amp socket in another part of your home.
Important
The wires in the mains lead are coloured in
accordance with the following code:
Green and Yellow - Earth
Blue - Neutral
Brown - Live
If you fit your own plug, the colours of the wires in the
mains lead of your appliance may not correspond
with the markings identifying the terminals in your
plug, proceed as follows:
Connect the Green and Yellow (earth) wire to the
terminal in the plug which is marked with the letter
«E» or the earth symbol or coloured green and
yellow.
Connect the blue (neutral) wire to the terminal in the
plug which is marked with the letter «N» or coloured
black.
Connect the brown (live) wire to the terminal in the
plug which is marked with the letter «L» or coloured
red.
The plug moulded onto the lead incorporates a fuse.
For replacement, use a 13 amp BSI362 fuse.
Only ASTA or BSI approved fuses should be used.
- 18 -
13 AMP
GREEN & YELLOW
13 AMP FUSE
BLUE
BROWN
CORD CLAMP
Page 19

Page 20

© Electrolux plc 2002
 Loading...