

Page 1

ZSK 3502X
INSTALLATIONS− UND
GEBRAUCHSANWEISUNG
Einbau−Schaltkasten
INSTALLATION AND
OPERATING INSTRUCTIONS
Built-In Switch Box
MANUEL D’INSTALLATION ET
D’UTILISATION
Bloc de commande encastré
MONTAGE- EN
GEBRUIKSVOORSCHRIFTEN
D
GB
F
NL
Schakelkast voor inbouw
Page 2

Dear Customer,
Please read through these operating instructions carefully. Above all, please take note of the ”Safety Instructions” section.
Please keep these operating instructions for later reference and pass them on to any subsequent owner.
The warning triangle and/or the specific words
«Important!», «Caution!» are used to highlight instructions that are important for your safety or for the function of the appliance. It is imperative that these instructions are observed.
1. These numbers guide you step for step through
the operation of the appliance.
2. . . .
3. . . .
After this symbol you will find supplementary
information on the operation and practical use
of the appliance.
Tips and instructions for the economical and
environmentally conscious use of the appliance are marked with this symbol.
In the event of a malfunction, these operating instructions contain information on how to rectify faults yourself, see the «What to do if...»” section.
If these instructions are not sufficient, there are two
places where you can obtain further assistance at any
time:
• Your local customer service centre (see «Customer Service» section).
Here any questions you may have on the features
and use of your appliance will be answered. Of
course, we would also be happy to hear any wishes, suggestions or criticism you may have. Our
objective is to continually improve our products
and services for the benefit of our customers.
• In the case of technical problems, our customer
service organisation is available to provide you
with assistance at any time, you will find addresses
and telephone numbers in the «Customer Service» section.
On this topic please also take note of the contents of
the «Service» section.
Compliance with these operating instructions and the
installation instructions is a pre-condition for our
obligations under the warranty.
17
Page 3

Content
Safety Instructions 19. . . . . . . . . . . . . . . . . . . . . . . . . . . . . . . . . . . . . . . . . . . . . . . . . . . . . . . . . . . . . . .
Electrical Safety 19. . . . . . . . . . . . . . . . . . . . . . . . . . . . . . . . . . . . . . . . . . . . . . . . . . . . . . . . . . . . . . . . . . . . . . .
Child Safety 19. . . . . . . . . . . . . . . . . . . . . . . . . . . . . . . . . . . . . . . . . . . . . . . . . . . . . . . . . . . . . . . . . . . . . . . . . . .
Safety When Using 19. . . . . . . . . . . . . . . . . . . . . . . . . . . . . . . . . . . . . . . . . . . . . . . . . . . . . . . . . . . . . . . . . . . .
Safety When Cleaning 19. . . . . . . . . . . . . . . . . . . . . . . . . . . . . . . . . . . . . . . . . . . . . . . . . . . . . . . . . . . . . . . . . .
Disposal 19. . . . . . . . . . . . . . . . . . . . . . . . . . . . . . . . . . . . . . . . . . . . . . . . . . . . . . . . . . . . . . . . . . . . . . . . .
Disposing of the Packaging Material 19. . . . . . . . . . . . . . . . . . . . . . . . . . . . . . . . . . . . . . . . . . . . . . . . . . . . . .
Information on Disposal 19. . . . . . . . . . . . . . . . . . . . . . . . . . . . . . . . . . . . . . . . . . . . . . . . . . . . . . . . . . . . . . . . .
Appliance Description 20. . . . . . . . . . . . . . . . . . . . . . . . . . . . . . . . . . . . . . . . . . . . . . . . . . . . . . . . . . . .
Control Panel 20. . . . . . . . . . . . . . . . . . . . . . . . . . . . . . . . . . . . . . . . . . . . . . . . . . . . . . . . . . . . . . . . . . . . . . . . .
Prior to Using for the First Time 20. . . . . . . . . . . . . . . . . . . . . . . . . . . . . . . . . . . . . . . . . . . . . . . . . . .
Cleaning for the First Time 20. . . . . . . . . . . . . . . . . . . . . . . . . . . . . . . . . . . . . . . . . . . . . . . . . . . . . . . . . . . . . .
Operating the Built-In Switch Box 21. . . . . . . . . . . . . . . . . . . . . . . . . . . . . . . . . . . . . . . . . . . . . . . . .
Ring Switches 21. . . . . . . . . . . . . . . . . . . . . . . . . . . . . . . . . . . . . . . . . . . . . . . . . . . . . . . . . . . . . . . . . . . . . . . . .
Single Ring Zone 21. . . . . . . . . . . . . . . . . . . . . . . . . . . . . . . . . . . . . . . . . . . . . . . . . . . . . . . . . . . . . . . . . . .
Double Ring Cooking Zone and Casserole Cooking Zone 21. . . . . . . . . . . . . . . . . . . . . . . . . . . . . . . .
Cooking with the Rings 22. . . . . . . . . . . . . . . . . . . . . . . . . . . . . . . . . . . . . . . . . . . . . . . . . . . . . . . . . . . . . . . . .
Cleaning and Care 23. . . . . . . . . . . . . . . . . . . . . . . . . . . . . . . . . . . . . . . . . . . . . . . . . . . . . . . . . . . . . . .
Switch Panel and Switch Knobs 23. . . . . . . . . . . . . . . . . . . . . . . . . . . . . . . . . . . . . . . . . . . . . . . . . . . . . . . . .
Appliances with Stainless Steel Exterior Finish 23. . . . . . . . . . . . . . . . . . . . . . . . . . . . . . . . . . . . . . . . . . . . .
What to do if ... 24. . . . . . . . . . . . . . . . . . . . . . . . . . . . . . . . . . . . . . . . . . . . . . . . . . . . . . . . . . . . . . . . . . .
Rectifying Malfunctions 24. . . . . . . . . . . . . . . . . . . . . . . . . . . . . . . . . . . . . . . . . . . . . . . . . . . . . . . . . . . . . . . . .
Installation Instructions 25. . . . . . . . . . . . . . . . . . . . . . . . . . . . . . . . . . . . . . . . . . . . . . . . . . . . . . . . . .
Safety Instructions 25. . . . . . . . . . . . . . . . . . . . . . . . . . . . . . . . . . . . . . . . . . . . . . . . . . . . . . . . . . . . . . . . . . . . .
Unpacking 25. . . . . . . . . . . . . . . . . . . . . . . . . . . . . . . . . . . . . . . . . . . . . . . . . . . . . . . . . . . . . . . . . . . . . . . . . . . .
Installation in Kitchen Units 25. . . . . . . . . . . . . . . . . . . . . . . . . . . . . . . . . . . . . . . . . . . . . . . . . . . . . . . . . . . . . .
Fitting 26. . . . . . . . . . . . . . . . . . . . . . . . . . . . . . . . . . . . . . . . . . . . . . . . . . . . . . . . . . . . . . . . . . . . . . . . . . . . . . . .
Electrical Connection 27. . . . . . . . . . . . . . . . . . . . . . . . . . . . . . . . . . . . . . . . . . . . . . . . . . . . . . . . . . . . . . . . . . .
Table of Combinations 27. . . . . . . . . . . . . . . . . . . . . . . . . . . . . . . . . . . . . . . . . . . . . . . . . . . . . . . . . . . . . . . . . .
Technical Data 28. . . . . . . . . . . . . . . . . . . . . . . . . . . . . . . . . . . . . . . . . . . . . . . . . . . . . . . . . . . . . . . . . . . . . . . .
Regulations, Standards, Directives 28. . . . . . . . . . . . . . . . . . . . . . . . . . . . . . . . . . . . . . . . . . . . . . . . . . . . . . .
Service and Spare Parts 29. . . . . . . . . . . . . . . . . . . . . . . . . . . . . . . . . . . . . . . . . . . . . . . . . . . . . . . . . .
18
Page 4

Safety Instructions
The safety aspects of this appliance comply with the
accepted technical standards and the applicable safety regulations. Nevertheless, we consider it our obligation to make you aware of the following safety information:
Electrical Safety
Assembly and connection of the new appliance is only
to be performed by an approved electrician.
Please observe this instruction, otherwise the warranty will not cover any damage that may occur.
Repairs to the appliance are only to be performed by
qualified service engineers. Improper repairs can give
rise to significant hazards.
Damaged appliances must not be used.
If your appliance needs repairing, please contact cu-
stomer service or your dealer.
In the event of a malfunction or defect, please switch
off at the fuse or remove the fuse.
Child Safety
Packaging (e.g. sheeting, polystyrene) can be dangerous for children. There is a risk of suffocation! Keep
packaging away from children.
The cooking zones become hot when you boil or brown
food. For this reason, always keep children away from
the cooking surface.
Safety When Using
After use check that the appliance is switched off. All
knobs must be in the OFF position.
Some of the rotary switches on your appliance have a
stop. Do not try to turn these switches past the stop,
instead turn them back in the opposite direction. Turn-
ing past the stop will cause damage to the switch!
Safety When Cleaning
Cleaning the appliance with a steam or high pressure
cleaner is forbidden for safety reasons.
Disposal
Packaging material
The packaging materials are environmentally
friendly and can be recycled. The plastic components are identified by markings, e.g. >PE<,
>PS<, etc. Please dispose of the packaging
materials in the appropriate container at your
local waste disposal facilities.
Old appliance
The symbol on the product or on its packaging indicates that this product may not be
treated as household waste. Instead it shall be
handed over to the applicable collection point
for the recycling of electrical and electronic
equipment. By ensuring this product is disposed of correctly, you will help prevent potential
negative consequences for the environment
and human health, which could otherwise be
caused by inappropriate waste handling of this
product. For more detailed information about
recycling of this product, please contact your
local city office, your household waste disposal
service or the shop where you purchased the
product.
Warning: Before disposing of old appliances
please make them inoperable so that they cannot be a source of danger.
To do this, disconnect the appliance from
the mains supply and remove the mains cable from the appliance.
19
Page 5
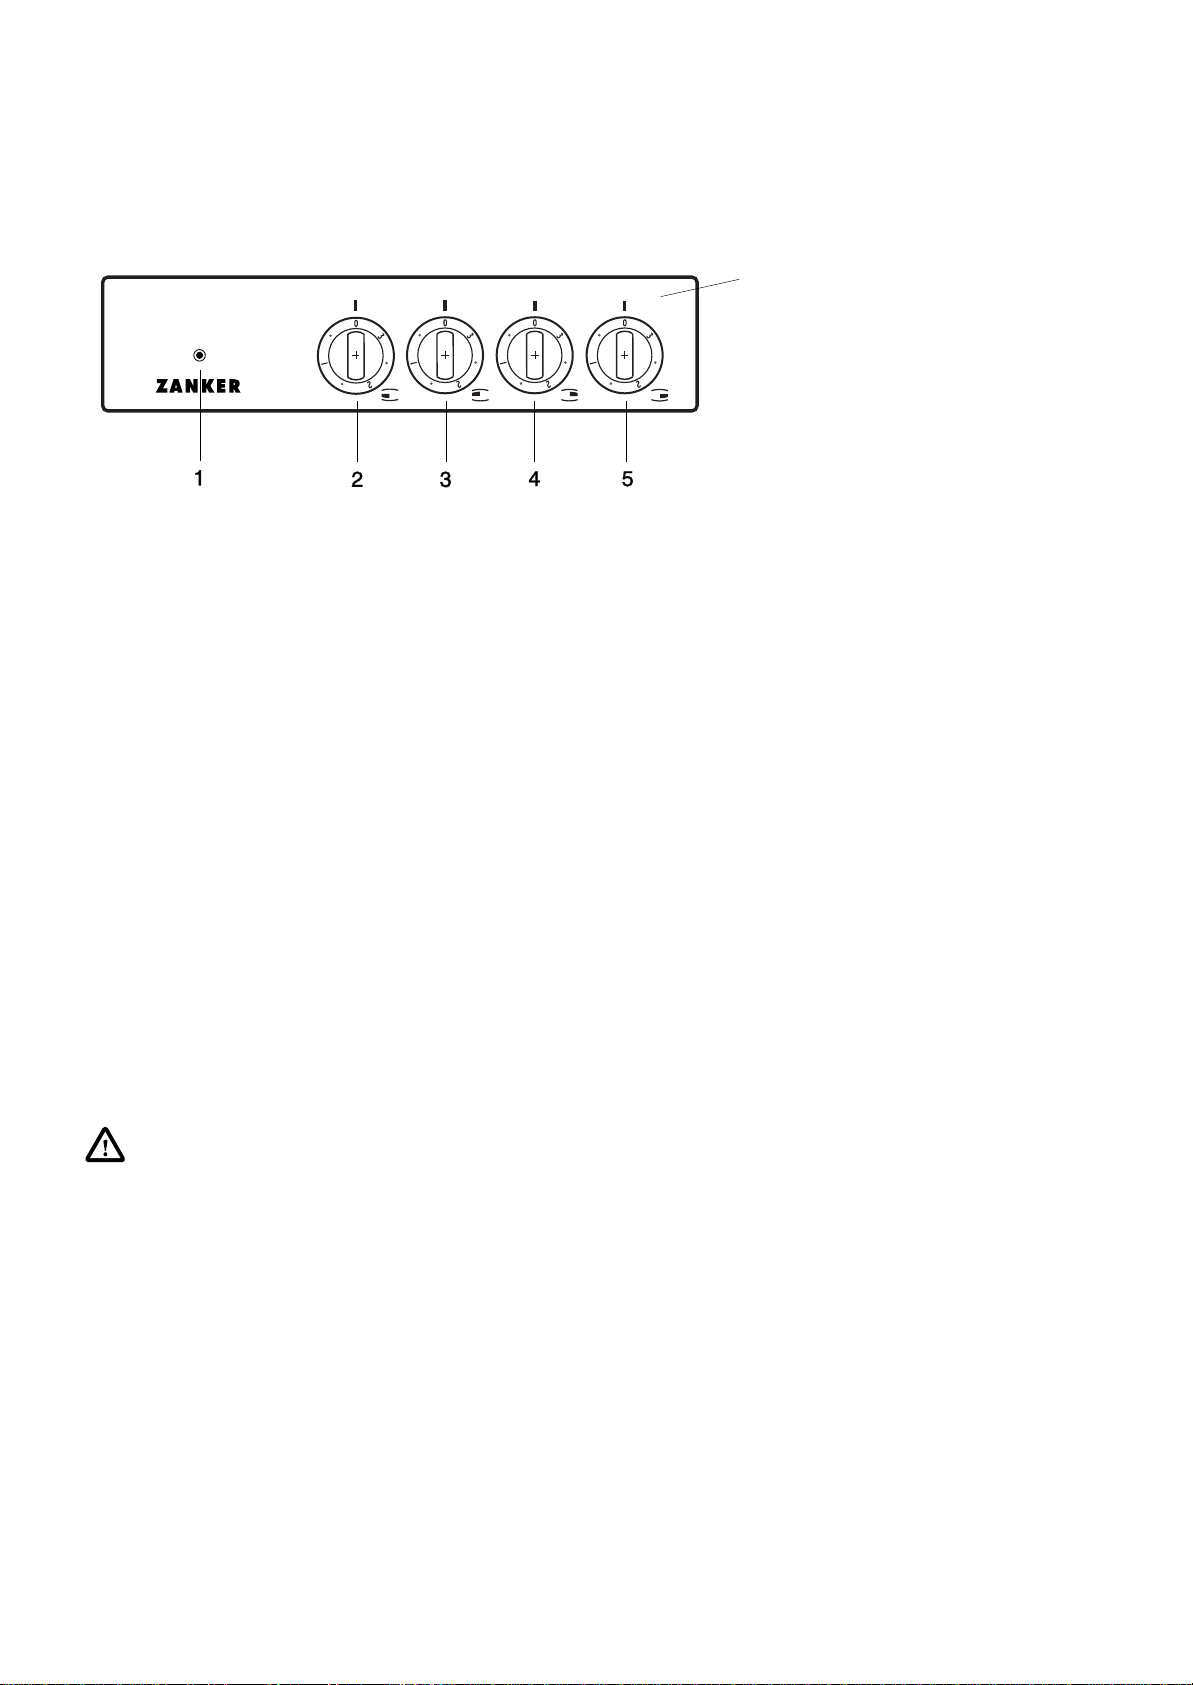
Appliance Description
Control Panel
Control Panel
Indicator, illuminates when the cooking zones or hot plates are switched on
À
Ring switch, front left for double ring zone
Á
Ring switch, rear left
Â
Ring switch, rear right for double ring zone
Ã
Ring switch, front right
Ä
with Ring Switches
Prior to Using for the First Time
Cleaning for the First
Time
Remove any adhesive labels and protective sheeting
from the appliance.
Clean the exterior parts with a damp cloth and mild
washing up liquid.
Important: Do not use any caustic or abrasive
cleaners! The surface could be damaged.
20
Page 6

Operating the Built−In Switch Box
Ring Switches
The cooking zone power can be adjusted in the range
1 to 3.
1 = Lowest power setting
3 = Highest power setting.
O = Off position
Single Ring Zone
The switches for the single ring cooking zones
can be turned to the right or the left.
Double Ring Cooking Zone and
Casserole Cooking Zone
Depending on the size of the pan, on the
double ring cooking zone and the casserole
cooking zone the larger heater ring can be
switched on in addition to the smaller cooking
zone.
The switch for the double ring cooking zone or
casserole cooking zone is turned to the right
and must not be turned beyond the stop!
Setting the Small Cooking Zone
Turn the ring switch for the double ring/casserole
cooking zone to the right and set to the required power
setting.
Switching In the Large Cooking Zone
1. Turn the ring switch for the double ring/casserole
cooking zone to the right. Turn past position 3
through light resistance to a clearly noticeable
stop.
2. Then set to the required power setting.
3. When cooking is finished, turn back to the OFF po-
sition.
The next time the double ring/casserole
cooking zone is switched on, the larger heater
ring must be switched in again.
21
Page 7

Cooking with the Rings
1. For bringing to the boil or browning, set the ring
switch to a high power setting.
2. As soon as steam starts to form or the oil is hot, turn
back to the power setting necessary for further
cooking.
3. When cooking is finished, turn back to the OFF position.
After use check that the appliance is switched
off. All ring switches must be in the OFF position!
22
Page 8

Cleaning and Care
It is not permitted to use steam and high pressure cleaning appliances for reasons of electrical safety.
Switch Panel and
Switch Knobs
Clean using warm water and washing up liquid or glass
cleaner, w i p e d r y. Under no circumstances should you
use caustic or abrasive cleaners, oven sprays, or steel
wool because these will attack the gloss finish, particularly on the switch knobs.
Appliances with
Stainless Steel Exterior
Finish
When cleaning ensure that the stainless steel
finish (the fine horizontal lines) is not cleaned
perpendicular to the grain.
For stainless steel fronts we recommend thorough and
regular cleaning with a suitable stainless steel cleaner
(e.g. Sidol-Stahlglanz, Wenol or Stahlfix).
Please observe the application instructions given on
cleaning and care products. Scourers and cleaners
that cause scratches are not suitable.
Apply the cleaner to a moist cloth before wiping, then
wash the surface with water and dry with a clean cloth.
23
Page 9

What to do if ...
Caution: For safety reasons, repairs to the appliance, particularly live parts, may only be carried out by qualified electricians or trained customer service engineers! Improper repairs
can give rise to significant hazards for the user!
If your appliance needs repairing, contact our
customer service organisation directly.
Rectifying Malfunctions
A malfunction may be caused by a minor fault that you
can rectify yourself using the following instructions.
... the switch box and cooking
zones do not work?
Check whether
• the mains fuse in the fuse box is intact. If the fuse
blows several times, please call an approved electrician.
• the indicator on the control panel illuminates.
• the corresponding cooking zones are switched on
and set to the required cooking setting.
If you call in customer service to resolve a problem listed in these notes, or due to an error in
the operation of the appliance, the customer
service engineer’s visit will not be free of
charge, even during the warranty period.
24
Page 10

Installation Instructions
Safety Instructions
The appliance is only to be connected to
the mains by a qualified electrician. The
proper connection of the appliance to the
mains is to be certified on page 14 as proof for
use in the event of a claim under the warranty.
Important! Zanker built-in switch boxes may
only be combined with glass ceramic cooking
surfaces or hobs in accordance with the Table
of Combinations. The usage of other glass ceramic cooking surfaces and hobs excludes any
liability on the part of Zanker. The approvals related to the test markings are invalid if this instruction is not observed.
The appliance must be isolated from the mains during
installation and servicing; remove or switch off the
fuse.
The general directives on the operation of electrical
appliances, the regulations of the local electricity board and the information contained in these installation
instructions are to be fully observed.
Unpacking
Check that the appliance has been delivered
undamaged. Appliances with obvious transport damage must not be connected to the
mains.
Installation in Kitchen
Units
Electrical safety is to be assured by correct installation.
A removable intermediate panel is necessary underneath the switch box. If installed away from the wall,
the rear wall of the switch box must also not be accessible.
Protection against touching in accordance with VDE
regulations must be assured by proper installation of
the appliances in suitable units that comply with the
standards . Kitchen units must be installed and fastened such that they are safe from tipping.
Remove any protective sheeting on the appliance prior
to using for the first time.
Abb.3
100 mind
Abb.4
35 mind
25
Page 11

In respect of the protection of surrounding surfaces
from overheating, this appliance is of type Y: this appliance, and the kitchen unit in which the appliance is
installed, can be installed in conjunction with a glass
ceramic cooking surface or hob with the rear wall and
one side wall against walls or units of any height, with
the other side against another appliance or unit of the
same height as the appliance.
Fitting
Please note the informations on the rating
plate, these informations are in case of a service call important.
The front of the unit in which the cut-out for the built-in
switch box is to be cut must be a minimum of 16 mm
and a maximum of 22 mm thick.
1. Saw a 80 x 377 mm cut-out in the front of the unit.
2. Remove the ring switches and cover from the ap-
pliance.
76
3. Open the cover on the terminal box. Lay the connection cable to the terminal box and connect in
accordance with the ”Electrical Connection” section.
4. Guide the appliance at an angle into the cut-out,
place in position and align.
5. Using the screws supplied, fix the two brackets so
that the built-in switch box is firmly secured.
6. Clip the panel back on.
7. Slide in the ring switches.
If necessary the additional support bracket can also be
fitted.
31
26
Page 12

Electrical Connection
All electrical installation work must be carried
out by a competent electrician and in accordance with the applicable local regulations. Incorrect installation can lead to injury or damage.
Before connecting the built-in switch box to the
glass ceramic cooking surface or hob via the
21 pole contacts, and connecting the appliance to the mains, always check that the
mains voltage and that of the appliance match.
A type HO5VV-F or higher quality cable must be used
for the mains connection cable.
A device is to be provided in the switch box installation
that enables the appliance to be isolated from the
mains with a separation of 3 mm on all poles. Suitable
devices are cut-outs, fuses and contactors.
The connection socket should be positioned such that
it is easily accessible; the cable should be at least
1.2m long so that the built-in switch box can be easily
plugged in after installation.
See enclosed wiring diagram.
Table of Combinations
Information on which cooking surfaces the switch boxes can be combined with:
Switch Box
ZSK 3502 X
Glass Ceramic Cast Hot Plates
ZKM 3180 X
EHC 650 X
EHC 660 X
315 1719 17 / 02.98
ZKM 2416 W
ZKM 2416 B
ZKM 2416 X
27
Page 13

Technical Data
Appliance Dimensions
Panel
Width 410 mm. . . . . . . . . . . . . . . . . . . . . . . . . . . . . . . . .
Height 90 mm. . . . . . . . . . . . . . . . . . . . . . . . . . . . . . . . .
Switch Box
Width 355 mm. . . . . . . . . . . . . . . . . . . . . . . . . . . . . . . . .
Depth 211 mm. . . . . . . . . . . . . . . . . . . . . . . . . . . . . . . . .
Height 67 mm. . . . . . . . . . . . . . . . . . . . . . . . . . . . . . . . .
Cut−Out Dimensions
Width 377 mm. . . . . . . . . . . . . . . . . . . . . . . . . . . . . . . . .
Height 80 mm. . . . . . . . . . . . . . . . . . . . . . . . . . . . . . . . .
Total Net Weight 3,4 kg. . . . . . . . . . . . .
Total Electrical Load max. 7.00 kW
Voltage 230 V X50Hz. . . . . . . . . . . . . . . . . . .
Regulations, Standards,
Directives
This appliance complies with the following EU Directives:
73/23/EWG dated 19.02.1973 (Low Voltage Directive)
89/336/EWG dated 03.05.1989 (EMC Directive including Directive Amendment 92/31/EWG).
90/683/EWG
28
Page 14

Service and Spare Parts
Confirmation of Connection by the Installer
If you require service or spare parts, please contact
your sales representative or spare parts service.
Our extensive customer service network is available to
all our customers.
Before you Request Customer
Service
Check that the problem is not caused by incorrect operation.
Check your built-in switch box in accordance with the
section: «What to do if . . .».
When You Want to Make Use of
Customer Service
• Make a note of the following information that is given on your appliance’s rating plate:
- Serial Number .............................................
- Model Name ................................................
- Prod. Number ..............................................
ZANKER
7.0 kW 230V, 230V 3, 400V 2-3 N ~50Hz
SC
Type
Serial Number
Prod no:
Range
ZSK 3502X
The rating plate is on the switch box panelling.
• Please always provide this data when:
- Requesting customer service
- Ordering spare parts or accessories
- Raising technical questions
• Make a careful note of your observations, this will
ease the preparations and work of our service engineer.
• Dial the Service No. 0180 322 66 22*. Your call will
be automatically directed to the nearest service
centre.
• Please be at home when the service engineer
calls, he needs your information.
* Only in Germany
Serial-Number Model Name Prod.Number
Model Name
The appliance was connected to the mains in accordance with regulations on .... .... .......:
Company and Installer
Signature
29
Page 15

30
Page 16

374 3958 00 /02.05
60
Änderungen vorbehalten
Subject to change
Sous réserve de modifications
Con riserva di modifiche
Wijzingen voorbehouden
Ret til ændringer forbeholdes
 Loading...