

Page 1
Machine à laver séchante
Comment déballer, installer et obtenir le maximum
de votre machine à laver séchante
Wasmachine/droger
Hoe u uw wasmachine/droger uitpakt, opstelt en
hoe u de beste prestaties van het apparaat verkrijgt
Waschtrockner
Wie Sie ihren Waschtrockner auspacken, aufstellen
und bestmôgliche Ergebnisse erzielen
Washer-dryer
Installation and users' instructions
for your washer-dryer
461303056 90525 Printed in Italy: Litograf s.r.l. Jesi
F NL E
D GB
F-NL-D-GB
Page 2
C
A
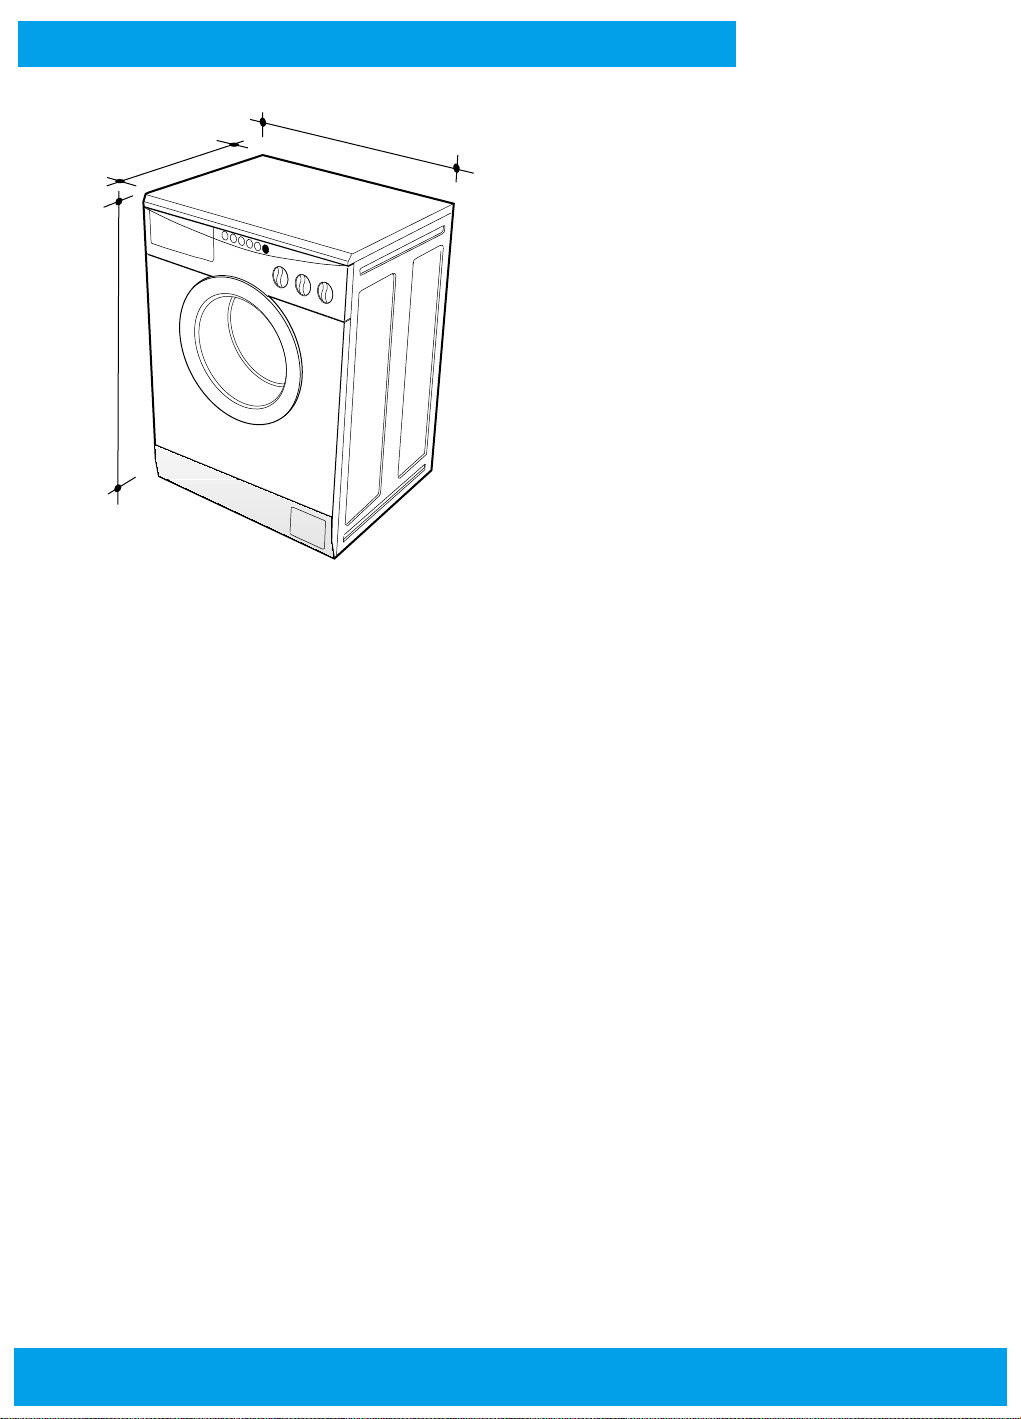
CARACTERISTIQUES TECHNIQUES
Cette machine est conforme
au D.M. 13/4/89 et à la Directive communautaire
CEE n. 87/308 du 2/6/87 relative à la suppression
des parasites radio.
TECHNISCHE KENMERKEN
Deze machine voldoet aan het Italiaans Ministerieel
Besluit 13/4/89 en aan de EEG-richtlijn n. 87/308
van 2/6/89 met betrekking tot de onderdrukking
van radiostoringen
B
•A - Width 59,5 cm •B - Height 85 cm •C - Dept 53 cm
•0,5 N/cm2 - Minimum •10 N/cm2 - maximum
•5 Kg - Cotton, linen •2 Kg - Synthetics, delicates •1 Kg - Woollens
•See plate with technical features inside the door filter
•A - Breedte 59,5 cm •B - Hoogte 85 cm •C - Diepte 53 cm
•0,5 N/cm2 - Minimum •10 N/cm2 - maximum
•5 Kg - Katoen, linnen •2 Kg - Synthetisch, delicaat •1 Kg - Wol
•Controleer of de spanning die is aangegeven bij de technische kenmerken
op het plaatje op de binnenkant van de filterklep overeenkomt met de
netspanning
TECHNISCHE KENNDATEN
Die Ausführung dieses Automaten entspricht der
Verordnung DM 13/4/89 und der EG-Verordnung
CEE Nr. 87/308 vom 02.06.1987 su Entstîrungen.
TECHNICAL CHARACTERISTICS
This machine conforms to D.M. 13/4/89 and EEC
Directive n° 87/308 of 2/6/87 for radio disturbance
suppression.
•A - Breite 59,5 cm •B - Hîhe 85 cm •C - Tiefe 53 cm
•0,5 N/cm2 - Minimum •10 N/cm2 - maximum
•5 Kg - Baumwolle, Leinen •2 Kg - Synthetik, Empfindliche Gewebe
•1 Kg - Wolle
•Ûberprüfen Sie, ob die auf der Innenseite der Filterklappe angegebene
Spannung der anliegenden Netzspannung entspricht, ob der Zähler,
die Begrenzungsventile, die Versorgungsleitung und die Steckerbuchse
entsprechend der maximalen Belastung ausgelegt sind
•A - Largeur 59,5 cm •B - Hauteur 85 cm •C - Profondeur 53 cm
•0,5 N/cm2 - Minimum •10 N/cm2 - maximum
•5 Kg - Coton, lin •2 Kg - Linge synthétique, délicat •1 Kg - Laine
•Voir plaque signalétique située à l'intérieur de la porte-filtre
14
Page 3
1 - HUBLOT
2 - TAMBOUR
3 - DESSUS STRATIFIÉ
4 - PIEDS REGLABLES
5 - FILTRE
1 - DEURTJE
2 - TROMMEL
3 - ANTIKRAS OPPERVLAK
4 - REGELBARE STEUNVOETJES
5 - FILTER
1 - ÖFFNUNG ZUR WÄSCHEEINLAGE
2 - TROMMEL
3 - KRATZFESTE ARBEITSPLATTE
4 - JUSTIERFÜSSCHEN
5 - FILTER
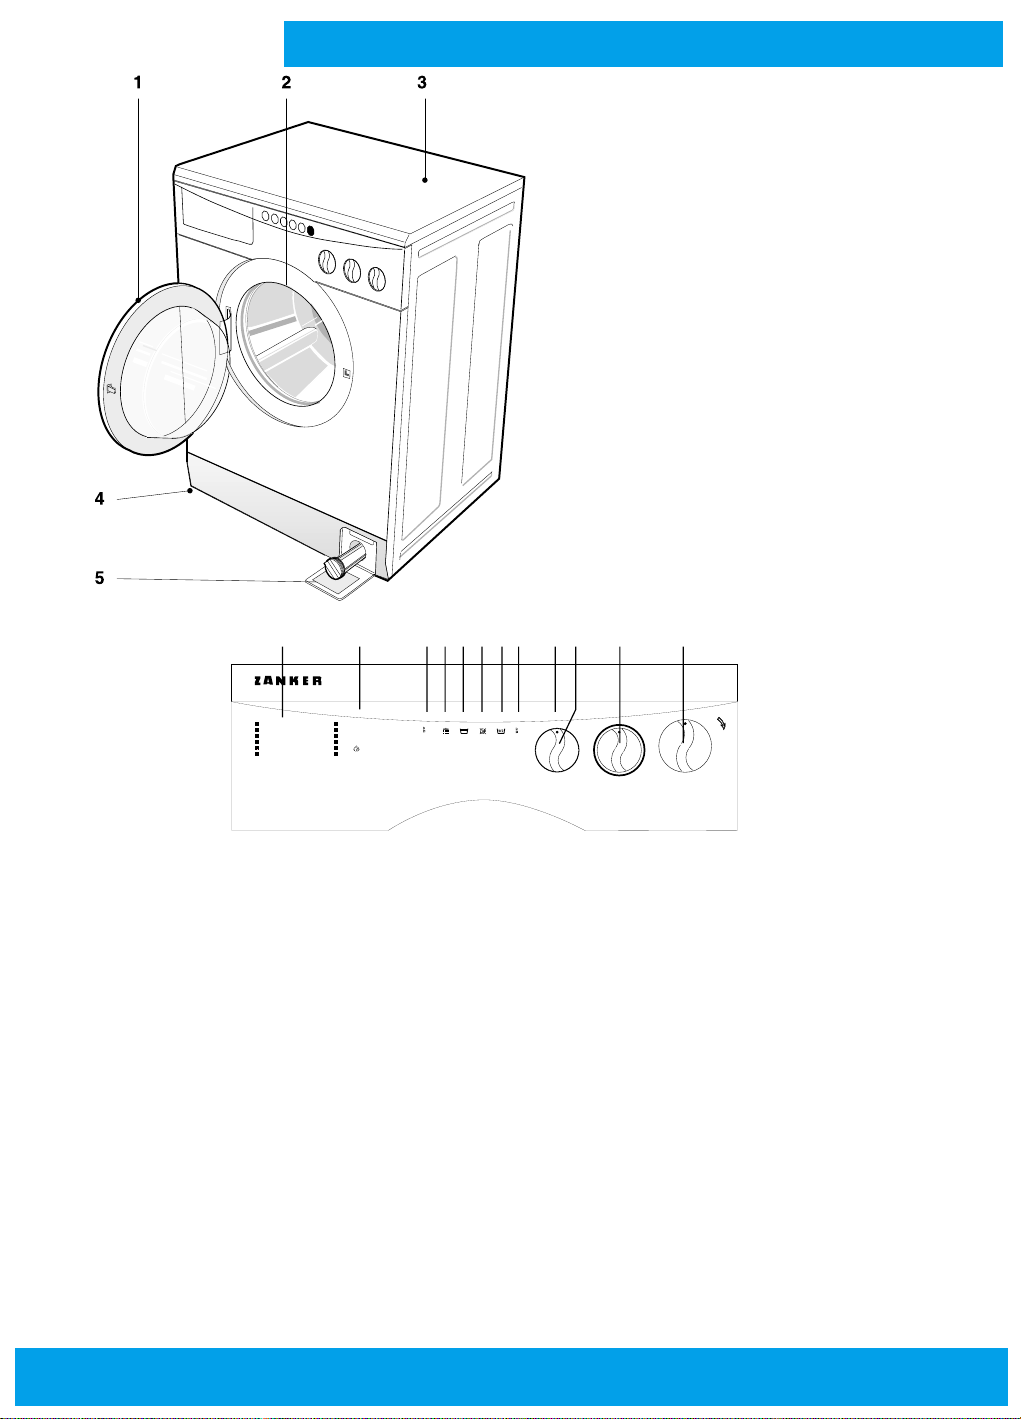
1 - DOOR
2 - DRUM
3 - SCRATCHPROFF TOP
4 - ADJUSTABLE FEET
5 - FILTER
ABCDEFGHIL NM
Pflegeleicht-/Feinwäsche m. Vorwaschen
1
Koch-/Buntwäsche mit Vorwaschen
2
Koch-/Buntwäsche ohne Vorwaschen
3
Buntwäsche farbecht
4
Spülen und Schleudern
5
Weichspülen und Schleudern
6
Schleudern
7
Pflegeleicht-/Feinwasche o. Vorwaschen
8
Weichspülen
9
Pumpen und Schonschleudern
10
Wolle
11
Pumpen und Schonschleudern
12
500
1000
Tableau de commande
A - TABLEAU DE PROGRAMMES
B - BACS Á PRODUITS DÉTERGENTS
H - TOUCHE MARCHE / ARRET
F - TOUCHE SUPPRESSION D'ESSORAGE
G - TOUCHE DEMI-CHARGE
D - TOUCHE RINÇAGES SUPPLEMENTAIRE
L - BOUTON THERMOSTA T REGLABLE
N - BOUTON PROGRAMMATEUR
I - VOYANT TEMOIN DE MISE SOUS TENSION
C - POUSSOIRRE ESSORAGE 500/MAX
E - POUSSOIRRE DE STOP AVEC EAU
M -
BOUTON POUR LA SÉLECTION DU TEMPS DE SÉCHAGE
Wasch- und Trockenvollautomat
A - PROGRAMMTABELLE
B - WASCHMITTELFACH
H - KNOPF ON/OFF
F -
KNOPF AUSSCHLUSS SCHLEUDERPROGRAMM
G - KNOPF HALBE MENGE TROCKNUNG
D - KNOPF ZUSATZ- SPÜLGANG
L - DREHKNOPF THERMOST AT
N - PROGRAMMIERKNOPF
I - BETRIEBSANZEIGE
C - TASTE 500/MAX UpM
E - TASTE ZUM STOPPEN OHNE WASSERABLAßE
M - DRUCKKNOPF FÜR DIE TROCKENZEIT
STOP
1
12
2
120'
40°
I
30°
O
°C
90°
80°
0'
50°
20'
60°
40'
70°
60'
3
11
STOP
100'
10
9
80'
4
5
8
6
STOP
7
Bedieningspaneel
A - PROGRAMMATABEL
B - WASMIDDELENLAATJE
H - KNOP ON/OFF
F - KNOP VOOR UITSCHAKELEN CENTRIFUGE
G - KNOP HALVE BELADING
D - KNOP VOOR EXTRA SPOELEN
L - REGELBARE TERMOST AATKNOP
N - PROGRAMMAKNOP
I - WAARSCHUWINGSLAMPJE
C - DRUKKNOP TO ERENTAL CENTRIFUGE 500 MAX
E - DRUKKNOP STOP MET WATER
M - KNOP VOOR DROOGTIJD
Control panel
A - PROGRAM T ABLE
B - DETERGENT DISPENSER
H - ON/OFF PUSHBUTTON
F - NO-SPIN PUSHBUTTON
G - HALF-LOAD PUSHBUTTON
D - EXTRA RINSE PUSHBUTTON
L - ADJUST ABLE THERMOSTA T KNOB
N - PROGRAMMER KNOB
I - ON/OFF INDICATOR LIGHT
C - 500/MAX SPIN SPEED BUTTON
E - NO DRAIN BUTTON
M - KNOB TO SELECT DRYING TIME
Page 4

Note
Notes
Notes
Réparations
Reparaturs
Repairs
Page 5

Contents
Warnings 2
Description of the machine 3
Installation 3
Operating instructions 6
Maintenance 8
Program tables 11-12
Control panel 13
Technical caracteristics 14
ENGLISH
1
Page 6

Welcome!
Congratulations on your choice.
Please read the following instructions carefully for easy and saf e use of the machine's
many functions.
Then see just how satisfied you will be.
WARNINGS
he equipment must only be used as a domestic washing machine, any other use
T
will be considered improper and therefore dangerous.
Do not touch the machine with wet hands or feet.
Do not allow unsupervised children to operate the machine.
The machine must only be opened on completion of the washing cycle.
Should the need occur, switch off the machine by pressing knob (P) or by pressing
and releasing the stop pushbutton if fitted.
If the machine is located on a carpet floor, ensure that there is a circulation of air
between the feet and the carpet.
• Do not remove or insert the plug
in the socket with wet hands.
• The machine cannot be opened
until three minutes after the cycle
has finished or the machine has
been switched off.
2
• The machine must be
connected to a power supply with
an efficient earth connection,
according to the law.
• For maintenance work,
disconnect the machine from the
power supply.
• Do not use an extension lead. • Do not expose the machine to
• Do not pull the power feed cable
or the equipment to remove the
plug from the power socket.
atmospheric agents.
• After use, it is advisable to
disconnect the machine from the
power supply and close the water
supply tap.
Page 7

Warning!
DESCRIPTION OF THE MACHINE
he washing machine is a domestic appliance that can wash any type of material.
T
• The Machine is constructed from panels treated and painted such that its aesthetic
quality remains unaltered in time.
• The motor and all moving parts have been designed and manufactured to
guarante silent operation.
• The stainless steel drum is large and well mounted for a better quality wash and
longer linen life.
• The control panel ensures easy selection of all the wash cycles desired*.
• The large door makes loading and unloading the washing easier.
• Its excellent stability is the result of extensive research by the designers in to
the equilibrium of masses in movement.
INSTALLATION
nstallation must be carried out by qualified personnel and according to the
I
manufacturer's instructions. Incorrect installation may cause dama ge or injury
to persons.
The machine can be installed anywhere, providing that the ambient temperature is
not less than 3°C and that the cables and pipes at the rear of the machine are not
crushed.
Unpacking
Transport the machine to near its installation place and remove the external packing
(Fig. 2). If the integrity of the machine is in doubt, do not use it. Seek advice from
qualified personnel.
Fig.1 Fig.2
* See control panel (page 13) and program tables (page 11-12)
3
Page 8

Warning! For tr ansport reasons, the suspended unit located in the machine is locked
in position by four distance pieces and screws . Before operating the machine, remove
the blocking screws, insert a screwdriver in the holes to make the distance pieces
fall out (fig. 3). Save the screws and distance pieces for future use.
N.B. If the distance pieces get stuck inside the machine, open the rear cov er panel
and remove them.
Installation
Electrical
connection
Water
connection
Carefully transport the machine to the connection points.
For perfect operation, the machine should be installed level.
Levelling can be carried by adjusting the feet (Fig. 4) on the machine.
Once the machine is level, block the feet by tightening the lock nuts with a spanner.
Check that the voltage written on the technical data plate on the inside of the door
filter corresponds to the mains supply voltage.
The counter, pressure relief v alve, supply lines and power connection have all been
designed for the maximum load requested.
Insert the plug in the socket, ensuring that it is fitted with an earth (Fig. 5).
If the electrical socket in which the plug of the machine is inserted is unsuitable,
have the socket replaced by qualified personnel.
It is good practice to avoid the use of adapters, e xtension leads and m ultiple sock ets*.
Turn on the tap and allow a good quantity of water to flow until it is clear and free
from impurities. This procedure is especially applicable in the case of new water
systems or those that have remained unused for some time.
Connect the water supply hose to the tap, inserting the filter provided, and hand
tighten (Fig. 6). Check that the other end of the hose is tight on the inlet (Fig. 7).
Position the discharge hose at a minimum height of 60 cm, though not more than
90 cm, from the ground (Fig. 8).
N.B. To prevent siphoning, do not hermeticall y seal the mac hine's dischar ge hose.
If the water system does not have a discharge system, use the special 'U' fitting to
hook the hose over the edge of a washbasin and tie it to the tap (Fig. 9).
Rmeember that the hoses must not be squashed when manoeuvring the machine
against the wall.
Fig.4 Fig.5 Fig.6
M
IN
. 60 C
M
A
M
X
.90 C
M
Fig.3
Fig.7 Fig.8 Fig.9
** See warnings (page 2)
4
Page 9

Stain removal
Not all stains can be removed by a machine washing.
The following instructions describe the treatment to be given to material prior to
being loaded in the machine, in order to avoid an unsuccessful wash and the
formation of residual discolouring.
• Wax: Remove the wax with a non-cutting edge in order to remove as much as
possible, then place a sheet of paper between an iron and the stained item.
• Ball point and felt tip pens: Reduce the stain with the aid of a soft cloth soaked
in colourless 90° C alcohol. Be careful not to spread the stain.
• Damp marks and mildew: After having checked that the item is colourfast on
a non-visible part, put it to soak in water with added bleach. Otherwise, place the
item in 10% oxygenated water and leave for 10-15 minutes.
• Ironing marks: if the fabric is slightly marked, use the procedure described for
mildew.
• Rust: Use an anti-rust product following the manufacturer's instructions.
• Chewing gum: Dilute using acetone and remove with a clean cloth.
• Paint: Do not wait f or the paint to dry. Treat immediately with the solvent indicated
on the paint container (water, turps, trichloroethylene), w ash with soap and water,
then rinse.
• Lipstick: Dab with ether if the item is wool or cotton, or with trichloroethylene if
it is silk.
• Nail varnish: Place the stained part of the item on a sheet of absorbent paper,
then wet the other side of the item with acetone. Ensure that the sheet of absorbent
paper is changed frequently. Continue until the stain has completely disappeared.
• Metal stains: Apply lemon juice until the stain has completely or almost
disappeared.
• Grease or tar: Spread some fresh butter on the stain, leav e for a while then dab
with oil of turpentine.
• Grass: Soap delicately, treat with dilute bleach. For woollens, 90° alcohol can
give good results.
Description of
washing symbols
Resistent material
Delicate fabric
9595
The item may be washed at 95°C
6060
The item may be washed at 60°C
4040
The item may be washed at 40°C
3030
The item may be washed at 30°C
The item must be hand washed
✤❒❙ ❃●❅❁■ ❏■●❙
cl
✣❁■ ❂❅ ❂●❅❁❃❈❅❄ ❉■
✭◆▲▼ ■❏▼ ❂❅
Before putting the material in the machine, examine the clothing label in order to
select the correct washing programme.
The table illustrated below may be of help.
✣❁■ ❂❅ ❉❒❏■❅❄ ❁▼
✣❁■ ❂❅ ❉❒❏■❅❄ ❁▼ ✑✕✐❡✣
✣❁■ ❂❅ ❉❒❏■❅❄ ❁▼ ✑✐✐❡✣
✤❏ ■❏▼ ❉❒❏■
✣❁■ ❂❅ ❄❒❙
A
❃●❅❁■❅❄ ◆▲❉■❇
P
✭◆▲▼ ■❏▼ ❂❅ ❄❒❙
F
✣❁■ ❏■●❙ ❂❅ ❄❒❙ ❃●❅❁■❅❄
◆▲❉■❇✚
✣❁■ ❏■●❙ ❂❅ ❄❒❙
❃●❅❁■❅❄ ◆▲❉■❇✚
❁❖❉❁▼❉❏■ ❆◆❅●✌ ❐◆❒❅
✤❒❙ ❆●❁▼
✣❁■ ❂❅ ❈◆■❇ ▼❏
✤❒❙ ❏■ ❃●❏▼❈❅▲
❈❁■❇❅❒
✣❁■ ❂❅ ❄❒❉❅❄ ❉■ ❁
❃●❏▼❈❅▲ ❄❒❉❅❒ ❁▼
■❏❒❍❁●
✣❁■ ❂❅ ❄❒❉❅❄ ❉■ ❁
❃●❏▼❈❅▲ ❄❒❉❅❒ ❁▼
❒❅❄◆❃❅❄
✭◆▲▼ ■❏▼ ❂❅
5
Page 10

OPERATING INSTRUCTIONS
For each wash ensure that:
• The water supply connections are secure *, the tap is turned on (Fig. 10) and the
discharge hose is positioned correctly.
• The programme selector (P) is in the stop position (STOP).
• Then, with dry hands, insert the plug in the power socket (Fig. 11).
• Sort the washing into fabrc types **.
• Check that there are no objects in the pockets of the clothing to wash which may
damage the fabric, washing machine or filter.
• Open the door (Fig. 12).
• Load the wasfhing in the machine and close the door.
N.B. When using liquid detergent (recommended for programmes without
pre-washes), insert the detergent cup supplied (Fig. 13) and follow the
instructions on the packet.
Remember to remove the liquid detergent cup when using soap powder (Fig. 14).
When filling the soap powder container, each product poured into its respective
section must not be allowed to overflow. Should the detergent enter the softener
section, the washing will be rinsed in soapy water, leaving white marks. Vice
versa, if the softener enters the detergent section during the washing cycle,
efficiency will be impaired.
• Add the reduced lather detergent and softener (if required) specially made for
automatic washing machines). For the dosage, refer to the instructions on the
packet. In the case of soft water, reduce the dosage.
N.C. Excessive use of softener may damage the fabric.
• Close the soap powder container (Fig. 15).
Warning! Do not remove the soap powder container while the machine is
in operation, as this may cause water to spill out.
• Select the most suitable programme and correct temperature from the programme
table***.
• Pre-set using the "Adjustable thermostat (T) and programmer" (P) knob.
Warning!
Do not rotate the programmer knob (P) in an anticlockwise direction (Fig. 16).
Fig.10 Fig.11 Fig.12 Fig.13
HIGH SPEED
Fig.14 Fig.15 Fig.16 Fig.17
* See "Water connection" (page 4)
** See "Clothing symbols" (page 5)
6
*** See Program tables (page 11-12)
Page 11

Fig.18
Fig.19
Fig.20
Fig.21
Fig.22
• Set the spin speed on high or low, according to the type of load (Fig. 17) (given
the delicate nature of synthetic materials, low speed spin selection is automatic).
• Press the no-spin pushbutton if required (Fig. 18). When this pushbutton is
pressed, the machine completes the wash cycle without spinning. This option is
useful for wash-n-wear clothing.
• If the washing weights 2,5 kg or less, press the half-load pushbutton (Fig. 20).
• No push the button to obtain an extra-rinse (Fig. 19). Use in areas with v ery soft
water or in case of allergy to possible residue washing soap.
•
Resistent materials option. Press the rinse stop pushbutton (Fig. 21) and the
machine will stop automatically at the start of the final rinse with the water still in the
machine, and the washing will remain suspended in the water without tangling.
To complete the programme, press and release the spin delay pushbutton (Fig. 21).
• To start the machine, pull the programmer knob (P) (Fig. 23), or if the machine has
pushbuttons, press the start pushbutton (Fig. 22): the luminous indicator will light up.
• If the required programme position is accidentally passed, interrupt the programme
by pressing the programmer knob (P) (Fig. 23) or, in the case of a machine with
pushbuttons, press the stop pushbutton (Fig. 22). Rotate the programmer (P) in
a clockwise direction until the required position is reached. Pull the programmer
knob out again (P) (Fig. 23) or, if fitted, press the start pushbutton (Fig. 22).
• It is always possible though not advisable, to add clothes which have been
forgotten during the main washing cycle. To do this, proceed as follows:
Always check, by looking through the transparent door, that there is no water
in the drum. Otherwise rotate programmer knob (P) to the discharge position.
If there is no water in the drum, press programmer knob (P) (Fig. 23), or press
and release the stop pushbutton if fitted (Fig. 22). Wait approximately 3 minutes
(Fig. 24) to allow the safety devices to de-activate. Open the door (Fig. 12), add
the forgotten clothing and re-close the door.
If required, add low lather detergent. To start the machine, pull programmer knob
(P) (Fig. 23), or if the machine has pushbuttons, press the start pushbutton (Fig.
22). The indicator light will be illuminated (Fig. 25).
• At the end of the washing programme, the machine wil stop at one of the STOP
positions on the programmer (P) *.
• Press the programmer knob (P) (Fig. 23), or press and release the stop pushb utton
if fitted (Fig. 22).
• Wait three (3) minutes for the door to unlock (Fig. 24).
• Remove the washing.
• With dry hands, disconnect the machine from the mains supply (Fig. 11).
• Turn off the water tap (Fig. 26).
In order to obtain the best possible results, do not exceed the following washing loads:
- 2,5 kg max. f or resistant materials (2 kg of washing of large and small dimensions)
Drier
- 1,5 kg of mixed fabrics and synthetics.
With these loads the washing moves freely in the drum, av oiding excessive creasing
while providing and efficient and uniform drying action. To programme the continuous
wash/dry cycle, follow the instructions given below.
3'
Fig.23 Fig.24 Fig.25 Fig.26
7
Page 12

Continuous
wash/dry
cycle
Fig.27
HIGH SPEED
Fig.28
Using
the machine
as a dryer
Fig.29
Fig.30
N.B. Do not insert plastic detergent containers in the drum as they ma y o verheat
and possibly melt (Fig. 31).
Only use the soap powder container fitted on the machine.
1) Press the half-load pushbutton (Fig. 27).
- Press the spin speed selector (Fig. 28) according to the type of fabric*.
Do not press the rinse stop pushbutton (Fig. 29) or the no-spin pushbutton (Fig. 30).
-
- Set the drying time with timer knob (M)***., according to the type of fabrics*.
- Select the most suitable programme and the correct temperature with programmer
(P) and thermostat knobs (T)*.
- Set the programme on programmer knob (P) (Fig. 32) and temperature on the
adjustable thermostat if fitted.
- To start the machine, pull programmer knob (P) (Fig. 32), or if the machine is
fitted with pushbuttons, press the start pushbutton (Fig. 35). This indicator light
will be illuminated (Fig. 36).
2) At the end of the washing and drying programme, the machine will stop on one
of the STOP positions on the programmer (Fig. 33).
3) The timer knob (M) stops in the position "O".
4) Press the programmer knob (P) (Fig. 32), or press and release the stop pushbutton
(if fitted) (Fig. 35).
5) Remove the washing.
With dry hands, disconnect the washing machine from the electricity supply (Fig. 34).
6)
7) Turn off the water tap (Fig. 38).
N.B. Before starting the drier, remove any detergent containers from the inside the
drum (Fig. 31).
Warning! Do not dry garments treated with solvents or petroleum based products,
as these volatile substances may cause an explosion.
N.B. Be careful not to overdry the clothing: excessive drying could crease the items
and make them difficult to iron. Do not use the machine for drying sleeping bags,
eiderdowns, pillows or bulky blankets, as these articles expand while drying and may
prevent the hot air from circulating in the machine. When the programmer knob (Fig.
32) is in the stop position, the drying function can be selected.
1) Load the machine and close the door, remembering that the best drying results
are obtained by not exceeding the loads indicated***.
2) Set the drying time with the knob (M).
3) Position programmer (P) (Fig. 32) on STOP for resistant fabrics or on STOP for
delicate fabrics (Fig. 33).
4) Warning! Turn on the water supply tap and leave it open during the program
cycle (Fig. 37).
5) Ensure that the discharge hose is positioned correctly.
6) With dry hands, connect the machine to the electrical supply (Fig. 34).
Fig.32
* See "Use of the machine" paragraph 15 (page 7)
8
** See Table of drying times and weights (page 12)
Fig.33Fig.31
Fig.34
Page 13

Fig.35
Fig.36
Fig.37
7) Pull programmer knob (P) (Fig. 32), or press the start-stop pushbutton (Fig. 35)
if fitted, to start the drying cycle.
Advice: In general, any threads etc. from the washing are discharged through
the drain hose. Ho we v er, if the machine has been used as a drier only or particular
items have been washed and dried, it is advisable to remove the washing and
run a rinse and spin cycle to discharge any threads from the drum, preventing
them from depositing in the successive cycle.
Warning! During the work cycle, the glass door and the dischar ge hose will
heat up, as will any zips or b uttons. Consequently, av oid contact with them
when removing the washing.
8) At the end of the drying cycle, the timer knob (M) will be at zero.
9) Press programmer knob (P) (Fig. 32), or press and release the start-stop
pushbutton, if fitted (Fig. 35).
10) With dry hands, disconnect the machine from the electricity supply (Fig. 34).
11) Turn off the water tap (Fig. 38).
12) Remove the washing.
MAINTENANCE
Introduction
Periodic soap
pwder container
cleaning
Pump filter
cleaning
Fig.38
Our wash-drier is a machine that does not need any particular or complicated
maintenance operations, in that it has been designed for a long working life.
Nevertheless, some attention is recommended*. Before carrying out the following
operations, ensure that the machine is disconnected from the electricity supply (Fig.
34) and the water is turned off (Fig. 38).
This is carried out each time that there is a build up of soap powder in the container .
The operation can be carried out be carried out by simply extracting the pull-out
container from its housing (a sharp pull is required to overcome the stop) (Fig. 39)
and rinsing it under a jet of water.
The machine must not be cleaned using solvents, a slightly soapy wet cloth is
sufficient.
This is carried out periodically. Ensure the machine is empty, there is no water in
the drum and the electricity supply is disconnected (Fig. 34).
The operation is carried out by placing a basin or cloth under the filter cover to soak
up any water (Fig. 40).
The filter is removed from its seating by rotating it half a re v olution in an anticloc kwise
direction and pulling outwards (Fig. 41). The filter is cleaned under a jet of water,
ensuring that all trapped impurities are removed.
The replace the filter in is housfing, rotating it clockwise until it locks in position
(Fig. 42).
Fig.39
* See "Warning" (page 2)
Fig.40
Fig.41
Fig.42
9
Page 14

IF THE MACHINE DOES NOT WORK
Before consulting the technical assistance service, check that the following operations
have been carried out. This may lead to a saving in both time and money.
Does not work
(indicator light off)
Does not work
(indicator light on)
Does not
take in water
T akes in and
discharges water
continuously
Does not
discharge water
and does not spin
Check that:
1) The power supply is available at the mains.
2) The plug is inserted correctly in the socket.
3) The programmer knob (P) is pulled out, or the start pushbutton (if fitted) is pressed*.
4) The door is closed.
5) Consult the techinical assistance service.
Check that:
1) The programmer knob (P) is on the selected programme.
2) Refer to problem "Does not take in water".
Check that:
1) Water is present in the supply system.
2) The tap is turned on.
3) The water feed hose is not kinked.
4) With the power disconnected, clean the inlet filter located between the tap and the
discharge hose**.
5) Consult the technical assistance service.
Check that:
1) The discharge hose is at the correct height (60-90 cm)***.
2) The discharge hose outlet is not under water.
3) Consult the technical assistance service.
Check that:
1) The discharge hose is positioned correctly
2) The discharge hose is not kinked.
3) The detergent dose is not excessive.
4) The soap powder container is not blocked.
5) The detergent is the correct type for a washfing machine.
Vibrates
or is noisy
The door
does not open
Does not dry
model
N ° 204276237
220 V
Hz
heating wash W
kg wash
kg dry
heating dryer W
2
wash motor W
5 / 100 N/cm
spin motor W
A
dryer motor W
pump W
total w
service
Fig.43
10
Check that:
1) Large articles (sheets, tablecloths, etc.) are not tangled or folded.
2) The washing machine is standing correctly on its feet
3) The four packing screws and distance pieces have been removed
A
*.
A
**.
1) Wafit 3 minutes after the programme has finished.
Check that:
1) The programme has been chosen correctly*.
2) The water tap is turned on.
3) The discharge filter is clean.
4) The washing load is right
A
***.
5) Consult the technical assistance service.
Try to start the machine to see whether the problem has been solved.
If the problem persists, call for technical assistance service (Fig. 43) quoting:
1) The type of malfunction.
2) The model.
3) The serial number of the machine displayed on the mameplate fitted on the inside
of the filter hatch.
* See "Use of the machine" (page 6)
** See fig. 7 (page 4)
*** See fig. 8 (page 4)
A
* See fig. 4 (page 4)
A
** See fig. 3 (page 4)
A
*** See Program tables (page 11-12)
Page 15

Knob
(P)*
1
#
2
3
Knob
(T)**
90°
60°
40°
90°
60°
40°
60°
Fabric
Cotton,
linen,
hemp
Cotton,
linen,
resistent
mixes
Cotton,
delicate
mixes
Cotton,
linen,
hemp
Cotton,
linen,
resistent
mixes
Cotton,
delicate
mixes
Cotton,
resistent
colours
WASHING PROGRAMMES
INTENSIVE PROGRAMS FOR RESISTENT FABRICS
Care
Examples and degree of
label
symbol
Sheets, white and
solid colour tablecloths,
90
towels, underwear;
heavy soil
Coloured underwear,
shirts, bath robes,
60
cotton knits, sheets;
normal soil
Sheets, white and
solid colour tablecloths,
40
towels, underwear;
light soil
Sheets white and
solid colour tablecloths,
90
towels, underwear;
heavy soil
Coloured underwear,
shirts, bath robes,
60
cotton knits, sheets;
normal soil
Sheets, white and
solid colour tablecloths,
40
towels, underwear;
light soil
Coloured underwear,
shirts, bath robes,
60
cotton knits, sheets;
normal soil
soiling
Quan-
tity
in kg
Up to
5
Up to
5
Up to
5
Up to
5
Up to
5
Up to
5
Up to
5
Dispenser
compart-
ments
1
23
1
23
1
23
23
23
23
23
Program
description
Prewash, main wash,
rinses, softener,
empty and final spin
Prewash, main wash,
rinses, softener,
empty and final spin
Prewash, main wash,
rinses, softener,
empty and final spin
Main wash, rinses,
softener, empty and
final spin
Main wash, rinses,
softener, empty and
final spin
Main wash, rinses,
softener, empty and
final spin
Main wash, rinses,
softener, empty and
final spin
Use of supplementary
buttons
Alta
velocità
500
As
As
requi-
requi-
red
As
requi-
red
As
requi-
red
As
requi-
red
As
requi-
red
As
requi-
red
As
requi-
red
red
As
requi-
red
As
requi-
red
As
requi-
red
As
requi-
red
As
requi-
red
As
requi-
red
requi-
requi-
requi-
requi-
requi-
requi-
requi-
1/2
As
red
As
red
As
red
As
red
As
red
As
red
As
red
As
requi-
red
As
requi-
red
As
requi-
red
As
requi-
red
As
requi-
red
As
requi-
red
As
requi-
red
# Reference program for power classification, in accordance with EN
60456/A 11
AUXILIARY PROGRAMS FOR RESISTENT FABRICS
Quan-
Knob
(P)*
4
5
6
Knob
(T)**
Any
posi-
tion
Any
posi-
tion
Any
posi-
tion
Fabric
Cotton, linen,
hemp and
resistent mixes
Cotton, linen,
hemp and
resistent mixes
Cotton, linen,
hemp and
resistent mixes
Program
Fast rinse
Whitener, scented
softener
Fast spin
tity
in Kg
Up to
5
Up to
5
Up to
5
Dispenser
compart-
ments
3
3
* Position of programmer knob ** Position of adjustable thermostat knob
Program description
rinses, softener,
empty and final spin
rinse, softener,
empty and final spin
Empty and final spin
Use of supplementary
buttons
Alta
velocità
500
As
As
requi-
requi-
red
As
requi-
red
As
requi-
red
red
As
requi-
red
As
requi-
red
requi-
1/2
As
red
As
requi-
red
11
Page 16

Knob
(P)*
7
8
Knob
(P)*
9
10
Knob
(T)**
60°
30°/
40°
60°
30°/
40°
Knob
(T)**
Any
posi-
tion
Any
posi-
tion
WASHING PROGRAMMES
GENTLE ACTION PROGRAMS FOR SYNTHETICS AND MIXES
Fabric
label
symbol
Resistent
mixes
Care
Synthetics
(nylon, perlon) cotton
mixes
Resistent
mixes
Synthetics
(nylon, perlon) cotton
mixes
AUXILIARY PROGRAMS FOR DELICATE FABRICS
Fabric
Mixes, delicate
synthetics
Mixes, delicate
synthetics
Examples and degree of
soiling
Shirts, sheets,
baby wear, nappies;
60
heavy soil
30
Colourfast shirts,
blouses, skirts;
40
normal soil
Shirts, sheets,
60
baby wear , nappies;
normal soil
Colourfast shirts,
30
blouses, skirts;
40
light soil
Program
Whitener, scented
softener
Gentle spin
Quan-
tity
in Kg
Up to
2,5
Up to
2,5
Up to
2,5
Up to
2,5
Quan-
tity
in Kg
Up to
2.5
Up to
2.5
Dispenser
compart-
ments
1
23
1
23
23
23
Dispenser
compart-
3
Program description
Prewash, main wash,
rinses, softener,
empty and slow spin
Prewash, main wash,
rinses, softener,
empty and slow spin
Main wash, rinses,
softener, empty and
slow spin
Main wash, rinses,
softener, empty and
slow spin
Program description
rinses, softener,
empty and slow spin
rinse, softener,
empty and slow spin
Use of supplementary
Alta
velocità
500
Recom-
men-
ded
Recom-
men-
ded
Recom-
men-
ded
Recom-
men-
ded
1/2
Use of supplementary
Alta
velocità
500
Recom-
men-
ded
Recom-
men-
ded
1/2
Knob
(P)*
Knob
(P)*
12
11
12
Knob
Fabric
(T)**
Woollen
35°
underwear
Woollen
Min.
and silk
underwear
Knob
(T)**
Any
Underwear, wool-
posi-
lens, wool mixes,
tion
SPECIAL WOOLLEN AND SILK PROGRAMS
Dispenser
Care
Examples and degree
label
symbol
Shirts, blouses, skirts
in delicate colours;
of soiling
Machine
washable wool
normal soil
Quan-
tity
in kg
Up to
1
Up to
1,5
compart-
ments
23
Program
description
High water level wash,
rinses, softener,
empty and slow spin
32
High water level short
wash, rinses, softener,
empty and slow spin
AUXILIARY PROGRAMS FOR WOOLLENS AND SILK
Quan-
Fabric
Program
tity
Dispenser
compart-
in kg
Gentle spin
silk
Up to
1
* Position of programmer knob ** Position of adjustable thermostat knob
Program
description
Empty and final spin
Use of supplementary
Alta
velocità
500
Use of supplementary
Alta
velocità
500
Recom-
men-
ded
Recom-
men-
ded
buttons
As required
1/2
1/2
 Loading...