

Page 1

Nomad Book
Keyboard Instructions
See the important Health and Safety information on page 7 before using this product.
™
*WARRANTY REGISTRATION
Your ZAGG Nomad Book comes with a one-year manufacturer’s warranty. In order to
activate the warranty, you must register your Nomad Book as well as keep your purchase
receipt. If you purchased your Nomad Book from ZAGG.com, ZAGG has already registered it and has a
copy of your proof of purchase.
NEED MORE HELP? PLEASE SEE OUR FAQ SECTION AT: www.ZAGG.com/faq
Page 2

IN THE BOX
(1) Nomad Book keyboard and case with stand
(2) Bumpers
• 10.5-inch iPad (already installed on the Nomad case)
• 9.7-inch tablets and iPad Pro including 9.7-inch iPad
(2017-18 models), 9.7-inch iPad Pro, iPad Air 2, iPad Air, Samsung Tab S3,
Samsung Tab S2
(4) Button strips
• 10.5-inch iPad Pro (already installed on the Nomad case)
• iPad Air
• iPad Air 2, 9.7-inch iPad Pro, iPad (5th and 6th generation)
• Samsung Tab S2 and Samsung Tab S3
(1) Magnet mounting plate for all tablets (already installed on the Nomad Case)
DETERMINING THE MAKE/MODEL OF YOUR TABLET
The Nomad Book keyboard and case can be customized to fit most tablets,
including the 10.5-inch iPad Pro bumper (already installed), 9.7-inch iPad, 9.7-inch
iPad Pro, iPad Air 2, iPad Air, Samsung Tab S3, and Samsung Tab S2.
The first step is determining the make/model of your tablet so you can install the
correct button strip. You can do this by turning your tablet on, going into Settings,
and checking the details under “About Product.” You can also visit this tutorial at
zagg.to/nomad-install.
1
Page 3
INSTALLING THE 10.5-INCH IPAD PRO
If you have a 10.5-inch iPad Pro, the correct bumper and button strip have already been
installed. The last part of the installation is listed below.
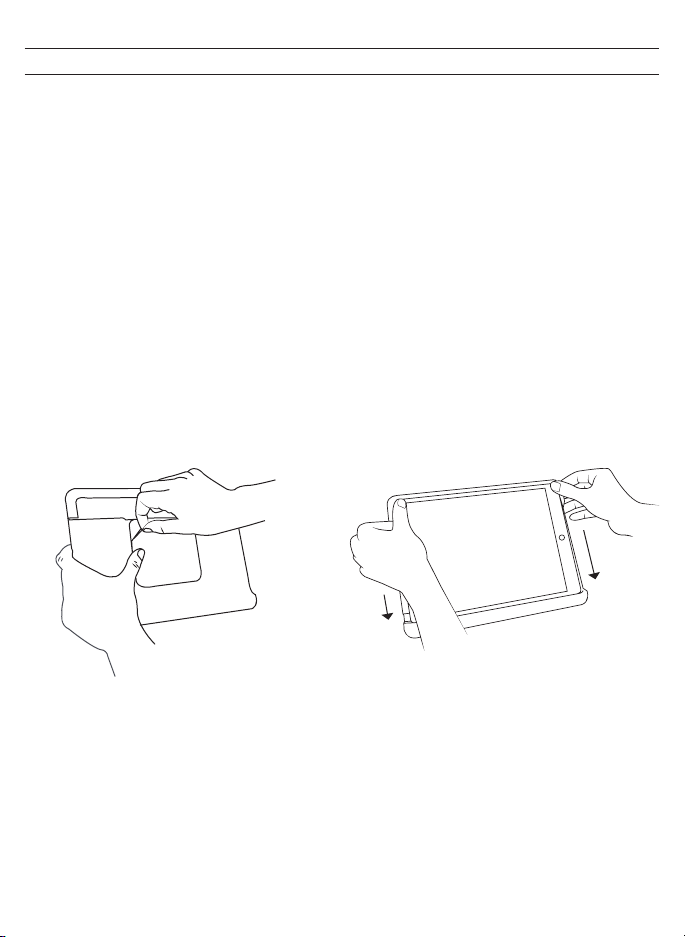
1. A magnet has already been installed in the Nomad case. Pull off the protective lining
from the sticky side of the magnet.
2. Set the bottom of your tablet into the groove at the bottom of the case, and then
press the rest of your tablet into place. It should fit snugly against the bumper at the
top of the case.
3. Press against the back of the case to ensure the adhesive side of the magnet
attaches to your tablet.
Removing the
Adhesive Liner
Attaching Your Tablet to the
Magnet
2
Page 4

REMOVING THE 10.5-INCH IPAD FROM THE CASE
Removing your tablet from the Nomad Book case is easy. Simply slip your fingers
between the edge of your tablet and the edge of the case and pull gently until the
tablet disengages from the case.
INSTALLING 9.7-INCH TABLETS
To watch the installation video, please visit zagg.to/nomad-install.
If you have a 9.7-inch iPad, 9.7-inch iPad Pro, iPad Air 2, iPad Air,
Samsung Tab S3, or Samsung Tab S2, you will need to remove the
10.5-inch bumper and button strip that were previously installed
in the Nomad Book case.
1.
Remove the pre-installed bumper by pushing on the stylus holder on the back
of the case and pulling the bumper away.
2.
Remove the pre-installed button strip by pushing the buttons from the outside
of the case inwards until it unsnaps. Then pull on the button strip from inside
the case until the strip releases.
3.
Install the correct button strip by inserting the single button on the left side of
the strip into the slot on the upper side of the case first. Then press the rest of
the button strip into the long slot in the top of the case.
4.
A magnet has already been installed in the Nomad Book Case. Install the
bumper for 9.7-inch tablets by pressing the stylus holder on the bumper into
the slot in the back of the case. Press the perimeter of the bumper into place,
checking all sides to make sure it is secure.
5.
Set the bottom of your tablet into the groove at the bottom of the case, and
then press the rest of your tablet into place. It should fit snugly against the
bumper at the top of the case.
6.
Press against the back of the case to ensure the adhesive side of the magnet
attaches to your tablet.
3
Page 5
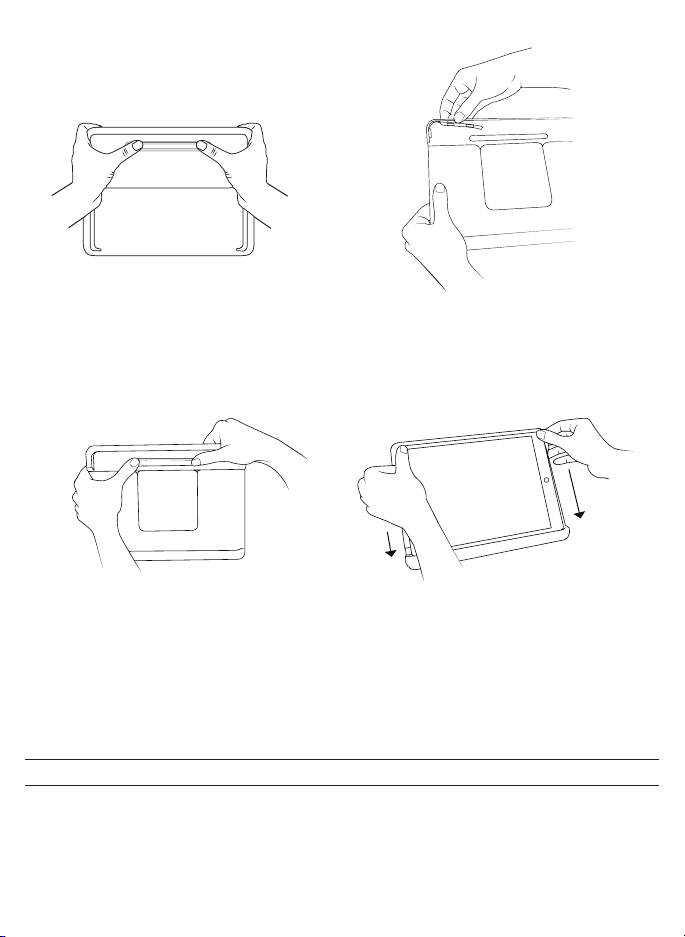
Removing the Bumper
Installing the Correct Button
Strip
Installing the Bumper
Attaching Your Tablet to the
Magnet Plate
DETACHING THE CASE FROM THE KEYBOARD
Hold one of the top corners of the keyboard with one hand, and with the other hand
on the corresponding top corner of the case, pull directly up. This will disengage
the magnets holding the keyboard and case together.
4
Page 6

POWERING ON AND OFF
1.
To turn your Nomad Book on, press the Power button located at the top right
corner of the keyboard. A green LED will light briefly.
2.
To turn your Nomad Book off, press and hold the Power button for three
seconds. A red LED will flash indicating it has turned off.
DISCONNECTING THE KEYBOARD
When you’d like to use the case without the keyboard, there are three ways you can
switch to your onscreen keyboard.
1.
Press the Keyboard Hide/Show button. This will disengage the Nomad Book
keyboard and allow you to use your device’s on-screen keyboard. Press the
Keyboard Hide/Show button again when you are ready to use your Nomad
Book keyboard.
2.
Turn off the Bluetooth® connection from your device.
3.
Turn your Nomad Book keyboard off.
PAIRING YOUR ZAGG NOMAD BOOK
Your ZAGG Nomad Book can pair with two devices at once. Pairing your Nomad
Book is easy; just follow these instructions.
1.
Ensure your device’s Bluetooth® is on.
2.
Press your Nomad Book’s 1 or 2 keys for three seconds. A blue LED light under
the key being depressed will begin pulsing, indicating your Nomad Book is in
pairing mode.
3.
Your device will display “ZAGG Nomad Book” as an available pairing option.
Select it and complete any other pairing steps based on your device.
4.
To pair your Nomad Book to another device, repeat steps 2 and 3. To toggle
between devices, simply press 1 or 2.
5.
Once paired, the Bluetooth key will stop pulsing and fade to off. Once begun,
if the Nomad Book doesn’t complete pairing after 60 seconds, it will abort the
process. If this happens, repeat steps 2 and 3.
5
Page 7
CHARGING
Your Nomad Book features a powerful lithium polymer battery that lasts up to two
years of normal use between charges.* It comes with a charging cable you can use
to charge your keyboard quickly and conveniently. To charge your Nomad Book,
follow these steps:
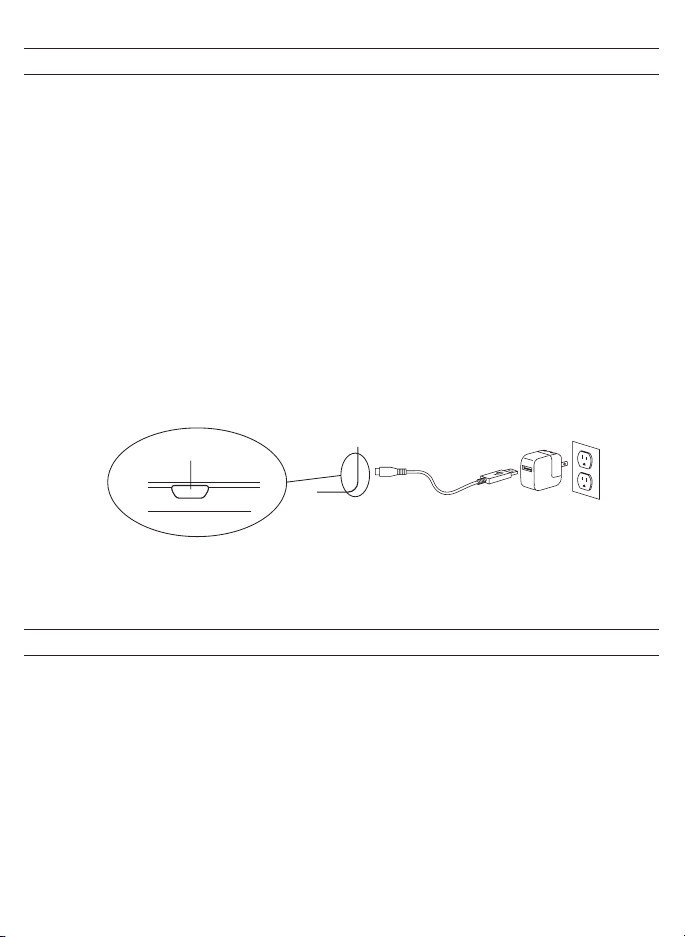
1.
Plug the micro USB connector into the charging port on the keyboard.
2.
Plug the regular USB connector into your preferred USB outlet. A red LED light
on the battery key will illuminate to indicate your keyboard is charging. This
LED will turn off when your keyboard is fully charged.
3.
Disconnect the charging cable.
* Based on regular use of one hour per day. Hours depend on a variety of
factors that are dierent for every user.
CHARGING PORT
BATTERY LIFE
To check your Nomad Book’s battery life, press fn + the battery key. The LED light
will flash one of the following three ways:
1.
3 green flashes = 50% or more battery life
2.
3 yellow flashes = 25-49% battery life
3.
3 red flashes = less than 25% battery life
6
Page 8
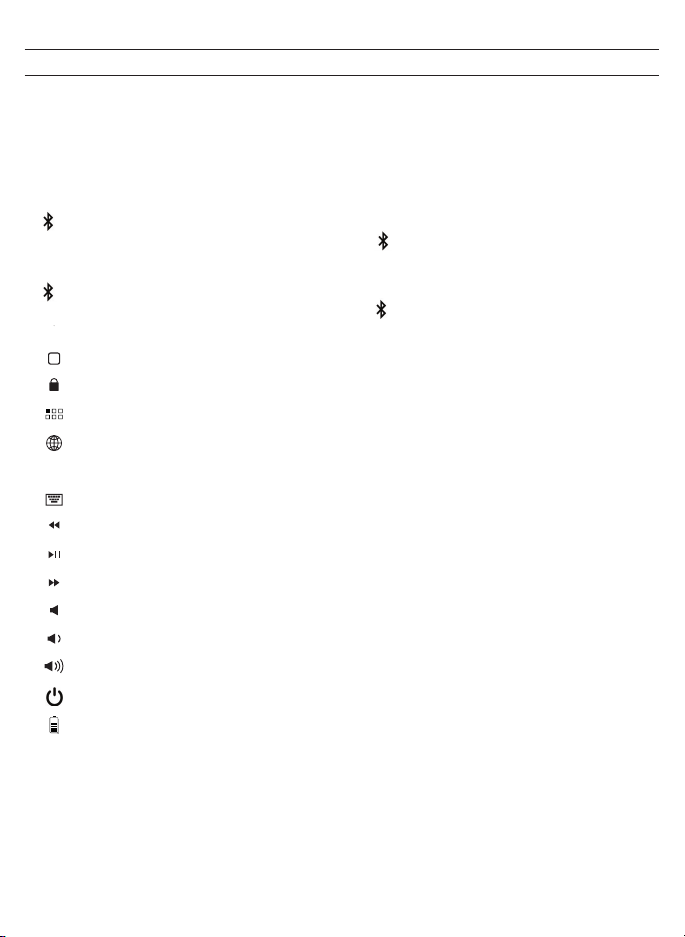
SPECIAL FUNCTION KEYS
Your Nomad Book keyboard features all of the special function keys you’re used
to that help you work and play. Here’s a few of the most useful functions.
1
BLUETOOTH 1– Hold for three seconds to pair your Nomad Book with your tablet. If
paired with a second device press 2 to instantly switch between devices.
BLUETOOTH 2– Hold for three seconds to pair your Nomad Book with your tablet. If
paired with a second device press 1 to instantly switch between devices.
2
HOME – Displays your tablet’s home screen.
LOCK – Activates and deactivates your tablet’s sleep mode.
APPS RUNNING – Displays all the apps currently running on your tablet.
LANGUAGE SYMBOL – Toggles between keyboard languages (if active on your device);
also, pressing cmd + space bar will do the same.
KEYBOARD HIDE/SHOW – Hides or shows your tablet’s on-screen keyboard.
PREVIOUS TRACK – Skips to the previous track on your selected playlist.
PLAY/PAUSE – Starts or pauses your current playlist.
NEXT TRACK – Skips to the next track on your current playlist.
MUTE – Mutes your tablet’s audio.
VOLUME DOWN – Decreases your tablet’s volume.
VOLUME UP – Increases your tablet’s volume.
POWER – Turns your Nomad Book keyboard on and off.
FN + BATTERY SYMBOL – Indicates remaining battery life.
7
Page 9

TROUBLESHOOTING
If your device doesn’t respond to Nomad Book, there may be a simple
explanation. Try the following steps.
1.
Restart your tablet.
2.
Turn your Nomad Book off and back on.
3.
Forget and re-pair your Nomad Book.
4.
If your Nomad Book does not establish or maintain a Bluetooth®
connection, reset the Bluetooth® module by charging your keyboard.
5.
If, after charging, your keyboard doesn’t operate correctly, please contact
ZAGG Customer Service.
If you still experience problems, please contact ZAGG Customer Service by
visiting zagg.com/support.
8
Page 10

For unparalleled scratch protection for your tablet, we recommend ZAGG’s
InvisibleShield®.
©2005 - 2018 ZAGG Inc All Rights Reserved.
Patents: zagg.com/patents | NASDAQ: ZAGG | MADE IN CHINA
iPad Pro, iPad Air, iPad, iPad Mini and Apple are trademarks of Apple Inc.
The Bluetooth® word mark and logo are trademarks of Bluetooth SIG, Inc. and
any use of such marks by ZAGG Inc is under license.
ZAGG, InvisibleShield and ZAGG Nomad Book are trademarks of ZAGG IP
Holdings Co., Inc.
Samsung and Tab are trademarks of Samsung Electronics
America, Inc. Ltd.
Changes or modifications not expressly approved by the party responsible for compliance
could void the user’s authority to operate the equipment.
This equipment has been tested and found to comply with the limits for a Class B digital
device, pursuant to Part 15 of the FCC Rules. These limits are designed to provide
reasonable protection against harmful interference in a residential installation. This
equipment generates uses and can radiate radio frequency energy and, if not installed
and used in accordance with the instructions, may cause harmful interference to radio
communications. However, there is no guarantee that interference will not occur in a
particular installation. If this equipment does cause harmful interference to radio or
television reception, which can be determined by turning the equipment off and on, the
user is encouraged to try to correct the interference by one of the following measures:
• Reorient or relocated the receiving antenna.
• Increase the separation between the equipment and receiver.
• Connect the equipment into an outlet on a circuit different from that to which the
receiver is connected.
• Consult the dealer or an experienced radio/TV technician for help.
Any changes or modifications not expressly approved by the party responsible for
compliance could void the user’s authority to operate this equipment. This device complies
with Part 1S of the FCC Rules. Operation is subject to the following two conditions:
1. This device may not cause harmful interference and
2. This device must accept any interference received, including interference that may
cause undesired operation
9
Page 11

Please read the precautions and operation information before using your keyboard or any
accessories that accompany it. Retain this information for future use.
1. Health Warning: Take frequent breaks when using your keyboard. If you
experience any discomfort, pain, tingling, numbness or burning in your neck,
shoulders, arms, wrists, hands or any other part of the body, stop using your
keyboard and consult a physician.
2. Use only micro-USB chargers in connection with your keyboard.
3. Do not attempt to service your keyboard.
4. Do not disassemble or attempt to disassemble your keyboard.
5. Do not crush or puncture the keyboard.
6. Do not immerse your keyboard in water.
7. Do not put your keyboard in contact with water or other liquids as they could
cause a short circuit, fire, or electric shock which could result in serious injury,
death or property damage.
8. Do not use liquid or aerosol cleaners or solvents on or near your keyboard. Clean
only with a soft, dry cloth. Disconnect any cords before cleaning the keyboard.
9. Do not use your keyboard while operating a motorized vehicle, including
automobile, boat or airplane. Doing so could put you and others at risk of serious
injury, death or property damage.
10. Do not use or place your keyboard near any heat sources including, but not
limited to, radiators, heat registers, stoves, other appliances, campfires or
barbeque grills.
11. To reduce the risk of fire or electric shock, wire or connect your keyboard to
products only in the manner instructed in the documentation supplied herewith.
Do not attempt to modify or adjust any ports. Any improper connections or
adjustments may cause damage.
12. When you are ready to discard your keyboard, recycle your keyboard in a manner
consistent with electronic recycling requirements or recommendations in your
geographic area.
10
Page 12

™
Nomad Book
Instrucciones del Teclado
ADVERTENCIA
Lee la importante información de salud y seguridad en la página 7 antes de usar este producto.
*Registro de la garantía
Tu ZAGG Nomad Book viene con una garantía de fábrica de un año. Para activar la garantía, debes registrar
tu Nomad Book y guardar tu recibo de compra. Si compraste tu Nomad Book a través de ZAGG.com, ZAGG
ya lo registró y tiene una copia de tu comprobante de compra.
¿NECESITAS MÁS AYUDA? POR FAVOR LEE NUESTRA SECCIÓN DE PREGUNTAS FRECUENTES EN: www.
zagg.com/faq
Page 13

EN LA CAJA
(1) Teclado y funda Nomad Book con soporte
(2) Protectores
• iPad de 10.5 pulgadas (ya instalada en la funda Nomad)
• Protector para tabletas y iPad Pro de 9.7 pulgadas (incluyendo iPad de 9.7
pulgadas (modelos 2017-18), iPad Pro de 9.7 pulgadas, iPad Air 2, iPad Air,
Samsung Tab S3, Samsung Tab S2)
(4) Banda de botones
• iPad Air
• iPad Pro de 10.5 pulgadas (ya instalada)
• iPad Air 2, iPad Pro de 9.7 pulgadas, iPad (5ta y 6ta generación)
• Samsung Tab S2 y Samsung Tab S3
(1) Placa de fijación magnética para todas las tabletas (ya instalada en la funda)
DETERMINAR LA MARCA/MODELO DE TU TABLETA
El teclado y la funda Nomad Book pueden personalizarse para adaptarse a la
mayoría de las tabletas, incluyendo el iPad Pro de 10.5 pulgadas (ya instalada),
iPad de 9.7 pulgadas, iPad Pro de 9.7 pulgadas, iPad Air 2, iPad Air, Samsung Tab
S3 y Samsung Tab S2. El primer paso es determinar la marca y el modelo de tu
tableta para instalar la banda de botones correcta. Para ello, enciende tu tableta,
ve a Configuración y revisa los detalles en “Acerca del producto”. También puedes
consultar este tutorial en zagg.to/nomad-install.
Page 14

INSTALACIÓN DEL IPAD PRO DE 10.5 PULGADAS
Si tienes un iPad Pro de 10.5 pulgadas, ya se han instalado los protectores y la banda de
botones correctos. La última parte de la instalación se detalla
a continuación.
1. Un imán ya viene instalado en la funda Nomad. Retira la lámina protectora del lado
adhesivo del imán.
2. Coloca la parte inferior de tu tableta en la ranura en el fondo de la funda y presiona
el resto de tu tableta para ponerla en su lugar. Debería encajar perfectamente
contra el protector.
3. Presiona contra la parte posterior de la funda para asegurarte de que el lado
adhesivo del imán se adhiera a tu tableta.
Retirar la lámina adhesiva Adherir tu tableta al imán
Page 15

RETIRAR EL IPAD DE 10.5 PULGADAS DE LA FUNDA
Retirar tu tableta de la funda Nomad es fácil. Simplemente desliza los dedos entre
el borde de la tableta y el borde de la funda Nomad y hala suavemente hasta que la
tableta se despegue de la funda.
INSTALACIÓN DE LAS TABLETAS DE 9.7 PULGADAS
Para ver el video de instalación, visita zagg.to/nomad-install.
Si tienes un iPad de 9.7 pulgadas, iPad Pro de 9.7 pulgadas, iPad Air 2, iPad Air,
Samsung Tab S3 o Samsung Tab S2, deberás retirar el protector y la banda del
botones del iPad de 10.5 pulgadas que fueron previamente instaladas en la funda
Nomad Book.
1.
Retira el protector preinstalado presionando el soporte del lápiz en la parte
posterior de la funda y halando el protector.
2.
Retira la banda de botones preinstalada presionando los botones desde el
exterior de la funda hacia adentro hasta que se suelte. Luego, hala la banda de
botones desde el interior de la funda hasta que la banda se suelte y salga.
3.
Instala la banda de botones correcta insertando el botón individual en el lado
izquierdo de la banda en la ranura en el lado superior de la funda, primero.
Luego, presiona el resto de la banda de botones en la ranura larga en la parte
superior de la funda.
4.
Instala el protector para la tableta de 9.7 pulgadas presionando el soporte del
lápiz sobre el protector en la ranura en la parte posterior de la funda. Presiona
el perímetro del protector para fijarlo en su sitio, verificando todos los lados
para asegurarte de que esté bien ajustado.
5.
Coloca la parte inferior de tu tableta en la ranura en la parte inferior de la
funda y luego presiona el resto de tu tableta para ponerla en su lugar. Debería
encajar cómodamente contra el protector en la parte superior de la funda.
6.
Presiona de nuevo en la parte posterior de la funda para asegurarte de que el
lado adhesivo del imán se adhiera a tu tableta.
Page 16

Retirar el protector
Instalar la banda de botones
correcta
Instalar el protector
Adherir tu tableta a la placa
magnética
SEPARAR LA FUNDA DEL TECLADO
Sostén una de las esquinas superiores del teclado con una mano, y con la otra
mano en la esquina superior correspondiente de la caja, tira directamente hacia
arriba. Esto desconectará los imanes que sujetan el teclado y la funda.
Page 17

ENCENDER Y APAGAR
1.
Para encender tu Nomad Book, presiona el botón de Encendido/Apagado
ubicado en la esquina superior derecha del teclado. Una luz LED verde se
encenderá brevemente.
2.
Para apagar tu Nomad Book, mantén presionado el botón de Encendido/
Apagado durante tres segundos. Una luz LED rojo parpadeará para indicar
que se ha apagado.
DESCONECTAR EL TECLADO
1.
Cuando quieras usar la funda sin el teclado, hay tres maneras en las que
puedes cambiar al uso del teclado de la pantalla.
2.
Presione el botón Ocultar/Mostrar teclado. Esto desactivará el teclado del
Nomad Book y te permitirá usar el teclado de la pantalla de tu dispositivo.
Presiona el botón Ocultar/Mostrar teclado nuevamente cuando estés listo para
usar tu teclado Nomad Book.
3.
Desactiva la conexión Bluetooth® desde tu dispositivo.
4.
Apaga el teclado de tu Nomad Book.
EMPAREJAR TU ZAGG NOMAD BOOK
Tu ZAGG Nomad Book puede emparejarse con hasta dos dispositivos a la vez.
Emparejar tu Nomad Book es fácil; solo sigue estas instrucciones.
1.
Asegúrate de que el Bluetooth® de tu dispositivo esté encendido.
2.
Presiona las teclas 1 o 2 de tu Nomad Book durante tres segundos. Se
encenderá una luz LED azul debajo de la tecla presionada, lo que indica que tu
Nomad Book está en modo de emparejamiento.
3.
Tu dispositivo mostrará “ZAGG Nomad Book” como una opción de
emparejamiento disponible. Selecciónala y completa cualquier otro paso de
emparejamiento que tu dispositivo requiera.
4.
Para emparejar tu Nomad Book con otro dispositivo, repite los pasos 2 y 3.
Para alternar entre dispositivos, simplemente presiona 1 o 2.
5.
Una vez emparejado, la tecla Bluetooth dejará de parpadear y se apagará. Una
vez comienza el proceso, si el Nomad Book no completa el emparejamiento
después de 60 segundos, abortará el proceso. Si esto sucede, repite los pasos
2 y 3.
Page 18

CARGA
Tu Nomad Book viene con una poderosa batería de polímero de litio que dura por
un máximo de dos años de uso normal entre cargas*. Viene con un cable cargador
que puedes usar para cargar tu teclado de forma rápida y conveniente. Para cargar
tu Nomad Book, sigue estos pasos:
1.
Enchufa el conector micro USB en el puerto de carga.
2.
Enchufa el conector USB regular en la toma USB que prefieras. Una luz LED
roja se encenderá en tu tecla de la batería para indicar que tu teclado se
está cargando. Esta LED se apagará cuando el teclado esté completamente
cargado.
3.
Desconecta el cable de carga.
* Basado en el uso regular de una hora por día. Las horas dependen de una
variedad de factores que son diferentes para cada usuario.
PUERTO DE CARGA
DURACIÓN DE LA BATERÍA
Para verificar la duración de la batería de tu Nomad Book, presiona fn + la tecla de
la batería. La luz LED parpadeará de una de las siguientes
tres maneras:
1.
3 destellos verdes = 50% o más de duración de la batería
2.
3 destellos amarillos = 25-49% de duración de la batería
3.
3 destellos rojos = menos de 25% de duración de la batería
Page 19

TECLAS DE FUNCIONES ESPECIALES
Tu teclado Nomad Book viene con todas las teclas de funciones especiales a las
que estás acostumbrado para que trabajes y juegues a gusto. Aquí presentamos
algunas de las funciones más útiles. Para obtener una lista completa de las teclas
de funciones y un manual de instrucciones completo, visita zagg.to/nomad-
install.
1
BLUETOOTH 1– mantén presionado durante tres segundos para conectar tu Nomad
Book con tu tableta. Si está conectada con un segundo dispositivo, presiona 2 para
alternar instantáneamente entre los dispositivos.
BLUETOOTH 2– mantén presionado tres segundos para conectar tu Nomad Book con
2
tu tableta. Si está conectada con un segundo dispositivo, presiona
1 para alternar instantáneamente entre los dispositivos.
INICIO – muestra la pantalla de inicio de tu dispositivo.
BLOQUEO – activa y desactiva el modo de suspensión de tu dispositivo.
APLICACIONES EN EJECUCIÓN – muestra todas las aplicaciones que se ejecutan
actualmente en tu tableta.
SÍMBOLO DE IDIOMA – alterna entre los idiomas del teclado (si está activo en tu
dispositivo); también se logra el mismo efecto presionando cmd +
barra espaciadora.
OCULTAR/MOSTRAR TECLADO – oculta o muestra el teclado de pantalla de
tu dispositivo.
PISTA ANTERIOR – salta a la pista anterior en tu lista de
reproducción seleccionada.
REPRODUCIR/PAUSA – reproduce o hace una pausa en tu lista de
reproducción actual.
SIGUIENTE PISTA – salta a la siguiente pista en tu lista de
reproducción seleccionada.
SILENCIO – silencia el audio de tu dispositivo.
BAJAR VOLUMEN – reduce el volumen de tu dispositivo.
SUBIR VOLUMEN – aumenta el volumen de tu dispositivo.
ENCENDIDO/APAGADO – enciende y apaga tu teclado Nomad Book.
FN + SÍMBOLO DE LA BATERÍA – indica el nivel de batería restante.
Page 20

RESOLUCIÓN DE PROBLEMAS
Si tu dispositivo no responde a Nomad Book, puede haber una explicación
simple. Prueba los siguientes pasos.
1.
Reinicia tu tableta.
2.
Apaga y enciende de nuevo tu Nomad Book.
3.
Presiona olvidar dispositivo y empareja de nuevo tu Nomad Book.
4.
Si tu Nomad Book no puede establecer o mantener una conexión
Bluetooth®, reinicia el módulo Bluetooth® cargando tu teclado.
5.
Si, después de cargarlo, tu teclado no funciona correctamente, por favor
ponte en contacto con el Servicio al cliente de ZAGG.
Si aún tienes problemas, ponte en contacto con el Servicio al cliente de ZAGG
visitando zagg.com/support.
Page 21

Para una protección inigualable contra rasguños para tu dispositivo, te
recomendamos la protección de pantalla InvisibleShield®.
©2005 - 2018 ZAGG Inc Todos los derechos reservados.
Patente: zagg.com/patents | NASDAQ: ZAGG | HECHO EN CHINA
iPad Pro, iPad Air, iPad son marcas registradas de Apple Inc..
La identidad gráfica y los logotipos de Bluetooth® son marcas registradas de
Bluetooth SIG, Inc. y cualquier utilización de tales marcas por parte de ZAGG Inc
se efectúa bajo licencia.
ZAGG, InvisibleShield y ZAGG Nomad Book son marcas registradas de ZAGG IP
Holdings Co., Inc.
Samsung y Tab son marcas registradas de Samsung Electronics America, Inc. Ltd.
Cualquier cambio o modificaciones no expresamente aprobados por la parte responsable
del cumplimiento podría invalidar la autoridad del usuario para operar este equipo.
Este equipo ha sido probado y se concluyó que cumple con los límites de un dispositivo
digital de Clase B, de conformidad con la Parte 15 de la normativa de la FCC. Estos límites
fueron diseñados para ofrecer una protección razonable contra cualquier interferencia
perjudicial en una instalación residencial. Este equipo genera, usa y puede emitir energía de
radio frecuencia y, si no es instalado y usado de acuerdo a las instrucciones, puede causar
interferencia perjudicial en las radiocomunicaciones. Sin embargo, no hay garantía de que
esa interferencia no ocurra en una instalación particular. Si este equipo causa interferencia
perjudicial en la recepción del radio o televisión, la cual se puede identificar apagando y
encendiendo el equipo, se exhorta al usuario a tratar de corregir la interferencia tomando
una de las siguientes medidas:
• Reorientar o reubicar la antena receptora.
• Aumentar la separación entre el equipo y el receptor.
• Conectar el equipo a una toma de corriente en un circuito diferente al que está
conectado el receptor.
• Consultar con el vendedor o con un técnico de radio/televisor experto para obtener
ayuda.
Cualquier cambio o modificaciones no expresamente aprobados por la parte responsable
del cumplimiento podría invalidar la autoridad del usuario para operar este equipo.
1. Este dispositivo puede no causar interferencia perjudicial.
2. Este dispositivo debe aceptar cualquier interferencia recibida, incluyendo
interferencias que puedan causar operaciones indeseadas.
Page 22

ADVERTENCIA
Por favor lee toda la información de precauciones y operación antes de usar tu teclado o
cualquier accesorio que lo acompañe. Guarda esta información para consultarla en el futuro.
1. Advertencia en materia de salud: toma descansos frecuentes mientras usas tu
teclado. Si sientes alguna incomodidad, dolor, hormigueo, entumecimiento o
ardor en el cuello, hombros, brazos, muñecas, manos o cualquier otra parte del
cuerpo, detén el uso del teclado y consulta con
un médico.
2. Usa solo cargadores micro USB en conexión con tu teclado.
3. No intentes hacerle mantenimiento a tu teclado.
4. No desarmes ni intentes desarmar tu teclado.
5. No rompas ni perfores tu teclado.
6. No sumerjas tu teclado en agua.
7. No pongas tu teclado en contacto con agua u otros líquidos ya que podría causar
un corto circuito, incendio o descarga eléctrica que podría resultar en lesiones,
muerte o daños a la propiedad.
8. No uses detergentes líquidos o en aerosol, o disolventes sobre o cerca de tu
teclado. Límpialo solamente con un paño suave y seco. Desconecta cualquier
cable antes de limpiar el teclado.
9. No uses tu teclado mientras operas un vehículo motorizado, incluyendo
automóviles, botes o aviones. Hacerlo podría ponerte a ti o a otras personas en
riesgo de lesiones graves, muerte o daños a la propiedad.
10. No uses o coloques tu teclado cerca de cualquier fuente de calor incluyendo,
pero sin limitarse a, radiadores, sensores de temperatura, estufas, otros
electrodomésticos, fogatas, o parrillas para asados.
11. Para reducir el riesgo de incendio o descarga eléctrica, enchufa o conecta tu
teclado solo de la manera descrita en la documentación incluida aquí. No intentes
modificar ni ajustar ningún puerto. Una conexión o ajustes inadecuados pueden
causar daños.
12. Cuando estés listo para desechar tu teclado, recíclalo de una manera que
cumpla los requerimientos o recomendaciones sobre reciclaje de dispositivos
electrónicos de tu área geográfica.
Page 23

™
Nomad Book
Instructions pour le clavier
MISE EN GARDE
Voir les informations importantes sur la santé et la sécurité à la page 7 avant d’utiliser
ce produit.
*ENREGISTREMENT DE LA GARANTIE
Votre Nomad Book ZAGG est livré avec une garantie du fabricant d’un an. Pour activer la garantie, vous
devez enregistrer votre Nomad Book ainsi que garder votre reçu d’achat. Si vous avez acheté votre Nomad
Book auprès de ZAGG.com, alors ZAGG l’a déjà enregistré et possède une copie de votre preuve d’achat.
BESOIN D’AIDE? VEUILLEZ CONSULTER NOTRE SECTION FAQ SUR : www.ZAGG.com/faq
Page 24

DANS L’EMBALLGE
(1) Clavier et étui Nomad Book avec support
(2) Pare-chocs
• iPad de 10,5 pouces (déjà installé sur l’étui Nomad)
• Pare-chocs pour tablettes 9,7 pouces et iPad Pro y compris iPad 9,7 pouces
(modèles 2017-18), iPad Pro 9,7 pouces, iPad Air 2, iPad Air, Samsung Tab S3,
Samsung Tab S2
(4) Bandes à boutons
• iPad Pro 10,5 pouces (déjà installé sur l’étui Nomad)
• iPad Air
• iPad Air 2, iPad Pro de 9,7 pouces, iPad (5ème et 6ème génération)
Samsung Tab S2 et Samsung Tab S3
(1) Plaque de montage magnétique pour toutes les tablettes (déjà installé sur l’étui
Nomad)
DÉTERMINER LA MARQUE/MODÈLE DE VOTRE TABLETTE
Le clavier et l’étui Nomad Book peuvent être personnalisés pour s’adapter à la
plupart des tablettes, notamment l’iPad Pro de 10,5 pouces (déjà installé), l’iPad 9,7
pouces, l’iPad Pro 9,7 pouces, l’iPad Air 2, l’iPad Air S3 et le Samsung Tab S2.
La première étape consiste à déterminer la marque/modèle de votre tablette
afin de pouvoir installer la bande à boutons appropriée. Vous pouvez le faire en
allumant votre tablette, en allant dans les paramètres, et en vérifiant les détails
sous “À propos du produit“. Vous pouvez également visiter ce tutoriel sur zagg.to/
nomad-install.
Page 25

INSTALLATION DE L’IPAD PRO 10,5 POUCES
Si vous disposez d’un iPad Pro de 10,5 pouces, le pare-chocs et la bande à boutons
appropriés ont déjà été installés. La dernière partie de l’installation est listée ci-dessous.
1. Un aimant a déjà été installé dans l’étui Nomad. Retirez la doublure de protection
du côté collant de l’aimant.
2. Placez le bas de votre tablette dans la rainure au bas de l’étui, puis appuyez sur le
reste de votre tablette pour la mettre en place. Elle devrait s’ajuster parfaitement
contre le pare-chocs en haut de l’étui.
3. Appuyez contre l’arrière de l’étui pour s’assurer que le côté adhésif de l’aimant se
fixe à votre tablette.
Retrait du
revêtement adhésif
Fixation de votre
tablette sur l’aimant
Page 26

RETRAIT DE L’IPAD DE 10,5 POUCES DE SON ÉTUI
Le retrait de votre tablette de son étui Nomad est facile. Faites glisser simplement
vos doigts entre le bord de votre tablette et le bord de l’étui Nomad et tirez
doucement jusqu’à ce que la tablette se dégage de l’étui.
INSTALLATION DES TABLETTES DE 9,7 POUCES
Pour regarer la vidéo d’installation veuillez visitez zagg.to/nomad-install.
Si vous avez un iPad de 9,7 pouces, un iPad Pro de 9,7 pouces, un iPad Air 2, un iPad
Air, un Samsung Tab S3 ou un Samsung Tab S2, vous devrez retirer le pare-chocs et
la bande à boutons pour iPad de 10,5 pouces qui étaient auparavant installés sur
l’étui Nomad Book.
1.
Retirez le pare-chocs préinstallé en appuyant sur le porte-stylet à l’arrière de
l’étui et en tirant le pare-chocs.
2.
Retirez la bande à boutons préinstallée en poussant les boutons de l’extérieur
de l’étui vers l’intérieur jusqu’à ce qu’elle se détache. Ensuite, tirez sur la bande
à boutons à l’intérieur du l’étui jusqu’à ce que la bande se libère.
3.
Installez la bande à boutons appropriée en insérant d’abord le bouton unique
du côté gauche de la bande dans la fente située sur le côté supérieur du l’étui.
Ensuite, appuyez sur le reste de la bande à boutons dans la longue fente en
haut de l’étui.
4.
Installez le pare-chocs pour les tablettes de 9,7 pouces en appuyant le
porte-stylet sur le pare-chocs dans la fente à l’arrière du l’étui. Appuyez sur le
périmètre du pare-chocs en place, en vérifiant tous les côtés pour s’assurer
qu’il est sécurisé.
5.
Ajustez le bas de votre tablette dans la fente située au bas de l’étui, puis
appuyez sur le reste de votre tablette pour la mettre en place. Elle devrait
s’ajuster parfaitement contre le pare-chocs en haut de l’étui.
6.
Appuyez sur l’arrière de l’étui pour vous assurer que le côté adhésif de l’aimant
s’attache à votre tablette.
Page 27

Retrait du pare-chocs
Installation de la bande à
boutons correcte
Installation du pare-chocs
Fixation de votre tablette à
la plaque d’aimant
DÉTACHEMENT DU BOÎTIER DU CLAVIER
Tenez l’un des coins supérieurs du clavier d’une main, et de l’autre main le coin
supérieur correspondant de l’étui, tirez directement vers le haut. Cela désengagera
les aimants qui maintiennent le clavier et le l’étui ensemble.
Page 28

ALLUMER ET ÉTEINDRE
1.
Pour activer votre Nomad Book, appuyez sur le bouton d’alimentation situé
dans le coin supérieur droit du clavier. Une LED verte s’allume brièvement.
2.
Pour éteindre votre Nomad Book, maintenez le bouton d’alimentation enfoncé
pendant trois secondes. Une LED rouge clignotera indiquant qu’elle est
éteinte.seconds.
DÉCONNEXION DU CLAVIER
Lorsque vous souhaitez utiliser l’étui sans le clavier, vous pouvez basculer sur votre
clavier à l’écran de trois manières différentes.
1.
Appuyez sur le bouton Afficher/Cacher le clavier. Cela désengagera le clavier
Nomad Book et vous permettra d’utiliser le clavier à l’écran de votre appareil.
Appuyez de nouveau sur le bouton Afficher/Cacher du clavier lorsque vous
décidez d’utiliser votre clavier Nomad Book.
2.
Éteignez la connexion Bluetooth® de votre appareil.
3.
Éteignez votre clavier Nomad Book.
SYNCHRONISATION DE VOTRE NOMAD BOOK ZAGG
Votre ZAGG Nomad Book peut être associé à deux appareils en même temps.
Synchroniser votre Nomad Book est facile; il suffit de suivre ces instructions.
1.
Assurez-vous que le Bluetooth® de votre appareil est activé.
2.
Appuyez sur les touches 1 ou 2 de votre Nomad Book pendant trois secondes.
Une lumière bleue LED sous la touche enfoncée commencera à clignoter,
indiquant que votre Nomad Book est en mode synchronisation.
3.
Votre appareil affichera “ZAGG Nomad Book” comme une option de
synchronisation disponible. Sélectionnez-le et effectuez toutes les autres
étapes de synchronisation en fonction de votre appareil.
4.
Pour synchroniser votre Nomad Book à un autre appareil, répétez les étapes 2
et 3. Pour basculer entre les appareils, appuyez simplement sur 1 ou 2.
5.
Une fois synchronisé, la touche Bluetooth cesse de clignoter et s’éteint. Une
fois commencé, si le Nomad Book ne termine pas la synchronisation après 60
secondes, il annulera le processus. Si cela se produit, répétez les étapes 2 et 3.
Page 29

CHARGEMENT
Votre Nomad Book est doté d’une puissante batterie au lithium-polymère qui dure
jusqu’à deux ans pour une utilisation normale entre les charges. * Il est livré avec un
câble de charge que vous pouvez utiliser pour charger votre clavier rapidement et
facilement. Pour charger votre Nomad Book, procédez comme suit :
1.
Branchez le connecteur micro USB dans le port de chargement du clavier.
2.
Branchez le connecteur USB standard dans votre prise USB préférée. Un
voyant DEL rouge sur la touche de la batterie s’allume pour indiquer que votre
clavier est en cours de chargement. Ce voyant s’éteint lorsque votre clavier est
complètement chargé.
3.
Débranchez le câble de charge.
* Basé sur une utilisation régulière d’une heure par jour. Les heures
dépendent d’une variété de facteurs qui sont diérents pour chaque
utilisateur.
PORT DE CHARGEMENT
DURÈE DE VIE DE LA BATTERIE
Pour vérifier l’autonomie de la batterie de votre Nomad Book, appuyez sur fn + la
touche de la batterie. La LED clignotera l’une des trois manières suivantes :
1.
3 clignotements verts = 50% ou plus de la durée de vie de la batterie
2.
3 clignotements jaunes = 25-49% de durée de vie de la batterie
3.
3 clignotements rouges = moins de 25% de la durée de vie de la batterie
Page 30

TOUCHES DE FONCTIONS SPÉCIALES
Votre clavier Nomad Book comprend toutes les touches de fonction spéciales
auxquelles vous êtes habitué pour travailler et jouer. Voici quelques-unes des
fonctions les plus utiles.
1
BLUETOOTH 1– Maintenez la touche enfoncée pendant trois secondes pour jumeler
votre Nomad Book avec votre tablette. S’il est synchronisé à un second périphérique,
appuyez sur 2 pour basculer instantanément entre les périphériques.
BLUETOOTH 2– Maintenez pendant trois secondes pour synchroniser votre Nomad
2
Book avec votre tablette. S’il est synchronisé avec un deuxième appareil, appuyez sur
1 pour basculer instantanément entre les appareils.
ACCUEIL – Affiche l’écran d’accueil de votre tablette.
VERROUILLAGE – Active et désactive le mode veille de votre tablette.
APPS EN COURS D’EXÉCUTION – Affiche toutes les applications en cours d’exécution
sur votre tablette.
SYMBOLE DE LANGUE – Bascule entre les langues du clavier (si actif sur votre
appareil); aussi, vous pouvez le faire en appuyant sur cmd + barre d’espace.
AFFICHIER/CACHER CLAVIER – Masque ou affiche le clavier sur l’écran de
votre tablette.
PISTE PRÉCÉDENTE – Passe à la piste précédente de votre liste de lecture sélectionnée.
PLAY/PAUSE – Démarre ou met en pause votre liste de lecture actuelle.
PISTE SUIVANTE – Passe à la piste suivante de votre liste de lecture actuelle.
MUET – Coupe le son de votre tablette.
VOLUME BAS – Diminue le volume de votre tablette.
VOLUME HAUT – Augmente le volume de votre tablette.
ALIMENTATION – Allume et éteint votre clavier Nomad Book.
FN + SYMBOLE DE BATTERIE – Indique la durée de vie restante de la batterie.
Page 31

DÉPANNAGE
Si votre appareil ne répond pas au Nomad Book, il peut y avoir une explication
simple. Essayez les étapes suivantes.
1.
Redémarrez votre tablette.
2.
Éteignez votre Nomad Book et rallumez-le.
3.
Dissociez et resynchronisez votre Nomad Book.
4.
Si votre Nomad Book n’établit ou ne maintient pas de connexion
Bluetooth®, réinitialisez le module Bluetooth® en chargeant votre clavier.
5.
Si, après la charge, votre clavier ne fonctionne pas correctement, veuillez
contacter le service clientèle de ZAGG.
Si vous rencontrez toujours des problèmes, contactez le service clientèle de
ZAGG en visitant zagg.com/support.
Page 32

Pour une protection anti-rayures inégalée pour votre tablette, nous vous
recommandons l’InvisibleShield® de ZAGG.
©2005 - 2018 ZAGG Inc All Rights Reserved.
Brevet: zagg.com/patents | NASDAQ: ZAGG | FABRIQUÉ EN CHINE
iPad Pro, iPad Air, iPad, iPad Mini and Apple are trademarks of Apple Inc.
La marque verbale et les logos de Bluetooth® sont des marques déposées
appartenant à Bluetooth SIG, Inc. et toute utilisation de ces marques par ZAGG
Inc est sous licence.
ZAGG, InvisibleShield et ZAGG Nomad Book sont des marques déposées de
ZAGG IP Holdings Co., Inc.
Samsung et Tab sont des marques déposées de Samsung Electronics America,
Inc. Ltd.
Les changements ou modifications non expressément approuvés par la partie responsable
de la conformité pourraient annuler l’autorité de l’utilisateur à utiliser l’équipement.
Cet équipement a été testé et déclaré conforme aux limites d’un appareil numérique de
classe B, conformément à la Section 15 des règles de la FCC. Ces limites sont conçues pour
fournir une protection raisonnable contre les interférences nuisibles dans un environnement
résidentiel.
Cet équipement génère des utilisations et peut émettre de l’énergie radiofréquence
et, s’il n’est pas installé et utilisé conformément aux instructions, peut provoquer des
interférences nuisibles aux communications radio. Cependant, il n’y a aucune garantie que
des interférences ne se produiront pas dans une installation particulière. Si cet équipement
cause des interférences nuisibles à la réception radio ou télévision, ce qui peut être
déterminé en éteignant et allumant l’équipement, l’utilisateur est invité à essayer de corriger
l’interférence par l’une des mesures suivantes :
• Réorienter ou déplacer l’antenne de réception.
• Augmenter la distance entre l’équipement et le récepteur.
• Connecter l’équipement à une prise d’un circuit différent de celui auquel le récepteur
est connecté.
• Consulter le revendeur ou un technicien radio/TV expérimenté pour obtenir de l’aide.
Tout changement ou modification non expressément approuvé par la partie responsable de
la conformité peut annuler l’autorité de l’utilisateur à utiliser cet équipement.
Cet appareil est conforme à la Section 1S des Règles FCC. L’opération est soumise aux deux
conditions suivantes :
1. Cet appareil ne peut pas causer d’interférences nuisibles
2. Cet appareil doit accepter toute interférence reçue, y compris les interférences
susceptibles de provoquer un fonctionnement indésirable
Page 33

MISE EN GARDE
Veuillez lire les précautions et les instructions d’utilisation avant d’utiliser votre clavier ou les
accessoires qui l’accompagnent. Conservez cette information pour une utilisation future.
1. Avertissement de santé : Prenez des pauses fréquentes lorsque vous utilisez
votre clavier. Si vous éprouvez de l’inconfort, de la douleur, des picotements, un
engourdissement ou une sensation de brûlure dans le cou, les épaules, les bras,
les poignets, les mains ou toute autre partie du corps, cessez d’utiliser votre clavier
et consultez un médecin.
2. Utilisez uniquement des chargeurs micro-USB avec votre clavier.
3. N’essayez pas de réparer votre clavier.
4. Ne démontez pas ou ne tentez pas de démonter votre clavier.
5. Ne pas écraser ou percer le clavier.
6. Ne plongez pas votre clavier dans l’eau.
7. Ne mettez pas votre clavier en contact avec de l’eau ou d’autres liquides, car ils
pourraient causer un court-circuit, un incendie ou un choc électrique pouvant
entraîner des blessures graves, la mort ou des dommages matériels.
8. N’utilisez pas de nettoyants liquides ou en aérosol ou de solvants sur ou à
proximité de votre clavier. Nettoyez uniquement avec un chiffon doux et sec.
Débranchez tous les câbles avant de nettoyer le clavier.
9. N’utilisez pas votre clavier lorsque vous conduisez un véhicule motorisé, y compris
une automobile, un bateau ou un avion. Cela pourrait vous exposer ainsi que
d’autres personnes à des risques de blessures graves, de mort ou de dommages
matériels.
10. N’utilisez pas et ne placez pas votre clavier à proximité de sources de chaleur,
y compris, mais sans s’y limiter, les radiateurs, les bouches de chaleur, les
cuisinières, les autres appareils, les feux de camp ou les barbecues.
11. Pour réduire le risque d’incendie ou d’électrocution, reliez ou connectez votre
clavier aux produits uniquement de la manière indiquée dans la documentation
fournie avec celui-ci. N’essayez pas de modifier ou d’ajuster les ports. Toute
connexion ou ajustement incorrect peut causer des dommages.
12. Lorsque vous êtes prêt à vous débarrasser de votre clavier, recyclez votre clavier
conformément aux exigences de recyclage électronique ou aux recommandations
de votre zone géographique.
 Loading...