

Page 1

1
Now Cam
TM
Instructions
*WARRANTY REGISTRATION
Your ZAGG Now Cam™ comes with a one-year manufacturer’s warranty. In order to activate the warranty,
you must register your Now Cam as well as keep your purchase receipt. If you purchased your ZAGG Now
Cam from zagg.com, ZAGG has already registered it and has a copy of your proof of purchase.
NEED MORE HELP? PLEASE SEE OUR FAQ SECTION AT: www.zagg.com/faq
Page 2
2
INTRODUCTION
Welcome to your next adventure. The ZAGG Now Cam offers a simple way to
capture your memories without the risk of scratching or losing your phone. Listen
to music, take hands-free calls, record videos, or snap some pictures while you
hang with friends and capture moments that will last a lifetime. The following
instructions will show you how to get the most from your Now Cam – keep them
for future reference.
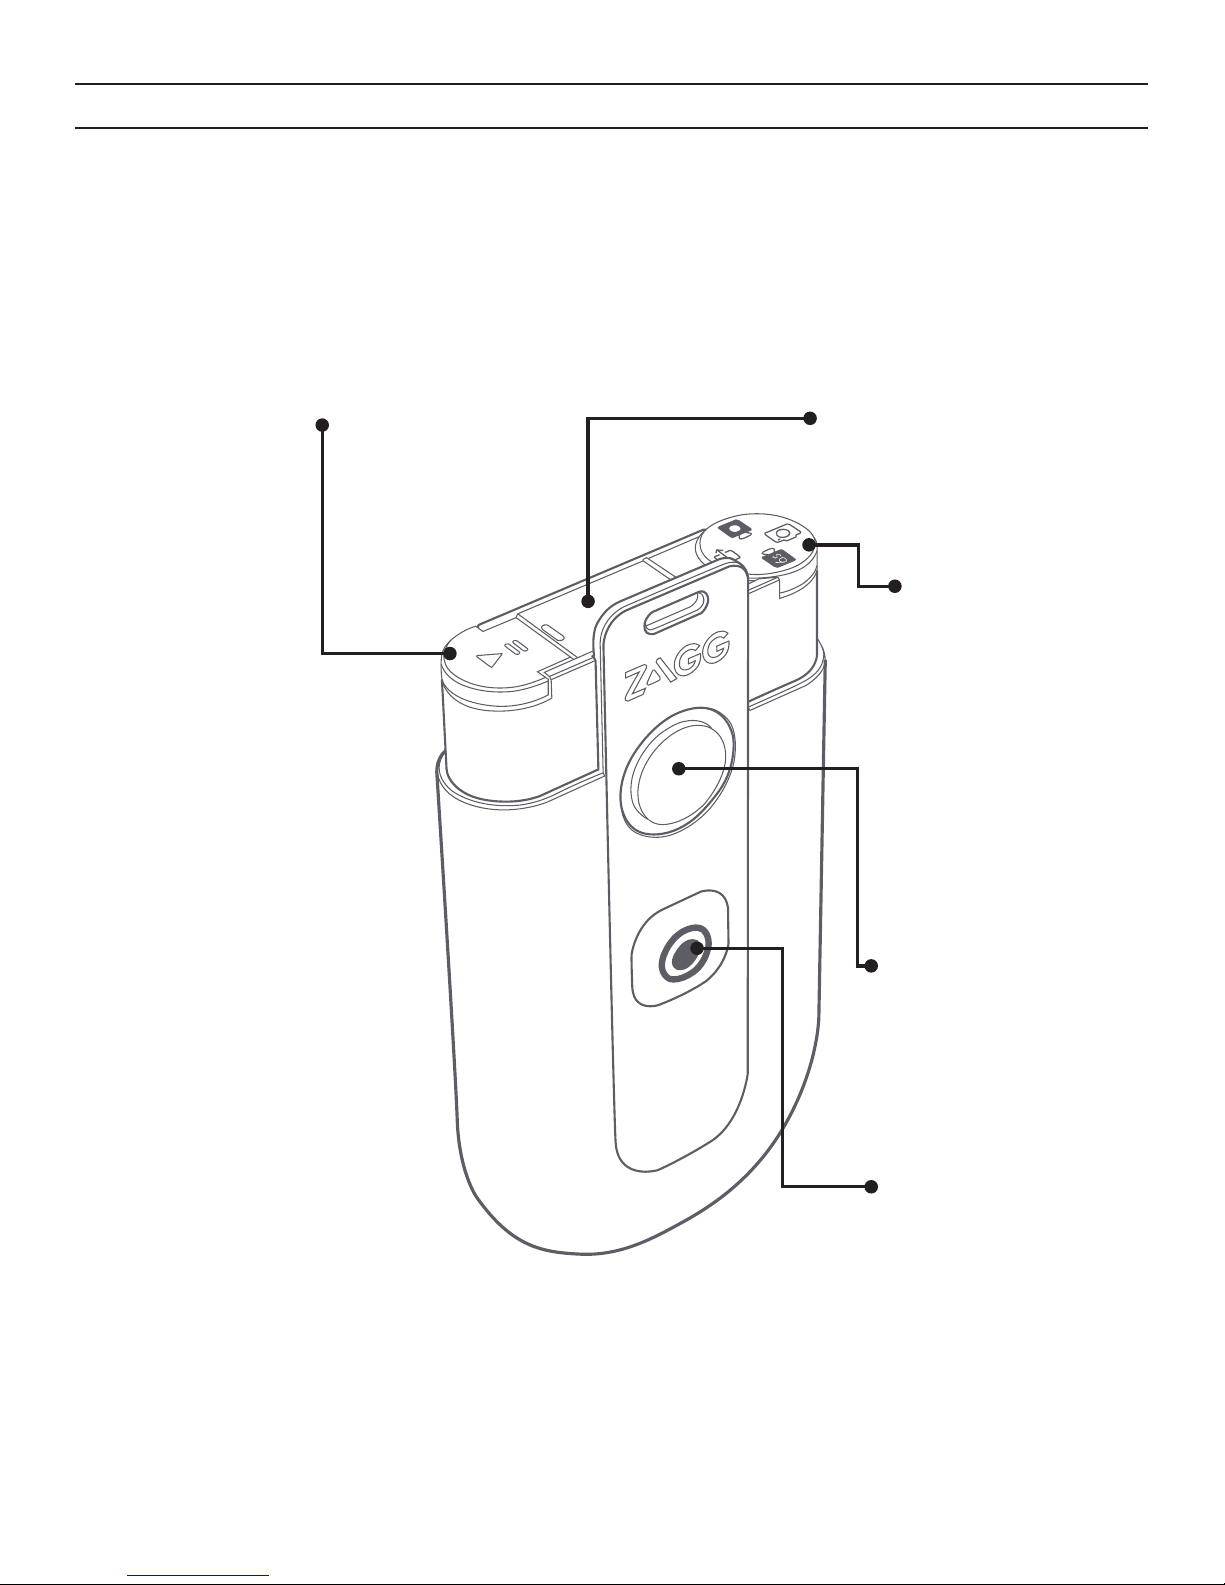
Speaker power/
control
Camera dial
Mounting magnet
Camera power/
shutter button
Charging port
Page 3

3
USING THE SPEAKER
Power and Pairing
Pairing your Now Cam is easy and only needs to be done once; after that the
Now Cam will automatically pair with your devices when you turn it on. The Now
Cam remembers multiple devices and does not need to be paired in order for
the camera to work – pairing is for music only.
1. Press and hold the Speaker Power/Control button for three seconds to
turn your Now Cam speaker on. A tone will sound and the LED next to the
camera lens will light red indicating it is powered on.
2. The first time you turn your Now Cam speaker on, it will automatically
enter pairing mode. This is indicated by the LED flashing red then blue
every second. To pair your Now Cam with multiple devices, press and hold
the power button for five seconds when you power it on to force it into
pairing mode.
3. Access the Bluetooth® settings on your device and ensure your Bluetooth
connection is on.
4. Your device’s Bluetooth menu will display “ZAGG Now Cam” as available
for pairing. Select this option and complete any additional pairing steps
according to your device. Another tone will indicate a successful pair and
the LED will flash blue every seven seconds while paired.
a. If pairing is not successful after 60 seconds, your Now Cam speaker
will stop searching for devices to pair with and the LEDs will stop
flashing. When it is paired, a tone will sound if your Bluetooth
connection is lost for any reason; if the connection is lost, the Now
Cam will automatically begin searching for a device to pair with
and will continue searching for 60 seconds. If no device is found,
the LEDs will stop flashing and the Bluetooth function will turn off,
though your camera will still work. To initiate pairing again, turn your
Now Cam Speaker off and then back on. If you are pairing your Now
Cam with a second device, press and hold the speaker power button
for five seconds as described above.
5. When you are ready to turn your Now Cam speaker off, press and hold the
Speaker Power/Control button for three seconds. A tone will accompany
the LED lighting red to indicate your Now Cam speaker is off. Note: Your
Now Cam speaker will automatically power off if it sits idle for 15 minutes. The
camera will automatically power off if it sits idle for five minutes.
Page 4

4
PLAYING MUSIC
TAKING CALLS
USING THE CAMERA
DOWNLOAD THE APP
Once paired, your Now Cam is ready to deliver portable music anywhere you go.
Here’s how to control your music:
1. Follow the pairing instructions as described above.
2. Select a playlist on your device.
3. Press the Play button on your Now Cam.
a. Press the Play button again to pause or resume your music.
b. Press the Play button twice quickly to track forward on your selected
playlist. Note: Your Now Cam speaker will enter sleep mode if no music
is played for 60 seconds. The LED will continue to flash blue indicating
your Now Cam is still paired. Begin playing music again to wake it.
Your Now Cam has a built-in mic that allows you to use it as a hands-free phone.
If you are listening to music, your music will pause automatically during a call and
resume automatically at the end. Here’s how to talk while you’re out adventuring:
1. Press the Play button once to answer an inbound call.
2. Press the Play button again to end the call. If you were playing music when
the all came in it will mute and then resume playing automatically when the
call is disconnected.
Your Now Cam has 4GB of built-in storage – that’s enough to hold up to 1600 HD®
pictures or 30 minutes of video! Transferring your pictures and videos is a snap and
only takes a few seconds – leaving you more time for fun. See below for instruction
on using the camera.
In order for the Now Cam camera to transfer files to your device, you’ll need to
download its app. It can be found by searching for “ZAGG Now Cam” on the App
Store or Google Play. Follow the app download process for your device and you’re
ready to go.
Page 5

5
TAKING PICTURES
CAPTURING BURST VIDEOS
Taking pictures with your Now Cam camera is as simple as pointing and
shooting. Here’s how to do it:
1. Ensure your Now Cam camera is turned on by pressing and holding the
Camera Power/Shutter button for three seconds. A tone will sound and the
LED next to the camera lens will light red, indicating it is powered on.
2. Turn the camera dial so that the camera icon is aligned with the red
selection nub.
3. Press the shutter button once.
4. Each time you take a picture, a shutter click will sound and the LED next to the
mounting magnet will blink red once. Note: If you are playing music while
taking pictures your music will fade for the shutter click and then resume
playing automatically. This is so you can verify a picture has been taken.
Your Now Cam is able to capture short six-second videos – perfect for sharing
your good times on social media. Recall, your Now Cam does not need to be
connected via Bluetooth in order for the camera to work. Here’s how to snag
those short clips:
1. Ensure your Now Cam camera is powered on as described above.
2. Turn the camera dial so that the 6s icon is aligned with the red selection nub.
3. Press the shutter button once.
4. A tone will indicate the camera is warmed up and recording. If you were
playing music when you begin recording, your music will mute until recording
stops; after you stop recording it will resume playing automatically.
5. While recording, the LED next to the camera lens will flash red every
second. Your Now Cam will automatically stop recording after six seconds;
you can also press the shutter button again to stop recording.
CAPTURING CONTINUOUS VIDEO
For those times when you need more than a picture, or longer than six seconds
of recording, your Now Cam is ready to record up to 30 minutes of continuous
video. Recall, your Now Cam does not need to be connected via Bluetooth in
order for the camera to work. Keep reading to see how it’s done.
Page 6

6
TRANSFERRING DATA VIA WI-FI
TRANSFERRING DATA VIA MICRO USB
Once you’ve captured some amazing photos or videos, transferring them to your
mobile device is a breeze. Here’s how easy it is:
1. Ensure your Now Cam camera is powered on as described above.
2. Turn the camera dial so that the download icon is aligned with the red selection nub.
3. Open your device’s Wi-Fi settings and select “ZAGG Now Cam”.
4. Open the Zagg Now Cam app on your device.
5. Open the app’s Camera Roll.
6. Select which photos and videos you’d like to transfer by touching them.
A checkbox will appear on marked pictures and videos.
7. Touch the download icon on the app. Selected files will begin transferring
to your phone’s camera roll. Note: Photos and videos you have taken with
the Now Cam will only be viewable on the device when the camera dial is
turned to the download icon and the Now Cam is connected to your device
via Wi-Fi. Also, Wi-Fi transfer is primarily intended for images and short
videos. We recommend using the included micro USB cable to transfer
large files.
You can also quickly and easily transfer your photos and videos directly to your
computer using the included micro USB cable. Here’s how:
1. Connect the included micro USB cable to your Now Cam by lifting the
cover located next to the camera dial.
2. Connect the USB end of the included cable to your computer. Your camera
will automatically turn on.
1. Ensure your Now Cam camera is powered on as described above.
2. Turn the camera dial so that the video icon is aligned with the red selection nub.
3. Press the shutter button once.
4. A tone will indicate the camera is warmed up and recording. If you were
playing music when you begin recording, your music will mute until recording
stops; after you stop recording it will resume playing automatically.
5. While recording, the LED next to the camera lens will flash red every
second. Press the shutter button again to stop recording.
Page 7

7
GENERAL INSTRUCTIONS
Charging
Your Now Cam is ready to deliver hours of music, pictures, and video*. It will
alert you when the battery reaches 20% capacity. Recharging it is quick and easy.
Here’s how:
1. The LED next to the mounting magnet will flash red every seven seconds
once your Now Cam’s rechargeable battery reaches 20% capacity remaining.
2. Lift the cover located between the camera dial and power button to
expose the micro USB port.
3. Connect the included micro USB cable to the port.
4. Connect the USB end of the cable to your preferred USB outlet. The LED
will light red while charging.
5. When the LED turns off, your Now Cam is fully charged. Remove the
charging cable and continue your adventures.
*Hours of use varies according to music play time and recording time. Recording requires more
power and will use your Now Cam’s battery faster.
3. Your computer will recognize the Now Cam as a new drive. Copy and
paste files to your preferred location, or simply drag and drop them.
4. When your files have transferred, the LED will flash red every two seconds
indicating that your Now Cam is charging.
5. Remove the included cable when you’re ready, and keep on adventuring.
INSTALLING AND USING THE LANYARDS
Your Now Cam includes three convenient lanyards that help ensure it stays with
you during your adventures. Installing the lanyards is a cinch – here’s how:
1. Feed the thin end of a lanyard through the hole in your Now Cam that
is just above the mounting magnet. Pull until the detachable clip on the
lanyard touches the hole.
2. Wrap the lanyard up and over the hole and place it through the thin end
you just fed through the hole.
3. Pull the lanyard completely through the thin end until the thin end
tightens upon itself.
4. Pass your hand through the lanyard for extra security during your activities.
Page 8

8
ERASING CONTENT FROM YOUR NOW CAM
MOUNTING YOUR NOW CAM
If you ever want to wipe your Now Cam’s memory completely clean, you can do
so through the app. Note, this permanently deletes all stored data on your Now
Cam and any lost files cannot be recovered. Only erase content from your Now
Cam after you have transferred any files you wish to keep.
1. Ensure your Now Cam is powered on.
2. Connect your camera to Wi-Fi as described above.
3. Select the gear icon in the app.
4. Select “Remove all pics/videos from Now Cam” under the Erase section,
and then select Erase.
5. The App will display a message stating that all content has been erased.
Your Now Cam comes with a powerful mounting magnet. Simply place the
magnet on a metal surface, follow the “Capturing Continuous Video” instructions,
and capture awesome action shots. The mounting magnet also works seamlessly
with the Now Cam Mount (sold separately) and makes attaching your Now Cam
virtually anywhere a breeze.
Page 9

9
To reach a trained customer service representative, please use one of the following:
ZAGG.com/support/contact.php | questions@zagg.com
1-800-700-ZAGG [9244] | 00-1-801-839-3906 for international customers
For unparalleled scratch protection for your mobile device, we recommend ZAGG’s InvisibleShield®.
©2016 ZAGG Inc All Rights Reserved | NASDAQ: ZAGG | MADE IN CHINA
Bluetooth® is a trademark of Bluetooth SIG, Inc.
ZAGG®, Now Cam™, and InvisibleShield®, are trademarks or registered trademarks of ZAGG Inc.
FCC STATEMENT
This device complies with Part 15 of the FCC Rules. Operation is subject to the following two conditions: (1)
This device may not cause harmful interference, and (2) this device must accept any interference received,
including interference that may cause undesired operation.
This equipment has been tested and found to comply with the limits for a Class B digital device, pursuant
to Part 15 of the FCC Rules. These limits are designed to provide reasonable protection against harmful
interference in a residential installation. This equipment generates, uses and can radiate radio frequency
energy and, if not installed and used in accordance with the instructions, may cause harmful interference
to radio communications. However, there is no guarantee that interference will not occur in a particular
installation. If this equipment does cause harmful interference to radio or television reception, which can be
determined by turning the equipment off and on, the user is encouraged to try to correct the interference by
one of the following measures:
• Reorient or relocate the receiving antenna.
• Increase the separation between the equipment and receiver.
• Connect the equipment into an outlet on a circuit different from that to which the receiver is connected.
• Consult the dealer or an experienced radio/TV technician for help.
FCC Caution: Any changes or modifications not expressly approved by the party responsible for compliance
could void the user’s authority to operate this equipment.
This transmitter must not be co-located or operating in conjunction with any other antenna or transmitter.
The product comply with the FCC portable RF exposure limit set forth for an uncontrolled environment
and are safe for intended operation as described in this manual. The further RF exposure reduction can be
achieved if the product can be kept as far as possible from the user body or set the device to lower output
power if such function is available.
Page 10

10
Now Cam
TM
Instructions
ENREGISTREMENT DE LA GARANTIE
Votre ZAGG Now Cam ™ est livré avec une garantie constructrice d’un an. Pour activer la garantie, vous
devez enregistrer votre Now Cam ainsi que de garder votre reçu d’achat. Si vous avez acheté votre ZAGG
Now Cam de zagg.com, ZAGG a déjà enregistré et dispose d’une copie de votre preuve d’achat.
BESOIN D’AIDE SUPPLÉMENTAIRE ? VOIR NOTRE SECTION FAQ À L’ADRESSE : WWW.ZAGG.COM/FAQ
Page 11

11
INTRODUCTION
Bienvenue à votre prochaine aventure. Le ZAGG Now Cam offre un moyen
simple pour capturer vos souvenirs sans les risques de rayures ou de perdre votre
téléphone. Écouter de la musique, prendre des appels mains-libres, enregistrer
des vidéos ou prendre quelques photos pendant que vous traînez avec des amis
et capturer des moments qui dureront toute une vie. Les instructions suivantes
vont vous montrer comment obtenir le maximum de votre Now Cam - les garder
pour référence future.
Contrôle de la
mise en marche/
du haut-parleur
Cadran de la
Caméra
Montage d’aimant
Bouton de mise
en marche/
déclencheur de
la caméra
Port de Chargement
Page 12

12
UTILISATION DE LA HAUT-PARLEUR
Allumer et Jumeler
Jumelage de votre Now Cam est facile et doit seulement être effectuée qu’une
seule fois ; après ça le Now Cam jumeler automatiquement avec vos appareils
lorsque vous l’allumez. Le Now Cam se souvient de multiples dispositifs et n’a
pas besoin d’être jumelé pour que la caméra fonctionne - jumelage est pour la
musique seulement.
1. Appuyez et maintenez le bouton de Mise en Marche du Haut-Parleur/
Contrôle pendant trois secondes pour allumer votre Now Cam hautparleur. Une tonalité sonnera et le LED à côté de la lentille de la caméra
devient rouge pour indiquer qu’il est allumé.
2. La première fois que votre Now Cam haut-parleur est allumé, il passe
automatiquement en mode de jumelage. Ceci est indiqué par le LED
rouge clignotant puis bleu à chaque seconde. Pour jumeler votre Now
Cam avec plusieurs appareils, appuyez et maintenez le bouton de mise
en marche du haut-parleur pendant cinq secondes lorsque vous l’allumez
pour la forcer en mode de jumelage.
3. Accédez aux paramètres de Bluetooth® sur votre appareil et vous assuré
que votre connexion de Bluetooth est activée.
4. Le menu de Bluetooth de votre appareil affichera “ZAGG Now Cam”
comme disponible pour le jumelage. Sélectionnez cette option et
effectuer toutes les étapes de jumelage supplémentaires en fonction de
votre appareil. Une autre tonalité indiquera un jumelage réussi et la LED
clignote en bleu toutes les sept secondes pendant le jumelage.
a. Si le jumelage ne réussit pas après 60 secondes, votre Now Cam
haut-parleur va arrêter la recherche pour les appareils à jumeler
et les LEDs cessent de clignoter. Quand il est jumeler, une tonalité
sonnera si votre connexion de Bluetooth est perdue pour une raison
quelconque ; si la connexion est perdue, le Now Cam commence
automatiquement à la recherche d’un appareil à jumeler et
continuera de chercher pendant 60 secondes. Si aucun appareil est
détecté, les LEDs cessent de clignoter et la fonction de Bluetooth
seront désactiver, mais votre caméra fonctionne toujours. Pour lancer
à nouveau jumelage, éteindre et allumer votre Now Cam hautparleur. Si vous jumelez votre Now Cam avec un second dispositif,
appuyez et maintenez le bouton de mise en marche du haut-parleur
pendant cinq secondes comme décrit ci-dessus.
5. Lorsque vous êtes prêt à éteindre votre Now Cam haut-parleur, appuyez
Page 13

13
JOUER DE LA MUSIQUE
PRENDRE DES APPELS
UTILISATION DE LA CAMÉRA
Une fois jumelé, votre Now Cam est prête à livrer la musique ultra portable partout où
vous allez. Voici comment contrôler votre musique:
1. Suivez les instructions de jumelage comme décrit ci-dessus.
2. Sélectionnez une liste de lecture sur votre appareil.
3. Appuyez sur le bouton Lecture de votre Now Cam.
a. Appuyez de nouveau sur le bouton de Lecture pour interrompre ou
reprendre votre musique.
b. Appuyez sur le bouton de Lecture deux fois rapidement pour suivre en
avant sur votre liste de lecture sélectionnée. Note: Votre Now Cam haut-
parleur passera en mode veille si aucune musique n’est jouée pendant
60 secondes. La LED continuera à clignoter en bleu indiquant que votre
Now Cam est toujours jumelé. Commencez à jouer à nouveau la musique
pour le réveiller.
Votre Now Cam a un micro intégré qui vous permet de l’utiliser comme un
téléphone mains-libres. Si vous écoutez de la musique, votre musique se interrompre
automatiquement lors d’un appel et reprend automatiquement à la fin. Voici comment
parler pendant que vous êtes à l’aventure:
1. Appuyez sur le bouton de Lecture une fois pour répondre à un appel entrant.
2. Appuyez de nouveau sur le bouton Lecture pour terminer l’appel. Si vous
jouiez à la musique lorsque l’appel est venu, il muet, puis reprendre la
lecture automatiquement lorsque l’appel est déconnecté.
Votre Now Cam a 4GB de stockage intégré - qui est suffisant pour contenir jusqu’à
1600 images HD® ou 30 minutes de vidéo! Transfert de vos photos et vidéos est
facile et prend juste quelques secondes - vous laissant plus de temps pour le
plaisir. Voir ci-dessous pour l’instruction sur l’utilisation de la caméra.
et maintenez le bouton de Mise en Marche du Haut-Parleur / Contrôle
pendant trois secondes. Une tonalité accompagne le rouge éclairage
de LED pour indiquer que votre Now Cam haut-parleur est éteint. Note:
Votre Now Cam haut-parleur éteindre automatiquement si elle reste inactive
pendant 15 minutes. La caméra éteindre automatiquement si elle reste
inactive pendant cinq minutes.
Page 14

14
PRENDRE DES PHOTOS
CAPTURER DES VIDÉOS DE COURTES DURÉES
Prendre des photos avec votre Now Cam caméra est aussi simple que de
pointage et de tir. Voici comment faire:
1. Vérifiez que votre Now Cam caméra est allumée en appuyant sur le
bouton de Mise en Marche / Déclencheur de caméra pendant trois
secondes. Une tonalité sonnera et le LED à côté de la lentille de la caméra
devient rouge pour indiquer qu’il est allumé.
2. Tournez le cadran de la caméra de sorte que l’icône de la caméra est
alignée avec la sélection nœud rouge.
3. Appuyez sur le bouton d’obturateur une fois.
4. Chaque fois que vous prenez une photo un son d’un clic du déclencheur
sonnera et la LED à côté de l’aimant de montage clignote rouge une fois.
Remarque : Si vous écoutez de la musique en prenant des photos votre
musique va disparaître pour le clic du déclencheur puis reprendre la
lecture automatiquement. Il en est ainsi pour que vous puissiez vérifier
une photo a été pris.
Votre Now Cam est capable de capturer de courtes vidéos de six secondes idéal pour partager vos bons moments sur les médias sociaux. Rappel, votre
Now Cam n’a pas besoin d’être connecté via Bluetooth pour que la caméra
fonctionne. Voici comment faire pour accrocher ces courtes séquences:
1. Vérifiez que votre Now Cam caméra est allumé, comme décrit ci-dessus.
2. Tournez le cadran de la caméra afin que l’icône 6s soit aligné avec la sélection
nœud rouge.
3. Appuyez sur le bouton de déclencheur une fois.
4. Une tonalité indiquera que l’appareil est réchauffé et enregistre. Si vous
jouiez à la musique lorsque vous commencez l’enregistrement, votre
musique se muet jusqu’à arrêt de l’enregistrement; après vous arrêtez
l’enregistrement, il reprendra automatiquement la lecture.
TÉLÉCHARGER L’APP
Pour que la Now Cam caméra transfère des fichiers sur votre appareil, vous aurez
besoin de télécharger son application. Il peut être trouvé en cherchant “ZAGG
Now Cam” sur l’App Store, ou Google Play. Suivez le processus de téléchargement
de l’application pour votre appareil et vous êtes prêt à aller.
Page 15

15
CAPTURER DES VIDÉOS EN CONTINUE
Pour les moments où vous avez besoin de plus qu’une image, ou plus de six
secondes d’enregistrement, votre Now Cam est prêt à enregistrer jusqu’à 30
minutes de vidéo en continu. Rappel, votre Now Cam n’a pas besoin d’être
connecté via Bluetooth pour que la caméra fonctionne. Continuez votre lecture
pour voir comment il est fait.
1. Vérifiez que votre Now Cam est allumé, comme décrit ci-dessus.
2. Tournez le cadran de la caméra de sorte que l’icône de la vidéo est alignée
avec la sélection nœud rouge.
3. Appuyez sur le déclencheur une fois.
4. Une tonalité indiquera que l’appareil est réchauffé et enregistre. Si vous
jouiez à la musique lorsque vous commencez l’enregistrement, votre
musique se muet jusqu’à arrêt de l’enregistrement ; après vous arrêtez
l’enregistrement, il reprendra automatiquement la lecture.
5. Pendant l’enregistrement, la LED à côté de la lentille de la caméra clignote
en rouge à chaque seconde. Appuyez de nouveau sur le bouton de
déclencheur pour arrêter l’enregistrement.
TRANSFERT DE DONNÉES VIA WI-FI
Une fois que vous avez capturé quelques photos ou des vidéos incroyables, les
transférer vers votre appareil mobile est facile. Voici comment il est facile:
1. Vérifiez que votre Now Cam caméra est allumé.
2. Tournez le cadran de la caméra de sorte que l’icône de téléchargement est
aligné avec la sélection nœud rouge.
3. Ouvrez les paramètres Wi-Fi de votre appareil et sélectionnez “ZAGG Now Cam”.
4. Ouvrez l’application Zagg Now Camera votre appareil.
5. Ouvrez rouleau de caméra de l’application.
6. Sélectionnez les photos et des vidéos que vous souhaitez transférer en les
touchant. Une case à cocher apparaît sur les photos et vidéos marquées.
7. Appuyez sur l’icône de téléchargement sur l’app. Les fichiers sélectionnés
5. Pendant l’enregistrement, la LED à côté de la lentille de la caméra clignote
en rouge à chaque seconde. Votre Now Cam arrête automatiquement
l’enregistrement après six secondes ; vous pouvez également appuyer à
nouveau sur le bouton de déclencheur pour arrêter l’enregistrement.
Page 16

16
INSTRUCTIONS GÉNÉRALES
Charge
Votre Now Cam est prête à livrer heures de musique, photos et vidéo *. Il vous
alertera lorsque la pile atteint 20% de sa capacité. Recharge est rapide et facile.
Voici comment:
1. La LED à côté de l’aimant de montage clignote en rouge toutes les sept
secondes une fois la pile rechargeable de votre Now Cam atteint 20% de la
capacité restante.
2. Soulevez le couvercle situé entre le cadran du camera et le bouton
d’alimentation pour exposer le port micro USB.
3. Branchez le câble micro USB fourni au port.
4. Branchez l’extrémité USB du câble à votre prise USB préféré. Le LED sera
rouge pendant le chargement.
5. Lorsque le LED éteint votre Now Cam est complètement chargée. Retirer le
câble de recharge et continuer vos aventures.
* Heures d’utilisation varie en fonction du temps de lecture de musique et de temps d’enregistrement.
Enregistrement nécessite plus de puissance et utiliser la pile de votre Now Cam plus rapidement.
seront commencé à transférer au rouleau de caméra de votre téléphone.
Remarque : Les photos et les vidéos que vous avez prises avec le Now
Cam seulement seront visibles sur l’appareil lorsque le cadran de caméra
est tourné vers l’icône de téléchargement et le Now Cam est connecté
à votre appareil via Wi-Fi. En outre, le transfert Wi-Fi est principalement
destiné aux images et de courtes vidéos. Nous vous recommandons
d’utiliser le câble micro USB fourni pour transférer de gros fichiers.
TRANSFERT DE DONNÉES VIA MICRO USB
Vous pouvez également transférer rapidement et facilement vos photos et vidéos
directement sur votre ordinateur via le câble micro USB inclus. Voici comment:
1. Branchez le câble micro USB fourni à votre Now Cam en soulevant le
couvercle situé à côté du cadran de la caméra.
2. Branchez l’extrémité USB du câble fourni à votre ordinateur. Votre appareil
s’allume automatiquement.
3. Votre ordinateur va reconnaître le Now Cam comme un nouveau lecteur.
Copiez et coller des fichiers à votre emplacement préféré, ou tout
simplement faire glisser et déposez-les.
4. Lorsque vos fichiers ont transféré la LED clignote en rouge toutes les deux
secondes, indiquant que votre Now Cam est en charge.
5. Retirez le câble fourni lorsque vous êtes prêt, et continuer à l’aventure.
Page 17

17
INSTALLATION ET UTILISATION DES CORDONS
Votre Now Cam comprend trois cordons pratiques qui permettent de garantir
qu’il reste avec vous lors de vos aventures. Installation des cordons est facilevoici comment:
1. Insérez l’extrémité mince du cordon dans le trou dans votre Now Cam qui
est juste au-dessus de l’aimant de montage. Tirez jusqu’à ce que la pince
amovible sur le cordon touche le trou.
2. Enroulez le cordon sur le trou et placez-le jusqu’à la fin mince que vous
venez nourri à travers le trou.
3. Retirez le cordon complètement à travers l’extrémité mince jusqu’à la fin
mince resserre sur lui-même.
4. Passez votre main à travers le cordon pour plus de sécurité lors de vos activités.
EFFACEMENT DU CONTENU DE VOTRE NOW CAM
MONTAGE DE VOTRE NOW CAM
Si jamais vous souhaitez effacer la mémoire de votre Now Cam complètement
propre, vous pouvez le faire via l’application. Remarque, cela supprime
définitivement toutes les données stockées sur votre Now Cam et tous les
fichiers perdus ne peuvent pas être récupéré. Seulement effacer le contenu de
votre Now Cam après avoir transféré des fichiers que vous souhaitez conserver.
1. Vérifiez que votre Now Cam est allumé.
2. Connectez votre caméra à Wi-Fi comme décrit ci-dessus.
3. Sélectionnez l’icône d’engrenage dans l’application.
4. Sélectionnez «Supprimer toutes les photos / vidéos du Now Cam” sous la
section Effacer, puis sélectionnez Effacer.
5. L’application affiche un message indiquant que tout le contenu a été effacé.
Votre Now Cam est livré avec un aimant puissant de montage. Il suffit de placer
l’aimant sur une surface métallique, suivez les instructions «Capture des vidéos en
continue”, et prendre des impressionnants photos d’action. L’aimant de montage
fonctionne également parfaitement avec le Now Cam Mount (vendu séparément)
et permet de connecter votre Now Cam pratiquement partout une brise.
Page 18

18
Pour joindre un représentant du service à la clientèle entraîné, s’il vous plaît utiliser une des méthodes suivantes:
ZAGG.com/support/contact.php | questions@zagg.com
1-800-700-ZAGG [9244] | 00-1-801-839-3906 pour les clients internationaux
Pour protection contre les rayures inégalées pour votre appareil mobile, nous recommandons
l’InvisibleShield® de Zagg.
© 2016 ZAGG Inc Tous droits réservés | NASDAQ : ZAGG | FABRIQUÉ EN CHINE
Bluetooth® est une marque déposée de Bluetooth SIG, Inc.
ZAGG®, Now Cam ™, et InvisibleShield®, sont des marques ou des marques déposées de ZAGG Inc.
DÉCLARATION DU FCC
Cet appareil est conforme à la partie 15 des règles de la FCC. Son fonctionnement est soumis aux deux
conditions suivantes : (1) Cet appareil ne peut pas causer des interférences nuisibles, et (2) cet appareil doit
accepter toute interférence reçue, y compris les interférences qui peuvent provoquer un fonctionnement
indésirable.
Cet équipement a été testé et trouvé conforme aux limites pour un appareil numérique de classe B,
conformément à la partie 15 des règles de la FCC. Ces limites sont conçues pour fournir une protection
raisonnable contre les interférences nuisibles dans une installation résidentielle. Cet équipement génère,
utilise et peut émettre une énergie de radiofréquence et, s’il n’est pas installé et utilisé conformément aux
instructions, peut causer des interférences nuisibles aux communications radio. Cependant, il n’existe aucune
garantie que des interférences ne se produiront pas dans une installation particulière. Si cet équipement
provoque des interférences nuisibles à la réception radio ou télévision, ce qui peut être déterminé en mettant
l’équipement sous tension et hors tension, l’utilisateur est encouragé à essayer de corriger l’interférence par
une ou plusieurs des mesures suivantes:
• Réorienter ou déplacer l’antenne de réception.
• Augmenter la distance entre l’équipement et le récepteur.
• Connecter l’équipement à une sortie sur un circuit différent de celui sur lequel le récepteur est branché.
• Consulter le revendeur ou un technicien radio/TV expérimenté pour de l’aide supplémentaire.
FCC Mise en Garde : Les changements ou modifications non expressément approuvés par la partie
responsable de la conformité pourraient annuler l’autorité de l’utilisateur à utiliser l’équipement.
Cet émetteur ne doit pas être co-localisées ou opérant en conjonction avec tout autre antenne ou émetteur.
Le produit conforme à la limite d’exposition RF portable FCC établies pour un environnement non contrôlé et
sont sans danger pour le fonctionnement prévu, comme décrit dans ce manuel. La poursuite de la réduction
de l’exposition RF peut être obtenu si le produit peut être maintenu autant que possible à partir du corps de
l’utilisateur ou que l’appareil pour abaisser la puissance de sortie si cette fonction est disponible.
Page 19

19
Now Cam
TM
Instrucciones
REGISTRO DE GARANTÍA
El ZAGG Now Cam™ viene con un año de garantía de fábrica. Para activar la garantía, debes registrar el
Now Cam así como conservar el comprobante de compra. Si compraste el Now Cam desde ZAGG.com,
ZAGG ya lo ha registrado y tiene copia de tu comprobante de compra.
SI NECESITAS AYUDA, POR FAVOR VISITA NUESTRA SECCIÓN DE PREGUNTAS FRECUENTES EN: www.zagg.com/faq
Page 20

20
INTRODUCCIÓN
Bienvenido a tu siguiente aventura. El ZAGG Now Cam te proporciona una
manera sencilla de capturar tus recuerdos sin el riesgo de rayar o perder el
teléfono. Escucha música, responde a llamadas en modo manos libres, graba
vídeos o saca fotos mientras estás con tus amigos y capta momentos que durarán
toda la vida. Las siguientes instrucciones te mostrarán cómo sacar el máximo
partido a tu Now Cam, guárdalas para futuras consultas.
Encendido/
control del altavoz
Dial de la
cámara
Montura magnética
Botón de encendido/
disparador de la cámara
Puerto de carga
Page 21

21
UTILIZACIÓN DEL ALTAVOZ
Encendido y Conexión
Conectar el Now Cam es fácil y solamente necesita hacerse una vez, después
el Now Cam se conectará de forma automática a tus dispositivos cuando lo
enciendas. El Now Cam recuerda varios dispositivos y no necesita conectarse
para que la cámara funcione, la conexión es sólo para la música.
1. Para encender el Now Cam, mantén pulsado el botón de Encendido/Control del
Altavoz durante tres segundos. Un tono te avisará y el LED situado al lado de la
cámara parpadeará en rojo para indicar que está encendido.
2. La primera vez que enciendas el altavoz Now Cam, se pondrá automáticamente
en modo conexión. Esto se indicará mediante el LED parpadeando en color rojo
y luego en azul cada segundo. Para conectar el Now Cam con varios dispositivos,
mantén pulsado el botón de encendido del altavoz durante cinco segundos
cuando lo enciendas para hacerlo entrar en modo conexión.
3. Accede a los ajustes de Bluetooth® de tu dispositivo y asegúrate que el
Bluetooth está activado.
4. El menú Bluetooth de tu dispositivo mostrará “ZAGG Now Cam” como
disponible para conectarse. Selecciona esta opción y completa cualquier paso
adicional de conexión dependiendo del dispositivo que tengas. Otro tono te
indicará que se ha conectado y el LED parpadeará en azul cada siete segundos
mientras esté conectado.
a. Si la conexión no se realiza tras 60 segundos, el altavoz Now Cam
dejará de buscar dispositivos a los que conectarse y los LED dejarán
de parpadear. Cuando esté conectado, sonará un tono si la conexión
Bluetooth se pierde por algún motivo. Si eso sucede, el Now Cam
empezará a buscar un dispositivo al que conectarse automáticamente
y seguirá buscando durante 60 segundos. Si no encuentra un
dispositivo, los LED dejarán de parpadear y la función Bluetooth
se apagará, aunque la cámara seguirá funcionando. Para iniciar el
proceso de conexión nuevamente, apaga y vuelve a encender el
altavoz Now Cam. Si lo estás conectando a un segundo dispositivo,
mantén pulsado el botón de encendido del altavoz durante cinco
segundos tal y como describimos anteriormente.
5. Cuando quieras apagar el altavoz Now Cam, mantén pulsado el botón de
Encendido/Control durante tres segundos. Sonará un tono a la vez que el LED
parpadeará en rojo para indicar que el altavoz se ha apagado. Nota: El altavoz
Now Cam se apagará de forma automática si permanece inactivo durante 15
minutos. La cámara se apagará automáticamente si permanece en reposo
durante cinco minutos.
Page 22

22
REPRODUCIR MÚSICA
RESPONDER LLAMADAS
UTILIZACIÓN DE LA CÁMARA
Una vez esté conectado, el Cam Now está listo para reproducir música de forma
portátil dondequiera que vayas. Aquí mostramos cómo controlar la música:
1. Sigue las instrucciones de conexión descritas anteriormente.
2. Selecciona una lista de reproducción en tu dispositivo.
3. Pulsa el botón de Reproducción en el Now Cam.
a. Pulsa el botón de Reproducción de nuevo para detener o reanudar la reproducción.
b. Pulsa el botón de Reproducción dos veces rápidamente para avanzar hacia
adelante en la lista de reproducción seleccionada. Nota: El altavoz Now Cam
entrará en modo reposo si no reproduce nada durante 60 segundos. El LED
seguirá parpadeando en azul para indicar que todavía está conectado.
Vuelve a reproducir música para activarlo.
El Now Cam lleva un micrófono integrado que te permite usarlo como un teléfono
manos libres. Si estás escuchando música, la música se detendrá cuando entre una
llamada y continuará de forma automática cuando termines. Aquí mostramos cómo
hablar mientras lo utilizas:
1. Pulsa el botón de Reproducción una vez para responder a una llamada entrante.
2. Pulsa el botón de Reproducción de nuevo para finalizar la llamada. Si
estabas escuchando música cuando recibiste la llamada, la música se
detendrá y volverá a sonar automáticamente cuando la llamada termine.
El Now Cam tiene 4GB de almacenamiento integrado, eso es suficiente como para
guardar hasta 1600 fotografías en HD® o 30 minutos de vídeo. Transferir las fotos
y los vídeos es muy sencillo y solamente llevará unos segundos, dejándote más
tiempo para divertirte. Lee a continuación las instrucciones para usar la cámara.
DESCARGA LA APLICACIÓN
Para que la cámara Now Cam pueda transferir archivos a tu dispositivo, necesitarás
descargar su aplicación. Puedes encontrarla buscando “ZAGG Now Cam” en el
App Store o en Google Play. Sigue el proceso de descarga de la aplicación para
tu dispositivo y listo.
Page 23

23
HACER FOTOGRAFÍAS
GRABAR VÍDEO EN MODO RÁFAGA
Hacer fotos con tu cámara Now Cam es tan sencillo como apuntar y disparar.
Aquí está cómo hacerlo:
1. Asegúrate de que la cámara Now Cam está encendida manteniendo
pulsado el botón de Encendido / Disparador de la cámara durante tres
segundos. Sonará un tono y el LED situado al lado de la lente de la
cámara se encenderá en color rojo para indicar que está encendido.
2. Gira el dial de la cámara para que el icono de la cámara quede alineado
con el núcleo de selección rojo.
3. Pulsa el botón del disparador una vez.
4. Cada vez que saques una foto, sonará un clic y el LED que hay al lado
de la montura magnética parpadeará en rojo una vez. Nota: Si estás
reproduciendo música mientras sacas fotografías, la música se parará
durante el clic del disparador y se reanudará automáticamente. Esto
sucede para verificar que la foto se ha sacado.
El Now Cam puede capturar vídeos cortos de seis segundos, perfectos para
compartir los buenos momentos en las redes sociales. Recuerda, el Now Cam
no necesita estar conectado a través de Bluetooth para que la cámara funcione.
Aquí mostramos cómo grabar esos clips:
1. Asegúrate que la cámara Now Cam está encendida tal y como
describimos anteriormente.
2. Gira el dial de la cámara para que el icono 6s quede alineado con el núcleo
de selección rojo.
3. Pulsa el botón del disparador una vez.
4. Un tono indicará que la cámara está preparada y grabando. Si estabas
reproduciendo música cuando empezaste a grabar, la música se detendrá
hasta que la grabación termine y se reanudará automáticamente.
5. Mientras grabes, el LED situado al lado de la lente de la cámara
parpadeará en rojo cada segundo. El Now Cam dejará de grabar de
forma automática tras seis segundos o también puedes detener la
grabación manualmente pulsando el botón del disparador otra vez.
Page 24

24
GRABAR VÍDEO EN MODO CONTINUO
Para cuando necesitas más que una fotografía o más de seis segundos de
grabación, el Now Cam está preparado para grabar hasta 30 minutos de vídeo
seguidos. Recuerda, el Now Cam no necesita estar conectado a través de
Bluetooth para que la cámara funcione. Sigue leyendo para ver cómo se hace.
1. Asegúrate de que el Now Cam está encendido tal y como describimos anteriormente.
2. Gira el dial de la cámara para que el icono de vídeo quede alineado con el
núcleo de selección rojo.
3. Pulsa el botón del disparador una vez.
4. Un tono indicará que la cámara está preparada y grabando. Si estabas
reproduciendo música cuando empezaste a grabar, la música se detendrá
hasta que la grabación termine y se reanudará automáticamente.
5. Mientras grabes, el LED situado al lado de la lente de la cámara parpadeará en
rojo cada segundo. Para dejar de grabar, pulsa el botón del disparador otra vez.
TRANSFERIR DATOS A TRAVÉS DE WI-FI
Cuando hayas capturado algunas fotos o vídeos increíbles, pasarlos a tu
dispositivo móvil es muy sencillo. A continuación mostramos lo fácil que es:
1. Asegúrate que la cámara Now Cam está encendida.
2. Gira el dial de la cámara para que el icono de descarga quede alineado
con el núcleo de selección rojo.
3. Abre los ajustes Wi-Fi de tu dispositivo y selecciona “ZAGG Now Cam”.
4. Abre la aplicación ZAGG Now Cam en tu dispositivo.
5. Abre el Carrete de la Cámara de la aplicación.
6. Selecciona qué fotos y vídeos te gustaría transferir tocándolos. Aparecerá
una casilla de verificación en las fotos y vídeos marcados.
7. Toca el icono de descarga de la aplicación. Los archivos seleccionados
empezarán a transferirse al carrete de la cámara de tu teléfono. Nota: Las fotos
y vídeos que hayas sacado con el Now Cam sólo se verán en el dispositivo
cuando el dial de la cámara se gire al icono de descarga y el Now Cam esté
conectado a tu dispositivo a través de Wi-Fi. Además, la transferencia Wi-Fi
está concebida inicialmente para imágenes y vídeos cortos. Recomendamos
usar el cable micro USB que trae para transferir archivos grandes.
Page 25

25
INSTRUCCIONES GENERALES
Carga
El Now Cam está listo para ofrecer horas de música, fotos y vídeo*. Te avisará
cuando la batería alcance el 20% de su capacidad. Recargarlo es rápido y fácil.
Aquí mostramos cómo:
1. El LED situado al lado de la montura magnética parpadeará en color rojo
cada siete segundos cuando la batería recargable del Now Cam alcance el
20% de capacidad restante.
2. Levanta la tapa situada entre el dial de la cámara y el botón de encendido
para dejar expuesto el puerto micro USB.
3. Conecta el cable micro USB que trae a dicho puerto.
4. Conecta el extremo del USB a la toma USB que prefieras. El LED se
encenderá en color rojo mientras se carga.
5. Cuando la luz LED se apague, el Now Cam estará completamente cargado.
Quita el cable de carga y sigue con tus actividades.
*Las horas de uso varían dependiendo del tiempo de reproducción de la música y del tiempo de grabación. La
grabación necesita más energía y consumirá la batería del Now Cam más rápido.
TRANSFERIR DATOS A TRAVÉS DE MICRO USB
También puedes pasar tus fotos y vídeos de forma rápida y sencilla directamente
a tu ordenador utilizando el cable micro USB que trae el Now Cam. Aquí se
muestra cómo:
1. Conecta el cable micro USB a tu Now Cam levantando la tapa situada al
lado del dial de la cámara.
2. Conecta el extremo USB del cable a tu ordenador. La cámara se encenderá
automáticamente.
3. Tu ordenador reconocerá el Now Cam como un nuevo dispositivo. Copia y
pega los archivos donde prefieras o simplemente arrástralos y suéltalos.
4. Cuando se hayan transferido los archivos, el LED parpadeará en color rojo
cada dos segundos para indicar que el Now Cam está cargándose.
5. Quita el cable cuando quieras y sigue disfrutando de tu dispositivo.
INSTALAR Y USAR LAS CORREAS
El Now Cam incluye tres prácticas correas que ayudan a que el dispositivo te
acompañe durante tus actividades. Instalar las correas es muy sencillo, aquí
mostramos cómo hacerlo:
Page 26

26
BORRAR CONTENIDO DEL NOW CAM
MONTAR EL NOW CAM
Si alguna vez quieres borrar la memoria del Now Cam puedes hacerlo a través
de la aplicación. No olvides que esta acción borra de forma permanente todos
los datos guardados en el Now Cam y que no podrán recuperarse. Borra
únicamente el contenido del Now Cam cuando hayas transferido los archivos
que quieres guardar.
1. Asegúrate que el Now Cam está encendido.
2. Conecta la cámara a través de Wi-Fi tal y como describimos
anteriormente.
3. Selecciona el icono de equipo en la aplicación.
4. Selecciona “Quitar todas las fotos/vídeos del Now Cam” debajo de la
sección de Borrar y luego selecciona Borrar.
5. La aplicación mostrará un mensaje cuando todo el contenido haya sido borrado.
El Now Cam trae una potente montura magnética. Simplemente coloca el imán
en una superficie de metal, sigue las instrucciones de “Grabar Vídeo en Modo
Continuo” y captura momentos increíbles. La montura magnética también sirve
para el Soporte Now Cam (se vende por separado) y hace que puedas colocar el
Now Cam casi en cualquier parte de forma muy sencilla.
1. Pasa el extremo fino de la correa por el orificio del Now Cam que está
justo encima de la montura magnética. Tira hasta que el clip extraíble de
la correa toque el orificio.
2. Enrolla la correa hacia arriba y sobre el orificio y colócala a través del
extremo fino que acabas de pasar por el orificio.
3. Tira de la correa completamente a través del extremo fino hasta que
quede apretado.
4. Pasa la mano por la correa para mayor seguridad durante tus actividades.
Page 27

27
Para ponerte en contacto con un representante del Servicio de Atención al Cliente, por favor utiliza uno de los
siguientes medios:
ZAGG.com/support/contact.php | questions@zagg.com
1-800-700-ZAGG [9244] | 00-1-801-839-3906 para clientes internacionales
Para conseguir una protección inigualable del dispositivo, recomendamos ZAGG’S InvisibleShield®.
©2016 ZAGG Inc Todos los derechos reservados | NASDAQ: ZAGG | FABRICADO EN CHINA
Bluetooth® es una marca registrada de Bluetooth SIG, Inc.
ZAGG®, Now Cam™ e InvisibleShield® son nombres comerciales o marcas registradas de ZAGG Inc.
DECLARACIÓN FCC
Este dispositivo cumple con la Parte 15 de la Normativa de la FCC. Su funcionamiento está sujeto a las dos
condiciones siguientes: (1) Este dispositivo no puede producir interferencias dañinas, y (2) el dispositivo debe
admitir las interferencias recibidas, incluso interferencias que causen un funcionamiento no deseado.
Este equipo ha sido sometido a prueba y cumple con las limitaciones impuestas a los dispositivos digitales
de Clase B, de conformidad con la Parte 15 de la Normativa FCC. Dichas limitaciones se han concebido
como medida de protección eficaz contra las interferencias dañinas en instalaciones domésticas. Este
equipo genera, utiliza y puede emitir energía de radiofrecuencia y, si no se instala y utiliza de acuerdo a las
instrucciones, podría provocar interferencias dañinas a las radiocomunicaciones. No obstante, no se puede
garantizar que no ocurran interferencias en algunas instalaciones. Si este equipo ocasiona interferencias
perjudiciales en la recepción de radio o televisión, que pueden comprobarse encendiendo y apagando el
equipo, se recomienda al usuario que intente corregir dicha interferencia mediante una de las siguientes
acciones:
• Cambia la orientación o la posición de la antena receptora.
• Aumenta la separación entre el equipo y el receptor.
• Conecta el equipo a una toma o circuito diferente al del receptor.
• Ponte en contacto con el distribuidor o con un técnico de radio y televisión.
Precaución de la FCC: Cualquier cambio o modificación no autorizados de forma expresa por la parte
responsable de su cumplimiento podría anular el derecho del usuario a utilizar el equipo.
Este transmisor no debe colocarse ni utilizarse junto a ninguna otra antena o transmisor.
El producto cumple con la Normativa de la FCC sobre el límite de exposición a radiofrecuencias establecido
para un entorno no controlado y es seguro para utilizarse tal y como se describe en este manual. Se puede
lograr una mayor reducción de la exposición a radiofrecuencias si se mantiene el producto lo más alejado
posible del usuario o si se fija la potencia de salida a un nivel más bajo siempre y cuando dicha función esté
disponible.
 Loading...