

Page 1

Keyboard Instructions
Folio
Ellipsis 10
*WARRANTY REGISTRATION
Your ZAGG Folio™ comes with a one-year manufacturer’s warranty. In order to activate
the warranty, you must register your Folio as well as keep your purchase receipt. If you
purchased your Folio from zagg.com, ZAGG has already registered it and has a copy of
your proof of purchase.
NEED MORE HELP? PLEASE SEE OUR FAQ SECTION AT: www.zagg.com/faq
See the important health and safety information on page 7 before using this product.
Page 2
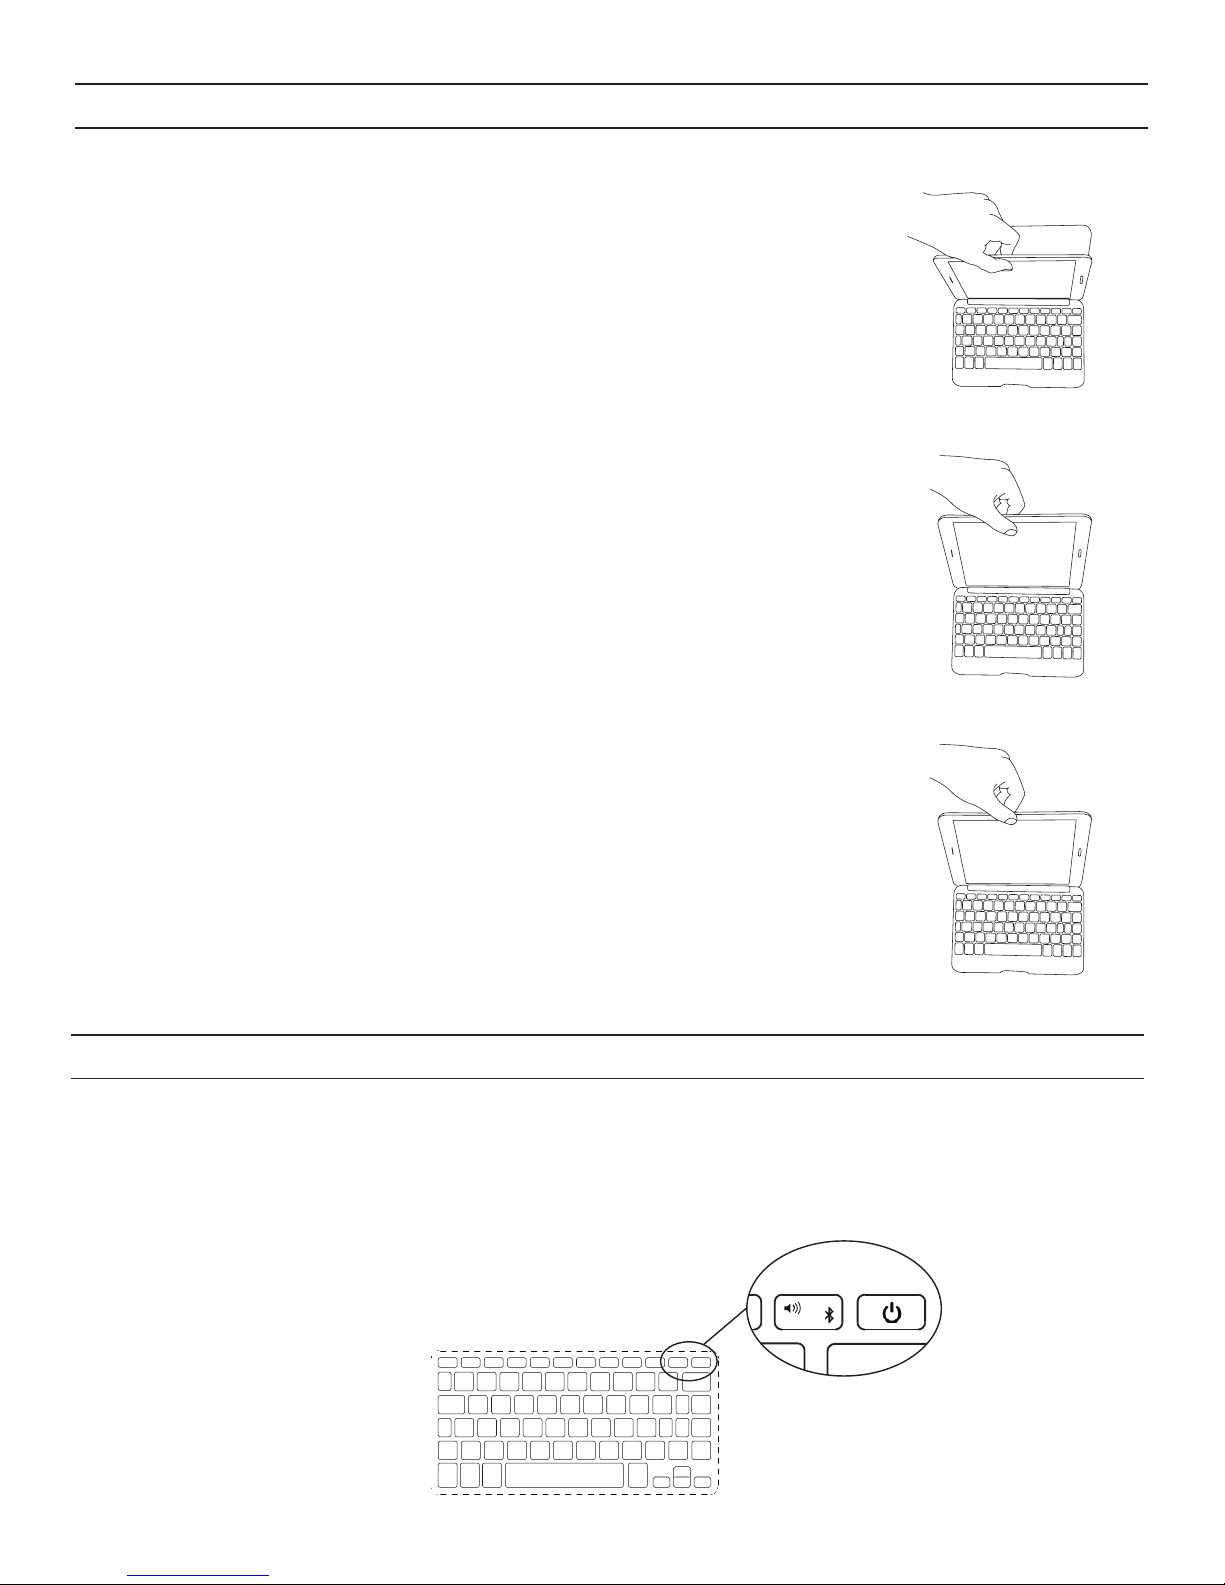
INSERTING/REMOVING YOUR Ellipsis™ 10
To insert your Ellipsis 10 into the Folio, start with the Folio’s
keyboard facing you. Then, with your tablet in landscape mode
and the volume control buttons facing up, set the bottom
half of your tablet in the cover (you may need to apply light
pressure to your tablet to ensure it is settled at the bottom of
the cover).
Next, snap the top half into the cover. Check all corners to
make sure they have seated properly.
To easily remove your tablet, grasp the top of the Folio’s cover
in the middle and apply a light pressure to the back of your
tablet. Grasp your tablet’s exposed side and lift/pull away from
the Folio.
1
POWERING ON AND OFF
To turn your Folio on, press the Power key. The green Power key LED will
illuminate briefly while the keyboard powers up. To turn your Folio o, press
and hold the Power key for two seconds; a red LED will light indicating your
Folio has powered o.
Page 3

PAIRING YOUR ZAGG Folio
Pairing your Folio with your tablet is easy. It should only need to be paired once
using the following directions. If the connection between your tablet and Folio is
ever lost, repeat these steps.
1. Ensure your tablet’s Bluetooth® settings are on.
2. Press the Bluetooth key on your Folio keyboard. A
blue LED under the Power key will flash until your
Folio and tablet are paired.
3. Your tablet will display the keyboard serial
number as an available device. Select this
option to complete pairing. Once paired, your
tablet will display “ZAGG Folio” in place of the
serial number.
CHARGING
Your Folio features a powerful lithium polymer battery that lasts for up to one
year of normal use between charges*. It comes with a charging cable you can use
to charge your keyboard quickly and conveniently. To charge your Folio, follow
these steps:
1. Plug the micro USB connector into the charging port.
2. Plug the regular USB connector into any 5V USB outlet.
3. The red Power key will illuminate to indicate your Folio is charging. Wait until
this light turns o, indicating a full charge. It usually takes two to four hours
to completely charge your Folio.
4. Remove the micro USB connector and enjoy your Folio for up to one year
before you need to charge it again.
5. If at any point your Folio begins to perform strangely, reset it’s system by
charging it.
* Normal use is approximately one hour of
use per day without the backlit feature.
Using the backlit feature will impact battery
life and will require more frequent charging.
CHARGING PORT
2
Page 4

BATTERY LIFE
As mentioned, the Folio features a powerful, rechargeable battery that lasts
up to one year between charges. To check your Folio’s remaining battery
power, press fn + battery key. The LED indicator will flash one of three ways.
1. Three green flashes indicate a full battery.
2. Three yellow flashes indicate a low battery.
3. Three red flashes indicate a critically low battery. When your Folio reaches critical
battery level, the red light will flash once every five minutes.
To help preserve battery life, your Folio will enter sleep mode if left on and
not used for several minutes. To awaken your Folio, press any key. The Folio’s
battery has no memory and may be charged whenever you wish.
3
SPECIAL FUNCTION KEYS
Your Folio keyboard has been designed with the following special
function keys to give you more control of your tablet:
HOME – Displays your Ellipsis 10’s home screen.
RETURN – Undoes the last operation.
LOCK – Activates and deactivates your Ellipsis 10’s sleep mode.
PREVIOUS TRACK – Skips to the previous track on your current playlist.
PLAY/PAUSE – Plays or pauses your current playlist.
NEXT TRACK – Skips to the next track on your current playlist.
VOLUME DOWN – Decreases your Ellipsis 10’s volume.
VOLUME UP – Increases your Ellipsis 10’s volume.
POWER – Turns your keyboard on and o.
MENU – Accesses your app settings.
INTERNET – Opens Google Chrome™ or your default internet browser.
CALENDAR – Opens Google Calendar™.
fn + SEARCH – Opens Google’s search function.
fn + BLUETOOTH PAIRING – Press to begin pairing your tablet and Folio.
internet
Page 5

fn + DELETE – Delete to the right of your cursor.
fn + TAB – Activates the Caps Lock feature. To turn Caps Lock o, press fn +
Tab again.
fn + CUT – Removes selected text and temporarily stores it in your clipboard.
fn + COPY – Copies selected text to your clipboard.
fn + PASTE – Pastes clipboard content in your selected area or field.
fn + BACKLIGHT SYMBOL (Backlit keyboards only) –
Activates your Folio’s
backlight feature. Pressing this key once will turn on the backlights at their
dimmest setting, pressing it twice will brighten the lights, and pressing it three
times will brighten them to their brightest setting. If you continue to press the
backlight key your Folio will cycle down through brightness settings, turn o,
then cycle back up through brightness settings.
NOTE: The backlights will automatically turn o after sixty seconds if not being used. Begin typing again to activate them.
fn + BACKLIGHT COLOR OPTIONS – Hold the backlight key and press the
right arrow/color change symbol to select your preferred backlight color.
Press repeatedly to cycle through available colors.
NOTE: The backlight feature must be turned on in order to select your preferred color.
fn + BATTERY SYMBOL – Indicates remaining battery life.
fn + WORLD SYMBOL –
Toggles between international keyboards (when
activated in your Ellipsis 10’s settings).
EMAIL – Opens Gmail™.
forward
delete
tab
TROUBLESHOOTING
If your Ellipsis 10 does not respond to your Folio there may be a simple
explanation such as a dead battery or an unsuccessful pairing. Please use
the following to help troubleshoot your situation. If none of the following
solve your issue, then please contact ZAGG Customer Service and one of
our trained professionals will be happy to assist you.
1. Restart your tablet by holding down the Power button until a window
appears that allows you to restart your tablet.
2. Turn your Folio o and back on. You should see the LED illuminate
briefly; if not, charge your Folio.
3. After charging, turn your Folio on. If the LED does not illuminate,
and your keyboard doesn’t operate correctly, please contact ZAGG’s
4
Page 6

5
customer service.
4. If your Folio can’t establish or maintain a Bluetooth connection, reset
the Bluetooth module by charging your keyboard.
5. Forget and re-pair your Folio. On your tablet, select: SETTINGS >
BLUETOOTH > ON. If you see “ZAGG Folio” listed as an available
device, touch the gear icon to the right of it and choose to have your
tablet forget the device.
6. Press Scan on your tablet and the Bluetooth key on your Folio and
watch for the LED to flash blue.
7. Your tablet should display the keyboard serial number as an available
device. Select it.
8. If your tablet gives you an error message or doesn’t connect, repeat the
pairing process.
For more help please see our FAQ section at: www.zagg.com/faq
To reach a trained customer service representative, please use one of the following:
zagg.com/support/contact.php | questions@zagg.com
1-800-700-ZAGG [9244] | 00-1-801-839-3906 for international customers
For unparalleled scratch protection for your Ellipsis 10, we recommend ZAGG’s InvisibleShield®.
©2016 ZAGG Inc All Rights Reserved.
PATENT PENDING | NASDAQ: ZAGG | MADE IN CHINA
Ellipsis™ is a trademark of Verizon Wireless.
Google Chrome™, Gmail™, and Google Calendar™ are trademarks of Google, Inc.
The Bluetooth® word mark and logos are registered trademarks owned by Bluetooth SIG, Inc. and
any use of such marks by ZAGG Inc is under license. Other trademarks and trade names are those
of their respective owners.
ZAGG®, InvisibleShield®, and ZAGG Folio™ are trademarks or registered trademarks of ZAGG Inc.
Page 7

Federal Communication Commission Interference Statement
This device complies with Part 15 of the FCC Rules. Operation is subject to the following two
conditions: (1) This device may not cause harmful interference, and (2) this device must accept any
interference received, including interference that may cause undesired operation.
This equipment has been tested and found to comply with the limits for a Class B digital device,
pursuant to Part 15 of the FCC Rules. These limits are designed to provide reasonable protection
against harmful interference in a residential installation. This equipment generates, uses and can
radiate radio frequency energy and, if not installed and used in accordance with the instructions,
may cause harmful interference to radio communications. However, there is no guarantee that
interference will not occur in a particular installation. If this equipment does cause harmful
interference to radio or television reception, which can be determined by turning the equipment
o and on, the user is encouraged to try to correct the interference by one of the following
measures:
• Reorient or relocate the receiving antenna.
• Increase the separation between the equipment and receiver.
• Connect the equipment into an outlet on a circuit dierent from that to which the receiver is
connected.
• Consult the dealer or an experienced radio/TV technician for help.
FCC Caution: Any changes or modifications not expressly approved by the party responsible for
compliance could void the user’s authority to operate this equipment.
This transmitter must not be co-located or operating in conjunction with any other antenna or
transmitter.
This product complies with the FCC portable RF exposure limit set forth for an uncontrolled
environment and is safe for intended operation as described in this manual. The further RF
exposure reduction can be achieved if the product can be kept as far as possible from the user
body or set the device to lower output power if such function is available.
6
Page 8

1. Health warning: Take frequent breaks when using your keyboard. If you
experience any discomfort, pain, tingling, numbness, or burning in your
neck, shoulders, arms, wrists, hands, or any other part of the body, stop
using your keyboard and consult a physician.
2. Use only micro USB chargers in connection with your keyboard.
3. Do not attempt to service your keyboard.
4. Do not disassemble or attempt to disassemble your keyboard.
5. Do not crush or puncture your keyboard.
6. Do not immerse your keyboard in water.
7. Do not put your keyboard in contact with water or other liquids as they
could cause a short circuit, fire, or electric shock which could result in
serious injury, death, or property damage.
8. Do not use liquid, or aerosol cleaners, or solvents on or near your keyboard.
Clean only with a soft, dry cloth. Disconnect any cords before cleaning the
keyboard.
9. Do not use your keyboard while operating a motorized vehicle, including
automobile, boat, or airplane. Doing so could put you and others at risk of
serious injury, death, or property damage.
10. Do not use or place your keyboard near any heat sources including, but not
limited to, radiators, heat registers, stoves, other appliances, campfires, or
barbeque grills.
11. To reduce the risk of fire or electric shock, wire or connect your keyboard
to products only in the manner instructed in the documentation supplied
herewith. Do not attempt to modify or adjust any ports. Any improper
connections or adjustments may cause damage.
12. When you are ready to discard your keyboard, recycle your keyboard
in a manner consistent with electronic recycling requirements or
recommendations in your geographic area.
Please read the precautions and operation information before using your keyboard
or any accessories that accompany it. Retain this information for future use.
7
 Loading...