

Page 1

Keyboard Instructions
*WARRANTY REGISTRATION
Your ZAGG® Auto-Fit keyboard comes with a one-year manufacturer’s warranty. In order
to activate the warranty, you must register your Auto-Fit as well as keep your purchase
receipt. If you purchased your ZAGG Auto-Fit from ZAGG.com, ZAGG® has already
registered it and has a copy of your proof of purchase.
NEED MORE HELP? PLEASE SEE OUR FAQ SECTION AT: www.ZAGG.com/faq
auto-fit
7”, 8,” & 10”
Page 2

INTRODUCTION
INSERTING/REMOVING YOUR TABLET
Your ZAGG Auto-Fit Bluetooth® keyboard features a unique spring-loaded
cover that allows it to work with small-form tablets that use Android ™
and Windows® operating systems. Simply press your tablet into the cover
and the springs automatically adjust to secure it. Now you can use one
convenient Bluetooth keyboard for all your tablet needs.
To insert your tablet into the Auto-Fit, start with the
keyboard facing you.
Then, with your tablet in landscape mode, press it into
the bottom of the spring-loaded cover. Lay your tablet
against the back of the cover and let the springs push it
to the top, securing the tablet in place.
- For larger tablets, you may have to press lightly to
get your tablet to snap into place.
When your tablet is secure, you can close the Auto-Fit
to protect it and your keyboard.
To easily remove your tablet, simply press it down into
the springs on the bottom of the cover until you have
enough space to lift it out of the cover.
- For larger tablets, press down on the tablet
as described but then use your thumbs on the
corners to separate your tablet from the Auto-Fit.
2
Page 3

3
USING THE KICKSTAND: APPLIES TO 7” VERSION ONLY
POWERING ON AND OFF
The Auto-Fit features a convenient kickstand for
added security. To use the kickstand, simply lift it
out from the back of the Auto-Fit’s cover.
When you’re done using the kickstand, press it back
into the Auto-Fit. A magnet will secure the kickstand in
place until you are ready to use it again.
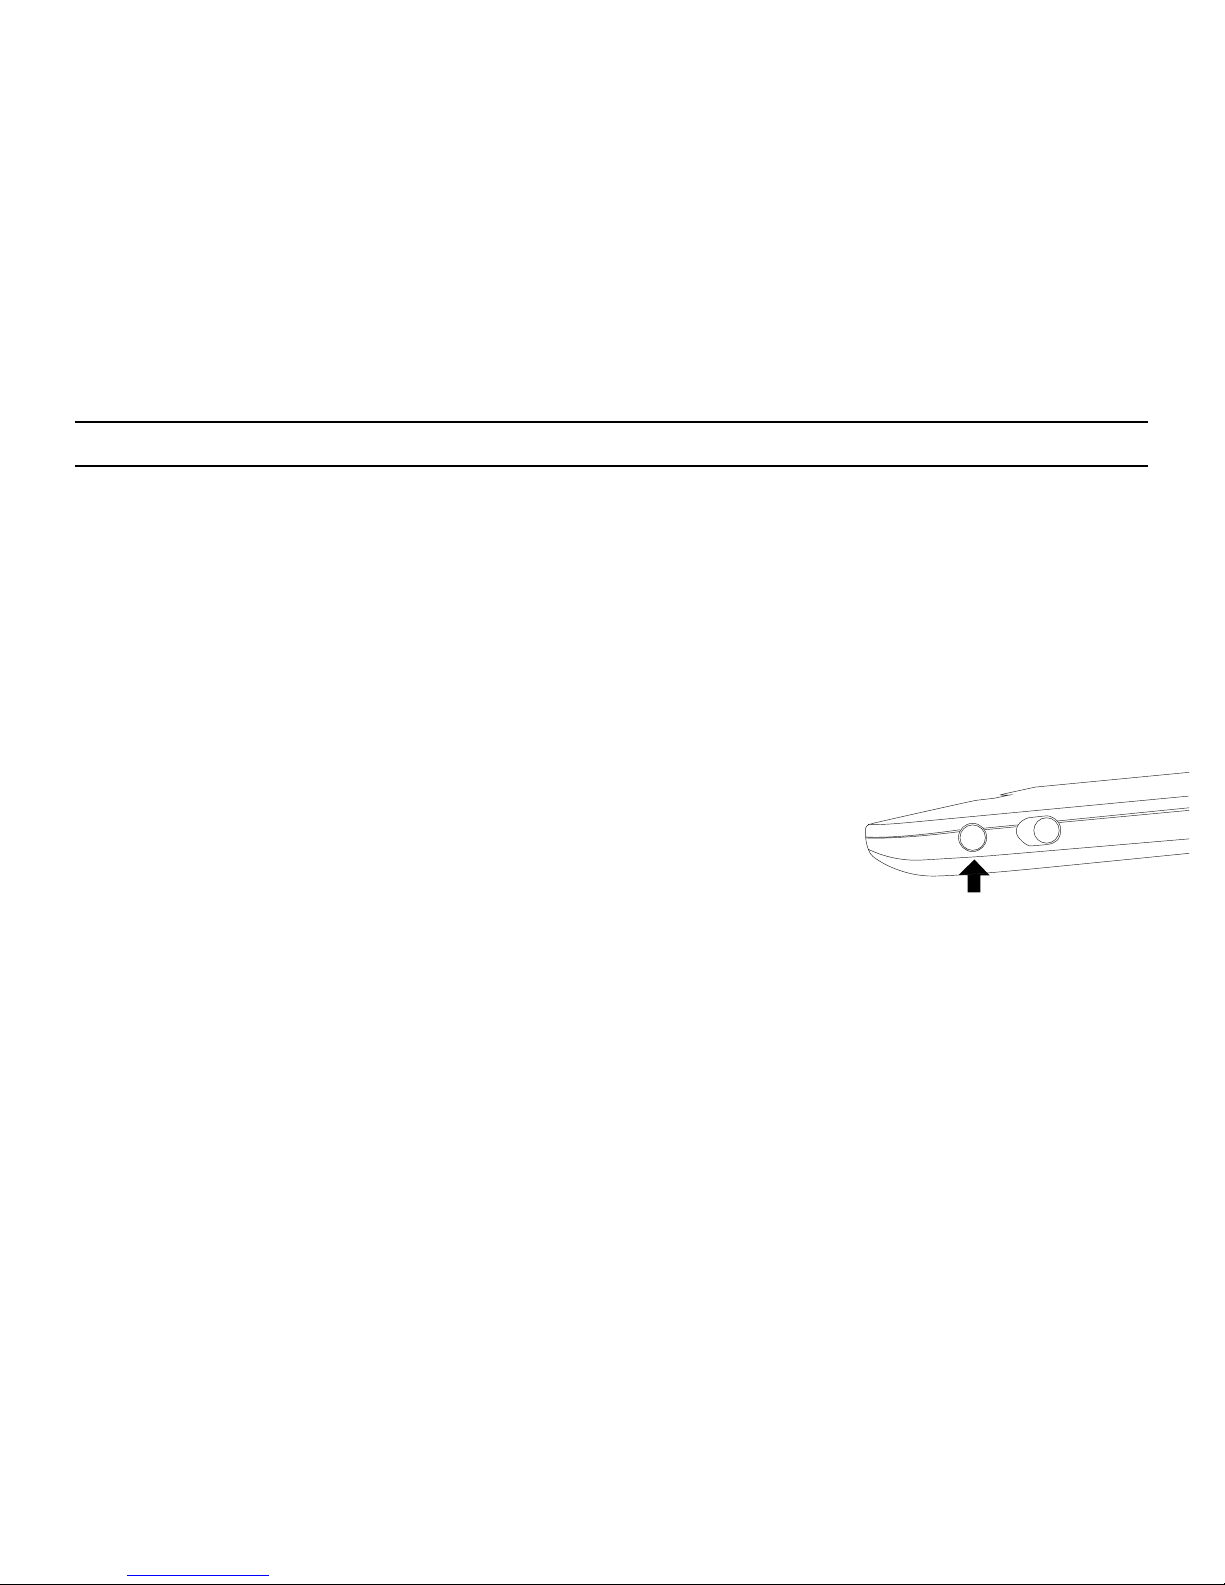
To turn your Auto-Fit on, move the POWER
switch to the ON position. A blue LED will
illuminate briefly while the keyboard powers
on. To turn your Auto-Fit o, slide the POWER
switch to the OFF position.
On
O
SELECTING YOUR OPERATING SYSTEM
The ZAGG Auto-Fit works with both Android and Windows operating
systems and can easily alternate between the two. You must select the
correct operating system before your Auto-Fit will pair with your device. To
choose the appropriate operating system, follow the instructions below. The
default keyboard operating system is Android, so if you have an Android
tablet proceed to “Pairing Your ZAGG Auto-Fit”.
FOR WINDOWS
1. Make sure your Auto-Fit keyboard is turned on.
2. Press the PAIR button (a blue LED on the right of the keyboard will
begin flashing).
3. While the blue LED is flashing, press fn + W.
4. Continue the pairing process as described in the “Pairing Your ZAGG
Auto-Fit” section.
Page 4

PAIRING YOUR ZAGG Auto-Fit
With your operating system selected, you are now ready to pair your Auto-Fit
keyboard to your device. Pairing your Auto-Fit with your tablet is easy; it should
only need to be paired once, using the following directions. If the connection
between your tablet and the Auto-Fit is ever lost, simply repeat these steps.
FOR ANDROID
1. On your device select: SETTINGS > BLUETOOTH > ON > SCAN.
2. Press the PAIR button on your Auto-Fit keyboard. A
blue LED in the right of the keyboard will flash until
your Auto-Fit and tablet are paired.
3. Your tablet will display the keyboard’s serial
number as an available device. Select this option
to complete pairing. Once your Auto-Fit is paired you
will see “ZAGG Auto-Fit” in your list of devices.
FOR WINDOWS
1. Access your device’s charms.
2. Select the Settings charm.
3. In Settings, select: CHANGE PC SETTINGS > PC AND DEVICES >
BLUETOOTH > ON. Your tablet will automatically begin searching for
available devices
4. Press the PAIR button on your Auto-Fit keyboard. A blue LED on the right of
the keyboard will flash until your Auto-Fit and tablet are paired.
5. When “ZAGG Auto-Fit” is displayed on your tablet as an available device,
select it and touch PAIR.
FOR ANDROID
1. Make sure your Auto-Fit keyboard is turned on.
2. Press the PAIR button (a blue LED on the right of the keyboard will
begin flashing).
3. While the blue LED is flashing, press fn + A.
4. Continue the pairing process as described in the “Pairing Your ZAGG
Auto-Fit” section.
4
Page 5

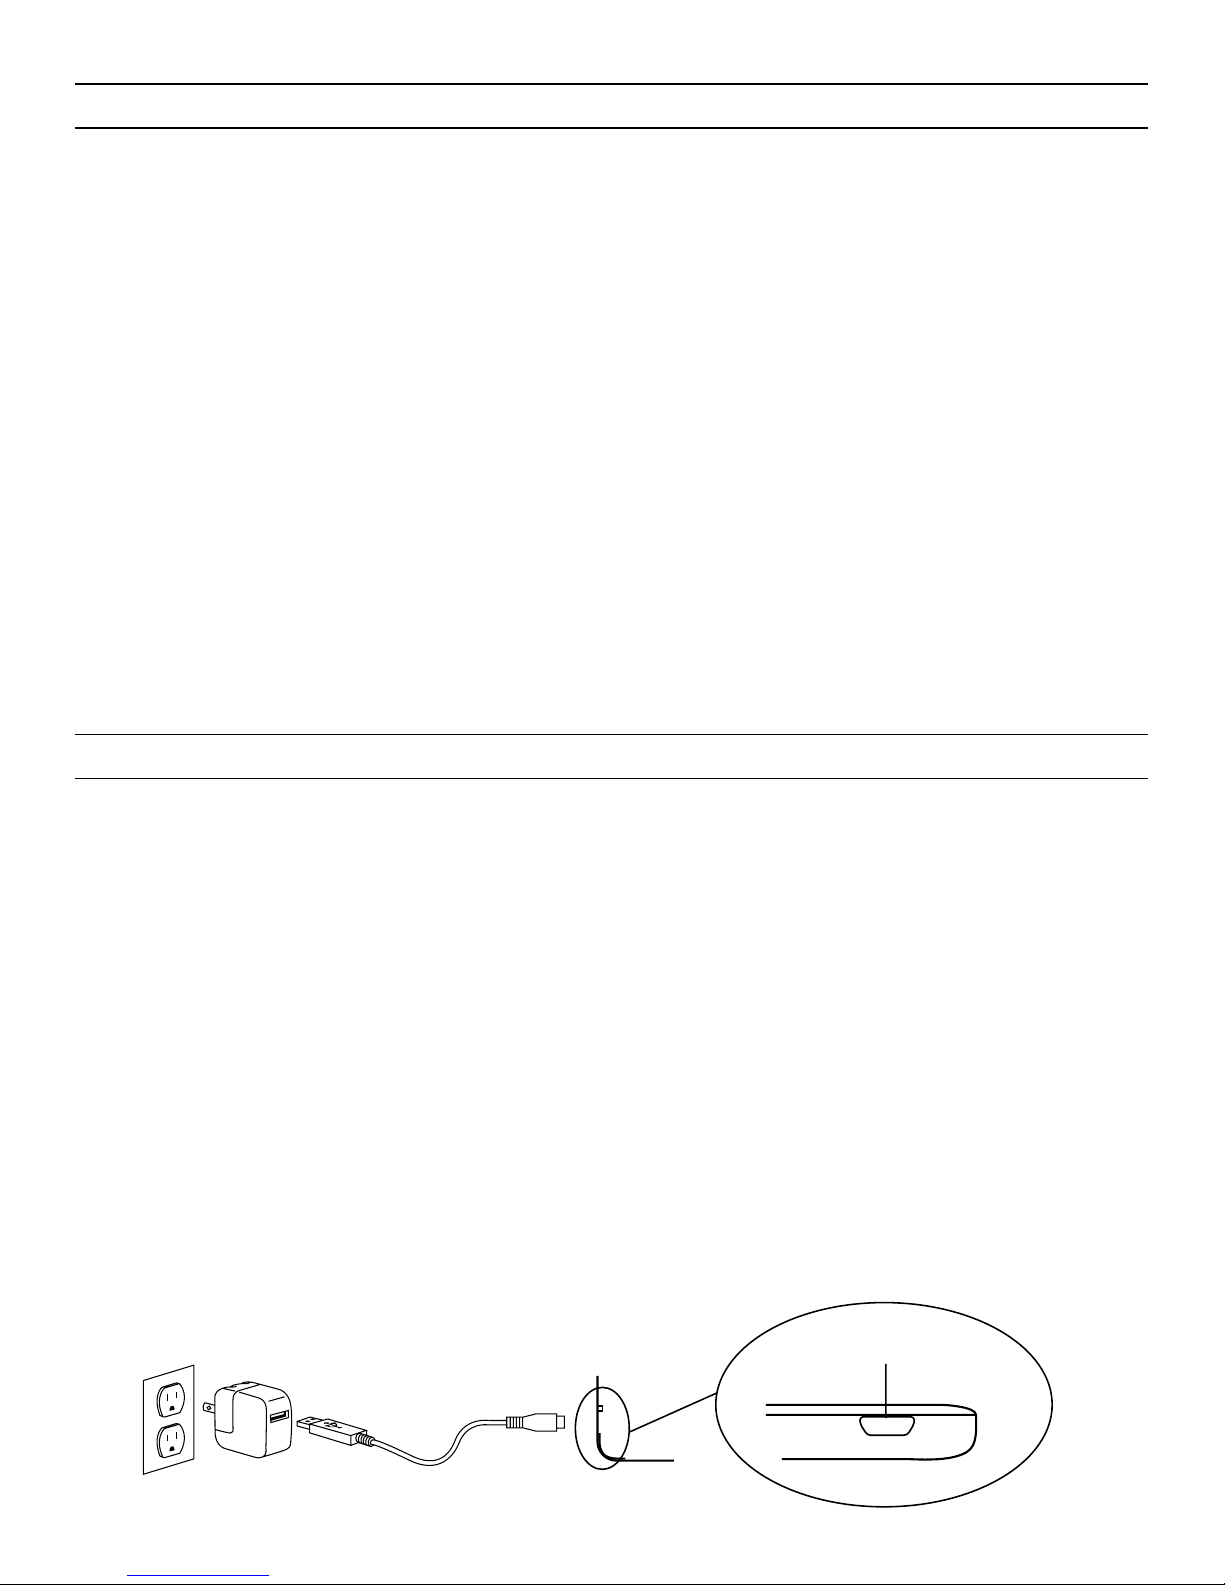
CHARGING
Your Auto-Fit features a powerful lithium polymer battery that lasts up to 1 year
of normal use between charges*. It comes with a charging cable you can use to
charge your keyboard quickly and conveniently. To charge your Auto-Fit, simply
follow these steps:
1. Plug the micro USB connector into the charging port.
2. Plug the regular USB connector into any USB outlet.
3. A red LED near the charging port on the left will illuminate to indicate the
Auto-Fit is charging. Wait until this light turns o, indicating a full charge. It
usually takes 2-4 hours to completely charge your keyboard.
4. Remove the micro USB connector and enjoy your Auto-Fit for up to 1 year of
normal use before you need to charge it again*.
* Normal use is approximately 1 hour of use per day.
CHARGING PORT
CHANGING YOUR AUTO-FIT’S OPERATING SYSTEM
Your ZAGG Auto-Fit can quickly and easily change between Android and
Windows operating systems. To change your selected operating system, follow
the directions below.
1. Have your device forget the Auto-Fit keyboard by selecting: SETTINGS >
BLUETOOTH. Locate “ZAGG Auto-Fit” in your list of devices and touch the
gear icon to the right of it. Choose to have your device forget the keyboard.
2. Press the PAIR button on your Auto-Fit keyboard. A blue LED on the right
side of the keyboard will begin flashing.
3. If your keyboard was previously paired to a Windows device, Press fn + A to
switch to Android. If your device was previously paired to an Android device,
press fn + W to switch to Windows.
4. Complete the normal pairing process as described in Pairing Your ZAGG Auto-Fit.
5
Page 6

SPECIAL FUNCTION KEYS
Your Auto-Fit keyboard features a selection of special functions keys to
give you more control over your tablet. Notice that not all functions work,
or work the same across operating systems. Please refer to the correct
operating system for a list of its special function keys.
FOR ANDROID
RETURN – Returns to the previous app or program that was last open.
HOME – Displays your tablet’s home screen.
LOCK – Activates and deactivates your tablet’s sleep mode.
SEARCH (AUTOFIT 10” ONLY) – Opens Google Search.
INTERNET – Opens your tablet’s default internet browser.
CALENDAR (AUTOFIT 10” ONLY) – Opens your tablet’s default calendar.
EMAIL – Opens your tablet’s default email provider.
PREVIOUS TRACK – Skips to the previous track on your selected playlist.
PLAY/PAUSE – Starts or pauses your music.
NEXT TRACK – Skips to the next track on your selected playlist.
MUTE – Mutes your tablet’s audio.
VOLUME DOWN – Decreases your tablet’s volume.
VOLUME UP – Increases your tablet’s volume.
6
BATTERY LIFE
As mentioned, the Auto-Fit features a powerful, rechargeable battery that
lasts up to 1 year between charges. To check your Auto-Fit’s remaining battery
power, simply hold down the function (fn) key and press the battery key (also
the alt key). The left LED indicator will flash one of three ways.
1. Three green flashes indicate 50% or more battery life remaining.
2. Three yellow flashes indicate between 25%-49% battery life remaining.
3. Three red flashes indicate less than 25% battery life remaining. When your Auto-Fit
reaches critical battery level, the red light will flash once every five minutes.
The Auto-Fit’s battery has no memory and may be charged whenever you
wish. For optimal battery life, we recommend turning your Auto-Fit o when
it will sit unused for a prolonged time.
Page 7

Fn
Caps
DELETE – Deletes text from left to right.
THE FUNCTION (FN) KEY – The fn key operates all functions printed in blue on a key
that features multiple symbols. To activate these functions, hold the fn key while you
press the desired function key.
fn + CAPS – Activates the caps lock feature. When caps lock is on the LED on the right
will illumine until caps lock is turned o. To turn caps lock o, hold the fn key and press
caps again.
fn + BATTERY SYMBOL –
Indicates remaining battery life.
MENU – Opens the menu for the app you are in.
fn + LANGUAGE – Toggles between available international keyboards (when
activated in your tablet’s settings).
fn + PgUp – Moves your cursor up one page in a document, or to the top of the page if
the document is less than one page.
fn + PgDn – Moves your cursor down one page in a document, or to the bottom of
the page if the document is less than one page.
fn + Home – Returns your cursor to the beginning of the line it is on in a document.
fn + End – Moves your cursor to the end of the line it is on in a document.
FOR WINDOWS
ESCAPE – Exits the program or app that is currently open.
WINDOWS – Displays your tablet’s home screen.
fn + F1-F12 – Operates Window’s specific shortcuts. Refer to your tablet’s user manual
for a description of each F Key.
LOCK – Locks your tablet such that you need to enter your password again to continue using it.
SEARCH (AUTOFIT 10” ONLY) – Opens Google Search.
INTERNET – Opens your tablet’s default internet browser.
CALENDAR (AUTOFIT 10” ONLY) – Opens your tablet’s default calendar.
EMAIL – Opens your tablet’s default email provider.
PREVIOUS TRACK – Skips to the previous track on your selected playlist.
PLAY/PAUSE – Plays or pauses your music.
NEXT TRACK – Skips to the next track on your selected playlist.
MUTE – Mutes your tablet’s audio.
VOLUME DOWN – Decreases your tablet’s volume.
VOLUME UP – Increases your tablet’s volume.
7
Fn
Page 8

8
TROUBLESHOOTING
If your tablet does not respond to your Auto-Fit there may be a simple
explanation such as a dead battery or an unsuccessful pairing. Please
use the following to help troubleshoot your situation. If none of the
information in this section solves your issue, please contact ZAGG
Customer Service and one of our trained professionals will be happy to
assist you.
1. Restart your tablet.
2. Turn your Auto-Fit o and back on. You should see the left LED status
light illuminate briefly, if not, charge your Auto-Fit.
3. After charging, turn your Auto-Fit on. If the left LED status light does
not illuminate, and your keyboard doesn’t operate correctly, please
contact ZAGG’s customer service.
4. Forget and re-pair your Auto-Fit. On your tablet select: SETTINGS >
BLUETOOTH > ON > SCAN. If you see “ZAGG Auto-Fit” listed as an
fn + PgUp – Moves your cursor up one page in a document, or to the top of the page
if the document is less than one page.
fn + PgDn – Moves your cursor down one page in a document, or to the bottom of
the page if the document is less than one page.
fn + Home – Returns your cursor to the beginning of the line it is on in a document.
fn + End – Moves your cursor to the end of the line it is on in a document.
Fn
Fn
Caps
DELETE – Deletes text from left to right.
fn + CAPS – Activates the Caps Lock feature. When Caps Lock is on the LED light on
the right will illuminate on most tablets until Caps Lock is turned o. To turn Caps Lock
o, simply hold the fn key and press Caps again.
THE FUNCTION (FN) KEY – The fn key operates all functions printed in blue on a key
that features multiple symbols. To activate these functions, hold the fn key while you
press the desired function key.
fn + BATTERY SYMBOL –
Indicates remaining battery life.
MENU – Opens the menu for the app you are in.
CHARMS – Opens the charms menu.
fn + LANGUAGE – Toggles between available international keyboards (when
activated in your tablet’s settings).
Page 9

available device, touch the gear icon to the right of it and choose to
have your tablet forget the device.
5. Push the PAIR button on your Auto-Fit and watch for the right LED
status light to flash blue.
6. Your tablet should display “ZAGG Auto-Fit” or your keyboard’s serial
number as an available device. Select it.
7. If your tablet gives you an error message, repeat the pairing process*.
* If you continually receive the same error message during pairing, or the above steps don’t work,
please contact ZAGG’s customer service for assistance.
9
For more help please see our FAQ at: www.ZAGG.com/faq
To reach a trained customer service representative, please use one of the following:
ZAGG.com/support/contact.php
questions@zagg.com
1-800-700-ZAGG [9244]
00-1-801-839-3906 for international customers
For unparalleled scratch protection for your tablet, we recommend ZAGG’s
invisibleSHIELD®.
©2005 - 2014 ZAGG Inc | All Rights Reserved.
PATENT PENDING | NASDAQ: ZAGG | MADE IN THE PHILIPPINES.
ZAGG®, invisibleSHIELD®, and ZAGG Auto-Fit are trademarks owned by ZAGG
Intellectual Property Holding Co., Inc.
Bluetooth® is a registered trademark of Bluetooth SIG, Inc.
This device complies with part 15 of the FCC Rules. Operation is subject to the
following two conditions:
1: This device may not cause harmful interference, and
2: This device must accept any interference received, including interference that may
cause undesired operation.
Page 10

Keyboard Instructions
FRENCH
*ENREGISTREMENT DE LA GARANTIE
Votre clavier ZAGG® Auto-Fit est livré avec une garantie d’un an du fabricant. Afin
d’activer la garantie, vous devez enregistrer votre Auto-Fit et conserver votre reçu d’achat.
Si vous avez acheté votre ZAGG Auto-Fit de ZAGG.com, ZAGG l’a déjà enregistré et a une
copie de votre preuve d’achat.
BESOIN D’AIDE SUPPLÉMENTAIRE? VOIR NOTRE SECTION FAQ À L’ADRESSE :
www.ZAGG.com/faq
auto-fit
7”, 8,” & 10”
Page 11

INTRODUCTION
INSÉRER/RETIRER VOTRE TABLETTE
Votre clavier Bluetooth® ZAGG Auto-Fit est doté d’un couvercle à ressort qui
lui permet de s’adapter à des tablettes de petit format qui fonctionnent avec
les systèmes d’exploitation Android™ et Windows®. Il vous sut d’insérer votre
tablette dans le couvercle et les ressorts s’ajusteront automatiquement pour la
sécuriser. Vous pouvez maintenant utiliser un seul clavier Bluetooth pratique
pour tous vos besoins en matière de tablette.
Pour insérer votre tablette dans l’Auto-Fit, tenez votre
clavier face à vous.
Ensuite, avec votre tablette en mode paysage, l’enfoncer
dans la partie inférieure du couvercle à ressort. Déposez
votre tablette contre le dos du couvercle et laissez les
ressorts la pousser vers le haut, fixant ainsi la tablette en
place.
- Pour les plus grandes tablettes, vous devrez
peut-être appuyer légèrement sur la partie supérieure
pour que votre tablette s’enclenche correctement.
Lorsque la tablette est sécurisée, vous pouvez fermer
l’Auto-Fit pour ainsi protéger votre clavier et votre tablette.
Pour retirer facilement votre tablette, appuyez sur les
ressorts de la partie inférieure du couvercle jusqu’à ce
que vous ayez susamment d’espace pour la retirer du
couvercle.
- Pour les plus grandes tablettes, appuyez sur la tablette
comme décrit, puis utilisez vos pouces sur les coins
pour séparer votre tablette de l’Auto-Fit.
2
Page 12

UTILISATION DE LA BÉQUILLE : applicable sur la version 7 po uniquement
MISE SOUS TENSION ET HORS TENSION
L’Auto-Fit dispose d’une béquille pratique pour plus
de sécurité. Pour utiliser la béquille, soulevez-la
pour la sortir de l’arrière du couvercle de l’Auto-Fit.
Positionnez-la à l’angle souhaité et placez l’Auto-Fit
sur une surface plane.
Lorsque vous avez terminé d’utiliser la béquille, rangez-la
de nouveau sur l’arrière de l’Auto-Fit. Un aimant fixera la
béquille dans cette position jusqu’à ce que vous soyez prêt
à l’utiliser à nouveau.
Pour activer votre Auto-Fit, mettre le bouton
POWER sur la position ON. Un voyant DEL bleu
s’allumera brièvement lorsque le clavier se mettra en
fonction. Pour désactiver votre Auto-Fit, mettre le
bouton POWER sur la position OFF.
On
O
SÉLECTION DU SYSTÈME D’EXPLOITATION
Le ZAGG Auto-Fit fonctionne avec les systèmes d’exploitation Android et
Windows et peut facilement alterner entre les deux. Vous devez sélectionner le
bon système d’exploitation avant de coupler votre Auto-Fit à votre appareil. Pour
choisir le système d’exploitation approprié, suivez les instructions ci-dessous.
Android est le système d’exploitation par défaut. Si vous possédez une tablette
Android, vous pouvez donc procédez au « Couplage de votre ZAGG AutoFit ».
POUR WINDOWS
1. Assurez-vous que votre clavier Auto-Fit est activé.
2. Appuyez sur le bouton PAIR (un voyant DEL bleu sur le côté droit du clavier
commencera à clignoter).
3. Lorsque le voyant DEL bleu clignote, appuyez sur fn + W.
4. Poursuivez le processus de couplage tel que décrit dans la section «
Couplage de votre ZAGG Auto-Fit ».
3
Page 13

POUR ANDROID
1. Assurez-vous que votre clavier Auto-Fit est activé.
2. Appuyez sur le bouton PAIR (un voyant DEL bleu sur le côté droit du clavier
commencera à clignoter).
3. Lorsque le voyant DEL bleu clignote, appuyez sur fn + A.
4. Poursuivez le processus de couplage tel que décrit dans la section «
Couplage de votre ZAGG Auto-Fit ».
COUPLAGE DE VOTRE ZAGG AUTO-FIT
Maintenant que votre système d’exploitation est sélectionné, vous êtes prêt à coupler
votre clavier Auto-Fit à votre appareil. Coupler votre Auto-Fit avec votre tablette est
facile. L’Auto-Fit ne devrait être couplé qu’une fois, à l’aide des instructions suivantes. Si
la connexion entre votre tablette et l’Auto-Fit se perd, il sut de répéter ces étapes.
POUR ANDROID
1. Sur votre appareil, sélectionnez : PARAMÈTRES > BLUETOOTH > ON > SCAN.
2. Appuyez sur le bouton PAIR de votre clavier Auto-Fit. Un voyant DEL bleu sur le
côté droit de votre clavier
clignotera jusqu’à ce que votre Auto-Fit et votre
tablette soient couplés.
3. Votre tablette achera le numéro de série du clavier comme
un périphérique disponible. Sélectionnez cette option pour terminer le couplage.
Dès que le couplage de votre Auto-Fit est terminé, vous verrez apparaître dans
votre liste d’appareils disponibles « ZAGG Auto-Fit ».
POUR WINDOWS
1. Accédez au menu de votre appareil
2. Sélectionnez l’icône des Paramètres.
3. Sous Paramètres, sélectionnez : MODIFIEZ LES PARAMÈTRES DU PC > PC ET
APPAREILS > BLUETOOTH > ON
4. Appuyez sur le bouton PAIR de votre clavier Auto-Fit. Un voyant DEL bleu sur
le côté droit de votre clavier clignotera jusqu’à ce que votre Auto-Fit et votre
tablette soient couplés.
5. Lorsque ZAGG Auto-Fit apparaît sur votre tablette comme appareil disponible,
sélectionnez-le et appuyez sur PAIR.
4
Page 14
CHARGEMENT
Votre Auto-Fit dispose d’une puissante batterie au lithium-polymère qui dure jusqu’à
un an en utilisation normale entre les charges*. Il est livré avec un câble de chargement
que vous pouvez utiliser pour charger votre clavier rapidement et facilement. Pour
charger votre Auto-Fit, il vous sut de suivre ces étapes :
1. Branchez le connecteur micro USB dans le port de charge.
2. Branchez le connecteur USB dans n’importe quelle prise USB.
3. Un voyant DEL rouge situé près du port de charge sur la gauche s’allumera pour
indiquer que l’Auto-Fit est en cours de charge. Attendez que ce voyant s’éteigne,
indiquant une charge complète. Une recharge complète de votre clavier prend
habituellement entre 2 à 4 heures.
4. Retirez le connecteur micro USB et profitez de votre Auto-Fit jusqu’à un an en
utilisation normale avant que vous n’ayez besoin de le recharger*.
*L’utilisation normale est d’environ une heure par jour.
MODIFICATION DU SYSTÈME D’EXPLOITATION DE VOTRE AUTO-FIT
Votre ZAGG Auto-Fit peut rapidement et facilement alterner entre les systèmes
d’exploitation Android et Windows. Pour modifier votre système d’exploitation, suivez
les instructions ci-dessous.
1. Faites en sorte que votre appareil oublie l’Auto-Fit en sélectionnant :
PARAMÈTRES > BLUETOOTH. Repérez « ZAGG Auto-Fit » dans votre liste
d’appareils et appuyez sur l’icône d’engrenage à la droite. Sélectionnez pour que
votre appareil oublie le clavier.
2. Appuyez sur le bouton PAIR de votre clavier Auto-Fit. Un voyant DEL bleu sur le
côté droit du clavier commencera à clignoter.
3. Si votre clavier était déjà couplé à un appareil Windows, appuyez sur fn + A pour
passer à un appareil Android. Si votre clavier était déjà couplé à un appareil
Android, appuyez sur fn + W pour passer à un appareil Windows.
4. Terminez le processus normal de couplage tel que décrit dans la section « Couplage de
votre ZAGG Auto-Fit ».
PORT DE CHARGE
5
Page 15

TOUCHES DE FONCTIONS SPÉCIALES
Votre clavier Auto-Fit a été conçu avec une sélection de touches de fonctions spéciales dans
le but de vous donner plus de contrôle sur votre tablette. Veuillez noter que les fonctions
ne sont pas toutes applicables ou ne fonctionnent pas toutes de la même façon selon les
systèmes d’exploitation. Veuillez vous référer au système d’exploitation approprié pour une
liste de ses touches de fonctions spéciales.
POUR ANDROID
RETOUR –
Renvoie à l’application précédente ou au programme qui était ouvert en dernier.
ACCUEIL – Ache l’écran d’accueil de votre tablette.
VÉROUILLAGE – Active et désactive le mode veille de votre tablette.
RECHERCHE (AUTO-FIT 10 PO SEULEMENT) – Ouvre Google Search.
INTERNET – Ouvre le navigateur par défaut de votre tablette.
CALENDRIER (AUTO-FIT 10 PO SEULEMENT) – Ouvre le calendrier par défaut de
votre tablette.
COURRIEL – Ouvre le fournisseur de messagerie par défaut de votre tablette.
PISTE PRÉCÉDENTE – Passe à la piste précédente sur votre liste de lecture actuelle.
LECTURE/PAUSE – Démarre ou met en pause votre musique.
PISTE SUIVANTE – Passe à la piste suivante sur votre liste de lecture actuelle.
SOURDINE – Désactive le son de votre tablette.
VOLUME FAIBLE – Diminue le volume de votre tablette.
AUTONOMIE DE LA BATTERIE
Comme mentionné, l’Auto-Fit dispose d’une batterie rechargeable puissante qui dure jusqu’à un
an entre les charges. Pour vérifier la puissance restante de la batterie de votre Auto-Fit, il sut
de maintenir la touche de fonction (fn) enfoncée et d’appuyer sur la touche de la batterie (qui est
également la touche alt). Le voyant DEL gauche clignotera de l’une des trois façons suivantes.
1. Trois clignotements verts indiquent 50 % ou plus de charge restante.
2. Trois clignotements jaunes indiquent entre 25 % et 49 % de charge restante.
3. Trois clignotements rouges indiquent moins de 25 % de charge restante. Lorsque votre
Auto-Fit atteint un niveau de charge critique, le voyant rouge clignote une fois toutes les
cinq minutes.
La batterie de l’Auto-Fit n’a pas de mémoire et peut être chargée chaque fois que vous le
souhaitez. Pour une durée de vie optimale de la batterie, nous recommandons d’éteindre
votre Auto-Fit lorsqu’il reste inutilisé pendant une période prolongée.
6
Page 16

Fn
Caps
VOLUME FORT – Augmente le volume de votre tablette.
suppr. – Supprime le texte de gauche à droite.
LA TOUCHE FONCTION (fn) – La touche fn exploite toutes les fonctions imprimées en
bleu sur les touches qui disposent de multiples symboles. Pour activer ces fonctions,
maintenez la touche fn enfoncée et appuyez sur la touche désirée.
fn + MAJ. – Active la fonction de verrouillage des majuscules. Lorsque le verrouillage
des majuscules est activé, le voyant DEL sur le côté droit s’illuminera jusqu’à ce que
le verrouillage des majuscules soit désactivé. Pour désactiver le verrouillage des
majuscules, maintenez enfoncée la touche fn et appuyez sur maj. à nouveau.
fn + SYMBOLE DE LA BATTERIE –
Indique la vie restante de la batterie.
MENU – Ouvre le menu de l’application en marche.
fn + LANGAGE – Bascule entre les claviers internationaux disponibles (lors de
l’activation dans les réglages de votre tablette).
fn + P.préc. – Déplace votre curseur à la page précédente d’un document, ou en haut
de la page lorsque le document est moins d’une page.
fn + P.suiv. – Déplace votre curseur à la page suivante d’un document, ou en bas de la
page lorsque le document est moins d’une page.
fn + Accueil – Déplace votre curseur au début de la ligne où il est placé dans un
document.
fn + Fin – Déplace votre curseur à la fin de la ligne où il est placé dans un document.
POUR WINDOWS
ÉCHAPP. – Quitte le programme ou l’application en cours d’exécution.
ICÔNE WINDOWS – Ache l’écran d’accueil de votre tablette.
fn + F1 à F12 – Fait fonctionner les raccourcis propres à Windows. Vous référer au
guide de l’utilisateur de votre tablette pour une description de chacune des touches F.
VERROUILLAGE – Verrouille votre tablette de manière à ce que vous ayez besoin d’entrer votre
mot de passe à nouveau pour continuer à l’utiliser.
RECHERCHE (AUTO-FIT 10 PO SEULEMENT) – Ouvre Google Search.
INTERNET – Ouvre le navigateur par défaut de votre tablette.
CALENDRIER (AUTO-FIT 10 PO SEULEMENT) – Ouvre le calendrier par défaut de
votre tablette.
COURRIEL – Ouvre le fournisseur de messagerie par défaut de votre tablette.
PISTE PRÉCÉDENTE – Passe à la piste précédente sur votre liste de lecture actuelle.
LECTURE/PAUSE – Démarre ou met en pause votre musique.
PISTE SUIVANTE – Passe à la piste suivante sur votre liste de lecture actuelle.
Fn
7
Page 17

DÉPANNAGE
Si votre tablette ne répond pas à votre Auto-Fit, il peut y avoir une
explication simple comme une décharge de la batterie ou un échec du
couplage. Veuillez utiliser les suggestions suivantes pour vous aider à
résoudre votre situation. Si aucune des informations de cette section
ne résout votre problème, veuillez contacter le service à la clientèle de
ZAGG, et l’un de nos professionnels qualifiés sera heureux de vous aider.
1. Redémarrez votre tablette.
2. Mettez votre Auto-Fit hors tension et rallumez-le. Vous devriez voir le
voyant d’état DEL de gauche s’allumer brièvement; si ce n’est pas le
cas, chargez votre Auto-Fit.
Fn
Fn
Caps
SOURDINE – Désactive le son de votre tablette.
VOLUME FAIBLE – Diminue le volume de votre tablette.
VOLUME FORT – Augmente le volume de votre tablette.
Suppr. – Supprime le texte de gauche à droite.
fn + maj. – Active la fonction de verrouillage des majuscules. Lorsque le verrouillage
des majuscules est activé, le voyant DEL sur le côté droit s’illuminera jusqu’à ce que
le verrouillage des majuscules soit désactivé. Pour désactiver le verrouillage des
majuscules, maintenez enfoncée la touche fn et appuyez sur maj. à nouveau.
LA TOUCHE FONCTION (fn) – La touche fn exploite toutes les fonctions imprimées en
bleu sur les touches qui disposent de multiples symboles. Pour activer ces fonctions,
maintenez la touche fn enfoncée et appuyez sur la touche désirée.
fn + SYMBOLE DE LA BATTERIE –
Indique la vie restante de la batterie.
MENU – Ouvre le menu de l’application en marche.
CHARMS – Ouvre le menu.
fn + LANGAGE – Bascule entre les claviers internationaux disponibles (lors de
l’activation dans les réglages de votre tablette).
fn + P.préc. – Déplace votre curseur à la page précédente d’un document, ou en haut
de la page lorsque le document est moins d’une page.
fn + P.suiv. – Déplace votre curseur à la page suivante d’un document, ou en bas de la
page lorsque le document est moins d’une page.
fn + Accueil – Déplace votre curseur au début de la ligne où il est placé dans un document.
fn + Fin – Déplace votre curseur à la fin de la ligne où il est placé dans un
document.
8
Page 18

3. Après la charge, allumez votre Auto-Fit. Si le voyant d’état DEL
de droite ne s’allume pas, et si votre clavier ne fonctionne pas
correctement, veuillez contacter le service à la clientèle de ZAGG.
4. Oubliez et recouplez votre Auto-Fit. Sur votre tablette, sélectionnez
: PARAMÈTRES > BLUETOOTH > ON > SCAN. Si vous voyez « ZAGG
Auto-Fit » répertorié comme un périphérique disponible, appuyez sur
l’icône d’engrenage à sa droite et faites en sorte que votre tablette
oublie le périphérique.
5. Appuyez sur le bouton PAIR de votre Auto-Fit et vérifiez que le voyant
d’état DEL de droite clignote en bleu.
6. Votre tablette devrait acher « ZAGG Auto-Fit » ou le numéro de série
du clavier comme un périphérique disponible. Sélectionnez-le.
7. Si votre tablette vous donne un message d’erreur, répétez le processus
de couplage*.
* Si vous recevez continuellement le même message d’erreur lors du couplage, ou si les
suggestions ci-dessus ne fonctionnent pas, veuillez contacter le service à la clientèle de ZAGG pour
obtenir de l’aide.
Pour obtenir plus d’aide, veuillez visiter notre FAQ à l’adresse : www.ZAGG.com/faq
Pour joindre un représentant au service à la clientèle qualifié, veuillez utiliser l’une des options
suivantes :
ZAGG.com/support/contact.php
questions@zagg.com
1-800-700-ZAGG [9244]
00-1-801-839-3906 pour les clients internationaux
Pour une protection anti-rayure inégalée pour votre tablette, nous vous recommandons
invisibleSHIELD® de ZAGG.
© 2005 - 2014 ZAGG inc. | Tous droits réservés.
EN ATTENTE DE BREVET | NASDAQ : ZAGG | FABRIQUÉ EN CHINE
ZAGG®, invisibleSHIELD®, et Auto-Fit® sont des marques appartenant à ZAGG Intellectual Property
Holding Co., inc.
Android™ est une marque de Google inc.
Windows® est une marque déposée de la société Microsoft.
Cet appareil est conforme à la section 15 des Règles FCC. Son fonctionnement est soumis aux
deux conditions suivantes :
1 : Cet appareil ne doit pas provoquer d’interférences nuisibles, et
2 : Cet appareil doit accepter toute interférence reçue, y compris les interférences pouvant
provoquer un fonctionnement indésirable.
9
Page 19

Keyboard Instructions
SPANISH
*REGISTRO DE GARANTÍA
Su teclado ZAGG® Auto-Fit viene con un año de garantía del fabricante. Para poder activar
la garantía, deberá registrar su Auto-Fit y mantener el recibo de compra. Si compro
su ZAGG Auto Fit en ZAGG.com, ZAGG ya registro su producto y tiene una copia del
comprobante de compra.
¿NECESITA MÁS AYUDA? POR FAVOR VER NUESTRA SECCIÓN DE PREGUNTAS
FRECUENTES EN: www.ZAGG.com/faq
auto-fit
7”, 8,” & 10”
Page 20

INTRODUCCIÓN
INSERTAR/REMOVER SU TABLETA
Su teclado ZAGG Auto-Fit con Bluetooth® ofrece una cubierta única de
resortes que le permite trabajar con la mayoría de las tabletas pequeñas.
Simplemente presione su tableta a la cubierta y los resortes se ajustaran
automáticamente para asegurarla. Ahora puede utilizar un teclado Bluetooth
conveniente para cubrir todas las necesidades de su tableta.
Para insertar la tableta en el Auto-Fit, coloque el teclado
mirando hacia usted.
Luego, con la tableta en posición horizontal, presiónela
contra la parte inferior de la cubierta. Acueste su tableta
sobre la parte trasera de la cubierta y deje que los resortes
la empujen hacia arriba, asegurando la tableta en su lugar.
- Para tabletas más grandes, es posible que tenga que
presionar un poco para que su tableta calce en su
lugar.
Una vez su tableta se encuentre asegurada, puede cerrar su
Auto-Fit para protegerla y proteger su teclado.
Para remover su tableta fácilmente, simplemente presione
hacia abajo hacia los resortes de la parte inferior de la
cubierta hasta que tenga suficiente espacio para levantar la
tableta de la cubierta.
- Para tabletas más grandes, presione la tableta hacia
abajo en la forma descrita, y luego utilice sus pulgares
en las esquinas para separar la tableta del Auto-Fit.
2
Page 21

3
UTILIZAR EL SOPORTE: Solo para la versión de 7 Pulgadas
ENCENDIDO Y APAGADO
El Auto-Fit ofrece un conveniente soporte de apoyo
para agregar seguridad. Para utilizar el soporte
de apoyo, simplemente levante la parte inferior
hacia afuera de la cubierta Auto-Fit. Colóquela en
el Angulo deseado y coloque el Auto-Fit en una
superficie plana.
Cuando termine de utilizar el soporte de apoyo,
simplemente empújelo hacia adentro del Auto-Fit. Un imán
asegurara el soporte hasta que lo utilice de nuevo.
Para encender su Auto-Fit, coloque el botón de
POWER en la posición de encendido ON. Una luz de
LED se encenderá mientras en teclado se enciende.
Para Apagar su Auto-Fit, coloque el botón de
POWER en la posición de apagado OFF.
On
O
SELECCIONAR SU SISTEMA OPERATIVO
El ZAGG Auto-Fit funciona con los sistemas operativos Android y Windows y
se puede alternar fácilmente entre ambos. Deberá elegir el sistema operativo
correcto antes de que su Auto-Fit se sincronice con su dispositivo. Para elegir
el sistema operativo apropiado, siga las instrucciones a continuación. El sistema
operativo predeterminado del teclado es Android, por ende si su tableta es
Android, proceda a la “Sincronización de su ZAGG Auto Fit”.
PARA WINDOWS
1. Asegúrese que su teclado Auto-Fit se encuentre encendido.
2. Presione el botón de SINCRONIZAR (un indicador LED azul en la parte
derecha del teclado comenzara a destellar).
3. Mientras el indicador LED azul se encuentra destellando, presione fn + W.
4. Continúe el proceso de sincronización como se describe en la “Sección se
Sincronizar su ZAGG Auto Fit”.
Page 22
SINCRONIZADO DE SU ZAGG AUTO-FIT
Con su sistema operativo seleccionado, ahora esta listo para sincronizar su teclado
Auto-Fit con su dispositivo. Es muy fácil sincronizar su Auto-Fit con su tableta; solo
necesitara sincronizarlos una vez, utilizando las siguientes instrucciones. De perderse la
conexión entre su tableta y el Auto-Fit, simplemente repita los pasos a continuación.
PARA ANDROID
1. Seleccione en su dispositivo: CONFIGURACIÓN > BLUETOOTH > ENCENDIDO >
ESCANEAR.
2. Presione el botón de sincronizado de su Teclado Auto-Fit. Una
luz de LED azul parpadeara a la derecha del teclado hasta
que se sincronice su Auto-Fit y su tableta.
3. Su tableta mostrara el numero de serial del teclado como un
dispositivo disponible. Seleccione esta opción para completar la sincronización.
una vez su Auto-Fit este sincronizado, usted vera al “ZAGG Auto-Fit” en la lista de
dispositivos.
PARA WINDOWS
1. Acceda al amuleto de su dispositivo.
2. Seleccione el amuleto de Configuraciones.
3. En las configuraciones, seleccione: CAMBIAR CONFIGURACIÓN DE PC → PC Y
DISPOSITIVOS > BLUETOOTH > ENCENDIDO. Su tableta comenzara de manera
automática a buscar por dispositivos disponibles.
4. Presione el botón de SINCRONIZACIÓN de su Teclado Auto-Fit. Una luz de LED
azul parpadeara a la derecha del teclado hasta que se sincronice su Auto-Fit y su
tableta.
5. Cuando el “ZAGG Auto-Fit” se muestre en su tableta como un dispositivo
disponible, selecciónelo y toque SINCRONIZAR.
PARA ANDROID
1. Asegúrese que su teclado Auto-Fit se encuentre encendido.
2. Presione el botón de SINCRONIZAR (un indicador LED azul en la parte
derecha del teclado comenzara a destellar).
3. Mientras el indicador LED azul se encuentra destellando, presione fn + A.
4. Continúe el proceso de sincronización como se describe en la “Sección se
Sincronizar su ZAGG Auto Fit”.
4
Page 23

CARGA
Su Auto-Fit contiene una poderosa batería de polímero de litio que dura por más 1
año de uso regular entre cargas*. Viene con un cable de recarga el cual puede utilizar
para cargar su teclado de manera rápida y conveniente. Para cargar su Auto-Fit,
simplemente siga estos pasos:
1. Enchufe el conector micro USB al puerto de carga.
2. Enchufe el conector regular USB a cualquier enchufe USB.
3. Una luz roja de LED próxima al puerto de carga en el lado izquierdo se encenderá
para indicar que el Auto-Fit se esta cargando. Espere hasta que esta luz se
apague, lo que indicara una carga total. Normalmente toma de 2 a 4 horas para
cargar su teclado por completo.
4. Remueva el conector micro USB y disfrute de su Auto-Fit hasta por 1 año de uso
normal antes de necesitar cargarlo de nuevo*.
* El uso normal es de aproximadamente una hora diaria.
CAMBIAR EL SISTEMA OPERATIVO DE SU AUTO-FIT
Su ZAGG Auto-Fit puede rápida y fácilmente cambiar entre los sistemas Android y
Windows. Para cambiar su sistema operativo seleccionado, siga las instrucciones a
continuación.
1. Haga que su dispositivo se de sincronice del teclado Auto-Fit seleccionando:
CONFIGURACIÓN → BLUETOOTH. Localice el “ZAGG Auto-Fit” en la lista de
dispositivos y seleccione el icono de engranaje para deshacerse de el. Opte por
que su dispositivo se de sincronice del teclado.
2. Presione el botón de SINCRONIZACIÓN de su Teclado Auto-Fit. Un indicador LED
azul en la parte derecha del teclado comenzara a destellar.
3.
Si su teclado estaba sincronizado anteriormente a un dispositivo Windows,
Presione fn + A para cambiarse a Android. Si su dispositivo estaba sincronizado
anteriormente a un dispositivo Android, presione fn + W para cambiarse a Windows.
4. Continúe el proceso de sincronización normal como se describe en la “Sección se
Sincronizar su ZAGG Auto Fit”
.
5
PUERTO DE CARGA
Page 24

TECLAS DE FUNCIONES ESPECIALES
Su teclado Auto-Fit ofrece una selección de teclas de función especial para darle mayor
control sobre su tableta. Note que no todas las funciones trabajan, o no funcionan igual con
todos los sistemas operativos. Por favor refiérase al sistema operativo correcto para una lista
de sus teclas de funciones especiales.
PARA ANDROID
RETURN –
Regresa a la aplicación o programa anterior.
HOME – Muestra la pantalla de inicio de su dispositivo.
LOCK – Activa y desactiva el modo de sueño de su tableta.
SEARCH (Solo en el Auto-Fit 10”) – Abre el Google Search.
INTERNET – Abre el navegador de internet predeterminado de su tableta.
CALENDAR (Solo en el Auto-Fit 10”) – Abre el calendario predeterminado de su tableta.
EMAIL – Abre el proveedor de Email predeterminado de su tableta.
PREVIOUS TRACK – Salta a la pista anterior en la lista de reproducción seleccionada.
PLAY/PAUSE – Reproduce o detiene la reproducción de su música.
NEXT TRACK – Pasa a la pista siguiente en la lista de reproducción seleccionada.
MUTE – Silencia el audio de su tableta.
VOLUME DOWN – Reduce el volumen de su tableta.
VOLUME UP – Incrementa el volumen de su tableta.
6
VIDA DE LA BATERÍA
Como se menciono anteriormente, el Auto-Fit presenta una poderosa batería recargable que
dura hasta un año antes de necesitar carga. Para revisar la carga restante de la batería del AutoFit, simplemente mantenga presionada la tecla función (fn) y la tecla de batería (también la tecla
alt). El indicador de LED parpadeara de las siguiente manera.
1. Tres destellos indican 50% o más de batería restante.
2. Tres destellos amarillos indican entre 25% y 49% de carga restante.
3. Tres destellos rojos, indican que queda menos del 25% de batería restante. Cuando su
Auto-Fit alcanza un nivel de batería critico, la luz roja destellara una vez cada cinco
minutos.
La batería del Auto-Fit no tiene memoria y se puede recargar cuando usted lo desee. Para el
funcionamiento optimo de la batería, recomendamos que apague su Auto-Fit cuando no lo
utilice por un tiempo prolongado.
Page 25
Fn
Caps
del – Borra el texto de izquierda a derecha.
LA TECLA DE FUNCIÓN (fn) – La tecla de fn opera todas las funciones impresas de
color azul en las teclas que muestran varios símbolos. Para activar estas funciones,
mantenga presionado la tecla fn y presione la tecla de función deseada.
fn + CAPS – Activa la función de Bloqueo de Mayúsculas. Cuando el bloqueo de
mayúsculas esta encendido, la luz LED en la parte derecha se iluminara hasta que se
apague el Bloqueo de Mayúsculas. Para apagar el bloqueo de mayúsculas, presione
simplemente la tecla de fn y presione caps de nuevo.
fn + SÍMBOLO DE LA BATERÍA –
Indica la vida restante de la batería.
MENÚ – Abre el menú para la aplicación en la que se encuentra.
fn + LENGUAJE – Cambia el teclado internacional disponible (si esta activado en la
configuración de su tableta).
fn + PgUp – Sube el cursor una pagina en el documento, o al principio de la pagina si el
documento tiene menos de una pagina.
fn + PgDn – Baja el cursor una pagina en el documento, o al final de la pagina si el
documento tiene menos de una pagina.
fn + Home– Regresa el cursor al principio de la línea donde se encuentre en el
documento.
fn + End – Mueve el cursor al final de la línea donde se encuentre en el documento.
PARA WINDOWS
ESCAPE – Sale del programa o de la aplicación en la que se encuentra actualmente.
ICONO DE WINDOWS – Muestra la pantalla de inicio de su tableta.
fn + F1-F12 – Opera los atajos específicos de Windows. Refiérase al manual de su
tableta para una descripción de cada una de las teclas F.
LOCK – Bloquea su tableta de manera que necesite ingresar su contraseña de nuevo
para
continuar utilizándola.
SEARCH (SOLO EN EL AUTO-FIT 10”) – Abre el Google Search.
INTERNET – Abre el navegador de internet predeterminado de su tableta.
CALENDAR (SOLO EN EL AUTO-FIT 10” ) – Abre el calendario predeterminado de su
tableta.
EMAIL – Abre el proveedor de Email predeterminado de su tableta.
PREVIOUS TRACK – Passe à la piste précédente sur votre liste de lecture actuelle.
PLAY/PAUSE – Reproduce o detiene la reproducción de su música.
NEXT TRACK – Pasa a la pista siguiente en la lista de reproducción seleccionada.
7
Fn
Page 26

8
RESOLUCIÓN DE PROBLEMAS
Si su dispositivo no responde a los comandos de su Auto-Fit puede
deberse a simplemente una batería agotada o a una sincronización
no exitosa. Por favor utilice la siguiente guía para ayudar a resolver su
problema. Si la información de esta sección no soluciona su problema, por
favor comuníquese con atención al cliente de ZAGG y uno de nuestros
profesionales entrenados lo ayudaran.
1. Reinicie su tableta.
2. Apague y vuelva a encender su Auto-Fit. Deberá ver las luces de LED
indicadoras de estado encenderse brevemente, de no hacerlo, recargue
su Auto-Fit.
Fn
Fn
Caps
MUTE – Silencia el audio de su tableta.
VOLUME DOWN – Reduce el volumen de su tableta.
VOLUME UP – Incrementa el volumen de su tableta.
DELETE – Borra el texto de izquierda a derecha.
fn + CAPS – Activa la función de Bloqueo de Mayúsculas. Cuando el bloqueo de
mayúsculas esta encendido, la luz LED en la parte derecha se iluminara hasta que se
apague el Bloqueo de Mayúsculas. Para apagar el Bloqueo de Mayúsculas, presione la
tecla de fn y presione caps de nuevo.
LA TECLA DE FUNCIÓN (fn) – La tecla de fn opera todas las funciones impresas de
color azul en las teclas que muestran varios símbolos. Para activar estas funciones,
mantenga presionado la tecla fn y presione la tecla de función deseada.
fn + SÍMBOLO DE LA BATERÍA –
Indica la vida restante de la batería.
MENÚ – Abre el menú para la aplicación en la que se encuentra.
AMULETO – Abre el menú de amuletos.
fn + LENGUAJE – Cambia el teclado internacional disponible (si esta activado en la
configuración de su tableta).
fn + PgUp – Sube el cursor una pagina en el documento, o al principio de la pagina si el
documento tiene menos de una pagina.
fn + PgDn – Baja el cursor una pagina en el documento, o al final de la pagina si el
documento tiene menos de una pagina.
fn + Home – Regresa el cursor al principio de la línea donde se encuentre en el documento.
fn + End – Mueve el cursor al final de la línea donde se encuentre en el
documento.
Page 27

3. Luego de cargarlo, encienda su Auto-Fit. Si el indicador LED a la
derecha no se enciende, y su teclado no funciona correctamente,
comuníquese con atención al cliente de ZAGG.
4. De sincronice y vuelva a sincronizar su Auto-Fit. En su tableta
seleccione: CONFIGURACIÓN → BLUETOOTH → ENCENDIDO →
ESCANEAR. Si ve el “ZAGG Auto-Fit” en la lista de dispositivos
disponibles, toque el icono a la derecha del mismo y elija la opción de
desincronizar este dispositivo.
5. Presione el botón de SINCRONIZAR en su Auto-Fit y espere que la luz
de LED a la derecha parpadee azul.
6. Su tableta deberá mostrar al “ZAGG Auto-Fit” o el numero de serial de
su teclado como dispositivo disponible. Selecciónelo.
7. Si su dispositivo le muestra un mensaje de error durante la
sincronización, repita el proceso de sincronización*.
* Si recibe el mismo error de manera continua durante la sincronización, o el paso anterior no
funciona, por favor comuníquese con atención al cliente de ZAGG.
9
Para más ayuda por favor vea nuestra sección de preguntas frecuentes en: www.ZAGG.com/faq
Para comunicarse con un representante de atención al cliente, por favor utilice los siguientes
canales:
ZAGG.com/support/contact.php
questions@zagg.com
1-800-700-ZAGG [9244]
00-1-801-839-3906 para clientes internacionales
Para una protección sin precedentes anti rayas para su tableta, recomendamos el ZAGG’s
invisibleSHIELD®.
©2005 - 2014 ZAGG Inc | Todos los Derechos Reservados.
PATENTE PENDIENTE | NASDAQ: ZAGG | HECHO EN CHINA
ZAGG®, InvisibleShield®, y Auto-Fit® son marcas comerciales propiedad de ZAGG Intellectual
Property Holding Co., Inc.
Android™ es marca registrada de Google Inc.
Windows® es una marca registrada de Microsoft Corporation.
Este dispositivo cumple con la parte Nro. 15 de las regulaciones de la FCC. La operación esta
sujeta a las siguientes condiciones:
1: Este dispositivo no debe causar interferencia dañina, y
2: Este dispositivo deberá aceptar cualquier interferencia recibida, incluyendo interferencia que
pueda ocasionar una operación indeseada.
Page 28

052714 | ANS7IN-BB0 | ANS8IN-BB0 | ANS1IN-BB0
 Loading...