

Page 1

iPhone
I N S T R U C T I O N
M A N U A L
TOUCHBOX
W I R E L E S S C O N T R O L L E R
Page 2

!
2!
Thank you for purchasing TouchBox by ZAETECH.
Disclaimer – TouchBox is for show and off road use only. It may not be used
while the vehicle is running. By using this device you are agreeing to the terms
of use and warranty on page 11.
WIRING DIAGRAM
Pin
Function
Wire Color
1
Ground
---
Black
2
Ignition
---
Black/ Orange
3
DigiGauge Expansion 1
---
Black/ Yellow
4
DigiGauge Expansion 2
---
Black/ Blue
5
Deflate Rear Right
---
Orange 6 Deflate Rear Left
---
Brown 7 Deflate Front Right
---
Yellow 8 Deflate Front Left
---
Green
9
Power (+12v)
---
Red
10
Auxiliary 3
---
Black/ White
11
Auxiliary 2
---
Black/ Green
12
Auxiliary 1
---
Black/ Red
13
Inflate Rear Right
---
Blue
14
Inflate Rear Left
---
Grey
15
Inflate Front Right
---
Violet
16
Inflate Front Left
---
White
Page 3

3!
INSTALLATION
Note: If you have purchesed the plug and play AccuAir VU4 harness,
plug it in inline with your VU4 and continue to step 3. You won’t be using
the main wiring harness or T-Tap connectors that are included in the box.
Step 1:
1) Attach the included T-Tap connectors to all 8 of your 12v valve wires.
2) Line up the wire in the metal groove of the clip and use pliers to clamp it
down.
Note: Squeeze connector hard with pliers until you hear it click.
Step 2:
1) Reference the wiring diagram on page 1 to connect the TouchBox valve
control wires.
2) Plug each of the 8 TouchBox valve control wires to its corresponding TTap connector on your valves.
Note: Ensure that the red spade connector is fully inserted straight into the
blue T-Tap connector.
Step 3:
1) Install the supplied wireless antenna in
a visible area from outside the car.
Preferably high up in the front or rear
window of the vehicle.
2) Connect the antenna wire to the
antenna port on the side of the
TouchBox device.
Note: Ensure that the antenna is screwed
in tight and the wire isn’t kinked or
squished when routed.
Page 4
!
4!
Step 4:
1) Connect the black/orange ignition wire
to your ignition.
2) Connect the red power wire to a
constant 12v source.
3) Securely ground the black wire.
4) Tape the ends of all unused auxiliary
wires.
5) Plug the wiring harness into the
TouchBox device.
Note: The plug on the TouchBox device
will glow red when powered.
Note: Do not connect auxiliary
accessories until the main harness is
plugged in.
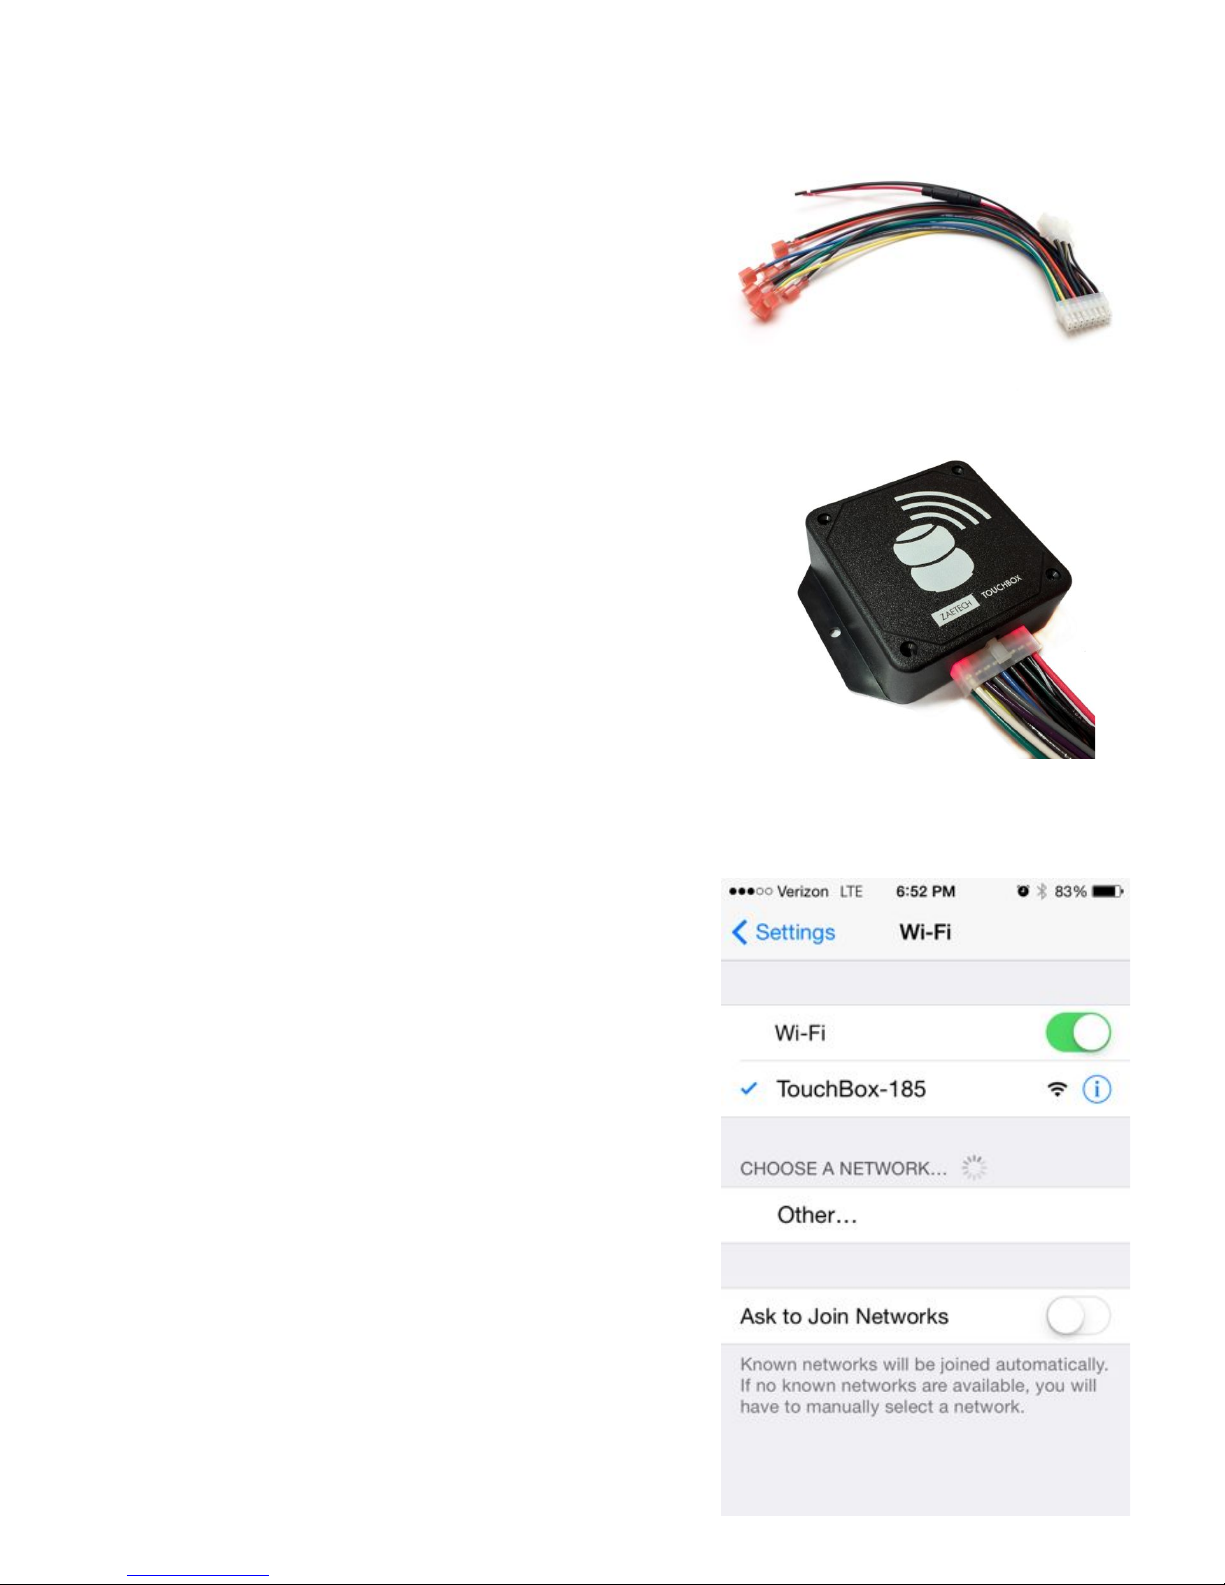
Step 5:
1) Open the ‘Wi-Fi Networks’ screen in the
‘Settings’ of your iPhone.
2) Connect to the ‘TouchBox-XXX’ network
that matches the serial number of your
device.
Note: The serial number of the Wi-Fi
network shown is 103. Your unique serial
number can be found on the bottom of
your TouchBox device.
Page 5

5!
Step 6:
1) Open the settings of your TouchBox’s
Wi-Fi network by clicking on the little
blue arrow next to it.
2) Set the connection type to ‘Static’.
3) Set the IP Address to 169.254.5.5
4) Set the Subnet Mask to 255.255.0.0
Note: Your iPhone will automatically
connect to your TouchBox when you’re
near your vehicle.
Step 7:
1) Open the TouchBox app and you will be
prompted to enter your device
password.
2) Enter the password found on the bottom
of your TouchBox device.
Note: Once you enter the password the
app will save it permanently.
Page 6

!
6!
CONTROL
Switches
This is the main screen to control your air
suspension. Once connected to your device
the screen will get brighter and the buttons
will become active. To ensure safety, this
screen will only be active when you have a
solid connection to a TouchBox device. You
can also change the theme in the options
menu. When the ignition is on this screen will
remain lit but control of the valves will be
disabled. !
!
Auxiliary
The auxiliary screen allows you to control air
ride accessories or other gadgets in your
vehicle. All 3 of the buttons are momentary
just like the switches. You have the ability to
change the labels of the buttons in the
options screen. See page 8 for more details.
Note: You can use emoji characters in the
button labels. !
Page 7

7!
Options
In the options screen you have the ability to
customize your experience. When actively
connected to your TouchBox device, any
settings that you change will be saved for
that specific device. If you connect to another
TouchBox, it will load the last settings you
saved for that device. We plan on adding a
lot more options as time goes on so make
sure to keep your app updated!
Page 8

!
8!
ADDITIONAL FEATURES
Auxiliary Setup
If your serial number is lower than 200:
The 3 auxiliary wires supply momentary 5v when pressed. These can be
used to power a small 5v device (i.e. aftermarket alarm functions). To use
these with 12v devices (i.e. air valve or air horn) a 5v triggered relay is
required for each auxiliary function. The TouchBox Auxiliary Relay, a 12v
relay board with 5v triggers, is available to purchase separately. It includes 3,
5v triggered relays with an attached wire harness for easy connection
If your serial number is higher than 200:
The 3 auxiliary wires supply momentary 12v when pressed. These can be
used to power a small 12v device (under 2 amps) like an air horn, electric
tank drain, or trunk popper.
Pressure Display with DigiGauge
The small 3-pin plug on the wiring harness is
an expansion slot for DigiGauge. This will
allow TouchBox to receive pressure readings
and display them on your iPhone. Your
TouchBox device already is set up to send
and receive pressure readings when
connected to DigiGauge.
Positional Faceplate
The faceplate of the TouchBox device is a
perfect square. It is designed so that you can
change the direction of the logo to suit your
trunk layout. Just remove the 4 screws and
rotate it to any direction you desire.
Note: Do not tamper with the electronics
when the cover is off. It may damage your
device.
Page 9

9!
DETAILED INFORMATION
• When the ignition is on you cannot adjust your air suspension. You can
establish a connection with the device and press buttons, but they won’t
work. This is a hard-wired safety feature. Auxiliary buttons will work with
ignition on.
• The Wi-Fi network the TouchBox device makes is open without a
password. Anyone near you vehicle can connect to it but in no way can
they control your vehicle or block you from connecting. The only way to
control your TouchBox is with the correct password.
• There is no way for you to change your password. Use caution when
giving it out.
• More then one iPhone can be connected to a TouchBox Wi-Fi network
simultaneously. The iPhone that opens the app with the correct
password first will have control over the device.
• The advertised range of the TouchBox Wi-Fi network is calculated in an
open area. If you try to use it from inside a building or behind an obstacle
then the range is significantly reduced. Placement of the device in your
vehicle also makes a difference. Try to install it in as high of any area as
possible, preferably near a window.
• The TouchBox device has a very small continuous power draw (50mA)
that is acceptable for a frequently driven vehicle. Disconnect your
TouchBox device if your vehicle is going to sit unused for longer than
four weeks.
Page 10

!
10!
TROUBLESHOOTING
I can’t connect to my TouchBox device
• Make sure the TouchBox device powered on and the plug is glowing red.
If you don’t see the red glow then your device is not receiving power.
• Your TouchBox device may have encountered an error during its last
connection and may be unable to establish a new connection. Please
unplug your TouchBox device and plug it back in to reset the Wi-Fi
broadcast.
It takes a long time to connect to my TouchBox
• You may not have the static IP settings setup that enables the instant
connection time. If you don’t set the static IP then your iPhone may take
up to 30 seconds to establish a connection with TouchBox. Go to step 6
and follow the instructions to setup static IP.
The TouchBox app freezes while connecting
• Your TouchBox device may have encountered an error during its last
connection and may be unable to establish a new connection. First try to
quit the app and reopen it. If the problem still occurs then unplug your
TouchBox device and plug it back in to reset the Wi-Fi broadcast.
The valve control is slow and inconsistent
• Your TouchBox device is not receiving a clear signal from your iPhone.
This problem occurs when you are at the edge of the usable range or if
there are obstacles blocking the wireless signal. Either try using
TouchBox closer to your vehicle or relocate your TouchBox device. To
maximize range and connection quality locate your TouchBox device as
high as possible, preferably near a window.
Page 11

11!
TERMS OF USE
• TouchBox is for show and off road use only. It may not be used while the vehicle is running.
• TouchBox is designed to work with 8 electric valves. It is only to be installed with valves that
draw less than 2 amps.
• TouchBox does not prevent you from over inflating your bags. Do not install on systems with tank
pressure greater then 150psi.
• You are required to install the ignition wire to a 12v ignition source.
• Do not operate TouchBox if anyone is near or under the vehicle.
• TouchBox is a supplemental control system for your existing management. Do not use it to
replace your existing hard-wired control system.
• If you need to work under your vehicle then you must disconnect your TouchBox device from its
power source.
• You must wire your TouchBox with the supplied wiring diagram. Any other method is prohibited.
• The TouchBox device is not weather proof. It must be installed in a dry location inside the cabin
of the vehicle.
WARRANTY
Limited Warranty. Zaetech, LLC warrants that upon delivery and for a period of 90 days following
delivery, the TouchBox will be free from defects in material and workmanship under proper and normal
use. Failure to comply with the terms of use shall immediately void this warranty. You are responsible
for proper installation, operation, and maintenance as specified in our publications on the TouchBox for
using the product in recommended applications within rated capacities. This warranty gives you
specific legal rights, and you may also have other rights which vary from state to state.
Remedies. In accordance with the terms of the limited warranty stated above (“Warranty”), Zaetech,
LLC will repair or replace any defective TouchBox, provided that written notice of the defect is received
by Zaetech, LLC within thirty (30) days of the appearance of such defect. If notice is not given within
such period, any claim for breach of warranty shall be conclusively deemed to have been waived and
Zaetech, LLC shall not be liable under this Warranty.
Limitations on Warranty. Zaetech LLC’s liability for any defect in the TouchBox, whether based on
contract, tort, warranty, strict liability, or any other theory, shall not exceed the purchase price of the
defective TouchBox. THIS WARRANTY IS IN LIEU OF ALL OTHER WARRANTIES, WHETHER
ORAL, WRITTEN, EXPRESS, IMPLIED, STATUTORY, OR OTHERWISE. IN PARTICULAR, THERE
IS NO WARRANTY OF MERCHANTABILITY OR FITNESS FOR A PARTICULAR PURPOSE. THE
REMEDY OF REPAIR OR REPLACEMENT PROVIDED UNDER THIS WARRANTY IS EXCLUSIVE
AND IN LIEU OF ALL OTHER REMEDIES. ZAETECH, LLC SHALL HAVE NO LIABILITY TO THE
CUSTOMER FOR CONSEQUENTIAL, SPECIAL, INCIDENTAL OR PUNITIVE DAMAGES OF ANY
KIND WHATSOEVER, INCLUDING, BUT NOT LIMITED TO, PERSONAL INJURY NOT CAUSED BY
NEGLIGENCE OF ZAETECH, LLC, PROPERTY DAMAGE, LOST PROFITS OR OTHER ECONOMIC
INJURY DUE TO ANY DEFECT IN THE GOODS OR ANY BREACH OF THIS AGREEMENT BY
ZAETECH, LLC. ZAETECH, LLC SHALL NOT BE LIABLE TO THE CUSTOMER IN TORT FOR ANY
DEFECT IN THE DESIGN OR MANUFACTURE OF THE GOODS. No representative, agent or dealer
of Zaetech LLC has authority to modify, expand, or extend this Warranty, to waive any of the limitations
or exclusions of this Warranty, or to make any different or additional warranties with respect to any
TouchBox or services furnished by Zaetech, LLC. Some states do not allow limitations on how long
an implied warranty lasts, so the above limitation may not apply to you. Some states do not
allow the exclusion or limitation of incidental or consequential damages, so the above limitation
or exclusion may not apply to you.
Page 12

!
12!
zaetech.net
V1.3!
 Loading...