


Wireless Broadband 11n Router User Guide
ZW-BR11NT WIRELESS-N Broadband Router
User Manual
Guía de Usuario
Veuillez lire ci-dessous avant Utilisation
Manual do Usuário
Instrukcja obslugi
ZAAPA TECHNOLOGY
Produced in: CHINA
IMPORTER: ZAAPA IBERICA B82126020
1990/05/ce CONFORMITY/COMPLIANT
WWW.ZAAPA.NET
MODEL: ZW-BR11NT
EQUIVALENT

Wireless Broadband 11n Router User Guide
Copyright Statement
Zaapa is the registered trademark. All the products and product names mentioned herein are the trademarks or
registered trademarks of their respective holders. Without the permission of Zaapa, individual or party is not
allowed to copy, plagiarize, imitate or translate it into other languages.
All the photos and product specifications mentioned in this manual are for references only. As the upgrade of
software and hardware, there will be changes. And if there are changes, Zaapa is not responsible for informing
in advance. If you want to know more about our product information, please visit our website at www.zaapa.net .
ENGLISH

Wireless Broadband 11n Router User Guide
Contents
Chapter 1: Introduction.......................................................................................................................1
Package Contents......................................................................................................................................................2
Chapter 2: Getting to Know the Wireless-N Broadband Router......................................................3
The Back Panel .......................................................................................................................................................... 3
The Front Panel.......................................................................................................................................................... 4
The Top Panel............................................................................................................................................................. 5
Hardware Installation................................................................................................................................................. 6
Chapter 3: Getting to Connect the Wireless-N Broadband Router................................................. 7
How to Set the Network Configurations for My Computer..................................................................................... 7
How to Check the Network Connection ................................................................................................................. 10
Chapter 4 Basic Configurations....................................................................................................... 11
How to Access the Web-based Configuration Utility.............................................................................................11
Setup Wizard ............................................................................................................................................................ 12
Chapter 5: Advanced Settings .........................................................................................................15
LAN Settings ............................................................................................................................................................ 15
WAN Settings—PPPoE............................................................................................................................................ 16
WAN Settings—Static IP.......................................................................................................................................... 17

Wireless Broadband 11n Router User Guide
MAC Address Clone................................................................................................................................................. 18
DNS Settings ............................................................................................................................................................ 19
Chapter 6: Wireless Settings............................................................................................................ 20
Basic Settings .......................................................................................................................................................... 20
Wireless Security Settings...................................................................................................................................... 21
WPS Settings............................................................................................................................................................ 27
WDS Settings ........................................................................................................................................................... 28
Advanced Wireless Settings...................................................................................................................................30
Wireless Access Control ......................................................................................................................................... 32
Wireless Connection Status.................................................................................................................................... 33
Chapter 7: DHCP Server................................................................................................................... 34
DHCP Server List ..................................................................................................................................................... 35
Chapter 8: Virtual Server.................................................................................................................. 36
Single Port Forwarding............................................................................................................................................ 36
Port Range Forwarding ........................................................................................................................................... 38
DMZ Settings............................................................................................................................................................39
UPnP Settings .......................................................................................................................................................... 39
Client Filter Settings................................................................................................................................................ 40
DNS Filter Settings................................................................................................................................................... 41
MAC Address Settings ............................................................................................................................................ 42
Prevent Network Attack........................................................................................................................................... 43

Wireless Broadband 11n Router User Guide
Remote Web Management................................................................................................................ 43
Local Web Management.......................................................................................................................................... 44
Ping Settings............................................................................................................................................................45
Static Routing........................................................................................................................................................... 45
Chapter 9: System Tools .................................................................................................................. 46
Time........................................................................................................................................................................... 46
DDNS......................................................................................................................................................................... 47
Backup/Restore........................................................................................................................................................ 48
Firmware Upgrade.................................................................................................................................................... 49
Restore to Factory Default Settings....................................................................................................................... 50
Reboot....................................................................................................................................................................... 51
Change Password.................................................................................................................................................... 51
System Log............................................................................................................................................................... 52
Appendix A: Product Features......................................................................................................... 53

Wireless Broadband 11n Router User Guide
Chapter 1: Introduction
Thank you for choosing the ZW-BR11NT Wireless-N Broadband Router. It employs the advanced MIMO (Multi
Input, Multi Output) technology and integrates router, wireless access point, four-port switch and firewall in one,
which will allow you to share Internet access over the four switched ports or via the wireless broadcast.
Compatible with IEEE 802.11n (Draft 2.0) standard, it can connect with existing 802.11b/g PCI, USB and
Notebook adapters. Up to 300Mbps transmission rate allows you to enjoy real-time activities such as video
streaming, online gaming and so on.
Besides, the Wireless-N Broadband Router supports all of the latest wireless security features, such as 64/128-bit
WEP encryption, WPS (PBC and PIN) encryption method, packet filtering and port forwarding, to prevent
unauthorized access and protect your network against malicious attack.
Moreover, the user-friendly Setup Wizard on the CD-ROM can assist you to set up the Wireless-N Broadband
Router easily. It also can be managed or configured through Local/Remote easy-to-use Web-based utility. So it is
the best choice for SOHOs and small-sized enterprises.
1

Wireless Broadband 11n Router User Guide
Package Contents
¾ One ZW-BR11NT Wireless-N Broadband Router
¾ One Ethernet Network Cable
¾ One Quick Installation Guide
¾ One Power Adapter
¾ One CD-ROM
If any of listed items are missing or damaged, please contact the Zaapa reseller from whom you
purchased for replacement immediately.
2

Wireless Broadband 11n Router User Guide
Chapter 2: Getting to Know the Wireless-N Broadband Router
The Back Panel
Here is the description of the back panel. The RJ-45 ports for cable connection and Reset button are located on
the back panel as shown below.
3

Wireless Broadband 11n Router User Guide
The Front Panel
There are the Router’s LED indicators on the front panel as shown below.
LED Indicator Status Description
POWER Always ON
SYS Blinking The SYS is blinking regularly when the system works normally.
WAN
WLAN Blinking Indicates the wireless signal is OK.
LAN(1/2/3/4)
WPS Blinking
Always ON Indicates the correct connection of the WAN ports.
Blinking Indicates the Router is transmitting/receiving data packets.
Always ON Indicates the correct connection of the LAN ports.
Blinking
The POWER indicator is Always ON when it is powered on and
works properly.
Indicates the Router is transmitting/receiving data packets.
Indicates the Router is negotiating with WPS clients in WPS Mode
(PBC or PIN code).
4

Wireless Broadband 11n Router User Guide
The Top Panel
On the top panel, three exposed reverse SMA antennas are located to broadcast the signals for wireless
network.
5

Wireless Broadband 11n Router User Guide
Hardware Installation
Before you connect the Wireless-N Broadband Router, please refer to the following steps for correct and easy
hardware installation. In order to get better wireless performance, please locate the Router at the centre of the
wireless network.
¾ Power off all devices connected, including the Modem and your PC(s)
¾ Connect one end of the included Ethernet network cable to one of the ports on the back panel of the Router.
Connect the other end to an Ethernet/WAN port of certain network device as a PC or switch. Please repeat
this step to add more PCs or other devices.
¾ Connect the Modem’s Internet cable to the WAN port of the Router
¾ Power on the Modem
¾ Power on the Router with the included power adapter. The Power LED indicator on the front panel will light
green if it’s connected correctly.
¾ Now, you can launch your PC(s) to configure the Router. More details please refer to the next chapter.
IMPORTANT: Please use the included power supply. Use of a different power adapter could cause
damage and void the warranty for this product.
6

Wireless Broadband 11n Router User Guide
Chapter 3: Getting to Connect the Wireless-N Broadband Router
For easy and fast configuration, the following steps for network configuration are required.
How to Set the Network Configurations for My Computer
Right click “My Network Places” and select
“Properties”
.
Right click “Local Area Network Connection” and
select “Properties”.
7
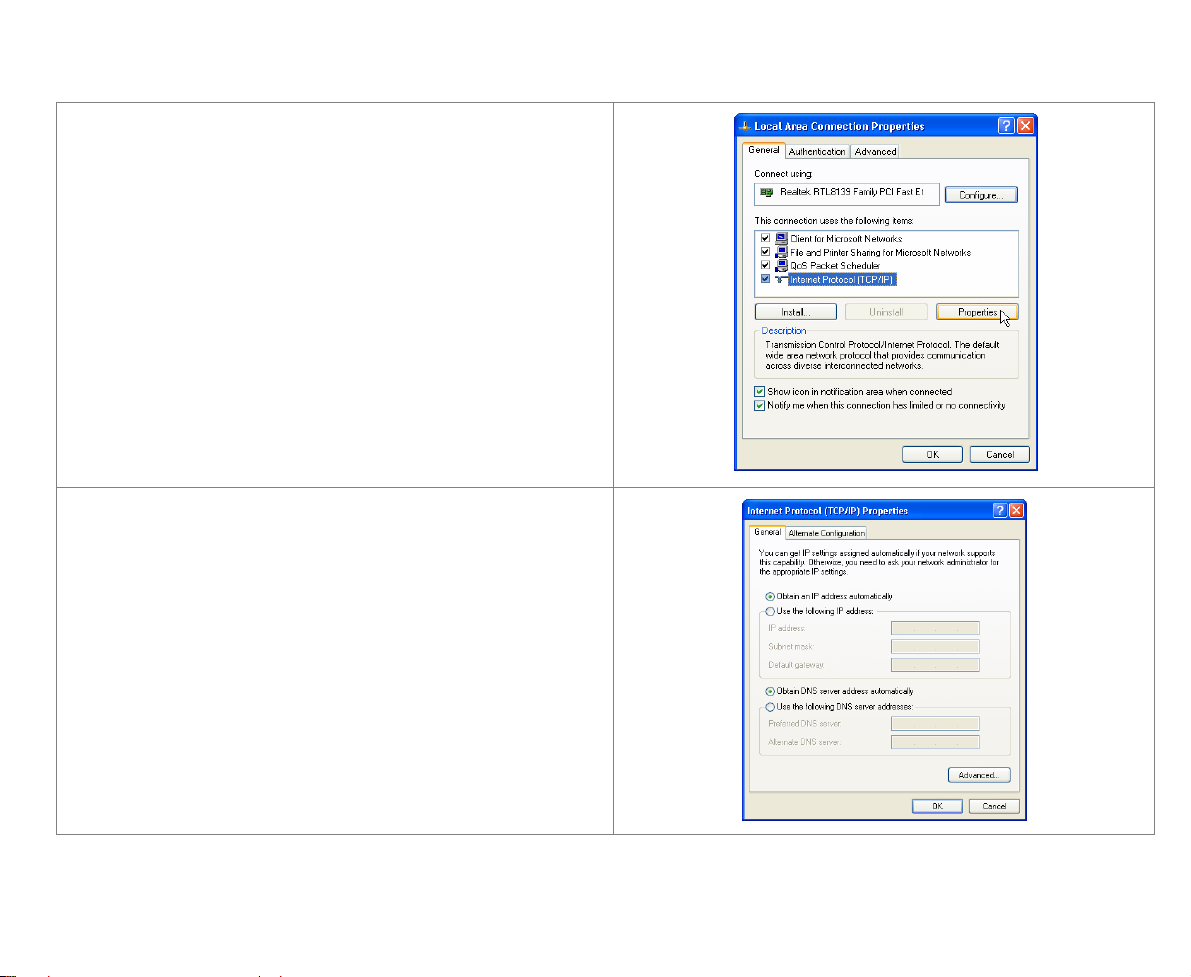
Select “Internet Protocol (TCP/IP)” and click
“Properties”.
Select “Obtain an IP address automatically” and
“Obtain DNS server address automatically”. Click
“OK” to save the configurations.
Wireless Broadband 11n Router User Guide
.
8

Or select “Use the following IP address” and enter
the IP address, Subnet mask, Default gateway as
shown right. Of course, you need to input the DNS
server address provided by your ISP. Otherwise, you
can use the Router’s default gateway as the DNS
proxy server. Click “OK” to save the configurations.
Wireless Broadband 11n Router User Guide
9

How to Check the Network Connection
Select “Start”—All
Programs”—“Accessories”
—“Command Prompt”.
Input the “ping 192.168.0.1” and press
“Enter”. If the screen displays as the
right figure, it means your PC is
connected to your router successfully.
If not, please make sure the hardware
installation and network adapter are
OK. After all preparations are made,
please proceed to Chapter 4 for more
and advanced configuration.
Wireless Broadband 11n Router User Guide
10

Wireless Broadband 11n Router User Guide
Chapter 4 Basic Configurations
This section is to show you how to configure your new Wireless-N Broadband Router through the
Web-based Configuration Utility.
How to Access the Web-based Configuration Utility
To access the Router’s Web-based Utility, launch
a web browser such as Internet Explorer or
Firefox and enter the Router’s default IP
address, http://192.168.0.1. Press “Enter”.
Please input the “admin” in both User Name and
Password. Click “OK”.
11

Setup Wizard
Here is the “Welcome to Setup Wizard” for
configuring your Router quickly. Click “Next”.
In this screen, select one mode of your Internet
connection you use. If you are not clear, press the
“Detect” button or contact your Internet Service
Provider, and click “Next”.
Wireless Broadband 11n Router User Guide
ÎConnection Mode 1: ADSL Virtual Dial-up (Via
PPPoE)
1. Enter the Account and Password provided by your
ISP, and click “Next”
12

Wireless Broadband 11n Router User Guide
ÎConnection Mode 2: Dynamic IP (Via DHCP)
1. If your connection mode is Dynamic IP, it means
your IP address keeps changing every time you
connect. You do not need to enter the information
like Mode 2 or Mode 3.
ÎConnection Mode 3: Static IP
1. In this screen, fill the network address
information from your ISP in the IP Address,
Subnet Mask, Gateway and Primary DNS server
fields and click “Next”.
2. Click “Apply” to reboot the Router, or press
“Reboot the router” button in System Tools of
the left menu.
13

3. It is rebooting now, please wait for a few minutes
and DO NOT power off it.
Click the “System Status” in the left menu of the
Web-based Utility to find out the current network and
system information.
Wireless Broadband 11n Router User Guide
Congratulations you on completing the Router’s basic settings. You are on the Internet now. If you want to
configure more, please proceed to the following explanations for Advanced Settings.
14

Wireless Broadband 11n Router User Guide
Chapter 5: Advanced Settings
This section is to conduct the advanced configurations for the Router, including LAN Settings, WAN
settings, MAC Address Clone and DNS Settings.
LAN Settings
AC Address:The Router’s physical MAC address
as seen on your local network, which is
unchangeable.
IP Address: The Router’s LAN IP address (not your
PC’s IP address). Once you modify the IP address,
you need to remember it for the Web-based
Utilitylogin next time. 192.168.0.1 is the default
value.
Subnet Mask: It’s shown the Router’s subnet mask
for measurement of the network size. 255.255.255.0
is the default value.
15

WAN Settings—PPPoE
Connection Mode: Show your current connection
mode.
Account:Enter them provided by your ISP.
Password:Enter them provided by your ISP.
MTU:Maximum Transmission Unit. It is the size of
largest datagram that can be sent over a network. The
default value is 1492. Do NOT modify it unless
necessary.
Service Name:It is defined as a set of characteristics
that are applied to a PPPoE connection. Enter it if
provided. Do NOT modify it unless necessary.
AC Name:Enter it if provided. Do NOT modify it unless
necessary.
Connect automatically to the Internet after rebooting
the system or connection failure.
Connect Manually:Connect to the Internet by the user
manually.
Wireless Broadband 11n Router User Guide
16

Connect on Demand:Re-establish your connection to
the Internet after the specific time (Max IdleTime).
Zero means your Internet connection at all time.
Otherwise, enter the minutes to be elapsed before you
want to disconnect the Internet access.
Connect on Fixed Time: Connect to the Internet
during the time you fix.
WAN Settings—Static IP
If your connection mode, static IP is chosen, please
enter the following addressing information.
IP Address:Here enter the WAN IP address provided
by your ISP.
Subnet Mask:Enter the WAN Subnet Mask here.
Gateway:Enter the WAN Gateway here.
Primary DNS Server:Enter the Primary DNS server
provided by your ISP.
Secondary DNS Server:Enter the secondary DNS
Wireless Broadband 11n Router User Guide
17

MAC Address Clone
Some ISPs require end-user's MAC address to
access their network. This feature copies the MAC
address of your network device to the Router.
MAC Address: The MAC address to be registered
with your Internet service provider.
Clone MAC address: Register your PC's MAC
address.
Restore default MAC address: Restore the default
hardware MAC address.
Wireless Broadband 11n Router User Guide
18

DNS Settings
DNS is short for Domain Name System(or Service), an
Internet service that translate domain names into IP
addresses which are provided by your Internet Service
Provider. Please consult your Internet Service
Provider for details if you do not have them.
DNS:
Click the checkbox to enable
the DNS server.
Primary DNS Address:
Enter the necessary address provided by your
ISP.
Secondary DNS Address:
Enter the second address if your ISP provides, which
is optional.
Wireless Broadband 11n Router User Guide
19

Wireless Broadband 11n Router User Guide
Chapter 6: Wireless Settings
This section mainly deals with the wireless settings, including Basic Settings, Security Setting, Access
Control and Advanced Settings.
Basic Settings
Network Mode: Supports 802.11b/g mixed, 802.11b,
802.11g and 802.11b/g/n mixed modes.
Main SSID: Main Service Set Identifier. It’s the "name"
of your wireless network.
Minor SSID: Minor Service Set Identifier. It is optional.
Broadcast (SSID):Select “enable” to enable the
device's SSID to be visible by wireless clients.
BSSID: It is a 48bit identity used to identify a particular
BSS (Basic Service Set) within an area. In
Infrastructure BSS networks, the BSSID is the MAC
(Medium Access Control) address of the AP
Channel: From the drop-menu, it is for selecting the
working channels of the wireless network. Please
select from 1 to 13, or select AutoSelect to select
20

Wireless Broadband 11n Router User Guide
different channels.
Channel Bandwidth:Select wireless work frequency
20M or 20/40M.
Wireless Security Settings
This page is to configure the wireless security of your Router. Six wireless security modes, WEP, WPA-Personal,
WPA2-Personal, WPA-Enterprise, WPA2-Enterprise and RADIUS, are supported. If you do not want to use
wireless security, select disable from the drop-down menu.
1. WEP
WEP (Wired Equivalent Privacy), a basic encryption
method, usually encrypts wireless data using a series of
digital keys (64 bits or 128 bits in length). By using the
same keys on each of your wireless network devices,
you can prevent unauthorized wireless devices from
monitoring your transmissions or using your wireless
resources.
SSID Choice: Select SSID to be configured security. The
device supports to configure different security classes
between the main SSID and the subordinate SSID.
Security Mode: There are several different security
modes; you can choose one from mixed WEP, WPAPersonal, WPA-Enterprise, etc.
21

Default Key: Select a valid encryption key.
WEP Key:Choose ASCII Characters or Hexadecimal
Digitsfrom the drop-down menu.
Key 1-4: Enter the WEP key here. Please note that the
key should be in accordance with the key format and be
valid.
2. WPA-Personal
WPA (Wi-Fi Protected Access), a Wi-Fi standard, is a
more recent wireless encryption scheme, designed to
improve the security features of WEP. It applies more
powerful encryption types (such as TKIP [Temporal
Key Integrity Protocol] or AES [Advanced Encryption
Standard]) and can change the keys dynamically on
every authorized wireless device.
WP A Algorithms: Select one encryption type, AES or
TKIP. (AES is stronger than TKIP.)
Pass Phrase: Enter the key which must have 8-63
ASCII characters.
Key Renewal Interval:Enter the key renewal period. It
is to tell the Router how often to change the keys.
3. WPA2-Personal
Wireless Broadband 11n Router User Guide
22

secure than Wired Equivalent Privacy (WEP) and
easy to set up.
WP A Algorithms: Select key Algorithms such as TKIP,
AES and TKIP&AES.
Pass Phrase: Enter the key which must have 8-63
ASCII characters.
Key Renewal Interval: Enter the key renewal
period. It is to tell the Router how often to change the
keys.
4. WPA-Enterprise
This Authentication protocol based on RADIUS
server. This security mode is used when a RADIUS
server is connected to the Router.
Radius IP Address: Please input IP address of the
radius server here.
Radius Port: Please input the port number of the
radius server here.
Shared key:The encryption key that the router is
Wireless Broadband 11n Router User Guide
WPA2 (Wi-Fi Protected Access version 2), It's more
23

authenticated through RADIUS server
Session Timeout: The recertification time interval
between the router and the server. The default value
is 3600s.
5. WPA2-Enterprise
This security mode is also used when a RADIUS
server is connected to the Router.
WPA Algorithms: Select key Algorithms such as TKIP
and AES.
Radius IP Address: Please input IP address of the
radius server here.
Radius Port: Please input the port number of the
radius server here.
Shared key:The encryption key that the router is
authenticated through RADIUS server
Session Timeout: The recertification time interval
between the router and the server. The default value
is 3600s.
6. 802.1X
Wireless Broadband 11n Router User Guide
24

Wireless Broadband 11n Router User Guide
This security mode is used when a RADIUS server is
connected to the Router. 802.1x, a kind of Port-based
authentication protocol, is an authentication type and
strategy for users. The port can be either a physic
port or logic port (such as VLAN). For wireless LAN
users, a port is just a channel. The final purpose of
802.11x authentication is to check if the port can be
used. If the port is authenticated successfully, you can
open this port which allows all the messages to pass.
If the port isn’t authenticated successfully, you can
keep this port “disable” which just allows 802.1x
authentication protocol message to pass.
WEP: Select “enable/disable” WEP encryption which
indicates the authentication process between wireless
adapter and wireless router.
Radius IP Address: Please input IP address of the
radius server here.
Radius Port: Please input the port number of the
radius server here.
Shared key:The encryption key that the router is
authenticated through RADIUS server
25

Session Timeout: The recertification time interval
between the router and the server. The default value
is 3600s.
NOTE: To improve security level, do not use
those words which can be found in a
dictionary or too easy to remember!
Wireless clients will remember the
WEP key, so you only have to input
the WEP key on wireless client once,
and it’s worth to use complicated
WEP key to improve security level.
Wireless Broadband 11n Router User Guide
26

WPS Settings
Wi-Fi Protected Setup (WPS) is the simplest way to
build connection between wireless network clients
and this wireless router. You don’t have to select
encryption mode and input a long encryption pass
phrase every time when you need to setup a
wireless client, you only have to press a button on
wireless client and this wireless router, and the
WPS will do the rest for you.
This wireless router supports two types of
WPS: Push-Button Configuration (PBC), and PIN
code.
PBC: Push-Button Configuration, You can push
WPS button of this wireless router, or select ‘PBC’
here to start WPS mode.
PIN: This is the WPS PIN code of this wireless
router. This code is useful when you need to build
wireless connection by WPS with other
WPS-enabled wireless devices.
Wireless Broadband 11n Router User Guide
27

WDS Settings
In this mode, you can expand the scope of network
by combining up to four other access points together,
and every access point can still accept wireless
clients.
Lazy Mode: You need configure the router’s BSSID
into another device, not need input another router’s
BSSID in it, and then connect together automatically.
Bridge Mode: You can wirelessly connect two or
more wired networks via this mode. In this mode, you
need to add the Wireless MAC address of the
connecting device into the Router's AP MAC address
table or select one from the scanning table. At the
same time, the connecting device should be in Lazy,
Repeater or Bridge mode.
Repeater Mode: You can select the mode to extend
the distance between the two WLAN devices.
Functioning as a WDS repeater, the ZW-BR11NT
connects to both a client card as an AP and to
another AP. In typical repeater applications, APs
connecting to other APs equipped with WDS
Wireless Broadband 11n Router User Guide
28

functionality must also support WDS. In this mode,
you need to add the MAC address of the connecting
device into the Router's AP MAC address table and
the connecting client should be in Lazy, Repeater or
client mode.
Encrypt Type: You can select WEP mode, TKIP
mode, AES mode for security here.
Pass phrase: Enter the key, the key format according
to encryption you selected.
AP MAC: Input the MAC address of another wireless
router.
NOTE: Two wireless routers must use the
same mode, band, channel number, and
security setting!
Wireless Broadband 11n Router User Guide
29

Advanced Wireless Settings
This section is to configure the advanced wireless
setting of the Router, including the Radio Preamble,
802.11g/n Rate, Fragmentation Threshold, RTS
Threshold, Beacon Period and DTIM Interval.
BG protection Mode: Auto by default. You can select
On or Off.
Basic Data Rates: For different requirement, you can
select one of the suitable Basic Data Rates.
Here, default value is (1-2-5.5.-11Mbps…).
Beacon Interval: Set the beacon interval of wireless
radio. Do not modify default value if you don’t know
what it is, default value is 100.
Fragment Threshold: Do not modify default value if you
don’t know what it is, default value is 2346.
RTS Threshold:Set the RTS threshold of wireless
radio. Do not modify default value if you don’t know
what it is, default value is 2347.
Wireless Broadband 11n Router User Guide
30

TX Power: You can set the output power of wireless
radio. Unless you’re using this wireless router in a
really big space, you may not have to set output power
to 100%. This will enhance security (malicious /
unknown users in distance will not be able to reach
your wireless router).
WMM Capable: It will enhance the data transfer
performance of multimedia contents when they’re
being transferred over wireless network. If you don’t
know what it is / not sure if you need it, it’s safe to set
this option to ‘Enable’, however, default value is
enabling.
APSD Capable: It is used for auto power-saved
service. The default is disabled.
Wireless Broadband 11n Router User Guide
31

Wireless Access Control
To secure your wireless LAN, the wireless access
control is actually based on the MAC address
management.
MAC Address Filter:If you want to access the
router from any external IP Address, please select the
“Disable”.
MAC Address:To specify an external IP address,
please add the MAC address manually and click
“Add”.
MAC Address List:The added MAC addresses
are listed here. Click “Delete” to delete the filter
management for this MAC address.
Wireless Broadband 11n Router User Guide
32

Wireless Connection Status
This page is to show the current wireless access
status. Click “Refresh” to update the wireless
connection information.
MAC Address
Shows the connecting PC’s MAC address.
Speed
The wireless transmission rate for the corresponding
PC.
RSSI
Stands for the Received Signal Strength Indication,
which is a measurement of the received radio signal
strength.
Wireless Broadband 11n Router User Guide
33

Chapter 7: DHCP Server
DHCP (Dynamic Host Control Protocol) is to assign
an IP address to the computers on the LAN/private
network. When you enable the DHCP Server, the
DHCP Server will allocate automatically an unused IP
address from the IP address pool to the requesting
computer in premise of activating “Obtain an IP
Address Automatically”. So specifying the starting
and ending address of the IP Address pool is needed.
DHCP Server:Activate the checkbox to enable
DHCP server.
IP Address Start/End: Enter the range of IP address
for DHCP server distribution.
Lease Time: The length of the IP address lease.
Wireless Broadband 11n Router User Guide
34

DHCP Server List
The Static IP assignment is to add a specifically static
IP address to the assigned MAC address. You can
view the related information in the DHCP server list.
IP Address: Enter one IP address for the computer
on the LAN network.
MAC Address:Enter the MAC address of the
computer you want to assign the above IP address.
Click “Add” to add the entry in the list.
Hostname:The name of the computer which
is added a new IP address.
Lease Time:The time length of the corresponding IP
address lease.
Wireless Broadband 11n Router User Guide
35

Chapter 8: Virtual Server
Single Port Forwarding
The ZW-BR11NT can be configured as a virtual server
on behalf of local services behind the LAN port. The
given remote requests will be re-directed to the local
servers via the virtual server. This section deals with
the single port forwarding mainly. The Single Port
Forwarding allows you to set up kinds of public
services such as web servers, ftp, e-mail and other
specialized Internet applications on your network.
NOTE: the virtual server uses known
host-name or public IP address.
External Port:This is the external port number for
server or Internet application, for example, port 21 for
ftp service.
Internal Port:This is the port number of LAN computer
set by the Router. The Internet traffic from the external
port will forward to the internal port. For example, you
can set the internal port NO.66 to act as the external
port NO.21 for ftp service.
Wireless Broadband 11n Router User Guide
36

IP Address:Enter the IP address of the PC
where you want to set the applications.
Protocol:Select the protocol (TCP/UDP/Both) for the
application.
Well-Known Service Port: Select the well-known
services as DNS, FTP from the drop-down menu to
add to the configured one above.
Delete/Enable:Click to check it for corresponding
operation.
NOTE: If you set the virtual server of the service
port as 80, you must set the Web
management port on
Remote Web Management page to be any
value except 80 such as 8080. Otherwise,
there will be a conflict to disable the
virtual server.
Wireless Broadband 11n Router User Guide
37

Port Range Forwarding
This section deals with the port range forwarding
mainly. The Port Range Forwarding allows you to set
up a range of public services such as web servers,
ftp, e-mail and other specialized Internet applications
to an assigned IP address on your LAN.
Start/End Port:Enter the start/end port number
which ranges the External ports used to set the
server or Internet applications?
IP Address:Enter the IP address of the PC where you
want to set the applications.
Protocol:Select the protocol (TCP/UDP /Both) for
the application.
Well-Known Service Port: Select the well-known
services as DNS, FTP from the drop-down menu to
add to the configured one above.
Delete/Enable:Click to check it for corresponding
operation.
Wireless Broadband 11n Router User Guide
38

DMZ Settings
The DMZ function is to allow one computer in LAN to
be exposed to the Internet for a special-purpose
service as Internet gaming or videoconferencing.
DMZ Host IP Address: The IP address of the
computer you want to expose.
Enable: Click the checkbox to enable the DMZ host.
IMPORTANT:
When enabled the DMZ host, the
firewall settings of the DMZ host will
not function.
UPnP Settings
UPnP (Universal Plug and Play) allows the system
(only Windows Me and Windows XP) to configure the
device for various Internet applications automatically.
Enable UPnP: Click the checkbox to enable the
UPnP.
Wireless Broadband 11n Router User Guide
39
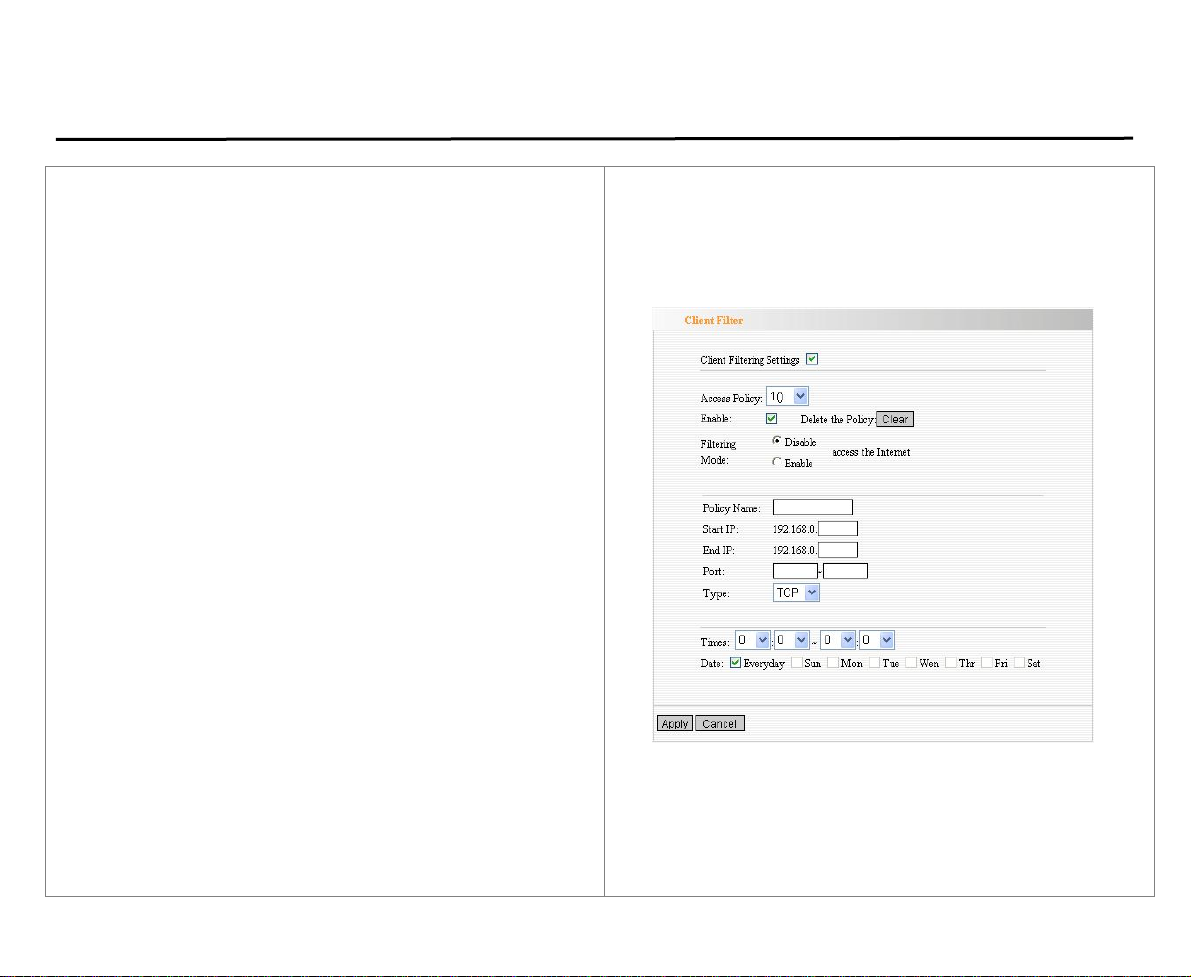
Client Filter Settings
Client Filter:Check to enable client filter.
Access Policy:Select one number from the drop-down
menu.
Enable:Check to enable the access policy.
Clear the Policy:Click “Clear” button to clear all
settings for the policy.
Filter Mode:Click one radio button to enable or disable
to access the Internet.
Policy Name:Enter a name for the access policy
selected.
IP Start/End:Enter the starting/ending IP address.
Port No.:Enter the port range based over the
protocol for access policy.
Protocol:Select one protocol (TCP/UDP/Both) from the
drop-down menu.
Times:Select the time range of client filter.
Days:Select the day(s) to run the access policy.
Wireless Broadband 11n Router User Guide
40

DNS Filter Settings
DNS Filter:Check to enable DNS filter.
Access Policy:Select one number from the drop-down
menu.
Enable:Check to enable the access policy.
Clear the Policy:Click “Clear” button to clear all
settings for the policy.
Filter Mode:Click one radio button to enable or
disable to access the Internet.
Policy Name: Enter a name for the access policy
selected.
IP Start/End: Enter the starting/ending IP address.
DNS:Specify the text strings or keywords in the DNS. If
any part of the DNS contains these strings or
words, the web page will not be accessible and display.
Times:Select the time range of client filter.
Days:Select the day(s) to run the access policy.
Wireless Broadband 11n Router User Guide
41

MAC Address Settings
MAC Address Filter:Check to enable MAC address
filter.
Access Policy:Select one number from the drop-down
menu.
Enable:Check to enable the access policy.
Clear the Policy:Click “Clear” button to clear all
settings for the policy.
Filter Mode:Click one radio button to enable or disable
to access the Internet.
Policy Name:Enter a name for the access policy
selected.
MAC Address:Enter the MAC address you want to run
the access policy.
Times:Select the time range of client filter.
Days: Select the day(s) to run the access policy.
Wireless Broadband 11n Router User Guide
42

Prevent Network Attack
This section is to protect the internal network from
exotic attack such as SYN Flooding attack, Smurf
attack, LAND attack, etc. Once detecting the unknown
attack, the Router will restrict its bandwidth
automatically.
The attacker’s IP address can be found from the
“System Log”.
Prevent Network Attack: Check to enable it for attack
prevention.
Remote Web Management
This section is to allow the network administrator to
manage the Router remotely. If you want to access
the Router from outside the local network, please
select the “Enable”.
Enable: Check to enable remote web management.
Port: The management port open to outside access
The default value is 80.
Wireless Broadband 11n Router User Guide
43

WAN IP Address: Specify the range of the WAN IP
address for remote management.
Local Web Management
Local web management, the alternative to remote
web management, is to allow the network
administrator to manage the Router in LAN. Any PC in
the LAN can access the Web management utility by
default. So you can enter the specific MAC address of
the LAN computer to function.
Enable:
Check to enable the local web management
MAC1/2/3…:
Enter the MAC addresses of LAN computers.
Wireless Broadband 11n Router User Guide
44

Ping Settings
The ping test is to check the status of your internet
connection. When disabling the test, the system will
ignore the ping test from WAN.
Disable the Ping for WAN: Check to enable it.
Static Routing
Static routing is the term used to refer to the manual
method to set up routing for successful packet
forwarding. The administrator puts in the entries for
every network that could be a destination. Usually
the static routes to network destinations are
unchangeable.
Destination LAN IP:
The address of the remote host with which you want
to construct a static route.
Subnet Mask:
The network portion of the Destination LAN IP.
Gateway:
The gateway of the next hop.
Wireless Broadband 11n Router User Guide
45

Chapter 9: System Tools
Time
This section is to select the time zone for your
location. If you turn off the Router, the settings for time
disappear. However, the Router will automatically
obtain the GMT time again once it has access to the
Internet.
Time Zone: Select your time zone from the drop-down
menu.
Customized time: Enter the time you customize.
Wireless Broadband 11n Router User Guide
46

DDNS
The DDNS (Dynamic Domain Name System) is
supported in this router . I t is to assign a fixed host and
domain name to a dynamic Internet IP address, which
is used to monitor hosting website, FTP server and so
on behind the Router. If you want to activate this
function, please select “Enable” and a DDNS service
provider to sign up.
DDNS:Click the radio button to enable or disable the
DDNS service.
Service Provider:Select one from the drop-down
menu and press “Sign up” for registration.
User Name:Enter the user name the same as the
registration name.
Password:Enter the password you set.
Domain Name: Enter the domain name which is
optional.
Wireless Broadband 11n Router User Guide
47

Backup/Restore
The device provides backup/restore settings, so you
need set a directory to keep these parameters.
Backup: Click this button to back up the Router’s
configurations.
Browse: Click this button to browse the directory
where you Back up or save files.
Restore: Click this button to restore the Router’s
configurations.
Wireless Broadband 11n Router User Guide
48

Firmware Upgrade
The Router provides the firmware upgrade by clicking
the “Upgrade” after browsing for the firmware upgrade
packet which you can download from
www. Zaapa.net. After the upgrade is completed, the
Router will reboot automatically.
Browse: Click this button to browse the directory
where you download the firmware upgrade files.
Upgrade: Click this button to start upgrade.
IMPORTANT:
Do not power off the system during
the firmware upgrade to avoid
damaging the device. The Router will
reboot after the upgrade.
Wireless Broadband 11n Router User Guide
49

Restore to Factory Default Settings
This button is to reset all configurations to the default
values. It means the Router will lose all the settings
you have set. So please Note down the related
settings if necessary.
Restore to Factory Default Settings: Click this button
to restore to default settings.
Factory Default Settings:
User Name: admin
Password: admin
IP Address: 192.168.0.1
Subnet Mask: 255.255.255.0
NOTE: After restoring to default settings,
please restart the device, then the
default settings can go into effect.
Wireless Broadband 11n Router User Guide
50

Reboot
Rebooting the Router makes the settings configured
go into effect or to set the Router again if setting
failure happens.
Reboot: Click this button to reboot the device.
Change Password
This section is to set a new user name and password
to better secure your router and network. Please Note
that the new password should be less than 14
characters.
User Name:Enter a new user name for the device.
Old Password:Enter the old password.
New Password:Enter a new password.
Re-enter to Confirm: Re-enter to confirm the new
password.
NOTE: It is highly recommended to change the
password to secure your network and
the Router.
Wireless Broadband 11n Router User Guide
51

System Log
The section is to view the system log. Click the
“Refresh” to update the log. Click “Clear” to clear all
shown information. If the log is over 150 records, it
will clear them automatically.
Refresh: Click this button to update the log.
Clear: Click this button to clear the current shown
log.
Wireless Broadband 11n Router User Guide
52

Wireless Broadband 11n Router User Guide
Appendix A: Product Features
◆ Integrates router, wireless access point, four-port switch and firewall in one
◆ Complies with IEEE802.11n, IEEE802.11b and IEEE802.11g standards
◆ MIMO technology utilizes reflection signal to increase three times transmission distance of original 802.11g
standard and reduces the "dead spots" in the wireless coverage area
◆ Provides 300Mbps receiving rate and 300Mbps sending rate
◆ Supports WMM to make your voice and video more smooth
◆ Supports 64/128-bit WEP, WPA, WPA2 encryption methods and 802.1x security authentication standards
◆ WPS (PBC and PIN) encryption method to free you from remembering long passwords
◆ Supports remote/local Web management
◆ Supports wireless Roaming technology and ensures high-efficient wireless connections
◆ Supports wireless SSID stealth mode and MAC address access control
◆ Supports Auto MDI/MDIX
◆ Provides system log to record the status of the router
◆ Supports MAC address filtering, NAT, NAPT
◆ Supports UPnP and DDNS
◆ Supports the access control over 30 MAC addresses
◆ Supports DHCP server/client
◆ Supports SNTP
◆ Supports virtual server and DMZ host
◆ Supports auto wireless channel selection
◆ Supports WDS function (wireless distribution system)
53

Declaración de Copyright
Zaapa es una marca registrada. Otras marcas registradas u otros nombres de marcas mencionados aquí
son marcas registradas. El copyright del producto entero como integración, incluyendo sus accesorios y
programas, pertenecen a esta compañía. Sin el permiso de Zaapa, no se permite la copia individual o de partes,
plagiar, imitar o traducirlo a otros idiomas.
Todas las fotografías y las especificaciones de los productos mencionados en este manual son solo referencias,
así como las actualizaciones de programas y productos que pueden sufrir cambios. Y si hay cambios, Zaapa
no es responsable de informar por adelantado. Si usted quiere saber mas acerca de la información de nuestros
productos, por favor visite nuestra página Web
www.zaapa.net

Contenido
Capítulo 1: Introducción..................................................................................................................... 1
Contenido del Paquete.............................................................................................................................................. 1
Capítulo 2: Familiarización con el Router Wireless-N Broadband.................................................. 2
Panel Posterior........................................................................................................................................................... 2
Panel Frontal.............................................................................................................................................................. 3
Panel Superior............................................................................................................................................................ 4
Instalación del Hardware........................................................................................................................................... 5
Capítulo 3: Comenzar la Conexión del Router Wireless-N Broadband......................................... 6
Cómo establecer las configuraciones de red para Mi Ordenador......................................................................... 6
Cómo comprobar la Conexión de Red..................................................................................................................... 8
Capítulo 4 Configurationes Básicas................................................................................................ 10
Cómo acceder a la configuración de utilidades a través del navegador ..................................... 10
Asistente de Configuración .................................................................................................................................... 10
Capítulo 5: Ajustes Avanzados........................................................................................................ 14
Configuraciónes LAN .............................................................................................................................................. 14
Configuraciónes WAN — PPPoE............................................................................................................................ 15
Configuraciónes WAN —IP Estática....................................................................................................................... 17

Clonar dirección MAC.............................................................................................................................................. 18
Configuraciónes DNS.............................................................................................................................................. 19
Capítulo 6: Configuraciones Wireless............................................................................................. 20
Configuraciones Básicas....................................................................................................................................... 20
Configuraciones de Seguridad Wireless ............................................................................................................... 21
Configuraciónes WPS.............................................................................................................................................. 28
Configuraciónes WDS ............................................................................................................................................. 29
Configuraciones Wireless Avanzadas.................................................................................................................... 31
Control de Acceso Wireless.................................................................................................................................... 33
Estado de Conexión Wireless................................................................................................................................. 34
Capítulo 7: DHCP Server ................................................................................................................. 35
Lista de Servidor DHCP........................................................................................................................................... 36
Capítulo 8: Servidor Virtual.............................................................................................................. 37
Envío de Puerto Individual...................................................................................................................................... 37
Envío de Gama de Puerto........................................................................................................................................ 39
Configuración DMZ................................................................................................................................................. 40
Configuraciones UPnP.......................................................................................................................................... 40
Configuraciones del Filtro Cliente......................................................................................................................... 40
Configuraciones de Filtro DNS.............................................................................................................................. 42
Configuraciones de Dirección MAC...................................................................................................................... 43
Prevención de Ataque de Red................................................................................................................................. 44

Gestión Web Remota.............................................................................................................................................. 45
Gestión Web Local................................................................................................................................................... 46
Configuraciones de Ping......................................................................................................................................... 46
Asignación de Ruta Estática................................................................................................................................... 47
Capítulo 9: Herramientas del Sistema............................................................................................. 48
Tiempo ...................................................................................................................................................................... 48
DDNS......................................................................................................................................................................... 49
Restaurar / Copia de Seguridad.............................................................................................................................. 50
Firmware Upgrade ................................................................................................................................................... 51
Restaure los ajustes por defecto de fábrica.......................................................................................................... 52
Reinicio..................................................................................................................................................................... 53
Cambiar Contraseña................................................................................................................................................ 53
Registro del Sistema................................................................................................................................................ 54
Apéndice A: Características del Producto...................................................................................... 55

Capítulo 1: Introducción
Gracias por escoger el Router ZW-BR11NT Wireless-N Broadband. Emplea la tecnología avanzada de MIMO
(multi entrada, multi salida) e integra el router, el punto de acceso wireless, el interruptor de cuatro puertos y el
cortafuego en uno, que permitirá que usted comparta el acceso del Internet a través de los cuatro puertos o vía
difusión wireless. Compatible con el estándar de IEEE 802.11n (2.0), puede conectar con los adaptadores PCI
802.11b/g, USB y de Portátil. Transmisión hasta 300Mbps que le permite que usted goce de actividades en
tiempo real tales como reproducción de vídeo sin descargar del ordenador, juego en línea etcétera.
Además, el Router Wireless-N Broadband soporta todas las características más actuales de seguridad wireless,
tales como, Encriptación bit 64/128- WEP, método de encriptación WPS (PBC y PIN), filtro de paquete y
reenvío de puerto, para prevenir el acceso no autorizado y proteger su red en contra de un ataque malicioso.
Por otra parte, el instalador de uso fácil en el CD-ROM puede asistirle para instalar el router de banda ancha
Wireless-N fácilmente. También puede ser gestionado o ser configurado con utilidad fácil del navegador de
forma ramota o local. Es tan la mejor opción para SOHOs y las empresas de pequeño tamaño.
Contenido del Paquete
¾ Un Router ZW-BR11NT Wireless-N Broadband
¾ Un Cable de Red Ethernet
¾ Una Guía de Instalación Rápida
¾ Un Adaptador de Alimentación
¾ Un CD-ROM
Si cualquier artículo de los mencionados le falta o están dañados, entre en contacto por favor con vendedor
de Zaapa donde usted compró el router para el reemplazo inmediato.
1

Capítulo 2: Familiarización con el Router Wireless-N Broadband
Panel Posterior
Descripción del panel trasero. Los puertos RJ-45 para la conexión del cable y el botón Reinicio se
localizan en el panel posterior como se muestra debajo:
2

Panel Frontal
En el panel frontal se encuentran los indicadores LED del Router como se muestra debajo:
Indicador LED Status Descripción
POWER
Siempre
Encendido
SYS Parpadeando
Siempre
WAN
Encendido
Parpadeando
El indicador POWER aparecerá siempre encendido cuando el
router esté encendido y funcionando adecuadamente.
SYS está parpadeando regularmente cuando el sistema trabaja
normalmente.
Indica la conexión correcta de los puertos WAN.
Indica que el Router está transmitiendo/recibiendo los paquetes
de datos.
WLAN Parpadeando Indica que la señal wireless es correcta.
LAN(1/2/3/4)
Siempre
Encendido
Parpadeando
Indica la conexión correcta de los puertos LAN.
Indica que el Router está transmitiendo/recibiendo los paquetes
de datos.
WPS Parpadeando
Indica que el Router está negociando con los clientes WPS en
el modo WPS (PBC or PIN Code).
3

Panel Superior
En el panel superior, se encuentran 3 antenas inversas SMA para la difusión de señales para la red wireless.
4

Instalación del Hardware
Antes de que usted conecte el Router de banda ancha Wireless-N Broadband, refiérase por favor a los pasos
siguientes para una instalación de hardware correcta y fácil. Para conseguir un mayor rendimiento wireless,
localice por favor el router en el centro de la red wireless.
¾ Apague todos los periféricos conectados, incluyendo el Módem y su PC(s)
¾ Conecte un extremo del cable Ethernet de red incluido a uno de los puertos del panel posterior del
Router. Conecte el otro extremo a un puerto Ethernet/WAN. Por favor repita este paso para agregar
más PC,s u otros periféricos.
¾ Conecte el cable de Internet del Módem al puerto WAN del Router
¾ Encienda el Módem
¾ Encienda el Router con el adaptador de de alimentación incluido. El indicador de alimentación LED en
el panel frontal se iluminará en color verde si está conectado corectamente.
¾ Ahora, usted puede abrir su PC(s) para configurar el Router. Para más detalles lea el capítulo siguiente.
IMPORTANTE:
Por favor utilice el adaptador de alimentación incluido. La utilización de un adaptador
diferente podría causar daños y anular la garantía de este producto.
5

Capítulo 3: Comenzar la Conexión del Router Wireless-N Broadband
Para la configuración fácil y rápida, los siguientes pasos para la configuración de red son requeridos.
Cómo establecer las configuraciones de red para Mi Ordenador
Clic Derecho en “My Network Places” y seleccione
“Properties”.
Clic Derecho en “Local Area Network Connection”
y seleccione “Properties”.
6

Seleccione “Internet Protocol (TCP/IP)” y clic en
“Properties”.
Seleccione “Obtain an IP address automatically” y
“Obtain DNS server address automatically”. Clic en
“OK” para guardar las configuraciones.
.
7

O seleccione “Use the following IP address” e
introduzca la dirección IP. , Máscara de Subred,
Gateway predefinida como lo mostrado a la derecha.
Por supuesto, usted tendrá que introducir la
dirección de servidor DNS proporcionada por su ISP.
De otro modo, usted puede utilizar la gateway por
defecto del Router como servidor proxy DNS. Clic en
“OK” para guardar las configuraciones.
Cómo comprobar la Conexión de Red
Seleccione “Start”—All Programs”—“Accessories”
—“Command Prompt”.
8

Introduzca “ping 192.168.0.1” y presione “Enter”. Si
la pantalla muestra lo mismo que en la figura
derecha, significa que su PC está conectado al
router satisfactoriamente.
Si no, cerciórese por favor que la instalación del
hardware y el adaptador de red sean correctas.
Después de que se hagan todas las preparaciones,
proceda por favor al capítulo 4 para más información
y configuración avanzada.
9

Capítulo 4 Configurationes Básicas
Esta sección le muestra como configurar su nuevo Router Wireless-N Broadband con la configuración de
utilidades a través de su navegador.
Cómo acceder a la configuración de utilidades a través del navegador
Para acceder a la Utilidad del Router a través del
navegador, entre en el navegador tal como Internet
Explorer o Firefox e introduzca la dirección IP por
defecto del Router, http://192.168.0.1. Presione
“Enter”.
Por favor introduzca el “admin” en ambos Nombre
de Usuario y Contraseña. Clic en “OK”.
Asistente de Configuración
10

Aquí aparece “Welcome to Setup Wizard” para
configurar su Router rápidamente. Clic en “Next”.
En esta pantalla, seleccione un modo de conexión
a Internet para ser utilizado. Si usted no lo tiene
claro, presione el botón “Detect” o contacte su
proveedor de Servicio de Internet, y clic en “Next”.
ÎModo de Conexión 1: ADSL marcación
telefónica Virtual (a través de PPPoE)
1. Introduzca la Cuenta y Contraseña proporcionada
por su ISP, y clic en “Next”.
11

Î Modo de Conexión 2: IP Dinámica (a través de
DHCP)
1. Si su modo de conexión es una IP dinámica, esto
significa que su dirección IP guara los cambios
cada vez que usted se conecte. Usted no necesita
introducir información como en los Modos 2 o 3.
Î Modo de Conexión 3: IP Estática
1. En esta pantalla, rellene la información de la
dirección de red de su ISP en la Dirección IP,
Máscara de Subred, Gateway servidor Primario
DNS y clic en “Next”.
2. Clic en “Apply” para reiniciar el Router, o presione
el botón “Reboot the router”en System Tools del
menú izquierdo.
12

3. SI reinicia ahora, por favor espere unos minutos y
NO lo apague.
Clic en “System Status” en el menú izquierdo de la
utilidad del navegador para encontrar la red actual e
información del sistema.
Felicidades usted acaba de completar los ajustes básicos del Router. Usted ahora está en Internet. Si usted
desea otras configuraciones, proceda por favor con las explicaciones siguientes para los ajustes avanzados.
13

Capítulo 5: Ajustes Avanzados
Esta sección sirve para conducir las configuraciones avanzadas para el router, incluyendo ajustes LAN, los
ajustes WAN, la copia de dirección MAC, y ajustes de DNS.
Configuraciónes LAN
Dirección MAC: La dirección MAC física como se ve
en su red local, la cual no es modificable.
Dirección IP: La dirección IP del LAN del Router (no
su dirección IP de PC). Una vez que usted ha
modificado la dirección IP, usted necesita recordarla
para introducir la contraseña de la Utilidad del
navegador la próxima vez. 192.168.0.1 es el valor
por defecto.
Máscara de Subred: Le muestra la máscara de
subred del router como medida del tamaño de la red.
El valor por defecto es 255.255.255.0.
14

Configuraciónes WAN — PPPoE
Connection Mode: Le muestra el actual modo de
conexión.
Account:Introduzca la cuenta proporcionada por su
ISP.
Password:Introduzca la contraseña proporcionada
por su ISP.
MTU:Unidad de Transmisión Máxima. Es el tamaño
del data grama más grande que se puede enviar
sobre una red. El valor por defecto es 1492. No lo
modifique a menos que sea necesario.
Service Name:Se define como sistema de las
características que se aplican a una conexión
PPPoE. Introdúzcalo si se lo han proporcionado. No
lo modifique a menos que sea necesario.
AC Name: Introdúzcalo si se lo han proporcionado.
No lo modifique a menos que sea necesario
Conecta automáticamente con Internet después de
reiniciar la conexión o fallo del sistema.
15

forma manual.
Connect on Demand: Reestablecer su conexión a
Internet después del momento específico (Tiempo de
Inactividad máximo). Cero significa su conexión de
Internet continúo. Si no, incorpore los minutos que
transcurrirán antes de que usted desee desconectar
el acceso a Internet.
Connect on Fixed Time: Conecta a Internet durante
el tiempo que usted establezca.
Connect Manually: El usuario conecta a Internet de
16

Configuraciónes WAN —IP Estática
Si en su modo de conexión, elige IP estática, por
favor introduzca la siguiente información.
IP Address:Aquí debe introducir la dirección IP WAN
proporcionada por su ISP.
Subnet Mask: Introduzca la máscara de Subred de
WAN aquí.
Gateway:Introduzca la Gateway WAN aquí.
Primary DNS Server:Introduzca el servidor DNS
Primario proporcionado por su ISP.
Secondary DNS Server: Introduzca el DNS
secundario.
17

Clonar dirección MAC
Algunas ISPs requieren del usuario la dirección MAC
para final tener acceso a su red. Esta característica
copia la dirección MAC de su dispositivo de red al
router.
MAC Address: La dirección MAC a ser registrada con
su proveedor de servicio de Internet.
Clone MAC address: Registra su dirección MAC del
PC.
Restore default MAC address: Restaura la dirección
MAC del hardware por defecto.
18

Configuraciónes DNS
DNS es una abreviatura de sistema de nombre de
dominio (o servicio), un servicio del Internet que
traduce nombres de dominio a las direcciones del IP
que son proporcionadas por proveedor de servicio de
Internet. Consulte por favor con su proveedor de
servicio de Internet para los detalles si usted no los
tiene.
DNS:
Clic en la caja de verificación para activar el
Servidor
DNS.
Primary DNS Address:
Introduzca la necesaria dirección proporcionada
por su ISP.
Secondary DNS Address:
Introduzca la dirección secundaria si su ISP
se la proporciona, es opcional.
19

Capítulo 6: Configuraciones Wireless
Esta sección se ocupa principalmente de los ajustes wireless, incluyendo las configuraciones básicas,
la configuración de seguridad, el control de acceso y las configuraciones avanzadas.
Configuraciones Básicas
Network Mode: Soporta mezcla de 802.11b/g, 802.11b,
802.11g y 802.11b/g/n en modo mez cla.
Main SSID: Identificador de sistema de servicio principal. Es
el nombre de su red wireless.
Minor SSID: Identificador de sistema de servicio Menor. Es
opcional.
Broadcast (SSID):Seleccionar “enable” para activar el SSID
del periférico para ser visible por los clientes gíreles.
BSSID: Es una identidad 48bit usada para identificar un BSS
particular (servicio básico establecido) dentro de un área. En
redes de la infraestructura BSS, el BSSID es la dirección de
MAC (control de acceso medio) del AP.
Canal: Del menú descendente, sirve para seleccionar los
canales de funcionamiento de la red wireless. Seleccione por
20

favor a partir del 1 al 13, o seleccione AutoSelect para
seleccionar diversos canales.
Channel Bandwidth:Seleccione la frecuencia de
funcionamiento wireless 20M o 20/40M.
Configuraciones de Seguridad Wireless
Esta página sirve para configurar la seguridad wireless de su router. Hay seis modos de seguridad wireless,
WEP, WPA-Personal, WPA2-Personal, WPA-Empresa, WPA2- Empresa y RADIO. Si usted no desea utilizar la
seguridad wireless, seleccione inhabilitar del menú descendente.
1. WEP
WEP (Privacidad Equivalente de Cable), es un
método básico de cifrado, cifra generalmente datos
wireless usando una serie de las claves digitales (64
bits o 128 bits en longitud). Usando las mismas
claves en cada uno de sus dispositivos wireless de la
red, usted puede evitar que los dispositivos wireless
21

desautorizados monitoricen sus transmisiones o
utilicen sus recursos wireless.
SSID Choice: Seleccione SSID para configurar la
seguridad. Este periférico soporta configurar
diferentes tipos de seguridad entre el SSID principal
y el SSID subordinado.
Security Mode: Hay varios modos de seguridad;
usted puede escoger uno, WEP, WPA-Personal,
WPA-Empresa, etc.
Default Key: Selecciona una clave de cifrado
válida.
WEP Key: Le permite escoger Caracteres ASCII o
Dígitos Hexadecimales del menú inferior.
Key 1-4: Introduzca la clave WEP aquí. Por favor
tenga en cuenta que la clave debe de estar en
concordancia con el formato de clave y ser válido.
22

2. WPA-Personal
WPA (Acceso Protegido Wi-Fi), un estándar Wi-Fi, es
un esquema wireless más reciente del cifrado,
diseñado para mejorar las características de la
seguridad WEP. Aplica tipos de gran alcance de
cifrado (tales como TKIP [protocolo dominante
temporal de integridad] o AES [estándar avanzado
del cifrado]) y puede cambiar las claves
dinámicamente en cada dispositivo wireless
autorizado.
WP A Algorithms: Seleccione un tipo de cifrado, AES
o TKIP. (AES es más fuerte que TKIP.)
Pass Phrase: Introduzca la clave que debe tener de
8-63 ASCII caracteres.
Key Renewal Interval:Introduzca el período de
reanudación de contraseña. Sirve para avisar al
Router cuando debe cambiar las claves.
23

3.WPA2-Personal
WPA2 (Acceso Protegido Wi-Fi version 2), es más
seguro que WEP y fácil de configurar.
WPA Algorithms: Seleccione los claves de Algoritmos
tales como TKIP, AES y TKIP&AES.
Pass Phrase: Introduzca la clave que debe tener de
8-63 ASCII caracteres.
Key Renewal Interval:Introduzca el período de
reanudación de contraseña. Sirve para avisar al
Router cuando debe cambiar las claves.
4. WPA-Empresa
Es un protocolo de autentificación basado en el
servidor de RADIO, se utiliza este modo de
seguridad cuando un servidor de RADIO está
conectado con el router.
Radius IP Address: Por favor introduzca la dirección
IP del servidor de radio aquí.
Radius Port: Por favor introduzca el número de
puerto del servidor de radio aquí.
24

Shared key:La clave de encriptación que el router ha
autenticado a través del servidor de radio.
Session Timeout: El intervalo del tiempo de
renovación de certificación entre el router y el
servidor. El valor prefijado es 3600s
5. WPA2-Empresa
Este modo de seguridad se utiliza también cuando
un servidor de radio esta conectado al Router.
WP A Algorithms: Seleccione un tipo de cifrado
como TKIP o AES.
Radius IP Address: Por favor introduzca la dirección
IP del servidor de radio aquí.
Radius Port: Por favor introduzca el número de
puerto del servidor de radio aquí.
Shared key: La clave de encriptación que el router
ha autenticado a través del servidor de radio.
Session Timeout: El intervalo del tiempo de
renovación de certificación entre el router y el
servidor. El valor prefijado es 3600s
25

6. 802.1X
Se utiliza este modo de la seguridad cuando un
servidor de RADIO está conectado con el router.
802.1x, es una clase de protocolo Puerto-basado en
la autentificación, es un tipo de la autentificación y
una estrategia para los usuarios. El puerto puede ser
un puerto físico o puerto de lógico (tal como VLAN).
Para los usuarios wireless de LAN, un puerto es
simplemente un canal. El propósito final de la
autentificación 802.11x es comprobar si el puerto
puede ser utilizado. Si el puerto se autentifica con
éxito, usted puede abrir este puerto que permita que
todos los mensajes pasen. Si el puerto no se
autentifica con éxito, usted puede dejar este puerto
"inhabilitado" el cual solamente permite que el
mensaje de gestión de protocolo de la
autentificación 802.1x pase.
WEP: Seleccione “enable/disable” para activar o
desactivar la encriptación WEP la cual indica el
proceso de autenticación entre el adaptador wireless
y el router wireless.
Radius IP Address: Por favor introduzca una
dirección IP del servidor de radio aquí.
26

Radius Port: Por favor introduzca el número de
puerto del servidor de radio aquí
Shared key:La clave de encriptación que el router ha
autenticado a través del servidor de radio.
Session Timeout: El intervalo del tiempo de
renovación de certificación entre el router y el
servidor. El valor prefijado es 3600s
NOTA: ¡ Para mejorar el nivel de la seguridad,
no utilice esas palabras que se
puedan encontrar en un diccionario o
demasiado fáciles de recordar! Los
clientes wireless recordarán la clave
WEP, así que usted tiene que
introducir solamente la clave WEP en
cliente wireless una vez, y le
compensa utilizar una clave
complicada de WEP para mejorar el
nivel de la seguridad.
27

Configuraciónes WPS
El sistema protegido Wi-Fi (WPS) es la manera
más simple de construir la conexión entre los
clientes wireless de la red y este router wireless.
Usted no tiene que seleccionar modo del cifrado e
introducir una larga contraseña de cifrado cada vez
que usted necesita configurar a un cliente wireless,
usted tiene que presionar solamente un botón en
cliente wireless y este router wireless, y el WPS
hará el resto por usted.
Este router wireless soporta dos tipos de WPS, el
botón de presión de Configuración PBC y el
código PIN.
PBC: Botón de presión de Configuración, usted
puede presionar el botón WPS del router wireless,
o seleccione ‘PBC’ aquí para comenzar el modo
WPS.
PIN: Este es el código PIN WPS del router
wireless. Este código es útil cuando usted necesita
crear una conexión a través de WPS con otros
periféricos activados WPS.
28

Configuraciónes WDS
En este modo, usted puede ampliar el alcance de la
red combinando hasta cuatro puntos de acceso
juntos, y cada punto de acceso puede aceptar a
clientes wireless.
Lazy Mode: Usted necesita configurar la BSSID del
router en otro periférico, no necesita introducir
ninguna otra BSSID en el, y después conectan junto
automáticamente.
Bridge Mode:
Usted puede conectar de forma inalámbrica dos o
más redes de cable en este modo. Usted necesita
agregar la dirección MAC inalámbrica del periférico
en la tabla de dirección AP MAC del router o
seleccionar uno de la tabla de la exploración. Al
mismo tiempo, el dispositivo que conecta debe estar
en modo lento, del repetidor o del modo puente.
Repeater Mode: Usted puede seleccionar el modo
para ampliar la distancia entre los dos dispositivos
WLAN. Funcionando como un repetidor de WDS, el
router conecta con una tarjeta de cliente como AP y
con otro AP. En usos típicos del repetidor, el APs
29

que conecta con el otro APs equipado de
funcionalidad WDS debe también soportar WDS. En
este modo, usted necesita agregar la dirección MAC
del dispositivo que conecta en la tabla de dirección
MAC del AP del Router y el cliente que conecta
debe estar en modo lento, del repetidor o modo
cliente.
Encrypt Type: Usted puede seleccionar el modo
WEP, modo TKIP, modo AES para la seguridad
aquí.
Pass phrase: Introduzca la clave, el formato de clave
de acuerdo con la encriptación que usted ha
seleccionado.
AP MAC: Introduzca la dirección MAC de otro router
wireless.
NOTA: ¡Dos router wireless deben utilizar la
misma banda, número de canal, y
ajuste de la seguridad!
30

Configuraciones Wireless Avanzadas
Esta sección es para las configuraciones avanzadas
del router, incluyendo el Preámbulo de radio, tasa
802.11g/n, Umbral de Fragmentación, Umbral RTS,
Beacon Period e intervalo DTIM.
BG protection Mode: Automático por defecto. Usted
puede seleccionar Encendido o Apagado.
Basic Data Rates: Para diferentes requisitos, usted
puede seleccionar una de las tasas de datos básicas
convenientes. Aquí, por defecto el valor es (1-2-5.5.11Mbps…).
Beacon Interval: Esta opción establece el intervalo de
tiempo que utiliza el router para el envío de paquetes
de sincronización con otros dispositivos wireless .No lo
modifique si no sabe lo que es, el valor por defecto es
100.
Fragment Threshold: No lo modifique si no sabe lo que
es, el valor por defecto es 2346.
RTS Threshold: Fije el umbral RTS del radio wireless.
No lo modifique si no sabe lo que es, el valor por
31

defecto es 2347.
TX Power: Usted puede fijar la salida de alimentación
del radio wireless. A menos que usted esté utilizando
el router wireless en un espacio muy amplio no debe
establecer la salida de alimentación al 100%. (Esto
aumentaría la posibilidad de que usuarios maliciosos o
desconocidos pudieran acceder a su router wireless).
WMM Capable: Realzará el funcionamiento de la
utilidad de transferencia de datos de contenido
multimedia cuando se están transfiriendo sobre una
red wireless. Si usted no sabe que es / no está seguro
si usted lo necesita, es preferible fijar esta opción
como permitida, el valor por defecto es permitido
APSD Capable: Se utiliza para el ahorro de energía
automático. El valor por defecto es desactivado.
32

Control de Acceso Wireless
Por seguridad de su red wireless, el control de
acceso wireless está actualmente basado en la
gestión de dirección MAC.
MAC Address Filter: Si usted desea acceder al router
a través de una dirección IP externa, por favor
seleccione “Inhabilitado”.
MAC Address: Para especificar una dirección IP
externa, por favor agregue la dirección MAC
manualmente y haga clic en “Agregar”.
MAC Address List: Las direcciones MAC
agregadas son listadas aquí. Haga clic en Borrar para
borrar la gestión de filtro de esta dirección MAC.
33

Estado de Conexión Wireless
Esta página le muestra el estado actual del acceso
wireless. Haga clic en “Refresh” para actualizar la
información de conexión wireless.
MAC Address
Muestra la dirección MAC del PC de conexión.
Speed
La tasa de transmisión wireless para el PC
correspondiente.
RSSI
Sirve para indicar la fuerza de la señal recibida, que
es una medida de la fuerza de señal de radio
recibida.
34

Capítulo 7: DHCP Server
DHCP (Dynamic Host Control Protocol) sirve para
asignar una dirección IP a los ordenadores en la red
LAN/privada. Cuando usted activa el servidor
DHCP, el servidor DHCP asignará automáticamente
una dirección IP no utilizada del fondo común al
ordenador requerido en la premisa de activación
"obtener una dirección IP automáticamente".
Necesita especificar el comienzo y finalización de la
dirección IP.
DHCP Server:Activar la caja de verificación para
habilitar al servidor DHCP.
IP Address Start/End: Introducir la gama de la
dirección IP para la distribución del servidor DHCP
Lease Time: La longitud de la dirección IP
Utilizada.
35

Lista de Servidor DHCP
La asignación de dirección IP estática se utiliza para
agregar una dirección IP específica a la dirección
MAC asignada, Usted puede ver la información
relacionada en la lista de servidor DHCP.
IP Address: Introduzca una dirección IP para el
ordenador en la red LAN.
MAC Address: Introduzca la dirección MAC del
ordenador al cual quiere asignar la dirección IP
superior. Clic en “Add” para agregar la entrada en la
lista.
Hostname: El nombre del ordenador al cual se ha
agregado una nueva dirección IP.
Lease Time: La longitud de tiempo utilizada de la
dirección IP correspondiente.
36

Capítulo 8: Servidor Virtual
Envío de Puerto Individual
El router puede ser configurado como servidor virtual
de los servicios locales detrás del puerto LAN. Los
requisitos remotos proporcionados serán redirigidos a
los servidores locales a través del servidor virtual.
Esta sección se ocupa del envío de puerto individual
principalmente. El envío de puerto individual le
permite establecer los tipos de servicios públicos
tales como servidores web, ftp, e-mail y otras
aplicaciones de Internet en su red.
NOTA: El servidor virtual utiliza un nombre de
host conocido o una dirección IP
pública.
External Port: Éste es el número de puerto externo
para el servidor o el uso de Internet, por ejemplo, el
puerto 21 para el servicio del ftp.
Internal Port: Éste es el número de puerto del
ordenador LAN establecidas por el Router. El tráfico
de Internet del puerto externo remitirá al puerto
interno. Por ejemplo, usted puede fijar el puerto
37

interno NO.66 para actuar como el puerto externo
NO.21 para el servicio del ftp.
IP Address: Introduzca la dirección IP del PC
Donde usted quiera establecer las aplicaciones.
Protocol:Seleccione el protocolo (TCP/UDP/Ambos)
para la aplicación.
Well-Known Service Port: Seleccione los servicios
bien conocidos como DNS, FTP del menú
desplegable para agregar al configurado superior.
Delete/Enable:Clic para verificarlo para el
funcionamiento correspondiente.
NOTA: Si usted fija el Servidor Virtual del
puerto del servicio como 80, usted debe
fijar el puerto de gestión Web en la
página remota de gestión Web con
cualquier valor excepto 80 tal como
como 8080. Si no, habrá un conflicto para
inhabilitar el Servidor Virtual
38
 Loading...