

Yuraku YUR.VISION YV19WB1 User Manual

Before You Start
※ Assembling the base to your monitor step by step.
STEP 1 STEP 2
※ Disassembling your monitor and the base step by step.
STEP 1 STEP 2
Before You Start

Contents
Contents .....................................................................................................................1
English .......................................................................................................................3
◇ Notice...........................................................................................................................................3
◇ Safety Information........................................................................................................................3
◇ Precaution....................................................................................................................................3
Package Contents.............................................................................................................................3
Hardware Installation.........................................................................................................................4
Input...........................................................................................................................................4
Control Buttons .................................................................................................................................4
OSD (On-Screen Display) Menu Mode.............................................................................................5
Troubleshooting.................................................................................................................................6
Supported Timing..............................................................................................................................6
Specification......................................................................................................................................7
Francais .....................................................................................................................8
◇ Avertissement..............................................................................................................................8
◇ Information de securite ................................................................................................................8
◇ Precautions..................................................................................................................................8
Contenu de l'emballage.....................................................................................................................8
Installation du materiel ......................................................................................................................9
Entree ........................................................................................................................................9
Boutons de configuration du menu....................................................................................................9
Mode de menu OSD (On-Screen Display)........................................................................................10
Depannage........................................................................................................................................11
Minutages acceptes ..........................................................................................................................11
Caractéristiques ................................................................................................................................12
Deutsch......................................................................................................................13
◇ Hinweise ......................................................................................................................................13
◇ Sicherheitsvorkehrungen.............................................................................................................13
◇ Zu beachten.................................................................................................................................13
Verpackungsinhalt.............................................................................................................................13
Hardware-Installation ........................................................................................................................14
Eingangsanschlus......................................................................................................................14
Befehlstasten ....................................................................................................................................14
OSD-Menu-Modus (Anzeige auf dem Bildschirm).............................................................................15
Fehlersuche ......................................................................................................................................16
Unterstutztes Timing........................................................................................................... ...............16
Spezifikationen..................................................................................................................................17
1

Espanol ......................................................................................................................18
◇ Noticia..........................................................................................................................................18
◇ Informacion de Seguridad............................................................................................................18
◇ Precaucion...................................................................................................................................18
Contenidos del Paquete....................................................................................................................18
Instalacion de Hardware....................................................................................................................19
Entrada ......................................................................................................................................19
Botones de control............................................................................................................................19
Menu de Modo de OSD (Exhibicion sobre la Pantalla) .....................................................................20
Solucion de Problemas .....................................................................................................................21
Tiempo apoyado................................................................................................................................21
Especificación...................................................................................................................................22
Italiano........................................................................................................................23
◇ Notifica.........................................................................................................................................23
◇ Informazioni per la sicurezza.......................................................................................................23
◇ Avvertenze...................................................................................................................................23
Contenuto della Confezione..............................................................................................................23
Installazione dello Hardware.............................................................................................................24
Ingresso.....................................................................................................................................24
Tasti di Controllo................................................................................................................................24
Modalita Menu OSD (On-Screen Display).........................................................................................25
Ricerca Guasti...................................................................................................................................26
Sincronizzazione Supportata.............................................................................................................26
Specifiche..........................................................................................................................................27
Portugues ..................................................................................................................28
◇ Aviso............................................................................................................................................28
◇ Informacao de seguranca............................................................................................................28
◇ Precaucao....................................................................................................................................28
Conteudo do pacote..........................................................................................................................28
Instalacao do hardware.....................................................................................................................29
Input...........................................................................................................................................29
Botoes de controlo ............................................................................................................................29
Modo do menu OSD (On-Screen Display)........................................................................................30
Localizador e Reparador de Defeitos................................................................................................31
Tempo apoiado..................................................................................................................................31
Especificação....................................................................................................................................32
Limited Warranty Policy ...........................................................................................33
2

English
◇ Notice
‧ All Information in this manual may change from time to time without prior notice.
‧ To ensure safety operation of this product, please read the following menu carefully before using
this product.
◇ Safety Information
‧ Do not place anything wet on the monitor or the power cord.
‧ Be sure to turn the monitor off before plugging the power cord into the socket.
‧ Be sure to check the power cord and the other cords are securely and rightly connected.
‧ Do not attempt to open the monitor. You may be hurt by electric shock. For service, call your place
of purchase.
◇ Precaution
‧ Do not expose the monitor to direct sunlight or heat.
‧ Do not spill liquid on the monitor.
‧ Do not use your monitor when magnets or electronic products are operating nearby.
‧ Do not use harsh chemicals or strong cleaning solvents to clean the monitor screen. Wipe it with
clean, soft clothes applied with mild solution.
‧ Do not place anything on your monitor. Bad ventilation may elevate temperature in the monitor.
‧ Do not use your fingers to touch the LCD Screen directly. Fingerprint that contains oil and may be
difficult to clean.
Package Contents
Our LCD monitor contains these following items. Make sure you get items listed below, otherwise
contact to your dealer or store.
1. 19” TFT LCD Monitor
2. Power Cord
3. VGA Cable
4. Audio Cable * The audio function is optional.
5. User’s Manual
3
Hardware Installation
Be carefully to your LCD monitor, it’ s very exquisite but easy to broken. T urn of f LCD’ s and PC’s power
before you set it up. Follow our installation step by step.
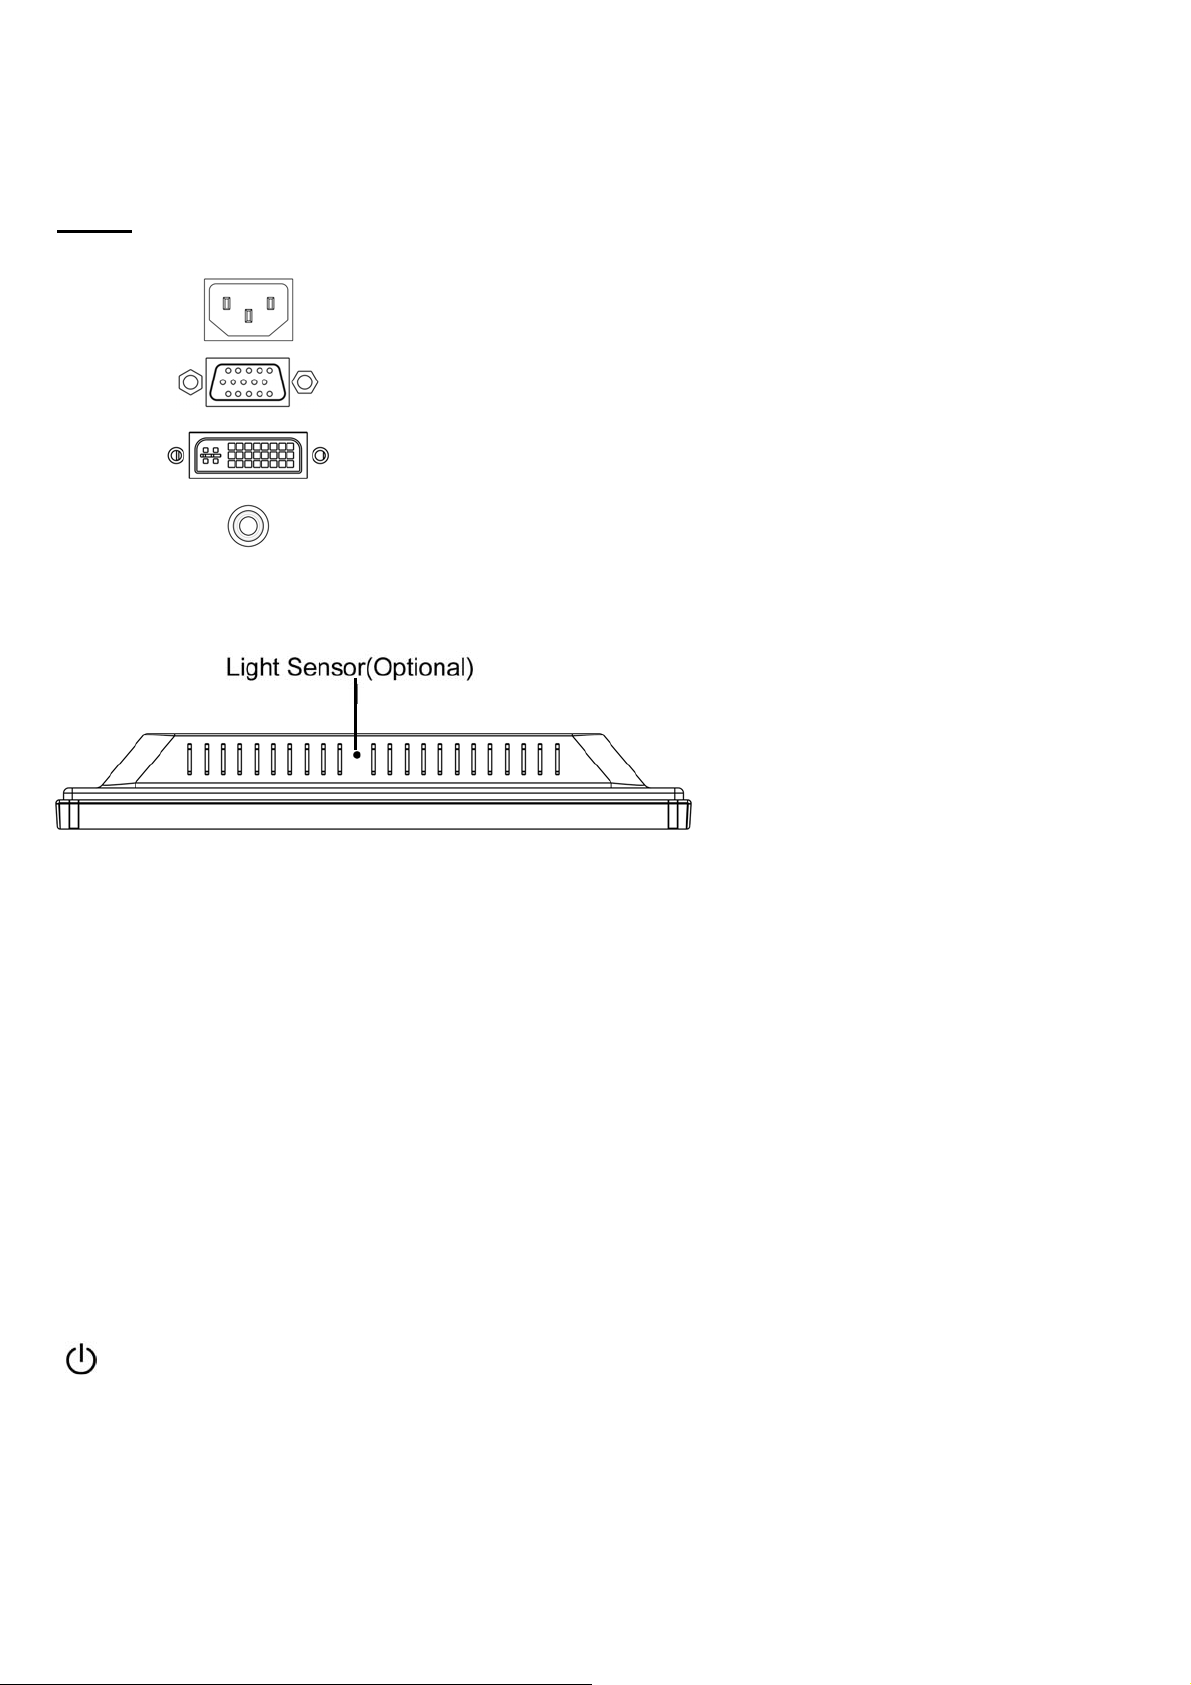
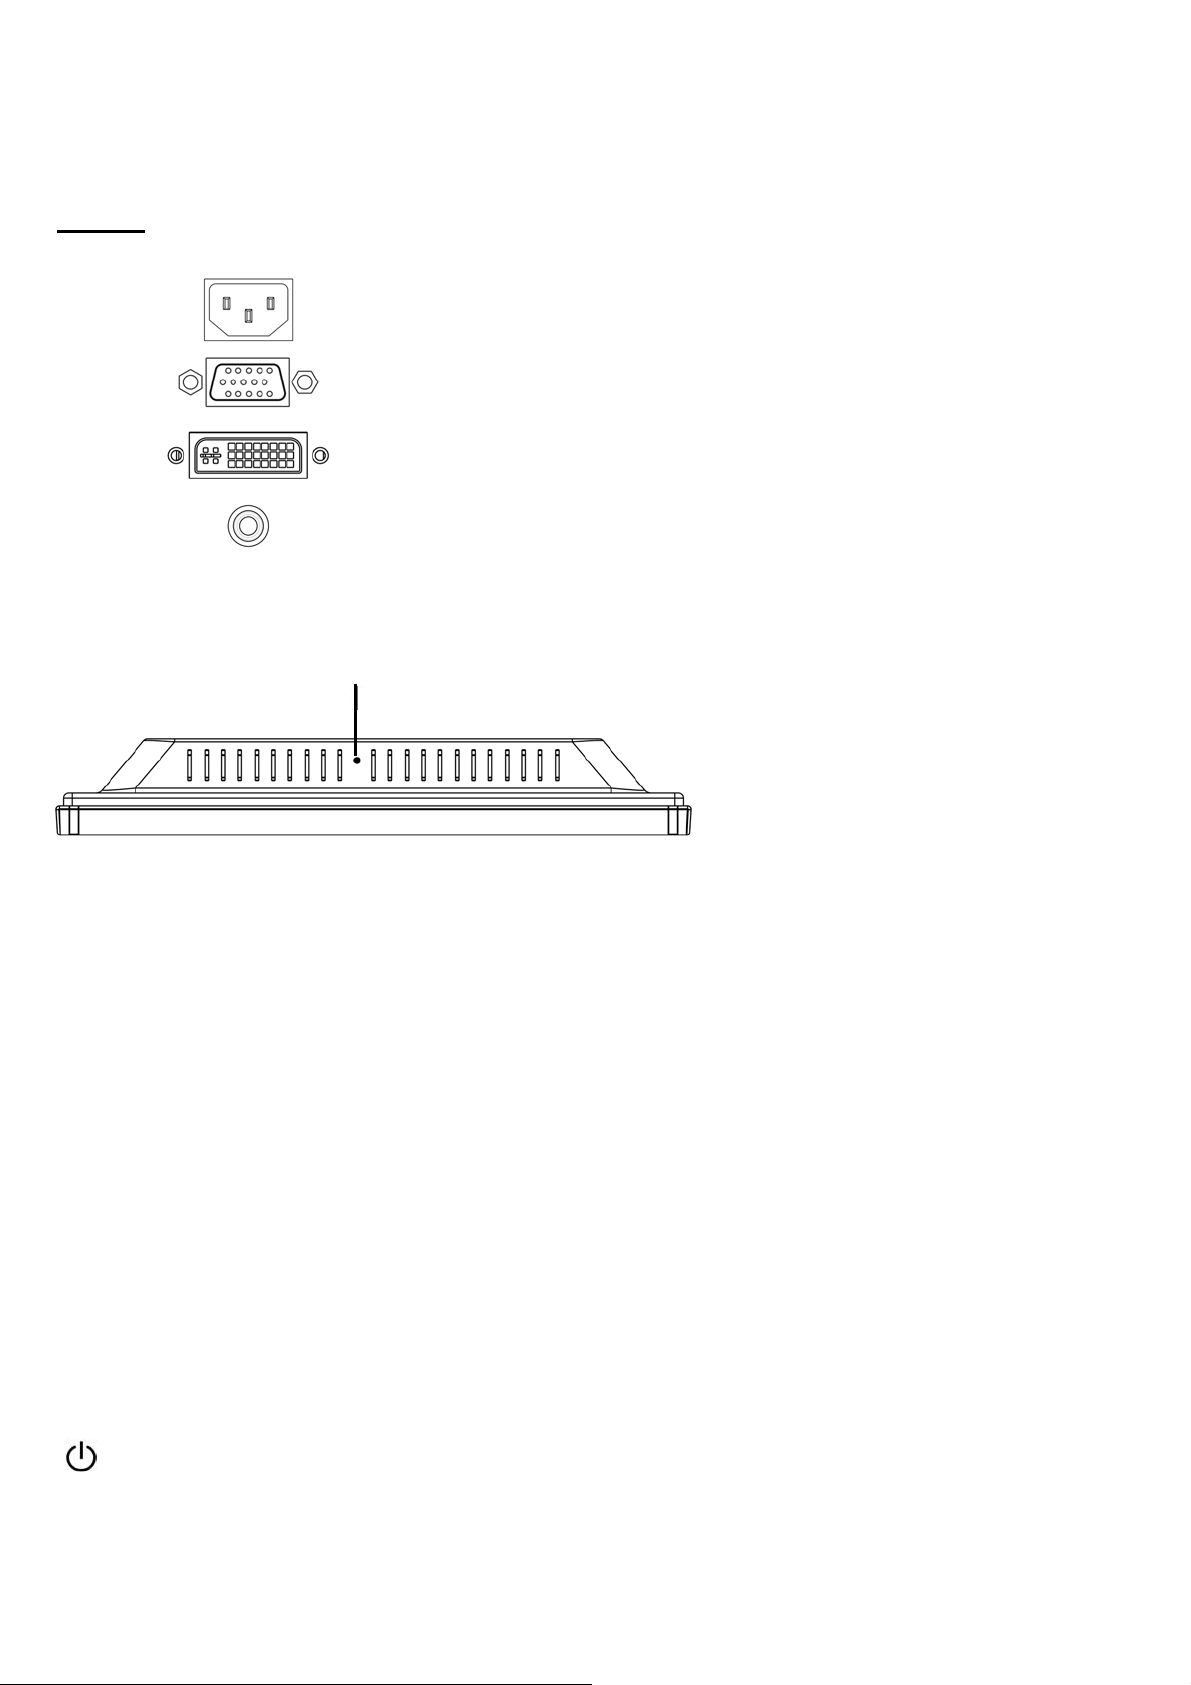
Input
AC input:This is for connecting the power cable.
VGA port : This can be connected with the D-Sub 15 pin signal
Cable.
DVI port : This can be connected with the DVI signal Cable.
Audio In:This can be connected to the PC audio-out connector
*NOTICE: DVI and Audio functions are optional features.
of sound resource.
Control Buttons
There are 5 keys for user to set up the monitor, including "Auto Adjust", "OSD menu", "Power", "Adjust
<->", "Adjust <+>". The following descriptions are the introduction of these Keys.
Auto Adjust (Function)
A
Function Select Button: This button allows you to select the control functions up in the OSD.
Hotkey: Press this button to apply the monitor setting automatically.
Menu (Function)
M
Function Select Button: This button allows you to select the control functions down in the OSD.
Hotkey: Press this button to get a pop-up OSD menu.
Power: Turn the LCD power on and off. When the power is on, the light is showing green,
Stand by will be orange.
Adjust < - >: Decrease the option value in the OSD menu.
-
Adjust < + >: Increase the option value in the OSD menu.
+
4

OSD (On-Screen Display) Menu Mode
Please adjust your Speaker Volume via your PC computer Speaker Volume control icon.
*
Please note that Sound will continue to play when your monitor is off, to turn off please turn off your
*
PC computer or mute the Speaker Volume control icon.
Press the OSD button to access menu, and press Increase / Decrease button for adjustment.
*
BRIGHTNESS
BRIGHTNESS
CONTRAST
Adjust the brightness of the display.
IBT (Light Sensor)-(Optional): This feature automatically adjust your
monitor brightness base on ambient light changes. To activate this feature
please select Auto icon within the main OSD Bri ghtness icon.
To deactivate please select Manual instead of Auto.
Adjust the difference between light and dark area.
PHASE
CLOCK
H-POSITION
V-POSITION
RESET
COLOR TEMPERATURE
RED
GREEN
BLUE
LANGUAGE
MISCELLANEOUS
EXIT OSD
MISCELLANEOUS
RETURN
The phase of the dot clock is adjusted.
The ratio of dividing frequency of the dot clock is adjusted.
Adjust the horizontal position of the display.
Adjust the vertical position of display.
Recall the default setting.
Adjust the color temperature.
Adjust the Red color temperature.
Adjust the Green color temperature.
Adjust the Blue color temperature.
Select the display language of the OSD Menu.
〝No〞will take you to the exit menu.〝Yes〞will bring you to the sub menus
of the Miscellaneous menu.
Saving and Leave.
Return to main menu.
OSD H-POSITION
Adjust the horizontal position of the OSD.
OSD V-POSITION
OSD DURATION
Adjust the vertical position of the OSD.
Adjust the timing of the OSD menu.
AUTO COLOR
Adjust the color automatically.
*
SOURCE
Select input Video source
:VGA or DVI
Notice: * Source is optional feature.
5
Troubleshooting
Make sure that your monitor is properly installed if you have encountered any trouble using this
product.
˙ There is no picture on the screen.
Check: 1.Power saving mode. Press any key and move the mouse to deactivate the mode.
2.Signal cable connector pins. If there are bent or missing pins, consult your place of
purchase.
˙ Characters look too dark or too light
Check: Using OSD Menu to adjust the Brightness.
˙ When your monitor shall be adjusted?
Check: If the resolution of frequency is being changed.
. The text appears on the screen are unclear.
Check: Make sure the resolution or refresh rate match with the Display Mode.
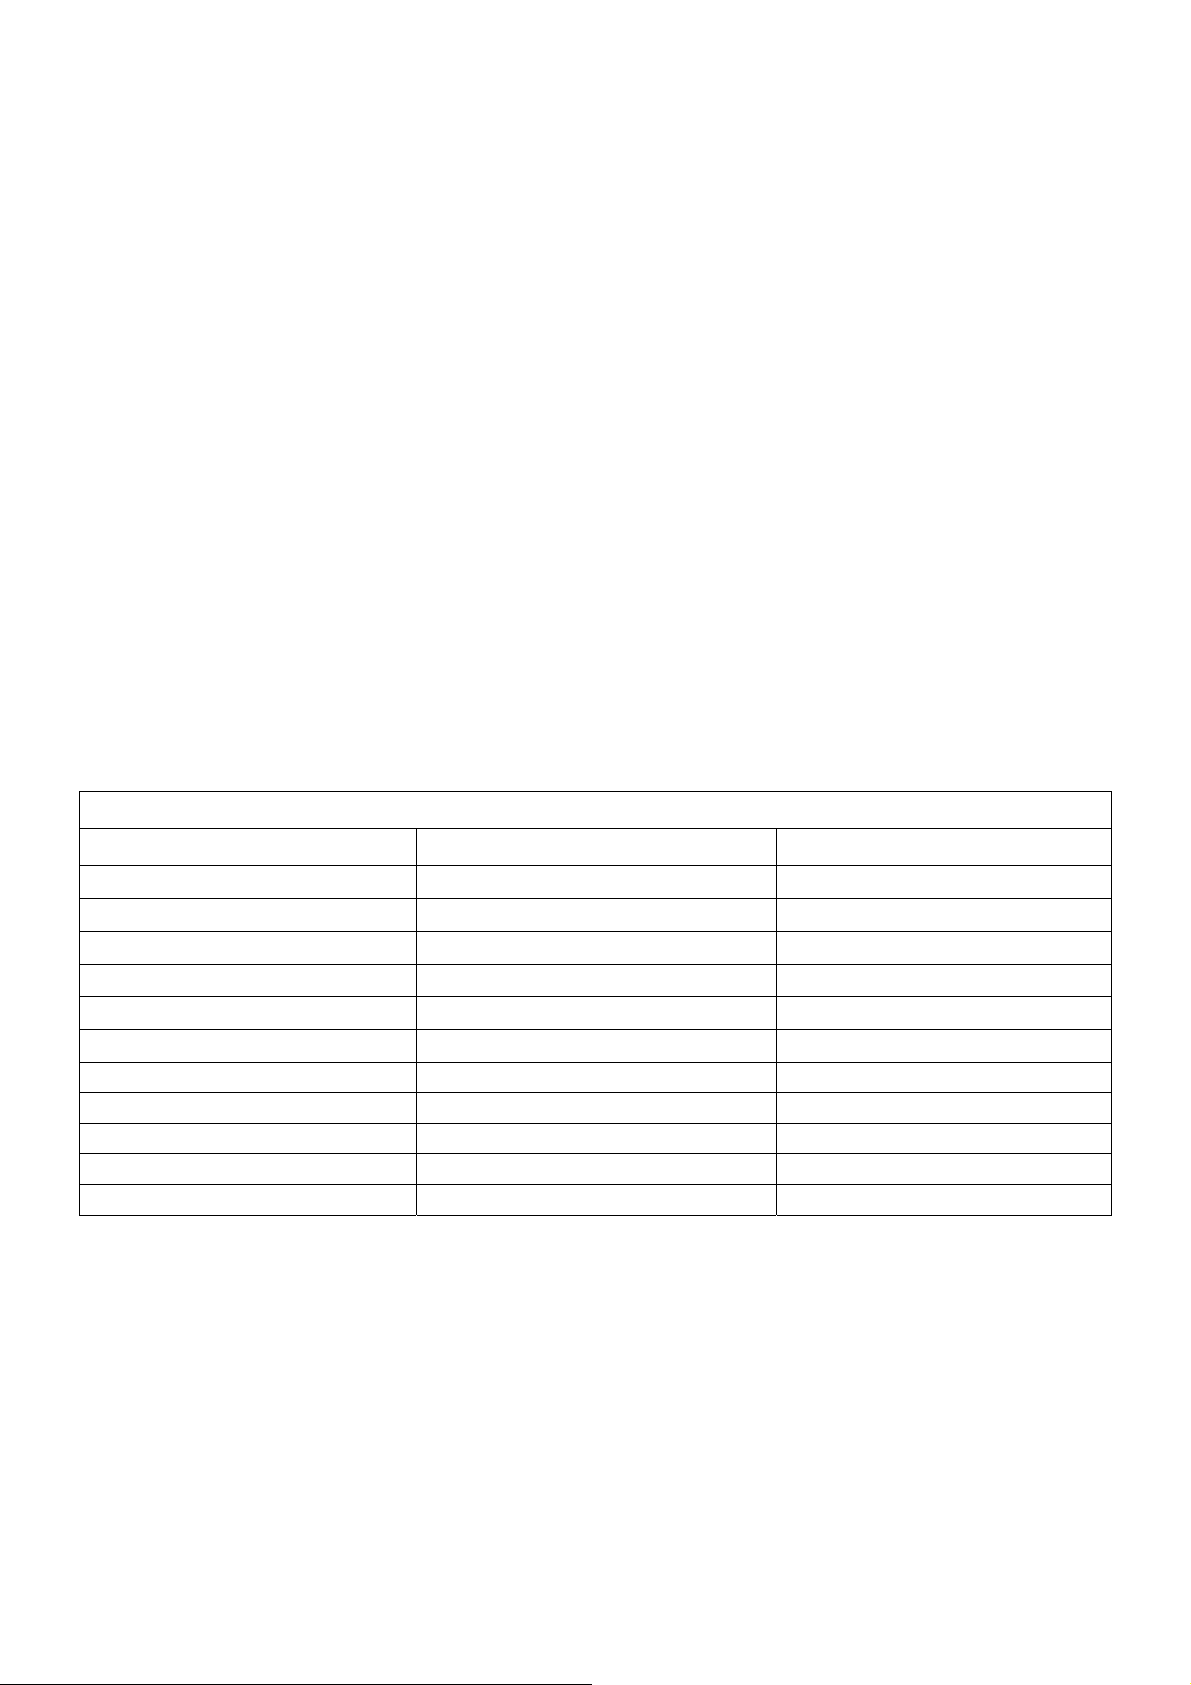
Supported Timing
Resolution Vertical Frequency (Hz) Horizontal Frequency (KHz)
640x480 72.81 37.9
640x480 75.00 37.5
800x600 56.25 35.2
800x600 60.32 37.9
800x600 72.19 50.0
800x600 75.00 46.9
1024x768 60.00 48.4
1024x768 70.07 56.5
1024x768 75.03 60.0
1280x800
1440x900
Display Mode
60.00 49.6
60.00 55.9
6
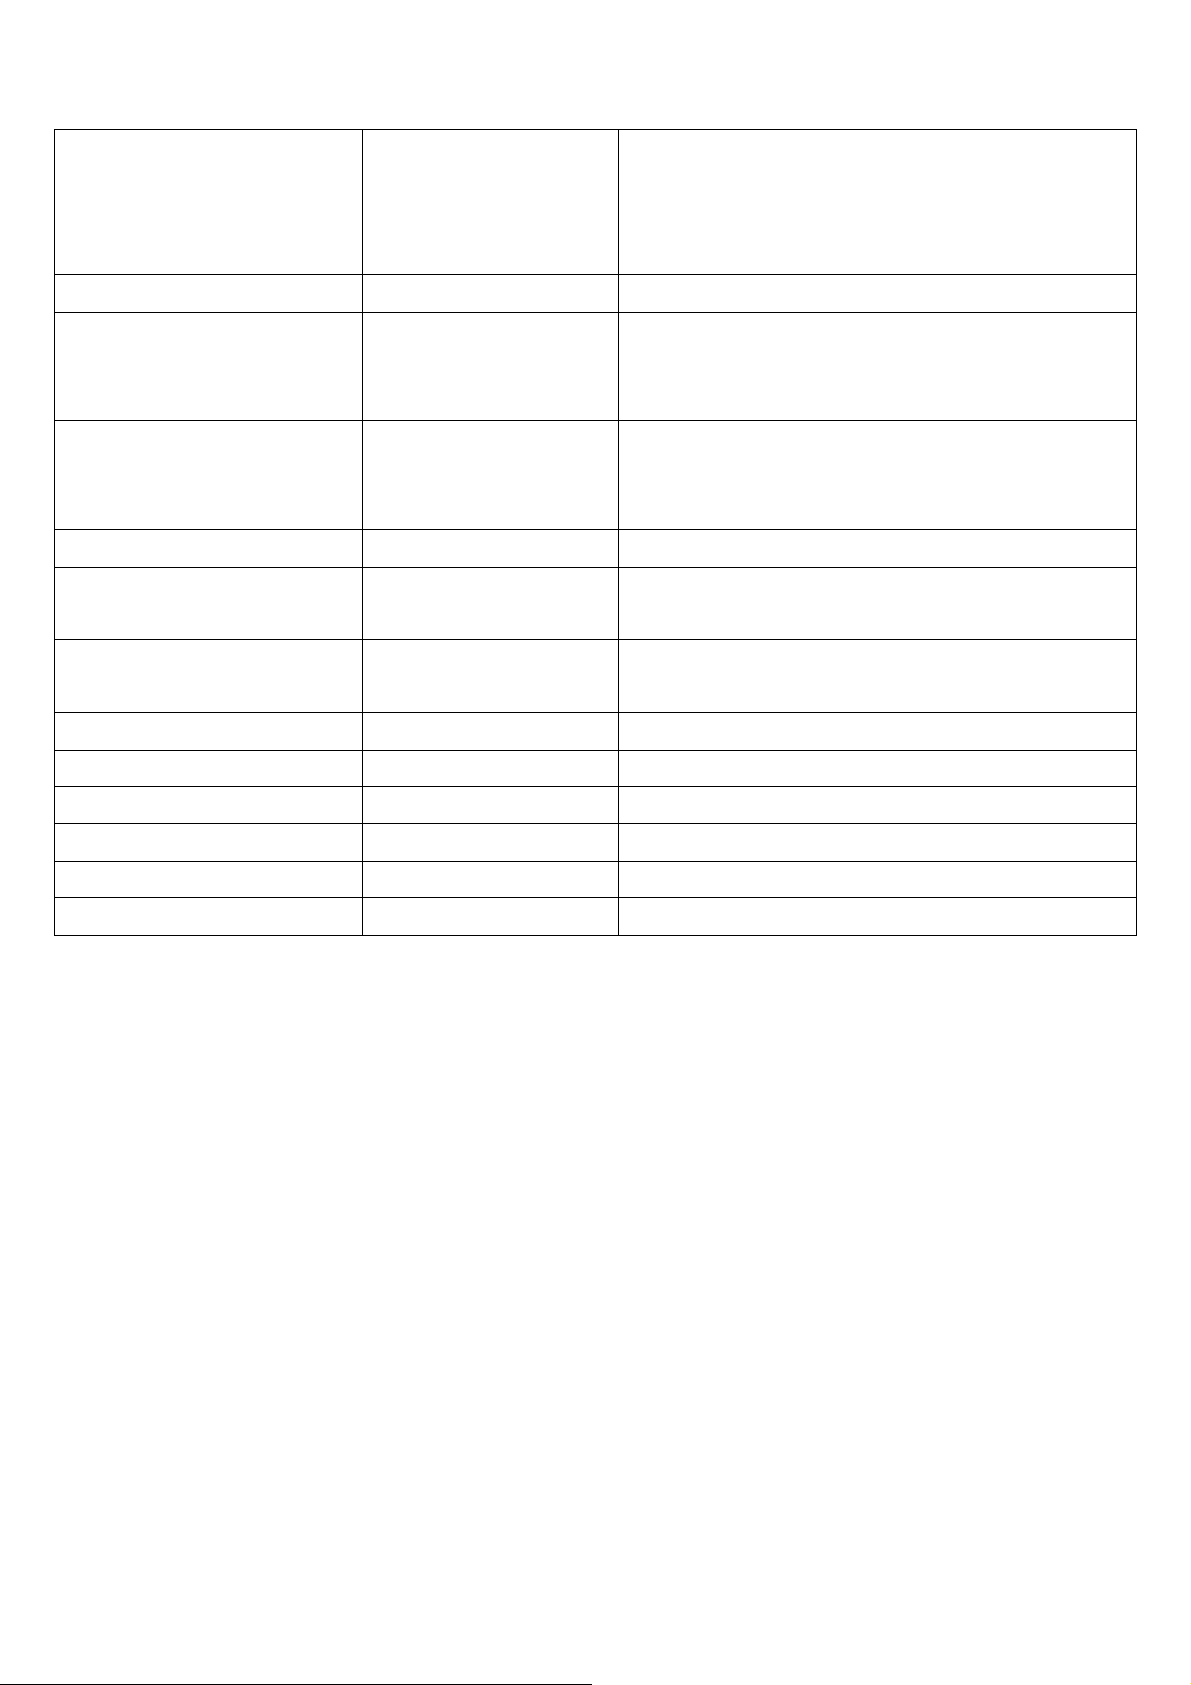
Specification
Input Signals
VGA
VGA compatible analog RGB
Compatibility
Connector
Power
Internal Speaker
User Interface
Operating Condition
Dimensions
DVI*
PC Up to 1440X900@60Hz(Non-interlaced)
VGA
Audio*
Power
Voltage
Consumption
Power saving mode
LED Indicator Active - Blue
Temperature
Humidity
Physical 464mm(W) x 335mm(H) x 169mm(D)
Composite sync supported
DDWG compliant Single Link TMDS Digital Visual
Interface (DVI)
D-sub 15-pins
Stereo Phone Jack
A/C Input
Built-in universal power supply:100-240 VAC, 50/60 Hz
Active < 45 Watt Max.
Standby < 3 Watt
Speaker x2
Standby - Flash
Operating: 5℃ to 40℃
20% ~ 80% R.H.
*
Net Weight
DDC
Power Management
Regulation (Certifications)
Others
Notice: * DVI, Speaker and Light Sensor are optional.
4.5 Kg ± 1
DDC2B
VESA DPMS
UL/CUL, FCC, CE
Light Sensor
*
7

Français
◇ Avertissement
‧ L’information dans ce manuel est sujette à modification sans notification.
‧ Veuillez lire et suivre les informations et précautions suivantes avant d’utiliser l’appareil..
◇ Information de sécurité
‧ Ne placez aucun objet mouillé sur le moniteur ou le cordon d’alimentation.
‧ Eteignez votre moniteur avant de connecter le cordon d’alimentation sur une prise de courant.
‧ Vérifiez que le cordon d’alimentation et les autres câbles sont correctement connectés.
‧ N’essayez jamais d’ouvrir le moniteur, un incendie ou une électrocution pourrait se produire.
Contacter votre revendeur ou un centre de service pour la maintenance.
◇ Précautions
‧ Evitez d’exposer le moniteur aux rayons directs du soleil ou a toute autre source de chaleur.
‧ Evitez d’exposer le moniteur à des liquides.
‧ N’utilisez pas votre ordinateur à proximités des aimants ou des produits électroniques.
‧ N’utilisez jamais des solvants tels que le diluant, l’alcool ou le benzène pour nettoyer l’écran.
Nettoyez l’écran avec un chiffon sec et doux.
‧ Ne placez pas des objets sur votre moniteur. Une ventilation insuffisante peut causer
l’augmentation de la température dans le moniteur.
‧ Evitez de toucher l’écran LCD avec vos doigts. La graisse de la peau est difficile à enlever.
Contenu de l’emballage
L’emballage du moniteur LCD contient les éléments ci-dessous. Vérifiez le contenu et contactez
immédiatement votre revendeur, si quelque chose manque.
1. Moniteur LCD 19” TFT
2. Cordon d’alimentation
3. Câble VGA
4. Câble audio
5. Manuel de l’utilisateur
* Fonction audio est optionnelle.
8
Installation du matériel
)
Prenez soin de votre moniteur LCD. Eteignez votre moniteur LCD et votre ordinateur avant de
commencer l’installation. Suivez les étapes ci-dessous pour compléter l’installation.
Entrée
Entrée en C.A:Pour connecter le câble d’alimentation
Port VGA : Peut être connecté avec le câble D-Sub 15
broches.
Port DVI: Pour connecter le câble de signal DVI.
Entrée audio In:Pour connecter le câble de signal de ligne de
*REMARQUE: Les fonctions DVI et Audio sont optionnelles.
sortie venant de l’ordinateur.
Capteur optique (en option
Boutons de configuration du menu
Il existe 5 touches utilisateur pour le réglage du moniteur "Réglage Auto ", " menu OSD ",
"Alimentation", "Réglage <->", "Réglage <+>". Vous trouverez ci-dessous une introduction à ces
touches.
Réglage Auto (Fonction)
Touche de sélection des fonctions: Cette touche vous permet de sélectionner les fonctions de contrôle
A
sur l’ODS (affichage écran).
Raccourci clavier: Appuyez sur cette touche pour appliquer automatiqquement le réglage.
Menu (Fonction)
Touche de sélection des fonctions: Cette touche vous permet de sélectionner les fonctions de contrôle
M
sous l’ODS (affichage écran).
Raccourci clavier: Appuyez sur cette touche pour obtenir un menu contextuel OSD.
Alimentation: Allumer et éteindre l’écran LCD. Quand l’app areil est allumé, la lumière s’allume en vert, Et
en orange en mode attente.
Réglage < - >: Baisser l’option valeur dans le menu OSD.
-
Réglage < + >: Augmenter l’option valeur dans le menu OSD
+
9
 Loading...