


Operation Instructions
Thank you for purchasing this monitor, a high-resolution multi-scan color
monitor.
Please read this guide thoroughly before installation.
FCC RADIO FREQUENCY INTERFERENCE STATEMENT
WARNING: (FOR FCC CERTIFIED MODELS)
This monitor has been tested and found compliant with the limits for a
Class B digital device, pursuant to part 15 of the FCC Rules. These limits
are designed to provide proper protection against harmful interference to
a residential installation. This monitor generates, uses, and can radiate
radio frequency energy. Harmful interference to radio communication may
be led as a result if it‘s not properly installed and used. However, there is
no guarantee that interference will not occur in a particular installation. If
this monitor does cause serious interference to radio or television reception,
resetting the monitor may determine it. Moreover, users are encouraged to
correct interference by doing one or more of the following:
Reorient or relocate the receiving antenna.
Move the monitor and the receiver further away from each other.
Connect the monitor into an outlet on a circuit different from that to
which the receiver is connected.
Consult your local dealer or an qualied technician.
FCC Warning:
To assure a continued FCC compliance, a user must use a grounded power
supply cord and the provided shielded video interface cable with bonded
ferrite cores. Also, any unauthorized changes or modications to this monitor
would void the user‘s authority to operate this device.
English
Note: If necessary, shielded interface cables and AC power cord must be
used to meet the emission level limits.

Content
English
Safety Precautions .............................................................................1
First Setup ..........................................................................................2
Quick Installation ................................................................................2
Front View of the Product ...................................................................3
Rear View of the Product ....................................................................3
Using On Screen Display (OSD) Functions........................................4
Supporting Timing Modes ...................................................................7
Technical Information..........................................................................8
Care and Maintenance .......................................................................9
Troubleshooting ..................................................................................9

Safety Precautions
This monitor is manufactured and tested on a ground principle that a
user’s safety comes rst. However, improper use or installation may result
danger to the monitor as well as to the user. Carefully go over the following
WARNINGS before installation and keep this guide handy.
WARNINGS:
This monitor should be operated only at the correct power sources
indicated on the label on the rear end of the monitor. If you’re unsure of
the power supply in your residence, consult your local dealer or power
company.
Do not try to repair the monitor yourself as it contains no user-
serviceable parts. The monitor should only be repaired by a qualied
technician.
Do not remove the monitor cabinet. There is high-voltage parts inside
that may cause electric shock to human bodies, even when the power
cord is disconnected .
Stop using the monitor if the cabinet is damaged. Have it checked by a
service technician.
English
Put your monitor only in a clean, dry environment. Unplug the monitor
immediately if gets wet and consult your service technician.
Always unplug the monitor before cleaning it. Clean the cabinet with a
clean, dry cloth. Apply non-ammonia based cleaner onto the cloth, not
directly onto the glass screen.
Keep the monitor away from magnetic objects, motors, TV sets, and
transformer.
Do not place heavy objects on the cable or power cord.
For PLUG CABLE EQUIPMENT, the Socket-outlet shall be installed
near the equipment and shall be easily accessible.
1

English
2
Quick Installation
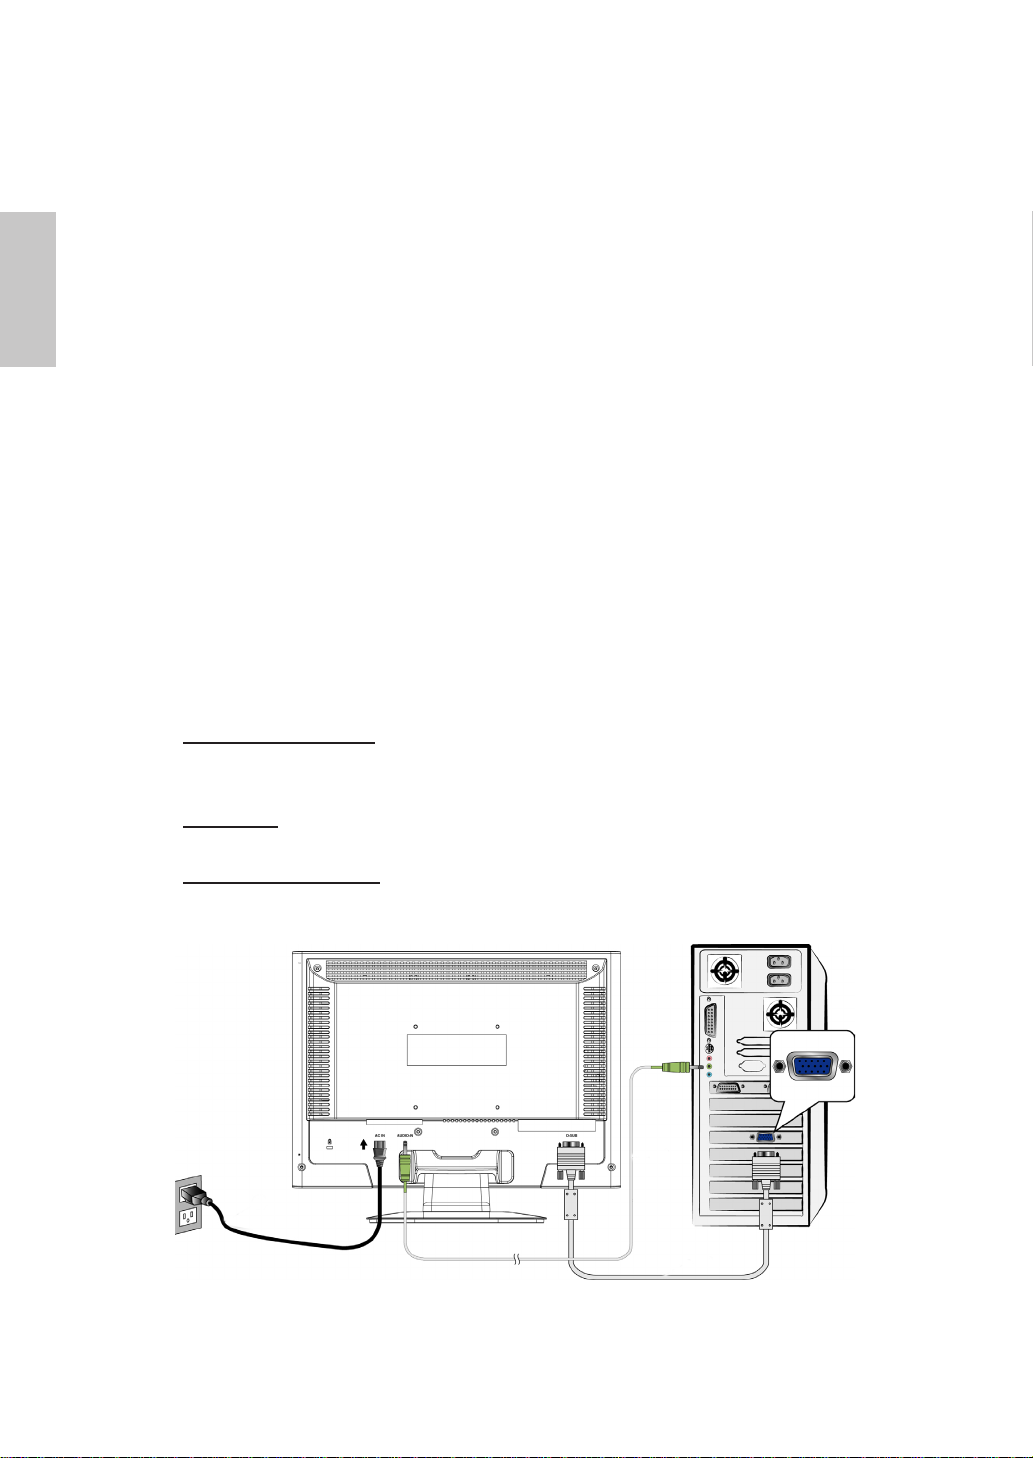
Connecting the Monitor
1. Connect power cord
Connect the power cord to a properly grounded AC outlet, then to the monitor.
2. Connect Analog video cable (D-Sub cable)
Make sure both monitor and computer are powered OFF. Connect the video
cable (D-Sub cable) to the computer, then to the monitor.
3. Power-ON computer and monitor
Power-ON the computer, then Power-ON the monitor.
4. Windows users: Setting the Timing Mode (Resolution and Refresh Rate)
Example: 1280 x 720 @ 60 Hz
Resolution Right-click on the Windows desktop > Properties > Settings >
“Desktop Area”. Set the resolution.
Refresh Rate (vertical frequency) See your graphic card’s user guide for
instructions.
Connection Diagram
A
First Setup
Congratulation for purchasing this monitor of high performance!
This monitor comes with the following accessories :
Power cable
D-Sub cable
Audio cable
User’s guide
Warranty Card
Power cable
udio cable
D-Sub cable

➊ ➋ ➌ ➍ ➎ ➏
➐ ➑ ➒
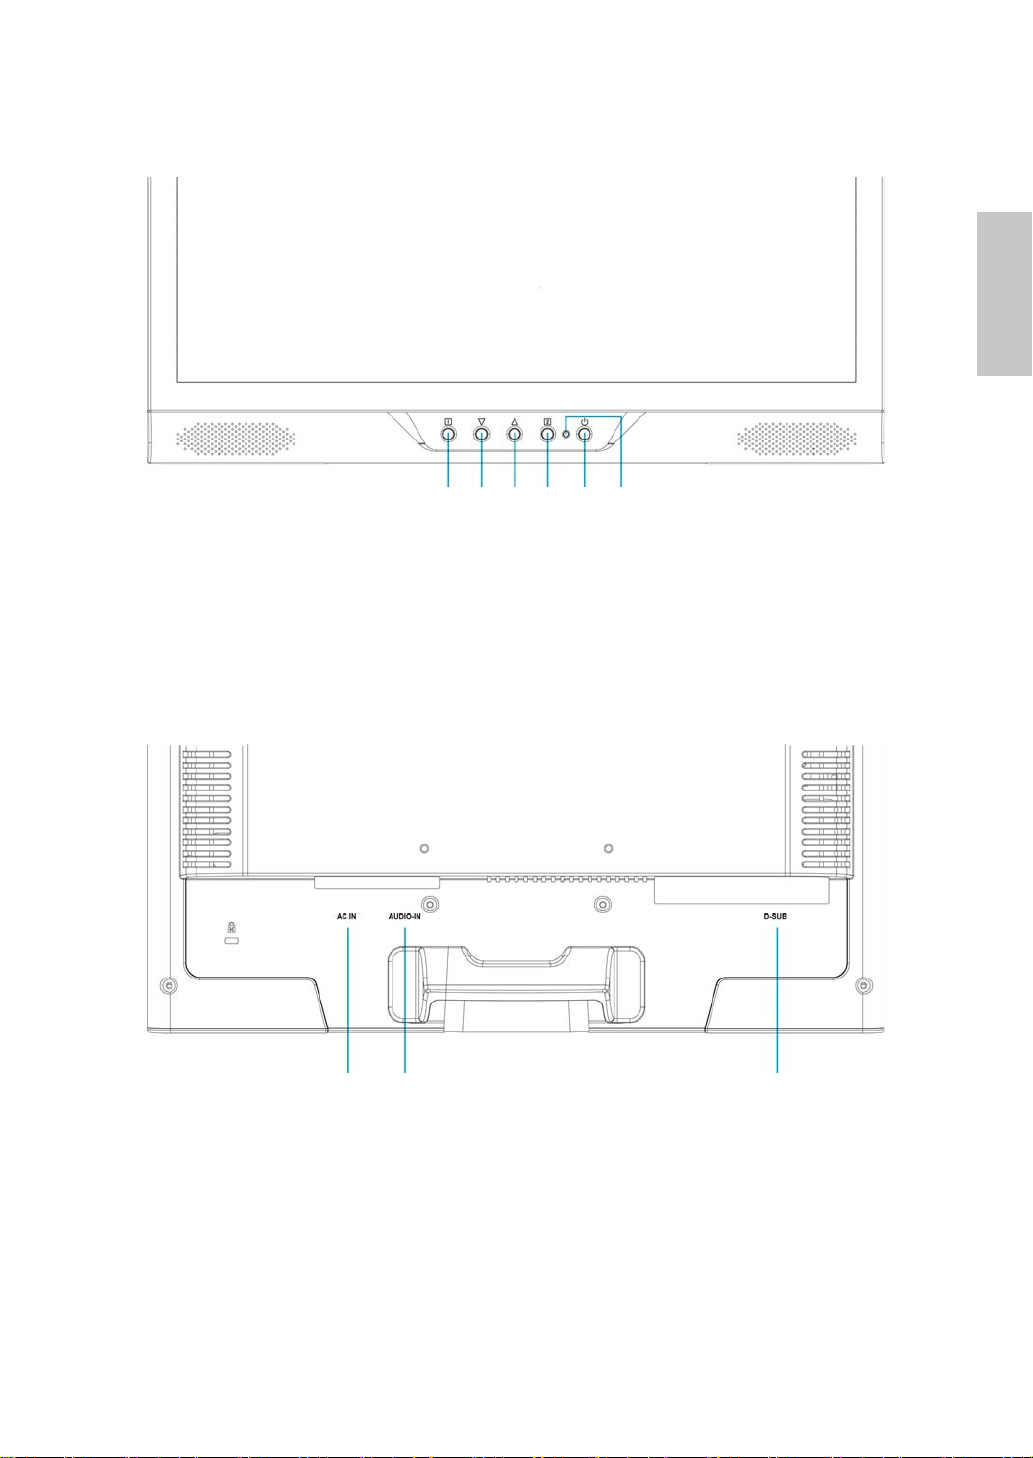
Front View of the Product
➊ OSD TURN ON/OFF ➍ CONFIRM SELECTION
➋ SCROLL DOWN/DECREASE ➎ POWER ON/OFF
➌ SCROLL UP/INCREASE ➏ LED INDICATOR
Rear View of the Product
➐ POWER INPUT ➒ VGA INPUT
➑ AUDIO INPUT
English
3
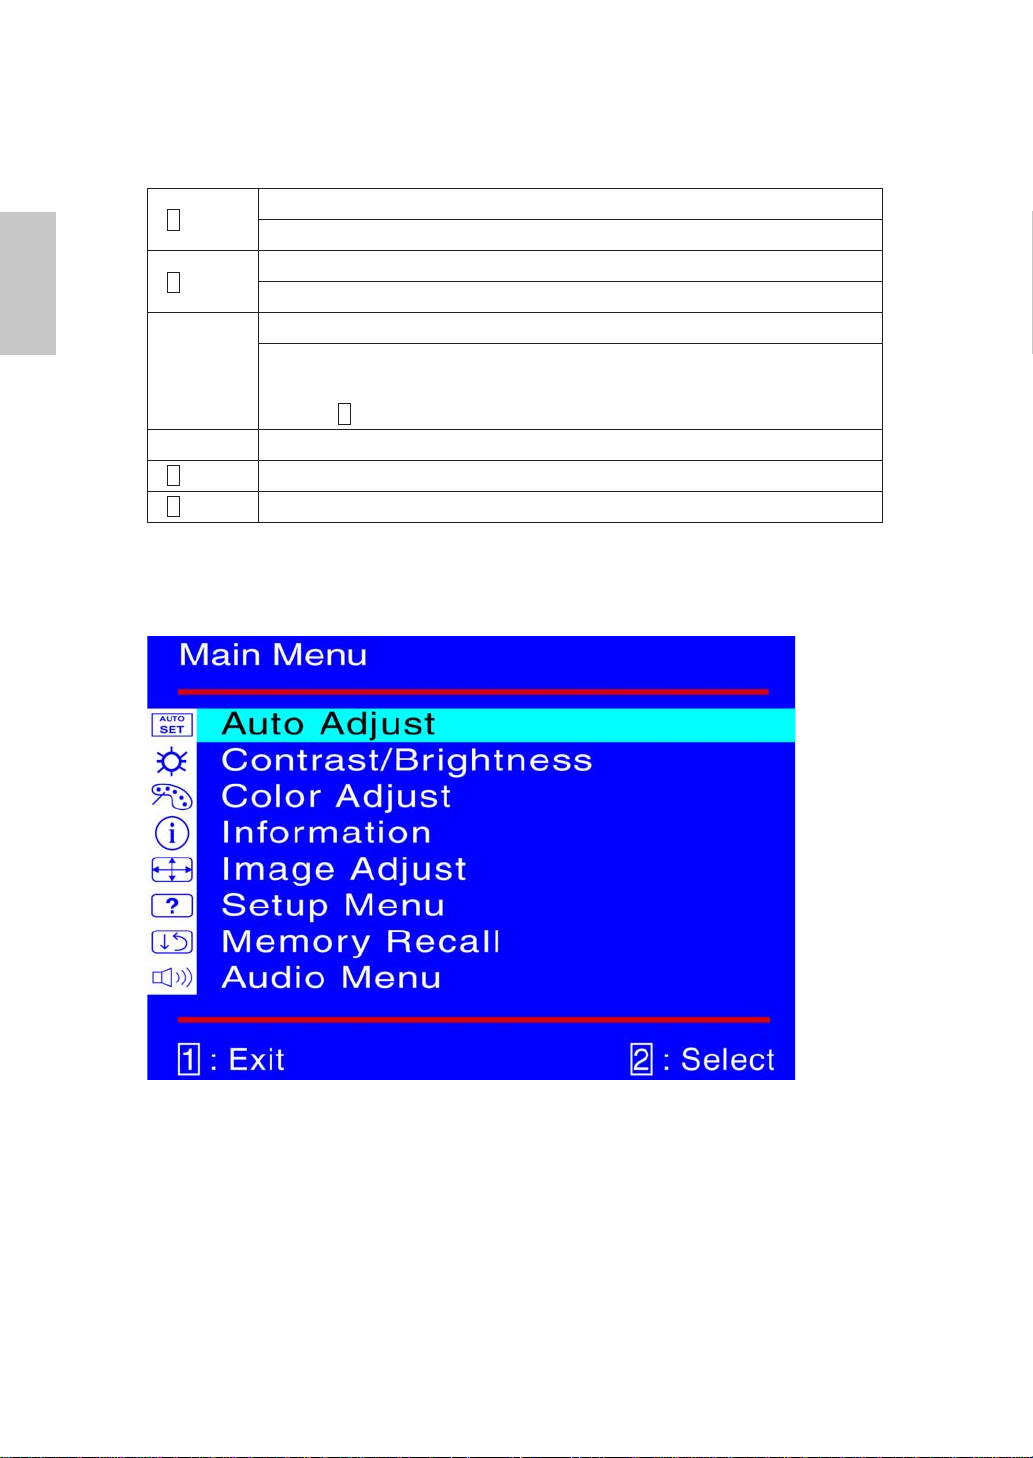
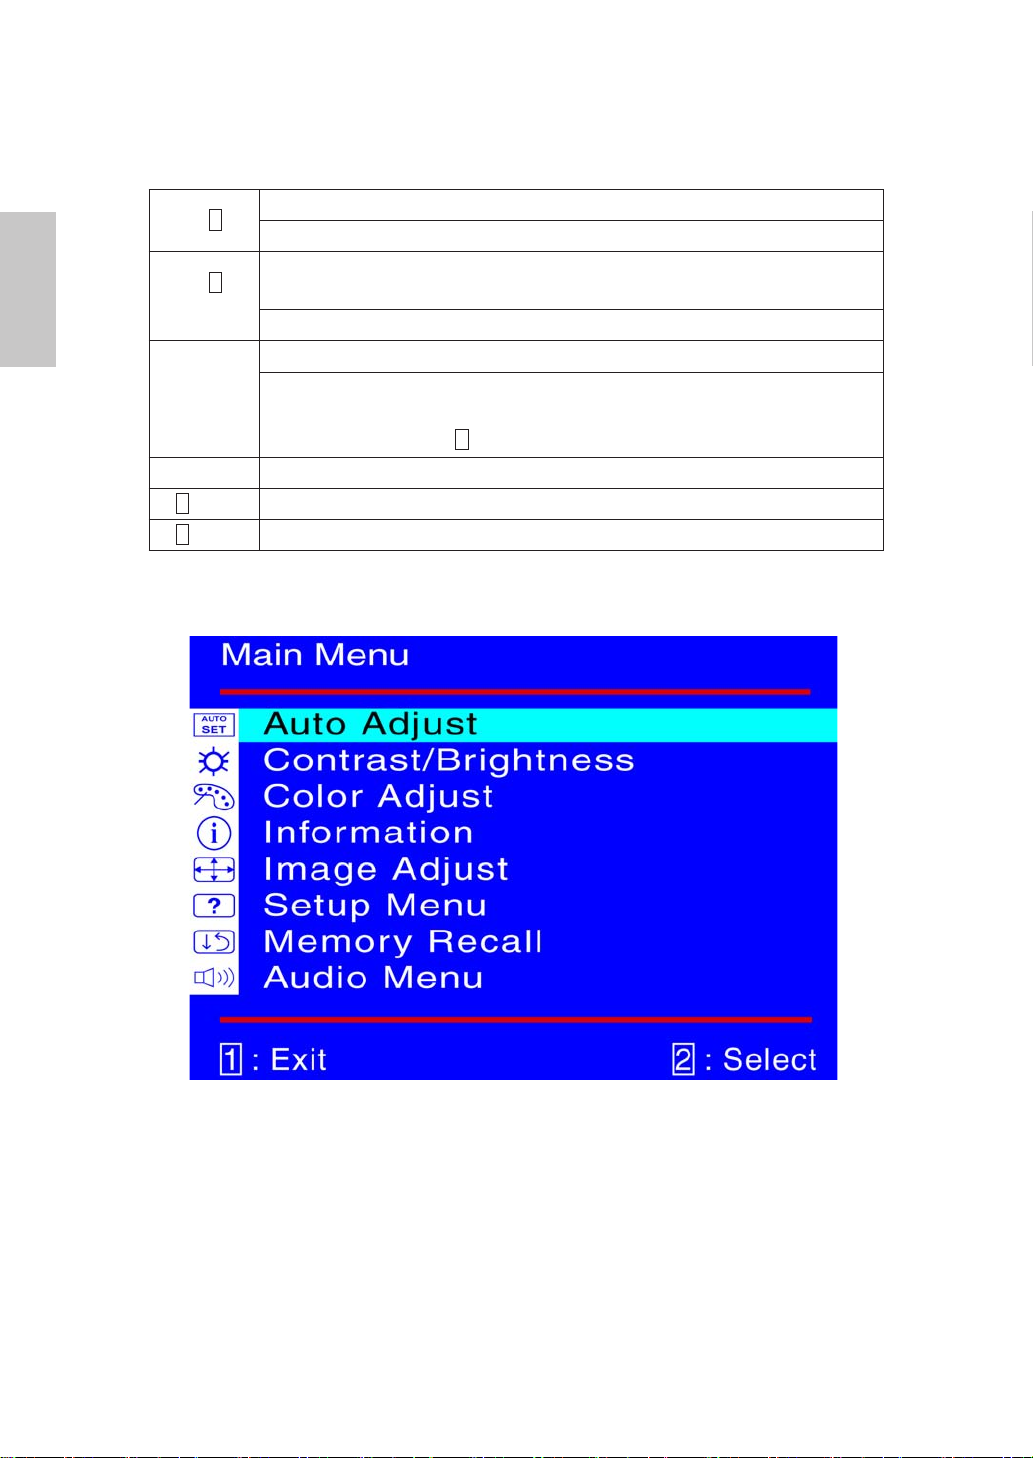
Using On Screen Display (OSD) Functions
1
English
1
2
▲or ▼
▼ + ▲ Recall both of Contrast and Brightness.
1
+ ▼ Power Lock (when not in OSD menu)
+ ▲ OSD Lock (when not in OSD menu)
Display main menu.
Exit from OSD menu.
Auto adjust the image when not in OSD menu.
Conrm the selection.
Select the desired item when in OSD menu.
When not in OSD menu, it is to immediately activate Contrast/
Brightness. It should be change to Contrast/ Brightness by pressing
button .
2
Main Menu
4
Short Cuts Function from the button(s)
AUTO
SET
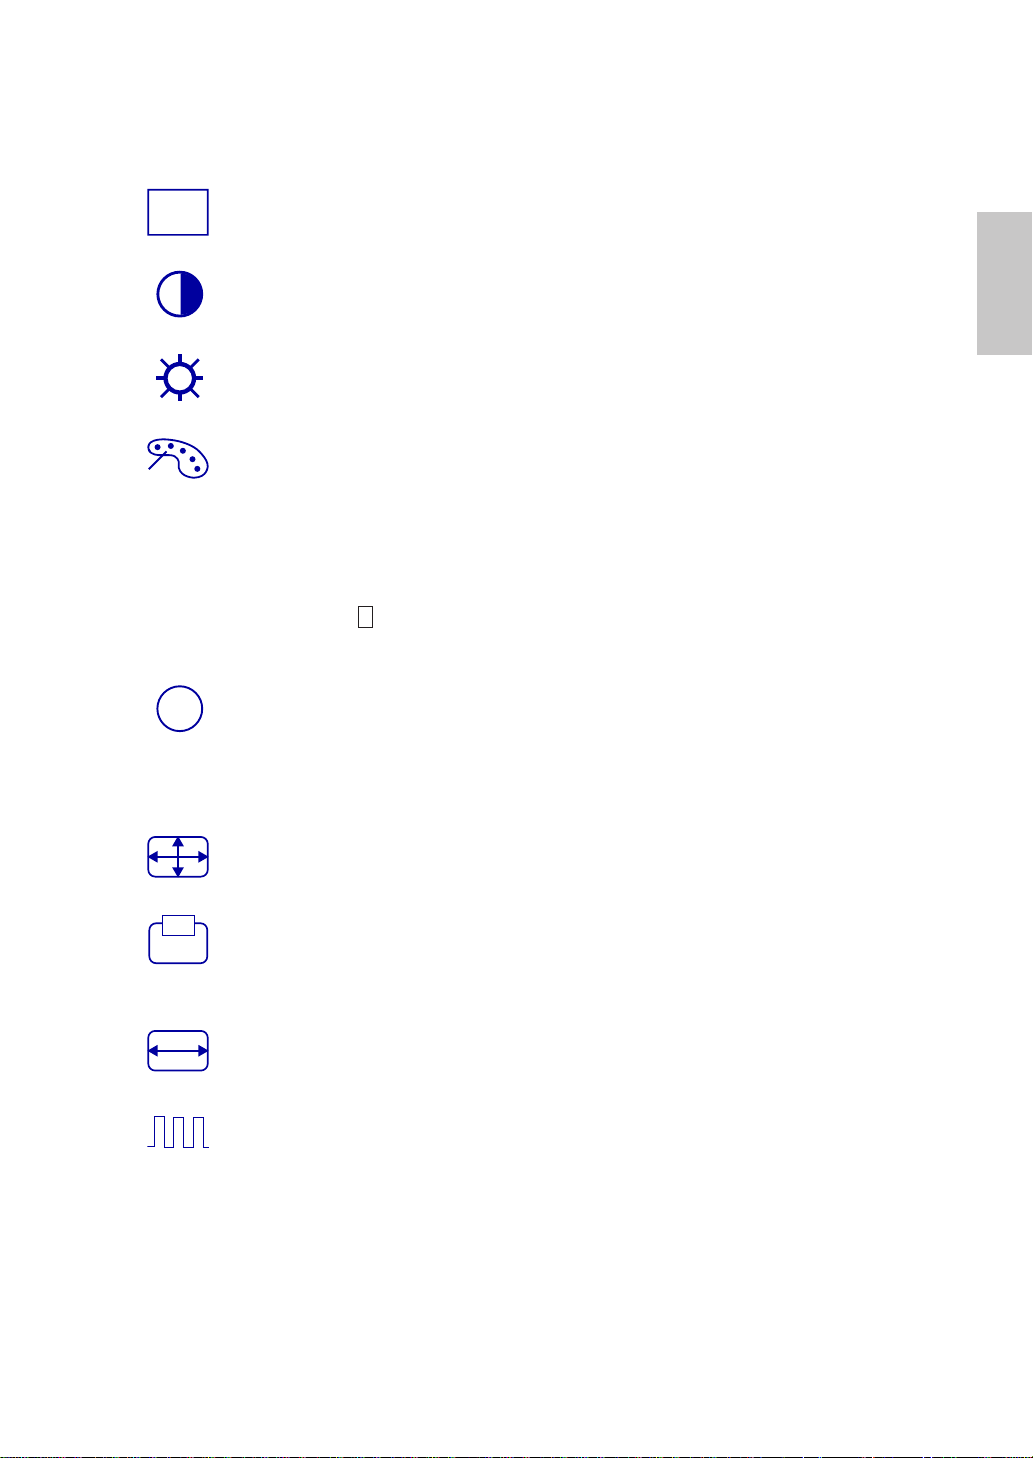
i
Auto Adjust : To auto adjust Horizontal Position, Vertical Position, Phase
(Fine Tune) and Clock (H. Size) of the screen.
Contrast : To adjust the foreground white level of screen image.
▲ : increase contrast, ▼: decrease contrast.
Brightness : : To adjust the luminance of the video.
▲: increase brightness, ▼ : decrease brightness.
Color Adjust : To select the color for improving brightness and color
saturation between9300K, 6500K, 5400K, and User Color.
9300K : Adds blue to screen image for cooler white.
6500K : Adds red to screen image for warmer white and richer red.
5400K : Adds green to screen image for a darker color.
User Color : Individual adjustments for red (R), green (G), blue (B).
1. Press button 2 to select the desired color.
2. Press ▼ or ▲ button to adjust selected color.
Information : To display the information, regarding the current input signal
coming from the graphic card in your computer.
Note: See your graphic card user guide for more information about
changing the resolution and refresh rate.
English
Image Adjust : To manually adjust the Horizontal/ Vertical position, H.
Size, Fine Tune and Sharpness.
H./V. Position : To adjust the horizontal and vertical position of the video.
H. Position : ▲ : move screen to the right, ▼ : move screen to the left.
V. Position : ▲ : move screen up, ▼ : move screen down.
H. Size : To adjust the width of the screen image.
▼: decrease the width of screen image, ▲: increase the width of screen image.
Fine Tune : To adjust the delay time of data and clock.
Press ▲ or ▼ to adjust to your preference.
5
Sharpness : To adjust the clarity of a non-WXGA (1280x720) signal with
?
OSD
▼ or ▲ button.
English
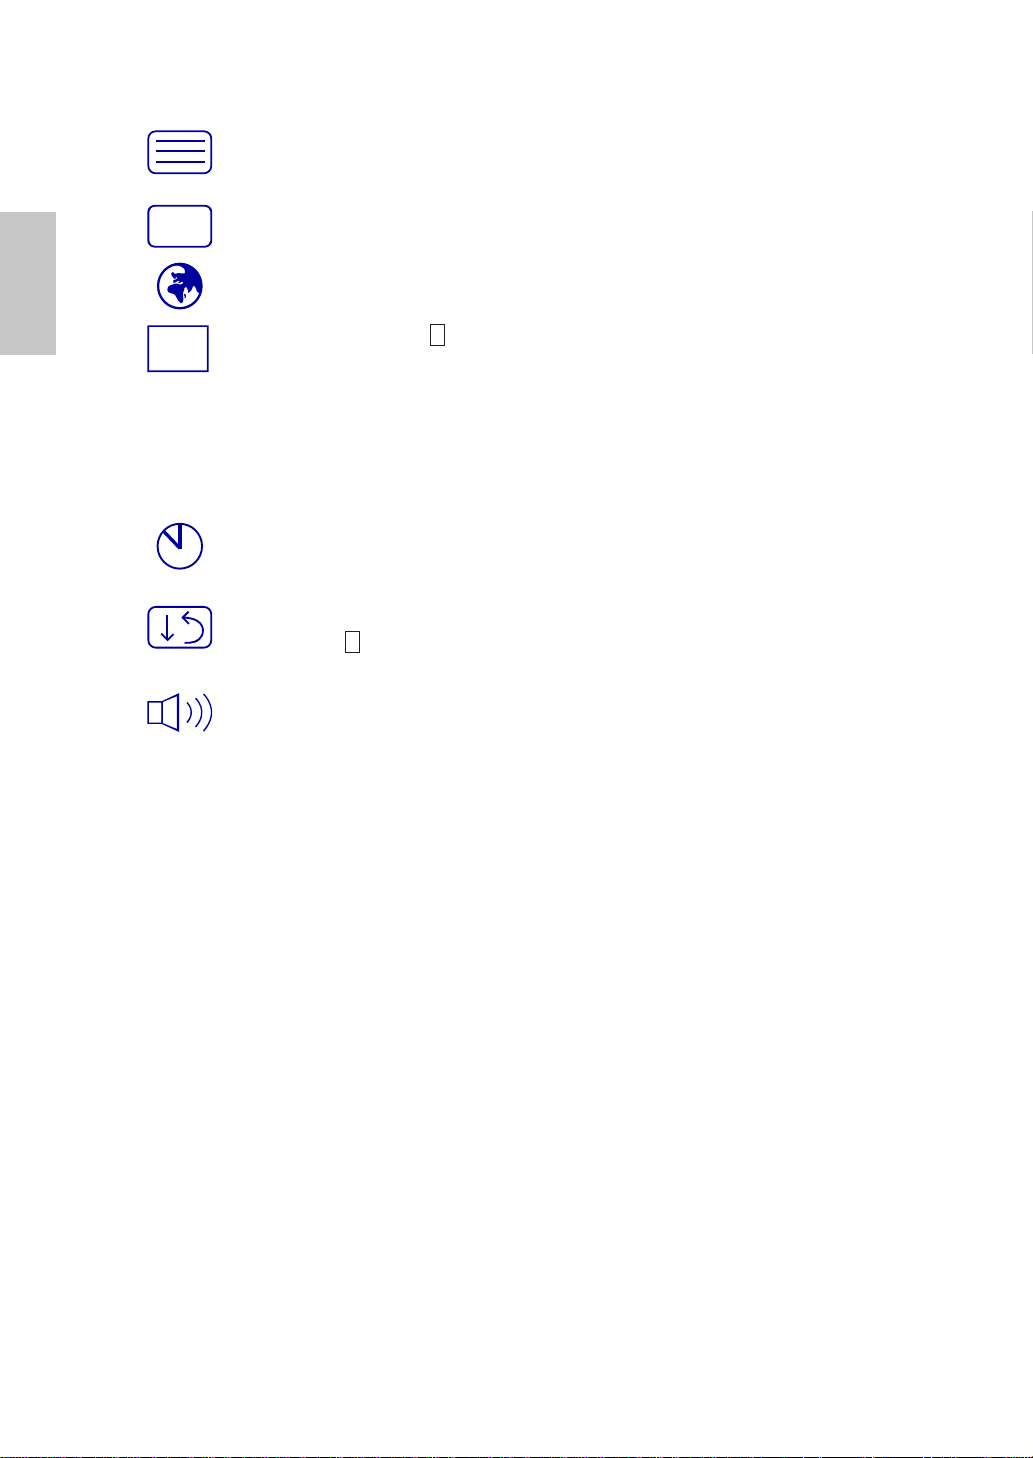
Setup Menu : To set up Language Select, OSD Position, OSD Time Out.
Language Select : To allow users to choose from available languages.
OSD Position : Press 2 button to select between horizontal and vertical
OSD Position adjustment.
Horizontal OSD Position : To horizontally adjust the OSD position.
▲ : move OSD to the right, ▼ : move OSD to the left.
Vertical OSD Position : To vertically adjust the OSD position.
▲ : move OSD up, ▼ : move OSD down.
OSD Time Out : To automatically turn off On Screen Display(OSD)after a
preset period of time.
Memory Recall : To recall factory settings for Video & audio controls.
Press button 2 to select the Memory Recall menu option.
Audio Menu : To adjust the audio functions.
Volume : To adjust the volume of speaker output.
Mute : To turn the Mute ON/OFF.
6
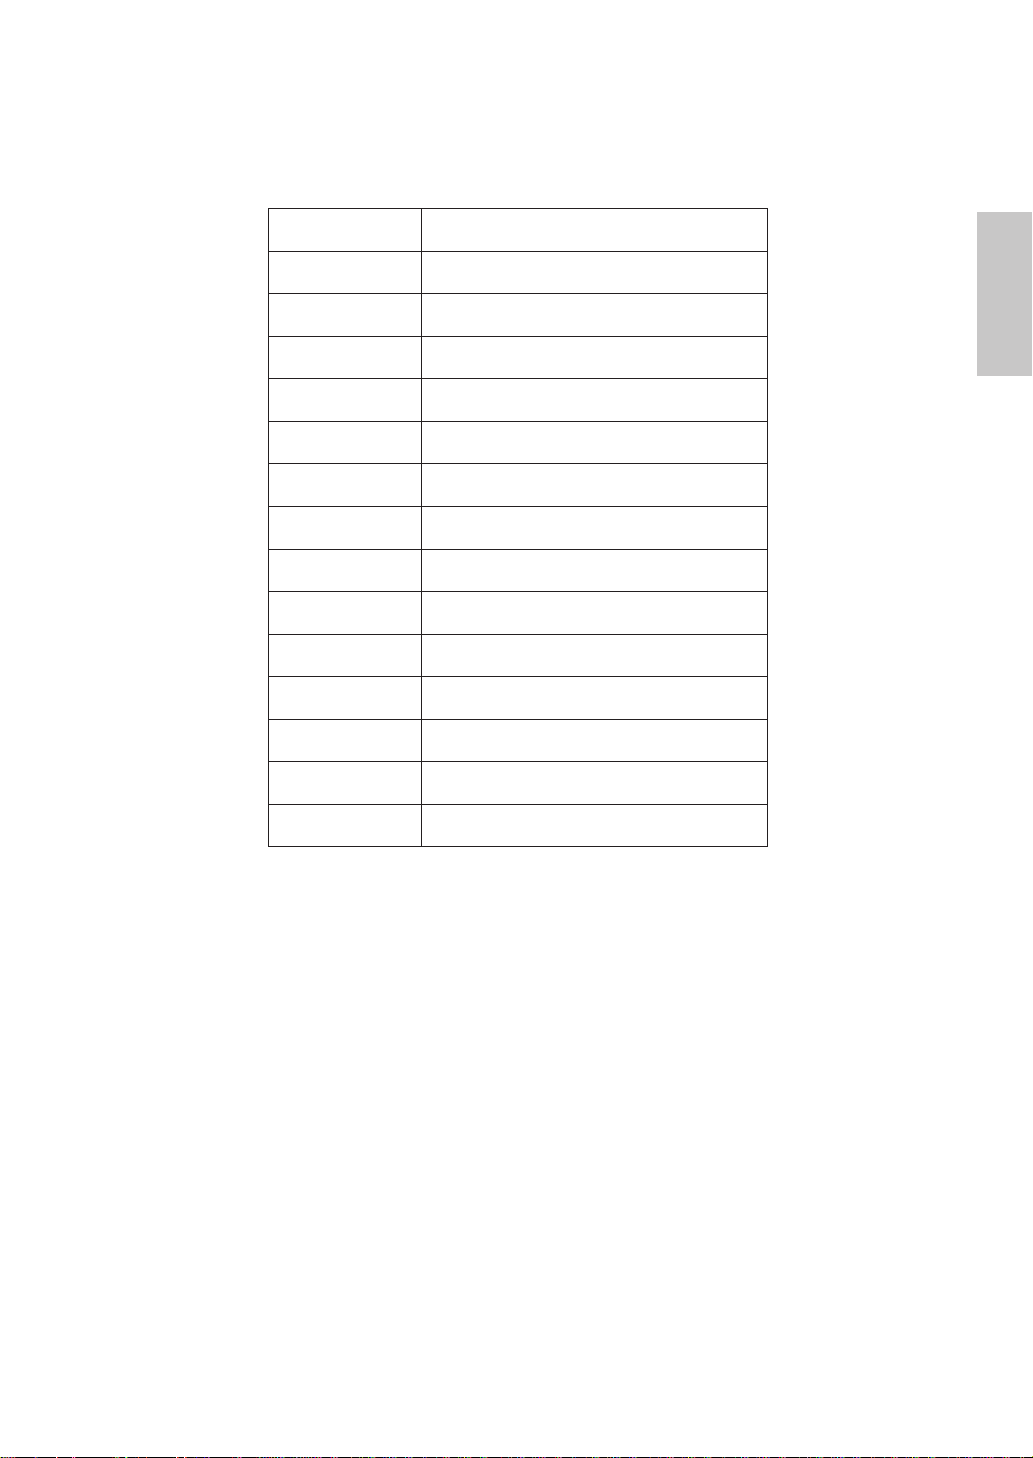
Supporting Timing Modes
VESA 720 x 400 @ 70Hz
VESA 640 x 480 @ 60Hz
MAC 640 x 480 @ 67Hz
VESA 640 x 480 @ 75Hz
VESA 800 x 600 @ 56Hz
VESA 800 x 600 @ 60Hz
VESA 800 x 600 @ 72Hz
VESA 800 x 600 @ 75Hz
MAC 832 x 624 @ 75Hz
VESA 1024 x 768 @ 60Hz
VESA 1024 x 768 @ 70Hz
VESA 1024 x 768 @ 75Hz
VESA 1152 x 864 @ 75Hz
VESA 1280 x 720 @ 60Hz
English
VESA 1280 x 720 @ 75Hz
Warning : Do not set the graphic card in your computer to exceed these maximum
refresh rates. Doing so may result in permanent damage to your monitor.
7
Technical Information
English
Technical Specication
LCD Panel 17” TFT
Energy Star compliant VESA
Power Management
Displayable Resolution WXGA 1280 x 720 max. Vertical Frequency 75Hz max.
Pixel Dimension 0.291 x 0.291 mm
LCD Display Color 262K (6 bits)
Tilt 0°~20°
Active Display Area 372.5 mm x 209.5mm
Temperature
Compliance CE, FCC
Power Input Voltage AC100-240 V
Speaker 1W x 2
DPMS compatible
< 1 W
Operating: 0°C ~ +40°C
Storage: -20°C ~ + 60°C
8

Care and Maintenance
Care
Avoid exposing your monitor directly to sunlight or other heat source. Place your
monitor away from the sun to reduce glare.
Put your monitor in a well ventilated area.
Do not place any heavy things on top of your monitor.
Make certain your monitor is installed in a clean and moisture-free area.
Keep your monitor away from magnets, motors, transformers, speakers, and TV
sets.
Safety Tips
If smoke, abnormal noise or odor came out from your monitor, caution you
should remove the power cord immediately and call your service center.
Never remove the rear cover of your monitor cabinet. The display unit inside
contains high-voltage parts and may cause electric shock to human bodies.
Never try to repair your monitor yourself. Always call your service center or a
qualied technician to x it.
Troubleshooting
No power
Make sure A/C power cord is securely connected to the power adapter and the
power supply is rmly connected to the monitor.
Plug another electrical device into the power outlet to verify that the outlet is
supplying proper voltage.
Make sure all signal cables are installed.
English
Power on but no screen image
Make sure the video cable supplied with the monitor is tightly secured to the
video output port on back of the computer. If not, tightly secure it.
Adjust brightness.
Wrong or abnormal colors
If any colors (red, green, blue) are missing, check the video cable to make sure
it is securely connected. Loose or broken pins in the cable connector could
cause an improper connection.
Connect the monitor to another computer.
9

Betriebshinweise
Danke, dass Sie sich für diesen hochauösenden Multiscan-Monitor
entschieden haben.
Bevor Sie mit der Installation beginnen, sollten Sie zuerst dieses Handbuch
durchlesen.
FCC-ERKLÄRUNG ZUR FUNKENTSTÖRUNG
HINWEIS: (NUR FÜR FCC-GEPRÜFTE MODELLE)
Dieses Gerät wurde getestet und entspricht den Anforderungen für
elektronische Geräte Klasse B, gemäß Artikel 15 der FCC Gesetze. Diese
Anforderungen sollen Schutz gegen störende Interferenzen bei im Haushalt
benutzten Elektrogeräten gewährleisten. Dieses Gerät erzeugt, nutzt und
entsendet Radiofrequenzen, die, falls das Gerät nicht ordnungsgemäß
installiert wurde, Interferenzen im Radioempfang hervorrufen können. Sollten
beim Betrieb des Gerätes dennoch störende Interferenzen beim Radiooder Fernsehempfang auftreten, sollten die Monitoreinstellungen überprüft
werden. Bestimmte Funkstörungen können auch beseitigt werden, indem
Sie die unten stehenden Schritte befolgen:
Drehen Sie die Empfangsantenne oder versetzen Sie sie an einen
anderen Ort;
Vergrößern Sie den Abstand zwischen dem Monitor und Ihrem Radio-,
Fernsehempfänger.
Verbinden Sie das Gerät mit einem Stromkreis verschieden von dem
des Radio-, Fernsehempfängers.
Wenden Sie sich an Ihren Händler oder bitten Sie einen erfahrenen
Radio/Fernsehfachmann um Hilfe
Deutsch
Dieser Monitor sollte nur in Verbindung mit einer geerdeten Stromquelle
sowie mit den beiliegenden abgeschirmten Video-Schnittstellenkabeln
benutzt werden. Veränderungen oder Modikationen, die nicht ausdrücklich
vom Hersteller genehmigt wurden, können zum Verlust der Erlaubnis für den
Betrieb dieses Gerätes führen.
Hinweis: Wenn erforderlich, müssen abgeschirmte Schnittstellenkabel
und Netzkabel verwendet werden, um den Emissionsbestimmungen zu
genügen.

Inhaltsverzeichnis
Deutsch
Sicherheitsbestimmungen ..................................................................1
Erster Setup........................................................................................2
Kurzanleitung......................................................................................2
Vorderansicht des Produkts................................................................3
Rückansicht des Produkts ..................................................................3
Verwenden der On Screen Display (OSD) Funktionen ......................4
Unterstützte Zeitsteuerungen .............................................................7
Technische Informationen...................................................................8
Pege und Aufbewahrung ..................................................................9
Fehlerbehebung .................................................................................9

Sicherheitsbestimmungen
Bei der Herstellung und Prüfung dieses Monitors stand die Sicherheit des
zukünftigen Nutzers immer im Vordergrund. Dennoch kann unsachgemäßer
Betrieb und Installation zu Schaden am Gerät und zu Gefahren für den
Nutzer führen. Lesen Sie sich deshalb zuerst sorgfältig die nachfolgenden
Warnhinweise durch, bevor Sie mit der Installation beginnen. Halten Sie
dieses Handbuch immer parat.
WARNHINWEISE:
Achten Sie darauf, dass der Monitor mit einer Stromquelle verbunden
ist, deren technische Daten, denen auf dem Hinweisschild auf der
Rückseite des Gerätes entsprechen. Wenn Sie dahingehend Zweifel
haben, so kontaktieren Sie Ihren Händler oder den Stromversorger.
Reparieren Sie den Monitor nie selbst. Der technische Aufbau ist so
kompliziert, dass Sie diese Aufgabe unbedingt einem qualizierten
Fachmann überlassen sollten.
Entfernen Sie nicht das Monitorgehäuse. Die Hochspannungsteile im
Innern des Gerätes können sogar elektrische Schläge aussenden,
wenn die Stromzufuhr unterbrochen wurde.
Nutzen Sie das Gerät nicht, wenn das Gehäuse beschädigt wurde. In
diesem Falle muss zuerst eine Überprüfung durch einen Fachmann
durchgeführt werden.
Deutsch
Stellen Sie den Monitor in einer sauberen, trockenen Umgebung auf.
Unterbrechen Sie sofort die Stromversorgung, wenn Feuchtigkeit in
das Gerät eingedrungen ist und wenden Sie sich an einen Fachmann
um Hilfe.
Unterbrechen Sie stets die Stromversorgung, bevor Sie mit der
Reinigung des Monitors beginnen. Geben Sie ammoniakfreie
Reinigungsüssigkeit zuerst auf ein Tuch , niemals jedoch gleich direkt
auf den Glasbildschirm.
Beachten Sie einen größeren Abstand des Monitors zu magnetischen
Gegenständen, Motoren, Fernsehapparaten und Transformatoren. .
Stellen Sie keine schweren Gegenstände auf Kabel und
Stromversorgung.
Die Verbindungsbuchsen ANSCHLIEßBARER ZUSATZGERÄTE
sollten sich in der Nähe des Monitors benden und leicht zugänglich
sein.
1
Deutsch
Netzkabel
Audiokabel
D-Sub-Kabel
Erster Setup
Gratulation, dass Sie sich für einen Monitor der Spitzenklasse entschieden haben!
Dieser Monitor verfügt über folgende Teile:
Netzkabel.
VGA-Kabel (D-Sub, 15-polig).
Audiokabel.
Benutzerhandbuch.
Garantiekarte
Kurzanleitung
Connecting the Monitor
1. Verbindung des Netzkabels
Verbinden Sie das Netzkabel mit einer geeigneten, geerdeten
Wechselstromquelle und danach mit dem Monitor.
2. Anschluss des Videokabels (D-Sub-Kabel)
Vergewissern Sie sich, dass sowohl der Bildschirm als auch der Computer
AUSGESCHALTET sind. Schließen Sie das Videokabel (D-Sub-Kabel) an den
Computer an.
3. Einschalten des Computers und Monitors
Schalten Sie erst den Computer und danach den Monitor ein.
4. Windows-Benutzer: Einstellen des Timing-Modus (Auösung und
Bildwiederholfrequenz)
Beispiel: 1280 x 720 @ 60 Hz
Auösung: Rechtsklicken Sie auf das Windows-Desktop > Eigenschaften >
Einstellungen > „Desktop-Bereich”. Stellen Sie die Auösung ein.
Bildwiederholfrequenz (vertikale Frequenz): Lesen Sie dazu im
Benutzerhandbuch Ihrer Grakkarte nach.
Beispiel:
2
Vorderansicht des Produkts
➊ ➋ ➌ ➍ ➎ ➏
➊ AKTIVIERT/BEENDET OSD ➍ EINSTELLUNG BESTÄTIGEN
➋ HERUNTER/VERRINGERN ➎ EIN/AUSSCHALTEN
➌ HERAUF/ERHÖHEN ➏ LED-ANZEIGE
Rückansicht des Produkts
Deutsch
➐ ➑ ➒
➐ NETZANSCHLUSS ➒ VGA-EINGANG (D-SUB 15-PIN)
➑ AUDIO-EINGANG
3
Deutsch
Verwenden der On Screen Display (OSD)
Funktionen
1
2
▲oder ▼
▼ + ▲ Ruft Kontrast und Helligkeit wieder auf.
1
+ ▼ Power-Sperre (wenn Sie sich nicht im OSD-Menü benden)
1
+ ▲ OSD-Sperre (wenn Sie sich nicht im OSD-Menü benden)
Hauptmenü (Main Menu)
Hauptmenü anzeigen.
OSD-Menü verlassen.
Automatisches Anpassen des Bildes, wenn Sie sich nicht im
Hauptmenü benden.
Bestätigen der Auswahl.
Wählen Sie den gewünschten Punkt im OSD-Menü aus.
Zur sofortigen Aktivierung von Kontrast/Helligkeit, wenn Sie sich
nicht im OSD-Menü benden. Wechseln Sie zu Kontrast/Helligkeit,
indem Sie die Taste drücken.
2
4
Schnelltastenfunktion
AUTO
SET
i
Autom. Anpassung (Auto Adjust) : Stellt Horizontal- und
Vertikal-Position, Phase (Feineinstellung) und Takt (H-Größe)
automatisch ein.
Kontrast (Contrast) : Stellt den Weißwert des Bildschirmvordergrundes
ein. ▲ : Erhöht Kontrast,▼: Verringert Kontrast.
Helligkeit (Brightness) : Zum Anpassen der Helligkeit des Videos.
▲: Helligkeit erhöhen,▼ : Helligkeit verringern.
Farbeinstellungen (Color Adjust) : Zum Auswahl der Farben, um die
Helligkeit und Farbsättigung zu verbessern. Zur Auswahl stehen:9300K,
6500K, 5400K und Benutzerdenierte-Farbe.
9300K : Fügt dem Bildschirm Blau hinzu und erzeugt ein kühleres Weiß.
6500K : Fügt dem Bildschirm Rot hinzu und erzeugt ein wärmeres Weiß
und ein prächtigeres Rot.
5400K : Fügt dem Bildschirm Grün hinzu und erzeugt einen dunkleren
Farbton.
Benutzerdenierte-Farbe (User Color) : Individuelle Einstellung für
rot(R), grün(G) und blau(B).
1. Drücken Sie die Taste 2 , um das Eingestellte zu übernehmen und mit
2. Drücken Sie die Taste ▼ order ▲ um die ausgewählte Farbe
einzustellen.
Deutsch
Informationen (Information) : Zeigt Informationen über das aktuelle
Eingangssignal von der Grakkarte Ihres Computers an.
Hinweis: Weitere Informationen über das Ändern der Auösung und
der Bildwiederholrate sind in der Bedienungsanleitung der Grakkarte
angegeben.
Bildanpassung (Image Adjust) :Stellt Horizontal/Vertikal-Position, H-
Größe, Feineinstellung und Schärfe ein.
H/V-Position (H./V. Position) :Stellt die Horizontal- und Vertikal-Position
des Videobildes ein.
H-Position : ▲ : Schiebt den Bildschirm nach rechts, ▼ : Schiebt den
Bildschirm nach links.
V-Position : ▲ : Schiebt den Bildschirm nach oben,▼ : Schiebt den
Bildschirm nach unten.
5
Horizontale Größe (H. Size) : Stellt die Breite des Bildschirms ein.
?
OSD
▼: erhöht die Breite des Bildschirms, ▲: verringert die Breite des Bildschirms.
Deutsch
Feineinstellung (Fine Tune) : Stellt die Verzögerungszeit ein.
Drücken Sie ▲ order ▼ ,um den Benutzerwunsch einzustellen.
Schärfe (Sharpness) : Zum Anpassen der Schärfe eines Nicht-WXGA
(1280x720) Signals mit der Taste▼ order ▲ .
Menü “Setup” (Setup Menu) : Stellt Sprachauswahl, OSD-Position und
OSD-Zeitüberschreitung ein.
Sprachauswahl (Language Select) :Ermöglicht dem Benutzer, aus
vorhandenen Sprachen auszuwählen.
OSD Position (OSD Position) :Drücken Sie die Taste 2 um zwischen
horizontaler und vertikaler Einstellung der OSD-Position zu wählen.
Horizontale OSD-Position :Zur horizontalen Einstellung der OSD-
Position.
▲ : OSD nach rechts bewegen, ▼ : OSD nach links bewegen
Vertikale OSD-Position :Zur vertikalen Einstellung der OSD-Position.
▲ : OSD nach oben bewegen, ▼ : OSD nach unten bewegen
OSD Einblendzeit (OSD Time Out) : Zum automatischen Abschalten des
On Screen Displays (OSD) nach Ablauf einer voreingestellten Zeitspanne.
Zurücksetzen (Memory Recall) : Zur Wiederherstellung der
Werkseinstellungen für die Video- & Audiosteuerung. Drücken Sie die
Taste 2 um die Option Speicher-Wiederherstellung auszuwählen.
Audio-Menü (Audio Menu) : Zur Einstellung der Audiofunktionen.
VLautstärke : Stellt die Tonausgabe der Lautsprecher ein.
Stumm : Ermöglicht die Wahl von Stumm EIN/AUS.
6
Unterstützte Zeitsteuerungen
VESA 720 x 400 @ 70Hz
VESA 640 x 480 @ 60Hz
MAC 640 x 480 @ 67Hz
VESA 640 x 480 @ 75Hz
VESA 800 x 600 @ 56Hz
VESA 800 x 600 @ 60Hz
VESA 800 x 600 @ 72Hz
VESA 800 x 600 @ 75Hz
MAC 832 x 624 @ 75Hz
VESA 1024 x 768 @ 60Hz
VESA 1024 x 768 @ 70Hz
VESA 1024 x 768 @ 75Hz
VESA 1152 x 864 @ 75Hz
VESA 1280 x 720 @ 60Hz
Deutsch
VESA 1280 x 720 @ 75Hz
Vorsicht : Stellen Sie die Bildwiederholrate der Grakkarte Ihres Computers nicht
auf einen Wert ein, der obige Maximalwerte überschreitet. Andernfalls könnte Ihr
Monitor permanent beschädigt werden.
7
 Loading...