

Page 1

Yuneec™
SMARTRADIO™
ST10™ Quick Start Guide
Page 2

Features
IMPORTANT NOTE: This Quick Start Guide is NOT intended to replace
the complete content included in the ST10 instruction manual. Although
the following information covers some of the basic details you need to
know we strongly recommend reading through the instruction manual
completely before charging/using the ST10.
Charging Your ST10
Use a suitable power source/supply (1.0A and 5V MAX output) and a cable with a Micro
USB connector to charge the 3.6V Li-Ion battery installed in the ST10. The time it takes to
fully charge the battery will depend on the current voltage/charge state of the battery and
the charge rate of your chosen power source/supply. For reference it will typically take
approximately 6 hours to charge a near fully discharged battery at the maximum
recommended charge rate of 1.5 amps.
1. Connect the cable with the Micro USB connector to the suitable power
source/supply
2. Connect the Micro USB connector to the corresponding port on the bottom of the
ST10
You can also remove the battery from the back of the ST10 and charge it separately using
a suitable Li-Ion battery charger and a lead with a compatible 2-pin JST connector (at a
maximum recommended charge rate of 1.5 amps).
IMPORTANT NOTE: Charging the Li-Ion battery using an incompatible charger
(such as a NiCd or NiMH battery charger), or even a compatible battery charger with
the incorrect settings, may result in damage to the battery or even fire resulting in
property damage and/or personal injury.
2
Page 3
Using Your ST10
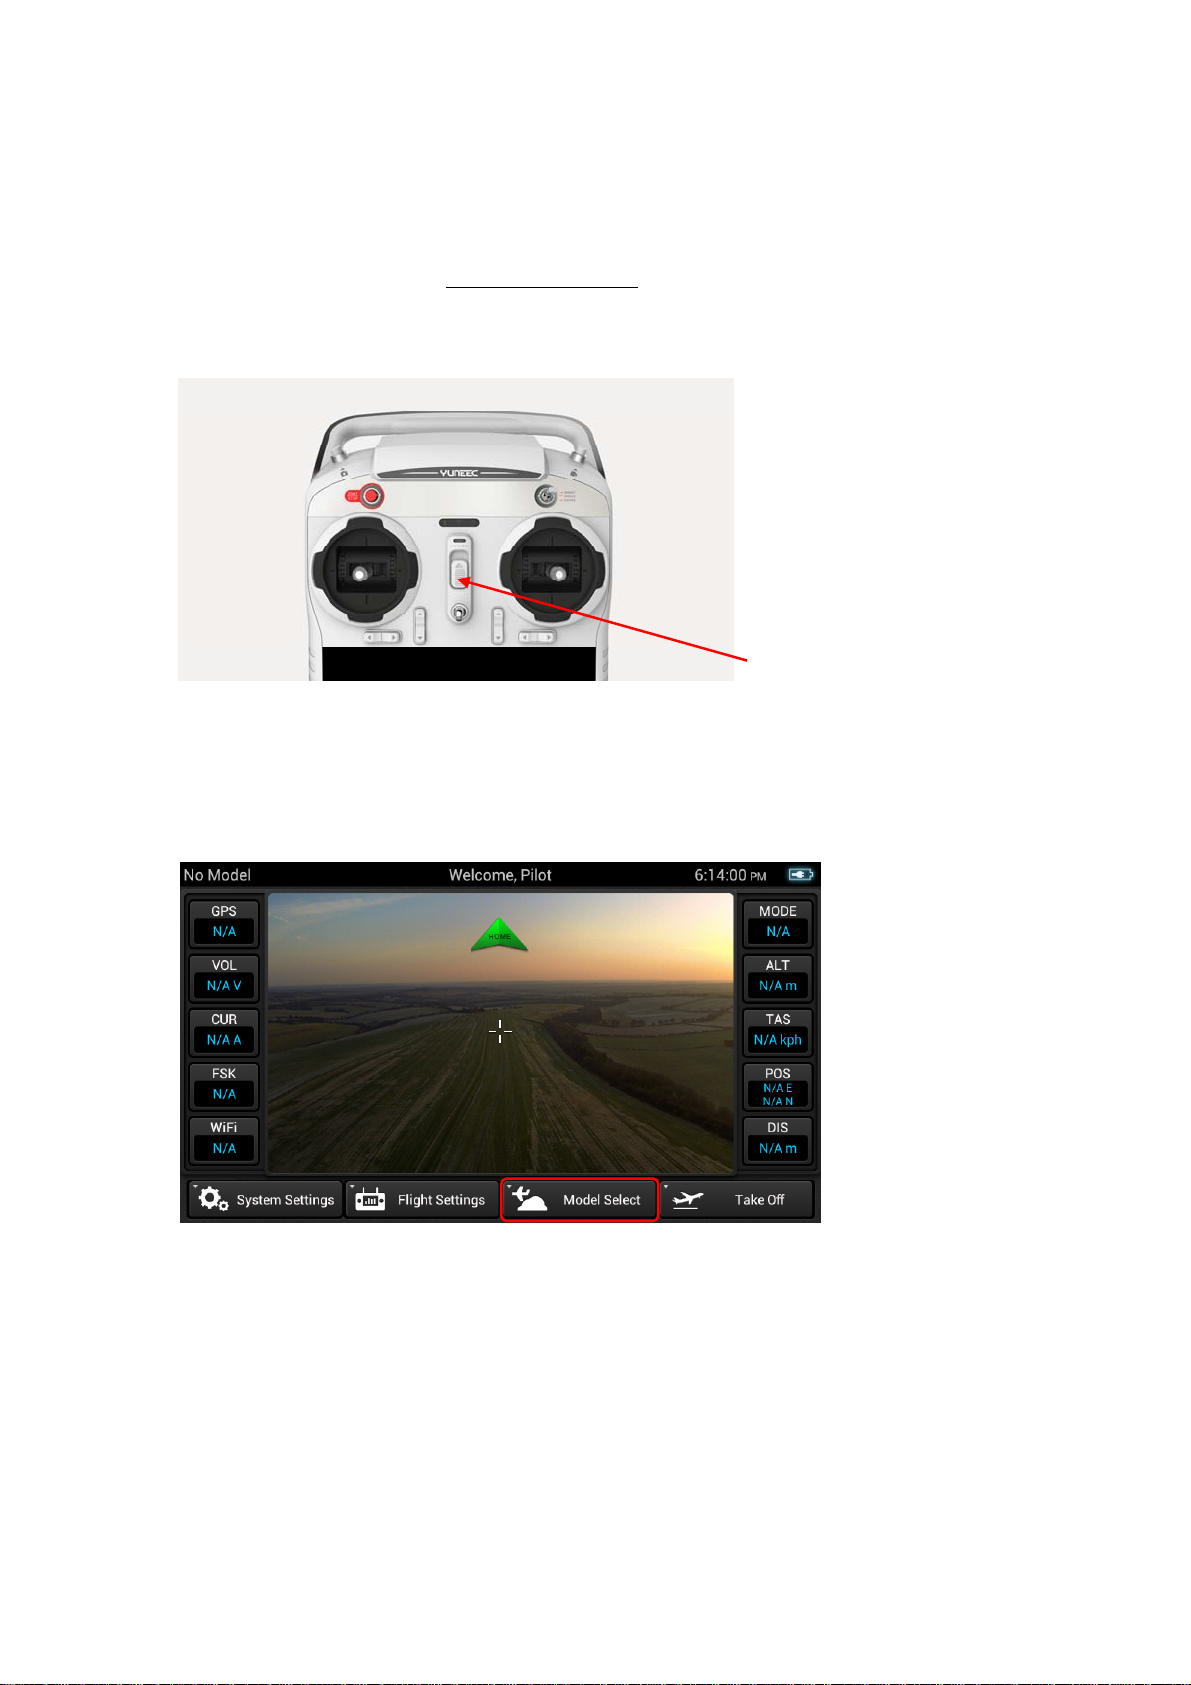
1. Power on the ST10 and enter RC mode
• Slide the Power Switch to the top to power on the ST10
Power switch
Model Select
• Tap the Mode Select button/icon
• Model Select should be the first step, if you tap other buttons before choosing a
model, this interface will come out, then tap Go to Model Select button/icon to get
into the following interfaces
3
Page 4

• To create a new model tap the New Model button/icon
• Give the new model a name, take or select an image (optional), select a type (if
applicable) then Save the new model
4
Page 5

• To edit or delet a model tap the model tap the model for about 2 seconds
Flight Settings
• Tap the Flight Settings button/icon
• Tap the Bind button/icon
5
Page 6

• Tap the Refresh button/icon, select the corresponding ID of the model and
camera, then tap the Bind button/icon
• Tap the Camera Select button/icon
• Tap Select to select a camera
6
Page 7

• Tap the Quick Review to review vid eos
z Tap the Mode Select button/icon to change mode
z Tap Hardware Monitor button/icon to know the status of channels
7
Page 8

System Setting
• Tap the System Settings button/icon
FCC Statement:
This equipment has been tested and found to comply with the limits for Part 15 of the FCC rules.
These limits are designed to provide reasonable protection against harmful interference in a
residential installation. This equipment generates, uses and can radiate radio frequency energy and,
if not installed and used in accordance with the instructions, may cause harmful interference to
radio communications.
However, there is no guarantee that interference will not occur in a particular installation. If this
equipment does cause harmful interference to radio or television reception, which can be
determined by turning the equipment off and on, the user is encouraged to try to correct the
interference by one or more of the following measures:
• Reorient or relocate the receiving antenna.
• Increase the separation between the equipment and receiver.
• Connect the equipment to an outlet on a circuit different from that to which the receiver is
connected.
8
Page 9

This device complies with part 15 of the FCC rules. Operation is subject to the following two
conditions:
(1) This device may not cause harmful interference, and (2) this device must accept any
interference received, including interference that may cause undesired operation.
Note: This equipment has been tested and found to comply with the limits for a Class B digital
device, pursuant to part 15 of the FCC Rules. These limits are designed to provide reasonable
protection against harmful interference in a residential installation. This equipment generates, uses
and can radiate radio frequency energy and, if not installed and used in accordance with the
instructions, may cause harmful interference to radio communications. However, there is no
guarantee that interference will not occur in a particular installation. If this equipment does cause
harmful interference to radio or television reception, which can be determined by turning the
equipment off and on, the user is encouraged to try to correct the interference by one or more of
the following measures:
—Reorient or relocate the receiving antenna.
—Increase the separation between the equipment and receiver.
—Connect the equipment into an outlet on a circuit different from that to which the receiver is
connected.
—Consult the dealer or an experienced radio/TV technician for help.
CAUTION:
Any changes or modifications not expressly approved by the grantee of this device
could void the user's authority to operate the equipment.
RF exposure warning
· This equipment must be installed and operated in accordance with provided
instructions and the antenna(s) used for this transmitter must be installed to provide a
separation distance of at least 20 cm from all persons and must not be co-located or
operating in conjunction with any other antenna or transmitter. End-users and
installers must be provide with antenna installation instructions and transmitter
operating conditions for satisfying RF exposure compliance.
9
Page 10

IC Radiation Exposure Statement for Canada
This device complies with Industry Canada licence-exempt RSS standard(s).
Operation is subject to the following two conditions: (1) this device may not cause
interference, and (2) this device must accept any interference, including interference
that may cause undesired operation of the device.
Le présent appareil est conforme aux CNR d'Industrie Canada applicables aux
appareils radio exempts de licence. L'exploitation est autorisée aux deux conditions
suivantes : (1) l'appareil ne doit pas produire de brouillage, et (2) l'utilisateur de
l'appareil doit accepter tout brouillage radioélectrique subi, même si le brouillage est
susceptible d'en compromettre le fonctionnement.
10
 Loading...