

Page 1

ELECTRICAL LONGBOARD
USER GUIDE
Page 2

Page 3

INDEX
01 ..................................
02 ..................................
03 ..................................
08 ..................................
09 ..................................
10 ..................................
11 ..................................
12 ..................................
16 ..................................
19 ..................................
20 ..................................
22 ..................................
24 ..................................
INDEX
INTRODUCTION
OVERVIEW
CHARGE SETUP
SYNCING CONTROLLER AND BOARD
FEATURES
SPECIFICATIONS
SAFETY WARNINGS AND TIPS
TROUBLESHOOTING
SPARE PARTS
GARAGE
INSTALLATION GUIDE
CERTIFICATION INFORMATION
1
Page 4

INTRODUCTION
Congratulations, you have purchased an E-GO 2 . You are now the owner of a portable, eco-friendly mode
of transport that is incredibly fun to use. Integrating state of the art motor technology developed by
YUNEEC for use in the aviation industry, E-GO 2 brings to the streets an experience and convenience that
was never available in the past.
Setting aside dated conventions, E-GO 2 focuses on what is essential to the design of a sustainable transport unit that functions in todays urban areas. Combining high performance with low consumption, the
E-GO 2 CRUISER allows you to travel up to 30Km / 18Mi on one full charge. Its lightweight design and
compact dimensions make the E-GO 2 the perfect wingman wherever you go: simply pick up your board
and step into a taxi, bus, train, or indoor location.
Boarding is often linked to extreme sports activities like surfing, skating, or snowboarding and there are
definitely similarities in the amount of freedom experienced when moving through space. However, E-GO
2 is foremost a city transport unit and distinguishes itself as such through features such as its advanced
braking system, giving the rider more control over his / her vehicle which is required to ensure the safety
of other people as well as his / her own.
Keeping the latter in mind, we would like to suggest you read through this users manual, to ensure you
understand fully how to properly set-up and use your E-GO 2 and what general common sense to apply
when riding in a public area. The general rule to follow: Ride with consideration and style. We hope you
enjoy your E-GO 2 experience!
2
Page 5
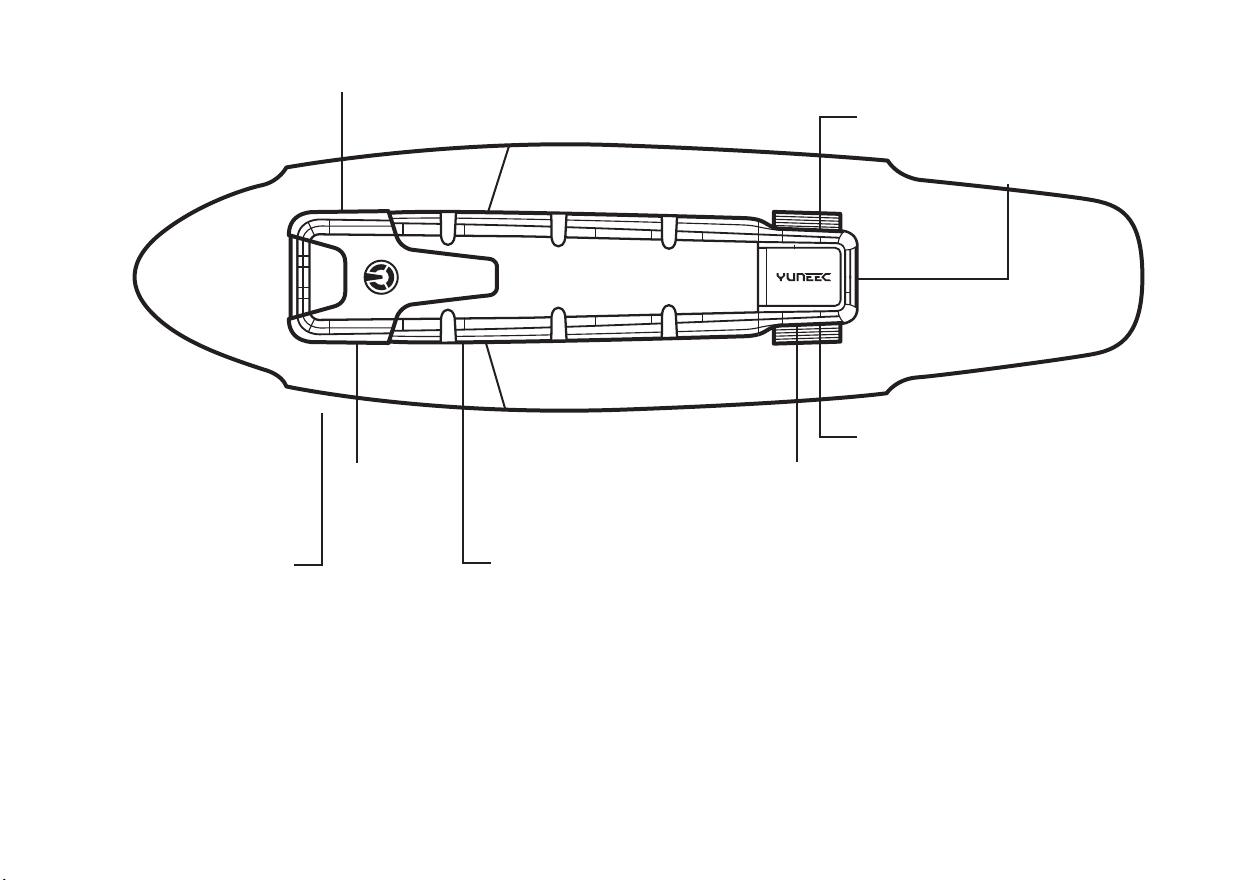
overview
1
3
6
5
2
THE DECK THE BATTERY
The E-GO 2 features a 12 mm, eight
layered composite wood deck, making
it flexible, durable and strong: all the
qualities a rider looks for in a board.
The deck surface is finished with
griptape to avoid slipping.
E-GO 2 ’s sleek, low profile multi-cell
battery pack is located under the deck,
and utilises Yuneec’s latest, patented
battery technology. Its’ flexible
battery casing allows the deck to bend
while riding.
3
4
charge port
1.
power switch
2.
power status
3.
indicator
USB port
4.
2.4GHz / bluetooth switch
5.
Electronic Control
6.
Unit (ECU)
Page 6
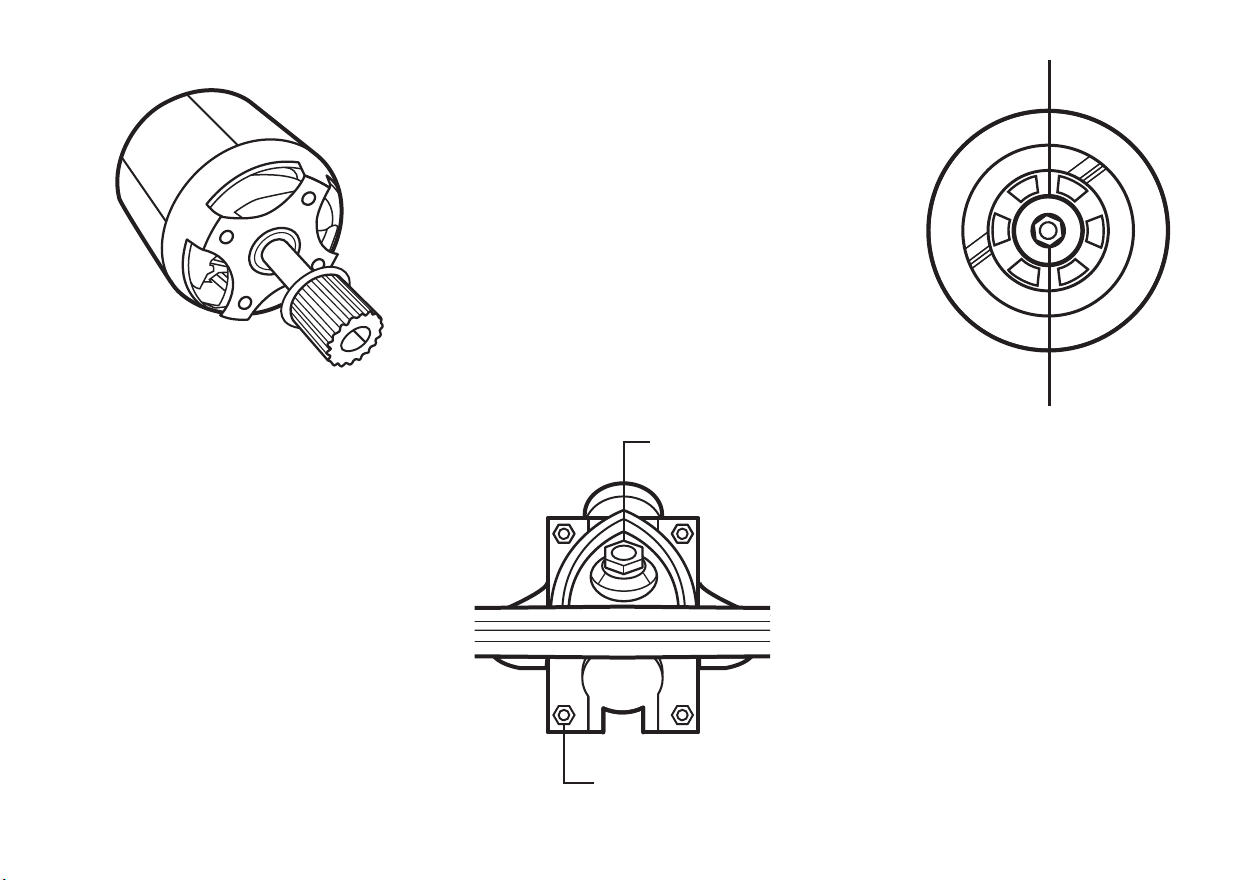
THE WHEELS
The E-GO 2 `s 90mm wheels provide
traction and stability on an array of
surfaces, turning the E-GO 2 into a
reliable urban transport system.
bearing
THE MOTOR
By integrating technology developed
by Yuneec for use in the aviation
industry, the brushless 400 watt
motor provides reliable and efficient
power for your E-GO 2 .
kingpin nut
axle nut
THE TRUCKS
Connecting the wheels to the deck
are two alloy trucks made of the
highest grade materials available.
The trucks can be adjusted using the
truck tool.
(For more on the truck tool see page 7)
baseplate nut
4
Page 7
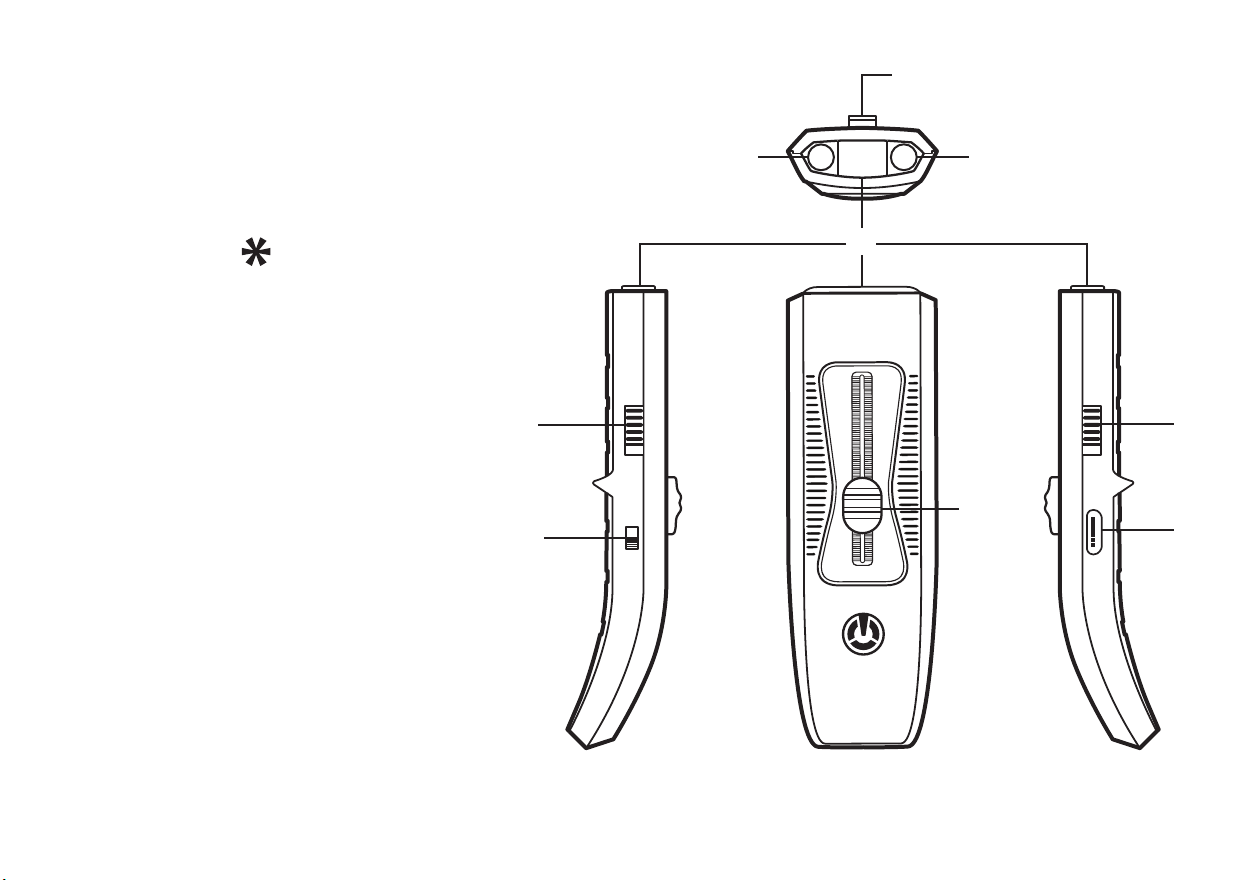
THE CONTROLLER
The EB24C is the smart controller of E-GO2,
a key feature of the E-GO 2 is without doubt
its sleek, pocket-sized, wireless controller
which allows you to intuitively control its
movements by simply sliding the throttle /
brake (7) up and down.
The battery status indicator's light (9)
indicates the wireless controller's and
board’s battery status:
Green light indicates the board’s battery
status. Blue light indicates the controller’s
battery status. Each light blinks 1,2,3 or 4
times in series. Each blink indicates 25% of
the total battery capacity.
10
7
8 9*
START
6
12
When the board or controllers battery goes
under 25% of its maximum capacity, the
controller vibrates, its light will turn red and
blink 1 time. When charging - with the
controller connected to the board - a red
light indicates that the controller’s battery
charge is less 100%.
Example: (when activated but not charging)
the board's battery is completely empty and
the controller's battery has less than 75% of
its full charge capacity left 1 red blink will be
followed by 2 blue blinks.
(For more information on the yellow and purple warning
lights, reference troubleshoot page 19)
11
7
13
5
Page 8
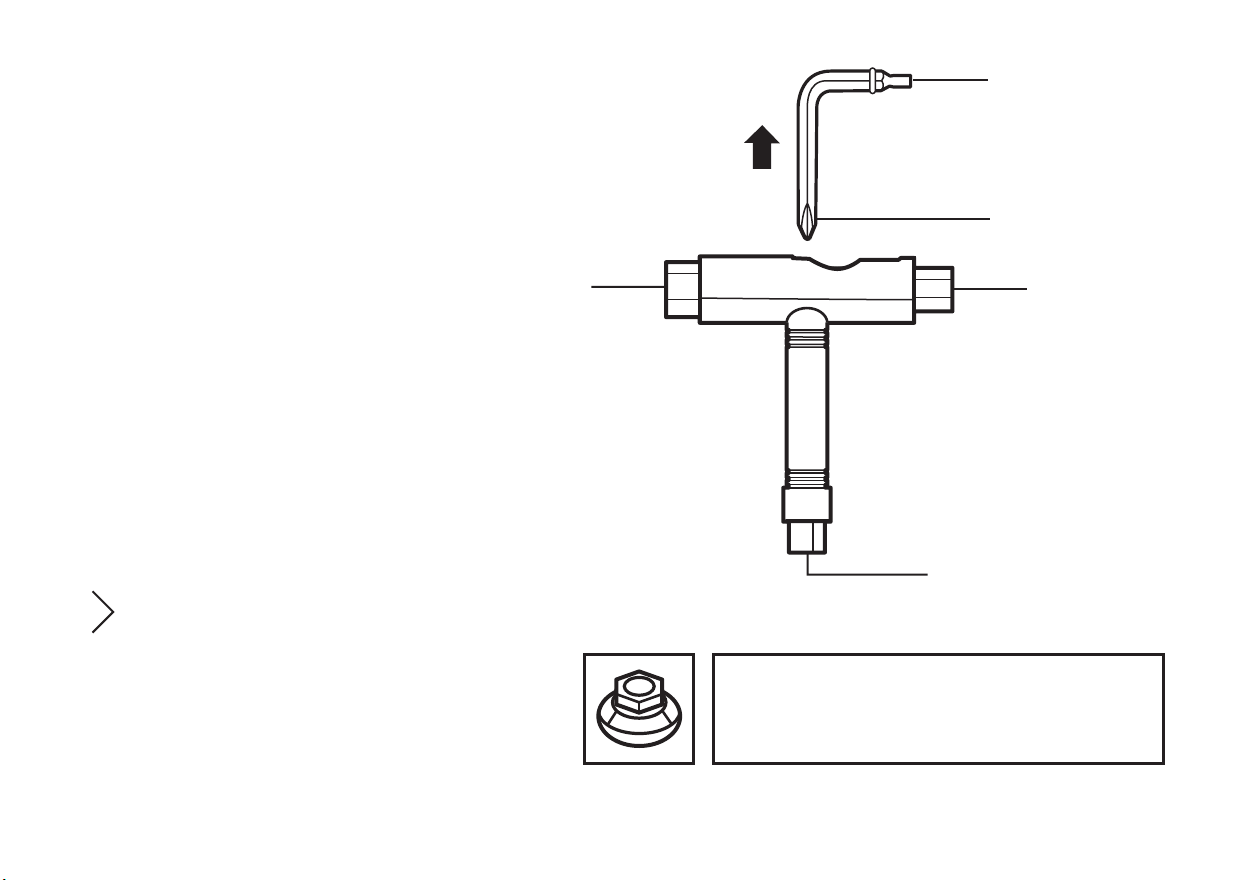
THE TRUCK TOOL
To keep your E-GO 2 's performance up to
maximum you will need to do regular maintenance checks (for more info on maintenance
please check page 17), making sure the
board is not obstructed by dirt and all nuts
and bolts are properly tightened. To tighten
and loosen these nuts and bolts, your E-GO
2 comes with a specific tool - the truck tool
- that allows you to do that. In general you
should make sure all parts are screwed on
there nice and tight, with the exception of
the kingpin nut which can be adjusted
according to your personal riding style.
START button
6.
throttle / brake
7.
flash light
8.
battery status indicator*
9.
riding mode switch
10.
speed mode switch
11.
torch light switch
12.
mini USB port
13.
17
14
15
18
hex tool
14.
phillips tool
15.
nut tool
16.
kingpin nut tool
17.
axle nut tool
18.
16
Tightening the kingpin will give a more stable, rigid
ride. Loosening the kingpin nut will make the board
more maneuverable and decreases the diameter of
your turn radius, allowing sharper turns.
6
Page 9

THE USB
Use the USB to connect the wireless
controller to the board's USB port, to any
computer or any other USB port for
recharging purposes.
THE CHARGER
The E-GO 2 charger allows you to fully
recharge the E-GO 2 and the controller's
battery in 3 to 5 hours (depending on
charge left and ambient temprature)
giving you a maximum riding range of 30
km / 18 miles (depending on weight, road
conditions, riding style, etc...).
charge status
indicator*
*red = charging / green = charged
Charge lead depending
on sales area
7
THE PIN TOOL
Also included with the E-GO 2 is a small
pin-shaped object, which allows you to
access the speed mode switch on the
controller and the bluetooth switch on the
the board .
Page 10

CHARGE
SETUP
The board needs to be
power-ed on in order to
charge the wireless controller
through the usb port.
Charge lead
depending
on sales area
To ensure a healthy battery life,
recharge the battery for 6 hours
straight before first use. This will
condition the battery and give better
long term performance.
8
Page 11

SYNCING CONTROLLER AND BOARD
1
Use the pin tool (page 8) to slide the
speed switch (positioned on the left side
of the controller) fully down.
4
Begin with the 'BLUETOOTH' switch
flipped toward the right (closest to the
motor). Immediately after powering the
board ON, move the ‘BLUETOOTH’ switch
to the left (furthest away from the motor)
and back to the right (closest to the
motor). Then the battery status indicator
should go from flashing fast to flashing
more slowly.
2
Slide down the riding mode switch
(positioned on the left side of the wireless
controller) to 'ECO' mode.
3
Make sure the 'BLUETOOTH' switch (ill. 4)
is switched to the side closest to the motor,
then turn on the board by switching the
power switch on. The board should now
beep two times and its battery status
indicator should be flashing fast.
5
Slide down the wireless controller’s throttle / brake to the lowest possible position, and
hold it there. At the same time, press and release the start button while the throttle/brake
is still held down. After 7 seconds, the controller will show 8 green flashes, followed by
blue flashes. At this point release the throttle / brake. The board should now beep again,
indicating a successful synchronization.
9
Page 12

FEATURES
THE E-GO 2 FEATURES 2 SPEED MODES: A SLOW MODE OR BEGINNER MODE - WITH A LIMITED SPEED OF 13 KM/H OR
8 MPH), AND A FAST MODE - WITH A MAXIMUM SPEED OF 20 KM/H OR 12.5 MPH.
THE E-GO 2 ALSO FEATURES 2 RIDING MODES: THE ECO MODE - WITH A LOWER ACCELERATION CURVE - AND THE SPORT
MODE - WITH A HIGHER ACCELERATION CURVE. RIDING IN ECO MODE WILL DEMAND LESS POWER FROM THE BATTERY
THUS MAXIMIZING THE EGO'S RANGE.
THE E-GO 2 WILL TAKE YOU UP INCLINES OF UP TO 10% FOR A LIMITED DISTANCE. VARIABLES LIKE WEIGHT OF RIDER,
INCLINE, AMBIENT TEMPERATURE AND ROAD SURFACE MAY CAUSE THE ECU TO OVERHEAT AND PERFORM A TEMPORARY CONTROLLED SHUTDOWN.
TO FULLY CHARGE THE E-GO 2 'S BATTERY, A CHARGE TIME OF 3 TO 5 HOURS FROM A STANDARD A/C POWER SOURCE
IS NEEDED. TO FULLY CHARGE THE WIRELESS CONTROLLER A CHARGE TIME OF ABOUT 50 MINUTES FROM ANY USB
PORT IS NEEDED.
THE E-GO 2 FEATURES A REGENERATIVE BRAKING SYSTEM (RBS) THAT RECYCLES POWER USED WHEN BRAKING TO RECHARGE
THE BATTERY. BE AWARE THAT RBS STOPPING PERFORMANCE VARIES DEPENDING ON RIDER WEIGHT AND CONDITIONS.
AT JUST 6.3 KG / 13.9 LBS, THE E-GO 2 IS LIGHTWEIGHT AND PORTABLE WHICH WORKS IN COMBINATION WITH AN
ARRAY OF PUBLIC TRANSPORTATION.
10
Page 13

PERFORMANCE
BOARD
Max. User Weight: 100kg / 220bs
Max. Range: 18mi / 30km
High Speed Mode Max.: 12.5mph / 20km/h
Low Speed Mode Max.: 8mph / 13km/h
CHARGER
Input: AC 100-240V / 50-60HZ / 1.5A Max.
Output: 29.5V / 2A
Charge Indicator: Red when charging /
Green when charged
CONTROLLER
Material: ABS Plastic
Dimensions: 125*41*33mm
Weight: 60g
Battery Type: Lithium
Battery Capacity: 240mAH
Battery Charging Time: 50 minutes
Wireless Connection: 2.4GHz
Vibration: Yes
Deck Material: Canadian Maple Wood
Deck Dimensions: 910*240mm
Wheel Material: Polyurethane
Wheel Size: 90mm diameter / 52mm width
Battery Type: Li-ion
Battery Capacity: 7.8 AH
Battery Cell Quantity: 21 pcs
Battery Charging Time: 3-5 hours (depending on ambient temperature)
Motor Type: Brushless Direct Current
Motor Power: Max. 400W / Ave Power 150W
Transmission Model: Synchronous Belt Drive
Board Weight: 13.9lbs / 6.3kg
SPECFICATIONS
11
Page 14

SAFETY WARNINGS AND TIPS
ABOUT THE SAFETY GUIDELINES
BEFORE RIDING THE E-GO 2 , IT IS STRONGLY ADVISED TO READ THROUGH AND FOLLOW ALL TIPS, INSTRUCTIONS AND WARNINGS
LISTED UNDERNEATH. THIS CAN REDUCE THE RISKS THAT COMES WITH USING A PERSONAL ELECTRONIC TRANSPORTER (PET) // IT
SHOULD BE CLEAR THAT READING THIS MANUAL WILL ONLY REDUCE AND NOT ELIMINATE THE RISK INHERENT TO USING A PERSONAL ELECTRIC TRANSPORT (PET) // IF YOU EXCEED THE ABILITY OF YOURSELF OR YOUR E-GO 2 BY RIDING OVER OBSTACLES OR ANY
OTHER UNSUITABLE SURFACES, THIS MIGHT POTENTIALLY LEAD TO COLLISIONS OR FALLS IN TURN LEADING TO SERIOUS OR FATAL
INJURY, OR THE DAMAGING OF YOUR E-GO 2
NEW RIDERS
FIRST TIME USING AN E-GO 2 ? START BY RIDING IN THE LOW SPEED MODE // INEXPERIENCED RIDERS ARE BEST TO FIRST PRACTICE
IN A SPACIOUS, NON TRAFFIC ZONE // INEXPERIENCED RIDERS SHOULD BE ASSISTED BY A MORE EXPERIENCED RIDER // DO NOT
LET NEW RIDERS OPERATE THE E-GO 2 OUTSIDE OF YOUR SUPERVISION UNLESS THEY HAVE READ THIS GUIDE // YOU SHOULD
NOT ALLOW ANYONE TO STEP ONTO YOUR E-GO 2 FOR THE FIRST TIME UNLESS YOU ARE THERE TO SUPPORT THEM // ASSIST NEW
RIDERS UNTIL THEY ARE COMFORTABLE WITH THE BASIC OPERATION OF THE E-GO 2
RIDER PROFILE
THE E-GO 2 IS DESIGNED FOR HUMAN RIDERS // THE E-GO 2 IS DESIGNED FOR RIDERS 14 YEARS AND OLDER // THE E-GO 2 IS
DESIGNED FOR RIDERS WITH A BODY WEIGHT UNDER 100 KG / 220 LBS // THE E-GO 2 IS NOT DESIGNED FOR CARGO TRANSPORTA-
TIONS // THE E-GO 2 IS DESIGNED FOR RIDERS IN GOOD PHYSICAL HEALTH // DO NOT RIDE THE E-GO 2 WHEN SICK // AS WITH ANY
OTHER PERSONAL ELECTRIC TRANSPORTATION DEVICE, YOU MUST BE MENTALLY ALERT TO SAFELY RIDE AN E-GO 2 // THE E-GO 2 IS
NOT DESIGNED FOR TANDEM USE, DO NOT TAKE ANY PASSENGERS WITH YOU ON THE E-GO 2 // DO NOT TAKE A CHILD IN YOUR ARMS
OR IN A CHILD CARRIER WHILE RIDING // DO NOT RIDE UNDER THE INFLUENCE OF DRUGS OR ALCOHOL // DO NOT ATTEMPT TO RIDE
IF YOU CAN NOT COMPLY FULLY WITH THE INSTRUCTIONS AND WARNING IN THIS GUIDE
12
Page 15

RIDER TIPS
WHILE RIDING KEEP YOUR BACK STRAIGHT AND USE YOUR ARMS TO MAINTAIN BALANCE // BENDING YOUR KNEES LOWERS
YOUR BODY'S CENTER OF GRAVITY WHICH INCREASES STABILITY // SHIFT YOUR BODY WEIGHT TO THE FRONT WHEN ACCELERATING // SHIFT YOUR BODY WEIGHT TO THE BACK WHEN BRAKING // TO TURN / CARVE, DISPLACE YOUR BODY WEIGHT AND
EXERT PRESSURE ON THE HEEL AND TOE SIDES OF THE BOARD // YOUR TURNING RADIUS DEPENDS ON THE AMOUNT OF
PRESSURE YOU EXERT ON THE SIDE OF THE BOARD: MORE PRESSURE MEANS SHARPER TURNING // CARVING WILL SLOW
DOWN YOUR SPEED AND MAKES FOR AN ENERGY EFFICIENT WAY OF BRAKING // BE MINDFUL WHEN TURNING / CARVING AT
HIGH SPEED // YOU CAN ADJUST MANEUVERABILITY BY TIGHTENING OR LOOSENING THE KINGPIN NUTS // ADJUST YOUR
RIDING STYLE WHEN RIDING AT NIGHT OR IN CONDITIONS WITH LOW VISIBILITY // ADAPT YOUR SPEED TO YOUR RIDING SKILL
AND ENVIRONMENT // DO NOT RIDE WHEN INTOXICATED // BEWARE THAT WET, FROZEN, OILY OR UNPAVED SURFACES ARE
UNSUITED FOR RIDING ON // BEWARE THAT BRAKING DISTANCES VARY ACCORDING TO SURFACE TEXTURE, HUMIDITY,
TEMPERATURE, ETC... // AVOID RIDING OVER GUTTERS, THIS MIGHT DAMAGE THE BOARD // DO NOT EXPOSE E-GO 2 TO
WATER: DO NOT RIDE WHEN RAINING, DO NOT RIDE THROUGH PUDDLES // ALWAYS WEAR PROTECTIVE GEAR WHEN RIDING
// ALWAYS WEAR A HELMET WHEN RIDING // USE AN APPROVED SKATEBOARD, BICYCLE OR FULL FACE MOTORCYCLE HELMET
THAT PROPERLY FITS WITH THE CHIN STRAP SECURELY FASTENED // USE DIRECT HAND CONTACT WHEN OPERATING THE
HANDHELD REMOTE, WEARING GLOVES OR AN UNUSUAL GRIP MIGHT INTERFERE WITH YOUR ABILITY TO ACCURATELY USE THE
CONTROLS // DO NOT WEAR LOOSE CLOTHING THAT CAN GET STUCK IN THE WHEELS OR DRIVE BELT // BE AWARE THAT A
STRONG ELECTROMAGNETIC FIELD IN YOUR AREA MIGHT INTERFERE WITH THE FUNCTION OF THE REMOTE CONTROLLER //
BRAKE WHEN GOING DOWNHILL TO MODERATE YOUR SPEED // TAKING ON INCLINES OVER 10% MIGHT OVERHEAT THE ECU
AND CAUSE INTERMITTENT POWER LOSS OR EVEN SHUT DOWN THE ECU // DO NOT RIDE E-GO 2 DOWNHILL MORE THAN 2%
TO AVOID ECU OVERHEATING // REGULAR SHORT BURST OF FULL POWER AND BRAKING HEAVILY WILL DRAIN THE BATTERY
FASTER THAN RIDING AT A MODERATE CONSISTENT SPEED // BEWARE OF WHEEL STOPS THAT CAN OCCUR WHEN THE E-GO
2 'S WHEELS ENCOUNTER AN OBSTACLE OR TERRAIN CHANGE THAT PREVENT THEM FROM MOVING, THIS WILL BRING THE
E-GO 2 TO AN ABRUPT STOP AND ARE LIKELY TO CAUSE A FALL // NEVER RIDE ON STAIRS, ELEVATORS OR THROUGH REVOLVING DOORS // DO NOT ATTEMPT JUMPS OR OTHER STUNTS, THIS MIGHT LEAD TO INJURY OR DEATH AND MIGHT DAMAGE
YOUR E-GO 2 // ALWAYS BE ALERT AND AWARE OF YOUR SURROUNDINGS WHEN RIDING
13
Page 16

RIDING OUTSIDE OF YOUR PRIVATE PROPERTY
ABIDE BY THE LAWS AND REGULATIONS IN YOUR STATE OR COUNTRY // RESPECT OTHER DRIVERS AND PEDESTRIANS ON THE ROAD //
AVOID RIDING ON BUSY ROADS AND CROWDED AREAS // ADJUST YOUR SPEED WHEN RIDING ON THE SIDEWALK // DO NOT PARK
YOUR E-GO 2 IN A WAY THAT BLOCKS PEOPLE OR TRAFFIC AS IT CREATES A SAFETY HAZARD // CROSS ROADS AT DESIGNATED CROSSWALKS OR SIGNALED INTERSECTIONS // DO NOT JAYWALK / RIDE // WHEN RIDING WITH OTHER E-GO 2 RIDERS YOU SHOULD KEEP
A SAFE DISTANCE FROM EACH OTHER AND OTHER TRANSPORT DEVICES // WHEN RIDING WITH OTHER E-GO 2 RIDERS YOU SHOULD
NOT RIDE SIDE-BY-SIDE UNLESS THERE IS PLENTY OF ROOM LEFT FOR PEDESTRIANS AND OTHER POTENTIAL TRAFFIC // IDENTIFY AND
KEEP A SAFE DISTANCE FROM HAZARDS AND OBSTACLES ON THE ROAD // DO NOT RIDE YOUR E-GO 2 ON PRIVATE PROPERTY (INSIDE
OR OUTSIDE) UNLESS YOU HAVE OBTAINED PERMISSION TO DO SO // MAINTAIN CONTROL OF YOUR EQUIPMENT
STORAGE AND MAINTENANCE
DO FREQUENT MAINTENANCE CHECKS: BEFORE RIDING MAKE SURE ALL SCREWS ARE TIGHT AND YOUR E-GO 2 2 IS IN PERFECT WORKING ORDER // CLEAN THE BOARD'S BEARINGS REGULARLY // TO CLEAN THE WHEELS IT IS ADVISED TO REMOVE THEM FROM THE AXLE
// TURN OFF E-GO 2 AND WIRELESS CONTROLLER WHEN NOT IN USE // CHOOSE A COOL ENVIRONMENT FOR STORING THE E-GO 2
AND ITS CHARGER // KEEP YOUR BATTERY FULLY CHARGED WHEN NOT IN USE // RECHARGE THE BATTERY IN A WELL VENTILATED
AREA // DO NOT RECHARGE THE BATTERY IN AN AREA THAT MIGHT ALLOW E-GO 2 OR ITS CHARGING UNIT TO BECOME WET // DO
NOT LEAVE E-GO 2 CHARGING UNATTENDED // KEEP CHILDREN AWAY FROM E-GO 2 WHEN CHARGING // DO NOT KEEP THE BATTERY
ON CHARGE ONCE IT IS FULLY CHARGED // STOP USE OF THE PRODUCT OR CHARGING UNIT IF ANY WIRES ARE WORN OR DAMAGED
// DO NOT MODIFY THE ELECTRICAL CONTROLS OR WIRING // ONLY USE A MOTOR, BATTERY OR CHARGING UNIT SUPPLIED OR
APPROVED BY E-GO 2 // DO NOT USE THE E-GO 2 'S BATTERY TO POWER ANY OTHER EQUIPMENT
14
Page 17

BATTERY SAFETY
LITHIUM-ION BATTERIES CAN EXPLODE OR CAUSE A FIRE IF THEY ARE USED INCORRECTLY OR IF THEY ARE DEFECTIVE. THEREFORE,
YOU ARE RECOMMENDED TO READ THE FOLLOWING INSTRUCTIONS VERY CAREFULLY:
- EACH TIME BEFORE USING THE BATTERY, CAREFULLY CHECK THE BATTERY PACK AND IN PARTICULAR THE PROTECTIVE SEAL/
CASING TO MAKE SURE THAT IT IS UNDAMAGED AND INTACT. IF IN DOUBT, TAKE THE BATTERY TO A CHEMICAL WASTE DISPOSAL
FACILITY AND/OR CONTACT YUNEEC CUSTOMER SUPPORT IMMEDIATELY.
- ALWAYS HANDLE THE BATTERY WITH CARE. NEVER DROP THE BATTERY.
- STORE THE BATTERY IN A SAFE AND DRY PLACE AND KEEP THE BATTERY AWAY FROM ALL METAL OBJECTS.
- NEVER EXPOSE THE BATTERY TO TEMPERATURES ABOVE 100 DEGREES CELSIUS.
- ONLY USE OFFICIAL YUNEEC E-GO 2 2 CHARGERS THAT HAVE BEEN SPECIALLY BEEN DESIGNED FOR USE WITH LITHIUM-ION BATTERIES.
- WHEN CHARGING BATTERIES, KEEP THE CHARGER AWAY FROM HIGHLY FLAMMABLE MATERIALS OR PRODUCTS AND NEVER LEAVE
THE CHARGER UNATTENDED WHEN IN USE.
- WHEN CHARGING THE CHARGER CAN GET HOT. DO NOT PLACE THE CHARGER ON DAMAGABLE SURFACES.
- IF YOU ARE NOT PLANNING ON USING THE BATTERY FOR ABOUT 6 MONTHS OR LONGER, FIRST CHARGE IT FULLY AND THEN
RECHARGE IT ONCE A YEAR. THIS IS BECAUSE A LITHIUM-ION BATTERY THAT HAS BEEN LEFT EMPTY FOR TOO LONG CAN NO
LONGER BE CHARGED.
15
Page 18

TROUBLESHOOTING
MY BOARD DOESN`T
START
MY BOARD IS MOVING
AT LOW SPEED...
1.1
1.2
1.3
1.4
1.5
1.6
2.1
2.2
Check if the board is activated on. When turning on the board you should
hear two beeps and its status indicator light should come on.
Check if the controller is powered ON. When turning ON the controller, its
blue light should start flashing.
If both the board and controller are powered ON, and the wireless controller's
green light is not flashing, it means the board and controller are not synchronized (see page 10).
If both board and controller are powered ON, and both the controller's blue
and green light are flashing but you don`t hear a beep and the board does
not start, turn off the board and turn it on again.
If the board and controller are synchronized and the controller's blue light
is followed by a red flashing light and vibration, it means the board's battery
is low and needs to be recharged.
If board and controller are synchronized and the controller's green light is
followed by a a red flashing light and vibration, it means the controller's
battery is low and needs to be recharged.
Check if the board is in slow speed mode. If so, move the controller's
speed mode switch to fast speed mode.
If during your ride the controller's blue light is flashing, followed by a red
flashing light and accompanied by vibration, it means the board's battery
is low and needs to be recharged.
16
Page 19

MY BOARD STOPS
MY BOARD STOPS
AUTOMATICALLY
AUTOMATICALLY
3.1
3.1
3.2
3.2
3.3
3.3
3.4
3.4
3.5
If during your ride the board stops and the controller's blue light is flashing,
If during your ride the board stops and the controller's blue
followed by a red flashing light and accompanied by vibration, it means the
light is flashing, followed by a red flashing light and accom-
board's battery is low and needs to be recharged.
panied by vibration, it means the board's battery is low and
needs to be recharged.
If during your ride the board stops and the controller's green light is flashing,
followed by a red flashing light and accompanied by vibration, it means the
If during your ride the board stops and the controller's green
controller's battery is low and needs to be recharged.
light is flashing, followed by a red flashing light and accom-
panied by vibration, it means the controller's battery is low
If during your ride the board stops and the controller's blue light is flashing
and needs to be recharged.
one to four times, followed by one yellow flash and is accompanied by
vibration, it means the board's ECU has overheated. Let it cool down for ten
If during your ride the board stops and the controller's blue
minutes and retry. If after this the board stops again, please contact the
light is flashing one to four times, followed by one yellow flash
E-GO 2 customer service.
and is accompanied by vibration, it means the board's ECU is
overheated. Let it cool down for ten minutes and retry. If after
If during your ride the board stops and the controller's blue light is flashing
this the board stops again, please contact the E-GO 2 customer
one to four times, followed by two yellow flashes and is accompanied by
service.
vibration, it means the board's battery has overheated. Let it cool down for
10 minutes and retry. If after this the board stops again, please contact
If during your ride the board stops and the controller's blue
the E-GO 2 customer service.
light is flashing one to four times, followed by two yellow
flashes and is accompanied by vibration, it means the board's
If during your ride the board stops and the controller's blue light is flashing
battery is overheated. Let it cool down for 10 minutes and retry.
one to four times, followed by three yellow flashes and is accompanied by
If after this the board stops again, please contact the E-GO 2
vibration, it means the board has been overloaded or is being used on in-
customer service.
clines greater than recommended.
3.5
3.6
If during your ride the board stops and the controller's blue
If during your ride the board stops and the controller's blue light is flashing
light is flashing one to four times, followed by three yellow
one to four times, followed by four yellow flashes and is accompanied by
flashes and is accompanied by vibration, it means the board
vibration, this indicates a motor malfunction. Please check if the motor plugs
has been overloaded or is being used on inclines greater than
are tightly is well connected to the lead of the battery compartment. If after
recommended. It is advised to avoid these circumstances.
this the board stops again, please contact the E-GO 2 customer service.
1
17
Page 20

3.7
If during your ride you hear a beep, the board stops and only the controller's
blue light is flashing, it means the control signal is lost. Turn the controller
off and then on again to reconnect.
MY BOARD DOESN'T
CHARGE
MY CONTROLLER
DOESN'T CHARGE
3.8
4.1
5.1
Control signal loss will occur when the distance between your board and
controller becomes too great. To reconnect close the distance between
the two.
Check if the charge cable is connected to the board and if the charger is
connected to a standard A/C power source. If the connection is good and
the board is charging, the charger's battery status indicator will turn red.
When fully charged it should turn green. In any other situation please contact
the E-GO 2 customer service.
Check if the USB cable is well connected to the controller and the charge
port and if the board is powered on. If the connection is good and the controller
is charging, the controller's red light will turn on. When fully charged the red
light will turn off. In any other situation please contact the E-GO 2 customer
service.
YUNEEC.COM
18
Page 21

SPARE PARTS
EGOCR001AU ..............
EGOCR001EU ..............
EGOCR001UK ..............
EGOCR001US ..............
EGOCR002 ..................
EGOCR003 ..................
EGOCR004 ..................
EGOCR005 ..................
EGOCR006 ..................
EGOCR007 ..................
EGOCR008 ..................
EGOCR009 ..................
EGOCR010AU ..............
EGOCR010EU ..............
EGOCR010UK ..............
EGOCR010US ..............
EGOCR011 ..................
EGOCR012 ..................
EGOCR013 ..................
EGOCR014 ..................
EGOCR015AU ..............
EGOCR015EU ...............
EGOCR015UK ...............
EGOCR015US ...............
EGOCR016 ..................
EGOCR017 ..................
E-GO 2 CRUISER WITH AU CHARGER
E-GO 2 CRUISER WITH EU CHARGER
E-GO 2 CRUISER WITH UK CHARGER
E-GO 2 CRUISER WITH US CHARGER
GRIP TAPE: E-GO 2 CRUISER
MOTOR COVER: E-GO 2 CRUISER
DRIVE BELT: E-GO 2 CRUISER
BUSHING SET: E-GO 2 CRUISER
WHEEL SET WITH PRE-INSTALLED BEARINGS: E-GO 2 CRUISER
BEARING SET: E-GO 2 CRUISER
COMPLETE HARDWARE SET: E-GO 2 CRUISER
REMOTE CONTROL WITH USB CABLE: E-GO 2 CRUISER
AU CHARGER: E-GO 2 CRUISER
EU CHARGER: E-GO 2 CRUISER
UK CHARGER: E-GO 2 CRUISER
US CHARGER: E-GO 2 CRUISER
FRONT TRUCK SET: E-GO 2 CRUISER
REAR TRUCK SET WITH MOTOR: E-GO 2 CRUISER
ELECTRONIC CONTROL UNIT (ECU): E-GO 2 CRUISER
BATTERY PACK: E-GO 2 CRUISER
CHARGE LEAD WITH AU PLUG: E-GO 2 CRUISER
CHARGE LEAD WITH EU PLUG: E-GO 2 CRUISER
CHARGE LEAD WITH UK PLUG: E-GO 2 CRUISER
CHARGE LEAD WITH US PLUG: E-GO 2 CRUISER
DECK WITH GRIP TAPE: E-GO 2 CRUISER
T-TOOL WITH PIN TOOL: E-GO 2 CRUISER
19
Page 22

DECK
SCREWS
4
3
GARAGE
2
1
front truck screws
1.
battery pack screws
2.
ECU screws
3.
rear truck screws
4.
8
10
9
10
motor cover
5.
drive belt cover
6.
drive belt cover screw
7.
drive belt
8.
drive wheel
9.
washer
10.
drive wheel nut
11.
MAKE SURE THE E-GO 2 IS POWERED
OFF WHEN DOING MAINTENANCE
OR REPLACING COMPONENTS.
DRIVE WHEEL
AND BELT
5
20
11
7
6
DEFORMING THE DRIVE
BELT MIGHT DAMAGE IT.
Page 23

12
13
14
15
18
19
21
TO REPLACE THE GRIP TAPE IT
IS ADVICED TO CONSULT YOUR
LOCAL SKATE SHOP.
16
17
20
22
23
24
25
TRUCKS AND BUSHINGS
king pin nut
26
12.
top cup washer
13.
top bushing
14.
truck
15.
bottom bushing
16.
bottom cup washer
17.
28
25
24
27
king pin
18.
baseplate nut
19.
baseplate
20.
baseplate rubber
21.
truck screw
22.
23.
24.
25.
26.
27.
28.
wheel nut
washer
bearing
spacer
truck axle
wheel
WHEELS AND
BEARINGS
21
APPLY EQUAL PRESSURE ON THE OUTER
RINGS OF THE BEARINGS TO PUSH THEM
OUT OF AND INTO THE WHEEL TO AVOID
DAMAGING THEM.
Page 24

BATTERY PACK AND ECU
28
ECU (Electronic
28.
29
Control Unit)
battery pack
29.
battery pack rubber
30.
30
INSTALLATION GUIDE
FRONT TRUCK SET
EGOCR011
1 Unscrew the front wheel bolts.
2 Dismount the front wheels from the
truck's axle.
connecting the front baseplate to the
deck.
bly with the replacement part and
reinstall.
the truck's axle and tighten the screws.
3 Unscrew the top screws
4 Replace the complete assem-
5 Mount the wheels back on
29
REAR TRUCK SET WITH
MOTOR
1 Unscrew the rear wheel nuts.
2 Dismount the rear wheels from the
truck's axle.
connecting the rear baseplate to the
deck.
with the replacement part and reinstall.
5 Mount the wheels back on the truck's
axle and tighten the screws.
EGOCR012
3 Unscrew the top screws
4 Replace the complete assembly
31
32
28
JST RCY connector
31.
EC3 connector
32.
ELECTRONIC CONTROL
UNIT
EGOCR013
1 Unscrew the screws connecting the
ECU to the deck.
the battery pack.
wires connecting the ECU to the battery
pack.
4 Reconnect the battery packs
wires to the replacement part.
the replacement part in it's slot with
the battery pack.
screws connecting the ECU to the deck.
2 Slide the ECU from
3 Disconnect the
5 Slide
6 Screw in the deck
22
Page 25

INSTALLATION GUIDE
MOTOR COVER EGOCR003
1 Unscrew the five screws securing
the motor cover.
2 Remove the motor
cover and replace it with the replacement part.
3 Screw on the motor
cover screws and tighten.
DRIVE BELT EGOCR004
1 Unscrew the drive wheel bolt.
2 Dismount the rear wheels from the
trucks axle.
cover screws.
the replacement part.
3 Unscrew the drive belt
4 Replace the belt with
5 Screw on and
tighten the drive belt cover screws.
6 Mount the drive wheel back onto the
truck's axle.
7 Screw on the drive wheel
nut and tighten.
E-GO 2 CRUISER
BUSHING SET EGOCR005
1 Unscrew the kingpin nut from the
kingpin.
3 Remount the truck and bushing on
the baseplate axle.
2 Replace the bushing.
4 Screw on and
tighten the king pin nut.
BEARING SET (8 PCS)
EGOCR007
1 Unscrew the wheel bolt. 2 Dismount
the wheel from the truck's axle.
3 Replace the bearing in the wheel
with the spare part by applying equal
pressure on the outer rings of the
bearings.
onto the truck axle.
4 Mount the wheel back
5 Screw on the
wheel nut and tighten.
THIS MANUAL IS SUBJECT TO CHANGE
WITH FUTURE REVISIONS.
> PLEASE VISIT WWW.YUNEEC.COM
WHEEL SET WITH PREINSTALLED BEARINGS
EGOCR006
1 Unscrew the wheel bolt. 2 Dismount
the wheel from the truck's axle and
replace it with the replacement part.
3 Screw on and tighten the wheel bolts.
BATTERY PACK EGOCR014
1 Unscrew the screws connecting the
battery pack to the deck.
2 Tilt the
battery pack out of its slot with the
ECU.
3 Disconnect the wires connec-
ting the battery pack to the ECU and
reconnect the ECU's wires to the replacement part.
in its slot with the ECU.
4 Slide the replacement part
5 Screw in the
deck screws connecting the battery
pack to the deck.
23
Page 26

CERTIFICATION INFORMATION
F CC S TATEMENT :
This equipm ent has been tested a nd found to comply with the l imits for Pa rt 15 of t he FCC ru les. These l imits ar e d esigned t o
p rovide re ason a ble p ro tection a gainst harmful interferenc e i n a r esiden tial i nsta llat ion. T hi s e quipment gener ates, uses and can
r adia te r ad io f re quency e ne r gy and, i f not installed and u sed i n ac cordance with the instru ctions, may cause harmful interf er ence
t o radi o communica ti on s .
However, there i s n o guar antee that interfer ence will not occ ur in a par tic ular i nstal l ation. I f t his e quipme n t does c ause harmful
interf er ence to r ad i o or television receptio n, which can be determ i ne d by tu rning t he eq u ipmen t o ff and on, the user is encour a ged to try to corr ec t the interfer ence by one or mo re of the foll owin g m ea s ur es:
R eorient or re l oc ate the re ce i ving antenna.
I ncre ase th e sep ar ation between the equipment and recei ver.
C onnec t the equi pmen t to an outlet o n a circuit differ en t from tha t to whic h the re ceiver i s con nected.
This device com pl ies with pa rt 15 o f the FC C rules. Oper at ion is subjec t t o the follo wing two c onditions:
(1) T his devic e may not c ause h a rmful interfer ence, and (2) t his d evice must accept a ny i nterf er en ce r eceived, includ ing interferenc e that may cause undesired operation.
N OTE: Th is equi pmen t h as been tested and found to comply with the limits for a Class B d igita l d evi
the F CC Ru les. T hese l i mits ar e designed t o pr ovide re as onable p ro tect ion a ga i nst har mful i nterfer en ce i n a r esidential installation . This equip me n t gener ates, uses and can radia te rad io fr eque ncy ener gy and, i f not insta ll ed and used in acco rdance with
the in struct io n s, may ca u se harmful interference to r adi o commu nica tions. Ho wever,
there i s n o g ua ra ntee that interfer ence will not occ ur i n a par tic ular in sta llat ion . If this equi pment does cause harmful interferenc e to radi o o r tel evi sion reception, which can be determ ined b y turn in g the e quipme nt o ff a nd on, t he user is enco uraged to
try to cor re ct th e i
— Reori en t or re l oc ate th e receiving antenna.
—Inc re ase the sepa r ation between the equipment and r ec eiver.
— Co nn ec t the equi pment into an outlet on a circuit diff er ent f rom that to w h ic h the r eceiver is c onnected .
— Co nsult t he d ea ler o r an e x perienced r adio/TV technic i an for help.
RF EXPOSURE WA RNI N G
This equipm e nt must be in stalled a nd oper ated in a ccord ance with p ro vided in struc tions and the antenna(s) used f or this
t ransm it ter must be insta ll ed to p r ovide a separa tion distance o f at le ast 20 cm f rom a ll p erso ns and m ust n ot b e c o-located o r
o pera ting in conjun ct i on with any other antenna or tr ansmit ter. En d -users an d in sta llers must be p ro vide with
tion i nstruct io n s and tra n smitter o pera ting co nditions for s atisf ying R F ex posu re compl ianc e .
n terference by one or mo r e of the follo w ing me asur es:
c e, pursuant t o pa rt 15 of
antenna installa-
24
 Loading...