

Yulong Computer Telecommunication Scientific YLCP331A Users Manual
MetroSMART Hotspot
TM
User Manual

Table of Contents
HELLO FROM COOLPAD..................................................................................
GETTING STARTED..........................................................................................
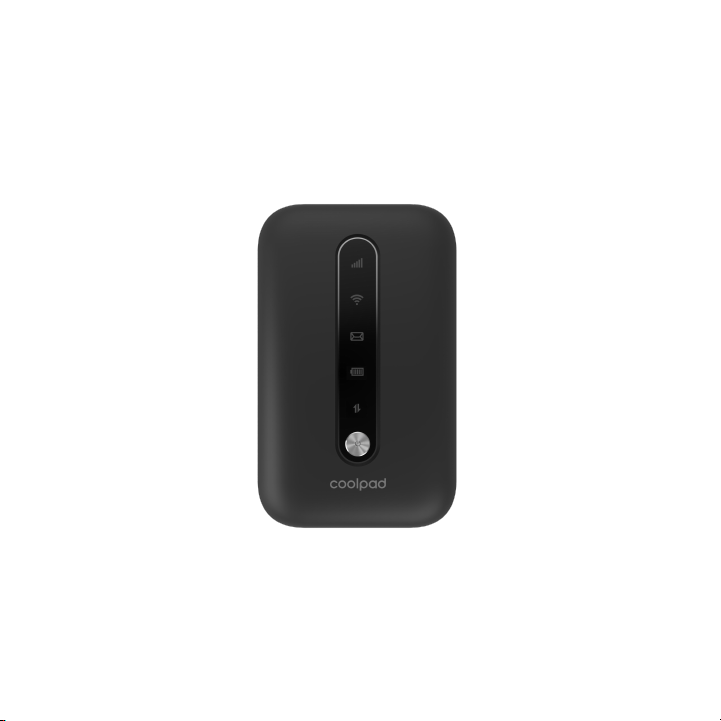
Device Layout...........................................................................................................2
On-Screen Indicators................................................................................................ 3
Charging Your Mobile Hotspot...................................................................................
Setting Up Your Mobile Hotspot.................................................................................
Connecting Your Wi-Fi Device to Your Mobile Hotspot................................................ 5
Using the WPS......................................................................................................... 6
MANAGING YOUR MOBILE HOTSPOT................................................................
Access Mobile Hotspot Using A Browser.................................................................... 7
Access Mobile Hotspot Using USB Cable...................................................................
WEB UI CONFIGURATION................................................................................. 9
Home.......................................................................................................................
Information...............................................................................................................
SMS...................................................................................................................... 10
Settings..................................................................................................................10
GET UPDATES..............................................................................................
Specs & hardware.................................................................................................. 16
In-box contents....................................................................................................... 17
Declaration of hazardous substances.......................................................................
HEALTH/SAFETY/WARRANTY GUIDE.............................................................. 19
Important Health Information and Safety Precautions................................................ 19
TIA Safety Information.............................................................................................
15
18
27
1
2
3
3
7
8
9
9

Safety Information...................................................................................................30
Consumer Information on SAR................................................................................ 33
STANDARD LIMITED WARRANTY....................................................................36

Hello from Coolpad
Thank you for purchasing your MetroSMART Hotspot! Please follow these simple but
important instructions for optimal use of your new mobile hotspot:
Notice: Products or services of the vendor or carrier are subject to change within this User
Guide without prior notice.
We offer self-service for our smart terminal device users. Please visit the Coolpad
Americas official website (at www.coolpad.us) for more information on supported product
models. Information on the website takes precedence.
1

Getting Started
• Power key: Hold the Power key for 3 seconds to power the device on/off.
• WPS key: Hold the WPS key for 3 seconds to activate the WPS function. Once
• LED indicators: Display network signal, Wi-Fi, SMS, battery charge and mobile data
• USB port: Use the USB port to charge your device via the USB cable.
Get off to a running start with your new MetroSMART Hotspot!
Device Layout
activated, the Wi-FiTMLED indicator will flash every two seconds. If the network is not
accessed within 2 minutes, the device will automatically exit WPS (Wi-Fi Protected
Setup) mode.
status.
2

• Reset: Hold both the Power key and the WPS key simultaneously for 15 seconds. All
LED indicators will flash green 4 times to indicate that the device has been reset to
• Reboot: Hold the Power key for 10 seconds to restart your device.
Indicators
Description
Network
Displays your current network status. Green light indicates the
network is connected; yellow light indicates poor network connection;
red light indicates no network connection, no SIM card, or no service.
Wi-Fi
Indicates when Wi-Fi is connected.
SMS
Indicates when there is a new message.
Battery
Displays your current battery status. Solid red light indicates the
battery level is less than 15%; when the device is charging, the
indicator will flash red when the battery level is below 15% and will
flash green when the battery level is higher than 15%.
Data
Indicates when your data allotment is running out.
1. Connect the microUSB end of the USB cable to the USB port on your device.
2. Connect the other end to the travel adapter.
3. Connect the travel adapter to an electrical outlet to fully charge your device.
factory default settings.
On-Screen Indicators
Charging Your Mobile Hotspot
Note: You can also charge the device by connecting it to a computer with the USB cable.
Setting Up Your Mobile Hotspot
3
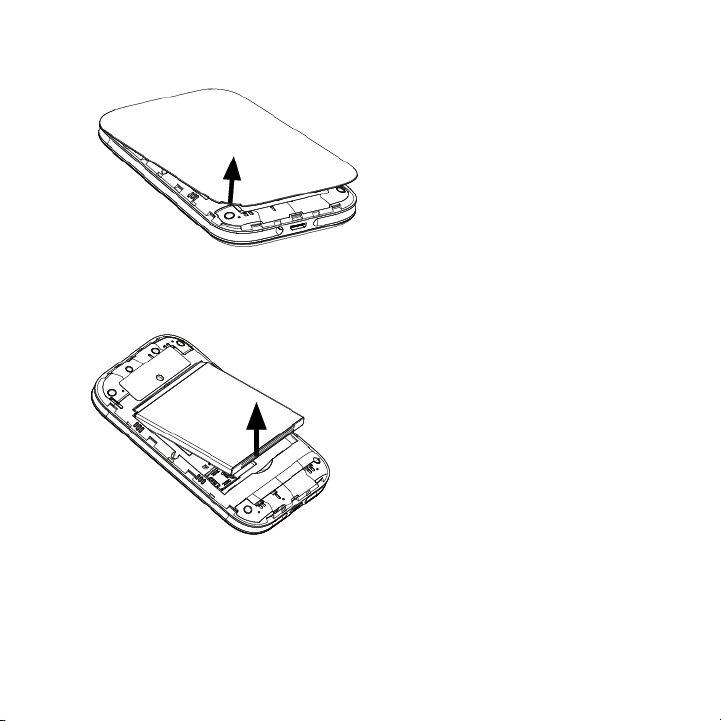
1. Open the back cover. Lift gently in the direction shown.
2. Remove the battery. Flip the device upside down and lift the battery upward
gently as shown.
4
Connecting Your Wi-Fi Device to Your Mobile Hotspot
1. Power on your mobile hotspot.
2. On your computer or other Wi-Fi enabled device, search for available Wi-Fi networks
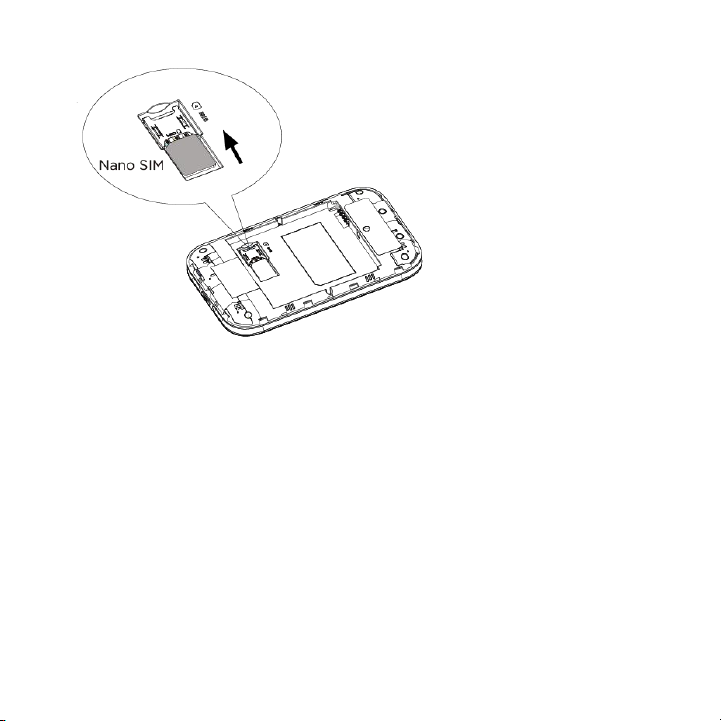
3. Insert the Nano SIM card. Install the battery and replace the back cover.
When replacing the back cover, please ensure the back cover is aligned
correctly.
and select network name (SSID) located on label on back panel of your mobile
hotspot.
Note: Wi-Fi name (SSID) and Wi-Fi Password are located on the label inside the back
cover of the device.
5

From a Windows computer: Left-click Wireless Network Connection on the
task bar to view available networks. Choose the SSID from the list of available
From a Mac computer: Select System Preferences > Network. Choose the
From an iOS device: Go to Settings > Wi-Fi. Choose the SSID from the list of
From an Android device: Go to Settings > Wi-Fi. Choose the SSID from the list
3. Enter the password located on label on back panel and click OK.
1. Power on your Mobile Hotspot and enable the Wi-Fi function from the device you
2. Press and hold the WPS key on your device for 3 seconds to start the Wi-Fi
3. Enable the WPS function on your Wi-Fi device in order to respond to this
4. Follow the system prompts on your Wi-Fi device to finish the connection.
5. If no Wi-Fi device is connected within 2 minutes, the WPS function will automatically
networks.
SSID from the list of available networks.
available networks.
of available networks.
Using the WPS
If your Wi-Fi device supports WPS, you do not have to input the password manually after
a WPS connection has been established. Please follow the following steps:
would like to connect.
Protected Setup authentication process.
authentication process.
turn off.
6

Managing Your Mobile Hotspot
1. Connect to your hotspot device through Wi-Fi using the network connection software
2. Open a browser and enter http://mobile.hotspot or http://192.168.0.1 in the address
3. Enter your Password in the field provided. The default password is "admin".
You can access your Mobile Hotspot device information using an Internet browser or by
connecting the device to a computer via the USB cable.
Access Mobile Hotspot Using A Browser
on your computer. Provide the Wi-Fi network password, if requested.
bar. The MetroSMART Hotspot login screen will appear.
7
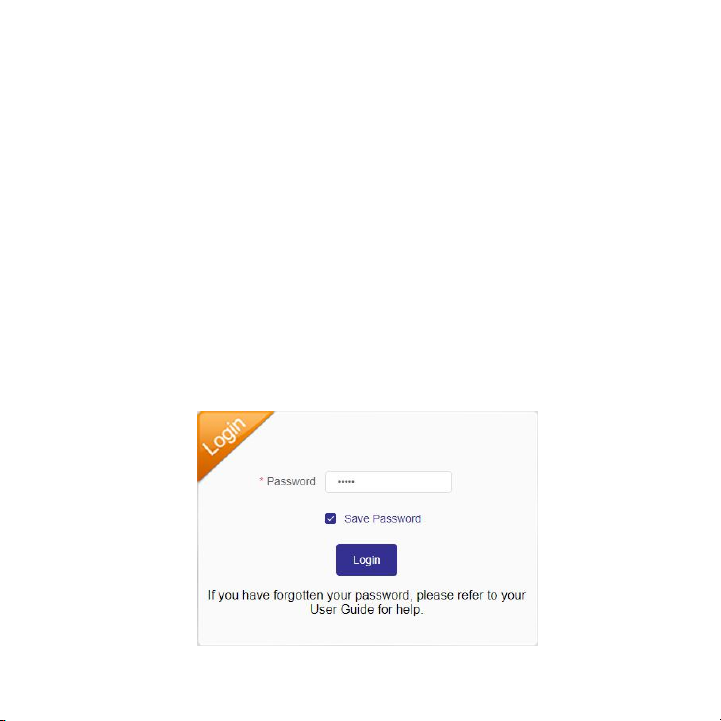
4. Click Login. If you entered the correct password, the Web User Interface screen
appears.
1. Connect your MetroSMART Hotspot to the computer with the USB cable.
2. Power on your device.
3. The computer operating system detects and recognizes new hardware and finishes
4. Open a browser and enter http://mobile.hotspot or http://192.168.0.1 in the address
5. Enter your Password in the field provided. The default password is "admin".
6. Click Login. If you entered the correct password, the Web User Interface screen
Access Mobile Hotspot Using USB Cable
the installation automatically.
bar. The MetroSMART Hotspot login screen will appear.
appears.
Note: Windows (32 bit & 64 bit) 7/8/8.1/10, Mac OS X 10.6 to 10.11 supported.
8

Web UI Configuration
• Connect/Disconnect: Click Connect/Disconnect to connect/disconnect the Internet.
• Connected Devices: Shows details of connected device(s), including host name,
• Blocked Devices: Shows details of blocked device(s) including host name, MAC
• Device information: Shows your device basic information, including phone number,
• View Plan Details: Shows your billing day, monthly data plan and time limit. To view
• Statistics: Shows upload speed, download speed, current connection and current
Home
On the Web User Interface screen, click Home to enter the Home screen. Here you can
view current data, duration, upload speed, download speed, current connect time, last
connect time, connected devices, blocked devices, etc.
MAC address, IP address and operation.
address, IP address and operation.
Information
On the Web User Interface screen, click Information to enter the Information screen. Here
you can view device information, plan details and statistics.
IMEI, IMSI, signal strength, network name (SSID), maximum connections, LAN
Domain, MAC address, IP address, WAN IP address, software version and hardware
version.
your plan details please visit https://my.t-mobile.com.
month duration, downloaded/uploaded and total used data.
Note: Data usage is approximate only. For actual usage, please contact your carrier.
9

SMS
• New: Click New to create a new SMS.
• Refresh: Click Refresh to refresh the SMS.
• Delete: Click the trash icon to delete a SMS.
• Draft: Unsent SMS is automatically saved as a draft.
• Basic Settings: Enable or disable Wi-Fi.
• SSID: Change the network name; enable or disable broadcast network name (Once
• Advanced Settings: Change network mode, channel bandwidth, country/region code
1. Access http://mobile.hotspot or http://192.168.0.1.
2. Click Settings in the navigation area.
3. Select the Wi-Fi Settings tab.
4. Enter a new name in the Network Name (SSID) field.
5. Click enable or disable checkbox for Broadcast Network Name to enable or disable
On the Web User Interface screen, click SMS to enter the SMS screen.
Device SMS
SIM SMS
View the SMS received and delete the SMS you want to delete.
Settings
On the Web User Interface screen, click Settings to enter the Settings screen.
Wi-Fi Settings
enabled, the router will broadcast the SSID, and other devices can discover and
connect to it); change the security mode and the password.
and channel frequency.
Changing Mobile Hotspot Network Name (SSID)
10
 Loading...