

Yukon Advanced Optics Signal N320RT, Signal N340RT, 28063, 28062 User Manual
DIGITALNIGHTVISIONDIGITALNIGHTVISIONDIGITALNIGHTVISION
SIGNALSIGNALSIGNAL
N320RT/N320RT/
N320RT/
N340RTN340RT
N340RT

v.0517
Stream your
discoveries

SPECIFICATIONS
MODEL / SKU#
Optical characteristics
Magnification
Digital zoom
Objective lens
Max. observation range of an animal 1.7 m tal (built-in IR on), m / y, approx
Field of view, degrees/m at 100 m
Close-up range, m
Eyepiece dioptre adjustment, D
Eye relief, mm
Electronic characteristics
Display type / Resolution, pixel
Sensor type / Resolution, pixel
Operational characteristics
Operating voltage, V / Battery
External power supply
Max. operating time on a set of batteries (at t=22°C)
- IR off, Wi-Fi on, hour
- IR on, Wi-Fi on, rec mode on, hour
Tripod mount thread
Operating temperature
Dimensions (LxWxH), mm / inch
Weight (w/o batteries), kg / oz
Video recorder
Video resolution, pixels
Photo resolution, pixels
Video / Photo format
Built-in memory
Memory capacity
Built-in IR LED Illuminator
Wavelength, nm
Wi-Fi channel
Frequency
Standard
Line-of-sight reception range, m
* Actual capacity may differ.
1
Signal N320RT / 28062
4.5x / 9x
2x
1:1.05
350 / 380
7.7 / 13.4
5
±5
14
LCD / 640x480
CMOS / 640x480
4 - 6.5 (6xAA)
5V power bank / USB( )
5
3
¼”
-15 °C…+50 °C / 5 F... 122 F ° °
168x111x56 6.6x4.4x2.2 /
0.35 / 12.4
320x240; 640х480
320х240; 640х480; 1280х960
avi / jpg
8Gb
1Gb / 40 min*
850 (visible)
2.4GHz
802.11 b/g/n
15
ENGLISH
Signal N340RT / 28063
4.5x / 9x
2x
1:1.05
300 / 330
7.7 / 13.4
5
±5
14
LCD / 640x480
CMOS / 640x480
4 - 6.5 (6xAA)
5V power bank / USB( )
5
3
¼”
-15 °C…+50 °C / 5 F... 122 F ° °
168x111x56 6.6x4.4x2.2 /
0.35 / 12.4
320x240; 640х480
320х240; 640х480; 1280х960
avi / jpg
8Gb
1Gb / 40 min*
940 (invisible)
2.4GHz
802.11 b/g/n
15
PACKAGE CONTENTS
Signal RT
Digital Night Vision Monocular
Carrying case
Neck strap
The design of this product is subject to change for development purposes.
The device's firmware is subject to change without prior notice.
Please visit to download the latest version of the user manual. www.yukonopticsglobal.com
2
FEATURES
2x digital zoom
Viewing range up to 350 m
Long range IR Illuminator (850nm/940nm)
Wide field of view
Wi-Fi remote review and operation using
smartphone
Micro USB cable
User manual
Lens cloth
Warranty card
Onboard video/sound recording
Suitable for day use
Charging with Power Bank
Updatable firmware
Stream Vision compatible
Tripod mount for installation of accessories
Youtube. Recording and live YouTube streaming
Your digital night vision monocular is perfectly suited to a wide range of applications including:
Outdoor observation
Search and rescue
Hunting & camping
Video recording and image capture
Sports and night navigation/observation
Equipment maintenance
2
3
INSTALLATION OF BATTERIES
Slide and open the battery cover (12).
Insert batteries (or rechargeable batteries) into the battery container observing polarity on the battery
cover.
Slide back the battery cover to its original position.
Attention! Do not use batteries of different types or batteries with various charge level because
this may significantly decrease operating time.
7
2
5 3
13
EXTERNAL POWER SUPPLY
The unit can operate on an external battery such as Power Bank (5V) or a computer (laptop).
8
4
8
12
Connect the plug of the USB cable to the unit’s USB port (9).
Connect the other plug of the USB cable to a Power bank or a computer.
Upon connection of an external power supply the unit stops operating on batteries.
Operation on external power supply is shown with an icon
11
More about powering from Power Bank and computer in section 13.
5
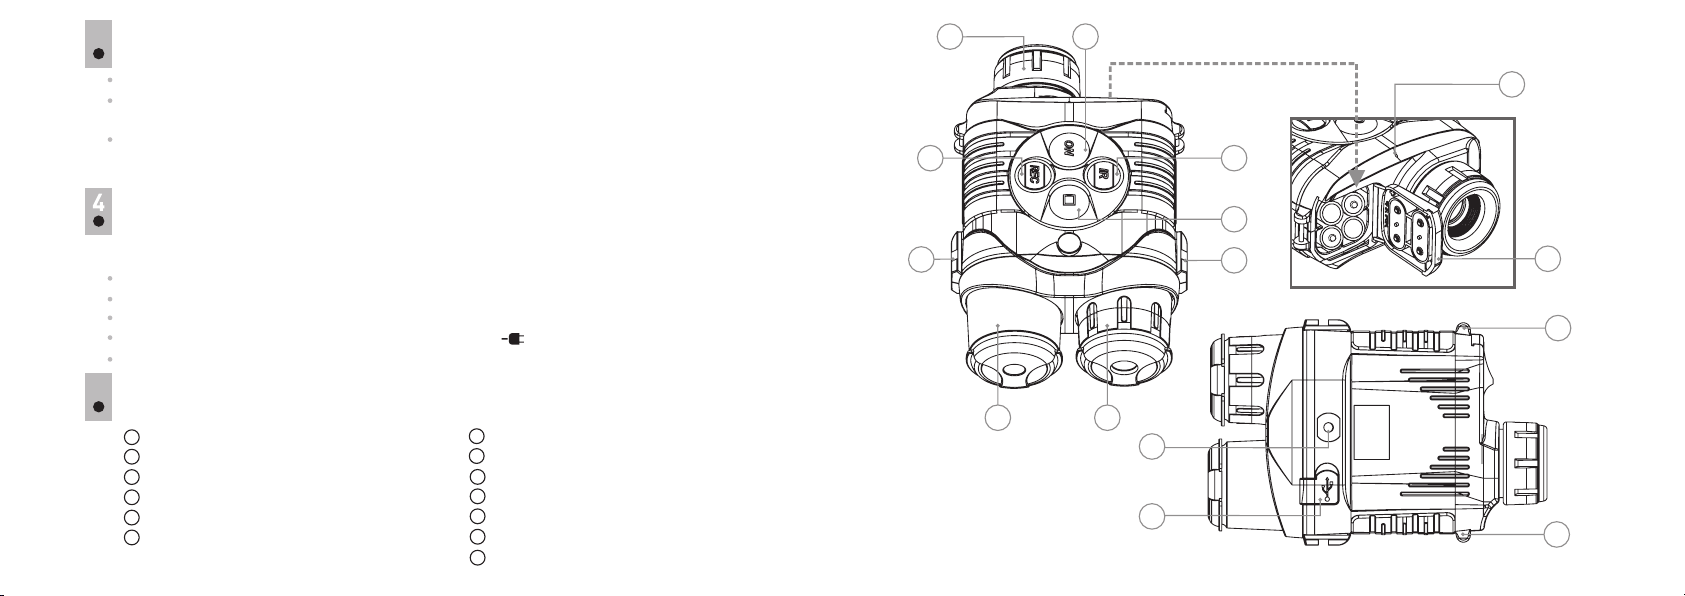
EXTERNAL VIEW AND CONTROLS
1
Objective lens
2
Button ON
3
Button IR
4
Button ZOOM
5
Button REC
6
IR Illuminator
3
7
Eyepiece diopter adjustment ring
8
Weaver rail
9
Micro USB port
10
Tripod mount
11
Neck strap lugs
12
Battery container cover
13
Microphone
6 1
10
9
11
4

6
DESCRIPTION OF CONTROLS
Button
Operating mode
The unit is off
ON
Display off mode
The unit is in modeVideo / Photo
The unit is in Review mode
Video
ZOOM
Photo
Review
Video
REC
Photo
Review
Video
IR
Photo
Review
st
1 short press
Turns the unit on
Turns the display on
Turns the Wi-Fi on
File deletion prompt See description of Review Mode
Digital zoom activation
Switch between files – rightwards navigation
Return to the beginning of file under review
Start video recording Stop video recording
Image capture
Recorded video review Pause video review
Switch between IR Illuminator modes
Switch between files - leftwards navigation.
Return to file currently viewed
nd
2 short press
Turns the Wi-Fi on
Turns the Wi-Fi on/off
Turns the Wi-Fi off
Image capture
Long press
Turns the display off
(hold longer than 1 sec)
Turns the unit off
(hold longer than 3 sec)
Enter / Exit the menu
—
Switch to Photo Mode
Switch to Review Mode
Switch to Video Mode
Turns the IR Illuminator off
—
To turn the display on, press iefly the button. br ON
To turn the unit off, press and hold down the button for more than three second. The display shows ON
message , countdown will start from 3 to seconds, and the unit turns off. “Switch off” 1
Achieve a crisp image of the icons on the display by rotating the eyepiece diopter adjustment ring . (7)
Locate an object at a certain distance, achive a crisp image of the object by rotating the objective lens .(1)
To adjust display brightness, hold down the ZOOM (4) button. Use the navigation buttons (IR; REC) to
select icon , enter the submenu with a brief press of the ZOOM button.
Adjust the image brightness with navigation buttons REC (5) и IR (3) (adjustment range is 0 to 20).
When changing the viewing distance, achieve a sharp image by rotating the objective lens . There is (1)
no need to rotate the eyepiece - you have already made the necessary individual adjustment.
When the device starts, the built-in IR Illuminator (6) switches on automatically (first level). Press the IR
(3) button successively to change power level (3 levels are available). The corresponding icon
will appear in the upper part of the display .
To turn the IR Illuminator off, press and hold down the button for two seconds. The IR icon will IR
disappear.
7
OPERATION
Remove the lens cover from the objective lens (1).
Turn the unit on by briefly pressing the button. Thedisplay shows the battery icon ON (2) charge .
To activate the digital zoom, briefly press the button. Full magnification is constantly shown in ZOOM (4)
the upper part of the display, for example “4.5x”.
Press the ZOOM button again to return to the initial magnification.
To start video recording, press briefly the REC (5) button.
To turn the display off during operation, press and hold down the button for more than one second. ON
The display will show a message. “Display off”
5
6
 Loading...