

Page 1
Model Name
eX300
(YCR-M05-P )
*
YCR-M05
Power
Standby energy consumption
Main body energy consumption
Battery
Diameter
Height
Weight
Speed
Filter
Sensor
Charging Time
Usage Time
Noise Level
100 V ~ 240 V
Below 1 W
10 W
Lithium lon Battery
13.8 inches
3.5 inches
6.06 Ibs
300 mm/s (Max.)
Antibacterial filter
IR, PSD, Encoder, Bumper
110 min.
120 min. (based on normal floor)
58 dB[A]
User Guide
Robotic Vacuum Cleaner eX300
Yujin Robot Customer Support : 1.855.926.1601
ㆍMonday-Friday 9 am to 6pm PST
ㆍSaturdays
ㆍSundays
©2014 Yujin Robot Inc.
16410 Manning Way, Cerritos, CA 90703
T 562.926.1601 F 562.926.1629
www.yujinrobotusa.com
One-Year Limited Warranty.
Specifications and features are subjected to change without notice.
Closed
Closed
MADE IN KOREA
iPMN.USA.300.V0
■Please be sure to read the Safety Precautions before use. www.yujinrobotusa.com
Page 2

● CONTENTS
SAFETY PRECAUTIONS
COMPONENTS
REFERENCE
INSTALLING THE ROBOT CLEANER
USAGE OF ROBOT CLEANER
Using remote control
Details for best cleaning
Operation principles of robot cleaner
• Principles of running
• Suction of robot cleaner
Check list before using
• Assemble side-brush
• Insert remote control battery
• Assemble ultra Microfiber Mop
Precaution before using
• Installation of charging station
• Charging
Usage of robot cleaner
• Start / Stop cleaning
• Set cleaning time
• Movement / Manual cleaning / Auto-charging
2
5
6
8
9
10
CARE & MAINTENANCE
STORAGE
CHECK BEFORE REPAIR REPORT
DISPLAY CHECK MESSAGE
• Emptying dust bin and servicing
the antibacterial filter
• Cleaning main-brush
• Cleaning side-brush
• Cleaning sensors
• Cleaning front wheel
12
14
15
16
1
Page 3
● S A F E T Y P R E C AU T I O N S
Please read this manual carefully and follow all warnings and instructions.
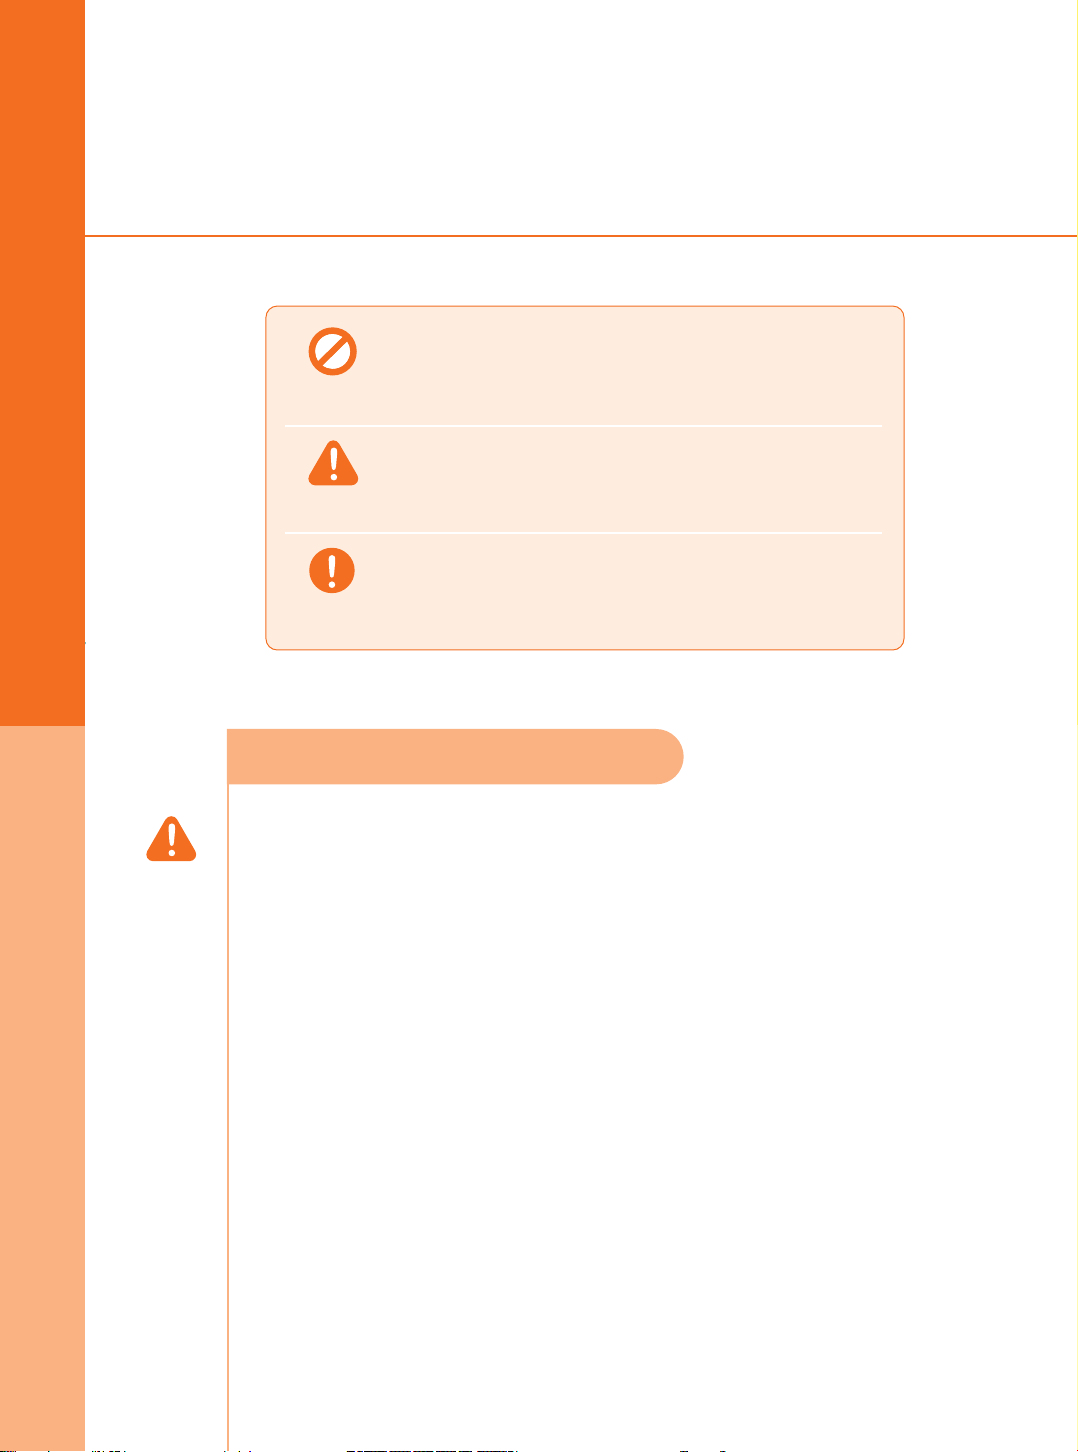
Users must be aware of prohibited operation
Warning
Prohibition
Warning
Caution
of this product.
Users must follow the instructions to avoid serious
injury or death.
Users must follow the instructions to avoid injury
or product damage.
Electric and power cord precautions
- Do not wrap the power cord tightly or place heavy objects on it.
→ It may cause electric shock or re.
- Keep the pin and interface of the power plug clean from dust or water.
→ It may cause malfunction or electric shock.
- Do not pull the power cord or touch the power plug with wet hands.
→ It may cause electric shock or re.
- Do not use a damaged power plug or power cord, or insert the power plug into a
loose outlet.
→ It may cause electric shock or re.
- In the event water enters the internal part of the cleaner, the product should be sent
for service even though the product was dried.
- Do not repeatedly plug and unplug the product.
→ It may cause electric shock or re.
- Caution should be taken when plugging the adapter directly into the charging socket.
→ It may cause electric shock or re.
2
Page 4

Prohibition
Warning
Caution
Caution
Caution
● S A F E T Y P R E C AU T I O N S
Precautions before using
- Do not touch the charger's power cord with wet hands.
→ It may cause electric shock.
- Arrange cables or wires before use to avoid entangling with the robot
→ It may cause re or electric shock due to damaged cable.
- Remove light objects or clothes before use.
→ It may damage the object or clothing while robot is in use.
- Remove small or fragile objects from the cleaning area before use.
→ Fragile objects may be damaged.
→ Remove coins or expensive jewelries before cleaning.
- Clear the oor of objects that may get in the way.
→ in towels. pads, power cords, table clothes, etc., may get tangled with the wheels.
Also objects on a table may fall o if the robot bumps a table.
Caution
Caution
Warning
Caution
Warning
- Empty the dust bin before operating the robot cleaner.
→ Suction function may not perform well if dust bin is full.
- Check that the main components such as antibacterial lter, brush
and dust bin are assembled properly before cleaning.
→ In the event you use the robot cleaner without the main components, such as the
antibacterial lter or brush, the product will not clean properly and such operation
may damage the product. Also, children and pets may be deemed as a barrier by
the robot cleaner resulting in certain areas not being cleaned.
- Do not operate robot cleaner when children or pets are present and le alone.
→ e children or pets may be aracted to the robot cleaner and may hurt themselves aempting
to play with the product.
- Do not place the power cord on the oor when installing charging station.
→ Robot cleaner may drag the power line while auto-charge or cleaning.
- Keep the top of the charging station away from water.
→ It may cause electric shock or re.
3
Page 5

● S A F E T Y P R E C AU T I O N S
Warning
Caution
Caution
Caution
Caution
Caution
Precautions while using
- In the event an unusual sound, smell or smoke emanates from the product, immediately
turn o the robot cleaner and place it a safe distance away from anything ammable.
→ It may cause electric shock or re.
- Do not use the robot cleaner on a table or any high surface.
→ It may damage the product.
- In rare instances the robot cleaner may scratch or otherwise damage particular ooring.
In this event, discontinue use.
- In the event a large piece of plastic or other substance is suctioned up, remove it immediately.
→ Serious damage to the robot cleaner can occur when it is used for a period of time with its suction
duct clogged.
- Remove the robot cleaner to another area when it is blocked by a threshold of the entrance
or porch.
- Prevent the robot cleaner from suctioning liquid materials.
- Do not use the robot cleaner near ammables such as cigarees, hot materials or gasoline.
→ It may cause re.
Caution
Warning
Warning
Warning
Warning
Warning
Caution
- Do not use use the robot cleaner outdoors.
Precautions after using
- In the event a foreign substance is stuck to the sensor mechanism, the robot cleaner may malfuction.
-
Prior to cleaning o foreign substances, turn OFF the power switch and then use the provided cleaning
brush to remove.
→ If the robot cleaner operates all of the sudden, it may cause injury or serious damage to the product.
- In the event the robot cleaner or components are destroyed, contact the manufacturer or service
center for repair.
→ It may cause electric shock or re.
- Prior to cleaning the charging station, rst pull out the power plug for safety reasons.
- Mishandling of the baery may cause an explosion or re. At the end of the baery's service
life dispose the baery in a lawful manner.
→ It may cause re.
- Do not spray water directly on the product or wipe the robot cleaner with volatile materials such as
benzene, thinner or alcohol when cleaning the product.
- Do not apply undue pressure to the bumper.
Caution
→ In case the bumper sensor is damaged, it may crash on the wall or with furniture.
- Do not disassemble, repair or alter the product except by an authorized service provider.
Caution
4
→ It may damage the product.
Page 6
YCR-M05
Quick Guide
Robotic Vacuum Cleaner eX300
YCR-M05
User Guide
Robotic Vacuum Cleaner eX300
■Please be sure to read the Safety Precautions before use. www.yujinrobotusa.com
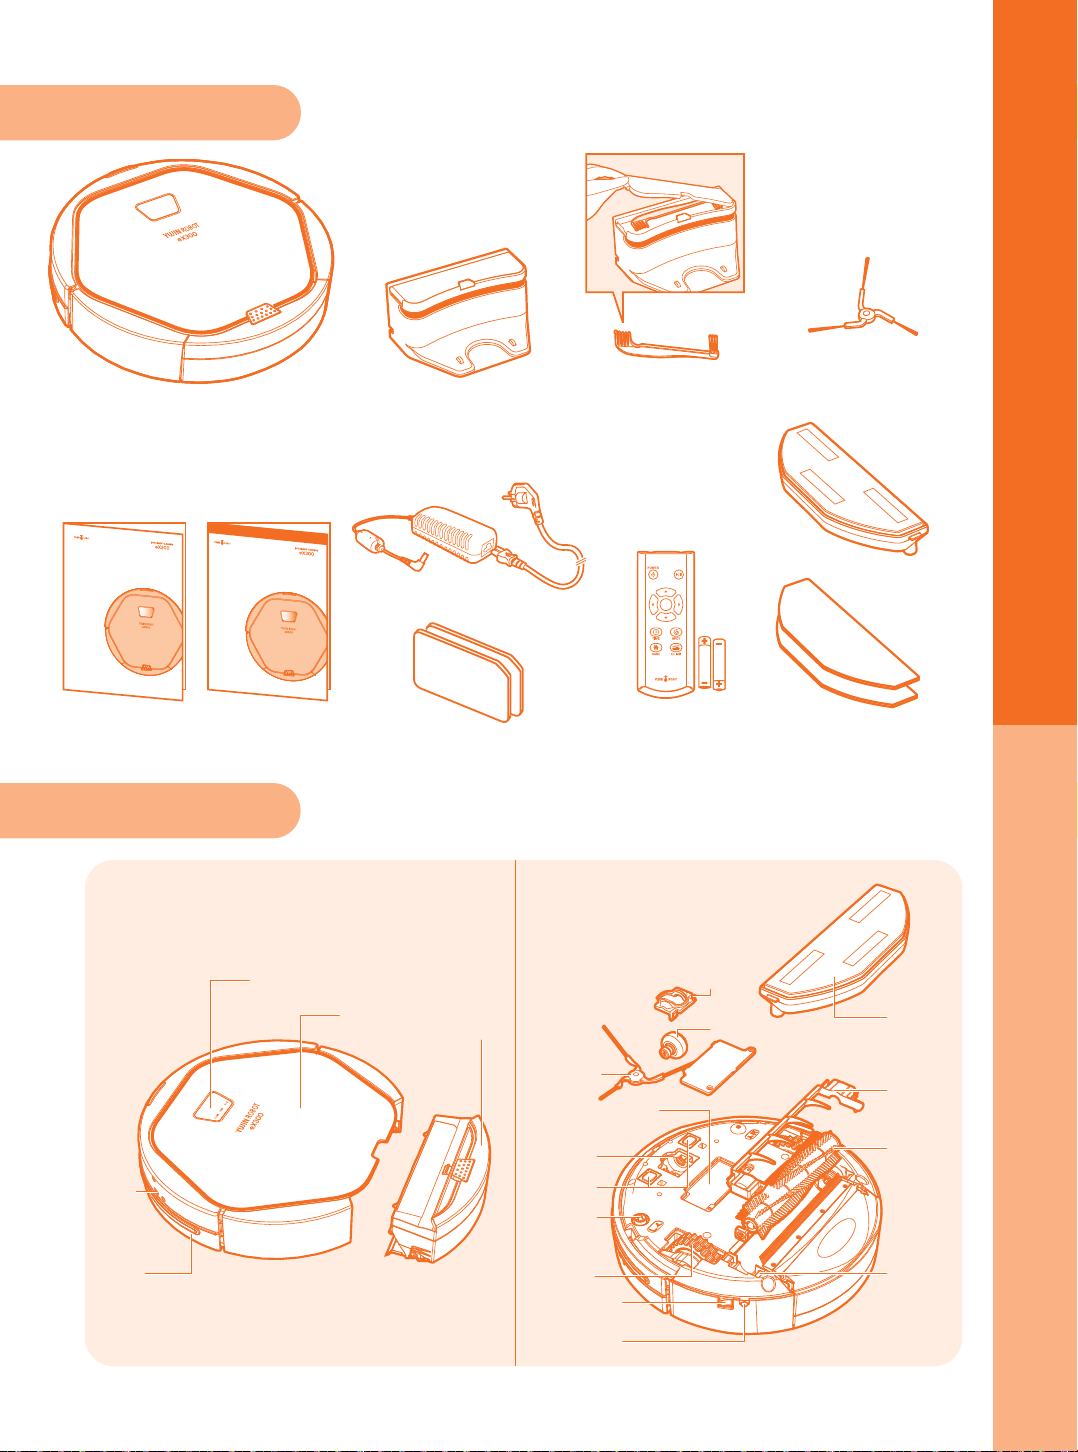
Components
● C O M P O N E N T S
Robot Vacuum Cleaner
User Guide
Quick Guide
Part Listing
● Top
Display Window
Charging Station
Adapter
Antibacterial Filter
Cleaning Brush
(Cleaning Brush is
contained inside of
charging station)
Remote Control
(batteries included)
● Bottom
Front Wheel
Fixed Cover
Side-Brush
Mop Plate
Ultra Microfiber
Wet Mop
Barrier
Sensor
Bumper
Decoration Cover
Dust Bin
Side Brushes
Lithium Ion Battery
Front Wheel
Position
Charging
Terminal
Fixed Pin
for Side-Brush
Wheel
Power Switch
Charging Jack
Manual
Front Wheel
Mop Plate
Main Brush
Cover
Main Brush
Main Brush
Fixing Clip
5
Page 7
● C O M P O N E N T S ● R E F E R E N C E
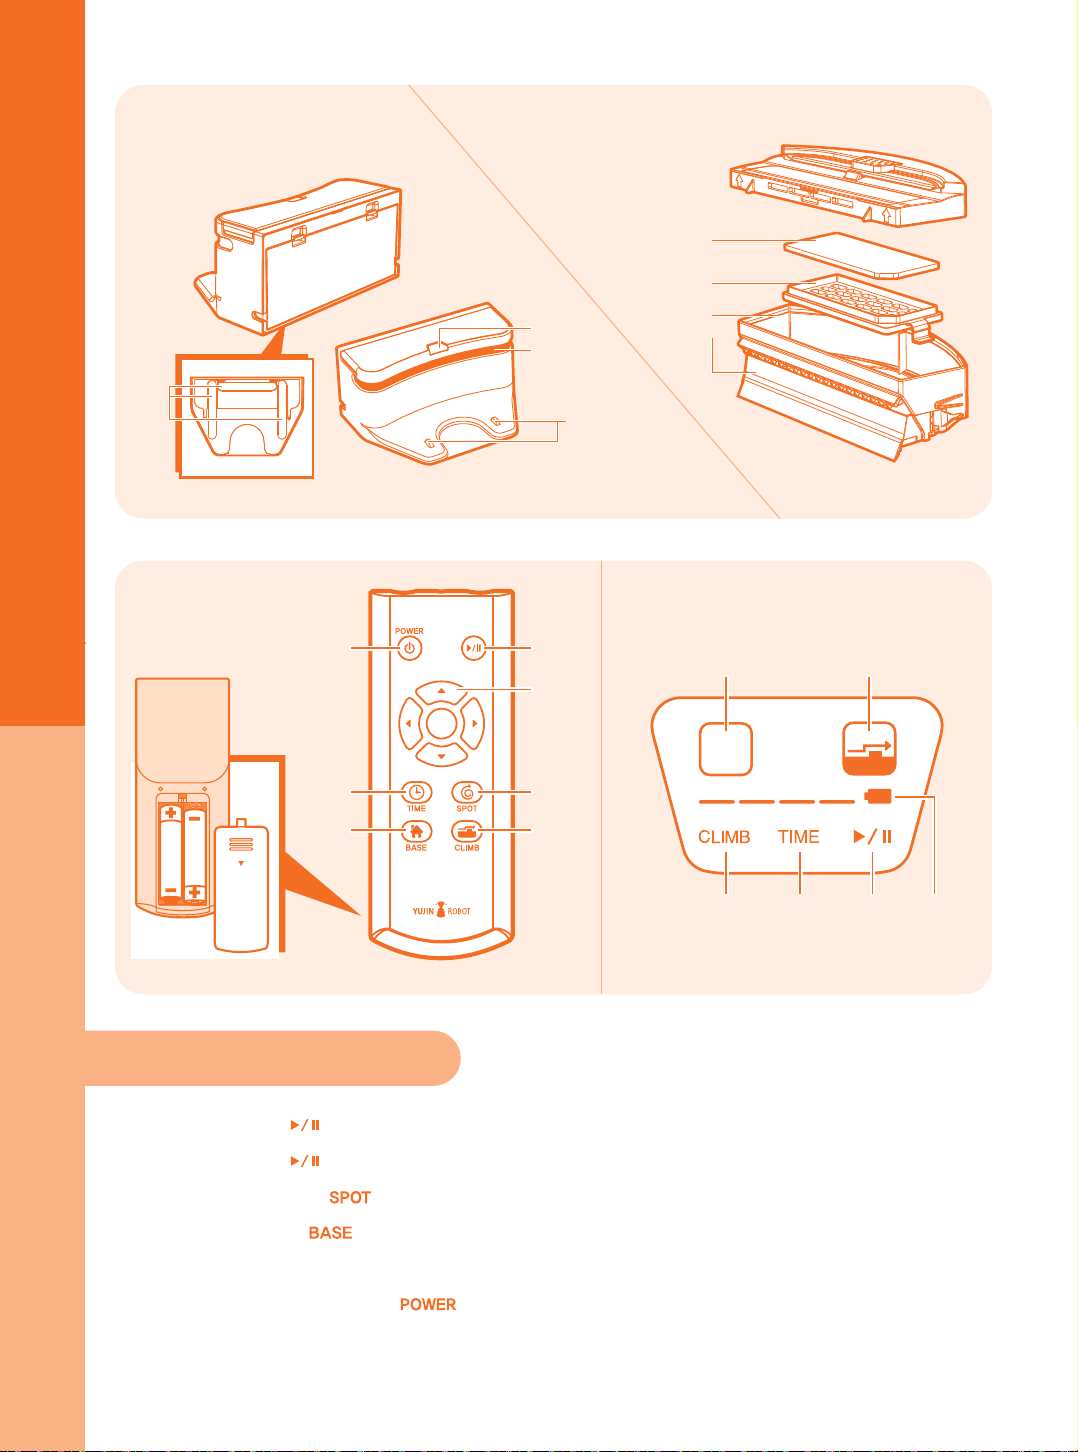
● Charging Station
Anti-Slip
Pad
● Dust Bin
Charging Display
Infrared Generator
Charging Terminal
Antibacterial Filter
Filter case
Dust Bin
Dust Bin
Blade
● Remote Control ● Display Screen
Power Button
Start/Stop
Button
Direction
Button
AUTO
Time
Setting
Button
Base
OPEN
Button
Spot Mode
Button
Climb Mode
Button
Climb Mode
Setting Button
Remote control operation
1. Press Start/Stop ( ) Button of the Remote Control to start cleaning.
2. Press Start/Stop ( ) Button or Power Button to stop cleaning
3. Operating Spot mode ( ) is only available by Remote Control
Time Setting
Button
Max15 30 90
Climb Mode IndicationAutomatic Cleaning Mode Indication
Start/Stop
Button
Battery
Status
4. When Base Button ( ) of Remote Control is pressed during cleaning cycle, POP will return to
Charging Station, and charging will start automatically
5. By pressing the Power Button ( ) of Remote Control, the display window will be turned off.
6
Page 8

Details For optimized cleaning
Please follow the instructions below for high cleaning efficiency.
Empty the dust bin after each use of the robot cleaner.
-
- Remove all the non-fixed objects such as toys, magazines or shoes before cleaning.
- Please do not lift or manually move the robot cleaner when the robot is operating.
- Make sure to charge for at least 1 hour before using for the first time.
(Refer to P.9 How to charge manually)
Operating principles of robot cleaner
Principles of operation
● R E F E R E N C E
eX300 operating under Random and Spot cleaning mode will recognize obstacles through
various sensors. Utilizing 20 detection sensor, the robot cleaner avoids walls, furniture and other objects.
It climbs a doorsill of up to 0.79 inches and the floor sensors help it avoid falling down stairs.
Be careful that pets or children do not force the robot to fall by playing with it.
Suction of robot cleaner
This product has a main brush, side-brushes and a vacuum suction duct. The dust on the floor is
gathered by the rotating side brush, and is swept into the dust bin by the rotating main brush.
7
Page 9
● I N S TA L L I N G T H E R O B OT CLEANER
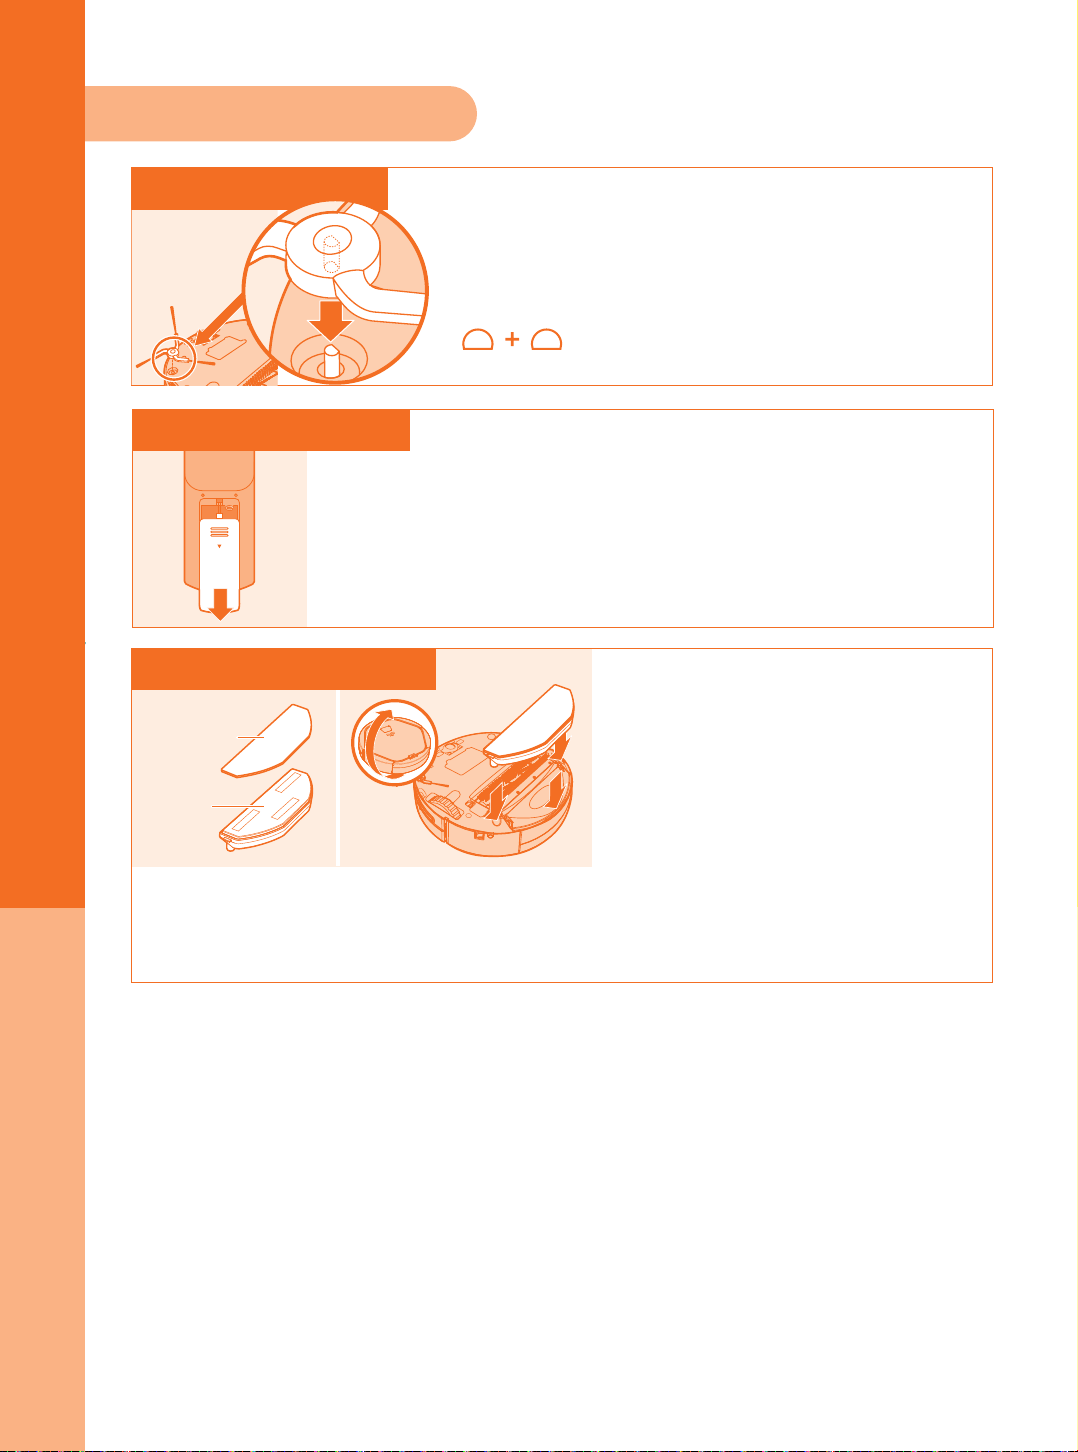
Pre operation check list
Assemble side brush
1. After turning over the robot vacuum, check the position
of the side brush.
2. Match the groove of the side brush to the fixed pin embedded
in a hollow opening of the backside of robot cleaner.
Insert remote control battery
There are no batteries inside the remote control at the time of
purchase. Install 2 x AAA batteries before using the remote
contol.
OPEN
1. Push the cover of the backside of the remote control
downward to open.
2. Check (+)(-) of the batteries and install.
3. Match the cover to the groove, and close until“click”sounds.
Assemble ultra microfiber mop
Ultra Microfiber
Mop
Mop Plate
1 2
1. Turn over the robot vacuum, and install the Mop Plate by combining it to the fixing
part of the main body.
2. If Mopping Mode is not used, separate and keep the Mop Plate separate from the Main Body.
8
Page 10
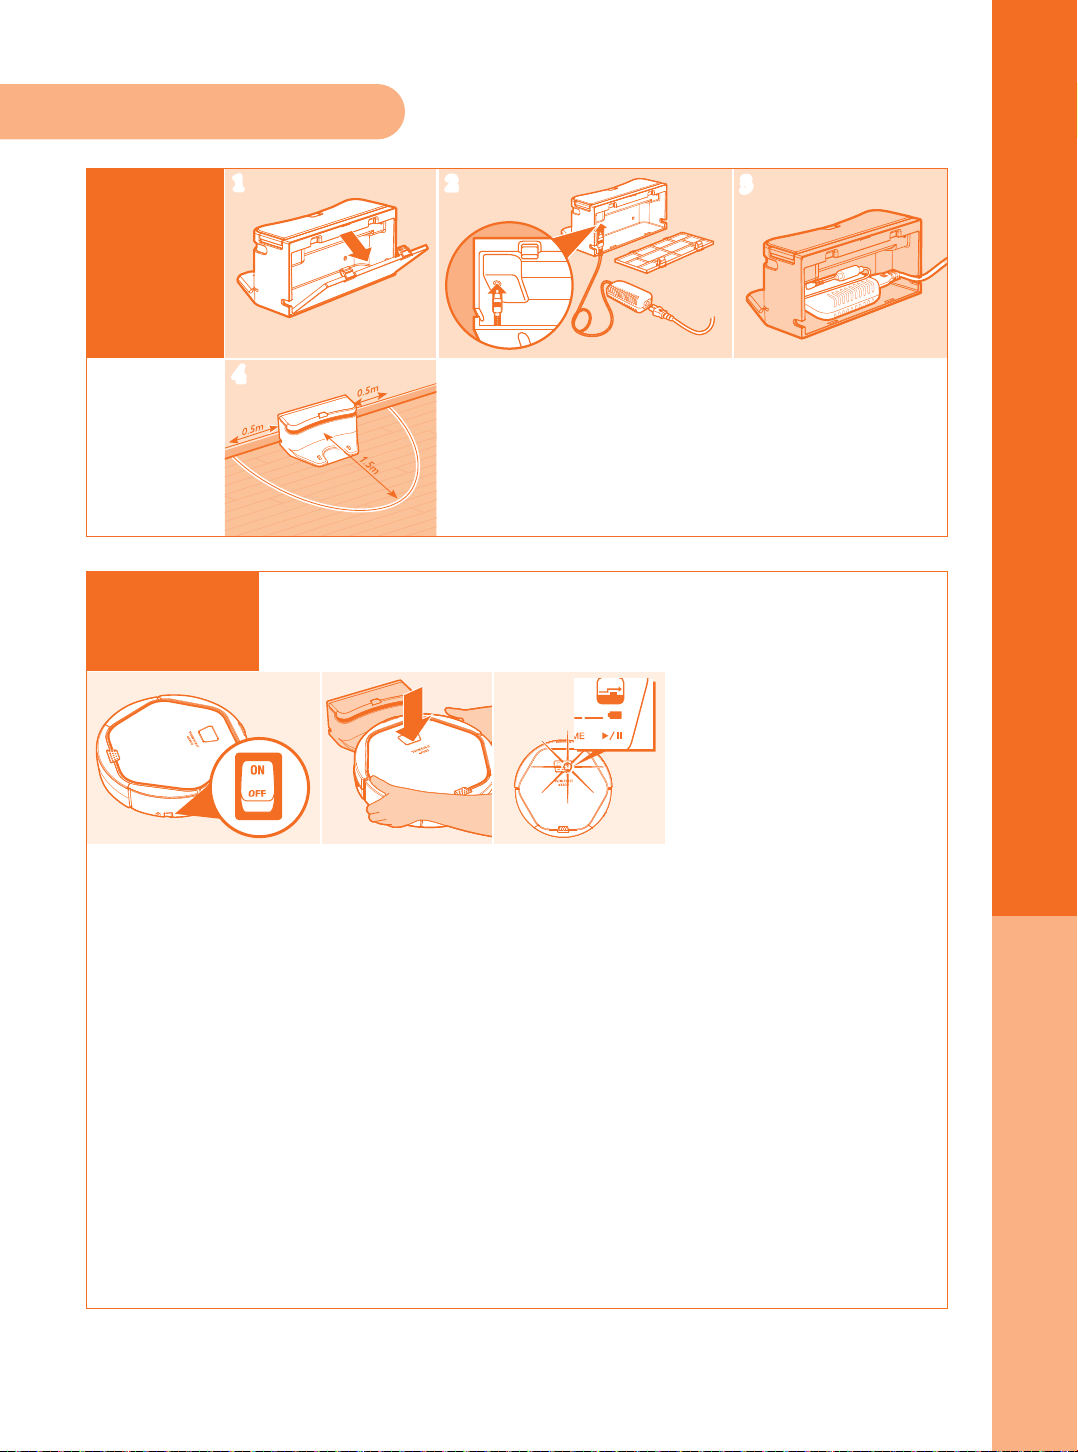
Pre cleaning check list
● I N S TA L L I N G T H E R O B OT CLEANER
Installation of
charging
station
Charging
1
2
※How to connect adapter
4
Open the back cover of the Charging Station,
and install the adapter with connected power plug as
shown in Figure 2 above.
The battery is not charged at the time of product purchase.
so it must be fully charged before first use.
Max
AUTO
Max15 30 90
3
1 2 3
1. Turn on the Power Switch on the side of the product.
2. Match the Charging Pin on the bottom of the Main Body with the socket of the Charging Station
correctly, and the robot changes to charing mode.
▶▶ Robot starts to charge with blinking battery status on the display window.
※ Change of the Charging Indicator status on Charging Station
Red: robot cleaner is in operation away from the docking station, or the charging connector
between the cleaner and docking station is not properly connected.
Green Blinking: Recharging (Remaining battery is 40% or less)
Green: Recharge completed (Battery is fully charged or over 40% charged)
3. The battery is fully charged; the battery status on display will be green.
[Auto-charge during use]
※ When the battery is low during an operation, this product automatically moves to the
charging station and performs auto charging.
※ If the base button of the remote control is pressed, it finds and moves to the charging station
and starts charging.
9
Page 11
● U S AGE OF RO B O T C L E A N E R
Operation of robot cleaner
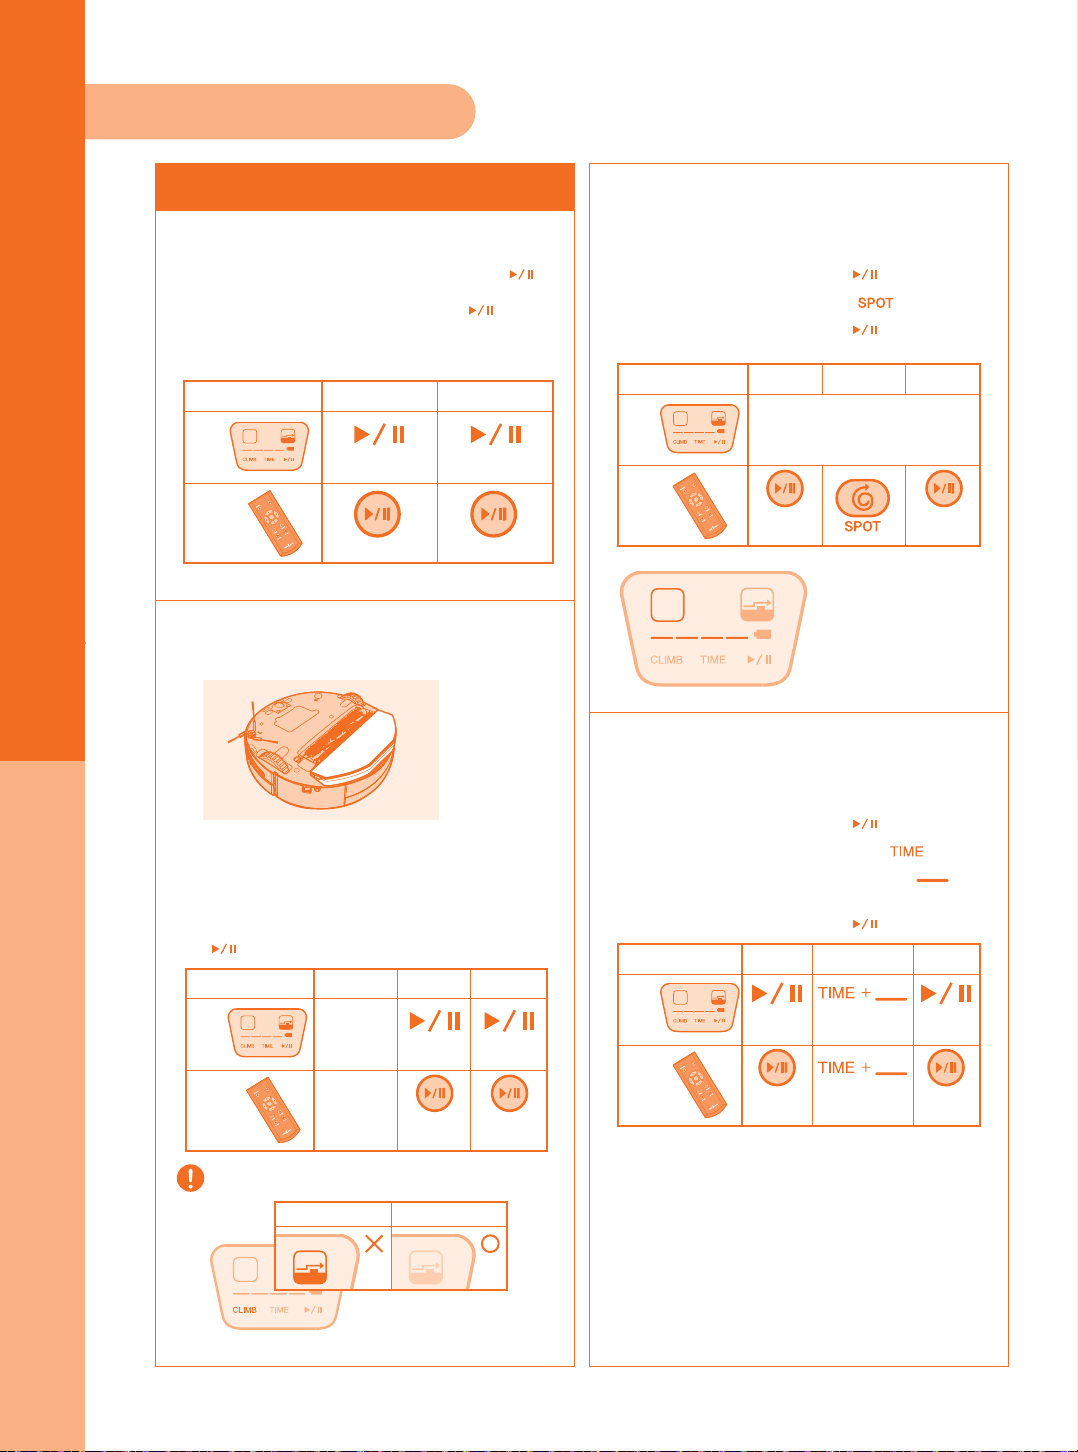
Start/Stop cleaning
● Basic cleaning
1. Press Start/Stop (or Power) button. ( )
2. Press Start/Stop button again. ( )
(the robot is preset for 90 minutes in
normal and starts to work in random.)
ORDER
Body
Remote
Control
AUTO
Max15 30 90
1 2
Start/Stop button
Start/Stop button
Start/Stop button
Start/Stop button
● Wet mopping
1. Turn over the robot as shown in the picture.
2. Soak Microfiber Wet Mop in water, wring
out and then attach to the Mop Plater.
3. Turn over the cleaning robot body to its
normal position and press the start button
( ) twice.
ORDER
Body
Remote
Control
Max15 30 90
Install the
wet mop
on the body
Install the
wet mop
on the body
AUTO
21 3
Start/Stop
button
Start/Stop
button
Start/Stop
button
Start/Stop
button
● Spot mode
Spot (Spiral) cleaning mode, robot
spirals in a 5ft radius.
1. Press Start/Stop button. ( )
2. Press spot mode button. ( )
1. Press Start/Stop button. ( )
ORDER
Body
Remote
control
AUTO
AUTO
※ set up spot mode is only possible
Max15 30 90
via remote control
Start/Stop
button
Max15 30 90
21 3
Start/Stop
button
※ During spot mode operation,
the time indicator light will
blink.
● Max mode
In Max mode, robot works until the battery
is exhausted.
1. Press Start/Stop button. ( )
2. Press the time setting button ( ) until
Max
Max
Max
Start/Stop
button
Start/Stop
button
a light on the letter Max displays ( ) in
the window
3. Press Start/Stop button. ( )
ORDER
Body
Remote
control
AUTO
Max15 30 90
Start/Stop
button
Start/Stop
button
21 3
Set Max mode
via time button
Set Max mode
via time button
Please deselect climb mode if you wish to use the robot
in mopping mode (after installed mop plate on the bottom)
Select Climb Mode Deselect Climb Mode
AUTO
Max15 30 90
※ If not the robot can get hung up
on door sills or other obstacles,
resulting in the robot working
improperly.
10
Page 12
Set cleaning time
AUTO
● U S AGE OF RO B O T C L E A N E R
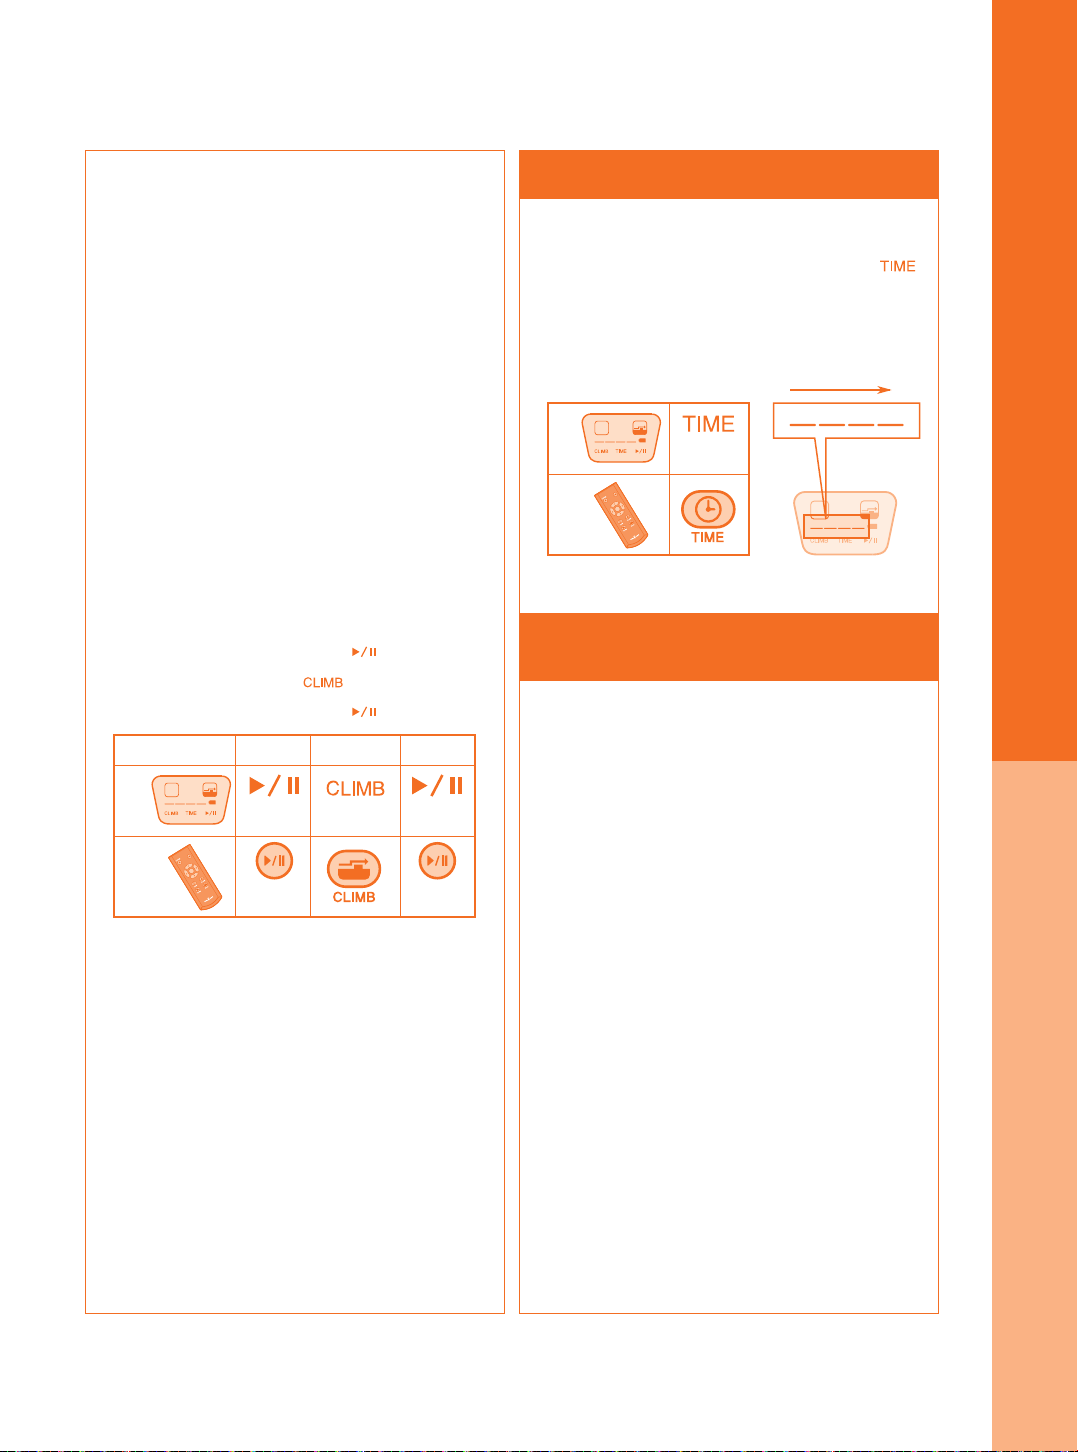
● Climb (Carpet) mode
The default climbing height of obstacles
for the robotic vacuum cleaner is up to
approximately 0.2 inches.
If you wish to set the robot to go over
obstacles over 0.2 inches, such as a door
sill, click CLIMB Button to turn on CLIMB
Mode!
: Do not use CLIMB mode on rugs or
carpets.
If you press CLIMB Button of the remote
control, the performance of the climbing
can be increased up to 0.79 inches.
(This performance may vary according
to the environment, such as the structure
of the door sill, etc.)
1. Press Start/Stop Button ( ).
2. Press climb Mode ( ) Button
3. Press Start/Stop Button ( ).
ORDER
Body
Remote
Control
AUTO
Max15 30 90
Start/Stop
Button
Start/Stop
Button
21 3
Climb Mode
Button
Start/Stop
Button
Start/Stop
Button
● Set cleaning time
Press Time Button to set cleaning time( ).
Every time you press the button, the time
will be changed according to following order
(15 minutes - 30 minutes - 90 minutes - MAX)
Max15 30 90
Max15 30 90
Max15 30 90
Body
Remote
Control
AUTO
Max15 30 90
Set Cleaning
Time
AUTO
Movement / Manual cleaning /
Auto-charging
● Manual controlling (moving)
If you want to move cleaning robot to a
different area, use the arrow keys on the
remote control.
- When you press the backward button,
the cleaning robot will rotate in place and
change directions.
- If you press the direction button when
power is on, it will move but it will not
clean (vacuum).
● Manual cleaning
After you start cleaning, press the
direction button on the Remote Control
to clean the desired area or direction.
● Auto-charging
The cleaning robot navigates to the Charging
Station and charges automatically when you
press the base button on the Remote Control.
※ Display window is activated by pressing
any of the buttons on the Main Body or
by using the Remote Control
11
Page 13
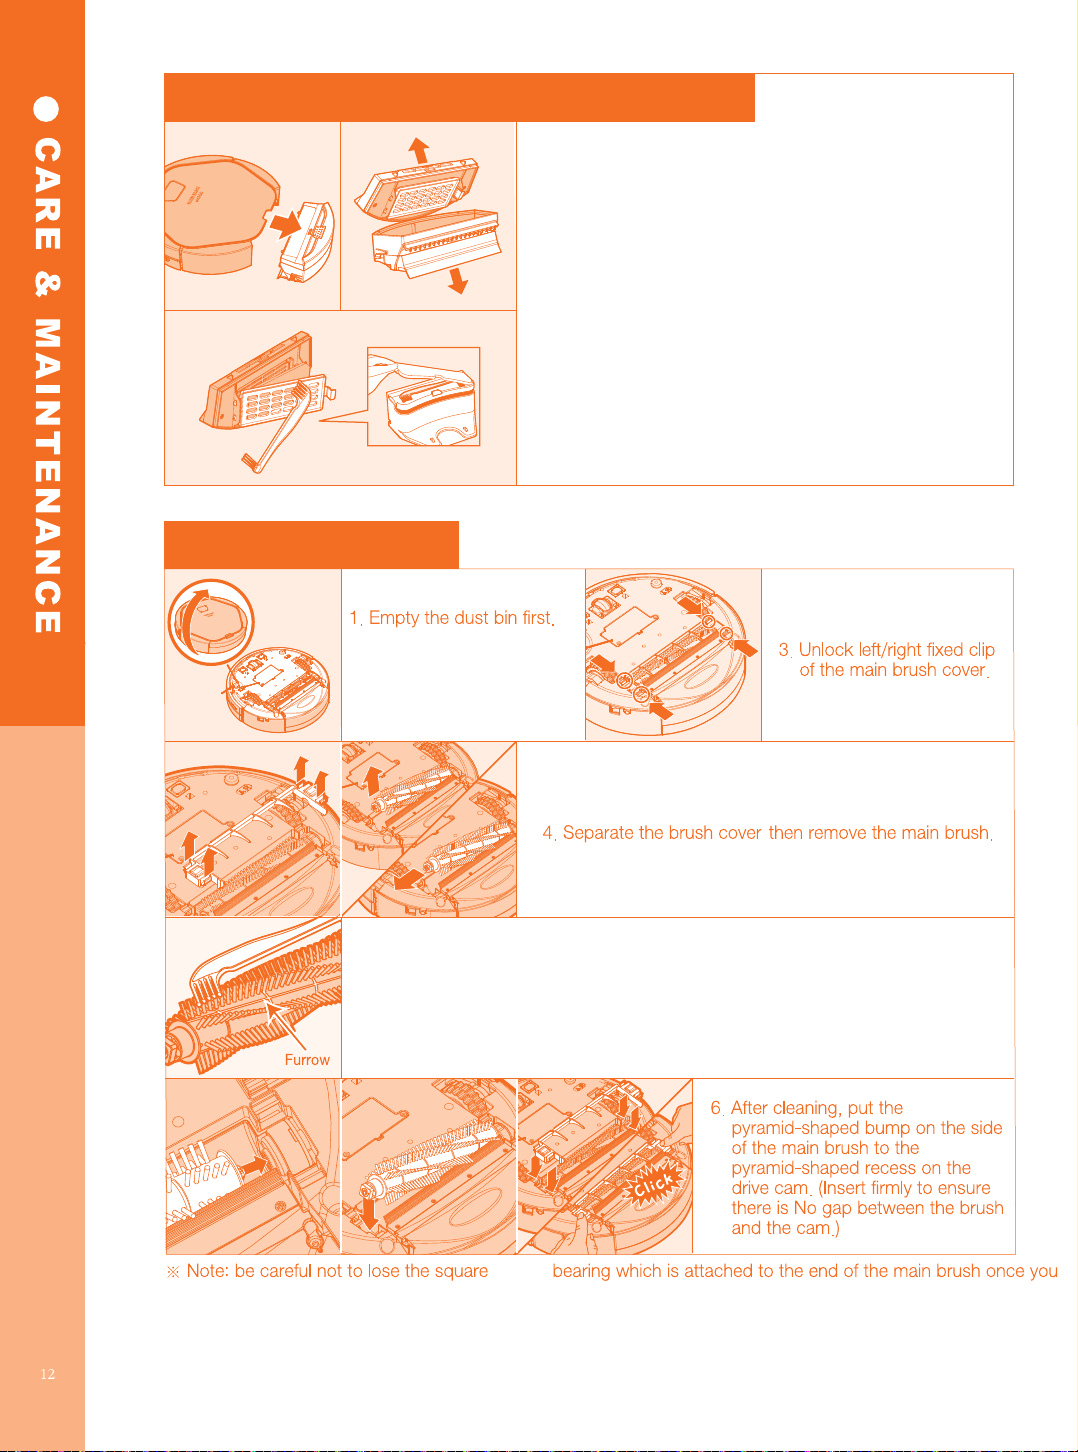
Emptying dust bin and servicing the antibacterial filter
1. Hold the Dust bin as in the figure and separate
antibacterial filter cover.
2. Clean the filter using cleaning brush.
※ Dust bin can be washed with water.
However, completely dry them before assembling
and using them again.
Cleaning main brush
2. Turn the robot vacuum
cleaner over and place
the bottom facing upright.
5. Clean hair, carpet fiber and other substances substances stuck on the main
brush using the cleaning brush. Over time, hairs and fibers accumulate
between the main brush and the bearing. This extra friction which will causes
less efficient cleaning, more battery strain leading to shorter running time and
may ultimately stop the Robot Vacuum Cleaning.
※ Use scissors or a knife along the main brush furrow to remove the hair.
pull it out for the Main Brush for cleaning.
,
-shape
Page 14
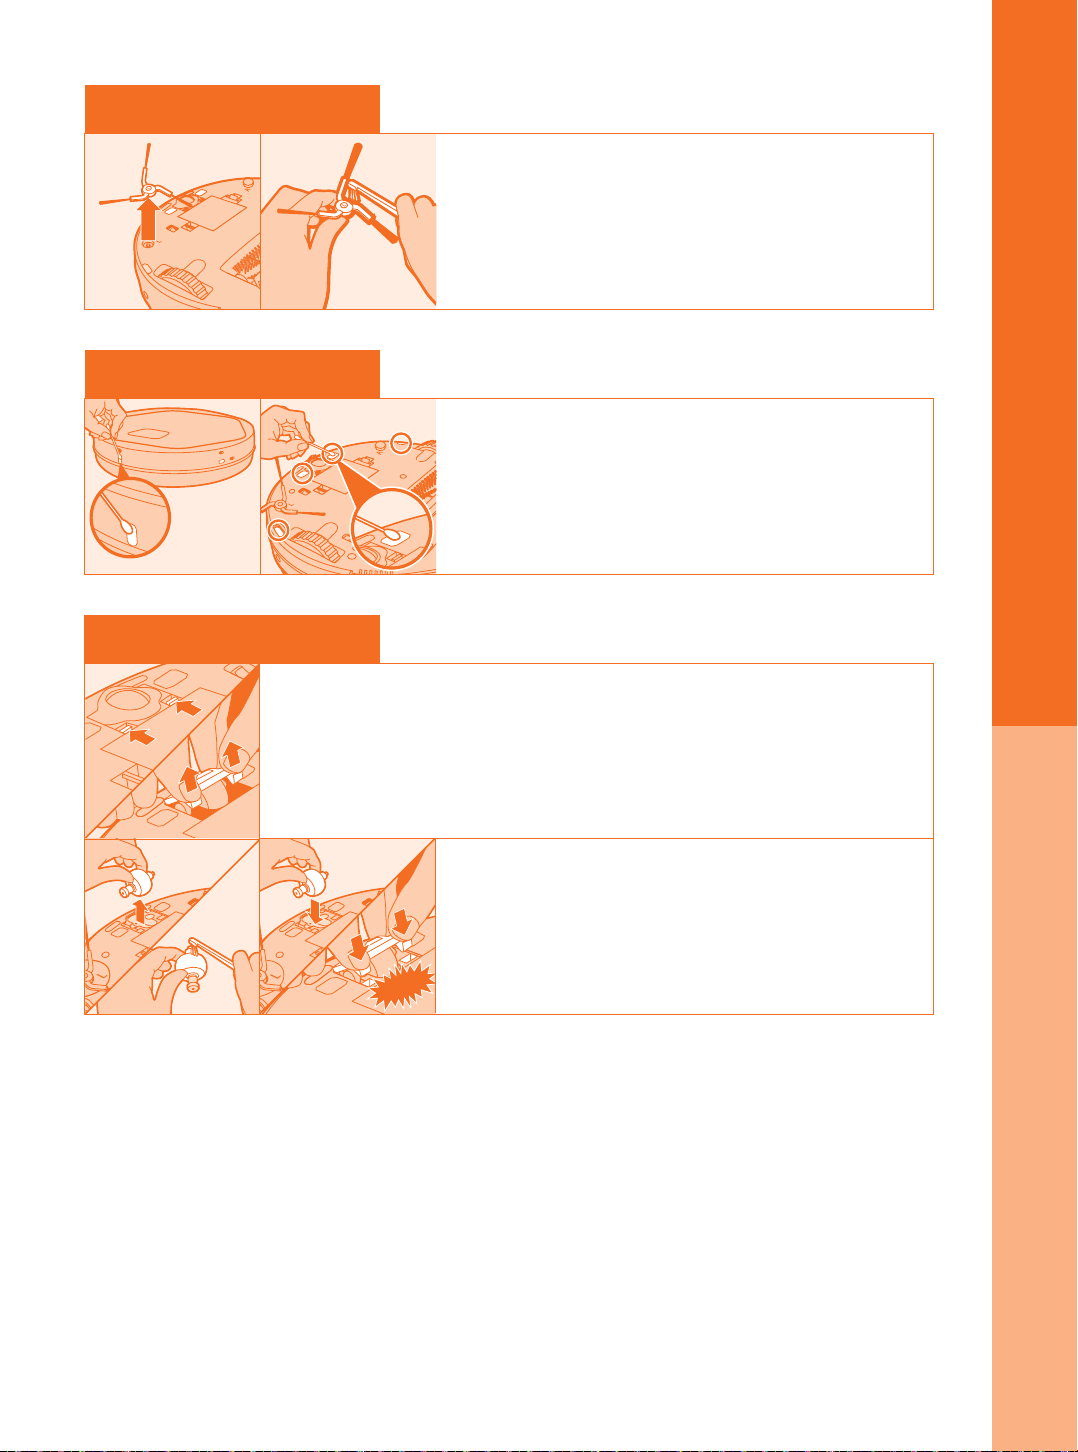
Cleaning side brush
Cleaning sensors
Cleaning front wheel
● C A R E & M A I N T E NANCE
1. Separate the side-brush with both hands.
2. Clean dust and foreign substance using the cleaning
brush.
※ When disassembling the side brush, hold the whole
three-strip brushes together at the same time and
pull it out.
1. Wipe the sensors on the Front Bumper of the robot
cleaner using q-tips.
2. Wipe the sensors on the bottom of the robot cleaner
using q-tips.
1. Press the front wheel Fix Clip with both hands and lift it up to separate.
2. Remove foreign substance on the front wheel using the cleaning brush.
3. Pull out the front wheel then clean dust and foreign
substances using the cleaning brush. For the main
brush, remove the bearings to be able to easily remove
any hair or other material on the axle.
4. Put the front wheel back in place and reassemble as
Click
※ The robot vacuum cleaner may not be working properly if the front and bottom cleaning robot sensors
are covered, for example, by dust, dirt or hair. Cleaning and careful managing are required for all sensors.
shown in the method above.
13
Page 15
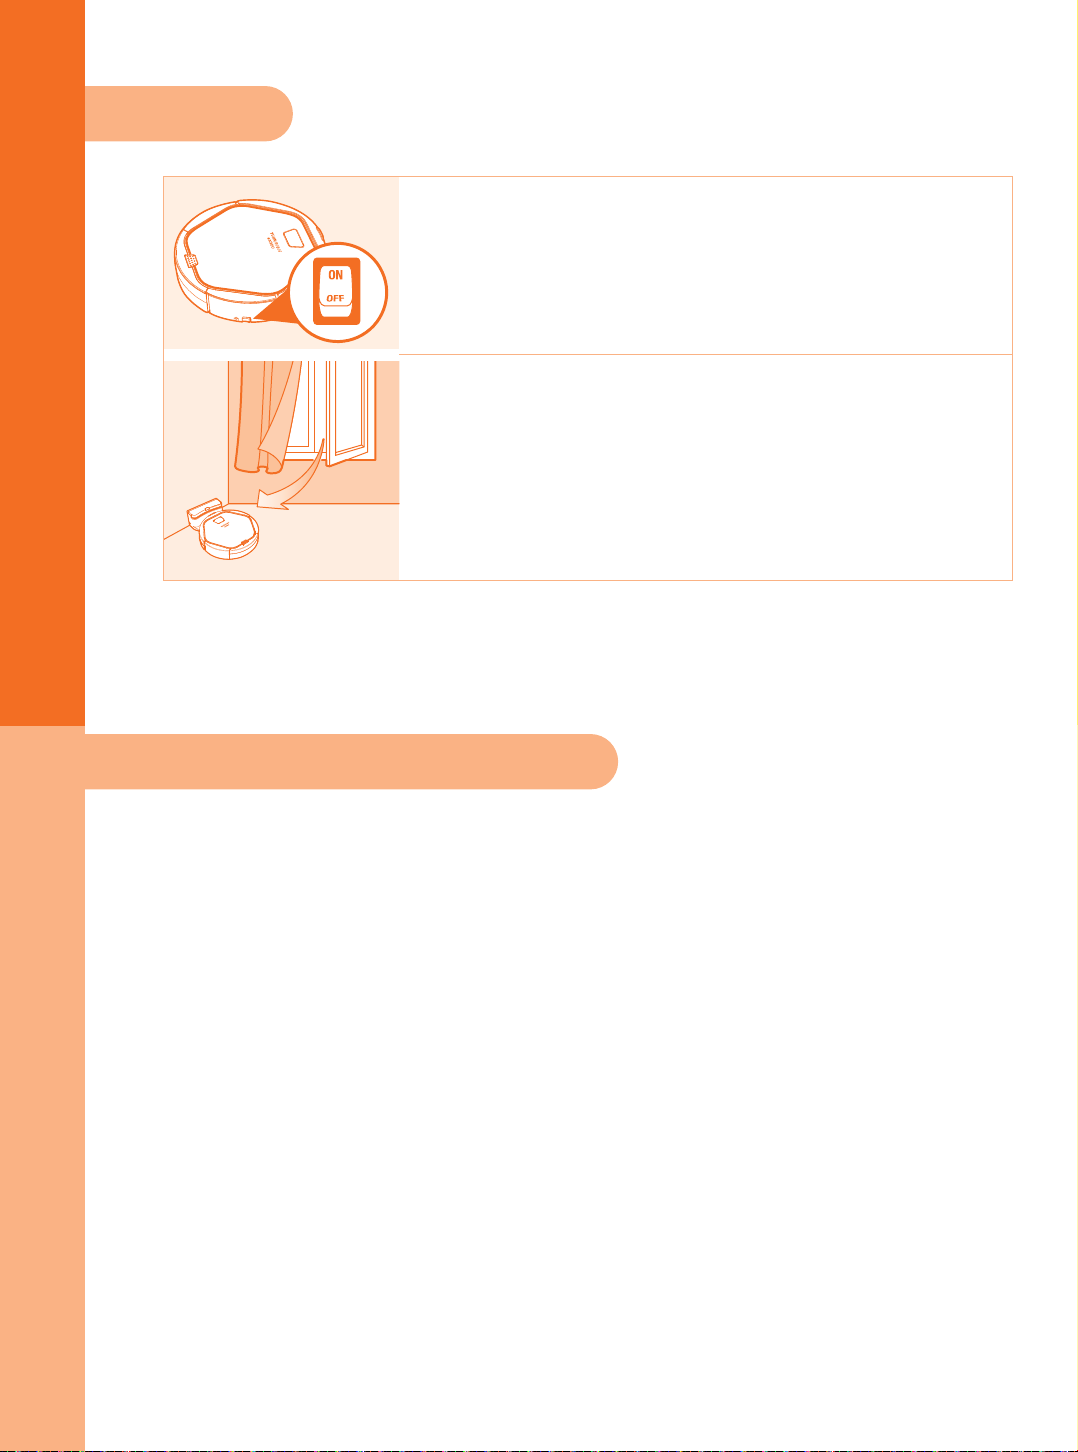
● S TO R A G E
Storage
1. If the vacuum cleaning robot is not used for a long period of time,
turn off the power switch on the side of the main body.
※ Please be aware that the battery could be discharged after an
extended period of non-use.
2. Keep the vacuum cleaning robot away from direct sunlight.
Store the vacuum cleaning robot in a well ventilated location.
※ Please do not store any objects on top of the vacuum cleaning robot as it may cause a malfunction
Battery caution & disposal information
1. Use the lithium-ion batteries for the robot cleaning vacuum.
and alkaline batteries for Remote Control.
2. Install only new batteries of the same type in your product.
3. With the correct polarity, as indicated in the battery compartment,
may shorten the life of the batteries or cause batteries to leak.
4. Do not mix old and new batteries.
5. Do not mix Alkaline, standard (Carbon-Zinc), rechargeable (Nickel Cadmium) or
(Nickel Metal Hydride) batteries.
6. Do not dispose of batteries in fire.
7. Batteries should be recycled or disposed of as per state and local guidelines.
14
Page 16

FAQ
If you can not solve the problem with the information below,
please contact our Customer Service Center through the website.
Problem Cause Solution
▶See <Product control & maintenance>
and empty the dust bin.
▶See <Product control & maintenance>
and use main brush.
▶See <Product control & maintenance>
and clean the dirty filter.
It is not
cleaning well.
▶Dust Bin is full.
▶Main Brush is dirty.
▶Filter is contaminated.
● C H E C K B E F O R E R E PA I R R E P O R T
Power switch
is turned off.
The robot is
not responding.
The robot is not
charging.
After cleaning,
the robot
cleaner is
not returning
to the charging
station.
▶Battery is low.
▶Battery is not inserted properly
into the robot cleaner.
▶Main brush is clogged with
hair and dust.
▶Power switch is turned off.
▶Remote Control batteries not
working.
▶Infrared sensor or beam
window of the remote control
are blocked or dirty.
▶Remote control is too close
to the Charging station or
Robot Cleaning Vacuum.
▶Charging station or Robot
Vacuum Cleaning is not
connected properly to the plug.
▶Home station or Robot
Vacuum Cleaning is not
connected properly to the plug.
▶Generator & ejector on the
home station and detector of
the robot cleaner is dirty.
▶Re-charge the robot cleaner.
▶See <Product control & maintenance>
and empty the dust bin.
▶See <Product control & maintenance>
and clean the dust bin.
▶Check the power switch on the bottom
of the main body.
▶Re-charge the robot cleaner.
▶Insert the battery of robot cleaner properly.
▶Change the battery of the remote control.
▶Wipe the infrared sensor & beam part of
the remote control with a soft cloth.
▶Move farther away from the Charging
Station and press the button again while
pointing at the Robot Vacuum Cleaning.
▶Connect the power of the Charging Station
properly.
▶Move the Charging Station. No objects
should be placed within 20 inches left/right
or 5 feet in front of the Charging Station.
This is to enable the robot cleaner to return
to the home station automatically after
cleaning.
15
Page 17
● C H E C K B E F O R E R E PA I R R E P O R T ● D I S P L AY C H E C K M E S S A G E
▶Dust bin is full or filter is dirty.
Noise of the
robot cleaner
is getting
worse.
▶Main brush is dirty or hairs
are accumulating between
the main brush and the
bearing.
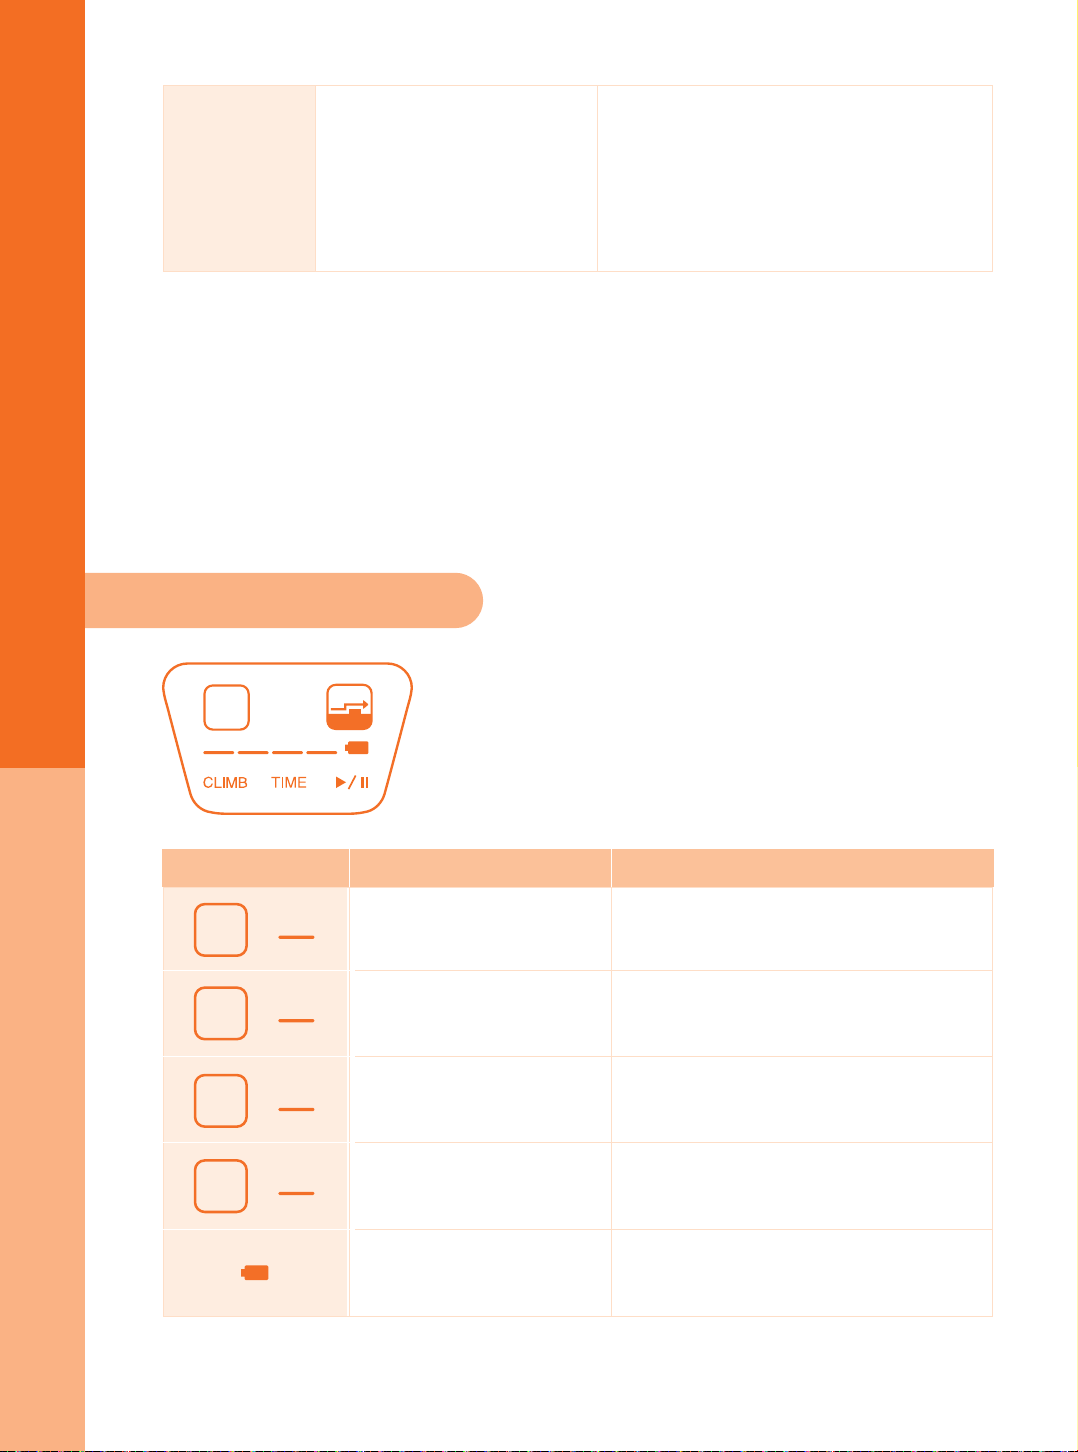
Display check message
AUTO
Max15 30 90
※ During operation, if the window icons are blinking, please refer
to the Checklist below before proceeding.
※ Clean the sensors and emptying the dust bin are required at least
once every two weeks. Periodic management will
extend the life of the cleaning robot.
▶Empty and clean the dust bin.
▶See <Product control & maintenance>
(page 12) and clean the filter.
▶See <Product control & maintenance>
(page 12) and clean the main brush.
Check display Cause Solution
AUTO
AUTO
AUTO
AUTO
15
+
30
+
90
+
Max
+
A wheel is lifted, or the
floor could not be detected
Wheel motor overload
Side brush overload
Main brush or suction
motor overload
Battery exhausted
16
Move the robot cleaner to flat area in
case the wheel is stuck on a threshold.
Check if material such as hair
or lint is on the wheel.
Check if material such as hair or
lint is on the main brush or side-brush.
Empty the dust bin and clean the main
brush and filter
Please charge
 Loading...