


IDS WA-S
IDS WA-S Charger
IDS WA-M
OPERATING MANUAL
OPERATING MANUAL
ba76199e03 08/2018
IDS WA System
SYSTEM FOR THE WIRELESS OPERATION OF IDS SENSORS

IDS WA System
For the most recent version of the manual, please visit
www.ysi.com
.
Contact YSI
1725 Brannum Lane
Yellow Springs, OH 45387 USA
Tel: +1 937-767-7241
800-765-4974
Email: info@ysi.com
Internet: www.ysi.com
Copyright © 2018 Xylem Inc.
2 ba76199e03 08/2018

IDS WA System Contents
Contents
1 General information . . . . . . . . . . . . . . . . . . . . . . . . . . . . . . . . . . . . . . . . . . 5
2 Safety . . . . . . . . . . . . . . . . . . . . . . . . . . . . . . . . . . . . . . . . . . . . . . . . . . . . . . 6
2.1 Safety information . . . . . . . . . . . . . . . . . . . . . . . . . . . . . . . . . . . . . . . . . . . . . . . . . . 6
2.1.1 Safety information in the operating manual. . . . . . . . . . . . . . . . . . . . . . . . . 6
2.1.2 Further documents providing safety information . . . . . . . . . . . . . . . . . . . . . 6
2.2 Safe operation. . . . . . . . . . . . . . . . . . . . . . . . . . . . . . . . . . . . . . . . . . . . . . . . . . . . . 6
2.2.1 Authorized use . . . . . . . . . . . . . . . . . . . . . . . . . . . . . . . . . . . . . . . . . . . . . . 6
2.2.2 Requirements for safe operation. . . . . . . . . . . . . . . . . . . . . . . . . . . . . . . . . 6
3 Commissioning . . . . . . . . . . . . . . . . . . . . . . . . . . . . . . . . . . . . . . . . . . . . . . 7
3.1 Scope of delivery. . . . . . . . . . . . . . . . . . . . . . . . . . . . . . . . . . . . . . . . . . . . . . . . . . . 7
3.2 System requirements . . . . . . . . . . . . . . . . . . . . . . . . . . . . . . . . . . . . . . . . . . . . . . . 7
3.3 Charging the battery with the IDS WA-S Charger. . . . . . . . . . . . . . . . . . . . . . . . . . 8
3.3.1 Power supply of the IDS WA-S Charger . . . . . . . . . . . . . . . . . . . . . . . . . . . 8
3.3.2 Charging the IDS WA-S battery . . . . . . . . . . . . . . . . . . . . . . . . . . . . . . . . . 9
3.3.3 Status LED of the IDS WA-S Charger. . . . . . . . . . . . . . . . . . . . . . . . . . . . . 9
3.4 Connecting the IDS WA-M adapter to a meter . . . . . . . . . . . . . . . . . . . . . . . . . . . 10
3.5 Connecting the IDS WA-S adapter to an IDS sensor . . . . . . . . . . . . . . . . . . . . . . 10
3.5.1 Removing the IDS WA-S adapter from the plug head of the IDS sensor . 11
3.6 Establishing a wireless connection . . . . . . . . . . . . . . . . . . . . . . . . . . . . . . . . . . . . 11
3.6.1 The Sensors menu . . . . . . . . . . . . . . . . . . . . . . . . . . . . . . . . . . . . . . . . . . 11
3.6.2 Establishing a wireless connection . . . . . . . . . . . . . . . . . . . . . . . . . . . . . . 13
3.7 Combining several IDS WA-S Charger modules . . . . . . . . . . . . . . . . . . . . . . . . . 13
3.8 Mounting an IDS WA-S Charger module to a wall . . . . . . . . . . . . . . . . . . . . . . . . 15
4 Operation and measurement . . . . . . . . . . . . . . . . . . . . . . . . . . . . . . . . . . 16
4.1 Operation . . . . . . . . . . . . . . . . . . . . . . . . . . . . . . . . . . . . . . . . . . . . . . . . . . . . . . . 16
4.2 Saving the measured value. . . . . . . . . . . . . . . . . . . . . . . . . . . . . . . . . . . . . . . . . . 17
4.2.1 Functions of the IDS WA-S adapter . . . . . . . . . . . . . . . . . . . . . . . . . . . . . 17
4.3 Status LEDs of the IDS WA-S adapter . . . . . . . . . . . . . . . . . . . . . . . . . . . . . . . . . 18
5 Storing the IDS WA-S adapter . . . . . . . . . . . . . . . . . . . . . . . . . . . . . . . . . 18
6 Maintenance, cleaning, disposal . . . . . . . . . . . . . . . . . . . . . . . . . . . . . . . 19
6.1 Maintenance . . . . . . . . . . . . . . . . . . . . . . . . . . . . . . . . . . . . . . . . . . . . . . . . . . . . . 19
6.2 Cleaning . . . . . . . . . . . . . . . . . . . . . . . . . . . . . . . . . . . . . . . . . . . . . . . . . . . . . . . . 19
6.3 Disposal . . . . . . . . . . . . . . . . . . . . . . . . . . . . . . . . . . . . . . . . . . . . . . . . . . . . . . . . 19
7 What to do if ... . . . . . . . . . . . . . . . . . . . . . . . . . . . . . . . . . . . . . . . . . . . . . 19
ba76199e03 08/2018 3

Contents IDS WA System
7.1 No connection between the sensor and meter . . . . . . . . . . . . . . . . . . . . . . . . . . . 19
7.2 Display of when a sensor is connected. . . . . . . . . . . . . . . . . . . . . . . . . . . . . . . . . 20
7.3 The battery of the IDS WA-S adapter cannot be charged . . . . . . . . . . . . . . . . . . . 20
7.4 Status LED of the IDS WA-S Charger flashing red/green . . . . . . . . . . . . . . . . . . . 21
8 Replacement parts and accessories . . . . . . . . . . . . . . . . . . . . . . . . . . . 21
9 Technical data . . . . . . . . . . . . . . . . . . . . . . . . . . . . . . . . . . . . . . . . . . . . . 21
9.1 General features . . . . . . . . . . . . . . . . . . . . . . . . . . . . . . . . . . . . . . . . . . . . . . . . . . 21
9.2 Adapter IDS WA-M . . . . . . . . . . . . . . . . . . . . . . . . . . . . . . . . . . . . . . . . . . . . . . . . 22
9.3 Adapter IDS WA-S . . . . . . . . . . . . . . . . . . . . . . . . . . . . . . . . . . . . . . . . . . . . . . . . . 23
9.4 IDS WA-S Charger. . . . . . . . . . . . . . . . . . . . . . . . . . . . . . . . . . . . . . . . . . . . . . . . . 24
Contact Information. . . . . . . . . . . . . . . . . . . . . . . . . . . . . . . . . . . . . . . . . 27
Ordering & Technical Support . . . . . . . . . . . . . . . . . . . . . . . . . . . . . . . . . . . . . . . . 27
Service Information . . . . . . . . . . . . . . . . . . . . . . . . . . . . . . . . . . . . . . . . . . . . . . . . 27
4 ba76199e03 08/2018
IDS WA System General information
2
1
3
6
1
5
6
2
3
4
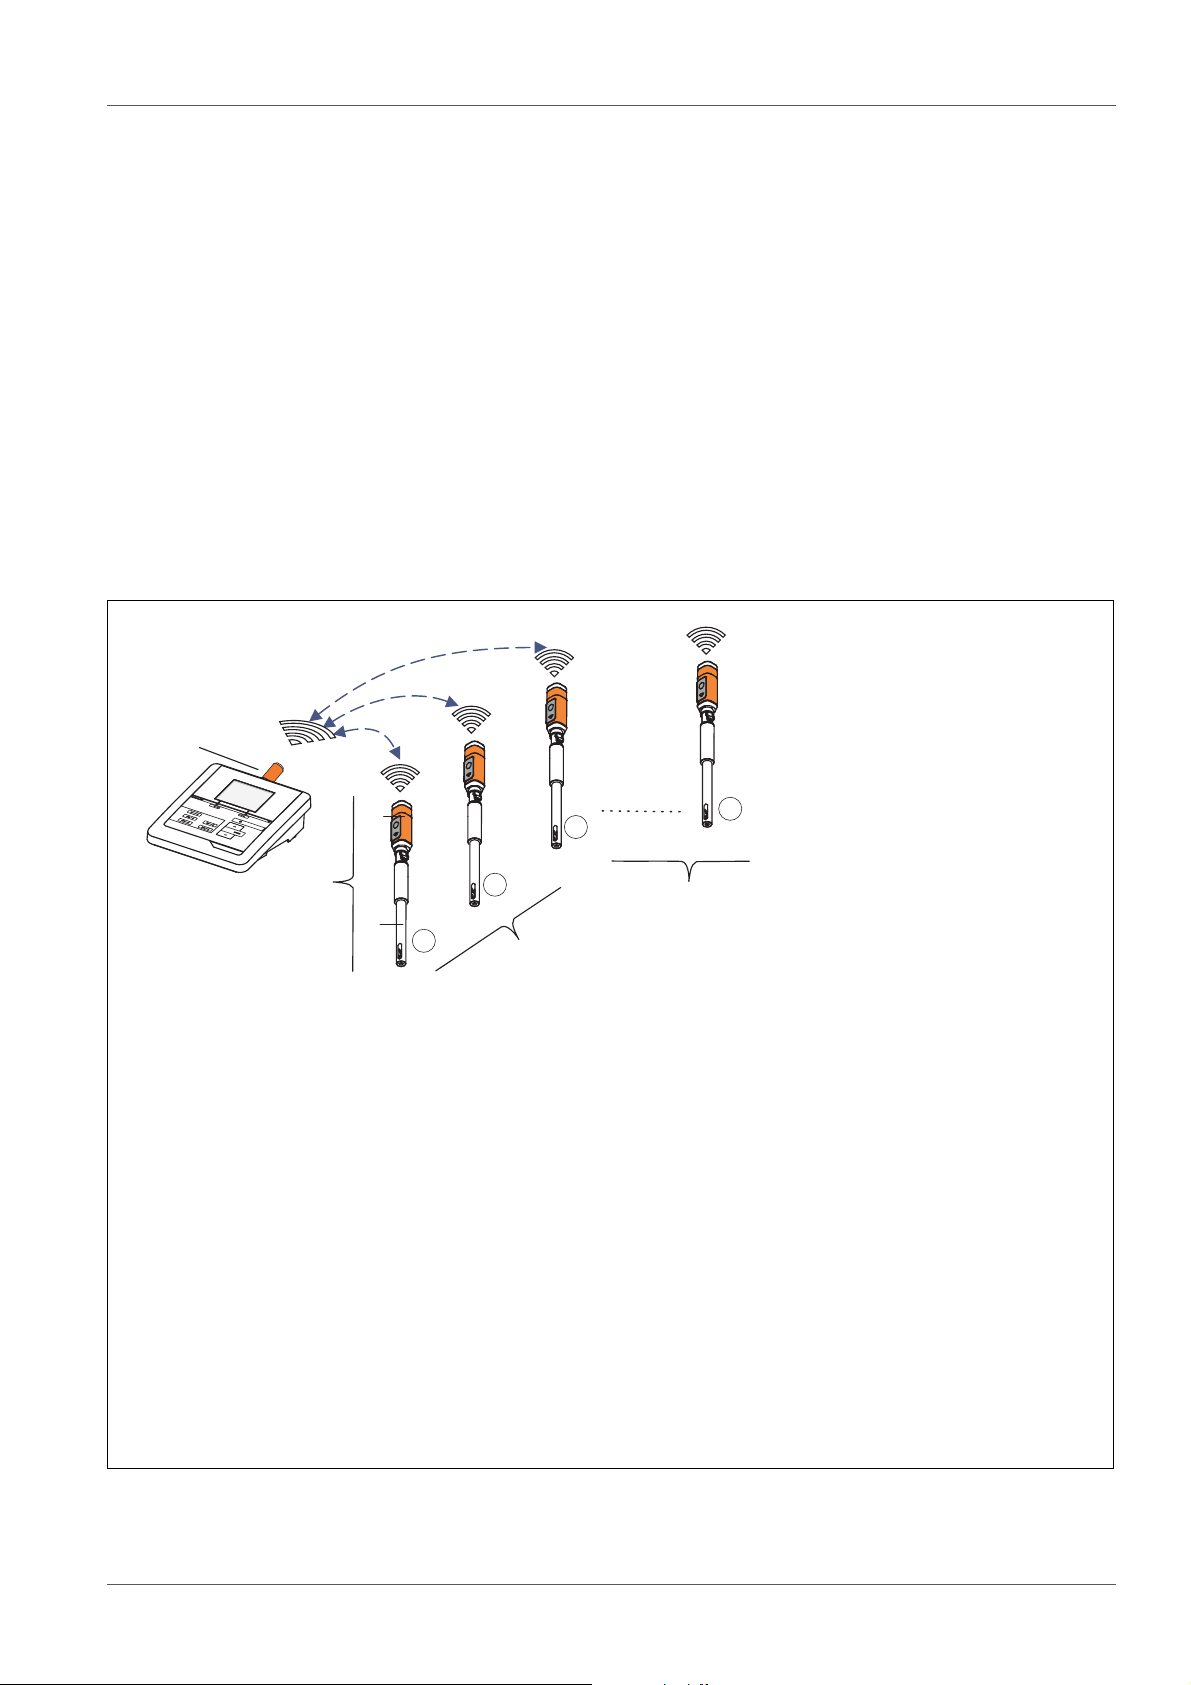
1 General information
The IDS WA System is an accessory for IDS measuring systems enabling a wireless connection between any IDS sensor with plug head connector (variant W) and
your IDS meter.
Two adapters, one at the IDS meter (IDS WA-M) and one at the sensor (IDS WAS), replace the sensor cable with an energy-saving Bluetooth LE radio connection.
The sensor is supplied with power by a rechargeable battery in the IDS WA-S
adapter. The battery is charged with the charging device included in the IDS WA
System (IDS WA-S Charger).
To upgrade the IDS WA System, equip further IDS sensors with the IDS WA-S
adapter, which is available as an accessory.
1 IDS WA-M adapter (on the meter)
With an IDS WA-M adapter connected, the IDS meter registers up to 6
wireless sensors within a radius of up to 10 meters. The administering of
the sensors is done in the Sensors menu.
2 Wireless sensor
Unit of IDS WA-S adapter (3) and IDS sensor (4)
3 IDS WA-S adapter (connected to the sensor)
4 IDS sensor with plug head connector (variant W)
5 Sensors registered and selected for the measured value display (max. 3,
corresponding to the number of sensor connections / channels on the
meter).
6 Sensors registered but not selected for the measured value display.
ba76199e03 08/2018 5

Safety IDS WA System
2 Safety
2.1 Safety information
2.1.1 Safety information in the operating manual
This operating manual provides important information on the safe operation of the
system. Read this operating manual thoroughly and make yourself familiar with the
system before putting it into operation or working with it. The operating manual
must be kept in the vicinity of the system so you can always find the information
you need.
2.1.2 Further documents providing safety information
The following documents provide additional information, which you should observe
for your safety when working with the measuring system:
• Operating manuals of meters, sensors and other accessories
• Safety datasheets of calibration or maintenance accessories (such as buffer
solutions, electrolyte solutions, etc.)
2.2 Safe operation
2.2.1 Authorized use
The authorized use of the IDS WA System is exclusively the running of a wireless
connection beween IDS sensors with IDS meters.
Only the operation and running of the analyzer according to the instructions and
technical specifications given in this operating manual is authorized (see section 9
ECHNICAL DATA).
T
Any other use is considered unauthorized.
2.2.2 Requirements for safe operation
Note the following points for safe operation:
• The IDS WA System may only be operated according to the authorized use
specified above.
• The IDS WA System may only be supplied with power by the energy sources
mentioned in this operating manual.
• The IDS WA System may only be operated under the environmental conditions
6 ba76199e03 08/2018

IDS WA System Commissioning
mentioned in this operating manual.
• The individual components of the IDS WA System must not be opened.
3 Commissioning
3.1 Scope of delivery
Depending on the order number, the scope of delivery consists of the whole IDS
WA Kit, or one individual item out of the IDS WA Kit.
•IDS WA Kit
– IDS WA-M adapter for the meter
– IDS WA-S adapter for the sensor
– IDS WA-S Charger to charge the battery in the IDS WA-S adapter
– USB cable to connect the IDS WA-S Charger to a USB socket
– Power pack with USB connection and country-specific line adapters
• Operating manual
3.2 System requirements
• IDS sensor with plug head connector (variant W)
Available sensors, see Internet
• WA capable meter
– MultiLab 4010(P)-1W IDS, MultiLab 4010(P)-1 IDS (from software version
V2.00)
– MultiLab 4010-2W IDS, MultiLab 4010-3W IDS
The meters with older software listed here can be retrofitted with the
function for the administration of wireless sensors via a software update
(see operating manual of your meter).
ba76199e03 08/2018 7
Commissioning IDS WA System
1
2
4
5
3
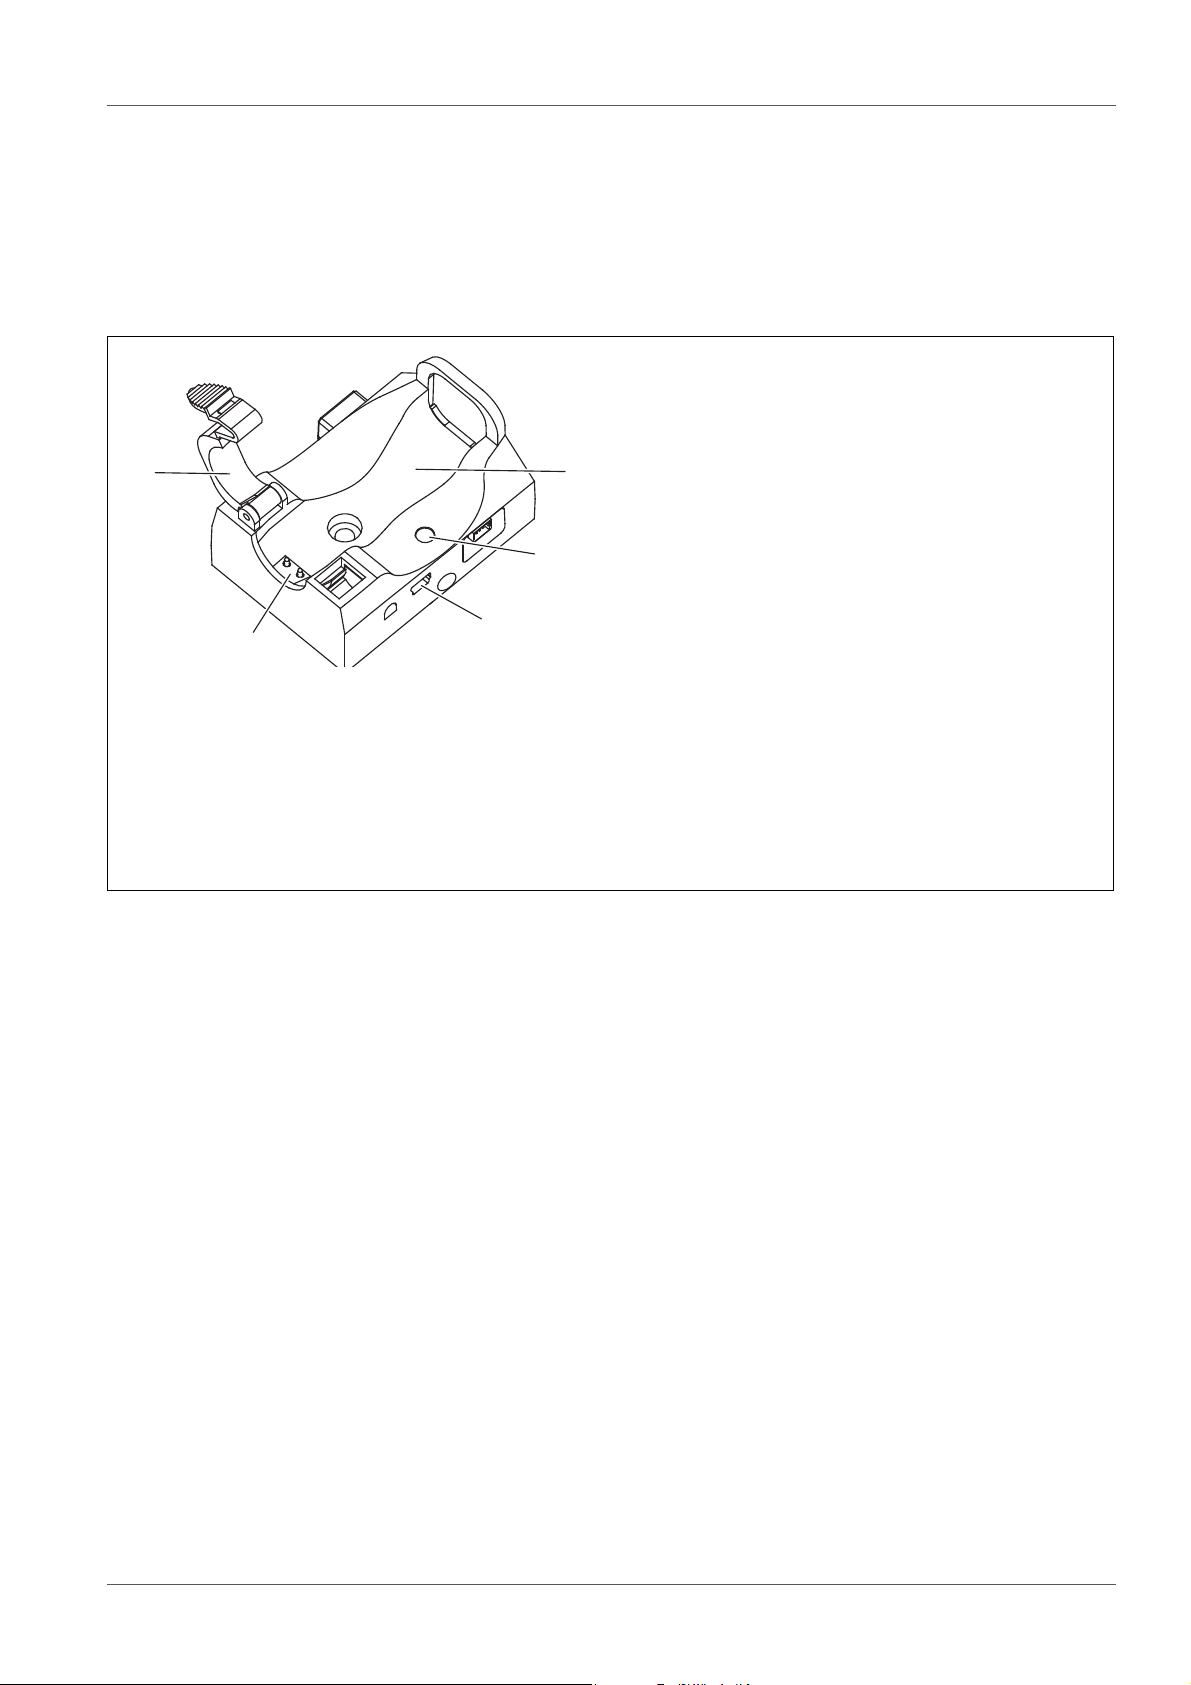
3.3 Charging the battery with the IDS WA-S Charger
The wireless transmission of sensor data from sensor to meter is only possible if
the battery in the IDS WA-S adapter is charged.
Charge the battery with the IDS WA-S Charger.
1 Charging slot for the IDS WA-S adapter
2 LED indicating the operating condition of the IDS WA-S Charger
3 USB-B connection for the power supply of the IDS WA-S Charger
4 Charging contacts for the IDS WA-S adapter
5 Retaining clip for the IDS WA-S adapter
The IDS WA-S Charger is used both to charge and store the IDS WA-S adapters
(e.g. overnight). The sensors may remain plugged to the IDS WA-S adapters while
being charged.
3.3.1 Power supply of the IDS WA-S Charger
1. Plug the USB plug of the USB cable supplied into the USB connector (3) of the
IDS WA-S Charger.
2. Plug the other USB plug of the cable to the USB connector of the power pack
or to the USB connector (USB 3.0 or higher) of a PC.
The status LED of the IDS WA-S Charger lights up green. The IDS WA-S
Charger is ready for operation.
8 ba76199e03 08/2018
IDS WA System Commissioning
A USB 2.x connector on the PC supplies up to 200 mA.
A USB 3.x connector on the PC supplies up to 900 mA.
If several USB devices are connected to a PC or a USB hub without extra
power supply, the available current is distributed to several connections.
One device consuming a lot of power may cause other devices to receive
not enough power so that they cannot be operated.
• Operate the IDS WA-S Charger on the USB 3.0 or higher interfaces of
your PC.
• Operate only one IDS WA-S Charger per PC to avoid possible conflicts
with other USB devices about power resources.
3.3.2 Charging the IDS WA-S battery
1. Open the retaining clip (5) on the IDS WA-S Charger.
2. Insert the IDS WA-S adapter in the IDS WA-S Charger. The charging contacts
of the adapter have to be positioned on the charging contacts (4) of the IDS
WA-S Charger. The function keys of the adapter point upwards.
3. Close the retaining clip (5) of the IDS WA-S Charger until it clicks into place.
The status LED (2) of the IDS WA-S Charger lights up red. The battery is being
charged.
3.3.3 Status LED of the IDS WA-S Charger
Color Status Meaning
GREEN Illumi-
nated
with IDS WA-S adapter:
The battery is fully charged. The charging current is
switched off.
without IDS WA-S adapter:
The IDS WA-S Charger is ready for operation.
RED Illumi-
The battery is being charged.
nated
GREEN/
Flashes Charging error (see section 7 W
HAT TO DO IF ...)
RED
Off - The IDS WA-S Charger is not supplied with enough power
ba76199e03 08/2018 9

Commissioning IDS WA System
IDS WA-M
1
2
3.4 Connecting the IDS WA-M adapter to a meter
For a working wireless connection the IDS WA-M adapter has to be connected to
an IDS meter.
1. Turn the IDS WA-M adapter so that the notch on the plug of the IDS WA-S
adapter is aligned to the guidance of the socket.
2. Plug the IDS WA-M adapter into an IDS sensor socket of the meter.
3.5 Connecting the IDS WA-S adapter to an IDS sensor
For a working wireless connection the IDS WA-S adapter has to be connected to
an IDS sensor with plug head connector (variant W).
1 Guidance
2Notch
10 ba76199e03 08/2018

IDS WA System Commissioning
Make sure that the plug connection is completely dry and clean.
1. Open the locking device on the plug head sensor.
2. Align the guidance (1) of the IDS WA-S adapter to the notch (2) in the plug of
the plug head sensor and insert the IDS WA-S adapter into the unlocked plug
of the plug head sensor until is clicks into place.
3. Close the locking device on the plug head sensor.
3.5.1 Removing the IDS WA-S adapter from the plug head of the IDS sensor
Make sure that the plug connection is completely dry and clean. If
necessary, clean the plug connection prior to opening.
1. Open the locking device on the plug head sensor.
2. Press together the clips of the IDS WA-S adapter with your thumb and forefinger and pull the IDS WA-S adapter out of the plug.
3.6 Establishing a wireless connection
3.6.1 The Sensors menu
You can administer the sensors for your IDS meter in the Sensors menu.
ba76199e03 08/2018 11

Commissioning IDS WA System
1
2
4
5
6
3
1 4110W 16010001
LE
D
2 4310W 15080123
---
3 4320W 15120056
---
4* FDO 4410W 15090246
---
[i] BAT 86 % SIGNAL -75 dBm
Sensors
Prerequisites for the wireless operation of sensors:
• The IDS meter can administer wireless sensors
(see section 3.2 S
YSTEM REQUIREMENTS)
• The IDS WA-M adapter is connected to the meter
• An IDS WA-S adapter is connected to an IDS sensor
• The battery in the IDS WA-S- adapter is charged
• The radio link is less than 10 m
• The radio link is free of visible obstacles
The list includes wireless sensors in the reception area and sensors that are connected to the meter.
The maximum number of sensors (with or without cable) that can be connected to
the meter corresponds to the number of IDS channels of the meter.
1 Sensor name, series number (max. 8 sensors)
2 Setting of the connection to the meter (
Open the connection setting for the sensor with
The IDS WA-S adapter of the selected sensor briefly lights up red.
3 * (asterisk): The sensor is already connected to another meter. If the
sensor is connected to another meter, the
blocked for the sensor there. For information, the status indicator [RO] is
displayed in the measured value display.
4[
i
] BAT xx %: Current charging condition of the battery in the IDS WA-S
12 ba76199e03 08/2018
adapter
5[
i
] SIGNAL xx dBm: Current signal strength
6
<F2>/[ ] or <F4>/[ ]: Update the list of sensors
---/
LED/)
<ENTER>.
<ENTER> and <CAL> keys are

IDS WA System Commissioning
3.6.2 Establishing a wireless connection
1. Open the Sensors / menu.
automatically (on switching on the meter)
manually (in the measured value display)
– with the softkey
– with the softkey
2. Select a sensor with
3. Open the connection setting for the sensor with
<F1__>/[Info]
<F2>/[ ] (MultiLab 4010-3(-2))
<><> .
<ENTER>.
The IDS WA-S adapter of the selected sensor briefly lights up red.
4. Select the connection setting for the sensor with
<ENTER>.
--- Sensor not connected.
LED Sensor connected
<><> and confirm with
(LED flashes during data exchange)
Sensor connected
(LED does not flash during data exchange)
5. Use
<M> to quit the Sensors menu.
The settings are accepted.
The measured value of the sensor is displayed.
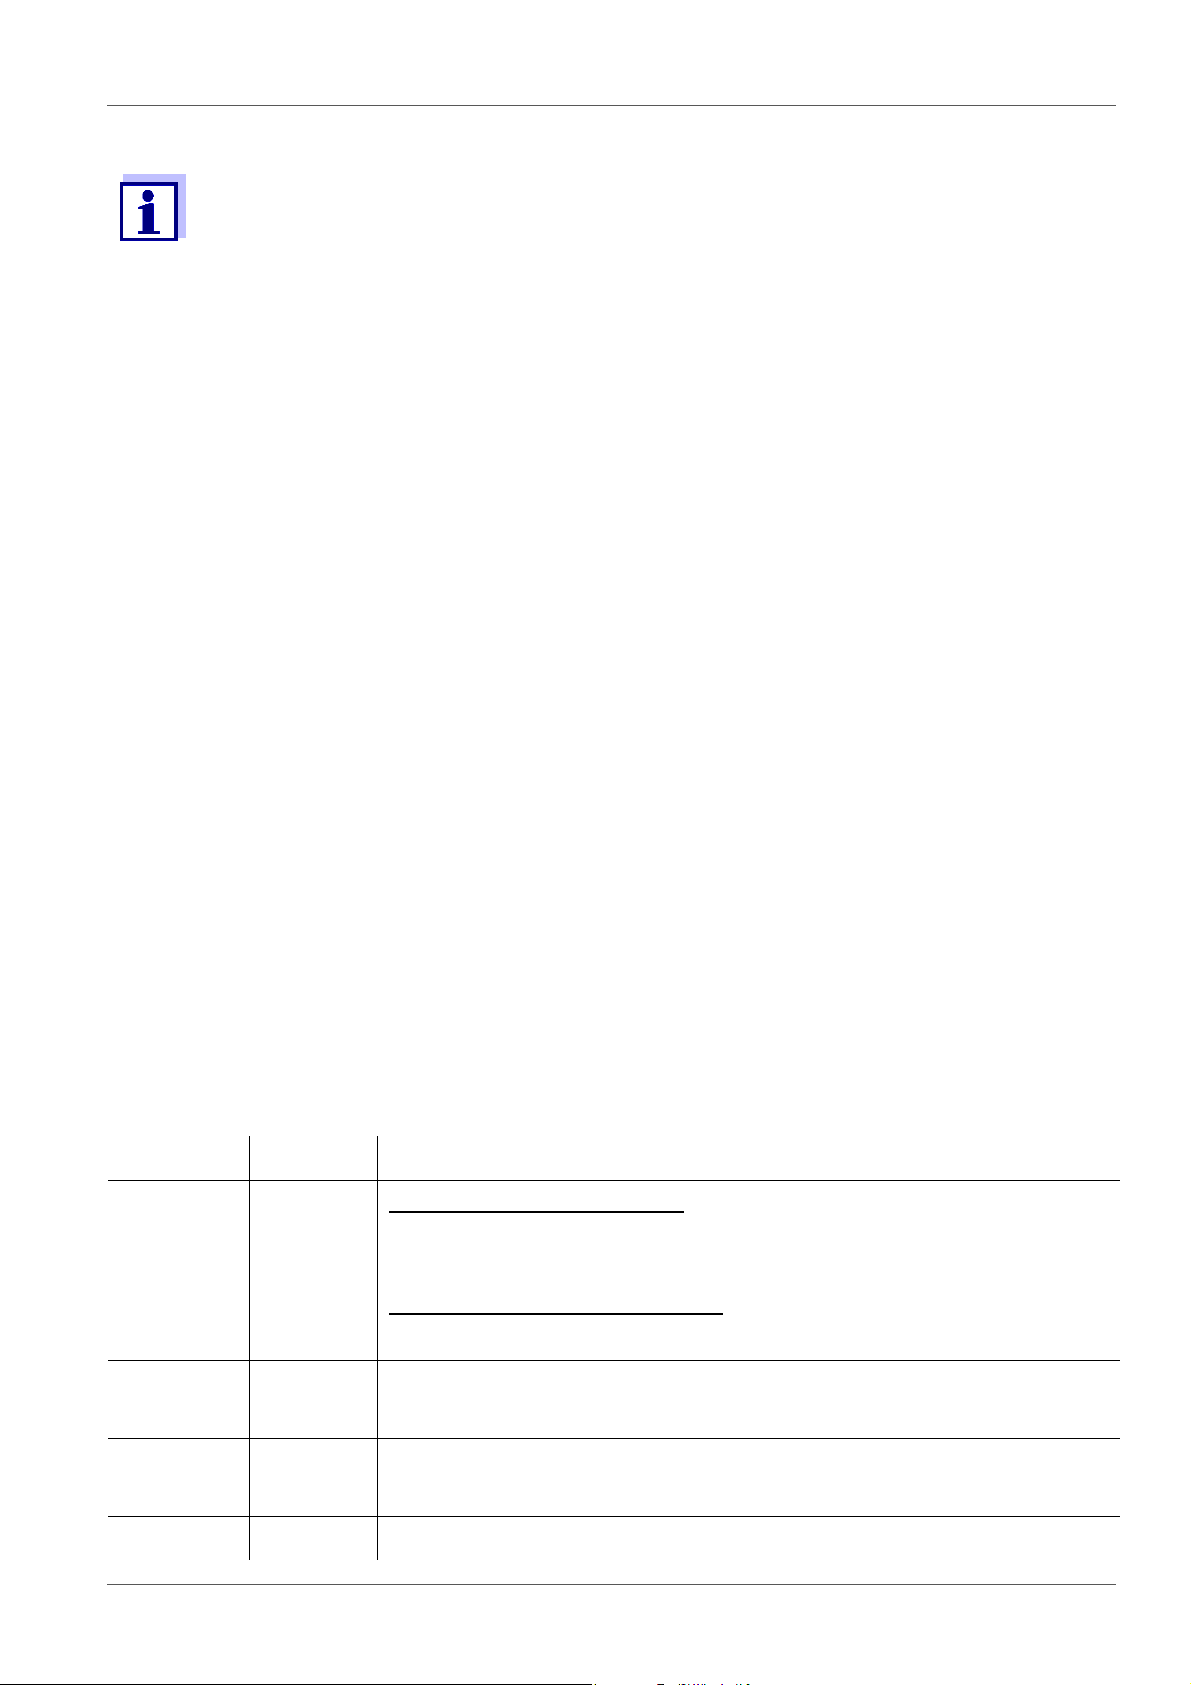
3.7 Combining several IDS WA-S Charger modules
To be able to charge several IDS WA-S adapters via one USB connection at the
same time, you can combine up to 5 IDS WA-S Charger modules to form one
charging station.
ba76199e03 08/2018 13

Commissioning IDS WA System
1
2
3
2
4
5
1
2
5
1 Socket for the power supply of a further IDS WA-S Charger module via
the plug (5) of the other module
2 Channel for the connection rod to bolt together the combined IDS WA-S
Charger modules
3 Pin receptacle for the mechanical positioning of a further IDS WA-S
Charger module with the pin (4) of the other module
4 Pin for the mechanical positioning of a further IDS WA-S Charger module
with the socket (3) of the other module
5 Plug for the power supply of a further IDS WA-S Charger module via the
socket (1) of the other module
1. Plug together up to 5 IDS WA-S Charger modules with the aid of the pin receptacle (3) and pin (4).
14 ba76199e03 08/2018

IDS WA System Commissioning
1
2
5
The number of IDS WA-S Charger modules is limited by the strength of
current available at the USB connection.
Each IDS WA-S Charger module requires a charging current of max. 180
mA.
Example: To be able to use 5 IDS WA-S Charger modules at one USB
connection, the USB connection must provide a current of at least 900 mA
(= 5 x 180 mA).
2. Bolt together up to 5 connection rods (corresponding to the number of IDS WAS Charger modules).
3. Tighten the cap nut with washer on the end of the connection rod with external
thread.
4. Plug the combined connection rod through the channel (2) up to the stop (at
the cap nut).
5. Tighten a bolt (M3x6) with washer onto the end with the open inside thread of
the connection rod.
Tighten the bolt until the combined IDS WA-S Charger modules form a permanent unit.
6. Always operate the combined IDS WA-S Charger modules connected to a
power pack with USB connection.
7. Connect the power pack with USB connection to the socket (1).
3.8 Mounting an IDS WA-S Charger module to a wall
To store the IDS WA-S Charger and IDS WA-S adapter in a way that saves space
and keeps them always ready for use, the IDS WA-S Charger is prepared to be
ba76199e03 08/2018 15

Operation and measurement IDS WA System
2
1
mounted to a wall.
You can fix the IDS WA-S Charger to a wall in the following ways:
1 Receptacle for hook
Put the IDS WA-S Charger on a hook through the receptacle on the
underside.
2 Bore hole for screwing the module to the wall:
Fix a screw (M5 with head diameter 8 mm) to the wall through the bore
hole.
The head of the screw must not protrude from the bore hole so the
charging contacts of the IDS WA-S adapter and IDS WA-S Charger are
not impeded.
4 Operation and measurement
4.1 Operation
Once the wireless connection is established the measured value of the sensor is
displayed on the meter. Establishing the connection for the first time may take
several seconds.
16 ba76199e03 08/2018

IDS WA System Operation and measurement
HOLD AR
AutoCal TEC
1
Info
03.04.2013
08:00
USB output
YSI
1
1 Charging condition of the battery in the IDS WA-S adapter
4.2 Saving the measured value
4.2.1 Functions of the IDS WA-S adapter
The IDS WA-S adapter on the sensor has a function key with which simple
functions can be executed on the sensor.
1 Function key of the IDS WA-S adapter
Function key Function
Short pressure
(< 1 second)
Long pressure
(> 1 second)
The current measured value is stored and output to an interface
of the connected meter.
A measurement with AutoRead is started.
When the measured value is stable the measured value is automatically stored and transferred to an interface of the meter that
is connected (see operating manual of your meter).
ba76199e03 08/2018 17

Storing the IDS WA-S adapter IDS WA System
4.3 Status LEDs of the IDS WA-S adapter
The IDS WA-S adapter on the sensor indicates its operating condition with colored
LEDs.
This indicating can be switched off in the Sensors menu.
Color Status Meaning
GREEN Flashes Data are exchanged between the sensor and meter.
The LED flashes during each data exchange.
You can switch off the flashing by selecting the connection
status
in the Sensors menu.
RED Flashes
once
BLUE Flashes
once
The sensor is identified.
The function is started for the selected sensor in the Sensors
menu with
<ENTER>.
The measured value was stored in the meter with the function
key of the IDS WA-S adapter and transferred to an interface.
BLUE Flashes A measurement with AutoRead was started with the function
key of the IDS WA-S adapter.
Off - No data exchange, no connection
5 Storing the IDS WA-S adapter
For storing, put the IDS WA-S adapter with the sensor connected into a IDS WA-S
Charger ready for operation.
The battery of the IDS WA-S adapter is automatically recharged when the charge
becomes less. Thus the wireless sensor is ready for operation at any time.
The IDS WA-S Charger ready for operation can also be used for storing the
wireless sensor for longer periods of time.
To store the wireless sensor outside the charging station for longer
periods of time, we recommend you store the IDS WA-S adapter and
sensor separately.
18 ba76199e03 08/2018

IDS WA System Maintenance, cleaning, disposal
6 Maintenance, cleaning, disposal
6.1 Maintenance
The only maintenance activity required is the charging of the batteries at regular
intervals.
6.2 Cleaning
Occasionally wipe the WA adapter with a damp, lint-free cloth. If necessary,
disinfect with Isopropanol.
NOTE
The housing is made of synthetic material. Thus, avoid contact with acetone or
similar detergents that contain solvents. Remove any splashes immediately.
6.3 Disposal
All components of the IDS WA System contain electronics.
At the end of their operational lifetime, the components of the IDS WA System must
be returned to the disposal or return system statutory in your country. If you have
any questions, please contact your supplier.
7 What to do if ...
7.1 No connection between the sensor and meter
Cause Remedy
– Battery of the IDS WA-
S adapter
– Charge the battery
– Battery defective.
Please contact the service department.
ba76199e03 08/2018 19

What to do if ... IDS WA System
Cause Remedy
– IDS WA-S adapter
or
IDS WA-M adapter
not identified
– Strong damping of the
radio signal
– Disconnect and reconnect the IDS WA-S adapter to
the sensor.
– Carry out a reset of the IDS WA-S adapter con-
nected to the sensor: Press the function key of the
adapter for more than 8 seconds
– Carry out a reset of the IDS WA-M adapter con-
nected to the meter: Disconnect and reconnect the
adapter to the meter.
– Carry out a reset of the meter (see operating man-
ual of your meter)
– Remove any obstacles in the radio link (e.g. doors,
panes etc.)
– Run the meter and sensor at a smaller distance
– Check the signal strength (in the menu Sensors
<F1__>
7.2 Display of when a sensor is connected
Cause Remedy
– The maximum number
of sensors or adapters
– Disconnect the IDS sensor
– Disconnect the IDS WA-M adapter
is exceeded
7.3 The battery of the IDS WA-S adapter cannot be charged
Cause Remedy
– Insufficient contact of the
IDS WA-S adapter in the
charging station
– Battery exhaustively dis-
charged
– Clean the contacts
– Fix the adapter with the retaining clip
– Carry out a reset of the IDS WA-S adapter in the
charging station (IDS WA-S Charger):
Press the function key of the adapter for at least 8
seconds
20 ba76199e03 08/2018

IDS WA System Replacement parts and accessories
7.4 Status LED of the IDS WA-S Charger flashing red/green
Cause Remedy
– Charging error (e.g. bat-
tery is exhaustively discharged)
– Remove the IDS WA-S adapter from the charging
station
– Insert the IDS WA-S adapter in the charging sta-
tion again
– Disconnect and then reconnect the charging cable
8 Replacement parts and accessories
Description Model Order no.
Adapter for IDS sensors IDS WA-S 108141y
Adapter for IDS meters IDS WA-M 108142y
Charging station for IDS WA-S adapter IDS WA-S Charger 108143y
Set for the wireless connection of IDS sen-
sors with IDS meter
IDS WA Kit 108144y
Power pack with USB interface NT USB Universal 902872y
9 Technical data
9.1 General features
Radio technology Bluetooth LE Bluetooth 4.0 Class 3 (0 dBm)
Contains transmitter modules
FCC ID: QOQBLE113
IC: 5123A-B6TBLE113
ba76199e03 08/2018 21

Technical data IDS WA System
At the moment, there exist licenses of the BlueTooth LE radio module in
use for Europe, USA, Canada, and other countries (list available from YSI
on request.)
Most important licenses: CE, FCC. All countries following these directives
can use this product without hesitation. Otherwise, further local licenses
may be necessary. On request, YSI can make available excerpts from the
datasheet of the supplier of the BlueTooth LE radio module.
Guidelines
EMC EC directive 2014/30/EC
and norms used
Radio data transmission
Meter safety EC directive 2014/35/EC
IP protection class EN 60529
9.2 Adapter IDS WA-M
EN 61000-6-3
EN 61000-3-2
EN 61000-3-3
EN 61000-6-1
FCC Class A
RED directive 2014/53/EU
EN 300 328
EN 301489-1
EN 301489-17
EN 60950
Dimensions Approx. 15 x 18 x 40 mm
Weight approx. 7 g
Mechanical
structure
Type of
protection
IP 43
Test certificates CE, FCC
Ambient conditions
Storage -25 °C ... +65 °C
Operation +5 °C ... +55 °C
Admissible rela-
tive humidity
Yearly mean: < 75 %
30 days/year: 95 %
Other days: 85 %
22 ba76199e03 08/2018

IDS WA System Technical data
Power supply Via the sensor connection socket of the meter
9.3 Adapter IDS WA-S
Dimensions Approx. 83 x 20 x 20 mm
Weight approx. 25 g
Mechanical
structure
Type of
protection
Test certificates CE, FCC
Ambient conditions
Storage -25 °C ... +65 °C
Operation +5 °C ... +55 °C
Admissible rela-
tive humidity
Power supply Rechargeable
battery
Operational life The battery life depends on the power
IP 66
Yearly mean: < 75 %
30 days/year: 95 %
Other days: 85 %
Lithium polymer battery 3.7 V, 240
mAh
requirement of the sensors connected
IDS sensor Battery life
(h)
pH/ORP Approx.
60 h
Conductivity Approx.
30 h
Dissolved oxygen Approx. 9 h
ba76199e03 08/2018 23

Technical data IDS WA System
9.4 IDS WA-S Charger
Dimensions Approx. 70 x 55 x 40 mm
Weight approx. 50 g
Mechanical
structure
Type of
protection
IP 43
Test certificates CE, FCC
Ambient conditions
Storage -25 °C ... +65 °C
Operation +5 °C ... +55 °C
Admissible rela-
tive humidity
Yearly mean: < 75 %
30 days/year: 95 %
Other days: 85 %
Power supply USB connection and plug connections on the IDS WA-
S Charger
The IDS WA-S Charger requires a current of 180 mA to
charge the battery of the IDS WA-S adapter
USB 3.x connections of the PC meet this criterion
Power pack with
USB connection
Helms-Man, PMB0501200P
Input: 100 ... 240 V ~ / 50 ... 60 Hz / 300 mA
Output: 5 V = / 1200 mA
Primary plugs contained in the scope of delivery:
Euro, US, UK and Australian.
Charging time Approx. 1.5 hours
24 ba76199e03 08/2018


IDS WA System Contact Information
Contact Information
Ordering & Technical Support
Telephone
Fax
: (937) 767-1058
Email
Mail: YSI Incorporated
Internet
When placing an order please have the following information available:
- YSI account number (if available)
- Model number or brief description
- Quantity
- Name and Phone Number
- Billing and shipping address
- Purchase Order or Credit Card
: (800) 897-4151
(937) 767-7241
Monday through Friday, 8:00 AM to 5:00 PM ET
: info@ysi.com
1725 Brannum Lane
Yellow Springs, OH 45387
USA
: www.ysi.com
ba76199d03 08/2018
Service Information
YSI has authorized service centers throughout the United States and
Internationally. For the nearest service center information, please visit
www.ysi.com
directly at 800-897-4151.
When returning a product for service, include the Product Return form
with cleaning certification. The form must be completely filled out for an
YSI Service Center to accept the instrument for service. The Product
Return form may be downloaded at www.ysi.com
‘Support‘ tab.
and click ‘Support’ or contact YSI Technical Support
and clicking on the
27

1) The tissue in plants that brings water upward from the roots;
2) a leading global water technology company.
We're 12,500 people unified in a common purpose: creating innovative solutions
to meet our world's water needs. Developing new technologies that will improve
the way water is used, conserved, and re-used in the future is central to our work.
We move, treat, analyze, and return water to the environment, and we help people
use water efficiently, in their homes, buildings, factories and farms. In more than
150 countries, we have strong, long-standing relationships with customers who
know us for our powerful combination of leading product brands and applications
expertise, backed by a legacy of innovation.
For more information on how Xylem can help you, go to www.xyleminc.com
Xylem |' m|zīlə
YSI
1725 Brannum Lane
Yellow Springs, OH 45387
Tel: +1 937-767-7241; 800-765-4974
Fax: +1 937-767-1058
Email: info@ysi.com
Web: www.ysi.com
©Xylem Inc
 Loading...