

Page 1
OPERATOR’S MANUAL
DZ160
6 25
58
HighSpeedNeedleValve
Regulator
113
134
FEATURES
The DZ160 was developed for serious aerobatics competition and
large IMAC style aircraft. It differs from previous YS Engines in that it
does not use a high pressure fuel system but rather a true fuel pump.
*Crankcase supercharging system unique to YS 4 stroke engines
*Fuel injected
*Convenient fuel pump adjustment
*High horsepower output with long service life
GLOW PLUG
Select the most appropriate glow plug from those designed
specifically for 4 cycle engines. Glow plug selection greatly affects the
maximum engine output and low idle. If RPM's decrease or stop when
the booster cord is removed, replace the plug. We recommend the
YS#4 plug for maximum performance. These are available from
YS Parts & Service or your favorite dealer.
INSTALLATION
WE RECOMMEND THAT THIS ENGINE BE MOUNTED ON A
SHOCK ABSORBING SOFT MOUNT
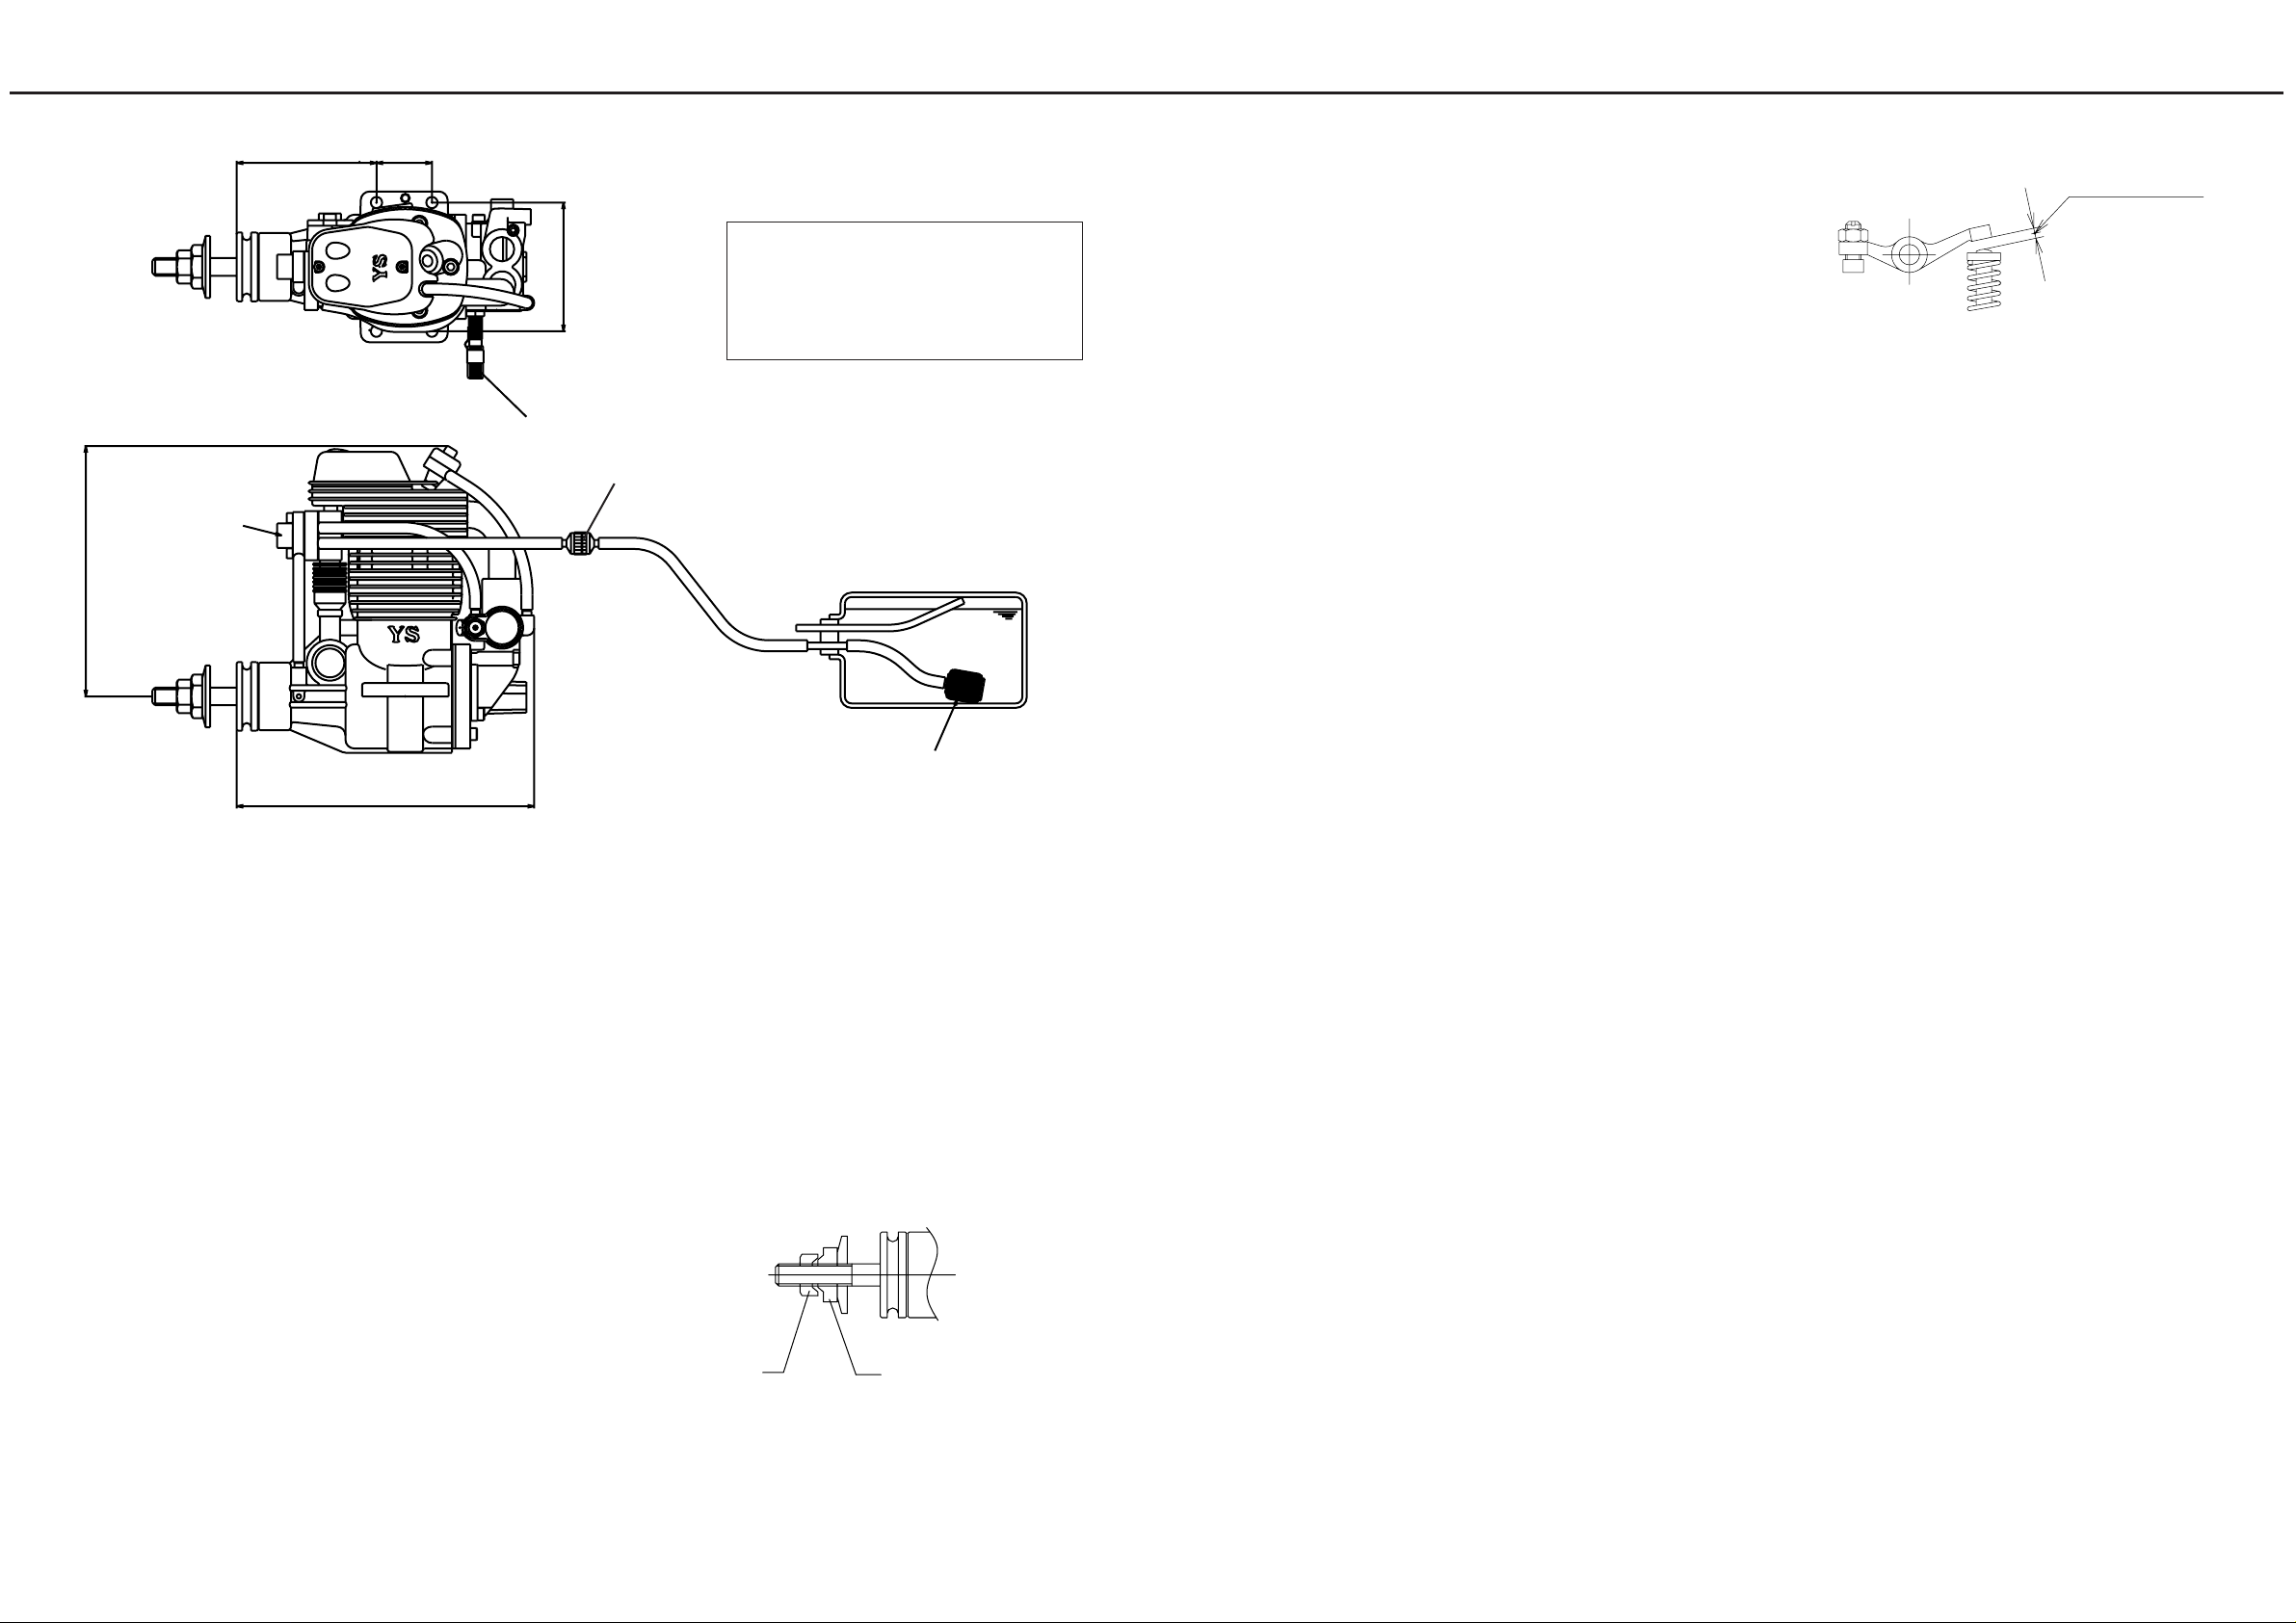
1 Connect the engine to the tank as shown in fig.1. The recom
mended fuel tank size is 18 to 24 oz. A standard
clunk type fuel tank may be used. If this type of tank is used, you
must use the special clunk supplied with the engine. Please note
that with this clunk,all of the fuel cannot be used from the tank.
As soon as any part of the clunk becomes exposed, the engine
will stop due to air entering the fuel pump.
2 Always use a fuel filter. We recommend YS filter ( 6720 ).
With this filter, you must remove the cloth portion of the filter and
leave both the metal filter screens in place.
Bore 34mm
Stroke 29.0mm
Displacement 26.33cc
Weight 930g
Practical rpm 2,000 -11,000rpm
FuelFilter
SPECIFICATIONS
FuelTankClunk
fig.1
PROPELLER INSTALLATION
Due to the high output power of the DZ160 engine, it is supplied with
a double locknut system for added safety. If you use any other type
of spinner or prop nut device, make sure it is of the double nut type.
1 Mount the propeller and tighten the rear nut. Next, tighten the
front nut as shown in fig.2. The rear nut has an offset shoulder so
the front nut will secure itself to the rear nut.
2 Select a good quality propeller that will allow the engine to
run at maximum speed between 7,800 to 9,000 rpm range.
We recommend sizes 16x13 to 17x12. Other prop sizes may be
used as long as the correct rpm range.
Front Nut
Rear Nut
fig.2
START UP
1 Always break the fuel line between the fuel filter and the tank for
filling.This will help to prevent dirt from entering the fuel pump. T o
prevent flooding the engine, clamp the fuel line with a hemostat
or clip where it enters the fuel pump.
2 Open the high speed needle 2 turns from the closed position.
The engine should run very rich with the recommended fuel and
glow plug. We recommend YS 20/20 fuel ( 20% nitro / 20% oil )
which is available from several manufacturers.
An electric starter is mandatory for starting this engine.
3
Attempting to hand start this engine is difficult and dangerous.
4 Close the throttle to the idle position and connect the glow driver.
The engine is now ready for starting.
DO NOT ATTEMPT TO START ENGINE AT FULL THROTTLE AS
THIS IS VERY DANGEROUS. ALWA YS USE EXTREME CAUTION
WHEN ENGINE IS RUNNING.
BREAK-IN
To maximize engine performance and increase durability , please follow
this break-in procedure.
1 Use the same size ( or slightly smaller ) propeller than you intend
to use in flying.
2 Use a good quality fuel containing 15% to 30% nitro, and oil content
of 20% to 24%. Synthetic oil only. If you use caster oil, no more
than 2% is recommended.
DO NOT USE FOUR CYCLE FUEL DUE TO LOW OIL CONTENT.
3 After the engine has started, slowly bring the throttle up to full.
Set high speed needle so it is running at a good rich setting without
the glow driver.
4 After the initial 20 minute break-in, mount the engine in the aircraft
and set the high speed to a richer than normal setting for the first
10 flights. This will help to lubricate all moving parts.
HIGH SPEED NEEDLE ADJUSTMENT
1
Adjustment of the high speed is done by the carburetor needle
valve.When the needle valve is turned clockwise, the mixture is
leaner. When it is turned counter-clockwise, the mixture is richer .
A good starting position for the high speed needle valve is 2 turns
open from the fully closed position. At this setting the engine
will be very rich and may die when you remove the glow driver.
If this happens, turn the needle valve in 1/2 turn and try again.
The final running setting for the high speed needle will be
approximately 1 to 1-1/2 turns open from fully closed.
2 When the engine is started, open the throttle gradually. Next,
find the peak position ( highest RPM ) by adjusting the needle
valve. Then the needle valve should be opened approximately
1/8 _ 1/4 turns from full RPM to achieve best performance.
REGULA TOR ADJUSTING
DO NOT ATTEMPT TO ADJUST THE REGULA T OR SCREW WITH
THE ENGINE RUNNING. STOP THE ENGINE BEFORE ADJUSTING
THIS SCREW
The low speed adjustment is the regulator screw on the front of the
engine. Turning the screw clockwise will richen the idle mixture, and
counter-clockwise will lean the idle mixture. It is preset at the factory
but may require further adjustment depending on fuel and conditions
in your areas.
1Wait until the engine is up to operating temperature before
adjusting the idle mixture
2Close the throttle gradually to an idle ( approximately 2,200 rpm ).
Let it idle for 15 -20 seconds and then slowly advance the hrottle.
The adjustment is correct when low to high speed has a smooth
transition.
3 If the engine is running rough at idle or too rich, turn the regulator
adjustment counter-clockwise to lean out the low end.
4 If the engine speeds up at idle, the low speed mixture is too lean. Turn the
low speed regulator adjustment clockwise to richen the mixture.
Tappet Clearance
fig.3
TAPPET ADJUSTMENT
Tappet clearance is preset at the factory . Adjustment, if you needed,
should be checked after the initial break-in. For maximum performance,
valves should be checked as normal maintenance.
1 Clearance adjustment should be done when the engine is cool.
2 The proper clearance should be set at not more than 0.002" maximum.
The adjustment is achieved by loosening the lock nut ( fig.3 ) and
turning the adjustment screw. The engine must be at top dead
center on the compression stroke before any adjustments are
made. This engine runs best with the valves set at a tight setting.
If the valves are set too loose ,power will be affected.
CAM GEAR TIMING
If for some reason you have to disassemble your engine, please
follow these important steps on reassembling the cam gear.
1Remove the carburetor and backplate assembly. Notice the
impression mark or dot opposite the rod journal on the crankshaft.
This mark is to point straight down or lined up with the outer case
seam line at the bottom
2 Reinstall the cam with the dot facing you and pointing slightly to
the left. This will allow the cam to turn to the right when properly
installed. The dot should be pointing straight up when cam is fully
installed. Reinstall cam cover and timing is now set.
FUEL PUMP
I
f you must disassemble the fuel pump to change the diaphragm or to
clean, take care that the valves and springs are replaced in exactly the
same manner in which they were removed. Do not disassemble the
pump needlessly. Use care with filtering your fuel and keeping the
entire fuel system in good working order. It will help to prevent fuel
pump problems.
Page 2
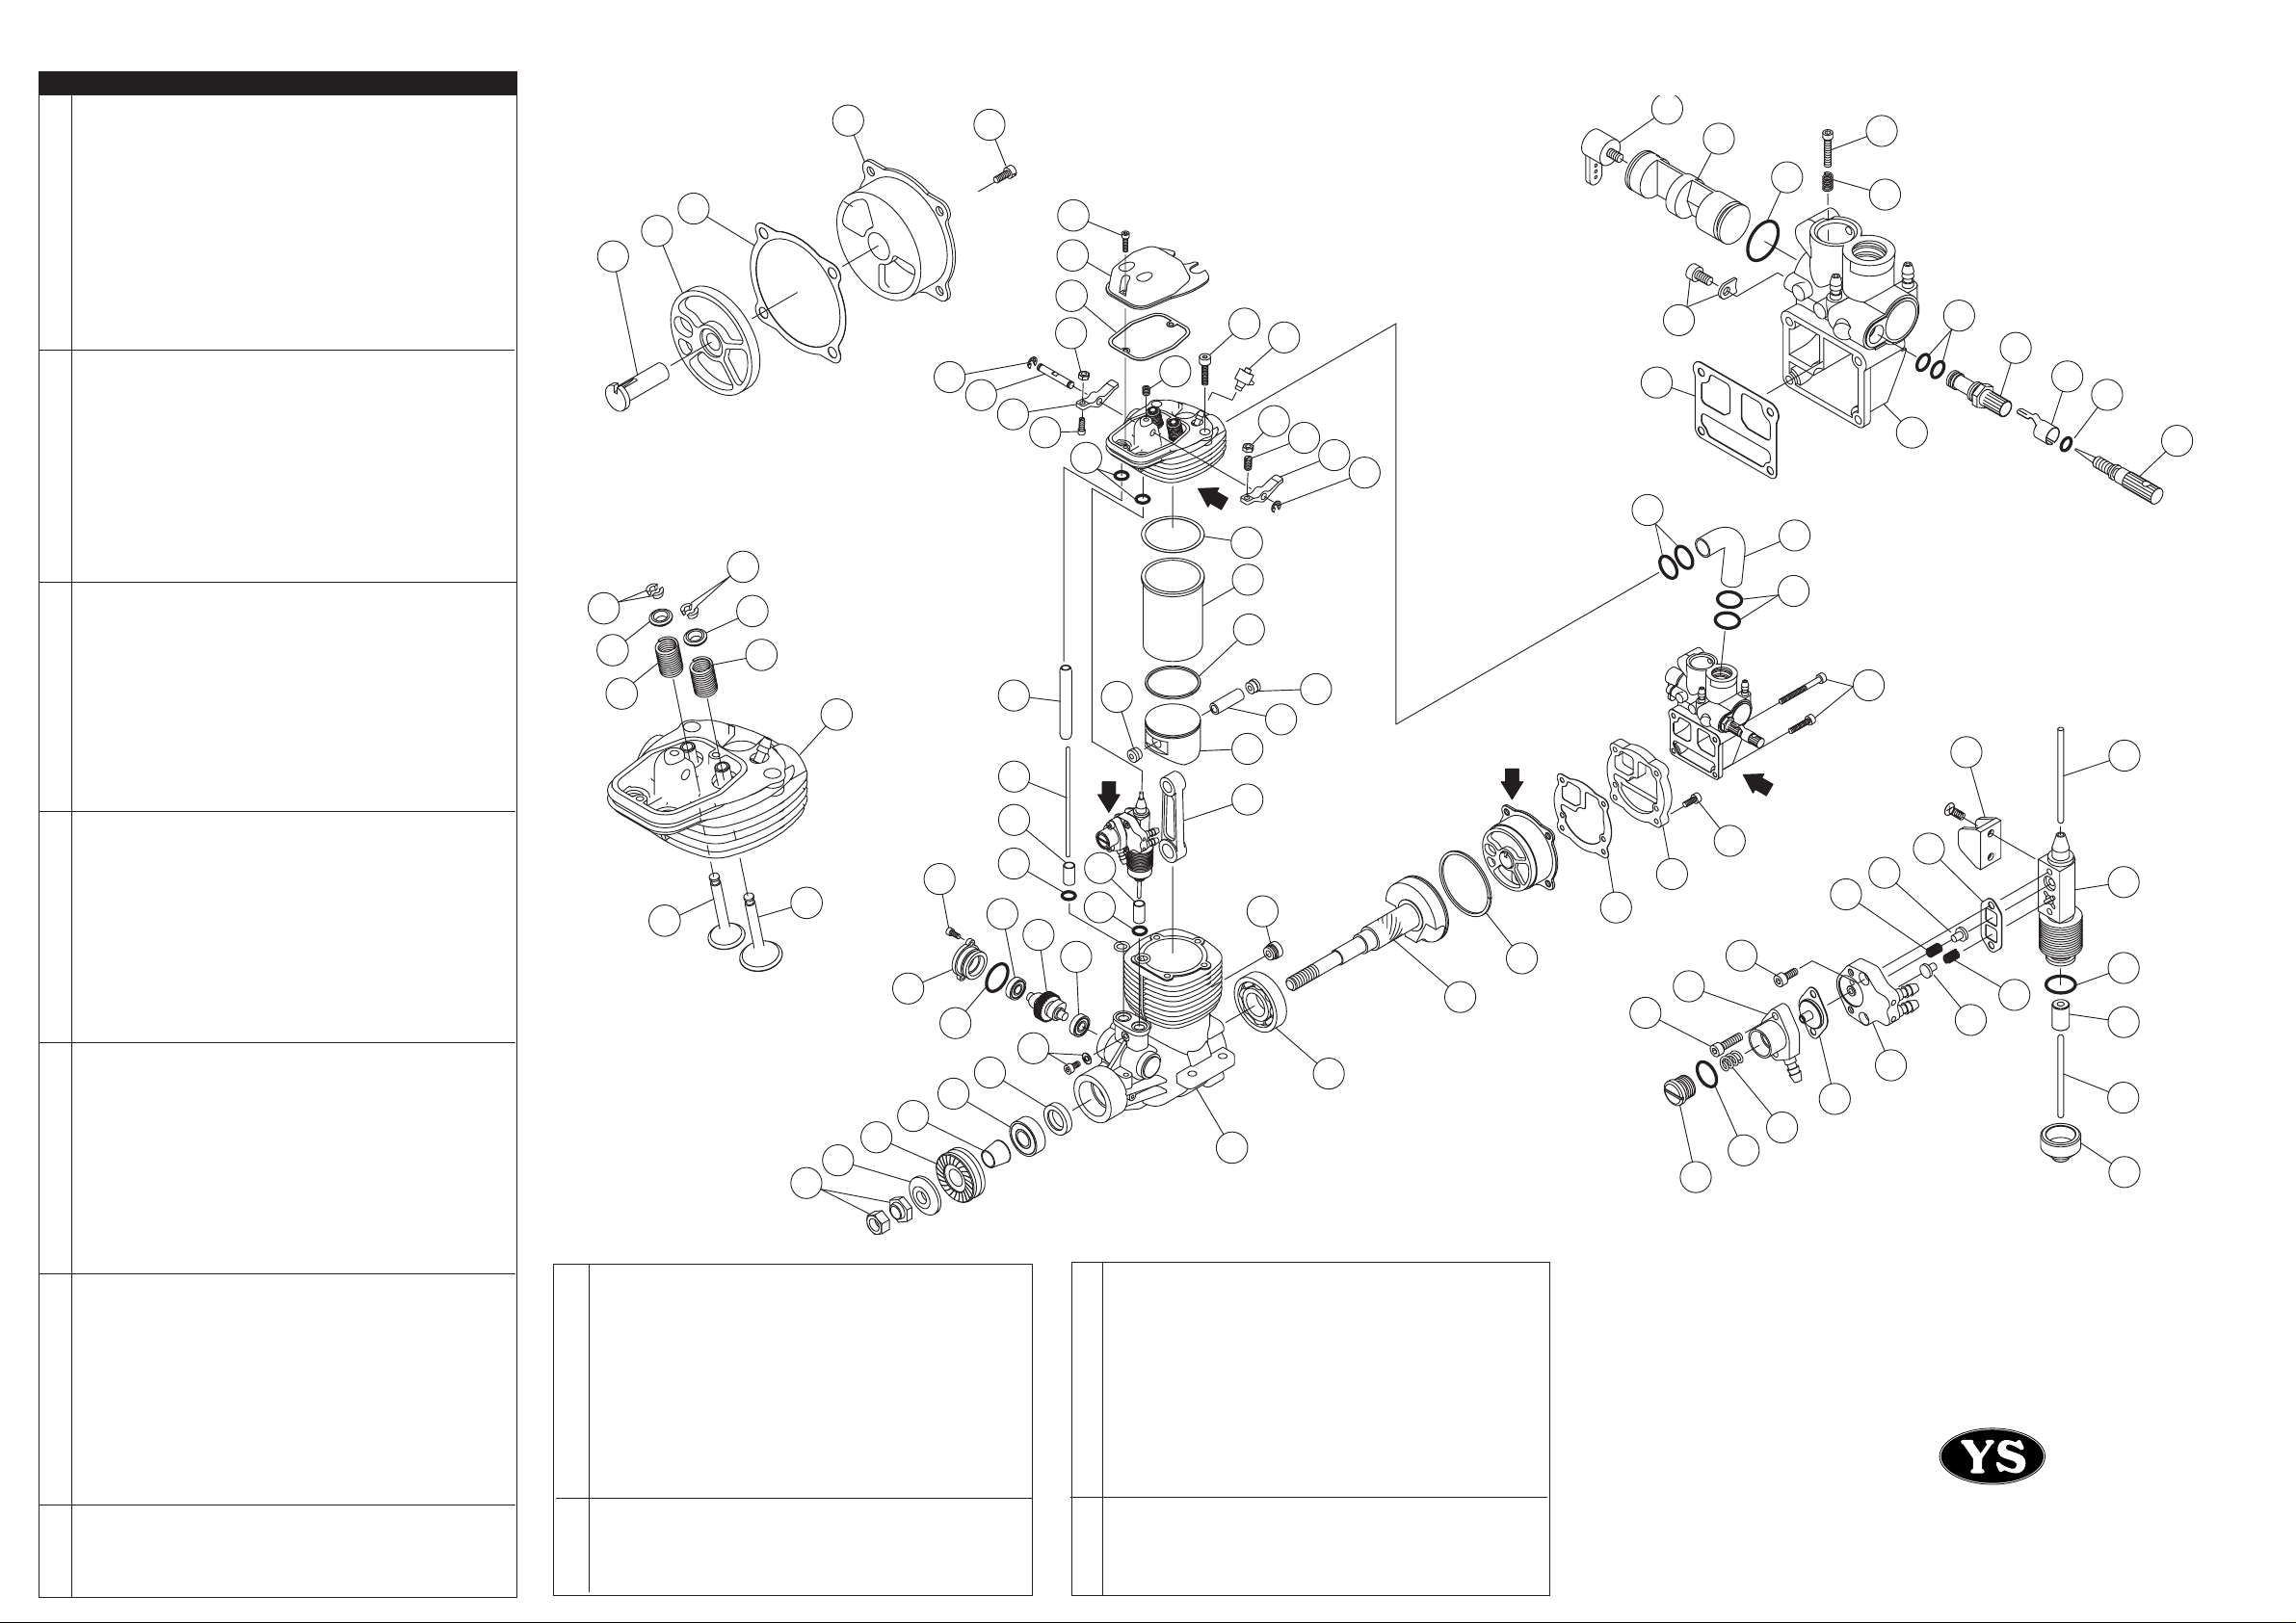
DZ160 Parts list
# Part# Description QTY
1 F4001 Crankcase 1
2 F2002 Valve cover 1
3 F1203 Head cover gasket 1
4 F1204 Valve cover screw set 2
5 F4005 Head gasket 1
F2006A Head assembly
6 F2006 Cylinder head 1
7 F1407 Intake valve 1
8 F1408 Exhaust valve 1
9 F1409 Valve spring set 2
10 F1410 Spring retainer set 2
11 F1411 Valve spring retainer clips 4
12 F1212 Rocker arm set 2
13 F2013 Intake tappet adjusting screw 1
14 F2014 Exhaust tappet Adjusting screw 1
15 F1214 Tappet adjusting lock nuts 2
16 F1215 Rocker arm shaft 1
17 F1216 Rocker arm shaft screw 1
18 F1217 E ring set 2
19 F1518 Head bolt set 5
20 F4020 Crankshaft 1
21 F1475 Crankshaft ring 1
22 F4022 Cylinder liner 1
23 F4023 Piston 1
24 F4024 Wrist pin 1
25 F1523 Wrist pin retainer set 2
26 F4026 Piston ring 1
27 F2027 Connecting rod 1
F4128A Back plate assy.
28 F4128 Back plate 1
29 F4029 Disc valve 1
30 F4030 Disc valve pin 1
31 F4031 Disc valve screw 1
32 F1230 Back plate gasket 1
33 F2132 Carburetor insulator 1
34 F2192 Iusulator gasket 1
35 F2133 Back plate screw set 6
36 F1232 Cam gear cover 1
37 F1233 Cam gear cover O-ring 1
38 F1234 Cam gear cover screws set 2
39 F2036 Cam 1
40 F2137 Cam followers 1
41 F2040 Exhaust push rod 1
42 F2041 Push rod cover 1
43 F1239 Push rod cover O-ring 4
44 F1240 Front bearing 1
45 F9122 Front bearing oil seal 1
46 F1341 Rear bearing 1
47 F1242 Cam gear bearing set 2
F2147A Pump assembly
48 F2047 Regulator body 1
49 F1245 Regulator adjusting screw 1
50 F1246 Regulator adjusting screw O-ring 1
51 F2050 Diaphram 1
52 F2051 Regulator spring 1
53 F2052 Regulator screw set 2
54 F2153 Fuel pump body 1
55 F2054 Pump valve 2
56 F2055 Pump valve spring 2
57 F2056 Pump plate 1
58 F2057 Pump screws 2
59 F2058 Pump gasket 1
60 F2186 Plunger 1
61 F2187 Pump insulator 1
62 F2188 Insulator O ring 1
28
32
29
30
31
18
16
DETAILB
11
11
10
9
8
10
9
6
38
7
36
47
DETAILA
37
45
44
80
79
84
85
63 F2059 Pump brakect 1
64 F2190 Upper push rod 1
65 F2191 Lower push rod 1
F2161A Carburetor assembly
66 F2161 Carburetor body with throttle barrel 1
F1545S Needle valve assembly
68 F1545 High speed needle valve 1
69 F1546 High speed needle valve O-ring 1
70 F1555 High speed needle seat 1
71 F1556 Needle valve socket O-ring set 3
72 F1557 Needle valve detent 1
73 F2168 Throttle barrel seal 2
74 R6124 Throttle barrel retainer 1
75 F1258 Throttle stop screw 1
12
42
41
40
43
4
2
3
15
17
14
43
19
87
15
13
12
18
A
5
22
26
25
23
25
24
D
27
40
43
39
47
86
76 F1259 Throttle stop spring 1
77 F1260S Throttle arm set 1
78 F2073 Carburetor gasket 1
79 F1564 Drive washer 1
80 F1565 Drive washer retainer 1
81 F1568 Intake pipe 1
82 F1269 Intake pipe O-ring 4
83 F1382 Wrist pin access plug 1
84 F1266 Propeller washer 1
85 F1267 Propeller nut set 2
87 F4088 Check valve 1
F2182S Gasket set 4
F2282S O ring set 16
F2083 Fuel tank clunk 1
83
46
1
20
77
67
73
74
78
75
76
66
71
70
72
69
68
DETAILC
82
81
82
35
B
63
64
C
21
34
53
33
48
49
35
56
58
51
52
50
DETAILD
55
57
59
55
54
62
56
60
65
61
YAMADA MFG.CO.,LTD
67 Tsuchitori Inuyama Aichi 484-0917 JAPAN
 Loading...