

Page 1
USER’S GUIDE
FCC ID : O44J1WENR
This device complies with Part 15 of the FCC Rules.
Operation is subject to the following two conditions :
(1) This device may not cause harmful interference, and
(2) This device must accept any interference received, including interference
that may cause undesired operation.
CAUTION :
Changes or modifications not expressly approved by the party
responsible for compliance could void the user
s authority to
operate this device.
Page 2
User’s GUIDE
TABLE OF CONTENTS
Safety Information
Remote :
Remote Button Functions
Remote Learning Routine
Keyless Entry
Alarm Mode
Trunk Release
Panic Mode
Valet Mode
Optional Programmable Features
Ignition Lock
Passive Locking
Optional Installation Features
Door pulse Duration
Flashing Signal Light
Anti-jacking
Page 4
Page 4
Page 5
Page 5
Page 6
Page 6
Page 7
Page 7
Page 7
Page 8
Page
8
Page
8
Page
8
Page 8
Page 8
Page 8
Page 3
User’s GUIDE
Page 3
The model name, R500 stands for
Safety Information
Please take these safety precautions into consideration, under the following conditions :
Page 4
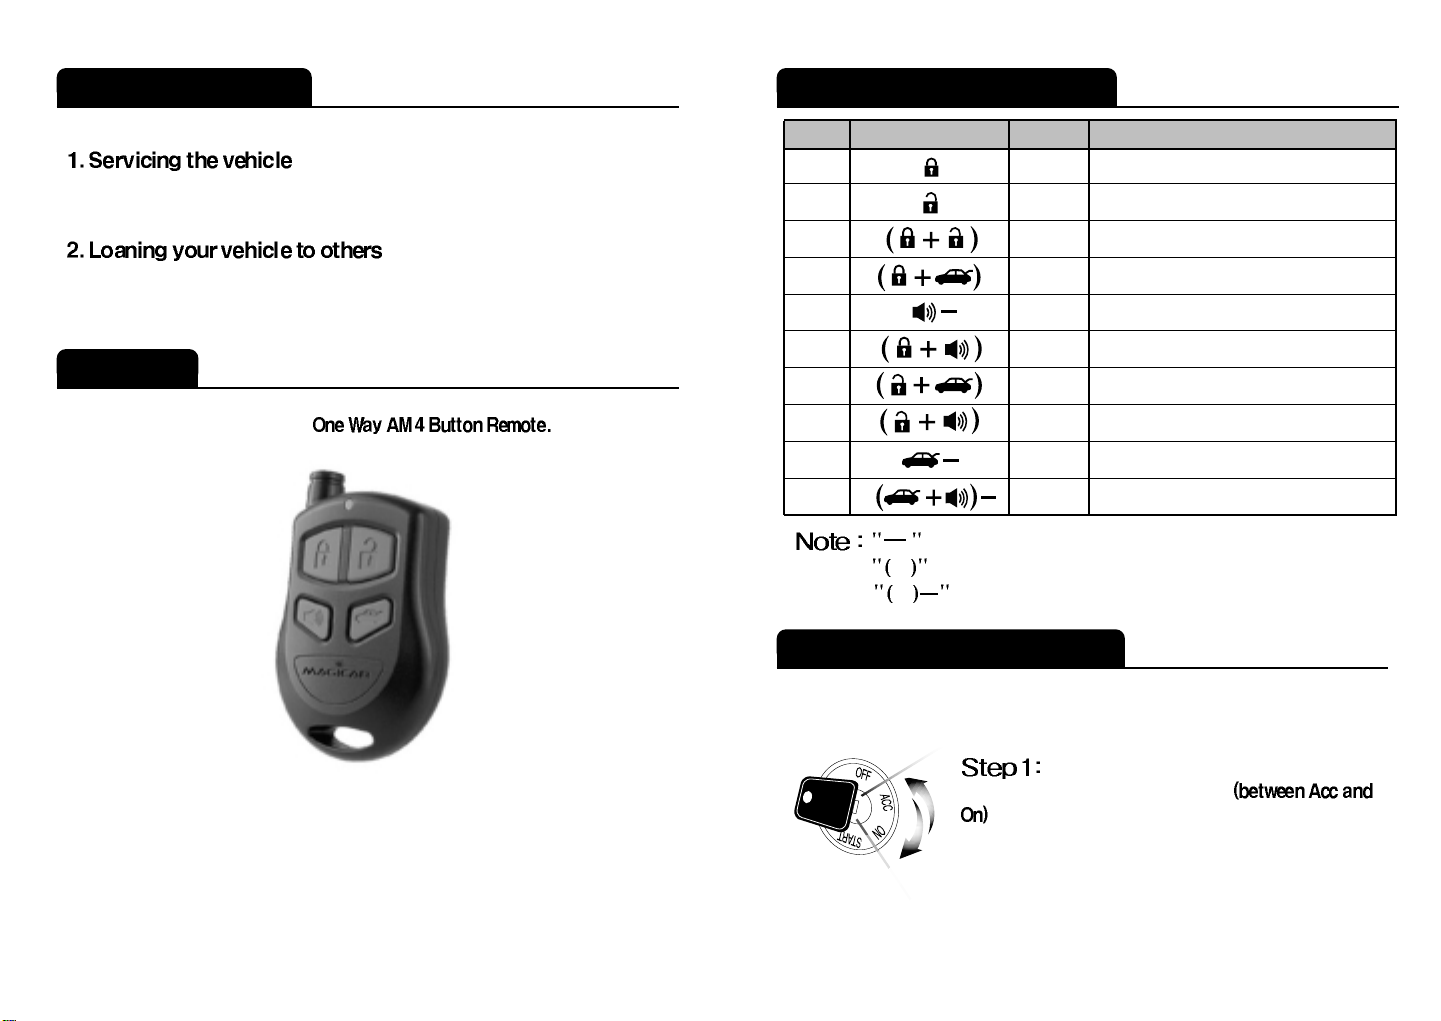
When servicing your automobile (i.e. changing the oil, washing your car), the
Magicar system should be in Valet Mode.
Whenever you loan your vehicle to an individual who is not familiar with Magicar,
please put the vehicle in Valet mode. This will prevent the vehicle barrower from
accidentally activating the Magicar auto-security system.
Remote
Page 5
Remote Button Functions
1
2
3
4
5
6
7
8
9
10
Lock0.5 sec
0.5 sec
0.5 sec
0.5 sec
Unlock
Button Press Function
2 sec
Panic, Press Lock to shut off Siren
Valet Mode - on/off
Siren Chirps for Lock /Unlock - on/off
0.5 sec
Ignition Lock - on/off
0.5 sec
Passive Arming - on/off
0.5 sec
Shock Sensor - on/off
2 sec
Trunk Release
2 sec
Programming Menu - Installer Only
Means pressing the button for 2 seconds.
Means simultaneously pressing the buttons.
Means simultaneously pressing the buttons for 2 seconds.
Remote Learning Routine
The Magicar will allow up to three remotes to be programmed to one vehicle.
Please perform the following procedure to add or reprogram additional remotes.
Activate Valet/ Programming mode by manually
turning the ignition on and off three times
with the key within a 7 second period.
The parking lights will flash once with successful completion of
this step.
Page 4

You can exit Valet Mode only by pressing buttons
simultaneously.
To arm the vehicle, press the button .
To disarm the vehicle, press the button.
If pressing the arm/disarm buttons does not arm/disarm the vehicle, you will need to
release the button and try again, as the remote stops transmitting as soon as the
LED stops flashing.
Press the buttons for a 0.5 second to mute the vehicle siren when
arming or disarming your vehicle. Keep in mind that your siren will still be activated
for all other modes(i.e.panic or alarm trigger) regardless of whether or not your siren
is in mute mode. The siren will be mute only when arming or disarming your vehicle.
When the alarm is armed, the starter kill function (an optional feature provided by
your installer) is activated. This feature disengages the starter mechanism on your
vehicle and prevents it from starting, even with a key.
To lock the vehicle, pressing the button for a 0.5 second.
To unlock the vehicle, press the button for a 0.5 second. If the pressing of the
lock/unlock buttons does not lock/unlock the doors, you will need to release the
button and try again, as the remote stops transmitting as soon as the LED stops
flashing. If the button is pressed for 2 seconds, it will panic the system.
Page 7
Keyless Entry
Alarm Mode
Page 6
Within a 7 second period after cycling the ignition for the 3
rd
time,
Press the button for a 0.5 second. The parking lights will flash
once to confirm that the transmitter has been programmed.
You can continue programming additional remotes. The parking lights
will flash two times when the programming mode has expired.
If you lose your remote after you have armed the vehicle, use your key
to open the door. The siren will go off. Turn the ignition on and off,
3 times with your key to shut down the alarm and put the system into
valet mode. You can cancel valet mode with a remote later on.
See: Valet mode, on page 7.
Trunk Release
Press the button for 2 seconds, in order to unlock and release your trunk door.
If pressing the trunk release button does not release the trunk, you will need to
release the button and try again, as the remote stops transmitting as soon as the
LED stops flashing.Note that the trunk release function will not only release the trunk
but will unlock the all doors as well.
Panic Mode
If Anti-Jacking option has been programmed (ask your dealer if you would
like to have this option) and the Ignition-Kill has been installed , Panic
Mode works as Anti-Jacking if the car key in the ignition. In Anti-Jacking
mode is activated while key is in the ignition,
a) the Siren will go off for 1.5 minutes, and b) Ignition-Kill will be activated
after the first 30 seconds. This is to give a 30 second warning to the
hijacker, then to disconnect the ignition to stop the vehicle.
Press the button for 2 seconds to enter Panic Mode. In this mode, the car will be
armed,if not armed already, and the siren will be activated and the parking lights will be
flashed. In order to disengage Panic Mode, press the button.
Then, press the button for a 0.5 second to unlock/ disarm your vehicle.
Valet Mode
While the vehicle is in valet mode, the only feature is the keyless entry and optional auxiliary
functions.
In order to enter Valet mode, press the buttons simultaneously for a 0.5 second. In order to manually enter Valet Mode, insert your car key into the ignition and turn the
ignition on and off
three times within 7 seconds
Page 5

Page 9Page 8
OPTIONAL PROGRAMMABLE FEATURES
Ignition Lock
These additional features may be programmed to the Magicar system by your
authorized Magicar dealer.
This programmable option enables your vehicle to automatically lock the doors once
the key is in the ignition for 30 Seconds.(Also you can lock the doors, If you step on
the brake pedal within 30 Seconds) In addition, the vehicle will automatically unlock
the doors when the key is pulled out of the ignition.
Passive Locking
You can turn this function on or off by pressing the buttons for a 0.5 second. When setting to passive locking, your system will lock automatically 30 seconds
after all the car doors are closed.
OPTIONAL INSTALLATION FEATURES
if you set this mode, Door Lock/Unlock
Pulse Duration will be changed 0.8 second to 4 seconds.
When you leave your car without
closing the doors, the signal lights will flash.
It can be programmed to send a signal to a relay to disconnect
the ignition wire of the vehicle upon anytime the vehicle is armed so that the
vehicle cannot start or run by a remote or a key.
And the running of vehicle can be shut off by remote’s panic command.
It can be programmed to send a signal to a relay to disconnect the
starter wire of the vehicle upon arming.
Page 10
Page 11
Page 12
Page 13
Page 14
Page 16
Page 16
Page 16
Page 17
Page 17
Page 18
Page 19
Page 19
INSTALLATION GUIDE
TABLE OF CONTENTS
INSTALLATION GUIDE
Installation Tips & Recommendations
R
500 Wiring Digram
CON 1
CON 2
CON 3
CON 4
CON 5
Antenna
Option Mode
Programming Menu Option
How to set Options
Canceling(Going to Factory Default)Option Mode
Confirmation of Wrong Programming
. . . . . . . . . . . . . . . . . . . . . . . . . .
. . . . . . . . . .. . . . . . . . . . . . . . . . . . . . . . . . . . . . . .
. . . . . . . . . . . . . . . . . . . . . . . . . . . . . . . . . . . . . . . . . . . . . . . . . . . . . . . . .
. . . . . . . . . . . . . . . . . . . . . . . . . . . . . . . . . . . . . . . . . . . . . . . . . . . . . . . . .
. . . . . . . . . . . . . . . . . . . . . . . . . . . . . . . . . . . . . . . . . . . . . . . . . . . . . . . . .
. . . . . . . . . . . . . . . . . . . . . . . . . . . . . . . . . . . . . . . . . . . . . . . . . . . . . . . . .
. . . . . . . . . . . . . . . . . . . . . . . . . . . . . . . . . . . . . . . . . . . . . . . . . . . . . . . . .
. . . . . . . . . . . . . . . . . . . . . . . . . . . . . . . . . . . . . . . . . . . . . . . . . . . . . .
. . . . . . . . . .. . . . . . . . . . . . . . . . .. . . . . . . . . . . . . . . .. . . . . . . .
. . . . . . . . . .. . . . . . . . . . . . . . . . . . . . . . . . . .
. . . . . . . . . . . . . . . . . . . . . . . . . . . . . . . . . . . . . . . . . . . .
. . . . . . . . . . . . . . .
. . . . . . . . . . . . . . . . . . . . . . . . . . . . .
Page 6

Page 10 Page 11
1-1. Please be careful not to lock yourself out.
Please lower the glass windows before you start the installation in case the door locks
with the key inside. Also, learn the remote to the brain module after the installation
has been completed.
1-2. Use Digital Multimeter for testing
Use a Digital Multimeter for all testing of wires in the vehicle. This should be done
on all wires even if you feel that you know exactly what they are and how they
should test. Use of lamp tester may damage the electrical circuit of the vehicle.
1-3. Find Good Ground
One of the most important wire connections is the ground connection.
Please find a spot that does not have any resistance to the battery ground.
Improper ground will result in malfunction of the system.
1-4. Make sure your installation does not become a driving hazard later
to the driver.
During installation process, please try to foresee there are any potential problems
to the driver later.
Installation Tips & Recommendations
1-5. Vehicle check-up prior to and after the installation.
Antenna
M861A Wiring Digram
Page 7

No 1 (Red) : (+)12V Input
Solder this wire to the vehicle’s 12V constant. This wire must be supplied power all
of the time and must be able to withstand high current draw.
No 2 (Green/ White) : (+)Output for parking Light
No 3 (Brown) : (+)12V Siren Output
The Black wire at the siren is to be chassis grounded.
The siren volume can be reduced by cutting the volume wire attached to the siren.
No 4 (Gray) : (+)12V Trunk Output
If the vehicle is equipped with electrical trunk release, the trunk out is
connected to trigger the trunk solenoid.
No 5 (Black) : Chassis Ground
This will be the one of the most important connections. Connect this wire to bare
metal of the vehicle. We do not recommend using the steering column for a grounding point. Make sure you strip back the paint or use a factory grounding point.
Bad grounding on this wire will be the beginning of future troubles.
Page 12
C0N1
trunk
Solenoid
trunk Release Switch
CON1-4
C0N2
Page 13
< Circuit diagram >
Circuit diagram during unlock output >
Circuit diagram during lock output>
Installers are able to install as per
the following methods when you install,
please find a suitable method as per
the door system of your vehicle
Negative Trigger Door Lock System
(W/O Actuator)
Positive Trigger Door Lock System
(W/O Actuator)
Positive parking light output.
Page 8

Page 15
No 2 (Blue) : Negative Starter-Kill Output
Please use the pre-wired starter kill relay.
Page 14
No 1 (Green) : (+12V)Ignition Input
This wire will test (using your digital multi-meter) 0V with the key off, and 12V with
the key in the
ON or RUN position
C0N3
87
Relay
85
86 30
87a
Cut
Starter
Key Cylinder
Starter Wire
OFF
A
C
C
O
N
START
87
Relay
85
86 30
87a
Cut
Engine
Key Cylinder
Ignition Wire
OFF
A
C
C
O
N
START
No 3 (Red/Black) : Negative Trigger Door Open Sense
No 4 (Red) : Positive Trigger Door Open Sense
+12V
CON3-3(-) Door Trigger
Dome Light
Door
Trigger SW
Door
Trigger SW
+12V
CON3-4(+) Door Trigger
Dome Light
Please make sure you have found a correct door sensing wire that monitors all doors.
No 5 (Violet / Black ) : (-)Trunk Trigger Input.
connect this to wire to the trunk lamp wire as shown below
No6 (Light Blue / White) : (+) Brake Trigger Input
Connect this wire to the foot Brake Wire as shown below.
+12V
CON3-6(+)Brake Trigger
Stop Lamp
Foot Brake S/W
CON 3-5
(-)Trunk Trigger Input
Trunk Lamp
+12V
< External Actuator>
External Actuator
Page 9

Page 16
Options Mode
Press buttons and Simultaneously for 2 seconds in order to enter
Option Mode.
Note :
"1. Door Lock/Unlock Pulse Duration :
If you set this mode, Door Lock/Unlock Pulse Duration wil be changed 0.8 second
to 4 seconds.
2. Start Kill Mode
Anti-Jacking(Ignition-Kill) :
The #2 wire of CON3 can be programmed to send a signal to a relay to disconnect
the ignition wire of the vehicle anytime the vehicle is armed so that the vehicle cannot
start or run by remote or key. The vehicle can also be shut off with remote by use of
the panic command, even if it is running with a key in the ignition.
Srarter-Kill :
The #2 wire of CON3 can be programmed to send a signal to a relay to disconnect
the srarter wire of the vehicle upon arming.
3. Parking Light Flashing :
With this option, the parking lights will flash if any door remains open while the vehicle is disarmed.
Door Lock/Unlock Pulse Duration
Application of Pre-wired Kill Relay
Flashing Parking Light During Door Open
0.8 Sec
Starter Kill
Disabled
4 Sec
Anti-jacking (IG-kill)
Activated
Features
(Factory Default)
Programming Menu Option
C0N4
No 1 (Black) : GND
No 2 (Black/White) : (+)LED
C0N 5
Antenna
LED Ass y
No 1 (Black) : GND
No 2 (White) : (-)and stage shock Input
No 3 (Red) : (+12)
No 4 (Yellow) :(-)1st stage shock Input
Page 17
Dual stage shock sensor
No7 (Black /White) : (-) Input for optional Sensor
When installing additional sensors, use this wire as the input wire for those sensors.
Always remember, when attaching more than one sensor to any input, you must diode isolate them so that they don’t backfeed into each other.
When Magicar systems are installed, please pay attention to stretch out the wire of
antenna. If the wire is bended or twisted seriously, it will be one of the reasons,
which will reduce the receiving range.
Antenna Module
FCC ID: O44J1WAMLEDANT
Page 10

Press button for 2 seconds (The siren and signal lights will chirp
one time each)
Press button three times (The siren and signal lights will chirp and flash
one time whenever press button ) and wait for 5 seconds.
You can only program one option at a time. You will have to repeat the procedure for
every option you would like to change.
Press buttons for 2 seconds. The siren and signal lights
will chirp and flash one time each.
- If you fail to program, the siren and signal lights will chirp and flash
three times each.
Press button the number of times to go to the option number you
want to change.
- The siren and signal lights will chirp and flash one time whenever
you press button .
Wait a few seconds. You will hear a number of chirps and see a number
of parking light flashes corresponding to the option number you want
to change. If the number of chirps or flashes does not match the option
number you want, wait 10 seconds, then start over at step 1.
Press button or as you want to program the option.
- If you press button , the option will be set to the default setting.
The siren and signal lights will chirp and flash one time each.
- If you press button , the option will be set to the optional setting.
The siren and signal lights will chirp and flash two times each.
The siren and signal lights will chirp and flash three times after 5 seconds
Press button after confirmation of the siren and signal lights as no. 3
(The siren and signal lights will chirp and flash two times each.)
Page 18
How to set Options
+
Page 19
Canceling
(Going to factory default)
Option Mode
Press buttons for 2 seconds (The siren and signal lights will
chirp and flash one time each).
- If you fail to program, the siren and lights will chirp and flash three
times each.
Press button three times. (The siren and signal lights will chirp and
flash once time the button is pressed.)
All options will be reset to factory defaults after the confirming 3 chirps
and flashes.
Confirmation of Wrong Programming
When you press the buttons incorrectly, Option Mode will not be programmed
and the siren will activate for 1 second.
+
+
 Loading...