


YotaPhone
Quick Guide
English, Français, Deutsch,
Italiano, Español

Get to know
your YotaPhone
English
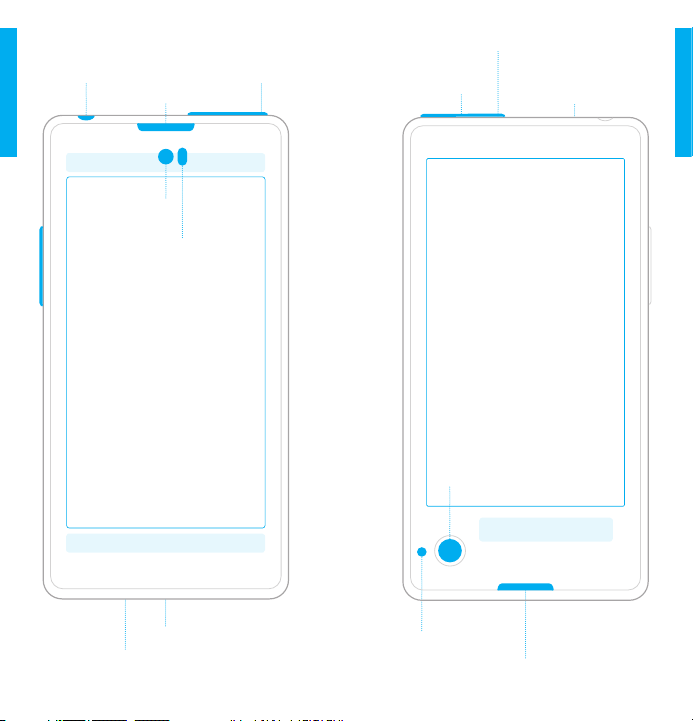
Headset jack
English
Volume buttons
Earpiece
Touch zone
Front camera
Proximity and
ambient light sensors
Power button
SIM ejection hole
SIM card tray
Secondary
microphone
English
Main screen
Back screen
Main camera
Lower front touch zone
Micro-USB connector
Main microphone
4 5
Camera
LED flash
Back touch zone
Loudspeaker
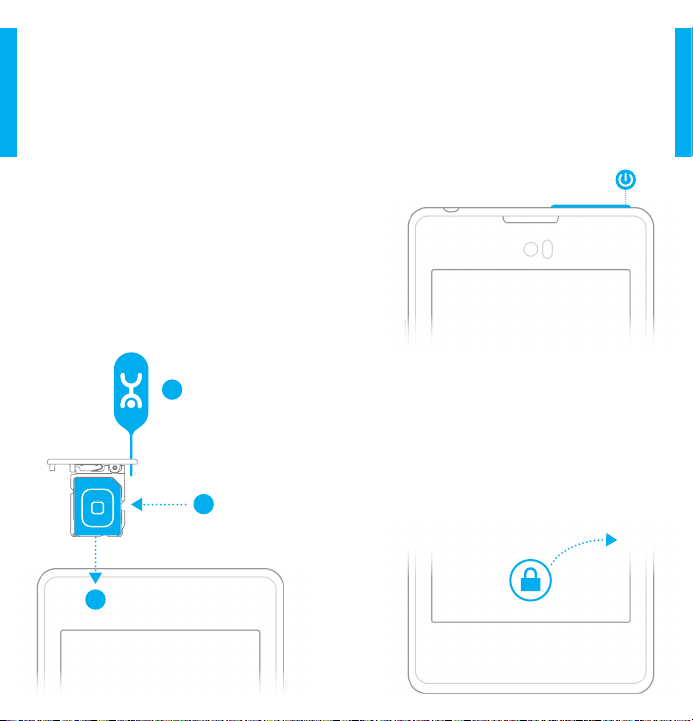
Install the Micro-SIM Card
Insert the Micro-SIM card from your
mobile service provider.
English
1. Insert the SIM eject tool into the
SIM ejection hole on your YotaPhone
until the SIM card tray is released.
Then pull out the tray.
2. Put the SIM card into the tray with
the contact area facing up.
3. Replace the SIM card tray carefully
until it locks.
Switch Your YotaPhone On/O
To switch your YotaPhone on, press
and hold the power button. To switch
your YotaPhone off, press and hold
the power button, select the Power
Off option and then tap OK.
English
1
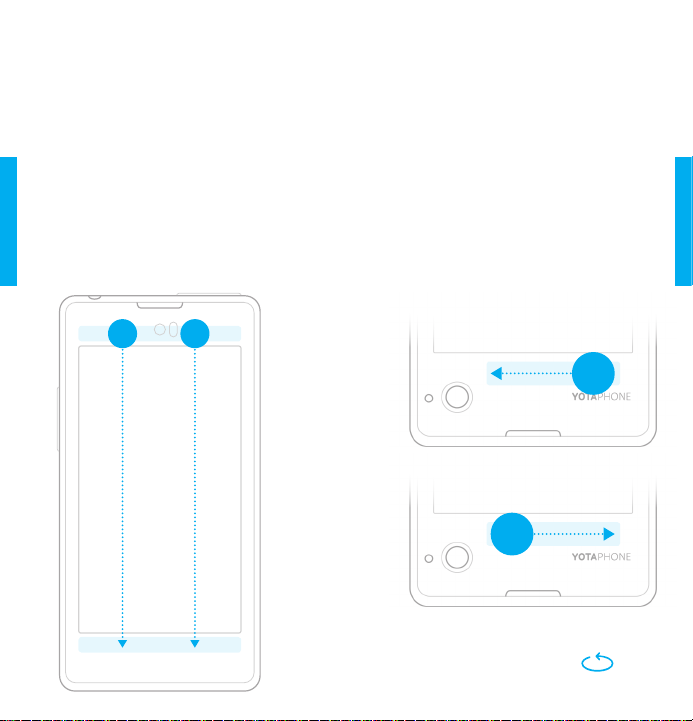
Lock/Unlock the Screen
SIM eject tool
2
SIM card
3
Back screen
6 7
To lock your YotaPhone screen, press
the power button.
To unlock your YotaPhone screen,
press the power button and drag the
lock icon on the screen to the side.

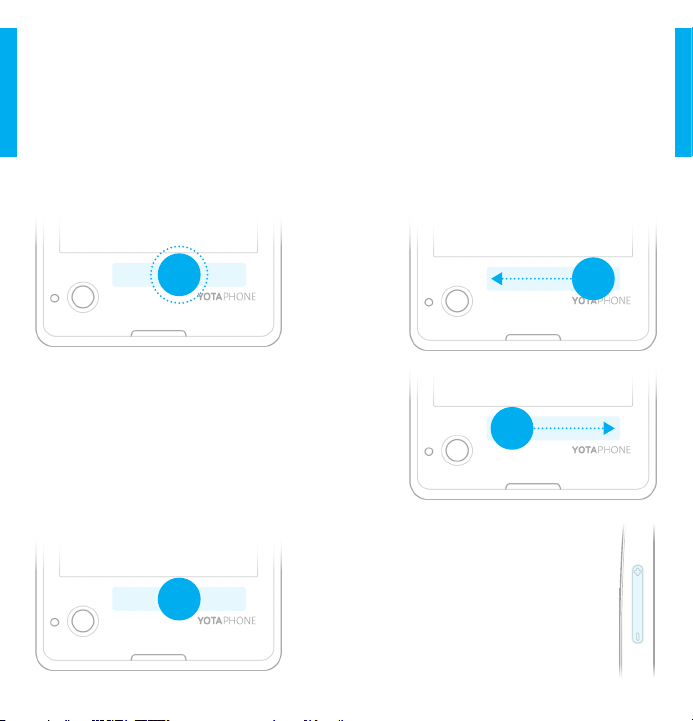
Main Screen Gestures
YotaPhone has touch zones instead
of buttons.
English
Home screen
Google Search
On the home screen, to open the
Google search, touch and hold the
middle of the lower front touch zone
To go to the home screen, swipe your
finger from left to right across the
lower front touch zone.
Recent Applications
Your YotaPhone can run several
applications at the same time. To
view the recent applications, tap the
lower front touch zone twice.
Back to the Previous Screen
To go one step back, swipe your finger
from right to left across the lower
front touch zone.
Put2Back Button
YotaPhone has pre-installed
YotaPhone Apps with a Put2Back
function. When you have one of
YotaPhone Apps opened on the main
screen, tap in the upper right
corner of the screen to activate the
8 9
application on the back screen.
English

Twin Swipe
Never miss anything important.
With YotaPhone Apps and Twin
English
swipe, the most recent information
on the back screen will remain
visible even with an empty battery.
To send a screenshot from the main
screen and display it on the back
screen, swipe your two fingers from
the upper front touch zone to the
lower front touch zone.
Back Touch Zone Gestures
Lock/Unlock the Back Touch Zone
The back touch zone locks
automatically after two minutes or
when the main screen is turned on.
To unlock the back touch zone, swipe
your finger from left to right or from
right to left across the back touch
zone.
English
The back touch zone unlocks
automatically when is pressed
and the phone is turned round.
10 11
Switching Between Applications
To switch between the Wallpaper
English
application and another running
application, tap the back touch
zone twice.
Select Menu Item
To select a menu item or open
an application item, tap the back
touch zone.
Swipe right/left
You can easily browse between pages,
items and notifications. Swipe your
finger from left to right or from right
to left on the back touch zone.
You can also scroll pages
with volume buttons.
English
12 13
Personalisation
You can personalise the back screen
by adding wallpaper.
English
1. On the home screen, tap >
YP Apps > to open the Wallpaper
application.
2. Swipe pictures to select the one to
be shown on the back screen.
3. Select Widgets and add clock,
weather or battery to your Wallpaper.
4. Tap in the right corner of
the screen to display the selected
wallpaper on the back screen.
To display any picture from the
Gallery as wallpaper on the back
screen:
1. Open the Wallpaper application
and tap
2. Select a picture from the Gallery.
3. Crop the selected picture and
press OK.
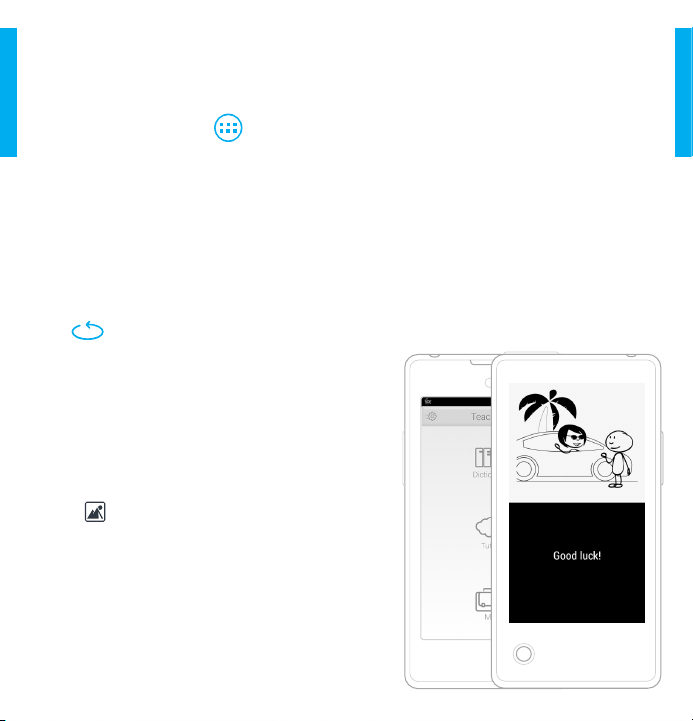
TeachMe
TeachMe is an educational
application designed to improve
your language knowledge with
Dictionary and Phrasebook.
Dictionary offers several categories
of words, while Phrasebook contains
general phrases and illustrations. The
words and phrases you are learning
can be shown as language cards on
the back screen.
English
4. Now your picture is available in
the Wallpaper application.
14 15

Organiser
You can keep track of what is
important and never miss a thing
English
with Organiser.
It allows you to see all your key events
on the back screen, including to-dos,
meetings, notes, reminders, birthdays
and timers.
Tap in the upper-right corner to
view events on the back screen.
InternetHub
InternetHub enriches your online
reading experience.
Filter the relevant information to
create a custom feed and read
comfortably even in the brightest
sunshine.
1. On the home screen, tap > YP
Apps > InternetHub.
2. Tap a category to select an item.
3. Tap to read the feeds on the
back screen.
4. Scroll through pages with swipes
or volume buttons.
English
16 17
Back Screen Notication
Settings
You can easily have the notication
content displayed on the back
English
screen.
1.
On the home screen, tap
2. Select YP APPS > Back Screen
3. Switch the Back screen
notifications slider ON.
4. Under notification mode, drag
the slider on top of Private. This will
change the setting to Open and all
the notifications are visible
5. Scroll through pages with swipes or
volume buttons
If you do not want to display any
notifications on the back screen, you
can disable them.
1. On the home screen, tap
2. Select
3.
notifications
YP APPS > Back Screen
Switch the
Back screen
slider
OFF
.
Help and Support
If your YotaPhone stops responding,
press and hold the power button
for 10 seconds. Your YotaPhone will
then restart.
For the full version of the User Guide
or Support, please go to the website:
yotaphone.com
18 19
Product Specications
OS
Android Jelly Bean 4.2.2
CPU
Dual Core 1.7 GHz Krait
FORM FACTOR
and back screen
DIMENSIONS
WEIGHT
MAIN SCREEN
colours;
capacitive multi touch
BACK SCREEN
capacitive touch zone below the EPD for
gesture controls
NETWORK
UMTS 900/1800/2100 MHz, GSM
900/1800/1900
MHz
CAMERA
front camera 1MP
MEMORY
CONNECTIVITY
GPS w/A-GPS + Glonass
VIDEO
MPEG-4, WebM
AUDIO
WAV
BATTERY
OTHER
proximity sensor, ambient light sensor,
micro- SIM, FM radio, special YotaPhone
gestures and Put2Back applications for the
back screen
Monoblock touch with front
133.6 x 67 x 9.99mm
146g
4.3” 720x1280 LCD, 16.7M
4.3” 360x640 EPD, 16 greyscale;
LTE 800/1800/2600 MHz,
Main camera 13MP AF, LED flash;
2GB RAM, 32GB eMMC
WiFi 802.11 a/b/g/n, BT v4.0,
1080p 30fps; H.263, H.264 AVC,
MP3, AAC, eAAC, eAAC+, AMR, MIDI,
1800mAh
Accelerometer, compass, gyroscope,
English
YotaPhone Product Information
YotaPhone User Guide:
www.yotaphone.com.
English
Network Support: You can use your YotaPhone only on the LTE 800, 1800 and 2600
MHz networks, on UMTS 900,1800 and
2100 MHz networks, and on the GSM 900,
1800, and 1900 MHz networks. You need a
subscription with a service provider.
Electronic Paper Display (EPD) Operating
Temperature: Do not use your device
in high or low temperatures. When the
temperature is lower than 0°C or higher
than 50°C, the performance of the EPD is
affected.
Battery and charging: This device has an
internal, rechargeable battery that cannot
be removed. The battery can be replaced
only by a service facility approved by Yota
Devices. To charge the device, use only
charger adapters and data cables approved
by Yota Devices. Other chargers and cables
can cause the battery to explode or damage
the device.
Product Safety, Care and Maintenance: See
“Product and Safety Information” in the
YotaPhone User Guide.
Radio Frequency Exposure Information:
Your YotaPhone is a radio transmitter and
receiver. It meets international guidelines
for exposure to radio waves. The highest
worn on the body (tests done following EN
50360:2001/AC & EN 62209-1:2006 standards). For more information, see “Product
and Safety Information” in the YotaPhone
User Guide.
WARNING: To avoid possible
hearing damage, do not listen
at high volume levels for long
periods.
Recycling and Disposal: Always recycle or
dispose your electronic products, batteries, accessories and packaging materials
according to your local regulations. Do not
dispose the device as household waste.
Manufacturer’s Warranty: Full details of
the warranty on this YotaPhone product are
displayed on our website at www.yotaphone.
com. The website also provides contact
details for Yota Devices repair and service
centres, and a description of the procedure
to be followed regarding the YotaPhone
warranty. As a consumer, you may have
other legal rights and protections including
warranties implied by statute. The YotaPhone warranty does not in any way limit,
restrict or otherwise affect such rights.
Declaration of Conformity: This product is
in compliance with the essential requirements and other relevant provisions of
Directive 1999/5/EC. For the declaration of
conformity, please go to http://www.yotaphone.com.
SAR value for this device is 0.570 W/kg
when tested at the ear (tests done following EN 50360:2001/A1:2012 & EN 622091:2006 standards) and 0.276 W/kg when
20 21
© 2013 Yota Devices. All rights reserved.
English

Français
For the full version of the user guide or
support, please visit the website:
yotaphone.com
Découvrez votre
YotaPhone
Français
Prise casque
Français
Boutons de volume
Écouteur
Zone tactile
Appareil
Photo avant
Capteurs de proximité
et de luminosité
ambiante
Écran principal
Bouton
d’alimentation
Trou d’éjection de la carte SIM
Plateau de
carte SIM
Microphone
secondaire
Écran arrière
Appareil photo principal
Français
Zone tactile inférieure avant
Connecteur micro-USB
Microphone principal
Flash à LED
de l’appareil
photo
Zone tactile arrière
Haut-parleour

Installer la carte micro-SIM
Insérez la carte micro-SIM de votre
fournisseur de services mobiles.
1. Insérez l’outil d’éjection de carte
SIM dans le trou d’éjection de carte
SIM sur votre YotaPhone jusqu’à
ce que le support de carte SIM se
dégage, puis extrayez-le.
Français
2. Placez la carte SIM sur le support,
zone de contact orientée vers le haut.
3. Remettez en place le support pour
l’enclencher.
Outil d’éjection
1
de la carte SIM
2
Carte SIM
3
Allumer/éteindre votre
YotaPhone
Pour allumer votre YotaPhone,
maintenez enfoncé le bouton marche/
arrêt. Pour éteindre votre YotaPhone,
maintenez enfoncé le bouton marche/
arrêt, sélectionnez l’option Éteindre,
puis appuyez sur OK.
Verrouiller/déverrouiller l’écran
Pour verrouiller l’écran de votre
YotaPhone, appuyez sur le bouton
marche/arrêt.
Pour déverrouiller l’écran de votre
YotaPhone, appuyez sur le bouton
marche/arrêt et faites glisser l’icône
de verrouillage vers le côté de l’écran.
Français
Ecran arrière
Mouvements sur l’écran
principal
YotaPhone dispose de zones tactiles
à la place de boutons.
Écran d’accueil
Pour accéder à l’écran d’accueil,
effectuez un mouvement de balayage
avec votre doigt de droite à gauche sur
Français
toute la zone tactile inférieure avant.
Retour à l’écran précédent
Pour revenir en arrière, effectuez un
mouvement de balayage de droite
à gauche sur toute la zone tactile
inférieure avant.
Recherche Google
Dans l’écran d’accueil, pour la recherche
Google, maintenez une pression au
milieu de la zone tactile inférieure avant.
Français
Applications récentes
Votre YotaPhone peut exécuter
plusieurs applications à la fois. Pour
afficher les applications récentes,
appuyez deux fois sur la zone tactile
inférieure avant.
Bouton Put2Back
YotaPhone dispose d’applications
YotaPhone Apps préinstallées
permettant l’affichage sur le
second écran. Lorsque l’une de ces
applications est ouverte sur l’écran
principal, appuyez sur dans le
coin supérieur droit pour transférer
l’application sur l’écran arrière.
Double balayage
Gardez à l’écran ce qui est
important. Avec YotaPhone Apps et
le double balayage, les informations
les plus récentes sur l’écran arrière
restent visibles même lorsque la
batterie est épuisée.
Pour envoyer une copie d’écran de
l’écran principal vers l’écran arrière,
effectuez un balayage avec deux doigts
Français
de la zone tactile supérieure avant vers
le bas de la zone.
Mouvements sur la zone
tactile arrière
Verrouiller/déverrouiller
la zone tactile arrière
La zone tactile arrière se verrouille
automatiquement après deux
minutes ou lorsque l’écran principal
est allumé.
Pour déverrouiller la zone tactile
arrière, effectuez avec votre doigt un
mouvement de balayage de gauche
à droite.
Français
La zone tactile arrière se déverrouille
automatiquement lorsque est
pressé et que le téléphone est retourné.

Basculer entre des applications
Balayage vers la droite/gauche
Pour basculer entre l’application
Wallpaper et une autre application en
cours d’exécution, appuyez deux fois
sur la zone tactile arrière.
Français
Sélectionner une option de menu
Pour sélectionner une option
de menu ou ouvrir un élément
d’application, appuyez sur la zone
tactile arrière.
Vous pouvez facilement parcourir
les pages, les éléments ou les
notifications. Faites glisser votre
doigt de gauche à droite ou de droite
à gauche sur la zone tactile arrière.
Français
Vous pouvez également
faire défiler les pages avec
les boutons de réglage du
volume.

Personnalisation
TeachMe
Vous pouvez personnaliser l’écran
arrière en ajoutant un fond d’écran.
1. Dans l’écran d’accueil, appuyez
sur > YP Apps > pour ouvrir
l’application Fond d’écran.
2. Balayez les images pour sélectionner
celle à afficher sur l’écran arrière.
Français
3. Sélectionnez Widgets et ajoutez
une horloge, la météo ou le niveau de
la batterie à votre fond d’écran en les
faisant glisser sur l’image.
4. Appuyez sur dans le coin droit
de l’écran pour afficher le fond d’écran
sélectionné sur l’écran arrière.
Pour acher une image de la galerie
comme fond d’écran sur l’écran
arrière:
1. Ouvrez l’application Fond d’écran et
appuyez sur
2. Sélectionnez une image dans la
Galerie.
3. Rognez l’image sélectionnée et
appuyez sur OK.
4. Votre image est maintenant
disponible dans l’application Fond
d’écran.Wallpaper application.
TeachMe est une application
éducative conçue pour améliorer vos
connaissances linguistiques avec
Dictionary et Phrasebook.
Dictionary offre plusieurs catégories
de mots, tandis que Phrasebook
contient des phrases générales et
des illustrations. Les mots et les
phrases que vous apprenez peuvent
être présentés sous forme de fiches
linguistiques sur l’écran arrière.
Français

Organiseur
InternetHub
Vous pouvez suivre les événements
importants et ne jamais rien rater
avec Organiseur.
Il vous permet de voir tous vos
éléments clés sur l’écran arrière,
notamment les tâches à effectuer,
les réunions, les notes, les rappels,
les anniversaires et les comptes à
rebours.
Français
Appuyez sur idans le coin
supérieur droit de l’écran pour
afficher les événements à l’arrière.
InternetHub enrichit votre
expérience de lecture en ligne.
Filtrez les informations pertinentes
pour créer un flux personnalisé et
lisez confortablement même en plein
soleil.
Français
1. Dans l’écran d’accueil, appuyez
sur > YP Apps > InternetHub.
2. Appuyez sur une catégorie pour
sélectionner un élément.
3. Appuyez sur pour lire les flux
sur l’écran arrière.
4. Faites défiler les pages avec des
balayages ou les boutons de volume.

Paramètres de notication
de l’écran arrière
Vous pouvez facilement acher le
contenu des notications sur l’écran
arrière.
1. Dans l’écran d’accueil, appuyez sur
2. Sélectionnez YP APPS > Écran arrière.
3. Placez le curseur Notifications sur
l’écran arrière sur ACTIVÉ.
Français
4. Sous le mode de notification, faites
glisser le curseur sur Privé. Cela change
le réglage sur Ouvert et toutes les
notifications sont visibles.
5. Faites défiler les pages avec des
balayages ou avec les boutons de
volume.
Si vous ne souhaitez pas afficher de
notifications sur l’écran arrière, vous
pouvez les désactiver..
1. Dans l’écran d’accueil, appuyez sur
2. Sélectionnez YP APPS > Écran arrière.
3. Placez le curseur Notifications sur
l’écran arrière sur DÉSACTIVÉ.
Aide et assistance
Si votre YotaPhone est bloqué,
maintenez enfoncé le bouton
marche/arrêt pendant 10 secondes.
Votre YotaPhone va redémarrer.
Pour la version complète du Guide
de l’utilisateur ou pour obtenir une
assistance, veuillez visiter le site Web:
yotaphone.com
Caractéristiques du produit
SYSTÈME D’EXPLOITATION
UC
Dual Core 1.7 GHz Krait
FORMAT
Appareil tactile monobloc avec
écrans avant et arrière
DIMENSIONS
POIDS
146g
ÉCRAN PRINCIPAL
millions de couleurs; interface tactile
multipoint capacitive
ÉCRAN ARRIÈRE
po. 360 x 640, 16 nuances de gris ; zone
tactile capacitive en dessous de l’écran
papier électronique pour les commandes
de mouvements
RÉSEAU
LTE 800/1800/2600 MHz,
UMTS 900/1800/2100 MHz, GSM
900/1800/1900 MHz
CAMÉRA
Appareil photo principal 13
mégapixels AF, flash à LED ; appareil photo
frontal 1 mégapixel
MÉMOIRE
RAM de 2 Go, eMMC de 32 Go
CONNECTIVITÉ
GPS w/A-GPS + Glonass
VIDÉO
1080p 30 ips ; H.263, H.264 AVC,
MPEG-4, WebM
AUDIO
MP3, AAC, eAAC, eAAC+, AMR, MIDI,
WAV
Android Jelly Bean 4.2.2
133.6 x 67 x 9.99mm
LCD 4,3 po. 720 x 1280, 16,7
Écran papier électronique 4,3
WiFi 802.11 a/b/g/n, BT v4.0,
Français

BATTERIE
1800 mAh
DIVERS
Accéléromètre, compas, gyroscope,
capteur de proximité, capteur de
lumière ambiante, micro-SIM, radio FM,
mouvements YotaPhone spéciaux et
applications Mettre à l’arrière pour l’écran
arrière
Informations sur le produit
YotaPhone
Guide de l’utilisateur du YotaPhone:
www.yotaphone.com.
Français
Réseaux pris en charge: Vous pouvez
utiliser votre YotaPhone uniquement sur
les réseaux LTE 800, 1800 et 2600 MHz, sur
les réseaux UMTS 900, 1800 et 2100 MHz,
et sur les réseaux GSM 900, 1800 et 1900
MHz. Il vous faut un abonnement chez un
fournisseur de services.
Température de fonctionnement de l’écran
arrière: N’utilisez pas votre appareil à des
températures très élevées ou très basses.
Lorsque la température est inférieure à 0°C
ou supérieure à 50°C, les performances de
l’écran arrière sont altérées.
Batterie et charge: Cet appareil dispose
d’une batterie interne rechargeable
inamovible. La batterie ne peut être
remplacée que par une entreprise de
service agréée par Yota Devices. Pour
charger l’appareil, utilisez uniquement
les adaptateurs de chargeur et les câbles
de données approuvés par Yota Devices.
D’autres chargeurs et d’autres câbles
peuvent faire exploser la batterie ou
endommager l’apparei.
Sécurité, entretien et maintenance
du produit: Reportez-vous au chapitre
«Informations sur le produit et la sécurité»
dans le Guide de l’utilisateur du YotaPhone.
Informations sur l’exposition aux
radiofréquences (RF): Votre YotaPhone
est un émetteur-récepteur radio. Il répond
aux directives internationales en matière
d’exposition aux ondes radio. La valeur SAR
la plus élevée pour cet appareil est de 0.570
W/kg près de l’oreille (tests effectués selon
les EN 50360:2001/AC & EN 62209-1:2006)
et 0.276 W/kg près du corps (tests effectués
selon les standards EN 62311:2008 et EN
62209-2:2010). Pour plus d’informations,
reportez-vous à «Informations sur le
produit et la sécurité» dans le Guide de
l’utilisateur du YotaPhone.
AVERTISSEMENT: Afin d’éviter des
dommages auditifs éventuels,
ne pas écouter à un niveau
sonore élevé pendant une durée
prolongée.
Recyclage et mise au rebut: Procédez
toujours au recyclage ou à la mise au rebut
de vos produits électroniques, batteries,
accessoires et matériaux d’emballage
conformément à la réglementation locale.
Ne mettez pas l’appareil au rebut avec les
déchets ménagers.
Garantie du fabricant: Les informations
détaillées sur la garantie de ce produit
YotaPhone sont présentées sur notre
site Web à l’adresse www.yotaphone.
com. Le site Web présente également des
informations de contact pour les centres
de réparation et de service Yota Devices,
ainsi qu’une description de la procédure
à suivre pour effectuer des réclamations
au titre de la garantie YotaPhone. En tant
que consommateur, vous pourriez avoir
d’autres droits et protections juridiques,
notamment des garanties implicites par
statut. La garantie YotaPhone ne limite, ne
restreint ou n’affecte en aucune manière de
tels droits.
Français

Déclaration de conformité: Ce produit est
conforme aux principales exigences et
autres clauses pertinentes de la directive
européenne 1999/5/EC. Pour la déclaration
de conformité, visitez le site Web http://
www.yotaphone.com.
© 2013 Yota Devices. Tous droits réservés.
Français
Pour la version complète du Guide de
l’utilisateur ou pour obtenir une assistance,
veuillez visiter le site Web:
yotaphone.com

Headset-Buchse
Ohrhörer
Touchbreich
Front-Kamera
Annäherungs- und
Umgebungslightsensoren
Ein/Aus-Schalter
Deutsch
Lernen Sie Ihr
YotaPhone kennen
Deutsch
Lautstärkeregler
Hauptbildschirm
Vorderer Touchbereich unten
Мicro-USB-Buchse
Hauptmikrofon
Deutsch

SIM-Karten-Auswurfschlitz
SIM-Kartenfach
Deutsch
Rükseitiger Bildschirm
Hauptkamera
Touchbereich unten
LED-Blitz
der Kamera
Lautsprecher
Zweites Mikrofon
Hinterer
Einlegen der Micro-SIM-Karte
So legen Sie die Micro-SIM-Karte
Ihres Mobilfunkanbieters ein:
1. Führen Sie den SIM-KartenAuswerfer so weit in den SIM-KartenAuswurfschlitz Ihres YotaPhone ein,
bis das SIM-Kartenfach entriegelt
wird. Ziehen Sie dann das Fach
heraus.
2. Legen Sie die SIM-Karte mit den
Kontakten nach oben in das Fach ein.
3. Schieben Sie das SIM-Kartenfach
vorsichtig wieder ein, bis es einrastet.
SIM-Karten-
1
Ausweifer
2
SIM-Karte
3
Rükseitiger Bildschirm
Deutsch

Ein- und Ausschalten des
YotaPhone
Um das YotaPhone einzuschalten,
drücken und halten Sie den Ein/Aus-
Schalter. Zum Ausschalten drücken
und halten Sie den Ein/Aus-Schalter,
wählen die Option „Aus“ und tippen
auf „OK“.
Sperren/Entsperren des
Deutsch
Bildschirms
Um den YotaPhone-Bildschirm zu
sperren, drücken Sie den Ein/Aus-
Schalter.
Um den YotaPhone-Bildschirm zu
entsperren, drücken Sie den Ein/Aus-
Schalter und ziehen das Sperrsymbol
auf dem Bildschirm zur Seite.
Menüsteuerung auf dem
Hauptbildschirm
Das YotaPhone verfügt über
Touchbereiche anstelle von
Schaltächen.
Startbildschirm
Zum Startbildschirm gelangen
Sie, indem Sie mit dem Finger von
links nach rechts über den vorderen
unteren Touchbereich ziehen.
Deutsch
Zurück zum vorherigen Bildschirm
Um einen Schritt zurückzugehen,
ziehen Sie mit dem Finger von rechts
nach links über den vorderen unteren
Touchbereich.

Google-Suche
Um die Google-Suche auf dem
Startbildschirm zu öffnen, berühren
und halten Sie die Mitte des vorderen
unteren Touchbereichs.
Aktuelle Apps
Auf Ihrem YotaPhone können
mehrere Apps gleichzeitig ausgeführt
werden. Um die zuletzt ausgeführten
Apps anzuzeigen, doppeltippen Sie auf
Deutsch
den vorderen unteren Touchbereich.
Put2Back-Schaltäche
Auf Ihrem YotaPhone sind spezielle
YotaPhone Apps mit Put2BackFunktion vorinstalliert. Ist eine
der YotaPhone Apps auf dem
Hauptbildschirm geöffnet, tippen
Sie rechts oben auf dem Bildschirm
auf , um die App auf dem
rückseitigen Bildschirm zu aktivieren.
Zwei-Finger-Swipe
Verpassen Sie nie wieder etwas
Wichtiges. Mit den YotaPhone
Apps und dem Zwei-Finger-Swipe
bleiben die neuesten Informationen
auch bei leerem Akku auf dem
rückseitigen Bildschirm sichtbar.
Um einen Screenshot vom
Hauptbildschirm auf den rückseitigen
Bildschirm zu verschieben und dort
anzuzeigen, ziehen Sie mit zwei Fingern
vom vorderen oberen Touchbereich
zum vorderen unteren Touchbereich.
Deutsch

Bewegungen auf dem
rückseitigen Touchbereich
Sperren/Entsperren des
rückseitigen Touchbereichs
Der rückseitige Touchbereich wird
nach 2 Minuten automatisch
gesperrt, oder wenn der
Hauptbildschirm eingeschaltet wird.
Um den rückseitigen Touchbereich
zu entsperren, ziehen Sie mit dem
Finger entweder von links nach rechts
oder von rechts nach links über den
rückseitigen Touchbereich.
Deutsch
Der rückseitige Touchbereich wird
automatisch entsperrt, wenn Sie
auf drücken und das Telefon
umdrehen.
Wechseln zwischen Apps
Um zwischen der Hintergrund-App
und einer anderen ausgeführten App
zu wechseln, doppeltippen Sie auf
den rückseitigen Touchbereich.
Deutsch
Auswählen eines Menüelements
Um ein Menüelement auszuwählen
oder eine App zu öffnen, tippen Sie
auf den rückseitigen Touchbereich.

Nach rechts/links ziehen
Personalisierung
Sie können ganz einfach durch Seiten,
Elemente und Benachrichtigungen
blättern. Ziehen Sie mit dem Finger
von links nach rechts bzw. von rechts
nach links auf dem rückseitigen
Touchbereich.
Deutsch
Sie können auch mit den
Lautstärkereglern durch die
Seiten blättern.
Sie können den rückseitigen
Bildschirm personalisieren, indem Sie
einen Hintergrund hinzufügen.
1. Tippen Sie auf dem Startbildschirm
auf > YP Apps >, um die App
Hintergrund zu öffnen.
2. Ziehen Sie über die Bilder, um
eines für den rückseitigen Bildschirm
auszuwählen.
3. Wählen Sie Widgets und fügen
Sie Uhr, Wetter oder Akku Ihrem
Hintergrund hinzu.
4. Tippen Sie in der rechten Ecke
des Bildschirms auf , um den
ausgewählten Hintergrund auf dem
rückseitigen Bildschirm anzuzeigen.
So zeigen Sie ein Bild aus der Galerie
als Hintergrund auf dem rückseitigen
Bildschirm an:
1. Öffnen Sie die App
Hintergrund und tippen Sie auf
2. Wählen Sie ein Bild aus der Galerie.
3. Schneiden Sie das ausgewählte Bild
zu und drücken Sie auf OK.
4. Nun ist das Bild in der Hintergrund-
App verfügbar.
Deutsch

TeachMe
Organiser
TeachMe ist eine
Bildungsanwendung, mit deren
Hilfe Sie Ihre Sprachkenntnisse
anhand eines Wörterbuchs
und einer Sammlung von
Redewendungen verbessern
können.
Das Wörterbuch enthält mehrere
Wortkategorien, die Redewendungen
enthalten allgemeine Sätze und
Illustrationen. Wörter und Redewendungen können in Form von
Sprachkarten auf dem rückseitigen
Bildschirm angezeigt werden.
Deutsch
Mit dem Organiser behalten Sie den
Überblick über alle wichtigen Dinge.
Alle wichtigen Ereignisse,
einschließlich Aufgaben,
Besprechungen, Notizen,
Erinnerungen, Geburtstage und
Timer, werden auf dem rückseitigen
Bildschirm angezeigt.
Tippen Sie rechts oben auf dem
Bildschirm auf um Ereignisse
auf dem rückseitigen Bildschirm
anzuzuzeigen.
Deutsch

InternetHub
Mit dem InternetHub wird OnlineLesen noch vergnüglicher.
Filtern Sie relevante Informationen,
um einen benutzerdefinierten Feed
zu erstellen, den Sie auch bei hellem
Sonnenlicht bequem lesen können.
1. Tippen Sie auf dem Startbildschirm
auf > YP Apps > InternetHub.
2. Tippen Sie auf eine Kategorie, um
ein Element auszuwählen.
3. Tippen Sie auf um die Feeds
auf dem rückseitigen Bildschirm zu
lesen.
Deutsch
4. Blättern Sie mit Swipes oder mit den
Lautstärkereglern durch die Seiten.
Einstellungen für
Benachrichtigungen auf dem
rückseitigen Bildschirm
Auf dem rückseitigen Bildschirm können
Sie ganz einfach die Inhalte von Benachrichtigungen anzeigen.
1. Tippen Sie auf
dem Startbildschirm auf
2. Wählen Sie YP APPS > Rückseitiger
Bildschirm.
3. Setzen Sie den Schieberegler
Benachrichtigungen auf dem rückseitigen
Bildschirm auf EIN.
4. Ziehen Sie unter dem
Benachrichtigungsmodus den
Schieberegler auf Privat. Dadurch wird
die Einstellung auf Offen gesetzt und alle
Benachrichtigungen sind sichtbar.
5. Blättern durch Wischen oder mithilfe der
Lautstärketasten durch die Seiten.
Wenn Sie auf dem rückseitigen Bildschirm
keine Benachrichtigungen anzeigen
möchten, können Sie diese deaktivieren.
1. Tippen Sie auf
dem Startbildschirm auf
2. Wählen SieYP APPS > Rückseitiger
Bildschirm
3. Setzen Sie den Schieberegler
Benachrichtigungen auf dem rückseitigen
Bildschirm auf AUS.
Deutsch

Hilfe und Support
Falls Ihr YotaPhone nicht mehr reagiert,
halten Sie den Ein/Aus-Schalter 10
Sekunden lang gedrückt. Ihr YotaPhone
wird dann neu gestartet.
Um die vollständige Version des
Benutzerhandbuchs herunterzuladen oder
Antworten auf Supportfragen zu erhalten,
besuchen Sie unsere Website:
yotaphone.com
Produktspezikationen
BS
Android Jelly Bean 4.2.2
CPU
Dual Core 1.7 GHz Krait
FORMFAKTOR
Vorder- und Rückseite
ABMESSUNGEN
GEWICHT
Deutsch
HAUPTBILDSCHIRM
16,7 Mio. Farben; kapazitives MultitouchDisplay
RÜCKBILDSCHIRM
16 Graustufen; kapazitiver Touchbereich
unter dem rückseitigen Bildschirm für
Bewegungssteuerungen
NETZ
UMTS 900/1800/2100 MHz, GSM
900/1800/1900 MHz
KAMERA
Frontkamera 1 MP
SPEICHER
KONNEKTIVITÄT
GPS w/A-GPS + Glonass
VIDEO
MPEG-4, WebM
AUDIO
WAV
AKKU
Monoblock-Touchscreen auf
133.6 x 67 x 9.99mm
146g
4,3 Zoll, 720 x 1280 LCD,
4,3 Zoll, 360 x 640 EPD,
LTE 800/1800/2600 MHz,
Hauptkamera 13 MP AF, LED-Blitz;
2 GB RAM, 32 GB eMMC
WiFi 802.11 a/b/g/n, BT v4.0,
11080 p 30 fps; H.263, H.264 AVC,
MP3, AAC, eAAC, eAAC+, AMR, MIDI,
1800 mAh
SONSTIGES
Beschleunigungsmesser,
Kompass, Gyroskop, Annäherungssensor,
Umgebungslichtsensor, Micro-SIM, FMRadio, spezielle YotaPhone-Bewegungen
und Put2Back-Apps für den rückseitigen
Bildschirm
YotaPhone-Produktinformationen
YotaPhone-Benutzerhandbuch:
www.yotaphone.com.
Netzunterstützung: Das YotaPhone kann
ausschließlich in den Netzen LTE 800, 1800
und 2600 MHz, UMTS 900, 1800 und 2100
MHz sowie GSM 900, 1800 und 1900 MHz
eingesetzt werden. Sie benötigen einen
Vertrag mit einem Dienstanbieter.
Betriebstemperatur des rückseitigen
Bildschirms: Verwenden Sie Ihr Gerät
nicht bei sehr hohen oder sehr niedrigen
Temperaturen. Temperaturen unter 0°C der
über 50° C beeinträchtigen die Leistung des
rückseitigen Bildschirms.
Akku und Aufladung: Dieses Gerät enthält
einen internen Akku, der zum Aufladen
nicht entfernt werden kann. Der Akku darf
nur in einer von Yota Devices autorisierten
Kundendienststelle ausgetauscht werden.
Verwenden Sie zum Aufladen ausschließlich
Ladeadapter und Datenkabel, die von Yota
Devices zugelassen sind. Bei Verwendung
anderer Ladegeräte und Kabel kann der
Akku explodieren oder das Gerät beschädigt
werden.
Produktsicherheit, Pflege und Instandhaltung:
Siehe Kapitel „Produkt- und Sicherheitsinformationen“ im YotaPhone-Benutzerhandbuch
Deutsch

Informationen zur Funkfrequenzexposition:
Ihr YotaPhone ist ein Funksender und
-empfänger. Es erfüllt die internationalen
Richtlinien zur Funkwellenbelastung.
Der Höchstwert für die spezifische
Absorptionsrate (SAR) dieses Geräts ist 0.570
W/kg bei Tests am Ohr (die Tests wurden
gemäß den Standards EN 50360:2001/
AC & EN 62209-1:2006 durchgeführt) und
0.276 W/kg am Körper (die Tests wurden
gemäß den Standards EN 62311:2008
& EN 62209-2:2010 durchgeführt).
Weitere Informationen finden
Sie im Kapitel „Produkt- und
Sicherheitsinformationen“ im
YotaPhone-Benutzerhandbuch.
WARNUNG: Um eventuelle Hörschäden
zu vermeiden, sollten Sie das Telefon nicht
über lange Zeiträume mit hoher Lautstärke
verwenden.
Recycling und Entsorgung: Entsorgen oder
recyceln Sie elektronische Produkte, Akkus,
Deutsch
Zubehör und Verpackungsmaterial stets
gemäß den an Ihrem Standort geltenden
Bestimmungen. Entsorgen Sie das Gerät
nicht als Hausmüll.
Herstellergarantie: Ausführliche
Garantieinformationen zu diesem
YotaPhone-Produkt finden Sie auf
unserer Website unter www.yotaphone.
com. Diese Website enthält auch
Kontaktinformationen über die Reparaturund Servicecenter von Yota Devices und
bietet darüber hinaus eine Beschreibung der
Vorgehensweise, die einzuhalten ist, um die
YotaPhone-Garantie in Anspruch nehmen
zu können. Als Verbraucher stehen Ihnen
möglicherweise weitere Rechtsansprüche
und Schutzmaßnahmen zu,
einschließlich gesetzlich vorgeschriebener
Gewährleistungen. Diese Rechte werden
durch die YotaPhone-Garantie in keiner
Weise begrenzt, eingeschränkt oder
anderweitig beeinträchtigt.
Konformitätserklärung: Dieses Produkt
erfüllt die wesentlichen Anforderungen
und sonstigen Vorschriften der Richtlinie
1999/5/EC. Die Konformitätserklärung
finden Sie auf unserer Website unter http://
www.yotaphone.com.
© 2013 Yota Devices. Alle Rechte vorbehalten.
Deutsch

Um die vollständige Version des
Benutzerhandbuchs herunterzuladen oder
Antworten auf Supportfragen zu erhalten,
besuchen Sie unsere Website:
yotaphone.com
Informazioni sullo
YotaPhone
Italiano
Italiano

Connettore
per auricolare
Zona touch
screen
Fotocamera
anteriore
Sensori di prossimità e
Pulsanti del volume
Schermo principale
Pulsante di
accensione
Ricevitore
luce ambiente
Foro di espulsione SIM
Alloggiamento
della scheda SIM
Schermo posteriore
Microfono secondairo
Italiano
Microfono principale
Zona touchscreen
anteriore in basso
Connetore
micro-USB
Fotocamera principale
Italiano
Zona touchscreen
Flash LED
fotocamera
Altoparlante

Installazione della
scheda micro SIM
Inserire la scheda micro SIM
ricevuta dal proprio gestore di
telefonia mobile.
1. Inserire lo strumento di estrazione
SIM nel foro di espulsione SIM
dello YotaPhone fino a quando
l’alloggiamento della scheda SIM
non viene sbloccato. Estrarre quindi
l’alloggiamento.
2. Inserire la scheda SIM
nell’alloggiamento con l’area di
contatto rivolta verso l’alto.
3. Riposizionare l’alloggiamento della
scheda SIM finché non si blocca
nuovamente.
Strumento
1
di espulsione
SIM
Italiano
3
2
Scheda
SIM
Accensione/spegnimento
dello YotaPhone
Per accendere lo YotaPhone, tenere
premuto il pulsante di accensione.
Per spegnere lo YotaPhone, tenere
premuto il pulsante di accensione,
selezionare l’opzione di spegnimento e
quindi toccare OK.
Blocco/sblocco dello schermo
Per bloccare lo schermo dello
YotaPhone, premere il pulsante di
accensione.
Per sbloccare lo schermo dello
YotaPhone, premere il pulsante di
accensione e trascinare di lato l’icona
con il lucchetto visualizzata sullo
schermo.
Italiano
Schermo posteriore

Azioni sullo schermo principale
YotaPhone dispone di zone
touchscreen anziché di pulsanti.
Schermata iniziale
Per andare alla schermata iniziale,
far scorrere il dito da sinistra a destra
lungo la zona touchscreen nella parte
anteriore in basso.
Tornare alla schermata precedente
Per tornare alla schermata
precedente, far scorrere il dito
Italiano
da destra a sinistra lungo la zona
touchscreen nella parte anteriore in
basso.
Ricerca in Google
Per aprire il motore di ricerca Google
nella schermata iniziale, toccare e
tenere premuto al centro della zona
touchscreen nella parte anteriore in
basso.
Applicazioni recenti
YotaPhone è in grado di eseguire diverse applicazioni contemporaneamente.
Per accedere alle applicazioni recenti,
toccare due volte la zona touchscreen
nella parte anteriore in basso.
Italiano
Pulsante Put2Back
YotaPhone dispone di app preinstallate con funzione Put2Back. Quando
sullo schermo principale è aperta
un’app YotaPhone, toccare
nell’angolo superiore destro dello
schermo per attivare l’applicazione
sullo schermo posteriore.

Doppio scorrimento
Non perdere mai nulla di
importante. Con le app di YotaPhone
e il doppio scorrimento, le
informazioni più recenti resteranno
visibili sullo schermo posteriore
anche con la batteria scarica.
Per inviare una schermata dallo
schermo principale e visualizzarla sullo
schermo posteriore, scorrere con due
dita dalla zona touchscreen nella parte
anteriore in alto alla zona touchscreen
nella parte anteriore in basso.
Italiano
Azioni sulla zona touchscreen
posteriore
Blocco/sblocco della zona
touchscreen posteriore
La zona touchscreen posteriore si
blocca automaticamente dopo due
minuti o quando si attiva lo schermo
principale.
Per sbloccare la zona touchscreen
posteriore, far scorrere il dito da sinistra
a destra o da destra a sinistra lungo la
zona touchscreen posteriore.
Italiano
La zona touchscreen posteriore si
sblocca automaticamente quando si
preme e si gira il telefono.

Passaggio da un’applicazione all’altra
Per passare dall’applicazione Sfondo
a un’altra applicazione in esecuzione,
toccare due volte la zona touchscreen
posteriore.
Selezione di una voce del menu
Per selezionare una voce del menu o
aprire un elemento dell’applicazione,
toccare la zona touchscreen posteriore.
Italiano
Scorrimento verso destra o verso
sinistra
È possibile passare da una pagina
all’altra, da un elemento all’altro
o da una notifica all’altra in modo
semplice e rapido. Scorrere il dito da
sinistra a destra o da destra a sinistra
nella zona touchscreen posteriore.
Italiano
È inoltre possibile passare
da una pagina all’altra
utilizzando i pulsanti del
volume.

Personalizzazione
TeachMe
È possibile personalizzare lo schermo
posteriore aggiungendo uno sfondo.
1. Nella schermata iniziale toccare
> YP Apps > per aprire l’applicazion
Sfondo.
2. Scorrere con il dito sulle immagini
per selezionare quella da visualizzare
sullo schermo posteriore.
3. Selezionare Widget e aggiungere
sullo sfondo l’orologio, nonché
informazioni sul tempo o sulla
batteria.
4. Toccare nell’angolo destro dello
schermo per visualizzare lo sfondo
selezionato sullo schermo posteriore.
Per visualizzare un’immagine della
raccolta come sfondo dello schermo
posteriore:
Italiano
1. Aprire l’applicazione Sfondo
e toccare
2. Selezionare un’immagine dalla
Raccolta.
3. Ritagliare l’immagine selezionata e
premere OK.
4. Ora l’immagine è disponibile
nell’applicazione Sfondo.
TeachMe è un’applicazione
educativa progettata per migliorare
le conoscenze linguistiche grazie
all’uso di un dizionario e di un
frasario.
Il dizionario include diverse
categorie di parole, mentre il frasario
contiene espressioni di uso comune
e illustrazioni. Le parole e le frasi
imparate possono essere visualizzate
come schede linguistiche sullo
schermo posteriore.
Italiano

Agenda
InternetHub
Grazie all’Agenda è possibile tenere
traccia delle cose importanti e non
perdere mai alcuna informazione.
Consente di visualizzare tutti gli
eventi importanti sullo schermo
posteriore, incluse le attività, le
riunioni, le note, i promemoria, i
compleanni e i contatori.
Toccare nell’angolo superiore
destro dello schermo per visualizzare
gli eventi sullo schermo posteriore.
Italiano
InternetHub arricchisce l’esperienza
di lettura online.
È possibile filtrare le informazioni
pertinenti per creare un feed personalizzato e leggere comodamente anche
sotto la luce del sole.
1. Nella schermata iniziale toccare >
YP Apps > InternetHub.
2. Toccare una categoria per
selezionare un elemento.
3. Toccare per leggere i feed sullo
schermo posteriore.
4. Passare da una pagina all’altra
mediante scorrimento o utilizzando i
pulsanti del volume.
Italiano

Impostazioni delle notiche
sullo schermo posteriore
È possibile impostare facilmente la
visualizzazione dei contenuti delle
notiche sullo schermo posteriore.
1. Nella schermata iniziale toccare
2. Selezionare YP APPS > Schermo
posteriore.
3. Posizionare il dispositivo di
scorrimento Notifiche schermo
posteriore su ON.
4. Nella modalità di notifica
trascinare il dispositivo di scorrimento
su Privato. L’opzione verrà impostata
su Apri e tutte le notifiche saranno
visibili.
5. Passare da una pagina all’altra
scorrendo rapidamente o utilizzando i
pulsanti del volume.
Italiano
Se non si desidera visualizzare alcuna
notifica sullo schermo posteriore, è
possibile disattivare le notifiche.
1. Nella schermata iniziale toccare
2. Selezionare YP APPS > Schermo
posteriore.
3. Posizionare il dispositivo di
scorrimento Notifiche schermo
posteriore su OFF.
Guida e assistenza
Se YotaPhone non risponde, tenere
premuto per 10 secondi il pulsante
di accensione. Lo YotaPhone verrà
riavviato.
Per la versione completa del manuale
dell’utente o per chiedere assistenza,
visitare il sito Web: yotaphone.com
Speciche del prodotto
SYSTÈME D’EXPLOITATION
4.2.2
CPU
Dual Core 1.7 GHz Krait
FORMATO
Touchscreen monoblocco con
schermo anteriore e posteriore
DIMENSIONI
133.6 x 67 x 9.99mm
PESO
146g
SCHERMO PRINCIPALE
colori; multitouch capacitivo
SCHERMO POSTERIORE
scala di grigi; zona touchscreen capacitivo
sotto il display EPD per controllo azioni
RETE
LTE 800/1800/2600 MHz,
UMTS 900/1800/2100 MHz, GSM
900/1800/1900MHz
FOTOCAMERA
flash LED; fotocamera anteriore 1 MP
MEMORIA
2 GB RAM, 32 GB eMMC
CONNETTIVITÀ
GPS con A-GPS + Glonass
VIDEO
1080p 30fps; H.263, H.264 AVC,
MPEG-4, WebM
AUDIO
MP3, AAC, eAAC, eAAC+, AMR, MIDI,
WAV
Android Jelly Bean
4,3” 720x1280 LCD, 16,7 M
4,3” 360x640 EPD, 16
Fotocamera principale 13 MP AF,
Wi-Fi 802.11 a/b/g/n, BT v4.0,
Italiano

BATTERIA
1800 mAh
ALTRO
Accelerometro, bussola, giroscopio,
sensore di prossimità, sensore luce
ambiente, micro SIM, radio FM, azioni
speciali YotaPhone e applicazioni Put2Back
per schermo posteriore
Informazioni sul prodotto
YotaPhone
Manuale dell’utente YotaPhone:
www.yotaphone.com.
Assistenza di rete: È possibile usare lo
YotaPhone solo nelle reti LTE a 800, 1800
o 2600 MHz, nelle reti UMTS a 900,1800
o 2100 MHz e nelle reti GSM a 900, 1800 o
1900 MHz. È necessario un abbonamento
con un provider di servizi.
Temperatura di esercizio del display in
carta elettronica (EPD): Non utilizzare il
dispositivo a temperature troppo elevate
o troppo basse. Una temperatura inferiore
a 0°C o superiore a 50°C influisce sulle
prestazioni dell’EPD.
Batteria e caricamento: Questo dispositivo
è dotato di una batteria ricaricabile interna
che non può essere rimossa. La batteria può
Italiano
essere sostituita solo da un centro servizi
autorizzato da Yota Devices. Per caricare
il dispositivo, utilizzare solo caricabatterie
e cavi approvati da Yota Devices. Altri
caricabatterie o cavi possono causare
l’esplosione della batteria o danneggiare il
dispositivo.
Sicurezza, cura e manutenzione del
prodotto: Consultare il capitolo relativo alle
informazioni sul prodotto e sulla sicurezza
nel manuale dell’utente YotaPhone.
Informazioni sull’esposizione alle
radiofrequenze: Lo YotaPhone è un
dispositivo trasmettitore e ricevitore radio.
Il dispositivo è conforme alle linee guida
internazionali in materia di esposizione
alle onde radio. Il valore SAR massimo
per questo dispositivo è 0.570 W/kg per
l’orecchio (test eseguiti in base agli standard
EN 50360:2001/AC e EN 62209-1:2006)
e 0.276 W/kg per il corpo (test eseguiti in
base agli standard EN 62311:2008 e EN
62209-2:2010). Per ulteriori informazioni,
consultare il capitolo relativo alle
informazioni sul prodotto e sulla sicurezza
nel manuale dell’utente YotaPhone.
AVVISO: Per evitare possibili danni
all’udito, non esporsi a volumi
elevati per periodi di tempo
prolungati.
Riciclo e smaltimento: Riciclare o smaltire
sempre i prodotti elettronici, le batterie, gli
accessori e gli imballaggi in conformità alle
normative locali. Non smaltire il dispositivo
come rifiuto domestico.
Garanzia del produttore: Per informazioni
dettagliate sulla garanzia di questo prodotto
YotaPhone, visitare il sito Web all’indirizzo
www.yotaphone.com. Il sito Web riporta
inoltre le informazioni di contatto dei centri
di riparazione e assistenza di Yota Devices
e una descrizione della procedura da
seguire per poter usufruire della garanzia
YotaPhone. È possibile che i consumatori
dispongano di altri diritti o coperture, tra
cui garanzie implicite stabilite dalla legge.
La garanzia YotaPhone non limita o riduce
in alcun modo la validità di tali diritti.
Italiano

Dichiarazione di conformità: Questo
prodotto è conforme ai requisiti
fondamentali e alle altre disposizioni
pertinenti della Direttiva 1999/5/EC. La
dichiarazione di conformità è disponibile
sul sito http://www.yotaphone.com.
© 2013 Yota Devices. Tutti i diritti riservati.
Italiano
Per la versione completa del manuale
dell’utente o per chiedere assistenza,
visitare il sito Web:
yotaphone.com

Conozca su
YotaPhone
Toma de
auriculares
Auricaular
Zone táctil
Cámaro
delantera
Sensores de
proximidad y de luz
ambiental
Botones de volumen
Pantalla principal
Zone tactile inférieure avant
Boton de
encendido
Español
Español
Español
Connector Micro USB
Micrófono principal
Trou d’éjection de la carte SIM
Plateau de
carteSIM
Pantalla trasera
Cámaro delantera
Microphone
secondaire
Zone táctil trasera
Instalar la tarjeta Micro SIM
Inserte la tarjeta Micro SIM
proporcionada por su operador de
telefonía móvil.
1. Inserte la herramienta de expulsión
de la SIM en el orificio para expulsar
la SIM de su YotaPhone hasta que se
suelte la bandeja de la tarjeta SIM. A
continuación, extraiga la bandeja.
2. Coloque la tarjeta SIM en la
bandeja con el área de contactos
hacia arriba.
3. Vuelva a insertar la bandeja de la
tarjeta SIM cuidadosamente hasta
que se acople.
Herramienta
1
de expulsión de
la SIM
2
Tarjeta SIM
Español
Flash
LED de la
cámara
Altavoz
3
Español
Pantalla trasera

Encender y apagar el
YotaPhone
Para encender el YotaPhone,
mantenga pulsado el botón de
encendido. Para apagar el YotaPhone,
mantenga pulsado el botón de
encendido, seleccione la opción
Apagar y pulse en Aceptar.
Bloquear y desbloquear la
pantalla
Para bloquear la pantalla del
YotaPhone, pulse el botón de
encendido.
Para desbloquear la pantalla del
YotaPhone, pulse el botón de
encendido y arrastre el icono de
bloqueo de la pantalla hacia el lado.
Gestos de la pantalla principal
YotaPhone no tiene botones, sino
zonas táctiles.
Pantalla de inicio
Para ir a la pantalla de inicio, deslice
el dedo de izquierda a derecha por la
zona táctil delantera inferior.
Volver a la pantalla anterior
Para volver al paso anterior, deslice
el dedo de derecha a izquierda por la
zona táctil delantera inferior.
Español
Español

Búsqueda en Google
En la pantalla de inicio, mantenga
pulsado en el centro de la zona
táctil delantera inferior para abrir la
búsqueda en Google.
Aplicaciones recientes
El YotaPhone puede ejecutar varias
aplicaciones a la vez. Para ver las
aplicaciones recientes, pulse dos
veces la zona táctil delantera inferior.
Botón Poner atrás
YotaPhone tiene aplicaciones de
YotaPhone preinstaladas con una
función Poner atrás. Cuando una
de las aplicaciones de YotaPhone
Español
esté abierta en la pantalla principal,
pulse en la esquina superior
derecha de la pantalla para activar la
aplicación en la pantalla trasera.
Deslizamiento doble
No se pierda nada importante. Con
las aplicaciones de YotaPhone y el
deslizamiento doble, la información
más reciente de la pantalla trasera
permanecerá visible incluso si se
agota la batería.
Para enviar una captura de pantalla
de la pantalla principal y mostrarla en
la pantalla trasera, deslice dos dedos
desde la zona táctil delantera superior
a la zona táctil delantera inferior.
Español

Gestos de la zona táctil trasera
Bloquear y desbloquear
la zona táctil trasera
La zona táctil trasera se bloquea
automáticamente transcurridos dos
minutos o cuando se active la pantalla
principal.
Para desbloquearla, deslice el dedo
de izquierda a derecha o de derecha a
izquierda por la zona táctil trasera.
Alternar entre aplicaciones
Para alternar entre la aplicación
Fondo de pantalla y cualquier otra
aplicación en funcionamiento, pulse
dos veces la zona táctil trasera.
Seleccionar elemento del menú
Para seleccionar un elemento del
menú o abrir un elemento de una
aplicación, pulse la zona táctil
trasera.
Español
Español
La zona táctil trasera se desbloquea
automáticamente cuando se pulsa
y se da la vuelta al teléfono.

Deslizar a la derecha o la izquierda
Personalización
Se puede navegar fácilmente entre
páginas, elementos y notificaciones.
Deslice el dedo de izquierda a
derecha o de derecha a izquierda en
la zona táctil trasera.
También puede desplazarse
por las páginas con los
botones de volumen.
Español
Puede personalizar la pantalla
trasera con un fondo de pantalla.
1. En la pantalla de inicio, pulse
> Aplicaciones de YP > para abrir la
aplicación Fondo de pantalla.
2. Deslice las imágenes para
seleccionar la que desea mostrar en
la pantalla trasera.
3. Seleccione Widgets y añada el reloj,
el tiempo o la batería al fondo de
pantalla.
4. Pulse en la esquina derecha
de la pantalla para mostrar el fondo
de pantalla seleccionado en la
pantalla trasera.
Para mostrar cualquier imagen de
la Galería como fondo de la pantalla
trasera:
1. Abra la aplicación Fondo de
pantalla y pulse
2. Seleccione una imagen de la
Galería.
3. Recorte la imagen seleccionada y
pulse Aceptar.
4. Ahora la imagen estará disponible
en la aplicación Fondo de pantalla.
Español

TeachMe
Organizador
TeachMe es una aplicación
educativa diseñada para mejorar
su conocimiento del idioma con
un Diccionario y una Guía de
conversación.
El Diccionario ofrece varias categorías
de palabras, mientras que la Guía
de conversación contiene frases
generales e ilustraciones. Las palabras
y frases que aprende se pueden
mostrar como fichas de idioma en la
pantalla trasera.
Español
Con el Organizador, podrá hacer
un seguimiento de las cosas
importantes y no se perderá nada.
Le permite ver todos los eventos
importantes en la pantalla trasera,
como tareas pendientes, reuniones,
notas, recordatorios, cumpleaños y
temporizadores.
Pulse en la esquina superior
derecha de la pantalla para ver los
eventos en la pantalla trasera.
Español

InternetHub
InternetHub mejora su experiencia
de lectura en Internet.
Filtre la información relevante para
crear una sección personalizada y lea
cómodamente incluso con la luz solar
más intensa.
1. En la pantalla de inicio, pulse >
Aplicaciones de YP > InternetHub.
2. Pulse una categoría para
seleccionar un elemento.
3. Pulse para leer las secciones
en la pantalla trasera.
4. Desplácese por las páginas
deslizando el dedo o con los botones
de volumen
Español
Ajustes de noticaciones en
la pantalla trasera
Puede mostrar fácilmente el
contenido de las noticaciones en la
pantalla trasera.
1. En la pantalla de inicio, pulse
2. Seleccione Aplicaciones de YP >
Pantalla trasera.
3. Cambie el control deslizante
Notificaciones de la pantalla trasera
a Activado.
4. En el modo de notificación,
arrastre el control deslizante
encima de Privado. Esto cambiará la
configuración a Abierto, de modo que
todas las notificaciones quedarán
visibles.
5. Desplácese por las páginas con
deslizamientos o con los botones de
volumen.
Si no desea mostrar notificaciones
en la pantalla trasera, puede
desactivarlas.
1. En la pantalla de inicio, pulse
2. Seleccione Aplicaciones de YP >
Pantalla trasera.
3. Cambie el control deslizante
Notificaciones de la pantalla trasera a
Desactivado.
Español

Ayuda y asistencia
Si el YotaPhone deja de responder,
mantenga pulsado el botón de
encendido durante 10 segundos.
De esta manera, se reiniciará el
YotaPhone.
Para obtener asistencia o la versión
completa de la guía del usuario, vaya
al sitio web: yotaphone.com
Especicaciones del producto
SO
Android Jelly Bean 4.2.2
CPU
Dual Core 1.7 GHz Krait
FACTOR DE FORMA
pantalla delantera y trasera
DIMENSIONES
PESO
146g
PANTALLA PRINCI PAL
de colores;multitáctil capacitiva
PANTALLA TRASERA
escala de grises de 16 niveles; zona táctil
capacitiva bajo la EPD para controles de
gestos
RED
LTE de 800/1800/2600 MHz, UMTS
de 900/1800/2100 MHz, GSM de
900/1800/1900MHz
CÁMARA
flash LED; cámara frontal de 1 MP
Español
MEMORIA
CONECTIVIDAD
GPS w/A-GPS + Glonass
Monobloque táctil con
133.6 x 67 x 9.99mm
4,3” 720x1280 LCD, 16,7M
EPD de 4,3” 360x640,
Cámara principal de 13 MP con AF,
2 GB de RAM, 32 GB de eMMC
WiFi 802.11 a/b/g/n, BT v4.0,
VIDEO
1080p 30 ips ; H.263, H.264 AVC,
MPEG-4, WebM
AUDIO
MP3, AAC, eAAC, eAAC+, AMR, MIDI,
WAV
BATERÍA
1800 mAh
OTROS
Acelerómetro, brújula, giroscopio,
sensor de proximidad, sensor de luz
ambiental, micro SIM, radio FM, gestos
especiales de YotaPhone y aplicaciones
Poner atrás para la pantalla trasera
Información del producto
YotaPhone
Guía del usuario de YotaPhone:
www.yotaphone.com.
Compatibilidad de red: El YotaPhone solo
se puede usar en redes LTE de 800, 1800 y
2600 MHz, en redes UMTS de 900, 1800 y
2100 y en redes GSM de 900, 1800 y 1900
MHz. Debe tener un contrato con un operador de telefonía
Temperatura de funcionamiento de la
pantalla de papel electrónico (EPD): No
utilice el dispositivo con temperaturas
bajas o elevadas. El rendimiento de la EPD
se verá afectado si el dispositivo se usa con
temperaturas inferiores a 0° C o superiores
a 50° C.
Batería y carga: Este dispositivo tiene
una batería interna recargable que no se
puede sacar. Las baterías solo las pueden
reemplazar talleres técnicos concertados
por Yota Devices. Para cargar el dispositivo,
use solos los adaptadores de carga y los
cables de datos aprobados por Yota Devices.
Otros cargadores y cables distintos podrían
provocar la explosión de la batería o el daño
del dispositivo.
Español

Seguridad del producto, cuidados y mantenimiento: Consulte el capítulo “Informa-
ción del producto y seguridad” en la guía del
usuario de YotaPhone.
Información de exposición a radiofrecuencias: El YotaPhone es un transmisor
y receptor de radio. Cumple las directrices
internacionales sobre la exposición a las
ondas de radio. El valor de SAR más alto de
este dispositivo es de 0.570 W/kg en el oído
(pruebas realizadas en conformidad con los
estándares EN 50360:2001/AC y EN 622091:2006) y de 0.276 W/kg cuando se lleva
en alguna parte del cuerpo (pruebas realizadas en conformidad con los estándares
EN 62311:2008 y EN 62209-2:2010). Para
obtener más información, consulte el
capítulo “Información del producto y seguridad” en la guía del usuario de YotaPhone.
ADVERTENCIA: A fin de evitar posibles daños
auditivos, no escuche por el dispositivo a un
volumen elevado durante mucho tiempo.
Reciclaje y eliminación: Recicle o
deseche siempre sus productos
electrónicos, baterías, accesorios
y materiales de embalaje de acuerdo con la normativa local. No deseche el
dispositivo como basura doméstica.
Garantía del fabricante: Para consultar todos
los detalles de la garantía sobre su producto
YotaPhone, visite nuestro sitio web: www.
yotaphone.com. En el sitio web también se
incluye información de contacto de los centros de servicio y reparación de Yota Devices
y una descripción del procedimiento que
debe seguirse conforme a la garantía de Yot-
Español
aPhone. Como cliente, es posible que tenga
otros derechos legales y protecciones, incluidas garantías implícitas por ley. La garantía
de YotaPhone no limita, restringe ni afecta
en modo alguno a dichos derechos.
Declaración de conformidad: Este producto
cumple con los requisitos fundamentales y otras disposiciones relevantes de
la Directiva 1999/5/EC. Para consultar la
declaración de conformidad, visite el sitio
web http://www.yotaphone.com.
© 2013 Yota Devices. Todos los derechos
reservados.
Español

Para obtener asistencia o la versión
completa de la guía del usuario,
vaya al sitio web:
yotaphone.com
 Loading...