

Page 1

User Guide
TITANIUM_USER_GUIDE
Page 2

Page 3

Titanium_User_Guide User Guide
i
Contents
Getting started ................................................................................................................................................................................................................................. 1
Get to know your YotaPhone .................................................................................................................................................................................................... 1
Install the SIM card .................................................................................................................................................................................................................... 3
Charge your phone .................................................................................................................................................................................................................... 5
Charge with a USB power adapter ................................................................................................................................................................................... 6
Charge with a computer .................................................................................................................................................................................................... 9
Switch your phone on/off ......................................................................................................................................................................................................... 10
Basics ............................................................................................................................................................................................................................................. 11
Lock or unlock the screen ....................................................................................................................................................................................................... 11
Lock or unlock the colour display .................................................................................................................................................................................... 12
Lock or unlock the always-on display ............................................................................................................................................................................. 12
Use the touch screen .............................................................................................................................................................................................................. 12
Tap .................................................................................................................................................................................................................................. 13
Tap and hold ................................................................................................................................................................................................................... 13
Double tap ....................................................................................................................................................................................................................... 14
Drag and drop ................................................................................................................................................................................................................. 14
Swipe............................................................................................................................................................................................................................... 15
Pinch ............................................................................................................................................................................................................................... 15
Nagivate the colour display ..................................................................................................................................................................................................... 16
Switch aeroplane mode on/off ................................................................................................................................................................................................. 16
Adjust the volume .................................................................................................................................................................................................................... 17
Change the volume settings ........................................................................................................................................................................................... 17
Switch between silent, vibration, and normal mode ........................................................................................................................................................ 17
Personalise the home screen .................................................................................................................................................................................................. 18
Customise the Favourites tray ........................................................................................................................................................................................ 18
Remove an application or widget shortcut from the Favourites tray ............................................................................................................................... 19
Add an application shortcut to the home screen ............................................................................................................................................................. 19
Add a widget shortcut to the home screen...................................................................................................................................................................... 19
Page 4

Titanium_User_Guide User Guide
ii
Move an application or widget shortcut ........................................................................................................................................................................... 20
Remove an application or widget shortcut ...................................................................................................................................................................... 20
Create a folder ................................................................................................................................................................................................................ 20
Choose a wallpaper for the home screen ....................................................................................................................................................................... 20
Change date and time ............................................................................................................................................................................................................. 21
Protect your YotaPhone .......................................................................................................................................................................................................... 21
Lock your screen ............................................................................................................................................................................................................. 21
Lock your SIM card ......................................................................................................................................................................................................... 22
Encrypt your data ............................................................................................................................................................................................................ 23
Get to know the indicators ....................................................................................................................................................................................................... 24
Set up user accounts ............................................................................................................................................................................................................... 26
Set up an existing Google account ................................................................................................................................................................................. 26
Create a new Google account ........................................................................................................................................................................................ 26
Always-on display ......................................................................................................................................................................................................................... 27
Navigation on the always-on display ....................................................................................................................................................................................... 28
Answer a call on the always-on display .................................................................................................................................................................................. 28
YotaPanel ................................................................................................................................................................................................................................ 29
Add a preset YotaPanel .................................................................................................................................................................................................. 29
Add a YotaPanel grid ...................................................................................................................................................................................................... 30
Remove a YotaPanel ...................................................................................................................................................................................................... 30
Add a widget to a grid ..................................................................................................................................................................................................... 31
Remove a widget ............................................................................................................................................................................................................ 31
Always-on display widgets ...................................................................................................................................................................................................... 32
Counter............................................................................................................................................................................................................................ 32
Messages ........................................................................................................................................................................................................................ 32
Emails.............................................................................................................................................................................................................................. 32
Calendar .......................................................................................................................................................................................................................... 33
Weather ........................................................................................................................................................................................................................... 33
Stocks.............................................................................................................................................................................................................................. 34
Clock ............................................................................................................................................................................................................................... 34
Music player .................................................................................................................................................................................................................... 35
Apps launcher ................................................................................................................................................................................................................. 35
YotaCover ............................................................................................................................................................................................................................... 36
Notifications on YotaCover ............................................................................................................................................................................................. 36
Switch YotaCover on ....................................................................................................................................................................................................... 36
Choose a picture for YotaCover ...................................................................................................................................................................................... 37
Add a new YotaCover ..................................................................................................................................................................................................... 37
Delete a YotaCover ......................................................................................................................................................................................................... 38
Page 5

Titanium_User_Guide User Guide
iii
Change the YotaCover settings ...................................................................................................................................................................................... 38
YotaEnergy .............................................................................................................................................................................................................................. 39
YotaMirror ................................................................................................................................................................................................................................ 39
YotaSnap ................................................................................................................................................................................................................................. 40
Calls ................................................................................................................................................................................................................................................ 41
Make a call .............................................................................................................................................................................................................................. 41
Call a contact .................................................................................................................................................................................................................. 41
Make a call from the call log ........................................................................................................................................................................................... 42
Make a call by using voice dialler ................................................................................................................................................................................... 42
Answer a call ........................................................................................................................................................................................................................... 42
Reject a call ............................................................................................................................................................................................................................. 43
Reject a call ..................................................................................................................................................................................................................... 43
Reject a call with a message .......................................................................................................................................................................................... 43
Make a conference call ........................................................................................................................................................................................................... 43
Make an international call........................................................................................................................................................................................................ 44
Make an emergency call ......................................................................................................................................................................................................... 44
Make an emergency call ................................................................................................................................................................................................. 45
Make an emergency using a locked phone .................................................................................................................................................................... 45
View the call log ...................................................................................................................................................................................................................... 46
Save a number from the call log to your contacts list ..................................................................................................................................................... 46
Send a message to a number in the call log ................................................................................................................................................................... 46
Clear the call log ............................................................................................................................................................................................................. 47
Manage your voicemail ........................................................................................................................................................................................................... 47
Check your voicemail ...................................................................................................................................................................................................... 47
Change the voicemail settings ........................................................................................................................................................................................ 47
Manage call settings ................................................................................................................................................................................................................ 48
Change your ringtone...................................................................................................................................................................................................... 48
Forward a call .................................................................................................................................................................................................................. 48
Switch call waiting on/off ................................................................................................................................................................................................. 49
Switch Fixed Dialling Numbers (FDN) on/off .................................................................................................................................................................. 49
Text input........................................................................................................................................................................................................................................ 50
Use the on-display keyboard ................................................................................................................................................................................................... 50
Get to know the on-displa y k e yboard .............................................................................................................................................................................. 51
Write text ......................................................................................................................................................................................................................... 51
Edit text ........................................................................................................................................................................................................................... 52
Switch word suggestions on/off ...................................................................................................................................................................................... 52
Page 6

Titanium_User_Guide User Guide
iv
Use voice input ........................................................................................................................................................................................................................ 53
Switch voice typing on..................................................................................................................................................................................................... 53
Use voice input ................................................................................................................................................................................................................ 53
Download offline speech recognition .............................................................................................................................................................................. 53
Change the default input method ............................................................................................................................................................................................ 54
Messaging ...................................................................................................................................................................................................................................... 54
Send a message ..................................................................................................................................................................................................................... 55
Read a message ..................................................................................................................................................................................................................... 56
Open a message ............................................................................................................................................................................................................. 56
Reply to a message ................................................................................................................................................................................................................. 57
Forward a message ................................................................................................................................................................................................................. 57
Delete a message or conversation .......................................................................................................................................................................................... 58
Delete a message ........................................................................................................................................................................................................... 58
Delete a conversation ..................................................................................................................................................................................................... 58
Customise the message settings ............................................................................................................................................................................................ 59
People ............................................................................................................................................................................................................................................. 59
Add a new contact ................................................................................................................................................................................................................... 59
Create a contact group ............................................................................................................................................................................................................ 60
Search for a contact ................................................................................................................................................................................................................ 60
Import or export contacts......................................................................................................................................................................................................... 61
Import contacts ................................................................................................................................................................................................................ 61
Export contacts ............................................................................................................................................................................................................... 61
Manage your contacts ............................................................................................................................................................................................................. 61
Edit a contact .................................................................................................................................................................................................................. 62
Set a contact photo ......................................................................................................................................................................................................... 62
Assign a contact to a group ............................................................................................................................................................................................ 62
Delete a contact .............................................................................................................................................................................................................. 63
Share a contact ............................................................................................................................................................................................................... 63
Add a contact to your favourites ..................................................................................................................................................................................... 64
Set a ringtone for a contact ............................................................................................................................................................................................. 64
Place a contact on the home screen ............................................................................................................................................................................... 64
Camera............................................................................................................................................................................................................................................ 65
Take a photo ........................................................................................................................................................................................................................... 65
Change the flash mode ........................................................................................................................................................................................................... 65
Use special effects .................................................................................................................................................................................................................. 66
Page 7

Titanium_User_Guide User Guide
v
Take a panorama photo .................................................................................................................................................................................................. 66
Take a high dynamic range (HDR) photo ....................................................................................................................................................................... 67
Take a photo with blurry edges ....................................................................................................................................................................................... 67
Record a video ........................................................................................................................................................................................................................ 67
Share your photos and videos ................................................................................................................................................................................................ 68
Gallery............................................................................................................................................................................................................................................. 69
Manage albums ....................................................................................................................................................................................................................... 69
Delete an album .............................................................................................................................................................................................................. 69
Change the album view................................................................................................................................................................................................... 70
View and edit pictures ............................................................................................................................................................................................................. 70
View pictures as a slideshow .......................................................................................................................................................................................... 70
View the details of a picture ............................................................................................................................................................................................ 70
Edit a picture ................................................................................................................................................................................................................... 71
Crop a picture .................................................................................................................................................................................................................. 71
Rotate a picture left or right ............................................................................................................................................................................................. 71
Delete a picture ............................................................................................................................................................................................................... 72
Delete several pictures from an album ........................................................................................................................................................................... 72
Set a picture as a wallpaper ............................................................................................................................................................................................ 72
Play a video ............................................................................................................................................................................................................................. 73
Multimedia ...................................................................................................................................................................................................................................... 73
Play music ............................................................................................................................................................................................................................... 73
Add an album to a playlist ............................................................................................................................................................................................... 74
Add songs to a playlist .................................................................................................................................................................................................... 74
Remove music from a playlist ......................................................................................................................................................................................... 74
Delete a playlist ............................................................................................................................................................................................................... 75
Listen to radio .......................................................................................................................................................................................................................... 75
Listen to radio .................................................................................................................................................................................................................. 75
Scan for stations automatically ....................................................................................................................................................................................... 76
Save a station as a preset .............................................................................................................................................................................................. 76
Switch radio off ................................................................................................................................................................................................................ 76
Edit videos ............................................................................................................................................................................................................................... 77
Start a new movie project................................................................................................................................................................................................ 77
Change your project name .............................................................................................................................................................................................. 77
Delete your project .......................................................................................................................................................................................................... 78
Add media to your movie ................................................................................................................................................................................................ 78
Add a soundtrack to your movie ..................................................................................................................................................................................... 78
Page 8

Titanium_User_Guide User Guide
vi
Add a title to your movie.................................................................................................................................................................................................. 78
Edit the title ..................................................................................................................................................................................................................... 79
Export a movie ................................................................................................................................................................................................................ 79
Record sounds ........................................................................................................................................................................................................................ 80
Connectivity ................................................................................................................................................................................................................................... 80
Mobile data connection ........................................................................................................................................................................................................... 81
Disable the mobile data connection ................................................................................................................................................................................ 81
Switch data roaming on................................................................................................................................................................................................... 82
View mobile data usage .................................................................................................................................................................................................. 82
Wi-Fi connection ...................................................................................................................................................................................................................... 82
Connect to a Wi-Fi network ............................................................................................................................................................................................. 83
Add a Wi-Fi network manually ........................................................................................................................................................................................ 83
Scan for Wi-Fi networks manually .................................................................................................................................................................................. 83
Switch Wi-Fi on/off .......................................................................................................................................................................................................... 84
Wi-Fi hotspot ........................................................................................................................................................................................................................... 84
Set up a Wi-Fi hotspot ..................................................................................................................................................................................................... 85
Switch your portable Wi-Fi hotspot on/off ....................................................................................................................................................................... 85
USB tethering .......................................................................................................................................................................................................................... 86
Bluetooth connection ............................................................................................................................................................................................................... 87
Switch Bluetooth on/off ................................................................................................................................................................................................... 87
Configure Bluetooth ........................................................................................................................................................................................................ 88
Make your YotaPhone visible to other Bluetooth devices............................................................................................................................................... 88
Pair your YotaPhone with another Bluetooth device ...................................................................................................................................................... 88
Use Bluetooth tethering................................................................................................................................................................................................... 89
Computer connection using USB ............................................................................................................................................................................................ 89
Connect as a media device (MTP) .................................................................................................................................................................................. 90
Connect as a Camera (PTP) ........................................................................................................................................................................................... 91
Chrome ........................................................................................................................................................................................................................................... 91
Browsing in Chrome ................................................................................................................................................................................................................ 92
Browse to a webpage ...................................................................................................................................................................................................... 92
Refresh a webpage ......................................................................................................................................................................................................... 92
Stop loading a webpage.................................................................................................................................................................................................. 92
Open a new tab ............................................................................................................................................................................................................... 93
Browse with incognito tabs ............................................................................................................................................................................................. 93
Switch between opened tabs .......................................................................................................................................................................................... 94
Close a tab ...................................................................................................................................................................................................................... 94
Page 9

Titanium_User_Guide User Guide
vii
Chrome settings ...................................................................................................................................................................................................................... 94
Change the settings ........................................................................................................................................................................................................ 94
Clear your browsing history ............................................................................................................................................................................................ 95
Bookmarks and history ............................................................................................................................................................................................................ 95
Save a page to your bookmarks ..................................................................................................................................................................................... 95
View your bookmarks ...................................................................................................................................................................................................... 96
Manage your bookmarks................................................................................................................................................................................................. 96
Delete a bookmark .......................................................................................................................................................................................................... 97
View your browsing history ............................................................................................................................................................................................. 97
Email ............................................................................................................................................................................................................................................... 98
Set up an email account .......................................................................................................................................................................................................... 98
Set up a corporate email account ........................................................................................................................................................................................... 98
Switch between multiple email accounts................................................................................................................................................................................. 99
Send an email ......................................................................................................................................................................................................................... 99
Read and reply to an email ................................................................................................................................................................................................... 100
View email folders ................................................................................................................................................................................................................. 100
Gmail ............................................................................................................................................................................................................................................. 101
Set up a Gmail account ......................................................................................................................................................................................................... 101
Set up an existing Gmail account ................................................................................................................................................................................. 101
Set up a new Gmail account ......................................................................................................................................................................................... 101
Send an email ....................................................................................................................................................................................................................... 102
Read and reply to an email ................................................................................................................................................................................................... 102
View email folders ................................................................................................................................................................................................................. 103
YotaPhone apps .......................................................................................................................................................................................................................... 103
YotaRSS ................................................................................................................................................................................................................................ 104
On the colour display .................................................................................................................................................................................................... 104
On the always-on display .............................................................................................................................................................................................. 105
Notepad/Clipper .................................................................................................................................................................................................................... 106
Browser ................................................................................................................................................................................................................................. 106
Organiser ............................................................................................................................................................................................................................... 107
TeachMe................................................................................................................................................................................................................................ 107
Yota Reader .......................................................................................................................................................................................................................... 107
On the colour display .................................................................................................................................................................................................... 107
On the always-on display .............................................................................................................................................................................................. 108
Games ................................................................................................................................................................................................................................... 109
Page 10

Titanium_User_Guide User Guide
viii
2048 .............................................................................................................................................................................................................................. 109
Checkers ....................................................................................................................................................................................................................... 110
Chess ............................................................................................................................................................................................................................ 110
Sudoku .......................................................................................................................................................................................................................... 111
SMS Fun................................................................................................................................................................................................................................ 111
Google apps ................................................................................................................................................................................................................................. 111
Google Drive ......................................................................................................................................................................................................................... 111
Create a new file ........................................................................................................................................................................................................... 112
Upload files to Google Drive ......................................................................................................................................................................................... 112
Google+ ................................................................................................................................................................................................................................. 112
Write and publish a new post ........................................................................................................................................................................................ 113
View and change Google+ settings .............................................................................................................................................................................. 113
Hangouts ............................................................................................................................................................................................................................... 113
Set up Hangouts ........................................................................................................................................................................................................... 114
Start a new hangout ...................................................................................................................................................................................................... 114
Maps ...................................................................................................................................................................................................................................... 114
Search for locations ...................................................................................................................................................................................................... 114
Get directions ................................................................................................................................................................................................................ 115
Navigate to a location .................................................................................................................................................................................................... 115
Play Store .............................................................................................................................................................................................................................. 116
Voice Search ......................................................................................................................................................................................................................... 116
YouTube ................................................................................................................................................................................................................................ 117
Tools ............................................................................................................................................................................................................................................. 117
Calculator .............................................................................................................................................................................................................................. 118
Calendar ................................................................................................................................................................................................................................ 118
Switch between different calendar view modes ............................................................................................................................................................ 118
Add an appointment ...................................................................................................................................................................................................... 118
View calendars .............................................................................................................................................................................................................. 119
Edit or delete an appointment ....................................................................................................................................................................................... 119
Clock ...................................................................................................................................................................................................................................... 120
Set an alarm .................................................................................................................................................................................................................. 120
Use the timer ................................................................................................................................................................................................................. 120
Use the stopwatch ......................................................................................................................................................................................................... 121
Downloads ............................................................................................................................................................................................................................. 121
Share your downloads .................................................................................................................................................................................................. 121
Sort your downloads ..................................................................................................................................................................................................... 122
Page 11

Titanium_User_Guide User Guide
ix
Delete your downloads.................................................................................................................................................................................................. 122
Troubleshooting .......................................................................................................................................................................................................................... 122
Help and support ................................................................................................................................................................................................................... 123
Software update .................................................................................................................................................................................................................... 123
Backup and reset .................................................................................................................................................................................................................. 123
Back up your data ......................................................................................................................................................................................................... 124
Reset your phone .......................................................................................................................................................................................................... 124
Specifications .............................................................................................................................................................................................................................. 124
Product and safety information ................................................................................................................................................................................................. 127
Safety .................................................................................................................................................................................................................................... 127
Use only charger adapters and data cables approved by Yota Devices ...................................................................................................................... 128
To save energy, unplug the charger when not in use. Do not attempt to replace YotaPhone battery yourself .......................................................... 128
Switch your device off in restricted areas ..................................................................................................................................................................... 128
Do not use your device when driving ............................................................................................................................................................................ 128
Repairing ....................................................................................................................................................................................................................... 129
Keep your device dry .................................................................................................................................................................................................... 129
Protect your display ....................................................................................................................................................................................................... 129
Protect your hearing ...................................................................................................................................................................................................... 129
Protect your eyes .......................................................................................................................................................................................................... 129
Network support .................................................................................................................................................................................................................... 130
Device type and identity information ..................................................................................................................................................................................... 130
Nano-SIM only ....................................................................................................................................................................................................................... 130
Electronic Paper Display (EPD) Operating Temperature ...................................................................................................................................................... 130
Emergency Call ..................................................................................................................................................................................................................... 131
Make an emergency call ............................................................................................................................................................................................... 131
Make an emergency call using a locked phone ............................................................................................................................................................ 131
Back up your important information ...................................................................................................................................................................................... 132
About Digital Rights Management (DRM) ............................................................................................................................................................................. 132
Protect your device from harmful content ............................................................................................................................................................................. 132
Avoid the reach of children .................................................................................................................................................................................................... 133
Medical devices ..................................................................................................................................................................................................................... 133
Care and maintenance .......................................................................................................................................................................................................... 133
Recycling and disposal .......................................................................................................................................................................................................... 134
Radio Frequency Exposure Information ................................................................................................................................................................................ 134
Manufacturer’s Warranty for YotaPhone ............................................................................................................................................................................... 134
Page 12

Titanium_User_Guide User Guide
x
Copyrights and other notices ................................................................................................................................................................................................ 135
Declaration of conformity .................................................................................................................................................. Error! Bookmark not defined.
Copyrights ..................................................................................................................................................................................................................... 135
FCC notice .................................................................................................................................................................................................................... 135
Disclaimers ............................................................................................................................................................................................................................ 136
Page 13

Titanium_User_Guide User Guide
1
Getting started
Start using your YotaPhone.
Get to know your YotaPhone
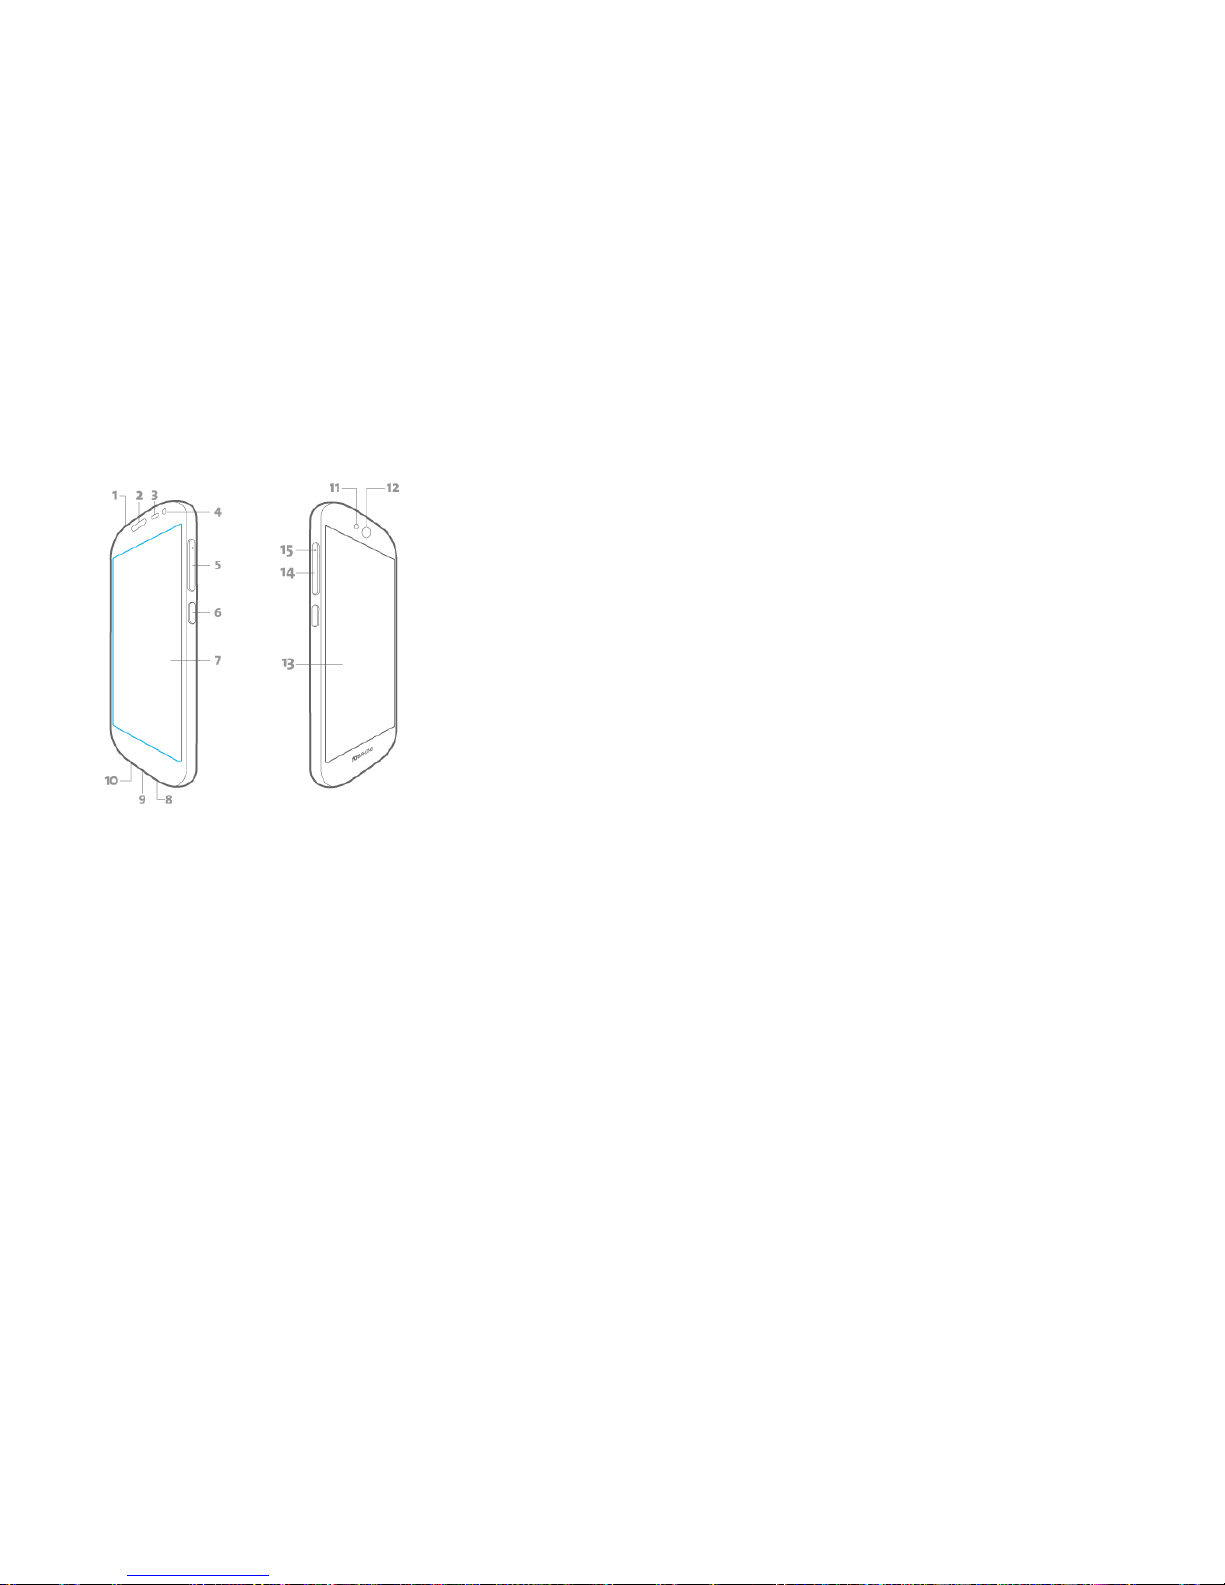
Your YotaPhone has two displays: the colour display and the always-on displa y.
Page 14
Titanium_User_Guide User Guide
2
1 Headset jack, microphone
2 Ear piece
3 Ambient light sensor and proximity sensor
4 Front camera
5 Volume buttons
6 Power button
7 Colour display
8 Loudspeaker
9 Micro USB connector
10 Main microphone
11 Camera LED flash
12 Main camera
Page 15

Titanium_User_Guide User Guide
3
13 Always-on display
14 SIM card tray
15 SIM eject hole
Install the SIM card
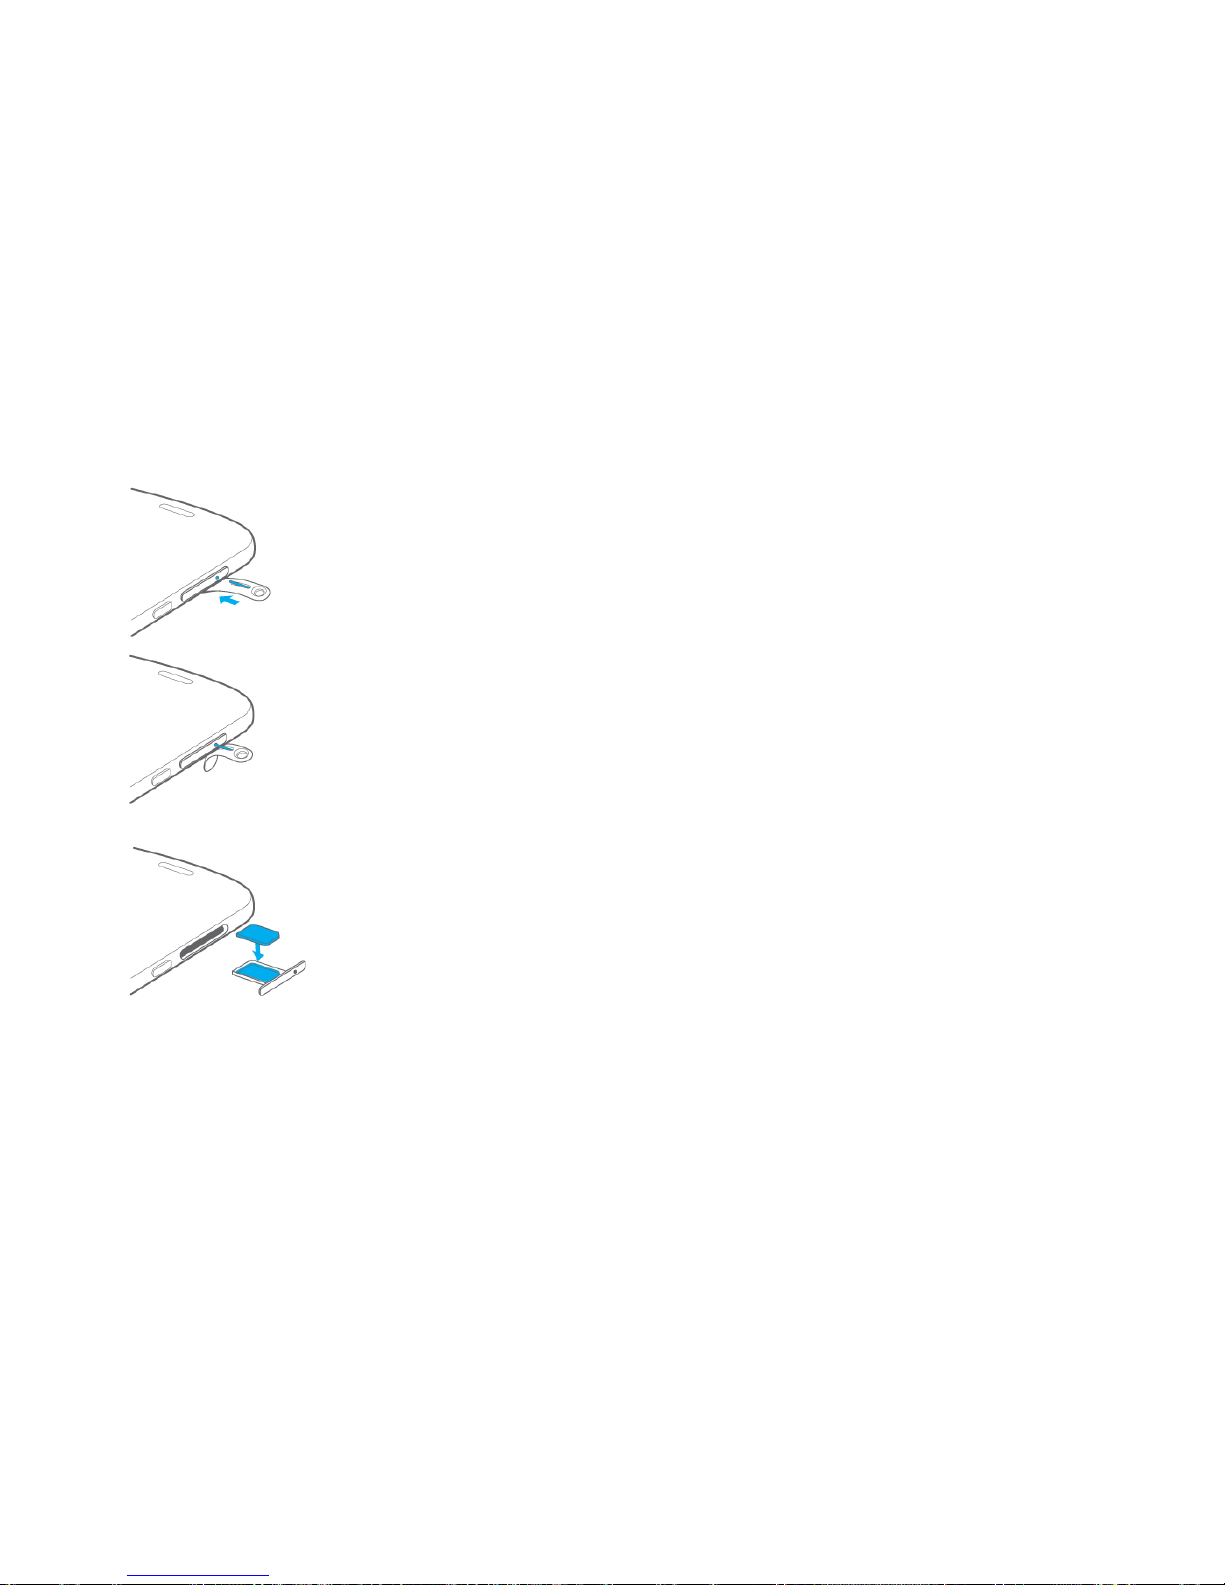
The SIM card tray is located under the volume button and you can open it with the SIM eject tool included in the package. Your service provider prov ides you
with the SIM card.
Your YotaPhone is designed to be used with a Nano-SIM card. Using an incompatible SIM card may damage your phone.
Page 16
Titanium_User_Guide User Guide
4
To install the SIM card:
1 Insert the SIM eject tool into the SIM eject hole, and push lightly until the SIM card tray releases.
Page 17
Titanium_User_Guide User Guide
5
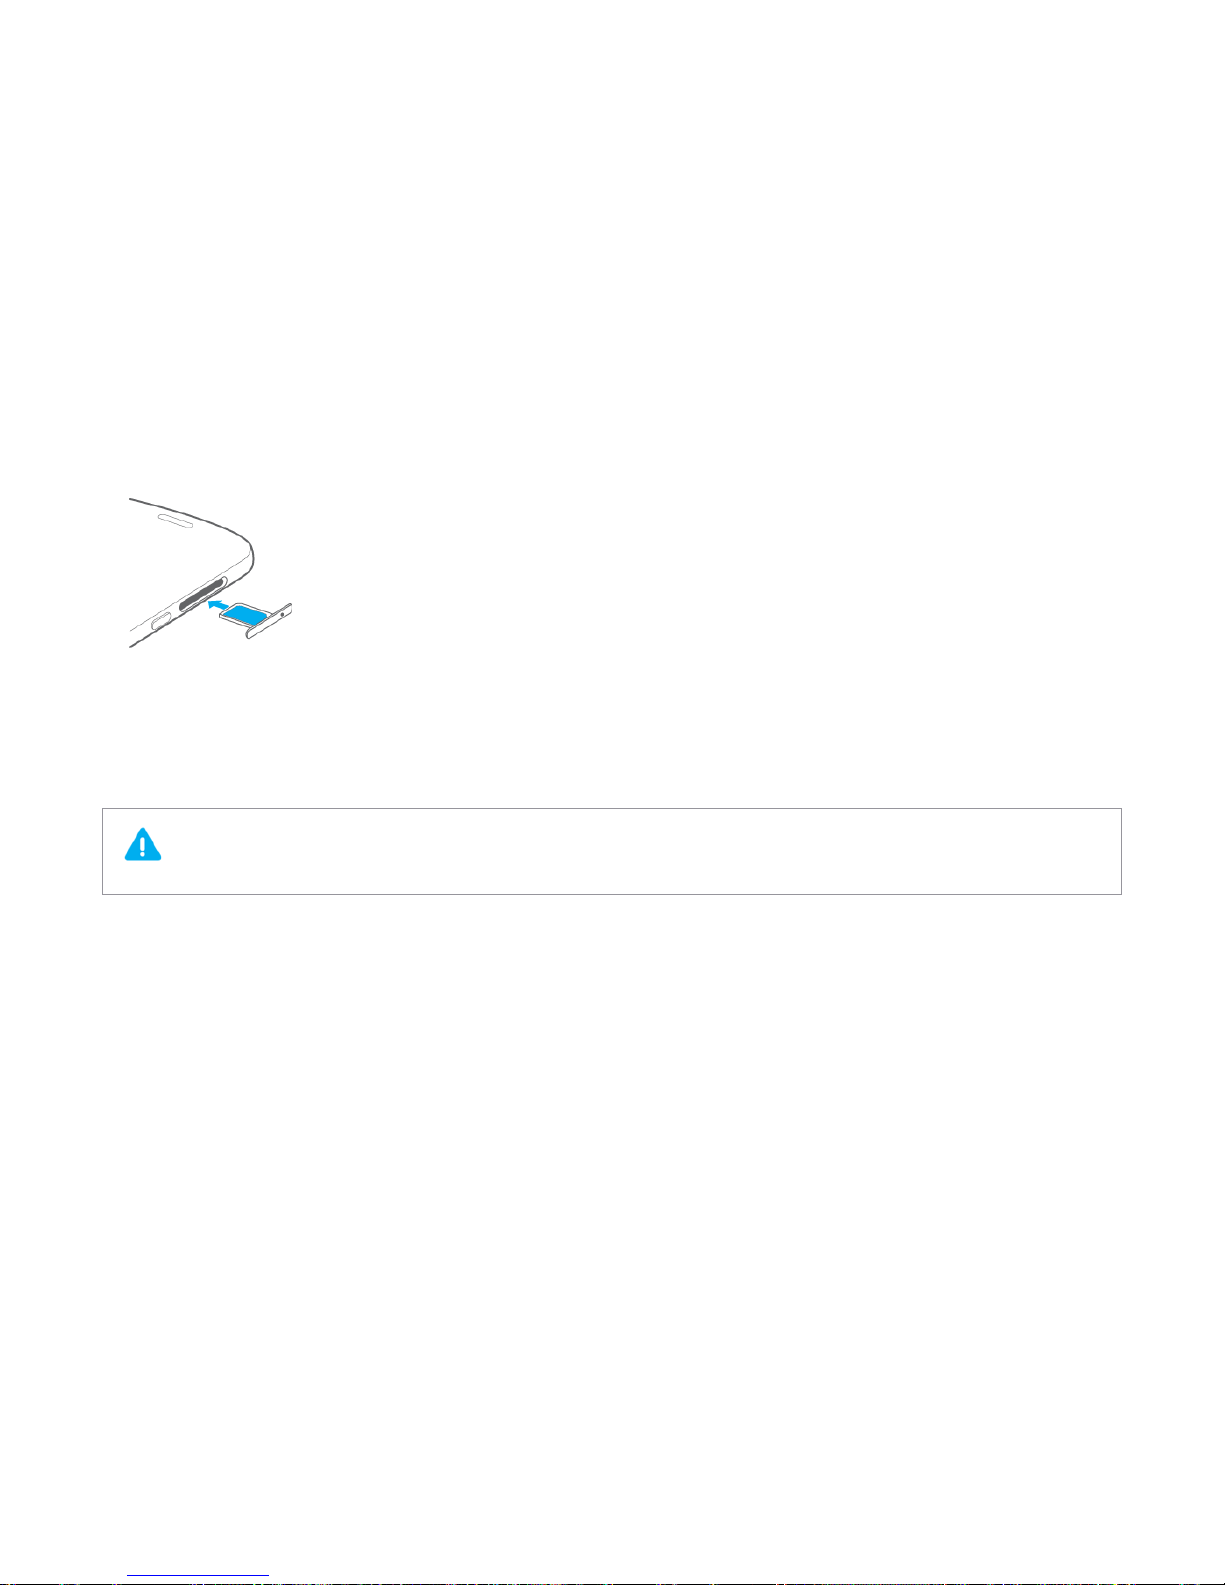
2 Put the SIM card in the tray with the contact area facing down.
3 Place the SIM card tray carefully back into its slot, and push it until it locks.
Charge your phone
The battery of your YotaPhone is non-removable. Do not attempt to open your phone to remove the battery.
Page 18
Titanium_User_Guide User Guide
6
Charge with a USB power adapter
Page 19

Titanium_User_Guide User Guide
7
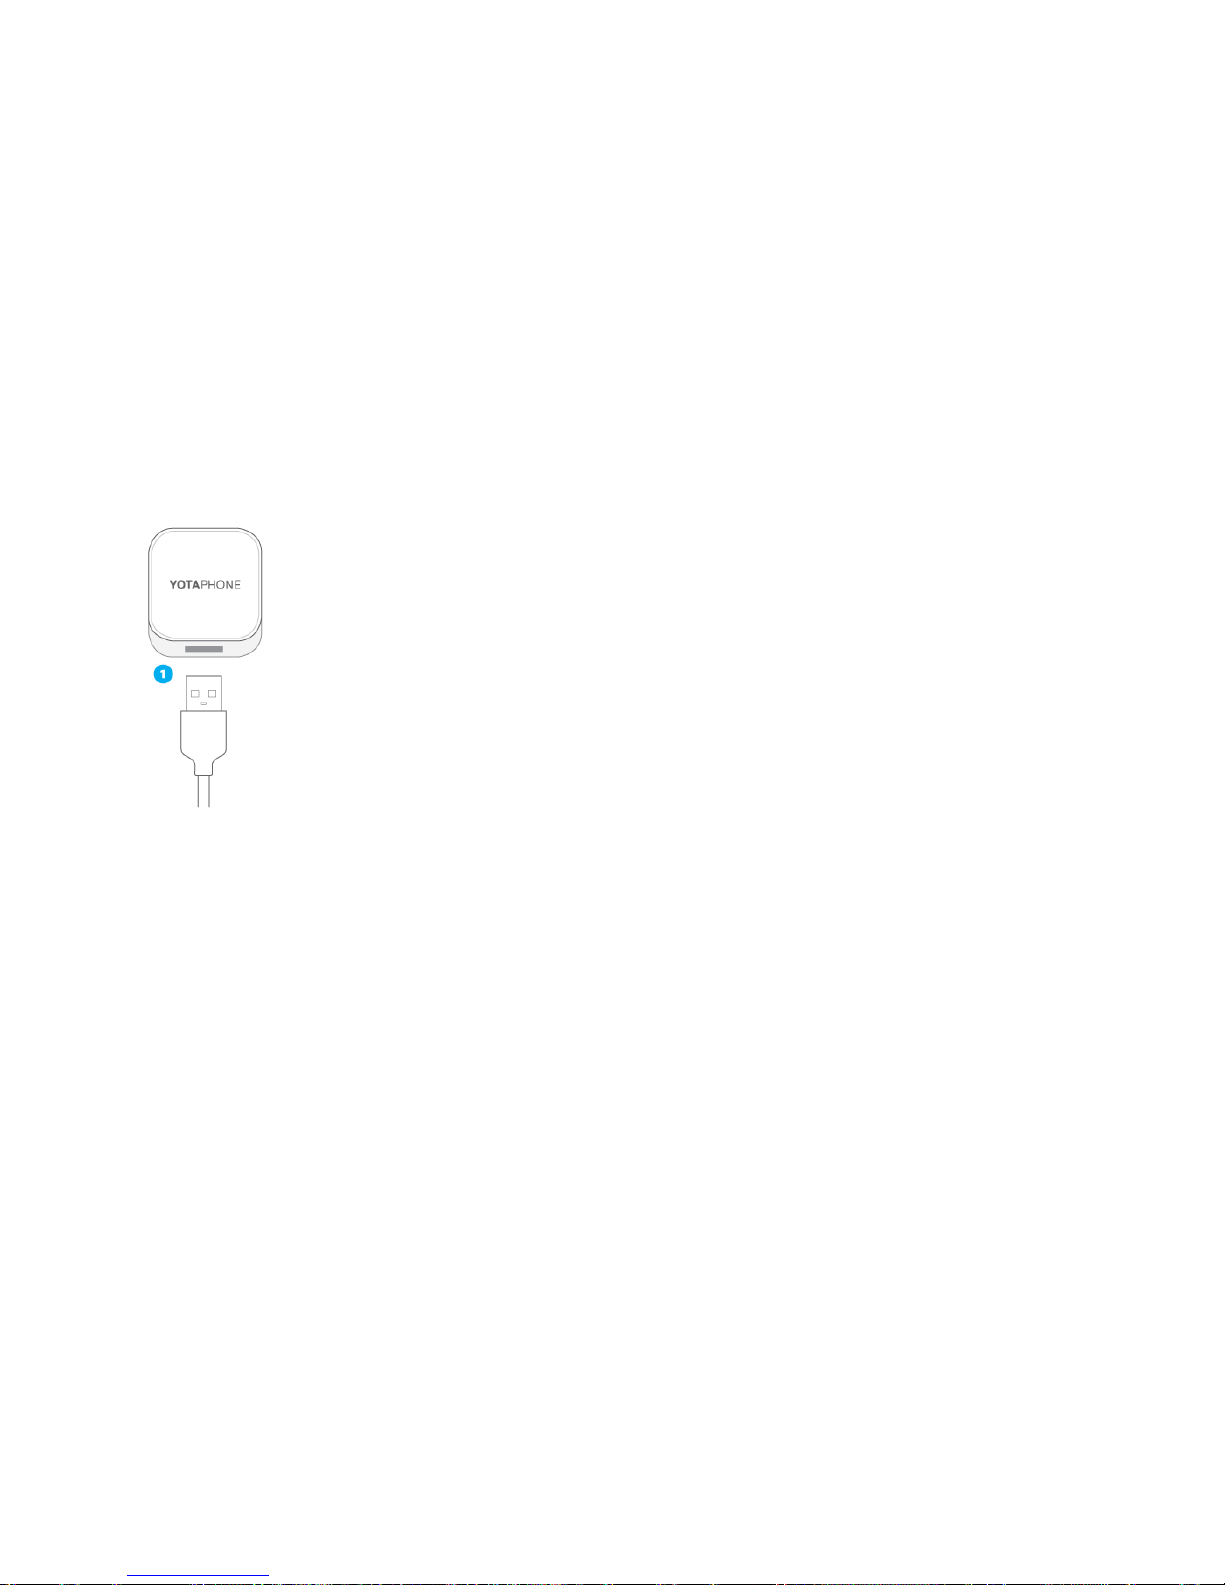
1 Connect the USB cable to the USB power adapter.
Page 20

Titanium_User_Guide User Guide
8
2 Insert the micro USB end of the cable into the micro USB connector on your YotaPhone.
3 Insert the power adapter into a wall socket to start charging.
The charger has an LED light that lights up when the phone is charging. When the battery is full, the LED light switches off.
Page 21

Titanium_User_Guide User Guide
9
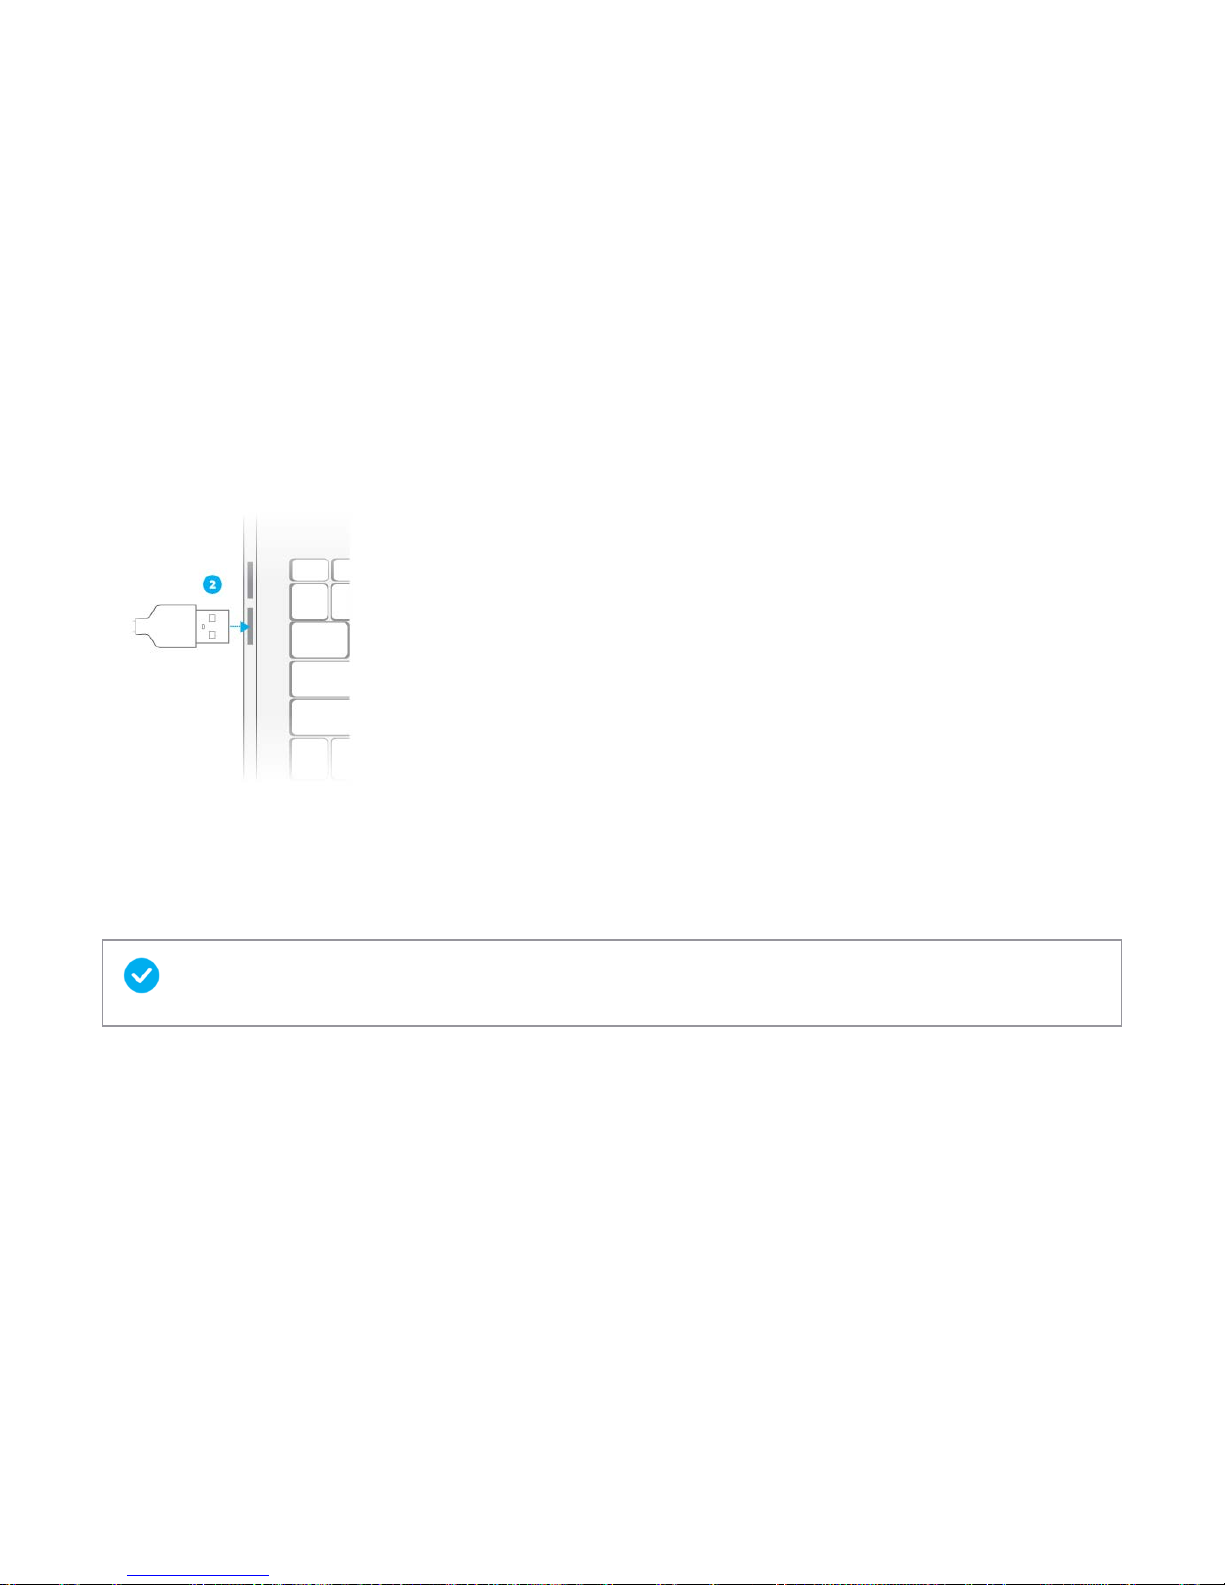
Charge with a computer
Page 22
Titanium_User_Guide User Guide
10
1 Insert the micro USB end of the cable into the micro USB connector on your YotaPhone.
2 Insert the other end of the USB cable into the USB port on your computer.
Switch your phone on/off
Charge the battery before using your YotaPhone for the first time.
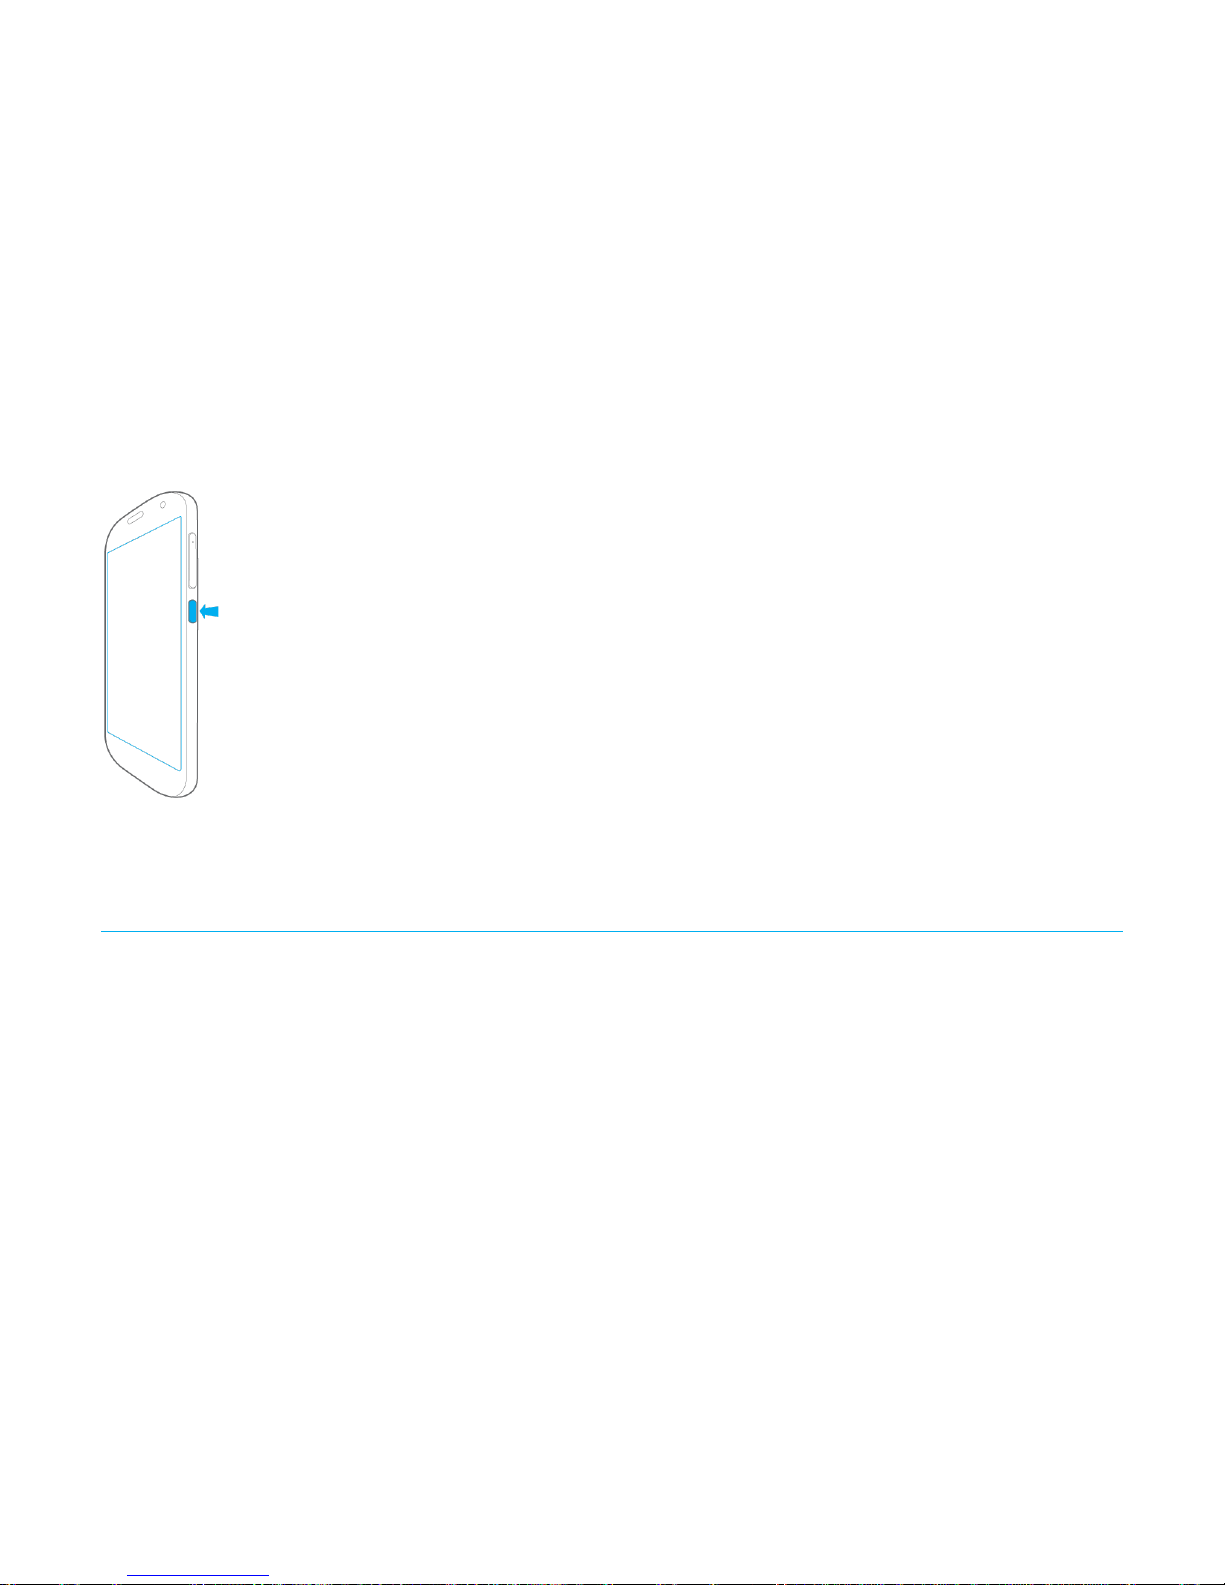
To switch your phone on, press and hold the power button until the phone vibrates.
Page 23
Titanium_User_Guide User Guide
11
To switch your phone off, press and hold the power button, tap Power off, and tap OK.
Basics
Get to know the basic functions of your YotaPhone.
Lock or unlock the screen
When you are holding your YotaPhone, it recognises which display is upwards. You can lock or unlock only the upwards-facing display.
Page 24

Titanium_User_Guide User Guide
12
Lock or unlock the colour display
To lock the screen, press the power button, or tap the screen with three or more fingers.
To unlock the screen, press the power button,and slide the lock icon to the side, or swipe upwards from the bottom of the screen.
Lock or unlock the always-on display
To lock the always-on display, press the power button, or tap the screen with three or more fingers.
To unlock the always-on display, slide the lock icon upwards.
For more screen lock options, see Protect your YotaPhone (on page 21).
Use the touch screen
Get to know the basic touch gestures.
Page 25
Titanium_User_Guide User Guide
13
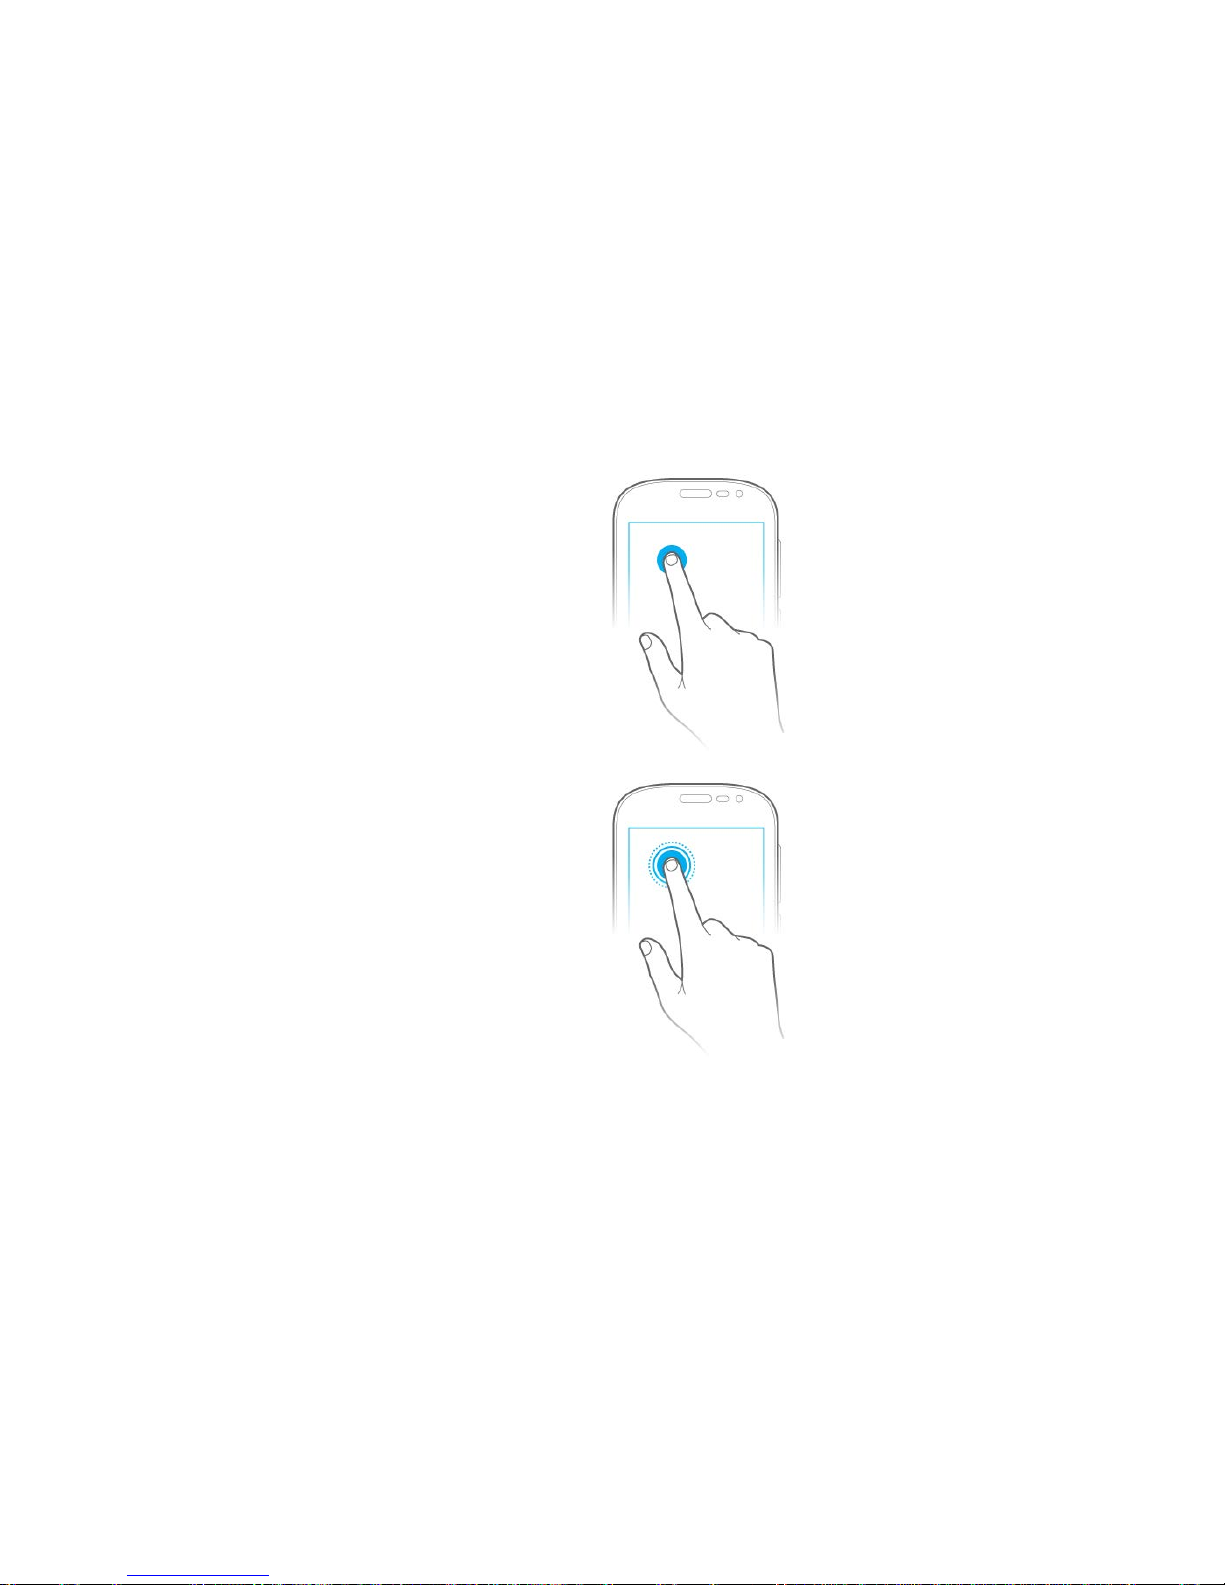
Tap
Tap the screen to interact with items on the screen, such as applications
and setting items, to write text using the on-display keyboard, or to press
on-display buttons.
Tap and hold
Tap and hold an item on the screen to view a menu.
Page 26
Titanium_User_Guide User Guide
14
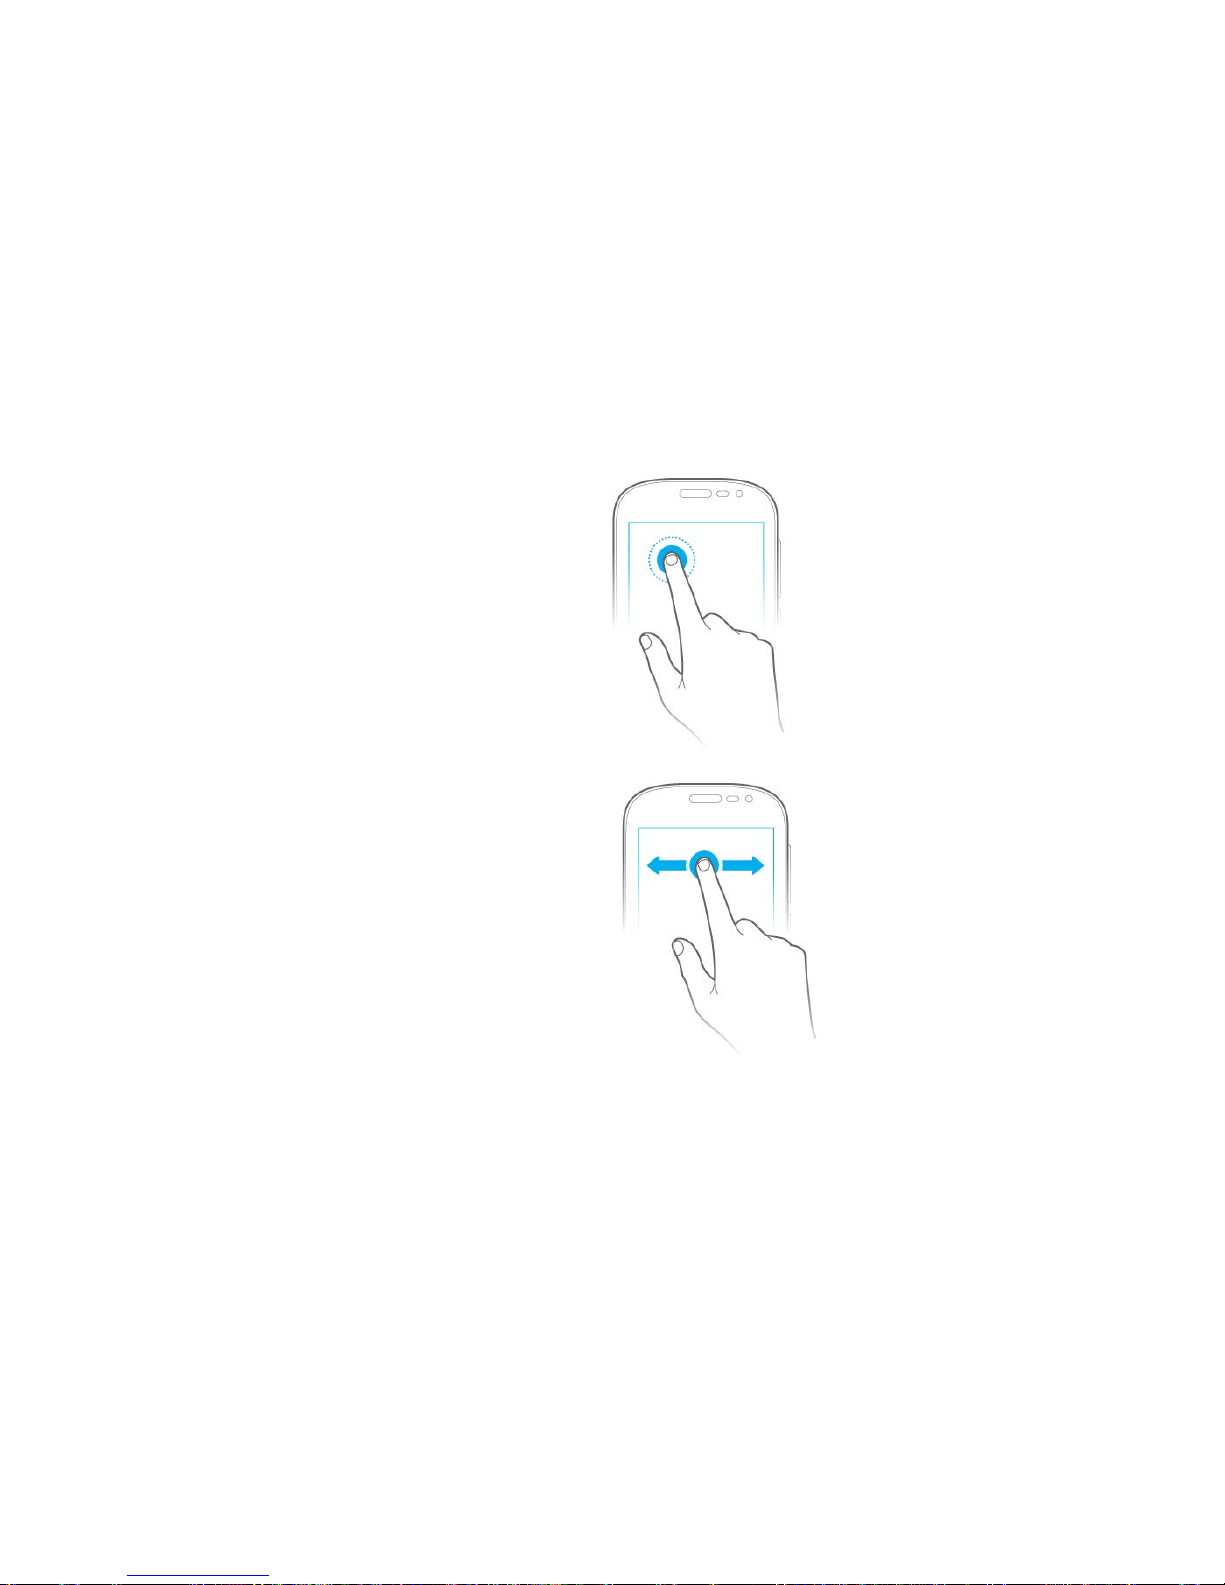
Double tap
Tap twice quickly on a picture, web page, or map to zoom in and out.
Drag and drop
To move an application on the home screen, tap and hold an icon without
releasing your finger, move the icon to another place, and release your
finger.
Page 27
Titanium_User_Guide User Guide
15
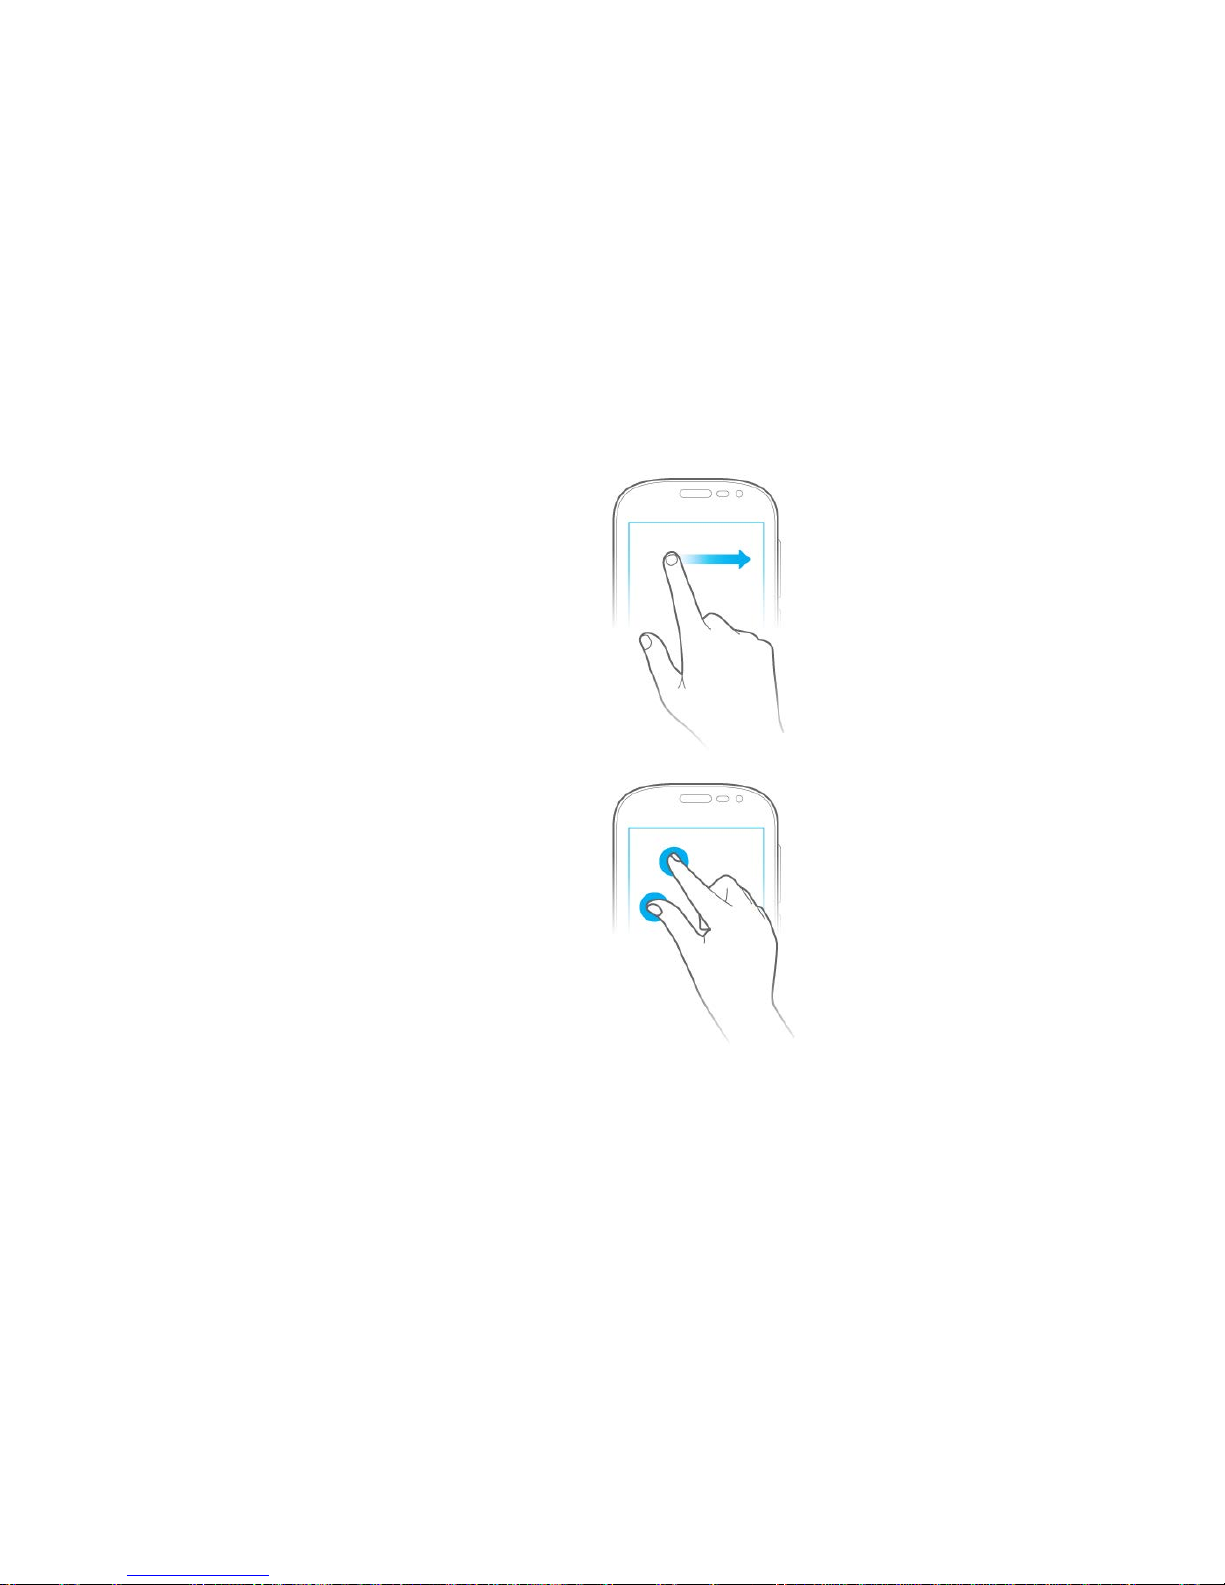
Swipe
To swipe, move your finger across the surface of your screen.
For example, you can swipe the home screen to the left or right to view
other home screen panels.
Pinch
In some applications, you can zoom in and out by placing two fingers on
the screen. Spread the fingers apart to zoom in, and pinch them together to
zoom out.
Page 28
Titanium_User_Guide User Guide
16
Nagivate the colour display
The AndroidTM navigation buttons are located at the bottom of the colour display.
• To go back to the previous screen, tap .
• To go to the home screen, tap .
• To open a list of recently used applications, tap .
To access more options, tap and hold
:
• To do a Google search, drag your finger towards Google.
• To send the current view to the always-on display using YotaMirror, drag your finger towards .
• To send a screenshot of the current view to the always-on display using YotaSnap, drag your finger towards .
Switch aeroplane mode on/off
Aeroplane mode switches off Wi-Fi, Bluetooth, and mobile networks, but otherwise allows you to continue using your phone.
To switch aeroplane mode on, press and hold the power button, and tap
.
To switch aeroplane mode off, press and hold the power button, and tap
.
Page 29

Titanium_User_Guide User Guide
17
Follow the instructions and safety requirements of your airline, and the laws and regulations of the regions in which you are flying.
Adjust the volume
To adjust the volume, press the volume buttons.
Change the volume settings
1 On the home screen, tap > Settings > DEVICE > Sound.
2 Tap Volumes.
3 To adjust the volume of Music, video, games & other media, Ringtone & notifications, and Alarms, tap and drag the sliders.
Switch between silent, vibration, and normal m ode
Your YotaPhone is in normal mode by default.
• To switch to silent mode, press and hold the power button, and tap .
• To switch to vibration mode, press and hold the power button, and tap .
Page 30
Titanium_User_Guide User Guide
18
• To switch to normal mode, press and hold the power button, and tap .
You can also switch between silent, vibration, and normal mode by pressing the volume buttons.
Personalise the home screen
You can customise the Favourites tray, add and remove application and widget shortcuts on the home screen, and change your wallpaper.
Customise the Favourites tray
The Favourites tray at the bottom of the home screen keeps your most important shortcuts at hand.
1 On the home screen, tap
.
2 Tap and hold an application or widget icon until the Favourites tray on the home screen appears.
3 Drag the icon into place and release your finger.
Page 31
Titanium_User_Guide User Guide
19
You can place four application or widget shortcuts on the Favourites tray.
You can also create a folder on the tray by stacking a shortcut on top of another.
Remove an application or widget shortcut from the Favourites
tray
Tap and hold an application or widget shortcut, and drag it away from the Favourites tray.
Add an application shortcut to the home screen
1 On the home screen, tap .
2 Tap and hold an application icon until the home screen appears.
3 Drag the icon onto the home screen.
Add a widget shortcut to the home screen
1 Tap and hold an empty space on the home screen
Page 32

Titanium_User_Guide User Guide
20
2 Tap WIDGETS.
3 Tap and hold a widget icon until the home screen appears.
4 Drag the icon onto the home screen.
Move an application or widget shortcut
1 Tap and hold the application or widget shortcut you want to move.
2 Drag the shortcut to a new location, and release your finger.
Remove an application or widget shortcut
1 Tap and hold the application or widget shortcut you want to remove.
2 Drag the shortcut or widget towards Remove, and release your finger.
Create a folder
1 Tap and hold an icon, drag it over another icon, and release your finger. The two icons are now stacked in a folder.
2 To name a folder, tap the folder to view its name. Tap Unnamed folder, and enter a new name.
Choose a wallpaper for the home screen
1 On the home screen, tap and hold an empty space.
2 Tap Wallpaper.
3 In the film strip, tap a picture, and tap Set wallpaper.
Page 33
Titanium_User_Guide User Guide
21
Change date and time
On the home screen, tap > Settings > SYSTEM > Date & time.
• To change the date, tap Set date, and select the correct date.
• To change the time, tap Set time, and select the correct time.
• To use the 24 hour format, select Use 24 hour format.
To automatically get the date, time, and time zone from your service provider’s network, tick Automatic time zone and Automatic date & time.
Protect your YotaPhone
Learn how to protect your YotaPhone using the screen lock, SIM card lock, and data encryption.
Lock your screen
1 On the home screen, tap > Settings > PERSONAL > Security > SCREEN SECURIT Y > Screen lock.
2 Tap to choose a screen lock option:
Page 34
Titanium_User_Guide User Guide
22
• None - No screen lock. This option provides no protection.
• Slide - Swipe to unlock the phone. This option provides minimal protection.
• Face Unlock - Use facial recognition to unlock the phone. This option is less secure than a pattern, PIN, or password, and is not available for the
always-on display.
• Pattern - Draw a simple pattern with your finger to unlock the phone.
• PIN - Use a PIN code to unlock the phone. The PIN code must contain four or more numbers.
• Password - Use a password to unlock the phone. The password must contain four or more letters or numbers.
When you set a password to lock your screen, keep the password in a safe place separate from your YotaPhone. If you forget your password and
cannot unlock your YotaPhone because you have entered a wrong password too many times, you may need to get your YotaPhone serviced and
possibly pay additional charges to unlock your YotaPhone. All the personal data in your YotaPhone may be deleted.
Lock your SIM card
The PIN code helps to protect your SIM card against unauthorised use. You can set your phone to ask for the PIN code when you switch it on. If the PIN code
is not supplied with your SIM card or you have forgotten the code, contact your service provider.
1 On the home screen, tap
> Settings > PERSONAL > Security > SIM CARD LOCK > Set up SIM card lock.
2 Tick Lock SIM card and enter the PIN code.
Page 35
Titanium_User_Guide User Guide
23
If you enter the PIN code incorrectly three times in succession, you must unblock the code with the PUK or PUK2 code. If you do not have them,
contact your service provider.
Encrypt your data
You can protect and encrypt your phone data, such as Google Accounts, application data, music and other media, and downloaded information. If you encrypt
your data, you must enter a numeric PIN or password each time you switch your phone on. If you have already set up a screen lock, you must use the same
PIN or password. You cannot have two PINs or passwords.
Encryption is irreversible. The only way to revert to an unencrypted phone is to perform a factory data reset, which erases all your data.
Before enabling encryption:
1 Set a lock screen PIN or password.
2 Charge your phone fully.
To enable encryption, on the home screen, tap
> Settings > PERSONAL > Security > ENCRYPTION > Encrypt phone. The encryption may take
more than an hour.
Page 36
Titanium_User_Guide User Guide
24
Do not interrupt the encryption process or you may lose some or all of your data.
Get to know the indicators
The indicators at the top of the screen give you information such as the current time, battery power level, and signal strength.
Page 37

Titanium_User_Guide User Guide
25
No signal
GPS activated
Signal strength
Call in progress
Roaming (outside of normal service area)
Missed call
GPRS network connected
Synced with the web
EDGE network connected
Connected to computer
UMTS network connected
No SIM or USIM card
HSDPA network connected
New text or multimedia message
HSPA+ network connected
Alarm activated
Downloading
Silent mode activated
Calendar reminder
Vibration mode activated
LTE network connected
Aeroplane mode activated
Wi-Fi connected
Error occurred
Bluetooth activated
Battery power level
Page 38

Titanium_User_Guide User Guide
26
Set up user accounts
Your YotaPhone uses the Android operating system provided by Google. To use Google applications and services, for example Google Play™ Store,
Gmail™, Drive
TM
, or Google Maps™, you need to set up a Google account.
You can set up an existing Google account, or if you do not have a Google account, you can create one.
On the home screen, tap
, and tap a Google application, such as Play Store, Gmail, or Drive.
Set up an existing Google account
1 On the Add a Google Account screen, tap Existing.
2 Enter your email address and password into the corresponding fields.
3 Tap
.
Create a new Google account
1 On the Add a Google Account screen, tap New.
2 Follow the instructions on the screen.
Page 39
Titanium_User_Guide User Guide
27
You can also set up an account in Settings. On the home screen, tap > Settings > ACCOUNTS > Add account.
Always-on display
The always-on display is an Electronic Paper Display, (EPD).
On the always-on display, you can, for example:
Answer calls
Read and send emails and text messages
Read books with YotaReader
Browse the web
Play games
Read RSS feeds
There are also many other applications and widgets available. You can find more widgets and applications in the YotaApps catalogue.
The applications and widgets on the always-on displa y are placed on Yot aP ane ls.
The always-on display does not lock automatically after a certain time. It will remain unlocked until you tap the screen with three or more fingers, press the
power button, or start using the colour display.
You can personalise your YotaPhone by adding a Yota Cov er with a picture you lik e on the alwa ys-on display.
Page 40
Titanium_User_Guide User Guide
28
Navigation on the always-on display
The navigation panel is located in the bottom of the screen.
To move to the next panel on the left, tap the left arrow. To move to the next panel on the right, tap right arrow. You can also swipe the screen with your finger
to move to another YotaPanel.
When you have opened an application on the always-on display, tap
to move one step back.
When you have opened an application on the always-on display, tap
to return to YotaPanels.
To activate YotaCover, tap
.
##Does this still apply?##To use mirror mode, tap and hold
, and drag your finger towards .
##Does this still apply?##To do a Google search, tap and hold
, and drag your finger towards Google.
Answer a call on the always-on display
You can answer a call using the always-on display.
• To answer a call, drag the call icon towards .
• To reject a call, drag the icon towards .
• To reject the call and to send a message to the caller, drag the call icon towards .
Page 41

Titanium_User_Guide User Guide
29
If you have a missed call, the calls notification will appear in full-screen mode for five minutes.
The calls widget on the YotaPanel shows the names or phone numbers of the callers, the date and time of missed calls, and a number of missed calls from
each contact.
To view your missed calls on the always-on display, tap the Calls widget.
To make a call, select the contact or the number.
YotaPanel
The widgets on the always-on display are placed on YotaP ane ls. You ca n add an d remove widgets using the YotaHub application.
When you first switch your YotaPhone on, you have one YotaPanel on the always-on display. You can have four YotaPanels installed on your phone.
You can add and remove YotaPanels and widgets using the YotaHub application.
Add a preset YotaPanel
1 On the home screen, tap > YotaHub.
2 Tap YotaPanels.
3 Swipe from right to left until you reach an empty panel.
4 Tap
.
5 To add a preset panel with widgets added, tap ALL.
6 Tap the panel you want to add.
7 Tap
Page 42

Titanium_User_Guide User Guide
30
Add a YotaPanel grid
1 On the home screen, tap > YotaHub.
2 Tap YotaPanels.
3 Swipe from right to left until you reach an empty panel.
4 Tap
.
5 To add an empty grid and add the widgets yourself, tap GRIDS.
6 Tap the kind of grid you want to use.
7 Tap
.
Remove a YotaPanel
1 On the home screen, tap > YotaHub.
2 Tap YotaPanels.
3 Swipe left or right to get to the panel you want to remove.
4 Tap
> Remove.
Page 43
Titanium_User_Guide User Guide
31
Add a widget to a grid
1 On the home screen, tap > YotaHub.
2 Tap YotaPanels.
3 Swipe left or right to get to the YotaPanel you want to edit.
4 Tap an empty space on the panel, or tap a widget you want to replace.
5 Tap the widget you want to add.
The selection of available widgets depends on the size of the empty space you want to place the widget into.
Remove a widget
1 On the home screen, tap > YotaHub.
2 Tap YotaPanels.
3 Swipe left or right to get to the YotaPanel you want to edit.
4 Tap and hold a widget
5 To leave the space empty, tap Leave empty. To add a new widget, tap a widget.
Page 44

Titanium_User_Guide User Guide
32
Always-on display widgets
Widgets on the always-on display offer information about incoming text messages, calls, email messages, or about the weather, stock exchange, or news.
You can find more widgets in the YotaApps catalogue.
Counter
The Counter widget shows the number of unread text messages, email messages, and missed calls. The Counter widget also appears on the YotaCover if
you have switched on YotaCover.
To view the unread messages or missed calls, tap the widget.
There are also separate widgets for calls, messages, and emails.
Messages
You can view your recent messages on the always-on display.
1 To open messages in list view, tap the messages widget.
2 Tap the conversation thread you want to read.
You can also reply to a message using the always-on displ a y.
Emails
The Email widget shows your recently received emails for the email accounts you have linked with the Email application.
When you open the email widget, the emails open as a list. To view the contents of an email message, tap the email.
Page 45
Titanium_User_Guide User Guide
33
• To view information about an email, tap .
• To send a new email, tap .
• To delete an email, tap .
• To reply to an email, tap
• To reply to all recipients of an email, tap .
• To forward an email, tap .
Calendar
The calendar widget shows the current month. The current day is marked by a rectangle, and a day with event information is marked with a dot.
• To view the events of a specific day, tap the day.
• To view a list of events, tap the calendar widget.
To view the event details, tap the event.
Your next event also shows in the Next event widget. T ap the widget to view the event details.
Weather
The weather widget shows the current weather. Tap the widget to view more details, such as 4 day forecasts, wind speed, humidity.
To change the update mode, units of measurement, and locations for the weather widget:
Page 46

Titanium_User_Guide User Guide
34
1 On the home screen, tap
> YotaHub.
2 Tap YotaPanels.
3 Swipe left or right to find the panel where you have placed the weather widget.
4 To view widget settings, tap the widget.
5 To save your new settings, tap Accept.
Stocks
Tap stocks widget to view the list of companies and their positions in the stock exchange. You can sort the info by day, week, month, or quarter.
To add stocks on your watchlist:
1 On the home screen, tap
> YotaHub.
2 Tap YotaPanels.
3 Swipe left or right to find the panel where you have placed the Stocks widget.
4 To view widget settings, tap the widget.
5 To save your new settings, tap Accept.
Clock
Shows time for current time zone.
Page 47
Titanium_User_Guide User Guide
35
Music player
Music player widget shows what song is currently playing.
• To play music, tap .
• To play the next track, tap .
• To play the previous track, tap .
Apps launcher
Apps launcher allows you to quickly launch any colour display application on the always-on display.
Three applications are set by default: Google Play Books, Maps, and Selfie. To add more applications, or change the defaults:
1 On the home screen, tap
> YotaHub.
2 Tap YotaPanels.
3 Swipe left or right to find the panel where you have placed the Apps launcher widget.
4 To view widget settings, tap the widget.
5 To add a new application, tap Tap to select application.
To remove an application from the list, tap and hold the application, then tap
.
6 To save your new settings, tap Accept.
Page 48

Titanium_User_Guide User Guide
36
YotaCover
With YotaCover, the always-on display is covered by a picture when the display is locked. YotaCover protects your privacy by hiding all the widgets that might
contain sensitive information.
Notifications on YotaCover
When you are using YotaCover on your always-on display, you can receive notifications to inform you about You can place some notifications on the
YotaCover to inform you about text messages, calls, and emails.
Small notifications
Small notifications show the amount of unread text messages, emails, and missed calls.
Full screen notificati ons
Full screen notifications show incoming calls, missed calls, text messages and email from favourite contacts. You can add contacts as favourites in the People
application.
Reminders about appointments in Calendar also appear as full screen notifications.
Switch YotaCover on
To switch YotaCover on, tap .
The screen locks automatically when YotaCover is in use.
Page 49
Titanium_User_Guide User Guide
37
To unlock the screen, tap
to open the YotaCover. If you have set up a screen lock, use the screen lock to unlock the screen when YotaCover is in use.
Choose a picture for YotaCover
You can choose your picture from a wide selection of pictures.
To set up a picture for the YotaCover:
1 On the home screen, tap
> YotaHub.
2 Tap YotaCovers.
3 To edit an existing YotaCover, tap the cover.
4 Tap the gallery you want to choose the picture from.
You can add pictures from your social media networks, or download pictures using YotaCast.
5 To choose a picture, tap a picture. To download the picture, tap the picture, and tap
.
Add a new YotaCover
When you first switch on your YotaPhone, you have only one YotaC ov er insta l led. You can have four individual YotaCovers at once. Each of these can use
different pictures from different sources.
To add a new YotaCover:
1 On the home screen, tap
> YotaHub.
2 Tap YotaCovers.
3 Swipe left to get to an empty panel.
Page 50

Titanium_User_Guide User Guide
38
4 Tap
.
5 Tap the gallery you want to choose the picture from.
You can add pictures from your social media networks, or download pictures using YotaCast.
6 To choose a picture, tap a picture. To download the picture, tap the picture, and tap
.
Delete a YotaCover
To delete a YotaCover:
1 On the home screen, tap
> YotaHub.
2 Tap YotaCovers.
3 Swipe to the cover you want to delete.
4 Tap
> Delete cover.
Change the YotaCover settings
You can change your notification settings on the YotaCover in Settings. To change the settings:
1 On the home screen, tap
> YotaHub.
2 Tap YotaCovers.
3 Tap
> Settings.
Page 51

Titanium_User_Guide User Guide
39
YotaEnergy
Use YotaEnergy to extend battery life on your phone by disabling features that consume your battery. The YotaEnergy view on YotaPanel consists of calls,
SMS messages, and battery status widgets.
To set up YotaEnergy, on the home Screen, tap
> Settings > ALWAYS-ON DISPLAY > YotaEnergy settings.
• Tap the switch next to Turn on automatically to activate YotaEnergy.
• You can set up YotaEnergy to turn on automatically when there is 5 %, 10 %, or 15 % of the battery left. You can also set a custom percentage.
• Tap the list below to pick the options you want to disable during YotaEnergy.
You can also add the YotaEnergy widget on a YotaPanel on the always-on display. Tap the widget to switch YotaEnergy on and off.
YotaMirror
When you are using an application on the colour display, you can send it to the always-on display and continue using the application there.
Using the always-on display is convenient when you do not want the screen to switch off, when you are looking at a map, for example, or reading an article on
a low battery.
To use YotaMirror:
1 On the colour display, tap and hold
and drag your finger towards .
2 Turn the phone around so that always-on display is facing up.
To stop using YotaMirror, turn the colour display facing up and unlock the display. YotaMirrors stops automatically.
Page 52
Titanium_User_Guide User Guide
40
Some applications have their own always-on display versions. These applications are adapted for the always-on display with a simple user
interface. When want to use this kind of an application on the always-on display adaptation, the icon that appears after holding , is .
YotaSnap
With YotaSnap you can take a screenshot of the colour display and send it to the always-on display. This image will be displayed there even after turning the
device off.
YotaSnap is convenient when you need to check some info at glance. With YotaSnap you do not have to unlock your phone or use an application: the
information you need will be displayed on the always-on display.
Alternatively, if the battery is low, you can send an image, for example a bar code ticket, to the always-on display. The image will be displayed there after the
phone’s battery is fully empty.
To take a screenshot and put it on the Always-on display:
1 Tap and hold
.
2 Slide to
, and release your finger.
Page 53
Titanium_User_Guide User Guide
41
Calls
Use your YotaPhone to call your contacts.
Make a call
1 On the home screen, tap .
2 To open the dialler, tap
.
3 Enter an area code and a phone number.
4 Tap
.
5 To end a call, tap
.
Call a contact
1 On the home screen, tap > .
2 Tap
, and select a contact.
3 Tap the contact's phone number.
Page 54
Titanium_User_Guide User Guide
42
Make a call from the call log
1 On the home screen, tap > .
2 Tap the phone number you want to call.
Make a call by using voice dialler
1 On the home screen, tap .
2 Tap
.
3 Say "call" and then the contact's name.
Answer a call
1 Drag towards .
2 To end the call, tap
.
You can also answer a call on the always-on disp lay.
Page 55

Titanium_User_Guide User Guide
43
Reject a call
If you cannot answer a call, you can reject the call, and send a message to the caller.
Reject a call
Drag towards .
Reject a call with a message
1 Drag towards .
2 Select a predefined text message, or tap Custom message to write a different message.
Make a conference call
A conference call is a call with three or more people.
To make a conference call:
1 Call the first participant.
Page 56
Titanium_User_Guide User Guide
44
2 After connecting to the first participant, tap
to add a second participant.
You can dial a number or choose a number from your contacts or call log. The first participant is automatically placed on hold while you c all the second
participant.
3 After connecting to the second participant, tap
to merge the calls.
4 To end the conference call, tap
.
Make an international call
1 On the home screen, tap .
2 Tap
, and tap and hold 0 until the + sign appears.
3 Enter the country code, area code, and phone number, and tap
.
Make an emergency call
You can use your device for emergency calls without inserting a SIM card.
Page 57
Titanium_User_Guide User Guide
45
Make an emergency call
When the phone is not locked, you can make an emergency call the same way as other calls.
1 On the home screen, tap
.
2 Tap
, enter the emergency number, and tap .
Make sure to give all the necessary information. End the call only after given permission to do so.
3 To end the call, tap
.
Make an emergency using a locked phone
You can make an emergency call even if the screen is locked.
If the phone is switched off, switch it on by pressing and holding the power button until the phone vibrates.
To make an emergency call when your YotaPhone is locked, tap Emergency call on the lock screen.
Page 58
Titanium_User_Guide User Guide
46
View the call log
On the home screen, tap > .
Save a number from the call log to your contacts list
1 In the call log, tap .
2 Tap Add to contacts.
3 To add the number to a new contact, select CREATE NEW CONTACT, fill in the relevant information, and tap DONE.
To add the number to an existing contact, select a contact from the list, set the phone number type, and tap OK.
Send a message to a number in the call log
1 In the call log, tap .
2 Next to the number, tap
.
3 Write a message.
4 To send the message, tap
.
Page 59
Titanium_User_Guide User Guide
47
Clear the call log
1 In the call log, tap , and tap Clear call log.
2 Tap OK.
Manage your voicemail
You can set up voicemail to receive messages from people who are trying to call you. For more information, contact your service provider.
Check your voicemail
When you have a new voicemail message, the message icon appears in the notifications drawer at the top left corner of the screen.
1 To view your notifications, swipe down from the top of the screen.
The message notification shows the number of received messages and the voicemail number to dial to listen to them.
2 Tap the voicemail number.
Your phone dials the voicemail number. Follow the instructions to listen to your messages.
Change the voicemail settings
On the home screen, tap > > Settings > Voicemail.
• To set up a new voicemail number, tap Setup, and select the Voicemail number field. Enter a new voicemail number, and tap OK.
Page 60
Titanium_User_Guide User Guide
48
• To select a ringtone, tap Voicemail, and tap Sound.
• If you want your phone to vibrate when a new voicemail is received, tick Vibrate.
Manage call settings
You can change your ringtone, switch call waiting on/off, and enable Fixed Dialling Numbers.
Change your ringtone
1 On the home screen, tap > > Settings.
2 Tap Phone ringtone, select a ringtone, and tap OK.
If you want your phone to vibrate when someone calls you, tick Vibrate when ringing.
Forward a call
You can set your YotaPhone to forward incoming calls to another number.
1 On the home screen, tap
> > Settings > Call forwarding.
2 Select a forwarding mode, and enter the phone number to which you want to forward your incoming calls.
3 Tap Enable.
Page 61
Titanium_User_Guide User Guide
49
Switch call waiting on/off
When call waiting is switched on, you are notified of other incoming calls during a call.
1 On the home screen, tap
> > Settings > Additional settings.
2 To switch call waiting on, tick Call waiting.
To switch call waiting off, untick Call waiting.
Switch Fixed Dialling Numbers (FDN) on/off
When this feature is switched on, you can make calls only to the phone numbers stored in the FDN list on the SIM card.
1 On the home screen, tap
> > Settings > Fixed Dialling Numbers.
2 Tap Enable FDN, enter your PIN2 code, and tap OK.
To disable FDN, tap Disable FDN, enter your PIN2 code, and tap OK.
Manage the Fixed Dialling Numbers (FDN) list
1 On the home screen, tap > > Settings > Fixed Dialling Numbers.
2 To view the list of existing FDN numbers, tap FDN list.
3 To add a contact, tap
> Add contact.
4 Enter a name and number, and tap Save.
5 Enter your PIN2 code.
Page 62

Titanium_User_Guide User Guide
50
Change the PIN2 code
1 On the home screen, tap > > Settings > Fixed Dialling Numbers.
2 Tap Change PIN2.
3 Enter your old PIN2 code, and tap OK.
4 Enter a new PIN2 code, and tap OK.
5 Confirm your PIN2 code.
Text input
You can enter text using the on-display keyboard or by voice input.
Use the on-display keyboard
Learn how to write text with the on-display keyboard. You can hold the phone in either portrait or landscape mode.
Page 63
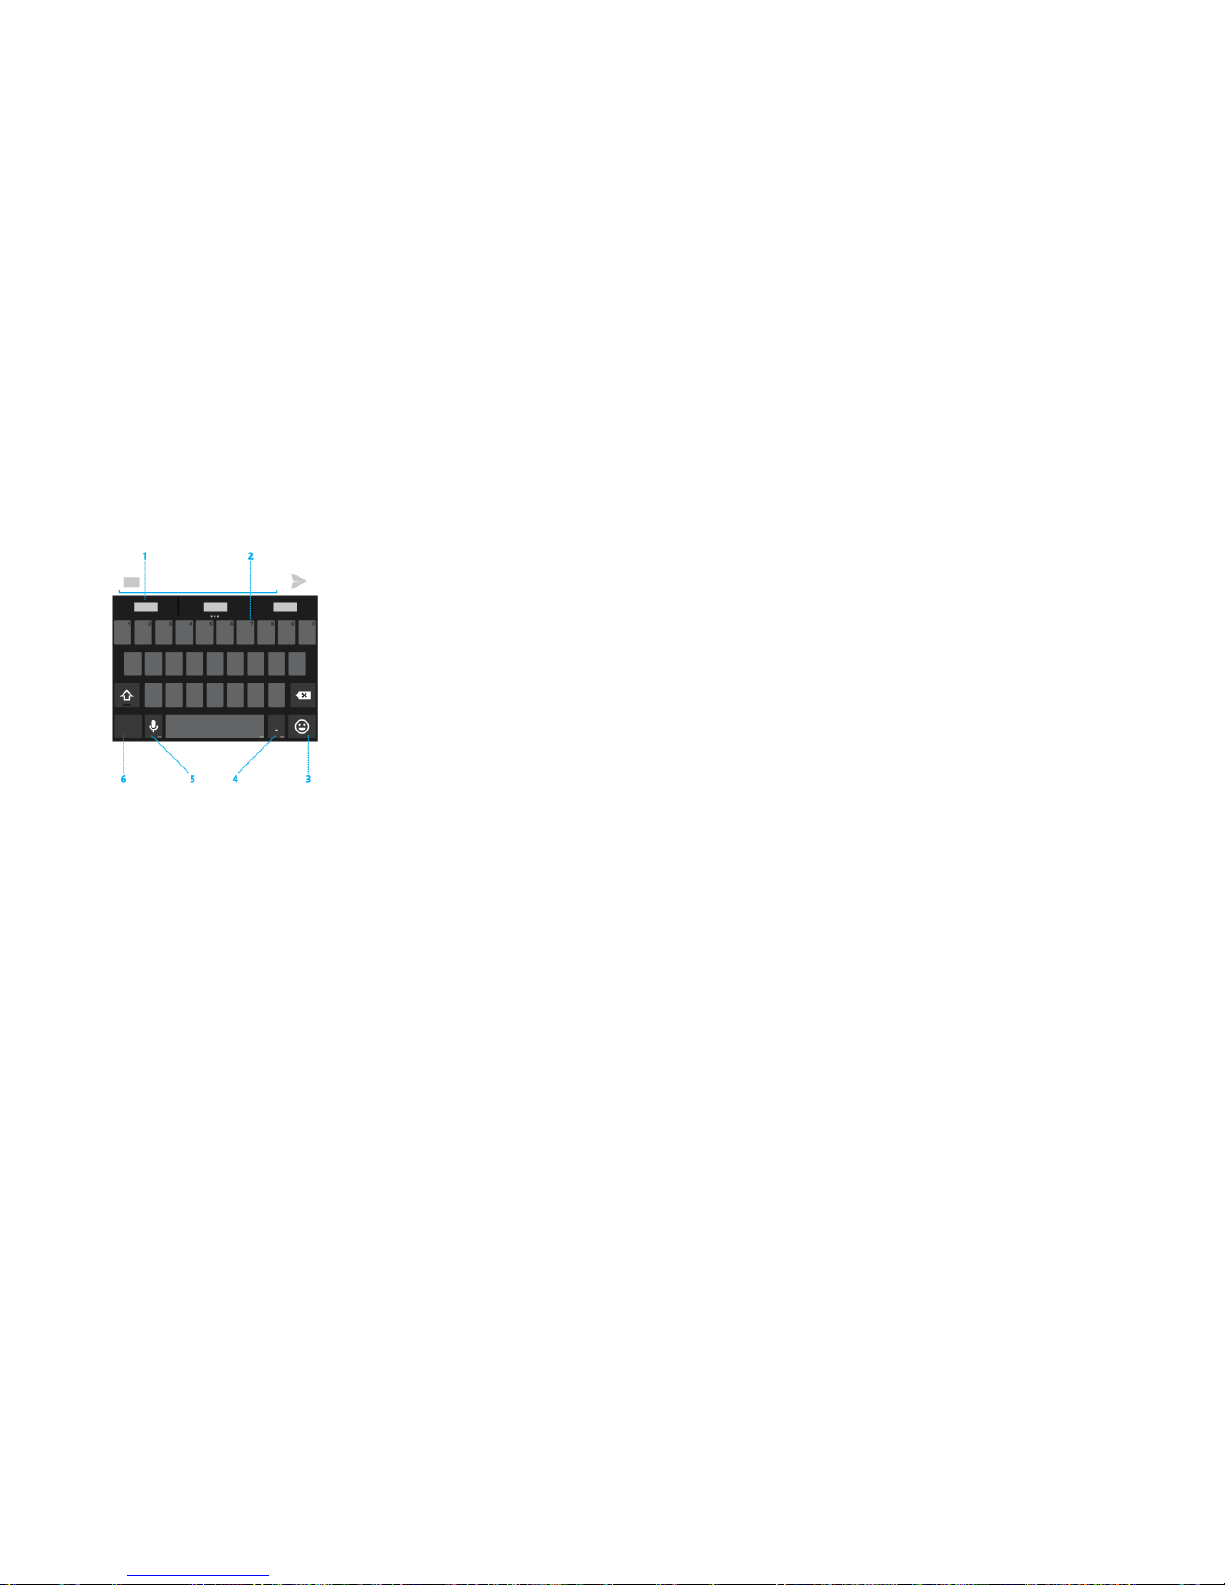
Titanium_User_Guide User Guide
51
Get to know the on-display keyboard
1 Tap the proposal to accept it.
2 Tap and hold to enter this number.
3 Tap to open the emoticon menu, and tap to select an emoticon.
4 Tap and hold, and slide your finger to select a symbol.
5 Tap to enter text using your voice, or tap and hold to see input options.
6 Tap to switch between letters and symbols.
Write text
1 Tap the text field you want to write into.
2 Tap the keys on the keyboard to write. The strip above the keyboard shows the characters you enter.
Page 64
Titanium_User_Guide User Guide
52
3 Select the desired word from the list of suggestions, or tap the space bar to accept the word you have written.
If you enter an incorrect word or number by mistake, tap
to erase the characters.
Edit text
• To select text, tap and hold the text you want to select. Move the sliders to select more or less text. To select all text, tap .
• To cut and copy, tap and hold to select the text. Tap cut, or copy.
• To paste, tap and hold the text field into which you want to paste. Tap PASTE.
• To delete text, tap to delete either selected text or the characters before the cursor.
• To switch caps lock on, tap twice quickly. To return to lowercase mode, tap once.
Switch word suggestions on/off
1 Tap and hold .
2 Tap Google Keyboard Settings.
3 To switch word suggestions off, under OTHER OPTIONS, untick the box next to Next-word suggestions.
To switch word suggestions back on, tick the box next to Next-word suggestions.
Page 65

Titanium_User_Guide User Guide
53
Use voice input
Before entering text by voice, make sure that you have switched voice typing on.
Switch voice typing on
1 On the home screen tap > Settings > PERSONAL > Language & input.
2 Tick Google voice typing.
Use voice input
You can enter text by voice anywhere where you can enter text using the on-display keyboard.
1 Tap a text field.
2 Tap
.
3 When prompted "speak now", say what you want to write.
Say "period", "comma", "exclamation point", or "exclamation mark" to enter punctuation.
Download offline speech recognition
To use voice input when your YotaPhone is offline, you must download offline speech recognition resources.
1 On the home screen, tap
> Settings > PERSONAL > Language & input.
Page 66
Titanium_User_Guide User Guide
54
2 Tap SPEECH > Voice Sea rc h.
3 Tap Offline speech recognition, and open the ALL tab.
4 Select a language from the list, and tap Download.
Change the default input method
You can use the default Android keyboard or select any other input method as your default way of entering text.
To set the default input method:
1 On the home screen, tap
> Settings > PERSONAL > Language & input.
2 Under KEYBOARD & INPUT METHODS, tap Default.
3 Tap Set up input methods, and select your preferred input method.
4 To adjust the settings for the selected input method, tap
.
Messaging
Keep in touch with your friends by sending them text and multimedia messages.
To open Messaging directly from the home screen, tap
.
To send or receive multimedia messages, you must switch your mobile data on.
Page 67
Titanium_User_Guide User Guide
55
1 On the home screen, tap
.
2 Tap Settings > WIRELESS & NETWORKS > More....
3 Tap Mobile networks, and tick Data enabled.
If you switch on mobile data, you may be charged due to a large amount of data transferring.
Send a message
1 On the home screen, tap .
2 Tap
.
3 To add a recipient from People, enter their name or phone number. You can add more than one recipient.
If you enter in an email address or add an attachment, the message automatically changes from a text message to a multimedia message.
4 Write your message.
5 To add a smiley, tap
, and select a smiley.
Page 68
Titanium_User_Guide User Guide
56
6 To add an attachment, tap
, and select a file, such as a picture or a video.
You can also take a new photo while writing your message. Tap Capture picture, tap
to take a picture, and tap to add the picture as an
attachment.
If the attachment you insert into a multimedia message is too large to be sent over the network, your YotaPhone may automatically reduce the size.
7 To send the message, tap
.
Only compatible phones can receive and show multimedia messages. Messages may look different on other phones.
Read a message
When you have received a message, you can see a notification icon on the top of the screen. Swipe the notification drawer down, and tap the message
notification to read the message.
In Messaging, the received messages are grouped by contact as conversation threads. The thread can contain both text and multimedia messages.
Open a message
1 On the home screen, tap .
2 To read a message, tap a conversation thread.
Page 69
Titanium_User_Guide User Guide
57
3 To view an attachment, tap Download.
You can also read a message on the always-on display
Reply to a message
1 On the home screen, tap .
2 Tap the conversation thread containing the message you want to reply to.
3 Tap the text field, and write your message.
4 To send the message, tap
.
Forward a message
1 On the home screen, tap .
2 Tap the conversation thread containing the message you want to forward.
3 Tap and hold the message, and tap Forward.
Before forwarding the message, you can edit the text and add or remove attachments.
Page 70
Titanium_User_Guide User Guide
58
Delete a message or conversation
You can delete individual messages or entire conversation threads.
Delete a message
1 On the home screen, tap .
2 Tap a conversation thread.
3 Tap and hold the message you want to delete.
4 Tap Delete.
Delete a conversation
1 On the home screen, tap .
2 Tap and hold the thread you want to delete.
3 Tap
.
You can also open the thread, and tap
> Delete thread.
Page 71
Titanium_User_Guide User Guide
59
Customise the message settings
1 On the home screen, tap .
2 Tap
, and tap Settings.
People
You can save and organise your contacts' names, numbers, addresses, and other contact information in People.
Add a new contact
1 On the home screen, tap > .
2 To add a new contact, tap
> .
If you have not signed into a Google account, you are taken to the Make it Google screen. You can choose to add an existing account or create a new
one. If you do not want to sign in, tap Not now.
Tap
> Create a new contact > Keep locally. Your contact is saved to your YotaPhone.
If you want to save and back up your contact online, tap Add account, and select an account to sign into.
3 Tap the contact detail fields and enter the relevant information.
Page 72
Titanium_User_Guide User Guide
60
4 To save, tap DONE.
Create a contact group
To create a contact group, you must sign in to an email or social networking account.
To create a contact group:
1 On the home screen, tap
> .
2 To create a new group, tap
> , and name the group.
3 To add contacts to the group, enter their names in the text field.
4 To save, tap DONE.
Search for a contact
1 On the home screen, tap > .
2 Tap
, and enter a name. The list filters your contacts as you write.
Page 73
Titanium_User_Guide User Guide
61
Import or export contacts
If you have contact information stored on a SIM card, for example, you can import them to your phone. You can also export contact information stored on your
phone to your SIM card.
Import contacts
1 On the home screen, tap > .
2 Tap
> .
3 Tap Import/export, and select Import from storage.
Export contacts
1 On the home screen, tap > .
2 Tap
> .
3 Tap Import/export, and select Export to storage or Export to SIM card.
Manage your contacts
In People, you can edit, delete and share your contacts. You can also assign your contacts to a group, and set a specific ringtone to a contact.
Page 74
Titanium_User_Guide User Guide
62
Edit a contact
1 On the home screen, tap > > .
2 Select the contact, and tap
> Edit.
3 Edit the contact details.
4 To save, tap DONE.
Set a contact photo
1 On the home screen, tap > > .
2 Select the contact, and tap
> Edit.
3 Tap the icon next to the contact name.
4 To select an existing photo, tap Choose photo from Gallery.
To take a new photo, tap Take photo.
5 Crop the photo, and tap Save.
6 To save the contact photo, tap DONE.
Assign a contact to a group
If you have created a group, you can assign a contact to it.
Page 75
Titanium_User_Guide User Guide
63
1 On the home screen, tap
> > .
2 Select the contact, and tap
> Edit.
3 Tap Group name field, select the group,and tap DONE.
Delete a contact
1 On the home screen, tap > > .
2 Select the contact, and tap
> Delete > OK.
If the contact is linked to an account, the contact is deleted from the online service where it is stored.
Share a contact
1 On the home screen, tap > > .
2 Select the contact, tap
> Share, and select a method to share the contact.
Page 76
Titanium_User_Guide User Guide
64
Add a contact to your favourites
1 On the home screen, tap > > .
2 Select the contact and tap
.
To remove a contact from your favourites, select the contact and tap
.
Set a ringtone for a contact
1 On the home screen, tap > > .
2 Select the contact, tap
> Set ringtone, and select a ringtone.
3 Tap OK to save.
Place a contact on the home screen
1 On the home screen, tap > > .
2 Select the contact, and tap
> Place on Home screen.
Page 77
Titanium_User_Guide User Guide
65
Camera
Use the camera to capture your precious moments, and share the photos with friends.
Take a photo
1 On the home screen, tap > Camera.
2 To switch to the front camera, tap
> . To switch back to the main camera, tap > .
3 To zoom in, spread two fingers apart on the screen. To zoom out, pinch the fingers together.
4 Tap your finger where you want to focus.
5 To take a photo, tap
.
To view the photo you just took, swipe left. To get back to the camera viewfinder, swipe right.
Your photos are saved in Gallery > Camera.
Change the flash mode
To switch flash on or off, or to use the automatic flash mode, tap , and tap a flash option:
Page 78
Titanium_User_Guide User Guide
66
• Flash on
• Automatic
• Flash off
Use special effects
You can use your YotaPhone to take pictures with different settings. Try these special effects for different kinds of photos.
Take a panorama photo
A panorama is a wide picture consisting of multiple shots stitched together seamlessly.
1 On the home screen, tap
> Camera.
2 Swipe from the left edge of the screen, and tap Panorama.
3 To start shooting a panorama photo, tap
.
4 Turn around slowly to create a panorama. The dots on the screen guide you.
5 Tap
when you are done.
Page 79
Titanium_User_Guide User Guide
67
Take a high dynamic range (HDR) photo
Use the HDR option to take vivid photos with lots of detail across the picture. This option is suitable for situations where there is high contrast between light
and dark areas.
1 On the home screen, tap
> Camera.
2 Tap
> .
Take a photo with blurry edges
Use the Lens blur option to take photos where the subject stands out from the background.
1 To take a picture with blurry edges, on the home screen, tap
> Camera.
2 Swipe from the left edge of the screen, and tap Lens blur.
3 Tap
to take a photo. Move your phone as the software instructs.
Record a video
1 On the home screen, tap > Camera.
2 To switch to video camera, swipe from the left edge of the screen, and tap Video.
Page 80
Titanium_User_Guide User Guide
68
3 To record a video using the front camera, tap
> . To switch back to main camera, tap > .
4 To start recording, tap
.
5 To stop recording, tap
.
Share your photos and videos
1 On the home screen, tap > Camera.
2 Take a photo or record a video.
3 Swipe left, and tap
.
4 Select the way you want to share your photo or video, and follow the instruc t ions.
You can also share a photo or video from Gallery.
1 On the home screen, tap
> Gallery.
2 Select the photo you want to share from Albums, and tap
.
3 Select the way you want to share the photo or video, and follow the instructions.
Page 81
Titanium_User_Guide User Guide
69
Gallery
Your pictures and videos are stored in albums. You can use Gallery to view your photos and videos captured by your phone or copied from your computer.
Manage albums
1 To open an album, on the home screen, tap > Gallery.
You can see the number of files stored in each album next to the album name.
2 To view the contents of an album, tap an album.
Delete an album
1 On the home screen, tap > Gallery.
2 Tap
in the top right corner of the screen and tap Select album.
3 Tap the folders you want to delete, and tap
.
Page 82

Titanium_User_Guide User Guide
70
Change the album view
In Albums, thumbnails of the contents are displayed in Grid view mode by default. To change the view mode to Filmstrip view, tap the folder name in the
top left corner of the screen, and tap Filmstrip view.
View and edit pictures
You can view pictures as a slideshow, edit pictures, and set a picture as a wallpaper.
View pictures as a slideshow
1 In Gallery, tap the album you want to view.
2 To start a slideshow, tap
, and tap Slideshow.
3 To stop the slideshow, swipe left or right.
View the details of a picture
1 In Gallery, tap a picture in an album.
2 Tap
, and tap Details.
Page 83

Titanium_User_Guide User Guide
71
Edit a picture
1 In Gallery, tap a picture in an album.
2 Tap
, and tap Edit.
3 To edit the picture, use the options at the bottom of the screen.
4 To save the edited picture, tap SAVE.
Crop a picture
1 In Gallery, tap a picture in an album.
2 Tap
, and tap Crop.
3 To crop the picture, move the frame on the screen.
4 To save the cropped picture, tap SAVE.
Rotate a picture left or right
1 In Gallery, tap a picture in an album.
2 Tap
, and tap Rotate left or Rotate right.
Page 84
Titanium_User_Guide User Guide
72
Delete a picture
1 In Gallery, tap a picture in an album.
2 Tap
, and tap Delete.
Delete several pictures from an album
1 In Gallery, tap the album from where you want to delete pictures.
2 Tap
, and tap Select item.
3 Tap the pictures you want to delete, and tap
.
Set a picture as a wallpaper
You can set any picture in Gallery as your wallpap er.
1 On the home screen, tap
> Gallery.
2 Select a picture in an album.
3 Tap
.
4 Tap Set picture as, and tap Wallpaper.
5 Tap Set wallpaper.
Page 85
Titanium_User_Guide User Guide
73
Play a video
1 On the home screen, tap > Gallery.
2 Tap an album that contains the video you want to watch.
3 Tap the video you want to watch.
4 To start watching the video, tap
.
Multimedia
Use your YotaPhone as a music player, listen to the radio, and create your own videos.
Play music
On the home screen, tap > Play Music. All the albums on your phone are displayed as thumbnails on the screen.
Page 86

Titanium_User_Guide User Guide
74
Add an album to a playlist
1 On the album cover, tap .
2 Tap Add to playlist.
Add songs to a playlist
1 To view all songs, tap the cover of an album.
2 Tap
next to the song name.
3 Tap Add to playlist.
Remove music from a playlist
1 Tap .
2 Tap Playlists.
3 Tap on a playlist.
4 Next to the song name, tap
.
5 Tap Remove from playlist.
Page 87
Titanium_User_Guide User Guide
75
Delete a playlist
1 Tap .
2 Tap Playlists.
3 Next to the playlist's name, tap
.
4 To delete the whole playlist, tap Delete.
Listen to radio
Connect a headset to your YotaPhone before switching on FM radio. YotaPhone uses the headset as its radio antenna.
Listen to radio
1 On the home screen, tap > FM radio.
2 To tune in to a station manually, tap
or .
To find the next or previous station, tap and hold
or .
3 To switch the radio off, tap
.
Page 88
Titanium_User_Guide User Guide
76
Scan for stations automatically
1 On the home screen, tap >FM radio.
2 Tap
> Scan. Tap the type of stations you want to scan, or tap All Stations.
3 To view the list of scanned stations, tap
> All Channels.
To tune in to a previously scanned station, tap
and choose a station from the All Channels list.
To rename a station in the All Channels list, tap and hold, and then tap Rename. Enter the new name and tap OK.
Save a station as a preset
1 On the home screen, tap > FM radio.
2 Tune in to the station you want to save.
3 Tap
at the bottom of the screen.
You can also tap and hold an existing preset station to replace it with a new one.
Switch radio off
1 On the home screen, tap > FM radio.
Page 89
Titanium_User_Guide User Guide
77
2 Tap
.
Edit videos
Movie Studio is a video editing application which pr ovid es you with a fun and easy way to share your video memories with your friends.
To open Movie Studio, on the home screen, tap
> Movie Studio.
In Movie Studio, the screen is divided into two areas: the upper half is the playback area and the lower half is the editing area.
Start a new movie project
1 To start a new project, tap .
2 Fill in the Project name field, and tap OK.
Change your project name
1 Tap .
2 Tap Change project name.
3 Change the project name, and tap OK.
Page 90
Titanium_User_Guide User Guide
78
Delete your project
1 Tap .
2 Tap Delete project.
Add media to your movie
To add media to your movie, tap .
You can add media by recording a video, taking a photo, or by importing a video clip, picture, or soundtrack.
You can also add photos or videos from the Gallery by tapping
in the editing area.
Add a soundtrack to your movie
After you have added media to a project, you can add a soundtrack to it.
To add soundtrack to your movie, tap
above the timeline.
Add a title to your movie
1 Scroll the timeline to the point where you want to add a title, then tap and hold the edge of the video clip until appears.
Page 91
Titanium_User_Guide User Guide
79
2 Tap
, and tap Add title.
3 Fill in the fields on the screen, and tap OK.
4 To finish, tap
.
Edit the title
1 To edit the title, tap the edge of the video clip.
2 Tap
, and tap Edit title.
3 Fill in the fields on the screen, and tap OK.
4 To finish editing, tap
.
Export a movie
1 To export your work and save it to Gallery, tap > Export film.
2 Select the size and quality of your film.
3 Tap Export.
Page 92
Titanium_User_Guide User Guide
80
Record sounds
1 On the home screen, tap > Sound recorder.
2 To start recording, tap
.
3 To stop recording, tap
.
4 To save your recording, tap Done.
5 To delete the recording, tap Discard.
Your recordings are stored on your phone and you can listen to them in Play Music.
Connectivity
You can use your YotaPhone to connect to other devices or share your internet connection.
Sharing your connection consumes a lot of battery power, especially on LTE networks. Switch the features off when you do not need them.
Page 93
Titanium_User_Guide User Guide
81
You may need to pay extra mobile data connection fees if you turn your YotaPhone into a portable hotspot and share your mobile data connection
with others. Please check with your network service provider.
Mobile data connection
Mobile networks enable you to connect to the internet whenever a mobile network is available. Make sure that you have ordered the mobile data service.
Disable the mobile data connection
The mobile data connection is enabled by default.
To disable mobile data connection:
1 On the home screen, tap
> Settings > WIRELESS & NETWORKS > More....
2 Tap Mobile networks, and untick Data enabled.
Enabling the mobile data connection may result in extra cost. Please check with your network service provider.
Page 94
Titanium_User_Guide User Guide
82
Switch data roaming on
To use your data connection outside of your carrier's coverage, you must enable data roaming on your phone. Data roaming is disabled by default.
1 On the home screen, tap
> Settings > WIRELESS & NETWORKS > More....
2 Tap Mobile networks, and tick Data roaming.
Switching data roaming on may incur significant roaming charges.
View mobile data usage
To monitor how your YotaPhone is using mobile data, on the home screen, tap > Settings > WIRELESS & NETWORKS> Data usage.
Wi-Fi connection
The first time you switch your YotaPhone on, it automatically searches for Wi-Fi networks, and displays their names and security settings on your screen. Tap
the Wi-Fi network you would like to connect to, and enter the passwor d, and the n tap Connect. You can skip this step and set up your Wi-Fi connection later
in Settings.
Page 95

Titanium_User_Guide User Guide
83
Connect to a Wi-Fi network
1 On the home screen, tap > Settings > WIRELESS & NETWORKS > Wi-Fi.
2 To switch Wi-Fi on, tap the switch next to Wi-Fi.
3 Tap the name of the Wi-Fi network you want to connect to.
4 Enter the Password if required.
Add a Wi-Fi network manually
1 On the home screen, tap > Settings > WIRELESS & NETWORKS > Wi-Fi.
2 Tap
.
3 Enter the Network SSID. It is the name of your wireless access point (WAP).
4 Tap Security field to select the security type.
The security type must match the security setting of your target WAP.
5 Enter the password if the target WAP is secured.
6 To store the network information and connect to your target WAP, tap Save.
Scan for Wi-Fi networks manually
1 On the home screen, tap > Settings > WIRELESS & NETWORKS > Wi-Fi.
Page 96

Titanium_User_Guide User Guide
84
2 Tap
.
3 Tap Scan.
Switch Wi-Fi on/off
By default, Wi-Fi is switched on.
To switch Wi-Fi off:
1 On the home screen tap
> Settings > WIRELESS & NETWORKS.
2 To switch Wi-Fi off, tap the switch next to Wi-Fi.
OR
1 Swipe down the notifications drawer, and tap
.
2 Tap
.
3 To switch Wi-Fi off, tap the switch next to Wi-Fi.
To switch Wi-Fi back on, tap the switch next to Wi-Fi.
Wi-Fi hotspot
You can set your YotaPhone up as a Wi-Fi hotspot to share your mobile data connection with other devices. You can share your data connection with up to 5
devices at a time.
Page 97
Titanium_User_Guide User Guide
85
You may need to pay extra mobile data connection fees if you turn your YotaPhone into a portable hotspot and share your mobile data connection
with others. Please check with your network service provider.
Set up a Wi-Fi hotspot
On the home screen, tap > Settings > WIRELESS & NETWORKS > More....
1 Tap Tethering & portable hotspot.
2 Tap Set up Wi-Fi hotspot.
3 Tap Network SSID and enter the name of your hotspot in the field.
4 To select the security type, tap Security.
5 Enter a password if the security of your hotspot is not set to open. The password must have at least 8 characters.
6 To store the Wi-Fi hotspot information, tap Save.
Switch your portable Wi-Fi hotspot on/off
1 On the home screen, tap > Settings > WIRELESS & NETWORKS> >More....
2 Tap Tethering & portable hotspot.
3 Tick Portable Wi-Fi hotspot.
Tethering or hotspot active is shown in the notifications drawer.
Page 98
Titanium_User_Guide User Guide
86
To switch your portable Wi-Fi hotspot off, untick Portable Wi-Fi hotspot.
Tethering and Wi-Fi hotspot consume a lot of battery power, especially on LTE networks. Switch the features off when you do not need them.
USB tethering
You can share your phone's data connection through USB to access the internet on your computer even when there is no Wi-Fi hotspot or internet service
nearby. You can share your data connection with up to 5 devices at a time.
Note that this feature does not work on Apple computers.
You may need to pay extra mobile data connection fees if you turn your YotaPhone into a portable hotspot and share your mobile data connection
with others. Please check with your network service provider.
1 Connect your phone to your computer with a USB cable.
2 On the home screen, tap
> Settings > WIRELESS & NETWORKS > More....
3 Tap Tethering & portable hotspot.
4 Tick USB tethering.
Page 99
Titanium_User_Guide User Guide
87
Tethering and Wi-Fi hotspot consume a lot of battery power, especially on LTE networks. Switch the features off when you do not need them.
Bluetooth connection
Bluetooth is a short-range wireless communications technology that enables you to connect your devices to a number of Bluetooth compatible devices, such
as computers, headsets, printers, and hands free car sets. The Bluetooth communication range is usually about 10 meters (about 33 feet).
You can also share your mobile data connection using Bluetooth.
Switch Bluetooth on/off
1 On the home screen, tap > Settings > WIRELESS & NETWORKS.
2 To switch Bluetooth on/off, tap the switch next to Bluetooth.
OR
1 Slide down the notifications drawer from the top of the screen, tap
, and tap .
2 To switch Bluetooth on/off, tap the switch next to Bluetooth.
Page 100
Titanium_User_Guide User Guide
88
Configure Bluetooth
1 On the home screen, tap > Settings > WIRELESS & NETWORKS > Bluetooth.
2 Tap
to:
• Rename phone - Rename your YotaPhone.
• Visibility timeout - Select how long your Yota Ph one is visible to other de vices .
• Show files received - View the files you have received through Bluetooth.
Make your YotaPhone visible to other Bluetooth devices
1 On the home screen, tap > Settings > WIRELESS & NETWORKS > Bluetooth.
2 To make your phone visible to other devices, tap the name of your phone.
Pair your YotaPhone with another Bluetooth device
The device you want to connect to must be set to visible so that your YotaPhone can find it.
1 On the home screen, tap > Settings > WIRELESS & NETWORKS > Bluetooth.
 Loading...