

YoSmart 1002 User Manual
Mini Hub
User Guide
YS1002-U1
Mini Hub
Us
er
Gui
de
Min i Hub *1
This manual is designed to help new users learn about
the product.
This manual is written for the YoSmart product based
on LoRa wireless technology.
The pictures in the manual are for reference only.
GuangDong YoSmart Corp reserves the right to modify
information in this manual without notification.
For more information, please visit
www.YoSmar t.c om.
Powe r Adapt er *1
Use r Guide * 1
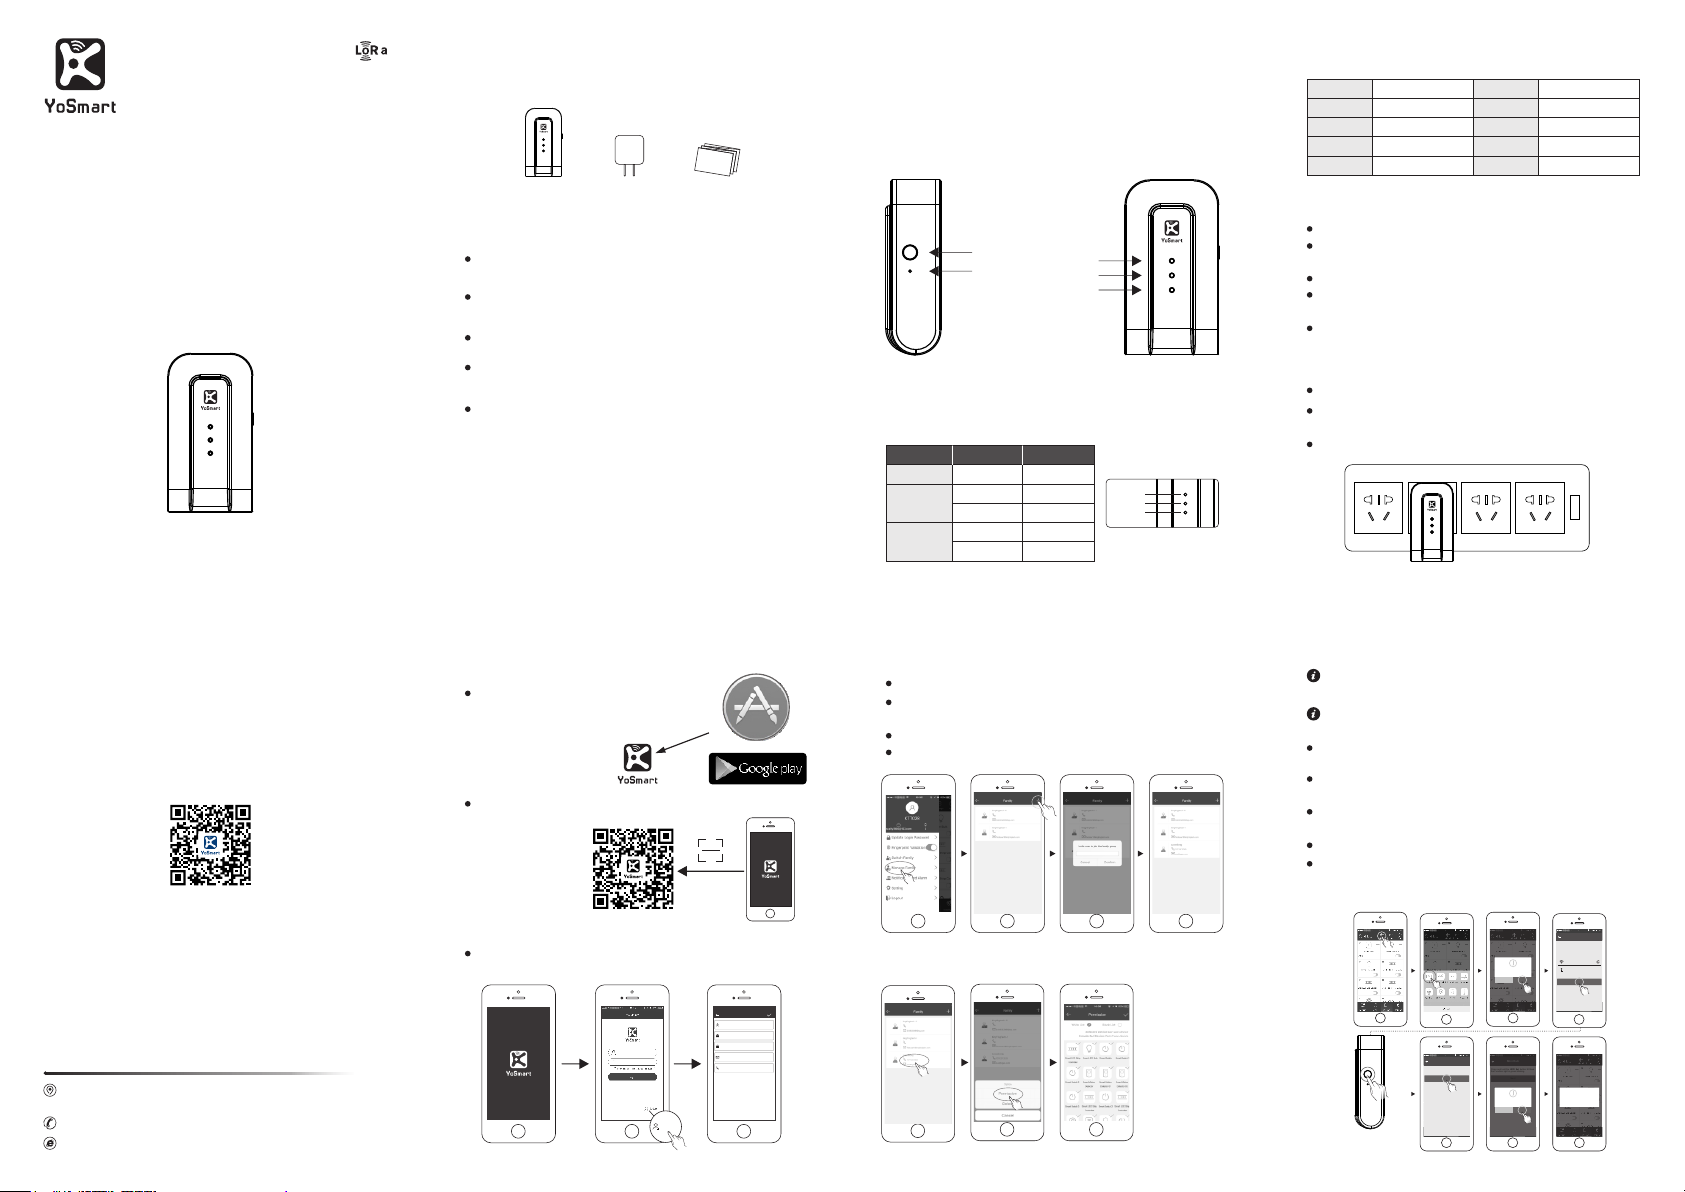
Mini Hub
Mini Hub is designed as a control center to manage
the interaction between your local devices and
external network by accessing the local area
network.
WiF i Set
Pow er Ligh t
Res et
Int ernet L ight
Fun ction L ight
Indication Lights
Indication Lights
Power
Internet
Function
IF
Green Lighting
Yellow Flashing
Off
Green Flashing
Red Lighting
It means
Power on
Online
Offline
Adding device
Equipment failu re
Power L ight
Inter net Lig ht
Funct ion Lig ht
Specifications
Name
Size
Voltage
wireless
connection
Humidity
Preference
Mini Hub
84*45*27mm
100 -240V AC
LoRa 2.4G WI FI
5% 95%RH~
(non-c ondensing )
Model
Weight
Power
Temperature
Preference
Color
YS1002-U1
56.9g
<3 W
-10℃~+50℃
Grey
Functions
Built-In RF communication module.
Bound cloud server with data security and automatic
fault recovery.
Wireless network connection.
Lo w po we r co ns umption a nd h ig h an ti -jammin g
ca pa bi li ty.
Communication distance of 600 meters.
Installation
Connect the power adapter(provided)to the device.
You can both plug the device into a wall outlet or a
distributor.
Turn on the power.
APP D ownlo ad
(IP hone & And roid)
Shenzhen YoSmart C orp ora tio n
B202, 1# Building, Daqian Industrial Park, Xin'an
Street, Bao'an 67 District, Shenzhen, CHINA
0755-2335 2885
www.YoS mar t. co m
Install the YoSmart App
YoSmart App available on the
iOS App Store and the
Google Play Store.
Scanning the QR code outside the box of YoSmart
Hub.
wn
Do
oad
l
scan ning the
QR cod e
ANDROID AP P ON
Create an account
Aft er in stalling the App, follow the instruct ions to
cre ate an acc ount.
Register
Input your account name
*
Input your password
*
Input your password
*
Input your E-Mail
*
Input your TEL
Register
Share Family Group
Login to your YoSmart App account.
Click your account name in the top left to enter the
User Center.
Click Manage Family and choose ' + ' in the top right.
Enter an account and choose confirm.
Permission Setting
Add a Mini Hub
Note: For the communication security, one mini hub
can be only added to one YoSmart App account.
Note: Set a WiFi network for your smart phone.
Login to your YoSmart App account, click the button
' ' choose hubadd device .
A tip note Choose the mode of net connection , ' '
choose the WiFi' button, set the WiFi for the device.'
Press and hold the WiFi Set button for about 5
seconds till there the function light is green blinking.
Click th e bu tton Next' ' on you r App .
A tip note WiFi is set, add the device? ,' ' Click 'confirm'
to add the device.
Mini Hub Next
1.Make sure you smart phone is connected
to a wireless network.
2.Choose the wireless network and enter
the code.
family
123456
WiFiWire Connect
Submit
Mini Hub
Next
Enter an alias
Hub
Add device
Confirm Cancel
ConfirmCancel
hold the bu tton
for 5 secon ds
取消
Mini Hub
Press and hold the WiFi Set button till there
the Function light is green blinking.
Next
Net connection
Choose the mode of net connection
Press and hold the WiFi Set button till there
the Function light is green blinking.
WiFi is set, add the device?
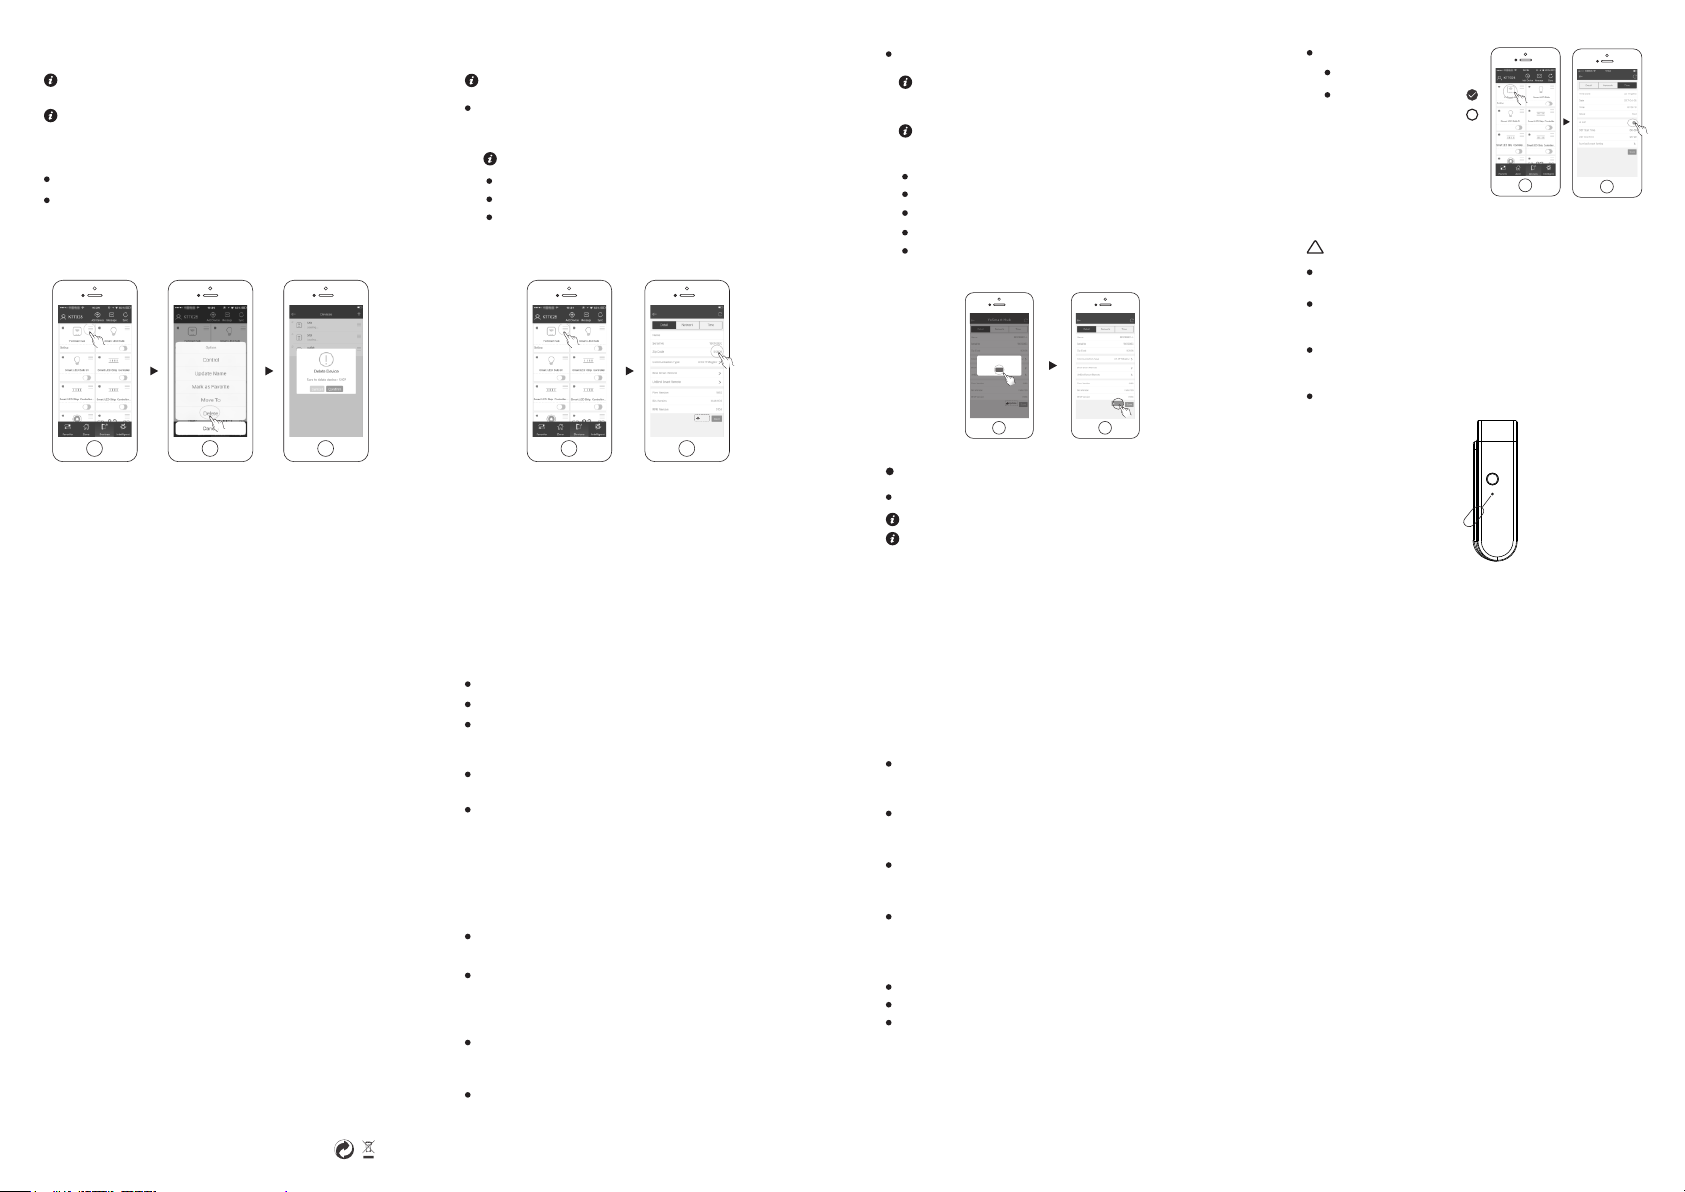
Delete a Mini Hub
Note: Pleas e de le te t he r el ated devices be fo re
deletin g th e hu b.
Note : The mini hub can be added to anothe r
YoSmart acc ount after be ing deleted in the
original ac count.
Login to your YoSmart App account.
Click Delete on the right menu bar of the mini hub.
Set the Mini Hub
Note: Make sure the mini hub is online.
Zip code
Zi p Co de wi ll he lp t he sm ar t d ev ic es to g et th e
re al -ti me w eat he r inf or mat io n of cu rr ent c it y.
Zip code default is set to 92606(Irvine CA, USA).
Click the hub to view Details.
Click Zip Code and type cur ren t zip code.
Click Save to save the setting.
YoSma rt H ub
Home Hub
FIRM
Device Updating
It will take about 5 minutes for the hub to update
to a new version. Please wait patiently until the
updating finished.
Updating progress ca n be vie wed in
Details and Updating option und er settings .
A notice will display 'Find a new version' .
Click OK to skip the notice.
Click Update to update the hub.
The function light turns into red flashing.
Hub updated completely, you will here two
beeping sounds.
YoSmar t Hu b
Reminder
Update to the new vrsion: 1063?
OK
Update
YoSmar t Hu b
Update
Time
Time Zone and Time
Time is automatically set according to the zip code.
Accurate time makes the schedules accurate.
IS DST
Press the IS DST Icon.
IS DST runs:
IS DST doesn't run:
Factory Reset
After factory re setting, all settings will be cleared.
!
Power off the Hub (by unplugging the Micro-USB power
connector).
Use an object round 1mm to press the Reset button
inside the hardware, and then plug in the power
connector while holding the button.
After plugging in the power connector, you will hear a
beeping sound. Keep pressing on the Reset button
until you hear a higher pitched beeping sound.
Release the Reset button.
Reset
YoSmar t Hu b
FCC Compliance Statement
Thi s devi ce compl ies w ith Pa rt 15 o f the FC C Rul es. Op era tio n is
sub jec ted to t he fo llo wing t wo co ndi tion s:
(1) This device may not cause harmful interference.
(2) This device must accept any interference received, including interference
that may cause undesired operation.
This equipment has been tested and found to comply with limits for a
Class B digital device, pursuant to Part 15 of the FCC rules. These limits
are designed to provide reasonable protection against harmful interference
in residential installations. This equipment generates, uses, and can radiate
radio frequency energy, and if not installed and used in accordance with
the instructions, may cause harmful interference to radio communications.
However, there is no guarantee that interference will not occur in a particular
installation. If this equipment does cause interference to radio or television
equipment reception, which can be determined by turning the equipment
off and on, the user is encouraged to try to correct the interference by one
or more of the following measures:
—Reorient or relocate the receiving antenna.
—Move the equipment away from the receiver.
—Plug the equi pment into an outlet on a circu it differ ent from that to which
the receive r is connec ted.
—Consult the dealer or an experienced radio/television technician for
additional suggestions.
This equipment complies with FCC radiation exposure limits set forth
for an uncontrolle d environment. This equi pment should be instal led
an d ope rat ed w it h mi nim um d is tanc e 2 0c m bet wee n the
radiator &your body.
You are cautioned that any change or modifications to the equipment
not expressly approved by the party responsible for compliance could
void your authority to operate such equipment.
If the time a rises to th row away yo ur produ ct, ple ase recy cle all the
compo nents p ossib le.
Batte ries and rech argea ble batte ries are not to be dis posed in you r
domes tic was te! Ple ase rec ycle th em at yo ur loca l recyc ling po int.
Together we can help to pr otect the en vironm ent.
Warning
Only use the provided power supply adapter.
Keep away from heat sources and water.
Refrain from using harsh chemicals or cleaning agents
on the device. Only use a clean, dry cloth to clean
the device.
Route the wiring strictly according to the installation to avoid
device damage caused by short-circuits.
Do not disassemble, repair or modify the device. Please
contact an authorized service center if there is a problem
with the device.
Remarks
This comm itment ca n only be applied to Mini hub
provided by GuangD ong YoSmart Corp.
Except specifi cal ly pro mised in thi s warr ant y, our
company does not warrant any other stated or
imp lie d pr omises includin g marke tab ility and
applica bility of any particu lar fu nction.
If there is any incorrect, altered, or blurred information,
the valid warranty date will be effectively a month after
the date of production automatically.
Within the free repair warranty period, our company or
our authorized service agents retains the right to retain
problem parts after replacement.
Warranty
Thank you for purchasing YoSmart products. Please
ask for a purchasing invoice in th e pur chas e of
YoSmart product.
Our warranty policies are as follows:
This product includes a 12-month limited warranty,
starting from the date of purchase. Your purchasing
invoice is necessary for the warranty to be valid.
Free exchang ed s ervice i s offered within a mo nth
from th e date of purchase for all YoSmart product s
excl uding accessor ies.
Our free services are offered to rectify manufacturing
defects or other quality issues during the valid warranty
period.
We promise to offer free return service within 7 days
of purchasing.
Our services are void when:
You cannot provide the purchase invoice .
Your purchasing invoice has been altered.
Your hub has been misused, physically damaged ,
or disassemble d.
 Loading...