


OWNER'S MANUAL
MANUEL DE L'UTILISATEUR

The exclamation point within an equilatereal triangle is
intended to alert the user to the presence of important
operating and maintenance (servicing) instructions in
the literature accompanying the appliance.
Le point d’exclamation à l’intérieur d’un triangle équilatéral
est prévu pour alerter l’utilisateur de la présence
d’instructions importantes dans la littérature accompagnant l’appareil en ce qui concerne l’opération et la
maintenance de cet appareil.
This lightning flash with arrowhead symbol, within
an equilateral triangle, is intended to alert the user to
the presence of uninsulated “dangerous voltage”
within the product’s enclosure that may be of sufficient
magnitude to constitute a risk of electric shock to persons.
Ce symbole d’éclair avec tête de flèche dans un triangle
équilatéral est prévu pour alerter l’utilisateur de la présence d’un
« voltage dangereux » non-isolé à proximité de l’enceinte du
produit qui pourrait être d’ampleur suffisante pour présenter
un risque de choque électrique.
IMPORTANT SAFETY INSTRUCTIONS
safety-4v7 • May 7/2008
CAUTION: TO REDUCE THE RISK OF ELECTRIC
SHOCK, DO NOT REMOVE COVER (OR BACK).
NO USER SERVICEABLE PARTS INSIDE.
REFER SERVICING TO QUALIFIED
SERVICE PERSONNEL.
FOLLOW ALL INSTRUCTIONS SUIVEZ TOUTES LES INSTRUCTIONS
Instructions pertaining to a risk of fire,
electric shock, or injury to a person
Read Instructions: The Owner’s Manual should be read and understood before operation
of your unit. Please, save these instructions for future reference and heed all warnings.
Clean only with dry cloth.
Packaging: Keep the box and packaging materials, in case the unit needs to be
returned for service.
Warning: To reduce the risk or fire or electric shock, do not expose this apparatus to rain or
moisture. Do not use this apparatus near water!
Warning: When using electric products, basic precautions should always be followed,
including the following:
Power Sources
Your unit should be connected to a power source only of the voltage specified in the
owners manual or as marked on the unit. This unit has a polarized plug. Do not use
with an extension cord or receptacle unless the plug can be fully inserted. Precautions should be taken so that the grounding scheme on the unit is not defeated. An
apparatus with CLASS I construction shall be connected to a Mains socket outlet with
a protective earthing ground. Where the MAINS plug or an appliance coupler is used
as the disconnect device, the disconnect device shall remain readily operable.
Hazards
Do not place this product on an unstable cart, stand, tripod, bracket or table. The
product may fall, causing serious personal injury and serious damage to the product.
Use only with cart, stand, tripod, bracket, or table recommended by the manufacturer
or sold with the product. Follow the manufacturer’s instructions when installing the
product and use mounting accessories recommended by the manufacturer. Only use
attachments/accessories specified by the manufacturer
Note: Prolonged use of headphones at a high volume may cause
health damage on your ears.
The apparatus should not be exposed to dripping or splashing water; no objects
filled with liquids should be placed on the apparatus.
Te rminals marked with the “lightning bolt” are hazardous live; the external wiring
connected to these terminals require installation by an instructed person or the use of
ready made leads or cords.
Ensure that proper ventilation is provided around the appliance. Do not install near
any heat sources such as radiators, heat registers, stoves, or other apparatus
(including amplifiers) that produce heat.
No naked flame sources, such as lighted candles, should be placed on the apparatus.
Power Cord
Do not defeat the safety purpose of the polarized or grounding-type plug. A polarized plug
has two blades with one wider than the other. A grounding type plug has two blades and a
third grounding prong. The wide blade or the third prong are provided for your safety. If the
provided plug does not fit into your outlet, consult an electrician for replacement of the
obsolete outlet. The AC supply cord should be routed so that it is unlikely that it will be
damaged. Protect the power cord from being walked on or pinched particularly at plugs. If
the AC supply cord is damaged DO NOT OPERATE THE UNIT. To completely disconnect
this apparatus from the AC Mains, disconnect the power supply cord plug from the AC
receptacle. The mains plug of the power supply cord shall remain readily operable.
Unplug this apparatus during lightning storms or when unused for long periods of time.
Service
The unit should be serviced only by qualified service personnel. Servicing is required
when the apparatus has been damaged in any way, such as power-supply cord or plug is
damaged, liquid has been spilled or objects have fallen into the apparatus, the apparatus
has been exposed to rain or moisture, does not operate normally, or has been dropped.
AVIS: AFIN DE REDUIRE LES RISQUE DE CHOC
ELECTRIQUE, N’ENLEVEZ PAS LE COUVERT (OU LE
PANNEAU ARRIERE) NE CONTIENT AUCUNE PIECE
REPARABLE PAR L’UTILISATEUR.
CONSULTEZ UN TECHNICIEN QUALIFIE
POUR L’ENTRETIENT
Instructions relatives au risque de feu,
choc électrique, ou blessures aux personnes
Veuillez Lire le Manuel: Il contient des informations qui devraient êtres comprises avant
l’opération de votre appareil. Conservez. Gardez S.V. P. ces instructions pour consultations
ultérieures et observez tous les avertissements.
Nettoyez seulement avec le tissu sec.
Emballage: Conservez la boite au cas ou l’appareil devait être retourner pour réparation.
Avertissement: Pour réduire le risque de feu ou la décharge électrique, n'exposez pas
cet appareil à la pluie ou à l'humidité. N’utilisez pas cet appareil près de l’eau!
Attention: Lors de l’utilisation de produits électrique, assurez-vous d’adhérer à des
précautions de bases incluant celle qui suivent:
Alimentation
L’ appareil ne doit être branché qu’à une source d’alimentation correspondant au
voltage spécifié dans le manuel ou tel qu’indiqué sur l’appareil. Cet appareil est équipé
d’une prise d’alimentation polarisée. Ne pas utiliser cet appareil avec un cordon de
raccordement à moins qu’il soit possible d’insérer complètement les trois lames. Des
précautions doivent êtres prises afin d’eviter que le système de mise à la terre de
l’appareil ne soit désengagé. Un appareil construit selon les normes de CLASS I
devrait être raccordé à une prise murale d’alimentation avec connexion intacte de mise
à la masse. Lorsqu’une prise de branchement ou un coupleur d'appareils est utilisée
comme dispositif de débranchement, ce dispositif de débranchement devra demeurer
pleinement fonctionnel avec raccordement à la masse.
Risque
Ne pas placer cet appareil sur un chariot, un support, un trépied ou une table instables.
L’appareil pourrait tomber et blesser quelqu’un ou subir des dommages importants.
Utiliser seulement un chariot, un support, un trépied ou une table recommandés par le
fabricant ou vendus avec le produit. Suivre les instructions du fabricant pour installer
l’appareil et utiliser les accessoires recommandés par le fabricant. Utilisez seulement
les attachements/accessoires indiqués par le fabricant
Note: L'utilisation prolongée des écouteurs à un volume élevé peut
avoir des conséquences néfastes sur la santé sur vos oreilles. .
Il convient de ne pas placer sur l’appareil de sources de flammes nues, telles que
des bougies allumées.
L’appeil ne doit pas être exposé à des égouttements d’eau ou des éclaboussures
et qu’aucun objet rempli de liquide tel que des vases ne doit être placé sur l’appareil.
Assurez que lappareil est fourni de la propre ventilation. Ne procédez pas à
l’installation près de source de chaleur tels que radiateurs, registre de chaleur, fours
ou autres appareils (incluant les amplificateurs) qui produisent de la chaleur.
Les dispositifs marqués d’une symbole “d’éclair” sont des parties dangereuses
au toucher et que les câblages extérieurs connectés à ces dispositifs de
connection extérieure doivent être effectivés par un opérateur formé ou en utilisant
des cordons déjà préparés.
Cordon d’Alimentation
Ne pas enlever le dispositif de sécurité sur la prise polarisée ou la prise avec tige de
mise à la masse du cordon d’alimentation. Une prise polarisée dispose de deux lames
dont une plus large que l’autre. Une prise avec tige de mise à la masse dispose de
deux lames en plus d’une troisième tige qui connecte à la masse. La lame plus large ou
la tige de mise à la masse est prévu pour votre sécurité. La prise murale est désuète si
elle n’est pas conçue pour accepter ce type de prise avec dispositif de sécurité. Dans
ce cas, contactez un électricien pour faire remplacer la prise murale. Évitez
d’endommager le cordon d’alimentation. Protégez le cordon d’alimentation. Assurezvous qu’on ne marche pas dessus et qu’on ne le pince pas en particulier aux prises.
N’UTILISEZ PA S L’APPAREIL si le cordon d’alimentation est endommagé. Pour
débrancher complètement cet appareil de l’alimentation CA principale, déconnectez le
cordon d’alimentation de la prise d’alimentation murale. Le cordon d’alimentation du
bloc d’alimentation de l’appareil doit demeurer pleinement fonctionnel.
Débranchez cet appareil durant les orages ou si inutilisé pendant de longues périodes.
Service
Consultez un technicien qualifié pour l’entretien de votre appareil. L'entretien est
nécessaire quand l'appareil a été endommagé de quelque façon que se soit. Par exemple
si le cordon d’alimentation ou la prise du cordon sont endommagés, si il y a eu du liquide
qui a été renversé à l’intérieur ou des objets sont tombés dans l'appareil, si l'appareil a été
exposé à la pluie ou à l'humidité, si il ne fonctionne pas normalement, ou a été échappé.
S2125A

Introduction
Your new AP812/818 Mixer/Amplifier is designed and built to provide long-term trouble
free performance. Drawing on over thirty years of experience in the design and manufacture of powered mixing consoles, Yorkville engineers were able to optimize the design
of the AP812/818. Including comprehensive features such as rack-mountability, quiet
internal fan cooling, two stereo input-channels with cue buttons, headphone monitoring
(of both the cue and monitor busses), phantom powering, dual 9-band EQ’s, power amp
channels and EQ’s assignable to Left/Right stereo operation or Main/Monitor mono operation, 255-preset digital signal processing, dual level-meters, 800 watts of stereo power
built-in, both 1/4-inch phone plugs and Speakon® output connectors.
Terminology
• 3-pin microphone inputs are referred to as XLR connectors.
• 1/4-inch jack sockets are called phone connectors.
• Balanced 1/4-inch inputs or outputs are called TRS or Tip-Ring-Sleeve
• Master control and mixing channels are called busses.
• Overload indicators are called Clip LED’s.
• Patch cables with dual conductors plus shielding and ring-tip-sleeve (stereo) 1/4-
inch phone plugs are referred to as balanced patch cables.
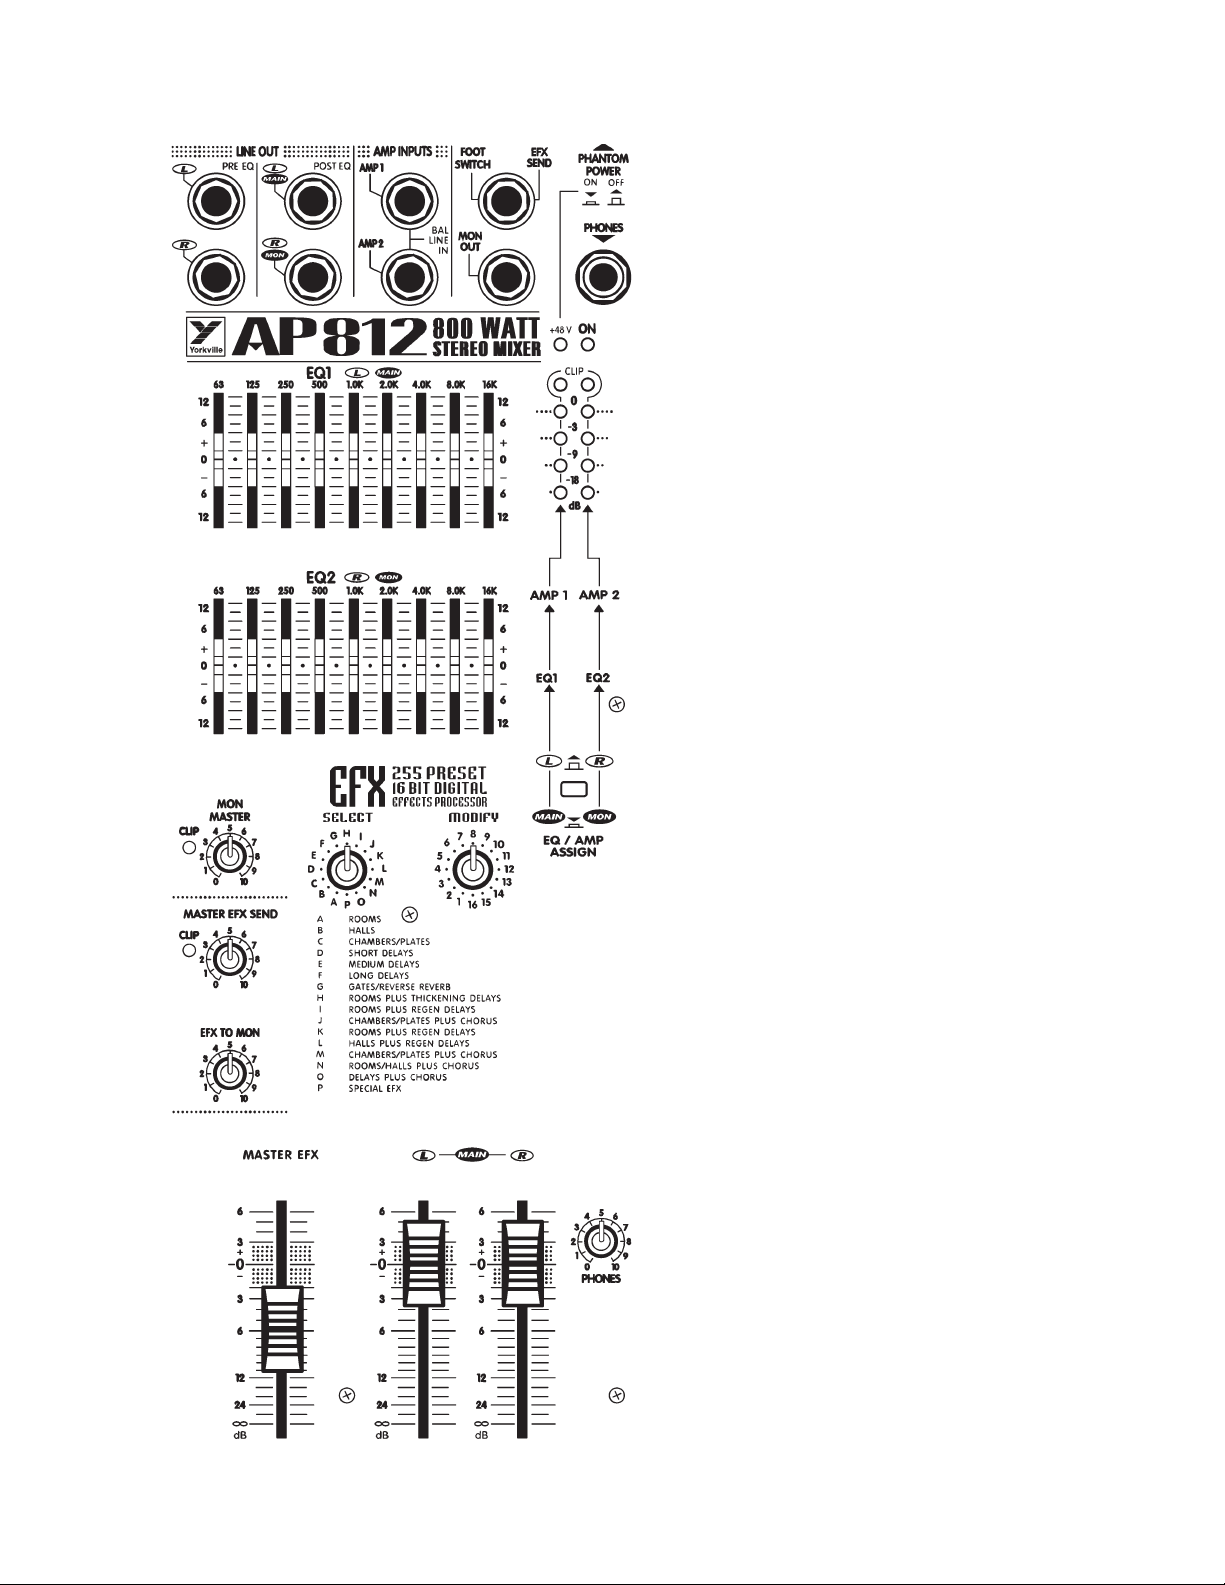
Basic Features
Channels 1 - 8 (1 - 14)
• XLR MIC and balanced TRS LINE inputs with low-noise input circuit design.
• Balanced LINE inputs accept either balanced or unbalanced lines.
• PHANTOM power (24 volts).
• Extremely wide input GAIN-adjustment.
• MONitor send controls are post-EQ and pre-fader.
• Three-band EQ with +/-15 dB of range and a sweepable mid (80 Hz - 8 kHz).
• Post-EQ, post-fader, EFX (effects) send controls.
• PAN controls provide constant gain levels at all settings.
• Increased circuit headroom and gain for a more flexible mix.
• Gold internal bus-interconnects for long life and maximum signal integrity.
• CLIP LED’s indicate even the briefest peaks, and fire at -3 dB, well before the
onset of actual clipping, at any and all active channel stages.
Stereo Channels (9/10, 11/12, 15/16 & 17/18)
(see diagram on following page)
• Left and Right 1/4-inch balanced TRS LINE inputs accept either balanced
or Unbalanced lines.
• The LEFT TRS input may be used for connecting a mono source and will inter-
nally patch it to the RIGHT channel input circuitry.
• LEFT and RIGHT RCA inputs.
• LOW, MID and HIGH frequency shelving EQ (+/- 15 dB).
• BALANCE control
• CUE buttons let you preview these channels through headphones with the
level faders shut off.
1

Master Features
• SELECT and MODIFY masters provide up 255 presets of reverb, delay
and other effects.
• Separate EFX TO MAIN and EFX TO MONitor masters.
• internal effects subsystem, based on the A.R.T. 16-bit digital effects processor,
delivers crystal clear performance.
• MASTER EFFECTS fader lets you insert the internal effect quickly and easily.
• MASTER EFX SEND con-
trol with it’s own CLIP
LED to help prevent
overloading the circuitry
at this stage.
• LEFT and RIGHT MAIN
faders - in fact all fad-
ers - feature 0 dB refer-
ence markings.
• MONitor master features its own CLIP LED
to help you avoid monitor distortion.
• The PHONES level
controls the headphone
amplifier which monitors the CUE bus when a
CUE button is depressed
and the MONitor bus
when it is not.
• The MAIN - MONitor
EQ/AMP push-button
lets you configure the
AP812 as either left-right
stereo with a separate
nine-band EQ for each
channel, or as a mono
system with one amplifier channel and EQ for
the MAIN PA speakers
and the other amplifier
channel and EQ for the
MONITOR speakers.
2
Power Amplifier Features
• A total output of 800 watts with well-proven, reliable AUDIOPRO technology.
• Industry leading specifications for distortion, damping, and efficiency.
• Comprehensive protection against low or even shorted loads, overheating and
DC damage to speakers.
• A combination of standard 1/4-inch and high-current Speakon® output connectors.

Feature Details & User Tips
Channel Strips
Inputs
Each channel has both a MIC and LINE input (except for channels 9/10 & 11/12
(15/16 & 17/18) which have RCA type inputs as well as 1/4-inch TRS inputs). The
LINE input will accept either balanced or unbalanced signals from all types of sources
and the MIC input is optimized for low-impedance microphones. The LINE input
is Tip-Ring-Sleeve balanced, with the Tip in phase, the Ring reverse phase and the
sleeve, Ground. The XLR is wired Pin 1= Ground, Pin 2 = in phase & Pin 3 = reverse
phase. This configuration is the standard throughout the world.
User tip: Problem; Hum and Buzz When Source is Unbalanced...
Unbalanced connections may be made to the LINE input with an unbalanced shield-
ed cable. However, field or leakage-induced ground currents between separate pieces
of equipment can sometimes produce hum and buzz. Most electronic instruments, for
example, still use unbalanced connections. If the equipment has more than one output feeding the mixer, even floating the circuit ground may not help.
CAUTION: We urge you to NEVER remove the ground-pin on the AC cord or otherwise disable the earth safety Ground connection as doing so can expose you to a serious shock hazard. Additionally, your radio interference problems will likely increase
and in some cases your hum problems will get even worse.
What to do: Hum and buzz can be safely reduced or eliminated with the AP812/818’s
input balancing, even when the signal source is unbalanced, Simply use standard TipRing-Sleeve balanced patch cables. However, in some worst-case instances it may be
necessary to create a special patch cable. In this case, use a 1/4-inch TRS (stereo) cable.
Attach a 1/4-inch TRS (stereo) plug to the end which will plug into the mixer’s
balanced-input as follows; 1) solder shield to Sleeve, 2) solder wire #1 to Tip, 3)
solder wire #2 to Ring. Now attach the mono plug to the other end of the cable as
follows: 4) solder the shield and wire #2 to the Sleeve, 5) solder wire #1 to the tip.
Now connect this mono end to the output of the unbalanced piece of equipment and
the stereo end to the AP812/818’s LINE input.
This technique will always reduce hum, and it can be used to connect any equipment
having a Balanced INPUT to any other equipment having an Unbalanced OUTPUT.
Phantom Power Button & LED
Located on the back panel near the SPEAKER outputs, this push-button activates the
24 Volt PHANTOM POWER feature built into the AP812/818. When the PHANTOM
POWER is activated, the +24V LED on the front panel (just below the PHONES jack) will
illuminate. Now you may connect condenser microphones to any channels without the
need for external power supplies. You may also connect dynamic mics to any channels
with the PHANTOM POWER activated without any problems or loss of sound quality.
Gain Control
With signal applied to the input, adjust this control so that occasional flashes of the
CLIP LED are observed. This will ensure that the signal level fits comfortably within
the channel strip’s headroom ~ low enough to prevent distortion, and yet high
enough to preserve the signal to noise ratio. This control covers a wide range, so it
may seem rather sensitive until you’re used to it.
Monitor Send
The MON send control is post-EQ & pre-fader. This means that the bit of channel signal it sends to the MASTER MONitor bus is tapped off at a point after the channel EQ
circuitry, and before the level fader. As a result it is not affected by the channel fader.
3

This means that you custom-equalize for the monitor system using the AP812/818’s
EQ2 equalizer or an external EQ patched between the AP812/818’s MON OUT jack
and the external power amp you are using for monitors.
User tip: In order to shut a channel off completely, it will be necessary to turn down
the MON send, as well as the channel fader.
3-Band EQ
Equalization is varied by four controls labeled HIGH, MID, SWEEPABLE MID (variable
from 80 Hz to 8 kHz), and LOW. Each control can either boost or cut the amplitude
of its frequency band by 15 dB. This is a considerable amount of gain change, roughly
equivalent to a 150% variation in audible loudness. It is therefore wise to use boost settings of not more than +3 dB to +6 dB in order to avoid feedback and/or distortion.
User tip: On the other hand, -15 dB of CUT-capability can come in handy for solving
certain mic or line problems. For example, substantial LOW and HIGH cuts can help
get rid of feedback plus puffing and thumping noises from harmonica mics. Flattop
guitar mics or transducers can often benefit from a slight MID cut to fatten the sound,
and direct or miked bass inputs usually benefit from a fairly substantial LO cut to
avoid main system distortion.
3-Band EQ - Channels 9/10, 11/12, (15/16 & 17/18)
LOW, MID & HIGH shelving EQ is provided for the stereo channels. Here again, the
gain range is plus/minus (+/-)15 dB. As a result, care should be taken in adjusting the
EQ above center position as a small adjustment can represent a large gain change.
Effects Send
The EFX send control varies the amount of post-EQ, post-fader channel signal
sent to the master EFX bus. The output of the EFX bus goes first to the EFX SEND
/ FOOTSWITCH jack and then to the internal 16-bit processor. The output of the
effects processor then goes to the MAIN master section to be mixed with the signals
going there direct from the input channels.
Cue Button - Channels 9/10, 11/12, (15/16 & 17/18)
The CUE feature enables you to preview channel signals via headphones before they
go to the main and/or MONitor bus. The CUE signal is post-EQ so that the channel
equalization will be in effect through the headphones. However, it is pre-fader so you
will need to shut the channel off through the mains and monitors when cueing. Use
the PHONES LEVEL to adjust cueing volume.
To employ this feature, simply follow these steps:
a) Connect a tape or CD-player to channel 9/10 and/or 11/12 (15/16, 17/18).
b) Pull the channel fader all the way down and turn the MON send off.
c) Depress the CUE button. Now that channel will have prominence through
your headphones.
d) Cue up your tape or CD track through the phones, then put it on play hold/
pause.
e) When you are ready to insert the recorded material, simply punch the CUE
button into the up position, then take the recorded material off play hold/
pause and bring up the channel fader and MON send to the desired mix lev-
els.
User tip: When you have inserted the cued material into the monitors, you will be
able to adjust its monitor mix level via headphones since the monitor bus signals
are always present through the phones when no channels are on CUE. The recorded
material’s main mix level will be audible to you through the main speaker system.
Pan or Balance Controls
This control directs the post-fader output of the channel between the LEFT and
RIGHT MAIN masters. In a stereo setup, the PAN/BALance can be used to position
the aural image of the channel left or right within the stereo listening field.
4

Channel Faders
This adjusts the levels of both the post-EQ channel
signal headed directly for the LEFT and RIGHT MAIN
master bus (via the PAN/BAL pot), and the EFX send
signal headed for the master EFX bus. The channel fader
does not control the MONitor send level.
Clip LED
The channel CLIP LED watches all the active electronic
stages in the channel circuit. Whenever any stage’s
signal peak approaches clipping to within 6 dB, the
CLIP LED circuitry captures and displays this event. See
under GAIN control for more about this feature.
Monitor Master & Clip LED
This control regulates the overall level of the master
MONitor bus. The CLIP LED, like the others, fires at 6 dB
below the onset of actual clipping so that a small amount
of activity is quite acceptable. If the LED flashes frequently, reduce the MON MASTER setting, or possibly one or
more of the channel MON send settings. The output of
the MON MASTER bus goes to the MON OUT jack. It
also goes to the EQ/AMP ASSIGN button where it can
be directed to the EQ2 equalizer and then to the RIGHTchannel of the built-in stereo power amplifier. Regardless
of the EQ/AMP ASSIGN button’s operation, the MONitor
signal remains available at the MON OUT jack so that it
can be used to drive an additional amp/speaker system.
Mon Out Jack
Located in the upper right area beside the PHONES
jack, MON OUT is the output of the monitor bus. It
is at line level (do not connect speakers to it directly)
and unbalanced. Connect your monitor power amp
or powered monitors here.
User tip: If another monitor system is in use, perhaps
full-range enclosures running off the main PA mix
as side-fills, you could connect a tape deck here
to record live performances. Plug a single 1/4-inch
male-to-dual 1/4-inch female Y adapter into the
MON OUT jack. Now simply run two of the appro-
priate patch cables (probably 1/4-inch male-to-RCA
male) into the tape deck’s L & R line level inputs.
You will now have the advantage of being able to
mix for recording, independent of the PA mix.
Left & Right Main Masters
EQ/Amp Assign Button
The MAIN master faders receive signals from the channel PAN/BAL controls and determine the output signal
levels at the L & R PRE-EQ LINE OUTPUT jacks.
User tip: Regardless of the ASSIGN button’s function, the PRE-EQ LINE OUTPUT jacks will always
carry the unequalized L & R stereo mix. This can be
useful if you are recording the live performance.
The MAIN faders also determine the signal levels
destined for the EQ/AMP ASSIGN button where they
are directed as follows:
5

a) Up in the L & R position, the ASSIGN button directs the Left & Right MAIN
master signals to EQ1 and EQ2 respectively. Thereafter, they go in two directions at once to the L & R (AMP 1 and AMP 2) inputs of the built-in power
amplifier and to the L & R POST EQ LINE OUTPUT jacks.
b) Down in the MAIN/MON position, the ASSIGN button also does two things.
First, it sums some of the LEFT and RIGHT MAIN signals into a single mono
signal and directs it to the input of EQ1, the output of which is then split and
goes to both the LEFT power amp channel and to the POST EQ MAIN (L)
LINE OUTPUT jack. Secondly, the button takes some of the MON MASTER’s
output signal and routes it to the input of EQ2, thereafter to be split and routed to the RIGHT channel of the built-in power amplifier and to the POST EQ
MON (R) LINE OUTPUT jack.
User tip: The stereo operating mode of the AP812 would be with the EQ/AMP ASSIGN
button up in the L & R position. This would supply up to 800 watts of stereo power (400
watts/channel) plus separate L & R 9-band EQ’s for the main system speakers. Power and
equalization for the monitors would come from a separate power amplifier and graphic
EQ. With the EQ/AMP ASSIGN button down in the MAIN/MON position, you now have
400 watts of mono power @ 4 ohms plus a single 9-band EQ for the main PA speakers,
also 400 watts @ 4 ohms and a single 9-band EQ for the monitors. Connect main PA
speakers to the AMP 1 SPEAKER OUTPUT's and monitors to AMP 2 SPEAKER OUTPUTS.
See under SPEAKER CONNECTIONS for suggested speaker impedances.
Pre & Post EQ Line Outputs
These are the outputs of the L & R main mixing busses. They are all at line level (do
not connect speakers directly) and unbalanced. The PRE EQ outputs are not affected
by either of the graphic equalizers. The stereo main mix is available from them at all
times, regardless of the EQ/AMP ASSIGN button setting. These would be available
for connecting a secondary mixer perhaps for a house PA, broadcast and/or recording
purposes. These outputs, although not balanced, have been designed to supply the
noise-canceling benefits of balanced outputs as long as the inputs of the unit (power
amp or mixer) you are connecting them to have bal-
anced inputs, and you use
TRS balanced cables.
6
The POST EQ output
signals are affected by the
graphic equalizers. They are
also affected by the EQ/AMP
ASSIGN button. With the
button up in the L & R MAIN
position, these jacks receive
the output of EQ1 at the L
MAIN jack and EQ2 at the R MON jack. With the EQ/AMP ASSIGN button down in
the MAIN/MON position, the L MAIN jack receives mono (left & right mixed together) main mix signal from EQ1 and monitor signals from EQ2. The POST EQ outputs
are best for driving power amplifiers whether for main or monitor speaker systems.
EQ1 & EQ2 Graphic Equalizers
The Q factor is greater in cut-mode than in boost-mode, which is desirable when
using the EQ for feedback control. Up to 12 dB of cut or boost is available. For more
information about their internal routing, see under LEFT & RIGHT MAIN MASTERS
and EQ/AMP ASSIGN BUTTON above.
User tip: As with all graphic EQ’s, minimal variations above or below center settings
are always recommended. The only exception to this rule might be in the fight against
feedback, but even there the ideal solution is to separate the offending speaker from
the offending mic or at least aim them in different directions. This way the whole system’s natural frequency response does not have to be compromised because of one mic
and one speaker. Ideally, a Real-time Frequency Analyzer and Pink Noise would be
employed before the audience arrives to help you pre-adjust the EQ (s) to cut obvious
system/room response spikes likely to cause feedback later on. Without such devices

you can achieve a vaguely similar result by simply turning up the level until a mic feeds
back, then reacting accordingly (this may or may not involve the EQ’s). In any case, the
prime suspect whenever feedback starts is always a monitor. A graphic EQ with a MIC
level input can be inserted between the offending mic and the mixer input to solve that
channel’s problem without altering the whole monitor system response.
Effects Bus Routing Overview
The AP812/818’s effects bus receives and mixes down all the channel EFX SEND signals. Its output is regulated by the MASTER EFX SEND control and is internally routed,
first to the EFX SEND / FOOTSWITCH jack. This is a switching jack which normally
allows the signal to proceed
internally to the effects pro-
cessor. But when a jack is
inserted here, the switching
function reroutes the effects
bus signal out the jack to
either an on/off footswitch or
whatever you have patched
it to, probably an external
effects unit, or possibly
something else if you have
decided to do without effects
and perhaps feed a broadcast
transmitter or recording unit.
In any case, the output of the
internal digital effects processor is permanently routed
to the MASTER EFX fader
and thereafter to the LEFT &
RIGHT MAIN MASTER busses, also to the EFX to MON
master control and thereafter
to the monitor bus.
Master EFX Send Control & Clip LED
For the quietest performance,
you should run the MASTER EFX SEND level as high as possible without causing distortion. With the channel EFX SEND controls turned up roughly half-way and signals coming into the channels, increase the MASTER EFX SEND level until some EFX CLIP LED
activity is observed, then turn it back down slightly until the flashing stops. You may now
re-adjust the channels EFX levels as desired. The MASTER EFX SEND may now be used to
tailor the EFX mix on all channels at once.
Digital Effects Processor
The internal Digital Effects Processor is a full 16 bit, 20 kHz bandwidth DSP-based effects
subsystem developed by Applied Research & Technology in Rochester, New York. It has
been custom programmed with 255 effects ranging from reverb to echo and special effects.
The selection of effects was determined in collaboration with a panel of sound engi-
neers experienced in live performance mixing. The panel was asked to choose effects
which would be of the most practical use in actual live performance situations. As
a result you will find the
internal system to be more
than adequate for most
applications.
EFX Footswitch/ Send Jack
A standard on/off footswitch
(optional) plugged into this
jack will enable you to turn
the internal effects system
7

on and off. Optionally, this jack may be employed to feed the EFX signal to an
external effects unit the output of which could be returned via an input channel perhaps channel 9/10 or 11/12 (15/16,17/18) if the effects unit is stereo. In this
mode, the channel fader would become the master effects return control, therefore
be sure to set that fader fairly low and adjust to desired levels. Be sure to turn the
EFX send control off in order to avoid creating a loop. Also, be sure to pull the EFX
MASTER fader down to the off position.
Phones Jack, Level Control & Sources
The PHONES jack accepts standard stereo headphones and is located in the upper
right area of the panel. The PHONES level control is located in the lower right area.
The source for all headphone signals is the MONitor bus until a CUE button is
depressed at which time only the cued channel can be heard through the phones.
Level Meters
These meters follow either the Left and
Right MAIN bus activities or a mono mix of
the mains on the Left-meter and monitors
on the Right-meter, all depending on the
position of the EQ/AMP ASSIGN button. If
either or both CLIP lights at the top of the
level meters is flashing too much of the
time, lower the appropriate MAIN MASTER
level to avoid possible distortion on peaks.
Amp 1 & 2 Inputs
These are switching jacks which enable
you to directly access either or both channels of the built-in power amplifier while
disconnecting them from normal internal
functions. This permits you to insert an
external-EQ, a processor /crossover (e.g.
élite) or a compressor/limiter between the
mixer section’s POST EQ LINE OUTPUTS
and the AMP 1 & AMP 2 INPUTS thus providing the 100% signal processing essential
for these functions to work properly.
User tip: If you have an electronic-crossover or processor/crossover, you can drive
subwoofers and full-range cabinets in a
biamped system with the AP812/818. The hookup goes as follows:
1. With the EQ/AMP ASSIGN button down in the MAIN/MON position, run a patch
cable from the POST EQ MAIN (L) LINE OUTPUT to the input on an electronic
crossover/processor.
2. Now run a second patch cable from the low-frequency or subwoofer output on
the crossover to the AP812/818’s AMP 1 INPUT and a third patch cable from the
crossover’s high-frequency or full-range output to the AP812/818’s AMP 2 INPUT.
3. Now connect two 8 ohm subwoofers or one 4 ohm subwoofer to the AMP
1 SPEAKER connector/s and two 8 ohm full-range cabinets to the AMP2
SPEAKER connector/s.
4. The complete system is now functional, not including monitors. How-ever, if you
need to vary the comparative volume levels of the subwoofer/s relative to the fullrange cabinets, another setup will be required with an external power amp for
the subwoofers or employing powered subwoofers. In that system, AMP 1 would
be for full-range speakers and AMP 2 would be for monitors. In other words, this
is a standard setup but with the MAIN (L) LINE OUTPUT going to the input of
the processor/crossover and then to an external amp driving the subwoofer/s, or
simply direct to the input of a powered subwoofer (ours have crossovers built in).
8

Power Amplifier - General
The AP812/818 has a built-in 800 watt stereo power amplifier. Each channel has an
input sensitivity of +4 dBv (1.4 volts RMS) for full-power output and each can deliver
over 400 watts into a 4 ohm speaker load. These amplifiers incorporate computer
designed internal heatsinks and a variable-speed fan which automatically provides
quiet operation consistent with cooling requirements. Cool air is drawn into the front
of the mixer, and heated air is expelled along the bottom of the back. Even at maximum power, this arrangement results in quiet, dependable performance.
PLEASE NOTE: THE AIR VENTS AT THE FRONT AND BOTTOM REAR OF THE
MIXER ARE ESSENTIAL FOR PROPER
OPERATION. BLOCKING THE
FREE FLOW OF AIR THROUGH
THE MIXER WILL RESULT IN
SYSTEM SHUT-DOWN DUE
TO OVERHEATING. REPEATED
OVERHEATING MAY EVENTUALLY
CAUSE DAMAGE. PLEASE KEEP THE
VENTS FREE OF OBSTRUCTIONS.
Speaker Connections
Two 1/4-inch jacks and one Speakon®
connector are in parallel with each amp-channel output stage. This allows the use of
speaker cables equipped with either type of connector. For full-power applications we
recommend 14-gauge cables equipped with the Speakon® connectors. This will reduce
risk of resistance buildup. The Speakon® system, developed in recent years by Neutrik
in Switzerland, features block-style contacts capable of handling large amounts of
power and the connectors lock down to prevent accidental kick-outs.
Connect one or two 8 ohm speakers or one (only) 4 ohm speaker to each chan-
nel. When connecting the Speakon’s®, push them in firmly and twist in a clockwise
motion. Push the tab and twist counter-clockwise to disconnect.
User tip: To connect two (8 ohm) speakers to one or both of the AP812’s powered
output channels via the Speakon
cable, e.g. Yorkville model SP2-25SS or SP2-50SS with Speakons® at both ends
(most higher-powered speaker enclosures now feature Speakons® as well) from the
AP812/818 to one of the enclosures. Now run a second cable from one cabinet to the
next via their dual, parallel inputs.
®
connectors, run a single Speakon® -equipped
Power Amplifier Protection
The AP812/818’s power amplifier is protected from damage due to open, shorted or
excessively low speaker loads. It will continue to run into a low (less than 4 ohms)
overall speaker impedance or even a total short-circuit for a brief time, however the
amplifier’s defense system will be activated. First, the built-in limiter will reduce output
power levels and the fan speed may increase. Then, if the condition worsens, a thermal
protection circuit will shut the power amplifier down. When this happens, check your
system for restricted air intake/exhaust at the AP812/818. Also check for shorted cables
or connectors and/or reduce the number of speakers being driven. In a few minutes
when it has had a chance to cool down, power amp function will resume.
User tip:
a) If the power amplifier shuts down as above, the mixer section will continue to
function. This means that, if the AP812/818’s power amp fails to come back on
(unlikely) and you have a spare power amplifier available, you can connect it to
the AP812/818 via the LINE OUTPUT jacks. See under PRE and POST EQ LINE
OUTPUTS for further information regarding connections.
b) Because the amplifier is also protected against open-circuit conditions, you
may use the AP812/818 without any speakers connected, for example if you
wanted to do some recording.
9

The AP812/818’s power amplifier also features speaker protection in case of
DC-offset. This is a very unlikely occurrence given the amp’s inherently stable design,
but should it happen, the output power is instantly shorted to ground and the speakers are saved. The AC mains breaker on the back panel will blow in response to this
condition (among others). If your breaker blows more than once in a short space of
time and the problem does not appear to be AC overload (see below), switch the
power off and take your AP812/818 to a qualified technician.
AC Power Circuit-Breaker
Located on the back panel near the SPEAKER connectors, this circuit-breaker’s main
function is to shut the AP812/818 down completely in case of an AC power overload.
If, for example, the unit were accidentally connected to a high-voltage power outlet,
this breaker would open as soon as the AP812/818’s POWER switch was flipped on. If
this breaker opens more than once in a short space of time, try plugging the AP812/818
into another power outlet. Also, see above regarding DC-offset speaker protection.
Rack Mounting (applies to AP812 only)
To rack-mount the AP812 you will need to purchase a pair of the accessory model RK812
rack ears, then simply remove the three screws holding each of the AP812's two end moldings in place and use the screws to mount the rack ears to the sides of the mixer.
General Operating Instructions
1. Connect the AC power cord to a 120 Volt AC grounded power outlet (220 to 240
Volts in export units).
2. Switch on the POWER and turn the MAIN and MONITOR MASTER controls to OFF for now.
3. Connect low-impedance microphones to the 3-pin XLR type MIC inputs.
4. Connect high-impedance mics or mono line-level signal sources - i.e. amplifier
line outputs, the output of a mono-mixer, an electric instrument, etc. to the 1/4inch BAL LINE IN jacks. Do not connect more than one thing to any of these
channels, that includes stereo outputs (if you try to connect a stereo source to a
mono channel using a Y adapter, you may get distortion).
5. Connect stereo sources - tape deck, CD-player, stereo keyboard, instrument, etc. -
to channels 9/10 and 11/12 (15/16,17/18), either via the RCA (phono) type inputs
or the 1/4-inch BAL LINE IN connectors. Once again, connect only one signal
source per channel and use shielded patch cords for all pre-amp connections.
Stereo sources may be connected to channels 1 through 8 if you use two of them,
one panned left, the other right.
Note A: The following setup applies to the system with the EQ/AMP ASSIGN button down
in the MAIN/MON position. This is with a mono main mix going to AMP 1 and the monitor
mix going to AMP 2 so that the whole system is being powered by the AP812/818.
6. Using heavy-gauge speaker cables (see under SPEAKER CONNECTIONS) connect
one or two 8 ohm main PA speakers to the AMP 1 SPEAKER outputs on the back
panel. Similarly, connect one or two 8 ohm monitors, or one 4 ohm monitor to
the AMP 2 SPEAKER outputs.
10

7. Position your main PA speakers at the front of the stage, pointing directly out at
the audience and position your monitor speakers on the stage floor, in front of
the mic stands, pointing up at the backs of the mics (remember to use cardioid or
uni-directional mics to reduce the threat of monitor feedback).
8. During a sound check with the band playing or other sources feeding the mixer
inputs, make the following control adjustments:
a) Set the channel LOW, MID & HIGH EQ controls and PAN or BAL controls at
center. Now set the channel GAIN, MON and EFX controls to OFF, the channel fader all the way down, and the GRAPHIC EQ sliders at center position.
b) Set the MAIN faders at 0 dB, turn the MONITOR MASTER control up to
approx. 8, the MAIN EFX master to around 7 and MONITOR EFX master to 5.
c) With the level faders still off, turn up the channel GAIN controls slowly until
the CLIP LED’s down beside the level faders begin to flash slightly. Now bring
up the channel level faders slowly until each channel can be heard at the
desired volume level through the main PA speakers.
d) Turn up the channel MON controls until the performers can hear themselves
at adequate volume levels without feedback.
e) Turn up the EFX controls on those channels requiring reverb. Usually this
would be the lead and harmony vocal channels. Reverb may be used on
other channels or on recorded music, but at lower levels.
f) Set the EFX SELECT control to establish the basic type of reverb, delay or what-
ever you prefer, then adjust the MODIFY control to establish the final sound.
9. Feedback during a performance is usually caused by one of the monitors. The
main PA is less likely to feed back because the mics are so far away from the
main PA speakers. Therefore, if one of the monitors and a mic are feeding back,
try the following procedures:
a) Turn the MONITOR master down until the feedback stops.
b) Go to EQ 2 and pull down one or two (but not more) of the EQ sliders in the
frequency range where the sound seems to be occurring.
c) Now turn the MONITOR master back up. If the feedback recurs, push the EQ
slider/s back up to center position and try pulling down one or two others.
d) In the rare case of main system feedback, follow the above type of procedure,
but using the MAIN master and the built in GRAPHIC EQ.
Note B: The following notes apply to the system with the EQ/AMP ASSIGN button up
in the stereo L & R position.
If you are employing a separate power amplifier for the monitor speakers, connect the
main speakers to the AMP 1 and AMP 2 SPEAKER OUTPUTS as in 6. above (also see
SPEAKER CONNECTIONS). Now run a shielded patch cord from the MONITOR OUT
jack to the input of the monitor power amp.
If you are employing a graphic equalizer for the monitors (a good idea - remember
there is no channel-EQ on the monitor signals and the AP812’s EQ 1 and EQ 2 are
now dedicated to the main-PA sound), run a shielded patch cord from the MONITOR
OUT jack to the input of the EQ, then another one from the EQ’s output to the input
of the monitor power amp (the Yorkville Beta-150EQ power amp has an EQ builtin). Follow the above steps in 7. and 8. to get the system ready to run. Now, take a
moment to read the following tips on running the this, or any, system.
11

12
Tips on Getting a Good Mix
If you’ve never mixed at high power levels before, the following suggestions may help
you to get a consistently good sound.
• When you have live microphones, don’t run the volume level right up to the
point of feedback! This is the most common mistake made by people mixing
live events. We’ve all heard systems on the verge of feedback and they sounded
terrible, even when no feedback was actually occurring! This happens because
working at the feedback point warps the frequency response of the system.
• To understand how volume level can affect frequency response, lets look at what
happens as you increase it to the point of feedback. Notice that feedback wants
to occur at a certain frequency? This is because the entire system - the room,
the microphones, the speakers, the people, everything - is showing a tendency
to RESONATE at a particular frequency. The technical term for a system which
shows a tendency to resonate is A HIGH Q FILTER. So by turning up to the feedback point, you are making the whole system behave like a high Q filter. This
gives you the same sound as if you turned everything down a lot and then boosted, say, the 1 kHz graphic EQ to +12 dB!
This is why stage feedback can be controlled by cutting certain frequencies with the
graphic EQ. However, using the graphic to control feedback means that, as the room
changes, (more people come in, it gets hotter, the dance floor empties or fills up,
etc.), the system’s equalization will change. You’ll be fighting the room all night.
• Having things loud doesn’t make up for the poor sound produced by spurious
response peaks. Fortunately, the Q of a system decreases rapidly as gain drops.
The professional way to avoid resonance effects is to keep about 3 dB away from
the first sign of feedback. The system will still be very loud, but it will sound a
whole lot better. Ideally, the graphic EQ should be used to flatten the overall
response, not to fix feedback.
• Use short reverb sounds and modest amounts of reverb. Long reverberation
effects cause the music to smear and can make things sound out of tune, especially as the music goes through harmonic changes. Shorter reverb tails enhance
the sound without spoiling definition. Having lots of dry in the mix keeps the kick
in it. Don’t forget that the room you are in may have lots of its own reverberation,
and that you can’t hear that in the headphones.
• Use tone controls sparsely; Most things sound great just as they are. A little
high-end boost can bring vocals to life. If you have a mic on the bass drum,
you can probably roll off most of the treble. (Its not useful to have mics listening
for sounds that aren’t there). Remember that making each instrument and voice
sound full when heard alone, will make the mix sound like mush when everything is heard together. Experiment, but be conservative with tone controls.
• Keep the vocals up front. Microphones tend to feed back, but instruments can
be turned up almost without limit. This fact biases volume in favor of the instruments. If you just follow what the mix seems to want, you may end up burying
the vocals so that they can’t be clearly heard. Most ears don’t like that.
• Speaking of ears, don’t forget yours. You’ve probably walked into a show late in
the evening and had your ears blistered by screaming horns. “What’s wrong with
whoever is doing the mix?” you might have said with fingers in your ears. What
was wrong was a technician with a dose of hearing fatigue and his/her unfortunate
reaction to it. After a relatively short exposure to high sound pressure levels, the
human ear shuts down somewhat, especially in the upper-midrange and high frequencies where it is most sensitive. This process reduces the immediate discomfort,
but there is debate as to whether it protects the ear in the long term and much evidence that damage does occur. In any case, the technician notices that the horns
sound muted and reacts by altering the EQ or the crossover to boost them (ouch!).
Apart from long-term physical danger, this sounds bad and turns off at least some of
the audience - especially the new arrivals. The solution - earplugs or other hearing
protection. Afterwards, some quiet time is in order to give damaged eardrum tissue
a chance to heal. Provided severe or repeated damage hasn’t created a buildup of

Specification
s
Number of Channels
12 (AP818: 18)
Mono Channel EQ (ch.1 to 8) Low, Sweep Mid, High (AP818: Ch. 1 - 14))
Stereo Channel EQ (ch. 9/10 & 11/12) Low, Mid, High (AP818: Ch. 15/16 & 17/18)
Channel Effects
All Channels
Monitors Effects
Yes
Balance Controls 9 to 12 (AP818: 15 to 18)
Pan Controls 1 to 8 (AP818: 1 to 14)
Inputs - XLR (bal) Ch. 1 - 8 (AP818: Ch. 1 to 14)
Inputs - 1/4-inch Ch. 1 - 12 (AP818: 1 to 18)
Inputs - RCA (unbal)
2 Stereo Sets
Clip /Mute LED
All Channels
Phantom Power
24 V + LED indicator
VU Meter
2 x 5 LED
Headphone Monitor Features
Cue , Volume
Internal Effects
Digital 16 Bit; 255 Effects
Effects Send
1 Internal/External
Effects Return to Main
Yes
Effects Return to Monitor
Yes
Reverb / Effects Footswitch
Yes
Max Gain to Line Out -Mic Input (dB)
63
Max Gain to Line Out -Line Input (dB)
45
Master EQ -1 (type /Channels /Range - dB)
Graphic / Mono / 9 Band 63 Hz - 16,000 Hz
Master EQ -2 (type /Channels /Range - dB)
Graphic / Mono / 9 Band 63 Hz - 16,000 Hz
Main Outputs ( Line Level)
4 , 1/4 inch (TRS) 2 pre, 2 post EQ
Main Amp Inputs (Line Level)
2 , 1/4 inch (TRS)
Monitor Outputs (Line Level)
1, 1/4 inch (TRS)
Outputs - Amp A - 1/4-inch Jacks
2
Outputs - Amp A - Speakon 4-pin
1(Euro only)
Outputs - Amp B - 1/4-inch Jacks
2
Outputs - Amp B - Speakon 4-pin
1 (Euro only)
Mixer - Signal to Noise Ratio (dB)
greater than 100
Mixer - Frequency Response (Tone and EQ Flat,+/-2dB)
20 Hz - 20,000 Hz
Mixer - Input Referred Noise to line out, @ 150 ohms (dBv)
-117
Mixer THD (Main out w/ -10dB input)
less than 0.03%
Amp A - Power Output @ 8 ohms (0%1"THD, 1kHz)
240
Amp A - Power Output @ 4 ohms
455
Amp A - Power Output -other
315 @ 2 ohms
Amp B - Power Output @ 8 Ohms (0%1"THD, 1kHz)
240
Amp B - Power Output @ 4 ohms
455
Amp B - Power Output -other
315 @ 2 ohms
THD - 1kHz (dB)
less than 0.03%
THD - 20Hz-20kHz (dB)
less than 0.1%
Hum and Noise (un / Aweight -dB)
-98
Typical crosstalk -1 kHz (dB)
-66
Input Impedance - Bal/Unbal (ohms)
22,000 - 12,000
Input Sesitivity (Vrms Sine)
1.47 V
CMRR @ 60Hz (min/typ)
54 dB / 66 dB
Max Votage Gain (dB)
29
Power Consumption (typ/max)
660 VA / 1200 VA
Protection
Thermal / Load / DC
Cooling
Variable Speed DC Fan
Transformer Type
Toroidal
Finish
Scratch Resistant Vinyl-Coated Aluminum
Chassis Construction
Steel
Rackmount Yes (RK812) (AP818: NOT APPLICABLE)
Other Features
Selectable stereo mains or mono main & monitor.
Dimensions (DWH, inches) 18 x 19 x 5.5 (AP818: 18 x 25.3 x 5.5)
Dimensions (DWH, cm) 45.7 x 48.3 x 14 (AP818: 45.7 x 64.3 x 14)
Weight (lbs/kg) 38 / 17.3 (AP818: 43 / 19.5)
scar tissue causing permanent hearing loss, you can return to hear your mix with
fresh ears. The mix should sound invitingly loud, but not painful.
• In basic terms, if you find that you’ve turned up the high end since the night
began and it still sounds the same to you as it did at the beginning, watch out.
That’s not “fatigued horns” or “changing room acoustics” rolling off the high end,
it’s your ears. Please do yourself and your audiences a favor - USE EARPLUGS!
And if you can’t bring yourself to do that, be considerate of your audiences and
leave the high-end EQ or crossover at normal settings.
13

Addendum
EQ Sweep Control
Although frequency sweep controls have graced the channel-EQs of recording
mixers for many years, they are only found on the more upscale PA mixers. As a
result many PA users, even veterans, are unfamiliar with their function. The
SWEEP control determines what range of frequencies is affected by the MID
cut/boost. It moves or sweeps the MID control's peak or notch in response all
the way up to several thousand Hertz or down to below 100Hz. As a result it
can have quite a noticeable effect on the sound especially since the MID cut or
boost will be interacting with whatever cuts or boosts you may have set with the
LOW or HIGH EQ controls.
For example, if you have set a LOW boost, a MID boost swept all the way down to the lowest
frequency setting will alter the sound of the lows and increase their volume. Be careful this
doesn't damage your woofers. And watch out for your tweeters/horns if you sweep the boost up
to the higher settings while the HI EQ is boosted.
Considering that the SWEEP control can alter everything you are
accustomed to an EQ doing, it would be worthwhile to spend some time
becoming acquainted with how it works. As music plays through a channel on
the mixer and speakers, adjust that channel's MID, first for a boost then for a cut
and SWEEP them back and forth. (If there is no MID cut or boost setting, i.e. if it
is set at the center position, the SWEEP will have no effect at all). Now repeat
the process with that channel's LOW and HIGH EQ controls at various settings
(but with the volume at a safe level for the speakers).
Hint: The PowerMAX SWEEP has a home base setting marked with a triangle at the 2.5kHz
mark. This approximately corresponds to the setting of the fixed mid controls on our other
mixers. Set channels not requiring SWEEP equalization at 2.5kHz and the MID cuts or boosts
will have more standard results.
Together, MID and SWEEP controls can be used to accomplish a variety
of tasks from combating feedback to improving the way things sound
through the PA or on recording. Here are some of those tasks & settings:
Note: These are approximate settings only. Use them as a starting point and tune around them.
• Killing feedback? Set MID at -6dB and slowly rotate SWEEP until the feedback stops. If
needed cut the MID further.
• Bonky sounding snare drum? -6dB @ 200Hz (roll off LOW EQ -6dB)
• Boomy bass drum? -6dB @ 300Hz (LOWEQ @ +6dB & HIGHEQ @ +3dB)
• Fwashy sounding cymbals? -9dB @ 300Hz (roll off LOW EQ -15dB)
• Excessive hiss from guitar, bass or keyboard amp? +3dB @ 5kHz (HI EQ rolled off -9dB)
• Fading vocal range (notes too low for singer)? +3dB @ 80Hz (LOW EQ rolled off -6dB)
• Puffing on harmonica mic? -9dB @ 80Hz (LOW EQ rolled off -12dB)
• Rack Toms? -3dB @400 Hz
• Floor tom? -6dB @ 200Hz
Generally speaking, you will probably end up with the MID in cut mode
for most problem solving uses of the SWEEP control. In any case you will
learn to use this feature judiciously. The best PA EQ setting is the one with
the least adjustment, but when you need to solve a problem it's good to
know how to use the tools.
EQ MID SWEEP Addendum 01.06.28.99
14

Introduction
Votre nouveau Mixeur/Amplificateur Yorkville AP812/818 a été conçu et construit
de façon à offrir une performance fiable pour plusieurs années à venir. Tirant sur
trente années d’expérience dans la conception et la fabrication de mixeurs amplifiés,
les ingénieurs de Yorkville ont été capables de doter le mixeur AP812 /818 de
caractéristiques tel montage en rack optionnel, ventilateur interne silencieux, deux
canaux stéréo avec des boutons cue, monitoring par casque d’écoute des signaux du
bus de moniteur et du cue, alimentation en duplex, double égalisateurs graphique
9 bandes, canaux d’amplificateur de puissance et égalisateur assignable en mode
d’opération stéréo Gauche/Droite ou en mode d’opération mono, unité de traitant de
signal numérique 255 pré-réglages, indicateur de niveau double, 800 watts de puissance stéréo intégré, prises de sortie 1/4” Speakon®.
Terminologie
• Les entrées à 3-tiges pour microphone sont appelées connecteurs XLR.
• Les prises réceptacles 1/4” sont appelées prises 1/4”.
• Les prises symétriques 1/4”, d’entrée ou de sortie, sont appelés TRS (tip-ringsleeve) ou Pointe - Bague - Corps
• Le contrôle maître et les canaux de mélange sont appelés bus.
• Les clignotants de surcharge sont appelés DEL d’écrêtage.
• Les câbles de branchement blindé avec des conducteurs doubles et prises 1/4”
TRS sont appelés câbles de branchement symétrique.
Caractéristiques de Base
Canaux 1 - 8 (1 - 14)
• Entrée XLR MIC et TRS LIGNE symétrique avec circuit d’entrée offrant un
niveau de bruit réduit.
• Entrée DE LIGNE symétrique acceptant les branchements niveau ligne symé-
trique ou asymétrique.
• ALIMENTATION EN DUPLEX (24 volts).
• Grande gamme de réglage de gain à l’entrée.
• Les contrôles d’envoi MONITEUR sont post-EQ et pré-fader.
• Trois bandes d’égalisation avec gammes de +/- 15dB, frequence variable 80Hz à 8kHz.
• Contrôles d’envoi aux EFX (effets) post-EQ et post fader.
• Les contrôles de panoramiques fournissent des niveaux de gain constants
à tous réglages.
• Circuit d’extension dynamique et de gain accru pour un mélange plus flexible.
• Branchement interne avec contact en or pour une vie prolongée et intégrité maxi-
mal de signal.
• Les DEL D’ÉCRÊTAGE indiquent même les pointes d’écrêtage les plus fines et
s’illuminent à - 3dB, bien avant l’écrêtage réel et ce à toute le étage actifs du canal.
Les Canaux Stéréo (9/10, 11/12, 15/16 & 17/18)
• Les prises d’entrée ligne symétriques TRS gauche et droite 1/4” acceptent les
lignes symétriques ou asymétriques.
• La prise d’entrées TRS GAUCHE peut être employée pour Branchez une source
mono. Le signal sera branché intérieurement au circuit d’entrée de canal DROITE.
• Prises d’entrées RCA GAUCHE et DROITE.
• Egalisateur à étalement pour fréquence HAUTE, MID et BASSE.
15

• Contrôle de balance
• Les boutons DE SIGNAL CUE vous permettent d’écouter, à l’aide d’un casque
d’écoute, ces canaux indépendamment du réglage de niveau du fader.
Caracteristiques de la Section Maitresse
• Les contrôles SELECT et MODIFY
fournissent un assortiment de 255
effets pré réglés de reverb, délais et
autres effets.
• Contrôles séparés pour effets au
mixe principal et effets aux moniteurs.
• Le sous-système interne d’effets,
basé sur le processeur numérique
d’effets A.R.T. 16 bit, offre une performance claire et définie.
• LE CONTRÔLE MASTER EFX vous
permet d’insérer l’effet interne rapidement et aisément.
• Contrôle MASTER EFX SEND avec
sa propre DEL D’ECRETAGE pour
aider à prévenir l’écrêtage à ce
stage.
• faders PRINCIPAL GAUCHE et
DROITE - en fait tout les faders -
dotés de la marques de référence
0dB.
• Le contrôle MON MASTER possède
sa propre DEL D’ECRETAGE pour
aider à prévenir l’écrêtage à ce
stage.
• Le contrôle de niveau PHONE règle
le niveau de l’amplificateur pour le casque d’écoute. Cet amplificateur contrôle le bus
de CUE quand un bouton de CUE est poussé et le BUS DE MONITEUR quand il n’y a
pas de bouton CUE poussé.
• Le bouton-poussoir MAIN - MONitor EQ/AMP vous permet de programmer
L’AP812/818 en système stéréo avec un égalisateur séparé neuf - bande pour
chaque canal, ou comme un système mono avec un canal d’amplificateur et égalisateur pour le mixe PRINCIPAL et l’autre canal d’amplificateur et égalisateur pour
le système DE MONITEUR
16
Les Caracteristique d’Amplificateur se Puissance
• Une sortie totale de 800 watts avec la fiabilité renommé de la technologie AUDIOPRO.
• Spécifications pour la distorsion, amortissement, et efficacité résultant d’une tech-
nologie de pointe.
• Protection compréhensive contre des charges basses ou même court-circuit, surchauffe et dommages aux haut-parleurs causé par DC.
• Prise de Sorties ¼- “ et Speakon®.

Details des Caractéristiques & Conseils à l’Utilisateur
Bandes de Canal
Entrées
Chaque canal est doté de prises d’entrée MIC et LIGNE (à l’exception de des canaux
9/10 & 11/12 (15/16 & 17/18) qui a sont dotés d’entrées RCA et 1/4 TRS). L’entrée
LIGNE acceptera des signaux symétriques ou asymétriques de tous types de sources.
L’entrée MIC est optimisée pour les microphones basse impédance. L’entrée LIGNE
est du type TRS symétrique, avec la Pointe en phase, l’anneau hors phase et le corps
à la masse. La prise XLR est connectée comme suit: tige 1=masse, tige 2 = en phase
& tige 3 = hors phase. Cette configuration est la norme à travers le monde.
Conseil à l’utilisateur: Le problème; un bourdonnement avec source est asymétrique.
Les raccordements asymétriques peuvent être faits à l’entrée LIGNE avec un câble
asymétrique blindé. Cependant, des effets de champs ou fuite peuvent induire des
courants de masse entre différentes pièces d’équipement produisant un bourdonnement. La plupart des instruments électroniques, par exemple, emploient toujours
des raccordements asymétriques. Parfois même le débranchement du circuit de masse
n’aide pas si l’équipement a plus d’une sortie qui alimentent le mixeur.
ATTENTION: Nous vous prions de ne JAMAIS enlever la tige de mise à la masse sur
le CORDON D’ALIMENTATION. Autrement dit, désactiver le raccordement de sécurité de mise à la terre. Cela pourrait vous exposer à un risque sérieux de choc. En
plus, vos problèmes d’interférence radio seraient probablement accrut et dans certains
cas vos problèmes de bourdonnement seraient même pire.
Que faire: Le bourdonnement peut être réduit ou éliminé en toute sûreté en utilisant
l’entrée symétrique du mixeur AP812/818 même quand le signal de source est asymétrique. Employez simplement des câbles de branchement symétriques avec prises type
TRS. Cependant, dans les pire cas, il peut être nécessaire de créer un câble spécial de
raccordement. Dans ce cas, employez un câble avec fiches 1/4 TRS (stéréo).
Raccordez une prise 1/4 TRS (stéréo) à l’extrémité du câble qui sera branché à
l’entrée symétrique du mixeur, comme suit; 1) souder le blindage au corps, 2) souder
le conducteur # 1 à la pointe, 3) soudez le conducteur # 2 à la bague. Attachez
maintenant une prise mono à l’autre extrémité du câble comme suit: 4) soudez le
blindage et le conducteur # 2 au corps, 5) soudez le conducteur # 1 à la pointe.
Branchez maintenant cette extrémité mono à la sortie de l’appareil asymétrique et
l’extrémité stéréo à l’entrée ligne du AP812/818. Cette technique réduira toujours
le bourdonnement, et elle peut être employé pour Branchez tout équipement avec
ENTRÉE symétrique à tout autre équipement avec SORTIE asymétrique.
Le Bouton et la DEL d'Alimentation en Duplex
Situé au panneau arrière près de la sortie D’HAUT-PARLEUR, ce bouton poussoir
active l’ALIMENTATION EN DUPLEX De 24 volt dont est doté l’AP812/818. Quand
L’ALIMENTATION EN DUPLEX est activé, la DEL +24V sur le panneau avant (juste en des-
sous de la prise pour casque d’écoute) s’illuminera. Vous pouvez maintenant Branchez des
microphones condensateur à n’importe quel canal sans avoir recourt à une alimentation
externe. Vous pouvez aussi relier, avec L’ALIMENTATION EN DUPLEX activé, des micro-
phones dynamiques à tout canal sans problème ou perte de qualité sonore.
Contrôle de Gain
Avec le signal appliqué à l’entrée, ajustez ce contrôle de façon à ce que la DEL
D’ECRETAGE s’illumine occasionnellement. Cela assurera que le niveau de signal
ne s’étend pas au-delà de l’extension dynamique du canal ~ assez bas pour prévenir
la distorsion, et assez haut pour conserver un bon rapport signal/bruit. Ce contrôle
couvre une gamme étendue, il peut donc vous sembler plutôt sensible jusqu’à ce que
vous y soyez habitué.
Envoi au Moniteur
Le contrôle d’envoi MON est post-EQ & pré-fader. Cela signifie que la portion de
signal du canal, dirigé au bus DE MASTER MONitor, est prise à partir d’un point
17

après le circuit d’égalisateur , et avant le fader de niveau. Le fader de niveau donc
aucun effet sur le signal destiné aux moniteurs. A l’aide de l’égalisateur EQ2 de votre
AP812/818, vous pouvez maintenant obtenir une égalisation sur mesure pour le
système de moniteur. Il est aussi possible de raccorder un égalisateur externe entre la
prise DE SORTIE MON de L’AP812/818 et l’amplificateur de puissance externe
utilisé pour les moniteurs.
Conseil: Pour fermer un canal complètement, il est nécessaire de fermer le contrôle
d’envoi MON, et le fader du canal.
Egalisateur 3-Bandes
L’égalisation est varié par les trois contrôles étiqueté HIGH, MID, SWEEP-MID (80Hz à
8kHz) et LOW. Chaque contrôle peut renforcer ou couper l’amplitude de sa bande de
fréquence par 15dB. C’est une gamme considérable de variation de gain, à peu près équivalent à une variation de volume audible de 150%. Il est donc sage de garder les réglages de
renforcement en-dessous de +3dB à +6dB à fin d’éviter le feedback et/ou la distorsion
Conseil: La possibilité de réglage de coupure de 15dB peut toutefois être pratique
pour résoudre certains problèmes de microphone ou de ligne. Par exemple, des coupures substantielles des BASSES et HAUTES fréquences peuvent aider à éliminer le
feedback et les bruits de “puffing” et “thumping” de microphones d’harmonica. Les
microphones de guitare acoustique “flattop” et les transducteurs peuvent souvent
bénéficier d’une coupure légère des MOYENNE. Les entrées de microphone ou les
injections directes de basse bénéficient habituellement d’une coupure des basses substantielle de façon à éviter la distorsion du système principale de moniteur.
Egalisateur 3-Bandes - Canaux (9/10, 11/12, 15/16 & 17/18)
Les canaux stéréo sont dotés d’égalisateur à cascade pour basses, mid et hautes
fréquences. La gamme de réglage varie encore un fois de plus/moins (+/-) 15dB. Un
ajustement minime peut représenter un changement de gain considérable. Il est donc
recommandé d’agir avec prudence lors des réglages au-dessus de la position centrale.
18
Envoi Aux Effets
Le contrôle d’envoi EFX SEND varie la somme de signal, poste - EQ et poste - fader,
acheminé au bus EFX principale. La sortie du bus EFX est d’abord acheminé vers le jack
EFX SEND/FOOTSWITCH et se dirige ensuite vers le processeur interne 16 bit. La sortie du
processeur d’effets numérique est ensuite acheminés à la section MAITRESSE PRINCIPALE
pour être mélangé avec les signaux provenant directement des canaux d’entrée.
Bouton Cue - Canaux (9/10, 11/12, 15/16 & 17/18)
La fonction CUE isole le signal du canal sélectionné et vous permet d’écouter, à
l’aide d’un casque d’écoute, les signaux de ce canal avant qu’ils soient acheminés
au bus principal et/ou au bus de MONITEUR. Le signal CUE est post - EQ de façon
à permettre le monitoring de l’égalisation de canal avec le casque d’écoute. Les signaux CUE sont cependant pré-fader. Il sera donc nécessaire de fermer le canal par les
contrôles “mains” et monitors lors du cueing. Employez le contrôle PHONE LEVEL
pour ajuster le niveau du casque d’écoute.
Pour employer la fonction cue, suivez simplement ces étapes:
a) Branchez un magnétophone à cassette ou un lecteur CD - aux canaux 9/10
ou 11/12 (15/16, 17/18).
b) Réduisez le fader et le contrôle MON au minimum.
c) Appuyez sur le bouton CUE. Ce canal sera maintenant prédominant au
casque d’écoute.
d) A l’aide du casque d’écoute placez votre bande ou piste CD à la position
désirée et appuyez sur le bouton PLAY HOLD/PAUSE.
e) Lorsque que vous êtes prêt à insérer la bande sonore que vous avez posi-
tionné, appuyez simplement sur le bouton CUE à nouveau pour qu’il soit en
position relevé. Enlevez ensuite la bande sonore à insérer de la position PLAY
HOLD /PAUSE et remontez les contrôles fader et envoi aux MON.
Conseil: Quand le signal est inséré aux moniteurs, il est possible d’ajuster son niveau
au mélange de moniteur à l’aide d’un casque d’écoute. Les signaux de bus de moni-
teur sont toujours présents à la prise d’entrée du
casque d’écoute quand les boutons CUE des deux
canaux sont en position relevé. Le niveau de la
bande sonore au mélange principal sera audible par
le système principal de haut-parleur.
Contrôle Pan ou Balance
Ce contrôle dirige la sortie post - fader du canal entre les sorties MAITRESSE GAUCHE et DROITE. Dans un ensemble
stéréo, le contrôle PAN/BALANCE peut être employé pour
situer l’image auriculaire du canal vers la droite ou la gauche.
Fader de Canal
Ce contrôle règle les niveaux des signaux post - EQ de
canal acheminé vers les bus maîtres GAUCHE et DROIT
PRINCIPAL (par le contrôle PAN/ PAL), et EFX SEND
acheminé vers le bus d’EFX maître. Le fader du canal ne
contrôle pas le niveau d’envoi aux MONITEURS.
DEL d’Ecretage
Le circuit de DEL D’ECRETAGE de chaque canal surveille tous les étages électroniques actifs du circuit
de canal. Le circuit de DEL D’ECRETAGE capturera et
exposera les impulsions de signal s’approchant à 6dB
en-dessous du niveau d’écrêtage. Voir la section contrôle de gain pour plus d’information à ce sujet.
Monitor Master & Clip LED
Ce contrôle règle le niveau général du bus maître DE
MONITEUR. La DEL D’ECRETAGE, comme les autres,
s’illumine à 6dB en dessous du niveau d’écrêtage réel
si bien qu’une activité occasionnelle est acceptable. Si
la DEL s’illumine fréquemment, réduisez le niveau du
contrôle MON MASTER, ou éventuellement le niveau du
MON SEND d’un ou plusieurs canaux. La sortie du bus
MON MASTER est acheminé vers la prise de sortie MON
OUT. Il va aussi au bouton EQ /AMP ASSIGN où il peut
être dirigé vers l’égalisateur EQ2 et ensuite vers le canal
DROIT de l’amplificateur de puissance stéréo interne.
Indépendamment de la position du bouton EQ/AMP
ASSIGN, le signal DE MONITEUR reste disponible à la
prise de sortie MON OUT pour permettre l’utilisation
d’un système amplificateur/haut-parleur supplémentaire.
Prise de Sortie Moniteurs "Mon Out"
La prise de sortie du bus de moniteur MON OUT est
situé dans la superficie supérieure droite, près de la prise
PHONES. Le signal asymétrique disponible à cette prise
est à un niveau ligne. (ne pas y Branchez des haut-parleurs directement). Branchez à cette prise votre amplifi-
cateur de moniteur externe ou des moniteurs amplifiés.
Conseil: Si un autre système de moniteur est utilisé,
telle “side-fills” avec enceintes pleine gamme à partir
du mélange principal, vous pouvez y Branchez un
magnétophone à cassette pour enregistrer la performance. Branchez simplement à la prise de sortie MON
OUT un adaptateur en Y (1/4” mâle - à - double 1/4”
femelle). Acheminez ensuite à partir de l’adaptateur en
Y deux câbles de branchement appropriés (probable-
19

ment 1/4” mâle à RCA mâle) aux entrées lignes de gauche et droite du magnétophone.
Vous aurez maintenant l’avantage d’être capable de contrôler les niveaux du mélange
pour enregistrer, indépendamment des réglages du mélange principal.
Contrôles Principales Maitres Droit et Gauche et Bouton "EQ/Amp"
Les faders maîtres PRINCIPAUX reçoivent les signaux provenant des contrôles PAN/
BAL de chaque canal et déterminent les niveaux de signal de sortie aux prises de sortie LIGNE L & R PRÉ-EQ.
Conseil: Indépendamment du réglage du bouton ASSIGN, les prises DE SORTIE DE
LIGNE PRÉ-EQ porteront toujours le mélange stéréo avant égalisation G & D Cela
peut être utile si vous enregistrez la performance en direct.
Les faders PRINCIPAUX déterminent aussi les niveaux de signal destinés aux
bouton EQ/AMP ASSIGN où ils sont ensuite dirigés comme suit:
a) En position sortie (L & R), le bouton ASSIGN dirige les signaux maîtres
PRINCIPAUX droit & gauche aux égalisateurs EQ1 et EQ2 respectivement. Les
signaux sont ensuite dirigés à la fois aux entrées de l’amplificateur de puissance interne gauche & droite et aux prises DE SORTIE DE LIGNE gauche &
droite POST EQ.
b) En position poussée (MAIN/ MON), le bouton ASSIGN fait aussi deux choses.
En premier lieu, il mélange une partie des signaux PRINCIPAUX GAUCHE
et DROIT en un signal mono et le dirige à l’entrée de l’égalisateur EQ1. Le
signal à la sortie de l’égalisateur est ensuite séparé et dirigé à la fois au canal
GAUCHE de l’amplificateur interne et à la prise DE SORTIE LIGNE POSTE
EQ PRINCIPAL (GAUCHE). En deuxième lieu, le bouton prend une partie du
signal de sortie MON MASTER et l’achemine à l’entrée de l’égalisateur EQ2.
Le signal est ensuite séparé et acheminé au canal DROIT de l’amplificateur de
puissance interne et à la prise DE SORTIE DE LIGNE POSTE EQ MON (Droit).
Conseil: Le mode d’opération stéréo est obtenu avec le bouton EQ/AMP ASSIG” en
position sortie (L&R). Cela procure jusqu’à 800 watts de puissance stéréo (400 watts/
canal) en plus d’une paire (gauche et droite) d’égalisateurs 9 bandes pour les hautparleurs principaux du système. En mode stéréo, un amplificateur de puissance et un
égalisateur graphique externe fournissent l’amplification et l’égalisation pour les moniteurs. Avec le bouton EQ/AMP ASSIGN en position poussée MAIN / MON vous avez
maintenant 400 watts de puissance mono à 4 Ohms plus un égalisateur 9 bandes
mono pour les haut-parleurs principaux, et 400 watts de puissance mono à 4 Ohms
plus un égalisateur 9 bandes mono pour les moniteurs. Branchez les haut-parleurs
principaux aux prises de sortie pour haut-parleurs AMP 1 et les haut-parleurs pour
moniteurs aux prises de sortie AMP 2. Voir la section BRANCHEMENT DES HAUTPARLEURS dans ce manuel pour les impédances suggérées de haut-parleur.
20
Prise de Sortie Ligne Pre & Post EQ
Ces prises sont les sorties des barres collectrices du mélange principal gauche & droit.
Elles sont toutes au niveau de ligne (ne pas brancher des haut-parleurs directement) et
asymétriques. Les sorties PRE EQ ne sont pas affectée par l’un ou l’autre des égalisateurs
graphiques. Le mélange principal
stéréo est toujours disponible à ces
sorties indépendamment du réglage
du bouton EQ/AMP ASSIGN. Ces
prises sont disponibles pour raccorder un mélangeur secondaire.
Elles peuvent être utilisé pour une PA
maison, pour la diffusion et/ou pour
l’enregistrement. Ces sorties, bien
qu’asymétriques, ont été conçues
de façon à fournir les bénéfices de
réduction de bruit associé aux sorties symétriques pourvu que l’appareil externe soit doté
d’entrée (mixeur ou amplificateur) symétriques, et que vous employez des câbles symétrique
Pointe/Bague/Corps. Les signaux aux prises de sortie POSTE EQ sont affectés par les égal-
isateurs graphiques. Ils sont aussi affectés par le bouton EQ/AMP ASSIGN. Avec le bouton
en position sortie (L & R MAIN), ces prises reçoivent les signaux de la sortie de l’égalisateur

EQ1 à la prise L MAIN et de l’égalisateur EQ2 à la prise MON R. Avec le bouton EQ/AMP
ASSIGN en position poussée, (MAIN/MON), la prise L MAIN reçoit le signal mono du
mélange principal (gauche & droit mélangé) de l’égalisateur EQ1 et le signal de moniteur de
l’égalisateur EQ2. Les sorties POST EQ sont à leur meilleur lorsqu’ils acheminent le signal à
un amplificateur de puissance pour systèmes de haut-parleur principal ou pour moniteur.
Les Egalisateurs Graphiques EQ1 & EQ2
Le facteur Q est plus grand en mode de coupure qu’en mode de renforcement per-
mettant ainsi un meilleur contrôle lorsque l’égalisateur est utilisé pour contrôler le
feedback. Un renforcement ou une coupure allant jusqu’à 12dB est disponible. Pour
plus d’information au sujet de leur acheminement interne, référez-vous au chapitre
CONTRÔLES DROIT ET GAUCHE PRINCIPAUX MAITRES ET BOUTON “EQ/AMP.”
Conseil: Comme avec tout égalisateur graphique, des variations minimes au-dessus ou en dessous du
point central sont toujours recommandées. La seule exception à cette règle pourrait être lors de coupure
dans le but d’éliminer le feedback. Même dans cette situation, il est préférable de séparer, ou de diriger
dans différentes directions, le haut-parleur et le microphone qui sont à la source du feedback. De cette
façon, la réponse en fréquence naturelle du système n’est pas compromise à cause d’un microphone
et d’un haut-parleur. Idéalement, un Analyseur de Fréquence temps Réel et un Bruit Rose seraient
employés avant l’arrivé de l’audience pour vous permettre de régler l’égalisateur(s) par rapport à la salle
de façon à couper les fréquences
qui pourraient vraisemblablement causer le feedback lors de
la performance. Vous pouvez
obtenir un résultat vaguement
similaire sans les dispositifs mentionné ci-dessus en augmentant
simplement le niveau du système
jusqu’à ce que un des microphones produise un feedback.
Vous devez ensuite faire les
réglages nécessaires pour éliminer ce feedback avec ou sans
égalisateur. Les retours de scène
sont souvent à la source du
problème lorsqu’un feedback se
produit. Un égalisateur graphique
avec niveau entrée MIC peut être
inséré entre le microphone et
l’entrée de mixeur pour résoudre
le problème de ce canal sans
modifier la réponse entière de
système de moniteur.
Aperce de l'Achieminement du Signal a Travers Bus d'Effets
Le bus d’effets de
l’AP812/818 reçoit et
mélange les signaux EFX
SEND de tout les canaux. Sa
sortie est réglée par le con-
trôle “MASTER EFX SEND” et
est intérieurement acheminée, en premier lieu à la prise “EFX SEND/ FOOTSWITCH.”
C’est une prise de commutation qui permet normalement au signal de procéder intérieurement au processeur d’effets interne. Mais quand une prise y est insérée, la fonction de commutation achemine la sortie de signal du bus d’effets à travers cette prise
de sortie. Un commutateur au pied, une unité externe d’effets, ou même un émetteur
d’émission ou un unité d’enregistrement peuvent y être branché . Quelque soit les cir-
constances, la sortie du processeur d’effets numériques interne est acheminé au fader
“MASTER EFX” et par la suite au bus “LEFT & RIGHT MAIN MASTER”. Elle est aussi
acheminée au “EFX”, au contrôle maître “MON”, et par la suite au bus de moniteur.
21

Contrôle “Master EFX Send” & DEL d’Écretage
Un réglage élevé, mais sans écrêtage, du contrôle MASTER EFX SEND permettra
d’obtenir une performance sans bruit. Avec les contrôles EFX SEND de canal réglés
en position centrale et avec signaux venant des canaux, élevez le niveau du con-
trôle EFX SEND jusqu’à ce que la DEL D’ECRETAGE s’illumine. Ensuite réduisez
légèrement le niveau du même contrôle de façon à cesser toute activité de la DEL
d’écrêtage. Vous pouvez maintenant ré - ajuster le niveau des contrôles EFX de
chaque canal au niveau désiré. Le MASTER EFX SEND peut maintenant être employé
pour façonner le mélange EFX sur tous les canaux.
Le Pprcesseur d'Effets Numérique
Conçue par la firme Applied Research & Technology de Rochester, New York,
le processeur interne d’effets numérique 16 bit, offre une largeur de bande de
20kHz.. Il a été spécialement programmé pour offrir 255 effets variant du reverb à
l’écho et aux effets spéciaux.
La sélection d’effets a été déterminé en collaboration avec un groupe d’ingénieurs en
sonorisation expérimenté dans le mixage de performance en direct. Ils avaient pour
tâche de choisir des effets d’usage courant pour les performance en direct. Le système
d’effets interne s’avérera plus qu’adéquat dans la plupart des situations.
La Prise EFX Footswitch/Send
Un commutateur au pied standard (option-
nel) branché à cette prise vous permettra
d’activer ou désactiver le système d’effets
interne. Cette prise peut aussi être employé
pour acheminer le signal vers un processeur de signal externe. Les sorties de
l’appareil peuvent ensuite être ramenés
au AP812/818 par les entrées de canal,
peut-être 9/10 ou 11/12 (15/16, 17/18) si
l’unité d’effets est stéréo. Dans ce cas, le
fader du canal deviendrait alors le contrôle
maître des effets, et il serait donc prudent
de régler le niveau relativement bas pour
ensuite l’ajuster au niveau désiré. Assurezvous de régler le contrôle EFX à “0” pour
éviter de créer une boucle avec le signal
d’effet. Assurez-vous aussi, de régler le contrôle EFX MASTER à la position minimum.
22
Prise Pour Casque d’Écoute,
Contrôle de Niveau & Sources
La prise PHONE accepte des casques
d’écoute stéréo ordinaires et est située
dans la superficie supérieure droite du
mixeur. Le contrôle de niveau est situé dans la superficie inférieure droite. La source
de signal à la prise PHONE parvient du bus de moniteur jusqu’à ce qu’un bouton
CUE soit enfoncé. Le signal présent au casque est alors celui du canal sélectionné.
Indicateurs de Niveau
La position du bouton EQ/ASSIGN détermine ce qui apparaît sur l’indicateur de
niveau. On y verra soit l’activité du bus principal ou l’activité du mélange mono des
principaux sur l’indicateur de niveau de gauche et celle des moniteurs sur l’indicateur
de niveau de droite. Réglez les niveaux de façon à ce que les DEL d’écrêtage au sommet de l’indicateur de niveau restent éteintes.
Les Entrées Amp 1 & Amp 2
Ces prises de commutation vous permettent d’accéder directement, en les débranchant de leur fonction normale, à un ou aux deux canaux de l’amplificateur de puissance interne. Cela vous permet d’insérer un égalisateur externe, un filtre séparateur

(par exemple processeur élite) ou un compresseur/limiteur entre la section de sortie
ligne POST EQ du mixeur et les ENTREES AMP 1 & AMP 2 permettant d’accéder au
plein signal nécessaire au bon fonctionnement de telle unité.
Conseil: Si vous avez un filtre séparateur électronique ou processeur/filtre séparateur,
vous pouvez entraîner des subwoofers et des cabinets pleine gamme dans un système à
double amplificateur avec le mixeur AP812/818. Le branchement se fait comme suit:
1 . Avec le bouton EQ/AMP ASSIGN en position le MAIN/ MON, raccordez
un câble de la prise LINE OUT POST EQ MAIN (L) à l’entrée d’un filtre
séparateur électronique/processeur.
2. Raccordez ensuite un deuxième câble de la sortie pour basses fréquences ou sortie subwoofer sur le filtre séparateur jusqu’à l’entrée AMP 1 du AP812/818 et un
troisième câble de la sortie haute fréquence ou pleine gamme du filtre séparateur
à l’entrée AMP 2 du AP812/818.
3. Branchez maintenant deux subwoofers 8 ohm ou un subwoofer 4 ohm à la prise
de sortie de haut-parleur AMP 1 et deux cabinets 8 Ohm pleine gamme à la prise
de sortie de haut-parleur AMP 2.
4. Le système complet, à part les
moniteurs, est maintenant fonctionnel. Un autre arrangement
avec amplificateur externe
pour les subwoofers ( des subs
amplifiés peuvent aussi ré utilisés) sera toutefois nécessaire si
vous devez varier les niveaux
comparatif de l’ensemble subwoofer/cabinet pleine gamme.
Dans ce système, AMP 1 serait
pour les cabinets pleine gamme et AMP 2 serait pour les moniteurs. Autrement
dit, c’est un arrangement ordinaire mais avec la sortie de ligne LINE OUT MAIN
(L) allant à l’entrée du processeur / filtre séparateur et ensuite à un amplificateur
externe pour le/les subwoofers. Vous pouvez aussi simplement diriger le signal de
la sortie de ligne LINE OUT MAIN (L) à l’entrée d’un subwoofer actif. (Les subwoofers amplifié de Yorkville sont tous doté de filtre interne).
Amplificateur de Puissance - Générale
Le AP812/818 est doté d’un amplificateur de puissance interne stéréo de 800 watts.
Chaque canal a une sensibilité d’entrée de +4dBv (1.4 volts RMS) permettant une
pleine puissance à la sortie et ils peuvent tous deux livrer 400 watts avec une charge
( H.P.) de 4 ohms. Des dissipateurs de chaleur conçu par ordinateur sont incorporés
aux amplificateurs internes et un ventilateur silencieux à vitesse variable fournit
le refroidissement nécessaire. L’air frais est attiré par le devant du mixeur, et l’air
chauffé est expulsé le long du bas derrière l’appareil. Même à pleine puissance, cette
disposition résulte en une performance fiable, et silencieuse.
NOTEZ S.V.P.: LES BOUCHES D’AÉRATION AU DEVANT ET A L’ARRIÈRE DU
MIXEUR SONT ESSENTIELLES À L’OPERATION PROPRE. BLOQUER LE PASSAGE
DE L’AIR LIBRE RÉSULTERA EN UN ARRÊT DU SYSTÈME DÙ AU SURCHAUFFAGE.
UNE TELLE CONDITION RÉPÉTÉ PEUT TÔT OU TARD CAUSER DES DOMMAGES.
S.V.P. GARDEZ LES BOUCHES D’AERATION LIBRES D’OBSTRUCTIONS
Les Raccordements de Haut-Parleur
Deux prises 1/4- et un connecteur Speakon® sont branchés en parallèle avec les étages
de sortie de chaque canal de l’amplificateur. Cela permet l’emploi de câbles pour hautparleur équipés avec l’un ou l’autre des types de connecteur. Pour les opérations pleine
puissance nous recommandons des câbles jauge 14 équipés de connecteurs Speak
on®. Cela réduira le risque d’intensification de résistance. Le système Speakon®, dével-
oppé au cours des dernièresannées par firme Neutrik en Suisse, est caractérisé par ses
contacts style bloccapable de manier de grandes sommes de puissance et ses connecteurs à verrouillage qui préviennent le débranchement accidentel.
23

Branchez un ou deux haut-parleurs 8 ohm ou un (seulement) haut-parleur 4 ohm
à chaque canal. Pour Branchez un connecteur Speakon’s®, poussez et tournez dans
le sens des aiguilles d’une montre. Pour déconnecter, poussez la languette et tournez
dans le sens contraire des aiguilles d’une montre.
Conseil: Voici comment brancher deux haut-parleurs (8 Ohm) à une ou aux sorties du
AP812/818 à l’aide de câbles équipés de connecteurs Speakon®: A partir de la sortie
du AP812/818, acheminez un câble équipé de connecteur Speakon® (tel les modèle
SP2-25SS ou SP2-50SS de Yorkville avec connecteurs Speakon® aux deux extrémités)
à une des enceintes. Branchez ensuite un deuxième câble d’une enceinte à l’autre par
leur entrée parallèle.
Protection de l'Amplificateur de Puissance
L’amplificateur de puissance du AP812/818 est doté d’un circuit de protection contre les dommages causés par les circuits ouverts, les courts-circuits ou les charges
de haut-parleur excessivement basses. Il continuera à fonctionner pour une brève
période avec une basse impédance générale de haut-parleur (moins que 4 Ohms) ou
même un court-circuit total, cependant le système de défense d’amplificateur sera
activé. En premier lieu, le limiteur interne réduira le niveau de puissance de sortie et
la vitesse de ventilateur peut s’accroître. Si les conditions s’empirent, un circuit de
protection thermique fermera l’amplificateur de puissance. Si cela arrive, assurez-
vous que les bouches d’aération sont libres de toute obstructions. Assurez-vous aussi
que les connecteurs ou câbles ne sont pas courts circuit. Il peut aussi être nécessaire
de réduire le nombre de haut-parleurs branché au système. Le AP812/818 fonction-
nera à nouveau lorsqu’il aura refroidit.
Conseil:
a) Notez que la section de mixeur continuera à fonctionner même si l’amplificateur
de puissance interne cesse de fonctionner (comme ci-dessus). Donc, après un arrêt de
fonctionnement, si vous n’arrivez pas à faire fonctionner l’amplificateur de puissance
à nouveau (ce qui est peu probable) et que vous avez un amplificateur de puissance
supplémentaire disponible, vous pouvez le branchez au AP812/818 par les prises DE
SORTIE DE LIGNE. Référez-vous à la section SORTIE LIGNE PRE et POST EQ pour
plus d’information en ce qui concerne les raccordements.
b) L’amplificateur est aussi protégé contre les circuits ouverts. Il est donc possible d’utiliser le AP812/818 sans haut-parleur branché aux sorties permettant ainsi
l’utilisation du AP812/818 pour enregistrement.
L’amplificateur de puissance du AP812/818 est aussi doté d’une protection de hautparleur en cas de décalage DC - C’est un incident qui est peu probable étant donné
le modèle d’amplificateur fondamentalement stable, mais si cela devait se produire,
la puissance de sortie est instantanément court-circuitée à la masse et les haut-par-
leurs sont sauvegardés. Le disjoncteur CA du panneau arrière déclenchera en réponse
à cette condition (entre autres). Si le disjoncteur déclenche à plus d’une reprise dans
une courte période de temps et que le problème ne paraît pas être une surcharge
CA (voire la section ci-dessous), fermez votre AP812/818, débranchez le cordon
d’alimentation et amenez l’appareil à un technicien qualifié
Disjoncteur de Circuit de Puissance de Puissance CA Situé sur le panneau arrière près des
connecteurs de haut-parleur, ce disjoncteur principal a pour fonction de fermer complètement le AP812/818 en cas d’une surcharge de puissance CA. Si, par exemple, l’appareil
24

était accidentellement relié à une prise de haut voltage, ce disjoncteur déclencherait dès
la mise en marche de l’appareil. Si ce disjoncteur déclenche à plusieurs reprises dans une
courte période de temps, essayez de brancher le AP812/818 à une autre prise de courant.
Référez-vous aussi à la section ci-dessus au sujet du décalage DC.
Montage en Rack (AP-812 only)
Pour monter le AP812/818 en rack, procurez-vous l’accessoire RK812 de Yorkville.
Enlevez ensuite les trois vis de chaque cotés qui tiennent en place les moulures et utilisez
ces vis pour monter les accessoires de montage en rack aux deux côtés du mixeur.
Instructions d’Opération Générale
1. Branchez le cordon d’alimentation CA à une prise 120 Volts avec mise à la terre
CA. (220 à 240 Volts pour certain pays).
2. Réglez les fader MAIN et MONITOR MASTER en position fermée et mettez
ensuite l’appareil en marche.
3. Branchez aux prises d’entrée à 3 tiges des microphones à basse impédance.
4. Branchez aux prise d’entrées symétriques ¼ les microphones à haute impé-
dance ou autre source de signal mono niveau ligne - ex.: sortie niveau ligne
d’amplificateur, la sortie d’un mixeur mono, d’un instrument électrique, etc. Ne
branchez pas plus qu’une chose par canal, incluant une sortie stéréo (si vous
essayez de Branchez une source stéréo à un canal mono utilisant un adaptateur
Y, vous pourriez obtenir un signal écrêté).
5. Branchez les sources de signal stéréo tels ceux provenant de magnétophone à cas-
sette, lecteur de disque compact, clavier stéréo, instrument, etc. aux prises RCA
ou ¼ (symétrique) des canaux 9/10 et 11/12 (15/16 et 17/18). Encore fois, branchez
seulement une source de signal par canal et utilisez toujours des câbles blindés
pour branchement de pré amplificateur. Les signaux provenant de sources stéréos
peuvent aussi être branché aux canaux de 1 à 8 en utilisant deux canaux avec
réglage du contrôle PAN pour un vers la droite et pour l’autre vers la gauche.
Note A: Dans le système qui suit le bouton EQ/AMP ASSIGN est en position poussée (MAIN/MON). Le mélange principal est mono et est amplifié à l’aide de
l’amplificateur AMP 1 et le mélange de moniteur à l’aide de l’amplificateur AMP 2 si
bien que le système entier est propulsé par L’AP812/818.
6. À l’aide de câbles pour haut-parleur grande capacité (voire la section LES
RACCORDEMENTS D’HAUT-PARLEUR) reliez un ou deux haut-parleurs principaux
8 ohm aux prises de sortie AMP 1 situées au panneau arrière. Reliez ensuite un ou
deux haut-parleurs pour moniteurs 8 ohm, ou un moniteur 4 ohm à la sortie AMP 2.
7. Positionnez vos haut-parleur principaux au devant de la scène, en les dirigeant
vers l’audience et positionnez vos haut-parleurs de moniteur sur le plancher de la
scène, devant les microphones, pointant vers l’arrière des microphones. (pour réduire le risque de feedback, utilisez des microphones cardioïdes ou unidirectionnels).
8. Lors du réglage du système, alors que le groupe joue ou que les autres sources de signal
sont présentes à l’entrée du mixeur, commencez par régler les contrôles comme suit:
a) Les contrôles d’égalisateur de canal LOW, MID & HIGH EQ et ceux de
PAN ou BAL en position centrale. Réglez ensuite les contrôles de GAIN de
canal et ceux de MON et EFX au minimum. Réglez ensuite les curseurs de
l’égalisateur graphique en position centrale.
b) Ajustez les faders MAIN à 0dB. Tournez le contrôle MON MASTER jusqu’à envi-
ron 8, celui de MASTER EFX à environ 7 et celui de EFX TO MON à environ 5.
c) Avec les faders niveau toujours en position fermé, tournez les contrôles de GAIN
de canal lentement jusqu’à ce que la DEL D’ECRETAGE située à côté du faders de
canal s’illumine légèrement. Pour chaque canal, réglez ensuite le niveau avec le
fader jusqu’à l’obtention du niveau désiré au système de haut-parleurs principal.
d) Tournez ensuite le contrôle MON de chaque canal de façon à obtenir le
niveaux désirés dans les moniteurs sans risque de feedback.
25

e) Réglez ensuite les contrôles EFX sur les canaux nécessitant une réverbération
ou autres effets, habituellement sur les canaux de voix principal et harmonie.
La réverbération peut aussi être employée sur les autres canaux ou sur la
musique enregistrée, mais généralement à des niveaux réduit.
f) Réglez le contrôle EFX SELECT de façon à établir le type fondamental de
reverb, retard ou autres effets désirés. Ensuite à l’aide du contrôle MODIFY
faite le réglage nécessaire pour obtenir l’effet final désiré.
9. Le feedback lors d’une performance est habituellement causé par un des moniteurs.
Puisque les microphones sont généralement loin des haut-parleurs, il est improbable
que le système principal soit à la source du problème. Donc, si un des moniteurs et un
microphone causent des problèmes de feedback, essayez les procédures suivantes:
a) Réduisez le niveau du contrôle MON MASTER jusqu’à l’arrêt du feedback.
b) Sur l’égalisateur EQ 2 réduisez le niveau d’un ou deux (pas plus que deux)
curseurs dans la gamme de fréquence d’où le son semble parvenir.
c) Augmentez maintenant à nouveau le niveau du contrôle MON MASTER. Si le
feedback se reproduit, repoussez le(s) curseur de l’égalisateur à “0” et répétez
le processus avec une ou deux autres bandes.
d) Dans le cas rare de feedback provenant du système principal, suivez le
même type de procédure, mais en utilisant le contrôle MAIN et l’égalisateur
graphique intégré EQ 1.
Notez Bien: Dans le système qui suit le bouton “EQ/AMP ASSIGN” est en position
sortie (“L/R”). Si vous employez un amplificateur de puissance séparé pour les hautparleurs de moniteur, reliez les haut-parleurs principaux aux sortie de haut-parleurs
des amplificateurs internes AMP 1 et AMP 2 tel qu’indiqué au paragraphe 6 ci-dessus.
(voir aussi la section “LES RACCORDEMENTS D’HAUT-PARLEURS”). Amenez maintenant une câble blindé de la prise “MON OUT” à l’entrée de l’amplificateur externe
pour moniteur.
Si vous employez un égalisateur graphique pour les moniteurs (recommandé - rappelez-vous qu’il n’y a aucune égalisation de canal sur les signaux de moniteur et les
égalisateurs EQ 1 et EQ 2 de l’AP812/818 sont maintenant consacrés au système
principal), amenez un câble blindé de la prise MON OUT à l’entrée de l’égalisateur,
et un autre de la sortie de l’égalisateur à l’entrée de l’amplificateur pour moniteur.
(L’amplificateur Yorkville Beta-150EQ est doté d’un égalisateur intégré). Votre sys-
tème, après avoir suivit les étape 7 et 8 tel qu’indiqué ci-dessus, est maintenant prêt
à être utilisé. Le texte qui suit vous aidera à obtenir le maximum de votre système.
Nous vous recommandons de prendre un moment pour le lire.
26
Conseil Pratique Pour Obtenir un Bon Mélange
• Les suggestions qui suivent vous permettrons d’obtenir un bon mélange de façon
consistante même si vous n’avez jamais mélangé à des niveaux élevés.
• En concert, le niveau des microphones est souvent réglé près du point de feedback! C’est une erreur commune. Nous avons tous entendus des systèmes sur
le point de feedback et ils semblaient terribles, même quand, en réalité, aucun
feedback ne survenait! Opérer un système à un niveau s’approchant du point de
feedback modifie la réponse en fréquence de ce système.
• Pour bien comprendre comment le niveau de volume affecte la réponse de
fréquence du système, écoutons ce qui se produit lorsque nous augmentons le
volume à un niveau se rapprochant du point de feedback. Notez que certaine
fréquence semble vouloir provoquer le feedback. C’est parce que l’ensemble
du système, y comprit la salle, les microphones, les haut-parleurs, les gens, bref
l’environnement au complet, démontre une tendance à résonner à une fréquence
particulière. Le terme technique pour un système qui démontre une tendance
à résonner est UN FILTRE A Q ÉLEVÉ. Donc en opérant le système à un niveau
s’approchant du point de feedback, le système entier se comporte comme un filtre à Q élevé, produisant le même type de sonorité qui serait obtenu en réduisant

le niveau global du système pour ensuite augmenter le niveau d’une des bandes
(par exemple 1 KHz) de l’égalisateur graphique à +12dB
• C’est pourquoi le feedback de scène peut être contrôlé en coupant certaines
fréquences avec l’égalisateur graphique. Cependant, tout changement à l’intérieur
de la salle, (plus ou moins de gens, changement de température, nombre de per-
sonnes au plancher de danse, etc.), nécessitera une modification au réglage de
l’égalisation du système. Heureusement, le Q d’un système diminue rapidement
avec la réduction du niveau. Pour éviter l’effet de résonance professionnellement,
au premier signe de feedback, réduisez le niveau d’environ 3 dB. Le niveau du
système sera encore très élevé, mais la sonorité du système sera de beaucoup
supérieure. Idéalement, l’égalisateur graphique devrait être employé pour niveler
la réponse générale du système, pas pour contrôler le feedback.
• Utilisez des effets de réverbération de courte durée et de façon modérée. La
réverbération longue durée peut avoir pour effet de camoufler la musique et de
rendre les sons discordants. Les effets de réverbération courte durée rehausserons
sans diminuer la définition, la qualité du son. Vous préserverez une meilleur
dynamique en utilisant les effets modérément. N’oubliez pas que la salle possède
sa propre réverbération inaudible avec un casque d’écoute.
• Employez les contrôles de tonalité avec réserve. La plupart des instruments
produisent une sonorité adéquate sans avoir recours à l’égalisation additionnelle.
Une légère augmentation des hautes fréquences peut parfois rendre la voix plus
vibrante alors que si vous avez un micro sur la grosse caisse, vous pouvez probablement réduire le niveau des aiguës. (Il est inutile d’amplifier des fréquences
qui sont absentes). Rappelez vous que si vous obtenez un son plein au réglage
individuel, vous risquez d’obtenir un mélange général confus. Encore une fois,
expérimentez avec réserve pour les réglages de tonalité.
• Gardez les voix en évidence. Les microphones ont tendance à produire un feedback alors que le niveau instrument raccordé directement peux être réglé sans
crainte de feedback et par le fait même, ont tendance à être réglé à des niveaux
plus élevé. Prenez bien soin de ne pas masquer les voix. Une bonne balance des
niveaux aide à rendre les chose plus agréable à l’oreille.
• Parlant d’oreilles, n’oubliez pas les vôtres. Vous avez sans doute été soumis, peut être
lors d’une arrivé tardive à un spectacle, à une sonorité agressive presque insupport-
able. Pourtant quelques minutes plus tard, cette même sonorité vous semblait tout
à fait normal. C’est parce que l’oreille humaine, après une exposition relativement
courte à des niveaux élevés se referme quelque peut pour apaiser la douleur, surtout
dans les bandes médiane aiguë et les hautes fréquences où l’oreille est plus sensible.
• Ce mécanisme réduit l’inconfort immédiat, mais il y a un débat à savoir s’il
protège l’oreille des dommages à long terme. Il semble toutefois évident qu’être
exposé à des niveaux de pression sonore trop élevé cause des dommages per-
manent. Donc, après avoir été exposé à des niveaux élevées trop longtemps,
le technicien remarque que les aiguës semblent tamisés et réagit en modifiant
l’égalisateur ou le filtre séparateur pour en augmenter le niveau (ouch!). En plus
du danger physique à long terme, une mauvaise sonorité engendrera un mécontentement pour certains membres de l’audience - surtout les nouveaux arrivées.
La solution: porter des bouchons de protection pour vos oreilles. Essayez aussi
de retourner à un endroit tranquille de temps à autre pour donner une chance
au tissu endommagé du tympan de guérir. Vous pouvez revenir à votre mélange
avec des oreilles fraîches pourvue que des dommages sévères ou répétés n’aient
pas créés un tissu cicatrisé causant des dommages permanent. Assurez-vous de
créer une atmosphère invitante avec un son fort mais agréable.
• En fait, si vous avez augmenté le niveau des aiguës depuis le début de la soirée
et que ça semble sonner tout comme au début, prenez garde! Ce ne sont pas les
trompes du système qui ont changé, ce n’est pas l’acoustique de la pièce non plus,
mais bien le mécanisme de protection de votre oreille qui s’est enclenché. Rendez
vous (et votre audiences) un service - UTILISEZ DES BOUCHONS À OREILLE! Et si
vous refusez toujours de porter les bouchons, par respect pour votre audience, laisser
le niveau des aiguës sur l’égalisateur ou le filtre séparateur à des réglages normaux.
27

Specifications
Nombre de canaux
12 (AP818: 18)
Égalisateur de canal Mono (c.1 à 8) Graves, Médianes, Aiguës (AP818: C. 1 - 14))
Égalisateur de canal stéréo (c. 9/10 et 11/12) Graves, Médianes, Aiguës (AP818: C. 15/16 & 17/18)
Effets de canal
Tout les canaux
Effet sur retour
Oui
Contrôle de Balance 9 à 12 (AP818: 15 à 18)
Contrôles Panoramiques 1 à 8 (AP818: 1 à 14)
Entrées - XLR (sym) Ch. 1 - 8 (AP818: C. 1 à 14)
Entrée - 1/4-pouce Ch. 1 - 12 (AP818: 1 à 18)
Entrées - RCA (asym)
2 Ensembles Stéréo
DEL Clip /Mute
Tout les canaux
Alimentation en Duplex
24 V + DEL indicator
VU mètre
2 x 5 DEL
Caractéristiques de monitoring par casque d’écoute
Repère , Volume
Effets Internes
Numérique 16 Bit; 255 Effets
Envoi aux effets
1 Interne/externe
Retour d'effets au bus principal
Oui
Retour d'effets au bus de retour
Oui
Commutateur au Pied Reverb / Effets
Oui
Gain maximum à la sortie ligne –Entrée pour microphone (dB)
63
Gain maximum à la sortie ligne –Entrée Ligne (dB)
45
Égalisateur Principal -1 (type /Canaux /Gamme - dB)
Graphique / Mono / 9 Bandes 63 Hz - 16,000 Hz
Égalisateur Principal - 2(type /Canaux /Gamme - dB)
Graphique / Mono / 9 Bandes 63 Hz - 16,000 Hz
Sorties Principales ( Niveau Ligne)
4 , 1/4 pouce (PBM) 2 pré, 2 post EQ
Entrées Ampli Principal (Niveau Ligne)
2 , 1/4 pouce (PBM)
Sorties de Retours (Niveau Ligne)
1, 1/4 pouce (PBM)
Sorties - Amp A – 1/4-pouce Jacks
2
Sorties - Amp A - Speakon 4-tiges
1 (Euro seulement)
Sorties - Amp B - 1/4-pouce Jacks
2
Sorties - Amp B - Speakon 4-tige
1 (Euro seulement)
Mixeur - Rapport Signal/Bruit (dB)
plus grand que 100
Mixeur - Réponse en Fréquence (Tone et EQ neutre,+/-2dB)
20 Hz - 20,000 Hz
Mixeur - Bruit d'Entrée Réfféré à la sortie ligne , @ 150 ohms (dBv)
-117
Mixeur - DHT (Sortie Principale avec entrée -10dB)
Moins que 0.03%
Amp A – Puissance de Sortie @ 8 ohms (0%1"DHT, 1kHz)
240
Amp A – Puissance de Sortie @ 4 ohms
455
Amp A – Puissance de Sortie autre
315 @ 2 ohms
Amp B – Puissance de Sortie @ 8 ohms (0%1"DHT, 1kHz)
240
Amp B – Puissance de Sortie @ 4 ohms
455
Amp B – Puissance de Sortie autre
315 @ 2 ohms
DHT - 1kHz (dB)
Moins que 0.03%
DHT - 20Hz-20kHz (dB)
Moins que 0.1%
Bruit et Bourdonnement (non / A Pondéré -dB)
-98
Transmodulation Typique -1 kHz (dB)
-66
Impédance d’Entrée - Sym/Asym (ohms)
22,000 - 12,000
Sensibilité d’entrée (Vrms Sinusoïdal)
1.47 V
Rapport de Réjection en Mode Commun@ 60Hz (min/typ)
54 dB / 66 dB
Gain Maximum de Voltage (dB)
29
Consommation de Puissance (typ/max)
660 VA / 1200 VA
Protection
Thermique / Charge / CC
Refroidissement
Ventilateur CC à Vitesse Variable
Type de transformateur
Toroïdal
Finition
Dessus en Aluminium recouvert de Vinyle résistant aux égratignures
Construction du Châssis
Métal
Montage en Rack
Oui (RK812) (AP818: NON APPLICABLE)
Autres Caractéristiques
Commutable stéréo principales ou mono principale et retours
Dimensions (PLH, pouces)
18 x 19 x 5.5 (AP818: 18 x 25.3 x 5.5)
Dimensions (PLH, cm)
45.7 x 48.3 x 14 (AP818: 45.7 x 64.3 x 14)
Poids (livres/kg)
38 / 17.3 (AP818: 43 / 19.5)
28

Addendum
Contrôle de Balayage D'Égalisateur
Bien que les contrôles de balayage de fréquences apparaissent sur les canaux des
consoles d'enregistrement depuis plusieurs années, on ne les retrouve que sur les
consoles P.A. les plus complexes. De ce fait, même les utilisateurs vétérans ne sont
parfois pas familiers avec leur fonction. Le contrôle de balayage détermine quelle gamme
de fréquences qui sera affectée par la coupure/augmentation des médianes en variant le
point central de la coupure/augmentation sur une gamme pouvant varier de plusieurs
milliers de Hertz à moins de cent hertz. Conséquemment, l'effet peut être considérable
surtout en conjonction avec les coupures ou augmentations aux réglages des contrôles
d'égalisation des hautes et basses fréquences.
Par exemple, si vous avez augmenté les basses et augmenté les moyennes avec le contrôle de
balayage réglé à la plus basse fréquence vous affecterez non seulement le volume mais aussi le
son. Prenez garde de ne pas endommager vos haut-parleurs. Du même fait, prenez garde de ne
pas endommager vos tweeters et trompes si vous augmentez les hautes fréquences et les
médiannes avec le contrôle de balayage à la plus haute fréquence.
Le contrôle de balayage peut altérer les résultats normalement obtenu lorsque
vous modifiez votre égalisateur. Nous vous recommandons donc de vous familiariser
avec son fonctionnement. Avec une pièce de musique appliquée à un canal du
mixeur ainsi qu’aux haut-parleurs, ajustez d’abord le contrôle MID de ce canal, pour
une augmentation et ensuite pour une coupure. Faite un mouvement de va-et-vient
avec le contrôle SWEEP. (Si le contrôle MID est en position centrale, le SWEEP
n’aura aucun effet). Répétez maintenant le procédé sur le même canal avec des
réglages différents des contrôle LOW et HIGH. (avec le volume à un niveau inoffensif
pour les haut-parleurs).
information: un triangle à la fréquence 2.5kHz indique la position de base du contrôle. Cela
correspond à peu près à la position des contrôles fixes « MID » sur nos autres mixeurs. Réglez
le contrôle MID à cette position sur les canaux ne requérant pas d'égalisation à balayage. Vous
obtiendrez alors des résultats plus standards en modifiant le réglage du contrôle «MID».
Ensemble, les contrôles MID et SWEEP peuvent être utilisés pour accomplir une
variétés de tâches comme prévenir le feedback ou améliorer le son du système ou de
l’enregistrement. Vous trouverez ci-dessous des réglages solutions:
Note: Notez: Ces réglages sont approximatifs seulement. Employez les comme point de départ
• Arrêter le feedback; réglez le contrôle MID à - 6dB et tournez lentement le contrôle
SWEEP jusqu'à l’arrêt du feedback. Coupez davantage les MID si nécessaire.
• caisse claire Bonky; - 6dB @ 200Hz (réduisez le contrôle LOW EQ à - 6dB)
• Grosse caisse Boomy; - 6dB @ 300Hz (avec LOW EQ à +6dB & HIGH EQ à +3dB)
• Cymbales Fwashy; - 9dB @ 300Hz (avec LOW EQ à - 15dB)
• Hiss excessif d’amplificateur de guitare, basse ou clavier; +3dB @ 5kHz (avec HI EQ à -9dB)
• Atténuation du vocal (registre trop bas pour le chanteur/chanteuse); +3dB @ 80Hz (avec
LOW EQ enroulait à -6dB)
• Puffing sur microphone d'harmonica; - 9dB @ 80Hz (avec LOW EQ à - 12dB)
• Toms; - 3dB @ 400@@Hz
• Floor tom; - 6dB @ 200Hz
Le contrôle MID sera généralement utilisé en mode de coupure pour résoudre la
plupart des problèmes. A vous d’utiliser ce contrôle judicieusement. Les meilleurs
systèmes sont généralement ceux qui nécessitent le moins d’ajustement, mais quand
un problème se présente, il est bon de savoir utiliser ces outils de travail.
EQ MID SWEEP Addendum 01.06.28.99F
29

EFX
EFX
CUE
MON
MON
EFX
MON
STEREO
AMP 1
AMP 2
Stereo Channel Input Details
Channels 9/10 & 11/12(AP812), 15/16 & 17/18(AP818)
Phantom Power
Mono Channel Input Details
Channels 1-8(AP812), Channels 1-14(AP818),
Phantom +24V
to CUE Switch (PFL)
12563 250500 1k 2k 4k 8k 16k
12563 250500 1k 2k 4k 8k 16k
to Mon Bus
Monitor
Effect Send
to Efx Bus
B
A
L
Left
Left Main
Right
Left
Right
Mon
Right Main
Mon Master Efx
Master Efx Send
Efx to Monitor
Efx
NC
Monitor
Pre EQ Out R
Pre EQ Out L
L / Main
R / Mon
EQ / AMP ASSIGN
SWITCH
EFFECTS
SelMod
HP Jack
Mon Bus
Left Bus
Right Bus
400 Watt
L / Main
400 Watt
R / Mon
L / MainR / Mon
L / Main Post EQ Out
R / Mon Post EQ Out
Efx Send
9 Band EQ
9 Band EQ
LED Bar Display
Pan Pot
-10db
Gain Pot
Ch. Fader
Low / Mid Sweep / High
Low / Mid / High
Block Diagram for
AP812/818
D ESIGNED & MANUFACTURED BY YORKVILLE SOUND
Amp A Input
Amp B Input
2 x 1/4" & Speakon
®
S
PEA
K
E
R
O
U
T
P
U
T
S
+1
-1
2 x 1/4" & Speakon
®
+1
-1
Pre-Fade Listen
LED
80 12k8k80
80 2.5k 12k
Low / Mid / High
80 2.5k 12k
P
R
E
E
Q
O
U
T
POS
T
E
Q
O
U
T
AMP
I
N
9/10 PFL 11/12 PFL
ap812blk.pdf June/99 version 3.5

T I G I D C E F F E L A T S T S E L B A
Y D N U O S E L L I V K R O • T I G I D T . R . A Y B S T C E F F E L A .
2 5 5 P R E S E T 1 6 B i t D I G I T A L E F F E C T S R P R C E S S O R
A S M O O R
1 m o o R l l a m S t h g i r B s 5 . 0
2 s 5 . 0 W m o o R l l a m S m r a
3 m o o R l l a m S k r a D s 5 . 0
4 m o o R l l a m S t h g i r B s 8 . 0
5 s 8 . 0 W m o o R l l a m S m r a
6 m o o R l l a m S t h g i r B s 0 . 1
7 s 0 . 1 W m o o R l l a m S m r a
8 m o o R m u i d e M t h g i r B s 2 . 1
9 s 2 . 1 W m o o R m u i d e M m r a
0 1 m o o R m u i d e M t h g i r B s 5 . 1
1 1 s 5 . 1 W m o o R m u i d e M m r a
2 1 m o o R m u i d e M k r a D s 5 . 1
3 1 r a L t h g i r B s 0 . 2 g e m o o R
4 1 s 0 . 2 W r a L m r a g e m o o R
5 1 r a L t h g i r B s 5 . 2 g e m o o R
6 1 s 5 . 2 W r a L m r a g e m o o R
B S L L A H
1 l l a H m u i d e
M k r a D s 5 . 1
2 s 5 . 1 W l l a H m u i d e M m r a
3 l l a H m u i d e M t h g i r B s 5 . 1
4 l l a H m u i d e M k r a D s 0 . 2
5 s 0 . 2 W l l a H m u i d e M m r a
6 l l a H m u i d e M t h g i r B s 0 . 2
7 l l a H m u i d e M k r a D s 5 . 2
8 s 5 . 2 W l l a H m u i d e M m r a
9 l l a H m u i d e M t h g i r B s 5 . 2
0 1 l l a H m u i d e M k r a D s 5 . 3
1 1 s 5 . 3 W l l a H m u i d e M m r a
2 1 l l a H m u i d e M t h g i r B s 5 . 3
3 1 r a L k r a D s 0 . 5 g e l l a H
4 1 s 0 . 5 W r a L m r a g e l l a H
5 1 g u H k r a D s 0 . 8 l l a H e
6 1 s 0 . 8 W g u H m r a l l a H e
C / S R E B M A H C
A L P S E T
1 W s 8 . 0 m r a r e b m a h C
2 r e b m a h C t h g i r B s 8 . 0
3 W s 2 . 1 m r a r e b m a h C
4 r e b m a h C t h g i r B s 2 . 1
5 W s 5 . 1 m r a r e b m
a h C
6 r e b m a h C t h g i r B s 5 . 1
7 W s 5 . 2 m r a r e b m a h C
8 r e b m a h C t h g i r B s 5 . 2
9 W s 5 . 3 m r a r e b m a h C
0 1 r e b m a h C t h g i r B s 5 . 3
1 1 e t a l P t h g i r B s 3 . 0
2 1 e t a l P t h g i r B s 5 . 0
3 1 e t a l P t h g i r B s 8 . 0
4 1 e t a l P t h g i r B s 2 . 1
5 1 e t a l P t h g i r B s 5 . 1
6 1 e t a l P t h g i r B s 0 . 2
D R O H S A L E D T S Y
1 a l e d p a l s s m 0 3 y
2 a l e d p a l s s m 5 3 y
3 a l e d p a l s s m 0 4 y
4 a l e d p a l s s m 0 5 y
5 a l e d p a l s s m 0 6 y
6 a l e d p a l s s m 0 7 y
7 a l e d p a l s s m 0 8 y
8 a l e d p a l s s m 0 9 y
9 a l e d p a l s s m 0 0 1 y
0 1 g e r s m 0 0 1 a l e d n e y
1 1 o l s m 5 2 1 g e r w a l e d n e y
2 1 g e r m u i d e m s m 5 2 1 a l e d n e y
3 1 o l s m 0 5 1
g e r w a l e d n e y
4 1 g e r m u i d e m s m 0 5 1 a l e d n e y
5 1 o l s m 5 7 1 g e r w a l e d n e y
6 1 g e r m u i d e m s m 5 7 1 a l e d n e y
E A L E D M U I D E M S Y
1 o l s m 0 0 2 g e r w a l e d n e y
2 g e r m u i d e m s m 0 0 2 a l e d n e y
3 o l s m 5 2 2 g e r w a l e d n e y
4 g e r m u i d e m s m 5 2 2 a l e d n e y
5 o l s m 0 5 2 g e r w a l e d n e y
6 g e r m u i d e m s m 0 5 2 a l e d n e y
7 o l s m 5 7 2 g e r w a l e d n e y
8 g e r m u i d e m s m 5 7 2 a l e d n e y
9 o l s m 0 0 3 g e r w a l e d n e y
0 1 g e r m u i d e m s m 0 0 3 a l e d n e y
1 1 o l s m 5 2 3 g e r w a l e d n e y
2 1 g e r m u i d e m s m 5 2 3 a l e d n e y
3 1 o l s m 0 5 3 g e r w a l e d n e y
4 1 g e r m u i d e m s m 0 5 3 a l e d n e y
5 1 o l s m 5 7 3 g e r w a l e d n
e y
6 1 g e r m u i d e m s m 5 7 3 a l e d n e y
F A L E D G N O L S Y
1 o l s m 0 9 3 g e r w a l e d n e y
2 g e r m u i d e m s m 0 9 3 a l e d n e y
3 o l s m 0 0 4 g e r w a l e d n e y
4 g e r m u i d e m s m 0 0 4 a l e d n e y
5 o l s m 0 1 4 g e r w a l e d n e y
6 g e r m u i d e m s m 0 1 4 a l e d n e y
7 o l s m 0 2 4 g e r w a l e d n e y
8 g e r m u i d e m s m 0 2 4 a l e d n e y
9 o l s m 0 3 4 g e r w a l e d n e y
0 1 g e r m u i d e m s m 0 3 4 a l e d n e y
1 1 o l s m 0 5 4 g e r w a l e d n e y
2 1 g e r m u i d e m s m 0 5 4 a l e d n e y
3 1 o l s m 5 7 4 g e r w a l e d n e y
4 1 g e r m u i d e m s m 5 7 4 a l e d n e y
5 1 o l s m 0 0 5 g e r w a l e d n e y
6 1 g e r m u i d e m s m 0 0 5 a l e d n e y
G G A E S R E V E R / D E T
B R E V E R
1 a c e d s 8 . 0 e t a G s m 0 0 1 y
2 a c e d s 8 . 0 e t a G s m 0 0 2 y
3 a c e d s 2 . 1 e t a G s m 0 0 1 y
4 a c e d s 2 . 1 e t a G s m 0 0 2 y
5 a c e d s 8 . 1 e t a G s m 0 5 1 y
6 a c e d s 8 . 1 e t a G s m 0 0 2 y
7 a c e d s 0 . 2 e t a G s m 0 0 3 y
8 a c e d s 5 . 2 e t a G s m 0 5 1 y
9 a c e d s 5 . 2 e t a G s m 0 5 2 y
0 1 a c e d s 5 . 2 e t a G s m 0 0 4 y
1 1 a c e d s 5 . 0 e R s m 0 0 1 y r e v e s
2 1 a c e d s 5 . 0 e R s m 0 0 2 y r e v e s
3 1 a c e d s 0 . 1 e R s m 0 0 1 y r e v e s
4 1 a c e d s 0 . 1 e R s m 0 0 2 y r e v e s
5 1 a c e d s 5 . 2 e R s m 0 5 2 y r e v e s
6 1 a c e d s 0 . 4 e R s m 0 0 3 y r e v e s
H & S M O O R
G N I N E K C I H T
A L E D S Y
1 m o o R l l a m S t h g i r B s 5 . 0
b u o d s m 0 5 + a l e d g n i l y
2 s 5 . 0 W m o o R l l a m S m r a
b
u o d s m 0 4 + a l e d g n i l y
3 m o o R l l a m S k r a D s 5 . 0
b u o d s m 0 4 + a l e d g n i l y
4 m o o R l l a m S t h g i r B s 8 . 0
b u o d s m 0 6 + a l e d g n i l y
5 s 8 . 0 W m o o R l l a m S m r a
b u o d s m 0 5 + a l e d g n i l y
6 m o o R l l a m S t h g i r B s 0 . 1
a l e d p a l s s m 0 7 + y
7 s 0 . 1 W m o o R l l a m S m r a
b u o d s m 0 5 + a l e d g n i l y
8
9 s 2 . 1 W m o o R m u i d e M m r a
b u o d s m 0 5 + a l e d g n i l y
0 1 1 . 5 s B r i g h t m u i d e M m o o R
a l e d p a l s s m 0 8 + y
1 1 s 5 . 1 W m o o R m u i d e M m r a
b u o d s m 0 6 + a l e d g n i l y
2 1 m o o R m u i d e M k r a D s 5 . 1
a l e d p a l s s m 0 7 + y
3 1 2 . 0 s B r i g h t r a L g e m o o R
a l e d p a l s s m 0 8 + y
4 1 s 0 . 2 W r a L m r a g e m o o R
b u o
d s m 0 6 + a l e d g n i l y
1 5 r L t h g i r B s 5 . 2 m R g
a l e d p a l s s m 0 0 1 + y
6 1 s 5 . 2 W r a L m r a g e m o o R
a l e d p a l s s m 0 8 + y
I & S L L A H
G N I N E K C I H T
A L E D S Y
1 l l a H m u i d e M k r a D s 5 . 1
b u o d s m 0 5 + a l e d g n i l y
2 s 5 . 1 W l l a H m u i d e M m r a
a l e d p a l s s m 0 7 + y
3 l l a H m u i d e M t h g i r B s 5 . 1
a l e d p a l s s m 0 9 + y
4 l l a H m u i d e M k r a D s 0 . 2
a l e d p a l s s m 0 9 + y
5 s 0 . 2 W l l a H m u i d e M m r a
a l e d p a l s s m 0 7 + y
6 l l a H m u i d e M t h g i r B s 0 . 2
b u o d s m 0 5 + a l e d g n i l y
7 l l a H m u i d e M k r a D s 5 . 2
a l e d p a l s s m 0 7 + y
8 s 5 . 2 W l l a H m u i d e M m r a
a l e d p a l s s m 0 8 + y
9 l l a H m u i d e M t h g i r B s 5 . 2
a l e d p a l s s m 0 0 1 + y
0 1 l l a H m u i d e M k r a D s 5 . 3
a l e d p a l s s m 0 8 + y
1 1 s 5 . 3 W l l a H m u i d e M m r a
a l e d p a l s s m 0 9 + y
2 1 l l a H m u i d e M t h g i r B s 5 . 3
a l e d p a l s s m 0 0 1 + y
3 1 r a L k r a D s 0 . 5 g e l l a H
a l e d p a l s s m 0 8 + y
J / S R E B M A H C
A L P & S E T
G N I N E K C I H T
A L E D S Y
1 W s 8 . 0 m r a r e b m a h C
b u o d s m 0 5 + a l e d g n i l y
2 r e b m a h C t h g i r B s 8 . 0
b u o d s m 0 5 + a l e d g n i l y
3 W s 2 . 1 m r a r e b m a h C
b u o d s m 0 6 + a l e d g n i l y
4 r e b m a h C t h g i r B s 2 . 1
a l e d p a l s s m 0 7 + y
5 W s 5 . 1 m r a r e b m a h C
a l e d p a l s s m 0 7 + y
6 r e b m a h C t h g i r B s 5 . 1
a l e d p a l s s m 0 8 + y
7 W s 5 . 2 m r a r e b m a h C
a l e d p a l s s m 0 8 + y
8 r e b m a h C t h g i r B s 5 . 2
a l e d p a l s s m 0 0 1 + y
9 W s 5 . 3 m r a r e b m a h C
a l e d p a l s s m 0 9 + y
0 1 r e b m a h C t h g i r B s 5 . 3
a l e d p a l s s m 0 0 1 + y
1 1 e t a l P t h g i r B s 3 . 0
b u o d s m 0 4 + a l e d g n i l y
2 1 e t a l P t h g i r B s 5 . 0
b u o d s m 0 5 + a l e d g n i l y
3 1 e t a l P t h g i r B s 8 . 0
b u o d s m 0 5 + a l e d g n i l y
4 1 e t a l P t h g i r B s 2 . 1
a l e d p a l s s m 0 8 + y
5 1 e t a l P t h g i r B s 5 . 1
a l e d p a l s s m 0 8 + y
6 1 e t a l P t h g i r B s 0 . 2
a l e d p a l s s m 0 0 1 + y
K & S M O O R
A L E D N E G E R S Y
1 m o o R l l a m S t h g i r B s 5 . 0
g e r s m 0 0 2 + a l e d n e y
2 s 5 . 0 W m o o R l l a m S m r a
g e r s m 5 7 1 + a l e d n e y
3 m
o o R l l a m S k r a D s 5 . 0
g e r s m 0 5 1 + a l e d n e y
4 m o o R l l a m S t h g i r B s 8 . 0
g e r s m 0 0 2 + a l e d n e y
5 s 8 . 0 W m o o R l l a m S m r a
g e r s m 0 5 1 + a l e d n e y
6 m o o R l l a m S t h g i r B s 0 . 1
g e r s m 5 7 1 + a l e d n e y
7 s 0 . 1 W m o o R l l a m S m r a
g e r s m 5 2 1 + a l e d n e y
8 m o o R m u i d e M t h g i r B s 2 . 1
g e r s m 0 5 1 + a l e d n e y
9 s 2 . 1 W m o o R m u i d e M m r a
g e r s m 0 0 2 + a l e d n e y
0 1 m o o R m u i d e M t h g i r B s 5 . 1
g e r s m 0 0 2 + a l e d n e y
1 1 s 5 . 1 W m o o R m u i d e M m r a
g e r s m 5 7 1 + a l e d n e y
2 1 m o o R m u i d e M k r a D s 5 . 1
g e r s m 0 5 1 + a l e d n e y
3 1 r a L t h g i r B s 0 . 2 g e m o o R
g e r s m 0 0 2 + a l e d n e y
4 1 s 0 . 2 W r a
L m r a g e m o o R
g e r s m 5 2 1 + a l e d n e y
5 1 r a L t h g i r B s 5 . 2 g e m o o R
g e r s m 0 5 1 + a l e d n e y
6 1 r a L t h g i r B s 5 . 2 g e m o o R
g e r s m 0 0 2 + a l e d n e y
L & S L L A H
A L E D N E G E R S Y
1 l l a H m u i d e M k r a D s 5 . 1
g e r s m 0 5 1 + a l e d n e y
2 s 5 . 1 W a l l a H d e M m r
g e r s m 5 7 1 + a l e d n e y
3 l l a H m u i d e M t h g i r B s 5 . 1
g e r s m 0 0 2 + a l e d n e y
4 l l a H m u i d e M k r a D s 0 . 2
g e r s m 0 0 2 + a l e d n e y
5 s 0 . 2 W a l l a H m u i d e M m r
g e r s m 0 5 1 + a l e d n e y
6 l l a H m u i d e M t h g i r B s 0 . 2
g e r s m 5 7 1 + a l e d n e y
7 l l a H m u i d e M k r a D s 5 . 2
g e r s m 0 0 2 + a l e d n e y
8 s 5 . 2 W a l l a H m u i d e M m r
g e r s m 0 5 1 + a l e d n e y
9
l l a H m u i d e M t h g i r B s 5 . 2
g e r s m 5 7 1 + a l e d n e y
0 1 l l a H m u i d e M k r a D s 5 . 3
g e r s m 5 2 1 + a l e d n e y
1 1 l l a H m u i d e M k r a D s 5 . 3
g e r s m 0 5 1 + a l e d n e y
2 1 l l a H m u i d e M t h g i r B s 5 . 3
g e r s m 0 0 2 + a l e d n e y
3 1 r a L k r a D s 0 . 5 g l l a H e
g e r s m 5 7 1 + a l e d n e y
4 1 r a L t h g i r B s 0 . 5 g e l l a H
g e r s m 0 0 2 + a l e d n e y
5 1 r a L k r a D s 0 . 8 g l l a H e
g e r s m 0 5 1 + a l e d n e y
6 1 r a L t h g i r B s 0 . 8 g e l l a H
g e r s m 0 0 2 + a l e d n e y
S R E B M A H C M
A L P / & S E T
A L E D N E G E R S Y
1 W s 8 . 0 m r a r e b m a h C
g e r s m 0 5 1 + a l e d n e y
2 r e b m a h C t h g i r B s 8 . 0
g e r s m 5 2 1 + a l e d n e y
3 W s 2 . 1 m r a r e b m a h C
g e r s m 5 7 1 + a l e d n e y
4 r e b m a h C t h g i r B s 2 . 1
g e r s m 0 0 2 + a l e d n e y
5 W s 5 . 1 m r a r e b m a h C
g e r s m 0 5 1 + a l e d n e y
6 r e b m a h C t h g i r B s 5 . 1
g e r s m 0 0 2 + a l e d n e y
7 W s 5 . 2 m r a r e b m a h C
g e r s m 5 7 1 + a l e d n e y
8 r e b m a h C t h g i r B s 5 . 2
g e r s m 5 2 1 + a l e d n e y
9 W s 5 . 3 m r a r e b m a h C
g e r s m 0 0 2 + a l e d n e y
0 1 r e b m a h C t h g i r B s 5 . 3
g e r s m 0 5 1 + a l e d n e y
1 1 e t a l P t h g i r B s 3 . 0
g e r s m 5 2 1 + a l e d n e y
2 1 g e r s m 0 5 1 + e t a l P t h g i r B s 5 . 0 e a l e d n y
3 1 g e r s m 0 0 2 + e t a l P t h g i r B s 8 . 0 e a l e d n y
4 1 g e r s m 5 7 1 + e t a l P t h g i r B s 2 . 1 e a l e d n y
5 1 g e r s m 0 5 1 + e t a l P t h g
i r B s 5 . 1 e a l e d n y
6 1 g e r s m 0 0 2 + e t a l P t h g i r B s 0 . 2 e a l e d n y
N S L L A H / S M O O R
S U R O H C &
1 o l s + m o o R t h g i r B s 5 . 0 c w s u r o h
2 s 8 . 0 W c m u i d e m + m o o R m r a s u r o h
3 o l s + m o o R t h g i r B s 0 . 1 c w s u r o h
4 s 2 . 1 W c m u i d e m + m o o R m r a s u r o h
5 o l s + m o o R t h g i r B s 5 . 1 c w s u r o h
6 s 8 . 1 W o l s + m o o R m r a c w s u r o h
7 c m u i d e m + m o o R t h g i r B s 5 . 2 s u r o h
8 s 0 . 3 W o l s + m o o R m r a c w s u r o h
9 o l s + l l a H t h g i r B s 0 . 2 c w s u r o h
0 1 s 5 . 2 W c m u i d e m + l l a H m r a s u r o h
1 1 o l s + l l a H t h g i r B s 5 . 2 c w s u r o h
2 1 s 0 . 3 W o l s + l l a H m r a c w s u r o h
3 1 s 5 . 3 W o l s + l l a H m r a c w s u r
o h
4 1 c m u i d e m + l l a H t h g i r B s 5 . 3 s u r o h
5 1 s 0 . 5 W o l s + l l a H m r a c w s u r o h
6 1 s 0 . 8 W o l s + l l a H m r a c w s u r o h
O A L E D S U R O H C & S Y
1 b u o d s m 0 5 a l e d g n i l o l s + y c w s u r o h
2 a l e d p a l s s m 0 8 c m u i d e m + y s u r o h
3 a l e d p a l s s m 0 0 1 c m u i d e m + y s u r o h
4 g e r s m 0 5 1 a l e d n e o l s + y c w s u r o h
5 g e r s m 5 7 1 a l e d n e c d e m + y s u r o h
6 g e r s m 0 0 2 a l e d n e o l s + y c w s u r o h
7 g e r s m 5 2 2 a l e d n e c d e m + y s u r o h
8 g e r s m 0 5 2 a l e d n e o l s + y c w s u r o h
9 g e r s m 5 7 2 a l e d n e c d e m + y s u r o h
0 1 g e r s m 0 0 3 a l e d n e o l s + y c w s u r o h
1 1 g e r s m 5 2 3 a l e d n e c d e m + y s u r o h
2 1 g e r s m
0 5 3 a l e d n e o l s + y c w s u r o h
3 1 g e r s m 0 7 3 a l e d n e c d e m + y s u r o h
4 1 g e r s m 0 8 a l e d n e o l s + y c w s u r o h
5 1 g e r s m 0 9 3 a l e d n e c d e m + y s u r o h
6 1 g e r s m 0 0 4 a l e d n e o l s + y c w s u r o h
P X F E L A I C E P S
1 c t i P a t c o t f i h S h o d e v n w
2 c t i P a t c o t f i h S h p u e v
3 c t i P r 3 r o j a m t f i h S h p u d
4 c t i P o d h t 5 r o j a m t f i h S h n w
5 c t i P l a u D r 3 r o j a m t f i h S h p u h t 5 & d
6 c t i P l a u D o d t c o & p u t c o t f i h S h n w
7 g n a l F e n u t e D r e
8 o l S g n a l F w g e r m u i d e m / w r e n e
9 o l S g n a l F w g e r h g i h / w r e n e
0 1 g n a l F m u i d e M g e r m u i d e m / w r e n e
1 1 g n a l F m u i d e M g e r h g i h / w r e n e
2 1
g e r h g i h s m 0 5 2 a l e d n e y
3 1 g e r m u i d e m s m 0 0 5 a l e d n e y
4 1 g e r h g i h s m 0 0 5 a l e d n e y
5 1 o l S g n a l F w c t i P + r e o d t c o t f i h S h n w
6 1 o l S g n a l F w c t i P + r e a t c o t f i h S h p u e v

32

Unlimited Warranty
Yorkville's two and ten-year unlimited warranty on this product is transferable
and does not require registration with Yorkville Sound or your dealer. If this
product should fail for any reason within two years of the original purchase
date (ten years for the wooden enclosure), simply return it to your Yorkville
dealer with original proof of purchase and it will be repaired free of charge.
This includes all Yorkville products, except for the YSM Series studio
monitors, Coliseum Mini Series and TX Series Loudspeakers.
Freight charges, consequential damages, weather damage, damage as a result
of improper installation, damages due to exposure to extreme humidity, accident
or natural disaster are excluded under the terms of this warranty. Warranty does
not cover consumables such as vacuum tubes or par bulbs. See your Yorkville
dealer for more details. Warranty valid only in Canada and the United States.
Garantie Illimitée
La garantie illimitée de deux et dix ans de ce produit est transférable. Il n`est pas
nécessaire de faire enregistrer votre nom auprès de Yorkville Sound ou de votre
détaillant. Si, pour une raison quelconque, ce produit devient défectueux durant
les deux années qui suivent la date d`achat initial (dix ans pour l`ébénisterie),
retournez-le simplement à votre détaillant Yorkville avec la preuve d`achat original
et il sera réparé gratuitement. Ceci inclus tous les produits Yorkville à l`exception
de la série de moniteurs de studio YSM, la mini série Coliseum et de la série TX.
Les frais de port et de manutention ainsi que les dommages indirects ou
dommages causés par désastres naturels, extrême humidité ou mauvaise
installation ne sont pas couverts par cette garantie. Cette garantie ne couvre
pas les produits consommables tels que lampe d`amplificateur ou ampoules
"PAR". Voir votre détaillant Yorkville pour plus de détails. Cette garantie n’est
valide qu’au Canada et aux États Unis d’Amérique.
www.yorkville.com
REAL Gear.
REAL People.
Yo rkville Sound
550 Granite Court
Pickering, Ontario
L1W-3Y8 CANADA
Canada
Voice: (905) 837-8481
Fax: (905) 837-8746
Yo rkville Sound Inc.
4625 Witmer Industrial Estate
Niagara Falls, New Yo rk
14305 USA
U.S.A.
Voice: (716) 297-2920
Fax: (716) 297-3689
Printed in Canada
Two & Ten Year Warranty
Two
&
Ten

U.S.A.
Yorkville Sound Inc.
4625 Witmer Industrial Estate
Niagara Falls, New Yo rk
14305 USA
Voice: (716) 297-2920
Fax: (716) 297-3689
WORLD HEADQUARTERS
CANADA
Yorkville Sound
550 Granite Court
Pickering, Ontario
L1W-3Y8 CANADA
Voice: (905) 837-8481
Fax: (905) 837-8746
Manual-Owners-ap81x-00-7v4 / April 15, 2010
 Loading...