

Page 1
YN622C -T X
Wi rel ess Fla sh Co ntrol ler
HCZ MOO
User Manual
用户手册
Page 2

Conten ts/Cautions
General De scr ipt ion . . . . . . . . . . . . . . . . . 1
Conventi ons U sed i n the M anu al . . . . . . . . . . 2
Supporte d Fun cti ons L ist . . . . . . . . . . . . . . . 3
Name of Part s/Q uic k Sta rt Gu ide . . . . . . . . . . . 4-5
Preparat ion B efo re Us e. . . . . . . . . . . . . . 6
Settings. . . . . . . . . . . . . . . . . . . . . 7-11
Flash Awa kin g and Triggering . . . . . . . . . . . 12
Control fr om Ca mer a’s Menu Scre en . . . . . . . . . 1 3
C.FN: Cust om Fu nct ion S ett ing s . . . . . . . . . . 14
Other Trigg er Mo des . . . . . . . . . . . . . . 1 5
Shutter Re lea se Fu nct ion . . . . . . . . . . . . 16
Referenc e . . . . . . . . . . . . . . . . . . . 17- 19
Tro ubl esh oot ing . . . . . . . . . . . . . . . . . . 20
Specific ati ons . . . . . . . . . . . . . . . . . . . 21
Pl eas e tu rn of f power s uppli es of all e qu ipm ent whe n
connecti ng or i nst all ing t he pr odu ct.
Please k eep i t dry. Be sur e not to use wet hand to to uch the
product. It is als o n ot all owe d to im mer se the prod uct into water
or ma ke it be ex pos ed in th e rain . Otherwise it ma y not wo rk
normally o r eve n be da mag ed.
Do no t use it in explosi ve sit uat ion s. Vio lating this wa rning
may cause an e xpl osi on or f ire .
This product involves battery, p lea se be in stri ct ac cor dan ce
with the rel eva nt pr ovi sio ns on t he us e of th e bat tery. Oth erw ise i t
would caus e pro per ty da mag e or pe rso nal i nju ry.
Page 3

Genera l Description
Thank you fo r cho osi ng pr odu cts o f YON GNU O.
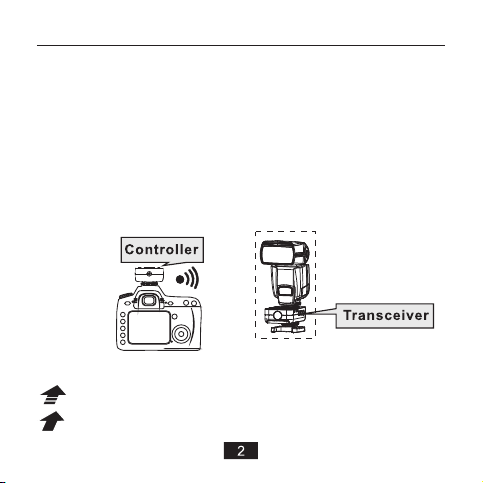
YN622C-T X E-T TL wireless fla sh cont rol ler is for supporting
the use of YN62 2C E-TTL wire les s fla sh tr igg er tr ans ceiver.
This product adopt s fle xib le LC D men u con tro l, su ppo rts
mixed use of E-TTL(II) m ode , m anu al mod e, o r s upe r s ync flash
mode o f gr oup A /B/ C fl ash . Su ppo rts multi fla sh, sup por ts E -TT L
ratio. It ca n be adjusted the e xpo sur e compensatio n or fl ash
output of eac h group. In addi tio n, it su ppo rts sett ing di ffe ren t
focal l eng th( zoo m)o f th e thr ee g rou ps of flash, the rem ote
controll ed dis tan ce up to 1 00M , supp orts 7 wireless cha nne ls
and thr ee grou ps A/B /C , a nd is equip ped wit h A F-a ssi st beam
emitter. Su ppo rts f irm war e upg rad e via U SB .
Compatib le ca mer a : Can on EO S ser ies D SLR
Cameras co mpa tib le wi th th e shu tte r rel eas e cab le (parts):
LS-2.5/C 1: 60 D/7 0D/ 400 Dse rie s/5 00D series/60 0D
series/1 000 D ser ies
LS-2.5/C 3: 40 D/5 0D/ 7D/ 1D se ries/5D se rie s
Page 4
Conven tions Used in the Manual
This ma nua l to assu me us ing com pat ibl e camer a/f lash
and YN 622 C tr ansce ive r in the same chan nel . Th e
featu res /functio ns sup ported by th e p rod uct dep end on th e
camer a and fla sh used . For the operat ion of ca mer a, flas h
ant th e YN62 2C tra nsceiver, pl eas e refer to releva nt use r
manua ls.
For the user manu al and fir mware of the latest ver sion,
p l e a s e v is i t t h e o ff i c i a l w e b s i t e o f Y O N G N U O :
www.hk yon gnuo. com .
YN622C-TX
YN622C
Icon used in t his m anu al:
Refer s to sh ort pre ss th e butto n.
Refer s to lo ng pres s(h old dow n) th e butto n.
Page 5

Suppor ted Functions List
LCD screen display, and multi -bu tto ns fo r qui ck op era tio n
The firmware can be upgraded th rou gh th e USB i nte rfa ce
Supports wireless shut ter r ele ase f unc tio n
The f oca l length(zoom)of the A/B/ C thr ee gro up flas h c an
be adjusted separately
Supports TTL Ratio A:B / A:B C
AF-as sis t beam emitt er fu nctio n
Fl ash m ode : GR( gro upi ng flas h)/ E-TTL (II )/Mul ti fl ash
Su ppo rts m ixe d us e of E-TTL( II) m ode, ma nua l flash m ode or
su per s ync (SS ) of A/ B/C g rou p flash .
Th e ex pos ure co mpe nsa tio n or fl ash out put of A/B /C three g rou ps
of f las hes c an be a dju sted se parate ly
Sh utt er Sy nc: 1st-cu rta in sync , 2nd -curt ain syn c and hig h-s pee d
sy nc, t he hi ghe st sy nc spee d is 1/ 800 0s
Su ppo rts F EC, F EB, F EL
Su ppo rts m ode lin g flash
Su ppo rts t he fl ash z oom ing (au to, m anu al)
Su per Syn c (SS ) tim e delay adjust men t, for hi ghe r x-s ync spe ed
th an th e cam era a llo ws
Se tti ngs s ave d aut oma tic ally
Th e fla sh sy nc si gna l can be input t hro ugh t he PC p ort
Su ppo rts th e basic fla sh tri gge r (ma x sync sp eed is 1/25 0s) of
st and ard h ot sh oe (n on Ca non bod y)
*The ab ove f unc tio ns need t o be u sed w ith t he Y N62 2C
transceiver. Pa rts of fun cti ons may r efe r t o the m anu fac tur er
of the camera and flash(FEL,Modeling Flash ).
(c an be d isa ble d)
Page 6
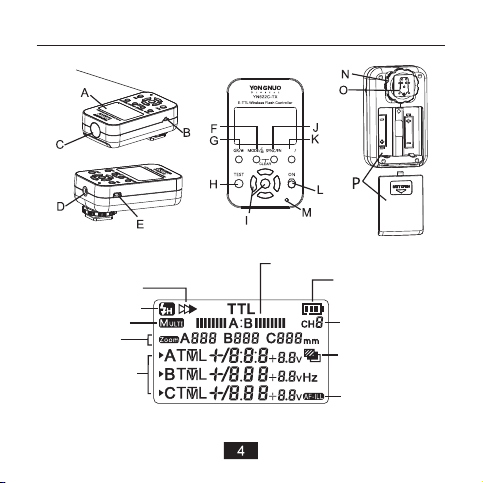
Name of Pa rts/Quick Start Guide
※The protec tiv e fil m can b e tor n out .
HCZ MOO
LCD
2nd curtai n Syn c
High speed s ync
Multi
ZOOM
Fla sh pa ram ete r
area
E-TTL Ra tio
Battery el ect ric ity
Channel
FEB
AF as sis t bea m
emitte r
Page 7
Name of Pa rts/Quick Start Guide
A-LCD: Dis pla y all t he se tti ngs o f con tro lle r.
B-2.5MM Shu tte r rele ase interfa ce: Wi rel ess shutter re lea se
function (P.16).
C-AF assis t bea m emi tte r: (P.14)
D-PC inter fac e: In put t he fl ash s ync s ign al( P.15) .
E-USB int erf ace : Connecte d to the com put er to update the
firmware ( P.19).
F- button: Flas h mod e set tin g.
G-GR/* button: Short press to mo ve t he a rro w to set fla sh g rou p
or ot her para meters; Long pre ss to g et di ffe ren t fun cti ons i nt
differ ent m odes.
H-TEST bu tto n: Lon g p res s to wake the fl ash up, loosen to tes t
the flash( P.12).
I-Select /Se t but ton g rou p: Mu lti fun ction button gr oup , inc lud ing
the [UP] [DO WN] [ LEF T] [R IGH T] an d [OK ] but ton s.
J-SYNC/F N but ton : Sh ort pre ss for fl ash shu tte r sync mo de
setting( P.11) , lon g pre ss for C.FN setting (P.14 ).
K-ZOOM/C H button: short pres s for zoo m sett ing (P.11) , long
press for ch ann el se tti ng( P.7) .
L-Power sw itc h: Sl ide t o ON fo r pow er on .
M-Status indicator : T he gr een light will bright whe n i n
communic ati on; whil e the red lig ht will bri ght when in tri gge rin g
(or shutte r rel eas ing ).
N-Lockin g rin g and l ock ing p in
O-Hot shoe M oun tin g foo t and c ont act s
P-Batter y com par tme nt an d bat ter y cov er
Page 8
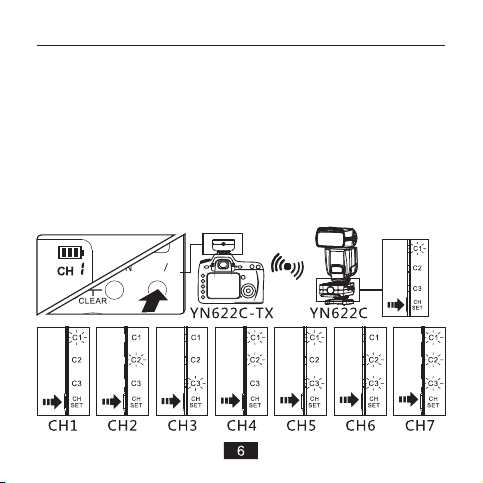
Prepar ation Before Use
HCZ MOO
Ch7
Ch6
Ch5
Ch4
Ch3
Ch2
Ch1
Ch1
1.YN622 C Transc eiver Set tings:
Set the receivin g group trans cei ver
(refe r to th e user manua l of th e YN6 22C).
2.YN622 C-TX Co ntrolle r Setting s:
1).In sta lling t he 2 AA (1.5 V)batterie s
2).In sta lling t he Co ntr oller o n the C amera .
3).Po wer o n when th e pow er sw itch sl ide s to [ON].
4).Ch ann el S ettin g: Long pre ss t he [ ZOO M/CH] but ton , th en
press t he sele ct/ set but ton gro up to the s ame cha nne l as
the YN622C t ran sceiver.
and cha nnel of the
(excl ude d).
Page 9

Settin gs
Flash Mod e Setti ng: GR/TTL/ Multi
Long pr ess the [ ] but ton to sw itc h the fla sh
mode GR /TT L/Multi.
In G R mo de, sho rt p ress the [ ] bu tton to swi tch
the cur rent gr oup the arr ow p oin ting to ; in T TL/Multi
mode, sh ort pres s t his b utt on can a lso swit ch the f las h
mode.
Example s:
1.GR
2.TTL
HCZ MOO
3.Multi
Page 10

Settin gs
HCZ MOO
1.GR-Gr oupin g flas h mode : set d iffer ent fl as h
modes for d iffer ent group s.
1).sh ort pre ss the [GR/*] but ton to
choos e the s ettin g gro ups .
2).Sh ort press the [ ] button
to se t t he fl ash mode of the
selec ted group, eac h pre ss of
the set tin g as belo w:
TTL: E- TTL (II) Fully Au tomat ic Fl ash
The F EC a dju stment r ange is wit hin - 3 to + 3EV, It’s
suppo rte d to p ress se lect/ set but ton gro up to adj ust the FEC
value . If t he F EC valu e is s et o n the flash , i
FEC val ue se t on the contr oll er.
M: Manu al Fl ash
The adjustme nt range is withi n 1/128 -1/ 1, press [LEF T] or
[RIGH T] but ton to ad jus t, press the [UP ] o r [ RIG HT] button
for fin e adj ustme nt.
SS(Su per S ync):ref er to P.1 4.
OFF: Th is gr oup is not par tic ipate i n fla sh.
*Long pre ss the [GR/* ] bu tton t o quickly turn o ff t he A /B
two gro ups a t the same tim e.
t wi ll p lus wit h the
Page 11

Settin gs
2.E-TTL(I I)Mode -Ful ly Automa tic Fla sh
1.)Se t the f lash group :
Long pr ess t he [GR/*] bu tto n to set th e TTL fl ash group.
2.)Se t the f lash ratio o r exp osure c omp ensation :
Short pre ss the [GR /*] butto n to select th e se tting ite ms,
then pr ess t he sele ct/ set b utton g rou ps to s et t he
param ete rs.
1. A+B+C (ALL)Flash G rou p-
Set FE C of A /B/C groups at one
time.
2. A:B Flash G rou p-
Set fla sh rati o of A/ B gro up
Se t F EC group(C
group does not flas h )
3. A:B CFlash G rou p-
Set fla sh rati o of A/ B gro up
Set FEC of A/B g roup
Set FEC of C gro up
of the A /B
Page 12

Settin gs
The det ail s of the flash r ati o setti ngs a s below:
Press[LEFT]or[RIGH T]
Press[UP]or[D OWN]
3.Multi Fla sh Mode:Strobosc opic Flash
Short press the [GR/* ] button to
selec t the items, then pre ss the
selec t/set button group s to set
the parameters.
Outpu t power
Strobo scopi c frequenc y
Strobo scopi c flash c ount
*The o utput po wer of gr oup B/ C s hou ld be se t up
throu gh th e camera’s me nu (P.13)respe cti vely
Page 13

HCZ MOO
HCZ MOO
Settin gs
4.ZOOM: Flash Coverage Setti ng
It supports th e co ntroller to set the focal length of th e
flash o n the t ransc eiv er.
5.Flash s hutte r sync
Short p res s the [SY NC/ FN] but ton t o
set th e sh utt er syn c mode (ex cept the
multi flas h). The re wi ll be a re levant
icon di spl ayed on t he LC D.
1st cur tai n sync
Short p ress th e [ZOOM/CH ]bu tton,
set the flash focal length of A /B/ C
group in se que nce, then pres s t he
Selec t/S et b utton g roup and set.
Setti ngs ra ng s uppor ted ma nua l
24-10 5mm ,AU (Au tom ati c).
2nd cur tai n sync high sp eed s ync
Page 14

Flash Awa king and Triggering
1.Flash Aw aking &Testi ng
When ha lf pres s the shu tte r butto n of the came ra or pre ss
the [T EST ] butt on o f the c ont roller , t he gre en wak e-up
indic ato r ligh t ligh ts o n, and the fl ash on the ho t-s hoe of the
trans cei ver w ill be waked u p. When l oos en the [T EST ]
butto n, the flas h of the selected gr oups wil l be tested fo r
once.
2.Fla sh tr iggering
Compl ete ly pres s the s hutte r but ton o f the c ame ra will
trigg er th e fla sh sy nch ronously, the red t rigge rin g ind icator
light l igh ts on.
HCZ MOO
Page 15

Contro l from Camera's Men u Screen
When usi ng EOS di gital ca mer as released si nce
2007, y ou can se t the con tro ller fu nct ions fr om the
camer a’s me nu screen. For the operatio n of the came ra,
pleas e ref er to the r ele van t user ma nua l.
EOS digita l camera s rel eas ed si nce 2 012 :supp ort E-
TTL II, ma nual fl ash , mul ti flas h, gr oup flash (G R).
E O S d ig it al c a m era s r el ea s e d fro m 2 00 7 t o
2011:s upp orts E- TTL II, manua l fla sh, mul ti fl ash
Under the T TL mo de, it supp ort s th e ca mer a me nu sett ing
FEB fun ction . The re will be rele vant ic on displa yed on the
contr oll er. (P.4)
Suppo rts se tting the Gr oup A fla sh zoom t hro ugh th e
camer a’s m enu .
Cance ls t he F EB f unc tio ns o r tu rns on/off AF Ass ist Bea m
Emitt er th ough the C.F N Set tings o f the e xternal fl ash m enu.
*If the 2nd curtain sync enabl ed, p lea se se t the f las h
param ete rs of eac h gro up th rough t he co ntroller.
*SS flas h mode can not b e cont rol led through the
camer a men u.
Page 16

HCZ MOO
Custom F unction Settings(C.FN)
1) .Long p ress th e [SYNC /FN] bu tton.
2) .Pres s the [up ] or [down] butt on s
to selec t the se tti ng items , the n
pr es s th e [L EFT ] or [RI GH T]
bu tto ns t o set the p ara me ters.
3) .Pres s [O K] to conf ir m an d exit the
se tti ng s.
01-SS : Sup er sync dela y Set tings
The ran ge of s ettings : 0. 0-2 .0
02-SH U(S hutte r): Wir eless shut ter f uncti on
Refer t o P.1 6,c an be set to ON/ OFF
03-AF : AF assis t lig ht fu nctio n
It ca n b e s et to ON /OF F, re levan t i con will disp layed on th e
scree n (re fer to P.4)
04-LE G(L egacy Flas h Tr igger ):S ingle cont act t rigge r
funct ion
Refer t o P.1 5, ca n be set to ON/O FF
05-EC O(E x Compat): E X ser ies fla sh Co mpat
Refer t o P.1 8, ca n be set to ON/O FF
(refe r to P.17 )
Page 17

Other Tri gger Modes
2.PC inte rface & L egacy F lash Trigge r
PC i nte rfa ce (inp ut) t rig ger: Us e LS- PC/PC c abl e (o pti on)to
co nne ct the co ntr oller a nd th e PC inte rfa ce of cam era .
Legacy Flash Trigger : Bas ic fl ash ( Sin gle Contac t)
trigg er: I nstal l the c ontro lle r on the ca mera hot sho e.
1).Tra nsm itting gro up setup: Se t bas e on the gr oup s of the
contr oll er (GR) .
2).Fl ash m ode setu p: Se t t he manu al fl ash (M) m ode
throu gh the fl ash con tro l panel , cha nge the flash ou tput
ma nuall y, a nd tr ig ger t hro ug h t he co nt rolle r' s P C
inter fac e o r main flash conta ct. Hi gh spe ed syn c or ot her
TTL fu nct ions are not supp ort ed (the highes t s ync sp eed
is 1/25 0s or l ower) .
*About th e C.FN 04 L egacy Fla sh Trigger :
Pleas e set t his cu sto m func tio n as OF F when using the
TTL trigge rin g. If it could n ot op erate prop erl y when
using t he si ngle conta ct tr igger, s et as O N.
Page 18

C1
C3
Shutte r Release Function
Use the YN6 22C tra nscei ver for wir ele ss t ransmitt ing ,
the YN622C -TX c ontrolle r as th e shutt er si gna l outpu t.
YN622 C-TX
YN622 C
1) .Us e the LS-2 .5 ser ies shutt er con necti ng c able t o
conne ct the cont rol ler and cam era ’s shu tte r i nterf ace , a s
for t he EOS digit al ca mer as rele ase d aft er 20 12, i t doe s
not nee d the s hutte r con nec ting ca ble .
2).Se t th e C. FN 0 2 as ON (P.14), tur n on the wir ele ss s hutte r
funct ion .
3).Pr ess t he [TEST ] but ton o f YN622C transce ive r (if t he
flash hav e inst all ed) an d lo ose, t he f lash w ill be tri gge red
once to tes t th e fl ash . Abo ut o ne s eco nd l ate r, th e ca mer a
shutt er wi ll be tri gge red a nd will f las h synchron ous ly.
Su pport s sin gle shot onl y.
If you do not u se the shut ter rele ase func tion, pl eas e
set the C .FN 0 2 as OFF.
Page 19

Refere nce
Abo ut the Supe r Sync( SS)
1.
Use n on-HS S (No n Hig h Speed Sync) flas h to re ali ze Hi gh
Speed Syn c. This f uncti on is more ap plicable to stro bes
flash es wh ose fla sh du ration is lo nger. It shou ld be u sed wit h
camer as wh ich sup por ts High S pee d Sync (H SS) a nd setting
SS time d ela y param ete rs.
A-Set th e cont rol ler SS ti me del ay par ame ters in C.FN 01 :
(refer to Pa ge 14 )
B-Using Su per S ync :
1).Set the fla sh into man ual mode. It supp ort s to use the flash
which is set on the hot-s hoe of the transcei ver or con nec t the
flash t hro ugh P C por t. Se tti ng full powe r fla sh ou tpu t (1/ 1) ma y
be needed.
2).Set the f las h s ync spee d o f t he camera as hig h s pee d s ync ,
the ma ximum shutter s ync sp eed s c an rea ch to 1/8 000 s.
Adjust “ SS” to a s uit abl e tim e d ela y parame ter s a cco rdi ng to
the flash mo del , out put p owe r and s hut ter s pee d.
3).Take p hot os an d check w het her t he flash of th e pho tos is
synchron ous . T he gra dat ion s or var iat ion s of the ligh t w ill b e
seen in the photos. The fla sh res ult wi ll be dif fer ent du e to
differ ent c ameras and flashes .
2. Ab out the Au tomat ic Save Fun ction:
Then co ntr oll er will aut oma tic all y save the set tin gs of cha nne l,
grouping , fla sh mo de, AF a ssi st be am em itt er et c.
Page 20

Refere nce
3.About t he Ex Com pat trigg er
When using the 4 30ex/ 550ex/580ex flash etc. wh ich
does not supp or t camera menu control ling the flas h,
enabl e this fu nctio n can use th e controlle r to remote
control the manual flash power ou tput of the above
flash .
1).Se t the C.F N 05 of t he control ler as ON (P.14).
2).Se t the fla sh on the YN62 2C as E-T TL flash mode.
3).Se t th e contr oller as manu al f lash under the GR
mode, s et the fl ash output .
*The fl ash scr een will not displa y the fla sh outp ut.
*If y ou do not use the above model flash, please se t
the C.F N 05 as OFF.
4.About t he LCD ba cklight :
Press a ny bu tton, the LC D bac kligh t wil l light for 5 se con ds.
5.About t he batt ery elect ricity di splay :
The ba ttery icon in the up per ri ght co rner of the LCD wi ll
displ ay th e cur rent el ect ric ity. When i n l ow batt ery, the
batte ry ic on will b lin k, pl ease re pla ce the batte ry.
18
Page 21

HCZ MOO
HCZ MOO
Refere nce
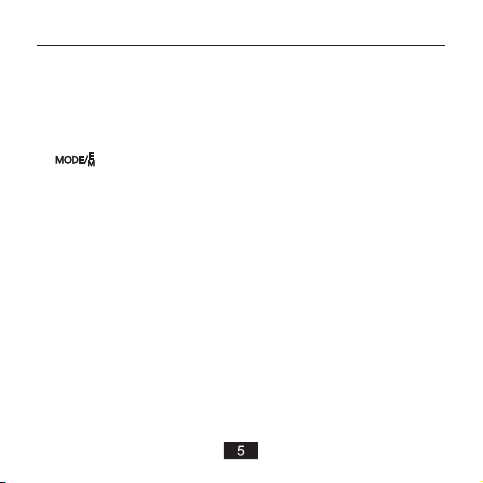
5.Facto ry Rese t
H ol d d o w n t h e [ M O D E ] a n d
[SYNC /FN ] b utt ons at th e s ame ti me
un til th e scre en as s ho wn, th en
loose n to re store fact ory s ettin gs.
6.USB Fir mware U pgrade
1).Vis it YO NGN UO of fic ial w ebs ite :
http://w ww.h kyo ngn uo. com t o dow nload the firmware
upgrade so ftw are a nd th e lat est f irm war e.
2).Tur n of f . K eep pre ssi ng [ mod e] button and tur n on aga in. The
screen wil l sho w
current ve rsi on ).
3).Conne ct the cont rol ler to P C vi a US B-M INI B ca ble
include)
4).Compl ete t he fi rmw are u pgr ade o per ation accordi ng to t he
.
prompt of so ftw are .
firmware upgrad e int erf ace (wi ll disp lay the
19
(not
Page 22

Trouble shooting
1. Fai l to po wer on or auto mat ic shut dow n:
The bat ter y is load ed in ver sely or e xha usted.
ØInsta ll the batter y ac cor ding to the cor rect dire ction the
batte ry compar tme nt ind ica tes an d ensure t he bat ter y is fu ll
and res tar t the pow er .
2. The fla sh do esn't fire
ØEnsur e t he power of all equ ipmen ts are full , the fl ash is
in read y sta te(the flash-re ady ind icator on)
ØEnsur e the c onn ectio n among th e c ont rolle r(t ransc eiv er) ,
camer a and t he flas h is re lia ble.
ØWheth er th e contr oll er and trans cei vers ar e set i n the
same ch ann els and c ont rol lable g rou ps.
3. TTL undere xpo sur e or over exp osure:
Check whe the r th e camer a bo dy or the f lash se ts
expos ure compen sat ion. It m ay b e underexp ose d if e xce eds
the effe cti ve flash di sta nce. It may ov erexp ose wh en TTL
and ma nua l flas h ar e used at t he same ti me, at thi s ti me the
manua l fla sh suit s to be u sed a s a backl igh t.
When oth er tro uble occ urs duri ng usi ng, it's su gge sted
to deal w ith t he trouble w ith t he proc edu res a s below :
1).R est art all t he eq uip ments .
2).R epl ace the b att eri es of the c ont roller and t ran sceiv ers .
3).R ese t the fac tor y set o f the con tro ller and tra nsc eiver s.
4).Re set t he factory s et of t he came ra/ flash.
20
Page 23

Specif ications
System typ e: Di git al FS K 2.4 GHz w ire les s con tro ller
Distance : 100 M
Channel: 7
Flash m ode : GR( E-T TL( II) , Manua l, Su per S ync )/E-TTL(II)/Mu lti
flash
Sync mode: 1 st- cur tai n, 2n d-c urt ain , Hi- spe ed sy nc(HSS)
Groups: 3G rou ps (A /B/ C)
MAX Sync spe ed: 1 /80 00s
Trigger Int erf ace : Hot -sh oe, PC po rt
Shutter re lea se in ter fac e: 2. 5MM s hut ter r ele ase i nterface
TTL Rati o: su pport
USB Firmwa re Up gra de: s upp ort
AF As sis t Bea m Emi tte r: su ppo rt
Zoom: support
Battery: AA X2( sup por t 1.2 V r ech arg eab le ba tte ry)3V
Stand-by t ime : 120 h
Dimensio ns: 8 9.5 ×53 ×39 mm
Wei ght :82 g
The f unc tions of t his u ser m anu al ar e based o n t est
conditio ns of o ur company. Furt her n oti ce wi ll not be g ive n if
the design a nd sp eci fic ati ons c han ge.
The YON GNU O log o in thi s man ual in clu des the registered
trademar k o r t rad ema rk of Sh enz hen Yong nuo Phot ogr aph y
Equipmen t Co.,L td in China or/and other countries(reg ion s).
All other tra dem ark s ar e th e pr ope rty of the ir r esp ect ive
owners.
21
Page 24

FCC ID: 2ACYPYN622C-TX
that may cause undesired operation.
SHENZHEN YONGNUO PHOTOGRAPHIC EQUIPMENT CO., LTD
Model name: E-TTL Wireless Flash Controller
Model No.: YN622C-TX
This device complies with Part 15 of the FCC Rules. Operation is subject to the
following two conditions: (1) this device may not cause harmful interference,
and (2) this device must accept any interference received, including interference
Changes or modifications not expressly approved by the party responsible for
compliance could void the user's authority to operate the equipment。
Note: This equipment has been tested and found to comply with the limits for a
Class B digital device, pursuant to part 15 of the FCC Rules. These limits are
designed to provide reasonable protection against harmful interference in a
residential installation. This equipment generates, uses and can radiate radio
frequency energy and, if not installed and used in accordance with the instructions,
may cause harmful interference to radio communications. However, there is no
guarantee that interference will not occur in a particular installation. If this
equipment does cause harmful interference to radio or television reception, which
can be determined by turning the equipment off and on, the user is encouraged to
try to correct the interference by one or more of the following measures:
—Reorient or relocate the receiving antenna.
—Increase the separation between the equipment and receiver.
—Connect the equipment into an outlet on a circuit different from that to which
the receiver is connected.
—Consult the dealer or an experienced radio/TV technician for help.
 Loading...