

Page 1
RFID Reader
User guide
www.yoke.net
Page 2
index
Language
English ------------------------------------------------------------------ 3
Germany --------------------------------------------------------------- 9
日本語
------------------------------------------------------------------ 13
简中
--------------------------------------------------------------------- 17
繁中
--------------------------------------------------------------------- 21
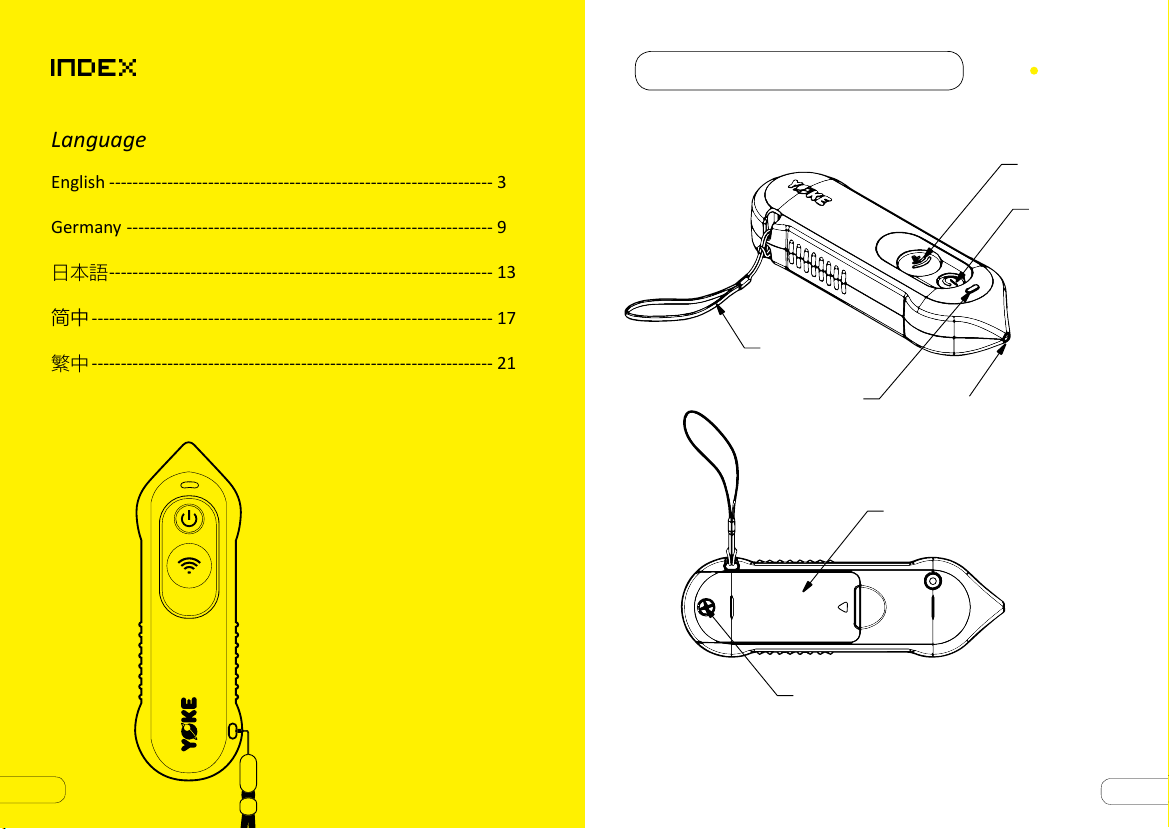
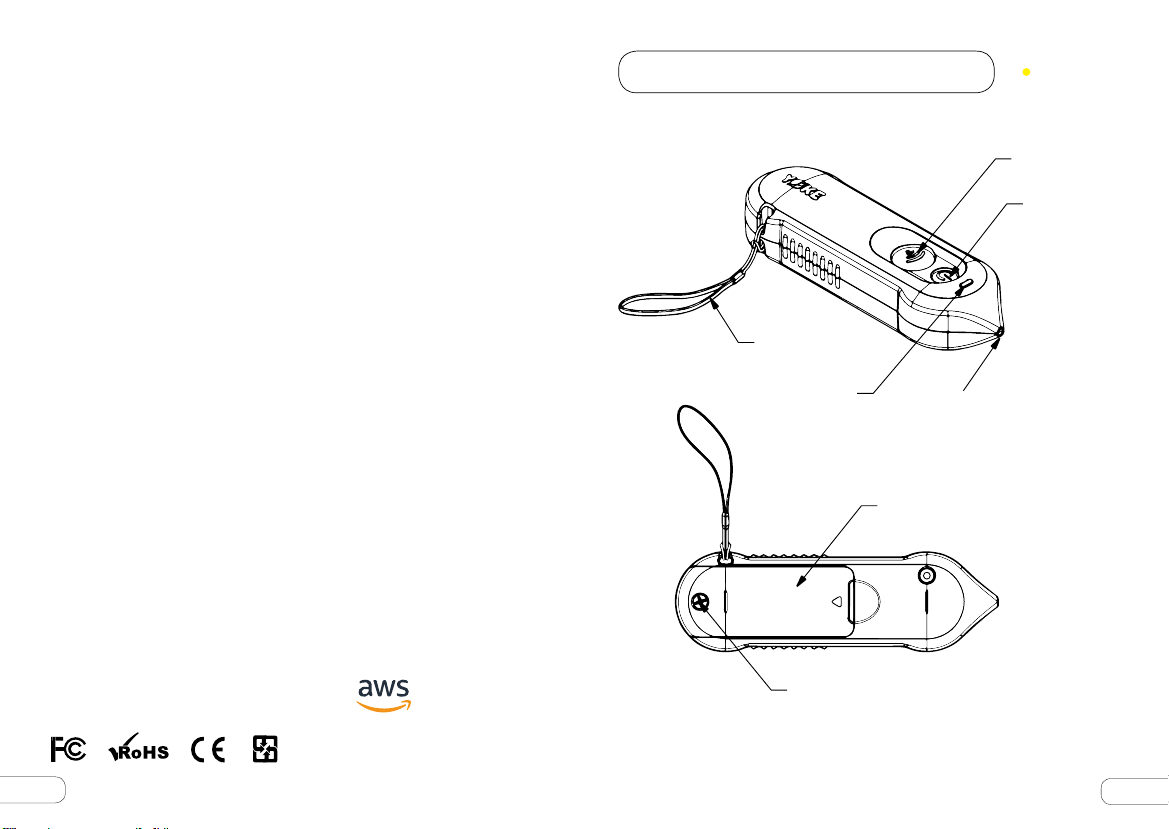
YOKE Reader Appearance
Wrist Band
Indicator Light
Red: Power On
Green: Read Successfully
Read Point
Battery Cover
AA Battery 2 pcs
English
Read Button
Power Switch
2
Fixing Screw
M4×10, 1pc
3
Page 3
YOKE iReader User’s Manual
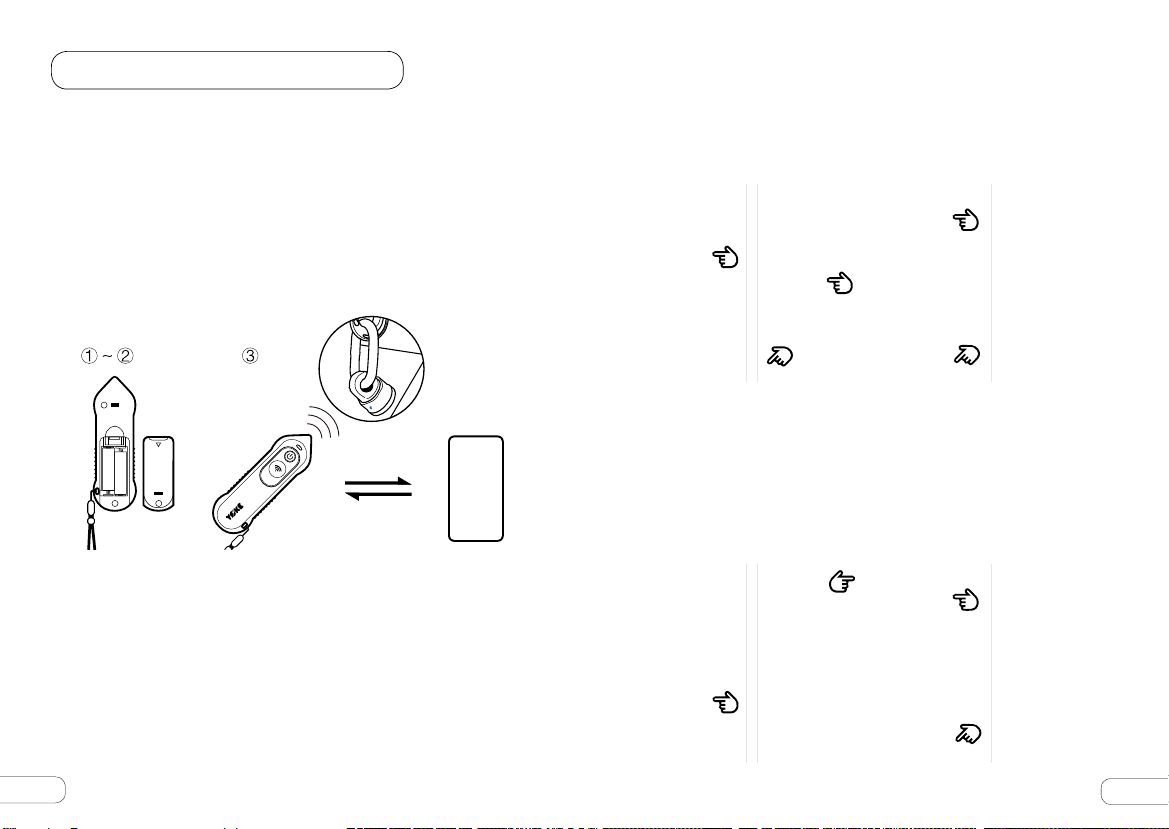
① Slide to uncover the Battery Cover and insert two AA-
batteries with sufficient power (rechargeable battery is also
applicable).
② Place the Battery Cover back. It is recommeded to secure
the Battery Cover with the fixing screw using a cross
screwdriver.
③ Press the Power Switch. The Indicator Light should light up
in red. The Reader is now turned on and ready to be paired
with the RFID Inspect
TM
App via Bluetooth.
Bluetooth”at the bottom to search for available Bluetooth
devices nearby.
Select“YOKE iReader”, refering to the serial number on the
back of the reader, to carry out pairing.
The YOKE iReader is ready to read RFID Tags after the the
App shows“Reader is Connected”.
5
1
3
APP
AA 1.
VX
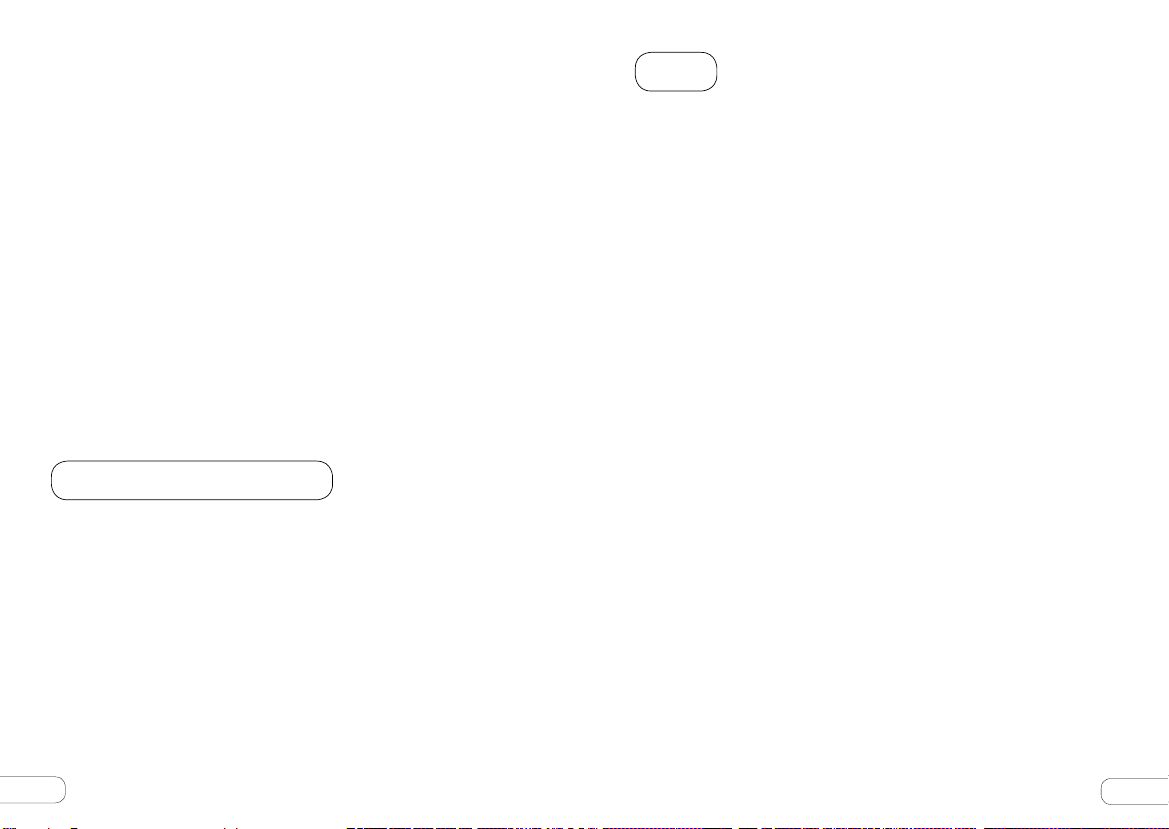
④ Connecting Instructions:
TM
a. Install RFID Inspect
App from App Store or Google Play
Store. (Search for“YOKE”or“RFID Inspect”.)
b. Make sure that the Bluetooth of the phone is turned on, or
that the Wi-Fi or data service is enabled.
c. For ID Verification:
Open RFID Inspect
TM
App on your smart phone.
Tap into “YOKE ID Verification”and select“Reader”Mode.
Tap the graphic at the center, and then activate“Scan
4
2
4
d. For Inspection Management:
Open RFID Inspect
TM
App on your smart phone.
Tap into “Inspection Management”. Tap the reader icon at the
upper right corner, and then activate“Scan Bluetooth”at the
bottom to search for available Bluetooth devices nearby.
Select “YOKE iReader”, refering to the serial number on the
back of the reader, to carry out pairing.
2
1
4
3
5
Page 4
The YOKE iReader is ready to read RFID Tags after the App
shows “Reader is Connected”.
⑤ Place the Read Point next to RFID Tag and press the Read
Button. The distance between the Read Point and the tag
should be no greater than 10mm. The Indicator Light should
show green if reading is successful; and the results of ID
Verification or the product information should show up in the
screen.
⑥ When the Reader is ON, a flashing green light denotes weak
battery power. Replacing the battery is recommended.
⑦ When the Reader is ON without operation for 5 minutes,
it will enter the sleeping mode automatically. At this time,
pressing the Read Button to revoke the Reader; whereas
the Power Switch to turn off the Reader.
Product Specifications
a. Dimensions: 160.4L x 50W x 39.5H mm
b. Working Frequency: 13.56 MHz
c. Voltage: + 3.0V (The Reader will flash in green to alert if the
voltage is lower than 2.7 V when the Reader is ON.)
Precautions:
a. The operating temperature for batteries to function normally
is 10℃ ~ 40℃ .
b. It is recommended to remove the battery if the device is to
be left unused for more than 30 days.
FCC
Federal Communications Commission (FCC) Statement
15.21
You are cautioned that changes or modifications not expressly
approved by the part responsible for compliance could void the
user’s authority to operate the equipment.
15.105(b)
This equipment has been tested and found to comply with
the limits for a Class B digital device, pursuant to part 15
of the FCC rules. These limits are designed to provide
reasonable protection against harmful interference in a
residential installation. This equipment generates, uses and
can radiate radio frequency energy and, if not installed and
used in accordance with the instructions, may cause harmful
interference to radio communications. However, there is
no guarantee that interference will not occur in a particular
installation. If this equipment does cause harmful interference
to radio or television reception, which can be determined by
turning the equipment off and on, the user is encouraged to
try to correct the interference by one or more of the following
measures:
-Reorient or relocate the receiving antenna.
-Increase the separation between the equipment and receiver.
-Connect the equipment into an outlet on a circuit different
from that to which the receiver is connected.
-Consult the dealer or an experienced radio/TV technician for
help.
6
7
Page 5
This device complies with Part 15 of the FCC Rules. Operation
is subject to the following two conditions:
① this device may not cause harmful interference and
② this device must accept any interference received, including
interference that may cause undesired operation of the
device.
FCC RF Radiation Exposure Statement:
① This Transmitter must not be co-located or operating in
conjunction with any other antenna or transmitter.
② This equipment complies with RF radiation exposure limits
set forth for an uncontrolled environment.
YOKE RFID-Lesegerät Kurzanleitung
Trageschlaufe
Germany
SCAN-Taste
POWER-Taste
Leuchtanzeige
Leuchtet rot: Einschaltung
Antenne
Leuchtet grün: Kopplung
Batterieabdeckung
2 x AA Batterien
powered
by
Made In Taiwan
8
Stellschraube
M4×10
9
Page 6

YOKE RFID-Lesegerät Kurzanleitung
2
①
Entfernen Sie die Batterieabdeckung auf der Rückseite von dem
RFID-Lesegerät und legen Sie zwei neue AA-Batterien(oder
wiederaufladbare Batterien) ein.
②
Setzen Sie die Batterieabdeckung wieder auf. Ziehen Sie die
Stellschraube mittels eines Kreuzschlitzschraubendreher , zur
Sicherung der Batterieabdeckung an
③
Drücken Sie auf die POWER-Taste, die LED leuchtet rot.Das
RFID-Lesegerät wird eingeschaltet, kann über eine BluetoothVerbindung mit App gekoppelt werden.
Sie der Modellname von dem RFID-Lesegerät in der Liste auf
der App. Die Seriennummer finden Sie auf der Rückseite des
Lesegeräts. Wenn eine Bluetooth-Verbindung hergestellt wird,
wird die Information von RFID Tag auf dem Bildschirm angezeigt.
1
3
5
APP
AA 1.2VX
④
Betrieb:
a. Bitte laden Sie die RFID InspectTM App aus App Store oder Google
Play Store herunter. (Suchbegriffe:YOKE oder RFID Inspect)
b. Achten Sie darauf, dass das Bluetooth Ihres Smartphones
aktiviert und Wireless-Verbindungen Ihres Smartphones aufbaut
sind.
c. Identifikation:
Starten Sie die RFID Inspect
TM
App Ihres Smartphones. Wählen
Sie Seite" Identifikation" und Klicken Sie die Option in der Mitte
der Seite. Wählen Sie im Untermenü die Option " Suche nach
Bluetooth-Geräten ". Nach dem Scannen Ihrer Umgebung nach
Bluetooth Geräten, zeigt die App gefundene Geräte an. Wählen
10
2
d. Inspektion:
Starten Sie die RFID Inspect
TM
App Ihres Smartphones. Wählen
4
Sie Seite" Inspektion" und Klicken Sie die Option der Seite
rechts oben. Wählen Sie im Untermenü die Option " Suche nach
Bluetooth-Geräten ".Nach dem Scannen Ihrer Umgebung nach
Bluetooth Geräten, zeigt die App gefundene Geräte an.Wählen
Sie der Modellname von dem RFID-Lesegerät in der Liste auf
der App. Die Seriennummer finden Sie auf der Rückseite des
Lesegeräts. Wenn eine Bluetooth-Verbindung hergestellt
wird,wird die Information von RFID Tag auf dem Bildschirm
2
4
1
3
11
Page 7

angezeigt.
⑤
Halten Sie das RFID-Lesegerät nahe an dem RFID Tag, und
drücken Sie auf die SCAN-Taste. Die LED leuchtet grün, wenn die
Verbingdung erforderlich ist. Die Information der Identifikation
wird auf dem Bildschirm angezeigt. Hinweis: Die Distanz
zwischen der Antenne und dem RFID Tag sollte nicht länger als
10mm sein.
⑥
Wenn die Batterien schwach sind, blinkt die LED grün. Ersetzen
Sie die Batterien.
⑦
Das RFID-Lesegerät wechselt nach 5 Minuten Inaktivität
automatisch in den Ruhemodus Um das RFIDLesegerät„aufzuwecken“, drücken Sie die SCAN-Taste.
Um das RFID-Lesegerät„auszuschalten“, drücken Sie die POWERTaste.
Technische Daten
a. Abmessung(LxBxH) : 160.4L x 50W x 39.5H mm
b. Betriebsfrequenz :13.56 MHz
c. Spannungsversorgung: + 3.0V(Die LED blinkt grün ,wenn die
Spannung unter 2.7 V ist.)
Hinweis:
a. Die optimale Betriebstemperatur von Batterien liegt im Bereich
℃
10
bis 40℃.
b. Falls das RFID-Lesgerät über 30 Tage nicht benutzt wird, wird
empfohlen die Batterien zu entfernen.
YOKE Reader 外観の説明
ハンドストラップ
パイロットランプ
赤ランプ:電源オン
緑ランプ:読取り成功
電池裏蓋
AA 乾電池 ×2
日本語
読取りボタン
電源スイッチ
読取りヘッド
powered
by
Made In Taiwan
12
固定ねじ
M4×10
13
Page 8

YOKE Reader リーダーの基本的な操作説明
2
① リーダーの電池裏蓋を開け、十分な電力がある AA 電池を 2 個
入れます ( 充電電池でもよい )。
② 裏蓋をかぶせ、ボックス内のネジ穴に合わせて、十字ドライバ
ーでねじ止めしてください。
③ 電源スイッチを押し、パイロットランプが赤色を示すことを確
認します。この時、リーダーはすでにオンの状態で、アプリと
ブルートゥースでペアリングができます。
検索する」をタッチし、結果リストからペアリングしたいリー
ダーのコードを探し、「ペアリングする」をタッチします。リ
ーダー背面ケースのシリアルナンバーをご参考ください。アプ
リ画面に「接続済み」と表示されたら、すぐに RFID Tag の読
取りが開始できます。
1
3
5
APP
AA 1.2VX
④
接続の手順
a. App Store 或いは Google Play Store から RFID Inspect
TM
をダウンロードしてください。(検索キーワードが YOKE 或い
は RFID Inspect)
b. 携帯のブルートゥーストとwi が確実にオンしているかどうかを
ご確認
c. 偽造防止の検証:
スマホ上の RFID Inspect
TM
App( 仮の名、追って改名 ) アプリを
開き、偽造防止検証の読取りページに入り、中央の図にタッチ
します。次にページ下方の「近くのブルートゥースデバイスを
14
App
d.
セキュリティ検証:
2
4
スマホ上の RFID InspectTM App アプリを開き、偽造防止検証の
読取りページに入り、中央の図にタッチします。次にページ下
方の「近くのブルートゥースデバイスを検索する」をタッチし、
結果リストからペアリングしたいリーダーのコードを探し、「ペ
アリングする」をタッチします。リーダー背面ケースのシリア
ルナンバーをご参考ください。アプリ画面に「接続済み」と表
示されたら、すぐに RFID Tag の読取りが開始できます。
2
1
4
3
15
Page 9

⑤ 読取りヘッドを RFID Tag に近づけ、読取りボタンを押します。
パイロットランプの緑ランプ点灯は読取り成功を示します。こ
の時アプリは偽造防止検証の結果を表示します。ご注意とお願
い:リーダーの先端とタッグの読み取り距離が 10mm 以上超え
ないように。
⑥ リーダーがオンの状態下での、パイロットランプの緑ランプ点
滅は電池の電力不足を示しています。電池を交換してください。
⑦ リーダーがオンの状態下で、何も操作せずに 5 分経過すると、
リーダーの電源は休止状態に入ります。この時、読取りボタン
を押すと、すぐリーダーを呼び覚ることができます。休止中に
電源ボタンを押すと、電源がオフになります。
YOKE Reader 外观说明
读取键
电源开关
简中
製品規格
a. サイズ : 160.4L x 50W x 39.5H mm
b. 作業周波数 : 13.56 MHz
c. 電圧 : + 3.0V ( 電圧が 2. 7V 未満になると、オンの状態下でリ
ーダーの緑ランプが点滅して知らせます)
注意事項 :
a. 乾電池の正常な作業温度環境は 10℃ ~ 40℃です。
b. 30 日以上使用しない時は、電池を取り外してください。
powered
by
Made In Taiwan
16
手腕带
指示灯
红灯
:开启电源
绿灯:读取成功
固定螺丝
M4×10
读取头
电池背盖
AA 干电池 ×2
17
Page 10

YOKE Reader 简易操作说明
① 请打开读取器的电池背盖,并放入两颗电力充足的 AA 电池
( 充电电池亦可 )。
清单中搜寻欲配对的读取器装置号码 (请参考 reader背盖的序
号 ),并点选进行配对,App画面显示已连线后即可开始读取
RFID Tag。
② 盖上电池背盖,并建议以十字螺丝起子搭配盒内螺丝锁上电池
背盖。
③ 按下电源开关,确认指示灯显示红色。此时读取器已是开启状态,
可与 App 进行蓝牙配对。
APP
AA 1.
VX
④ 连线步骤
a. 从 App Store 或腾讯应用宝下载 RFID Inspect
TM
App ( 关键字寻
找 YOKE 或 RFID Inspect)
b. 确认手机本身的蓝牙与无线网络是否打开 :
c. 防伪验证
TM
打开手机上的 RFID Inspect
App,进入防伪验证读取页面并
点选中央图示,再点选页面下方的扫描附近蓝牙装置,于结果
5
1
3
2
4
d. 检测管理 :
打开手机上的 RFID Inspect
TM
App,进入检测管理读取页面并
点选右上读取器,再点选页面下方的扫描附近蓝牙装置,于结
果清单中搜寻欲配对的读取器装置号码 (请参考 reader背盖的
序号 ),并点选进行配对,App 画面显示已连线后即可开始读取
RFID Tag。
2
4
1
3
18
19
Page 11

⑤ 将读取头靠近 RFID Tag,并按下读取键。当指示灯显示绿灯,
表示读取成功,此时 App 即会显示防伪验证结果。切记:读取头
与 Tag 的读取距离不得超过 10mm。
⑥ 当读取器于开启的状态下,指示灯呈现绿灯闪烁时,表示电池电
量不足,请更换电池。
⑦ 读取器在开启的状态下,若经过 5 分钟未有任何操作,读取器的
电源将会进入休眠状态。此时按下读取钮,即可唤醒读取器;若
休眠中按下电源钮,则会关闭电源。
产品规格
YOKE Reader 外觀說明
繁中
讀取鍵
電源開關
a. 尺寸:160.4L x 50W x 39.5H mm
b. 工作频率:13.56 MHz
c. 电压:+ 3.0V ( 当电压低于 2.7 V,在开启状态下读取器会闪烁绿
灯提示 )
注意事项 :
a. 干电池正常环境作业温度为 10℃ ~ 40℃。
c. 若 30 日以上不使用,建议取下电池。
powered
by
Made In Taiwan
20
手腕帶
指示燈
紅燈:開啟電源
綠燈:讀取成功
固定螺絲
M4×10
讀取頭
電池背蓋
AA 乾電池 ×2
21
Page 12

YOKE Reader 簡易操作說明
2
① 請打開讀取器的電池背蓋,並放入兩顆電力充足的 AA 電池
( 充電電池亦可 )。
② 蓋上電池背蓋,並建議以十字螺絲起子搭配盒內螺絲鎖上電池
背蓋。
③ 按下電源開關,確認指示燈顯示紅色。此時讀取器已是開啟狀態,
可與 App 進行藍牙配對。
清單中搜尋欲配對的讀取器裝置號碼 (請參考 reader 背蓋的序
號 ),並點選進行配對,App畫面顯示已連線後即可開始讀取
RFID Tag。
5
1
3
AA 1.2VX
④ 連線步驟
a.從 App Store 或 Google Play Store 下載 RFID Inspect
鍵字尋找 YOKE 或 RFID Inspect)
b. 確認手機本身的藍牙與無線網路是否確實打開
c. 防偽驗證 :
TM
打開手機上的 RFID Inspect
App,進入防偽驗證讀取頁面並
點選中央圖示,再點選頁面下方的掃描附近藍牙裝置,於結果
22
APP
TM
App (關
2
4
d. 檢測管理 :
打開手機上的 RFID Inspect
TM
App,進入檢測管理讀取頁面並
點選右上讀取器,再點選頁面下方的掃描附近藍牙裝置,於結
果清單中搜尋欲配對的讀取器裝置號碼 (請參考 reader 背蓋的
序號 ),並點選進行配對,App 畫面顯示已連線後即可開始讀取
RFID Tag。
2
4
1
3
23
Page 13

⑤ 將讀取頭靠近 RFID Tag,並按下讀取鍵。當指示燈顯示綠燈,
表示讀取成功,此時 App 即會顯示防偽驗證結果。切記 : 讀取頭
與 Tag 的讀取距離不得超過 10mm。
⑥ 當讀取器於開啟的狀態下,指示燈呈現綠燈閃爍時,表示電池電
量不足,請更換電池。
⑦ 讀取器在開啟的狀態下,若經過 5 分鐘未有任何操作,讀取器的
電源將會進入休眠狀態。此時按下讀取鈕,即可喚醒讀取器;若
休眠中按下電源鈕,則會關閉電源。
產品規格
a. 尺寸:160.4L x 50W x 39.5H mm
b. 工作頻率:13.56 MHz
c. 電壓:+ 3.0V ( 當電壓低於 2.7 V,在開啟狀態下讀取器會閃爍綠
燈提示 )
注意事項 :
a. 乾電池正常環境作業溫度為 10℃ ~ 40℃。
b. 若 30 日以上不使用,建議取下電池。
NCC
根據 NCC 低功率電波輻射性電機管理辦法規定:
第十二條 經型式認證合格之低功率射頻電機,非經許可,公司、商
號或使用者均不得擅自變更頻率、加大功率或變更原設計
之特性及功能。
第十四條 低功率射頻電機之使用不得影響飛航安全及干擾合法通信;
經發現有干擾現象時,應立即停用,並改善至無干擾時方
得繼續使用。前項合法通信,指依電信法規定作業之無線
電通信。低功率射頻電機須忍受合法通信或工業、科學及
醫療用電波輻射性電機設備之干擾。
powered
by
Made In Taiwan
24
25
Page 14

RFID Inspect
TM
26
27
Page 15

RFID Reader
Solutions of Inspection management,
and Product ID-verification
 Loading...