

Page 1
Page 2

Page 3

Legal Notice
ii | Yoggie Management Server™
Legal Notice
©
Copyright 2006-2008. Yoggie Security Systems Ltd. All rights reserved.
Any and all intellectual property rights related to the Yoggie Management Server™
product belongs solely to Yoggie Security Systems Ltd. and its licensors, and may
not be used in any manner except as explicitly permitted by Yoggie Security
Systems Ltd., in the Terms of Use Agreement.
The technology and products described in this material are protected by registered
and/or pending patents of Yoggie Security Systems Ltd. and/or its licensors.
Yoggie™, Yoggie logo, Yoggie.com™, Yoggie Gatekeeper™, Yoggie Pico™, Yoggie
SOHO™, Gatekeeper Pro™, Gatekeeper Pico Pro™, Yoggie Pico Personal™, Yoggie
Pico Pro™, Yoggie Firestick Pico™, Yoggie Management Server™ are trademarks
or registered trademarks of Yoggie Security Systems Ltd. All other trademarks,
service marks, and logos appearing in this material or on the product belong to
their respective owners.
Q1 2008
YFUM001.00
Page 4
Safety Instructions
User Guide | iii
Safety Instructions
Use the following safety guidelines to help ensure your own personal safety and to
help protect your system and working environment from potential damage.
The power supply in your Yoggie Management Server™ device may produce
high voltages and energy hazards, which can cause bodily harm. Unless you are
instructed otherwise by Yoggie Security Systems Ltd, only trained service
technicians are authorized to remove the covers and access any components inside
the system.
Keep your system away from radiation and heat sources.
Do not block cooling vents or air intakes.
If any of the following conditions occur, disconnect the product from the power
source and replace the part, or contact your trained service provider:
The power cable or plug is damaged.
An object has fallen into the product.
The product has been exposed to water.
The product has been dropped or damaged.
The product does not operate properly when you follow the operating
instructions.
Page 5

Table of Contents
iv | Yoggie Management Server™
Table of Contents
TABLE OF FIGURES ..................................................................................... 6
ABOUT THIS USER GUIDE ........................................................................... 8
INTRODUCTION .......................................................................................... 9
USI N G T HE YOGG I E MANAGEMENT SER VER ™ .........................................................9
TECHNICAL SPECIFICATIONS .......................................................................... 11
GETTING STARTED.................................................................................... 12
PACKAGE CONTENTS .................................................................................... 12
INSTALLING .............................................................................................. 12
POWERING UP THE YMS ............................................................................... 13
CONNECTING TO YOUR NE TW ORK .................................................................... 14
LOGGING IN ............................................................................................. 14
INITIAL SETUP AND REGIS TR A TI ON ................................................................... 16
YMS PAGE ELEMENTS .................................................................................. 20
DISCONNECTING ........................................................................................ 21
MANAGING THE YMS DEVICE .................................................................... 22
YMS PREFERENCES ..................................................................................... 22
Configuring the Time Zone ............................................................... 22
Configuring the Corporate Password .................................................. 22
Configuring an External IP Address ................................................... 23
Configuring Display Preferences ........................................................ 23
MANAGING USER S ...................................................................................... 25
Adding a User ................................................................................ 25
Modifying User Properties ................................................................ 26
Deleting a User............................................................................... 26
MANAGING GATEKEEPER DEVICES ........................................................... 27
VIEWING SECURI TY LOGS ............................................................................. 27
DISABLING/ENABLING A GATEKEEPER DEVICE ...................................................... 29
UNREGISTERING A GATEKEEPER DEVICE ............................................................. 29
MANAGING CORPORATE SECURITY .......................................................... 30
MANAGING GROUPS .................................................................................... 31
Adding a Group .............................................................................. 31
Using Directory Services .................................................................. 33
Modifying Group Properties .............................................................. 34
Page 6

Table of Contents
User Guide | v
Deleting a Group ............................................................................ 34
MANAGING SEC URIT Y PROFILES ...................................................................... 36
Adding a Security Profile .................................................................. 36
Modifying Profile Properties .............................................................. 37
Deleting a Security Profile ................................................................ 38
MANAGING POLI CIE S ................................................................................... 38
Adding a Policy ............................................................................... 38
Modifying Policy Properties ............................................................... 38
Deleting a Policy ............................................................................. 39
DISABLING PROTECTION ............................................................................... 39
CONFIGURING POLICY PARAMETERS ....................................................... 41
CONFIGURING FIREW ALL SETTINGS .................................................................. 42
Rules ................................................................................................................................. 42
Blacklist and Whitelist ..................................................................... 44
Enabling Port Forwarding ................................................................. 45
CONFIGURING IDS/IPS SETTINGS ................................................................... 47
CONFIGURING VPN SET TI NGS ........................................................................ 47
Generic VPN ................................................................................... 48
Cisco VPN ...................................................................................... 48
CONFIGURING ANTI-VIRUS SETTINGS ............................................................... 49
CONFIGURING ANTI-SP A M SETTINGS ................................................................ 50
CONFIGURING WEB FIL T ER ING SET TI N GS ........................................................... 51
LOGGING AND REPORTING ....................................................................... 52
VIEWING THE SY S T EM LOG ............................................................................ 52
VIEWING THE SE CU RI TY LOG .......................................................................... 53
CRE AT ING RE POR TS .................................................................................... 55
REPORT EXAMPLES ...................................................................................... 57
Page 7

About this User Guide
Using the Yoggie Management Server™
6 | Yoggie Management Server™
Table of Figures
Figure 1 – Yoggie Corporate Security Solution ...................................................... 10
Figure 2 – YMS Device: rear panel ....................................................................... 13
Figure 3 – YMS Device: front panel ..................................................................... 13
Figure 6 – Welcome page .................................................................................. 16
Figure 7 – Time Settings page ............................................................................ 16
Figure 8 – Network Settings page ....................................................................... 17
Figure 9 – External IP Address page ................................................................... 18
Figure 10 – Set Administrator Password page ...................................................... 19
Figure 11 – YMS Page Elements ......................................................................... 20
Figure 12 – Time Zone and Corporate Password page ........................................... 22
Figure 13 – Network Settings page ..................................................................... 23
Figure 14 – Display Preferences ......................................................................... 24
Figure 15 – Users page ..................................................................................... 25
Figure 16 – Edit User page ................................................................................ 26
Figure 17 – Gatekeeper Devices ......................................................................... 27
Figure 18 – Gatekeeper Device Detail ................................................................. 28
Figure 19 – Security Log.................................................................................... 28
Figure 20 – YMS Security Element ...................................................................... 30
Figure 21 – Gatekeeper Groups .......................................................................... 31
Figure 22 – Group Editor ................................................................................... 32
Figure 23 – Directory Services ........................................................................... 33
Figure 24 - Security Profiles ............................................................................... 36
Figure 25 – Security Profile Details ..................................................................... 37
Figure 26 – Policy Editor .................................................................................... 38
Figure 27 – Password Generator ......................................................................... 39
Figure 28 – Firewall Policy: Rules ....................................................................... 42
Figure 29 – Firewall Policy: Rule Editor ................................................................ 43
Figure 30 – Firewall Policy: Blacklist .................................................................... 44
Figure 31 – Firewall Policy: Whitelist ................................................................... 45
Figure 32 – Firewall Policy: Port Forwarding ......................................................... 46
Figure 33 – IDS/IPS Policy ................................................................................. 47
Figure 34 – VPN Policy: Generic ......................................................................... 48
Figure 35 – VPN Policy: Cisco ............................................................................. 49
Figure 36 – Anti-Virus Policy .............................................................................. 49
Figure 37 - Anti-Spam Policy .............................................................................. 50
Figure 38 – Web-Filtering Policy ......................................................................... 51
Figure 39 – System Logs ................................................................................... 52
Figure 40 - System Log: Individual Entry ............................................................. 53
Figure 41 – Security Log.................................................................................... 53
Figure 42 – Security Log: Individual Entry ........................................................... 54
Figure 43 – YMS Reports ................................................................................... 55
Figure 44 - Report Query Form: Security Summary .............................................. 56
Page 8

About this User Guide
Using the Yoggie Management Server™
User Guide | 7
Figure 45 – Security Summary Report (Text and Chart) ........................................57
Figure 46 – Security Summary Report (Bar Chart) ................................................58
Figure 47 – Web-Filtering Category Summary Report (Pie Chart) ............................59
Figure 48 – Registration Report (Text) ................................................................59
Page 9
About this User Guide
Using the Yoggie Management Server™
8 | Yoggie Management Server™
About this User Guide
The following User Guide provides installation and usage instructions for the
Yoggie Management Server™.
Style and Syntax Conventions
Verdana
Regular text.
Arial Bold
Names of fields and other pag e components.
Arial Italics
Special terms, the first time they appear.
Monospace
Bold
Text entered by the user on the computer page.
No t e s , which offer an additional explanation or a hint on how to
overcome a common problem.
Wa rn i ng s , which indicate extra caution needed in order to avoid
potential problems.
Page 10

Introduction
Using the Yoggie Management Server™
User Guide | 9
Introduction
The Yoggie Management Server™ (YMS) is a robust security-management
appliance installed in the server room of an organization. It offers a central
security solution for the management and monitoring of the organization’s Yoggie
security mini-computers, also known as Gatekeepers.
Using the Yoggie Management Server™
Gatekeeper devices provide remote and mobile user protection against Internet
threats anytime, anywhere. The IT manager must continuously monitor and
manage the fleet of Gatekeeper devices from a remote central point, to enforce
corporate-level security.
A single YMS unit offers remote central management of up to 5,000 Gatekeeper
units. A YMS unit monitors and logs the Gatekeeper units’ activity in real time, and
ensures uninterrupted protection by keeping the Gatekeeper units up to date with
the latest security and firmware updates. A YMS unit extends the IT manager’s
ability to easily enforce security policies on various groups in the organization,
using a Web-based management console without requiring any agent installation.
YMS supports day-to-day administration tasks, such as generation of daily security
reports, disabling of lost or stolen Gatekeeper devices, and so on.
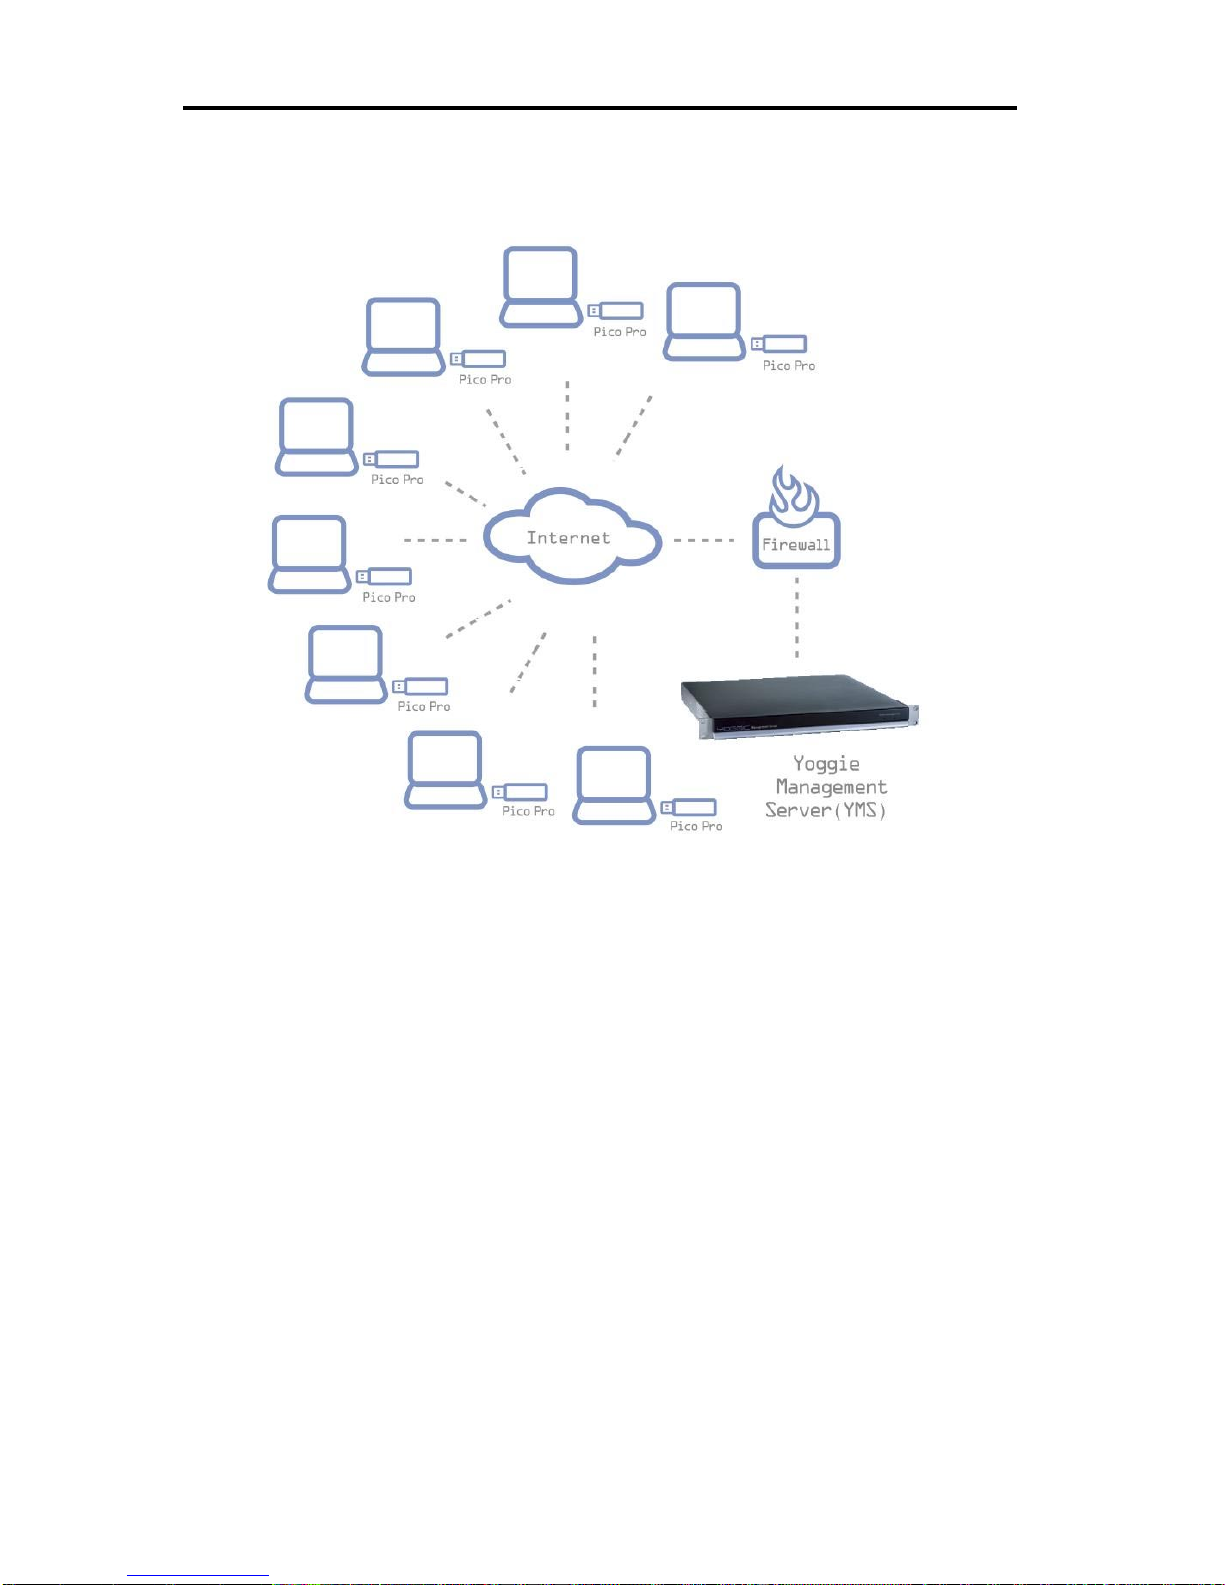
In a common network setup, Gatekeeper units are plugged into laptops belonging
to different groups in the organization. Most of these laptops are located outside
the corporate network. The corporate YMS is visible to both the external users and
to the internal LAN users. After Gatekeeper units are registered to the YMS, they
report logs and details to the YMS, and receive security and firmware updates
from the YMS. The network setup is illustrated in the following diagram:
Page 11
Introduction
Using the Yoggie Management Server™
10 | Yoggie Management Server™
Figure 1 – Yoggie Corporate Security Solution
Page 12

Introduction
Technical Specifications
User Guide | 11
Technical Specifications
Component
Description
CPU Board
Supports Intel® P4 processor 2.8 GHz
Intel® 845GV chipset with 400/533MHz FSB
System Memory
1GB DDR 200/266 on two 184-pin DIMM socket
Ethernet Port
Two 32-bit/33MHz Gigabit/Fast Ethernet ports
PCI Expansion
Two PCI expansion slots for development
Storage Device
Tw o 3 .5’ HD D
Compact Flash
Disk on Module (DOM)
Serial Port
One DB9 (for system console)
One 2x5 pin-connector
LEDs
Indicators for power status and storage access
Ethernet AC/LNK and speed status
IDE
Two IDE connectors - one 40-pin and one 44-pin
USB
Pin header on-board for two USB devices
VGA
Built-in on-board VGA pin-connector
Power
Full-range 220W ATX PSU
Dimensions
Height: 44 mm (1.73 in)
Width: 430 mm (16.83 in)
Depth: 390 mm (15.35 in)
Weight
5.6 kg (12.33 lb) Net
Operating temperature
5° to 40° C (67° to 130° F)
Storage temperature
0° to 70° C (58° to 184° F)
Operating humidity
20% to 90% RH
Storage humidity
5% to 95% RH
Certification
CE/FCC/UL
Page 13
Getting Started
Package Contents
12 | Yoggie Management Server™
Getting Started
Getting started consists of Yoggie Management Server™ installation, power up,
connection, initial setup, and registration procedures. This chapter also describes
how to deploy the YMS in the corporate network.
Package Contents
Yoggie Management Server™ device
Power cable
User Guide CD
Installing
The YMS device is shipped fully assembled and covered. The YMS device includes
two mounting brackets built into the sides of the device housing.
To prepare the YMS for a 19" rack installation:
1. Fasten the mounting brackets to the side rails of the rack, using two screws on
each side (not included).
Ensure that proper grounding is provided for the rack assembly, to prevent
potential electrical problems in the devices mounted on the rack.
Do not remove the covers for any purpose, during the installation procedure.
To ensure easy access during installation and maintenance, leave sufficient
space behind the rack.
Page 14
Getting Started
Powering Up the YMS
User Guide | 13
Powering Up the YMS
Before turning on the YMS device, connect the device to a power source using the
power cable provided.
Verify that the unit is grounded according to regulations.
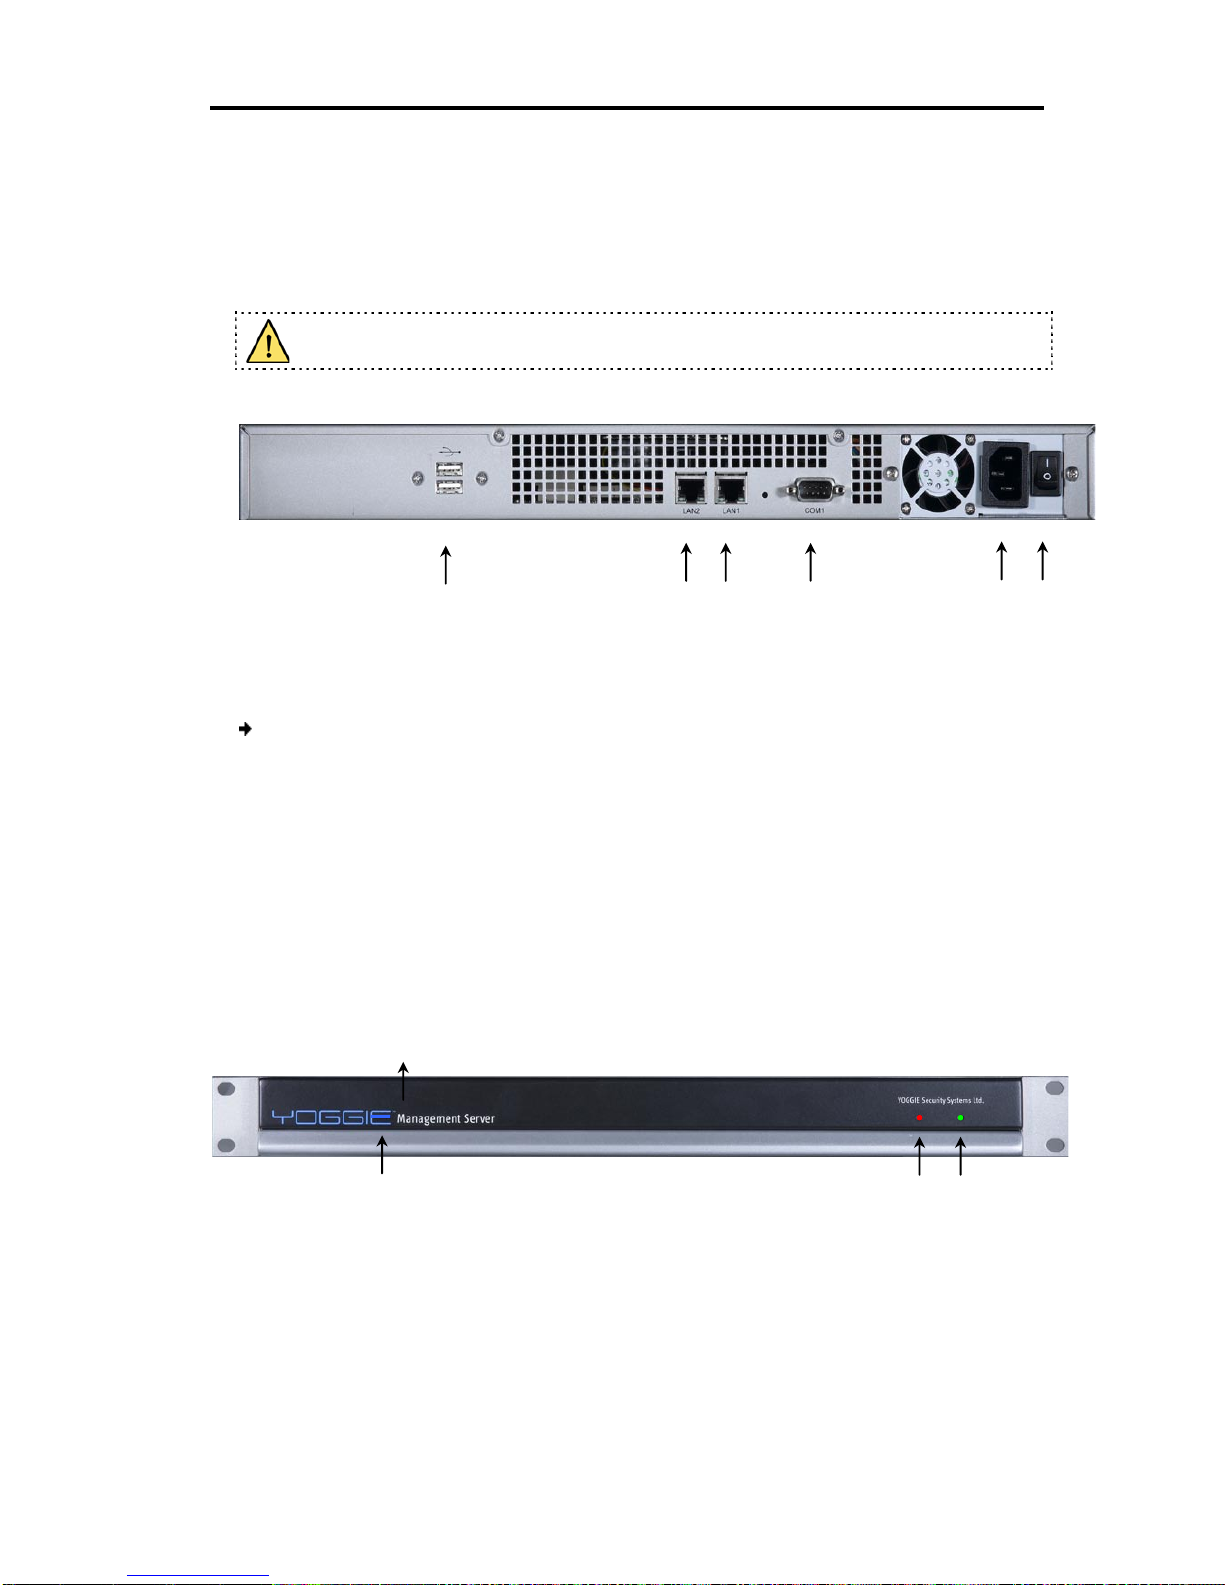
Figure
2 –
YMS Device: rear panel
To power up the YMS device:
1. On the rear panel, turn on the power switch.
The device powers up immediately. The lights on the front panel of the device
indicate the status of the unit, as follows:
The blue LED in the Yoggie logo and the green LED are illuminated if the
device has power.
The red LED is illuminated if there is hard disk activity.
2. The device takes up to two minutes to fully load.
Figure 3 – YMS Device: front panel
US B Po r ts
Power
socket
Power
switch
COM1
LAN2 LAN1
blue LED
red LED
green LED
Page 15
Getting Started
Connecting to Your Network
14 | Yoggie Management Server™
Connecting to Your Network
To connect the YMS to your network, you will need two RJ-45 network cables (not
included in the package). The network cables should be connected to the rear
panel of the YMS device.
To connect the network cables to the rear panel:
1. Connect the RJ-45 cable from the PC to the right port, labeled L AN 2, using
either a 10 MB or a 100 MB Fast Ethernet. This link is used for management.
2. Connect the RJ-45 cable from the network link to the left port, labeled L AN 1 ,
using either a 10 MB or a 100 MB Fast Ethernet Connection. This link is used for
communication with the Gatekeeper devices.
3. Check the connectivity indicators on the rear panel of the device. The LAN 1 and
LAN 2 link LEDs should be illuminated in green.
Gatekeeper units can be plugged into traveling or remote laptops that are directly
or remotely connected to the corporate network. To allow safe communication
with the Gatekeeper devices, the YMS must be installed in the network DMZ with
two additional rules on the corporate Firewall:
External: An y > Y M S External Public I P Ad d r e s s YMS TCP/UDP port 5222
Internal: LAN > YMS Private IP address YMS TCP/UDP port 5222 and YMS TCP
443
In corporate networks which use two firewalls (Internal and External), add
the External rule to the External Firewall, and add the Internal rule to the Internal
Firewall.
External users can see the YMS, using its External Public IP Address (YMS External
IP), while LAN users can connect to the YMS using its private IP address (YMS IP
address). (See Initial Setup and Registration below.)
Logging In
The YMS Management Console provides access to YMS configuration through your
Web browser. You can monitor Gatekeeper activity, manage and enforce corporate
security policy, view and print security reports and logs, manage system and user
settings, and more. You can access the YMS from the PC in one of the following
ways:
Direct connection: The YMS is connected to the PC directly through the YMS
management interface L A N 2 . Default management IP settings are
1.1.1.1 Class C.
Network connection: The YMS is connected to the LAN under the same
network subnet as the PC, through the LA N 1 physical interface.
Page 16
Getting Started
Logging In
User Guide | 15
The first time the Super Admin user logs in to the YMS, connecting to the
YMS is possible only directly through LAN 2 , the management interface.
To connect to the YMS using a direct connection:
1. Connect the PC to the YMS using a crossed network cable:
Connect one end to the PC network port.
Connect the other end to the YMS L A N 2 port.
2. In the PC, configure the network interface to include the following network
settings:
IP Address: 1.1.1.9
Subnet Mask: 255.255.255.0
3. Access the management console, by opening a Web browser and typing the
following URL: https://1.1.1.1.
To connect to the YMS through the network:
1. Connect the YMS to the network, using the L A N 1 port.
2. Verify that the YMS has received an IP address belonging to the corporate LAN.
To log in to YMS:
1. Open a Web browser and type the following URL:
https://<Management IP|YMS IP>
2. Type your username and password and click Login.
Default credentials are:
User Name: admin
Password: admin
Page 17
Getting Started
Initial Setup and Registration
16 | Yoggie Management Server™
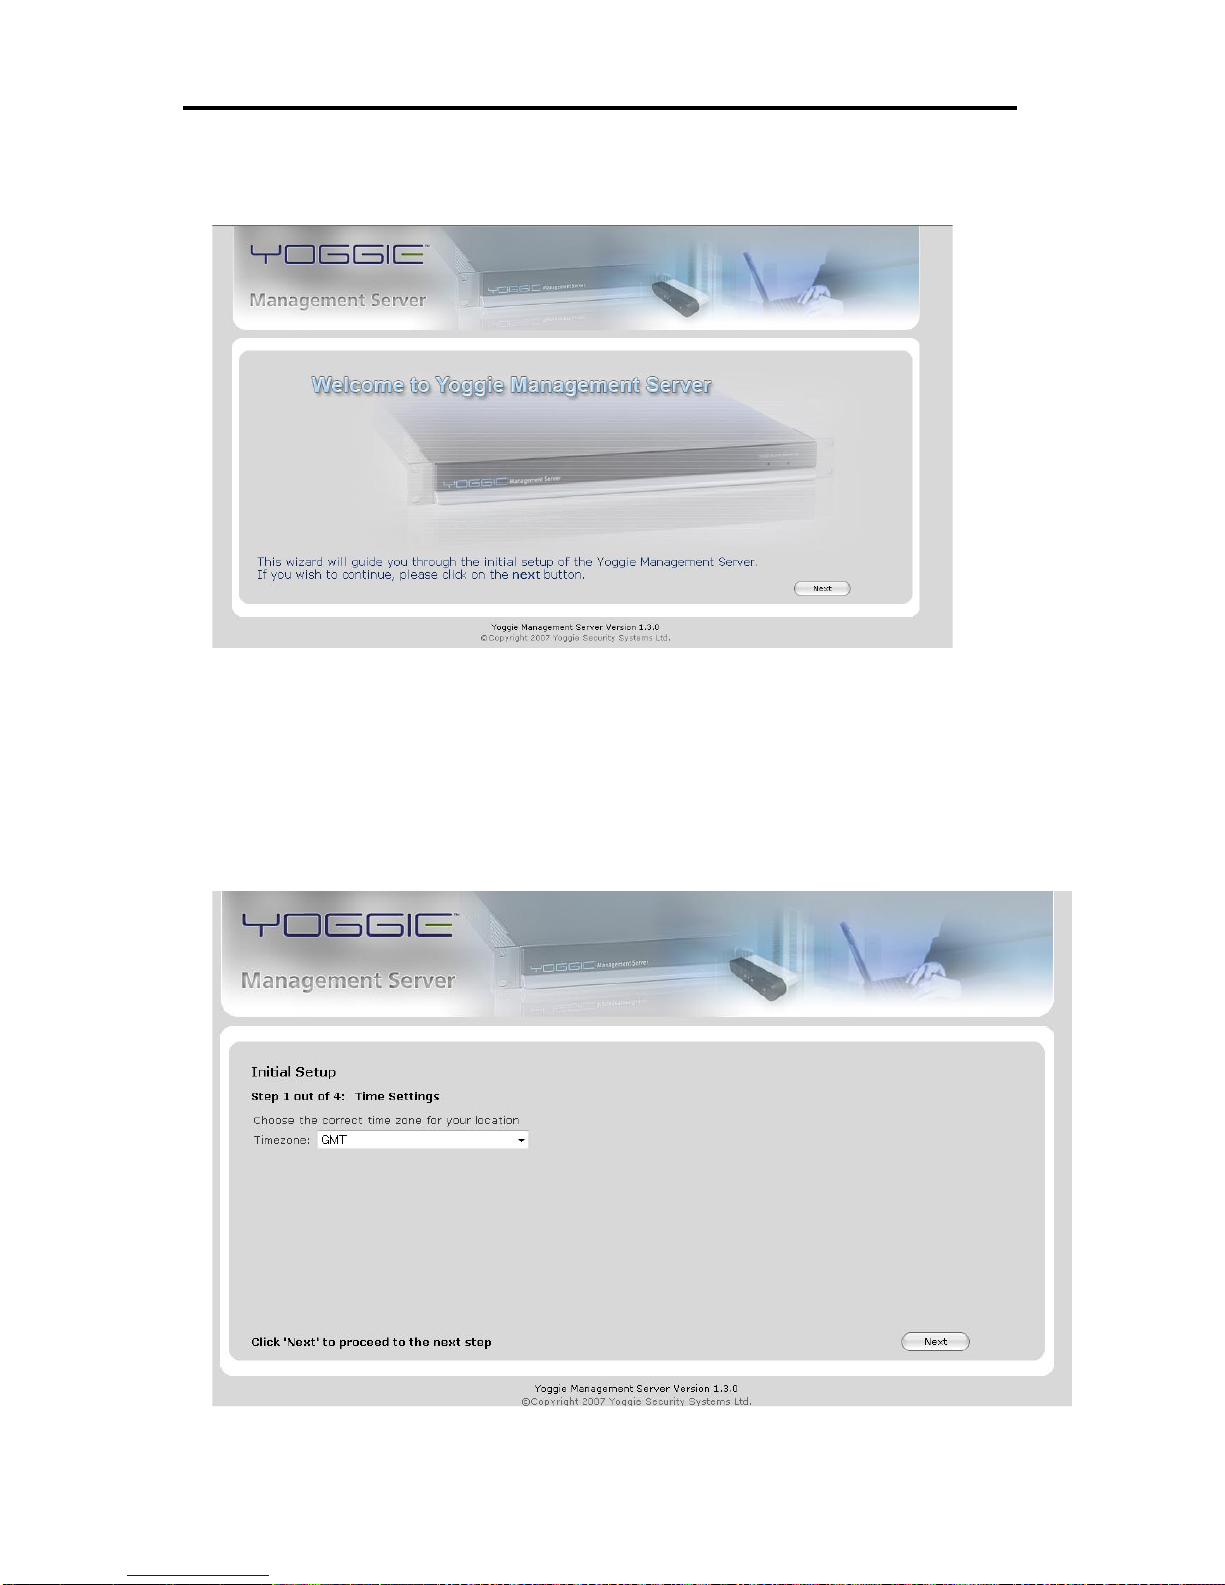
The Welcome page appears.
Figure 4 – Welcome page
3. Click Next to enter the Initial Setup and Registration Wizard.
Initial Setup and Registration
The first time the Super Admin user logs in, the Initial Setup wizard begins and the
Time Settings page appears.
Figure 5 – Time Settings page
Page 18
Getting Started
Initial Setup and Registration
User Guide | 17
To set up and register the Yoggi Management Server:
1. In Timezone, select your time zone.
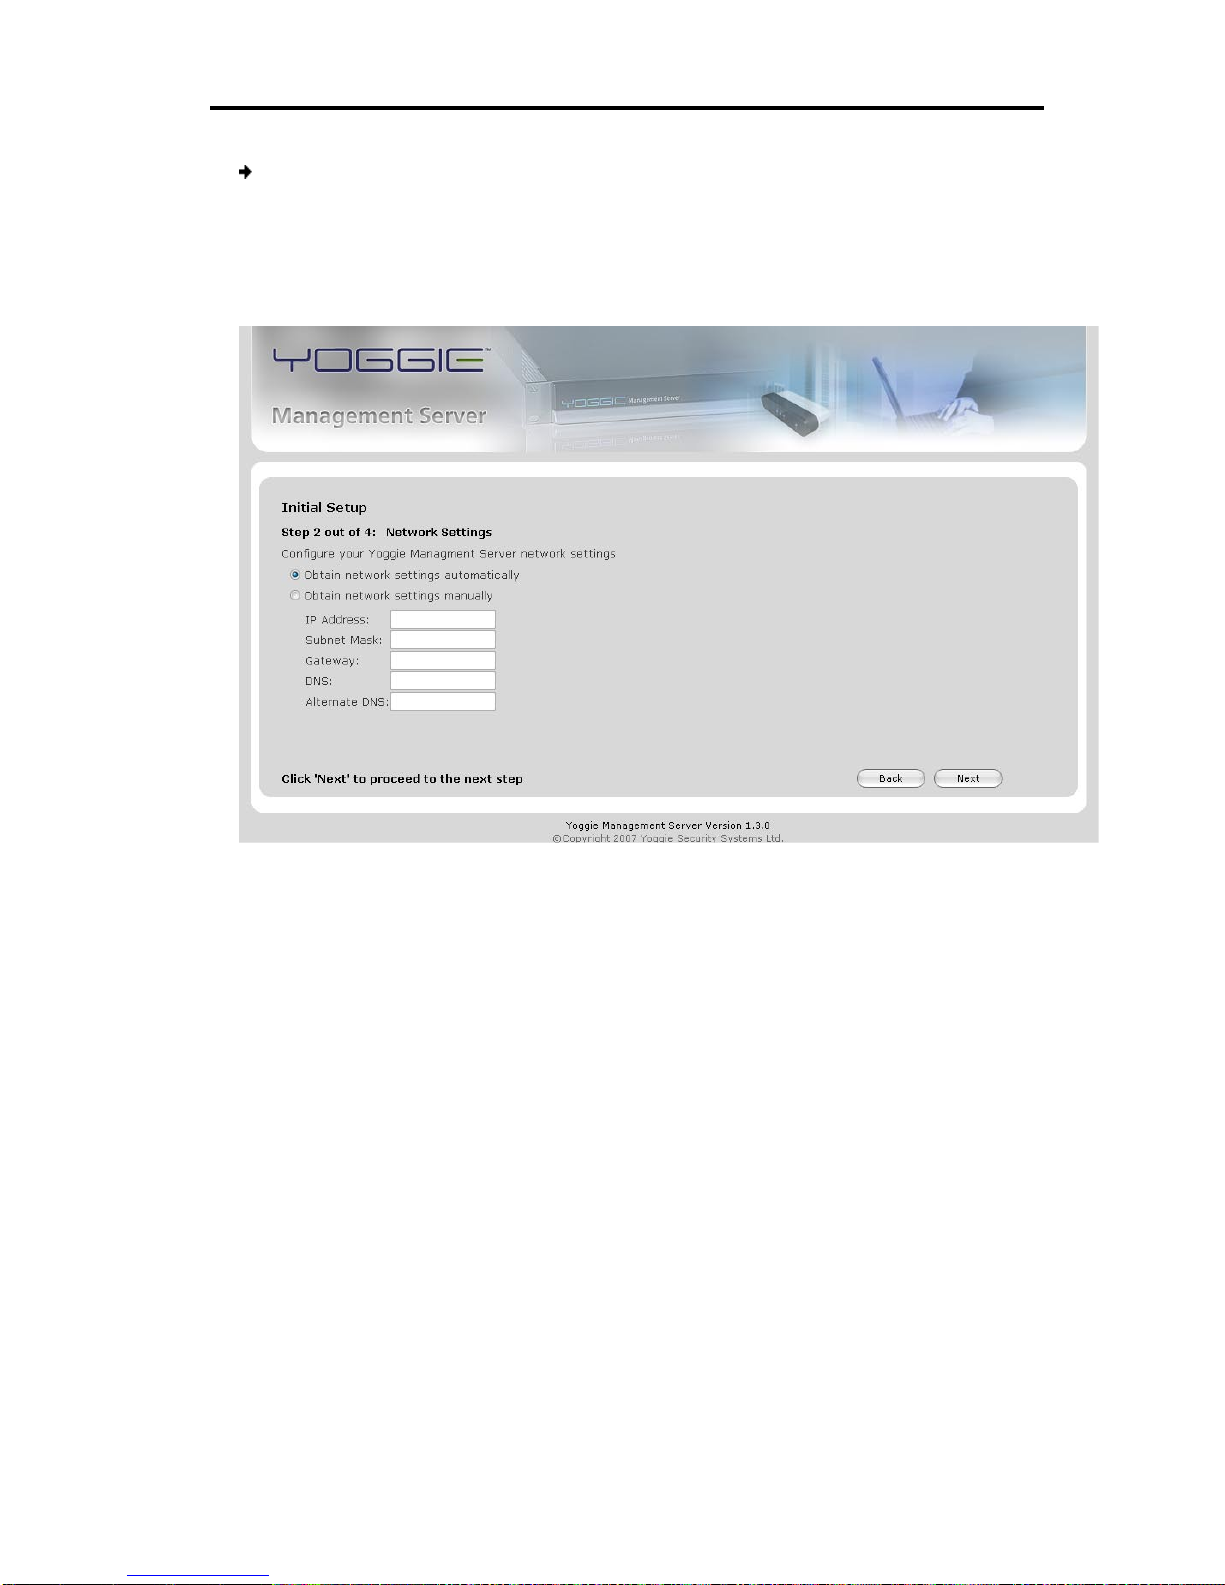
2. Click Next.
The Initial Setup Network Settings page appears.
Figure 6 – Network Settings page
3. Select one of the following options:
Obtain network settings automatically – all the settings are acquired
automatically from the network DHCP server. Proceed to the next step.
Obtain network settings manually – all the settings are acquired manually
(that is, by the user typing values for the settings).
Type values for the following settings:
IP Address: The IP address you would like to assign to the YMS.
Subnet Mask: The subnet mask of the network to which the YMS is
connected.
Gateway: The network gateway address.
DNS: The network DNS server address.
Alternate DNS: The network secondary DNS server address (optional).
Page 19

Getting Started
Initial Setup and Registration
18 | Yoggie Management Server™
4. Click Next.
The initial setup External IP Address page appears.
Figure 7 – External IP Address page
5. The External IP is the IP address used for communications between the YMS and
the Gatekeeper devices. This must be the actual IP address used by devices to
connect to the YMS from outside the organization. The Gatekeepers will initiate
periodic connections to this IP address using ports 5222 and 443.
In External IP, type an external IP address.
Page 20

Getting Started
Initial Setup and Registration
User Guide | 19
6. Click Next.
The Set Administrator Password page appears.
Figure 8 – Set Administrator Password page
7. In Password, type an administrator password (case-sensitive).
8. In Verify Password, retype the password for confirmation.
This password will be used by the Gatekeepers to log in to the Yoggie
Management Server.
It is strongly recommended to change the default admin password. To
change the password, in the left menu click Users, and navigate to
Password.
9. Click Finish to complete registration.
The Yoggie Management Server™ is now configured and operational.
To enforce corporate policy, each Gatekeeper in the organization must be
configured to communicate with the YMS. For more information, refer to the
Gatekeeper User Guide.
Page 21

Getting Started
YMS Page Elements
20 | Yoggie Management Server™
YMS Page Elements
The main page of the Yoggie Management Server software contains the following
elements:
Status Area
Navigation Bar
Main Panel
Figure 9 – YMS Page Elements
Status
Area
Navigation
Bar
Main
Panel
Page 22

Getting Started
Disconnecting
User Guide | 21
Disconnecting
To disconnect the YMS:
1. Turn off the YMS using the power switch on the rear panel.
2. Safely unplug the device from the power source, if necessary.
Page 23

Managing the YMS Device
YMS Preferences
22 | Yoggie Management Server™
Managing the YMS Device
This chapter describes setting a number of YMS preferences and setting up users.
YMS Preferences
Configuring the Time Zone
You can modify the time zone that you selected during the installation process.
To set the time zone:
1. Navigate to Configuration > General.
The Time Zone and Corporate Password page appears.
Figure 10 – Time Zone and Corporate Password page
2. In Timezone, select a time zone.
3. Click Save.
Configuring the Corporate Password
The YMS corporate password is used to prevent unauthorized users who do not
belong to the corporate, from connecting to the YMS. The password is verified
each time a Gatekeeper device attempts to connect to the YMS.
Page 24

Managing the YMS Device
YMS Preferences
User Guide | 23
To specify the corporate password:
1. Navigate to Configuration > General.
The Time Zone and Corporate Password page appears (see Figure 10).
2. In YMS Corporate Password, type a password.
3. Click Save.
Configuring an External IP Address
The External IP Address is used to connect to the YMS from outside the
organization.
To configure an external IP address:
1. Navigate to Configuration > Network.
The automatically assigned network settings appear.
Figure 11 – Network Settings page
2. Click Edit.
You are prompted to update your networking settings.
3. Type the new settings and click Apply.
Configuring Display Preferences
YMS provides several customizable settings relating to how data is displayed.
Page 25

Managing the YMS Device
YMS Preferences
24 | Yoggie Management Server™
To configure display preferences:
1. Navigate to Configuration > Preferences.
The following page appears.
Figure 12 – Display Preferences
2. In Gatekeepers, modify the default number of entries displayed in the
Gatekeepers list.
3. In Security Logs, modify the default number of entries displayed in the Security
Logs list.
4. In System Logs, modify the default number of entries displayed in the System
Logs list.
5. In Time interval of 'Contacted', change the timeframe shown (in days) to the
value of the Contacted parameter in the status area at the top of the main
page; the Contacted parameter shows the number of Gatekeeper devices
contacted in this timeframe.
Page 26

Managing the YMS Device
Managing Users
User Guide | 25
Managing Users
YMS has three user levels:
Super Admin
: This user has unlimited privileges.
Ad m i n
: This user can view and change all configuration settings, except the
user-related settings.
View Only
: Standard user; this user can only view Gatekeeper properties,
logs, and reports.
Only the navigation-bar elements relevant to the specific user who has
logged in, are displayed.
Adding a User
To add a user:
1. Navigate to the Users page.
Figure 13 – Users page
Page 27

Managing the YMS Device
Managing Users
26 | Yoggie Management Server™
2. Click New.
The Edit User page appears.
Figure 14 – Edit User page
3. In Password, type a password for the user.
4. In Verify Password, retype the password for confirmation.
5. In Email address, type an email address for the user.
6. Click Submit.
Modifying User Properties
To change user properties:
1. Navigate to the Users page (see Figure 13).
2. Select a user, and click Edit.
The Edit User page appears (see Figure 14).
3. To change the password, select the Change password check box.
4. In Password, type a new password.
5. In Verify Password, retype the password for confirmation.
6. In Email address, change the user's email address, if required.
7. Click Submit.
Deleting a User
To delete a user:
1. Navigate to the Users page (see Figure 13).
2. Select the user you want to delete.
3. Click Delete.
Page 28

Managing Gatekeeper Devices
Viewing Security Logs
User Guide | 27
Managing Gatekeeper Devices
Gatekeeper devices can be monitored, enabled/disabled, and unregistered (that
is, removed from the database).
Viewing Security Logs
You can view all security events related to a single Gatekeeper device without the
need to filter the entire Security Log.
To view a security activity of a Gatekeeper device:
1. Navigate to Gatekeepers. A list of Gatekeeper devices is displayed.
Figure 15 – Gatekeeper Devices
2. In Field, select from the drop-down list the desired criteria, to narrow down the
list of devices.
3. In the text box, type the serial number of a specific Gatekeeper device, and
click Search.
The device appears in the list of Gatekeeper devices.
4. Under Serial Number, click the serial number of the Gatekeeper device you want
to monitor.
Page 29

Managing Gatekeeper Devices
Viewing Security Logs
28 | Yoggie Management Server™
The Gatekeeper Details page appears.
Figure 16 – Gatekeeper Device Detail
5. Click View Logs.
The Security Log for the Gatekeeper device is displayed.
Figure 17 – Security Log
Page 30

Managing Gatekeeper Devices
Disabling/Enabling a Gatekeeper Device
User Guide | 29
Disabling/Enabling a Gatekeeper Device
You can temporarily halt the activity of a Gatekeeper device by disabling it. A
disabled Gatekeeper no longer receives service from the YMS: it does not receive
Firmware updates, the security policy is not enforced on this Gatekeeper, and its
details and logs are no longer updated in the YMS. The Gatekeeper State,
displayed in the Gatekeepers Table, changes to disabled. You can re-activate the
Gatekeeper by enabling it.
To disable a Gatekeeper device:
1. Navigate to Gatekeepers. A list of gatekeeper devices is displayed (see Figure
15).
2. Under Serial Number, click the serial number of the Gatekeeper device you want
to disable.
The details page appears (see Figure 16).
3. Click Disable Device.
The Gatekeeper Status changes to 'Disabled'.
To enable a Gatekeeper device:
1. Navigate to Gatekeepers. A list of gatekeeper devices is displayed (see Figure
15).
2. Under Serial Number, click the serial number of the Gatekeeper device you want
to enable.
The details page appears (see Figure 16).
3. Click Enable Device.
The Gatekeeper Status changes to 'Enabled'.
Unregistering a Gatekeeper Device
You can temporarily remove a Gatekeeper device from the YMS system, and
delete all of its related data, by unregistering it. Note that the Gatekeeper will
automatically re-register to the YMS after a few minutes.
To unregister a Gatekeeper device:
1. Navigate to Gatekeepers. A list of gatekeeper devices is displayed (see Figure
15).
2. Under Serial Number, click the serial number of the Gatekeeper device you want
to unregister.
The details page appears (see Figure 16).
3. Click Unregister Device.
The YMS data associated with the Gatekeeper device is permanently removed.
Page 31

Managing Corporate Security
Unregistering a Gatekeeper Device
30 | Yoggie Management Server™
Managing Corporate Security
YMS manages and enforces corporate security using Groups, Security Profiles, and
Policies. A Group is a set of one or more Gatekeeper units which usually
corresponds to a group in the organization. Each Gatekeeper device belongs to a
Group; each Group is associated with a Security Profile. A Security Profile is a set of
three Policies – high, medium, and low – which are applicable to one or more
Groups. Only one of the three policies is enforced at a given time. The
relationships between Groups, Security Profiles, and Policies are illustrated in the
following diagram:
Figure 18 – YMS Security Element
The procedure necessary for setting up the YMS to enforce corporate security on
the organization’s Gatekeeper units includes the following tasks:
Creating Groups – see Managing Groups
Associating each Gatekeeper device with a Group
Defining a set of Policies – see Managing Policies
Creating Security Profiles based on the Policies – see Managing Security
Profiles
Setting a Security Profile and an active security level for each Group
Enabling protection on all Gatekeeper devices
L
P
S
e
Marketing
Gro up
S
e
e
w
S
e
e
w
R&D
Gr o up
Sales
Gr o up
Marketing
Security
Profile A
Security
Profile C
Security
Profile B
Pico1
Pico2
Pico3
High
Medium
Low
Page 32

Managing Corporate Security
Managing Groups
User Guide | 31
Managing Groups
Gatekeeper devices can be assigned to a Group, so that a set of devices can be
assigned the same Security Profile without the need to configure each device
individually. Each Gatekeeper device registered to the YMS belongs to a Group. If
a Group has not been defined, each new Gatekeeper which registers to the YMS
automatically belongs to the default Group, Yoggie Default Group.
The IT manager can manually define new Groups in the YMS. Alternatively Groups
which correspond to departments in the organization can easily be propagated
from the corporate Directory Services database.
Adding a Group
A group can be created manually or via the Directory Services.
To add a new group manually:
1. Navigate to the Groups page. The Gatekeeper Groups page is displayed.
Figure 19 – Gatekeeper Groups
Page 33

Managing Corporate Security
Managing Groups
32 | Yoggie Management Server™
2. Click New.
The Group Editor appears:
Figure 20 – Group Editor
3. In Name, modify the name of the group.
4. In Description, modify the description of the group.
5. In Security Profile, select a Security Profile for the group.
6. Under Security Level, use the slider to select a security level, as defined for the
chosen Security Profile, for the Group. The available security levels are:
High
Medium
Low
7. To locate Gatekeeper devices more easily, you can filter the list of Gatekeeper
devices.
To filter the list by:
Serial Number – Select the Serial Number checkbox; in Filter By, type the
device serial number.
Name – Select the Name checkbox; in Filter By type the device name.
Group – Select the Group checkbox; in Filter By type the Group name.
8. Use the arrow buttons to add/remove member devices to/from the group;
click Remove All if you want to remove all member devices from the group.
Page 34

Managing Corporate Security
Managing Groups
User Guide | 33
9. Click Save.
The new settings are immediately applied to all members of the group.
Using Directory Services
To add a new group using Directory Services:
1. Navigate to the Groups page. The Gateway Groups page is displayed (see
Figure 19).
2. Click Directory Services.
The Directory Services page appears:
Figure 21 – Directory Services
3. Specify all the details required to locate the groups you want to use:
In Directory Service version, select 'Active Directory (2003)', as it is
currently the only supported version.
In Distinguished Name, type a query using the following format:
CN=username,CN=Users,DC=test,DC=yoggie objectClass=*
In IP Address, type the IP address of the ldap server.
In Port, type the number of the port used for communication with the ldap
server.
In Password, type the password for the username specified in Distinguished
Name.
In Filter by attribute, type the name of an attribute to filter by, to narrow
down the result set.
Page 35

Managing Corporate Security
Managing Groups
34 | Yoggie Management Server™
4. To test connectivity with the ldap server, click Test Connection.
The test results are displayed (Success or Failure). If the connection fails,
verify the connection parameters including username and password.
5. Click Import.
Search results are listed in the Imported Info area.
6. In the New Groups Names area, place the new groups you want to add to the
YMS.
To use an entry from the Imported Info list, select an element and click the
arrow button.
The group is moved to the New Groups Names area.
To remove an entry from the New Groups Names list, select the element
and click the button.
7. Click Save to add the set of groups listed in New Groups Names, as new groups
in the YMS.
The new groups which you have just added appear in the Groups page. You
can navigate to this page to add members to the groups and configure
security. Each group initially has no members and is assigned the Yoggie
default Security Profile.
Modifying Group Properties
To change group properties:
1. Navigate to the Groups page. The Gateway Groups page is displayed (see
Figure 19).
2. Under Name, click the name of a group.
The Group Editor page appears (see Figure 20).
3. In Name, modify the name of the group, if necessary.
4. In Description, modify the description of the group, if necessary.
5. In Security Profile, select a different security profile for the group, if necessary.
6. Under Security Level, use the slider to select a different security level.
7. Use the arrow buttons to add or remove member devices to/from the
group.
8. Click Save.
The new settings are immediately applied to all members of the group.
Deleting a Group
To delete a group:
1. Navigate to the Groups page. The Gateway Groups page is displayed (see
Figure 19).
Page 36

Managing Corporate Security
Managing Groups
User Guide | 35
2. Click the X button to the left of the group to be deleted.
The confirmation prompt appears.
Once a Group is deleted, all its members automatically join the Yoggie Default
Group.
Page 37

Managing Corporate Security
Managing Security Profiles
36 | Yoggie Management Server™
Managing Security Profiles
YMS manages per-Group Security Profiles. A Security Profile is a set of three
Policies – high, medium and, low – and is applicable to one or more groups. Only
one of the three policies is enforced at any given time. If a Security Profile was not
defined for a group, the Yoggie Default Security Profile is applied to the Group.
Adding a Security Profile
To add a new security profile:
1. Navigate to the Security Profiles page.
Figure 22 - Security Profiles
Page 38

Managing Corporate Security
Managing Security Profiles
User Guide | 37
2. Click New.
A new Profile is created with the default Low/Medium/High policies.
Figure 23 – Security Profile Details
3. In Name, type a name for the profile.
4. In Description, type a description for the profile.
5. For each of the three levels (High Policy, Med Policy, and Low Policy), to change
a level:
Click Select
Choose a Policy
Click Apply.
6. In the Security Profile Details page, click Save.
Modifying Profile Properties
To change a Security Profile:
1. Navigate to the Security Profiles page, and click the name of the profile you
want to change.
2. Modify the profile’s properties; click Reset to reset to last saved.
3. In the Security Profile Details page, click Save.
Page 39

Managing Corporate Security
Managing Policies
38 | Yoggie Management Server™
Deleting a Security Profile
To delete a Security Profile:
1. Navigate to the Security Profiles page.
2. Click the X button to the left of the security profile to be deleted.
The confirmation prompt appears.
Managing Policies
Adding a Policy
To add a new policy:
1. Navigate to the Security Profiles page, and click Policy Editor.
The Policy Editor page appears, listing all existing Policies.
Figure 24 – Policy Editor
2. Do one of the following:
To create a policy using an existing policy as a starting point, select the
“base” policy and click Duplicate.
To create a policy using the YMS default settings as a starting point, click
New.
3. Follow detailed instructions in the Configuring Policy Parameters
chapter.
Modifying Policy Properties
See Configuring Policy Parameters
.
Page 40

Managing Corporate Security
Disabling Protection
User Guide | 39
Deleting a Policy
To delete a policy:
1. Navigate to the Security Profiles > Policy Editor page, and select the policy to
delete.
2. Click Delete.
The confirmation prompt appears.
Disabling Protection
In case of an emergency – for example, if a Gatekeeper unit is lost or damaged –
the network can be accessed by disabling the Gatekeeper enforcement configured
for the laptop. The Gatekeeper user provides the IT manager a unique
identification number, and displays it on the laptop. The YMS Password Generator
uses the identification number to generate a password. The password has a
limited usage time and a limited validity period. The password is delivered to the
end user by any means acceptable to the IT manager. The user enters the
password to disable the enforcement until the Gatekeeper protection can be
restored.
To disable protection for a specific Gatekeeper device:
1. Navigate to Configuration > Password Generator.
Figure 25 – Password Generator
2. In Unique ID, type the ID given to you by the Gatekeeper user.
3. In From and To, select the range of dates during which the password can be
used.
Page 41

Managing Corporate Security
Disabling Protection
40 | Yoggie Management Server™
4. In Effective time, type the number of hours of connection time allowed.
5. Click Generate.
A new password is displayed.
6. Notify the Gatekeeper user of the new password in any way acceptable to your
organization (for example, phone or fax).
Page 42

Configuring Policy Parameters
Disabling Protection
User Guide | 41
Configuring Policy Parameters
A Security Policy is a set of all security service configurations provided by the
Gatekeeper device. The default policies are: Yoggie Default High, Yoggie Default
Medium, and Yoggie Default Low. The three policies - high, medium, and low,
represent three levels of security:
High Policy—the most secure policy; provides the highest security.
Medium Policy—the recommended policy.
Low Policy—least secure policy.
Low Policy and Medium Policy maintain system functionality. Choosing the
High Policy may reduce overall functionality.
The level of security may automatically change from a lower level to a higher level
and vice versa, depending on the level of threats approaching the Gatekeeper
device. This feature is called Adaptive Security Policy.
A Security Policy includes the configuration of constraints for the following security
issues, each represented by a tab in the Policy Editor page:
Firewall
IDS/IPS
VPN
An t i -Virus
An t i -Spam
Web Filtering
To configure policy parameters:
1. Navigate to the Policy Editor, and select the desired tab (listed above).
2. Configure the policy, using the procedures and information in the sections
below.
3. In any of the tabs, click Save to save the current policy, or Save As to name a
new policy.
Page 43

Configuring Policy Parameters
Configuring Firewall Settings
42 | Yoggie Management Server™
Configuring Firewall Settings
Firewall configuration includes:
Rules
Blacklist
Whitelist
Port Forwarding
The following precedence convention is applied:
Manually-defined rules override (that is, take precedence over) the
blacklist/whitelist checkmark specifications.
When there are two or more rules, a rule positioned higher in the list takes
precedence over rules positioned lower in the list.
If the whitelist and the blacklist are both selected, the whitelist overrides any
specifications in the blacklist.
Rules
To add a rule:
1. Navigate to the Policy Editor page, and select the Firewall tab.
2. Click the Rules link. The following page is displayed.
Figure 26 – Firewall Policy: Rules
Page 44

Configuring Policy Parameters
Configuring Firewall Settings
User Guide | 43
3. Click the button.
The Rule Editor appears.
Figure 27 – Firewall Policy: Rule Editor
4. Define the rule using the parameters described in the following table:
Parameter
Description
Values
Direction
Direction of traffic being monitored
Inbound
Outbound
Remote IP Address
Source of inbound, or destination of
outbound traffic
Any
IP add ress format
Port Range
Start and end numbers of a series of ports
<fr om>-<to>
Type
Protocol of the rule applies to: TCP, UDP, or
both
TCP
UDP
TCP/UDP
Action
Action to apply
Block
Unblock
Comment
Textual note
String
5. Click A d d .
The rule is added to the Firewall Policy.
6. To change the order of the rules, use the buttons. Rules higher in the list
take precedence over lower ones.
Page 45

Configuring Policy Parameters
Configuring Firewall Settings
44 | Yoggie Management Server™
To delete a rule:
1. On the Policy Editor > Firewall > Rules page, select the rule you want to delete.
2. Click the button.
Blacklist and Whitelist
You can specify a blacklist of ports to be blocked, and a whitelist of ports to be
allowed. Note that any customized Rules override the specifications in the blacklist
or whitelist.
To use the blacklist/whitelist:
1. Navigate to the Policy Editor page, and open the Firewall tab.
2. Click the Blacklist/Whitelist link.
The Outbound Port Blacklist/Whitelist page is displayed.
Figure 28 – Firewall Policy: Blacklist
Page 46

Configuring Policy Parameters
Configuring Firewall Settings
User Guide | 45
Figure 29 – Firewall Policy: Whitelist
3. Select Activate Port Blacklist/Whitelist checkbox.
4. Select the checkboxes of all the ports to be included in the blacklist/whitelist.
The buttons at the top of each page provide shortcuts for making checkbox
selections:
: Select All
: Clear All
: Toggle
5. Click Save to save the current policy, or Save As to name a new policy.
Enabling Port Forwarding
This feature is only relevant in units which can be connected to the PC via
pass-through setup.
To enable/disable Port Forwarding:
1. Navigate to the Policy Editor page, and open the Firewall tab.
Page 47

Configuring Policy Parameters
Configuring Firewall Settings
46 | Yoggie Management Server™
2. Click the Port Forwarding link.
The following page is displayed.
Figure 30 – Firewall Policy: Port Forwarding
3. Select the Allow Yoggie Gatekeeper users to define Port Forwarding checkbox, to
enable Port Forwarding, or clear the checkbox to disable Port Forwarding.
4. Click Save to save the current policy, or Save As to name a new policy.
Page 48

Configuring Policy Parameters
Configuring IDS/IPS Settings
User Guide | 47
Configuring IDS/IPS Settings
YMS IDS/IPS settings specify the security policies to be applied on each threat
type activity.
To configure IDS/IPS settings:
1. Navigate to the Policy Editor > IDS/IPS tab. The following page is displayed.
Figure 31 – IDS/IPS Policy
2. Select the Activate IDS/IPS checkbox to activate the IDS/IPS, or clear the
checkbox to disable the IDS/IPS.
3. If you activated the IDS/IPS, specify for each category whether the traffic is
allowed, logged, or blocked.
4. Click Save to save the current policy, or Save As to name a new policy.
Configuring VPN Settings
The Gatekeeper has a Generic VPN client which allows the Gatekeeper to integrate
with VPN servers from various vendors. The YMS enables the administrator to
configure selected VPN client settings to be enforced on the organization’s
Gatekeeper units.
To configure VPN settings:
1. Navigate to the Policy Editor > VPN tab.
2. Select 'Generic' or 'Cisco' as the VPN type.
3. Specify the parameters according to the appropriate table below.
4. Click Save to save the current policy, or Save As to name a new policy.
Page 49

Configuring Policy Parameters
Configuring VPN Settings
48 | Yoggie Management Server™
Generic VPN
Figure 32 – VPN Policy: Generic
Generic VPN Parameters
Parameter
Description
Values
Connection Type
Type of VPN connection
IPSec Tunnel…
VPN Gateway Address
Address of the VPN Gateway
IP address format
Remote Network Address
Address of the machine from which the
connection is made
IP address format
Remote Network Mask
(optional)
Mask defining a set of network addresses
Network Mask
format
Cisco VPN
Page 50

Configuring Policy Parameters
Configuring Anti-Virus Settings
User Guide | 49
Figure 33 – VPN Policy: Cisco
Cisco VPN Parameters
Parameter
Description
Values
VPN Gateway Address
Address of the VPN Gateway
IP address format
N A T -T
Whether to allow IPsec packets
to go through NAT
Selected: Allow
Cleared: Do not allow
Configuring Anti-Virus Settings
YMS Anti-Virus settings define the Gatekeeper unit scan capabilities regarding
various threats, including viruses, Trojans, spyware, rootkits, and other malicious
programs. Scanning can be performed on various Internet protocols and file sizes.
To configure Anti-Virus settings:
1. Navigate to the Policy Editor > Antivirus tab.
2. Select the first checkbox, to block downloads over 10 MB.
3. Select one or more of the four Protocols to scan checkboxes, to specify which
traffic is to be scanned for viruses.
4. Click Save to save the current policy, or Save As to name a new policy.
Figure 34 – Anti-Virus Policy
Page 51

Configuring Policy Parameters
Configuring Anti-Spam Settings
50 | Yoggie Management Server™
Configuring Anti-Spam Settings
The Gatekeeper device can identify emails that are likely to contain Spam. You
can activate this feature and can optionally include the suspicion in the message’s
subject line.
To configure Anti-Spam settings:
1. Navigate to the Policy Editor > An t i -Spam tab. The following page is displayed.
Figure 35 - Anti-Spam Policy
2. Select the Activate Anti-spam checkbox to activate anti-spam checks.
3. If Anti-spam is activated, select/clear the Tag subject lines of suspicious spam
emails checkbox, to include/exclude a “spam-warning” tag in the subject line of
each suspicious email message.
4. Click Save to save the current policy, or Save As to name a new policy.
Page 52

Configuring Policy Parameters
Configuring Web Filtering Settings
User Guide | 51
Configuring Web Filtering Settings
The Gatekeeper devices can filter Web content. Over fifty Web filtering categories
are available.
To configure Web filtering settings:
1. Navigate to the Policy Editor > Web Filtering tab. The following page appears.
Figure 36 – Web-Filtering Policy
2. Select the Activate Web Filtering checkbox to turn on this feature.
3. Select the checkboxes to the left of one or more categories to specify what type
of content to block.
4. Click Save to save the current policy, or Save As to name a new policy.
Page 53

Logging and Reporting
Viewing the System Log
52 | Yoggie Management Server™
Logging and Reporting
YMS activity history is recorded in the System Log and Security Log for
subsequent reference.
A large number of textual and graphical reports based on queries of the stored
data can be prepared.
Viewing the System Log
To view System Log entries:
1. Navigate to System Logs. The System Logs page is displayed.
Figure 37 – System Logs
Page 54

Logging and Reporting
Viewing the Security Log
User Guide | 53
2. Click a security event to see its details.
The log event details appear in the System Log Event page.
Figure 38 - System Log: Individual Entry
Viewing the Security Log
The basic Security Log contains event data regarding all Gatekeeper devices. You
can also view the log for a specific device by clicking the View Logs button at the
bottom of the Gatekeeper Details page (see Figure 16)Error! Reference source not
found..
To view Security Log entries:
1. Navigate to Security Logs.
Figure 39 – Security Log
Page 55

Logging and Reporting
Viewing the Security Log
54 | Yoggie Management Server™
2. Click a security event to see its details.
The log event details appear in the Log Event page.
Figure 40 – Security Log: Individual Entry
Page 56

Logging and Reporting
Creating Reports
User Guide | 55
Creating Reports
Reports present information about the various types of security events in the form
of graphical charts. These charts reflect information gathered during the last 24
hours of operation.
To design and view a report:
1. Navigate to Reports. The Reports list is displayed.
Figure 41 – YMS Reports
Page 57

Logging and Reporting
Creating Reports
56 | Yoggie Management Server™
2. Under Name, click the desired report.
A form appears with criteria for the contents (scope) of the report.
Figure 42 - Report Query Form: Security Summary
3. In the Dates area, in From and To, select the beginning and end dates of the
time period covered by the report.
4. In the Yoggie Gatekeepers area:
Select Al l to include all gatekeepers.
Select Choose from list to choose specific gatekeepers.
Select By Name, and in Filter, type the specific gatekeeper name, to filter
the list of gatekeepers according to name.
Select By Serial Number, and in Filter, type the specific gatekeeper serial
number, to filter the list of gatekeepers according to serial number.
5. In the Format area:
In Type, select the type of report: Text, Bar chart, Pie chart, or Combined
(text+chart).
In File type, select the type of file to save: HTML or PDF.
6. Click Submit.
HTML reports are compiled and displayed (see examples below). PDF reports
can also be saved to local disk on the host PC.
Page 58

Logging and Reporting
Report Examples
User Guide | 57
Report Examples
Figure 43 – Security Summary Report (Text and Chart)
Page 59

Logging and Reporting
Report Examples
58 | Yoggie Management Server™
Figure 44 – Security Summary Report (Bar Chart)
Page 60

Logging and Reporting
Report Examples
User Guide | 59
Figure 45 – Web-Filtering Category Summary Report (Pie Chart)
Figure 46 – Registration Report (Text)
 Loading...