


OPERATION MANUAL

234


Contents
Dangers, Warnings & Cautions................................................................................................................................6
Yoder Components....................................................................................................................................................9
Smoker Arrival & Assembly.....................................................................................................................................10
Quick Start Guide.....................................................................................................................................................12
Yfi App Connection...................................................................................................................................................16
Smoker Placement & Leveling...............................................................................................................................30
Operating the Smoker..............................................................................................................................................31
Initial Burn O.............................................................................................................................................................31
Lighting Your Smoker...............................................................................................................................................31
Pre-Heating.................................................................................................................................................................31
Lid Position..................................................................................................................................................................31
Pellet Usage................................................................................................................................................................31
Door Open Function................................................................................................................................................31
Prime Button...............................................................................................................................................................31
Pre-Grill Checklist/Routine Maintenance...........................................................................................................32
Startup Procedure....................................................................................................................................................35
Shutting Down the Smoker.....................................................................................................................................37
Manual Startup..........................................................................................................................................................38
Getting the Most From Your Yoder: Direct & Indirect Grilling, Smoking & Baking...................................40
Variable Displacement Damper............................................................................................................................42

Contents
Grill Maintenance......................................................................................................................................................44
Preparing the Grill For Season..............................................................................................................................44
Painted Surfaces.......................................................................................................................................................44
Cooking Grates.........................................................................................................................................................44
Heat Diuser/Drip Plate..........................................................................................................................................44
Cooking Chamber.....................................................................................................................................................44
Firebox and Burn Grate Assembly Maintenance...............................................................................................45
Stainless Steel Burn Grate.....................................................................................................................................45
Burn Grate Inspection..............................................................................................................................................45
Igniter........................................................................................................................................................................... 47
Fan Cooled Hopper Assembly..............................................................................................................................48
Grease Management Area and Bucket...............................................................................................................48
Additional Maintenance..........................................................................................................................................48
Fuse Replacement....................................................................................................................................................49
Storing Your Grill........................................................................................................................................................49
Smoker Exploded Views.........................................................................................................................................51
Recipes........................................................................................................................................................................62
Notes............................................................................................................................................................................68
Warranty Information...............................................................................................................................back cover
YODERSMOKERS.COM
5

DANGERS, WARNINGS AND CAUTIONS
• Failure to follow the “Dangers, Warnings and Cautions” may result in serious bodily injury, death, or fire.
• Read this manual completely before using your Yoder for the first time.
• Keep the grill a minimum of 18 inches away from combustible surfaces.
• The cooking chamber door must remain closed during the cool-down cycle. Failure to do so
can cause burn back in the hopper.
• Do not modify the holes in the burn grate.
• Do not add pellets by hand to the burn grate when the grill is in use.
• Do not use your grill in the rain or around any source of water.
• Do not leave your grill unattended during operation.
• Close supervision is necessary when any appliance is used by or near children.
• Do not transport your grill while operating or when the grill is hot. Make sure the fire is out and
the grill is cool before moving.
• Extreme caution must be used when moving an appliance containing hot oil or other hot liquids.
• Exterior surfaces on the grill will be hot when in use and during cool down.
• Unplug from outlet when not in use and before cleaning.
• Allow to cool before putting on or taking o parts, or before performing any routine service
or maintenance.
• Should a grease fire occur, turn the controller to the “o” position and unplug the unit to stop the fans.
Keep the lid closed until the fire is out.
• If the Yoder fails to initially light after pressing the START button, or goes out during operation (due to
a power surge or power failure), do not restart the Yoder without removing the cooking grates and
heat diuser/drip plate to check for a pellet overflow that may have occurred.
• Do not store the grill cover or other flammable items under or near the grill.
• After a period of non-use, the hopper, auger and firepot must be inspected for obstruction.
• Do not touch hot surfaces. Use handles or knobs, and wear heat resistant gloves when
operating the grill.
6

• If your grill is stored outside, care should be taken to assure that water does not enter the pellet hopper.
(The use of a grill cover is highly recommended).
• When you are finished cooking, turn the power switch to the “o” position. The fan will continue to run
for 18 minutes or until the temperature inside the cooking chamber falls below 125° F, whichever occurs
first. During this period the cooking chamber door must remain closed. Failure to do so can cause burn
back in the hopper.
• Longer detachable power-supply cord or extension cords are available and may be used if care is
exercised in their use. If a longer detachable power-supply cord or extension cord is used:
a) The marked electrical rating of the cord set or extension cord should be at least as great as
the electrical rating of the appliance (2 amps).
b) The cord should be arranged so that it will not drape over the countertop or table where it
can be pulled on by children, tripped over unintentionally, or contact hot surfaces.
• Caution: Risk of Electric Shock. Keep extension cord connection dry and o the ground.
Do not immerse cord or plugs in water or other liquid.
• Caution: To ensure continued protection against risk of electric shock, connect to properly grounded
outlets only.
• Outdoor extension cords should be used with outdoor use products and are surface marked with
the sux letter “W” and with a tag stating “Suitable for use with outdoor appliances.”
• Do not operate any appliance with a damaged cord or plug, or after the appliance malfunctions or has
been damaged in any manner. Return appliance to the nearest authorized service facility for
examination, repair, or adjustment.
• Always attach plug to appliance first, then plug cord into the wall outlet. To disconnect, turn any control
to “o”, then remove plug from wall outlet.
• The use of accessory attachments not recommended by the appliance manufacturer may cause injuries.
• Store product indoors when not in use if possible – out of the reach of children.
• Do not clean this product with a water spray or the like.
• Do not place on or near a hot gas or electric burner, or in a heated oven.
• For household use only.
• Do not use appliance for other than intended use.
• Check www.YoderSmokers.com occasionally for updates and new product information.
7

8

CONTROLS
COOKING GRATES
HEAT DIFFUSER
HOPPER
BURN GRATE
IGNITER
FIRE POT
VARIABLE
DISPLACEMENT
DAMPER
9

SMOKER ASSEMBLY
Smoker Arrival
Your Yoder Smoker will arrive boxed and ready to assemble. Please follow the assembly instructions. If
you purchased the competition cart, then it arrived on a pallet wrapped, and held on with bands. Cut the
bands and remove the plastic wrap and foam from the smoker. Remove the smoker from the pallet. It is
recommended that two people remove the Yoder from the pallet due to its size and weight. Open the
hopper lid and remove the grease bucket that contains the power cord and a spare fuse and set aside.
Open the cooking chamber and remove all of the wrapped components. There will be a front shelf,
a side shelf, four cooking grates, a heat diuser plate, burn grate, and smoke stack.
NOTE: If pellets were ordered, they will be in the cooking chamber as well.
Assembly of your new Yoder starts by installing the burn grate inside the firebox (FIG 1). Install the heat
diuser plate and smoke stack next (FIG 2). The smoke stack installs flush to the inside of the cooking
chamber with the long leg pointed straight up. Tighten the thumb screw securely.
BURN GRATE
FIRE BOX
FIG 1
FIG 2
10

Place the cooking grates inside the cooking chamber. (FIG 3)
Attach the front and side shelves to the Yoder. (FIG 4)
FIG 3
FIG 4
Use the side shelf to assist in moving the Yoder into positon. It is recommended that two people move the
Yoder due to its size and weight. Once in position, follow the setup instructions (Page 30) to prepare your
new cooker for use.
11

QUICK START GUIDE
SECTION 1.A
POWER
BUTTON
CONTROLLER LAYOUT
SELECTION
BUTTONS
LCD DISPLAY
SCREEN
ROTARY
SELECTOR
INDICATOR
LIGHT
TEMPERATURE
PROBE JACKS
POWER BUTTON – Powers the grill on and o. Once the grill is turned on, and a fire has started,
pressing the power button to turn the unit o will initiate shut down mode. This mode allows the
fans to continue running to ensure a safe, full burn of any pellets left in the firepot. The unit will turn
o once the grill reaches 125°F or runs for 18 minutes, whichever occurs first.
SELECTION BUTTONS – These buttons are used to make selections throughout the menu.
LCD DISPLAY SCREEN – Displays all content.
ROTARY SELECTOR – Allows you to navigate the menu by rotating the knob and also allows you
to make selections or switch between options by pressing in on the knob.
INDICATOR LIGHT – Lit when power to the unit is on, and when the grill is in shut down mode.
TEMPERATURE PROBE JACKS – Plug in your temperature probes to be able to view food
temperature on the display screen.
SECTION 1.B
start-up menu
STA RT – Press to initiate cooking functions
MENU – Press to access programs and settings
PRIME – Press to manually operate the auger
12
start
menu
prime

175
175
SECTION 1.C
home screen
OPERATING MODE
INDICATOR
GRILL
TEMPERATURE
GRILL TEMPERATURE – Displays the current temperature of the grill at the center of the main
cooking surface. Upon startup, the display will flash “HEAT UP” until the internal temperature
of the unit reaches 125°F. At that point, the controller will display the temperature of the main
cooking surface.
OPERATING MODE INDICATOR – Indicates the current mode the grill is operating in.
Heat-Up Mode – An upward pointing, blinking arrow indicates
the grill is increasing the temperature.
Maintenance Mode – A diamond indicates the grill is in maintenance mode
and is operating to maintain the set temperature.
SET TEMPERATURE
350°F
350°F
50
°F
°F
52
PROBE/CHANNEL 1
TEMPERATURE
PROBE/CHANNEL 2
TEMPERATURE
Cool Down Mode – A downward pointing, blinking arrow indicates
the grill is decreasing the temperature.
SET TEMPERATURE – Displays the selected set temperature. To adjust the set point, turn the
dial on the rotary selector knob clockwise to increase or counter-clockwise to decrease. The
rotary selector adjusts in 5° increments. You can press in on the rotary selector to switch to 25°
increments.
PROBE / CHANNEL 1 TEMPERATURE – Displays the temperature reading from Probe 1 when
a food probe is inserted into the appropriate jack. If no probe is connected, the screen will not
display temperature in this area.
PROBE / CHANNEL 2 TEMPERATURE – Displays the temperature reading from Probe 2 when
a food probe is inserted into the appropriate jack. If no probe is connected, the screen will not
display temperature in this area.
13

SECTION 1.D
This menu allows access to options that are available during a cook. To access the menu, press any
of the three selection buttons while at the home view screen. The menu will appear and allow for a
selection to be made for three seconds before returning to the home view. The currently selected
view will appear at the top of the screen.
VIEW – Press to toggle between view options.
See Section 1.E for additional view options.
MENU – Press to access programs and settings.
PRIME – Press to manually operate the auger.
in-cook selection menu
SECTION 1.E
As shown in Section 1.C, the “Pit & Probes” view is the default display option. There are five total
display options; they can be chosen by pressing the view selection button on the control panel.
ALTERNATE DISPLAYS
PIT & probes
PROBE 1
PIT
PROBE 2
PROGRAM
14

SECTION 1.F
main menu
The main menu is accessible in either the start-up menu or in the in-cook selection menu. This
menu allows the user to access their dierent programs, settings, and general information about
their grill. Navigate the available selections in the main menu by using the rotary selector knob.
You can turn the knob clockwise or counter-clockwise to change your selection and press inward
on the knob to make a selection.
TIME COOK PROGRAM – The time cook function is used to run the grill for a set amount of time at
a specified temperature.
TEMP COOK PROGRAM – The temp cook program is used to run the grill at a specified
temperature until either Probe 1 or Probe 2 (user specified) hits the desired temperature.
CUSTOM PROGRAMS – The custom program feature allows the user to create and save a program
with as many as nine steps for the cook to follow. This function is beneficial when there is a specific
method you follow when cooking a certain type of meat or a particular recipe.
WIFI – Displays the current WiFi connection settings.
SETTINGS – Allows access to additional settings, such as temperature selection between Fahrenheit
& Celsius or calibration of the thermocouple while the grill is running. There is a test function that
can be initiated before starting the grill. The test function allows each mechanical component of the
hopper assembly to be tested.
ABOUT – Displays the current controller program information.
15
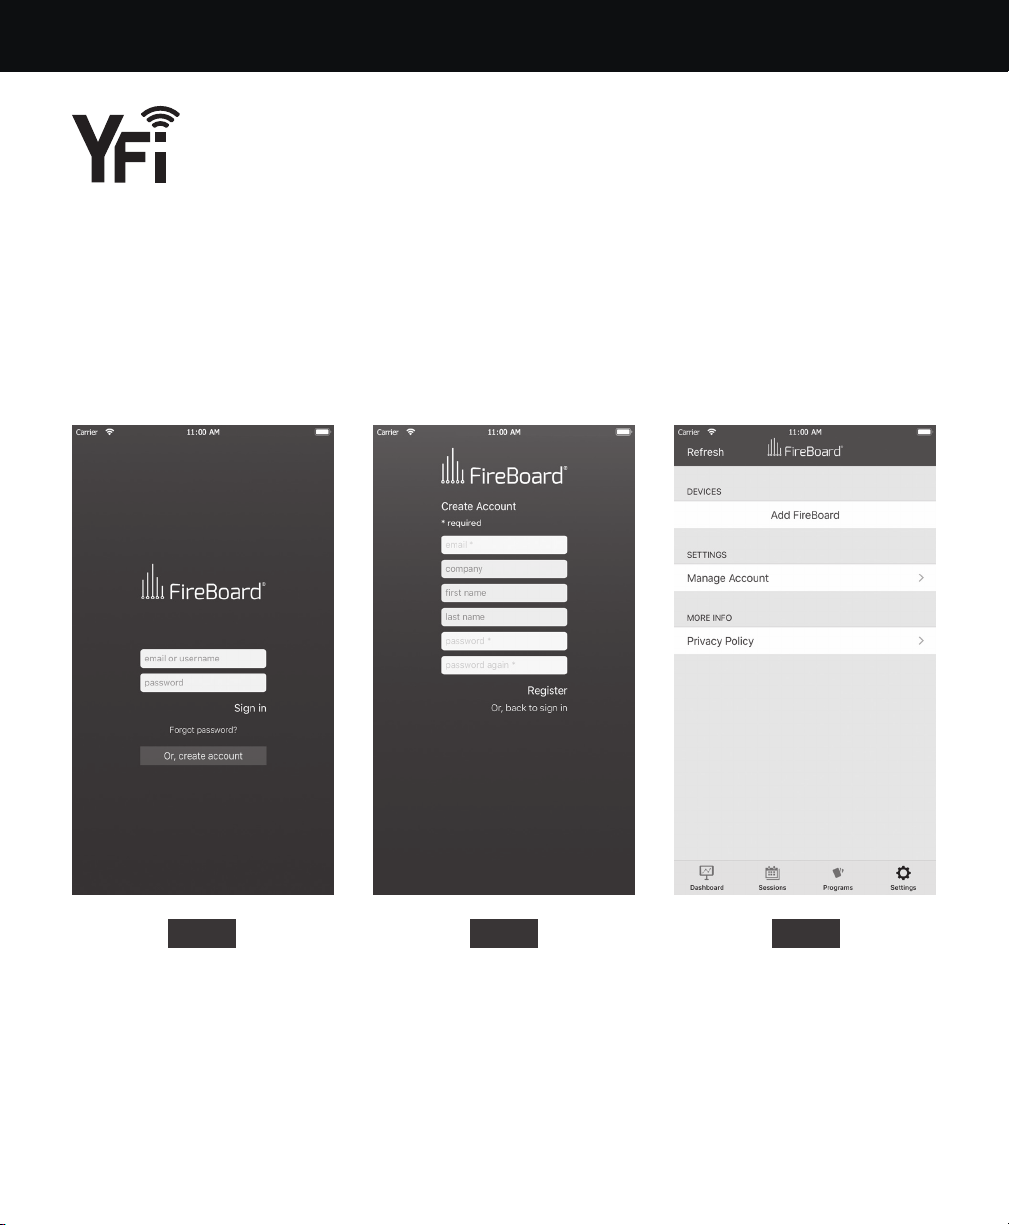
CONNECT TO THE APP
App Install + Account Creation
The very first thing you’ll need to do is download the free FireBoard app onto your smartphone or
tablet. From your mobile device, please visit https://apps.yodersmokers.com to obtain download
links for iOS or Android platforms.
After installing and opening the FireBoard app, you’ll be presented with a login screen (FIG 5).
FIG 5 FIG 6 FIG 7
If you don’t already have a FireBoard account, you’ll need to create one. Tap on “Create Account”,
fill in the fields (FIG 6), and tap “Register.”
Once registered and logged in, you should be located on the settings screen (FIG 7), ready to pair
your cooker’s embedded FireBoard with the app. If your app isn’t already on the settings screen, tap
the gear icon in the bottom right hand corner of the screen to navigate to the settings screen.
16

pairing your device
Next, make sure your cooker is plugged in, and the power button has been pushed. You should see
the default screen with the “YS” logo and the default menu displayed on your cooker. Also, please
make sure your mobile device’s Bluetooth connectivity is on. It should be noted, Android users must
have their mobile device’s location services enabled, or the Bluetooth pairing will fail. While within
30 feet of your cooker, tap the “Add FireBoard” button on your app screen. Your mobile device will
scan for nearby FireBoard devices (FIG 8) and will find the one embedded into your cooker’s ACS.
Once found, the app will show you the serial number of your cooker’s internal FireBoard (FIG 9).
FIG 8 FIG 9 FIG 10
Finally, tap the serial number shown to complete the pairing process. Once complete, you’ll see
your cooker’s FireBoard serial number listed in the settings screen. After a few seconds, you’ll also
notice the Bluetooth icon becomes active on your cooker’s listing (FIG 10).
17

CONFIGURING WIFI
Tap your cooker’s serial number from the list, and a few tasks can be accomplished from this new
screen (FIG 11), but for now, we’re interested in getting Wi-Fi connectivity configured, so tap on the
“Manage Wi-Fi” option.
In this new screen (FIG 12), you’ll notice a place for a network name and a password. If you already
know the network name you’ll be using, or if the network you use is not broadcasting its name (also
referred to as an SSID), you can enter the name and password of the Wi-Fi router or access point on
the provided lines. Please note that network names and passwords are case sensitive.
If you’re unsure of the exact spelling of your network name, or you are unsure of which networks are
within the range of your cooker, you can use the “View Available Networks” button to have your
mobile device scan for nearby 2.4GHz networks (FIG 13).
FIG 11 FIG 12 FIG 13 FIG 14
Tap on the Network you’d like to use, provide the appropriate password, and tap the “Connect”
button. It may take up to a minute for the connection to fully establish, but you’ll soon see that the
Wi-Fi icon on your cooker’s listing will activate (FIG 14). If, after a minute or so, it does not, try re-
entering your network name and password, and try connecting again.
18

THE APP IN DEPTH
Before we get into all the details, we’d like to point out that the cooker cannot be started from the
app. You will have full control once it has been started - including the ability to shut it down - but
the cooker must be started from its front panel before the app can do anything aside from reporting
current status. This helps ensure the safe operation of your cooker.
THE DASHBOARD
If you click on the first icon of the tab bar (the navigation that spans across the bottom of the screen),
you’ll be presented with the Dashboard (FIG 15). This is your quick overview screen, as well as one
of the main sections you’ll use to interact with your cooker.
The large grey bar across the top indicates your cooker’s current setpoint, internal temperature, and
the temperature of the two probes, if you have them plugged in. If you don’t have the probes plugged
in, or the pit is not currently running, you will see dashes in place of the temperature readings.
Below the large grey bar is an area used to show the various temperature readings available in
graph format. We will get into more detail on this in a bit.
Once the cooker is running, the setpoint and pit values will reflect the current status
of the pit (FIG 16).
FIG 15 FIG 16
19

NOTABLE DASHBOARD FEATURES
• You can change the pit’s setpoint by tapping on the setpoint in the grey banner (Figure 17). Simply
enter your new desired setpoint and tap the “Set” button. Please note that changes to the setpoint
take a few seconds to take eect. Please be patient for them to be reflected in the cooker and in the
app’s dashboard.
• The names of the two probe ports can be set according to what you’re cooking. Tapping on the
probe port in the grey banner will allow you to change its name (FIG 18). This name will also be used
in the various charts throughout the app.
• An alert – in the form of an app alert, an SMS text message, or an email – can be set to let you know
when one of the meat probes are at a certain temp. Simply tap on the temperature shown for the
probe in the grey banner, tapping “Add New Alert,” then “Set Up Alert” and set up your parameters
(FIG 18, 19).
FIG 18 FIG 19FIG 17
Alerts can be restricted to only occur during specific times of the day or at a given frequency by
using the “Custom Start/Stop Time” selection. Please note that SMS text and email alerts require a
little bit of set-up in the settings screen, which is described later in this document.
20

NOTABLE DASHBOARD FEATURES (CONTINUED)
• You can choose between two visualizations of the running temperature data: a basic chart, and
a detailed chart. You can toggle between the two by tapping on the word “Chart” or “Detail,”
respectively, in the title bar area of the app (FIG 20, 21).
• Tapping the small wrench icon in the upper right of the grey bar will take you to a section that allows
you to choose between multiple cookers (if you have more than one paired to your mobile device)
(FIG 22) and also allows you to shut down your cooker (FIG 23).
FIG 20
FIG 22 FIG 23
FIG 21
21
 Loading...