


Backyard Smoker
OPERATION INSTRUCTIONS
Version 1.0, SEPT 2013

Welcome to Yoder Smokers
Thank you for purchasing a Yoder Smoker. You are joining a family of satised customers. We are very proud of our product and that it is handcrafted in the heartland. Please
review the following information carefully. It will give you great tips and information that
will help you use your Yoder.
Please complete the form below for future reference. Additionally, complete the online
Warranty Registration (www.yodersmokers.com/warranty-registration-form) using the
information that you lled out below. If you would rather mail in your warranty information there is a form on the back of the manual that you can ll out and send in. Your
serial number is located on the metal plate on your smoker’s door.
Thank You for Choosing Yoder Smokers
Model
Serial Number
Date of Purchase
Purchased From

Contents
Dangers, Warnings and Cautions......................................................................................3
Available Product Add-Ons...............................................................................................4
Smoker Diagram................................................................................................................6
Smoker Assembly..............................................................................................................7
• Smoker Arrival.........................................................................................................7
• Smoker Placement.................................................................................................7
• Leveling the Smoker...............................................................................................7
Operating the Smoker.......................................................................................................7
• Initial Burn O........................................................................................................7
• Lighting Your Smoker.............................................................................................7
• Pre-Heating............................................................................................................7
• Door Position..........................................................................................................7
Pre-Grill Checklist/Routine Maintenance..........................................................................8
How to Build a Fire For Your Smoker..............................................................................10
How to Use Your Smoker for Direct Grilling....................................................................12
• Using the Firebox for Direct Grilling.....................................................................12
• Using the Cooking Chamber for Direct Grilling....................................................13
Grill Maintenance.............................................................................................................16
• Preparing the Grill For Season..............................................................................16
• Painted Surfaces...................................................................................................16
• Cooking Grates.....................................................................................................16
• Heat Management Plate.......................................................................................16
• Cooking Chamber.................................................................................................16
• Grease Management and Bucket.........................................................................17
• Additional Maintenance........................................................................................17
• Storing Your Grill...................................................................................................17
Wood Flavor Guidelines..................................................................................................18
Wood Useage..................................................................................................................18
How Often Do I Maintain My Fire....................................................................................18
Meat Temperature Guide.................................................................................................19
Warranty Information.......................................................................................................20

Dangers, Warnings and Cautions
Failure to follow the “Dangers, Warnings and Cautions” contained
inthismanualmayresultinseriousbodilyinjury,deathorinare.
• Read this manual completelybeforeusingyourYoderforthersttime.
• Do not use indoors! This smoker is for outdoor use only.
• Do not leave pets, infants, or children unattended near a smoker in use.
• Keep the grill a minimum of 12 inches away from combustible surfaces.
• Do not use lighter uid, gasoline, or any other highly ammable uids to ignite or
re-ignite your smoker.
• Do not use or store lighter uid, gasoline or any other highly ammable uids
within ve feet of the smoker.
• Do not transport your grill while operating or when the grill is hot. Make sure the
re is out and the grill is cool before moving.
• Exterior surfaces on the grill will be hot when in use and during cool down.
• Should a grease re occur, keep the door closed until the re is out.
• Use heat resistant gloves when operating the grill.
• Do not remove any ash until the re has completely burned out and are fully
extinguished.
• Check the Yoder website (www.YoderSmokers.com) occasionally for updates
and new product information for the Yoder.
3

Available Product Add-Ons
2nd Level Slide-Out Shelf
Adding the second shelf increases the cooking area in your smoker.
Log Lighter
The log lighter allows you to use propane to get the re started.
Charcoal Grate
Adding a charcoal grate to your smoker allows you to convert the main cooking chamber into a direct grill.
Heat Management Plate
The heat management plate installs against the common wall of the rebox and the
cooking chamber. The design forces the heat and smoke to enter the cooking chamber
under the heat plate and is then released incrementally as it travels across the cooking
chamber. This design reduces the side to side temperature variance that is commonly
seen in oset cookers.
Counter Weight
The counter weight is welded onto the door of the main cooking chamber. The counter
weight assists in opening the door by reducing the weight that is being lifted.
Pot Warmer
The pot warmer is a metal channel welded onto the top of the rebox door. The heat
from the rebox warmes the channel and you can place a pot on it to keep it warm.
For more information about any extra accessories, call your local Yoder dealer or
contact us directly at 877-409-6337 or email us at service@yodersmokers.com.
Smoker Name Part Number
Cheyenne
Log Lighter W41695
Charcoal Grate 41440
Heat Management Plate 41433
Wichita
Log Lighter W41695
Charcoal Grate 41440
2nd Level Slide-Out Shelf W41788
Heat Management Plage 41212
4

Smoker (cont) Part Number (cont)
Loaded Wichita
Log Lighter W41695
Charcoal Grate 41440
The Kingman
Log Lighter W41695
Charcoal Grate 42587
Durango 20”
Log Lighter W41695
Charcoal Grate 41440
2nd Level Slide-Out Shelf W41788
Durango 24”
Log Lighter W41695
Charcoal Grate 42587
The Stockton
Log Lighter W41695
5
(optional)
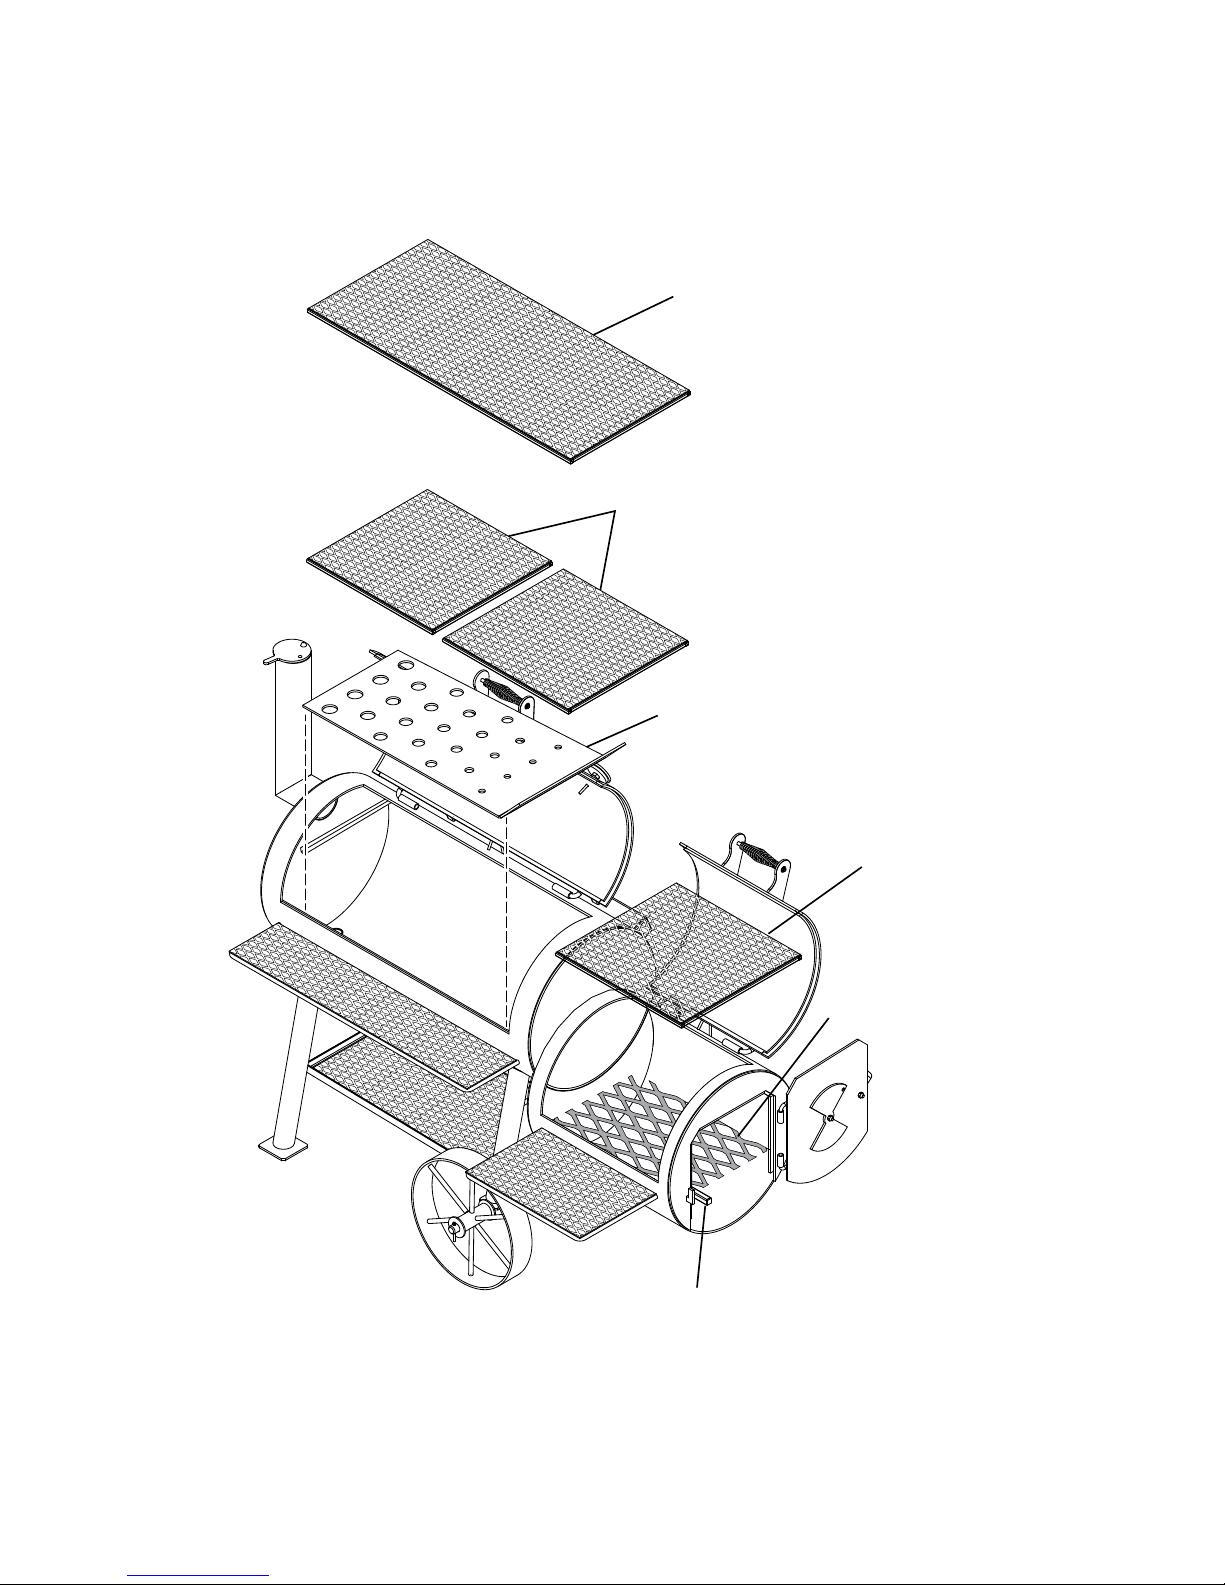
Smoker Diagram
SECOND SHELF
COOKING GRATE
HEAT MANAGEMENT PLATE
(optional)
COOKING GRATE
WOOD GRATE
LOG LIGHTER
NOTE: Loaded Wichita shown. Your smoker may vary slightly depending on model.
6
 Loading...