

Page 1
Your Modern Green Idea
M
I
N
I
S
P
L
I
T
S
•
V
R
F
G
N
I
T
H
G
I
L
D
E
L
•
•
R
A
P
L
T
A
O
S
C
•
Wall Mount Control
Features & Functions
601 Arrow Ln, O’Fallon, MO 63366 • [email protected] • ymgigroup.com • 866-833-3138
WMMS-M6-WallControl
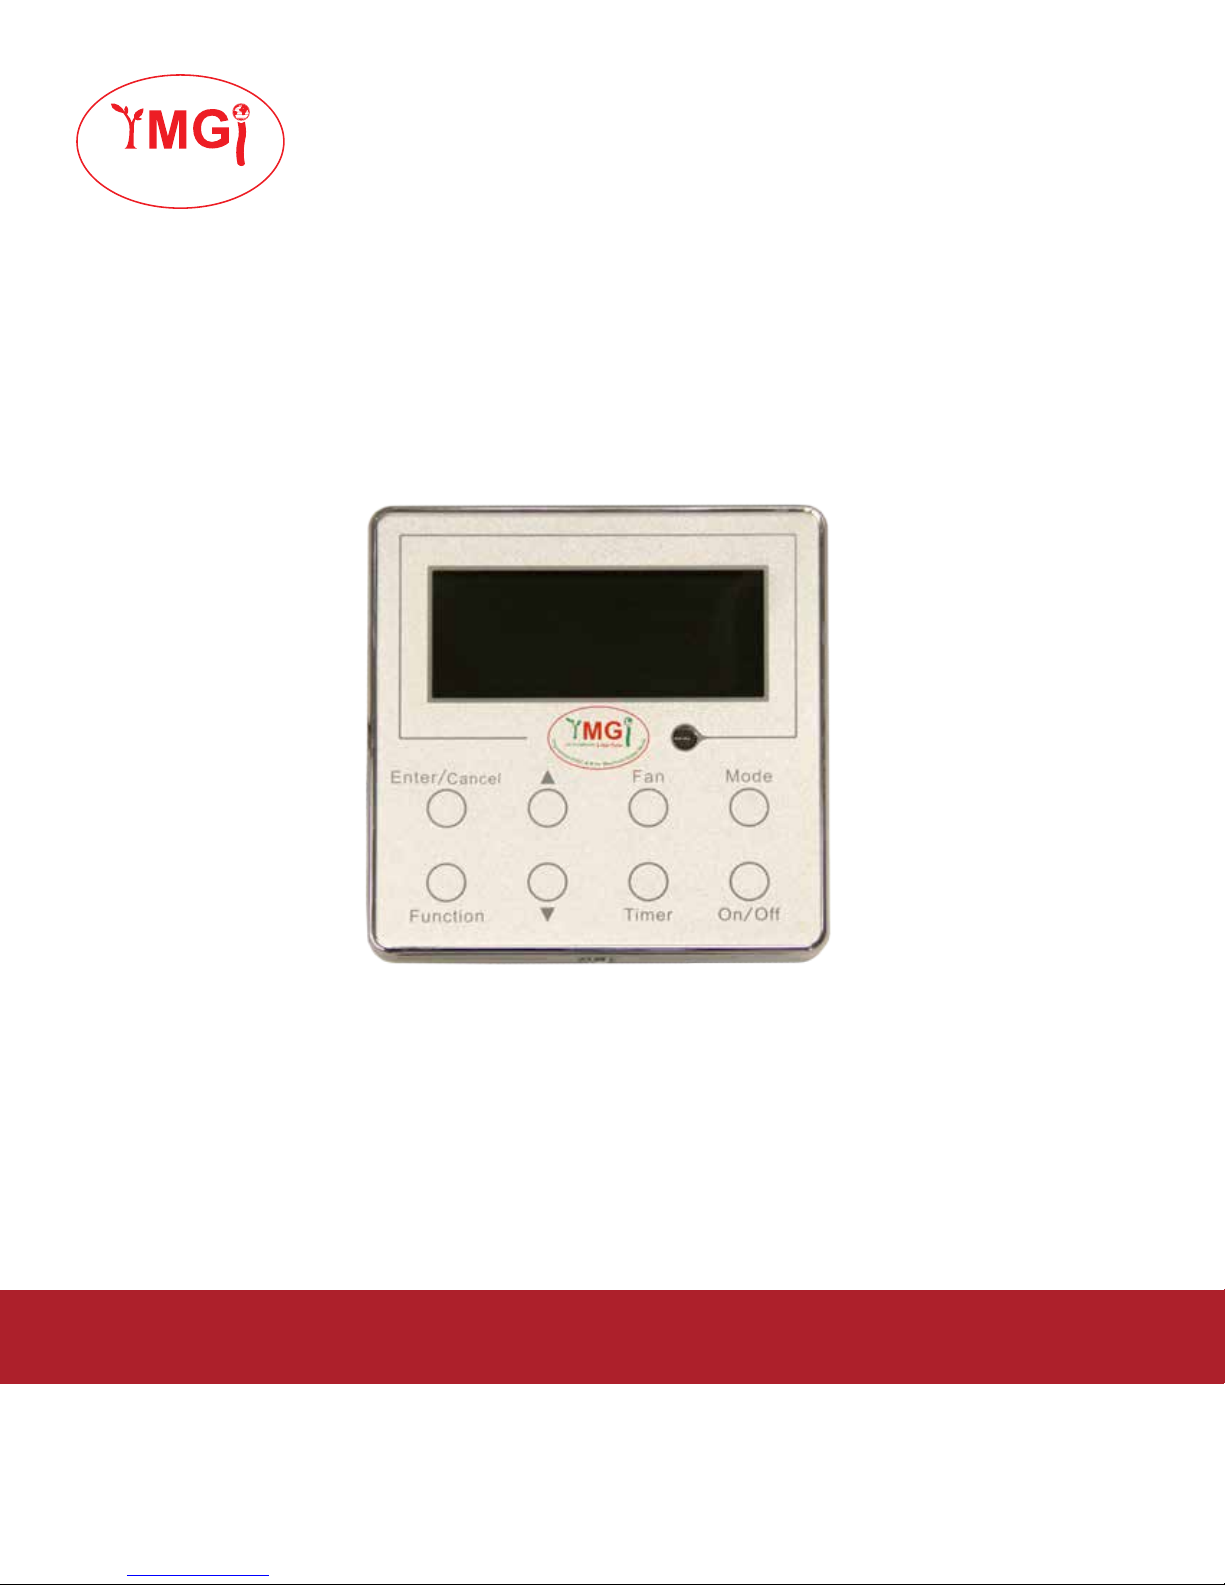
Wired Wall Mount Control
USERS GUIDE
YMGI Group
Page 2
Your Modern Green Idea
M
I
N
I
S
P
L
I
T
S
•
V
G
N
I
T
H
G
I
L
D
E
L
R
•
F
R
•
A
P
L
T
A
O
S
C
•
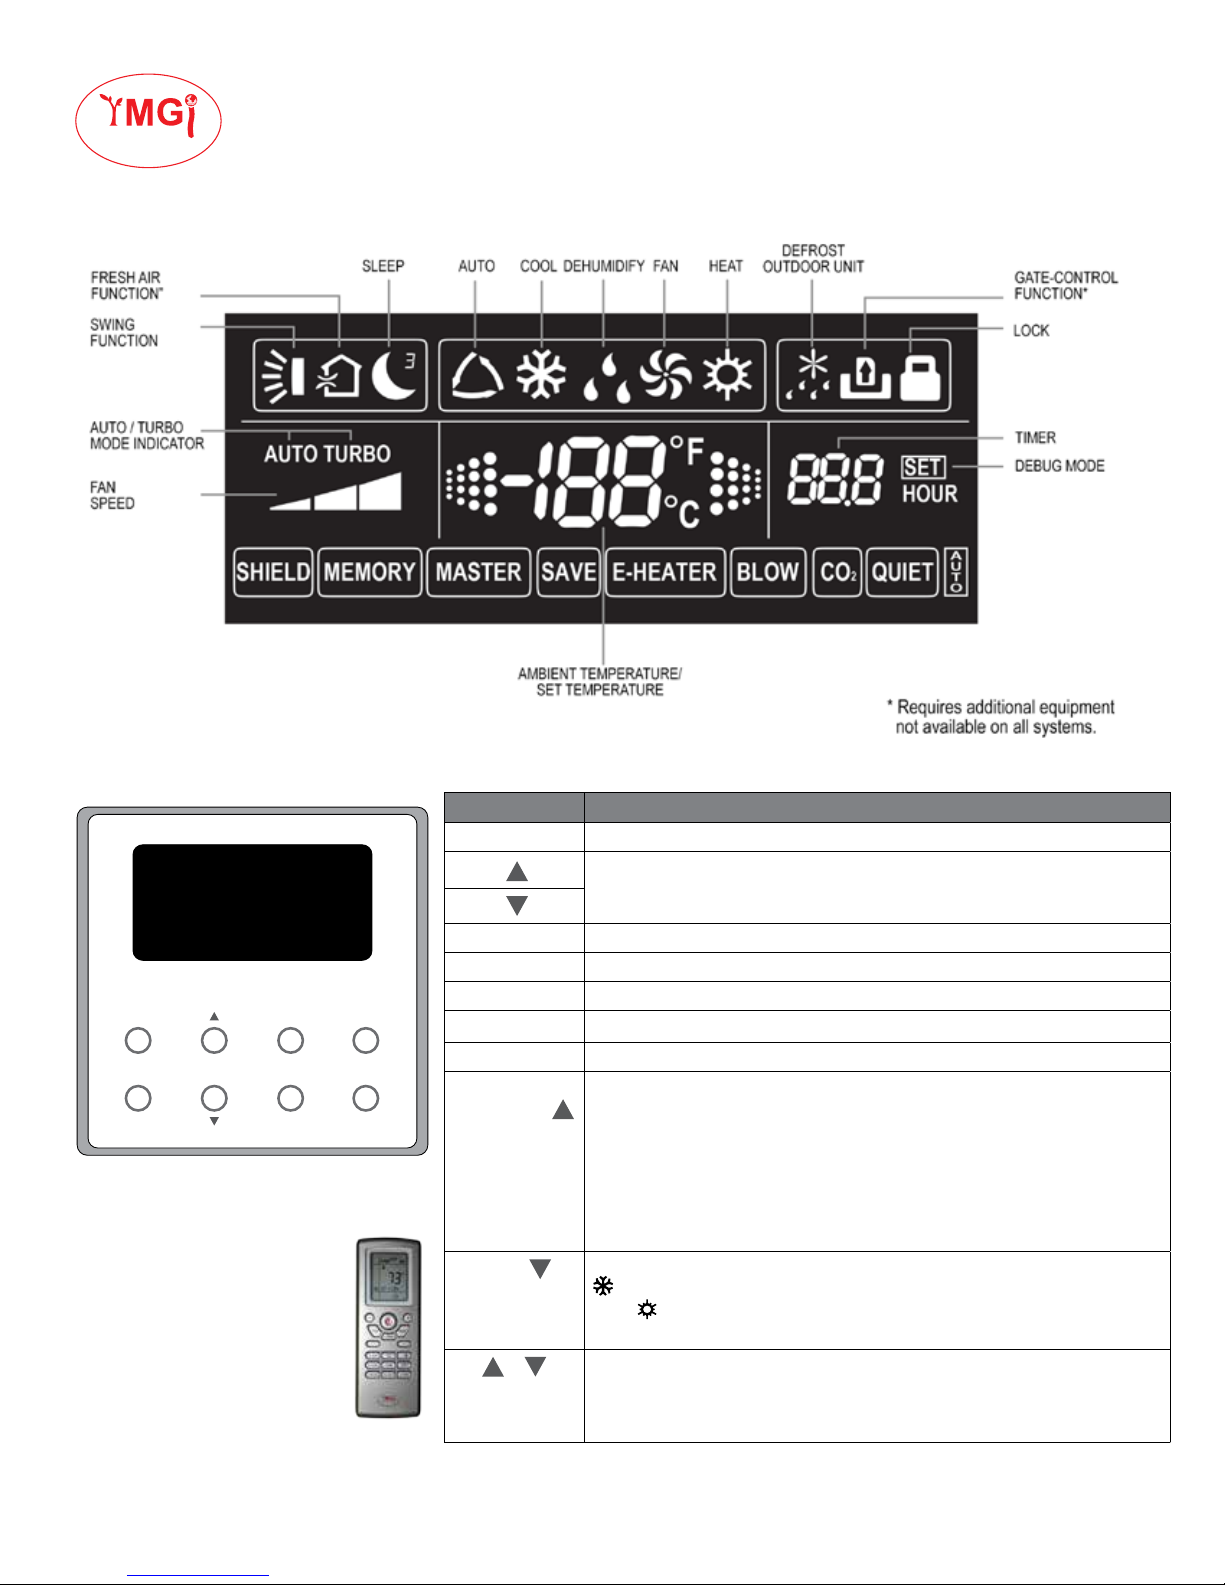
Wall Mount Control Digital Display
Wall Mount Control Buttons
Button Function
Enter/Cancel Function selection and cancellation
Fan Set High / Med / Low / Auto Fan Speed
Mode Select Cool / Heat / Fan / Dry / Auto Operating Mode of the Indoor Unit
Enter/Cancel Fan Mode
On/OffTimerFunction
Along with the Wall Mount
Control, Ceiling Cassette, Floor/
Ceiling Mount, and the Recessed
Indoor Units and the Universal Air
Handling Unit may come with a
Remote Control.
The Remote Control can be used
to send commands to the Wall
Mount Control for operation of
your Indoor Unit.
Function Select Turbo / Save / E-heater / Blow / Sleep / Swing Functions
Timer Timer setting
On/Off Indoor Unit Power Button
Mode + Press both buttons for 5 seconds while Indoor Unit is OFF to Enter/
Fan +
+
• Temperature setting of the indoor unit.
Range: 61-86 °F / 16-30 °C
• Timer setting, Range: 0.5-24 hr
Cancel the Memory function.
When Memory is set the Indoor Unit will store settings, so that in
the event of a power loss, the Indoor Unit will resume with your
personalized settings when power is restored. If Memory is not set,
the indoor unit is defaulted to be turned off after power recovery. The
Memory function is off by default before installation.
Press both buttons simultaneously when the Indoor Unit is OFF.
will be display on the Wall Mount Control to identify a Cooling only
unit,
will be display on the Wall Mount Control to identify a Cooling
and Heating unit.
Press both buttons for 5 seconds while Indoor Unit is OFF to Start/
Cancel the Lock function. No buttons will respond while in Lock mode.
To Unlock press both buttons again and hold them for 5 seconds.
2
YMGI Group • 601 Arrow Ln, O’Fallon, MO 63366 • [email protected] • ymgigroup.com • 866-833-3138
Page 3
WALL MOUNT CONTROL FUNCTIONS
Basic Functions
ON/OFF
Your Modern Green Idea
M
I
N
I
S
P
L
I
T
S
•
V
R
Press On/Off to turn ON your Indoor Unit. Pressing this button again will turn OFF the Indoor Unit.
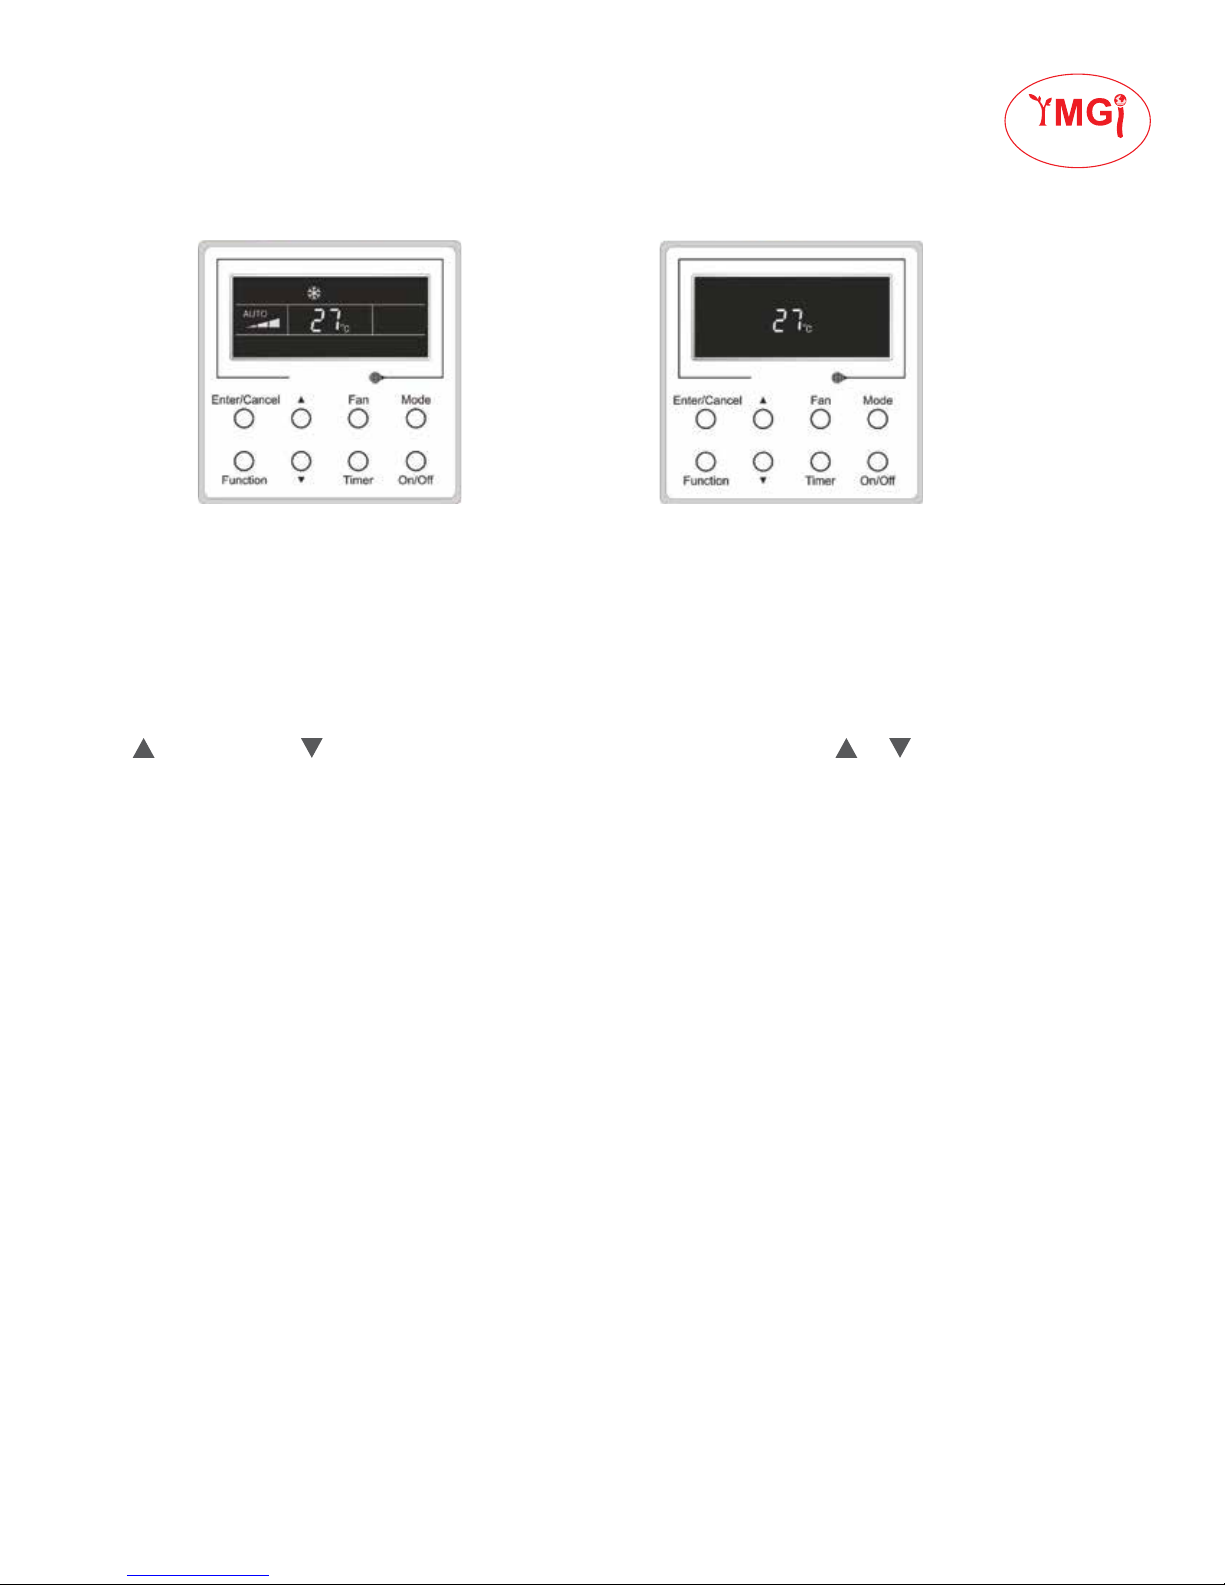
The illustrations show how your Wall Control Unit will appear when your system is ON or OFF.
Indoor Unit ON Indoor Unit OFF
The temperature setting range is 61-86°F or 16-30°C under the COOL mode.
MODE
While your Indoor Unit is ON, you can select what mode you would like it to operate in. When pressed
the Mode button will cycle through the operating settings in the following order:
AUTO – COOL – DEHUMIDIFY – FAN - HEAT
G
N
I
T
H
G
I
L
D
E
L
•
F
R
•
A
P
L
T
A
O
S
C
•
TEMPERATURE
Press to increase or to decrease the set temperature. Holding down the or button will increase or
decrease the set temperature 1°F every 0.5 seconds.
In COOL, DEHUMIDIFY, FAN or HEAT Modes the temperature range is 61-86°F or 16-30°C.
In AUTO mode the temperature setting is not adjustable.
FAN
When your Indoor Unit is ON, the FAN button allows you to control the Fan Speed. The Fan button will cycle
through the operating settings in the following order:
AUTO – LOW – MEDIUM - HIGH
AUTO
AUTO Mode is a factory preset that will automatically switch your system between HEAT and COOL to
maintain 77°F.
Mode Conicts
All Indoor Units on the same system MUST run in the same mode, either all COOL or all HEAT. With a 2 (or
more) Indoor Unit system, you cannot run one Indoor Unit in COOL Mode and another in HEAT. Attempting
to do this will create a mode conflict, and you will receive an E7 Error Message on your Indoor Unit Display,
additionally all Indoor Units will not run until mode selection is the same Mode setting on all Indoor Units.
Also, if you have set the TIMER ON function, and the mode for that Indoor Unit conflicts with other Indoor
Units operating when the TIMER ON function attempts to turn the system on, it will also create a Mode Conflict
and shut down the Indoor Unit.
In the event a restart doesn’t clear the error, you may need to shut power off to the outdoor unit and the entire
system, wait approximately 10 minutes, restore power and restart the system, making sure all Indoor Units are
in the same Mode.
YMGI Group • 601 Arrow Ln, O’Fallon, MO 63366 • [email protected] • ymgigroup.com • 866-833-3138
3
Page 4
Your Modern Green Idea
M
I
N
I
S
P
L
I
T
S
•
V
G
N
I
T
H
G
I
L
D
E
L
R
•
F
R
•
A
P
L
T
A
O
S
C
•
REMOTE CONTROL FUNCTIONS
SETTING THE ON/OFF TIMER
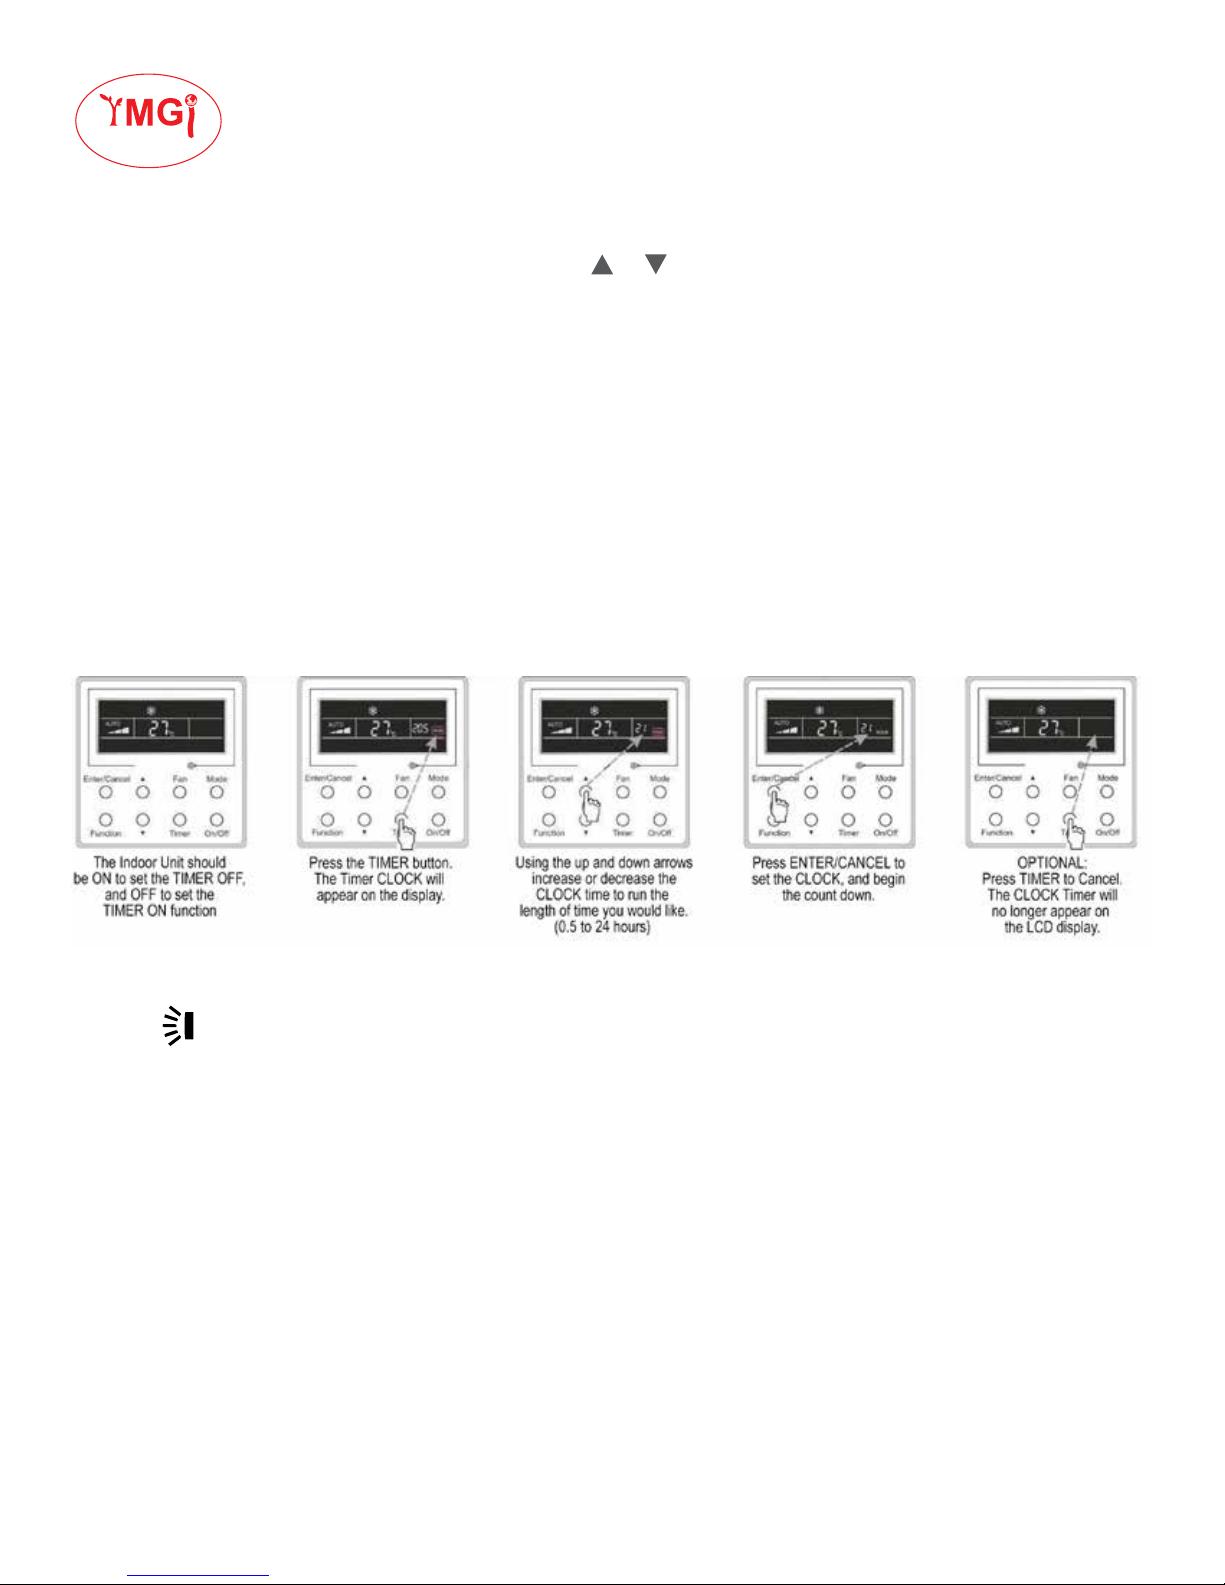
When your Indoor Unit is ON, press Timer to set TIMER ON/OFF.
The Timer range is 0.5 – 24 hours. Each press of the
or button will increase or decrease the set value by
0.5 hours. If you hold the button down, the time increment will increase or decrease by 0.5 hours every half
second.
TIMER ON
When your Indoor Unit is turned OFF, you can set the ON Timer by pressing the TIMER button. The LED
Display will show “XX.X HOUR”, with “HOUR” blinking. This indicates how long the system should wait before
turning your Indoor Unit ON.
TIMER OFF
When your Indoor Unit is turned ON, you can set the OFF Timer by pressing the TIMER button. The LED
Display will show “XX.X HOUR”, with “HOUR” blinking. This indicates how long the system will run before
turning your Indoor Unit OFF.
If the LED Display does not display the “XX.X HOUR” icon, it means the Timer setting has been cancelled.
The Function button will allow you to operate SWING, SLEEP, TURBO and Blow functions. You will need to
press the button to cycle through the different features the Function button controls.
SWING
On select models of Indoor Units, the Swing function operates the motorized air louvers. This helps circulate
air in a room, and can alleviate warm or cold spots.
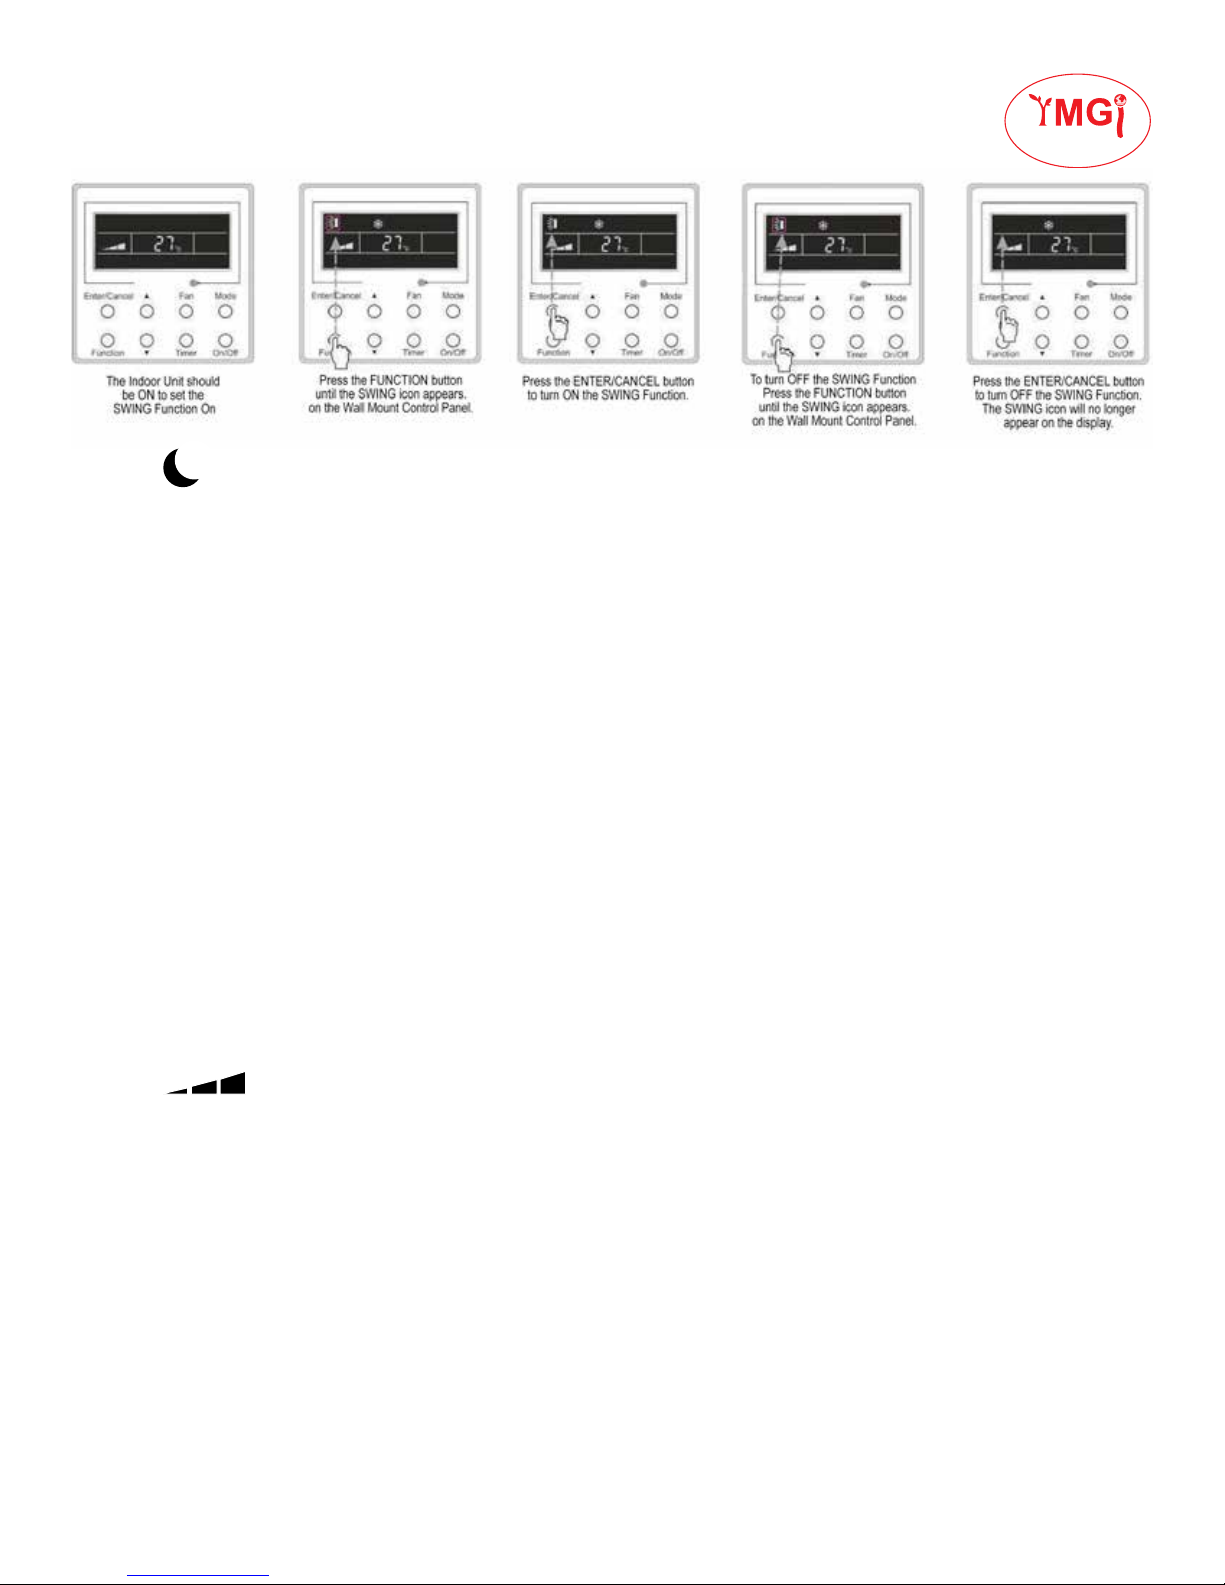
To turn ON the SWING function, press the Function button repeatedly, until the SWING icon appears on the
LED Display of the Wall Mount Control. When the SWING icon blinks, press the Enter/Cancel button to turn the
function ON. The SWING icon will remain on the display.
To turn OFF the SWING function, press the Function button repeatedly, until the SWING icon appears on the
LED Display of the Wall Mount Control. While the SWING icon blinks, press the Enter/Cancel button to turn the
function OFF. The SWING icon will no longer appear on the display.
If you do not press the Enter/Cancel button to turn ON/OFF the function, the Wall Mount Control will continue
its preset operation after 5 seconds.
4
YMGI Group • 601 Arrow Ln, O’Fallon, MO 63366 • [email protected] • ymgigroup.com • 866-833-3138
Page 5
REMOTE CONTROL FUNCTIONS
Your Modern Green Idea
M
I
N
I
S
P
L
I
T
S
•
V
G
I
L
D
E
L
R
•
F
R
•
A
P
L
T
A
O
S
C
•
1
SLEEP
The SLEEP function allows a gradual raising of the set temperature of a room in cooling season, and a
gradual dropping of the set temperature of a room in heating season. This function is designed to reduce
energy usage while you sleep or the room is not in use, while maintaining the room comfortable.
In the COOL or DEHUMIDIFY mode, the temperature will increase by 1°F after the unit runs under Sleep 1
Mode for 1 hour, and will increase another 1°F the following hour. Once the room temperature has increased
2°F, the unit will maintain this temperature until SLEEP mode is turned off.
G
N
I
T
H
In the HEAT mode, the temperature will decrease by 1°F after the unit runs in Sleep 1 Mode for 1 hour, and will
decrease another 1°F the following hour. Once the room temperature has decreased 2°F, the unit will maintain
this temperature until SLEEP mode is turned off.
To turn ON the SLEEP function, press the Function button repeatedly, until the SLEEP icon appears on the
LED Display of the Wall Mount Control. When the SLEEP icon blinks, press the Enter/Cancel button to turn the
function ON. The SLEEP icon will remain on the display.
To turn OFF the SLEEP function, press the Function button repeatedly, until the SLEEP icon appears on the
LED Display of the Wall Mount Control. When the SLEEP icon blinks, press the Enter/Cancel button to turn the
function OFF. The SLEEP icon will no longer appear on the display.
TURBO
TURBO function is designed to allow you to reach the set temperature in your room as quickly as your system
is capable.
While your Indoor Unit is in the COOL or HEAT mode, press the Function button, until the Wall Mount Control
selects the TURBO interface. Press the Enter/Cancel button to turn ON the TURBO function. The TURBO icon
will appear on your Wall Mount Control’s LED Screen.
To turn OFF the TURBO function, press the Function button until TURBO is selected, and press Enter/Cancel
button. The TURBO icon on the display will disappear.
While your Indoor Unit is in the COOL or HEAT mode, press the Function button, until the Wall Mount Control
selects the TURBO interface. Press the Enter/Cancel button to turn ON the TURBO function.
YMGI Group • 601 Arrow Ln, O’Fallon, MO 63366 • [email protected] • ymgigroup.com • 866-833-3138
5
Page 6
Your Modern Green Idea
M
I
N
I
S
P
L
I
T
S
•
V
R
G
N
I
T
H
G
I
L
D
E
L
•
F
R
•
A
P
L
T
A
O
S
C
•
REMOTE CONTROL FUNCTIONS
E-HEATER
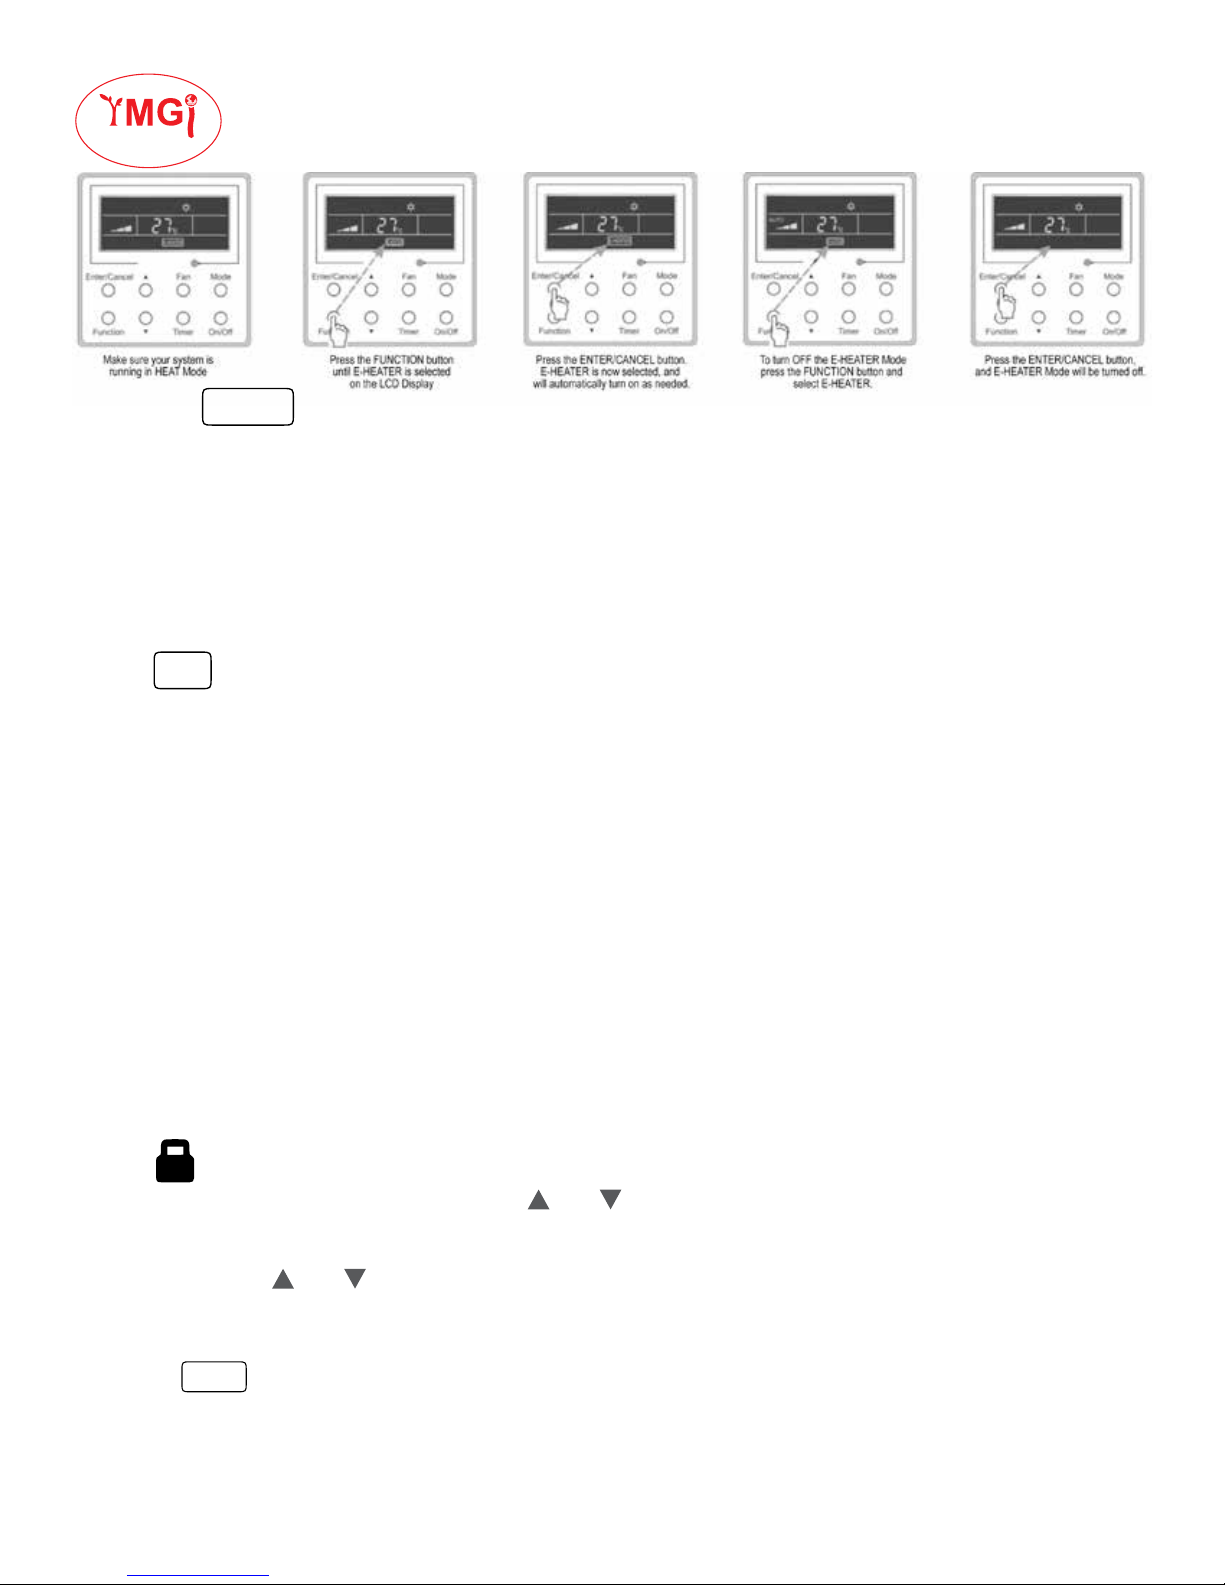
E-Heater is the auxiliary electric heating function. When your system is in HEAT mode, you can turn on the
E-Heater function for improved efficiency. Once this function is set, E-Heater will run automatically whenever
the system is in HEAT mode.
To turn ON the E-HEATER function, while the system is running in HEAT mode, press the Function button
select E-Heater. Once the E-Heater icon is visible, press the Enter/Cancel button.
On Indoor Units that do not have an auxilary heater, this Mode does not function.
BLOW
The BLOW function is a maintenance function designed to prevent mildew from growing on the coils of your
Indoor Units. By running the fan on your Indoor Unit for a few additional minutes after normal operation, it
evaporates water that may have condensed on the coil. This is helpful in very humid climates.
When the BLOW function is activated, the Indoor Unit fan will run at low speed for 2 minutes to help
evaporate any moisture that is present on the coil. When BLOW function is not active, the system will shut
off immediately. The BLOW function will only work when the Indoor Unit operates in COOL or DEHUMIDIFY
modes, and does not operate in FAN or HEAT modes.
While your Indoor Unit is running in COOL or DEHUMIDIFY Mode, press the Function button until BLOW is
selected. Once it is highlighted, press the Enter/Cancel button. The BLOW function is now activated.
To turn OFF the BLOW Function, press the Function button until the BLOW setting is selected, and hit the
Enter/Cancel button. The BLOW button will no longer appear on the LED display.
OTHER FUNCTIONS
LOCK
When running your system, you can press the and simultaneously for 5 seconds the LOCK icon will
appear on your LED display, and it will LOCK the Wall Mount Control.
To Unlock press the and simultaneously for 5 seconds, and the LOCK icon will turn off.
When the LOCK function is active, no buttons will respond.
MEMORY
When the MEMORY Function is activated, the MEMORY icon will be displayed. In the event of a power failure,
the system will store all of the functions and modes you have programmed into your YMGI system. When
power is restored, the unit will come online with the last settings that you programmed. MEMORY will store
your MODE, TEMPERATURE, FAN SPEED and LOCK state.
6
YMGI Group • 601 Arrow Ln, O’Fallon, MO 63366 • [email protected] • ymgigroup.com • 866-833-3138
Page 7
REMOTE CONTROL FUNCTIONS
If the MEMORY Function is not set, the system will need to be turned ON when power is
restored, and all settings will be at factory defaults.
Your Modern Green Idea
M
I
N
I
S
P
L
I
T
S
•
V
G
N
I
T
H
G
I
L
D
E
L
R
•
F
R
•
A
P
L
T
A
O
S
C
•
While your Indoor Unit is turned OFF, press the MODE and buttons simultaneously for 5 seconds to turn the
MEMORY mode ON. Repeating this will turn MEMORY mode OFF. MEMORY is turned off by default.
ERRORS
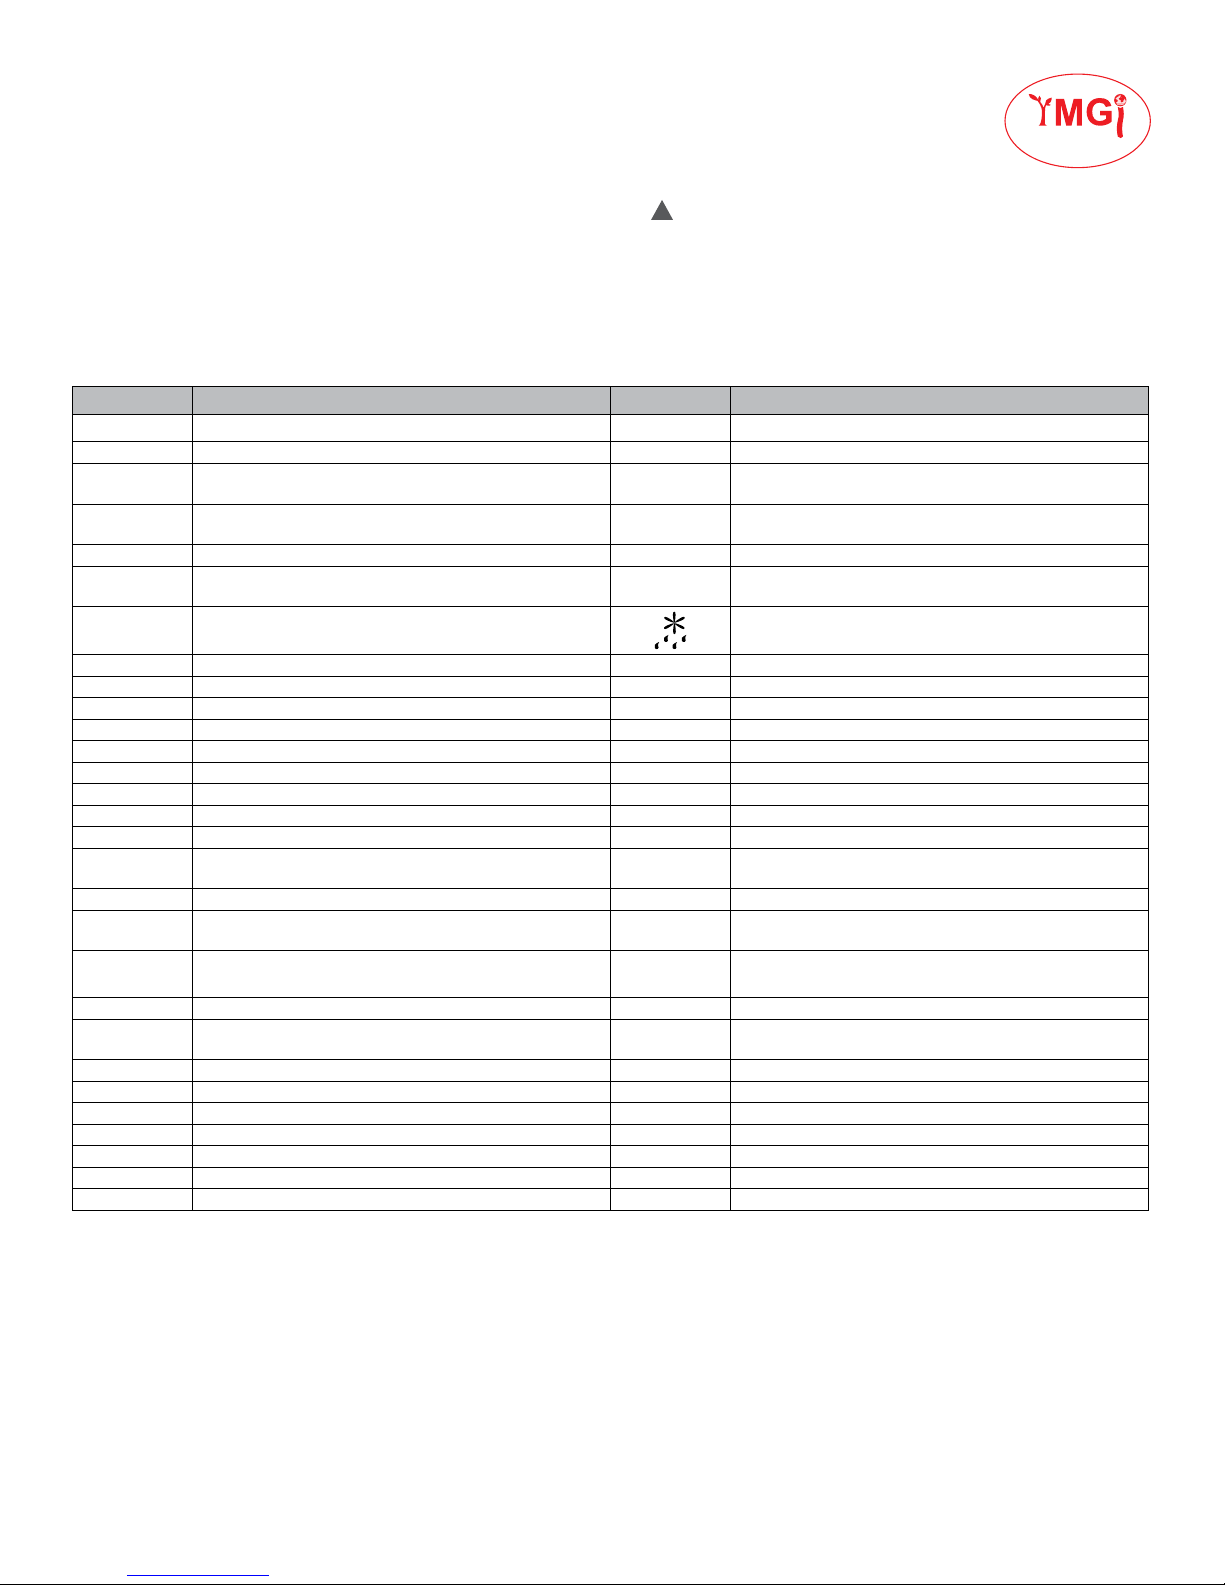
If a system protection or an error or malfunction occurs during operation, a code will be shown on the LED
display.If multiple errors occur at the same time, the LED display will cycle through the codes on the display.In
the event of any error, shut down the unit and contact your installer or an HVAC professional near you.
Error Code Protection / Malfunction Error Code Protection / Malfunction
F1 Return air temperature sensor open/short circuited P6 Drive board communication error
F2 Evaporator Temperature sensor open/short circuited H3 Compressor overheating protection
b5 Indoor Unit liquid valve temperature sensor open/short
circuited
b7 Indoor Gas Valve temperature sensor open/short
circuited
P7 IPM temperature sensor open/short circuited E7 Running mode conflict
F3 Outdoor Ambient temperature sensor open/short
circuited
F4 Outdoor Unit condenser mid-tube temperature sensor
open/short circuited
F5 Discharge temperature sensor open/short circuited H1 Forced Defrosting
E6 Indoor and outdoor unit communication error Lc Compressor startup failure
PL DC bus under-voltage protection E4 High discharge temperature protection
PH DC bus over-voltage protection E8 Overload protection
U1 Compressor phase current sensing circuit error E4 Whole unit over-current protection
HE Compressor demagnetization protection E5 Over phase current protection
Ho PFC protection H7 Compressor desynchronizing
P8 IPM Termperature Protection H5 IPM Current protection
L9 Over-power protection Ld Compressor phase loss/reversal protection
F0 System Charge shortage or blockage protection F8 Frequency restricted/reduced with whole unit current
PU Capacitor charging error En Frequency restricted/reduced with IPM current protection
E1 High pressure protection f9 Frequency restricted/reduced with high discharge
E3 Low pressure protection F6 Frequency restricted/reduced with anti-freezing
LE Compressor stalling Frequency restricted/reduced with overload protection
LF Over-speeding EU Frequency restricted/reduced with IPM temperature
PF Drive board temperature sensor error E9 Indoor unit full water error
P9 AC contactor protection E2 Anti-freezing protection
PE Temperature drift protection PP AC input voltage abnormal
Pd Sensor connection protection U5 Whole unit current sensing circuit error
U3 DC bus voltage drop error U7 4-way valve reversing error
L3 Outdoor fan 1 error protection H6 Motor stalling
LA Outdoor fan 2 error protection U8 PG motor zero-crossing protection
LP Indoor and Outdoor Units unmatched
dn Communication line disconnected or expansion valve
error
Fo Pump-down
Defrost or oil return
protection
temperature
protection
protection
NOTICE
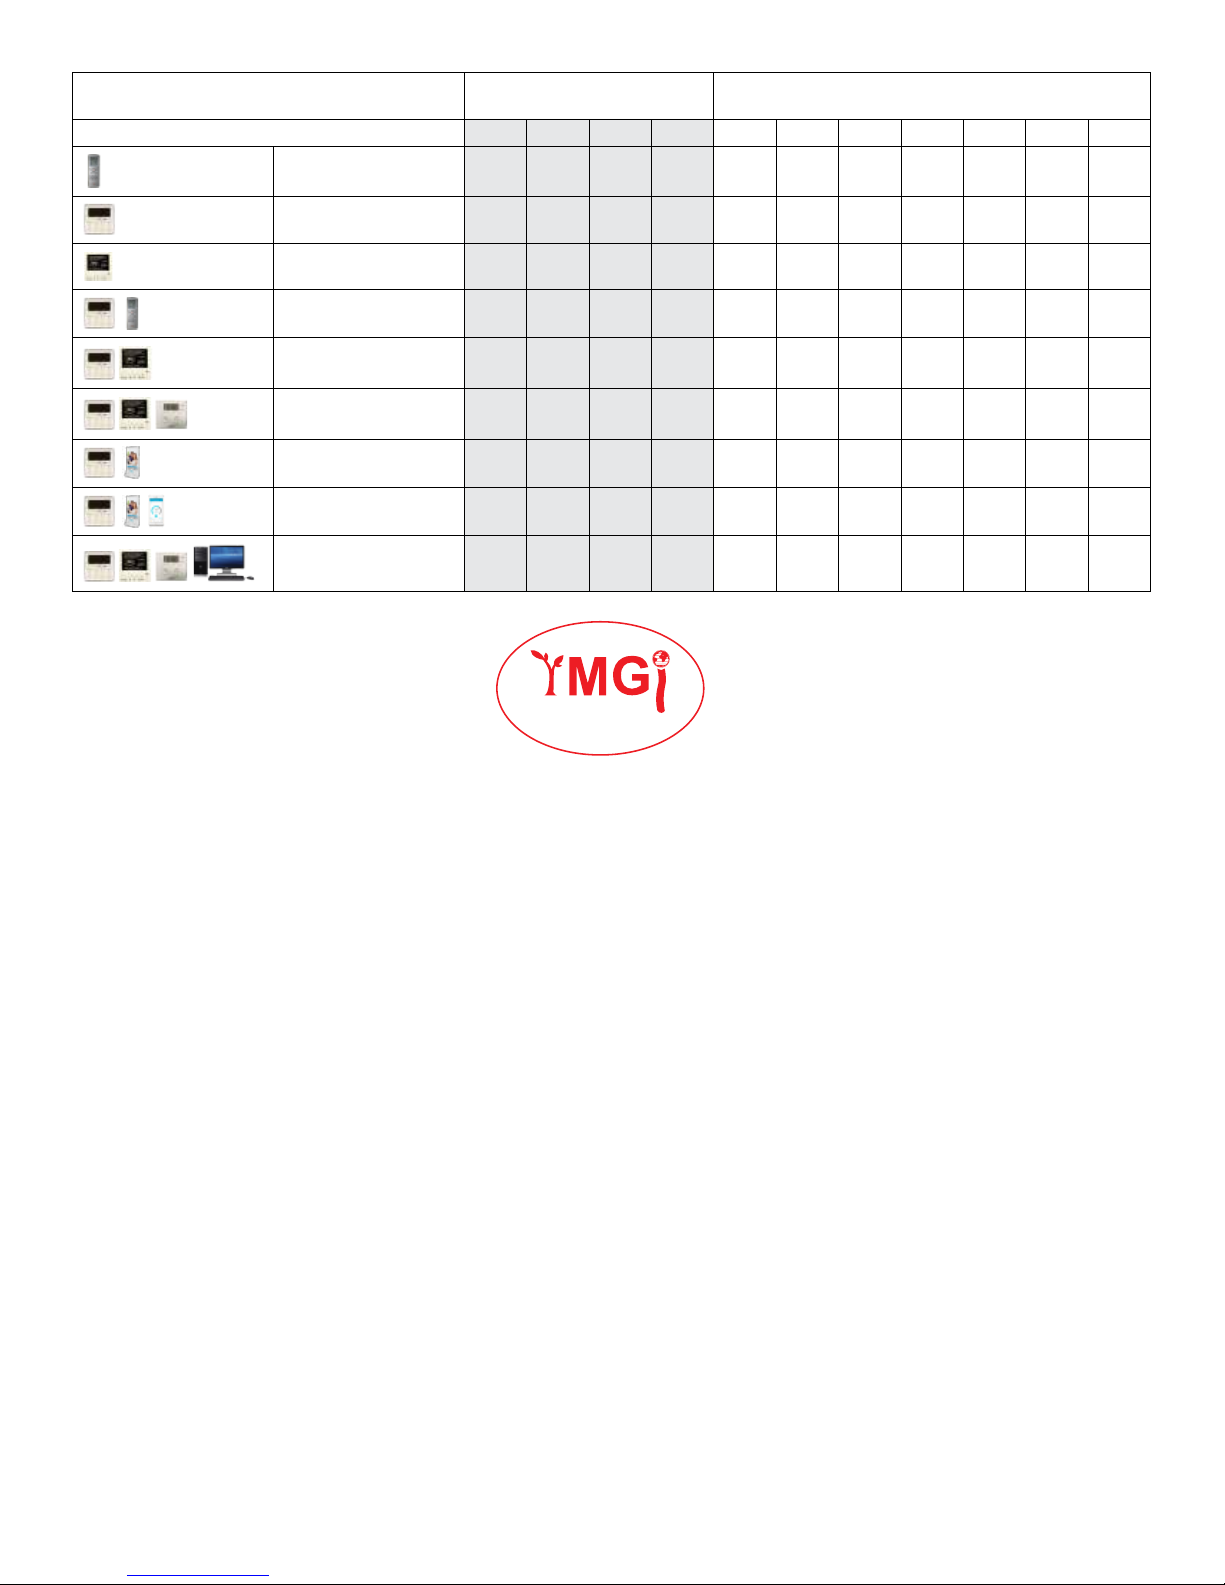
Each Wall Mount Control is wired to a single Indoor Unit.
Recessed Fan Coild and Universal Air Handler Indoor Units that do not have an IR receiver built-in, can be
controlled with one of these options:
•Wall Mount Control
•Remote-Wall Mount Control
•Thermostat-YMGI Bridge Controller-Wall Mount Control
Wall Mounted EW, Ceiling Cassette EC, Floor/Ceiling Mount EU Indoor Units which have an IR receiver built
in, and can be controlled with a Remote Control or the options listed above.
YMGI Group • 601 Arrow Ln, O’Fallon, MO 63366 • [email protected] • ymgigroup.com • 866-833-3138
7
Page 8
Product Series:
Control Options/Combinations
Remote Control
WMMS
Indoor Units
VRF
Indoor Units
EW EC EU EF EW EC EU EF-L EF-M/H FA UC
• • • • • •
Wall Control
Bridge Control
Wall Control, & Remote Contol
Wall Control & Bridge Control
Wall Control, Bridge Control &
Thermostat
Wall Control & WiFi Control
Wall Control, WiFi Contol &
Smart Phone
Wall Control, Bridge Control,
Thermostat & Computerized
Group Control
• • • • • • • • • • •
• • • • • • • • •
• • • • • • • • •
• • • • • • • • •
• • • • • • • • •
• • • • • • • • •
• • • • • • • • •
• • • • • • • • •
Your Modern Green Idea
M
I
N
I
S
P
L
I
T
S
•
V
R
F
G
N
I
T
H
G
I
L
D
E
L
•
•
R
A
P
L
T
A
O
S
C
•
YMGI is dedicated to designing, manufacturing and distributing the highest quality, energy saving and
environmentally friendly air conditioner and heat pump products, while providing the best service and
support to all of our customers. Our mission is to help build a sustainable, ecient and green world.
YMGI Symphony-Ductless & Ducted Heat Pump & Heat Recovery:
• SymphonySOLARDCInverter
(55) Multiple PV, (56) Single PV; (78) Multiple PH; (79) Single PH
• SymphonySOLODCInverter
(57)2,3-Single Zone 16 SEER, 09-24K Btu/h
(58)2-Single Zone 16-22 SEER, 09-36K Btu/h
(58)3-Single Zone 21 SEER, 09-36K Btu/h
(58)4-Single Zone 30 SEER, 09-18K Btu/h
• SymphonyCHOIRDCInverter
(59)2-DC Inverter Multiple Zone 16 SEER, 2x09K to 5x12K Btu/h
(59)4-DC Inverter Multiple Zone 21 SEER, 2x09K to 5x12K Btu/h
(59)2S-DC Inverter Multiple Zone 16 SEER 6x09K to 9x09K Btu/h
• SymphonyVRF-DCInverterHPorHeatRecoveryupto80Zones.
• SymphonyHARMONY-PackagedSelf-Contained
42”x16” PTAC/PTHP, 26” & 24” TTWA, and 37”x24” WMMP
• SymphonyCONDUCTOR
SideDischargeCondensingUnitSHCR
MiniCentralPackagedUnit VPAK
YMGIGroup
601 Arrow Ln, O’Fallon, MO 63366
www.ymgigroup.com
Tel: 866-833-3138 • Fax: 866-377-3355 • Email: [email protected]
Unit appearance and specications are subject to change without notice.
YMGIHVAC&SolarSupply
601 Arrow Ln, O’Fallon, MO 63366
www.ymgihvacsupply.com
Copyright ©2017 YMGI Group
 Loading...