

Page 1

LITERATURE Part No: LIT-WMMS-USER MANUAL-0102-20130201
AIR CONDITIONER AND HEAT PUMP
WALL MOUNT MINI SPLIT TYPE
Series M2
USER'S MANUAL
SINGLE, DUAL, TRIPLE, QUAD ZONES
Literature Part No: Lit-WMMS-User Manual-0102-20130201
For WMMS Series of Product 09 to 60K Btu/h Single/Dual/Tri/Quad Zone (Cooling, Heat Pump W or W/O Ele. Heater)
Subject to Continuous Engineering Improvement without Prior Notice.
(This Manual is Good for Mini Split Wall Mount Product Line of Different Brands Made by
YMGI Group-YMGI, YMGI Products, and Others Claimed by YMGI Group,
POB 1559, O'Fallon, MO, USA-Check with [email protected] or [email protected])
This product is designed and manufactured free from defects in material and workmanship under the normal use and
maintenance. Installation, operation, maintenance and service shall follow professional practices for regular cooling and
heating equipment, NEC, State, City or Local Codes and related manuals from us. Otherwise, damage to equipment or
property even injury to people may occur.
Installer: Currently licensed HVAC installer only, Read this manual before installation. Sign on the warranty registration card.
User: Keep this manual for future maintenance and service use.
Servicer: Use this manual for service reference.
YMGI Group, POB 1559
YMGI Group New Energy, POB 1668
O'Fallon, MO 63366, USA
Tel: (866)833-3138 Fax: (866)377-3355
Web Site: www.ymgigroup.com
Email: [email protected]
YMGI, Engineered Comfort Products for A Sustainable and Efficient Green World !
Page 2

CONTENTS
End User Technician Contact of Technical Support-Manufacturer
Toll Free Number: 1-866-833-3138 x 703
Email: [email protected]
P1 OF 34 P2 OF 34
Manufacturer shall not be responsible for problems due to Do-it-Yourself(DIY) installation or other bad installation
or abnormal usage of this unit such as unreasonable capacity or efficiency expectation of the unit, working out of
the designed or recommended outdoor weather conditions, and
A bad connection of the connecting pipes.
Folding or deterioration of connecting pipes during installation.
Shocks during the installation due to unprofessional or incautious installation or usage.
An installation or usage not conforming to the regulations or factory recommendations.
Possible costs, services or disasters caused by such bad installation or abnormal usage.
A not very effective operation of the air-conditioner due to a bad vacuum.
A distance between indoor and outdoor units that exceeds the recommended ranges.
The presence of foreign substances left in the air-conditioner during installation.
The under performance due to such bad installation or abnormal usage.
Water leakage problems due to such bad installation of drain hoses.
Refrigerant or oil leakage due to unsuccessful pipe connections.
Problems caused by rough handling unit during bad installation or abnormal usage.
IMPERATIVE
LIABILITIES
Always Keep Your External Unit In A Vertical Position During Handling.
All Units Shall Be Installed by Experienced or Licensed HVAC Contractor or Technician.
Customers must NOT Install This Unit by Themselves or Hire Non-Licensed Persons to Do the Job. We
Decline Any Consequences, Including Damage to Unit, People, Properties and Others Resulted from Such
Behaviour.
Following NEC, State and Local Codes and Installation Instructions of All Units, Otherwise Unit Warranty Will
Be Void and Serious Damage To People Or Property May Be Caused.
Read Manuals Thoroughly before Installation.
YMGI Group Shall NOT Take Any Responsibilities for Any Damage or Loss Due to Improper Installation or
Operation or Natural Disaster.
Don't Supply Power until All Wiring and Tubing and Checking is Completed.
Ground the Unit Following Instructions and NEC, State and Local Codes.
Connect All Wiring Securely. Loose Wire or Other Bad Contact May Cause Arc or Overheating and Fire
Hazard.
(End user needs to contact installation or service technician to check the unit, before the
technicians contact manufacturer technical support-straight technical communication)
16
15
18
20
21
22
22
23
25
27
29
2
3
14
17
19
32
33
13
21
INDOOR UNIT-MAJOR COMPONENTS
IMPORTANT NOTES
BRIEF INTRODUCTION TO MINI SPLIT WALL MOUNT SYSTEM
SAFETY-ATTENTIONS
MINI WALL MOUNT SYSTEMS-MODELS
SYSTEM COMPONENTS-GENERAL
SYSTEM COMPONENTS & INSTALLATION CLEARANCE: SINGLE ZONE
SYSTEM COMPONENTS & INSTALLATION CLEARANCE: DUAL ZONE
SYSTEM COMPONENTS & INSTALLATION CLEARANCE: TRIPLE ZONE
SYSTEM COMPONENTS & INSTALLATION CLEARANCE: QUAD ZONE
REMOTE OR LINE CONTROL
LED DISPLAY PANEL
REPARATION OF REMOTE OR LINE CONTROL
FUNCTIONS-REMOTE OR LINE CONTROL
OPERATION OF THE UNIT
SERVICE AND MAINTENANCE
DOUBTING ABOUT UNIT FAILURE
LIMITED PRODUCT WARRANTY POLICIES
LIMITED PRODUCT WARRANTY REGISTRATION CARD
WARRANTY AND TECH. SUPPORT
USER NOTES AND SERVICE LOG
12
34
MEMO
31
DIAGNOSIS CODE & TROUBLE-SHOOTING GUIDELINE
YMGI, Engineered Comfort Products for A Sustainable and Efficient Green World !YMGI, Engineered Comfort Products for A Sustainable and Efficient Green World !
CUSTOMER AND TECHNICIAN MUST READ
4
Page 3

MUST READ
MUST READ
P3 OF 34
P4 OF 34
LIMITED PRODUCT WARRANTY POLICIES
The YMGI products are designed and manufactured free from defects in workmanship, and materials for normal
use. However, for any reason, including many handlings and occasions between the YMGI factories/warehouses
and where you receive the products, the unit doesn't work, YMGI Group will help to remedy the occurrence in the
following warranting ways:
Compressor: YMGI will warrant the compressor of YMGI-validated and approved warranty filing, for a period of
5 years from the date of successful installation at original location.
Parts: YMGI will warrant parts of YMGI-validated and approved warranty filing, for one year from the date of
successful installation at original location.
All warranty compressors and parts replaced will become the sole property of YMGI Group and must be returned
to YMGI Group upon request. Warranty parts may be new or refurbished. All parts are tested and approved
before shipping.
At no time does the YMGI Group warrant labor cost of any type. Warranty will start from the date of
successful installation at initial location, or 90 days as of original shipping date from YMGI Group,
whichever comes first.
This is a standard warranty of limited liability and DOES NOT cover the following:
* Any damage or repairs to properties, or persons as an incident or consequence of improper or faulty
transportation, installation, operation, maintenance or service.
* Damage caused by frozen or broken water hoses or refrigeration pipes in the event of equipment failure.
* Any damage as a result of floods, fire, wind, lightening, accidents, corrosive atmosphere or any other conditions
beyond the control of YMGI Group.
* Any damage due to interruption or inadequate electrical service to equipment.
* Any products that are installed outside the US or Canada.
* Any unit that has been moved from the original installation address.
* Any labor costs associated with the installation or service of the unit.
* Poor unit performance due to improper unit selection (SEER, Unit size).
To validate the above warranties, ALL the following conditions must all be fulfilled:
1. The unit was fully (100%) and successfully installed by licensed or certified HVAC technicians.
2. The unit was installed following all NEC, state and local codes.
3. The unit was installed following all instructions and manuals made by YMGI Group.
4. ALL fields, especially the technician-checklist, of the Limited Warranty Registration Card/Form were filled
completely by the installing technician and signed by both the installing company technician and the unit owner.
5. The Limited Warranty Registration Card/Form and a copy of the original installing company's invoice had
been received by YMGI Group-Warranty Dept., POB 1559, O'Fallon, MO 63366, within 7 days of successful
installation.
No warranty filing will be validated or approved, if any one of the above 5 conditions is not met.
Product registration doesn't guarantee the validity of this limited warranty statement.
Steps to follow for warranty part replacement:
1. Installing or service technician contacts YMGI tech support at 1-866-833-3138 ext 703 from the jobsite, to
double-check and confirm with YMGI Technical support the exact part(s) needed to fix all the problems.
2. YMGI will check the customer's warranty filing. Parts for validated and approved warranty will not be charged.
Parts of invalid warranty filing or unapproved warranty requesting, will be charged accordingly.
3. YMGI will ground ship out the parts ASAP. Expedited shipping is available at the customer's cost.
4. Replacement parts of approved warranty registration are to be warranted for the remainder of the 1 year parts
and 5 year compressor warranty. Purchasing of replacement parts of invalid warranty filing or unapproved
warranty requesting, will be as they are and bear no warranty.
YMGI keeps on improving products with various engineering changes without prior notice. Such improvements
or changes include but not limited to product specification, appearance, functions, sizes, packaging and others.
These improvements or changes will not void the limited warranty stated herein. YMGI keeps the final explanation
of this warranty policy.
LIMITED PRODUCT WARRANTY REGISTRATION CARD
LIMITED PRODUCT WARRANTY
REGISTRATION CARD / FORM
YMGI to Fill Top Portion, at Shipping, and Keep Copy A; Center Copy B for Installer to Fill and Mail back to YMGI; Bottom Copy C for Customer to Fill and Keep
Installation Finished and Unit Works Successfully.
Print Name of Installation HVAC Technician:
Signature:
Date and time:
Installation Finished and Unit Works Successfully.
Print Name of Owner:
Signature:
Date and time:
1) Are you the only one to install whole system?
If not, % of installation done by you (HVAC technician).
3) Did you read the User Manual and Installation Instruction, before you
started the installation?
5) Supply electrical power V/Ph/Hz measured at wiring terminal block of
Indoor unit: outdoor unit:
7) Wire gauge, length and terminal colors between circuit breaker/
disconnect switch to outdoor unit:
9) The size of HVAC circuit breaker/fuse or disconnect switch to the
outdoor unit:
11) What is the refrigerant pipe length between each indoor unit and the
outdoor unit? Unit A Unit B Unit C Unit D...
13) What is the elevation difference between each indoor unit and the
outdoor unit? Unit A Unit B Unit C Unit D...
(indoor unit above outdoor unit +, below -)
15) Where is the outdoor unit located?
Ground wall balcony roof other
location or pad
17) Were the refrigerant pipe ends capped or taped seal, prior to running
them through structures to keep debris from entering the copper lines?
21) Did you check if the compressor can be started and stopped in a
correct (design) manner?
25) Have you checked all unit functions, with customer's witness, and all
functions are correct?
27) Do you provide regular one-year free technical service for this
installation?
2) What had been done, prior to your arrival?
4) Who unpacked the unit and accessory boxes to check for damage?
6) Incoming electrical power V/Ph/Hz measured at terminal blocks of
indoor unit: outdoor unit:
8) Wire gauge, length and terminal colors between each indoor and
outdoor unit: Unit A Unit B Unit C Unit D...
12) Where is/are the indoor unit(s) located?
Unit A Unit B Unit C Unit D...
16) Have you checked to make sure there is no cross-piping and no
cross-wiring between any two indoor units (zones)? How did you do it,
who was with you?
22) If copper length were not made to the supplied or recommended
refrigerant pipe length, how much refrigerant added or deducted?
26) Did you show the user how to operate the unit? Did he/she understand you?
Contact Where the Units are Installed:
Name:
Address:
City:
State (Province):
Contact of the Installing HVAC Contractor/Technician:
Technician Full Name (Print):
HVAC Technician's Company Name:
Address:
Currently Licensed or Certified HVAC Technician License or Certification Number:
Official Phone # to Check the License Validity:
Phone: Fax:
Email:
Country:
YMGI-Recommended Contractor/Technician:
Phone:Fax:
Email:
City:State (Province):
License Approved or Certified by:
The Company the
Unit Was Sold Though:
Did the Company
Pay to YMGI:
Installation Invoice Attached
to the Registration Card
For
YMGI
Use
Only
Unit #5
Unit #6
Unit #7
Unit #8
Outdoor Serial Number (One Outdoor
Unit, One Registration Card/Form):
Indoor
Serial
Number:
For Multi
Zone Units
Unit #1
Unit #2
Unit #3
Unit #4
Shipping Packing
List Number:
Registration Card
Serial No.
Date the Filled Registration
Card YMGI Received:
Unit(s) Work
Successfully (Yes/No):
Warranty
Approved
Warranty
Denied
18) Have you checked and run cooling or heating, one unit by one unit, all
working fine?
20) Did you vacuum correctly to check the connecting pipes and indoor unit for
leakage, what was the micron gauge reading, for how many minutes?
24) What were the measured temperatures (probe not touching any metal):
OOO
At cooling: indoor return air F, discharge air F, and outdoor F
OOO
At heating: indoor return air F, discharge air F, and outdoor F
23) Measured refrigerant pressures at outdoor service suction valve, when unit
was st.
O
Heat pump (PSI): Cooling (PSI): Outdoor Ambient Temp. ( F):
HVAC Contractor/
Technician--Name
Hired YMGI-Recommended
HVAC Contractor/Technician?
List for Installating HVAC Technician to Double Check Installation Quality, and Warranty Processing Purpose (if not filled by technician, or not filled fully, warranty will void)
10) Are the inter-connecting wires and copper lines between indoor and outdoor
units installed/covered/protected by line set covers, or anything else?
14) Did you check the indoor unit for condensate leakage and refrigerant
leakage, before and after connecting them?
28) Do you list the working details in the invoice and leave a copy to the
customer?
19) Did you charge the inter-connection copper pipes and indoor unit with
nitrogen to check for positive leakage (pressures 150-200PSI), before
conducting vacuuming leakage check?
By signing above, I acknowledge the liability and responsibility for any false statement or not telling all the facts, and I authorize YMGI to check the details of the filled above, and make its
decision on warranty. I understand our filing or filling the warranty card/form DOESN'T mean automatic warranty approval, because warranty is approved only to those qualified and successful
installations by qualified HVAC technician. I know the warranty, if approved, is a standard 5-year compressor and 1-year other parts only, without any labor coverage. I agree to and will follow
all the contents contained in the Limited Product Warranty Policy that YMGI, not other entity, stated in public, including but not limited to manuals, web site, email, etc.
Important Note: A copy of the installing HVAC company's invoice to show all their work details, your payment proof, center copy B of this registration card filled after a successful
installation, all three (3) MUST be mailed together to Warranty Dept., YMGI Group, POB 1559, O'Fallon, MO 63366, for warranty processing. Customer keeps bottom copy C. YMGI
will check against copy A that was kept at YMGI.
Is the outdoor unit anchored to
ground or secured onto wall
bracket?
YMGI, Engineered Comfort Products for A Sustainable and Efficient Green World !YMGI, Engineered Comfort Products for A Sustainable and Efficient Green World !
Page 4

MUST READ
MUST READ
P5 OF 34
P6 OF 34
CUSTOMER AND TECHNICIAN MUST READ
PRIOR TO OPENING THE BOX OF, OR INSTALLING /
SERVICING THE PRODUCT (HVAC & R)
Upon the purchasing, unpacking, installation and/or service of this product, you and all other parties hired to
install or service your products, have read all YMGI Group (we) has written hereafter and all agree:
1) You understand all that is written hereafter in this and other documents that we publish.
2) You will follow what is written hereafter in this and other documents that we publish.
3) You will be bound by and completely follow all policies, guidelines, instructions, warnings, attentions and other
materials, as published by YMGI Group, its subsidiaries or sister companies, in writing.
4) Only a successful installation, fully (100%) conducted by a qualified HVAC technician(s), as detailed in the
checklist of the Limited Product Warranty Policy and Limited Product Warranty Registration Card/Form,
along with a properly detailed installation invoice, is eligible for the Limited Product Warranty.
5) Failure to follow what is written hereafter may cause various equipment issues that you will take full
responsibility and liability for, including, but not limited to, losing manufacturer's warranty, unit not working
properly, unit malfunctions, under-performance, decreased safety, increased potential of various damages to
your property, body, home and/or business, etc.
6) YMGI documents and policies supersede those made or provided by the sales distributors or installing
contractors. YMGI Group maintains the final authority in explaining and resolving any and all discrepancies
that might exist between distributors/contractors' documents and ours.
YMGI STRONGLY RECOMMENDS:
* Customer hires a currently licensed/ certified HVAC technician(s) (N.A.T.E. or A.C.C.A certification is strongly
recommended) to conduct 100% of the installation, inspection of all unit functions and repair service.
* Customer signs an installation/service contract with the installation/service technician's company who has good
service references and you trust. Installation and service is very important to the life of your investment and
provide you a lifetime of comfort and peace of mind.
* Customer requests the installer to put down a1-year labor warranty coverage in the installation contract.
* Have the technician check against all the items in the checklist of the Limited Product Warranty Registration
Card/Form, sign and date it, to help ensure a proper and professional installation.
* Customer pays in full, only after all the unit functions are inspected, the unit works properly, warranty checklist
is fully filled out and signed and you are fully satisfied.
* If any unit abnormality is found, have your technician check the unit first. Have them call for manufacturer
technical assistance, if necessary, from your job site, not his office, so that we can more accurately assist him
in diagnosing the cause of the malfunction.
Dear Customer(s)/End User(s)/Unit Purchaser(s)/Installer(s)/Contractor(s)
Thanks for choosing YMGI products.
The YMGI equipment you purchased is either a split-type or a self-contained cooling/heating system which
requires an installer's license, certification, knowledge, experience, carefulness and details for a successful and
good installation. This equipment is different from those window or portable air conditioners you can normally
purchase from local retail stores such as Home Depot, Lowe's, Sears, etc. which the manufacturer may not
require licensed personnel to install.
Reading and following the YMGI Group recommendations, suggestions, and requirements, written in the
following pages and other documents, is the first step in our hope and effort to help ensure a smooth installation
& proper operation of your products for many years.
WHY DOES YMGI GROUP REQUIRE INSTALLATION AND SERVICE TO BE
PERFORMED BY LICENSED OR CERTIFIED HVAC TECHNICIAN/
CONTRACTOR?
1) They have the training and experience to accurately and safely install and service your equipment.
The equipment runs with high-pressure refrigerant and oil and line-voltage. The copper lines must be installed
properly to prevent leakage and foreign substances from contaminating the refrigerant system.
2) You will save money in the long run.
If any problems occur on the unit that is fully installed by the licensed or certified contractor, they have the
training and experience to correct the problem more efficiently. A technician(s) may be unwilling to repair an
issue on a unit that they did not install. If you do find a technician willing to perform the service, there is an
increased possibility of higher service fees than normal, increased service visits, or delayed service from that
technician.
3) It's the law!
The federal, state and/or local government and authorities have various governing laws or regulations,
guidelines, ordinances, etc., requiring only licensed or certified professionals can install and service high
pressure HVAC equipment.
SUGGESTIONS, TO AID YOU IN HIRING AN HVAC CONTRACTOR:
1) Hire a currently, practicing, licensed/ certified HVAC technician/ contractor. Technicians, who are no longer
practicing (retired, etc.) in this field, may not have the updated knowledge or may lack experience on the
equipment you have purchased.
2) Hire a technician/ contractor who services customers in your local area and you are familiar with. Local
contractors have a faster response time and will be easier for you to determine if they are reputable.
3) Use only reputable licensed/ certified HVAC installation contractors/ technicians to prevent any unexpected
charges as a result from unethical business practices.
4) Check their references, to verify they are a good service provider to the general customers. N.A.T.E or A.C.C.A
certified technicians are strongly recommended.
5) Some contractors/ technicians may not feel comfortable about installing the equipment that you purchase for
them to install, and they prefer to purchase and install the equipment. You can contact YMGI directly to check
and see if there have been any contractors in your area who have installed our products or similar.
6) Ask for a detailed quote for the whole installation project. A flat rate quote is the safest contract for both you
and the contractor
7) Your local HVAC technicians may charge you on a project basis or on an hourly basis. To our general
knowledge and experience, a full single head installation may normally cost anywhere from $800 to
$1500. These costs are estimates and your actual costs may differ due to job nature and location.
8) Number of hours can vary depending upon each individual situation, some factors are, but not limited to:
9) How difficult or complex the indoor unit is to be securely installed.
10) Hoe difficult or how long the inter-connecting pipes and wires are to be installed.
11) If all the suggestions have been taken and all the necessary steps are followed.
CUSTOMER AND TECHNICIAN MUST READ
YMGI, Engineered Comfort Products for A Sustainable and Efficient Green World !YMGI, Engineered Comfort Products for A Sustainable and Efficient Green World !
Page 5

The cost of not having your unit installed properly can be more expensive than spending the little extra money
that hiring the right contractor will cost. Protect your investment and warranty eligibility by doing it right the first
time.
THE FOLLOWING LISTS THE JOBS AND RESPONSIBILITIES OF THE
TECHNICIAN/ CONTRACTOR:
* Performing a load calculation for the room(s) you would like to air condition. Cooling requirements will be
different from the heating requirements. They will consider cooling hours, heating hours and your special needs
or requirements. Supplemental heating such as baseboard heater or portable heater may help you save money
by not over-sizing or under-sizing the heating equipment.
* Selecting the right type, size or model of cooling and/or heating equipment.
* Determining the best location to install the unit. (Positioning indoor unit, outdoor unit and running the inter connecting pipes/wires.)
* Selecting the correct electrical components (HVAC circuit breaker or fuse and disconnect switch for the electric
power to the outdoor unit, types and sizes of the connecting wires between circuit breaker/disconnect switch
and outdoor unit, and the wires between outdoor unit and indoor unit).
* Keeping the indoor unit away from the ceiling and the outdoor unit away from the wall, bushes and other
obstacles at a proper and safe distance to allow for the proper airflow through the unit's.
* Placing the units on a secured level structure.
* Taping and sealing both ends of the inter-connecting pipes, before running them through structures, to prevent
dust or other debris from getting into the pipes otherwise they will contaminate and damage the refrigeration
system. Failure to follow this practice will make your factory warranty void.
* Connecting the inter-connecting pipes between the outdoor and indoor units. Checking for leaks through
pressurization with nitrogen. After releasing nitrogen, evacuate the piping and indoor unit, for removal of system
contaminants. Finally refrigerant introduction and adjustment, if necessary, from the outdoor unit.
* Back-seating the stopping valves at outdoor condensing unit to release pre-charged refrigerant from outdoor
unit to indoor unit.
* Measuring and recording the electrical voltages at different terminals and the refrigerant pressures at stopping
valves of outdoor condensing unit.
* Verifying and ensuring the unit is connected to the proper electrical power supply.
* Adjusting refrigerant levels (if necessary) following the installation instructions or chart on the unit.
* Checking for any unusual noises and other abnormalities that might be present.
* Operating the unit and check all functions, one by one, and explain to the owner how to operate and maintain
the unit.
* Completing all fields in detail on the installer checklist, signing and dating the Warranty Registration Card/Form.
LIMITED PRODUCT WARRANTY
If the installation is successfully and fully done by a qualified licensed/ certified HVAC technician/contractor, the
registration card/form is filled completely and correctly, and filed along with a valid installation invoice from the
contractor company within 7 days of the original installation, the following standard Limited Product Warranty is
qualified:
5-year on compressor and 1-year other PARTS ONLY. There is no labor coverage.
12) If the contractor(s)/technician(s) are experienced with the systems/brands you purchase.
You might spend less. But remember, many times you get what you pay for.
13) Sign a contract with them. The contract should list all the detailed work they will conduct and the standards
they will follow. Some contractors are willing to include a 1-year installation/service warranty at no extra
charge. Check with them to see if that is available. If available, include that in the contract.
14) Verify and confirm the installation is done completely and all the unit functions have been checked and are
working properly, all the items in the checklist have been checked and marked well in the warranty registration
card/form, prior to paying the contractor in full.
CUSTOMER AND TECHNICIAN MUST READ
BRIEF UNIT INFO
BRIEF UNIT INFO
P8 OF 34
P7 OF 34
1) The YMGI Limited Product Warranty Policy, details the eligibilities, coverage's and other explanations of the warranty
terms between YMGI group and the unit owner.
2) The YMGI Limited Product Warranty Policy and the Warranty Registration Card/Form are either included inside the
user's manual and/or installation instruction manual, or come separately in the unit packaging box/envelope. If for any
reason they are not included with your shipment, contact our sales or customer service to request a copy (electronic or
printed), prior to installation.
3) The checklist, in the Warranty Registration Card/Form, is for the currently licensed/ certified HVAC technician to fill out
completely, while verifying all unit functions are operating correctly. This checklist is for the technician to test and check all
details of your unit, to verify and ensure its proper operation.
4) The technician must complete all fields in the Warranty Registration Card/Form, especially the unit model and serial
numbers and distributor information, and most importantly, the technician checklist.
5) Warranty Registration Card/Form shall be mailed, along with the original copy of the currently licensed HVAC
contractor's full installation invoice, to YMGI Group, within 7-days after original installation, in order for YMGI to review
and process your warranty registration.
6) Keep a copy of Warranty Registration Card/Form for your own use in the future, to aid in any possible future warranty
claiming, any request of parts, customer service, and/or technical support.
7) YMGI reserves the right to approve or deny the warranty status based on the information reviewed.
Mailing address of the Warranty Registration Card/Form: Warranty Department, YMGI Group, POB 1559,
O'Fallon, MO 63366, USA.
Following these requirements will aid in ensuring the units will be installed to the general HVAC practicing
standards and are necessary factory requirements, to find problems early, prevent possible damage to the unit
and help ensure the unit will work properly for its life time.
QUESTIONS ABOUT SELF-INSTALLATION VS HIRING LICENSED HVAC
TECHNICIANS
Does YMGI allow to do-it-yourself installations (DIY) partially or fully? NO.
Unfortunately no brand or manufacturer can take the responsibility of the equipment if it is not professionally
installed by a currently licensed HVAC technician/ contractor.
If unit is installed by non-licensed people, in part or fully, will the factory warranty be void? YES.
Some DIY installations have been successful, but these are exceptions. Most have resulted in equipment failure,
due to lack of knowledge and experience. A few of the problems result from DIY's lack of knowledge in the
following areas:
* Sizing and selecting correct type, size and model of cooling and/or heating equipment.
* Sizing and installing correct electric circuit breakers and wires.
* Wiring the units correctly and properly.
* Taping the ends, connecting to indoor and outdoor units correctly and properly.
* Vacuuming the inter-connecting refrigerant lines.
* Checking and/or fixing the refrigerant leaks.
* Checking and/or fixing the condensate drain leaks.
* Releasing the refrigerant from outdoor unit to indoor unit.
* Running the unit to check all the unit functions.
* Conducting the installation or trouble-shooting with correct tools, experience or professional knowledge to
correct the problem.
RECEIVING AND FREIGHT DAMAGE
ATTENTION
* Freight (package/unit) shall be checked thoroughly for damage at receiving before accepting by signing on the
carrier's delivery paperwork.
* Upon shipment being signed for acceptance, it becomes a binding document as to the condition of the products
on delivery. We cannot process any shipping damage claim, if you accept the delivery.
* If damage is found at delivery, both you and the delivery driver must make notes on the delivery receipt or other
freight paperwork detailing the damage found by marking position/parts on unit, description of damage, time/
date, your name, contact phone, etc. on the delivery documents. Make a copy of the marked delivery receipt.
CUSTOMER AND TECHNICIAN MUST READ
YMGI, Engineered Comfort Products for A Sustainable and Efficient Green World !YMGI, Engineered Comfort Products for A Sustainable and Efficient Green World !
Page 6

F. Charges for your return:
1)A restocking charge of 25% creditable invoice value.
2)All return shipping fees.
3)Additional fees will be charged, if products are found to be damaged, missing or used.
4)YMGI will notify the distributor of the charges only after the inspection and assessment of the returned products
has been completed.
Attention:
1) Returned products must be shipped within 7 days of YMGI's releasing of RGA #.
2) All RGA shipping shall be prepaid by the customer. YMGI will not accept any COD freight.
YMGI GROUP DISCLAIMING-1:
YMGI Group will NOT accept any return, or may not honor 100% credit for any return of Product(s)/Part(s)/
Accessories, in any of the following cases:
* Return requests made 30 or more days after the date of original sales shipping from YMGI Group warehouse.
* Return shipment is initiated 8 days or more after the RGA is approved.
* Returned products received not displaying an YMGI-approved valid RGA #.
* Returned products received C.O.D.
* Returned products not received in the original packaging.
* Returned products received with non-repairable packaging, including duct tape or marks on units or carton
boxes.
* Returned products received with missing units/parts/accessories.
* Returned products received, are found to be non-functional or damaged.
YMGI GROUP DISCLAIMING-2:
* YMGI Group will not be responsible for any losses of returned unit(s)/part(s)/accessories in transition to YMGI
Group warehouse.
* YMGI Group RGA is valid for seven (7) days from the original issuing date. Returns will not be accepted, if
shipping is made 8 or more days after the YMGI Group RGA is issued.
DEFECTIVE UNITS / PARTS / ACCESSORIES-REPAIR OR REPLACEMENT
Out of thousands of units sold every year, there may be an occasional instance your product does not operate
properly. Reasons of but are not limited to: manufacturing, installation, operation, maintenance and
knowledge of operator.
The defects might be found before/ during installation or in the operation of the unit. Defects can be in the form
of blown fuse(s), defective control board(s), damaged remote control, loose or missing screws, etc. These
defective parts can be replaced easily.
Some functions of our units are different from what are typical in traditional split type air conditioning and heat
pump systems and similar systems made by other manufacturers. These are not defects. Take some time to
learn the functions of your unit. We will be happy to assist you with any questions you may have concerning the
functions of your new unit.
1. Part repair or replacement after trouble-shooting: This is the most common and generally the easiest and
most economical way for all parties, since the problem and all part needs can be accurately and completely
identified.
* Your technician calls our technical support line, from your job site, after checking your units and getting all the information
ready.
* Our technical support will go through several steps, over the phone or through email, with your technician, in order to help
identify and resolve the problems. Normally wiring correction, piping correction, part repair/ replacement will resolve the
problems.
Equipment failure does not automatically denote a product defect from the factory assembly line. The defects can
be caused, during production, transportation, installation, operation, maintenance, or service. Defects may NOT
be the responsibility of the manufacturer. Nobody willfully or intentionally produces a defective product. No
determination shall be made until the technical issue(s) or the causes of the defect(s) are identified.
If a defect is found, whether at the original installation, or during normal operation, we will gladly help you in the
following steps in sequence from 1 to 3:
CUSTOMER AND TECHNICIAN MUST READ
MUST READ
MUST READ
P9 OF 34 P10 OF 34
YMGI, Engineered Comfort Products for A Sustainable and Efficient Green World !YMGI, Engineered Comfort Products for A Sustainable and Efficient Green World !
* If the damage is minor or partial, that you choose to accept, you can contact the distributor or YMGI to discuss
the possible replacement of the damaged part.
* If refusal of the shipment is needed due to severe freight damage, DO NOT sign the carrier's delivery receipt
document indicating that you accept the products. Mark receipt "REFUSED DUE TO FREIGHT DAMAGE."
Sign and date along with the delivery driver's signature and date.
* Take pictures showing the damage, before the delivery driver leaves.
* If you accept the delivery or fail to note damage on the driver's delivery receipt, the ability to claim freight
damage is lost and YMGI will not replace the unit on this basis.
* Contact the distributor or YMGI, report the damage by forwarding the marked delivery receipt copy and pictures.
* Only after YMGI verifies with the carrier the necessary detailed notes of received freight damage, will the
damaged products be eligible for replacement.
* If the returned products are found not damaged, YMGI will treat it as a return and will charge you 25% of
product value plus added shipping cost.
RETURN-YMGI GROUP POLICIES & RETURN GOODS AUTHORIZATION (RGA)
All sales are final. If the customer wishes to return a product, the following Return Policies apply.
A. Only those products (units, parts or accessories) under the following conditions, are eligible for return:
1) Products are returned within 30 days of their original shipment date from YMGI
2) Products have not been installed.
3) No damage exists on the products being returned.
4) No missing products.
5) Products and packages are clean.
6) No duct tape or marking on the product or box.
7) Products are still their original package, in good shape and in re-sellable condition, as YMGI determines.
B. Preapproval steps for your return request:
1) Contact your distributor or YMGI to request a return.
2) Photograph your product and box to show details
3) YMGI will review your request, along with the pictures and any other details pertaining to your request.
4) If YMGI agrees to process your return request, a form called Return Goods Authorization (RGA), along with
an assigned RGA # will be forwarded to your distributor or you.
5) Any return without YMGI Group approved RGA #, will not be accepted.
C. YMGI must verify the following before you can pack your products:
1) No products (units, parts, accessories) are missing.
2) No damage is found.
3) The products are in the original packaging.
4) No duct tape on any product or box.
5) Pictures have been taken and sent to YMGI to verify the product and boxes are not damaged.
6) The RGA has been completed and a copy has been returned to YMGI, via email or fax.
7) YMGI has approved the request in writing.
D. Shipping Preparation:
1) Package all products in a manner in which no damage can occur to the product and secure to a pallet.
2) Take and forward pictures of packed pallets for YMGI to verify proper packaging and no existing damage.
3) Include the YMGI approved RGA# in the shipping documents.
4) YMGI reserves the right to approve or deny any shipments.
5) YMGI can arrange shipping for you, but not at YMGI's cost. If this option is chosen, a packing list and BOL will
be issued to you through YMGI.
6) If the above option is not chosen, you will be responsible for all freight charges. YMGI will not accept any
returned items COD.
7) Place the package in an area which is accessible to the shipping company for pickup and limits the possibility
of damage to the product. Customer must be present at the time of freight pick up.
After shipping, fax the BOL to YMGI Group at 1-866-377-3355 or email to [email protected],
detailing the information of the freight company and their tracking number.
E.Freight Damage:
1) YMGI Group will inspect returned items
2) Claiming of freight damage from a customer hired carrier will be the customer's responsibility.
3) Claiming of freight damage from a YMGI hired carrier will be YMGI's responsibility.
CUSTOMER AND TECHNICIAN MUST READ
Page 7
MUST READ
MUST READ
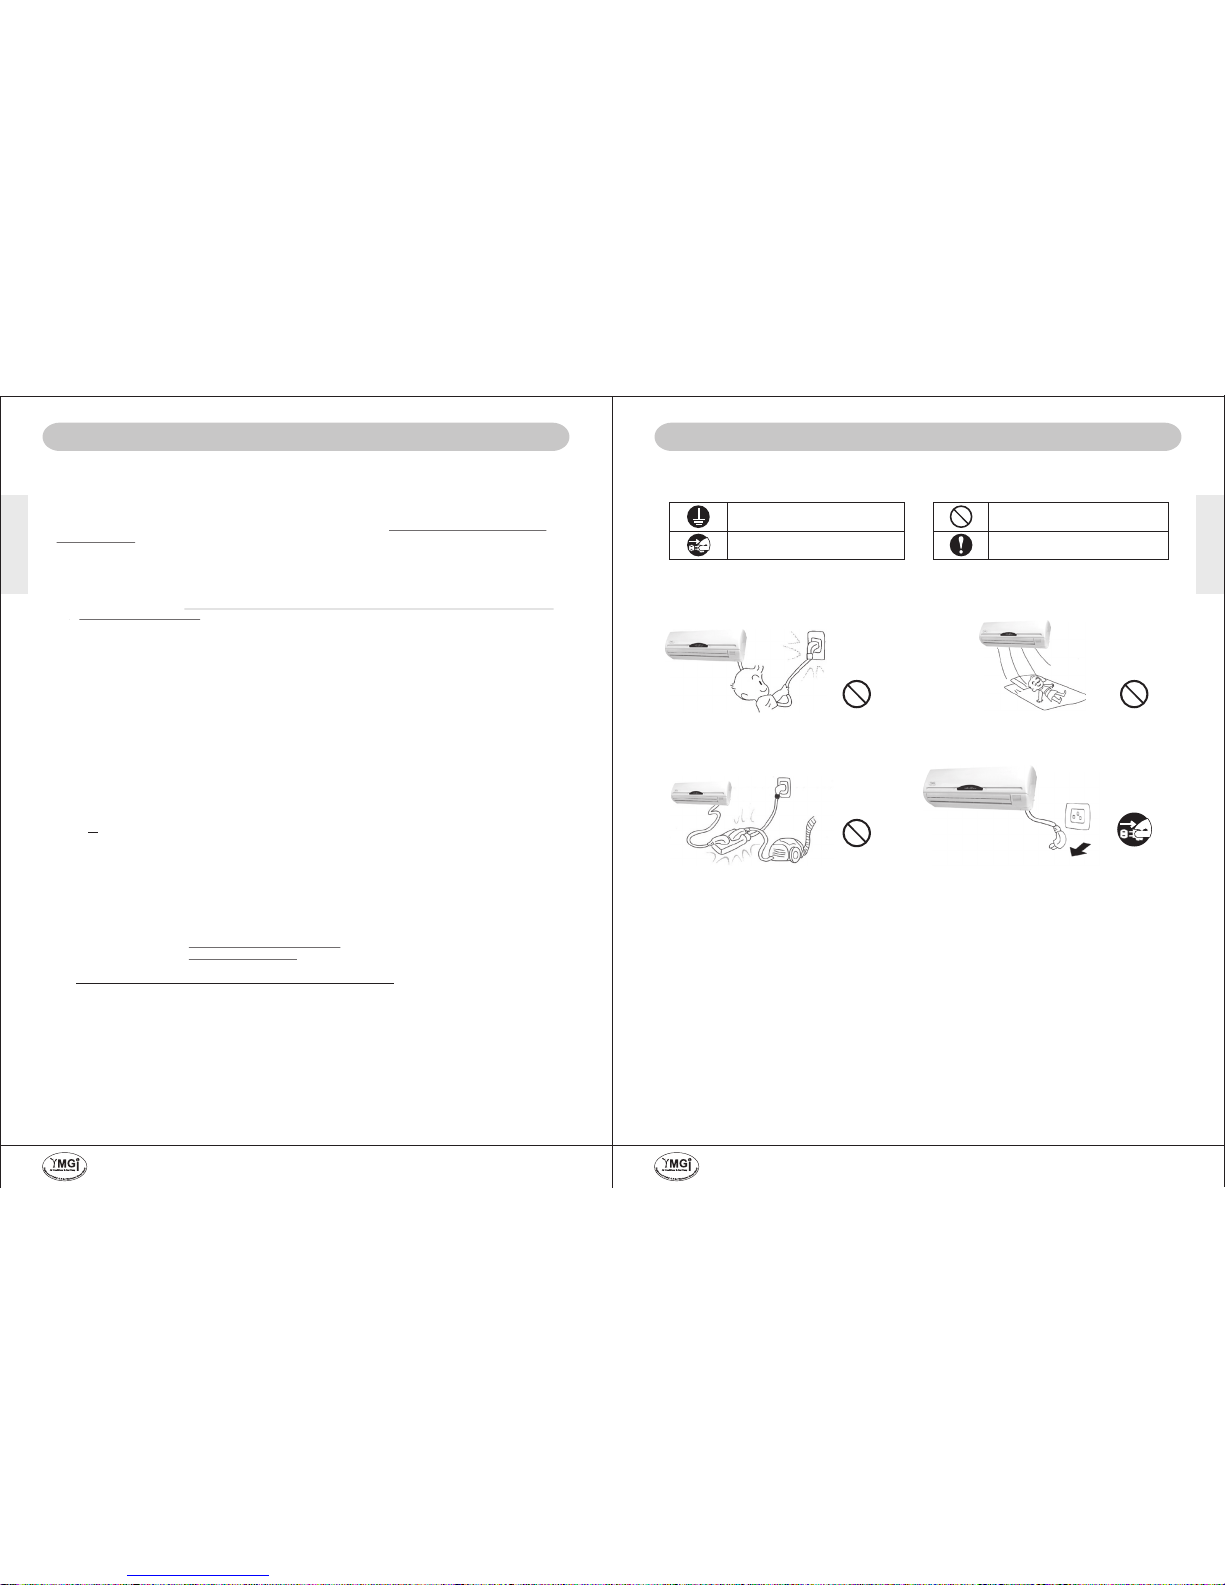
These precautions are essential and must be strictly observed.
DO NOT pull on the power cord or refrigeration lines.
Install them in a secured position. A line set plastic
cover is recommended.
DO NOT install the unit in places where there is
exposure to flammable materials or gas leakage.
DO NOT use wire or circuit breakers that do not meet
electrical safety standards. Several circuits cannot
be connected to one breaker.
DO NOT wire or open the unit while it is running.
Make sure to shut off all circuits prior to inspecting or
servicing the unit.
DO NOT install unit in a damp laundry room or near
flammable gas. All units must be protected by
certified electrical circuit breakers and in accordance
with all safety codes.
DO NOT use the unit in cool or dry mode for
prolonged periods where humidity is higher than 80%.
SAFETY WARNINGS
READ THESE SAFETY WARNINGS COMPLETELY PRIOR TO ANY USE.
DO NOT install the indoor unit close to cooking
surfaces or ventilation systems. Poor placement
could inhibit peak performance.
DO NOT blow cold air directly towards people for
extended periods. It may get you a bad cold.
DO NOT use chemical solvents, flammable
insecticides, or abrasive materials. Clean the unit
only with a soft dry cloth or rag.
DO NOT continue to operate the unit if there is any
abnormal odor, burning, scorching, or smoke. Stop
and disconnect the unit immediately.
DO NOT use the system for anything other than what
it was designed for or any non-HVAC purposes. Do
not store near food, paint, or other chemicals.
DO NOT operate the unit for prolonged periods
without refreshing ambient air. Opening a door or
window periodically will suffice.
DO NOT draw on the power cord or refrigeration
lines. Install them in secured positions. Plastic
cover of line set is recommended.
DO NOT blow the cold air directly towards people
for prolonged period. Otherwise, people may get
cold.
DO NOT use smaller than enough wires. Do not
put several circuits to one breaker. Don't use
smaller than enough circuit breakers. Otherwise
power failure or fire may be caused.
DO NOT wire or open unit while unit is running.
Sparks or fire may occur. It may cause a shock to
people.
Ground connection
Forbidden
Disconnect the plug
Imperative
IMPORTANT NOTES
P11 OF 34
P12 OF 34
* Your technician will then need to verify and confirm the problem(s) before YMGI can ship out the replacement part(s).
Inaccurate or incomplete troubleshooting or part replacement will delay the repair. YMGI technical support will only speak
with a licensed/certified technician in regards to the repair of your unit. In our experience this saves time and money for
all parties involved.
Your technician is the only person to perform any physical checking, trouble-shooting and replacing of any
defective part(s) for your units. Our factory technical support is just a help. YMGI provided no labor warranty
on the products.
2. Unit/part repair at our workshop(s): Due to the limitations of our technical support not being at your job site,
or your technician's experience with our product, the problem may not be resolved as quickly as would be
desired. If the problem is still not resolved after attempts between your technician and our technical support,
you can elect to have the unit repaired at our facility. If this step is chosen:
1) YMGI will send to you the Customer Request to Ship Products to YMGI Service Center for Inspection and Repair,
and Authorization to Charge form.
2) You will review the form and fill all fields appropriately, sign and send back to the YMGI Group.
3) Once the form has been completed and sent back to YMGI, remove the units and ship back to YMGI.
Please make a note describing the problem and communication history, if possible. Our technicians will check the
units and find the problem(s), repair the issue(s), and ship the unit back to you following the conditions set forth in
the signed repair agreement. All unit removal and re-installation is done at your cost and must be done by a
currently valid licensed HVAC technician.
3. Unit replacement: Only applies to those defects reported within 30 days of original purchase date and if all
necessary warranty paperwork had been received and approved. This option applies only if the above steps
cannot resolve the problem(s). Either indoor or outdoor unit replacement is available, based on the actual need,
at YMGI's determination. This option shall be the last resort, due to refrigerant and wiring considerations. All
unit removal, re-installation and shipping cost are the responsibility of the customer. YMGI maintains the final
authority as to unit replacement. Replacement will be made with the same model only. Alternate units will be
treated as a new order.
Returning Replaced Defective Units/Parts/Accessories After Unit Repair: (Only applies to steps 1&3 above)
1) Repack the replaced unit/ part /accessory in the box which contained the replacement part.
2) Parts can be boxed for UPS, FedEx or equivalent ground service. Units shall be secured onto the skid on which the
replacement was shipped after placing into the package from the replacement product.
3) Ship all replaced products, to YMGI-designated location. You will be charged if YMGI does not receive the replaced parts.
Standard factory warranty does not cover the cost of materials and labor that are incurred at your site.
There will be no cost for the replacement unit, if YMGI determines the defect is manufacturer related.
Replacement will be made with the same model, only. Alternate units will be treated as a new order.
CUSTOMER SERVICE / TECHNICAL SUPPORT FROM YMGI GROUP
For questions or help with your unit, contact the original installer or service provider.
YMGI Group does not install nor physically service your unit. Your installer or service provider must check the
unit prior to contacting YMGI Group from your jobsite, in order to be helped in an efficient and timely manner.
* Factory customer service at [email protected] Tel: 1-866-833-3138x704
* Factory technical support at [email protected] Tel: 866-833-3138x703
* Fax: 1-866-377-3355
An "YMGI Group Customer Service/Technical Support Daily Log Sheet" will be filed in writing at our office,
for effective communication between you and YMGI Group customer service, your technician and YMGI Group
technical support. Before contacting the YMGI Group locate the IP# written at the top of your warranty registration
form. Use this IP# whenever you contact the YMGI Group.
DISTRIBUTOR AND MANUFACTURER POLICIES
* All questions concerning sales or money will be directed to the sales distributor from which you purchased the
units.
* Read and follow all policies set forth from the distributor from which you purchased your unit.
* Upon purchase and installation of the unit(s), you agree to be bounded by all policies published by both
distributors and YMGI.
* MGI Group has the final authority and supersedes other related parties (distributors, etc.) concerning all policies
regarding YMGI products.
CUSTOMER AND TECHNICIAN MUST READ
YMGI, Engineered Comfort Products for A Sustainable and Efficient Green World !YMGI, Engineered Comfort Products for A Sustainable and Efficient Green World !
Page 8
MUST READ
MUST READ
SAFETY-ATTENTIONS
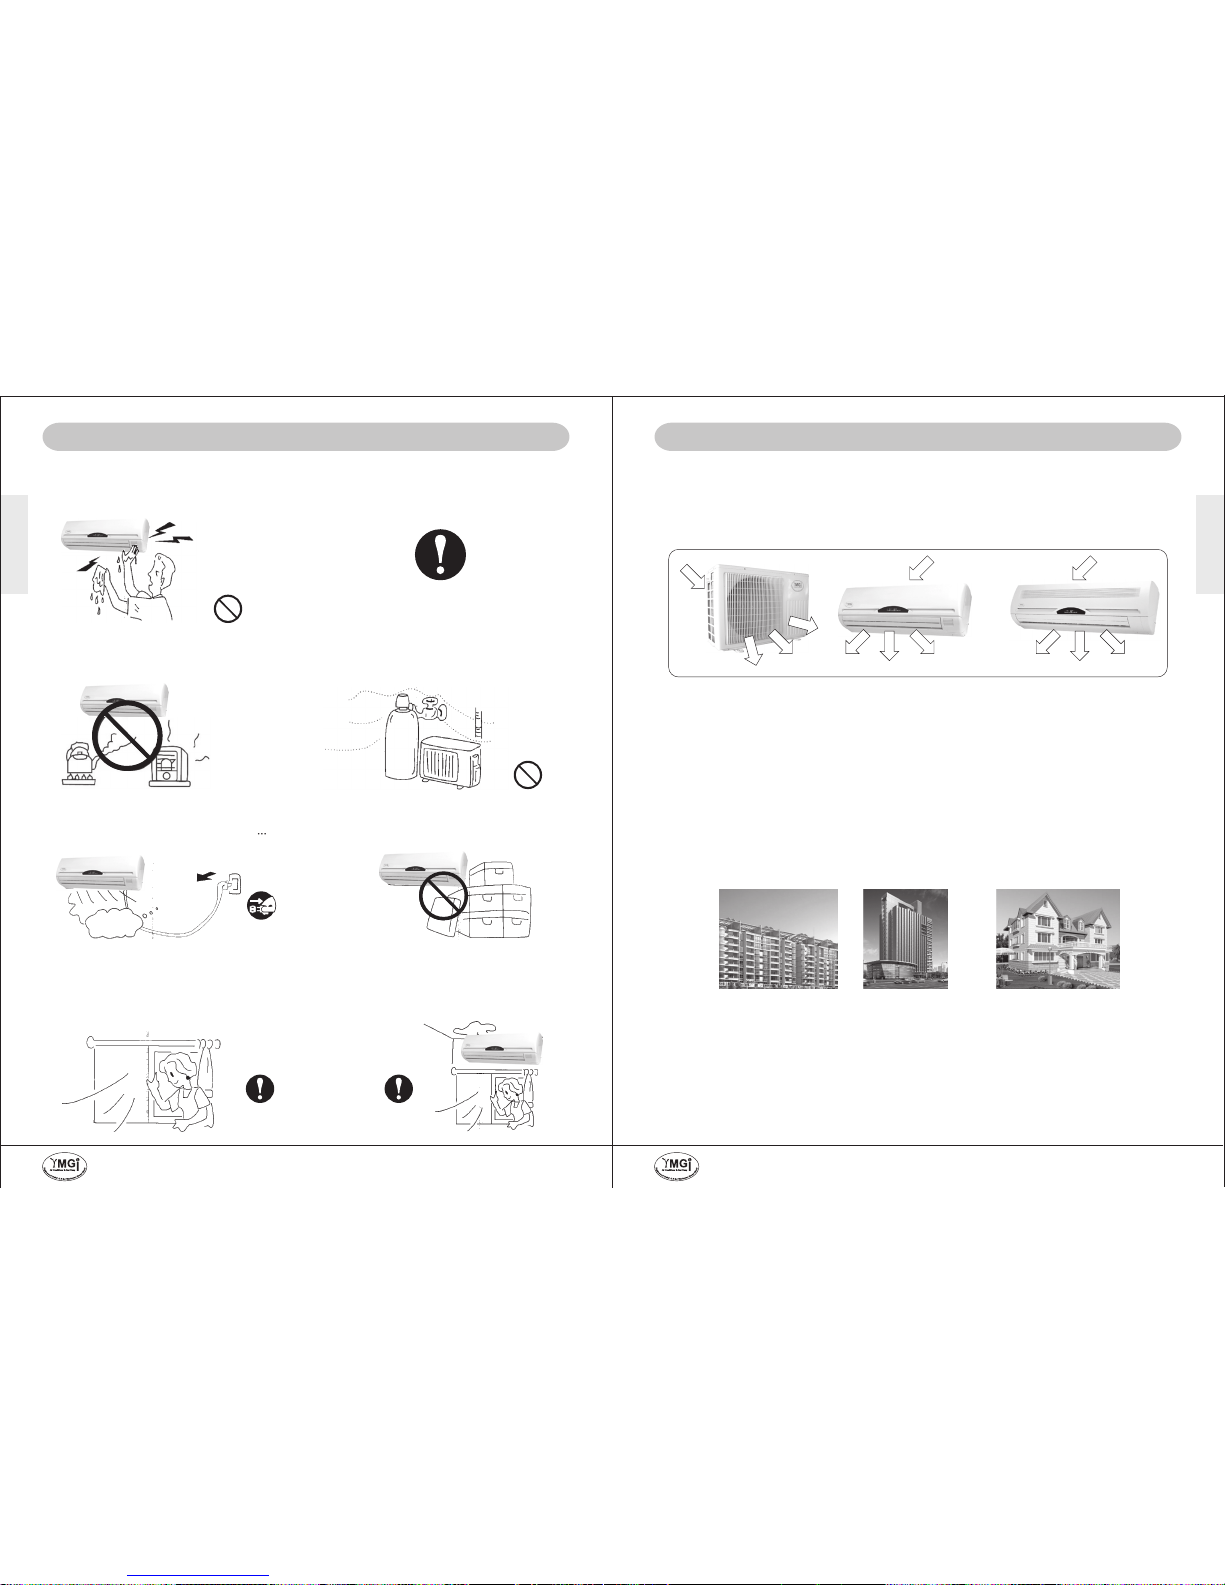
Clean the unit with a soft cloth or dry rag. Do not
use chemical solvents, flammable insecticide, sprays
or the likely products to clean the unit. Otherwise,
damage to the unit may be incurred.
Intall the unit in accordance with all the safety codes
applied. The unit cannot be installed in a washhouse or where flammable gas could ocurr. The unit
must be electrically protected by qualified circuit
breakers.
Do NOT install the indoor unit close to cooking or
ventilation. Otherwise, unit efficiency will be
affected seriously.
Do NOT install the unit in places at risk of farmable
gas leakage. If electric spark is incurred in the unit
accidentally, it could cause a fire or an explosion.
Stop and disconnect the unit immediately after finding
the unit at anomaly oder (burning, scorching )
Do NOT use the system for other non-HVAC purpose.
Do not store it along with food or painting or other
chemicals.
Close doors and windows. If you use the unit for a
prolonged period and the ambient air turns to be
unpleasant, open a door or a window for a moment
to refresh the atmosphere.
Do NOT use the unit in cool/dry during a prolonged
period at high moisture (higher than 80%).
Condensation could be formed on the indoor unit
casing if a door or window is open or the indoor
humidity is high.
Mini Split Wall Mount Systems are designed for high performance, easy installation and service. Each system
consists of one or several indoor units and one outdoor unit, which are connected by one set or several multiple
sets of interconnection refrigerant pipes and electric wires.
As shown in the following sample picture of outdoor unit, air is drawn through the coil from the rear side and then
discharged from the front side. In cooling mode, air passing through coil is cooled; in heating mode, air passing
through coil is heated.
Sample Wall Mount Mini Split System (For Continuous Engineering Improvement and Various Marketing
Needs and Actual Part Availability Reason, Unit Appearance Subject to Change or Update Continuously
without Prior Notice)
Outdoor unit(s) provides the electrical and thermal power for the whole system. Electrical and thermal
components such as compressors and motors and heat exchange coils and others, are incorporated into the
cabinet in an optimized order. They can be either hung on the wall or installed on the ground. Once stacking or
bracket kit is used, some outdoor units can be stacked 2 or 3 units high, upon unit size and applications. Air is
discharged horizontally, quietly and smoothly. These units are perfect fit in locations where installation and
applications of general up-flow condensing units are limited, such as apartments, condos, lofts, multi-families and
high-rise buildings and others named or unnamed.
Indoor unit(s) delivers the thermal and acoustical comfort to the rooms. Air is drawn through the coil from the
front or topside and then discharged from the bottom. In cooling mode, air passing through coil is cooled; in
heating mode, air passing through coil is heated. Air is filtered or treated by the built in mechanism (washable or
enzyme equipped or electrostatic powered filter, varies from model to model), before being delivered into the
room, with more than enough comfort and care, at a wide angle (swing or not, varies from model to model).
Air In
Air Out
BRIEF INTRODUCTION TO MINI SPLIT WALL MOUNT SYSTEM
NOTES: Since ductless system is not designed to incorporate or use with ducted return or discharge tunnels, one
single-zone unit SHALL NOT be used to take care of the cooling or heating load of more than one-story room.
Several single-zone ductless systems or multiple-zone ductless systems shall be proper in this regard.
These units are designed for applications at:
* Residential
* Light commercial
* Commercial
* Hospital
* Institutional
* Industrial
Apartments
Office Buildings
Homes
Application Samples of Wall Mount Mini Split Systems
P13 OF 34 P14 OF 34
YMGI, Engineered Comfort Products for A Sustainable and Efficient Green World !YMGI, Engineered Comfort Products for A Sustainable and Efficient Green World !
Page 9
INSTALLER'S
INSTRUCTION
BRIEF UNIT INFO
IMPORTANT NOTES-About System Performance:
1) The rated performance data is tested under one of the indoor & outdoor conditions at standard set-up installation.
2) Actual performance varies upon many factors such as indoor and outdoor temperatures, inter-connecting pipe length/bending, elevation
difference between indoor and outdoor units, refrigerant level, vacuum level, leakage, air or moisture or other contamilation level, foreign
substance left in the piping, indoor filter cleaness, indoor and outdoor coil conditions, and others.
3) The electrical driving voltage and frequency, as well as the mechanical performing pressures and temperatures, at different operating points,
during different operating periods, at different operating conditions. Suggest to measure temepratures and pressures several minutes after
starting, when unit is stablized.
4) May refer to other specification tables or engineering submittals, for detailed system performance at different conditions.
5) System performance will be degraded, if systems are improperly selected, operated, installed, maintained, or serviced (which are not
conducted by manufacturer).
MINI WALL MOUNT SYSTEMS-MODELS
Wall Mount Mini Split - Single Zone
Cooling Only
System Model WMMS-09K-31A(B) WMMS-12K-31A(B)
WMMS-18K-31B WMMS-24K-31B WMMS-30K-31B WMMS-36K-31B
Indoor Unit
WMMS-09E-31A(B) WMMS-12E-31A(B)
WMMS-18E-31B WMMS-24E-31B WMMS-30E-31B WMMS-36E-31B
Outdoor Unit
WMMS-09C-31A(B) WMMS-12C-31A(B)
WMMS-18C-31B WMMS-24C-31B WMMS-30C-31B WMMS-36C-31B
Heat Pump
System Model WMMS-09K-32A(B) WMMS-12K-32A(B)
WMMS-18K-32B WMMS-24K-32B WMMS-30K-32B WMMS-36K-32B
Indoor Unit
WMMS-09E-32A(B) WMMS-12E-32A(B)
WMMS-18E-32B WMMS-24E-32B WMMS-30E-32B WMMS-36E-32B
Outdoor Unit
WMMS-09C-32A(B) WMMS-12C-32A(B)
WMMS-18C-32B WMMS-24C-32B WMMS-30C-32B WMMS-36C-32B
Heat Pump
/ Elec. Heat
System Model
WMMS-09K-34B WMMS-12K-34B WMMS-18K-34B WMMS-24K-34B WMMS-30K-34B WMMS-36K-34B
Indoor Unit
WMMS-09E-34B WMMS-12E-34B WMMS-18E-34B WMMS-24E-34B WMMS-30E-34B WMMS-36E-34B
Outdoor Unit
WMMS-09C-32B WMMS-12C-32B WMMS-18C-32B WMMS-24C-32B WMMS-30C-32B WMMS-36C-32B
Wall Mount Mini Split - Dual Zone
Cooling Only
System Model
Indoor Unit
Outdoor Unit
Heat Pump
System Model
Indoor Unit
Outdoor Unit
Heat Pump
/ Elec. Heat
System Model
Indoor Unit
Outdoor Unit
WMMS-2X09K-31B WMMS-0912K-31B WMMS-2X12K-31B WMMS-2X18K-31B WMMS-2X-24K-31B WMMS-2X30K-31B
WMMS-09E(F)-31B WMMS-09/12E(F)-31B WMMS-12E(F)-31B WMMS-18E(F)-31B WMMS-24E(F)-31B WMMS-30E(F)-31B
WMMS-2X09C-31B WMMS-0912C-31B WMMS-2X12C-31B WMMS-2X18C-31B WMMS-2X24C-31B WMMS-2X30C-31B
WMMS-2X09K-32B WMMS-0912K-32B WMMS-2X12K-32B WMMS-2X18K-32B WMMS-2X24K-32B WMMS-2X30K-32B
WMMS-09E(F)-32B WMMS-09/12E(F)-32B WMMS-12E(F)-32B WMMS-18E(F)-32B WMMS-24E(F)-32B WMMS-30E(F)-32B
WMMS-2X09C-32B WMMS-0912C-32B WMMS-2X12C-32B WMMS-2X18C-32B WMMS-2X24C-32B WMMS-2X30C-32B
WMMS-2X09K-34B WMMS-0912K-34B WMMS-2X12K-34B WMMS-2X18K-34B WMMS-2X24K-34B WMMS-2X30K-34B
WMMS-09E(F)-34B WMMS-09/12E(F)-34B WMMS-12E(F)-34B WMMS-18E(F)-34B WMMS-24E(F)-34B WMMS-30E(F)-34B
WMMS-2X09C-32B WMMS-09/12C-32B WMMS-2X12C-32B WMMS-2X18C-32B WMMS-2X24C-32B WMMS-2X30C-32B
Wall Mount Mini Split - Triple Zone
Cooling Only
System Model
Indoor Unit
Outdoor Unit
Heat Pump
System Model
Indoor Unit
Outdoor Unit
Heat Pump
/ Elec. Heat
System Model
Indoor Unit
Outdoor Unit
WMMS-3X09K-31B WMMS-3X12K-31B WMMS-2X0912K-31B WMMS-2X-1218K-31B WMMS-2X1824K-31B WMMS-1230K-31B
WMMS-09E(F)-31B WMMS-09E(F)-31B WMMS-09/12E(F)-31B WMMS-12/18E(F)-31B WMMS-18/24E(F)-31B WMMS-12/30E(F)-31B
WMMS-3X09C-31B WMMS-3X12C-31B WMMS-2X0912C-31B WMMS-2X1218C-31B WMMS-2X1824C-31B WMMS-2X1230C-31B
WMMS-3X09K-32B WMMS-3X12K-32B WMMS-2X0912K-32B WMMS-2X1218K-32B WMMS-2X1824K-32B WMMS-2X1230K-32B
WMMS-09E(F)-32B WMMS-09E(F)-32B WMMS-09/12E(F)-32B WMMS-12/18E(F)-32B WMMS-18/24E(F)-32B WMMS-12/30E(F)-32B
WMMS-3X09C-32B WMMS-3X12C-32B WMMS-2X0912C-32B WMMS-2X1218C-32B WMMS-2X1824C-32B WMMS-2X1230C-32B
WMMS-3X09K-34B WMMS-3X12K-34B WMMS-2X0912K-34B WMMS-2X1218K-34B WMMS-2X1824K-34B WMMS-2X1230K-34B
WMMS-09E(F)-34B WMMS-09E(F)-34B WMMS-09/12E(F)-34B WMMS-12/18E(F)-34B WMMS-18/24E(F)-34B WMMS-12/30E(F)-34B
WMMS-3X09C-32B WMMS-3X12C-32B WMMS-2X0912C-32B WMMS-2X1218C-32B WMMS-2X1824-32B WMMS-2X1230C-32B
Cooling Only
System Model
Indoor Unit
Outdoor Unit
Heat Pump
System Model
Indoor Unit
Outdoor Unit
Heat Pump
/ Elec. Heat
System Model
Indoor Unit
Outdoor Unit
Wall Mount Mini Split - Quad Zone
WMMS-4X09K-31B WMMS-4X12K-31B WMMS32X0912K-31B WMMS-3X-1209K-31B
WMMS-2X(0912)K-31B
WMMS-09E(F)-31B WMMS-12E(F)-31B WMMS-09/12E(F)-31B WMMS-12/09E(F)-31B WMMS-09/12E(F)-31B
WMMS-4X09C-31B WMMS-4X12C-31B WMMS-3X0912C-31B WMMS-3X1209C-31B
WMMS-2X(0912)C-31B
WMMS-4X09K-32B WMMS-4X12K-32B WMMS-3X0912K-32B WMMS-3X1209K-32B
WMMS-2X(0912)K-32B
WMMS-09E(F)-32B WMMS-12E(F)-32B WMMS-09/12E(F)-32B WMMS-12/09E(F)-32B WMMS-09/12E(F)-32B
WMMS-4X09C-32B WMMS-4X12C-32B WMMS-3X0912C-32B WMMS-3X1209C-32B
WMMS-2X(0912)C-32B
WMMS-4X09K-34B WMMS-4X12K-34B WMMS-3X0912K-34B WMMS-3X1209K-34B
WMMS-2X(0912)K-34B
WMMS-09E(F)-34B WMMS-12(E)F-34B WMMS-09/12E(F)-34B WMMS-12/09E(F)-34B WMMS-09/12E(F)-34B
WMMS-4X09C-32B WMMS-4X12C-32B WMMS-3X0912C-32B WMMS-3X1209C-32B
WMMS-2X(0912)C-34B
Wall Mount Mini -Basic Split
Systems-Single & Multiple Zones
13 SEER
R410A
SYSTEM COMPONENTS-GENERAL
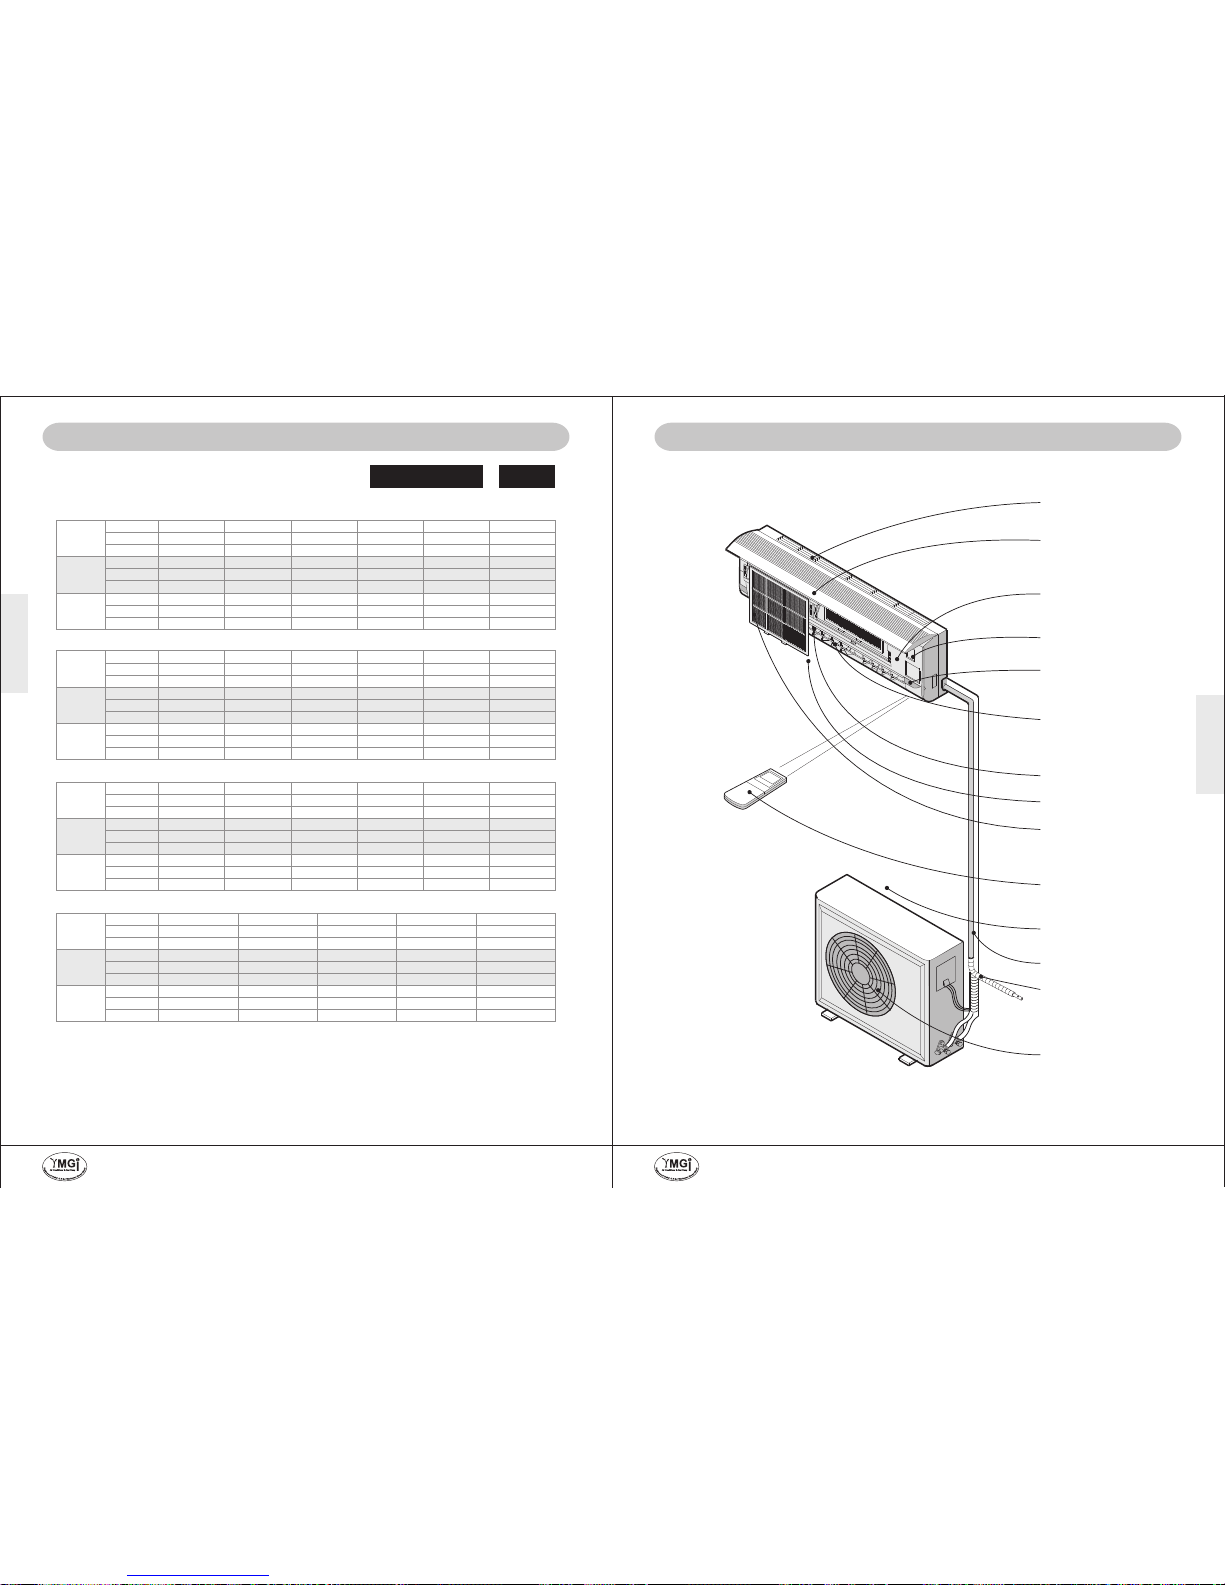
INDOOR UNIT
Air Inlet
Air Intake Grilles
Temperature Sensor
Indicating Lamp &
Signal Receiving
Window
Emergency Switch
Horizontal Louver
Vertical Louver
Air Outlet
Air Filter
Remote Control
Air Inlet
Connecting Pipe
and Cable
Drainage Hose
Air Outlet
OUTDOOR UNIT
The figures in this manual are based on the external view of a standard model.
Consequently, the shape or appearance may differ from that of the air conditioner you have
selected.
P15 OF 34
P16 OF 34
YMGI, Engineered Comfort Products for A Sustainable and Efficient Green World !YMGI, Engineered Comfort Products for A Sustainable and Efficient Green World !
Page 10
INSTALLER'S
INSTRUCTION
INSTALLER'S
INSTRUCTION
P17 OF 34 P18 OF 34
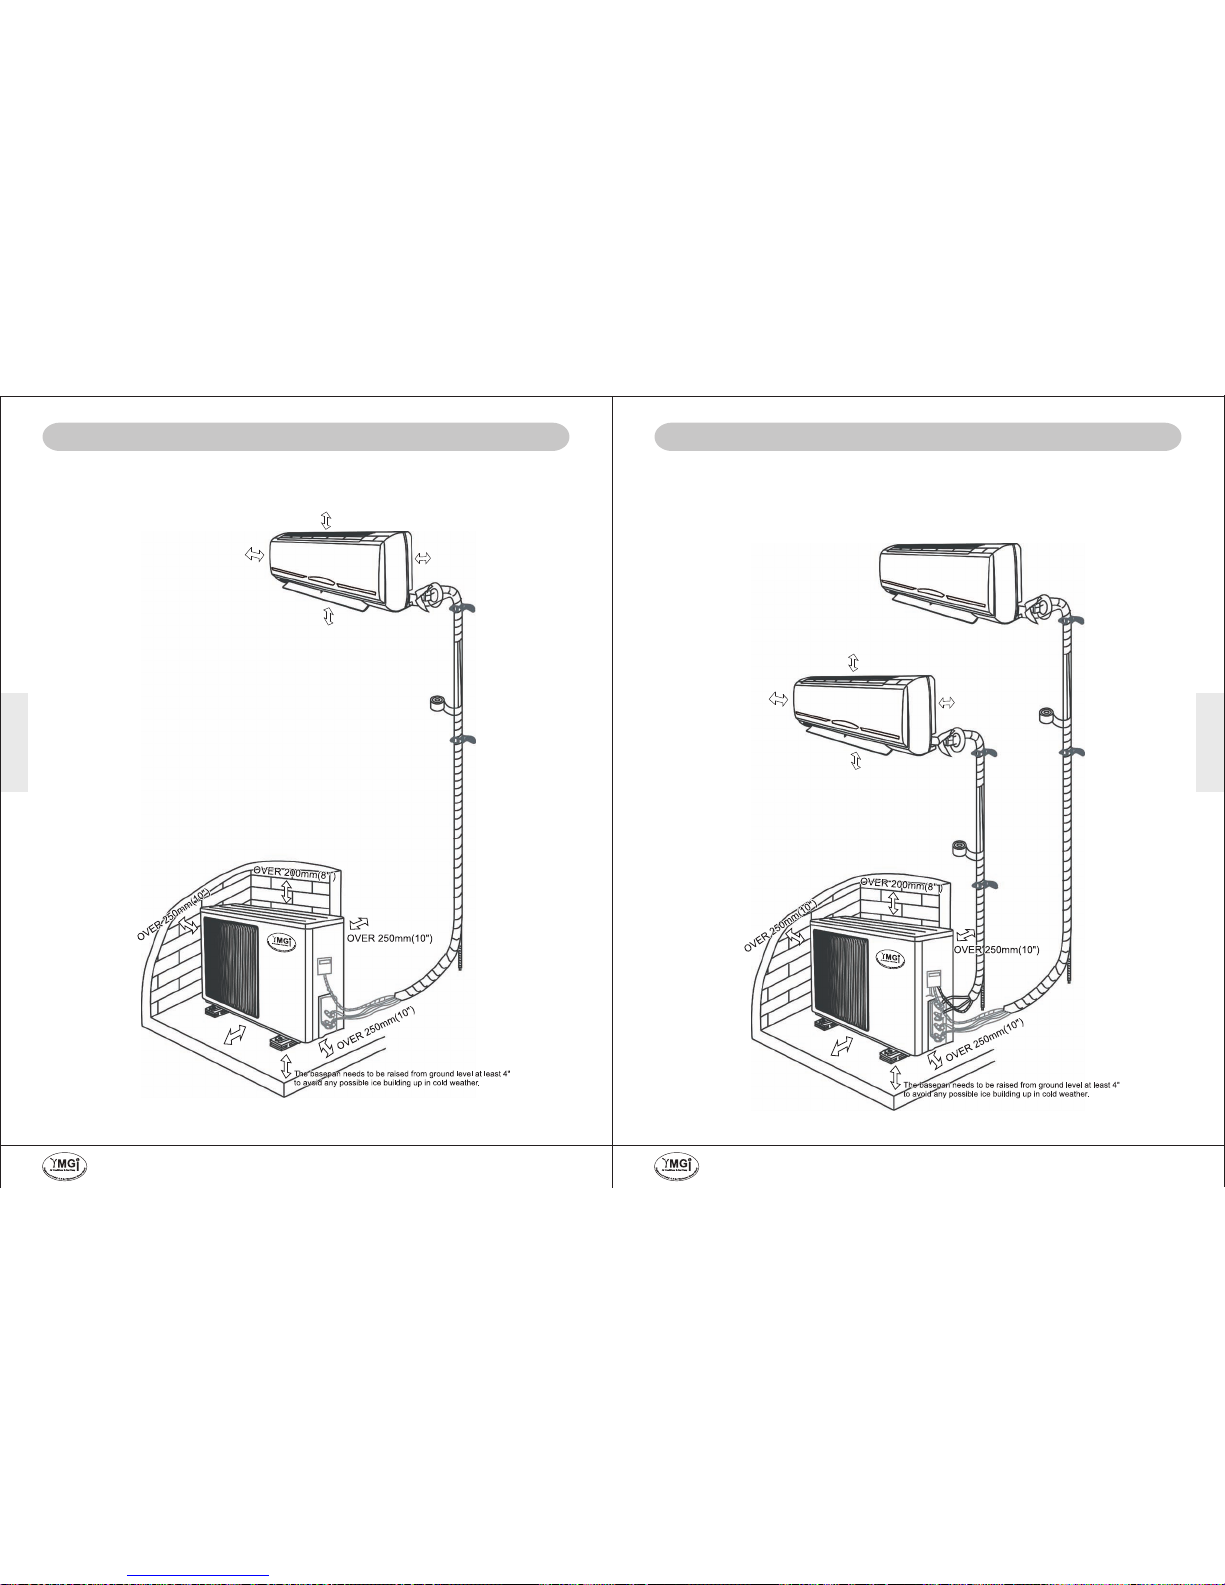
SYSTEM COMPONENTS & INSTALLATION CLEARANCE: SINGLE ZONE
OVER 50mm(2 )"
OVER 100mm(4 )"
OVER 500mm(20 )"
OVER 2000m
m(80 )"
Indoor unit A
Outdoor unit
OVER 100mm(4 )"
SYSTEM COMPONENTS & INSTALLATION CLEARANCE: DUAL ZONE
OVER
500mm(20 )"
Outdoor unit
OVER 50mm(2 )"
OVER 100mm(4 )"
OVER 2000mm(80 )"
Indoor unit A
OVER 100mm(4 )"
Indoor unit B
CLEARANCE REQUIRED AROUND UNITS-SINGLE ZONE
CLEARANCE REQUIRED AROUND UNITS-DUAL ZONE
YMGI, Engineered Comfort Products for A Sustainable and Efficient Green World !YMGI, Engineered Comfort Products for A Sustainable and Efficient Green World !
Page 11
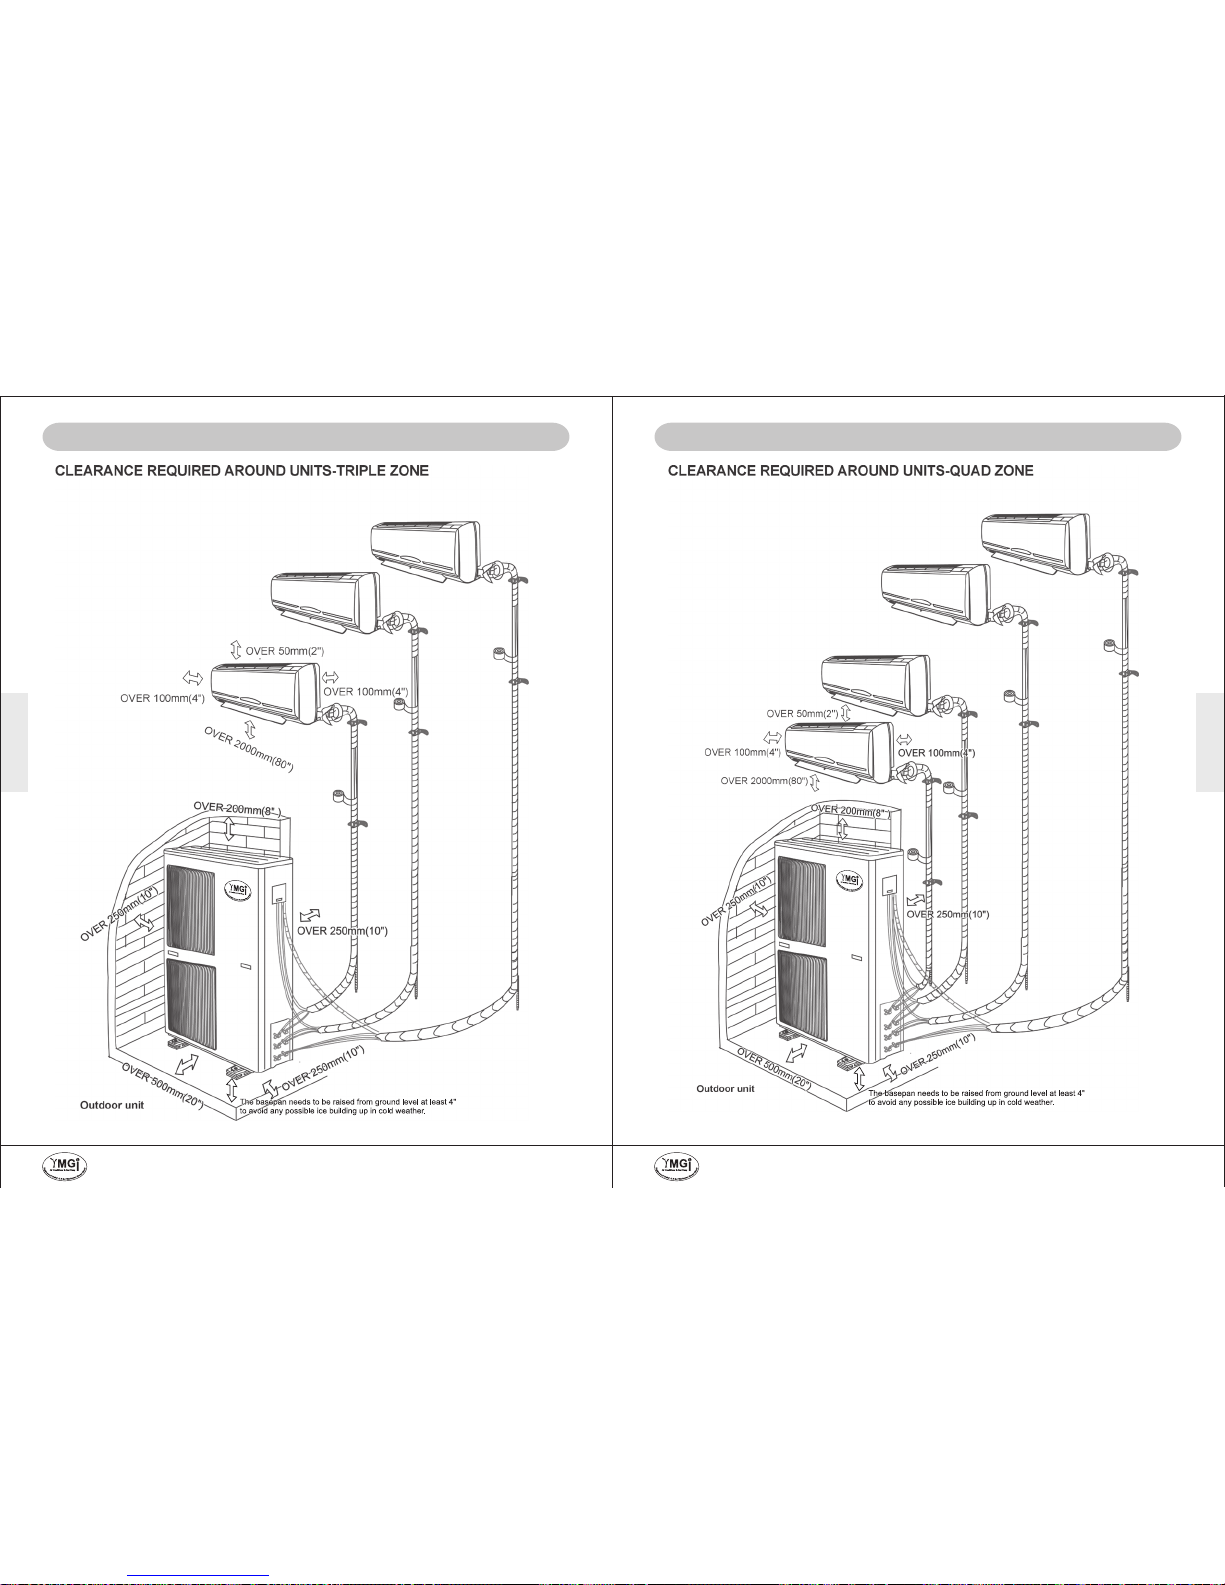
Indoor unit A
Indoor unit B
Indoor unit C
Indoor unit A
Indoor unit B
Indoor unit C
Indoor unit D
INSTALLER'S
INSTRUCTION
INSTALLER'S
INSTRUCTION
P20 OF 34P19 OF 34
SYSTEM COMPONENTS & INSTALLATION CLEARANCE: TRIPLE ZONE
SYSTEM COMPONENTS & INSTALLATION CLEARANCE: QUAD ZONE
YMGI, Engineered Comfort Products for A Sustainable and Efficient Green World !YMGI, Engineered Comfort Products for A Sustainable and Efficient Green World !
Page 12
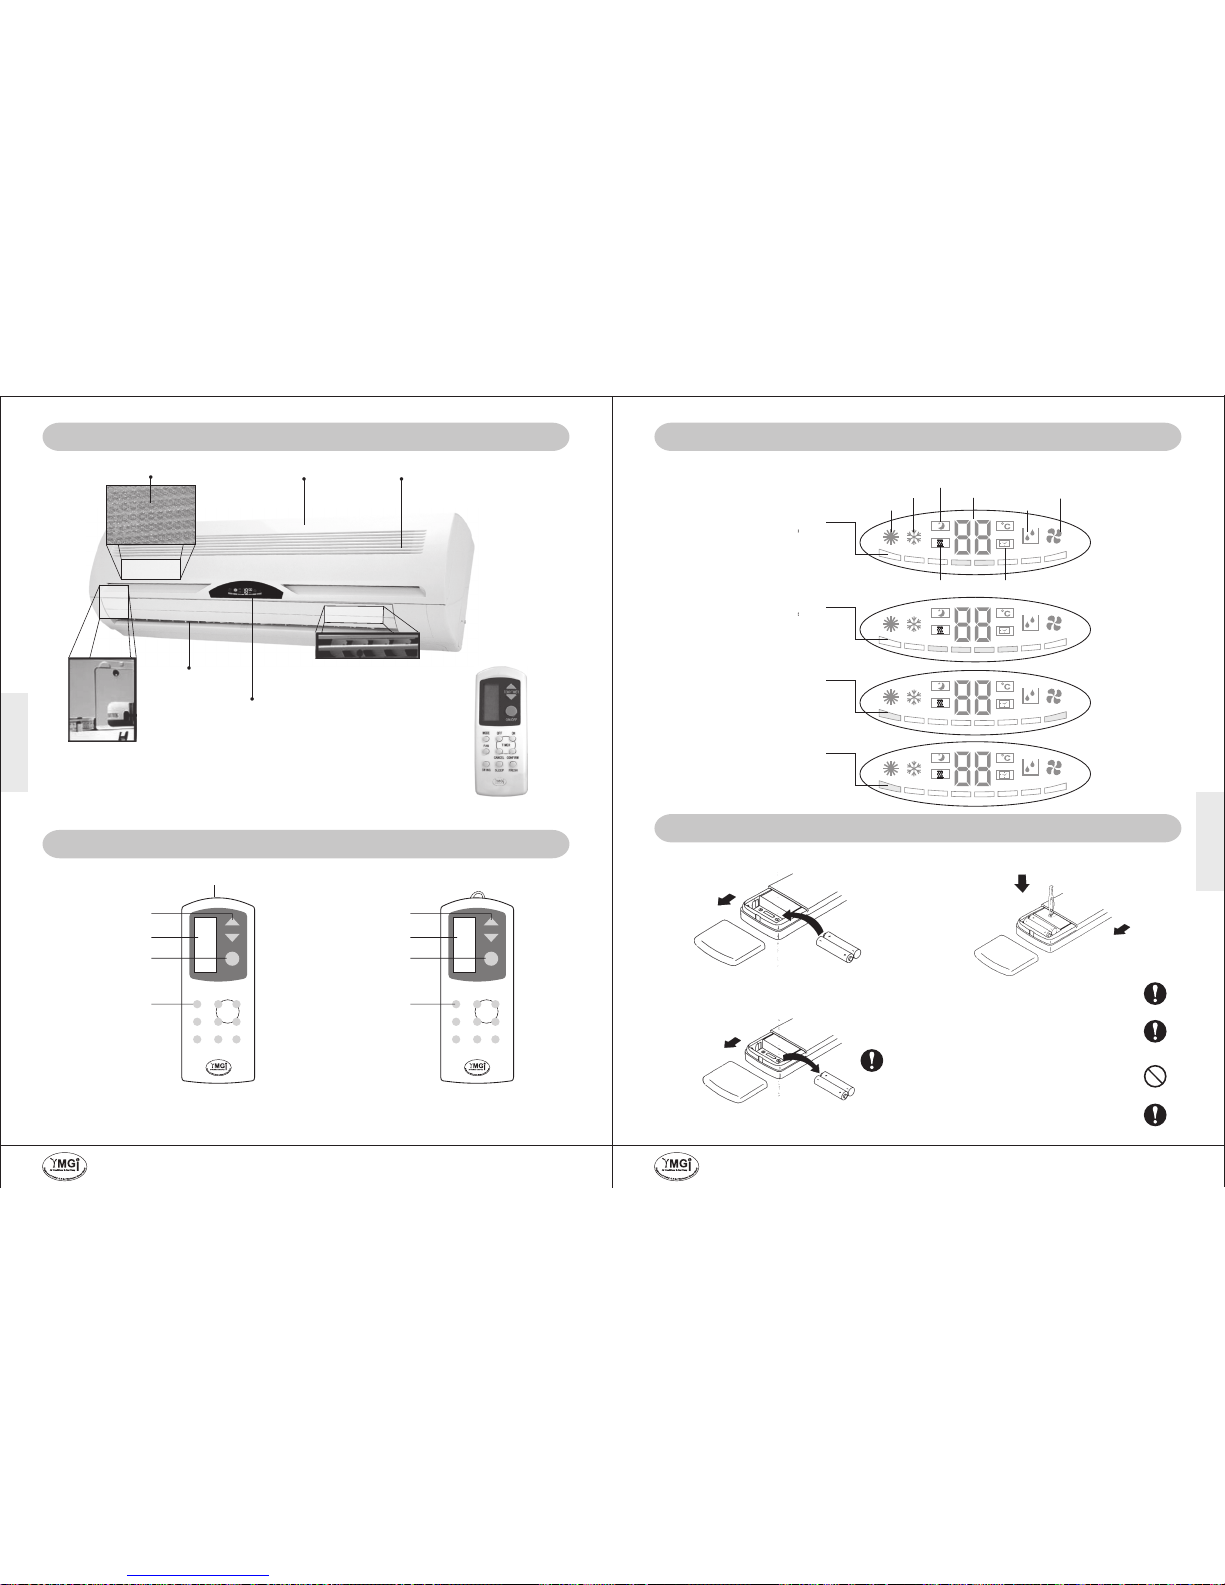
REPARATION OF REMOTE OR LINE CONTROLER
Short-circuit RESET button as indicated (after the
change of the batteries).
Open the lid at back, place the 2 AAA 1.5V-LR03
batteries in right polarities.
NOTICE
If the remote control does not operate
correctly, press RESET button to resolve it.
The signal can be transmitted as far as 275
inches (23 feet) away from the indoor unit if
the control is pointed towards the front of
the indoor unit.
Take care of the remote/line control. To
avoid any problem, do not drop it on the floor
or throw it or expose it to the humidity.
When press a button, the indoor unit beeps
once or twice, indicating the indoor unit has
received control signal.
Remove the batteries if you don't use the remote/line
control for a long period.
INDOOR UNIT-MAJOR COMPONENTS
Air Filter Front Panel or Faceplate Air Inlets
Auto-Directional Louvers
(Up and Down)
Singnal Receiver
Test/Reset Switch
Manual Louvers
(Side to Side)
Remote Control (or Optional Wall Thermostat)
UNIT OPERATION
INSTALLER'S
INSTRUCTION
P22 OF 34P21 OF 34
Heating mode
Sleep mode
Dry mode
Fan mode
Set temperature
Status indicating bar
2-bar indicator POWER ON
Cooling mode
Timer mode
Fast cooling/Auxiliary electrical heating
Status indicating bar
4-bar indicator Room
temperature reachs to
setting temperature
Status indicating bar
2-bar indicator flash in circle:
Standard Operation
Status indicating bar
1-bar indicator flash in
circle:Defrosting
LED DISPLAY PANEL
(Notes: may be hidden in unit and not exposed to customers)
CONFIRM
MODE OFF
ON
FAN
TIMER
CANCEL
SWING SLEEP FRESH
ON/OFF
TEMP/TIME
Buttons
ON/OFF
LCD Display
Temperature /
Timing setting
Signal Transmitting Device
Line Control Signal
Remote Control Line Control
Notes:
Default control is remote
There is no heat mode in cool only air-conditioner
REMOTE OR LINE CONTROL
CONFIRM
MODE OFF
ON
FAN
TIMER
CANCEL
SWING SLEEP FRESH
ON/OFF
TEMP/TIME
ON/OFF
LCD Display
Temperature /
Timing setting
Buttons
YMGI, Engineered Comfort Products for A Sustainable and Efficient Green World !YMGI, Engineered Comfort Products for A Sustainable and Efficient Green World !
Page 13
UNIT OPERATION
UNIT OPERATION
P24 OF 34
P23 OF 34
F. "FRESH"
FRESH
Otherwise claimed, this button is not actuated for:
* Fresh air, or,
* Manual turn on or off supplemental heating
FUNCTIONS-REMOTE OR LINE CONTROL
A. Power
BATTERY ON/OFF
Once two AAA batteries are loaded into the remote control battery compartment in the right polarity, LCD
screen shows all signs available for 3 seconds before they all go off the screen totally.
Once one or two batteries are unloaded from the remote control battery compartment, if no button is
touched, the LCD screen display will go off in 15 seconds, if any button is pressed within 15 seconds, the LCD
screen display will go off right away.
B. Run/Stop
"ON/OFF"
If ON/OFF button is pressed the first time, LCD displays AUTO, temperature meter sign, AUTO FAN and
SWING from the top to bottom of the LCD screen;
If ON/OFF button is pressed after power off, LCD displays what is left prior to POWER OFF (including MODE,
TEMPERATURE, FAN SPEED, LOUVER, but excluding SLEEP, TIMER and FRESH).
ON/OFF
C. MODE
MODE includes: AUTO, COOL, DRY, FAN and HEAT. Mode changes from one to the next one in a sequence
once MODE button is pressed.
In AUTO mode, temperature number goes off, all other buttons work.
In all other modes, temperature number shows up, all other buttons work.
MODE
Cool only type has not HEAT mode. Each time MODE button is pressed, the operation mode is changed in a
sequence: Cool, Dry, Fan only and Heat.
D. Temperature/Time Adjustment
These buttons are for time adjustment too. If pressed intermittently within 5 seconds after pressing TIMER ON
or TIMER OFF, time (hour) changes at 1hour/press; if held down continuously, time changes at 1hour/0.5Sec.
Time cycle is between 1-12hrs.
Temparature/Time change will show up on the Control's LCD display.
Temperature range is 64 to 86F, Time range is 0 to 24Hr or 0 to 12Hr.
Normally, these buttons are for temperature up and down adjustment at 1F/press, to decrease 1F, press " "
button once; to increase 1F, press " "button once; If held down for continuous adjustment, number changes at
1F/0.5Sec.
(auto)(high)
E. Fan Speed Adjustment
FAN
(medium)(low)
FAN MODE includes: AUTO, LOW, MED and HIGH. Every time FAN button is pressed once, fan sign
changes once from one to the next one in a sequence: LOW (1-section/fan blade spins slowly), MED. (3-section/
fan blade spins a little quicker), HIGH (5-section/fan blade spins quicker), AUTO (4-blade fan).
G. SLEEP
SLEEP
Press "SLEEP" button to turn the unit into or out of SLEEP mode. When SLEEP button is pressed, star/moon
sign either shows up or goes off. If star/moon sign is ON, MODE turns into SLEEP mode (see related function
change separately); if pressed again, star/moon sign goes off, MODE turns into the regular.
May Need to Manually
Adjust Left / Right Deflector
When Unit Fully
Stops Running.
Cool
or
Dry
Mode
Heat
Mode
FUNCTIONS-REMOTE OR LINE CONTROL
H. SWING
SWING
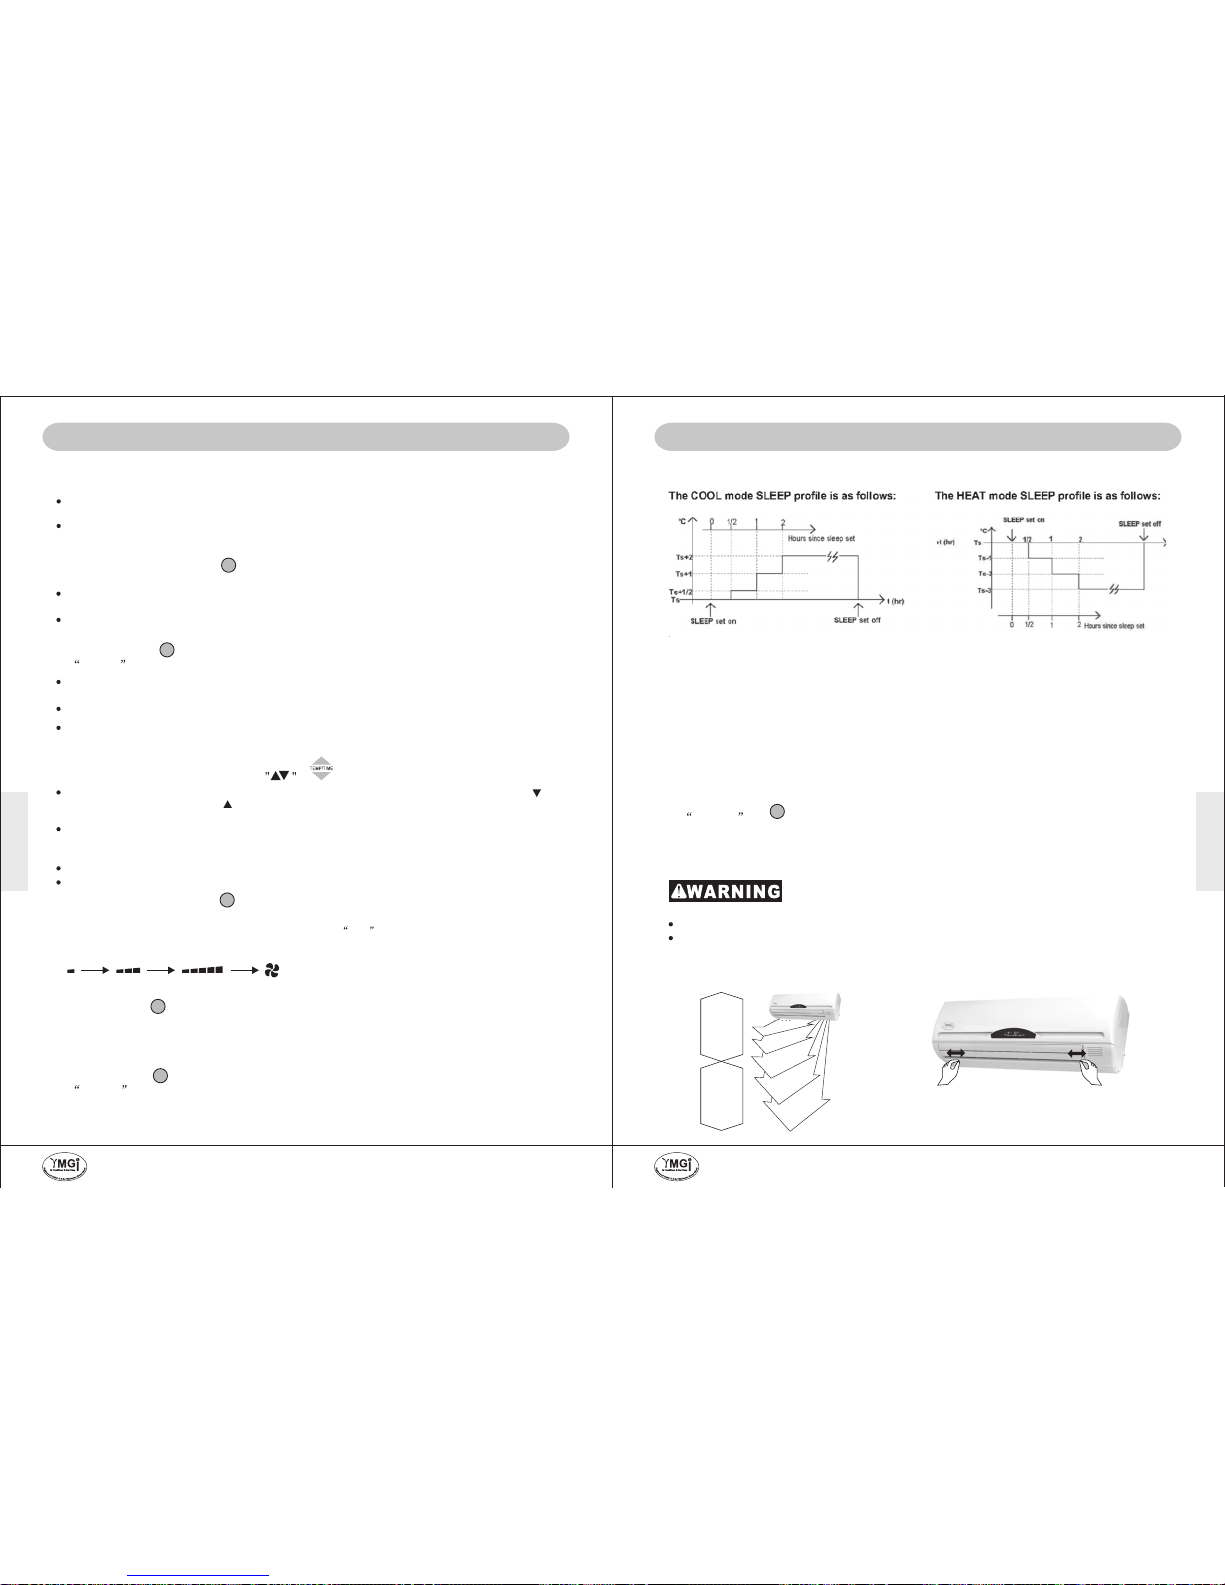
Control with the remote control to adjust up/down air flow direction, NOT to
adjust louvers during swinging.
In Cool or Dry mode, louver swings to blow air downward in (1), (2) and (3) zones.
In Heat mode, louver swings to blow air downward in (3), (4) and (5) zones.
When power turned on, louver will fully open, then shut off; when power turned off, all shutt off.
Whenever "SWING" button is pressed once, up-down louver(s) will oscillate between up and down, or stop
oscillating and stay still, or be turned off.
In SWING mode, the deflector will not oscillate left-right back and forth, if otherwise stated. Air flow right / left
direction change shall be done by manul adjustment. Conduct this adjustment when unit and all moving parts
stop running. If adjust during operation, the auto swinging louver may pinch your fingers.
(1)
(2)
(3)
(4)
(5)
When Sleep Mode Gets Started During Cooling
The set temperature will automatically rise 0.5 or 1 degree, once every 1/2 or 1 hour, for several times, in a
period of 2 hours, and then stay at Ts+2 until Sleep Mode button is pressed off, following a sample pattern as
illustrated at the left side picture above.
This way, fan blows at low speed, set temperature is getting higher so that the room temperature will not be
conditioned too low, to accommodate the decreased cooling load when people fall in sleep at night time, and
other heat gain also drops due to less activities and energy consumption and dropped outdoor temperature.
When Sleep Mode Gets Started During Heating
The set temperature will automatically start to drop 1 degree, once every 1/2 or 1 hour, for several times, in a
period of 2 hours, and then stay at Ts-3 until Sleep Mode button is pressed off, following a sample pattern as
illustrated at the right side picture above.
This way, fan blows at low speed, set temperature is getting lower so that the room temperature will not be
conditioned too warm, to accommodate the decreased heating load when people fall in sleep at night time, and
other heat loss also drops.
SLEEP FUNCTION
This function will increase or decrease the set temperature over time.
YMGI, Engineered Comfort Products for A Sustainable and Efficient Green World !YMGI, Engineered Comfort Products for A Sustainable and Efficient Green World !
Page 14
UNIT OPERATION
UNIT OPERATION
P26 OF 34P25 OF 34
OPERATION OF THE UNIT
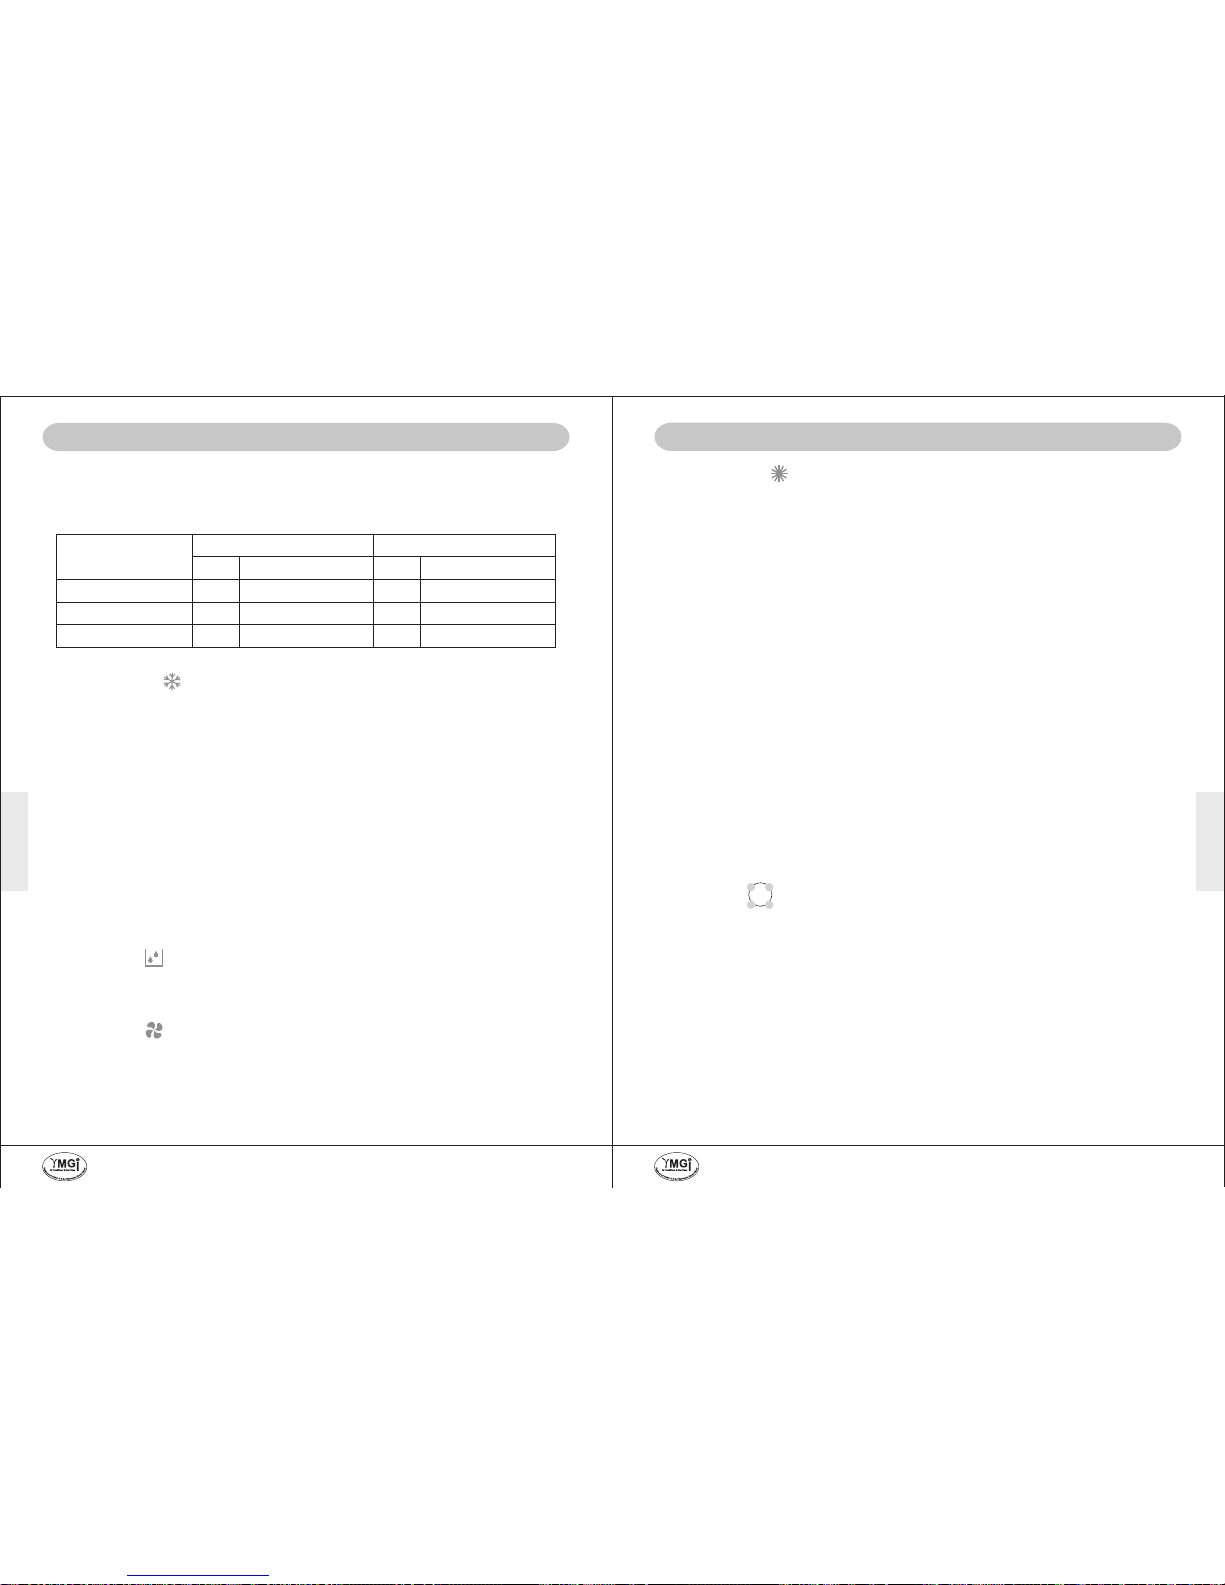
A. AUTO MODE
Cool Only Unit
Heat Pump Unit
Mode
Pre-Set Temperature
Mode
Pre-Set Temperature
0
Above 78 F
Cool Cool
0
77 F
0
77 F
0
From 68-78 F
Dry Dry
0
(RT-35)F each 3 minutes
0
(RT-35)F each 3 minutes
0
Below 68 F
Heat
0
73 F
Room temperatures(RT)
When started, operation mode will turn into COOL or DRY or HEAT mode upon room temperature as shown in
the following table. Once AUTO operation mode is set, unit will change operation mode as the room temperature
changes. If unit restarts after last operation stops for two hours, it will start in the same mode as set before
operation was stopped. Press SWING button to change air flow direction up/down.
Heat
NA
B. COOL MODE
Pointing remote/line control to the unit, press MODE button until COOL is shown. Press TEMPERATURE
ADJUSTMENT button to change the setting temperature. In this mode, you can press SWING button or
MANUAL SWING button, if available, to change up/down air flow direction. Press FAN SPEED button to change
the fan speed of indoor unit. Once the temperature settled is reached, both indoor and outdoor unit will stop to
run. Outdoor unit will work again as soon as the indoor air temperature sensor feels the room temperature is 1 or
o
2 F higher than set temperature.
Once set temperature is reached, outdoor unit compressor and fan motor will stop working right away, outdoor
reversing valve stays un-energized.
1) If "circulation" function is built in (2008.06 or ealier production), then the indoor fan will keep on rotating to
circulate the air in the room, so that air temperature stratefication will not be caused, and then compressor will
not come on and go off often.
2) If "circulation" function is NOT built in (2008.06 or later production), then the indoor fan will keep on rotating for
60 to 90 seconds to blow out the residual cooling capacity left on cold coil, then shut off.
Once the sensed indoor temperature is 1 or 2 F above set temperature and the 3-mintue compressor restarting
protection time is passed, indoor unit fan motor and outdoor unit compressor and fan motor will resume to work
right away.
C. DRY MODE
Pointing remote/line control to the unit, press MODE button until DRY is shown. In this mode, you can press
SWING button or MANUAL SWING button, if available, to change up/down air flow direction. Press FAN SPEED
button to change the fan speed of indoor unit.
D. FAN MODE
Pointing remote/line control to the unit, press FAN button until DRY is shown. In this mode, you can press
SWING button to change up/down air flow direction. Press FAN SPEED button to change the fan speed of indoor
unit.
F. TIMER
"CANCEL"
Once TIMER "CANCEL" button is pressed, previous TIMER set-up shall be cleared and all TIMER related signs
go off.
NOTICE: To cancel timer, press CANCEL button of the Timer. If power sets off, time must be reset, otherwise
Timer Operation will not be right.
OPERATION OF THE UNIT
CONFIRM
OFF
ON
TIMER
CANCEL
E. HEAT MODE
Pointing remote/line control to the unit, press MODE button until HEAT is shown.
In this mode, you can press FAN SPEED button to change the fan speed of indoor unit. Press TEMPERATURE
ADJUSTMENT button to change the setting temperature. As heat pump starts indoor unit will not start to blow air
only until the sensed indoor coil copper tube temperature is warm enough (anti-cold blowing). Outdoor fan motor
and compressor will start to work right away. In heat pump mode, larger pipe at outdoor unit should be hot and
smaller pipe should be warm.
NOTES:
4) Heater will start as supplemental heat to heat pump, once the outdoor temperature is low and the difference
between sensed indoor temperature and sensed indoor coil temperature is lower than the designated value.
oo
5) Suggest set indoor temperature between 68 F and 75F. Heating efficiency becomes inferior when room
o
temperature is below 35 F.
Once set temperature is reached, outdoor unit compressor and fan motor will stop working right away, outdoor
reversing valve stays energized for 2 minutes, while indoor unit will keep on blowing residual heat for a little while
before it fully stops.
1) If "circulation" function is built in (2008.06 or ealier production), then the indoor fan will keep on rotating to
circulate the air in the room, so that air temperature stratification will not be caused, and then compressor will
not come on and go off often.
2) If "circulation" function is NOT built in (2008.06 or later production), then the indoor fan will keep on rotating for
60 to 90 seconds to blow out the residual heating capacity left on warm/hot coil, then shut off.
Once the sensed indoor temperature is 1 or 2 F below set temperature and the 3-mintue compressor restarting
protection time is passed, outdoor reversing valve will be energized first, then outdoor unit compressor and fan
motor will resume to work. Indoor blower will start to blower warm air once the indoor coil is warm enough
(sensed temperature).
"TIMER ON" AND "TIMER OFF"
Once pressed, TIMER related signs show up and hour sign blinks. If pressing TIMER "ON" or "OFF" button, time
changes at 1hr/press (being held down intermittently) or 1hr/0.5second (being held down continuously); If no
action 5 seconds after pressing TIMER "ON" or "OFF", or "CONFIRM" button is not pressed 5 seconds after time
adjustment is made, TIMER related signs will go off in another 10 seconds.
"CONFIRM"
Once TIMER "CONFIRM" button is pressed, set-up of TIMER "ON" or TIMER "OFF" is actuated.
"TIMER ON" is to set up the hour span from now on when the unit will be turned ON. "TIMER OFF" is to set up
the hour span from now on when the unit will be turned OFF. "TIMER ON" or "TIMER OFF" set-up must be input
by pressing the "TIMER CONFIRM" button.
3) During heat pump mode, outdoor unit may need to defrost to get rid of ice/frost built up in cold weather as
much as possible. In this case indoor fan motor stops, outdoor compressor works, outdoor fan motor cycles
unit defrost cycle quits upon both sensed temp and/or time.
YMGI, Engineered Comfort Products for A Sustainable and Efficient Green World !YMGI, Engineered Comfort Products for A Sustainable and Efficient Green World !
Page 15
UNIT MAINTENANCE &
SERVICE GUIDE
UNIT MAINTENANCE &
SERVICE GUIDE
P28 OF 34P27 OF 34
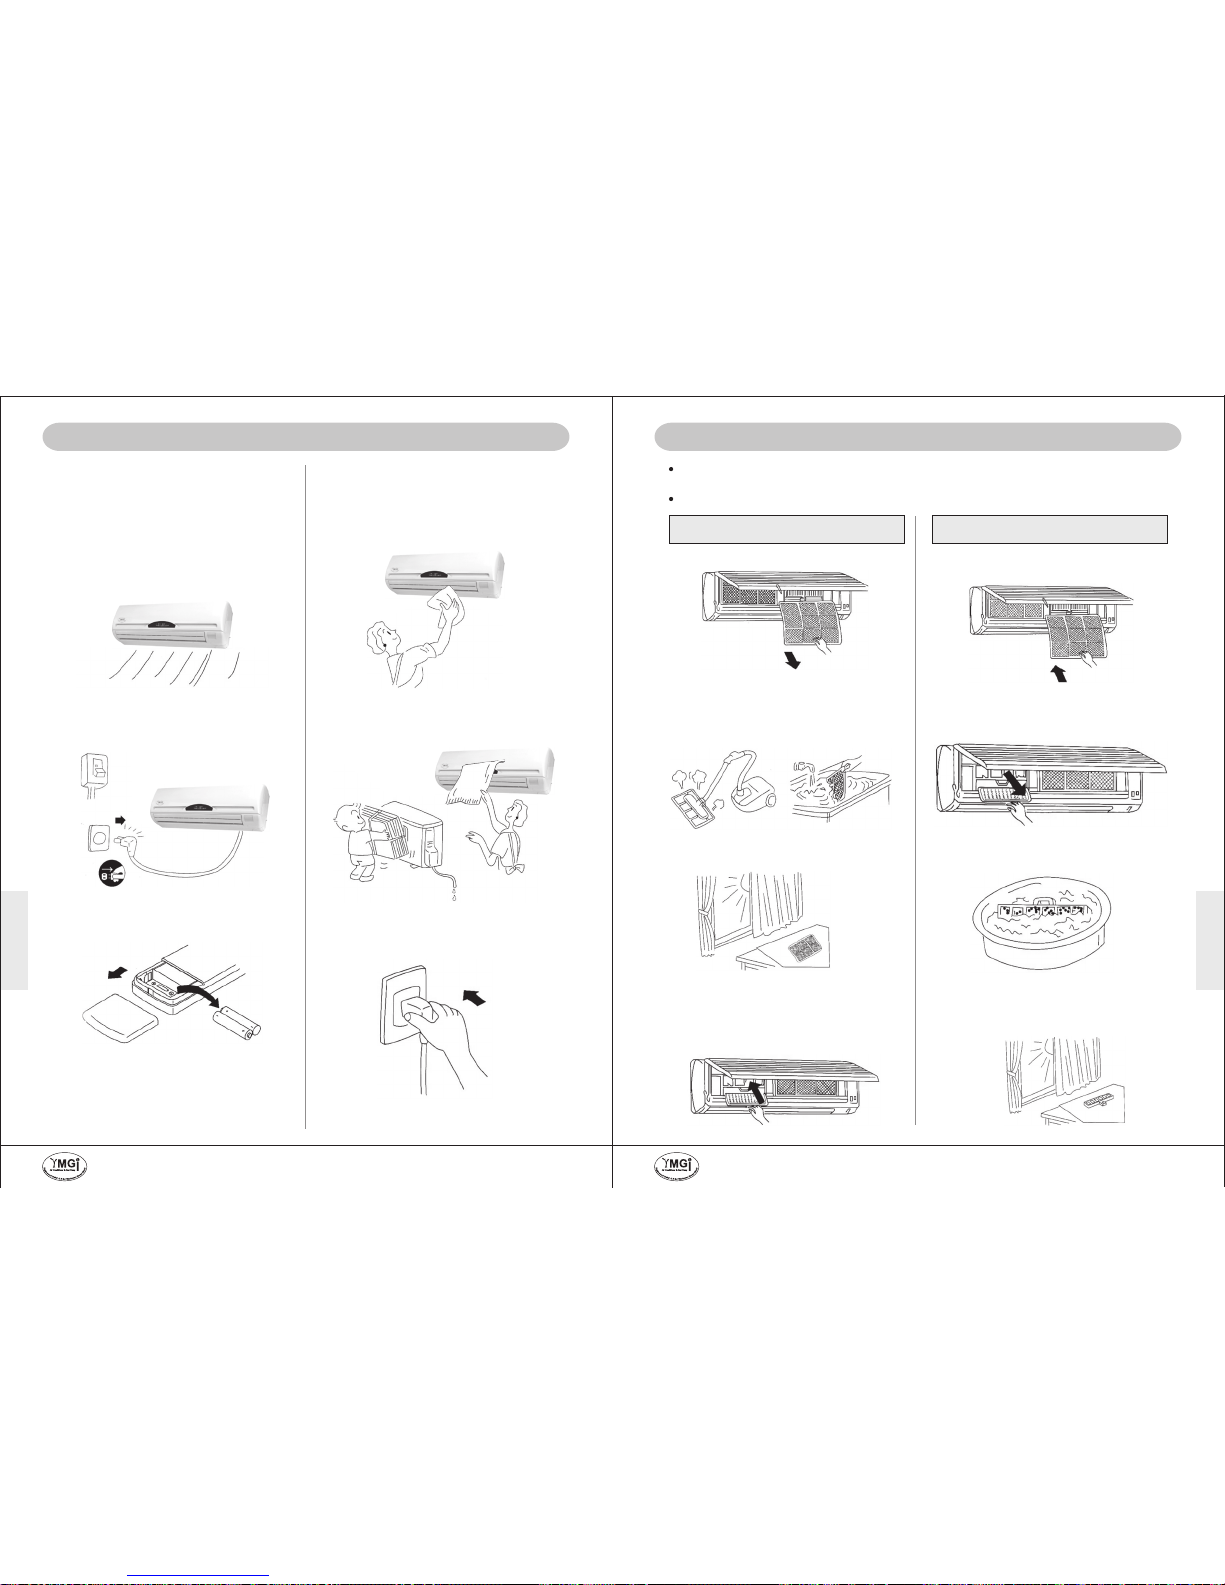
SERVICE AND MAINTENANCE
Unit Not Used for a Long Time
Turn off the unit by remote or line control, then
turn off circuit breaker.
Take the batteries out of the remote or line control.
Clean filters and replace them back to their original
positions. Clean indoor unit with soft cloth. Do not
use gasoline, benzene, grinding powder, detergent,
insecticide, etc. to clean units as they can hurt the
units.
Check to make sure that inlets and outlets of indoor
and outdoor units not be covered or blocked. Clean
filter, if necessary.
Check to make sure ground wire not loose.
Put batteries into control and turn on unit. Run
FAN only for 1 hour before moving onto other mode.
Start FAN 1 hour to completely dry the inside of the
indoor unit.
Set to the HEAT mode, then select the highest
temperature as the control can go, then indoor fan
will be on. Run for 1 hour.
Prior to Using the Unit
Regular Air Filter, Deodorization Filter or Air Cleaner must be cleaned once a
while, depending upon air quality and unit application.
Open Front Panel only After Unit Stops Running Completely.
Check and Clean Air Filter
Check and Clean Deodorization Flters
and Air Cleaner
1. Take out filters.
2. Clean filters with a vacuum cleaner or by patting
them gently (if they are very dirty, wash them in
0
warm water below 104 F dissolved with neutral
solution of washing detergent).
3. Rinse filters with clean water, the dry them in cool
air.
4. Insert them back to their original positions
securely. Close plastic front panel.
1. Take out filters, deodorization filter or air cleaner,
if available.
2. Clean deodorization filter, air cleaner with warm
0
water below 100 Fdissolved with neutral washing
detergent.
3. Rinse filters with clean water, then dry them in
cool air.
4. Insert them back to their original positions, Close
plastic front panel.
SERVICE AND MAINTENANCE
YMGI, Engineered Comfort Products for A Sustainable and Efficient Green World !YMGI, Engineered Comfort Products for A Sustainable and Efficient Green World !
Page 16
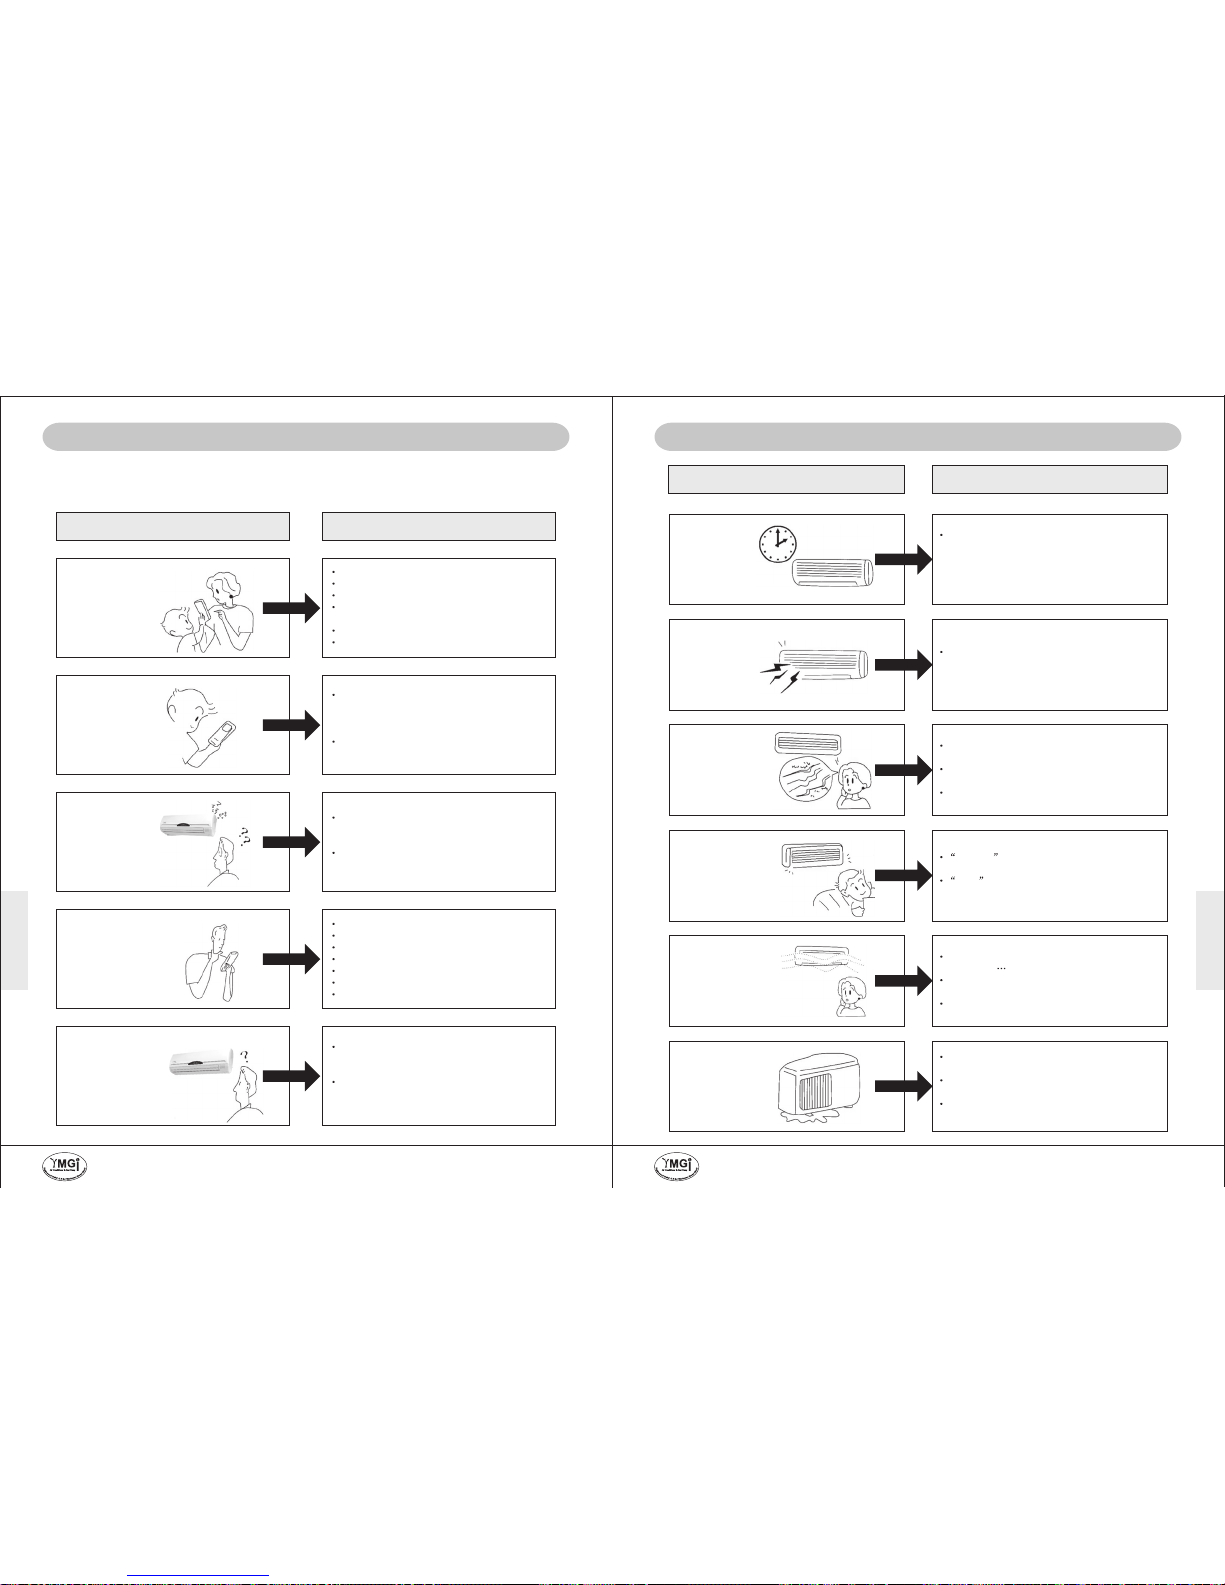
UNIT MAINTENANCE &
SERVICE GUIDE
UNIT MAINTENANCE &
SERVICE GUIDE
P30 OF 34P29 OF 34
If your problems could not be resolved with procedure described below, please stop
your unit and contact the installer or distributor.
Unit does not operate at all.
Remote control
does not display.
Cooling and heating is
not satisfied after
running for a long time.
Blower doesn't run while
outdoor unit is running
during HEAT mode.
Phenomenon
Analysis and Solution
Power blackout?
Circuit breaker trips?
Fuse in panel blown?
Is voltage higher or than 10% of the required
rated value?
Wire loose or damaged?
Check power piror to checking the unit.
If disturbed abnormally or operation modes
changed too frequently, sometimes remote
control would lose functions. Remove
batteries and reposition batteries.
If remote control displays unclear or displays
all symbols, need to replace with good batteries.
Air will not be immediatly blown out at the start
of the HEAT mode. Blower won't work until the
indoor coil is warm enough.
Coil copper tube temperature sensor should be
in the copper tube holder securely with wires
connected well.
Does temperature set up right?
Dirty filter?
Unit inlet or oulet blocked?
Unit still in sleep mode?
Indoor fan speed set at low?
Doors and windows are open?
Too much sunshine or extra heat in room?
Unit doesn't run after
ON/OFF button is
pressed.
There are many ways to protect the unit. Unit
stops as per microprocessor program safety
instructions. Please wait a little while.
Pressed ON/OFF too many times? Press it
firmly to check if the indoor unit beeps.
DOUBTING ABOUT UNIT FAILURE
Phenomenon
Analysis and Solution
Indoor unit fan
stops for about
10 minutes while
outdoor unit is
still in operation
at heating mode.
You may hear the
craking sounds.
You may hear the
sound like running
water.
You may hear"POOSH"
sound and "CLICK"
sound.
You may smell some
odor blowing out of
the air that
air-conditioner.
Condensate found
in outdoor unit
drain pan.
It may be defrosting the outdoor unit coil.
This process should complete in about
10 minutes at most (it freezes when
outdoor temperature is low and humidity
is high).
Friction sounds could be caused by expansion
and contraction of front panel due to temperature
changes at unit startup or shutdown.
During cooling, condensate from pipes or coils
accumulated.
During heating, condensate at heat-exchanger
coil drips.
During heating, at defrosting, melt ice builds up
condensate.
Odors from the filter or coil (dust, moisture,
fungi, mold ). Need to clean filter.
Heater is clicked on. Don't need to be worried
about.
If abnormal, need to check the unit.
POOSH sound of refrigerant flow change
when cooling or heating mode is finished.
Click sound of fan or compressor when
contactors being engaged.
Sound of running refrigerant in air-conditioner
due to its expansion or flowing.
Sound of accumulated condensate dripping
from the heat-exchanger to dain pan.
Melting sounds of frost on heat-exchanger.
DOUBTING ABOUT UNIT FAILURE
YMGI, Engineered Comfort Products for A Sustainable and Efficient Green World !YMGI, Engineered Comfort Products for A Sustainable and Efficient Green World !
Page 17
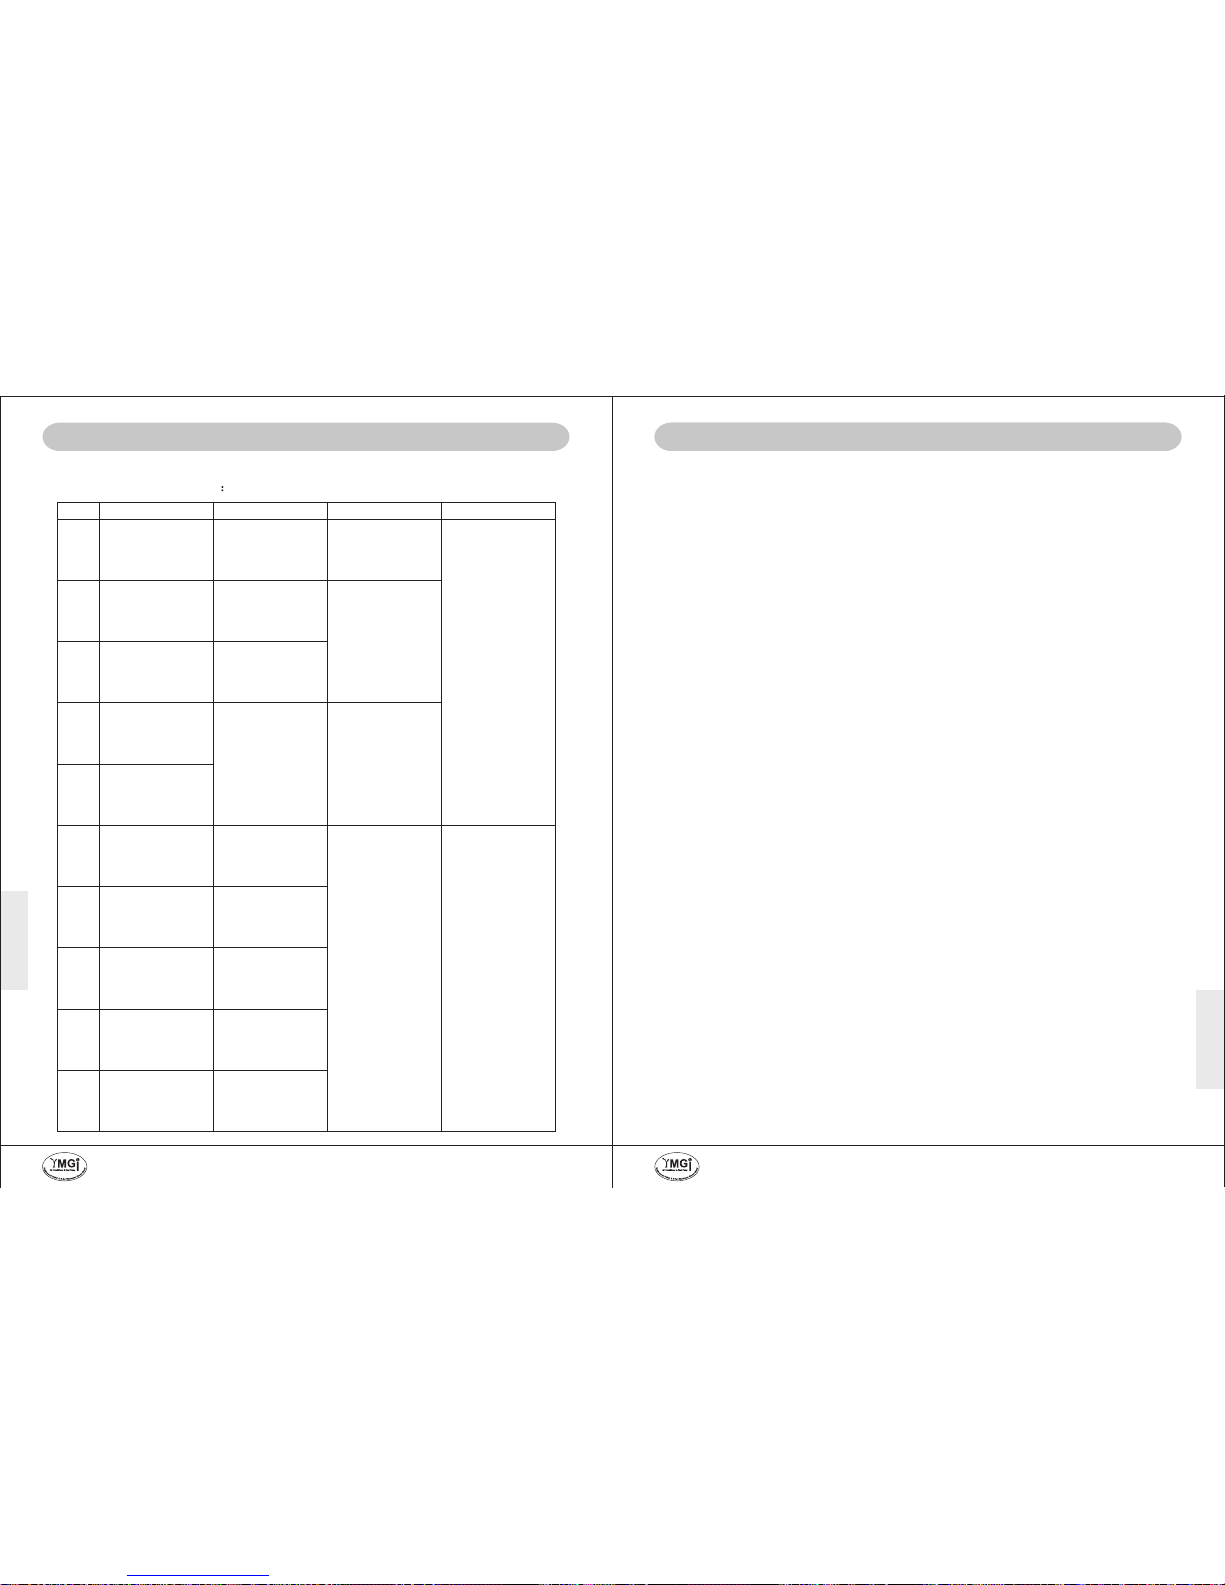
WARRANTY &
SUPPORT
UNIT MAINTENANCE &
SERVICE GUIDE
P32 OF 34
P31 OF 34
WARRANTY AND TECH. SUPPORT
YMGI warrants to the purchaser/owner(s) that YMGI products be free from defects in material and
workmanship under the normal use and maintenance, with the standard Limited Product Warranty
Policies that comes with the unit or sales package.
YMGI IS NOT RESPONSIBLE FOR
CONTACT FOR FIELD SERVICE OR REPAIR
The following people, in a prioritized sequence, will take care of your request or issue:
1) The original installer; otherwise,
2) Your current service contractor; otherwise,
3) Authorized contractor in YMGI list that is close to you; otherwise,
4) Authorized Distributor in YMGI Distributor list; otherwise,
5) Contractor/Distributor you prefer who is close to you.
CONTACT FOR GENERAL TECHNICAL QUESTIONS OR SUPPORT, IN A SEQUENCE:
1) The original installer; otherwise,
2) The current service contractor; otherwise,
3) The distributor; where the unit is purchased from otherwise,
4) YMGI Technical Support:
Tel: (866) 833-3138*703 Email: [email protected]
* Regular equipment maintenance or field service or field inspection.
* Damage or repairs required as a consequence Customer do-it-yoursely(DIY) installation and/or any other faulty
installation or improper application.
* Failure to start due to voltage conditions, blown fuses, open circuit breakers, or other damages due to the
inadequacy or interruption of electrical service.
* Damage or repairs needed as a consequence of any misapplication, abuse, improper servicing, unauthorized
alteration, or improper operation.
* Damage as a result of floods, winds, fires, lightening, accidents, corrosive atmosphere, or other conditions
beyond the control of YMGI.
* Parts not supplied or designated by YMGI.
* Products installed outside USA or Canada.
* Any damages to person or property of whatever kind, direct or indirect, special or consequential, whether
resulting from use or loss of use of the product.
The original licensed installer or current service contractor should be contacted first of all, since they installed
the unit and/or know more details than anybody else.
They will check the unit and find out the problems with the professional knowledge about HVAC and electric
product installation by using special tools or instrument.
They can contact YMGI technical support for technical help during unit installation or inspection.
Product model and serial numbers needed, which can be found on unit nameplate sticker, so that our
technician can quickly identify the unit, parts and wiring diagrams, among our many products and models.
* Any problems due to improper cooling and heating load calcuation of the room/building the air conditioner/heat
pump system is to be installed. Equipment users can get the calculation schedule from your room/building
architect or your installation or related service HVAC contractor, who should have knowledge and tools to do
these calculation correctly.
* Any problems due to improper sizing and selecting air conditioner/heat pump system. These equipment sizing
and selection work should be conducted by either your room/building architect or your installation or related
service HVAC contractor, who should have knowledge and tools to do these calculation correctly, and get your
approval, before your purchasing these air conditioner or heat pump equipment.
* Any problems due to improper installing of the air conditioner/heat pump system. Installation should be
conducted by currently licensed HVAC technician, following manufacturer installation instructions, all governing
safety codes, with care and professionalism.
* Any problems due to improper operation of the air conditioner/heat pump system. Users shall keep the manual
and look up in the manuals for the correct understanding how the unit will work and how to operate the unit
correctly.
* Any problems due to improper maintenance of the air conditioner/heat pump system. Like a car, regular
maintenance or yearly checking is necessary for the unit to work properly for you, before the season comes. For
example, air filter shall be checked for cleaness from time to time. Remote control batteries shall be checked for
enough power, before judging the unit is not working...
DIAGONSIS CODE, POSSIBLE CLAUSES, AND SUGGESTED ACTIONS TO
USER AND TECHNICIAN
DIAGNOSIS CODE & TROUBLE-SHOOTING GUIDELINE
Codes
Descriptions
Possible Reasons
Suggestion to User Technician Trouble-Shooting
E1
Condensate Full in drain pan
Dain pan dirty, drain hose
clogging, water level switch
failure, loose connection,
bad control board/
components, etc.
Check if drain hose is
clogged; if not, need to call
your installing or service
technician.
E2
Indoor air temp. sensor failure
Bad temperature sensor;
loose connection, damaged
wires, bad control board/
components, etc.
E3
Indoor coil copper tube
sensor failure
Bad temperature sensor;
loose connection, damaged
wires, bad control board/
components, etc.
Lift up grille/cover, to check
if the sensor looks bad or
drops out of holding socket/
pocket; or, to call installing
or service technician.
E4
Abnormal cooling
E5
Abnormal heating
Dirty filters/coils, refrigerant
leaks over time, pipe too
long, kinks or clogging in
pipe line or valves, pipe
damage, sensor failure,
compressor or board or
other component failures,
etc.
1) Regularly check and
clean indoor unit filters,
indoor and outdoor coils.
2) The service valves at
outdoor unit should be
generally cool at cooling
mode, hot at heating
mode;
3) Call your installing or
service technician to
check unit.
E6
Cooling-outdoor coil low
temp. protection
Outdoor too cold to run
cooling mode, windy, too
much refrigerant, short
piping, etc.
E7
Cooling-Indoor coil antifreeze protection
Dirty filter/coils, indoor fan
motor failure, loose blower
wheel/motor connection, too
much or less refrigerant,
pipe/cap. tube/valve
clogging, etc.
E8
Heating-outdoor coil high
temp. protection
Outdoor temperature too
warm to run heating mode,
too much refrigerant, short
piping, etc.
E9
Heating-indoor coil anti-to
hot protection
Dirty filter/coils, indoor fan
motor failure, loose blower
wheel/motor connection, too
much refrigerant, pipe/cap.
tube/valve clogging, etc.
E0
Heating-outdoor coil too
cold protection
Outdoor temperature is too
cold to run heat pump/
heating.
1) Shut off the unit;
2) Cooling, wait until
weather allows the unit
to re-start, or switch to
alternative cooling
equipment which allows
lower ambient cooling;
3) Heating, wait until
weather allows the unit
to re-start, or switch to
base-board heater, gas
furnace or other
alternative heating
sources during cold
hours/days.
1) Check if these are
caused by installation or
component failure;
2) There could be nothing
abnormal, but the unit is
at protection mode, which
means the current
ambient temperature is
not proper to run the unit;
3) If there is something
wrong, need to find all
the clauses and correct
or fix the problems and
not to leave any bugs.
1) Shut off power;
2) Follow possible clauses
listed at the left, to check
one by one;
3) To save time for quick
diagnosis as much as
posible, suggest your
technician to make
appointment with YMGI
tech. support, and call us
while the techician is at
job site.
4) Better to check the unit,
get problems and model
model #, and serial #
ready, before calling
YMGI tech. support.
5) Need the technician
physically, at the job site,
use right tools and
experience, to find all the
clauses and correct or fix
the problems and not to
leave any bugs.
YMGI, Engineered Comfort Products for A Sustainable and Efficient Green World !YMGI, Engineered Comfort Products for A Sustainable and Efficient Green World !
Page 18
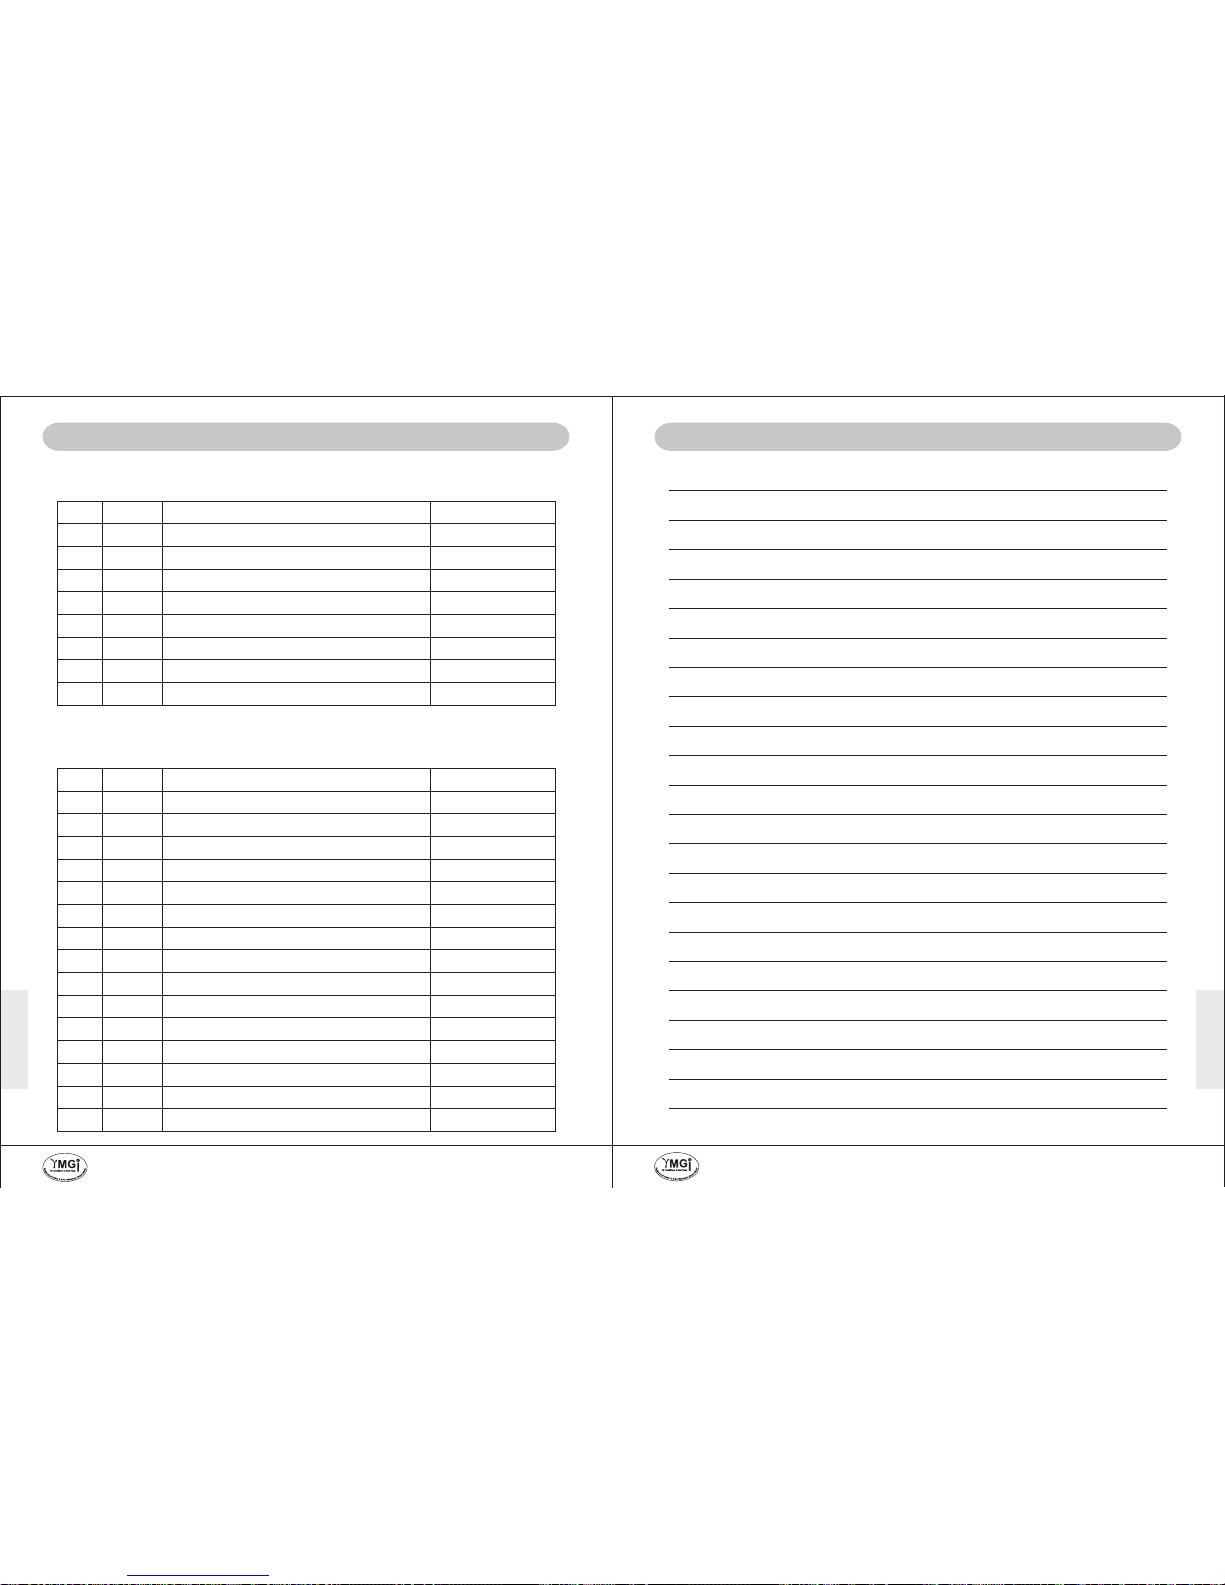
WARRANTY &
SUPPORT
WARRANTY &
SUPPORT
P33 OF 34
P34 OF 34
USER NOTES AND SERVICE LOG
MEMO
SERVICE/MAINTENANCE LOG
Put down whatever questions you have or problems you have seen as a unit history:
No. Date
Service/Maintenance Conducted Person/Phone
USER NOTES
Put down whatever questions you have or problems you have seen as a unit history:
No. Date
Questions or Problems
Remarks
YMGI, Engineered Comfort Products for A Sustainable and Efficient Green World !YMGI, Engineered Comfort Products for A Sustainable and Efficient Green World !
 Loading...