

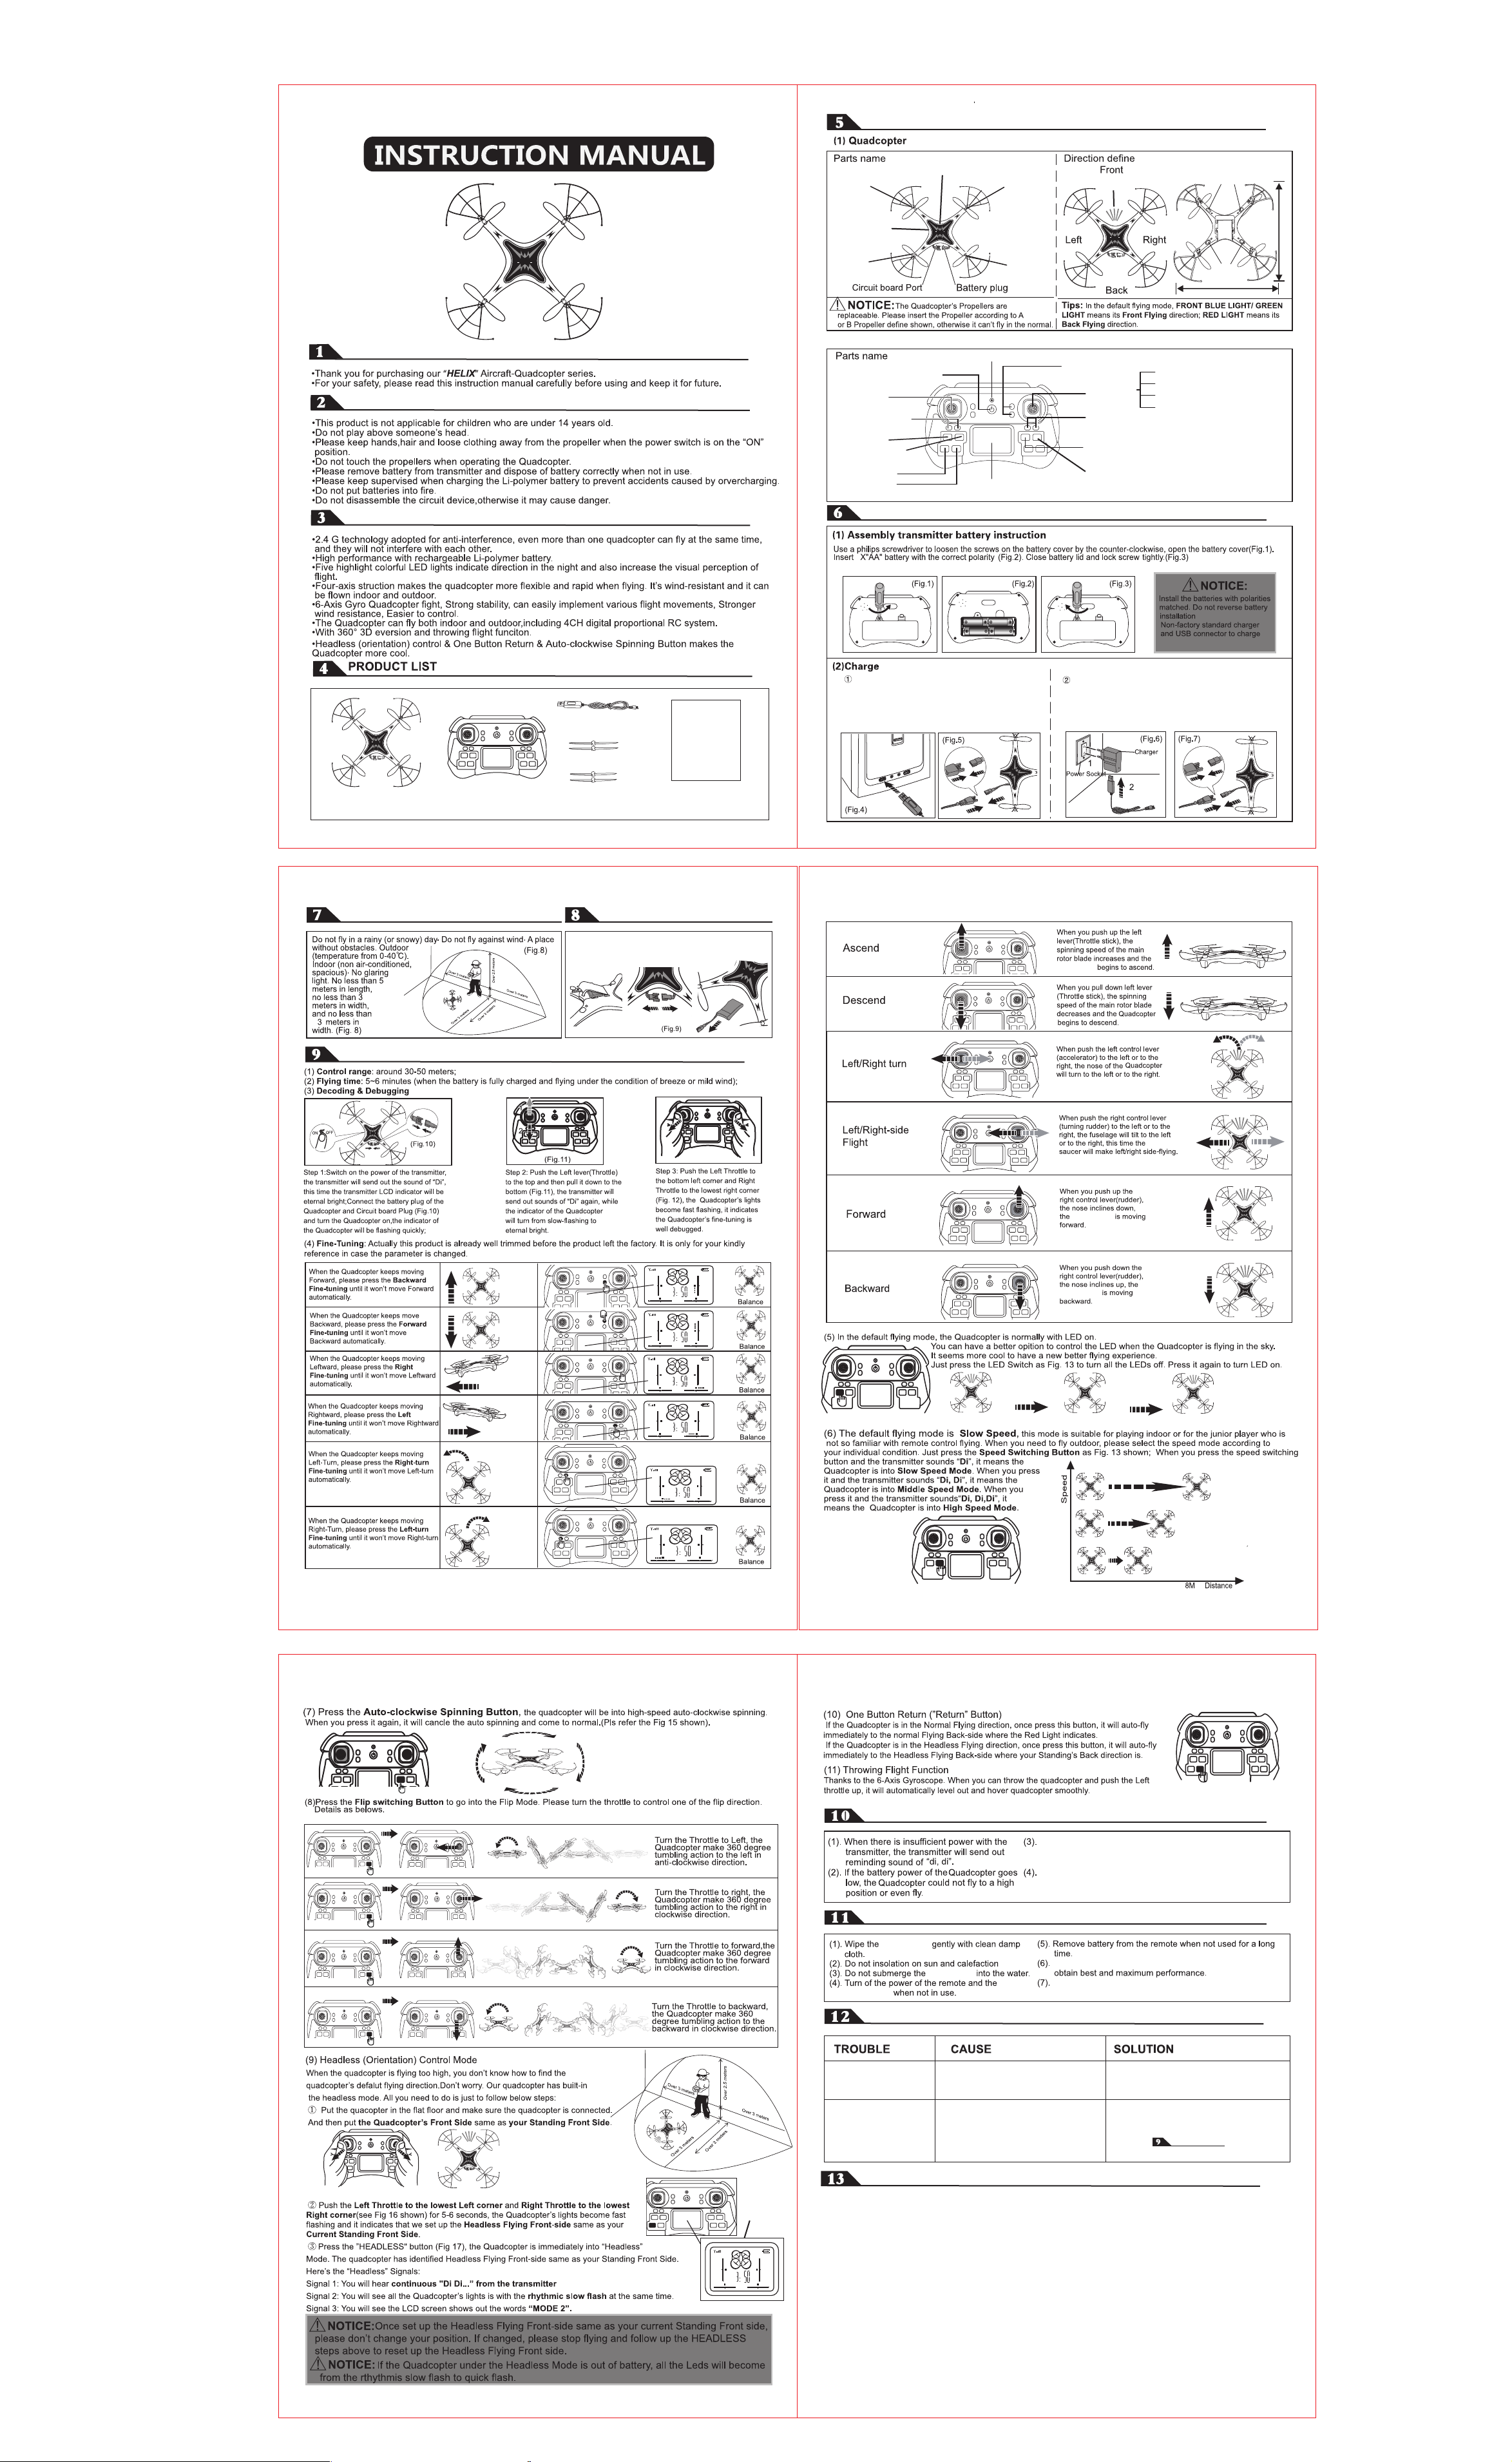
Parts name and direction define
HeliX
QUADROTOR SERIES
HeliX
QUADROTOR SERIES
HeliX
QUADROTOR SERIES
HeliX
QUADROTOR SERIES
HeliX
QUADROTOR SERIES
HeliX
QUADROTOR SERIES
HeliX
QUADROTOR SERIES
HeliX
QUADROTOR SERIES
HeliX
QUADROTOR SERIES
HeliX
HeliX
QUADROTOR SERIES
HeliX
HeliX
HeliX
HeliX
HeliX
HeliX
HeliX
HeliX
HeliX
HeliX
HeliX
HeliX
HeliX
HeliX
HeliX
HeliX
QUADROTOR SERIES
HeliX
QUADROTOR SERIES
HeliX
QUADROTOR SERIES
HeliX
QUADROTOR SERIES
HeliX
QUADROTOR SERIES
HeliX
QUADROTOR SERIES
HeliX
QUADROTOR SERIES
HeliX
QUADROTOR SERIES
HeliX
HeliX
QUAD
R
OTOR SE
RIES
PREFACE
SAFETY PRECAUTION
PRODUCT INTRODUCTION
QUADROTOR SERIES
Quadcopter Fuselage
NO.Q13
A Propeller
Power Switch
(On/Off Button)
B Propeller
FRONT BLUE LIGHT
NO.Q13s
B Propeller
A Propeller
GREEN LIGHT
15CM
RED LIGHT
15CM
(2) Transmitter
Power switch
Left Throttle
(Up/Down/Left-turn /Right-turn)
Fine-tuning Button
(for Left-turn/Right-Turn)
LED Switch
(Light On/Off)
Speed Switching Button
(Low/Middle/High Speed)
Headless Button
One Button Return
lnstruction light
“HeliX” Logo for Item No.
LCD Screen for Item No.
Fine-tuning Button
(for Forward/Backward)
Right Throttle
Fine-tuning Button
(for Left-side/Right-side Flight)
Auto-clockwise Spinning Button
Flip Switching Button(Flip Mode)
Q13
Q13s
① Forward (Forward Filp Mode)
② Backward (Backward Filp Mode)
③ Left-side Flight
(Left-side Filp Mode)
④ Right-side Flight (Right-side Filp Mode)
Battery Assembly & Charging Instruction
USB Cable
A Propeller
Quadcopter
Transmitter
B Propeller
Instruction Manual
(with rechargeable battery)
To find a place to fly Replacing the battery
4
Please insert the USB line’s port into the computer
(As Fig. 4) and use another side of USB to connect
the Battery Plug (As Fig. 5), and then the light on
the USB is Red;When the charging is finished, the
light will be off.The Quadcopter can fly about 6
minutes after charging about 40 minutes.
Here’s the Flying tips for your reference:
.Do not use
your Quadcopter
Plug the USB charger into the Power Socket and connect
the USB port into the charger(As Fig.6), the red indicator
of the USB will keep eternal bright.Please use the USB’s
another side to connect the Battery Plug(As Fig. 7), the
light on the USB will be Red.When finished the charging,
the light will be off.
Control method
Open the battery cover to disconnect the Battery Plug
and Circuit board Port, and pull the rechargeable
Li-battery out (As Fig.9).
Quadcopter
QUADROTOR SERIES
QUADROTOR SERIES
(Fig.12)
QUADROTOR SERIES
QUADROTOR SERIES
Moving
Forward
Moving
backward
Moving
Leftward
Moving
Rightward
CH
CH
CH
CH
Quadcopter
TX
%
TX
Quadcopter
%
TX
%
TX
QUADROTOR SERIES
Fig. 13
Default Mode LED OFF LED ON
QUADROTOR SERIES
QUADROTOR SERIES
%
CH
CH
TX
%
TX
%
Moving
QUADROTOR SERIES
Left-Spin
Moving
QUADROTOR SERIES
Right-Spin
(5) In the normal, you can fly the quadcopter according to the its default Flying direction that’s Green Lights indicate the Flying
Front-side and Red Lights indicate the Flying Back-side; Meantimes, the LCD screen of the transimitter will show Mode 1;
QUADROTOR SERIES
Auto-clockwise Spinning
Fig 15
Left Flip Mode
LEFT FLIP
Right Flip Mode
Notice
Fig. 14
QUADROTOR SERIES
QUADROTOR SERIES
QUADROTOR SERIES
QUADROTOR SERIES
0M 3M 6M
QUADROTOR SERIES
High Speed Mode
QUADROTOR SERIES
Middle Speed Mode
Slow Speed Mode
Fig 18
Repair immediately when the Quadcopter is damaged or out
of shape.(If the rotor is seriously broken, do not fly the product,
or else it may cause some accident.)
When the quadcopter has run out of electricity or being placed
for 3 months, please timely charge it for 20 minutes and then
unplug it and keep it well.
Fig 16
Forward Flip Mode
Backward Flip Mode
The Quadcopter Front Side
(The Headless Flying Front-side denifition )
Fig 17
LCD screen
is for Q13S
CH
%
Maintenance
Quadcopter
Quadcopter
Quadcopter
New 1.5V “AA” alkaline batteries, for the transmitter to
Check the Quadcopter regularly to make sure it’s in good
shape.
Trouble manage
(1). Propeller can’t move
(2). Suddenly stop and
drop down when flying
(1). No response from the
Quadcopter
(2). The Quadcopter can’t
be hovering normally
(1). ON/OFF switch is OFF
(2). Run out of power
(1). The quadcopter fails to be decoded.
(2).The band of the transmitter doesn’t
correspond to the decoding of the
Quadcopter
(1). Turn the power on.
(2). Recharge the Quadcopter or
change the transmitter’s batteries.
Adjust the band on the transmitter and keep
it the same as the Quadcopter.Please make
decoding once again by the following Step
(3) or (4) mentioned in
Control method
the Instrunction Manual.
FCC COMPLIANCE INFORMATION STATEMENT (U.S)
Warning: Changes or modifications to this unit not expressly approved by the party responsible for compliance could
void the user’s authority to operate the equipment.
NOTE: This equipment has been tested and found to comply with the limits for a Class B digital device, pursuant to
Part 15 of the FCC Rules. These limits are designed to provide reasonable protection against harmful interference in
TX
MODE 2
a residential installation. This equipment generates, uses and can radiate radio frequency energy and, if not installed
and used in accordance with the instructions, may cause harmful interference to radio communications.
However, there is no guarantee that interference will not occur in a particular installation. If this equipment does cause
harmful interference to radio or television reception, which can be determined by turning the equipment off and on, the
user is encouraged to try to correct the interference by one or more of the following measures:
Reorient or relocate the receiving antenna.
Increase the separation between the equipment and receiver.
Connect the equipment into an outlet on a circuit different from that to which the receiver is connected.
Consult the dealer or an experienced radio/TV technician for help.
“The device must not be co-located or operating in conjunction with any other antenna or transmitter.”
 Loading...