

Yingdakang Technology 300M Users manual
300M Extreme High Power Wireless-N Router
User Manual
Ver.: 1.0.0

FCC STATEMENT
This equipment has been tested and found to comply with the limits
for a Class B digital device, pursuant to part 15 of the FCC Rules.
These limits are designed to provide reasonable protection against
harmful interference in a residential installation. This equipment
generates uses and can radiate radio frequency energy and, if not
in-stalled and used in accordance with the instructions, may cause
harmful interference to radio communications. However, there is no
guarantee that interference will not occur in a particular installation.
If this equipment does cause harmful interference to radio or
television reception, which can be determined by turning the
equipment off and on, the user is encouraged to try to correct the
interference by one or more of the following measures:
• Reorient or relocate the receiving antenna.
• Increase the separation between the equipment and
receiver.
• Connect the equipment into an outlet on a circuit
different from that to which the receiver is
connected.
• Consult the dealer or an experienced radio / TV
technician for help.
1

This device complies with part 15 of the FCC Rules. Operation is
subject to the following two conditions:
• This device may not cause harmful interference.
• This device must accept any interference received,
including interference that may cause undesired
operation.
Any changes or modifications not expressly approved by the party
responsible for compliance could void the user’s authority to
operate the equipment.
Note: This device must more than 20cm away from human
body when using.
2

Chapter 1 Product Overview...............................................................................5
1.1 Package Contents .......................................................................................5
1.2 Panel Overview ...........................................................................................6
Chapter 2 Installation...........................................................................................8
Chapter 3 Internet Connection Setup...............................................................10
3.1 Configure your PC’s TCP/IP Settings........................................................10
3.2 Login to Router..........................................................................................15
3.3 Quick Internet Connection Setup ..............................................................15
3.4 Quick Wizard .............................................................................................17
Chapter 4 Network Settings ..............................................................................18
4.1 Status Info .................................................................................................18
4.2 WAN ..........................................................................................................19
4.2.1 PPPoE...............................................................................................19
4.2.2 Static IP .............................................................................................21
4.2.3 Dynamic IP ........................................................................................21
4.2.4 PPTP .................................................................................................22
4.2.5 L2TP..................................................................................................23
4.3 LAN ...........................................................................................................24
4.4 MAC Clone ................................................................................................25
4.5 DNS...........................................................................................................25
4.6 Bandwidth Control .....................................................................................26
4.7 Traffic Statistics..........................................................................................28
4.9 WAN Speed...............................................................................................29
Chapter 5 Wireless Settings..............................................................................31
5.1 Wireless Basic Settings.............................................................................31
5.2 Wireless Security.......................................................................................32
5.2.1 WPS Settings ....................................................................................32
5.2.2 WPA-PSK..........................................................................................33
5.2.3 WPA2-PSK........................................................................................34
5.2.4 WEP...................................................................................................34
5.3 Operation Mode.........................................................................................35
5.3.1 Universal Repeater............................................................................35
5.3.2 WISP..................................................................................................35
5.3.3 WDS Bridge Mode.............................................................................36
3

5.4 MAC Filtering.............................................................................................38
5.5 Connection Status .....................................................................................40
Chapter 6 DHCP .................................................................................................41
6.1 DHCP Settings ..........................................................................................41
6.2 DHCP Clients & Address Reservation.......................................................41
Chapter 7 Virtual Server....................................................................................43
7.1 Port Forwarding.........................................................................................43
7.2 DMZ...........................................................................................................45
7.3 UPnP .........................................................................................................46
Chapter 8 Security Settings..............................................................................47
8.1 IP Address Filtering ...................................................................................47
8.2 MAC Address Filtering...............................................................................49
8.3 URL Filtering..............................................................................................51
8.4 Remote Management................................................................................52
Chapter 9 Routing Settings...............................................................................54
9.1 Routing Table ............................................................................................54
9.2 Static Routing ............................................................................................54
Chapter 10 Maintenance....................................................................................56
10.1 Time Settings...........................................................................................56
10.2 DDNS ......................................................................................................56
10.3 Backup/Restore.......................................................................................57
10.4 Factory Default ........................................................................................59
10.5 Firmware Upgrade...................................................................................60
10.6 Restart.....................................................................................................60
10.7 Password.................................................................................................60
10.8 System Logs............................................................................................61
Appendix A: Product Specification..................................................................62
Appendix B: Glossary........................................................................................64
Appendix C: Contact Information.....................................................................65
4

Chapter 1 Product Overview
iBall Baton 300M eXtreme High Power Wireless-N Router
(iB-WRX300NP) complies with IEEE 802.11 b/g/n wireless standards.
- MIMO Technology - Wireless data transmission speed up to 300Mbps
- Broadband Internet (Cable /DSL) - Configure internet through (RJ45)
WAN port
- WISP Internet - Configure Internet through wireless mode
- Operation Mode - AP Router / Universal Repeater / WDS
- 5dBi x 2 Omni-directional Antenna
- Easy Setup Wizard Utility helps users to configure the router easily.
1.1 Package Contents
The following items should be found in your package:
300M MIMO Wireless-N Router
DC Power Adapter
Patch Cord
Resource CD for 300M eXtreme High Power Wireless-N Router,
including Easy Setup Wizard, Other Helpful Information
Conventions
The Router or iB-WRX300NP mentioned in this guide stands for iBall Baton
300M eXtreme High Power Wireless-N Router without any explanation.
5
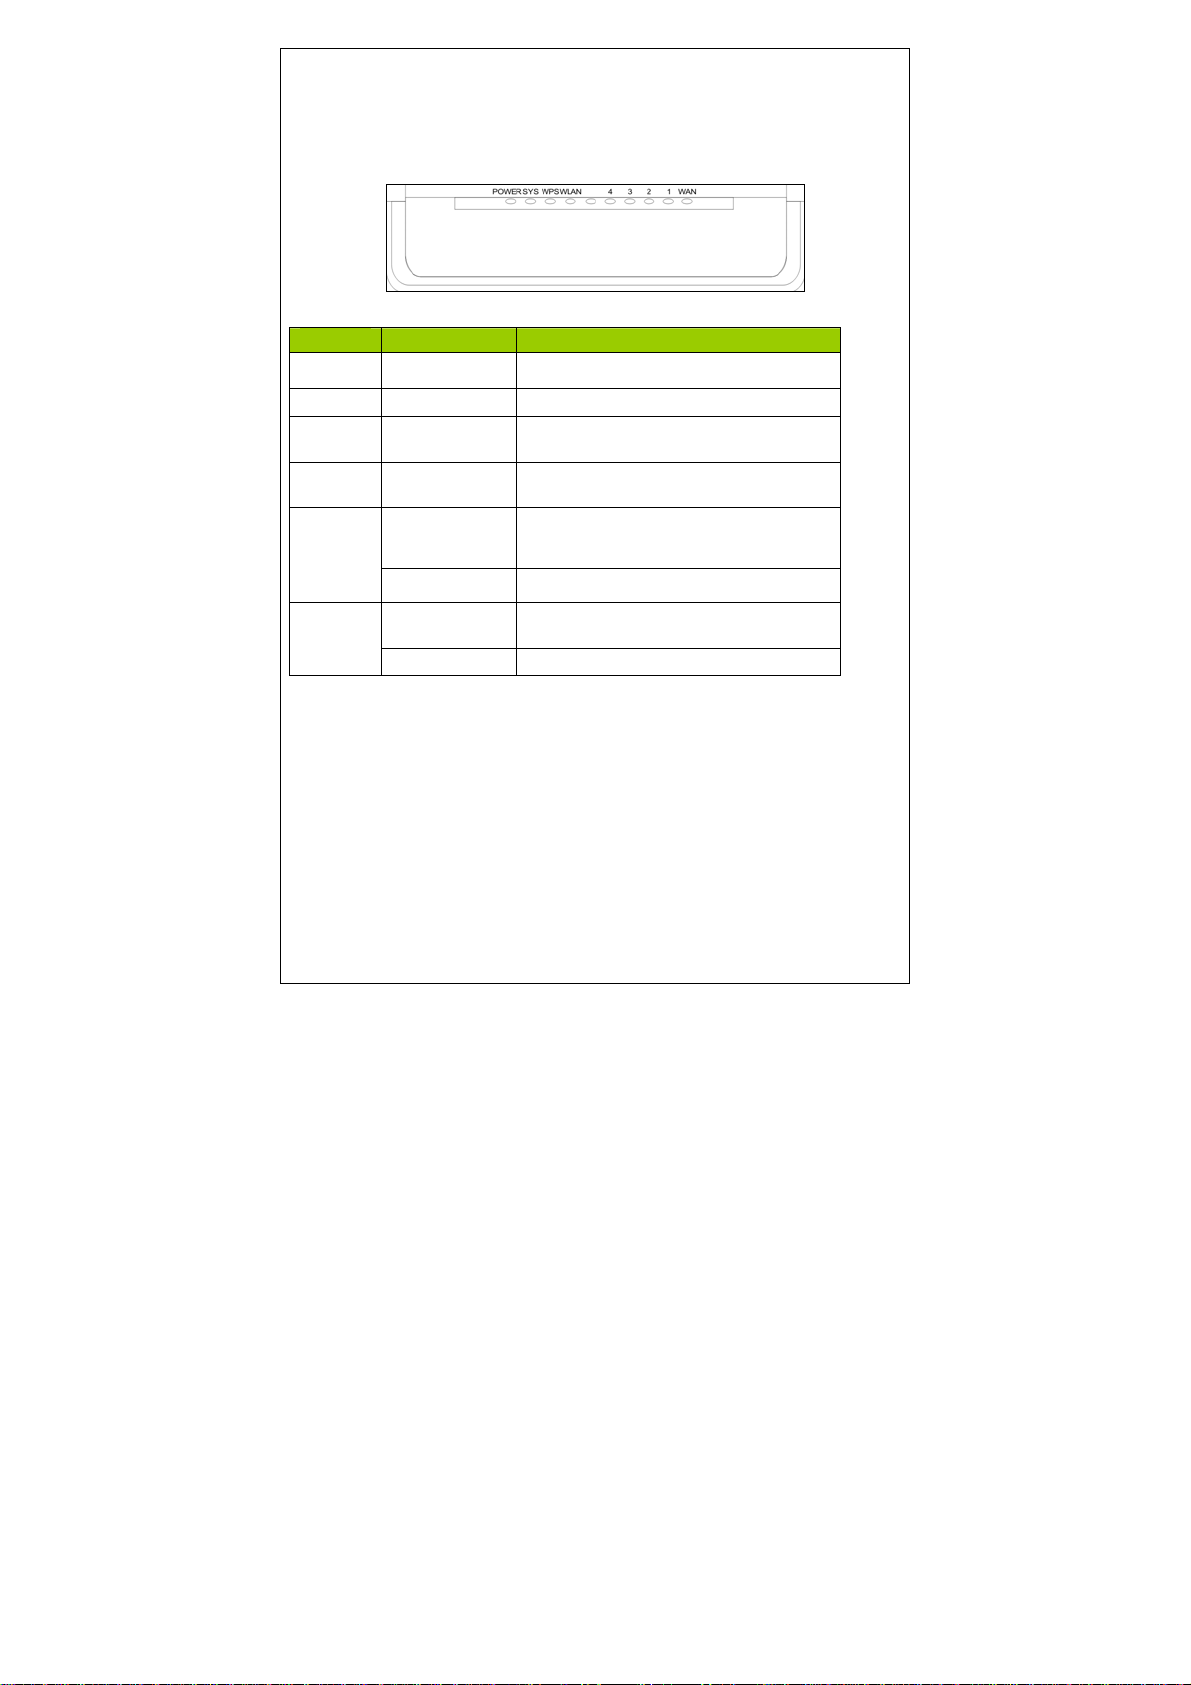
1.2 Panel Overview
LED overview:
Status
Power Red Router is power ON
SYS Green Router is working properly
WPS Green
WLAN Blue
LED Status Description
WPS function is activated, LED will keep
on about 2 minutes
Device linked to the corresponding port but
there is no activity
LAN
WAN
Green
Green in flash Data access
Red
Red in flash Data access
RJ45 cable is plugged, and Ethernet
connection is established
RJ45 cable is plugged, and Ethernet
connection is established.
6
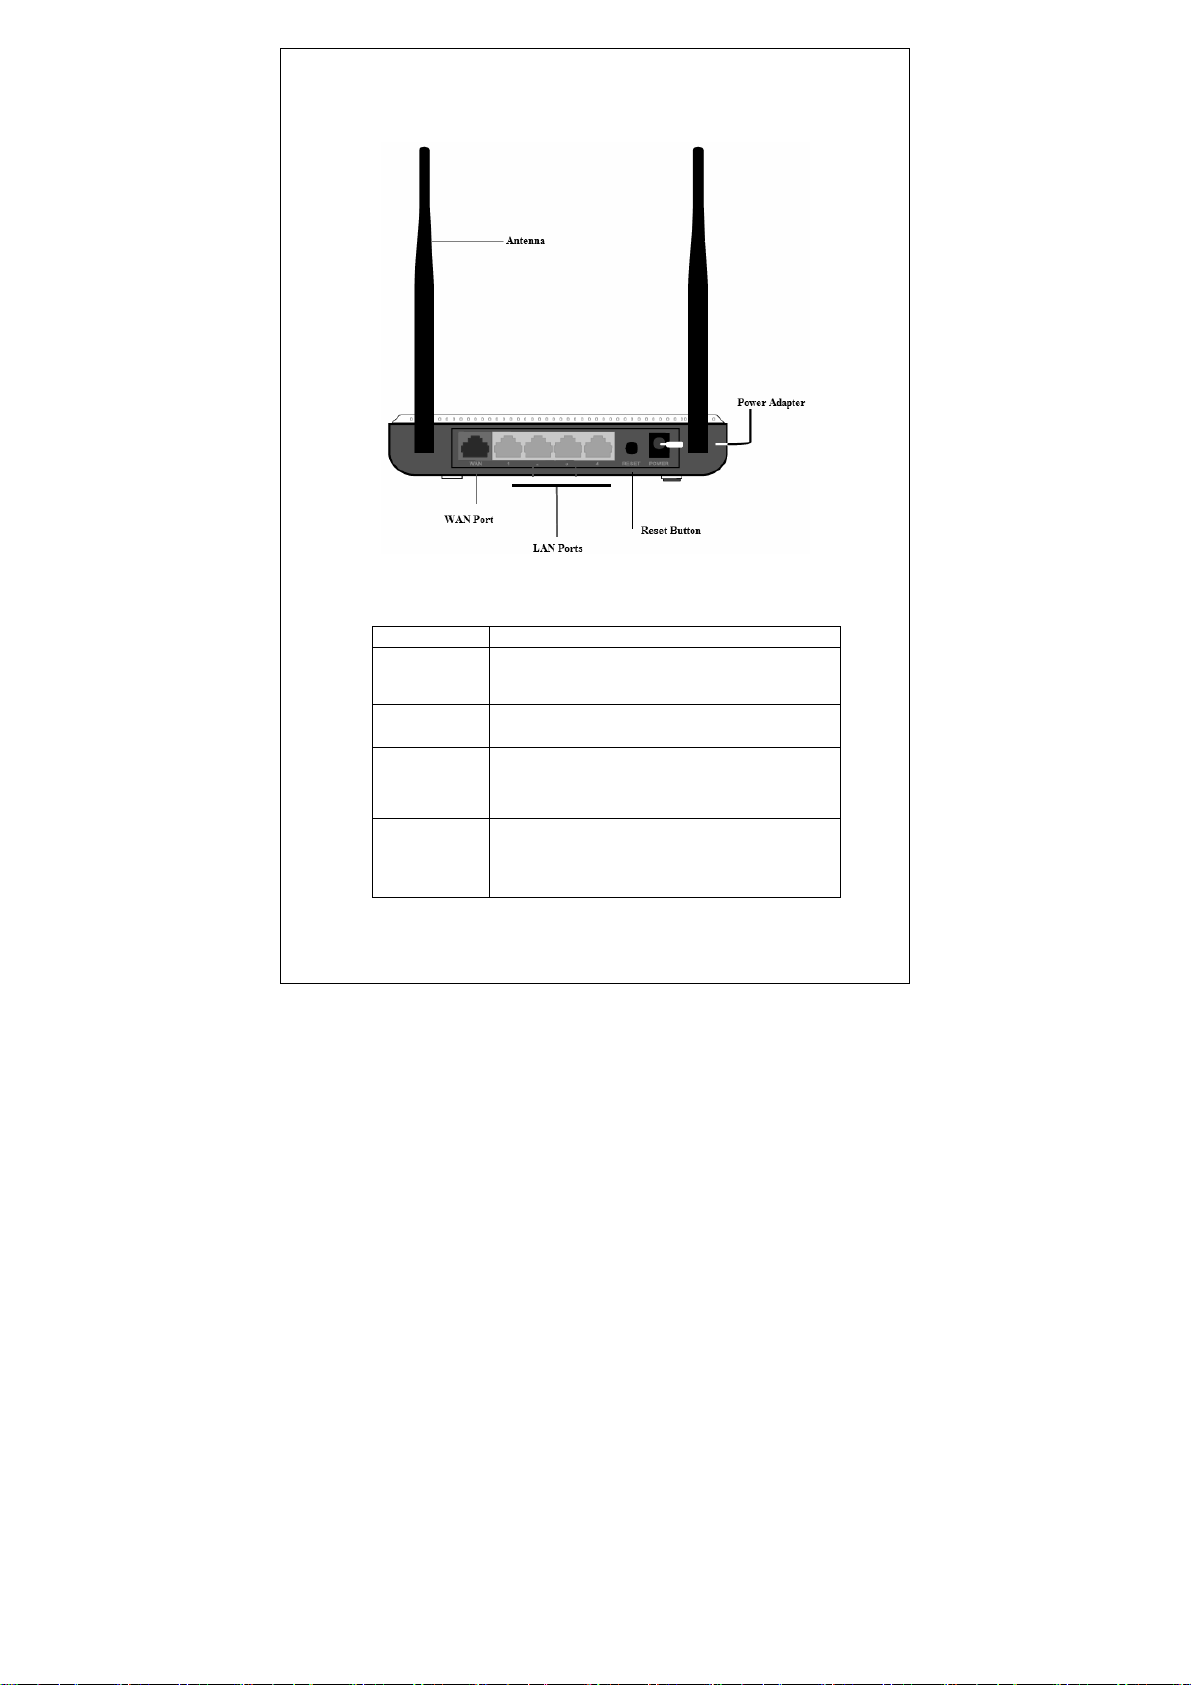
Port/Button Overview:
Port/Button Description
WAN
Internet port connecting to a DSL/Cable
modem or ISP directly
LAN
RESET
PWR
For connection to a computer or router.
Pressing this button for 7 seconds
restores the device to factory default
settings.
Kindly use bundled power adapter to
avoid hardware failure
7
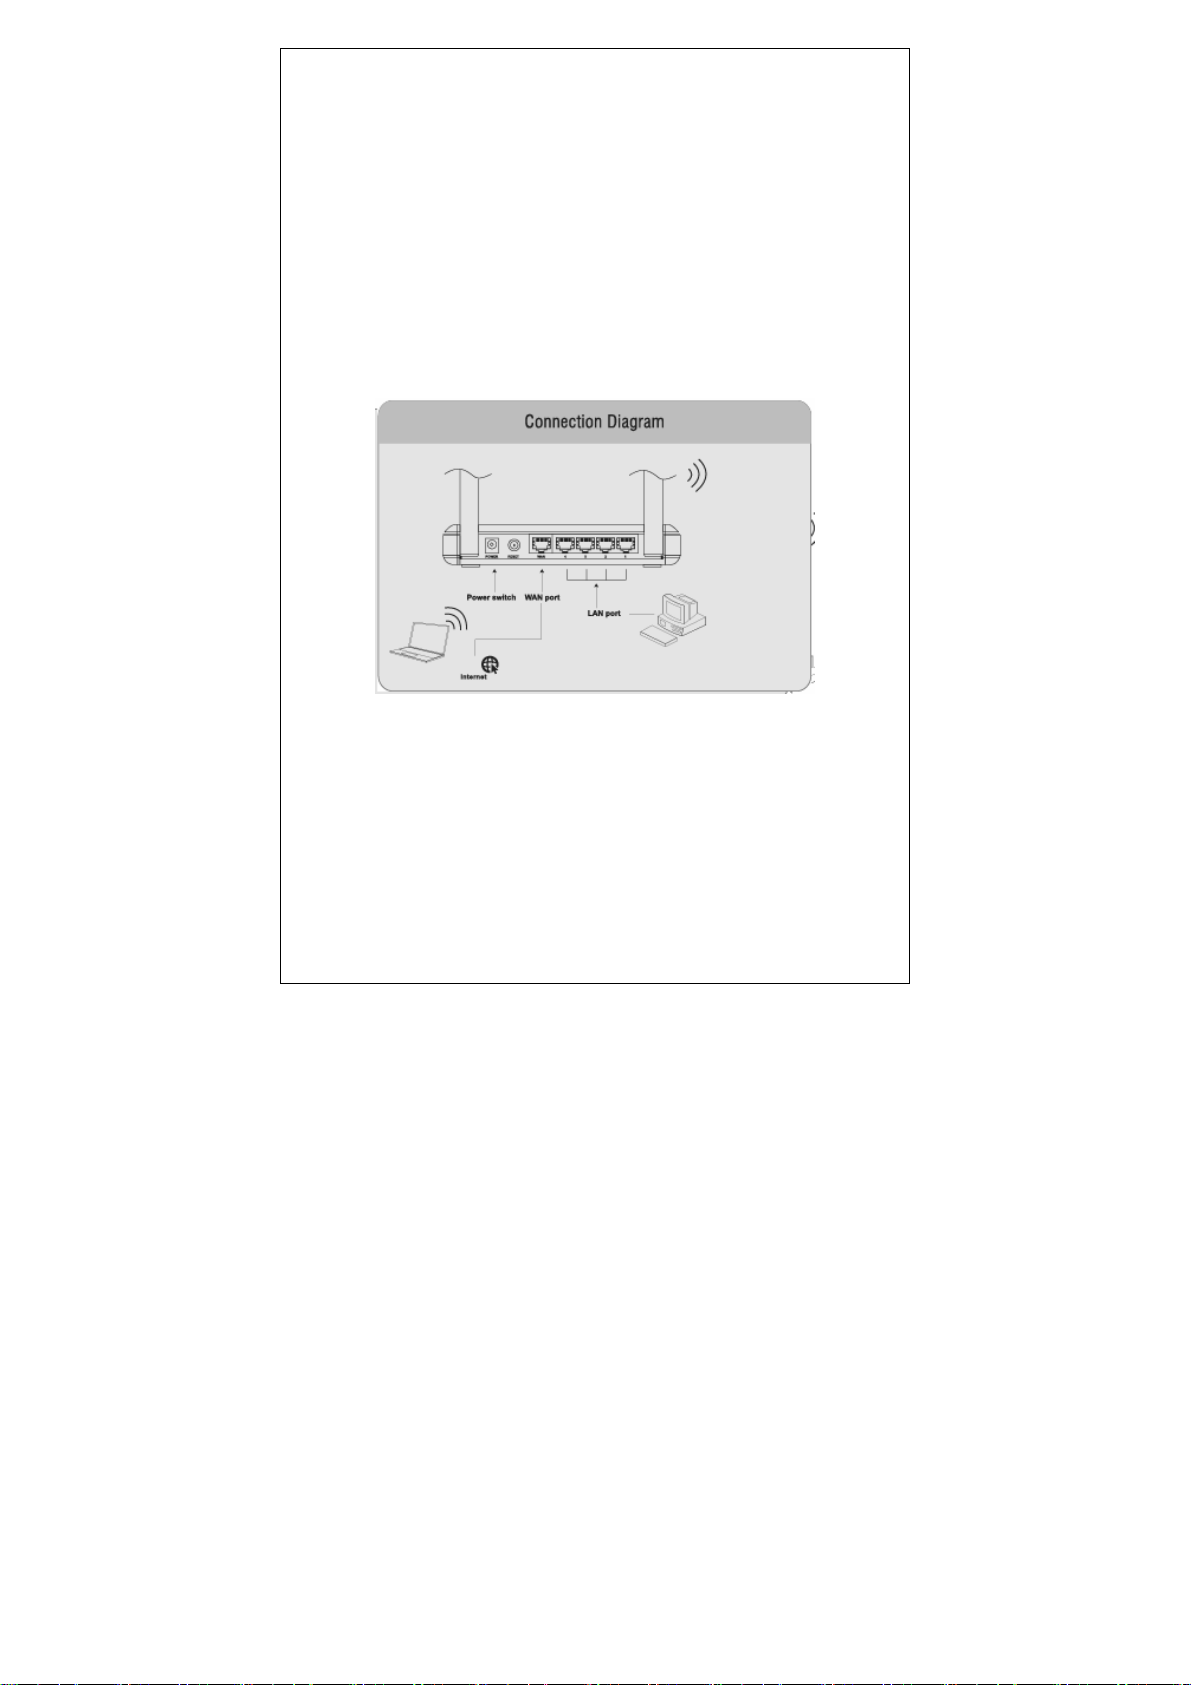
Chapter 2 Installation
1. Connect one end of the included power adapter to the router and
then plug the other end into a wall outlet nearby.
2. Connect the LAN port on the Router to the NIC port on your PC
using an Ethernet cable.
3. Connect the WAN port on the Router to an Internet-enabled
Cable/xDSL modem using an Ethernet cable.
4. Insert the included “Easy Setup Wizard” CD-ROM into your PC’s
drive, click “Setup.exe” if the program does not run automatically and
follow onscreen instructions to complete settings. Or directly launch a web
browser and configure the router on web based utility
(For details, refer to chapter 3).
8
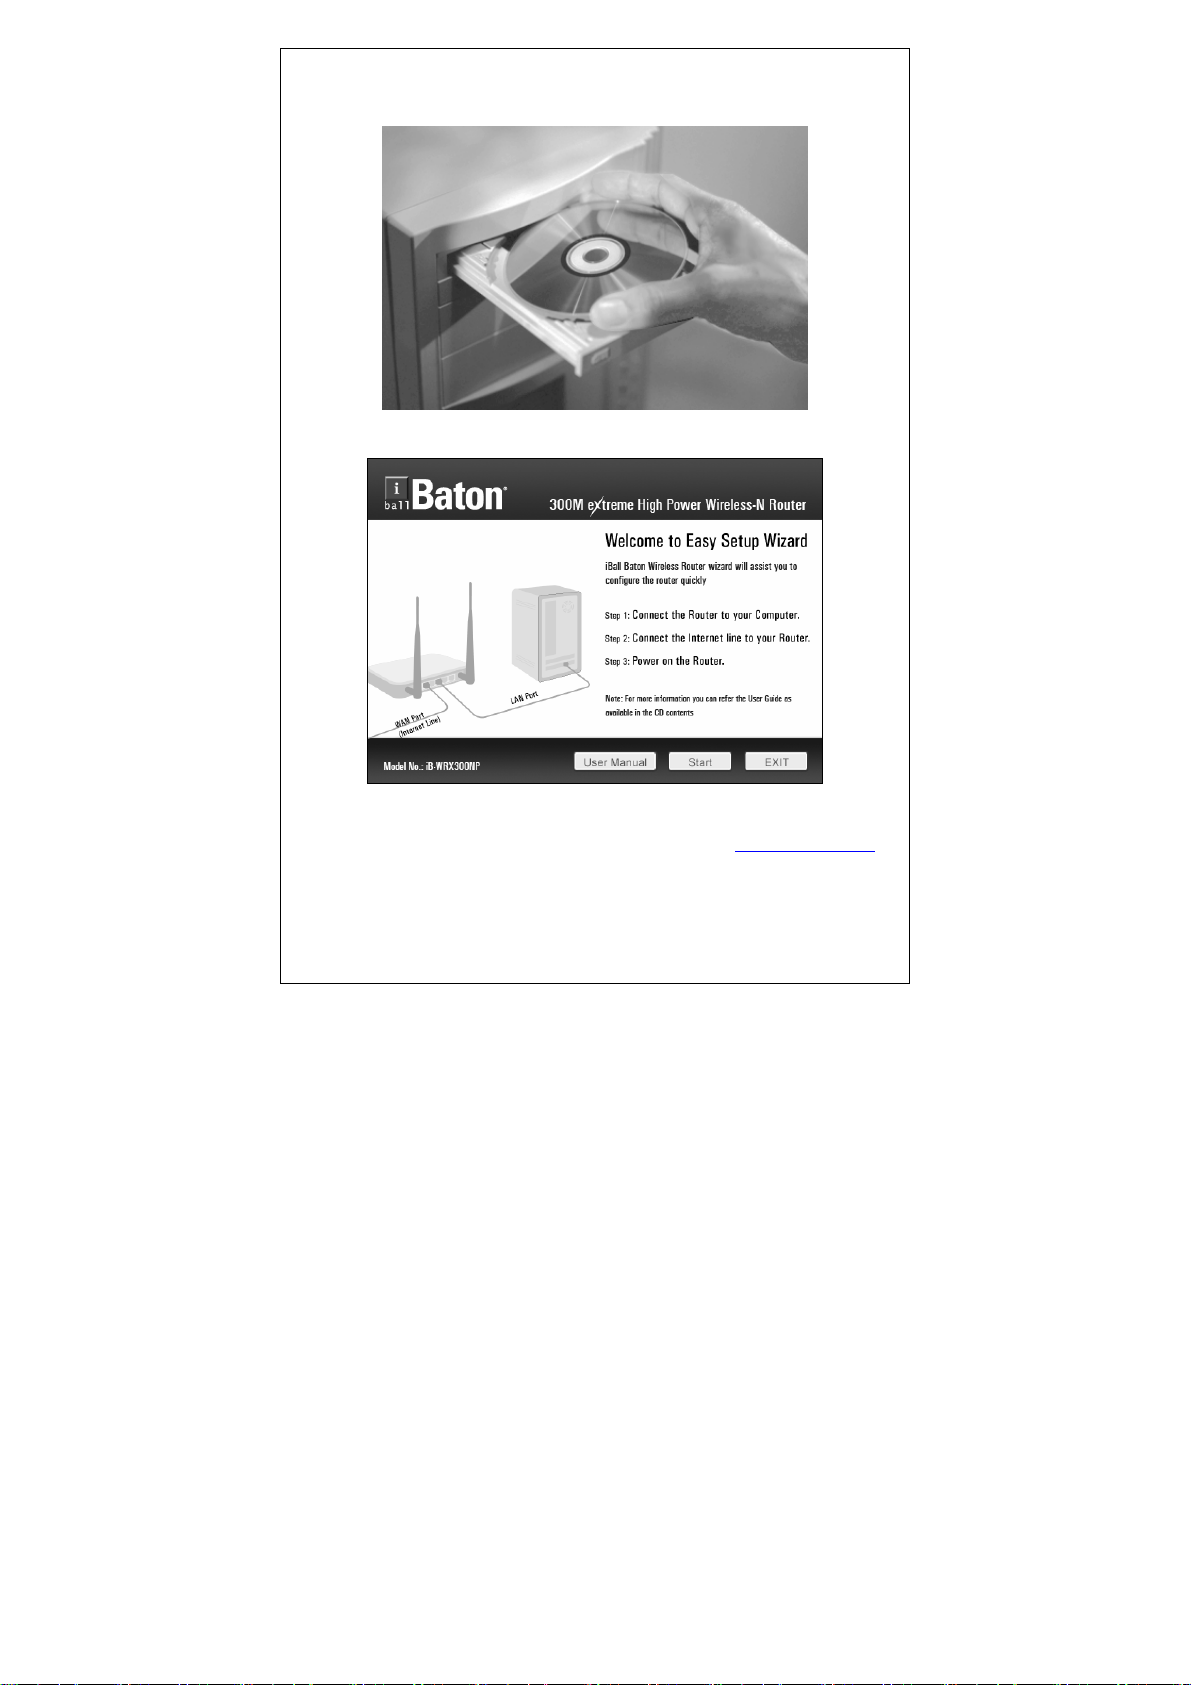
As you click on Start button router web page will open http://192.168.1.1
Login to the router interface by inserting default password: admin & click
on OK.
9
Chapter 3 Internet Connection Setup
3.1 Configure your PC’s TCP/IP Settings
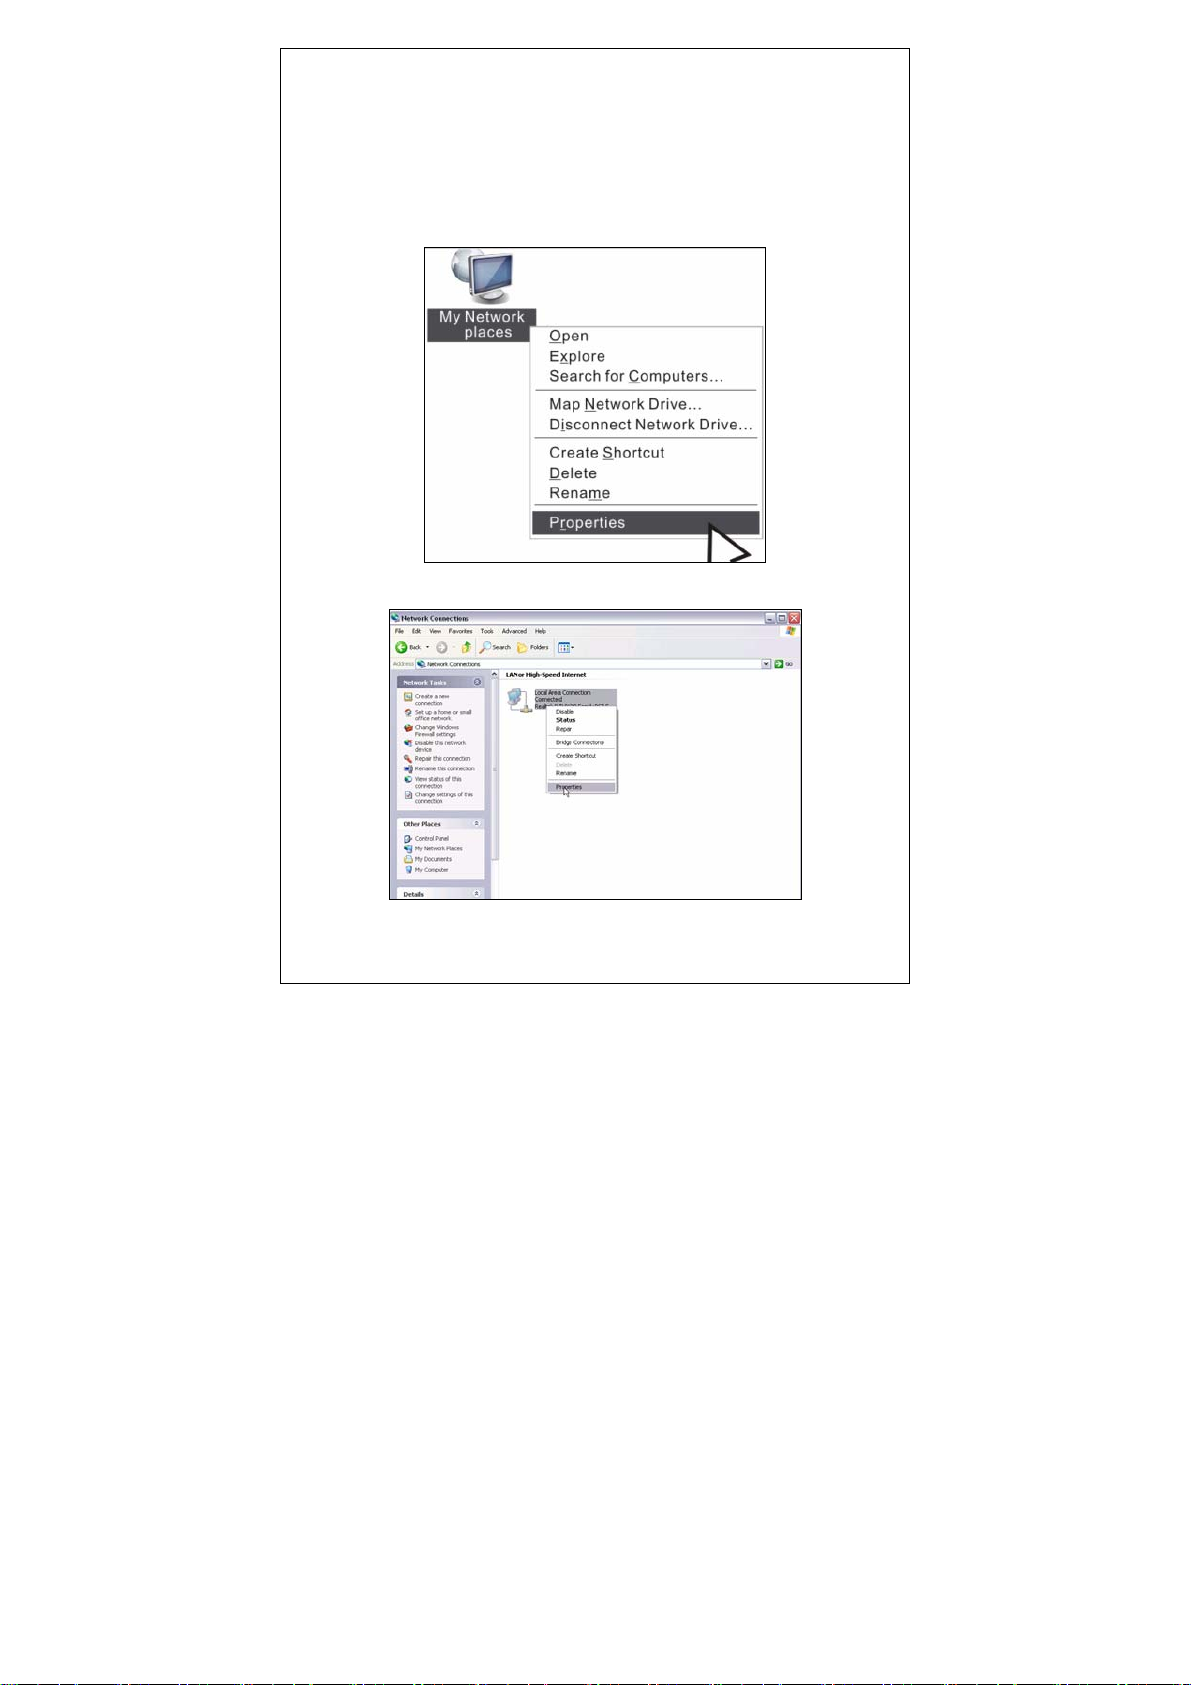
If you are using Windows XP operating system, do as follows.
1. Right click “My Network Places” and select “Properties”.
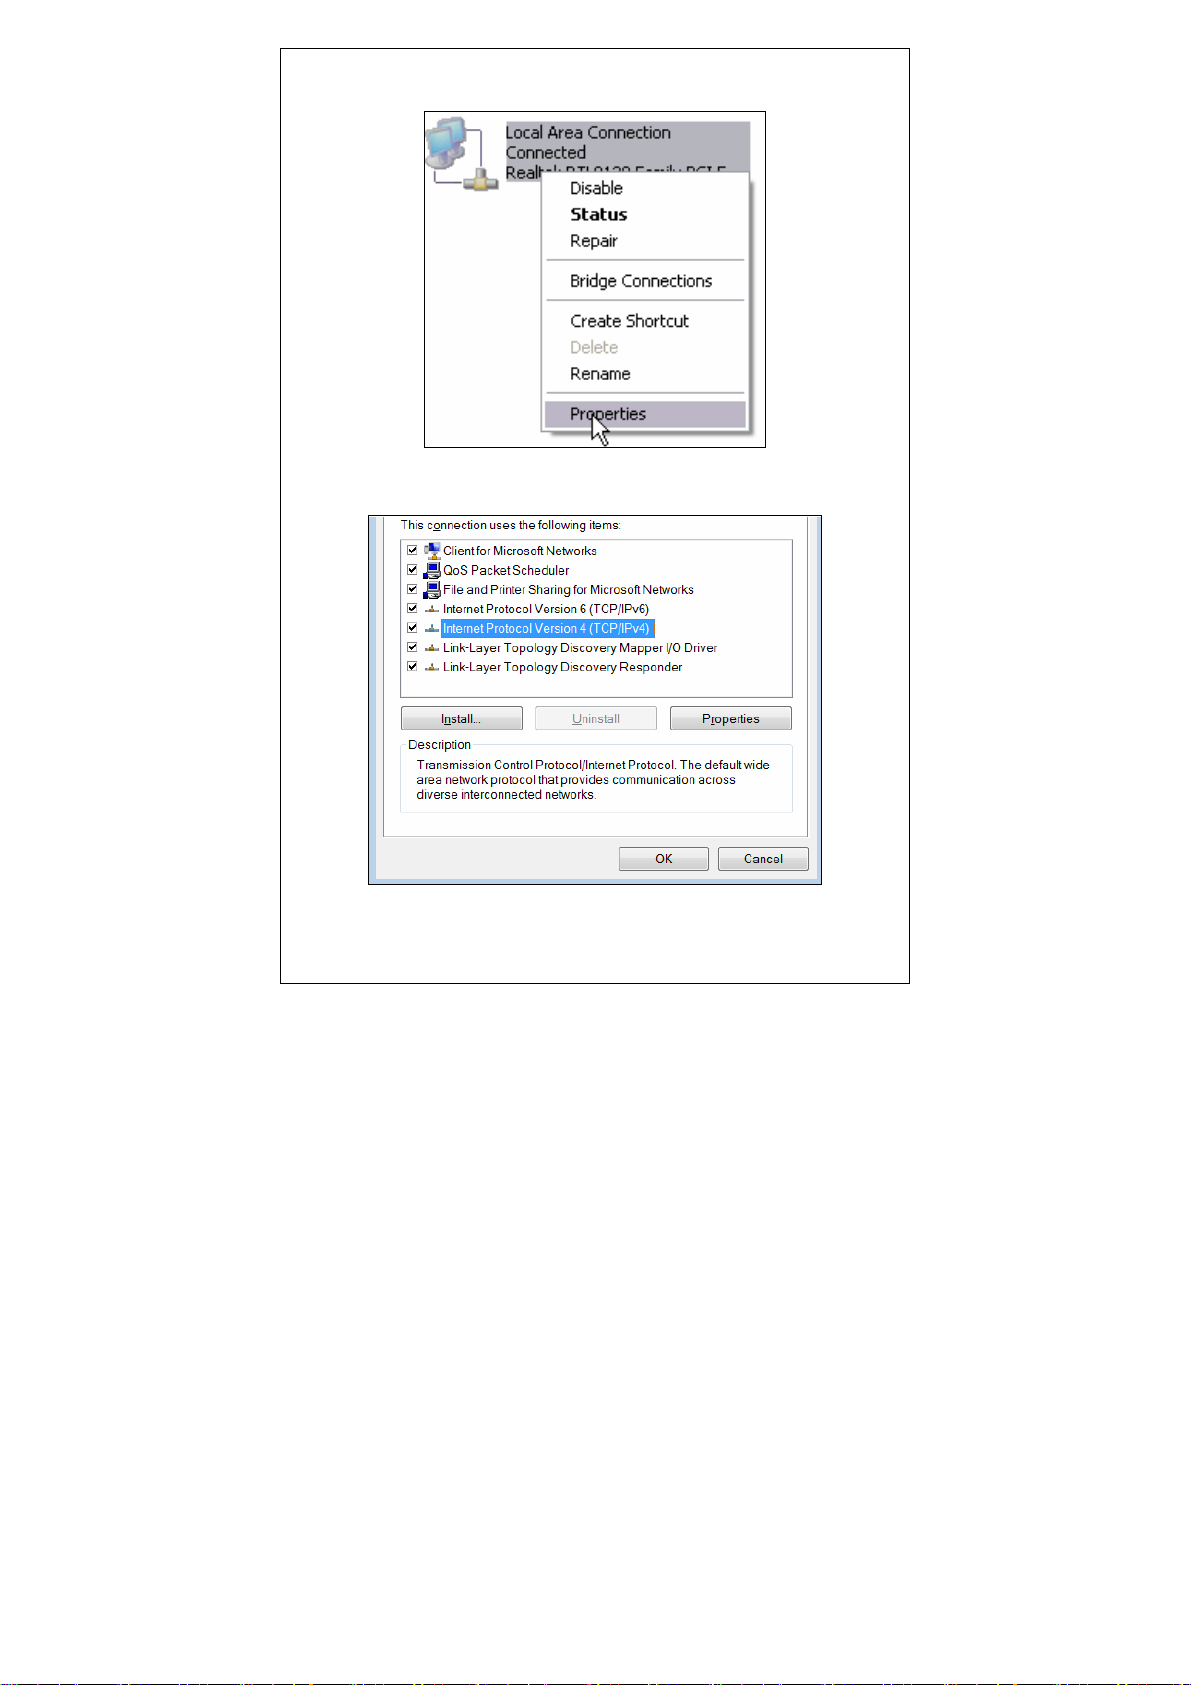
2. Right click “Local Area Connection” and select “Properties”
3. Select “Internet Protocol (TCP/IP)” on the appearing window and
10
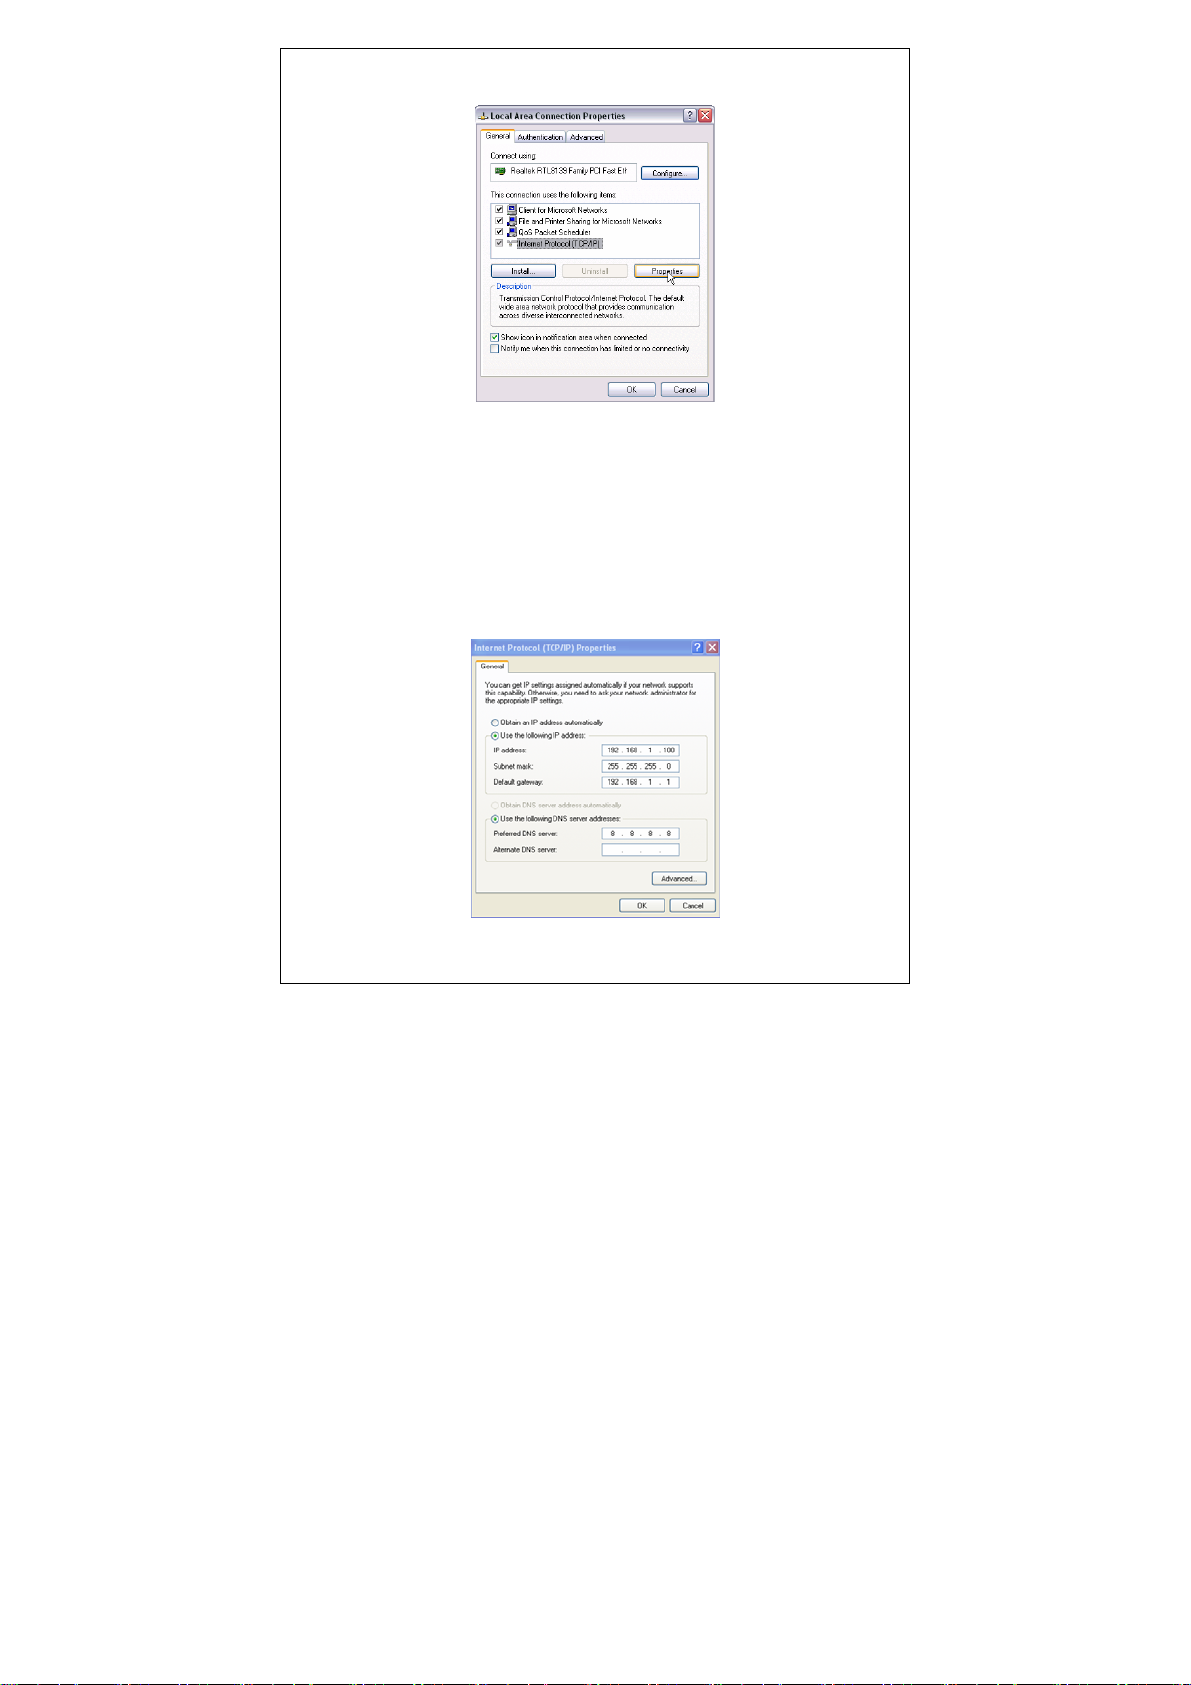
click “Properties” button.
4. Select “Use the following IP address”
● IP address: Enter 192.168.1.xxx (xxx can be any value from 2~254).
● Subnet mask: Enter 255.255.255.0.
● Default gateway: Enter 192.168.1.1.
● Preferred DNS server: Enter 192.168.1.1 in case that you don’t know
the local DNS server address (Or contact your ISP for help).
At last, click OK to save your settings.
If you are using Windows 7 operating system, do as follows:
11
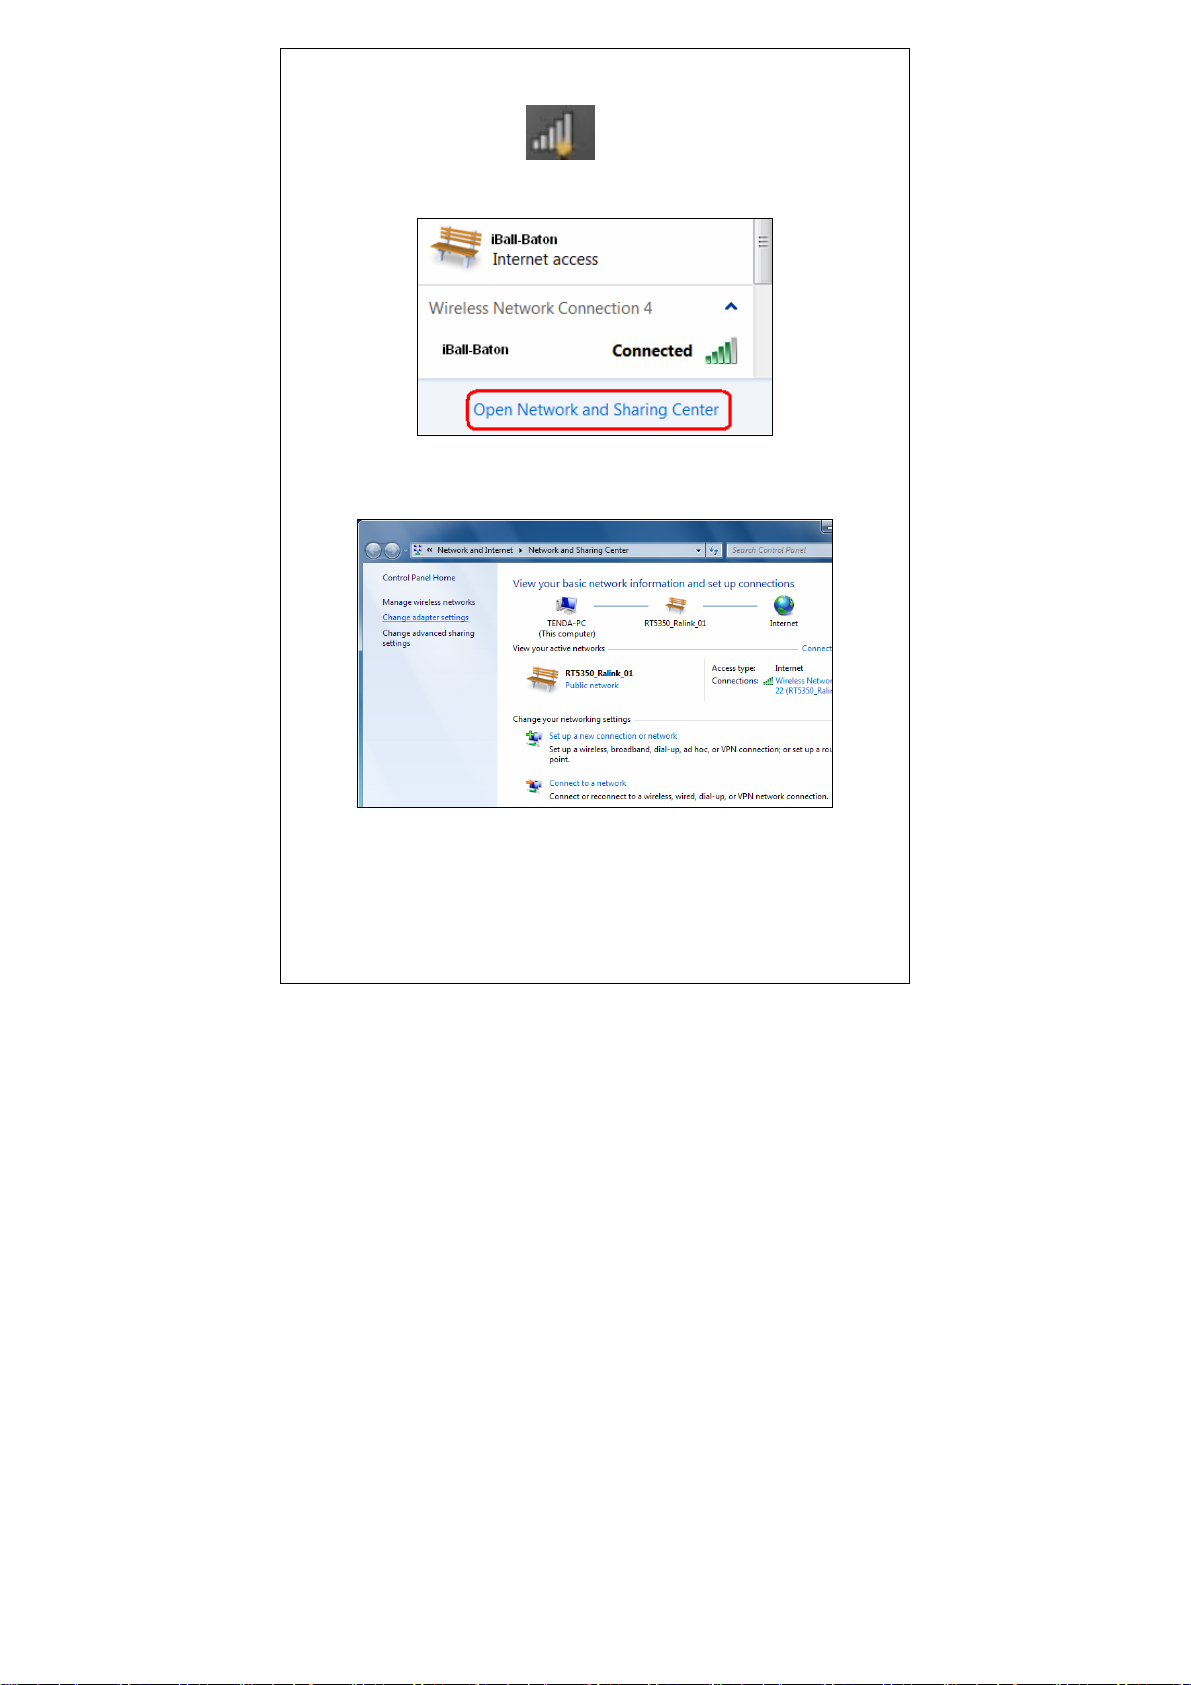
1. Right click network icon
“Open Network and Sharing Center”.
2. Click “Change adapter settings”.
on your desktop and then click the
12
3. Right click “Local Area Connection” and select “Properties””
4. Select “Internet Protocol (TCP/IP)” on the appearing window and
click “Properties” button.
13

5. Select “Use the following IP address”
● IP address: Enter 192.168.1.xxx (xxx can be any value from 2~254).
● Subnet mask: Enter 255.255.255.0.
● Default gateway: Enter 192.168.1.1.
● Preferred DNS server: Enter 192.168.1.1 in case that you don’t know
the local DNS server address (Or contact your ISP for help).
At last, click OK to save your settings.
14
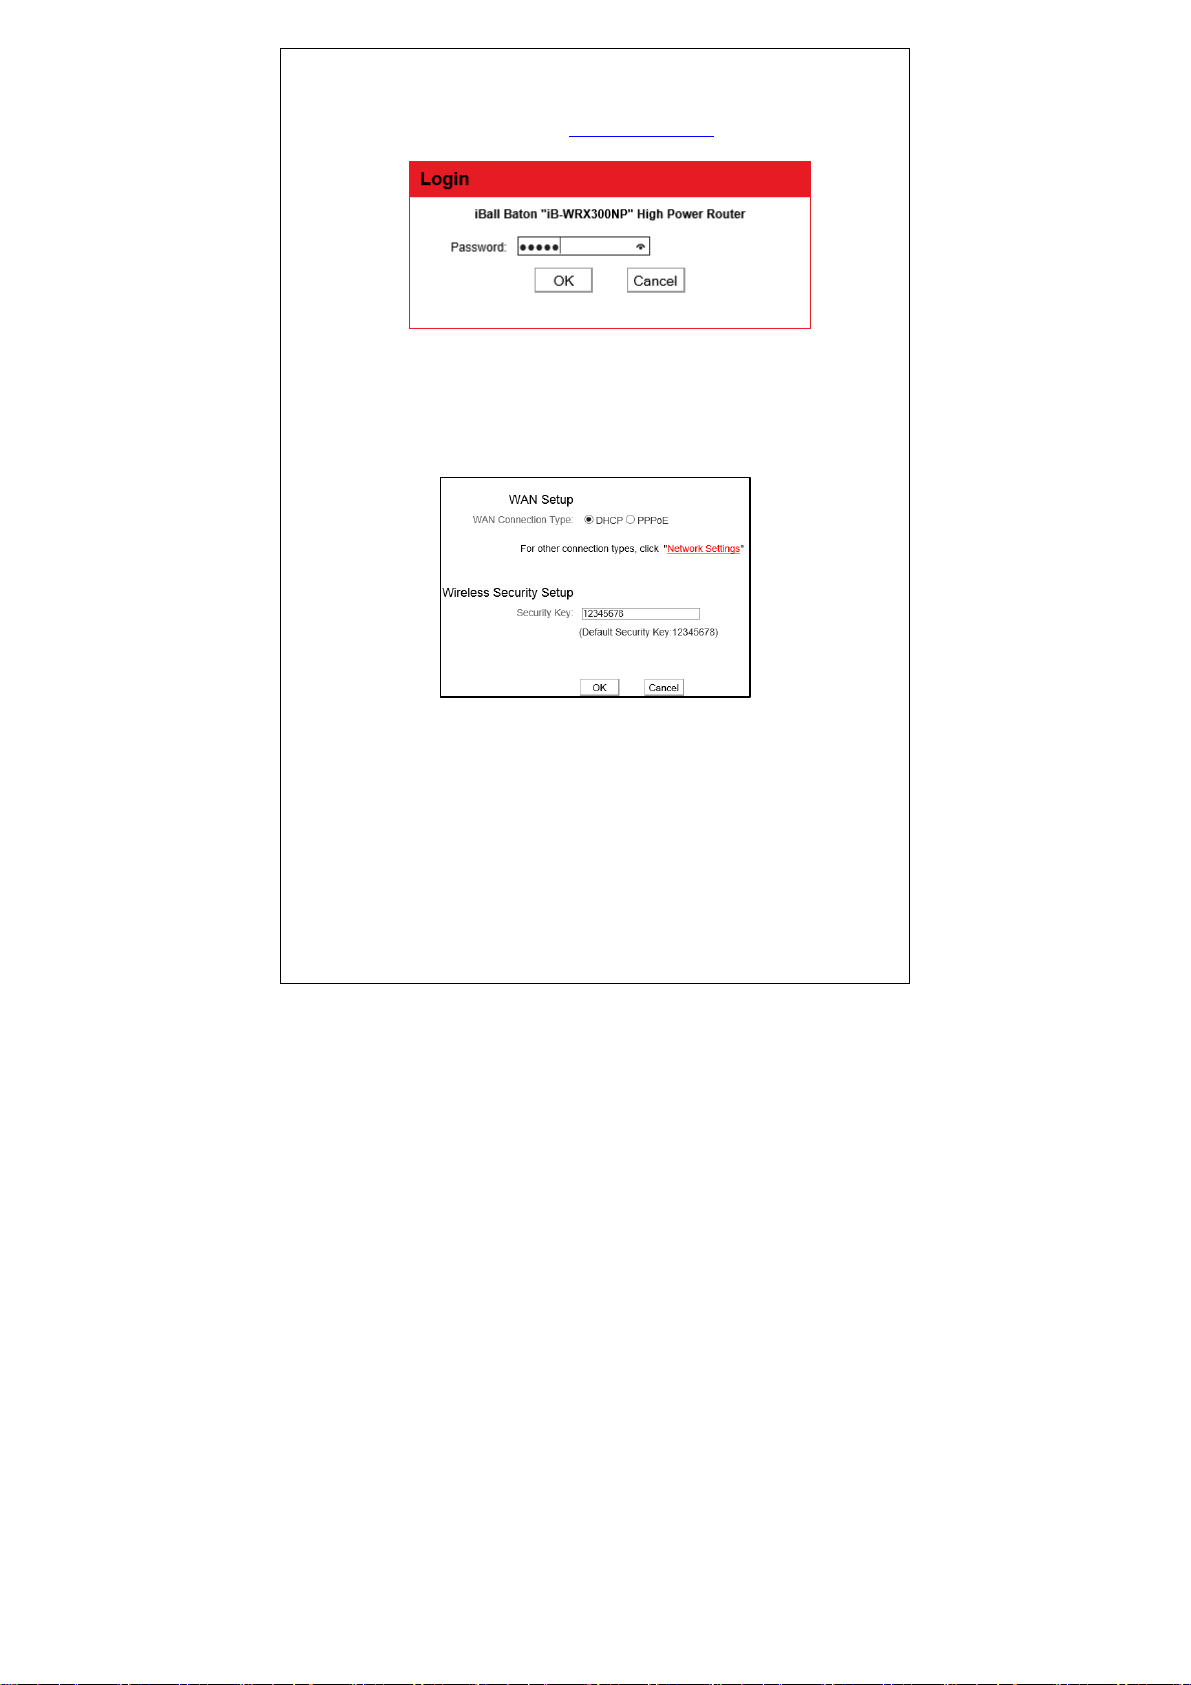
3.2 Login to Router
1. Open a web browser; enter http:// 192.168.1.1
to access router web based
in the address bar
Type password and then press “Enter” to go to interface below:
3.3 Quick Internet Connection Setup
There are 2 Internet connection types on this screen, PPPoE and
Dynamic IP (DHCP).
15
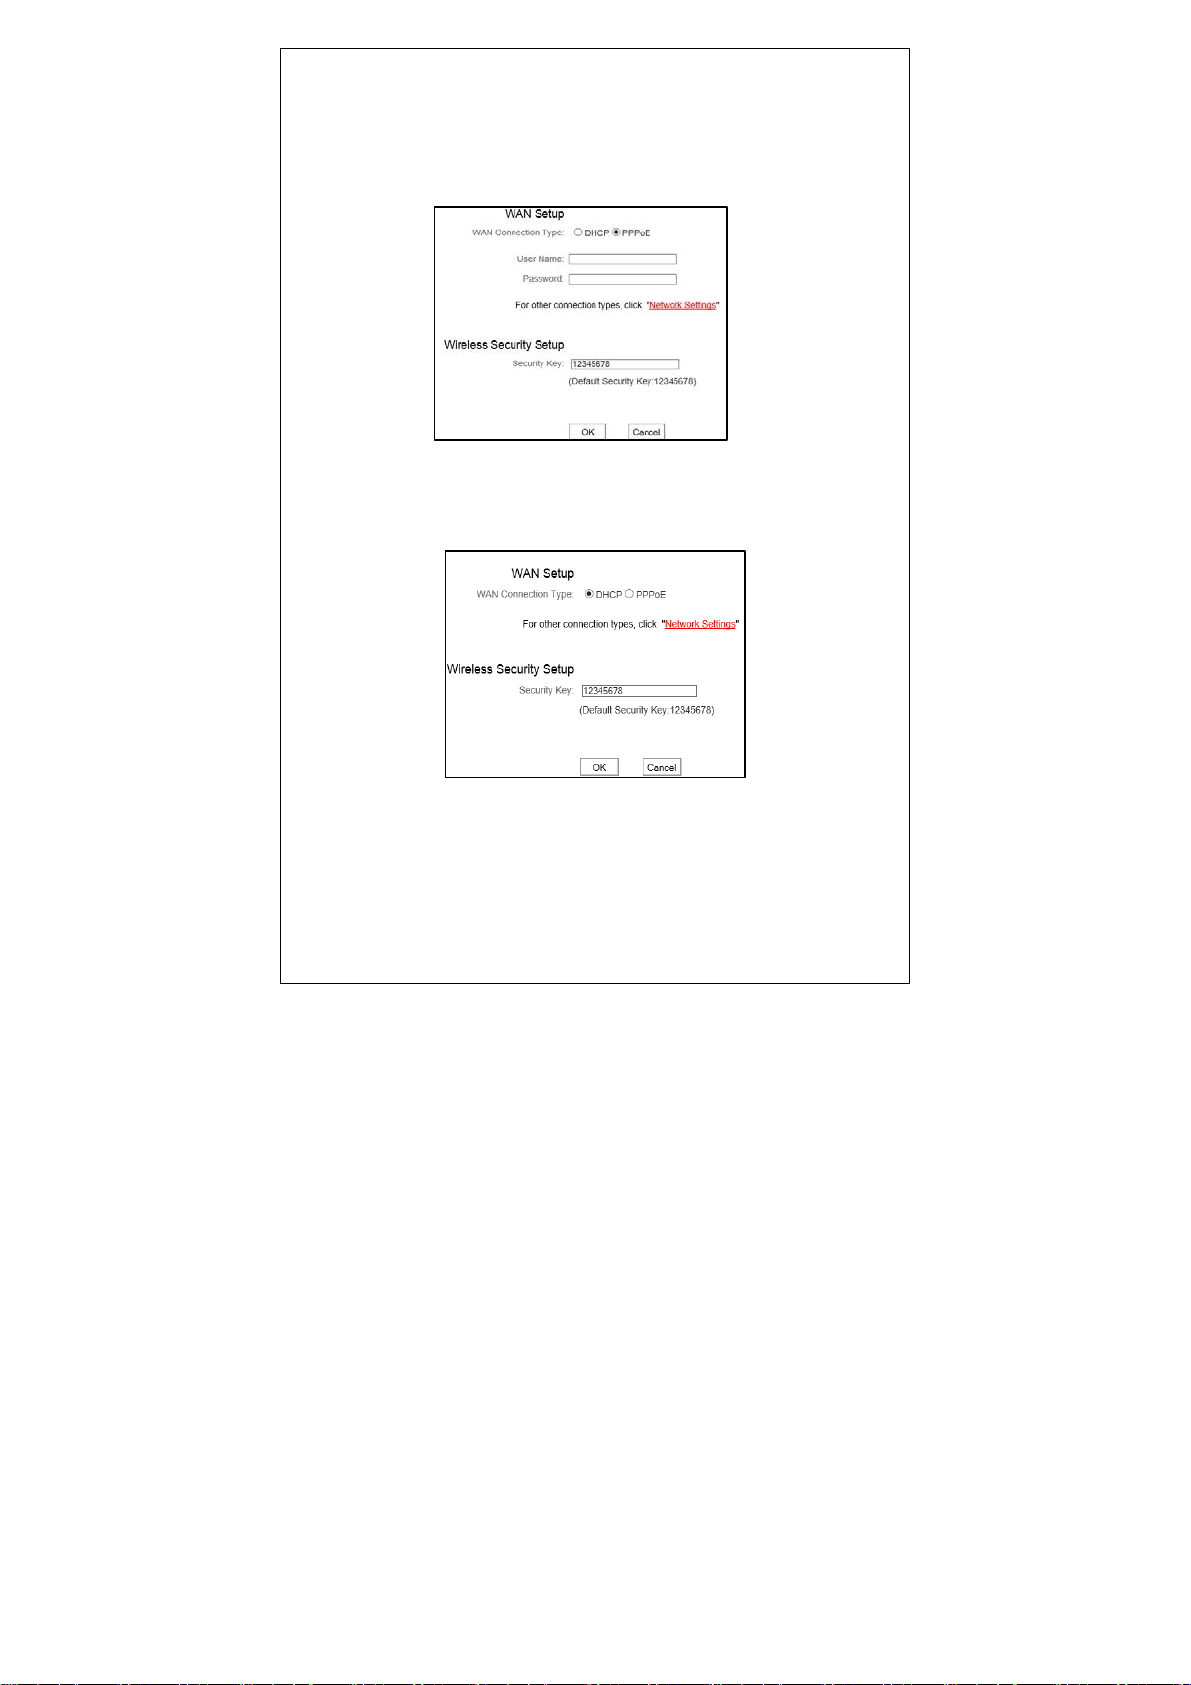
PPPoE
Select PPPoE, if your ISP are using a PPPoE connection and enter
the PPPoE user name and password provided by your ISP. Then setup a
wireless security key on the interface below to secure your wireless
network. At last, click the OK button to save your settings.
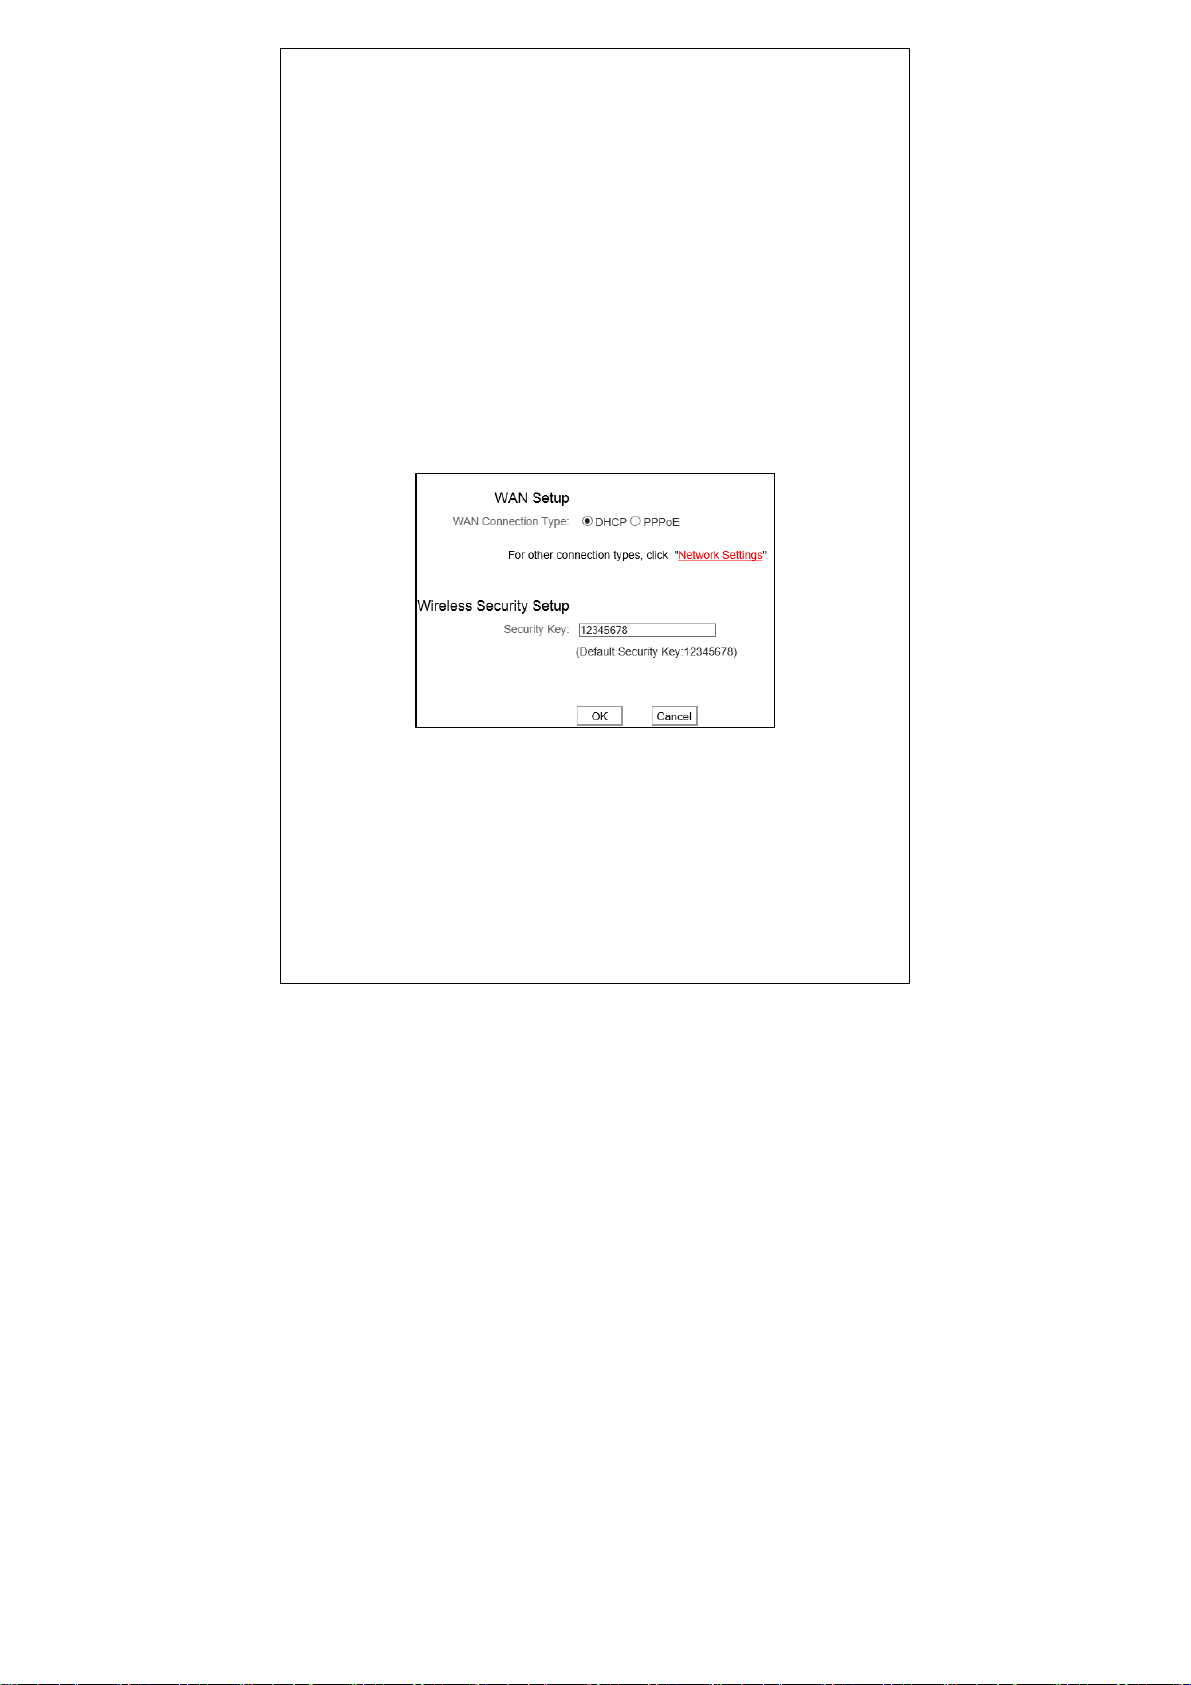
Dynamic IP
Select Dynamic IP if your ISP does not give you any IP information or
account information.
● The default Internet connection type is PPPoE.
Contact your ISP if you are not clear about the PPPoE user name and
password.
● Go to Chapter4 > WAN Settings, if you are using an Internet connection
type other than the above- mentioned.
16
3.4 Quick Wizard
Use the interface below to fast secure your wireless network (Only a
catchy security key is required) or go to Advanced (click the “Advanced”
tab on the upper right corner)–Wireless--Security Settings for more
settings (Apart from the security key option, you can select a security
mode and a cipher type that best fit yourself or keep the defaults thereof
unchanged. Detailed settings for the latter option, refer to Section 5.2
hereof).
The interface below allows you to setup a wireless password (security
key) that consists of 8 characters only. The password is preset to
12345678 with WPA-PSK AES encryption by default; you can change it to
whatever catchy phrase of 8 characters only.
17
Chapter 4. Network Settings
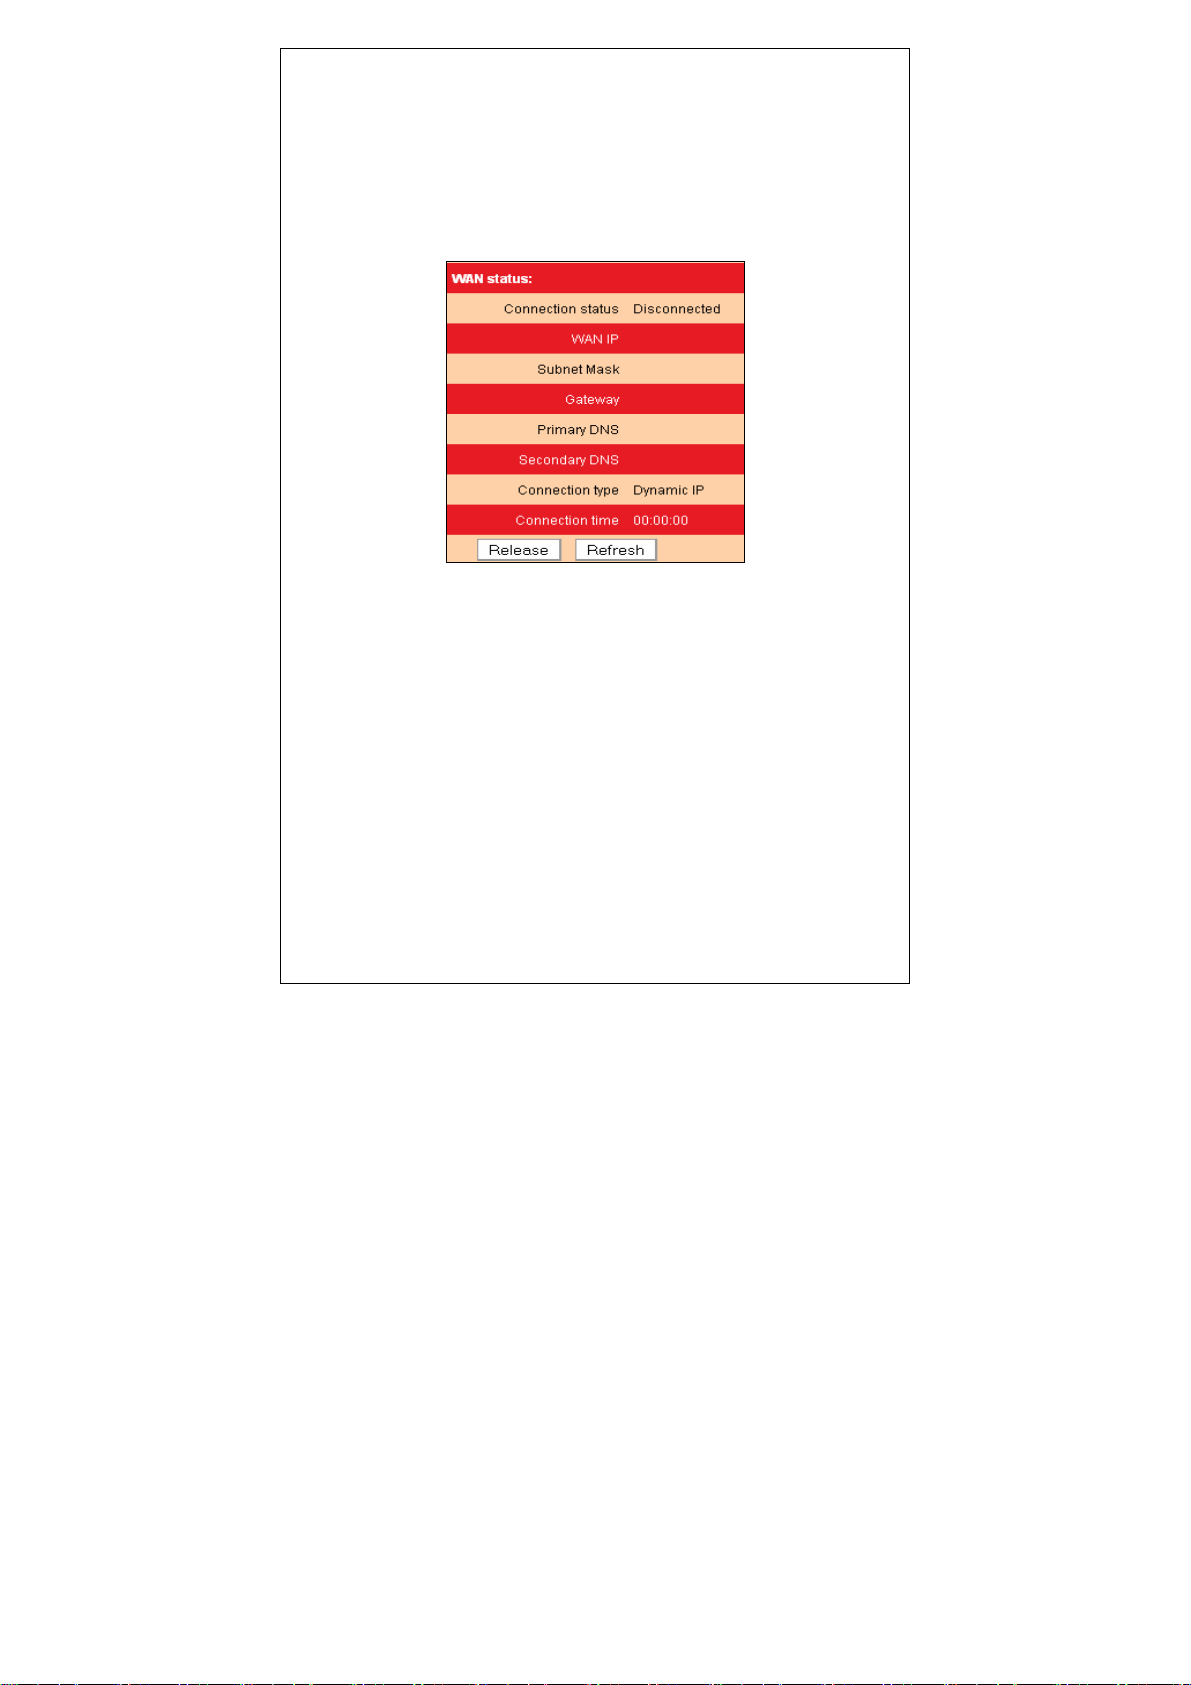
4.1 Status Info
This section allows you to view the router’s WAN and system
information.
● Connection Status: Displays WAN connection statuses: Disconnected,
Connecting or Connected.
Disconnected: Indicates that the Ethernet cable from your ISP side is not
/ not correctly connected to the WAN port on A5 or A5 is not logically
connected to your ISP.
Connecting: Indicates that the WAN port is correctly connected and is
requesting an IP address from your ISP.
Connected: Indicates that has been connected to your ISP.
● WAN IP: Displays WAN IP address.
● Subnet Mask: Displays WAN subnet mask.
● Gateway: Displays WAN gateway address.
● Primary DNS: Displays WAN primary DNS address.
● Secondary DNS: Displays WAN secondary DNS address.
● Connection Type: Displays current Internet connection type.
18

● LAN MAC Address: Displays router’s LAN MAC address.
● WAN MAC Address: Displays router’s WAN MAC address.
● System Time: Displays the time when system is updated.
● Connected client: Displays the number of connected computers (which
obtains IP addresses from the device’ DHCP server).
● Software Version: Displays router’s firmware version.
● Hardware Version: Displays router’s hardware version.
4.2 WAN
There are 5 Internet connection types available for your selection:
PPPoE, Static IP,Dynamic IP,PPTP and L2TP. Select your Internet
connection type and follow corresponding instructions below:
4.2.1 PPPoE
Select PPPoE, if your ISP are using a PPPoE connection and provide
you with PPPoE user name and password information.
19
 Loading...