

Page 1
This manual may not reflect your actual device’s operation. All infor mation is subject to change
without prior notification. Please follow your actual device’s operational procedures.
Feature Summary
● Wi-Fi network
● 11.6” Touch Screen
● Built-in G-sensor
● 3rd-party Apps
● Media Entertainment
● Dual Webcams
Accessories
Main Unit ● USB cable ● AC/DC Adaptor
Keyboard ● User Manual
Note:Pressing and holding down the Ctr l + Brow ser butt on can turn on/off the
keyboard backlight.
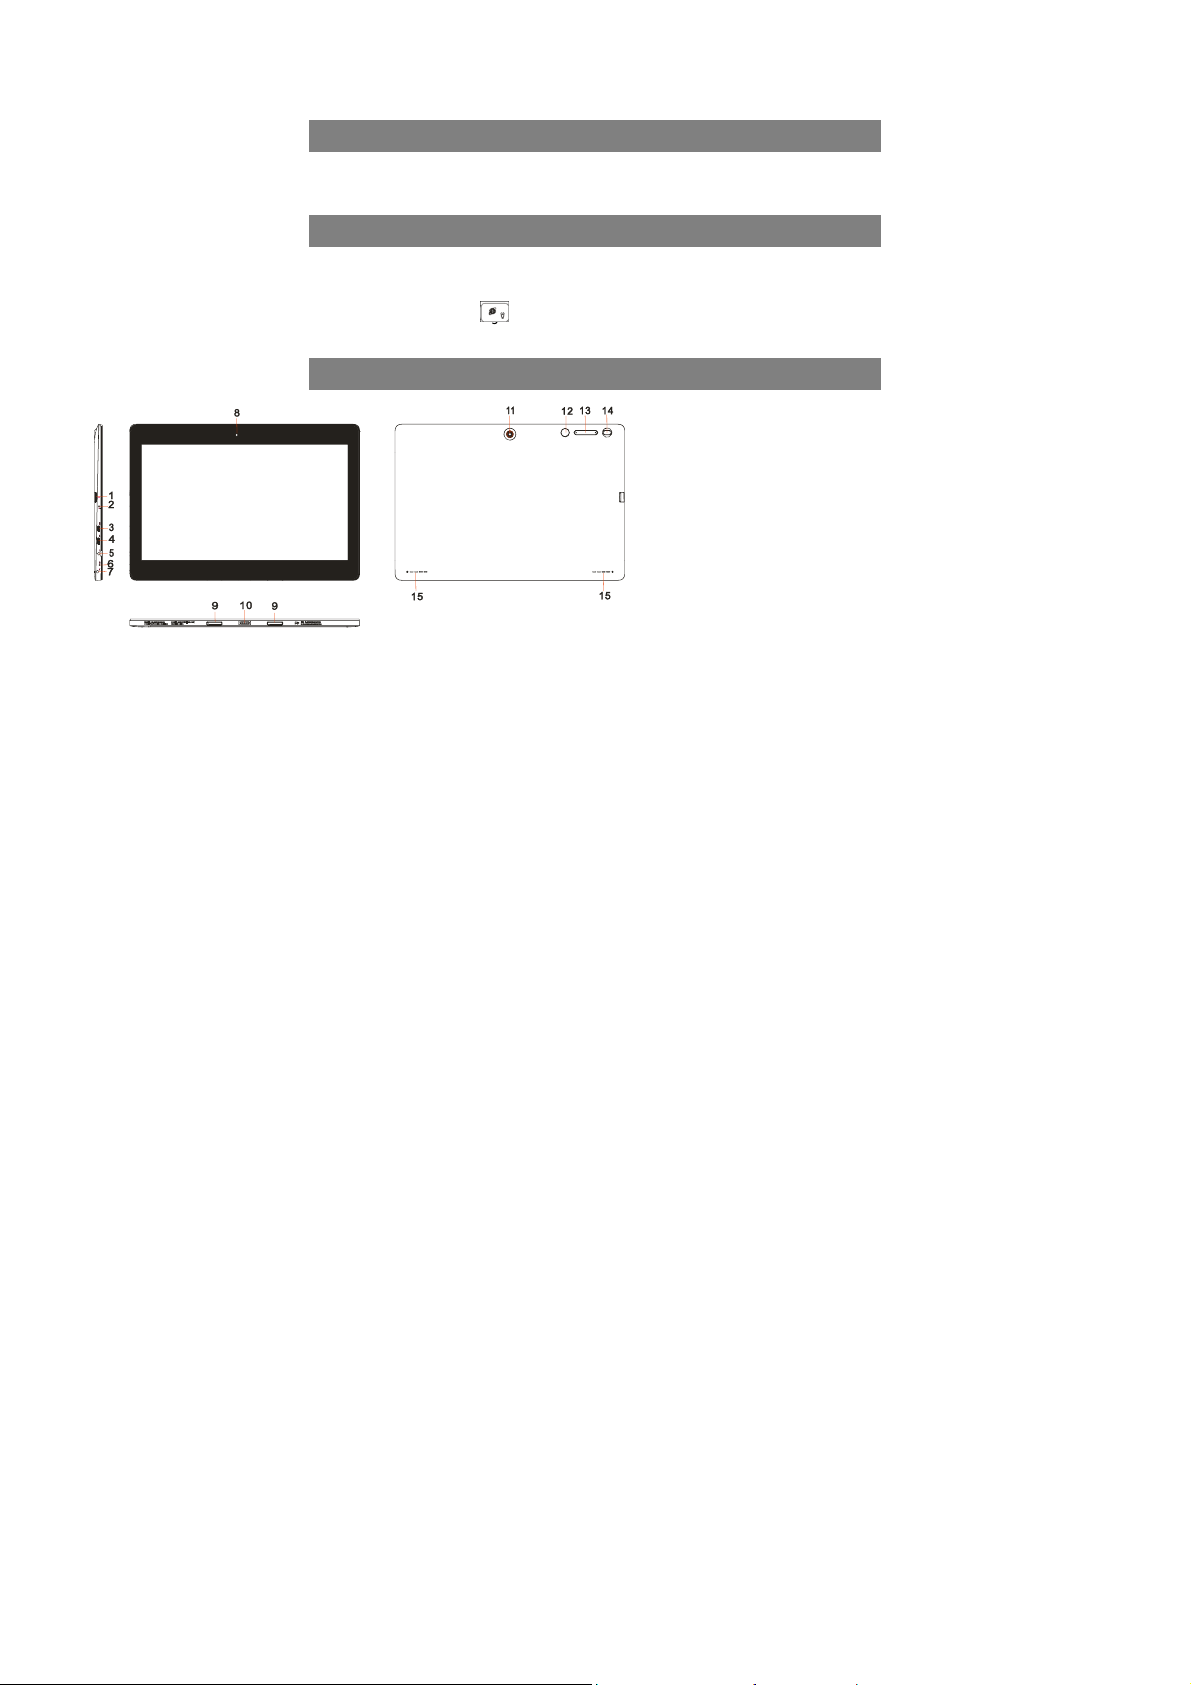
Buttons & Ports
1. Micro-SD Card Slot
2. Charge indicator
3. HDMI interface
4. Micro USB port– connects to PC via USB cable.
5. DC-In Socket– connects to AC/DC power adapter.
6. Built-in microphone
7. Earphone socket – connects to stereo earphones.
8. Front webcam
9. Sustaining port (female) – fix and sustain connection to external
keyboard
10. Pogo pin connector (female) –connect external keyboard
11. Rear webcam
12. Home button – go to the Home screen.
13. VOL+/- button – increase/decrease the volume.
14. Power –briefly press to lock or unlock the screen; press and hold to
turn on or off the unit or reset it.
15. Built-in speaker
1
Page 2
Basic Connections
Charging the Battery
The device has a built-in rechargeable battery. Charge the device when the battery
level is low.
To charge the battery, connect the device to the provided power adapter via the DC-In
socket. It takes about 4.5 hours to fully charge the battery.
The charge indicator lights in red during charging and in orange when charge is full.
Note:
a. You are prompted to charge the battery when the device warns that the battery is lower than 15%!
b. In the event that the device shuts down automatically because of battery exhaustion, charge the battery
for at least 30 minutes before you can turn on the device.
Turning On/ Off the Tablet
To turn on the device, press and hold the Power button on the unit until you see the
boot-up screen. It may take a few minutes to start up the system.
To turn off the device, press and hold the Power button until you see the option
“Power Off”, and tap on “Power Off”.
Tip: The device may fall asleep with the screen display locked when there is no touch action for a while.
You can briefly press the Power button to wake it up.
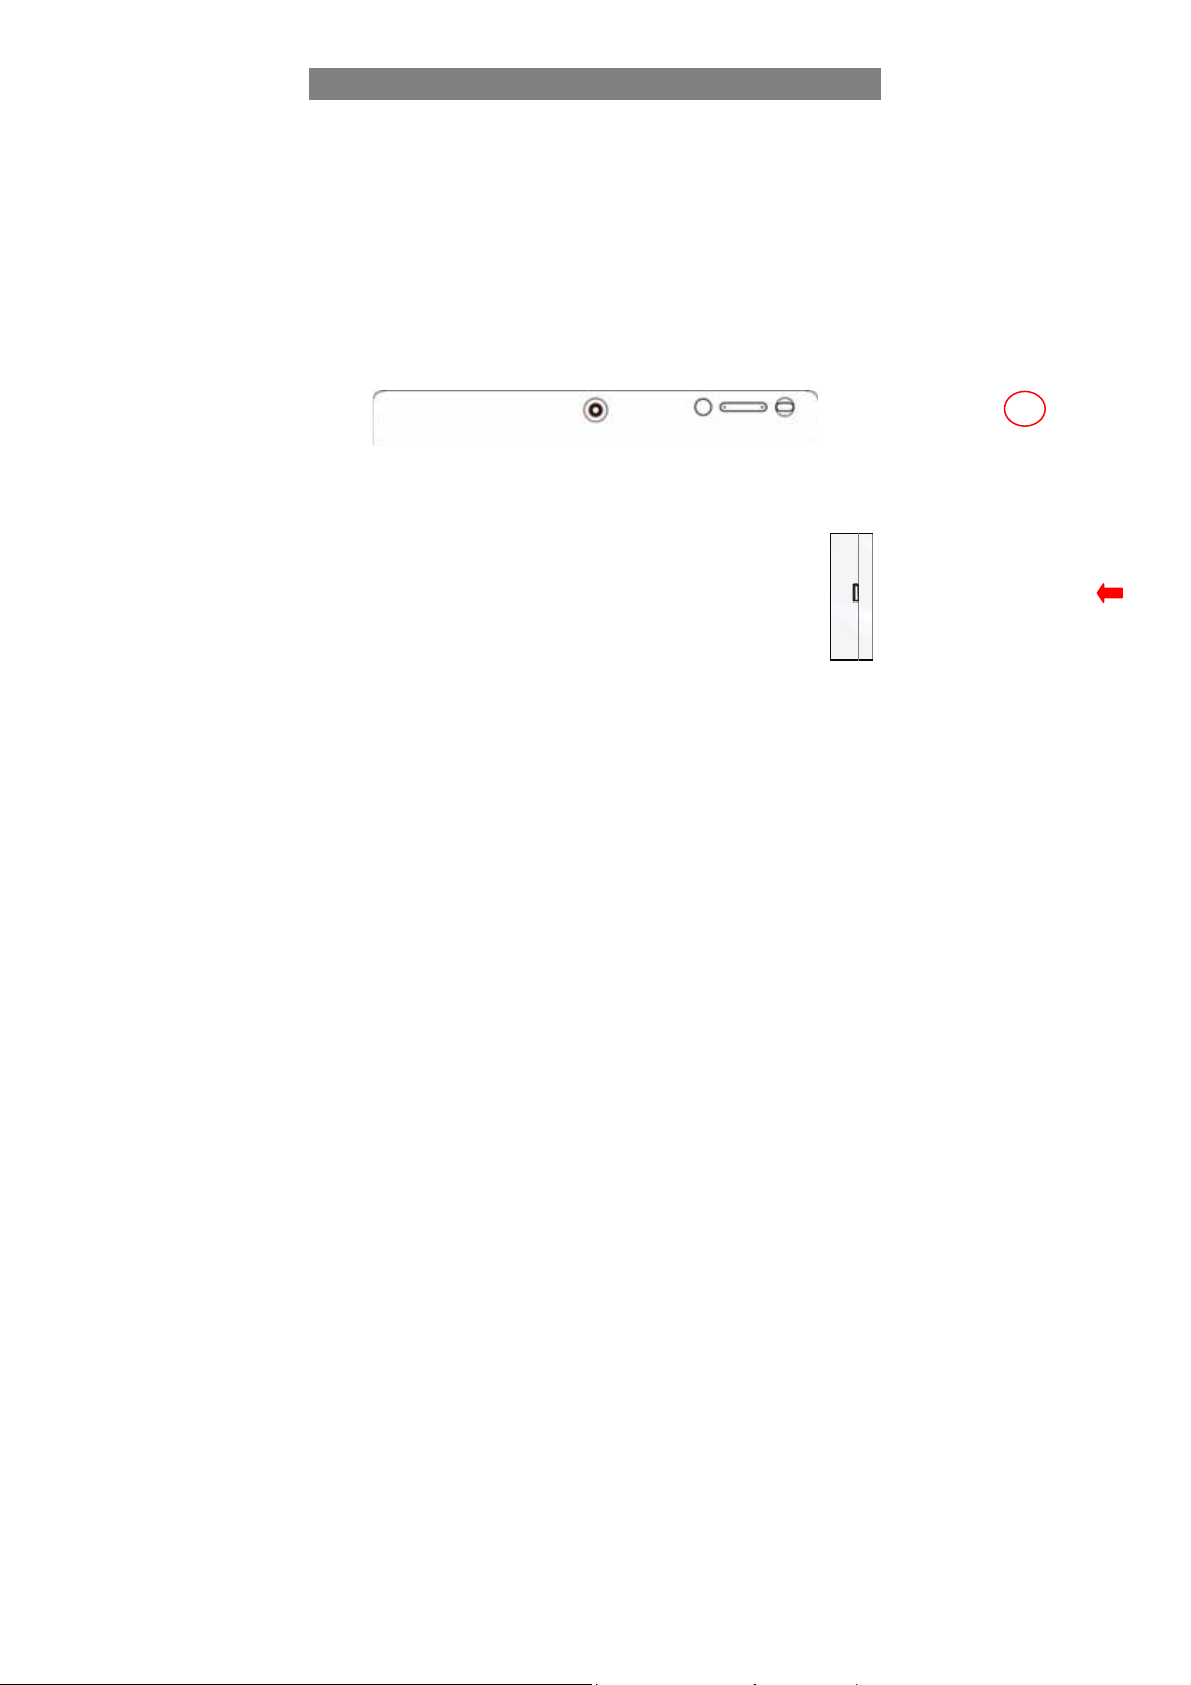
Installing the Memory Card (Micro-SD card)
This device can read files directly from a memory card (Micro-SD card).
Also, you can install a card into the slot on the top edge of the device for the
purpose of reading data from the memory card.
To install a memory card, find the card slot on the back of device and then
insert the card into the slot in correct orientation.
To access the files stored in the memory card, enter the File Manager mode and
select “Directory” to find the right directory. Tap on the SD card icon or Return button to
get to the root directory, where you can easily find the SD card you connected.
Note: In the case that you connect both Micro SD card and USB discs to this device at
the same time, you will find the following disc symbols under the root directory:
- Emulated: the local disc.
- SD 0 : the local disc, i.e. the internal memory of the device.
- SD 1: the Micro SD card you insert.
- USB card1/2/3: the USB memory connected.
Connecting to PC for transferring files
Before reading or playing files, you need to transfer media files from a computer to the
device.
2
Page 3
(1) C
o
nico
g
h
a
P
H
a
A
Y
e
c
c
a
e
n
e
t
o
S
K
a
F
w
e
e
e
e
n
o
e
de f
w
p
i
p
a
a
e
a
e
b
d
M
a
o
g
e
b
n
e
a
o
t
b
t
m
o
a
u
u
e
m
o
u
e
r
p
nnect the devic
(2) O
ce connected,
n. Open the ph
(3) Di
sconnect the U
Usin
the Physical
For t
e sake of using
dedic
ted keyboard.
1.
lace the dedicat
2.
old your tablet
c
ontacts on the k
t
blet.
3.
s soon as the k
4.
ou can rotate th
to a computer
he tablet will be
ne icon and co
B cable to remo
eyboard
convenience, th
ollow these ste
ed keyboard on
ith two hands,
yboard to the j
yboard is conn
tablet to overl
ith the supplie
identified as a
y files to it just
ve the device fr
s device is desi
s to connect th
an even and sta
lign the connect
ck and positioni
cted to the tabl
p the keyboard
USB cable.
TP device with
s you do on yo
m the computer
ned to be equip
keyboard to yo
le plane (e.g. d
or and the two
g slots at the b
t, it is ready for
s you do with a
mobile phone
r hard drive.
.
ped with a
r tablet:
sk);
agnetic
ttom of the
se.
laptop.
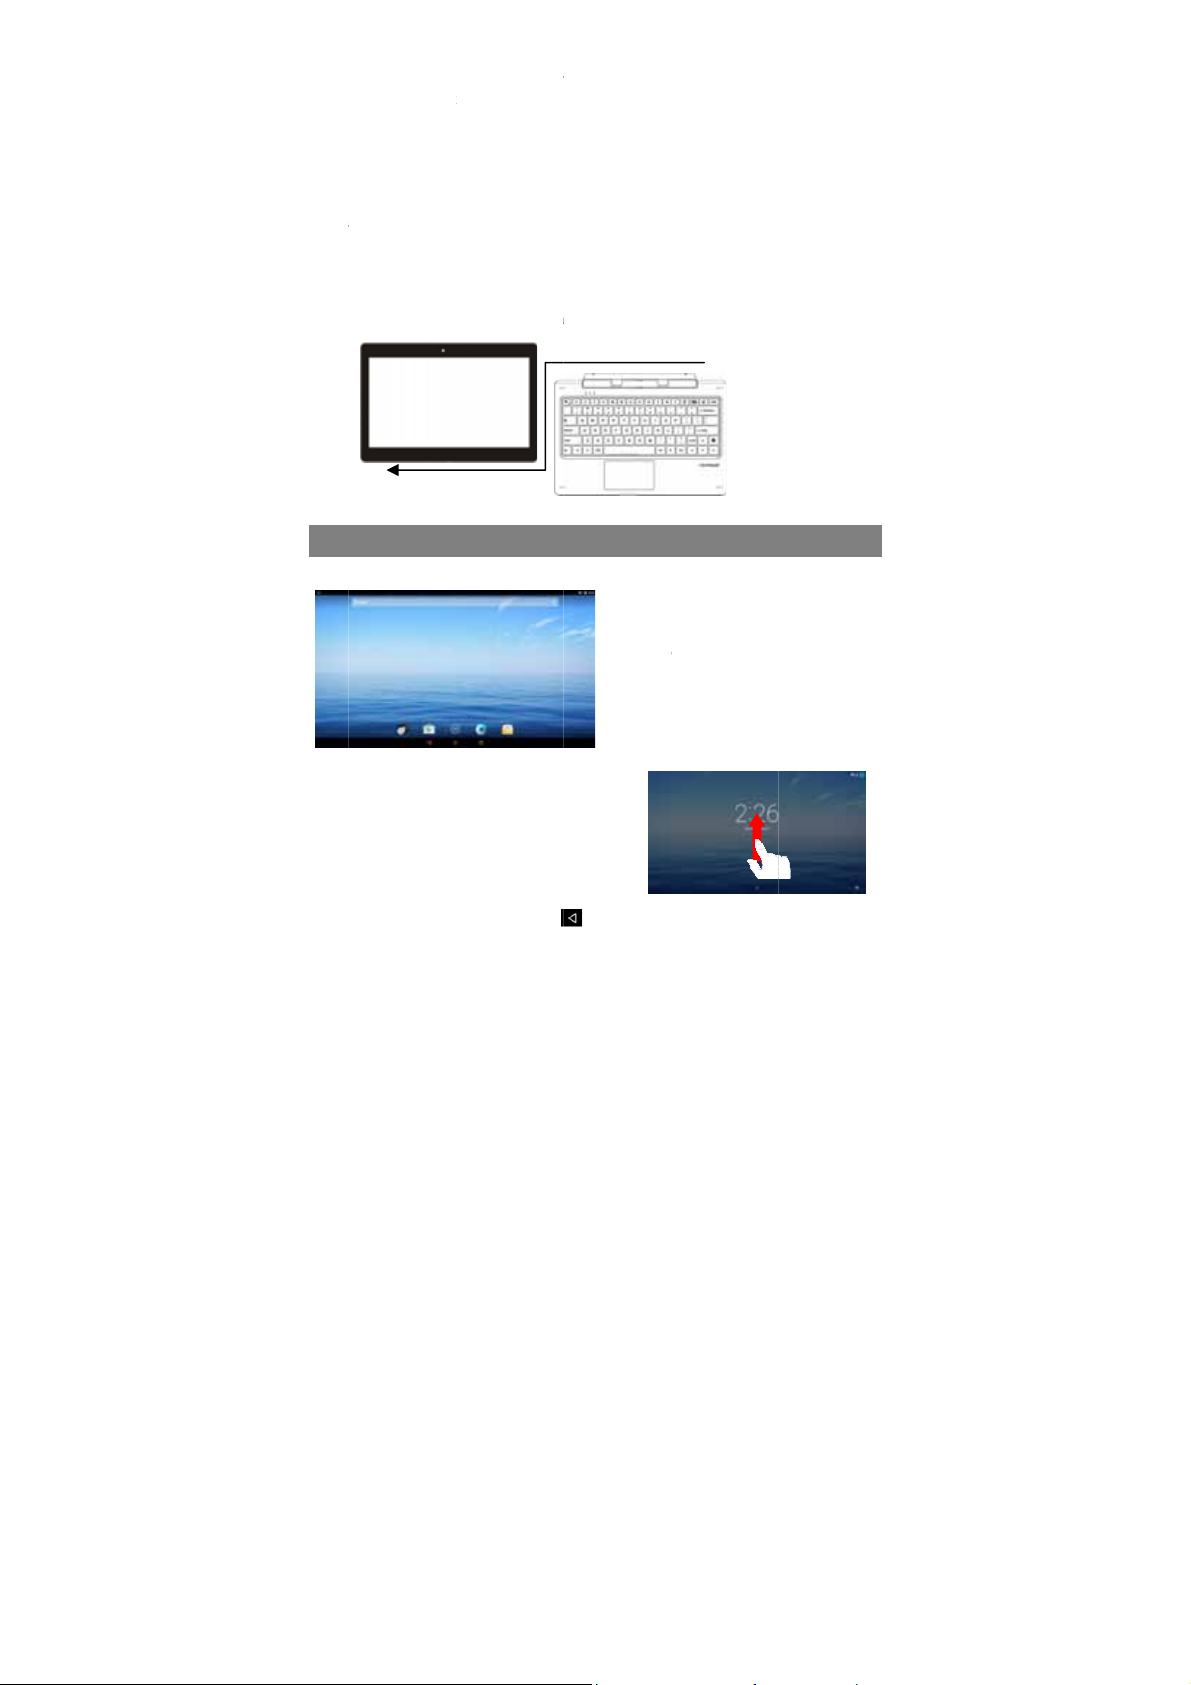
Hom
Screen
Unlo
k the Screen
The s
reen will be lock
a whil
e. You need to u
p upwards.
your t
Gen
ral Touch Acti
Ge
eral: Tap on th
c
g
d after the devic
lock the screen
ns
Return button
Basic
Operati
a
a. Ba
b. Ti
c. G
d. Ap
e. Re
f. Ho
g. Re
is idle for
y swiping
to get back
3
n
tery level
e
ogle Search ba
plication tab
turn button
me button
cent opened ap
o previous scre
s
n page; tap
Page 4
Hom
e
e
c
a
u
n
d
s
t
v
w
e
u
g
o
s
c
Top
S
Tscayou
Cmaycon
t
;
o
I
o
s
c
u
h
o
y
o
o
e
o
o
m
d
p
k
w
c
c
e
t
e
r
k
n
h
t
e
w
p
t
s
o
u
n
n
a
e
o
h
e
c
e
a
n
m
b
h
o
a
e
button to
conte
xt menu options
open
d apps.
Cli
k: Click briefly
Dr
g: When watchi
yo
can drag the sli
poi
t of time elapse
Sli
e your finger:
Mu
ic, Video, Phot
on
he screen and
list
Mo
e your fingers
or
ebpage, you p
scr
en, and move t
yo
r fingers wider t
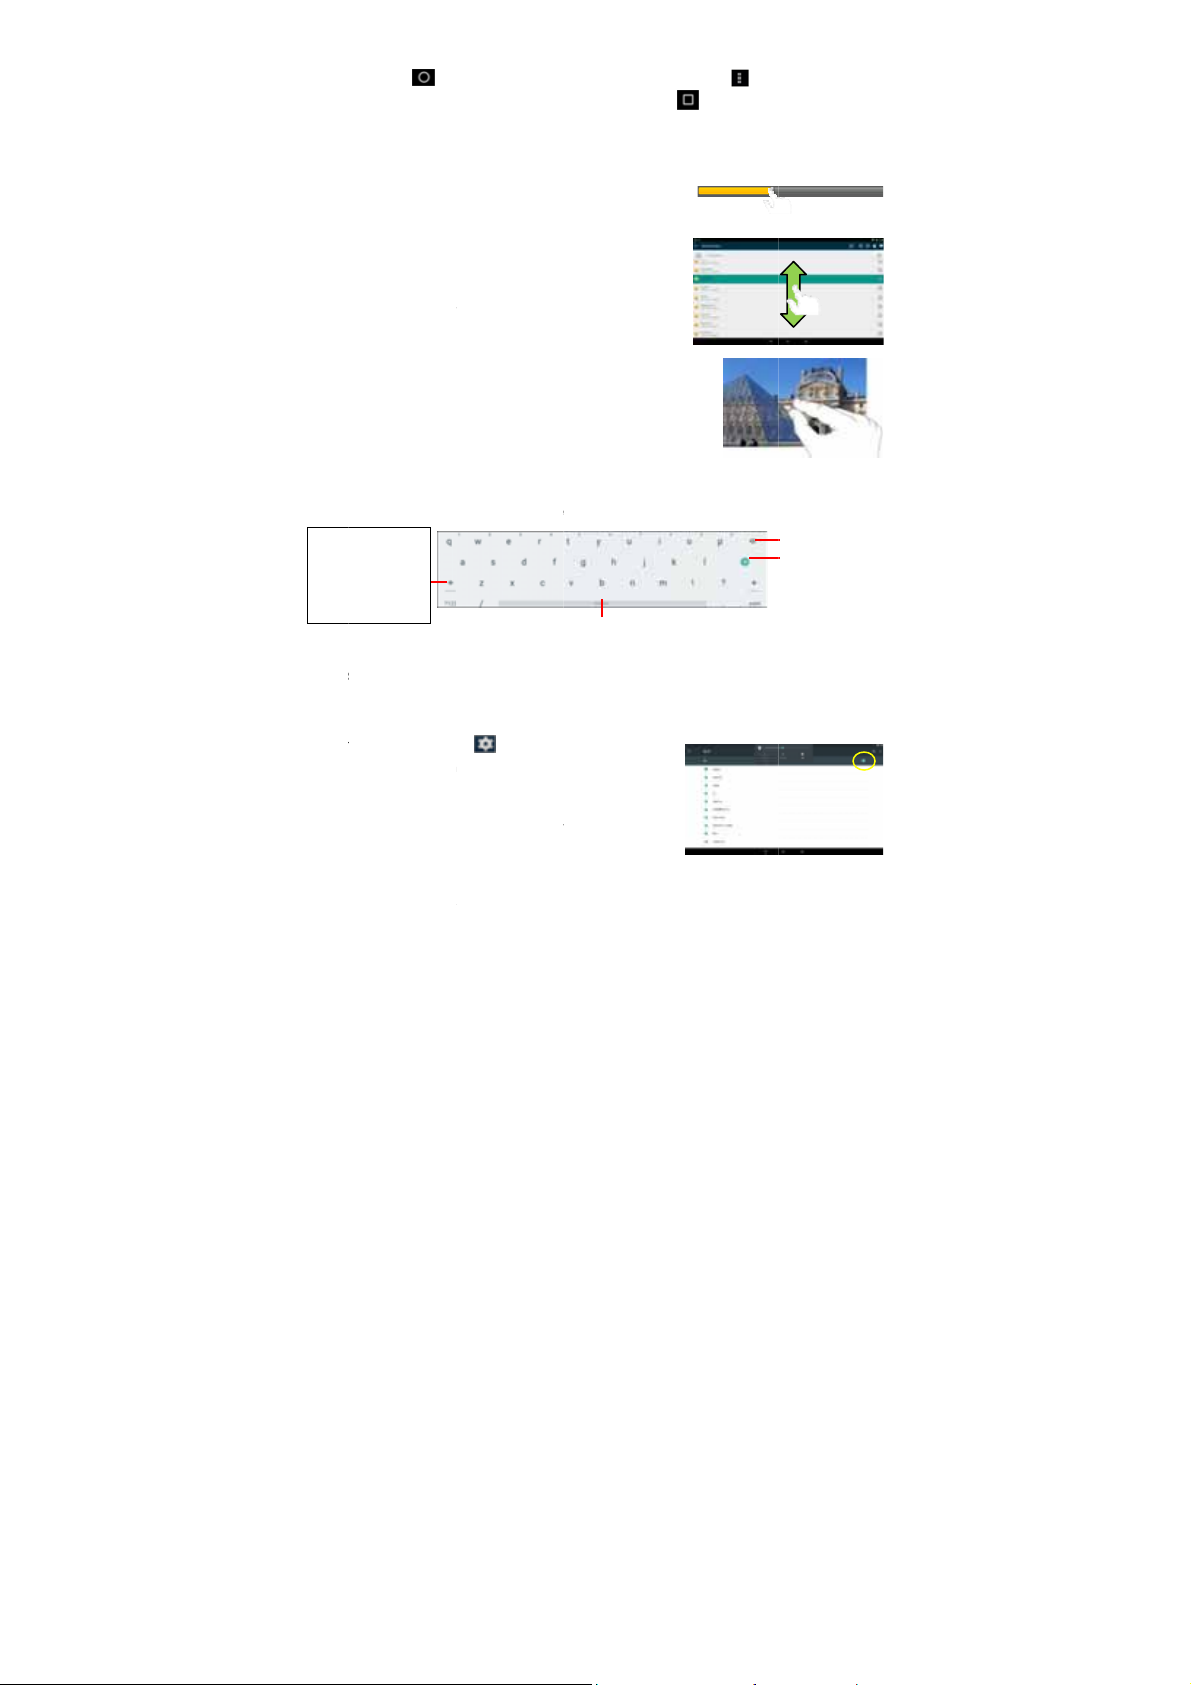
Usin
the Virtual Ke
When
ever you need t
ard, with which y
keyb
Caps
Lock: quickly
tap twi
ce to input all
letters
in capital;
briefly
tap once to
input
he first letter
tal.
in capi
Acce
sing Internet
You
an access to th
Make
WI-FI Connecti
a.
ap the Setting ic
en the settings
b.
elect “WIFI” an
to
turn on WIFI.
c.
ap “Wi-Fi” to s
n automatically
r range and dis
d.
hoose a networ
be secured
necting. If the
go to the Home
and tap the Re
n an item to op
ng a video or lis
der of the progr
d from the file.
n the different b
, etc.), you can
lide up and dow
loser/ wider: W
t your fingers (a
em closer to zo
zoom in it for b
board
input somethin
u can enter a w
Internet easily
n
n on the ap
enu.
slide the toggle
elect a router,
for available W
lay them on a li
from the list an
ith password, s
onnection is s
screen; tap Me
ent Apps butto
n a file, a link,
ening to music,
ss bar at any
owsers (File,
eep your finger
to scroll the fil
en viewing a ph
least two) on t
om out it, or op
etter visual effe
g, tap on any t
bsite address or
Space
ith Wi-Fi netwo
s screen to
switch to “ON”
he device will
iFi networks in
t.
d then tap “Con
you will have
ccessful, the
u button to
to check t
n application or
to
e
n
t.
xt input box to
ny text required.
rks.
ect” to connect.
to enter the p
essage ‘Conn
ring up the
e recently
page.
pen the virtual
Backspace
Enter
Some network
ssword before
cted to…(WiFi
4
Page 5

Ne
t
c
u
n
h
n
h
s
p
S
d
V
i
c
o
T
e
b
o
y
y
n
e
y
n
p
m
h
A
e
d
e
e
o
w
b
e
h
h
f
g
c
i
work Name)’ wil
l appear under t
e WIFI Setting.
Laun
h Web Brows
To l a
nch the web
scree
n.
Playi
g Music
Tap t
e Play Music ic
launc
h the music pla
Enter
the music librar
playe
r. All music files
in thu
mbnails.
Playi
g Videos
Tap t
e Photos icon i
You
hould see all th
Ta
a video file and
Major
r-Chrome
rowser Chrom
n in the applica
er.
once you start
will be displaye
the apps page
picture and vid
start playing it.
pplicati
, tap on the C
tion page to
the music
in the library
to launch it.
o files/ folders i
ons
rome icon
there are some
on the apps
.
Note:
ome video files ma
the en
of the manual, and
iew
ng Photos
Laun
h the applicatio
phot
s.
(1)
Photos should b
can slide your fi
right to browse
(2)
ap a photo thu
not be played corr
make sure the vide
n Photos to vie
e listed in thum
ger on the scre
hotos.
bnail to view t
ctly with the device.
resolution, encodin
pictures or
nail. You
n left or
e photo in
5
Refer to the Techni
format or file type
al Specifications at
s supported.
Page 6

full screen, and slide your finger on the screen horizontally to view next or
previous picture
Using the Webcam
Tap the Camera in the apps page to launch the Camera application.
Camera mode
Video mode
Viewfinder
After entering the application, you will be ready to take photo or video recording.
Swipe rightward to bring up the work mode option menu with which you can switch
between Camera or Video mode,
To check the pictures you have taken and the video clips you have recorded, launch
the File Manager application.
Managing Files and Folders
You can explore files and folders with the File Manager application.
In the Home Screen, tap the Applications shortcut to display all applications and then
tap the File Manager icon to enter the file exploration mode.
When you select a file or folder by holding your tap on the target for a few seconds, a
context menu will emerge
Sending/Receiving E-mails
In the Home or Apps Screen, tap the Email
icon to launch the application.
Setup Email Account
First you need to setup an E-mail account for
receiving or sending emails.
6
Page 7

(1) Start up the email application by tapping the Email application icon and you are
prompted to setup an account.
(2) Input your email address and login password. You can set the account as default
by selecting the option “Send email from this account by default”.
(3) Tap “Manual Setup” to set the email server information if necessary.
(4) Choose the server type from POP3, IMAP or Exchange for incoming emails. To
know what type of your email server is, you can consult the service provider,
network administrator or search for information in the Internet.
(5) Input required information (server, port etc.). You can obtain the information from
the service provider, network administrator or the Internet.
(6) Choose the server type for outgoing emails, and input required server information.
(7) Click “Next” to continue. Your tablet will check the server settings. When it prompts
you that “Your account is set up, and email is on its way”, your account is set up
successfully.
(8) Input your name and then tap on “Done” to finish.
Note: If you have more than one account, every time when you start up the email application, you e nter t he
default email account.
Specifications
Item Description
CPU
LPDDR3 2GB
Display 11.6-inch IPS LCD, Touchpad (capacitive touch pad), 1366X768 pixels
Built-in operating system Android OS 5.1
Hardware IBM PC or compatible PC, Note-book or Macintosh with USB port
Internal Memory EMMC :64 GB
Memory Card type
Operation System Windows2000/XP/Vista/windows7/Linux2.4/ MAC OS 10.6.7 above
Camera Front, 2.0 mega pixels; rear 2.0 mega pixels
Interface
Wi-Fi WiFi (802.11 b/g/n), Wi-Fi hot spot
G-sensor Support 360 degrees rotation
Bluetooth Support(V4.0)
Audio Format MP3/FLC/WAV/OGG/AAC/M4A
Video Format AVI/3GP/MP4/MKV/TS
Image Format JPEG/BMP/PNG/GIF
Battery Charge Time About 4.5 Hours
Battery Life
Power Supply
Intel Atom x5, quad core, CPU@1.84GHz
Micro-SD card: 2GB, 4GB (SDHC), 8GB (SDHC), 16GB, 32GB, 64GB
(SDHC)
Micro-USB 2.0 High speed
Micro-SD card slot
3.5mm Earphone
About 10 hours of music playback; About 8 hours of video
playback; About 8 hours of web browsing.
Rechargeable lithium-ion polymer battery;
AC Adapter: AC Input 100-240V~50/60Hz, DC Output 5V/3 A
7
Page 8

IC Caution.
FCC Statement
RSS-Gen Issue 4 November 2014"&"CNR-Gen 4e edition Novembre 2014:
- English:
This device complies with Industry Canada licence-exempt RSS standard(s).
Operation is subject to the following two conditions: (1) This device may not cause
interference, and (2) This device must accept any interference, including interference
that may cause undesired operation of the device.
- French:
Le présentappareilestconforme aux CNR d'Industrie Canada applicables aux
appareils radio exempts de licence. L'exploitationestautorisée aux deux conditions
suivantes:
(1) l'appareil ne doit pas produire de brouillage, et
(2) l'utilisateur de l'appareildoit accepter tout brouillageradioélectriquesubi, mêmesi le
brouillageest susceptible d'encompromettre le fonctionnement.
FCC Caution.
This device complies with part 15 of the FCC Rules. Operation is subject to the
following two conditions: (1) This device may not cause harmful interference, and (2)
this device must accept any interference received, including interference that may
cause undesired operation.
Any Changes or modifications not expressly approved by the party responsible for
compliance could void the user's authority to operate the equipment.
Note: This equipment has been tested and found to comply with the limits for a Class
B digital device, pursuant to part 15 of the FCC Rules. These limits are designed to
provide reasonable protection against harmful interference in a residential installation.
This equipment generates uses and can radiate radio frequency energy and, if not
installed and used in accordance with the instructions, may cause harmful
interference to radio communications. However, there is no guarantee that
interference will not occur in a particular installation. If this equipment does cause
harmful interference to radio or television reception, which can be determined by
turning the equipment off and on, the user is encouraged to try to correct the
interference by one or more of the following measures:
-Reorient or relocate the receiving antenna.
-Increase the separation between theequipment and receiver.
-Connect the equipment into an outlet on a circuit different from that to which the
receiver is connected.
-Consult the dealer or an experienced radio/TV technician for help.
The device has been evaluated to meet general RF exposure requirement. The
device can be used in portable exposure condition without restriction.
This manual was correct and complete at the time of printing. However, new
specifications and updates can occur at any time without prior notice. No part of this
manual may be copied, republished, reproduced, transmitted or distributed in any way
without prior written consent of E Fun. Any unauthorized distribution of this manual is
expressly forbidden.
E Fun may find it necessary to modify, amend or otherwise change or update this
manual. We reserve the right to do this at any time, without any prior notice. All
8
Page 9

specifications and features are subject to change without notice. All screen shots
shown are simulated and may not represent the actual screen on production units
sold to consumers.
For instruction manuals, updated drivers or other information, be sure to visit our
website at:
www.nextbookusa.com
Or write to us at:
E Fun
West Covina, CA 91791
USA
Copyright © 2016
Frequently Asked Questions(FAQ)
Q: Can I connect an external hard drive, USB stick to copy files to the device?
A: Yes, you can. The device supports USB HOST function, which can read USB stick Just connect
the device to USB stick or player through OTG cable.
Q: When I plug the device into my computer, the Windows Hardware installation window
asks me to install a driver. What should I do?
A:
When you connect the device to PC for the first time or has just restored the factory default settings, you
may come across such prompt. Just click on Next button to finish the automatic installation. Normally,
Windows should not do this because it should see the device as an external hard drive.
Q: My device freezes, what should I do?
A: Try holding down the Power button until the device is reset and then restart the device.
Q: I downloaded an application, but I cannot install it in my device. Why? A: Some
applications developed for Android mobile might not run properly in the Device. Please consult the
respective software developer for further information. You are NOT suggested to enable Unknown
Sources under “Settings Security”.
Q: When charging, my device shows it is charging but will not power on. What’s the problem?
A: Please try charging for about 30 minutes, and then restart the device. If the problem still remains,
try pressing and holding down the Power button for about 15 seconds the until device is reset.
Q: The device cannot enter Android system after power-on, what should I do?
A: Make sure the device has enough battery charge before power-on. If you fail to enter Android
system after many tries, please try the Recovery mode to restore factory default settings (referring
to the problem of forgetting password below), or contact your vendor for technical help or support.
Q: The device is unable to be charged, what should I do?
A: Make sure you use a dedicated power adaptor provided for the device. If the problem still exists,
contact the vendor.
Q: The display is empty or blurred, what should I do?
A: Please try to restart the device. If the problem still exists, there may be something wrong with the
display physically, just contact your vendor.
9
Page 10

Q: The device runs slowly, how to speed it up?
A: The more applications you have installed, the slower the device is. Please uninstall some
applications that you don’t use often to speed it up.
Q: I forget my power-on password or graphic, how to start up the device?
A: If you forget your password, you have to enter the Recovery mode to load default factory
settings: Press Power button to confirm entering the Recovery mode.
(1) Power off the device first. Press and hold down the VOL+ button and Power button to enter
Recovery mode.
(2) Use VOL+/- button to move the cursor up/down and select ‘Wipe data/ factory reset’.
(3) Press Power button to confirm entering the Recovery mode.
(4) User Vol+/- button to select “ Yes-- delete all user data” and confirm with Power button.
(5) Select “ Reboot system now” before pressing Power button to confirm.
When your device is restarted, the preset password will be deactivated.
Q: The device prompts me lack of space, how to release some space?
A: Applications are installed in internal memory of the device by default. Space gets less if you
install more and more applications. Please uninstall some applications or move some to
expandable memory like Micro SD card to release space.
Q: How to access Internet via Wi-Fi?
A: The device features WiFi module. Make sure there is a WiFi router nearby, and then go to
“Settings” “Wireless & Network”. Turn on Wi-Fi, the device should search for Wi-Fi routers around
you and list them. Click the router that you want to connect, enter password if required. When
connected successfully, you can surf on the Internet then. Please get closer to the Wi-Fi router as
possible as you can to avoid weak signal.
Q: How to connect to a USB flash disk?
A: The device can read USB flash disk with its USB HOST feature. Connect a USB flash disk to the
device with a dedicated OTG cable (not provided with the device) and then manage files in the USB
disk with File Manager.
Q: How do I know if my WiFi network is connected successfully with the device?
A: To make sure that the device is connected to WiFi access point successfully, go to Settings ->
Wireless & Network -> WiFi, and then you should see the small text “Connected” under the network
name in the right window.
Q: I have problems making a WiFi connection. What can I do?
A:
- Check your WiFi router/modem by using another WiFi device (ex: friend’s laptop) to verify that
your router/modem is functioning properly.
- Check your WiFi router/modem documentation to see if it has a pairing button that needs to be
pressed. Some modems have such a button that must be pressed the very first time you try to
make a WiFi connection with a new device.
- Make sure that you are relatively close to the modem/router to make your first connection. Then
later you can test to see how far away you can make a connection. - Try connecting to a friend’s
WiFi access point to see if reacts the same way. If it connects, then you know that you’ll have to set
your WiFi router/modem with similar parameters.
- Turn off the WiFi, then turn it back on again. Go to Settings -> Wireless Network -> WiFi.
- Make sure you have entered the correct password if required.
Q: My device cannot play a video file that I have copied to it. What can I do?
A: Video files are created in many different formats as well as sizes (resolution). See Technical
Specification in User Manual for detail information.
10
Page 11

The Company hereby warrants to the original retail purchaser of this product
ONE YEAR LIMITED WARRANTY
that should this product or any part thereof, under normal use and conditions, be
proven defective in material or workmanship within one year parts and 90 days
labor from the date of original purchase, such defect(s) will be repaired or
replaced with reconditioned product (at the Company’s option) for parts and
repair labor. This limited Warranty is the purchaser’s exclusiv e remedy for any
such defect(s).
To obtain repairs or replacement within the terms of this warranty, please visit
www. Nextbookusa.com or contact us West Covina, CA 91791, USA. Proof of
warranty coverage (i.e.- dated bill of sale) is required.
This Warranty dose not apply to any product or part thereof which, in the
opinion of the Company, has suffered or been damaged through alteration,
improper installation, mishandling, misuse, neglect, accident, or by removal or
defacement of the factory serial number/bar code label(s). The opinion of the
Company with respect to this matter shall be final. THE EXTENT OF THE
COMPANY’S LIABILITY UNDER THIS WARRANTY IS LIMITED TO THE
REPAIR OR REPLACEMENT PROVIDED ABOVE AND, IN NO EVENT,
SHALL THE COMPANY’S LIABILITY EXCEED THE PURCHASE PRICE
PAID BY PURCHASED FOR THE PRODUCT.
THIS WARRANTY IS IN LIEU OF ALL OTHER EXPRESS WARRANTIES
OR LIABILITIES. ANY IMPLIED WARRANTIES, INCLUDING ANY
IMPLIED WARRANTY OF MERCHANTABILITY, SHALL BE LIMITED TO
THE DURATION OF THIS WRITTEN WARRANTY. ANY ACTION FOR
BREACH OF ANY WARRANT Y HEREUNDER, INCLUDING ANY IMPLIED
WARRANTY OF MERCHANTABILITY, MUST BE BROUGHT WITHIN A
PERIOD OF 12 MONTHS FROM THE DATE OF ORIGINAL PURCHASE. IN
NO CASE SHALL THE COMPANY BE LIABLE FOR ANY
CONSEQUENTIAL OR INCIDENTAL DAMAGES FOR BREACH OF THIS
OR ANY OTHER WARRANTY EXPRESS OR IMPLIED WHATSOEVER.
No person or representative is authorized to assume for the Company any
liability other than expressed herein in connection with the sale of this product.
Some jurisdiction do not allow limitations on how long an implied warranty lasts
or the exclusion or limitation of incidental or consequential damages so the above
limitations or exclusions may not apply to you. This Warranty gives you specific
legal rights and you may also have other rights, which vary from jurisdiction to
jurisdiction.
11
 Loading...