

Page 1

Cautions
1. Do not subject the device to severe impact or drop it from high position.
2. Do not use the player in extreme hot or cold, dusty or damp field. Do not expose it to
direct sunshine.
3. Back up the data frequently in case of accident data loss.
4. Avoid using the player in strong magnetic field.
5. Keep the device away from water or other liquids. In the event that water or other
liquids enter the device, power off the product immediately, take out the battery and
clean the device.
6. Do not use chemical solution to clean the device in order to avoid corrosion. Clean it
with a dry cloth.
7. We are not responsible for the damages or lost dat a caused by malfunction, mi susing,
repairing the device or battery replacement.
8. Do not attempt to disassemble, repair or modify the product, or it will be out of
guarantee.
9. The design of the player or actual display may be different from what is shown in this
manual. It should be subject to the actual display or design.
FCC NOTICE
1. This device complies with Part 15 of the FCC Rules.
Operation is subject to the following two conditions:
(1) This device may not cause harmful interference, and
(2) This device must accept any interference received, including
interference that may cause undesired operation.
2. Changes or modifications not expressly approved by the party
responsible for compliance could void the user’s authority to
operate the equipment.
Page 1 of 11
Page 2

1 Key Features
MP3&WMA Playback
Play audio files in the format of MP3 or WMA.
Navigation Function
You can use the navigation function to search for and play the specified folder or track.
Voice R ecording
Record voice as WAV file and playback the recorded content in excellent audio quality.
FM Transmitter
Transmit the audio signal from the MP3 player to the FM radio. You can receive the audio
signal through the FM radio.
Removable Storage Device
Provides high-speed USB interface for you to copy files from or to the player.
Lyric Display
Display lyric of the current track during playback.
2 System Requirements
O Hardware: IBM PC & Compatible PC, Notebook with USB interface
O Operating System: Windows98/SE, Windows Me, Windows2000/XP
3 Package Content
Please check the package for the following items. If any one of them is missing, please
contact the vendor:
O Main Unit
O Stereo earphone
O USB cable
O Neck Strap
O AAA –size Alkaline Battery
O User Manual
O Driver CD
4 Before Using
4.1 Connect to the PC and download audio files
For Windows 98/SE, you are required to install the included driver before connect i on. For
detail information about driver installation, see the “Driver Installation” section.
The MP3 player is a plug & play device under WIN2000/XP/ME OS. You don’t need to
install the driver. Just connect the player to the PC and download audio files following
these steps:
(1) Plug the larger end of the USB cable to the USB port of the PC, and plug the smaller
Page 2 of 11
Page 3
end to the USB port of the player.
(2) Double click “My Computer” on the desktop, you see a removable disk which
represents the player. Just copy the files from the PC to the removable disk.
4.2 Removing the player from the PC safely
For Windows2000/XP:
(1) Left click the
(2) Click the pop-up mini-window with message of “Stop the USB Mass Storage Device –
Drive (X)”.
(3) When you see the following prompt, pull out the MP3 player.
For Win98, please make sure the data transfer is completed before unplugging the MP3
player.
icon at the right hand corner of the taskbar.
4.3 Installing Battery
(1) Press on the battery cover and slide it off in the direction of the arrow.
(2) Insert one AAA - size battery.
(3) Close the battery cover.
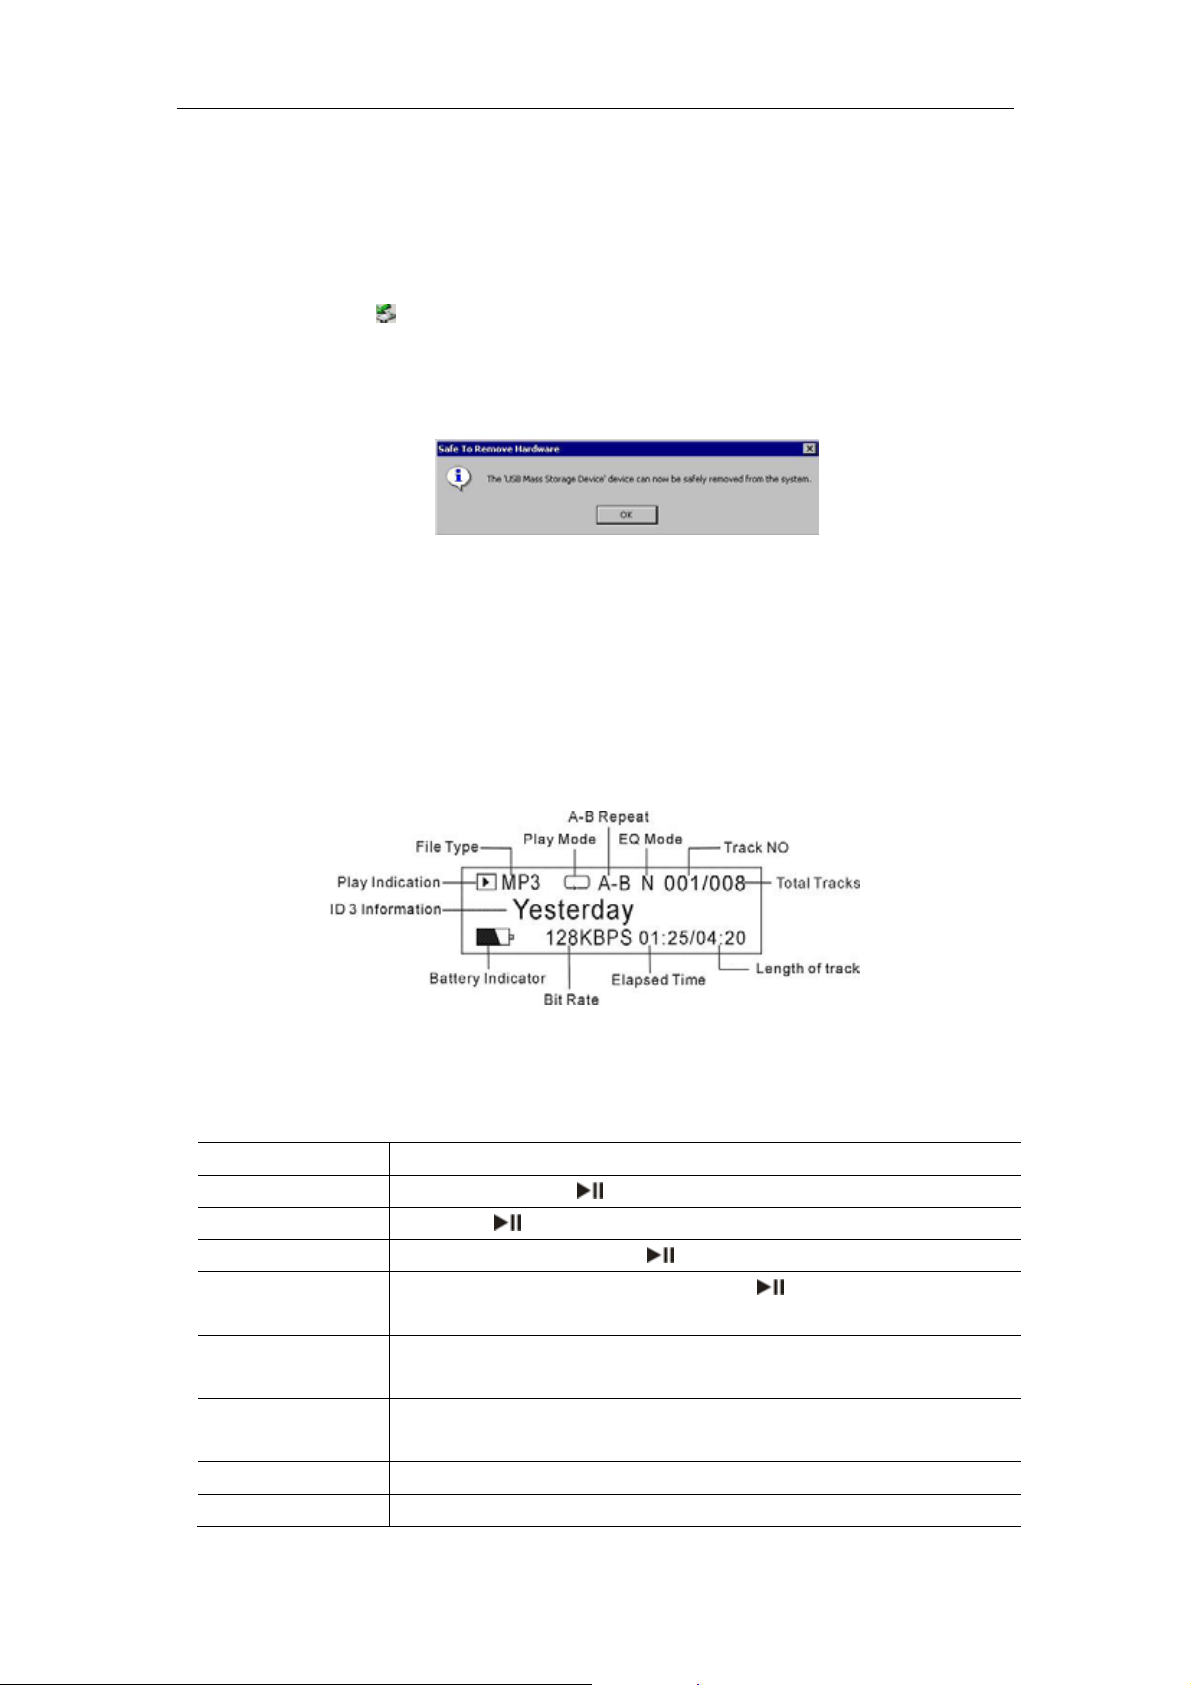
5 LCD Indication
Remark: ID3 Information includes track title, artist, album, lyric etc.
6 Basic Operations
Function Operation
Power On/Off Press and hold the key until you see prompt on the display.
Play Press the key to play track.
Pause During playback, press the key to pause.
Stop During playback, press and hold the for a while to stop the
playback and return to the beginning of current track.
Adjust Volume
Play the previous
track
Play the next track
Fast Forward
Press the V+ key to increase the volume.
Press the V- key to decrease the volume.
Turn the Control Wheel leftwards.
Turn the Control Wheel rightwards.
Turn the Control Wheel to the right and hold it.
Page 3 of 11
Page 4
Rewind
Lock/Unlock keys
Select Mode
Turn the Control Wheel to the left and hold it.
Push the
being pressed accidentally.
Push the
Music Mode –
Press and hold the Control Wheel key to enter the main menu,
select “Music” by turning the Control Wheel and then press the
Control Wheel confirm.
Voice Mode –
Press and hold the Control Wheel to enter the main menu, select
“Voice” by turning the Control Wheel and then press the Control
Wheel to confirm.
7 Advanced Features
O Using the Menu
Press and hold the Control Wheel to enter the main menu.
Turn the Control Wheel leftwards or rightwards to select the menu item and press the
Control Wheel to confirm the selected item.
Press the
return automatically in a few seconds.
To exit from the menu mode, on the main menu, select “Return” and press the
Control Wheel to confirm. Or, do not press any key, it will exit automatically in a few
seconds.
O Using the Navigation Function
In the music or voice mode, press and hold the Control Wheel to enter the main
menu, select the “Folder” item and press the Control Wheel to enter the folder
navigation mode.
To navigate through the folders:
(1) Turn the Control Wheel leftwards or rightwards to select folder.
(2) Press the Control Wheel to enter the selected folder.
(3) Turn the Control Wheel to select track that you want to play.
(4) Press the
(5) Press the Control Wheel to close the current folder. When you reach the root
directory, you can press the
to the main menu.
To delete folder or track:
(1) In the navigation mode, select the folder or track that you want to delete.
(2) Press the A-B key to delete it.
(3) Turn the Control Wheel to select the “Yes” option and press the A-B key again to
confirm deletion.
Note: You can only delete empty folder.
O A-B Repeat
To repeat specified section of the current track,
key to return to the previous menu level. Or , do not press any key it will
key to play the selected track.
switch to the locked position to lock keys against
switch to the unlocked position to enable all keys.
key to exit from the navigation mode and return
Page 4 of 11
Page 5

(1) Press the A-B key during playback to select the start point of the repeat. At the
top of the LCD screen shows “A-”.
(2) Press the A-B key again at the desired point to specify the end point of the
repeat. At the top of the screen,“A-B”displays instead. The section between the
start point and the end point begins to be played repeatedly.
(3) Press the A-B key shortly to stop A-B repeat.
O Select Play Mode
You can switch between the following five play modes:
Normal –Play all tracks in order and stop after playing all
Repeat One –Keep repeating the current track
Repeat All –Play all tracks in order and repeat
Shuffle –Play all tracks randomly and stop after playing all
Rep Shuffle –Keep repeating all tracks randomly
To select the play mode:
(1) In the Music or Voice mode, press Control Wheel shortly to show the
submenus.
(2) Select the “Repeat” item and press the Control Wheel to show the provided
options.
(3) Select the desired mode option and press the Control Wheel to confirm.
O Switch EQ Mode
You can play the tracks in different sound effect. The device provides 6 EQ modes:
Normal, Rock, Jazz, Classic, Pop and Bass.
To set the EQ mode:
(1) In the Music or Voice mode, press Control Wheel shortly to show the
submenus.
(2) Select the “Equalizer” item and press the Control Wheel to show the provided
options.
(3) Select the desired mode option and press the Control Wheel to confirm.
O Preview Tracks
You can preview all tracks on the current play list before listening. In the preview
mode, the player plays the first 10 seconds of every track.
In the Music or Voice mod e, press the Control Wheel shortly to show the subm enus,
select “Preview” and then press the Control Wheel to start preview. To end the
preview, press the Control Wheel again.
O Delete Single Track
(1) In the Music or Voice mode, turn the Control Wheel leftwards or rightwards to
select the track that you want to delete.
(2) Press the Control Wheel shortly to show the submenus.
(3) Select the “Delete” item and press the
key to confirm deletion.
O Display Lyric
To display the lyric during playback, you need to download a lyric file with the same
name as the current track title to the player. The extension name for the lyric file is
“.lrc”, you can download it from the related website.
Page 5 of 11
Page 6

8 Voice Recording
O Record
(1) In the Music or Voice mode, press and hold the A-B key for a few seconds until
you see the following recording screen.
(2) Speak into the built-in microphone.
(3) To stop recording, press the A-B key again. A voice file named as V00Y. WAV
(where Y is the sequence number) is created. Now, you can press the
play the voice file that you just recorded.
O Play Voice File
(1) On the main menu, select the “Voice” item to enter the Voice mode.
(2) Select the file that you want to play and press the
Alternatively , you can enter the navigation mode, open the Voice folder and select the
voice file that you want play.
key to
key to play it.
9 FM Transmitter
FM transmitter enables you to transmit the audio signal from the MP3 player to the
optional FM radio. You can use the FM radio to tune in the audio files being played on the
MP3 player.
Usage:
(1) On the main menu, select the “FM Transmit” item
and press the Control Wheel to confirm.
(2) Turn the Control Wheel to select the FM frequency
that receives the transmitted audio signal.
(3) Open the FM radio and tune to the frequency that
you set in the step (2) above. Then you can listen in
the music being played on the MP3 player.
10 Customizing Settings
On the main menu, select the “Settings” item and press the key to enter the system
settings mode.
O Set backlight time
On the main menu, select “Backlight” and press the Control Wheel to confirm.
Select among the four options: 5 Secs, 10 Secs, Always on, Disable by turning the
Control Wheel and then press the Control Wheel to confirm your selection.
Page 6 of 11
Page 7

According to this setting, when you press any key, the backlight will be on for the set time.
O LCD Contrast setting
(1) In the “Settings” menu, select “Contrast” and press the Control Wheel to confirm.
(2) Turn the Control Wheel to adjust the contrast level and then press the Control
Wheel to confirm your settings.
O Set the standby time
On the main menu, select “Shutdown” and press the Control Wheel to confirm.
Select one option from “1 Mins”, “2 Mins”, “5 Mins”, “10 Mins” and “Disable” and then
press the Control Wheel to confirm your selection.
According to this setting, the player will be turned off automatically when it is idle for
selected time.
O Set the timer
On the main menu, select “Play Time” and press the Control Wheel to confirm.
Select one option from “30mins”, “60mins”, “90mins”, “120mins" and “Always On”, and
then press the Control Wheel to confirm your selection.
According to this setting, the player will be turned off automatically when the set playing
time is elapsed.
O View memory state
In the “Setting” menu, turn the Control Wheel to select “Memory”, and then press the
Control Wheel see total capacity and free space of the internal memory.
O Set Display Language
On the “Setting” menu, select “Language” and press the Control Wheel to confirm.
Select one language by turning the Control Wheel and then press the Control Wheel to
confirm your selection.
11 Driver Installation
For Windows 98/SE, you are required to install the driver first before connecting it to the
computer.
(1) Insert the driver CD into the CD-ROM
and execute the Setup.htm file on it. Click
the player picture with correct model on
the following pane.
(3) Click “Yes” on the following dialogue to
start installation.
(2) Select “Run this program from its
current location” in order to execute
Setup.exe program at once, and
then click “OK” to continue.
(4) The installation progress starts.
Page 7 of 11
Page 8

(5) Click “Next” to continue.
(6) Click “Yes” to accept the license
agreement.
(7) Click “Browse” to specify the directory
where the driver is installed, or use the
default destination, and click “Next” to
continue.
(8) Click “Next” to continue.
(9) The system executes the requested
operations.
(10) Click “Finish” to finish the
installation and restart the computer.
Tip: For WIN2000 or WINXP, it is recommended to install the driver also so that you can
upgrade, initialize or recover the system.
Page 8 of 11
Page 9

12 Firmware Upgrade
To get the latest version of the firmware,
(1) Install the enclosed driver first.
(2) Connect the player to the PC.
(3) Click “Start” → “Program” → EMXXX Digital Audio Player, and select “Firmware
Update”.(Note: EM728SF is the player model)
(4) You are guided to the following upgrade dialogue. If “Format Date Area” is selected,
all files stored in the player will be erased.
(5) Press the “Start” button to start upgrading.
Note: Firmware upgrade process will format the device. Please backup your important
data before upgrading.
13 Troubleshooting
Problem Possible Cause Solution
The LCD displays
nothing when the Play
key is pressed.
The player cannot be
powered on even the
battery is replaced.
Press the Play key after
turning on, while the
player has no response.
No sound when playing
music or voice file.
1. No battery or battery is too
low.
2. The keys are locked.
FAT table in the flash memory
may have errors in the case of
strong magnet, static, and
incorrect disconnection.
The keys are locked by Hold
switch
1. The volume is too low.
2. There are problems with the
audio file.
1. Install or replace the
battery.
2. Unlock the Hold switch.
Upgrade the firmware
Slide the Hold switc h to the
unlocked position.
1. Adjust the volume.
2. Delete the file or play oth
files.
Page 9 of 11
Page 10

The player cannot be
connected to the PC.
The displayed time is
changing constantly.
The PC has error when
you plug and unplug the
player.
Total memory displayed
on the player is not in
accordance with the
marked amount.
Some of MP3 files
cannot be played
properly.
1. The driver is not installed or
2. The USB interface is not
The bit rate of the MP3 file is
changing during playback.
The player is disconnected from
the PC abruptly while
transferring files.
Part of memory is used to store
programs and display
characters.
The MP3 file is compressed by a
standard, such as MPEG I Layer
1 or Layer 2 that the player does
not support.
1. Install or reinstall the
destroyed.
supported by PC’s
motherboard.
2. Update or replace the
Try to use fixed bit rate to
compress the MP3 file.
Do not disconnect the player
from the PC when
transferring files.
1.Delete the unsupported
2.Use MPEG I Layer 3
driver shipped with the
player.
PC’s motherboard.
MP3 files.
standard to compress the
unsupported MP3 files.
14 Technical Specifications
Item Specification
Capacity 16MB/32MB/64MB/128MB/256MB/512MB/1GB
Battery Type AAA-size alkaline or chargeable Lithium Battery
Battery Life 6-10 Hours
LCD
Earphone Power 5mW+5mW
Output Frequency 20HZ-20KHZ
Record Bit Rate 8KHz
Audio File Format
Record Format WAV
EQ Mode Normal, Classic, Jazz, Pop, Rock, Bass
SNR
Supported Languages Simplified Chinese, T ra ditional Chinese and English
USB Port USB2.0
Operational Temperature
Storage Temperature
Operational Relative Humidity * 20% ~ 90%
Storage Relat ive Humidity * 20% ~ 93%
128X32 Pixel,White EL Backlight
MP3(MPEG 1/2/2.5 layer 3),WMA
>90dB
0℃ ~ +55℃
0℃ ~ +55℃
15 Notice
O Plug & Play is only available for WIN2000/XP. It is not supported by WIN98 and
Page 10 of 11
Page 11

WIN98SE under which a driver needed to be installed.
O Push the Hold switch to the unlocked position to enable all key s b efore operation.
O Please replace the battery immediately when the display indicates low battery, or the
device will be powered off automatically.
O Please unplug the player properly to avoid data lo sing.
O The transfer rate displayed on the PC may be different depending on the operating
system. Exact transfer rate should be subject to the player's indication.
O When the recorded voice file is too large, it is normal that the response of the device
may be slow.
Page 11 of 11
 Loading...