

Page 1
Thank you for your purchasing. Before you use the product, please read the instruction
manual carefully and save for futher reference.
Manufacturer: Shanghai Xiaoyi Technology Co., Ltd.
Address: 6F, Building E, No.2889, Jinke Road, Shanghai, China.
Tel: +86-21-6165 6722
http://www.yitechnology.com
YI-M1 Mirrorless Digital Camera User Manual
Page 2
Specification
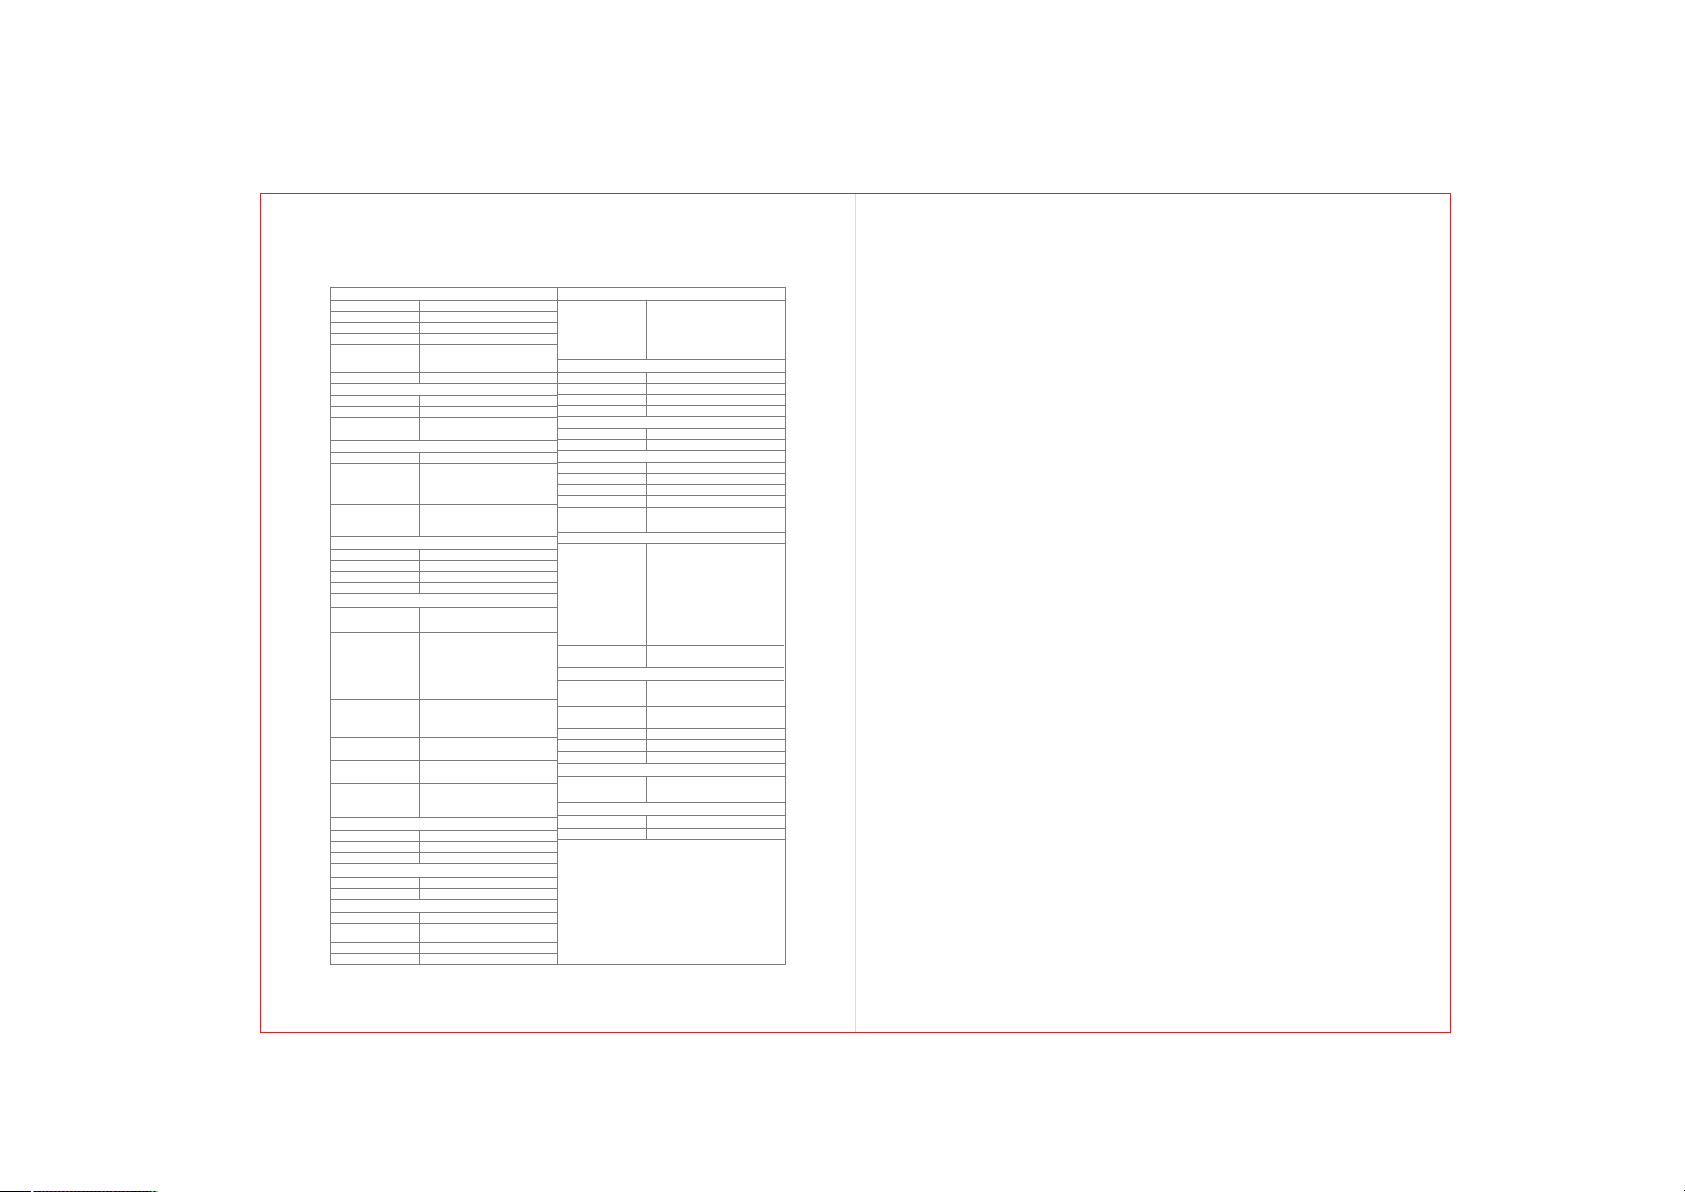
Product Type
Model
Camera Type
Lens Mount
Equivalent Focal Length
Number of Pixels
(effective)/ aspect ratio
Sensor Size
Image Quality
Maximal Resolution:
Image Quality:
File Format
Focus
Focus System
Autofocus
Manual Focus
Focus Brightness Range
Number of Focus Points
LCD Screen
Screen size
Resolution
Touch Screen
Brightness Adjustment
Exposure
Mechanical Shutter
Speed
Exposure Modes
Metering Modes
ISO
Scene Modes
Exposure Compensation
Exposure Brackating
HDR
Flash
External Flash
Flash Modes
Flash Sync Speed
Driver modes
Driver Modes
Continuous Speed
Color
Color Modes
White Balance
WB Bracketing
Color Space
YI-M1
Interchangeable-lens digital camera
Micro four thirds
Approximately 2x focal length
Number of pixels(effective): 20.16 megapiexls
Number of pixels(total): 21.77 megapixels
Image sensor aspect ratio: 1.33 (4:3)
17.3 mm×13mm
20M: 5184×3888 pixel
50M, 20M,16M, 8M, 3M, VGA
RAW, JPEG (compression: Super Fine
1/2.7, Fine1/4, Normal 1/8, Exif v2.3)
Contrast detect
Face detection
Single-AF
Continuous AF
LCD touch and shoot AF
Yes (Peak MF and Magnifier MF)
-4EV-20EV
81 points
3" 1.04 MP (approx.)
720RGB×480
Yes
Yes
1/4000s-60s
Auto, Program, Aperture-Priority,
Shutter-Priority, Manual Shutter
(B mode, T mode) Scanning
Panorama, Scenery Mode,
Master Guide
Multi-segment Metering Mode,
Spot Metering Mode, Center-weighted
Metering Mode
Auto,100, 200, 400, 800, 1600, 3200,
6400, 12800, 25600
Portrait, Landscape, Sport, Night scene,
Candle, Sunset, Fireworks, Beach & Snow
±5EV
Yes
Yes
Yes
Auto, On, Off,
1/125s
Single, Continuous, Timer (2s, 10s)
5fps
Standard, Portrait, Vivid, B&W, High-contrast B&W
Auto, Sunny, Shadow, Cloudy,
Incandescent, CWB (2000-11500)
Yes
sRGB,AdobeRGB
Video
Video Resolutions
Video Format
Video Format
Audio Format
Microphone
Speaker
Record/Delete
Storage Type
Memory Card Settings
Connectivity
USB
HDMI
Wireless
BLE
Remote Control
Playback Modes
Playback Modes
Picture Edit
Others
Battery
Dimensions
Timelapse Recording
Aspect Ratios
Panorama Mode
Firmware Update
Firmware Update
Working Condition
Operating
Storage
4K 3840×21 60 30fps,2K 2048
×1536 30fp s,FULL HD 1920×
1080 60fps ,30fps,24f ps,HD
1280×720 60fps,30fps,24fps,
VGA 640×48 0 240fps
MPEG-4/H.264
AAC
Stereo
Mono
SD/SDHC/SDXC (max 512G)
Erase all, Format
USB 2.0
Yes (Micro HDMI)
Yes (2.4G)
Yes (4.1)
Remote Control: currently not supported
(coming soon via App update)
Mode:
Still Image: Single, Single with Detail Info,
Index Display, Magnification
Video: Play, FW, BK, Pause
Playback modes:
Picture - Single, Single with Detail Info,
Index, Enlarged
Video - Play, Forward, Backward,
Pause
RAW->JPEG, Color->B&W, Resize,
Protection, Erase
Lithium, up to 380 shoots
(based on CIPA standard)
113.5mm(W)×64.3mm(H)×33.6mm
(D) (Protrusions excluded)
Yes (automatically create timelapse video)
4:3, 3:2, 16:9, 1:1
Yes
Camera: via smartphone or PC;
Lens: along with camera upgrade
14-104℉, 30-90% RH
-4-140 ℉, 10-90% RH
Contents
1. Contents of Package
2. Parts of the Camera
3. Getting Started
1). Insert the battery
2). Insert the memory card
3). Place/remove the lens
4). Charge the battery
5). Attach the strap
4. Powering the camera on and off
5. Setting the Date and Time
6. Select shooting mode
7. Shoot Pictures / Record Videos
1). Shoot pictures
2). Record videos
8. Image/Video Playback
1). View/edit still pictures
2). Detailed info/index display
3). Enlarged view
4). Delete pictures
5). Watch videos
9. Connect YI Mirrorless App to YI-M1 Mirrorless Digital Camera
10.Safety precautions
11. Wireless functions
1
2
4
7
8
9
10
12
15
17
18
Page 3
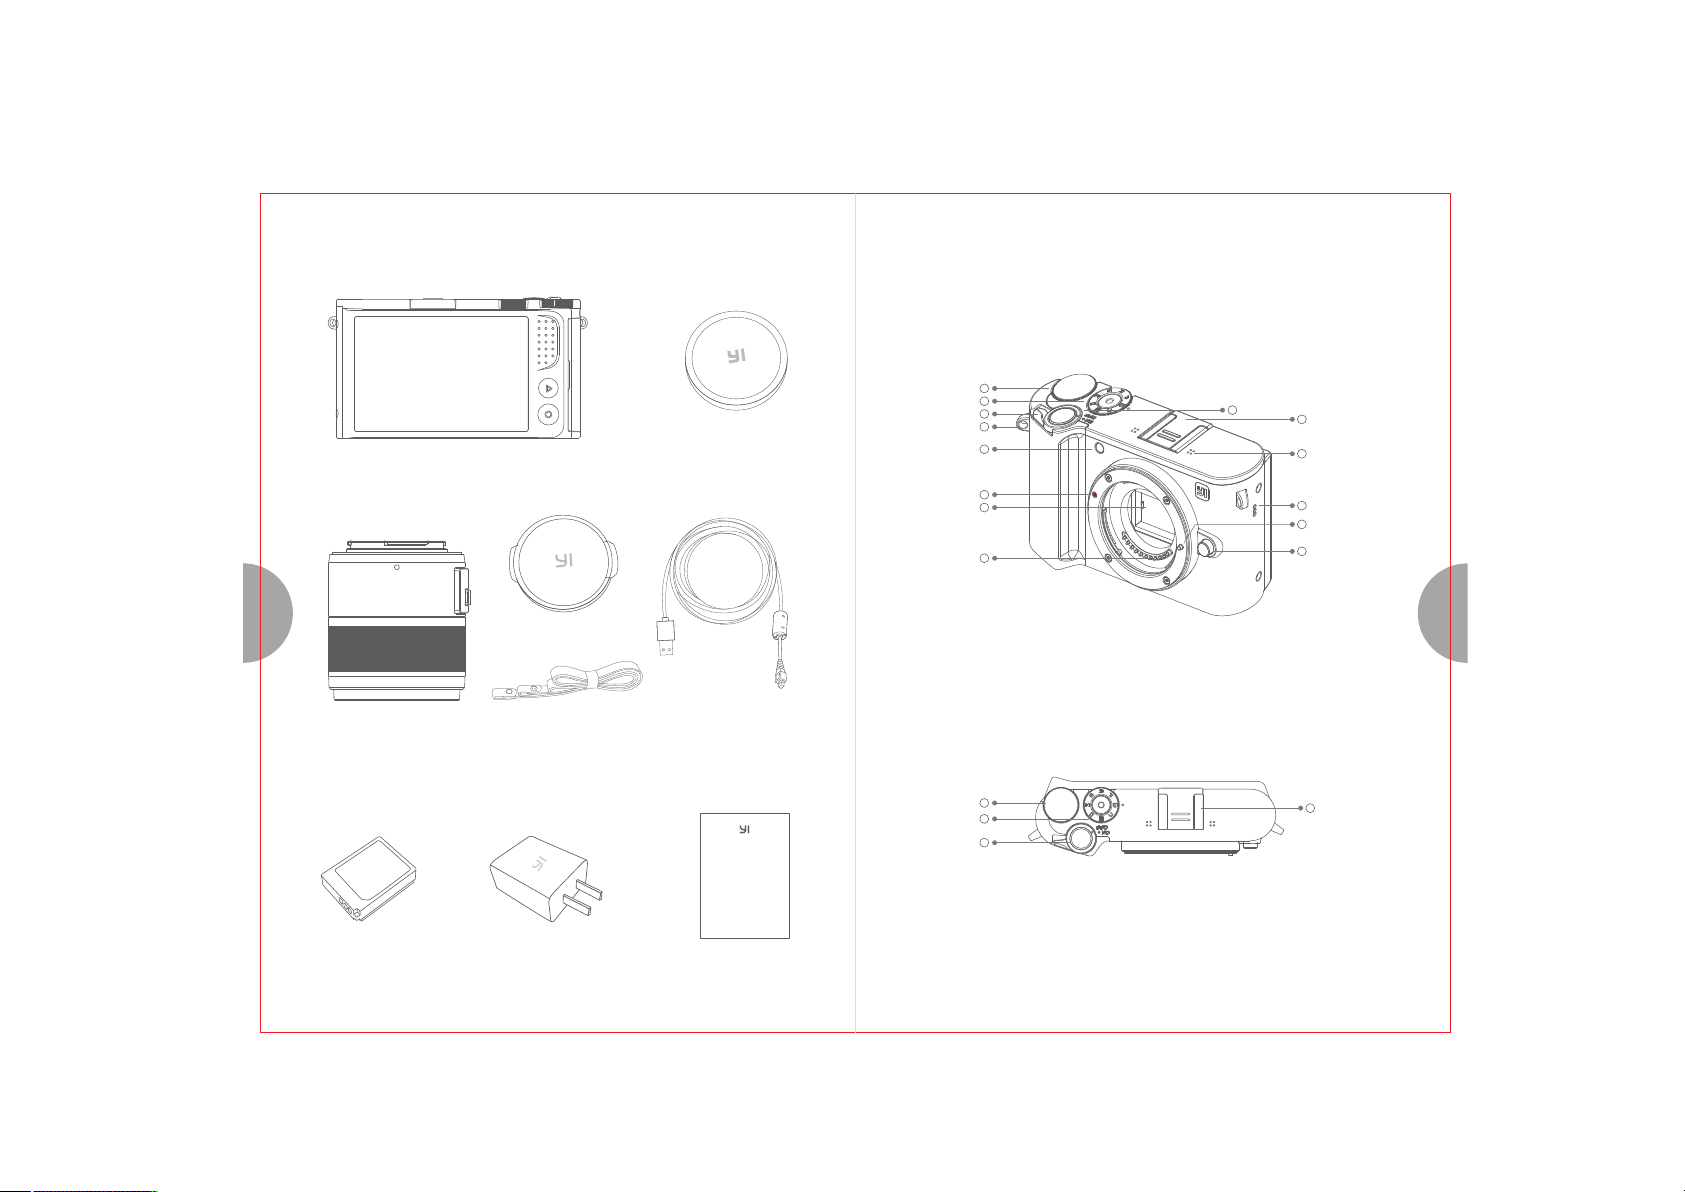
1. Contents of Package
Camera body×1
Body cap×1
(attached)
2. Parts of the Camera
1
Control dial
2
Mode dial
Strap eyelet
illuminator
indicator
3
4
6
7
8
9
ON/OFF button
AF Assistant
Lens attachment
Image sensor
Lens attach point
5
Shutter button
10
Hot shoe
11
Microphone
12
Speaker
13
Lens lock pin
Lens release button
14
1 2
Lens cap×1
Lens×1
(Varies on kit, quantity
of lens may vary)
Battery×1
Strap×1
Power Adapter×1
USB cable×1
小蚁微 单 相 机 使 用 指 南
User Manual×1
Control dial
Mode dial
Shutter button
1
2
5
10
Hot shoe
Page 4
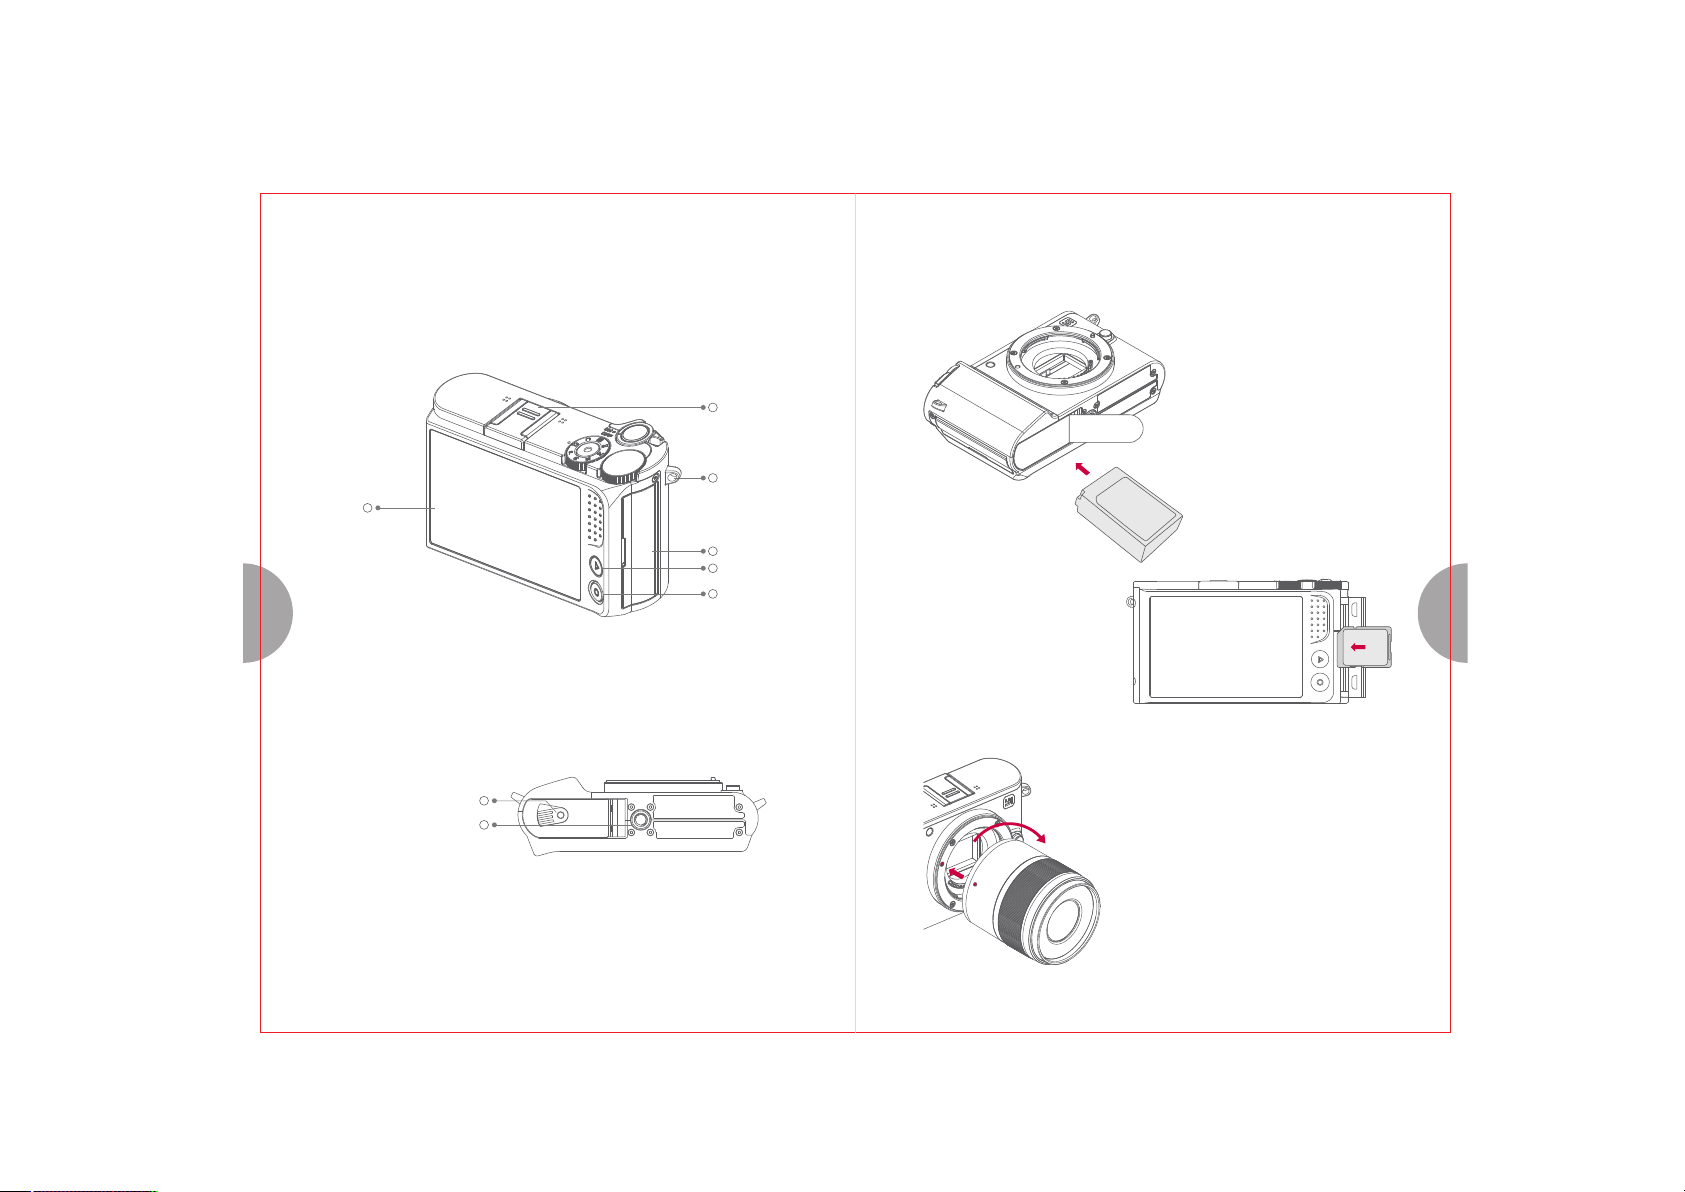
3. Getting Started
1. Inserting the Battery
10
Hot shoe
16
Strap eyelet
15
LCD Monitor
17
USB card Solt Cover
Playback button
18
Function button
19
3 4
(Q button)
2. Inserting the Memory Card
Turn the camera off and open the memory
card slot cover. Align the memory card with
the label to LCD monitor, then slide it in until
it clicks into place at the back of the slot. To
remove: press the card in until it unlocks and
release it slowly.
Gently slide the battery-chamber latch to open.
Insert the battery contacts first in the direction
shown by the arrow. Close the cover and latch
the chamber.
USB
Battery-Cham ber Latch
Tripod Mount
20
21
3. Attaching / Removing the lens
1) Attaching the lens
Align the lens attachment indicator (red) on the body with
the alignment indicator (red) on the lens, then insert the lens
into the camera's body.
Rotate the lens clockwise until you hear it click (direction
indicated by arrow).
Page 5
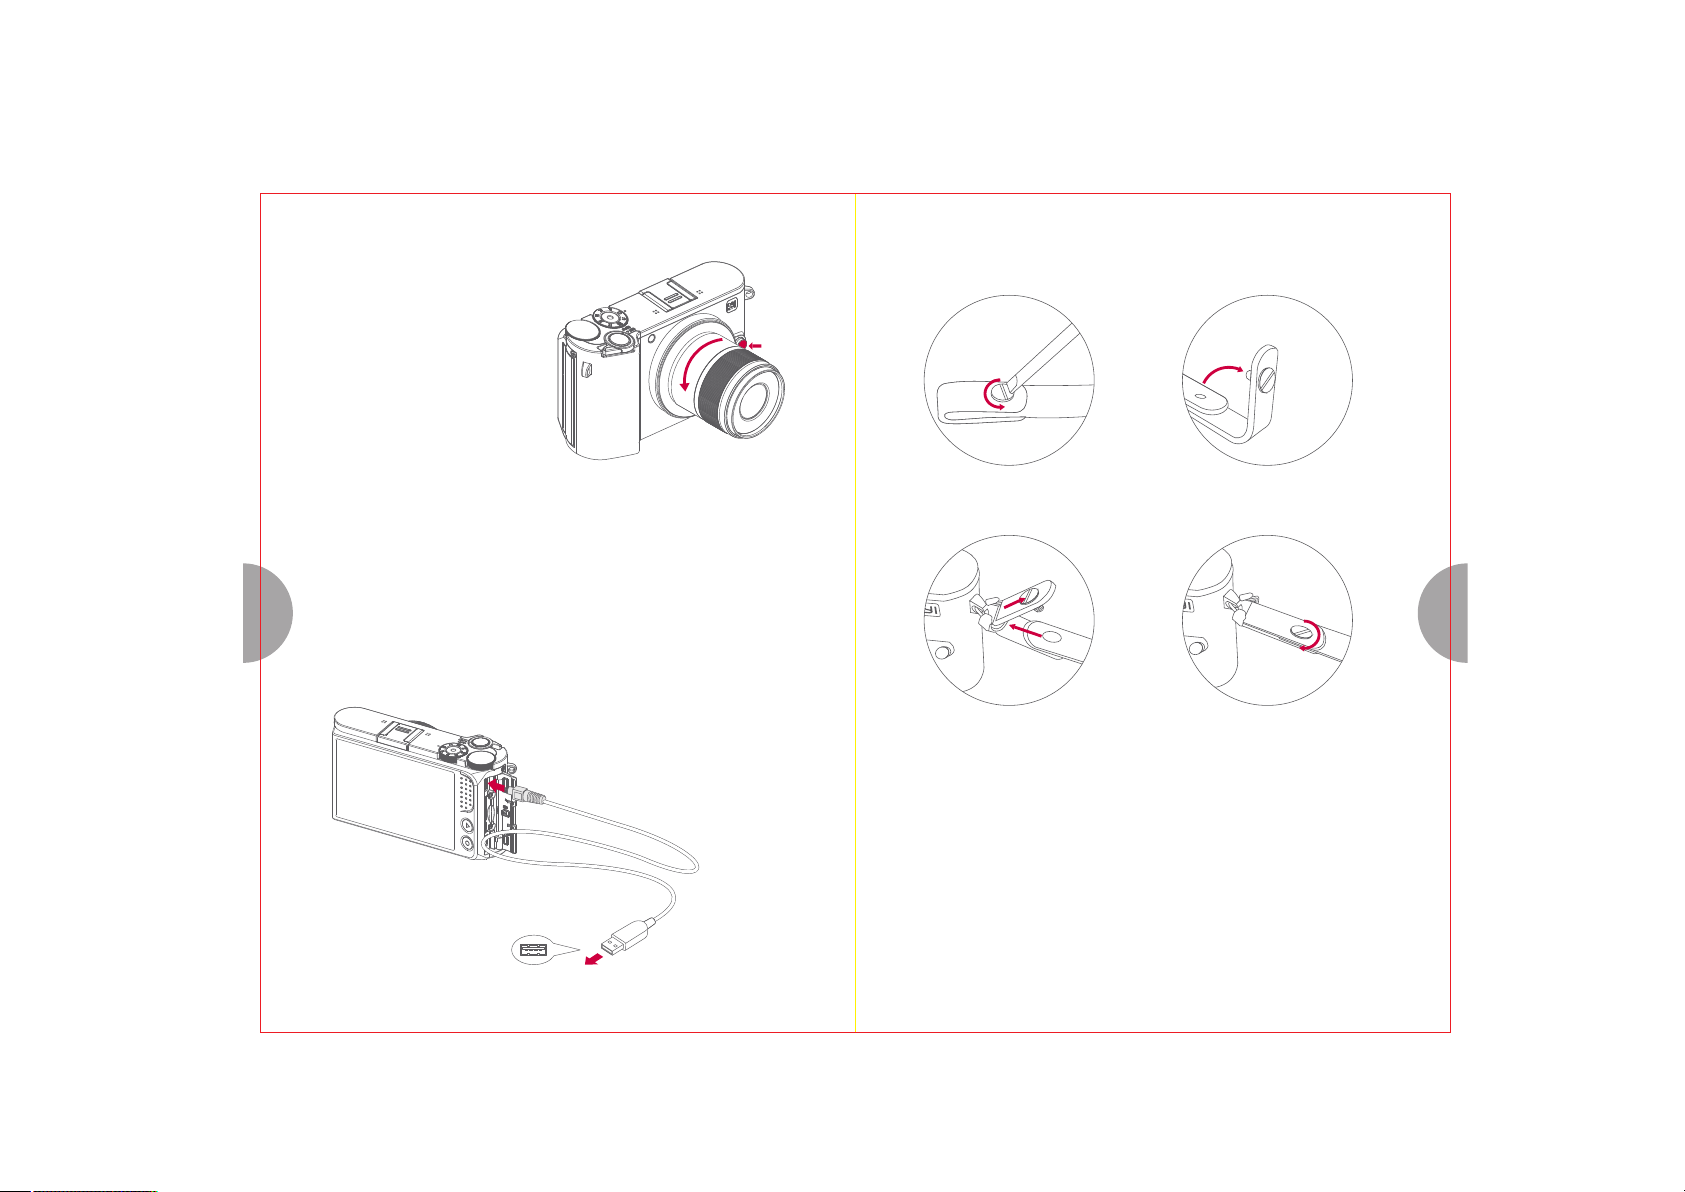
2) Removing the lens
1
Press the lens release button while rotating
the lens in the direction of the arrow.
5. Attaching the strap
1
2
Untighten the screw Insert one side of the strap go through
the eyelet.
4. Charging the Battery
You can use the USB cable to charge via adapter or PC. 5V/1A power adapter is recommended.
Charging via USB: takes about 3 hours for complete charge.
Charging with charger accessory: takes about 2.5 hours for complete charge.
Charging time depends on battery lifetime and environment conditions.
Also if the battery has not been used for a long time, it takes longer to charge.
NOTE: If nothing appears on the LCD monitor after connecting the camera to a computer, the battery may be out of
power. Please keep the camera connected to the computer until the battery has charged, then disconnect and
connect the camera again.
Tighten the screw to secure the strap
3 4
and leather pad
Once the screw is tightened and the strap
is placed, repeat the same steps with
65
the other side of the strap.
Page 6
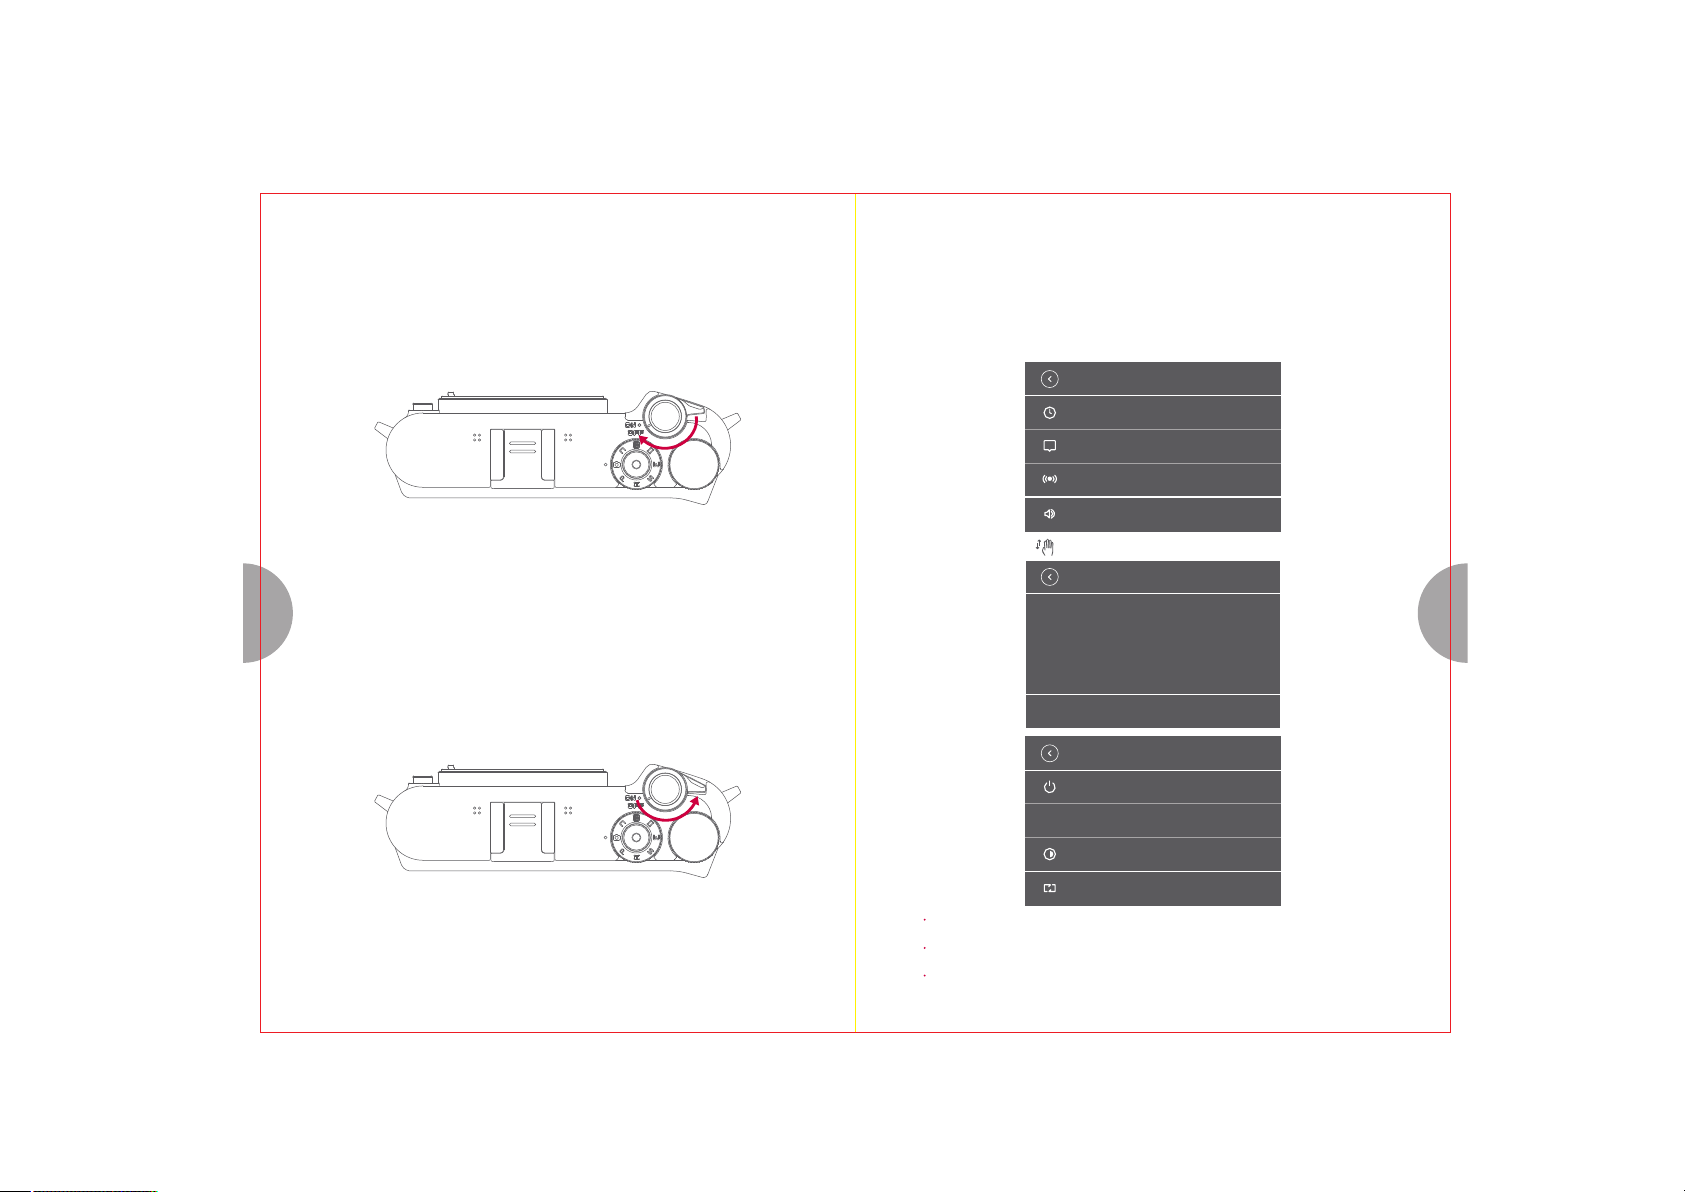
4. Powering the camera on and off
1. Powering on
Turn On/Off dial Clockwise.
5. Setting the Date and Time
Menu display
[Basic settings] [ Date and time]
- Swipe right on the LCD monitor - Find [Basic settings]
- Select [Basic settings] - Select [Date and time] sub-menu
Basic settings
Date and time
A
language
Shutter sound
System operation sound
Slide the screen up or down to adjust options.
Date an d time
< >Simplified Chinese
< ON >
< ON >
2. Powering off
Turn On/Off dial counter-clockwise.
2015
Date 2016 2
20171357
Add date watermark
Month Day
6
Time
14 3 3:
15: 35
16 35:
< OFF >
Basic settings
Auto power off: ON
Color space
RGB
Brightness adjustment
Restore default settings
You can adjust color space, screen brightness, or restore to default settings by configuring settings under
[Basic settings] menu.
Tap "Back" button on the upper-left hand corner of the LCD Monitor or half push the shutter to go back to
Live View screen.
You can also press the Q button to return to Live View screen.
< ON >
< sR GB >
< +2 >
87
Page 7
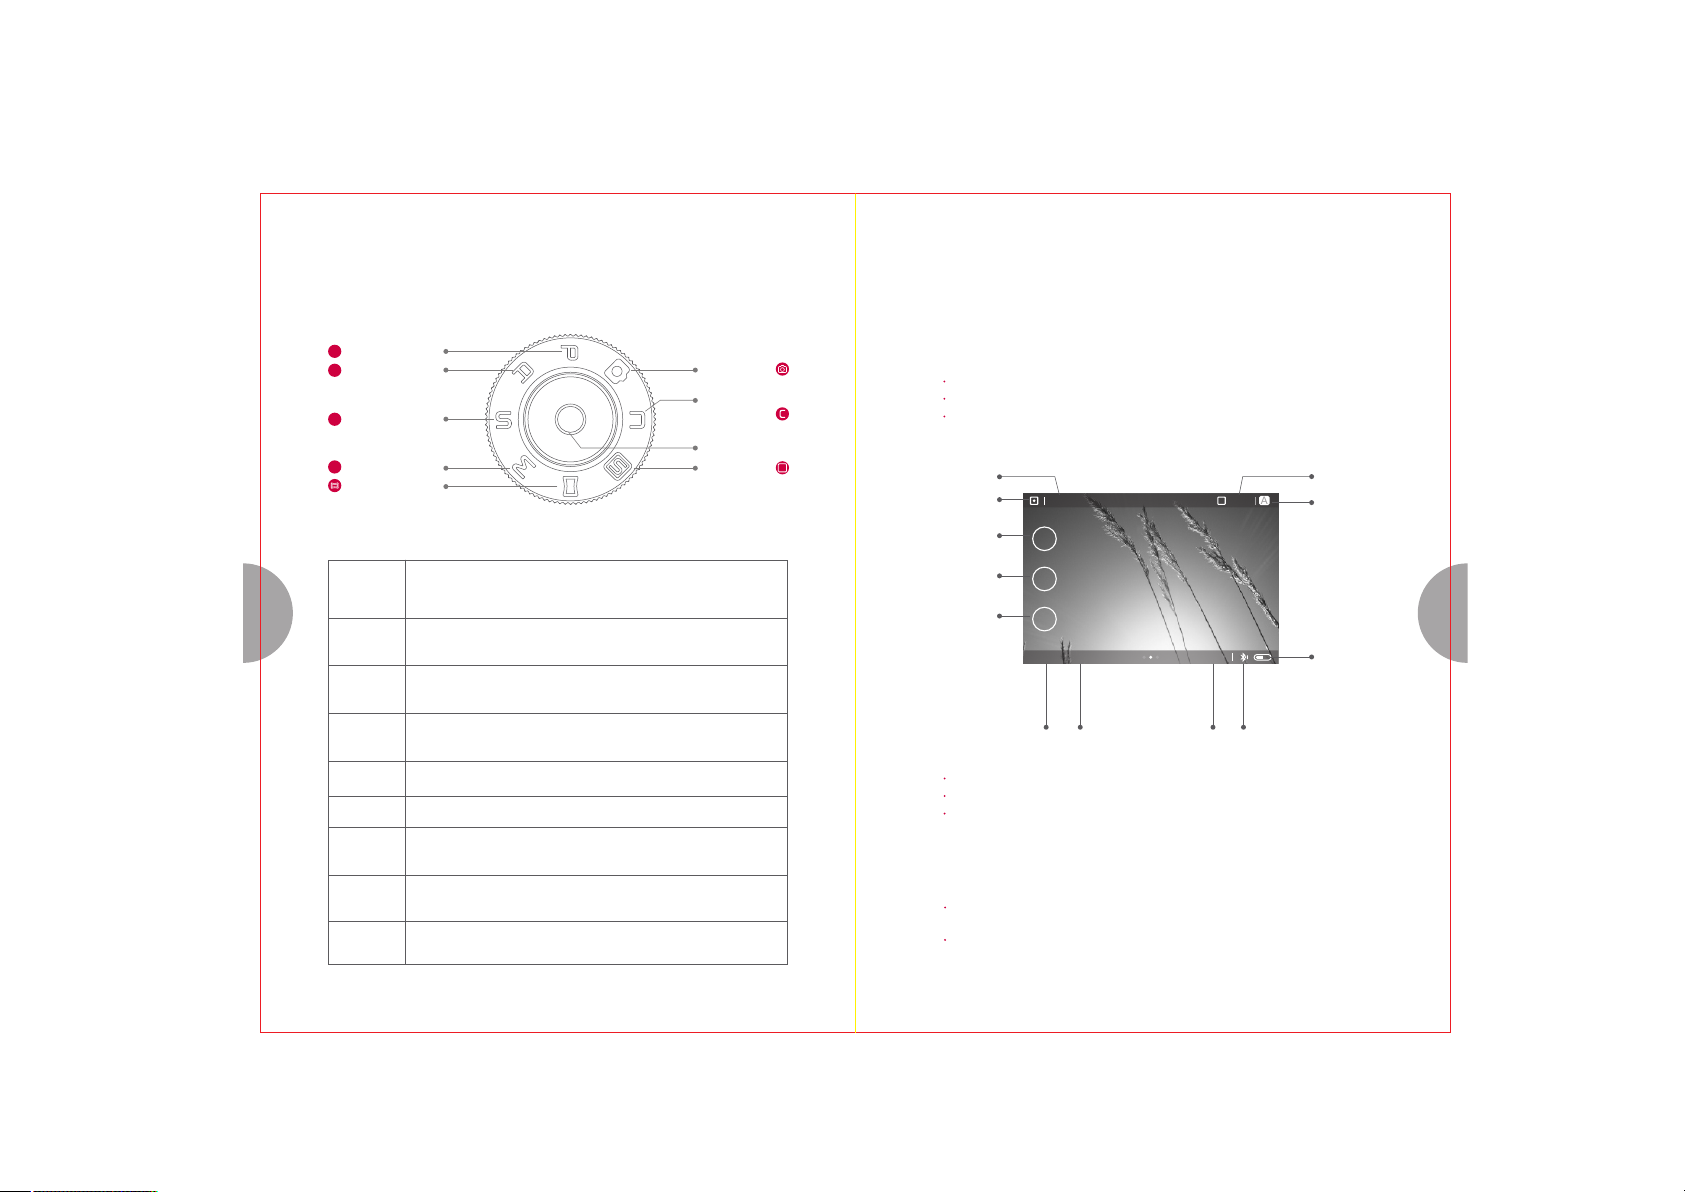
6. Select shooting mode
Program Mode
P
Aperture-priority
A
S
M
Mode
Shutter-priority
Mode
Manual Mode
Panorama Mode
Automatic
Mode
Master
Guide
Video Mode
SCE NE
7. Shoot Pictures / Record Videos
1. Shooting still pictures
1) Select a shooting mode.
2) Set up the camera and decide on the composition.
3) Adjust the focus and make sure the subject is clear:
Focus on the subject by touching the subject on the LCD monitor.
Tap Q button in Live View screen to change focus modes.
Press the shutter button halfway and a green frame (AF target) will be displayed in
the focus location.
S
ISO
Metering
modes
Aperture
F
ISO 100
2.8
S-AF
Focus modes
A
Exposure
modes
Automatic
Mode
9 10
Aperturepriority Mode
Shutterpriority Mode
Manual Mode
Panorama
Mode
Video
Master
Guide
SC EN E
Program
Mode
A fully automated mode in which the camera automatically configures
the best setting for the current scene. All you need to do is to push the
shutter button.
Select the aperture to control the depth of field, and let the camera
automatically adjust to the appropriate shutter speed.
Select the shutter speed in order to have different moving effects
or to make sure the clarity of the image.
Set the aperture, shutter speed, ISO and other shooting parameters
in order to have the free exposure control.
Shoot with wide-angle images using this mode.
Record videos.
Download composition templates from YI Mirrorless App to create
high-quality images just as you are having a master by your side
Select a scene that goes well with the current
shooting environment to achieve professional level results.
Camera automatically sets the
optimum aperture and shutter speed for best results.
Shutter
Exposure
compensation
White balance
S
EV
AWB 20M
4000
+1.0
File size
1999
Remaining shots
Wireless connection status
Aperture: Rotate the control dial set the aperture in mode A.
Shutter: Rotate the control dial to select shutter speed in mode S.
Exposure compensation: Press the exposure compensation button, then rotate the
control dial to set the compensation value.
4) Press the shutter button all the way down to take a picture.
When the LCD Monitor enabled, tap directly on the subject
in the Live View screen to focus and shoot.
After shooting, the image will be displayed on the LCD Monitor.
(display time is depends on the time you set in [Auto Playback])
Power
Page 8
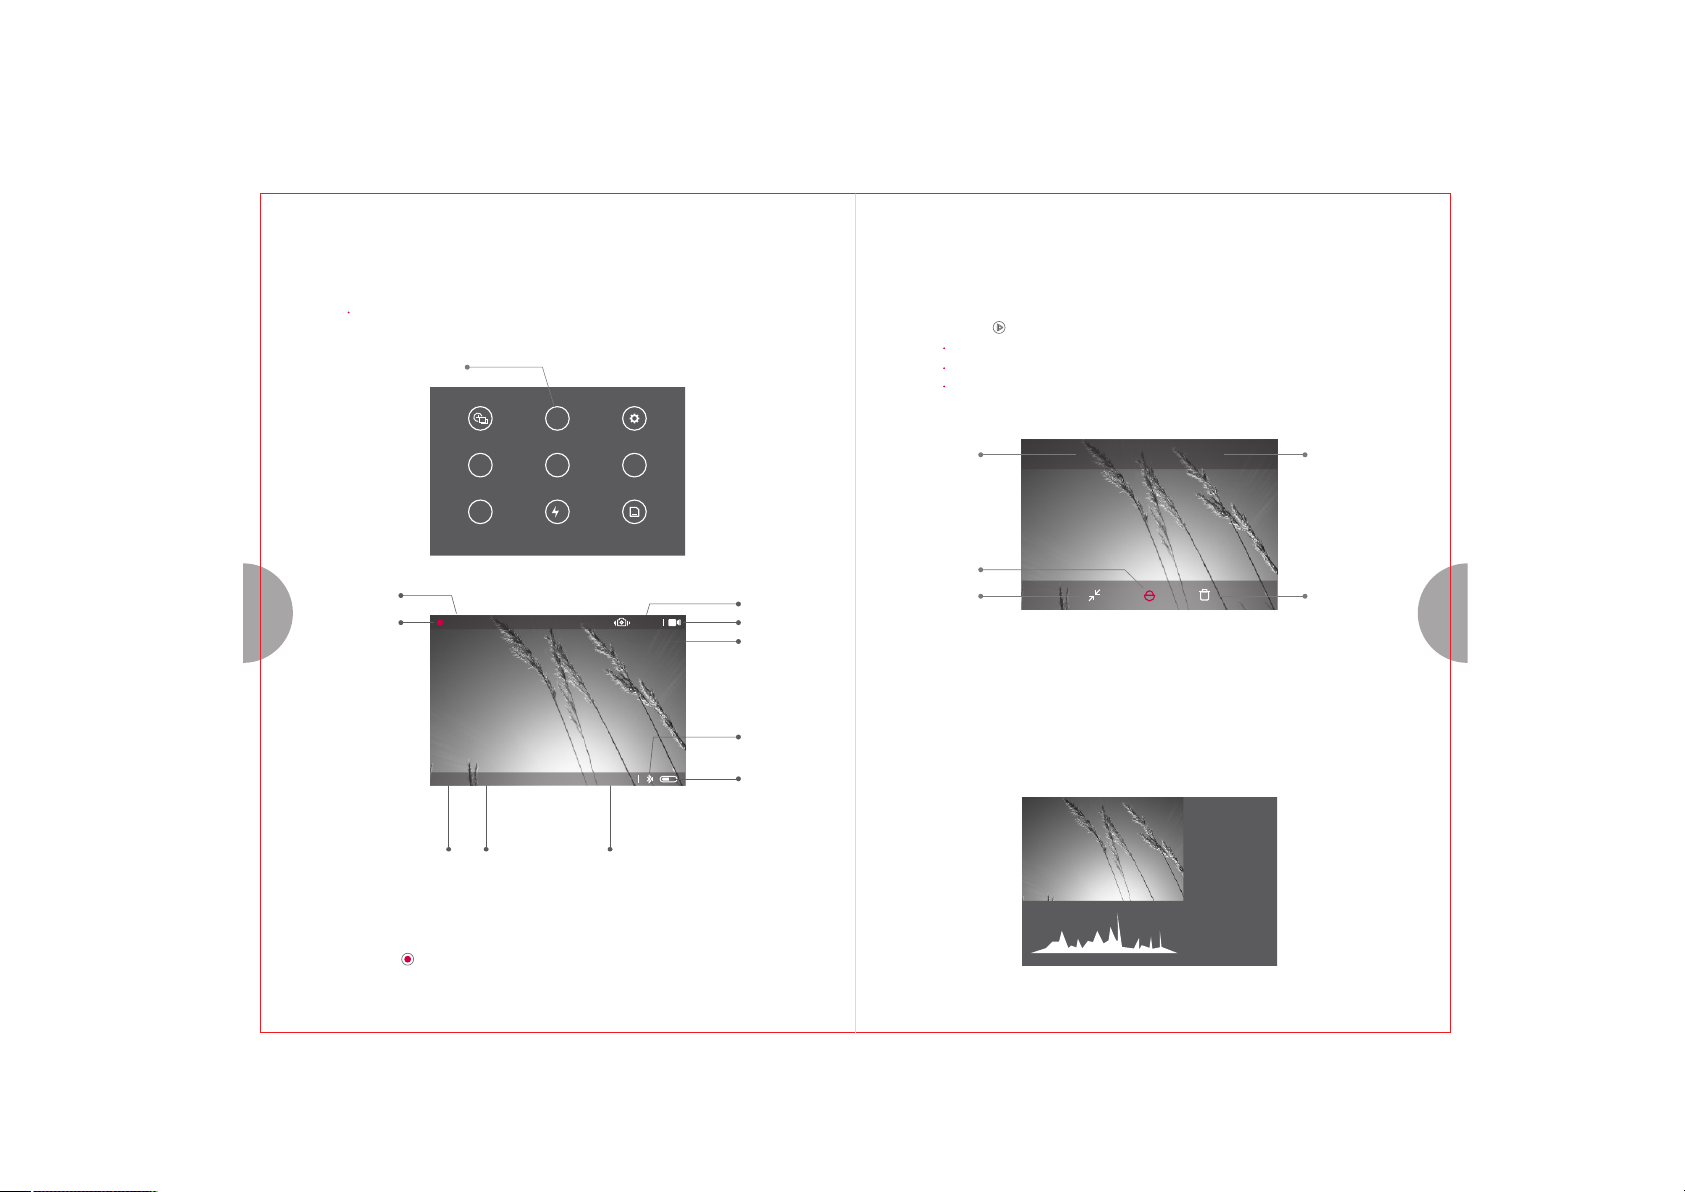
2. Record videos
1) During the display of Live View screen, select the video button on the mode dial to record video.
Set the parameters to your preference with [Video Setting] in advanced.
8. Image/Video Playback
1. View/edit still pictures
1) Press the button to view/edit pictures/videos.
The last captured image/video will be displayed.
Video Settings
Slide the screen left or right to switch in between pictures and videos.
Long press (about 0.5s) image to enter editing interface. Tap again to exit single
4K
Time Lapse
BKT
AE/WB Bracketing
Video Settings
RAW
File Format
16M
Image Quality
Recording
11 12
Time
Recording
Status
00:00:00
Flash Mode
Basic Settings
4:3
Image Aspect
A
Card Setup
C-AF
Focus Mode
Video Mode
Electronic
Image
Stabilization
viewing mode.
Color to
B&W
Locking
Resize
Color WEB RAW JPEG
RAW format to
JPEG format
Delete
AWB 1080P
White Balance
Video Resolution Remaining Recording Time
2) Press the button again to end recording.
00:00
Wi-Fi Status
Power
2. Information display/index display
Rotate control dial counter-clockwise to alternate between detailed info and index display.
Mode:
M
Metering:
Center
F5.6
Aperture:
Shutter:
1/250s
EV:
0.0
ISO: 100
200
Focus Mode:
S-AF
Focal length:
43mm
WB: Auto
Sunny
Color Space:
AdobeRGB
Size:
5184×3888
2015/12/15
15:48:14
200/1200 | P8160132.JPG
Page 9
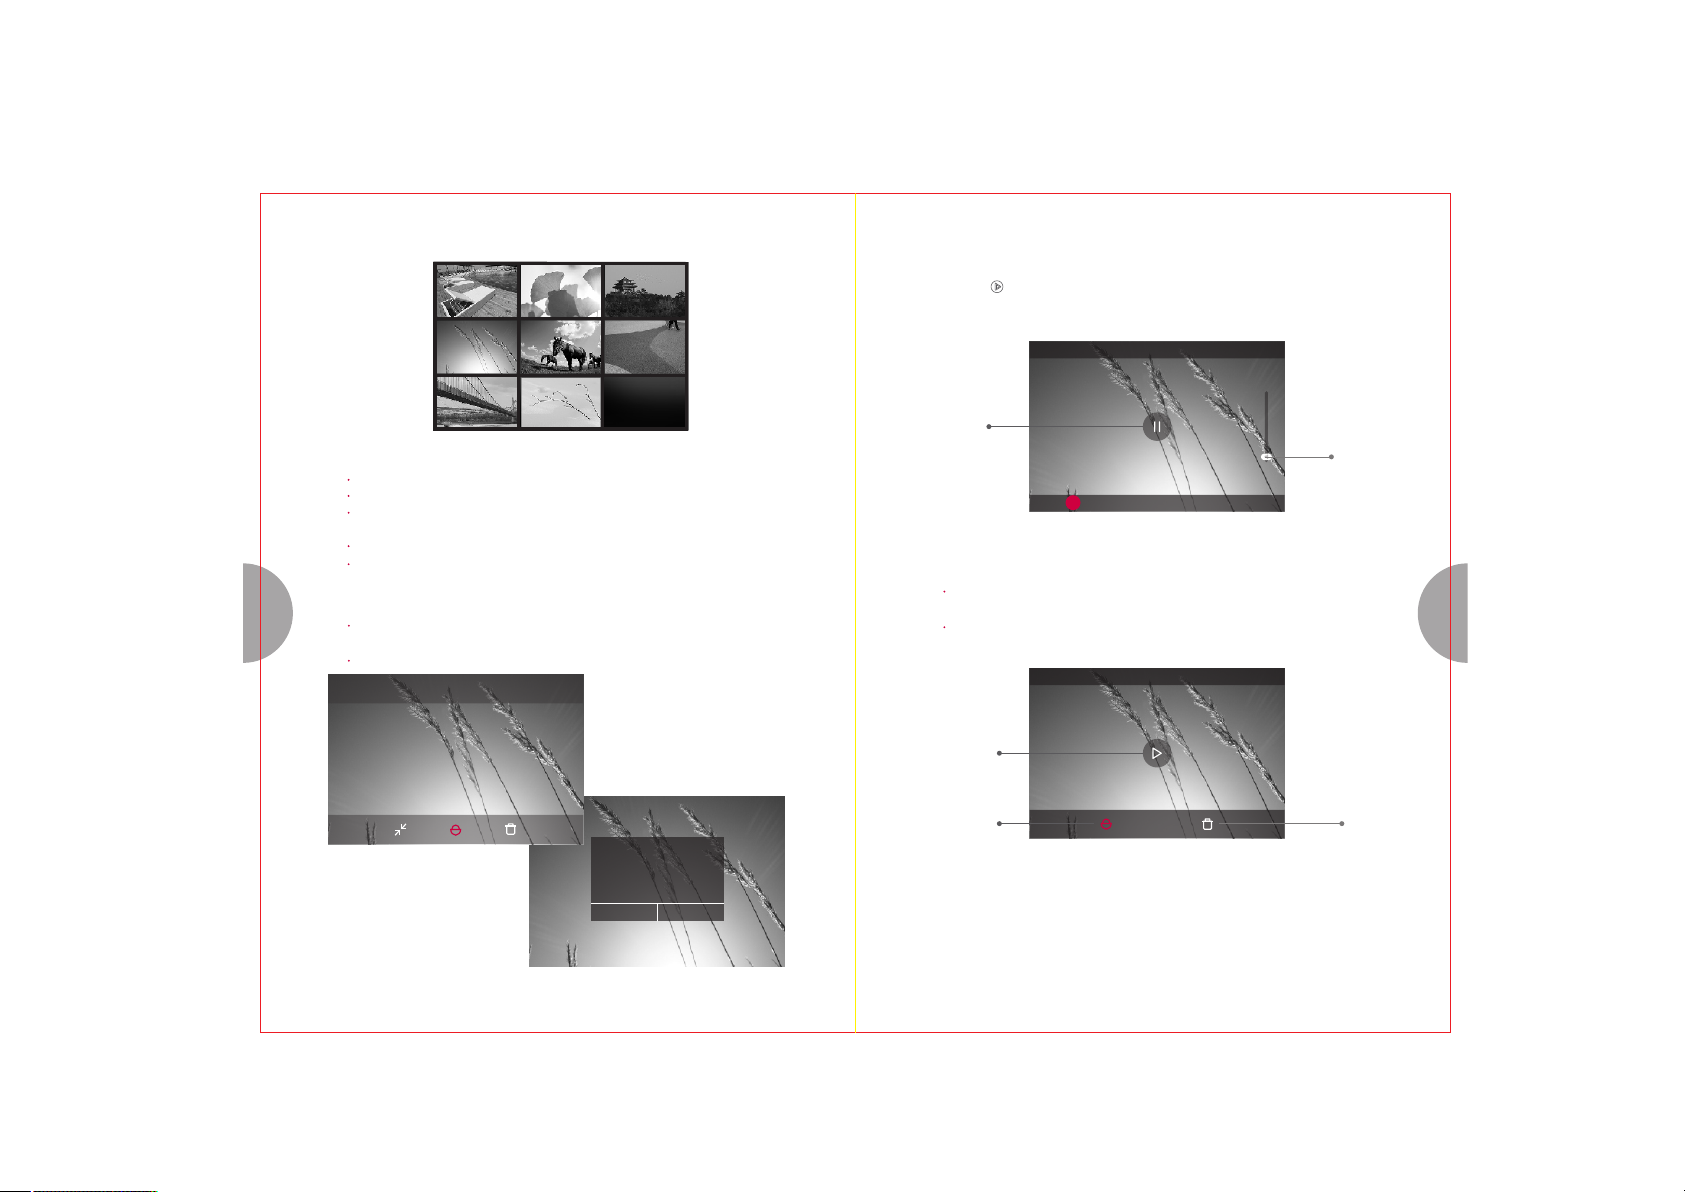
5. Watching videos
1) Press the button to watch videos. You can press the playback button to pause, drag the
slider to fast forward or backward, or drag the volume slider to adjust the volume.
00:00:00
Pause
3. Enlarged view
Volume
In playback mode, turn the control dial clockwise to enlarge the view.
Double-click screen to enlarge the image 2x.
The default enlarge setting can be configured to 2x-10x in advanced. Tap on Q
button in Enlarged view to delete the picture.
Zooming with gesture on the image is supported in single viewing mode/enlarged mode.
In Enlarged viewing mode, single tap on the LCD Monitor to return to Single viewing
mode.
13 14
4. Deleting images
While in picture editing mode, you can tap on the Delete button at the bottom of the
LCD Moniter to delete the picture.
Tap“Delete”o n the bottom of the LCD monitor to delete the picture.
Color > WEB RAW > JPEG
2) Deleting videos
When playing a video, Long press (about 0.5s) on any blank area of the screen to display
video edit menu, and tap on Delete icon to erase the video.
Or Press the Q button to delete the video.
00:48:15
Play
Delete the Picture?
CancelConfirm
Lock
Erase
Page 10
9. Connect YI Mirrorless App to YI-M1 Mirrorless Digital Camera
CAUTION:
To avoid fire or shock hazards, do not disassemble the camera,
expose it to water or high-humidity environment.
You can download the YI Mirrorless App from the App Store or Google Play.
R
You can also scan the QR code to download YI Mirrorless App.
You can download photos, upload Master Guide templates to the camera, and update
firmware through the App once it has been paired to your phone.
General precautions: Before you use the product, please read the instructions
1. How to connect YI-M1 Mirrorless Digital Camera to YI Mirrorless App (Android), only
15 16
necessary one time:
A. Insert the micro SD card into the camera and power on;
B. Enable the phone’s Bluetooth and Wi-Fi, then open App to pair the camera Bluetooth to your phone
for the first time;
C. On the App connection page, follow the prompt to pair the camera Bluetooth;
D. After the Bluetooth pairing is successful, follow the prompt to connect the camera Wi-Fi, once the
connection is complete, you can view the camera album.
2. How to connect YI-M1 Mirrorless Digital Camera to YI Mirrorless App (iOS), only necessary
one time:
A. Insert the micro SD card into the camera and power on;
B. Enable the phone’s Bluetooth and Wi-Fi, then open App to pair the camera Bluetooth to your phone
for the first time;
C. On the App connection page, follow the prompt to pair the camera Bluetooth;
D. After the Bluetooth pairing is successful, follow the prompt to connect the camera Wi-Fi. Select the
camera Wi-Fi network (Wi-Fi network name: YI_M1_xxxxxx) under system settings, then press and
hold the password input box to select [ Paste] and press [Join]. Wait for the Wi-Fi network to
automatically connect. Return to the YI Mirrorless App, once the connection is complete, you can view
the camera album.
thoroughly and keep this well for future reference.
Cleaning--Always unplug this product from the wall outlet before cleaning. Use only a damp
cloth for cleaning. Never use any type of liquid, aerosol cleaner or any type of organic solvent
to chean this product.
Accessories--For your safety, and to avoid product damage, use only accessories
recommended by YI.
Humidity--To avoid the product being damaged by high humidity, it is advised to place this
product in de-humidifing storage. Humidity--To avoid the product damage due to high humidity,
it is advised to place this product in dehumidifing storage.
Location--To avoid damage to the product, mount the product securely on a stable tripod,
stand , or bracket. Location--To avoid product damage, mount the product securely on a
stable tripod, stand , or bracket.
Power Source--Please only use the batteries indicated by the label on this product.
Foreign Objects--To avoid injuries, never insert any metal object into the product.
Heat--Never use or store this product near any heated source such as hair dryer, oven,
heater or any type of equipments or appliances that generate heat, including power amplifiers.
Page 11

10. Safety precautions
1.Handling the camera
1) Do not use the camera near flammable or explosive gases.
2) Do not use or store the camera in dusty or humid environments.
3) Do not point the flash and LED (including AF illuminator) to people (infants, children, etc.)
at close range.
4) Always use and store the camera out of the reach of children and infants to prevent
the following dangerous situations which could cause serious injury;
Accidentally entangled by the camera strap may cause suffocation;
Accidentally swallowing the battery, cards or other small parts;
Accidentally firing the flash into their own eyes or those of another child;
Accidentally point the flash to the eyes of other children.
5) Do not look at the sun or strong light through the camera.
6) Do not cover the flash with your hand.
7) Use SD/SDHC/SDXC memory cards only. Never use other types of cards.
If you accidently insert another type of card into the camera,contact an authorized
distributor or service center. Do not try to remove the card by force.
8) Do not remove the battery with the power on, it may cause fire or burning of your hands.
17 18
9) Do not operate camera with wet hands.
10) Do not leave the camera in extremely high-temperature environments. Doing so may cause
parts to deteriorate and in some circumstances, cause the camera to catch fire.
11) Covering the camera (with a blanket for instance) may lead to overheating and cause fire.
11. Wireless functions
1. Frequency: 2.412-2.462 GHz
Equivalent isotropic radiated power: Antenna gain<10dBi≤100mW or≤20dBm
Maximum power spectral density: Antenna gain<10dBi≤10dBm/MHz(EIRP) Carrier
frequency tolerance: 20ppm
Band emission power: (outside 2.412-2.462 GHz band) ≤-80dBm/Hz(EIRP)spurious emission
(radiation) power(Corresponding to a carrier other than ± 2.5 times the channel bandwidth)≤
-36dBm/100kHz(30-1000MHz)≤-33dBm/100kHz(2.412-2.462 GHz)≤-40dBm/1MHz
(other 1-12.75GHz)
2. Do not use external antennas or other transmitting antennas.
3. Please stop using the camera immediately if you notice that you are interfering
with other legal radio communications. You should take measures to remove the
intereference before you use the camera again.
4. Please be advised that the radio waves coming from the camera may interefere
with other industrial/ scientific/ medical equipments.
5. Please do not use the camera on an airplane or at the airport.
Page 12

19
This device complies with Part 15 of the FCC Rules / Industry Canada licence-exempt RSS standard(s). Operation is
subject to the following two conditions: (1) this device may not cause harmful interference, and (2) this device must accept
any interference received, including interference that may cause undesired operation.
Le présent appareil est conforme aux CNR d'Industrie Canada applicables auxappareils radio exempts de licence.
L'exploitation est autorisée aux deux conditions suivantes : (1) l'appareil ne doit pas produire de brouillage, et (2) l'utilisateur
de l'appareil doit accepter tout brouillage radioélectrique subi, même si le brouillage est susceptible d'en compromettre le
fonctionnement.
Changes or modifications not expressly approved by the party responsible for compliance could void the
user's authority to operate the equipment.
This equipment has been tested and found to comply with the limits for a Class B digital device, pursuant to part
15 of the FCC Rules. These limits are designed to provide reasonable protection against harmful interference
in a residential installation. This equipment generates uses and can radiate radio frequency energy and, if not
installed and used in accordance with the instructions, may cause harmful interference to radio communications.
However, there is no guarantee that interference will not occur in a particular installation. If this equipment does
cause harmful interference to radio or television reception, which can be determined by turning the equipment
off and on, the user is encouraged to try to correct the interference by one or more of the following measures:
Reorien t or relocate the receiving antenna.
Increas e the separat ion between th e equipment a nd receiver.
Connect the equipmen t into an outle t on a circuit different fro m that to whic h the receiver is connected.
Consult the dealer or an experience d radio/TV te chnician for h elp.
Under Industry Canada regulations, this radio transmitter may only operate using an antenna of a type and maximum (or
lesser) gain approved for the transmitter by Industry Canada. To reduce potential radio interference to other users, the
antenna type and its gain should be so chosen that the equivalent isotropically radiated power (e.i.r.p.) is not more than
that necessary for successful communication.
Conformément à la réglementation d'Industrie Canada, le présent émetteur radio
d'un type et d'un gain maximal (ou inférieur) approuvé
risques de brouillage
sorte que la puissance isotrope rayonnée équivalente (p.i.r.e.) ne dépasse pas
d'une communication satisfaisante.
MPE Requirements
To satisfy FCC / IC RF exposure requirements, a separation distance of 20 cm or more should be maintained between the
antenna of this device and persons during device operation.To ensure compliance, operations at closer than this distance is
not recommended.
Les antennes installées doivent être situées de facon à ce que la population ne puissey être exposée à une distance
de moin de 20 cm. Installer les antennes de facon à ceque le personnel ne puisse approcher à 20 cm ou moins de la
position centrale de l’antenne. La FCC des éltats-unis stipule que cet appareil doit être en tout temps éloigné d’au
moins 20 cm des personnes pendant son functionnement.
radioélectriqueà l 'intention des autres utilisateurs, il faut choisir le type d'antenne et son gain de
pour lé' metteur par Industrie Canada. Dans le but de réduire les
peut fonctionner avec une antenne
l'intensité nécessaire à l'établissement
 Loading...