

Page 1

YI HALO User Manual
Disclaimer ........................................................................................................................................... 2
Copyright Notice ................................................................................................................................ 2
Trademark Acknowledgement ......................................................................................................... 2
Safety Instructions ............................................................................................................................. 2
1. Introduction .................................................................................................................................... 3
1.1 Overview .................................................................................................................................. 3
1.2 Getting to Know the Camera ................................................................................................. 3
1.3 Package Contents .................................................................................................................. 5
2. Getting Started............................................................................................................................... 5
2.1 Inserting Memory Cards ........................................................................................................ 5
2.2 Supplying Power ................................................................................................................... 10
2.3 Mounting YI HALO ................................................................................................................ 15
2.4 Turning YI HALO ON/OFF................................................................................................... 16
2.5 Auto Check ............................................................................................................................ 17
2.6 Camera Status Screen ......................................................................................................... 18
2.7 Replacing the Cameras ....................................................................................................... 18
3. Camera Menus ............................................................................................................................ 24
3.1 Wi-Fi Setup ............................................................................................................................ 25
3.2 Select Camera Mode ............................................................................................................ 26
3.3 Image Quality Settings ......................................................................................................... 28
3.4 System Settings .................................................................................................................... 34
3.5 Sync Settings ......................................................................................................................... 37
4. Recording ..................................................................................................................................... 38
4.1 Preparing to Record ............................................................................................................. 38
4.2 Preview ................................................................................................................................... 38
4.3 Start Recording ..................................................................................................................... 42
4.4 Indicators Displayed during Recording .............................................................................. 42
4.5 Exporting Files to a Computer ............................................................................................ 43
5. Remote Control ........................................................................................................................... 46
5.1 YI HALO App for Android Phone ........................................................................................ 46
5.2 Bluetooth Remote ................................................................................................................. 48
6. Additional Information ................................................................................................................. 50
6.1 Troubleshooting .................................................................................................................... 50
6.2 Logs and Submit Feedback Via the App ........................................................................... 55
6.3 Customer Support ................................................................................................................. 56
6.4 Technical Specifications ...................................................................................................... 56
Page 2

Disclaimer
The information in this document is subject to change without notice. YI
Technology reserves the right to revise this document and to make changes
from time to time in the content hereof without obligation to notify any person
of such revisions or changes. YI Technology will not be responsible for issues
arising from typographical errors or users’ interpretations of the language
used herein which may be different from that intended by YI Technology.
Copyright Notice
COPYRIGHT ©2017 YI Technologies, Inc.
All trademarks, trade names, logos, icons, images, written material, code, and
product names used in association with the accompanying product are the
copyrights, trademarks or other intellectual property owned and controlled
exclusively by YI Technologies, Inc.
Trademark Acknowledgement
All other company, brand and product names are trademarks or registered
trademarks of their respective holders. YI Technology has no affiliation to, is
not associated or sponsored with, and has no express rights in third-party
trademarks.
Safety Instructions
To prevent damage to YI HALO Camera or injury to yourself or others, please
carefully read the following safety precautions before using this device.
WARNINGS
1. Do not use YI HALO near water.
This product is not waterproof, or water resistant so contact with water
could result in permanent damage to the product as well as electric shock
and injury to people. If the camera or accessories are exposed to
moisture, please immediately disconnect the power supply.
2. Only use a dry cloth to clean. Do not rinse or immerse any element of the
camera. Do not use soaps, detergents, ammonia, alkaline cleaners,
bleach and/or abrasive cleaning compounds or solvents as these
substances may damage electronic circuity.
3. Avoid exposure to excessive vibration.
Be careful when carrying or moving this product. Do not drop. The internal
mechanism is likely to be damaged by severe shock.
Page 3

4. Maintain sufficient ventilation.
Do not block any ventilation openings.
5. Do not operate or store near any heat source.
Keep this product away from heat sources like radiators, heat registers,
stoves, or any other apparatus that produce heat. Remove any batteries
before storage. Avoid storing in places under extreme temperature, severe
vibration, strong magnetic fields, direct sunlight, damp areas and heat
sources.
Recommended operation temperature for YI HALO:
- Operating range: 0℃~35℃, 32°F ~95°F
6. Handle the battery carefully.
● Only use batteries approved for use in this product.
● Do not disassemble the battery. Do not expose the battery to flame or
excessive heat.
● Do not use near or expose the battery to any chemicals.
● Keep the battery dry.
● Do not handle the battery if it is damaged or leaking. Battery disposal
must be in accordance with local environmental regulations.
● Do not charge the YI internal battery with anything except the included
AC Adapter.
● Storing the battery fully charged or in very high or cold temperature
conditions may reduce the battery life.
7. It is recommended to be used at least 20cm/8 inches away from the user.
1. Introduction
1.1 Overview
Thank you for using YI HALO - the newest Google Jump stereoscopic 360 VR
Camera, built by YI. This manual is intended to help you get the most of this
camera. Please read it thoroughly and keep it for further use.
1.2 Getting to Know the Camera
YI HALO consists of 17 hardware clock synchronized unit cameras (including
1 up view camera) and 1 controller. Controller refers to the camera on the
side of YI HALO that is used to control all cameras for these functions:
● Displays all unit cameras’ status
● Connects to the mobile phone or the Bluetooth remote so that all cameras
can be controlled remotely
● Synchronizes the settings among all cameras
Page 4
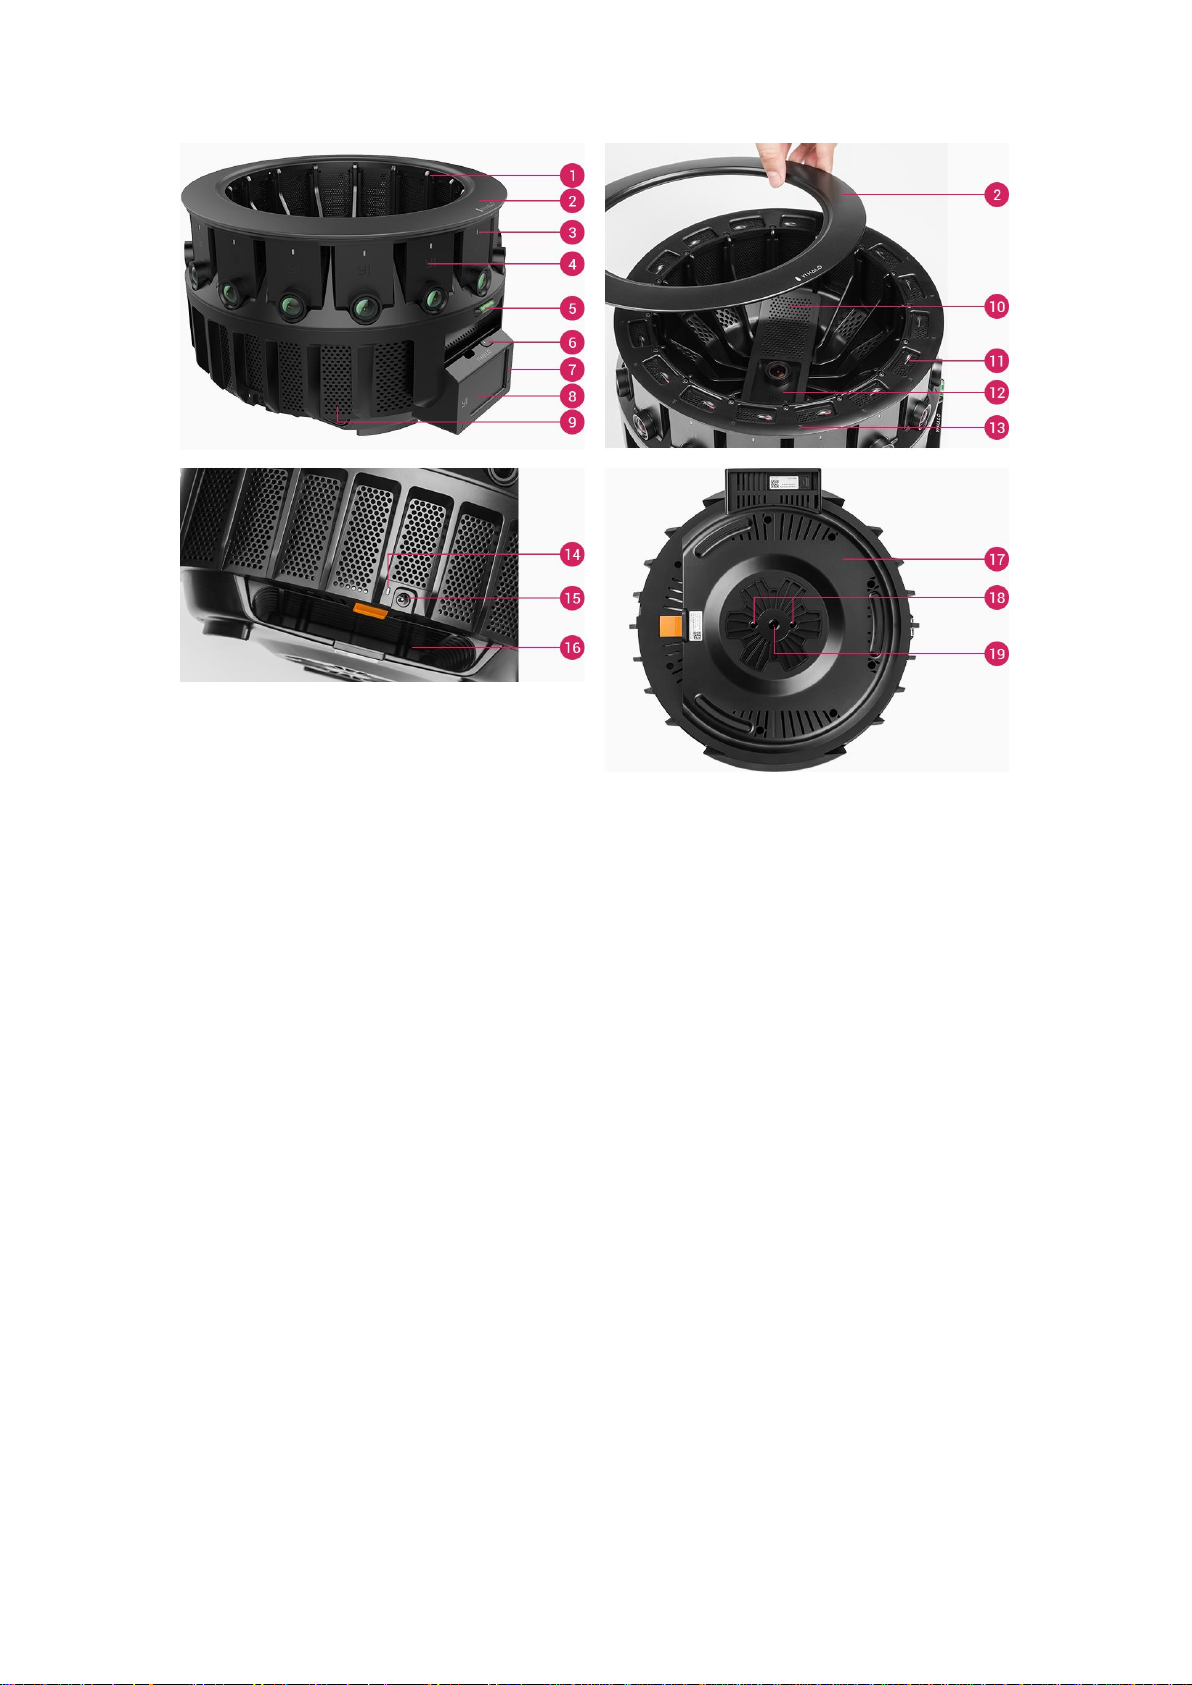
1. Frame
2. Removable top cover
3. Status light
4. Unit camera
5. Bubble level
6. Shutter/Power button
7. Controller cover
8. Controller
9. Ventilation openings
10. Up camera panel
11. MicroSD card slot
12. Up camera
13. Position indicator (Camera ID)
14. Power light
15. Power terminal
16. Battery compartment
17. Bottom panel
18. 1/4 Tripod socket
19. 3/8 Tripod socket
Page 5
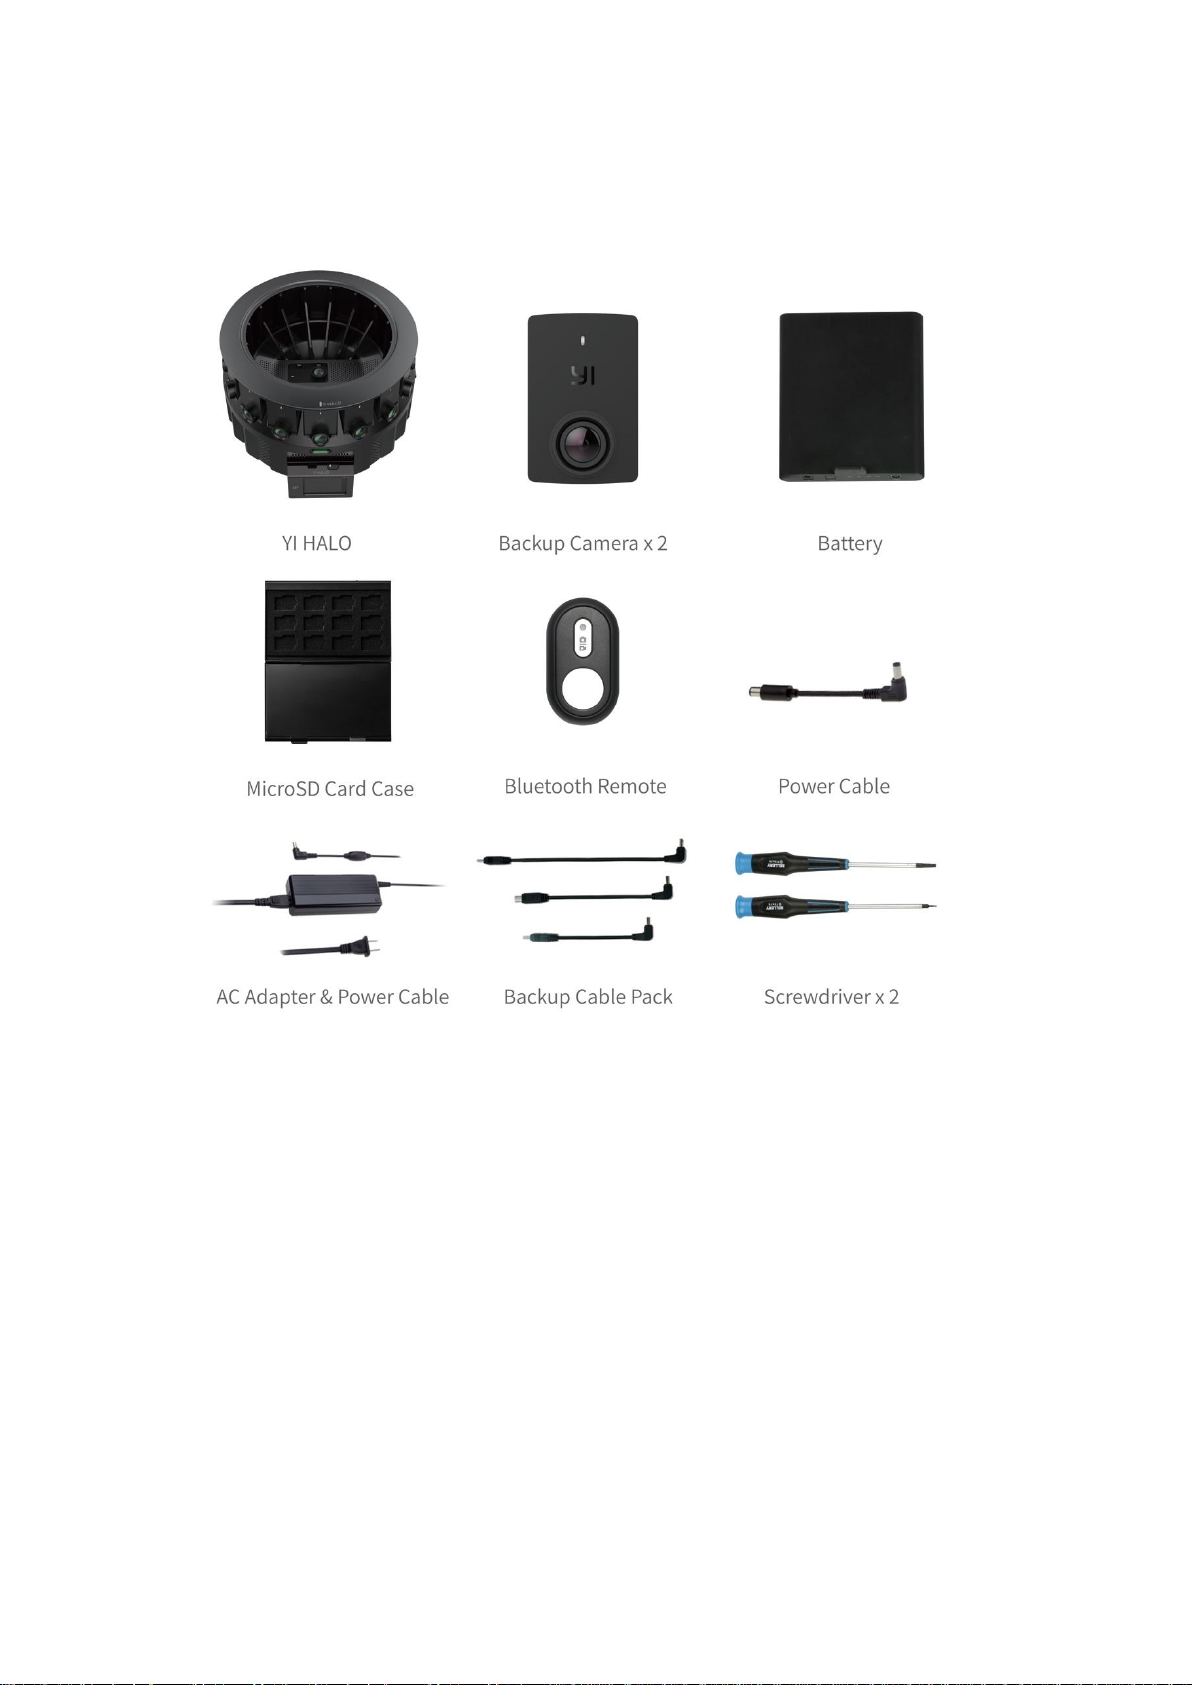
1.3 Package Contents
2. Getting Started
YI HALO ships with all cameras pre-installed.
2.1 Inserting Memory Cards
YI HALO does not ship with microSD cards. The first time you use it you need
to insert a microSD card that is formatted to exFat format into each camera.
MicroSD cards formatted to Fat32 format on a Mac computer is also
supported, but only Master Boot Record (MBR) partitions will work in the
camera. The cards listed below are highly recommended:
Page 6
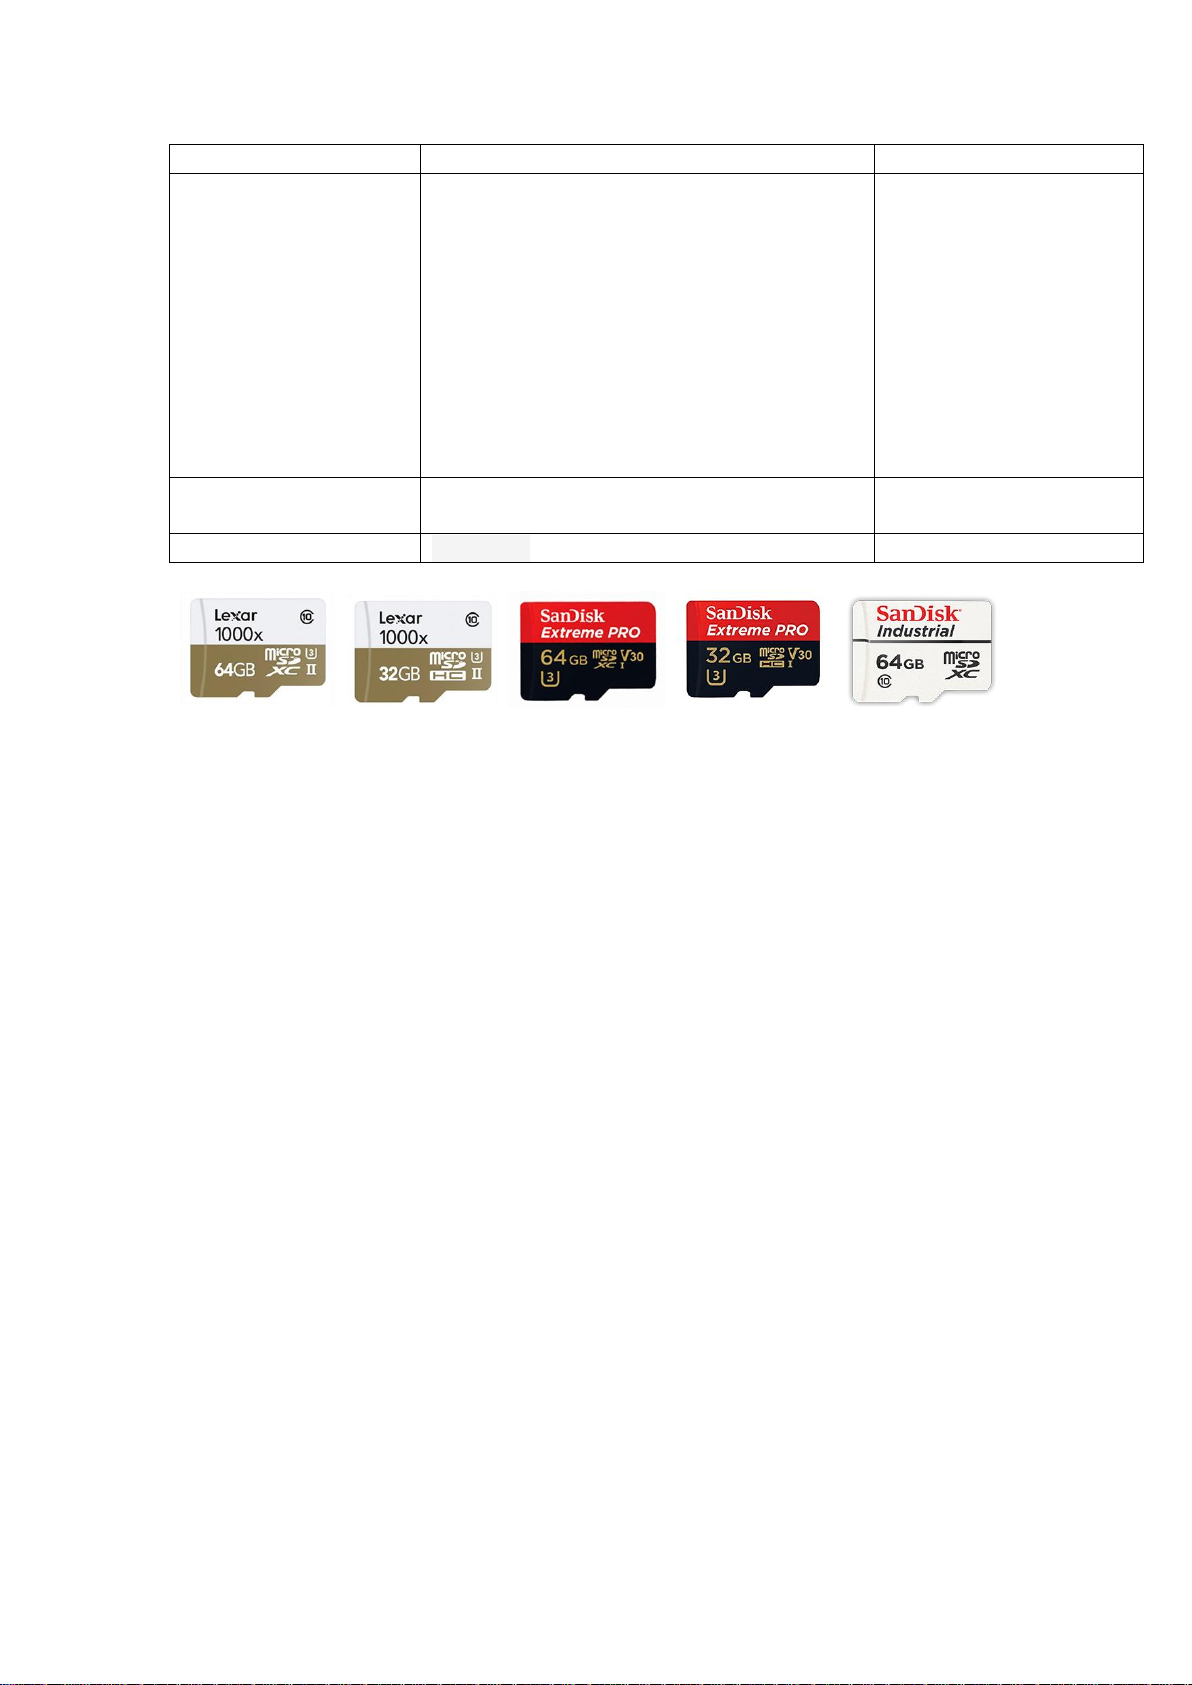
MicroSD card Brand
MicroSD card Type
MicroSD card Volume
Lexar
1000x U3
(LSDMI64GCBNL1000R
LSDMI32GCBNL1000R
LSDMI64GCBAS1000R
LSDMI32GCBAS1000R
LSDMI64GCBEU1000R
LSDMI32GCBEU1000R
LSDMI64GCBANZ1000R
LSDMI32GCBANZ1000R
LSDMI64GCBJP1000R
LSDMI32GCBJP1000R)
64GB/32GB
Sandisk
Extreme Pro U3 V30(SDSQXXG-064GGN6MA or SDSQXXG-032G-GN6MA)
64GB/32GB
Sandisk
Industrial
64GB
Note:
It is recommended to power off YI HALO first before inserting/removing the
microSD cards. Hot inserting/removing the microSD cards may cause
recognition issue or unintended consequences to the microSD cards.
1. Ring Cameras
Remove the top cover, insert the microSD cards into their counterparts
from above.
Page 7
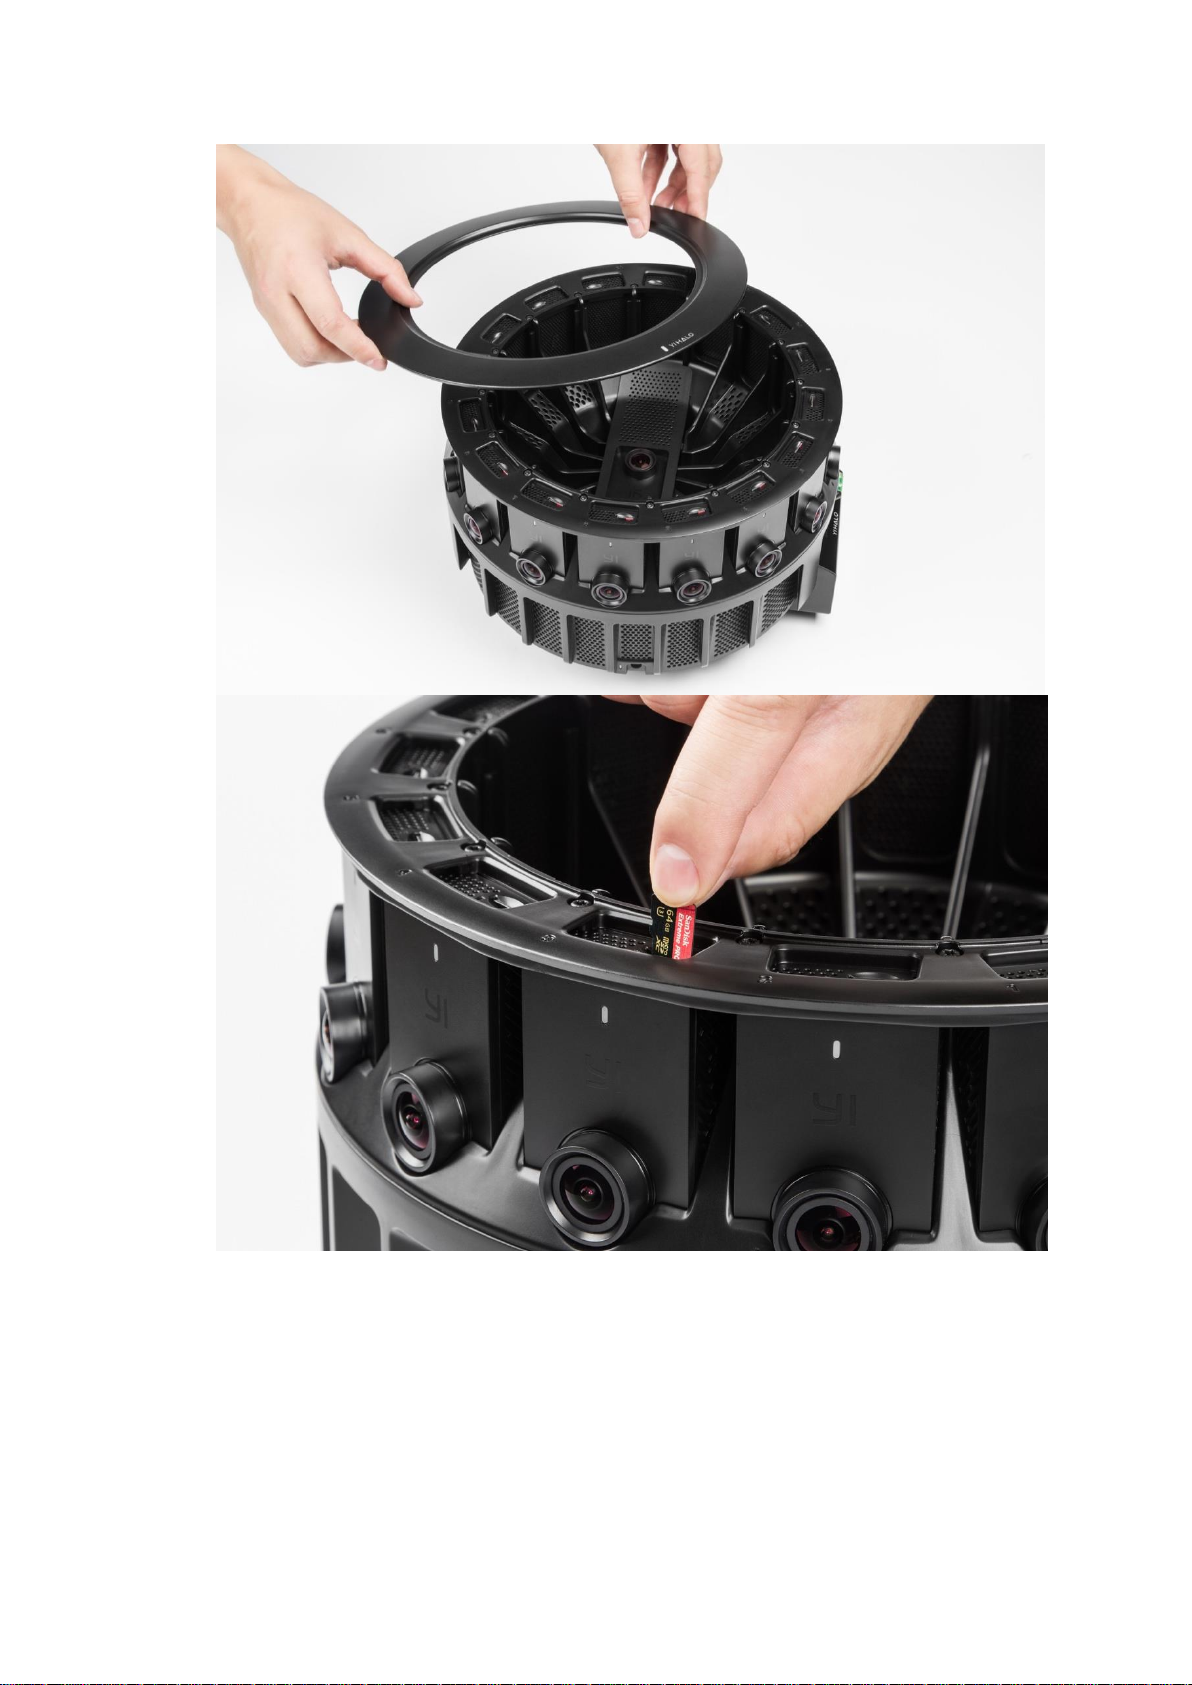
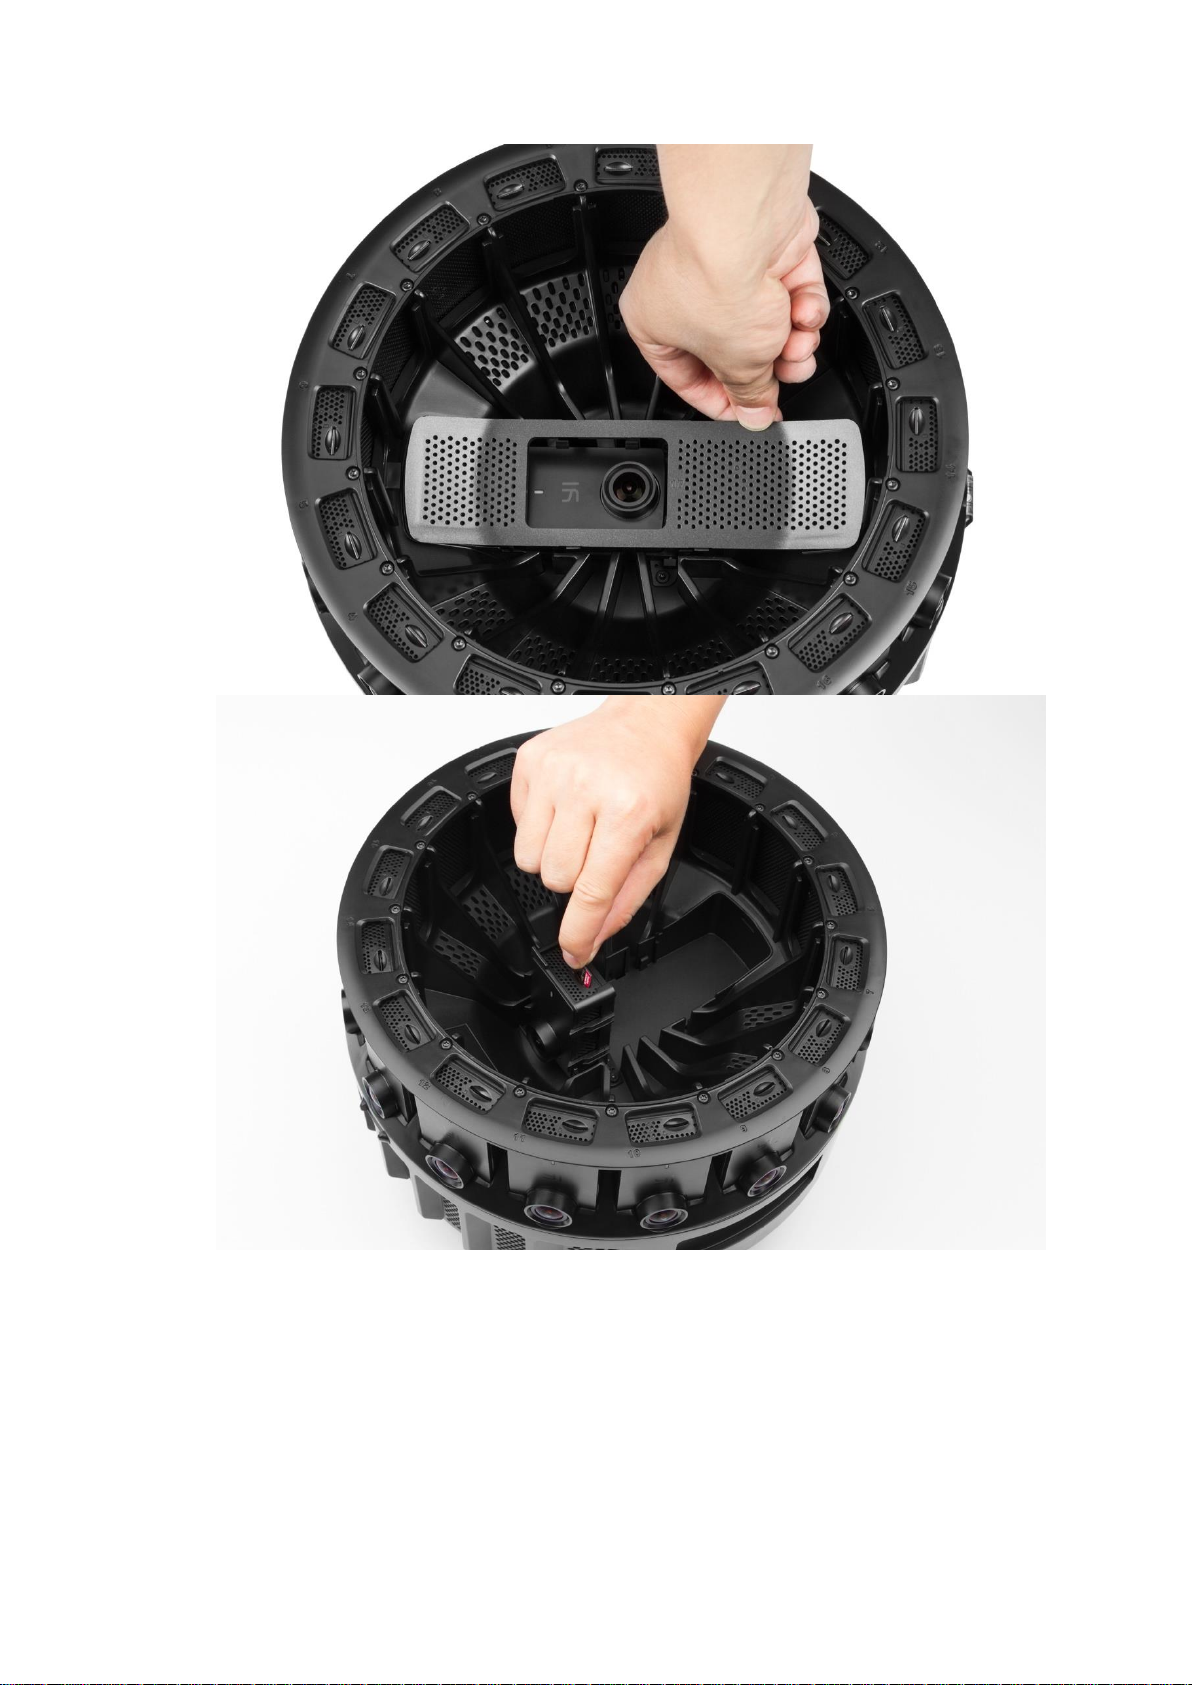
2. Up Camera
Uncover the up camera’s panel, gently lift up the up camera and insert an
microSD card into the camera.
Page 8
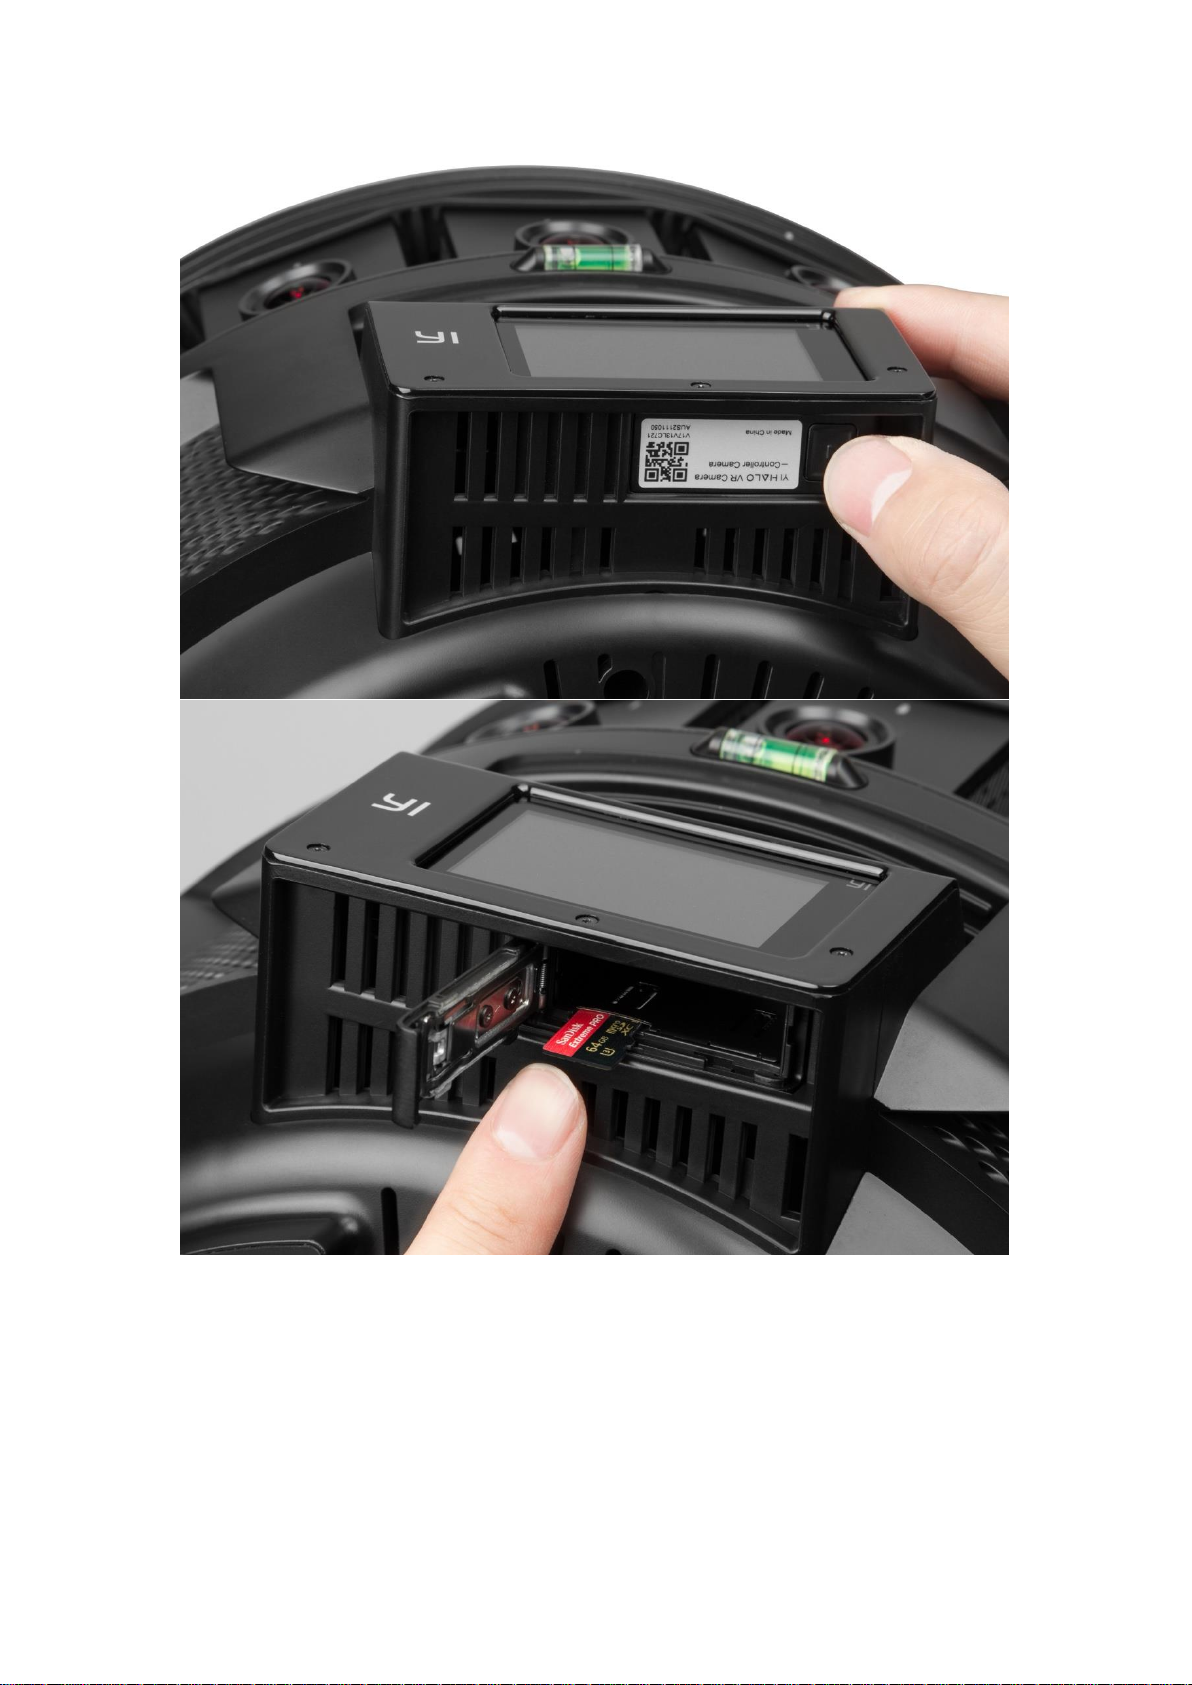
3. Controller
Slide to open the controller’s battery door from the bottom, and insert a
microSD card into the controller.
Page 9
Notes:
● All microSD cards should be identical for better synchronization.
● Carefully handle the microSD cards. Avoid liquids, dust and debris.
● Power off the rig before inserting or removing the card.
● The microSD cards status is displayed on the control panel. If the
microSD card is full or an error occurs when recording, the icon for the
affected camera will turn to red. You can check what the problem is by
tapping the red icon.
Page 10
2.2 Supplying Power
You can power YI HALO using either the portable battery or the AC adapter.
The adapter can also be connected directly to the battery and simultaneously
charge it while the camera is running.
The power light located just above the barrel input on the rig, should be red
when supplying power. YI HALO draws approximately 50 watts when
recording in 2.5K resolution. Under typical operating conditions, a fully
charged supplied portable battery will run YI HALO for over 100 minutes.
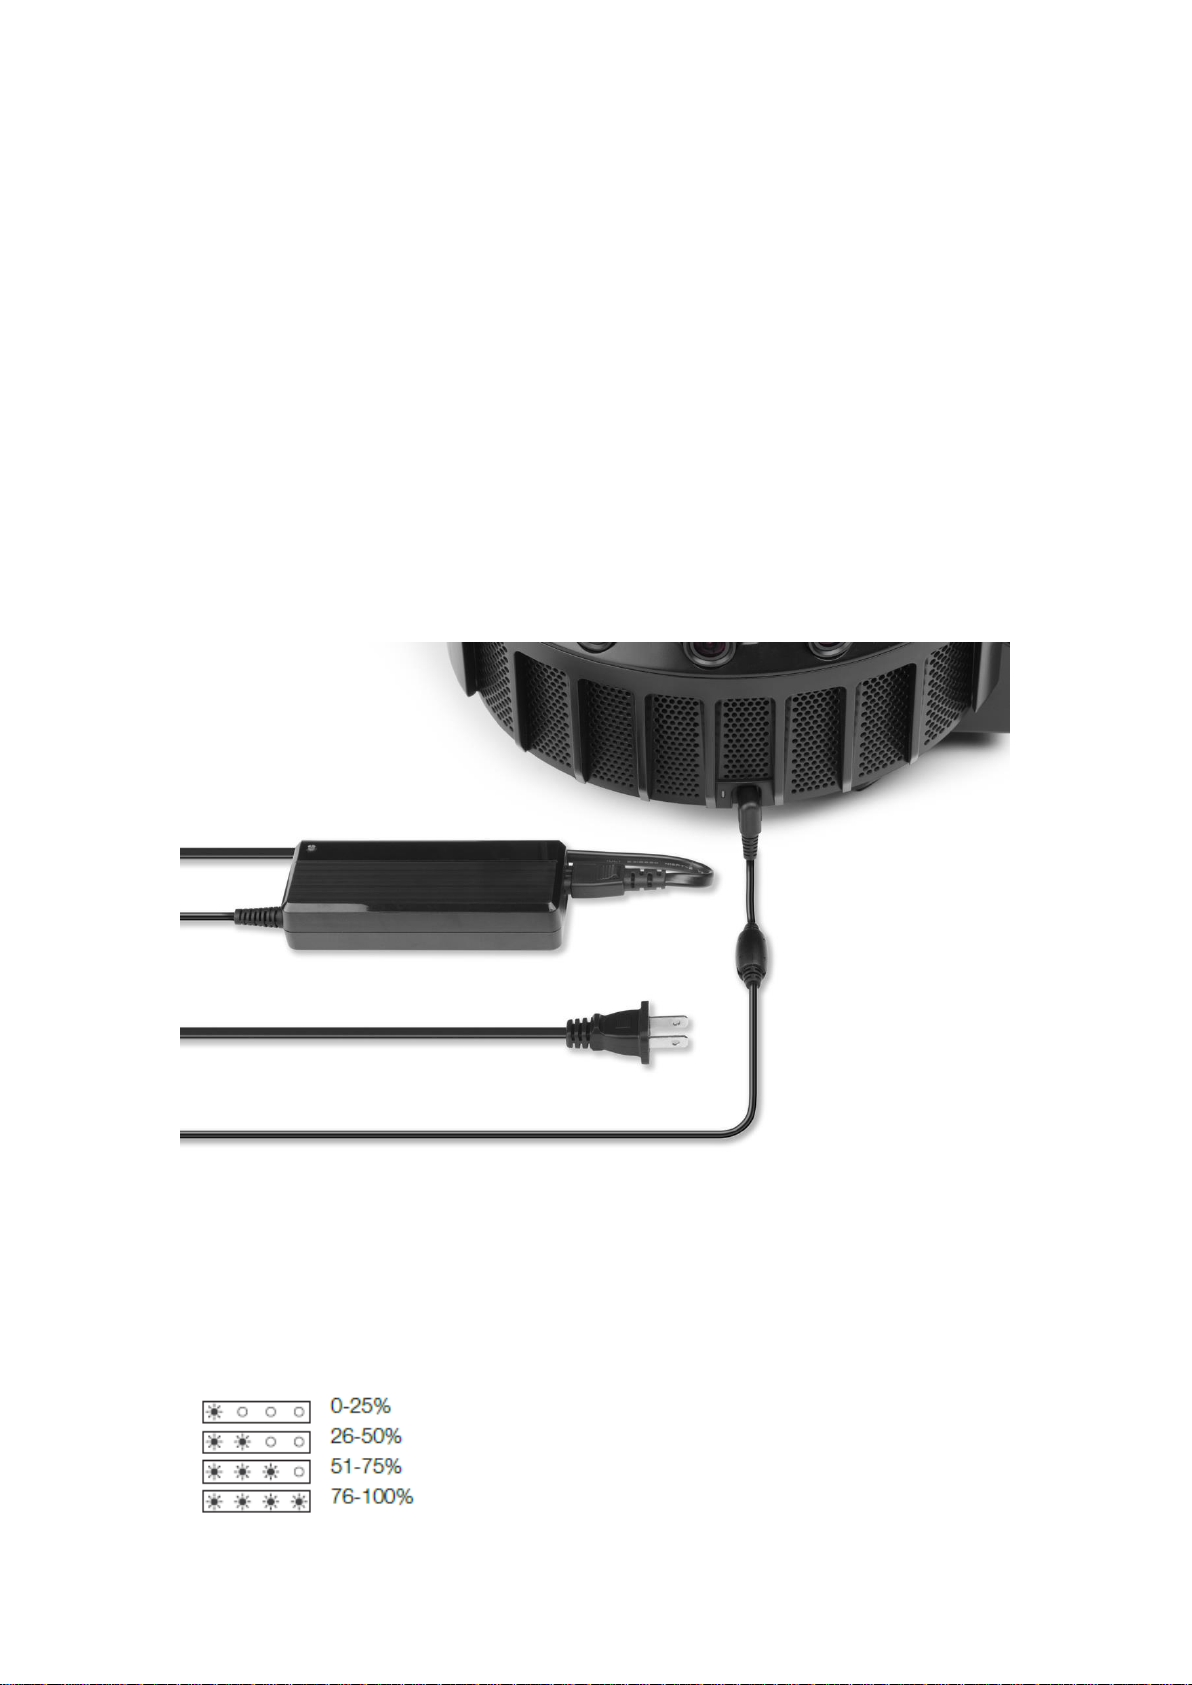
2.2.1 Power YI HALO from the AC adapter
1. Connect the power adapter’s DC plug to the power terminal on the rig.
2. Connect the power cord to the AC adapter and plug it into a power outlet.
2.2.2 Powering YI HALO with the Portable Battery
1. Long press the power button on the battery to turn it on.
2. Check the remaining battery charge by observing the status lights on the
side of the battery. 4 lights on indicates that the battery is fully charged.
Page 11
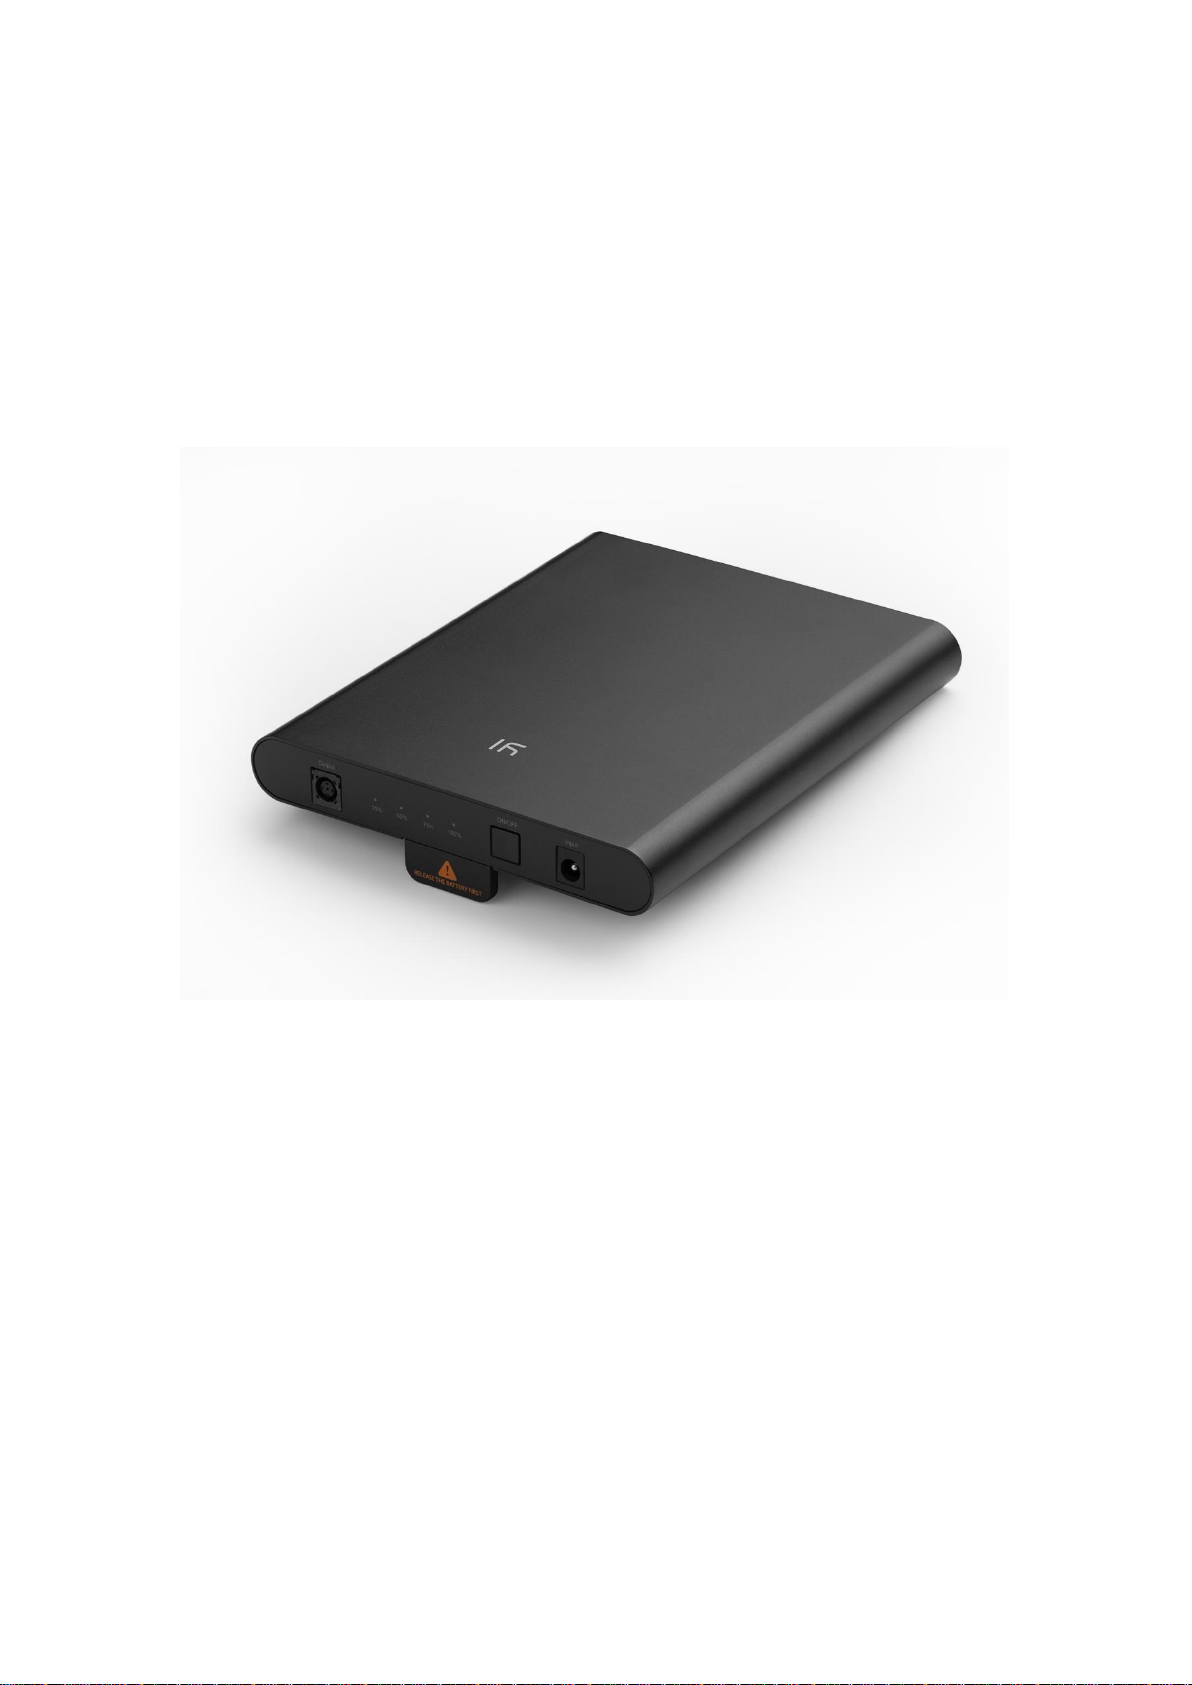
3. Slide the battery into the compartment.
4. Plug the power cord to connect the mobile battery with YI HALO.
Notes:
● Keep the battery in dry and cool place.
● When the battery has not been used for a long time, charge the battery
fully and then use it until it fully discharges again.
● Do not charge the YI internal battery with anything except the included AC
power supply.
● Repeatedly charging and discharging the battery will eventually shorten its
battery life.
Page 12
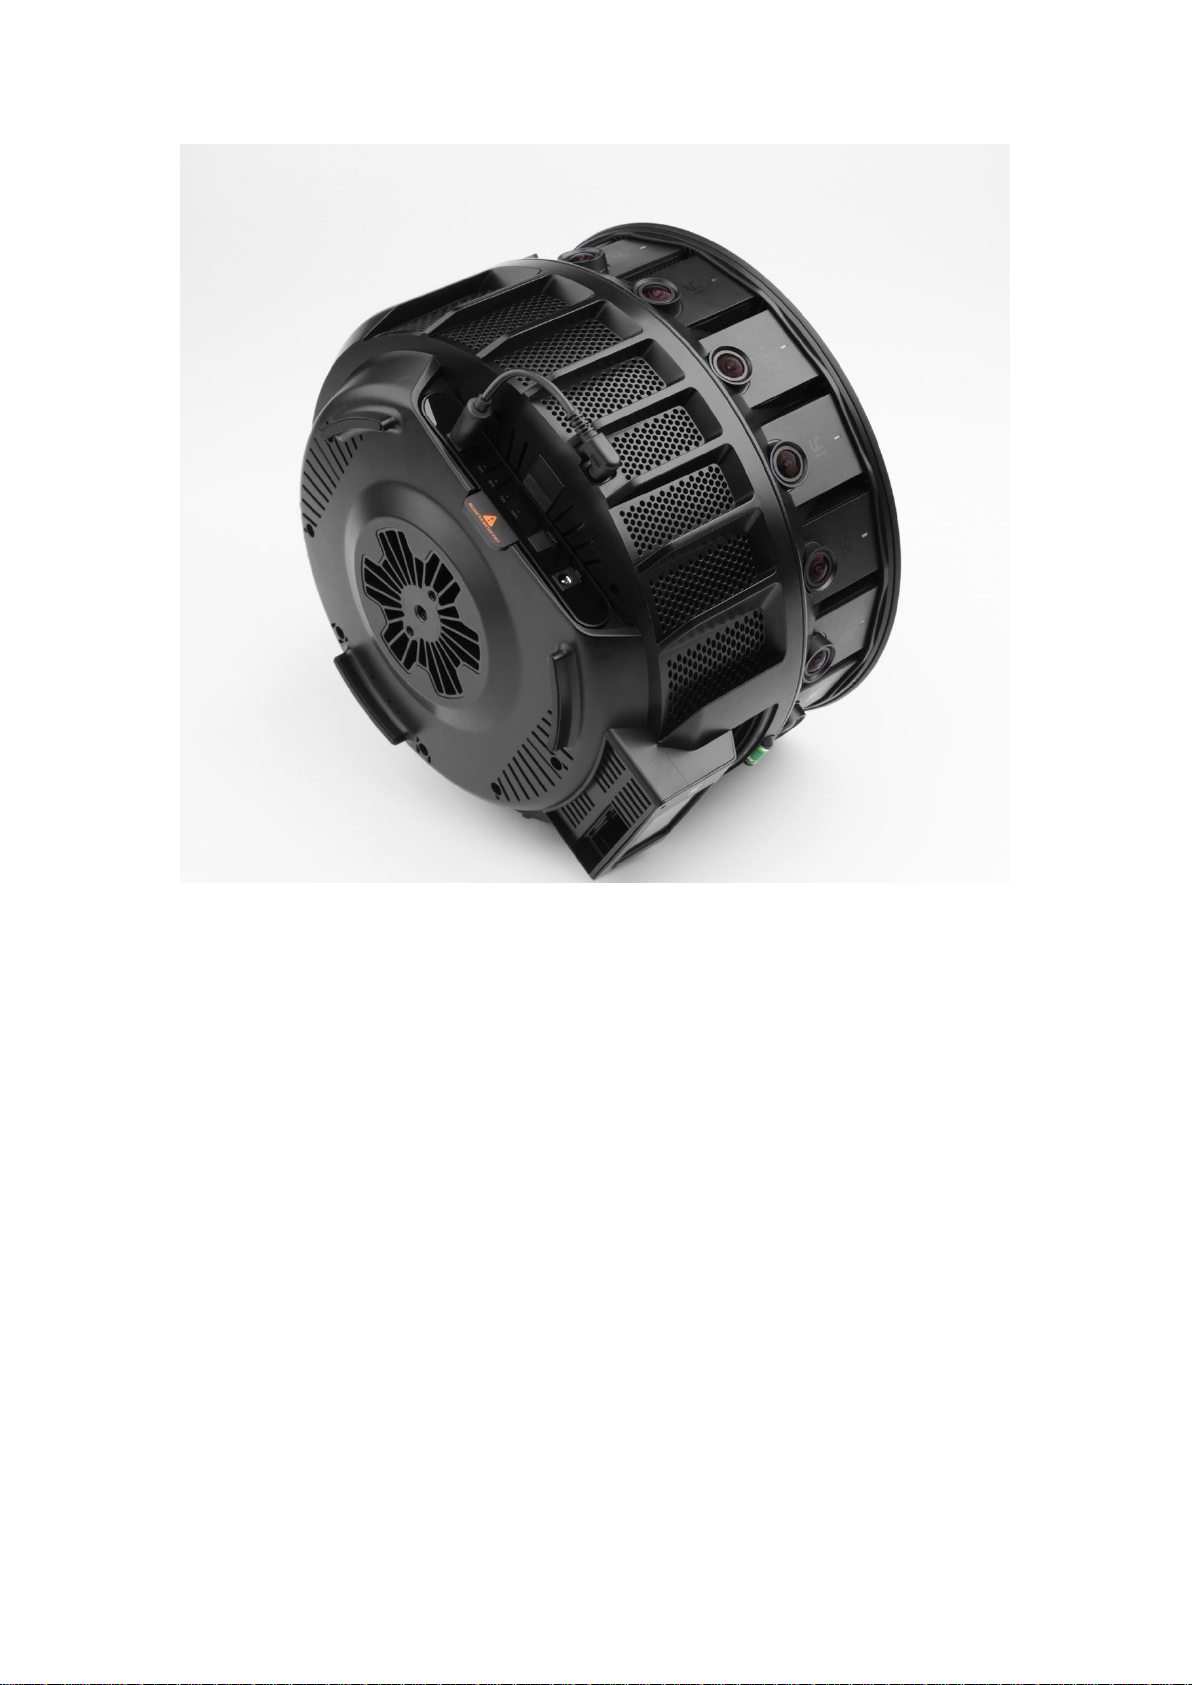
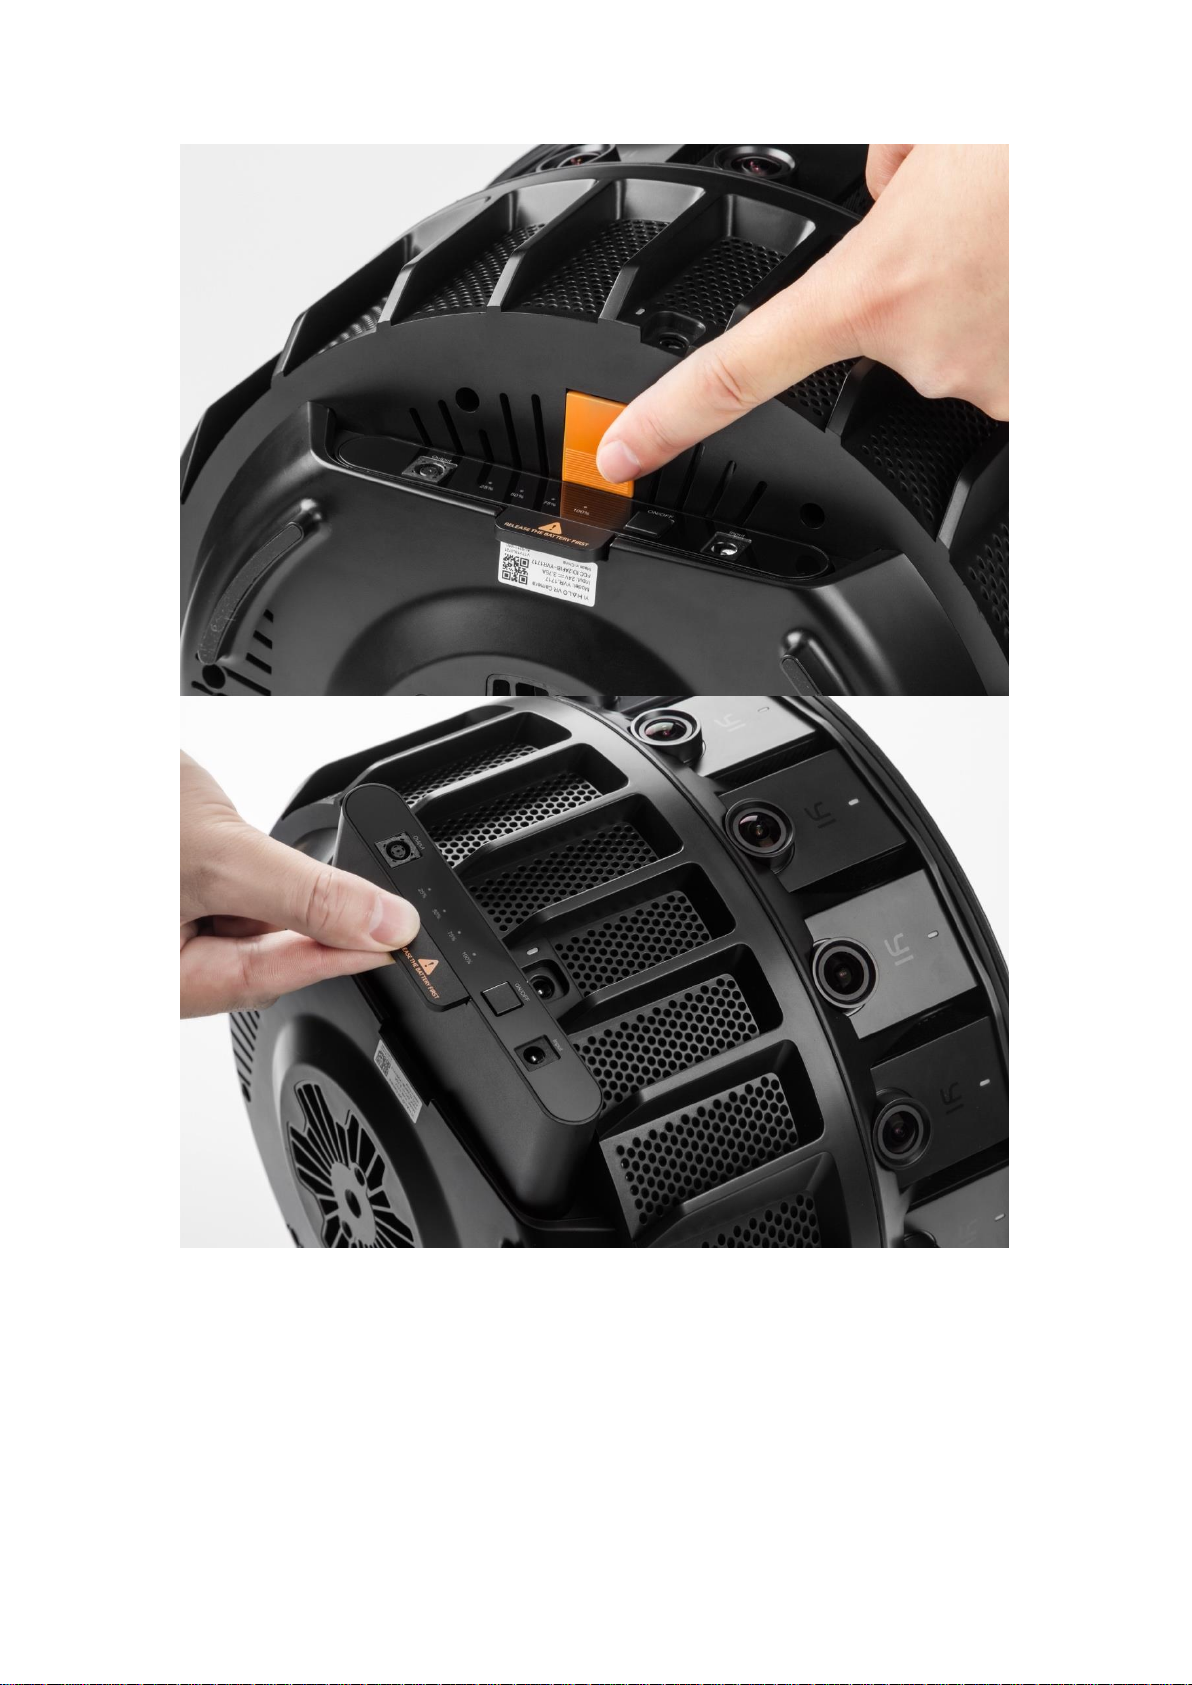
If you want to remove the battery, press the button at the bottom of the rig and
pull the battery out.
Page 13
2.2.3 Powering YI HALO with the External Battery
1. Make sure the external battery is on.
2. Plug the power cord to connect the external battery with YI HALO.
Note:
When turning YI HALO on, you may see the pop-up window below on the
controller; if you do, please press ‘Yes’.
Page 14
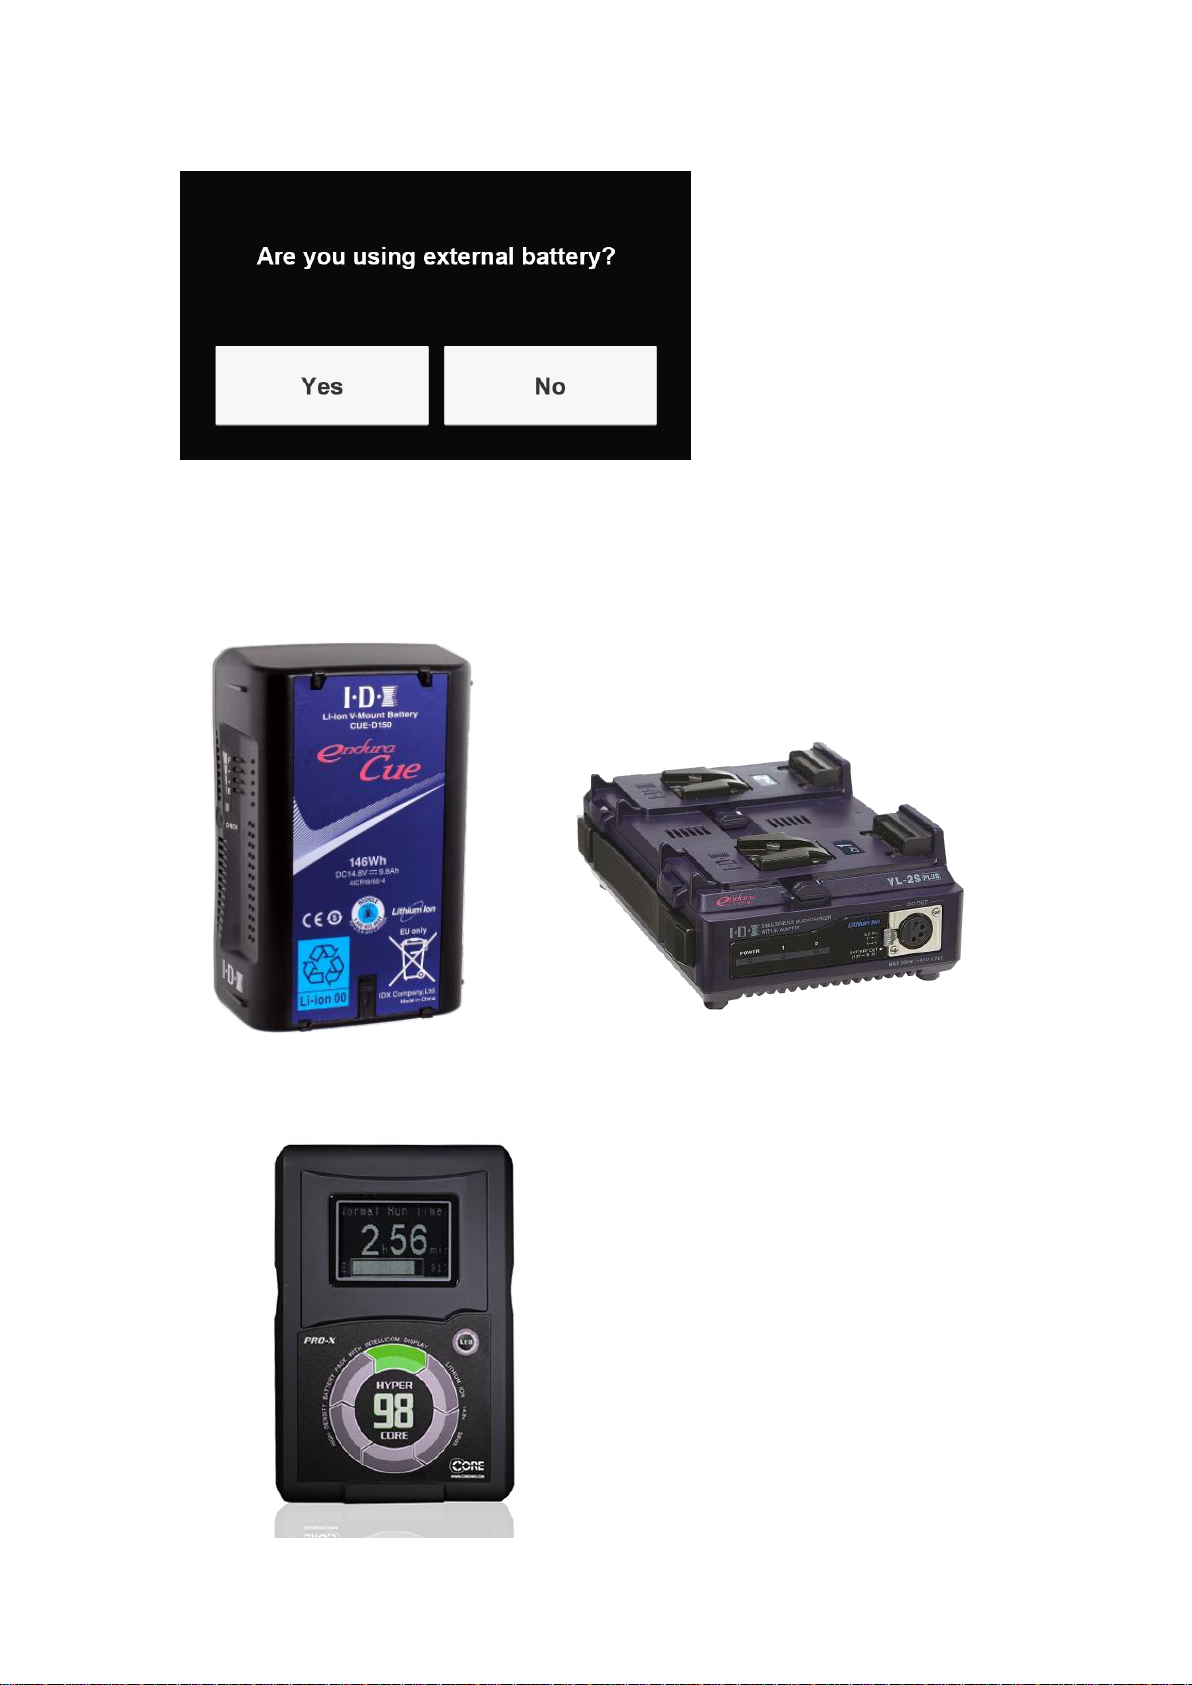
The external battery listed below are recommended:
IDX Li-ion V-Mount battery CUE-D150 & IDX V-Mount Chargers VL-2SPLUS
(which provides simultaneous 2-battery charging)
Core SWX HyperCore 98Wh 14.8V V-Mount Battery
Page 15
CAME-TV D-Tap Cable With Male 2.1 DC Connector
2.3 Mounting YI HALO
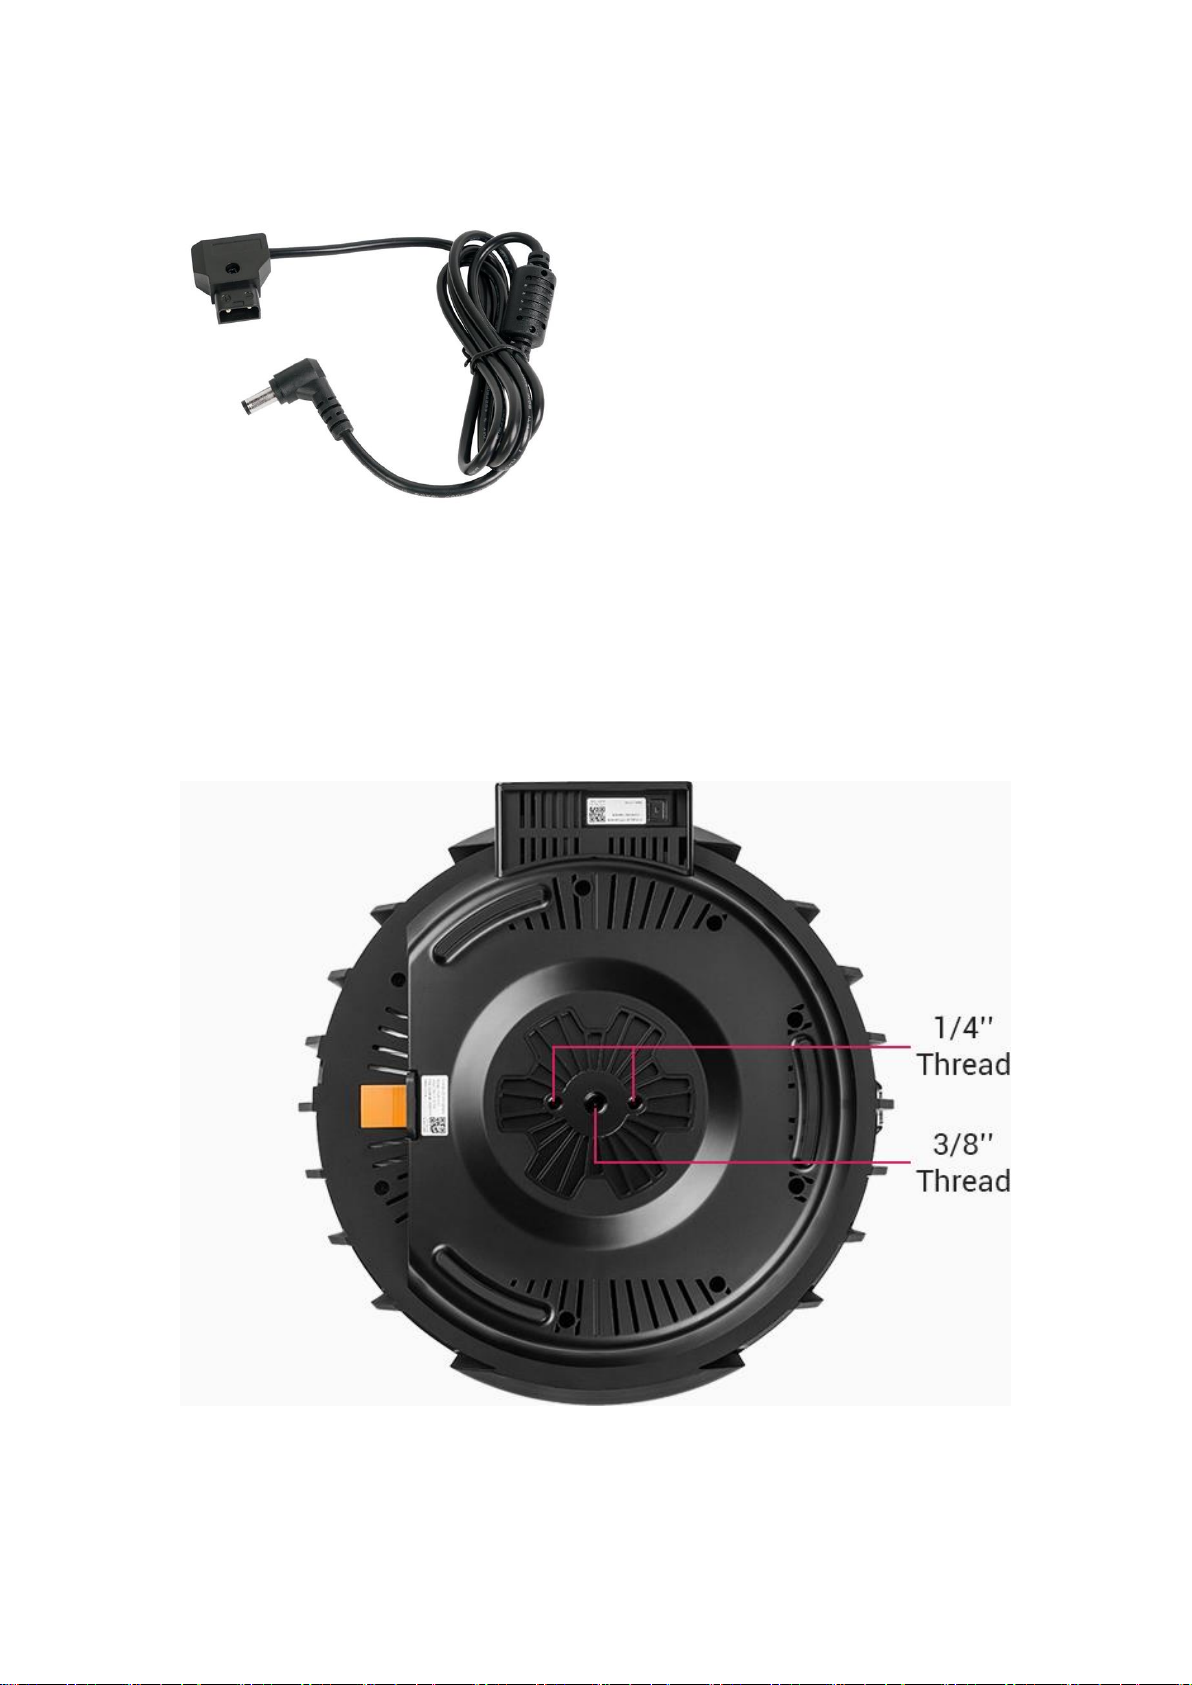
You can mount YI HALO on a tripod with screw threads located on the bottom
of the rig. The middle one is a 3/8-16 UNC thread while the other two are 1/420 UNC threads.
Note:
When removing YI HALO from a tripod or other mounting solutions,
disconnect the power source first to avoid damage.
Page 16
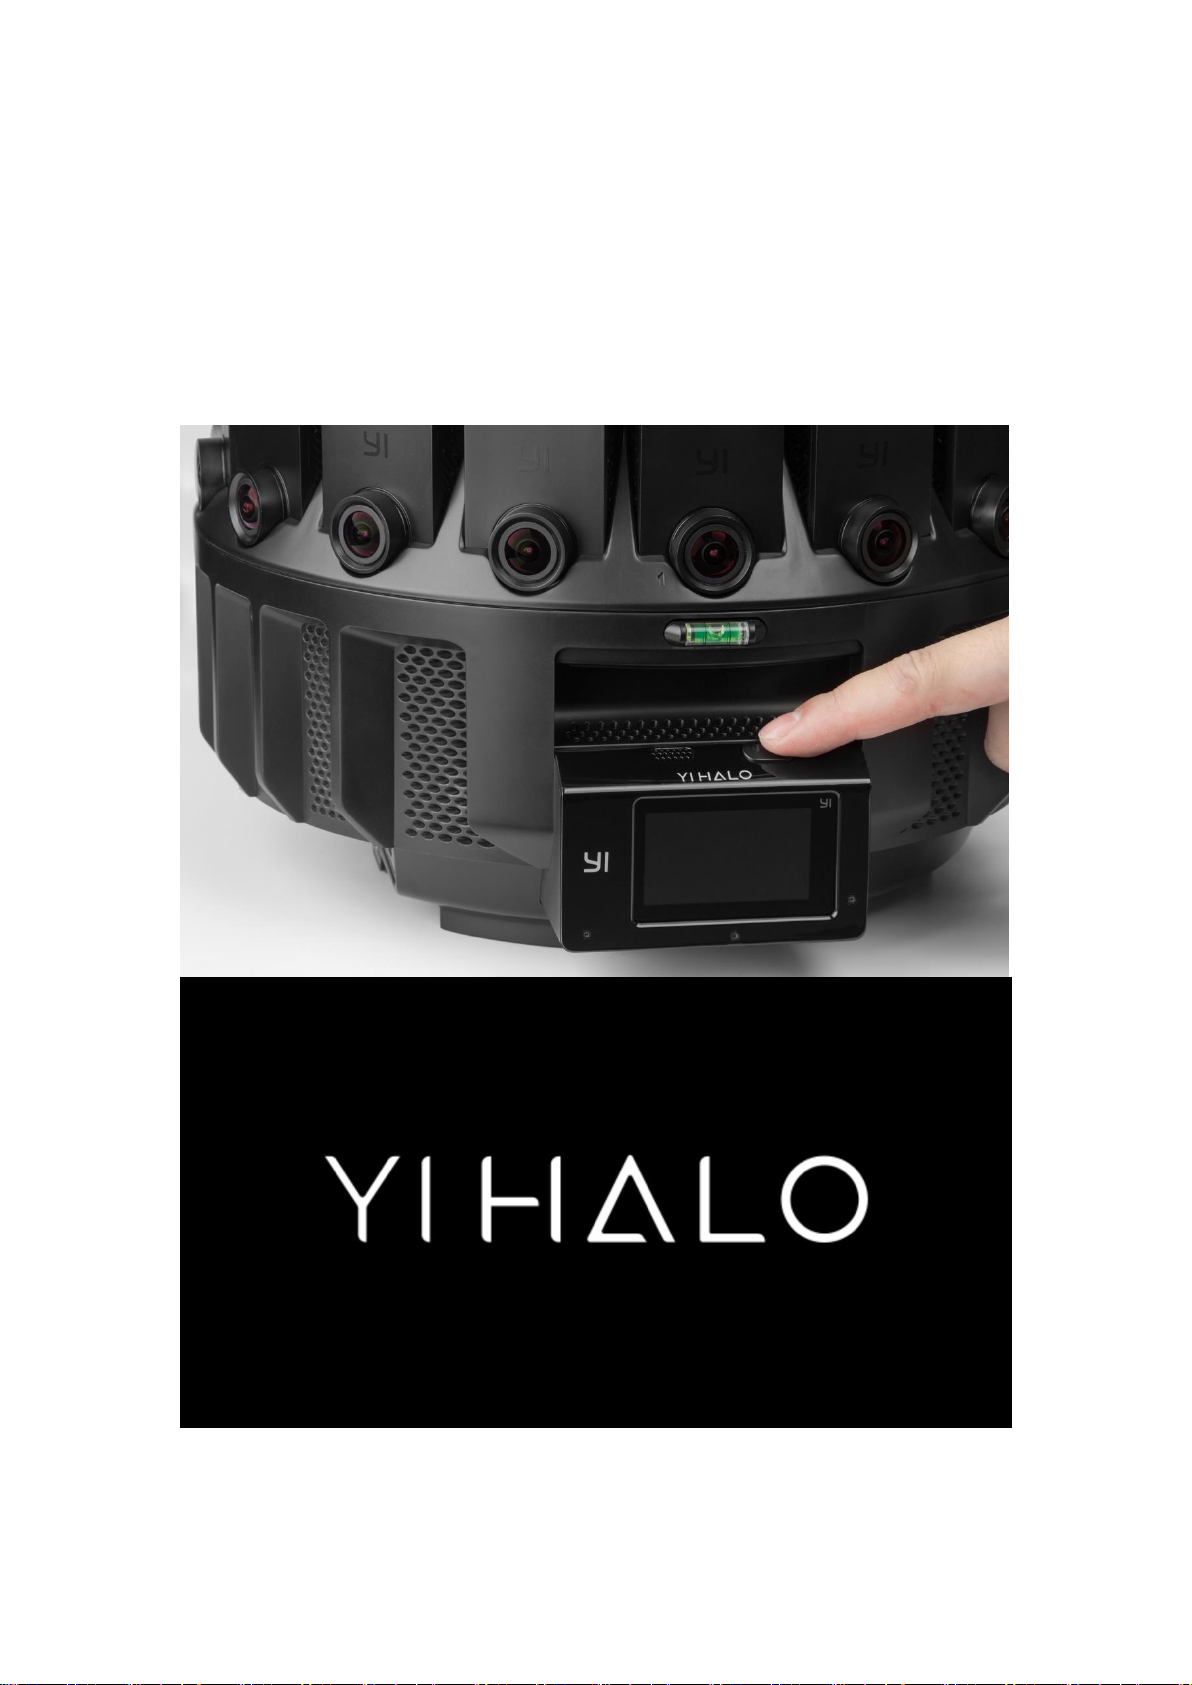
2.4 Turning YI HALO ON/OFF
The rig’s power button is located on the top of the controller. Press and hold
the power button for 2 seconds to turn YI HALO on, then the controller’s
speaker emits startup sound and unit cameras’ status lights flash once. The
screen is blank for 10~15 seconds. After that, a ‘YI HALO’ logo will appear on
the screen and will stay for 15 seconds.
Press and hold the power button for 2 seconds to turn off the rig.
Page 17
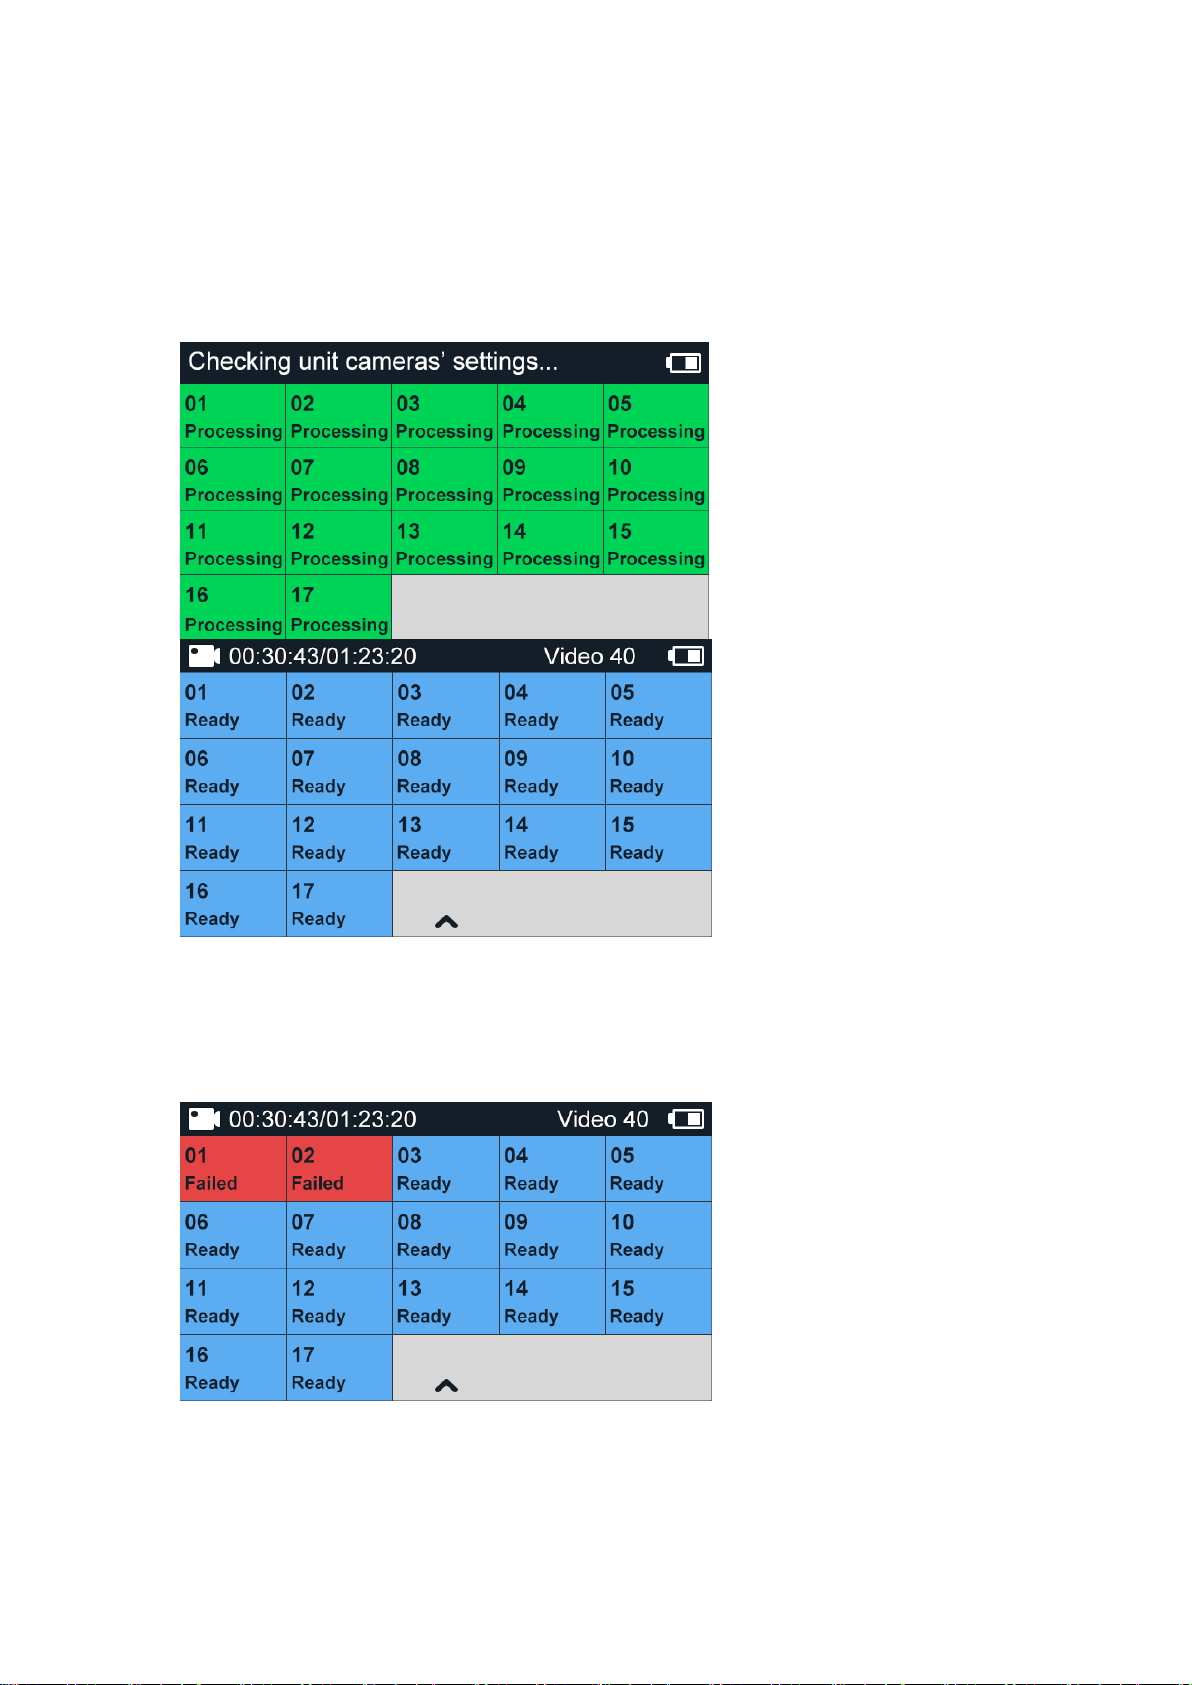
2.5 Auto Check
After ‘YI HALO’ logo disappears, the rig will check itself automatically. This
process takes about 20 seconds normally. If there is no error occurs, the
screen will display unit cameras’ status as ‘Ready’ in blue color.
If an exception happens to a unit camera(s), including but not limited to: no
SD card/unable to read the SD card/fail to turn on the unit camera/fail to
connect to the controller, the unit camera’s status will be displayed as ‘Failed’
with a red background.
Page 18
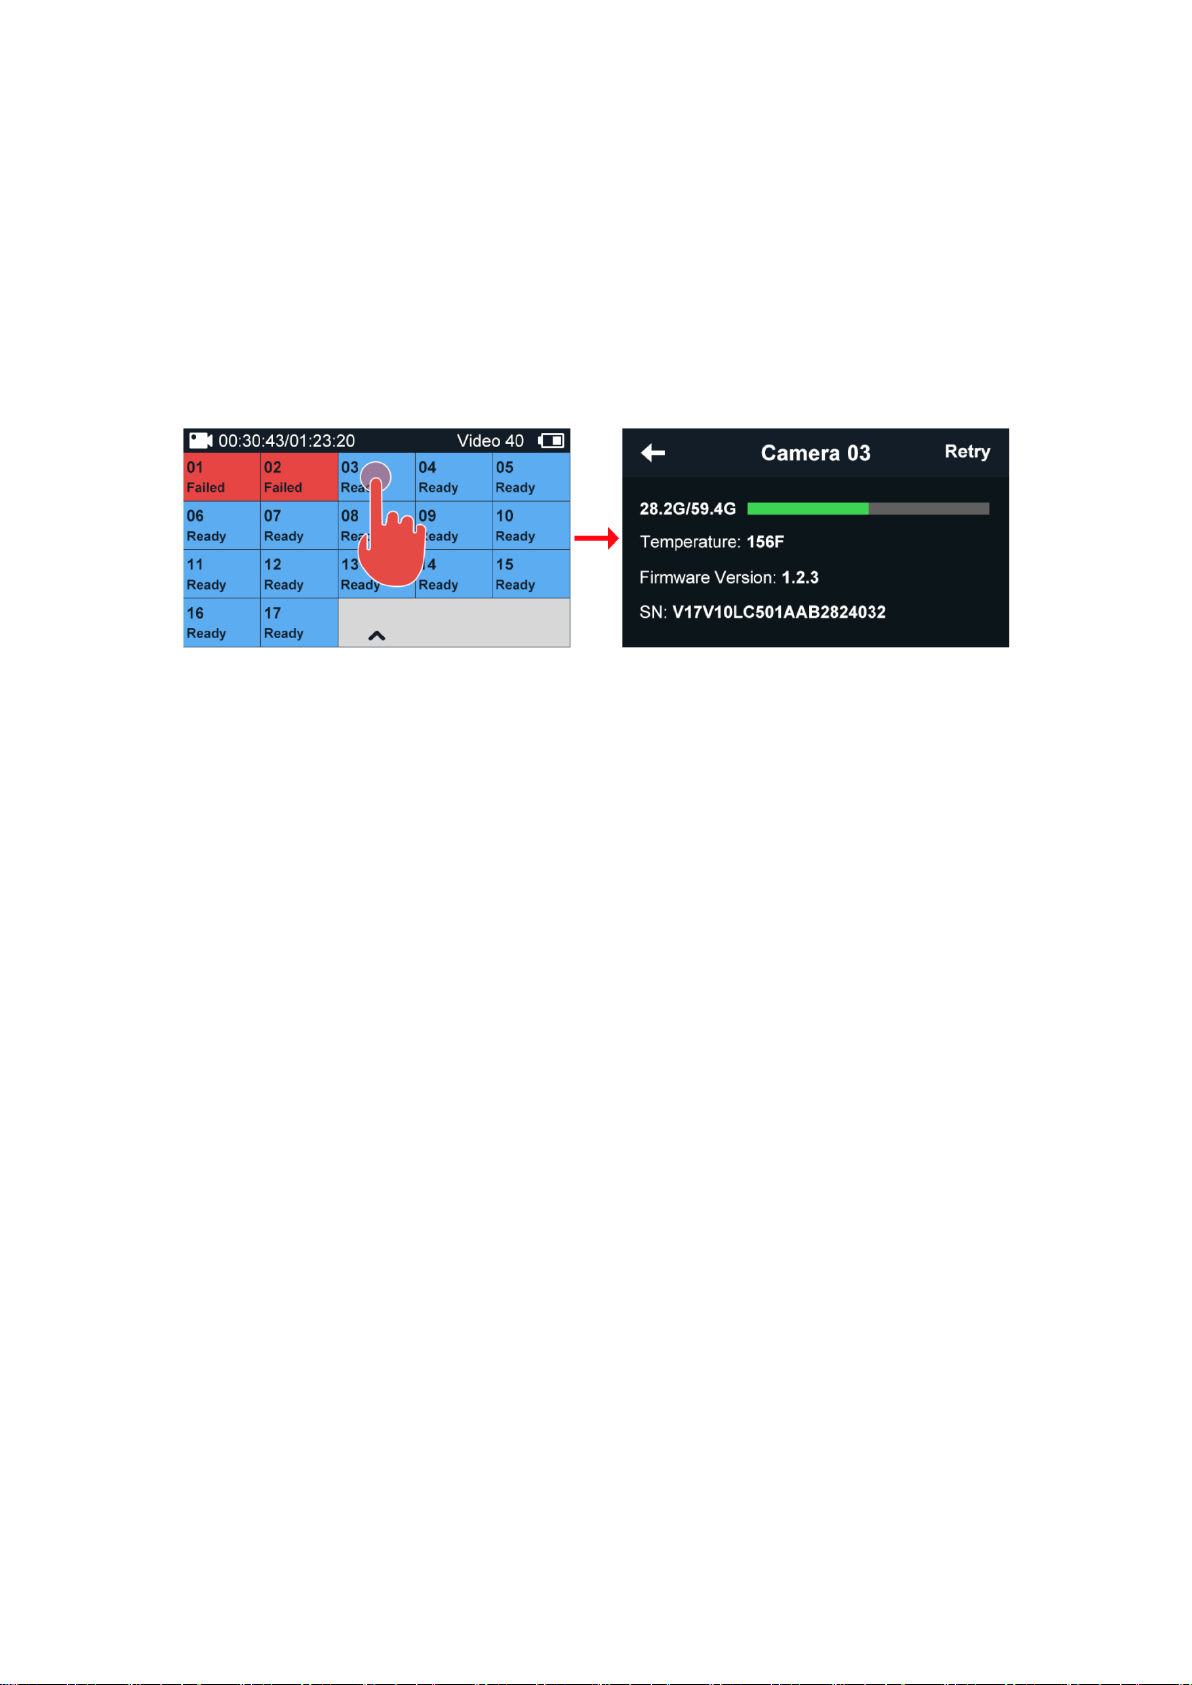
2.6 Camera Status Screen
Tap the rectangle icon marked with camera ID on the control panel, the
screen will display the following information:
1. Storage Condition
2. Temperature
3. Firmware Version
4. Serial No.
5. Cause of the Failure (if the unit camera status is ‘Failed’)
2.7 Replacing the Cameras
YI HALO ships with all cameras pre-installed. If you need to replace the
controller or unit camera with backup camera, please follow the steps below:
2.7.1 Hardware Update
● Replacing the controller
1. Use the small screwdriver provided to remove the controller cover.
Page 19
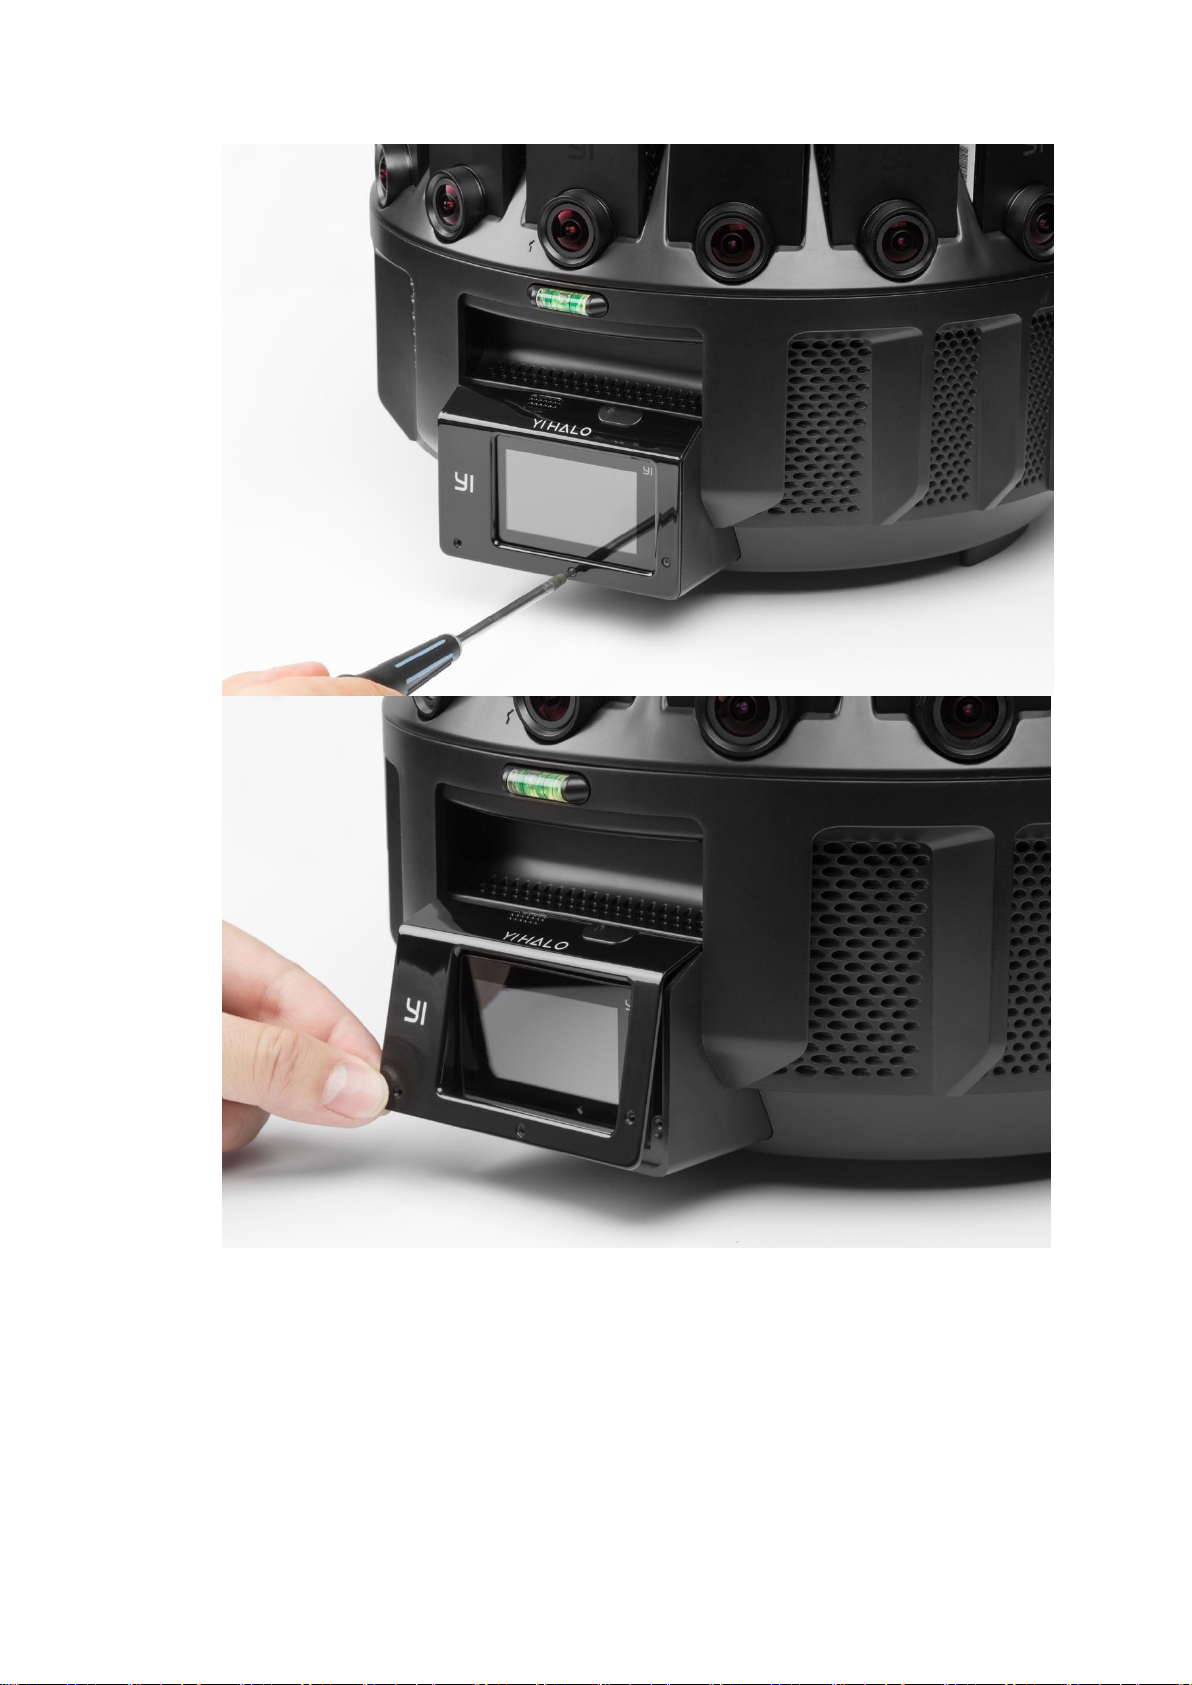
2. Disconnect the controller from the USB cable, then remove the
controller and set it aside.
Page 20
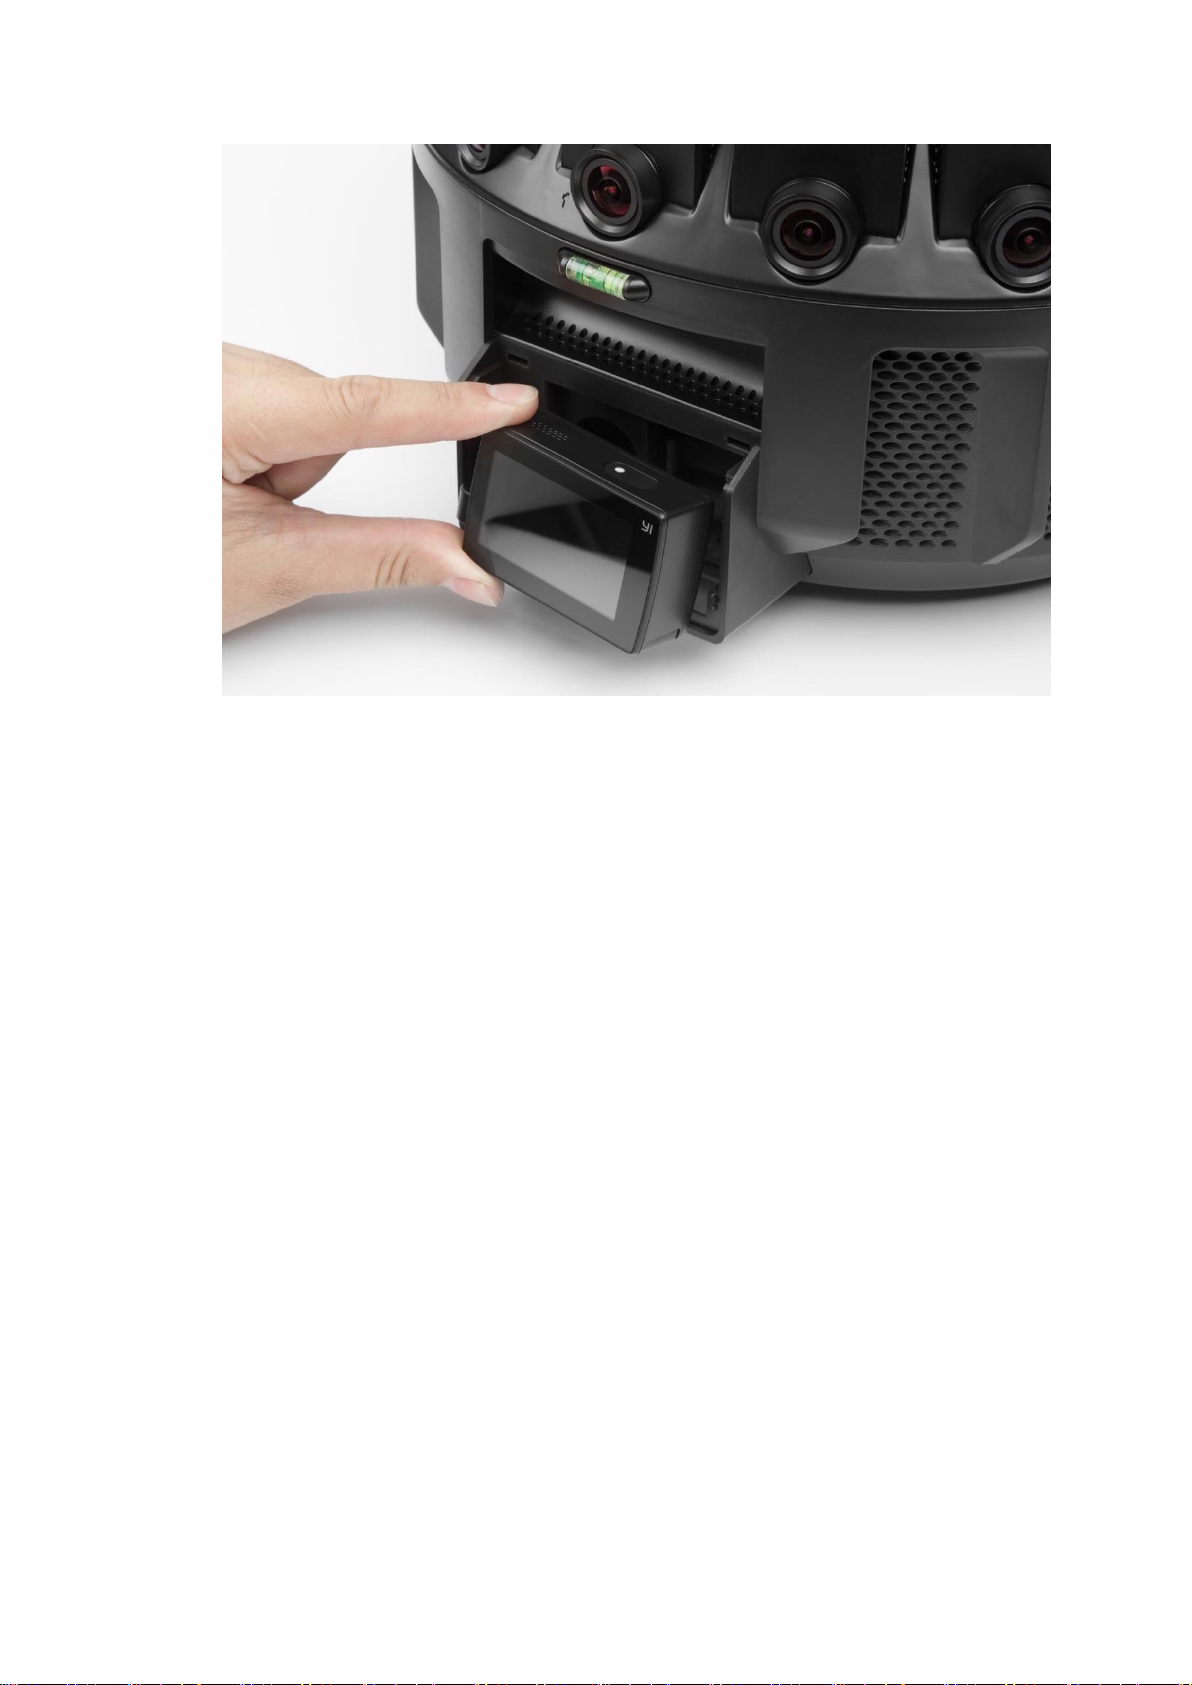
3. Align the new controller’s lens with the inner frame, reconnect the USB
cable, then push the new controller into the controller holder with the
screen facing out.
4. Align the controller cover with the screen and re-insert the screws.
5. Make sure that the backup controller’s firmware version is the same as
the unit cameras’, otherwise update the backup controller’s firmware to
the same version.
● Replacing unit cameras on the ring
1. Loosen screws beneath the top cover to unlock unit cameras. Mark
problematic camera with a piece of tape.
Page 21
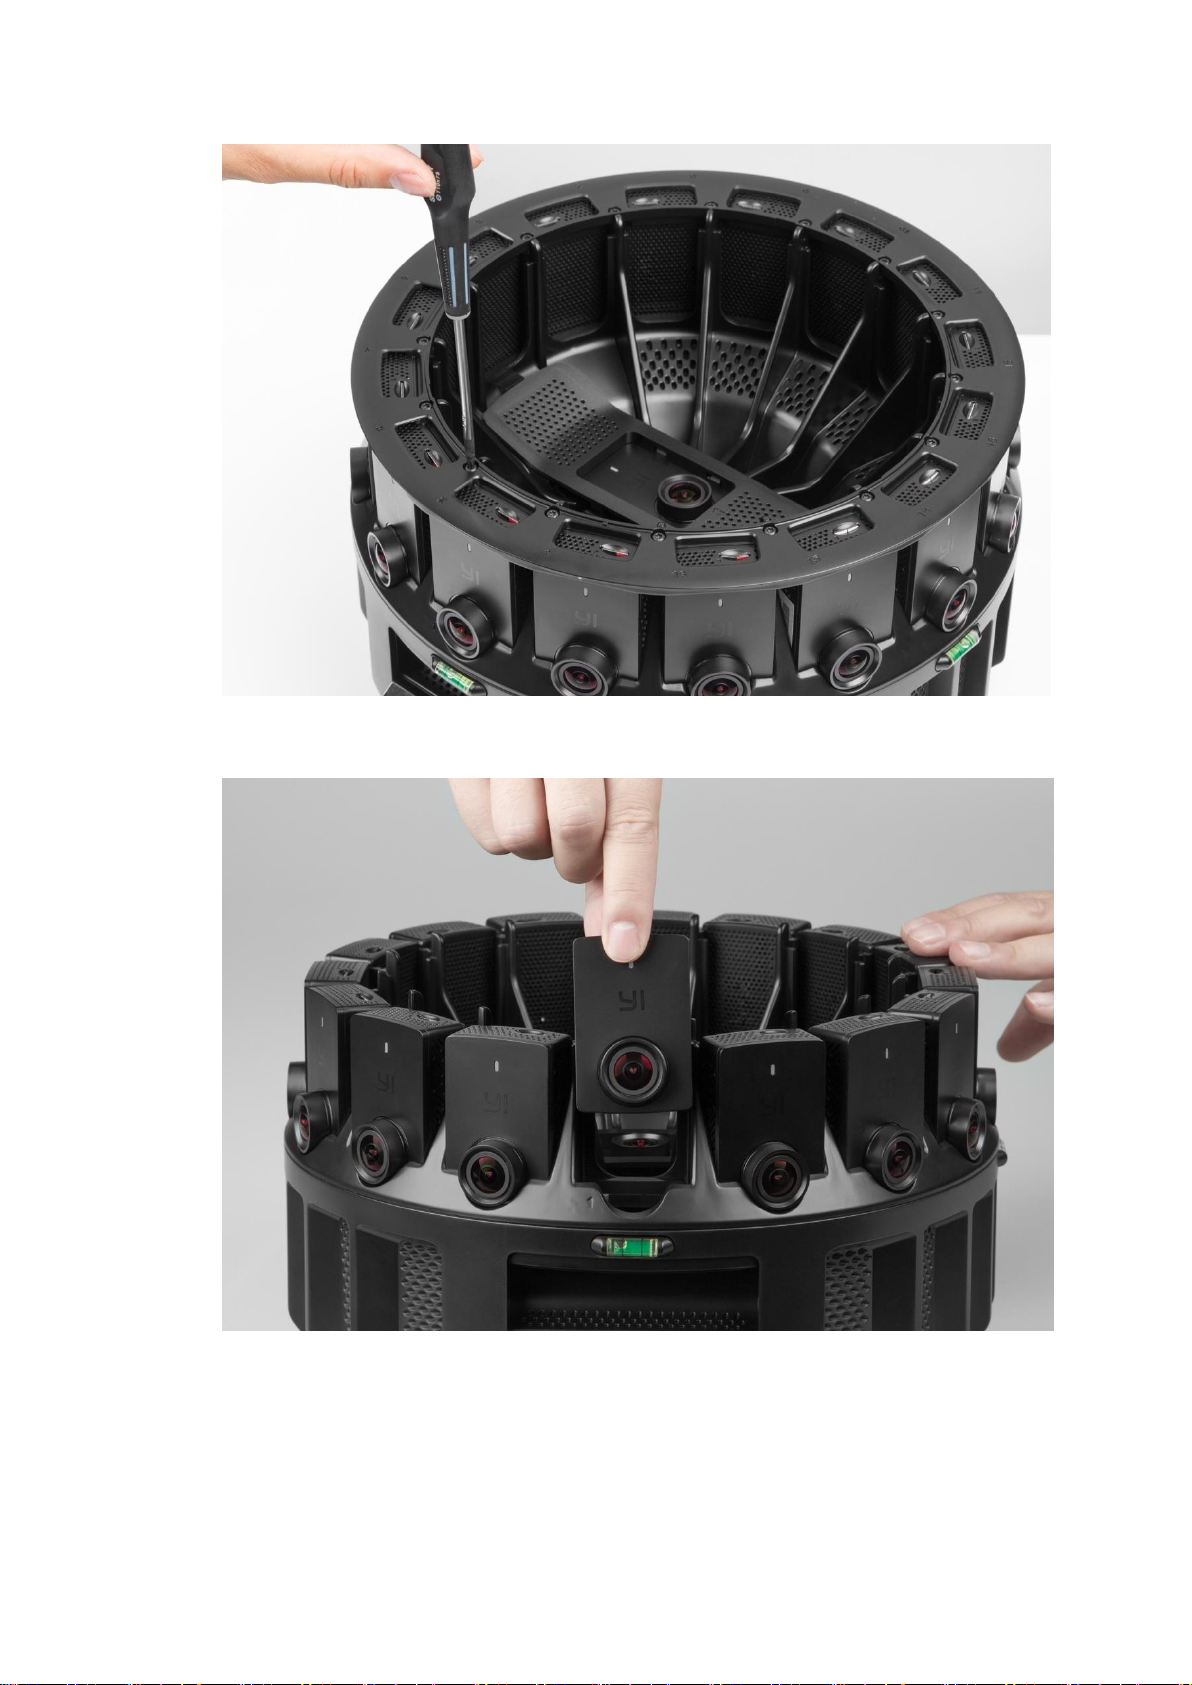
2. Pull out the problematic unit and insert the new one.
3. Make sure that all unit cameras are using the same firmware version,
or else update the unit camera’s firmware version.
4. Assemble the rig.
Page 22
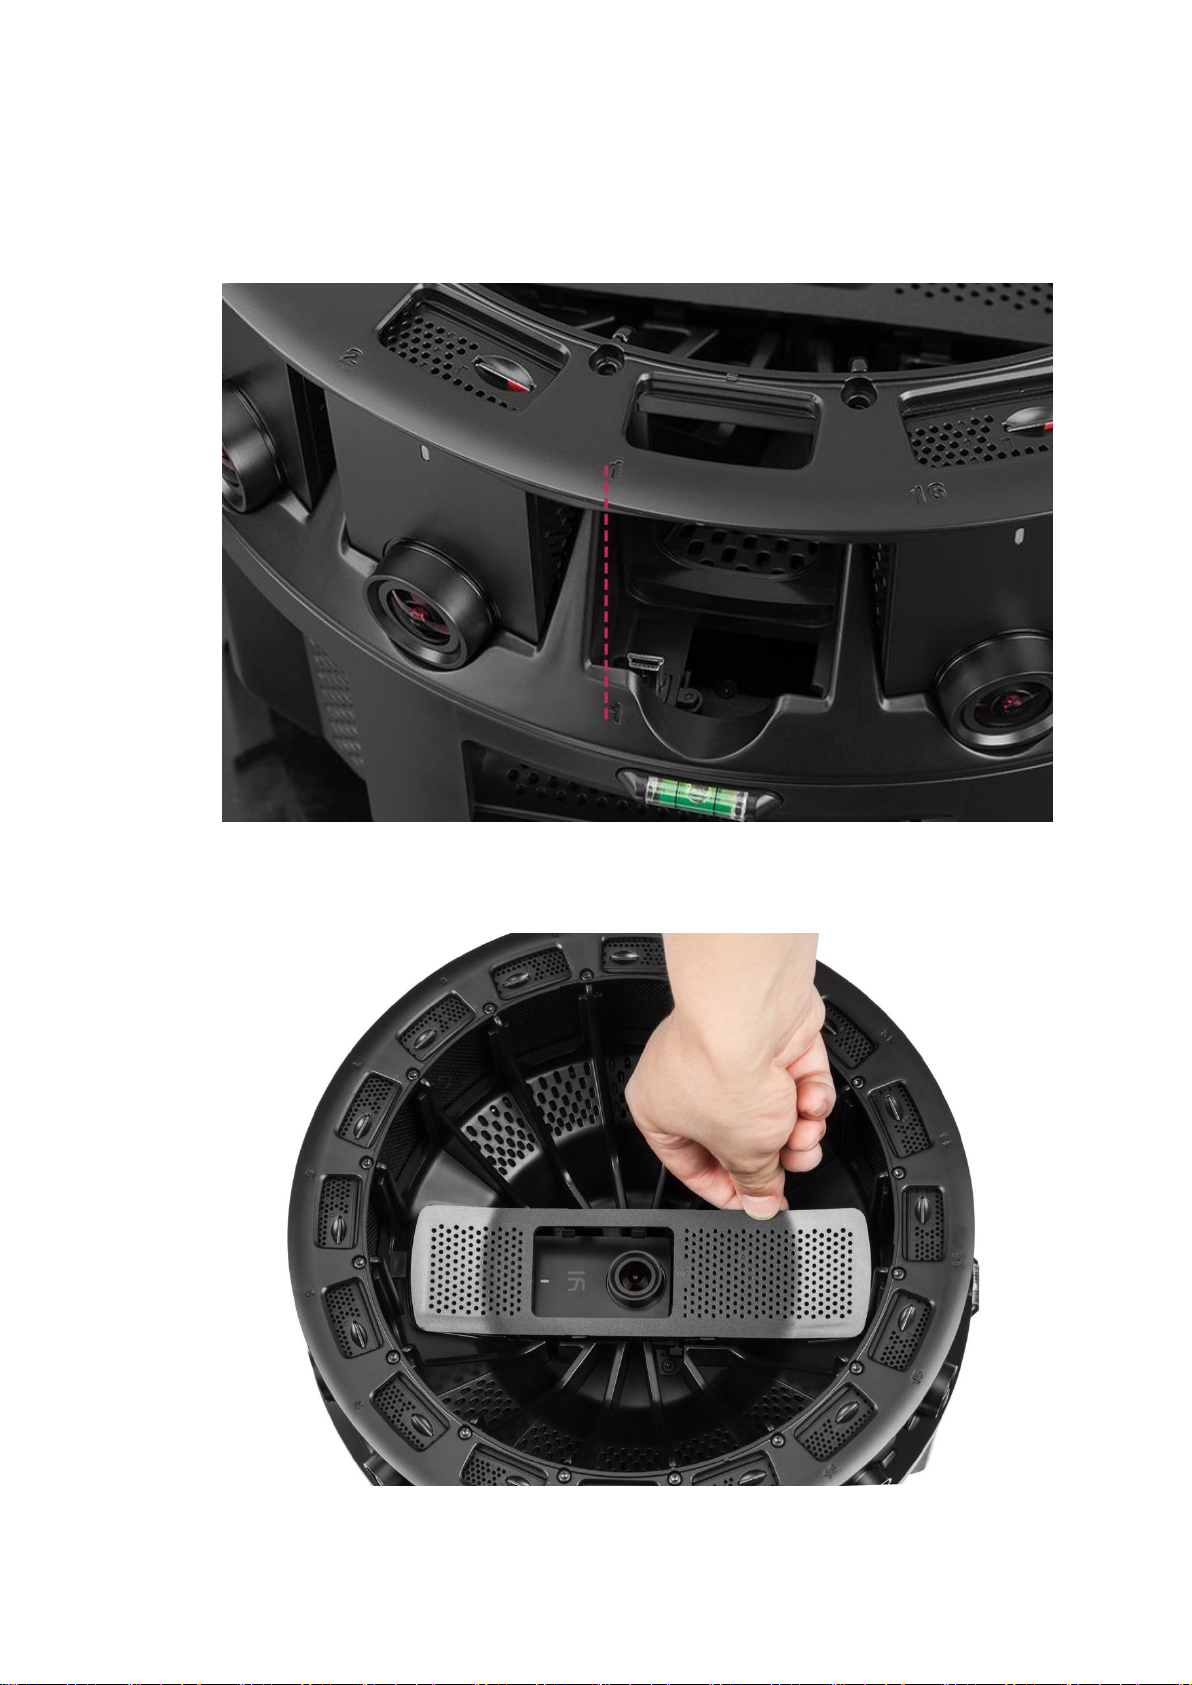
Note:
● Be sure to line up camera 1 with the top ring marked 1. Camera 1 is unit
camera directly above the controller. You can refer to the photo below,
there is “1” mark on the ring and over the controller.
● Replacing the up camera
1. Remove the up camera’s panel from above.
Page 23
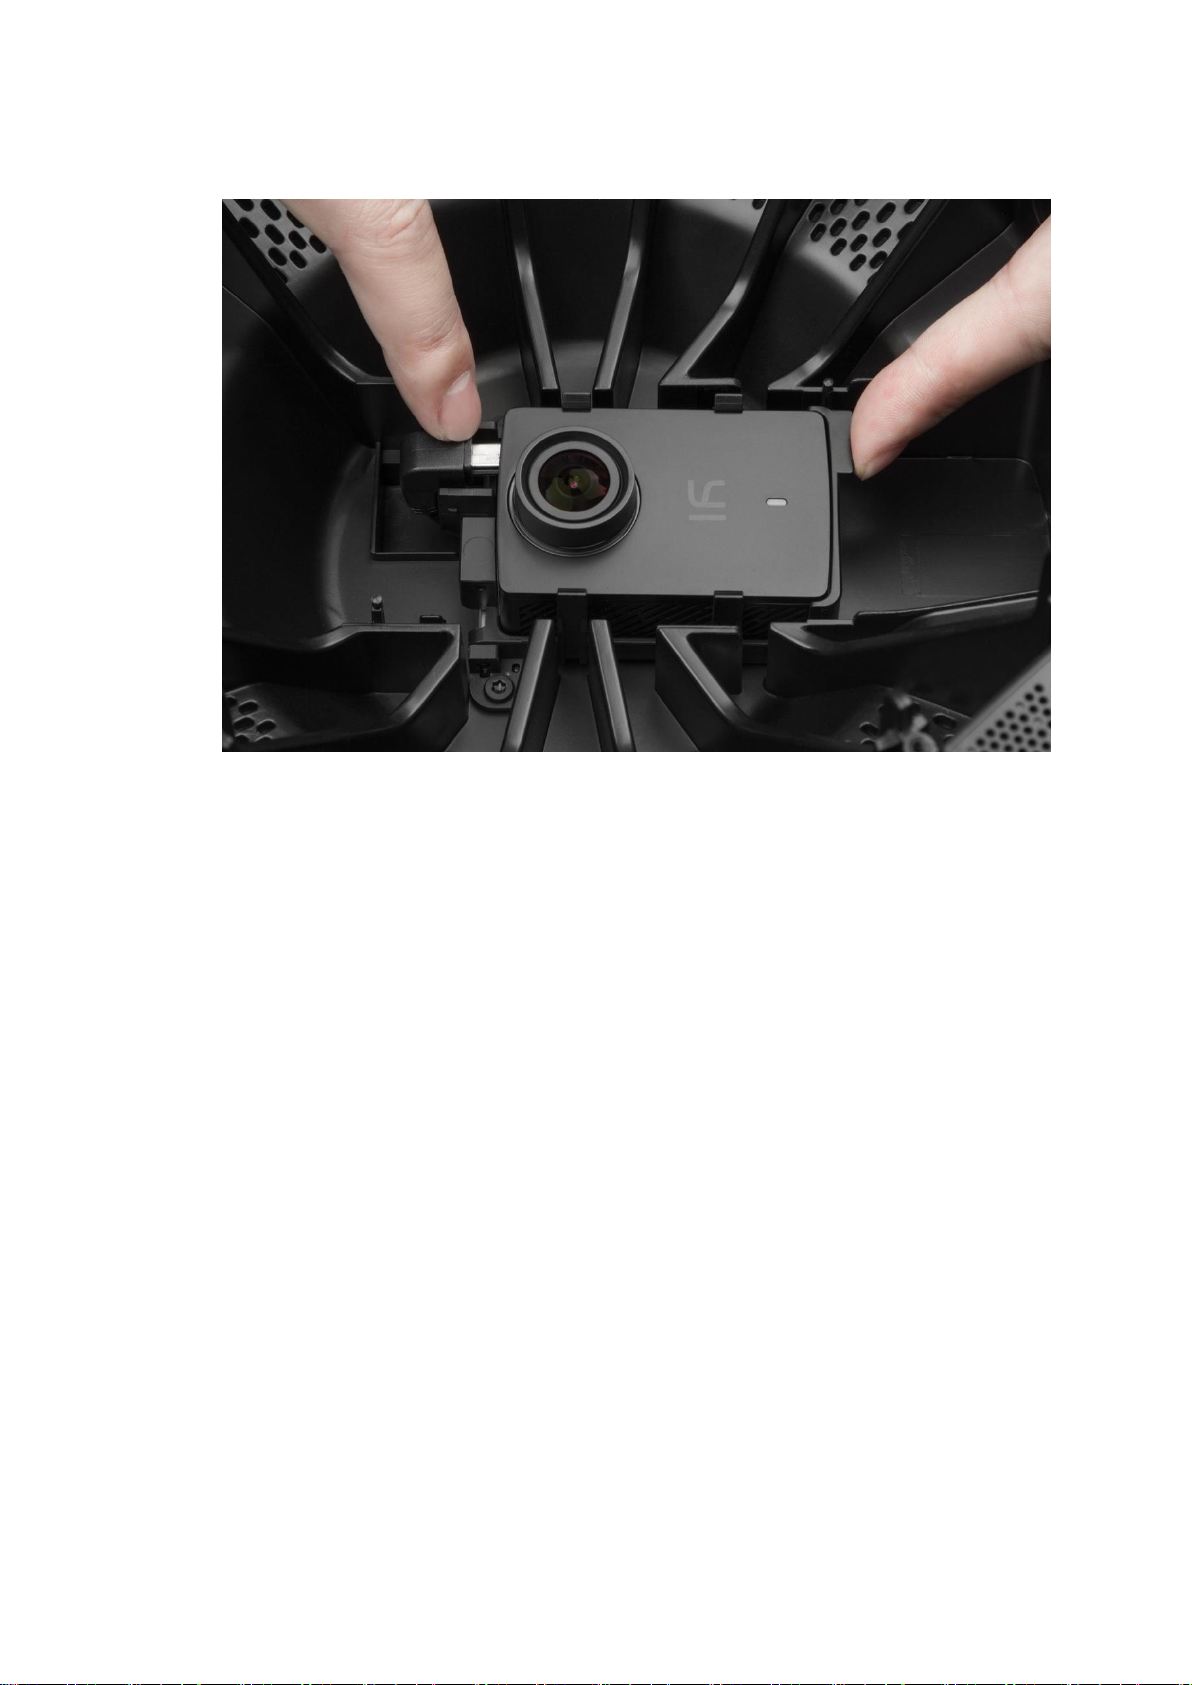
2. Pull the up camera out of the camera holder.
3. Place the new camera in the correct orientation.
4. Make sure that the camera’s firmware version is the same as the other
unit cameras, otherwise update the new unit camera’s firmware to the
same version.
5. Reattach the panel to lock the camera.
2.7.2 Firmware Update
Backup/Single Unit Camera Firmware Update Procedure
Make sure that the battery be fully charged (or 50%) and the power adapter
connected before updating.
1) Copy the ‘firmware_slave.bin’ to a microSD card.
2) Create a new ‘.txt’ file and rename it to ‘auto_update.script’, copy the
‘auto_update.script’ file to the microSD card.
3) Insert the microSD card to the backup unit camera.
4) Install the unit camera, and then power the rig on.
5) After finish backup unit camera firmware updating, please restart the rig.
Backup Controller Firmware Update Procedure
Make sure that the battery be fully charged (or 50%) and the power adapter
connected before updating.
1) Copy the ‘firmware_master.bin’ to a microSD card.
2) Create a new ‘.txt’ file and rename it to ‘auto_update.script’, then copy the
‘auto_update.script’ file to the same microSD card.
3) Insert the microSD card to the backup controller.
4) Install the controller, and then power the rig on.
Page 24
3. Camera Menus
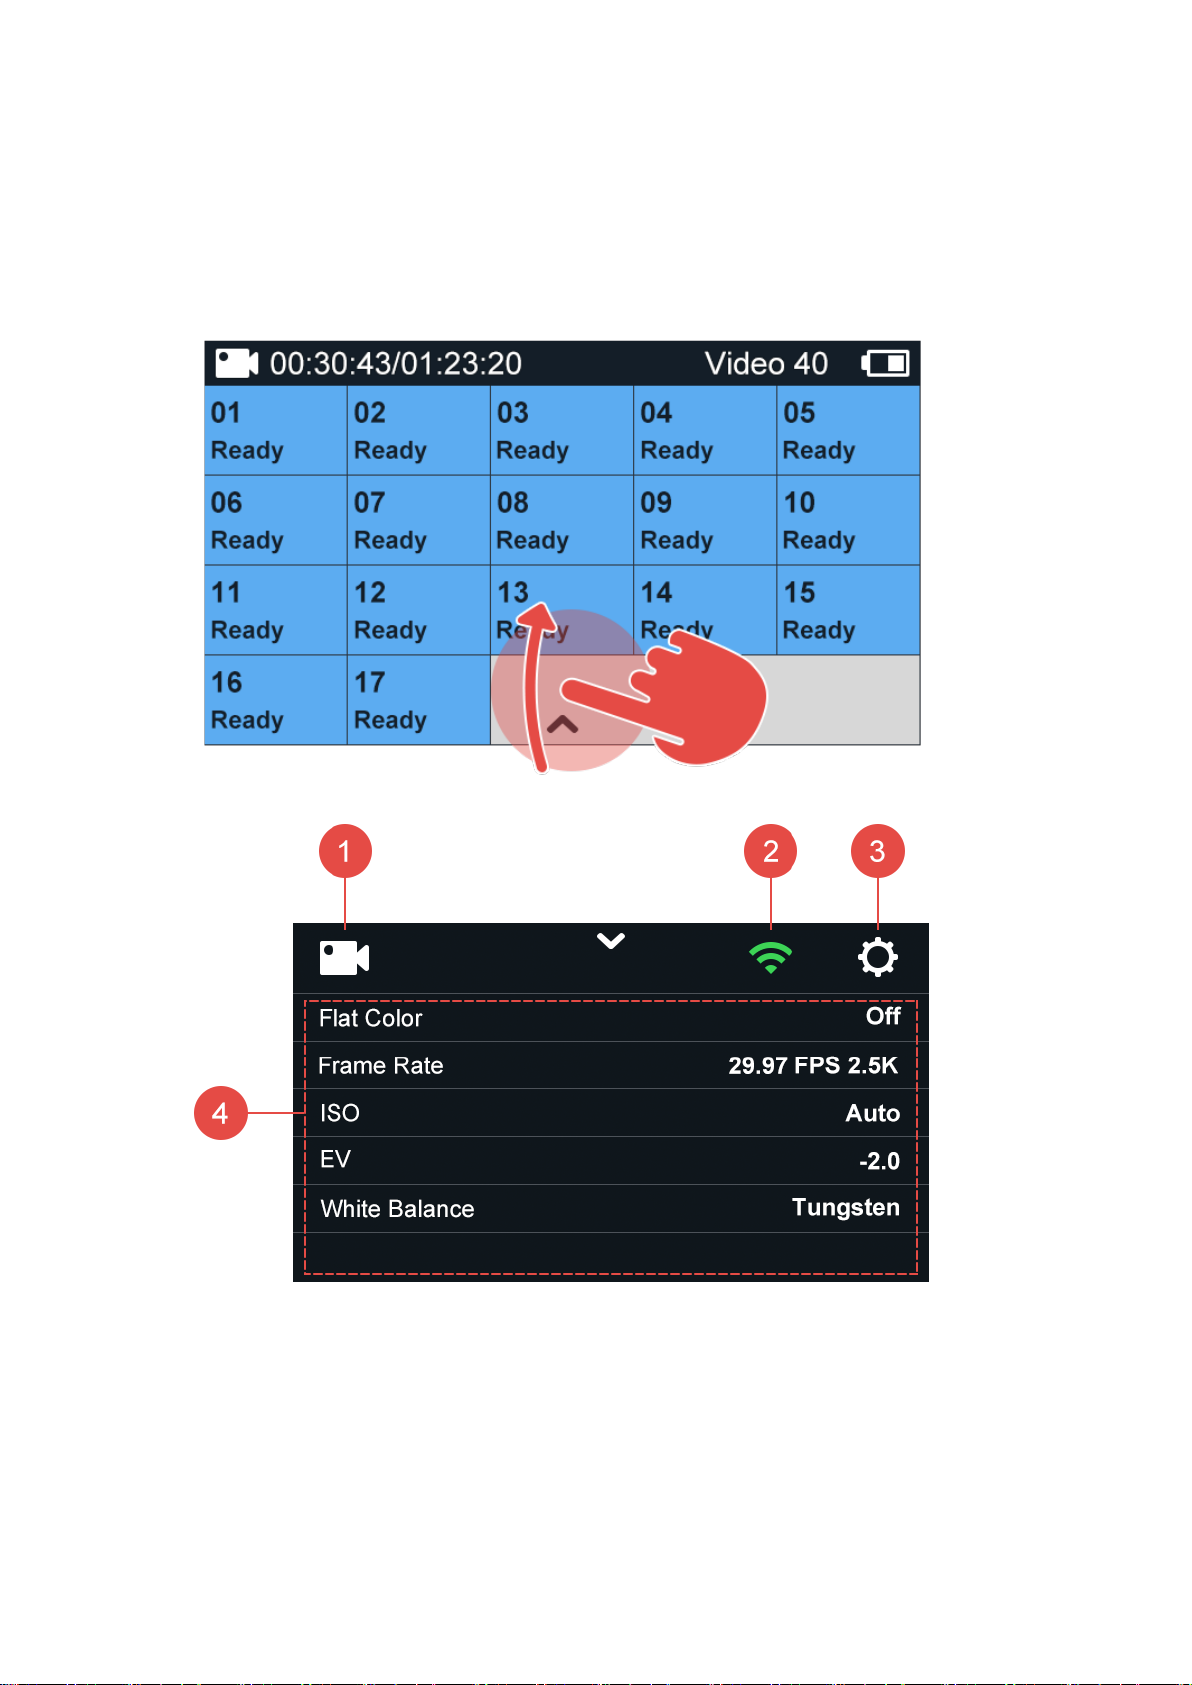
Many of YI HALO’s functions can be adjusted from the camera menus
displayed on the control panel. To access the main menu, slide up or down on
the touchscreen after the rig finishes its auto-check.
1. Display the current camera mode
2. Access Wi-Fi settings
3. Access setting menu
4. Display camera settings
Page 25
3.1 Wi-Fi Setup
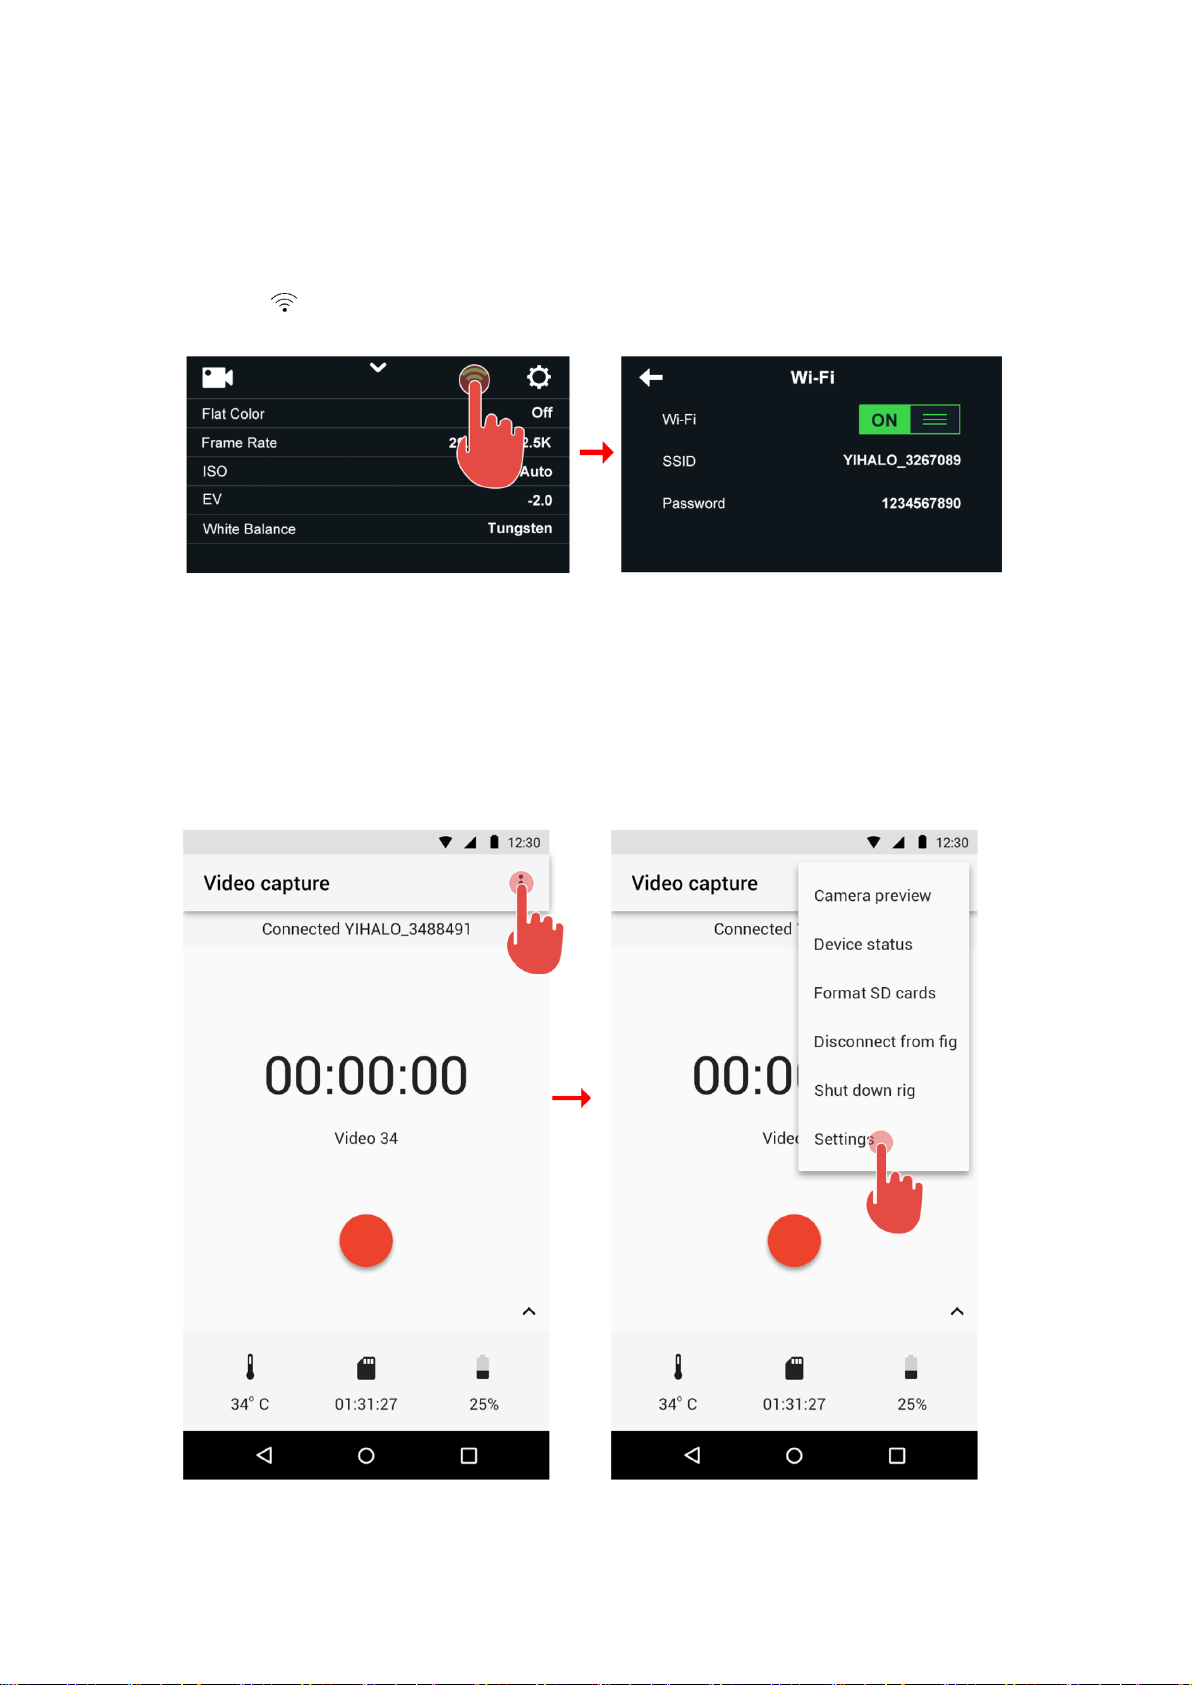
The rig connects to mobile app via Wi-Fi. For more information, see 5.1.1
Connecting
Tap the icon on the main menu to toggle Wi-Fi on/off and view Wi-Fi info.
The default setting for Wi-Fi is on, and the default password is 1234567890.
You can change Wi-Fi password from YI HALO app. Running a ‘Factory
Reset’ will reset the Wi-Fi password back to the default.
Steps to change the Wi-Fi password:
1. Open YI HALO app
2. Connect the mobile phone with the rig
3. Tap here to enter camera settings
Page 26
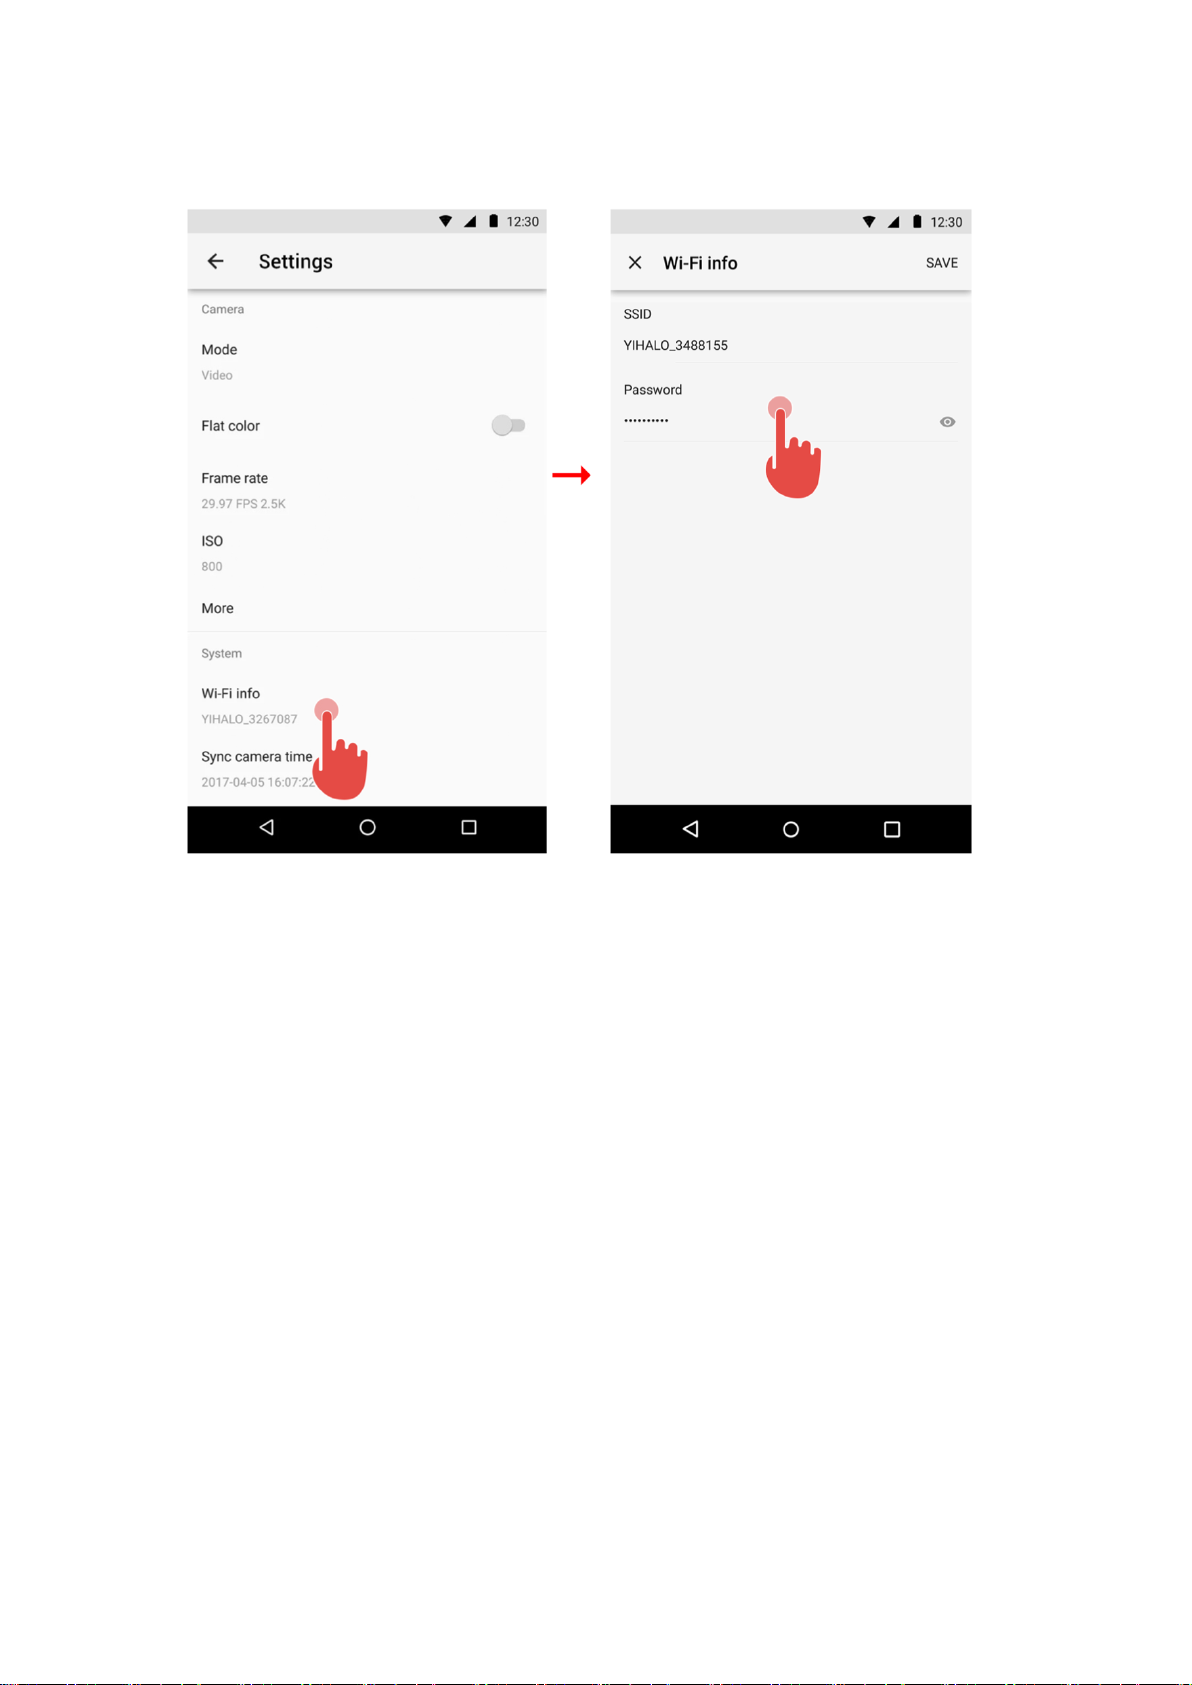
4. Tap ‘Wi-Fi info’ bar, then you can change Wi-Fi SSID and Wi-Fi password
in the Wi-Fi info page.
3.2 Select Camera Mode
YI HALO provides three shooting options as below:
Video Mode: Record video
Photo Mode: Capture still image
Time Lapse Video Mode: Create video from frames captured at specific
intervals
YI HALO is set to video mode by default. The icon at the top left corner on the
main menu indicates the current camera mode you’ve selected.
Page 27
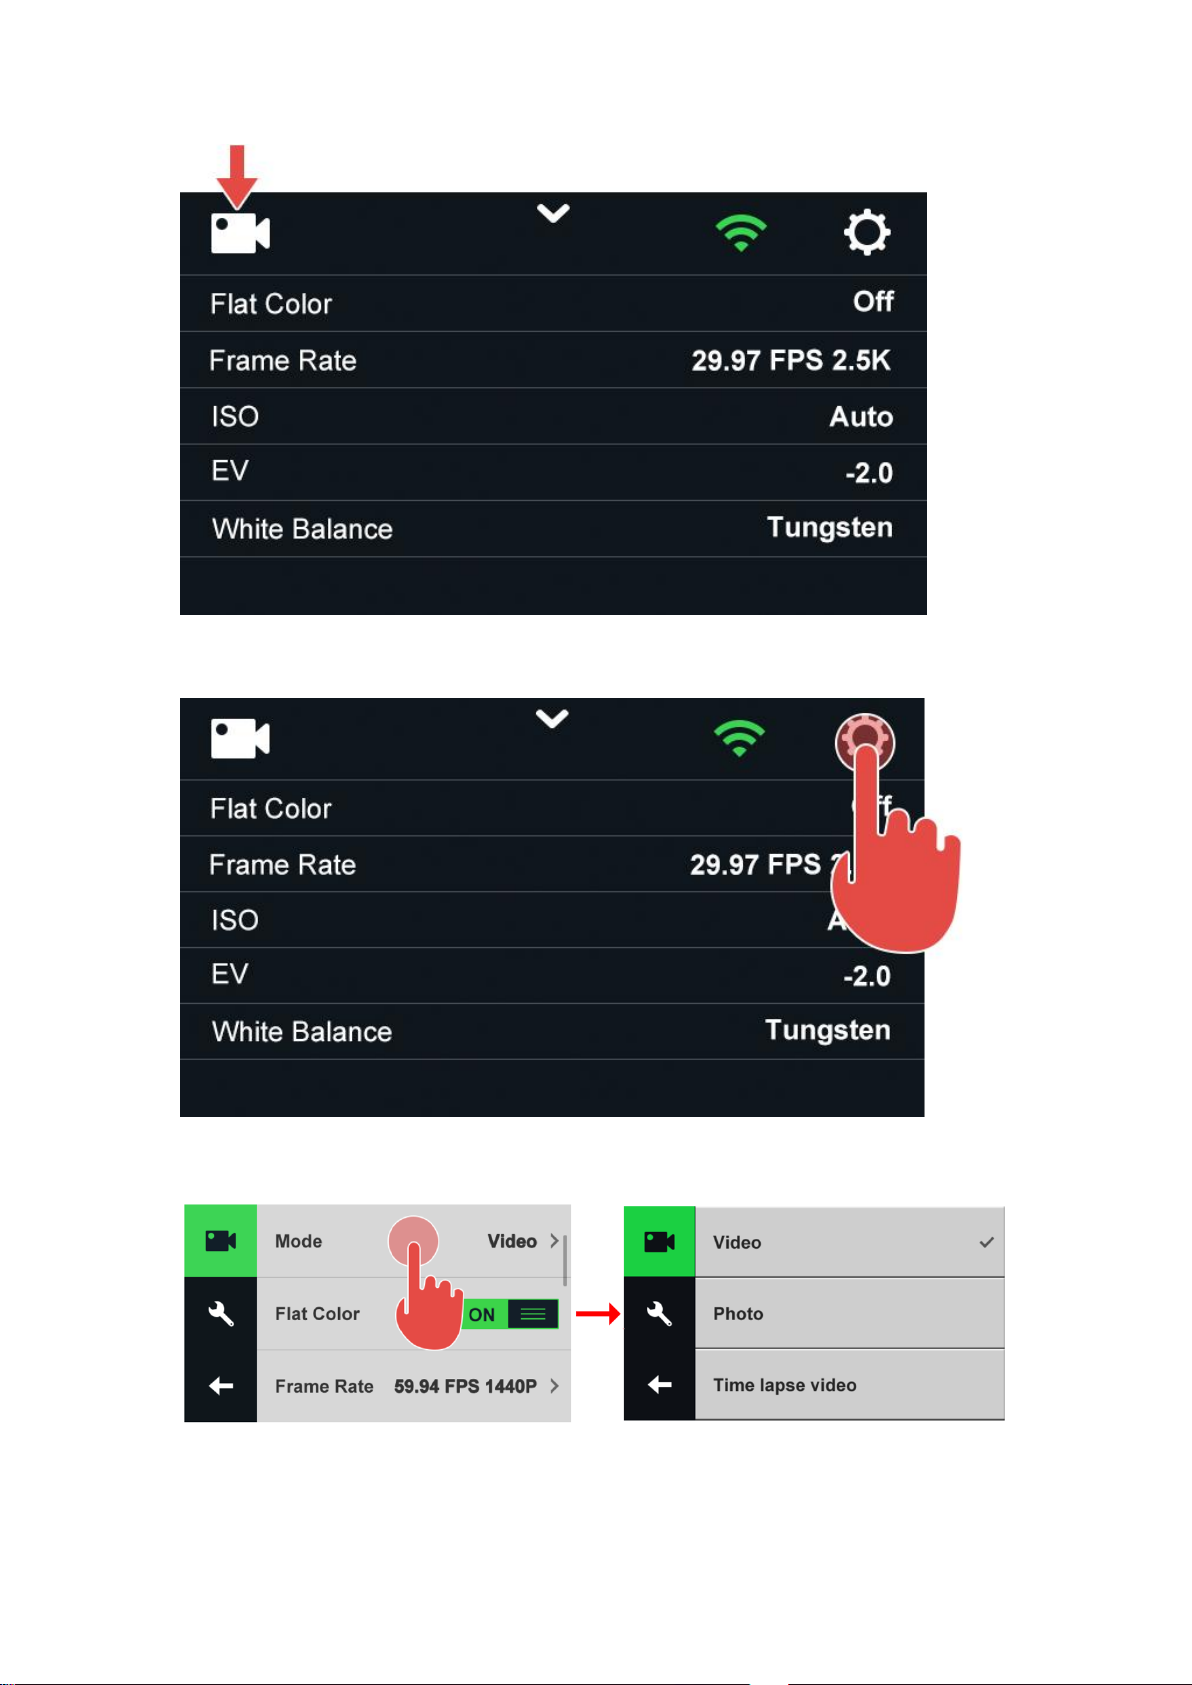
To change the camera mode, tap this icon to enter the submenu.
Once in the submenu, tap ‘Mode’ and choose the shooting mode.
Page 28
3.3 Image Quality Settings
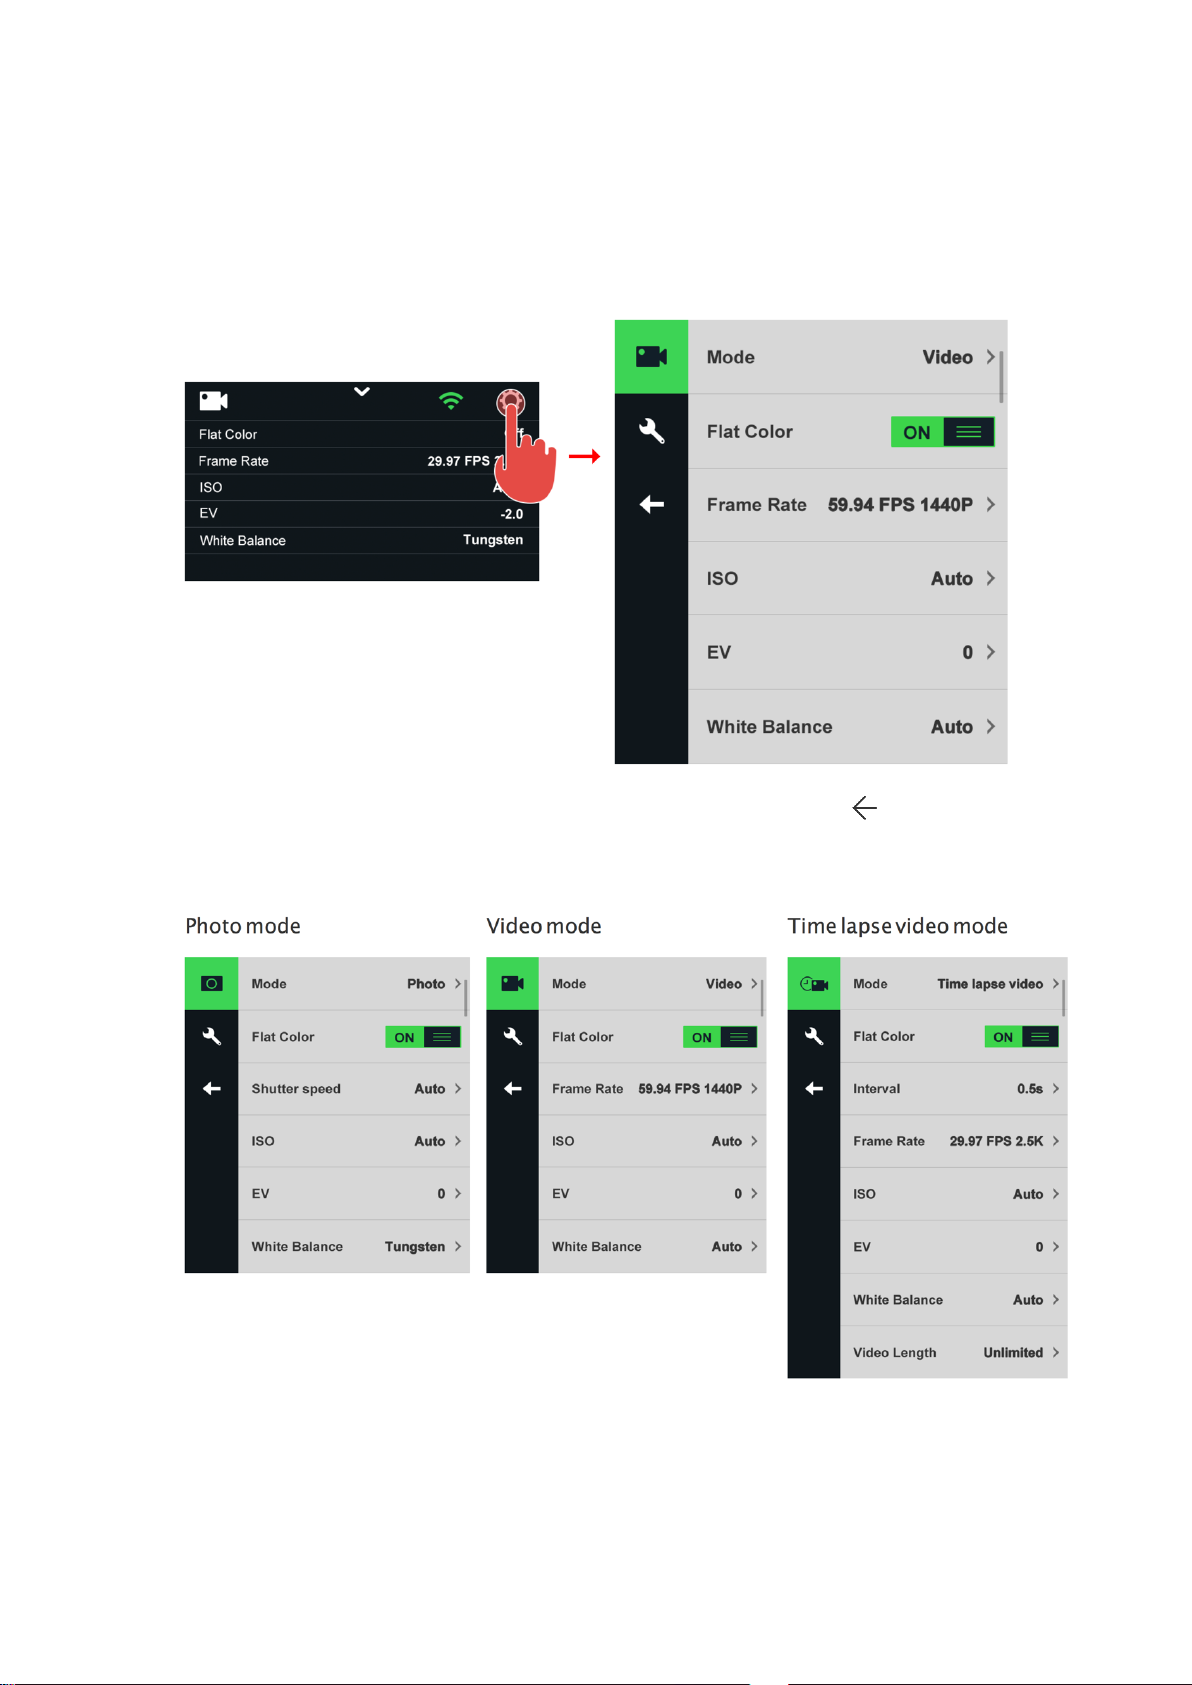
The current image quality settings are displayed on the main camera menu.
Tap this icon on the main menu to access the setting menu.
To go back to the previous screen or exit the submenu, tap the icon.
The settings menu has a slight difference between three camera modes.
Page 29
3.3.1 Video Settings
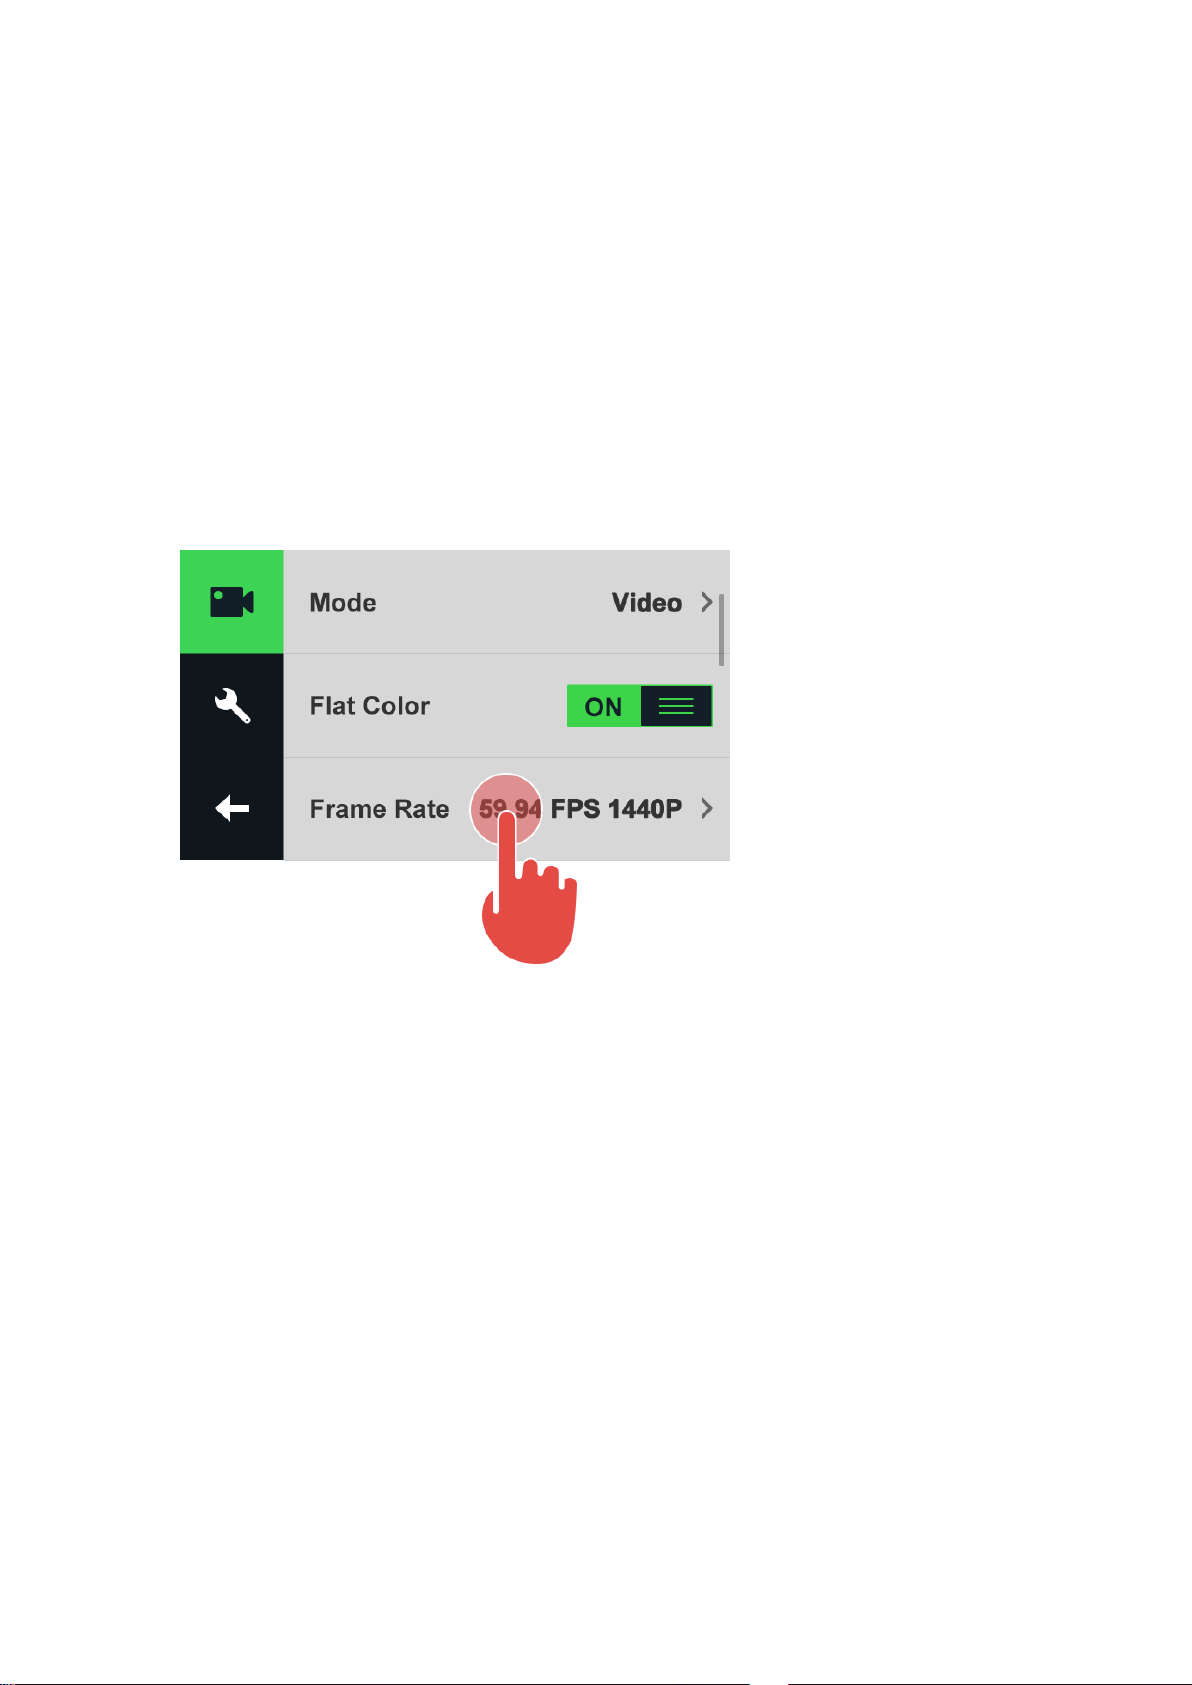
1. Frame Rate
YI HALO offers four frame rates:
● 29.97 FPS 2.5K
● 25 FPS 2.5K
● 59.94 FPS 1440P
● 50 FPS 1440P
YI HALO records in 29.97 FPS 2.5K by default. Tap the ‘Frame Rate’ bar to
adjust the frame and resolution setting.
2. Flat Color
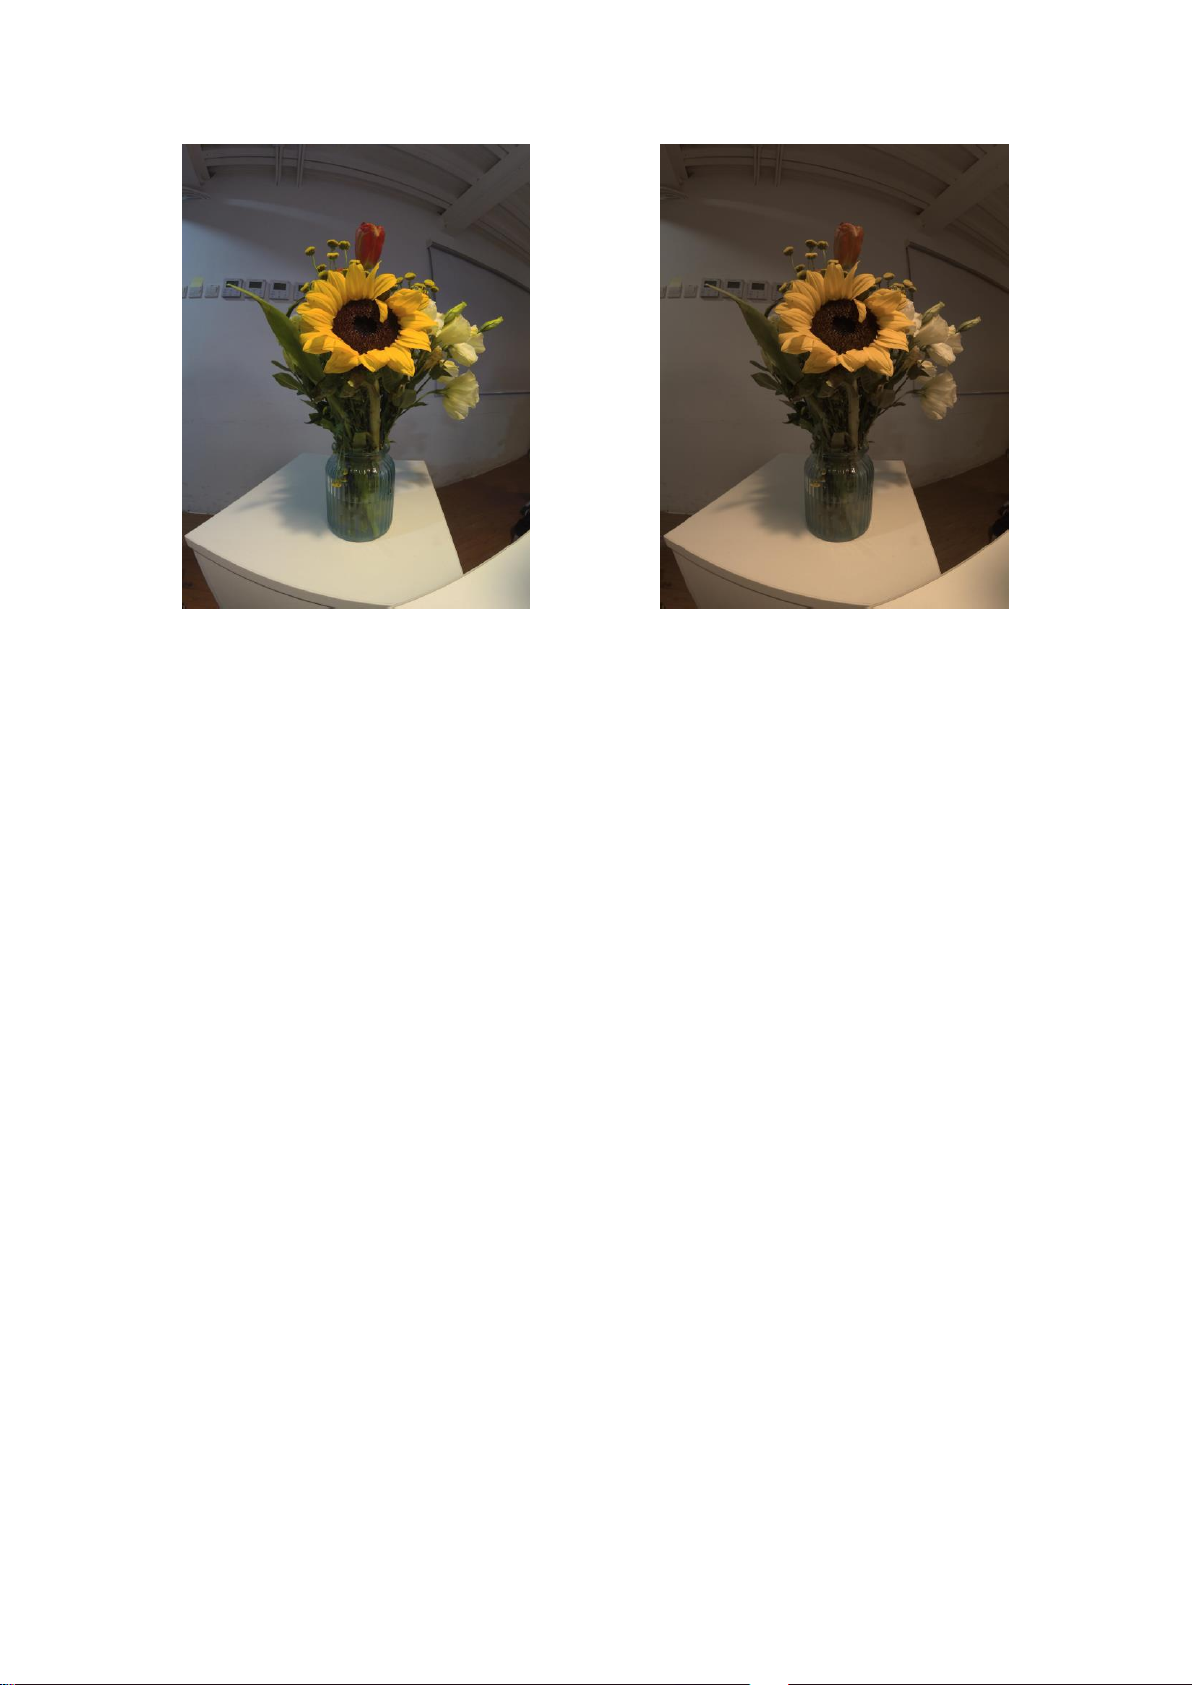
Flat Color provides minimal color enhancement while preserving the original
color characteristics. Images shot with ‘Flat’ setting have minimal contrast,
neutral saturation and minimal sharpening so you have more room to work in
post-processing.
Here is a comparison between images with ‘Flat Color’ ON and OFF.
Page 30
Flat color OFF
Flat color ON
This mode is recommended when you are shooting a scene with color
correction in mind. It is ‘OFF’ by default.
3. ISO
ISO settings are helpful when you are under a variety of light conditions. For
YI HALO, the ISO value is set to ‘Auto’ by default. In that mode, the rig can
adjust the ISO automatically according to the surrounding light condition.
You can also set the ISO to a fixed value. YI HALO offers six options in video
mode:
● Auto
● 400
● 800
● 1600
● 3200
● 6400
4. Exposure Value
You can set exposure value by tapping the ‘EV’ bar. The number ranges from
+2.0 to -2.0 in 0.5 increments. Exposure Value is a way to represent the
brightness of a scene in a numeric scale. Each exposure ‘stop’ is a doubling
or halving of the amount of light.
Page 31

5. White Balance
YI HALO includes 5 white balance presets for a variety of color temperature
conditions. These are:
● Auto
● Native
● Tungsten Light: 3000K
● Daylight: 5500K
● Cloudy: 6500K
The white balance is set to ‘Auto’ by default. You can use Native to create a
minimally color-corrected file from the image sensor that allows for more
precise adjustments in post-production.
Tap the ‘White Balance’ bar to adjust the White Balance setting.
3.3.2 Photo Settings
Unit cameras of YI HALO capture photo at 12MP (4000x3000).
1. Flat Color
This setting in Photo mode is the same as that in Video mode.
2. Shutter Speed
The shutter speed options of YI HALO are as following:
Auto, 2s, 5s, 10s, 20s, 30s
It is set to ‘Auto’ by default. In that mode, the rig adjusts the shutter speed
automatically. A longer shutter speed is set to capture movement, for
example, capture light trails of car taillights.
Note:
The App preview may be too bright or too white. It is due to overexposure.
This can be common during the day if the shutter is not set to Auto or the EV
(exposure value) is too high (i.e. +2.0). You can resolve this by setting the
shutter to Auto and the EV (exposure value) to 0.
3. ISO
YI HALO offers five ISO options in Photo mode:
● Auto
● 100
● 200
● 400
Page 32

● 800
4. Exposure Value
This setting in Photo mode is the same as that in Video mode.
5. White Balance
This setting in Photo mode is the same as that in Video mode.
3.3.3 Time Lapse Video Settings
1. Flat Color
This setting in Time Lapse Video mode is the same as that in Video mode.
2. Interval
The interval setting only applies in Time Lapse Video mode. Interval
determines the amount of time that passes between each captured frame.
Available intervals range from 0.5 second (default) to 60 seconds _ 0.5s, 1s,
2s, 5s, 10s, 30s, 60s.
The interval you set depends on how fast the scene you would like to capture
is changing. A slower changing scene can allow a longer interval to achieve
smooth playback.
In normal video mode, recording in 2.5K resolution at 29.97 frames per
second would take about 130 minutes to fill up a 64GB card. But in time lapse
video mode, the time consumed would be much longer. Setting interval to
0.5s, the rig would capture 2 frames per second. Therefore, it would take
1920 minutes (32.5 hours) to fill up a 64GB card.
If accidental power outage or a recording fails during recording video, please
do not remove the card. The video captured previous would recover
automatically after powering on the rig.
Page 33

Recommendations
Interval
Examples
0.5s
Driving
1s
Moving traffic
2s
Fast moving clouds
5s
Sunsets and sunrises
10s
Slow moving clouds
30s
Moving shadows
60s
Construction projects
3. Frame Rate
Time Lapse video is captured at 2.5K (2560 x 1920). YI HALO offers two
frame rates:
● 29.97 FPS 2.5K
● 25 FPS 2.5K
4. ISO
This setting in Time Lapse Video mode is the same as that in Video mode.
5. Exposure Value
This setting in Time Lapse Video mode is the same as that in Video mode.
6. White Balance
This setting in Time Lapse Video mode is the same as that in Video mode.
7. Video Length
This setting determines how long you want your time lapse compilation to be.
The time lapse video length is unlimited by default. In that mode, the rig stops
recording time lapse video by pressing the shutter button.
Fixed values are also available, ranging from 6 seconds to 120 seconds. If
you set the video length to a fixed value, the rig will stop recording
automatically when the frames captured reach the goal.
Page 34
3.4 System Settings
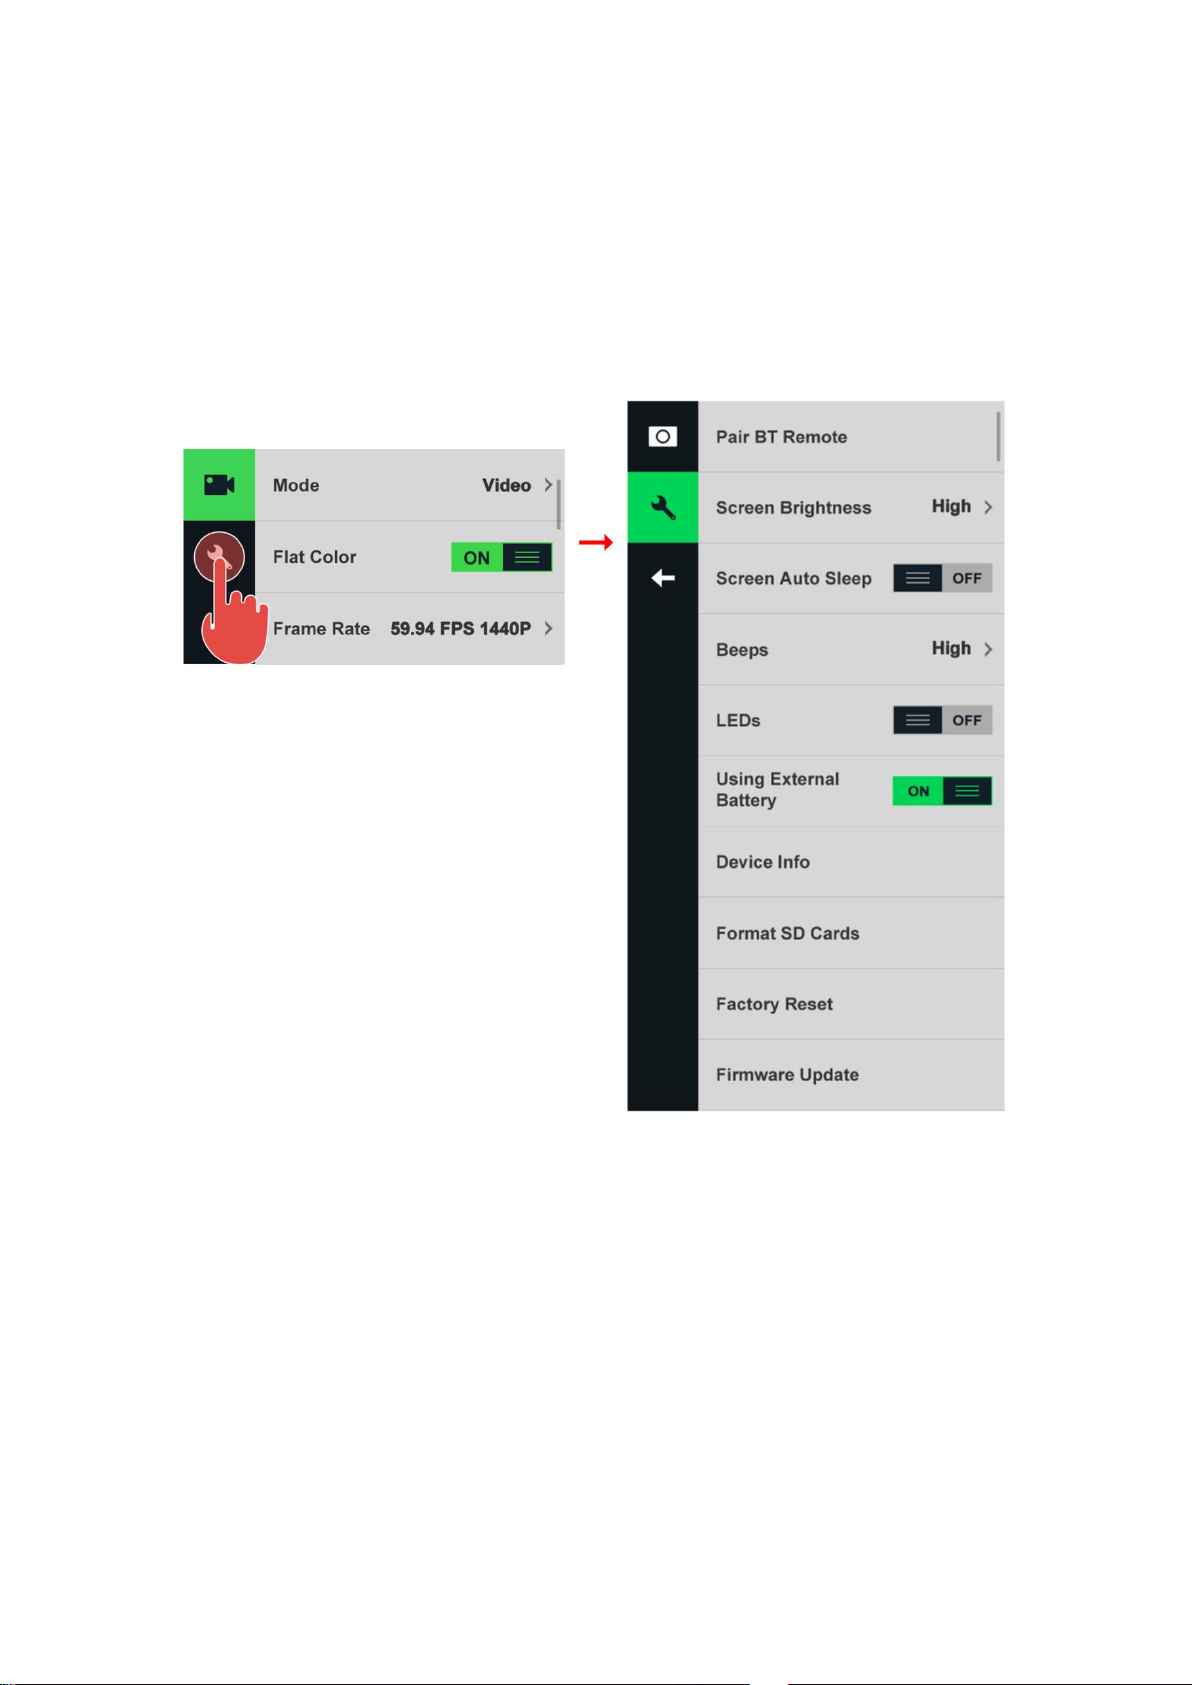
Tap this icon to access system setup menu.
3.4.1 Pair BT Remote
Tap the ‘Pair BT Remote’ bar on the setting menu, the rig starts to search for
the Bluetooth remote. Press any button on your remote to pair it to the rig.
After pairing successfully, you can operate the rig up to 10 meters away. You
can use the Bluetooth remote to:
● Start recording
● End recording
● Shoot pictures
Page 35
3.4.2 Screen Brightness
You can customize the brightness of the screen by tapping the ‘Brightness’
bar and select between High, Middle and Low.
3.4.3 Screen Auto Sleep
If you turn the ‘Screen Auto Sleep’ on, the screen will automatically turn off
after one minute of inactivity. This is useful if you think recording cameras will
be influenced by the screen light. Also, this is helpful for power saving.
3.4.4 Beeps
You can set the volume for the sound indicator to be High (default), Low or
Mute
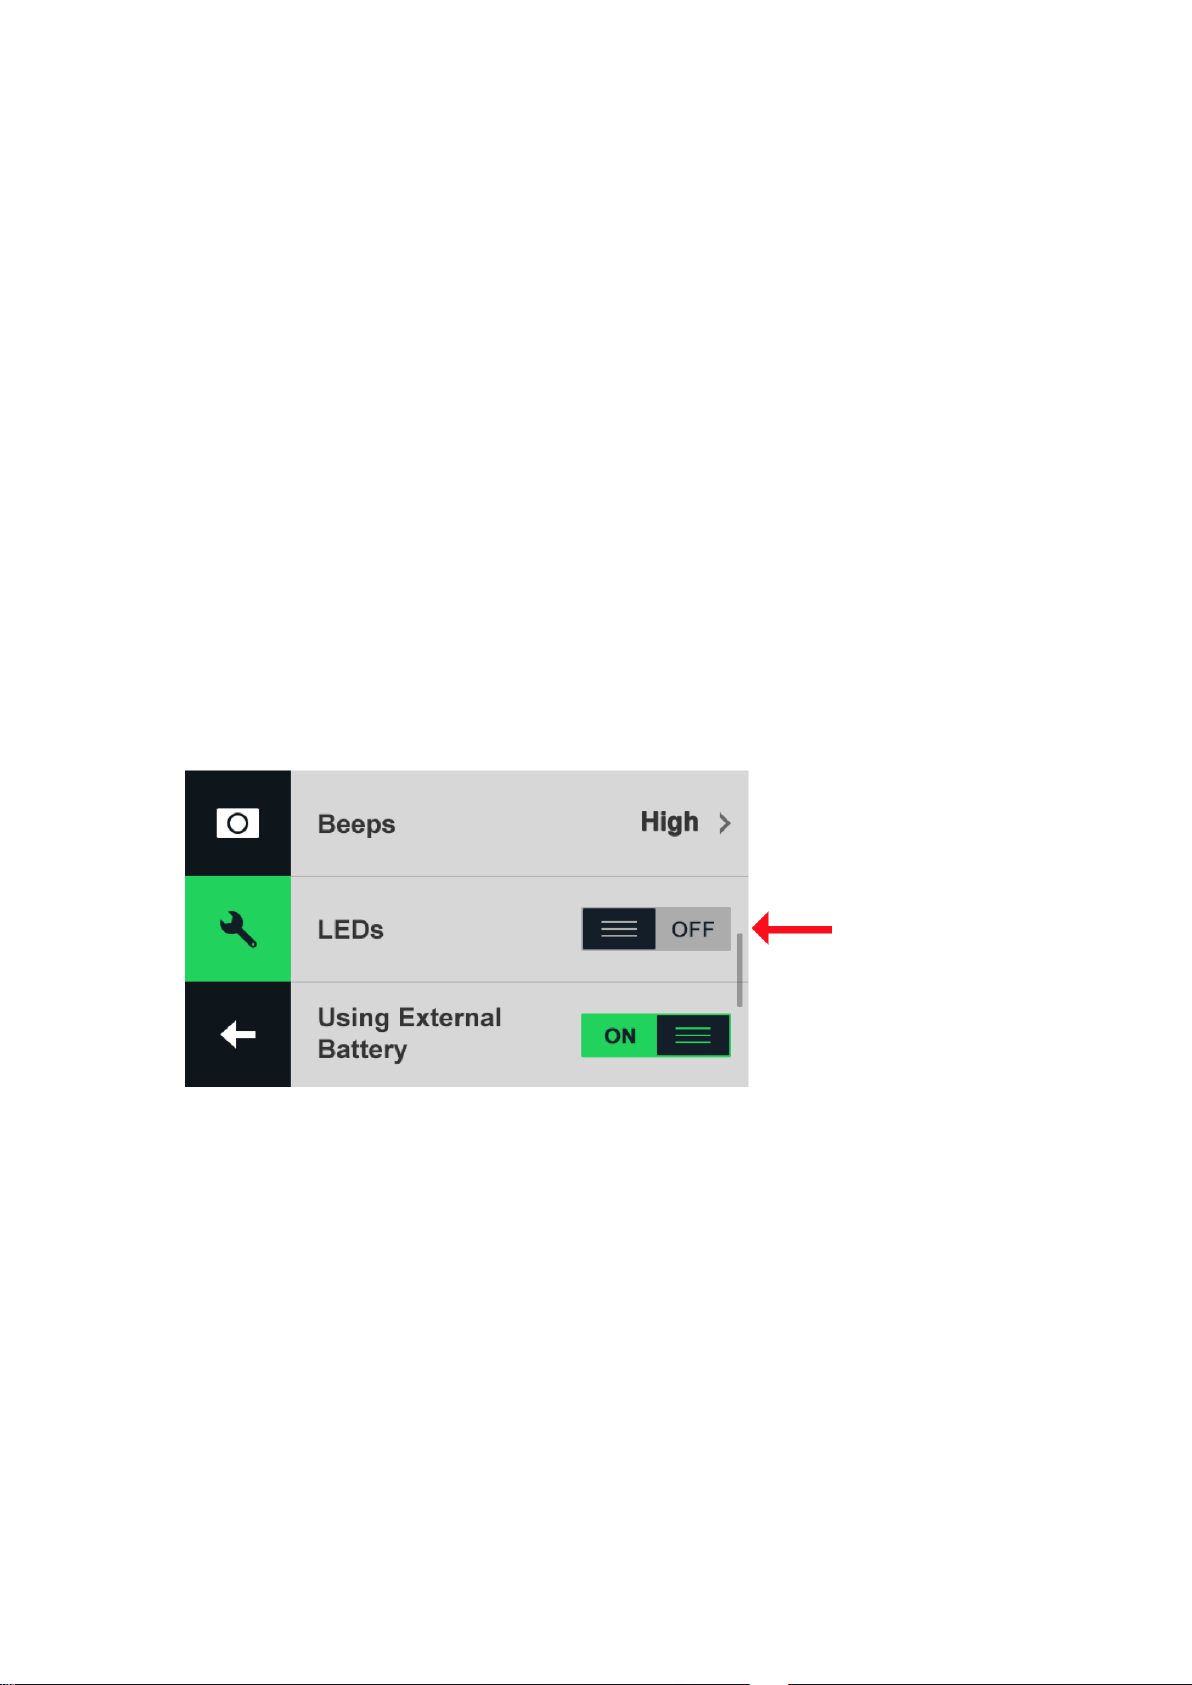
3.4.5 LEDs
You can switch the light indicator on/off with this icon.
If the switch is on (default), when unit cameras are recording, the status lights
will be red and flash. When unit cameras are free, the red status lights are on.
3.4.6 Device Info
Tap the ‘Device Info’ bar to see the detailed information of your YI HALO,
including the model, the serial number, the firmware version and the date and
time of the rig. Tap the screen to back to the setting menu.
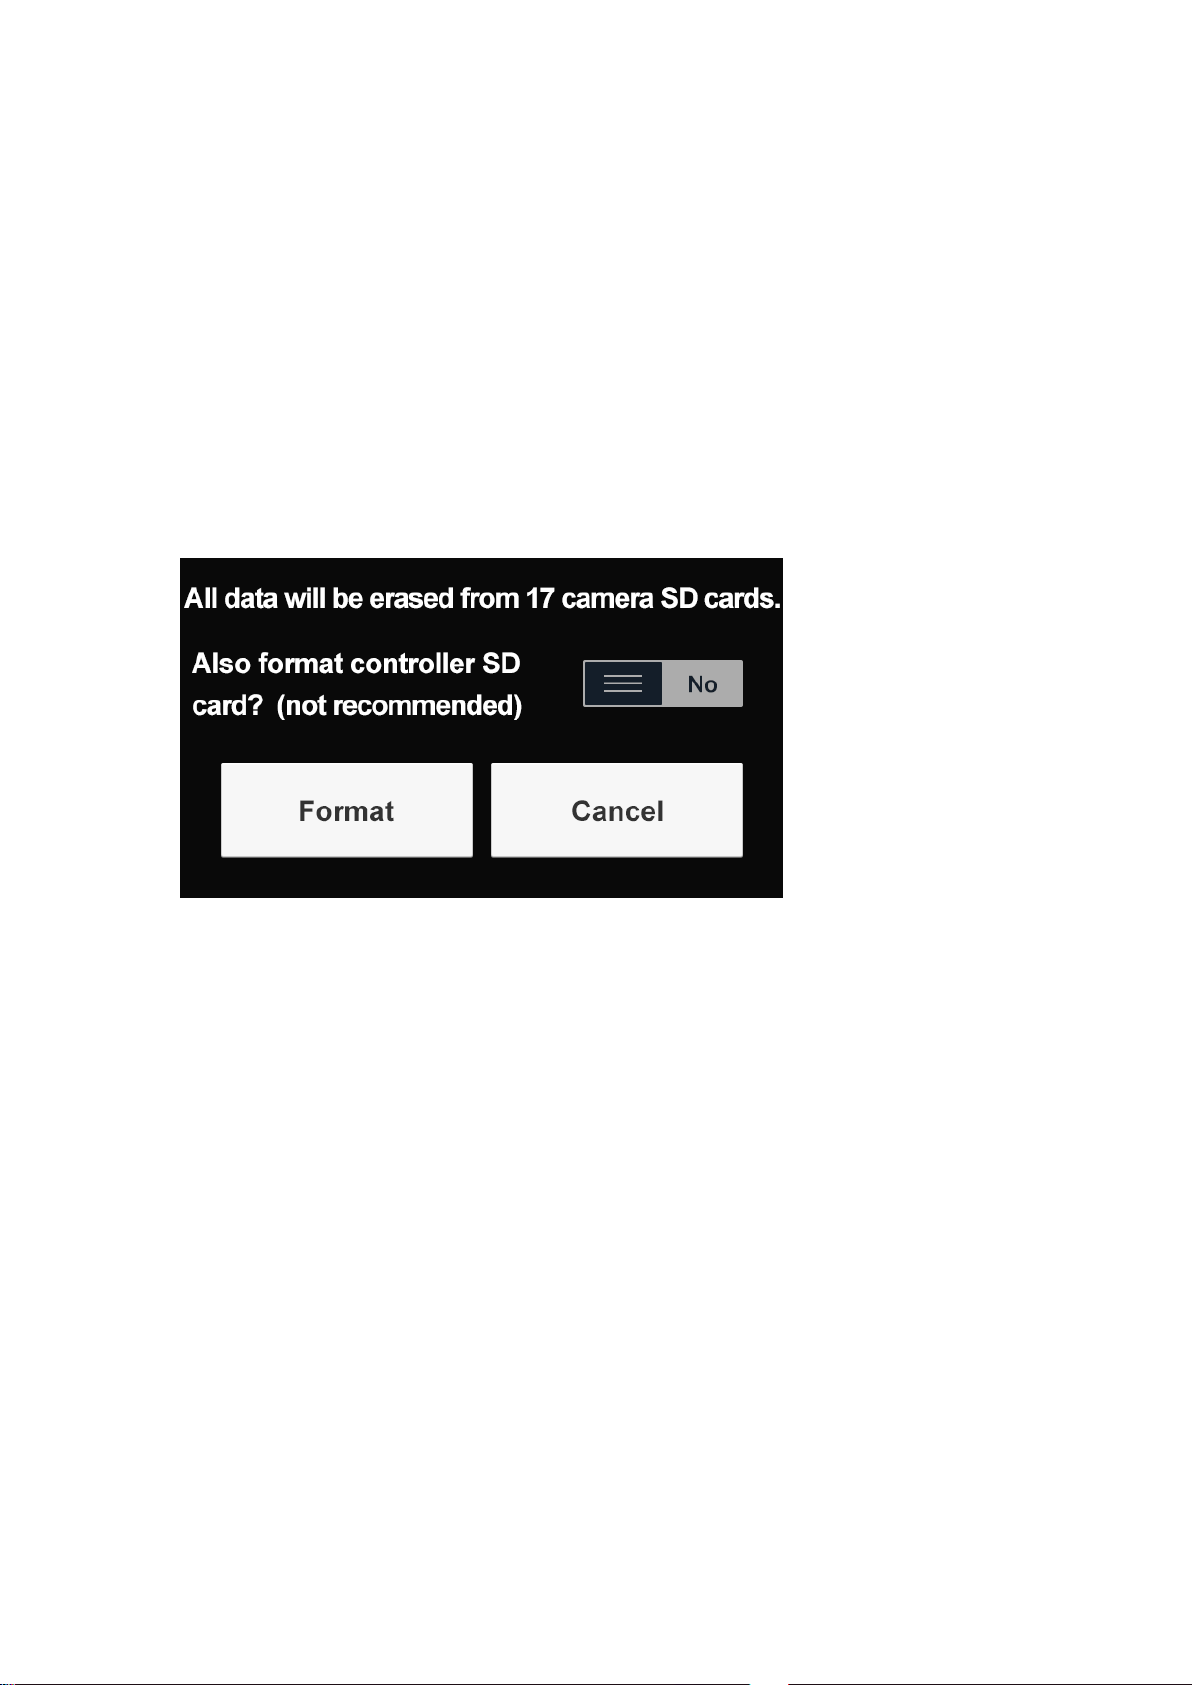
3.4.7 Format SD Cards
Tap the ‘Format SD Cards’ bar to format all unit cameras’ SD cards.
Page 36
Notes:
● You need to insert a microSD card that is formatted to exFat format into
each camera. MicroSD cards formatted to Fat32 format on a Mac
computer is also supported, but only Master Boot Record (MBR) partitions
will work in the camera.
● Formatting SD cards permanently deletes any data they contain. Be sure
to copy any files you want to keep to a computer before proceeding.
We offer an option to format the controller’s SD card. If you switch on this
button, the SD card in the controller will also be formatted, but this is not
recommended in common use because it will cause the loss of log files in the
controller. Logs are important because they provide information on how users
operate the camera and the system running state. Developers check the logs
to locate problems.
3.4.8 Factory Reset
With this setting, you can reset all cameras to their default settings. This also
resets the shot counter.
3.4.9 Firmware Update Procedure
Please follow the steps below to update firmware:
1) Power off YI HALO and unplug the microSD card from the controller.
2) Copy the ‘firmware_master.bin’ and ‘firmware_slave.bin’ files to controller’s
MicroSD card root directory.
3) Insert the microSD card back to the controller.
4) Confirm that microSD cards in all unit cameras are available.
5) Power on the rig.
6) Navigate the setting menu, tap the ‘Firmware Update’ bar, confirm to
update firmware on a pop-up, then the firmware updating will start.
Note: This process takes about 30 minutes normally. Make sure the power
adapter connected before updating.
Page 37

When the rig is updating the firmware, the screen displays the status of each
unit camera and the blue status light is blinking.
Check the LED Status Light
Blinking blue: Updating goes on normally.
After firmware updating is done, the LED status lights turn to solid red again.
Exception Handling
● If the unit camera’s status light is blue instead of red after updating
1) Unplug the microSD card from the abnormal unit camera.
2) Copy the ‘firmware_slave.bin’ file to the microSD card, and then
rename it to ‘firmware_force.bin’.
3) Insert the microSD card back to the abnormal unit camera, and then
the firmware updating starts. Updating goes on normally with LED status
light blinking blue.
● If the rig shows firmware mismatch error, it means some unit cameras fail
to update the firmware
1) Create a empty file and name it to ‘auto_update.script’ on your
computer.
2) Unplug the microSD card from the abnormal unit camera. Copy the file
together with the ‘firmware_slave.bin’ file to microSD card.
3) Insert the microSD card back to the abnormal unit camera, and then
the firmware updating starts. Updating goes on normally with LED status
light blinking blue.
3.4.10 Using External Battery
When powering YI HALO with an external battery, please make sure this
option is set to ON.
3.5 Sync Settings
Every time you change the unit camera related settings, the rig will
automatically synchronize the settings between all cameras.
The controller screen will display unit camera status as ‘Ready’ in blue color, if
there are errors, the screen will display unit camera status as ‘Failed’ in red
color.
Notes: If ‘Failed’ appears on the screen, try to
● Tap the red rectangle to check the detailed failure cause.
● Tap the ‘Retry’ button in the upper right corner of the screen.
● Restart the rig.
● Remove the power supply and plug it again, then turn on the rig.
● Factory Reset. With this setting, you can reset all cameras to default
settings, please be careful.
Page 38
4. Recording
This section explains the recording basics.
4.1 Preparing to Record
1. Make sure microSD cards in unit cameras and the controller.
2. Power on the rig.
3. Be sure that all unit cameras are ready after the auto check.
4. Confirm the current camera mode.
5. Adjust settings.
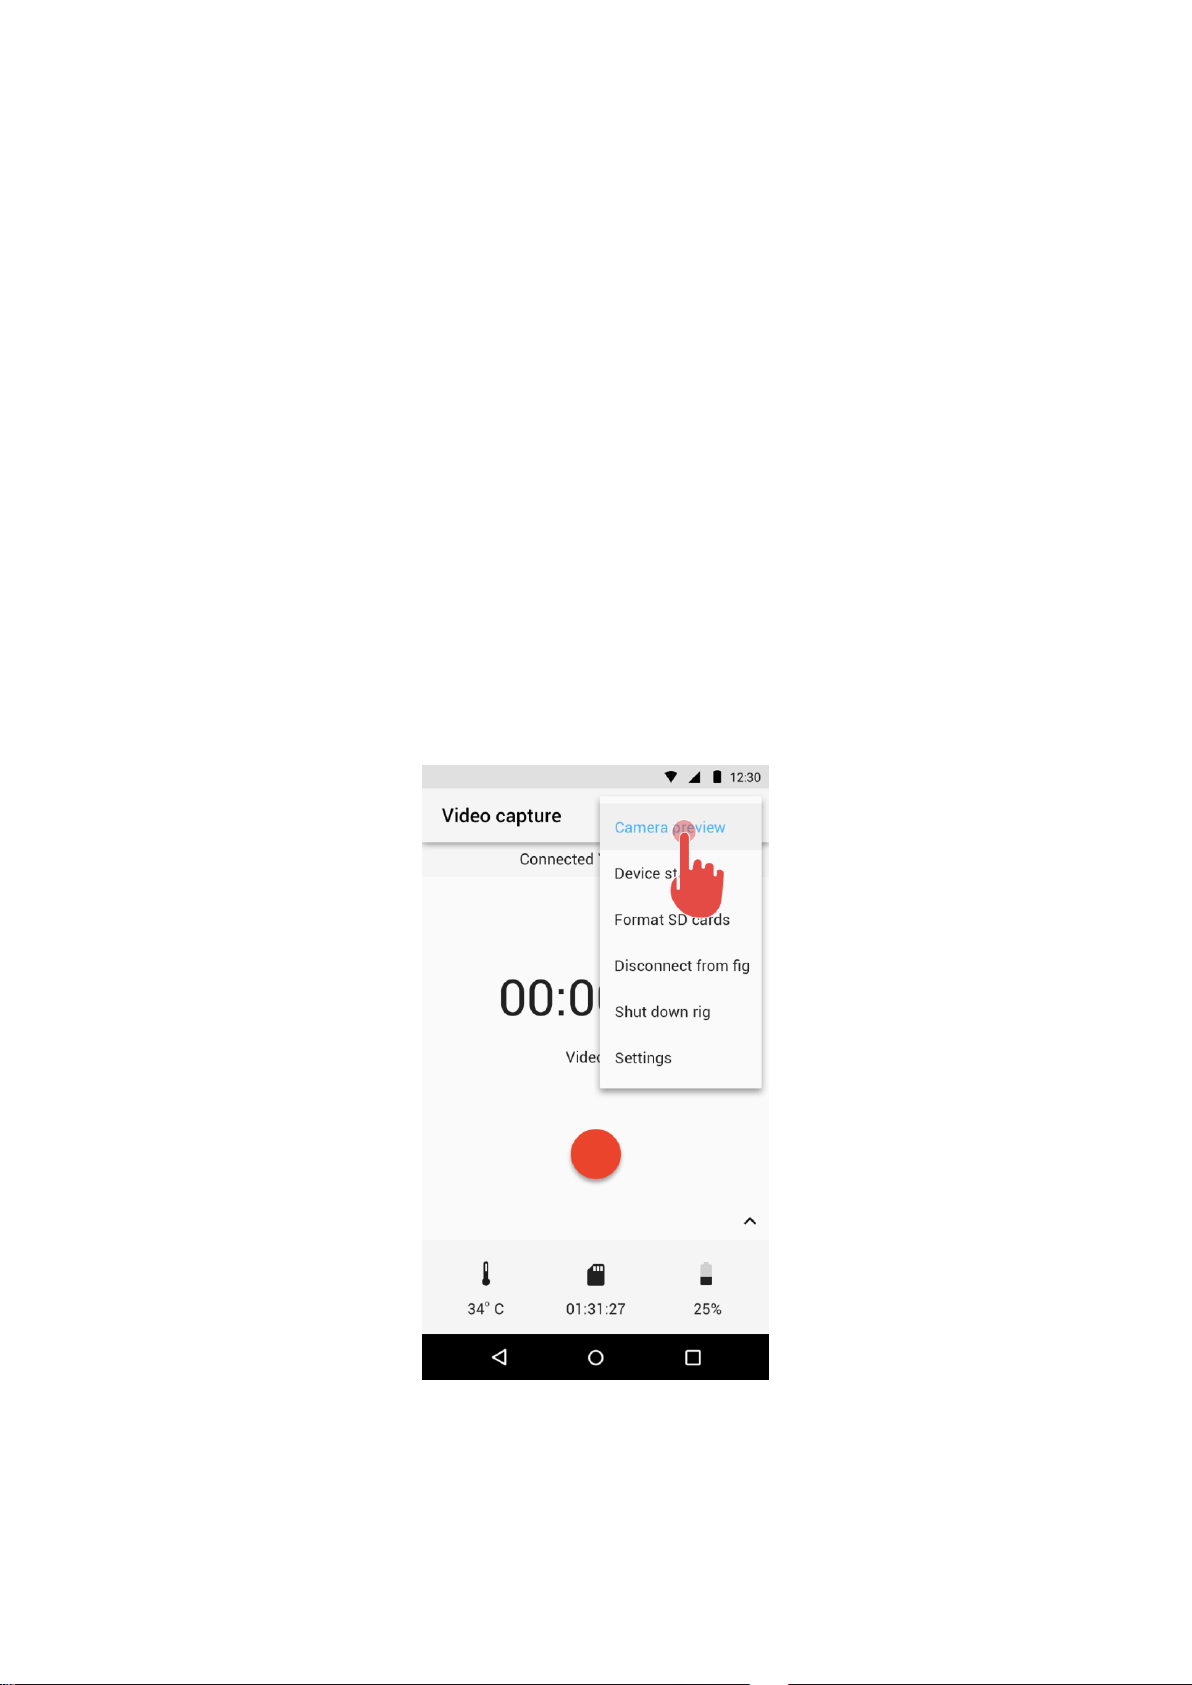
4.2 Preview
The only way to see camera preview is viewing from YI HALO app. After
connecting the app to the rig successfully over Wi-Fi, tap the icon in the upper
right corner of the main page in the app, a popup menu is shown. Select
‘Camera preview’.
Page 39
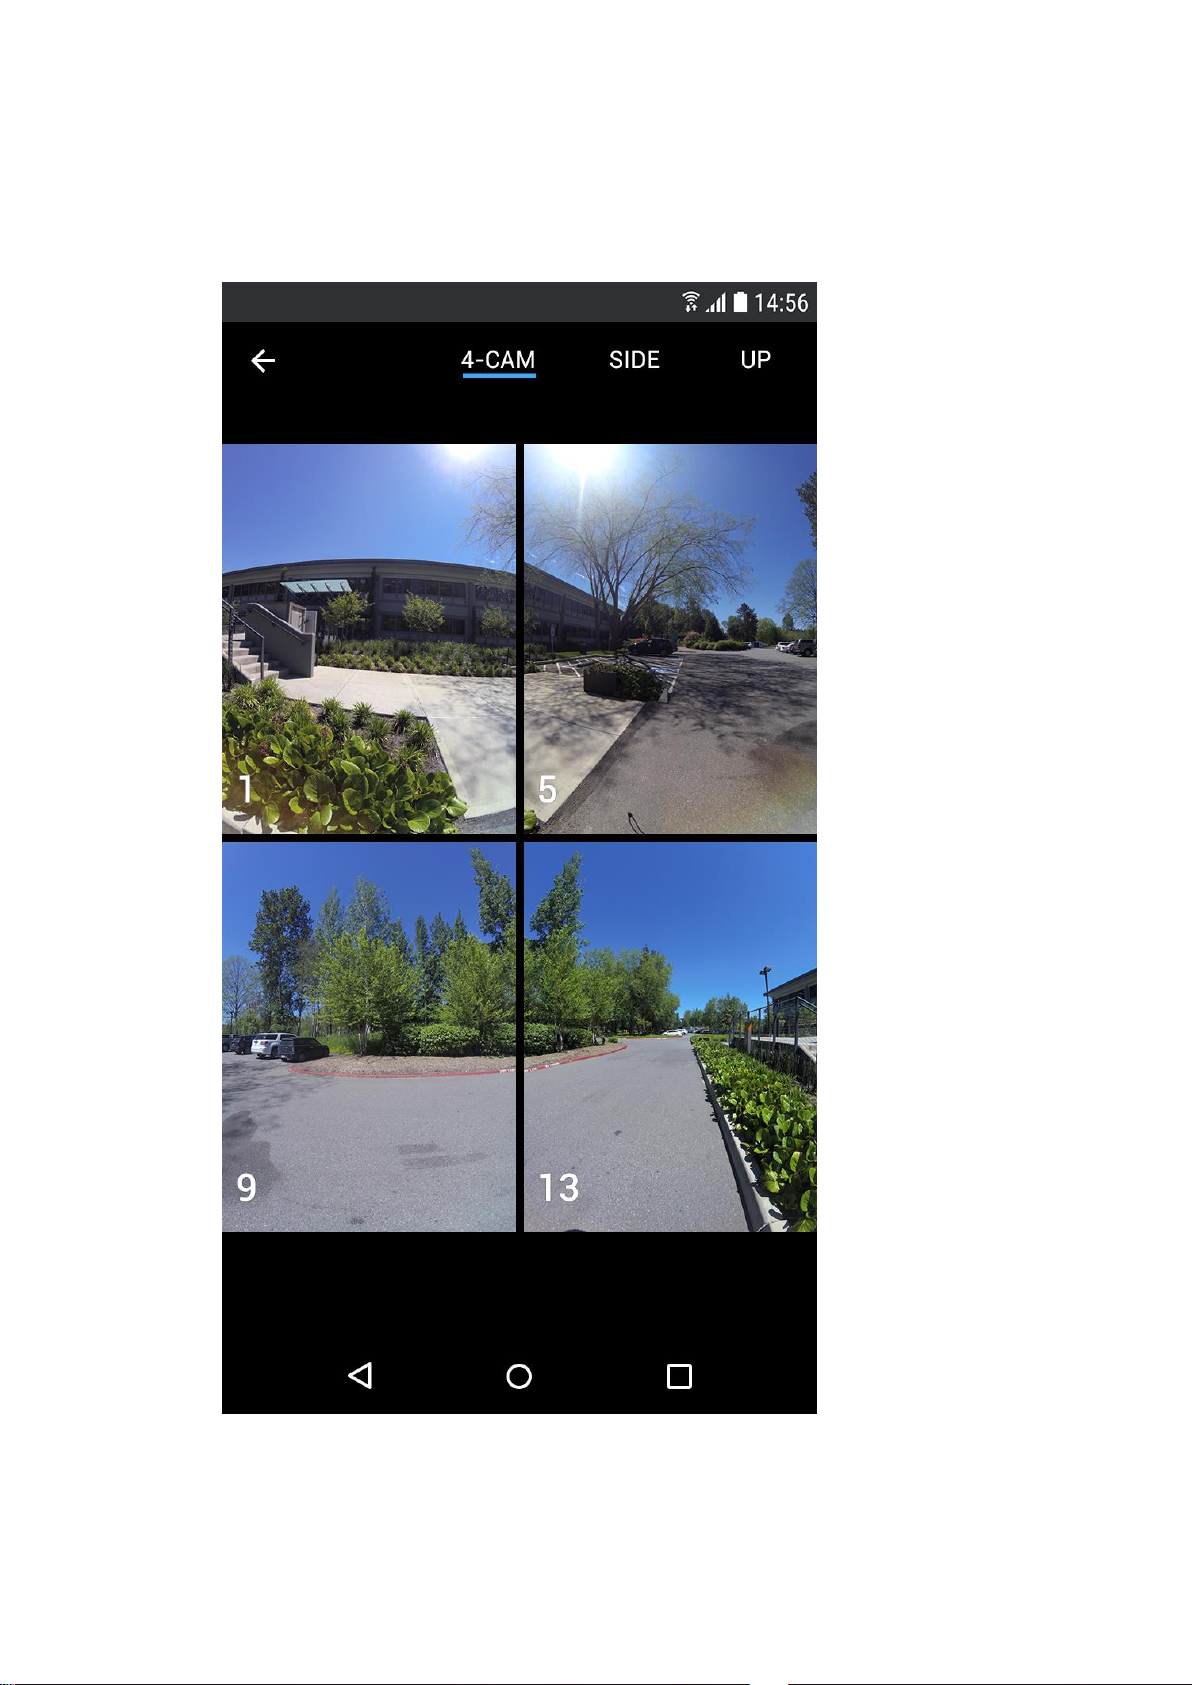
There are three 3 views for preview. The number on each window is the
camera ID.
● 4-CAM view so you can preview all directions at once.
Page 40
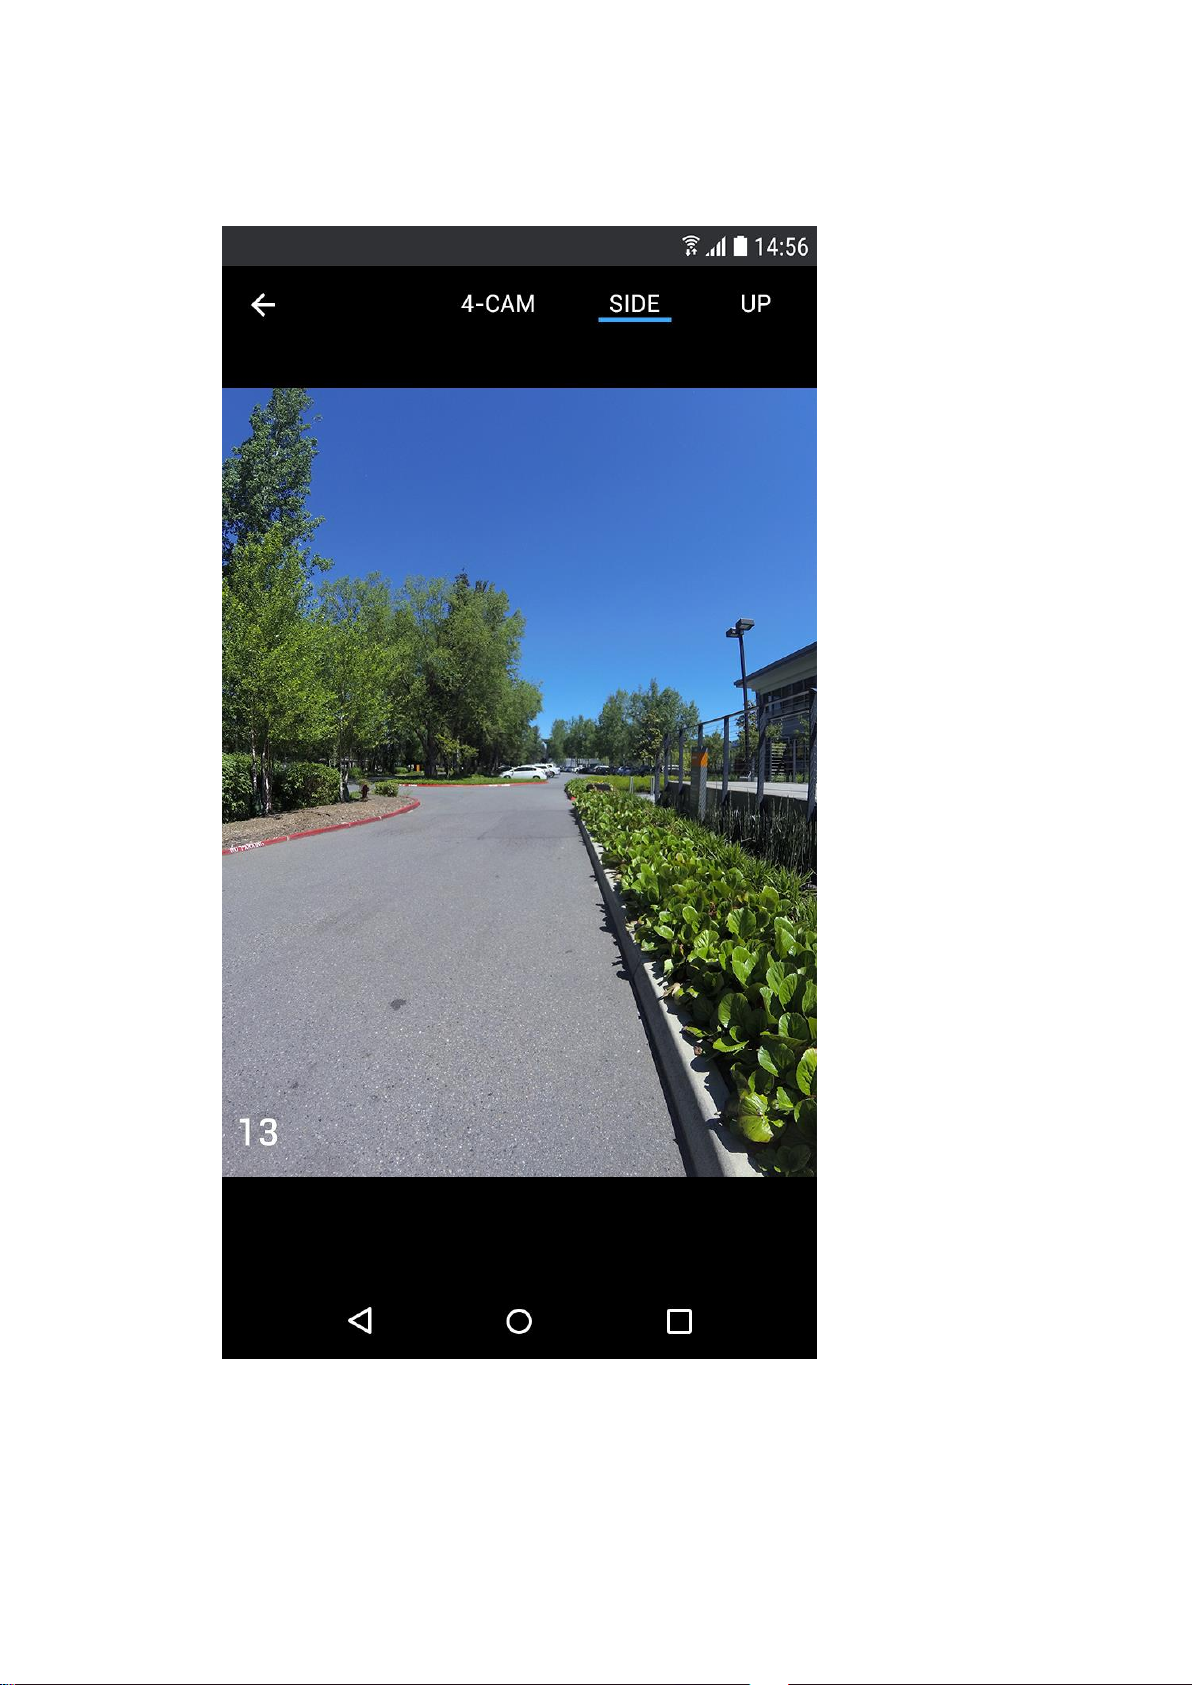
● Side view which shows full height previews side-by-side with horizontal
drag to pan, so you can see more details.
Page 41
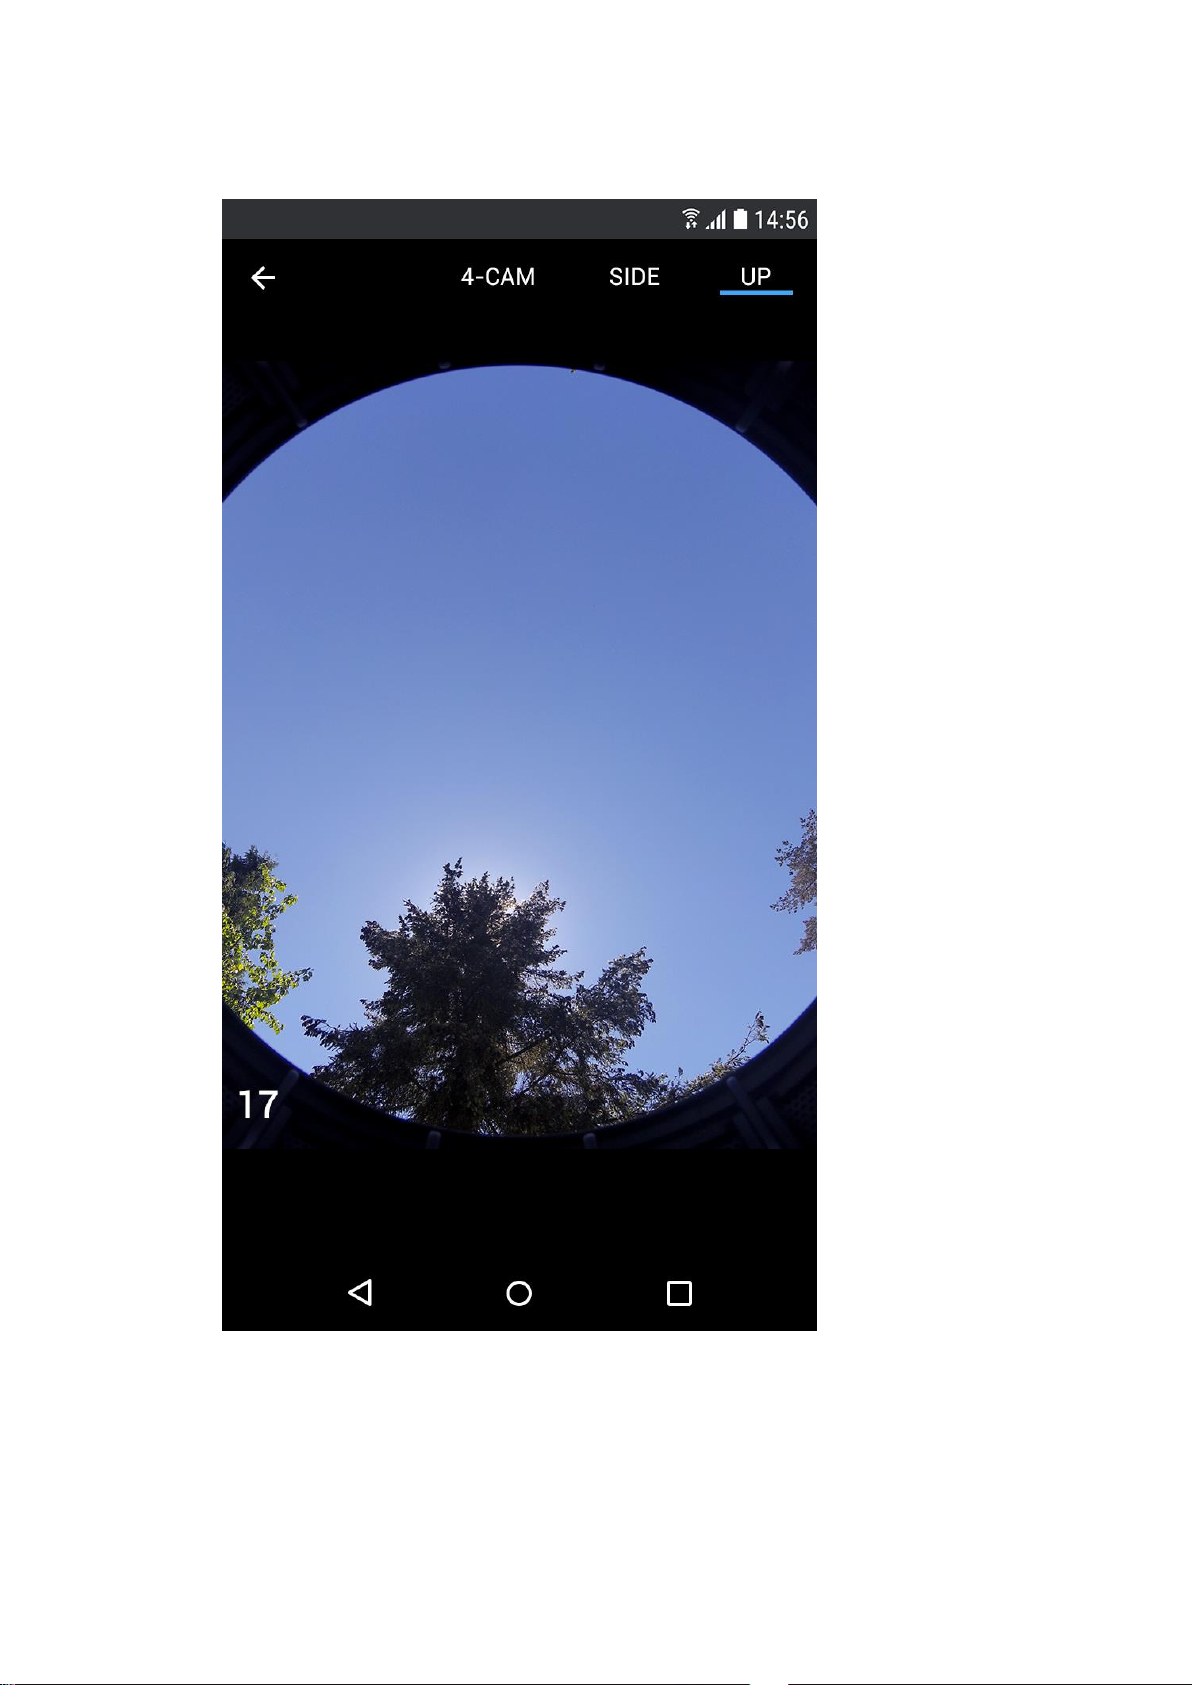
● Up view for the up camera.
Page 42
4.3 Start Recording
Press the button located on the top of the controller to begin recording. The
status LEDs are red and flashing during recording.
Press the shutter button again to stop recording. The status LEDs flash once
and the sound indicator emits one beep, and then the LEDs turn to solid red.
Notes:
● Do not remove microSD cards during recording. If any microSD card is
removed, the rig will stop recording automatically within 30 seconds or
less.
● Overheating _The rig stops recording automatically when any of the unit
camera chips reach 212 °F.
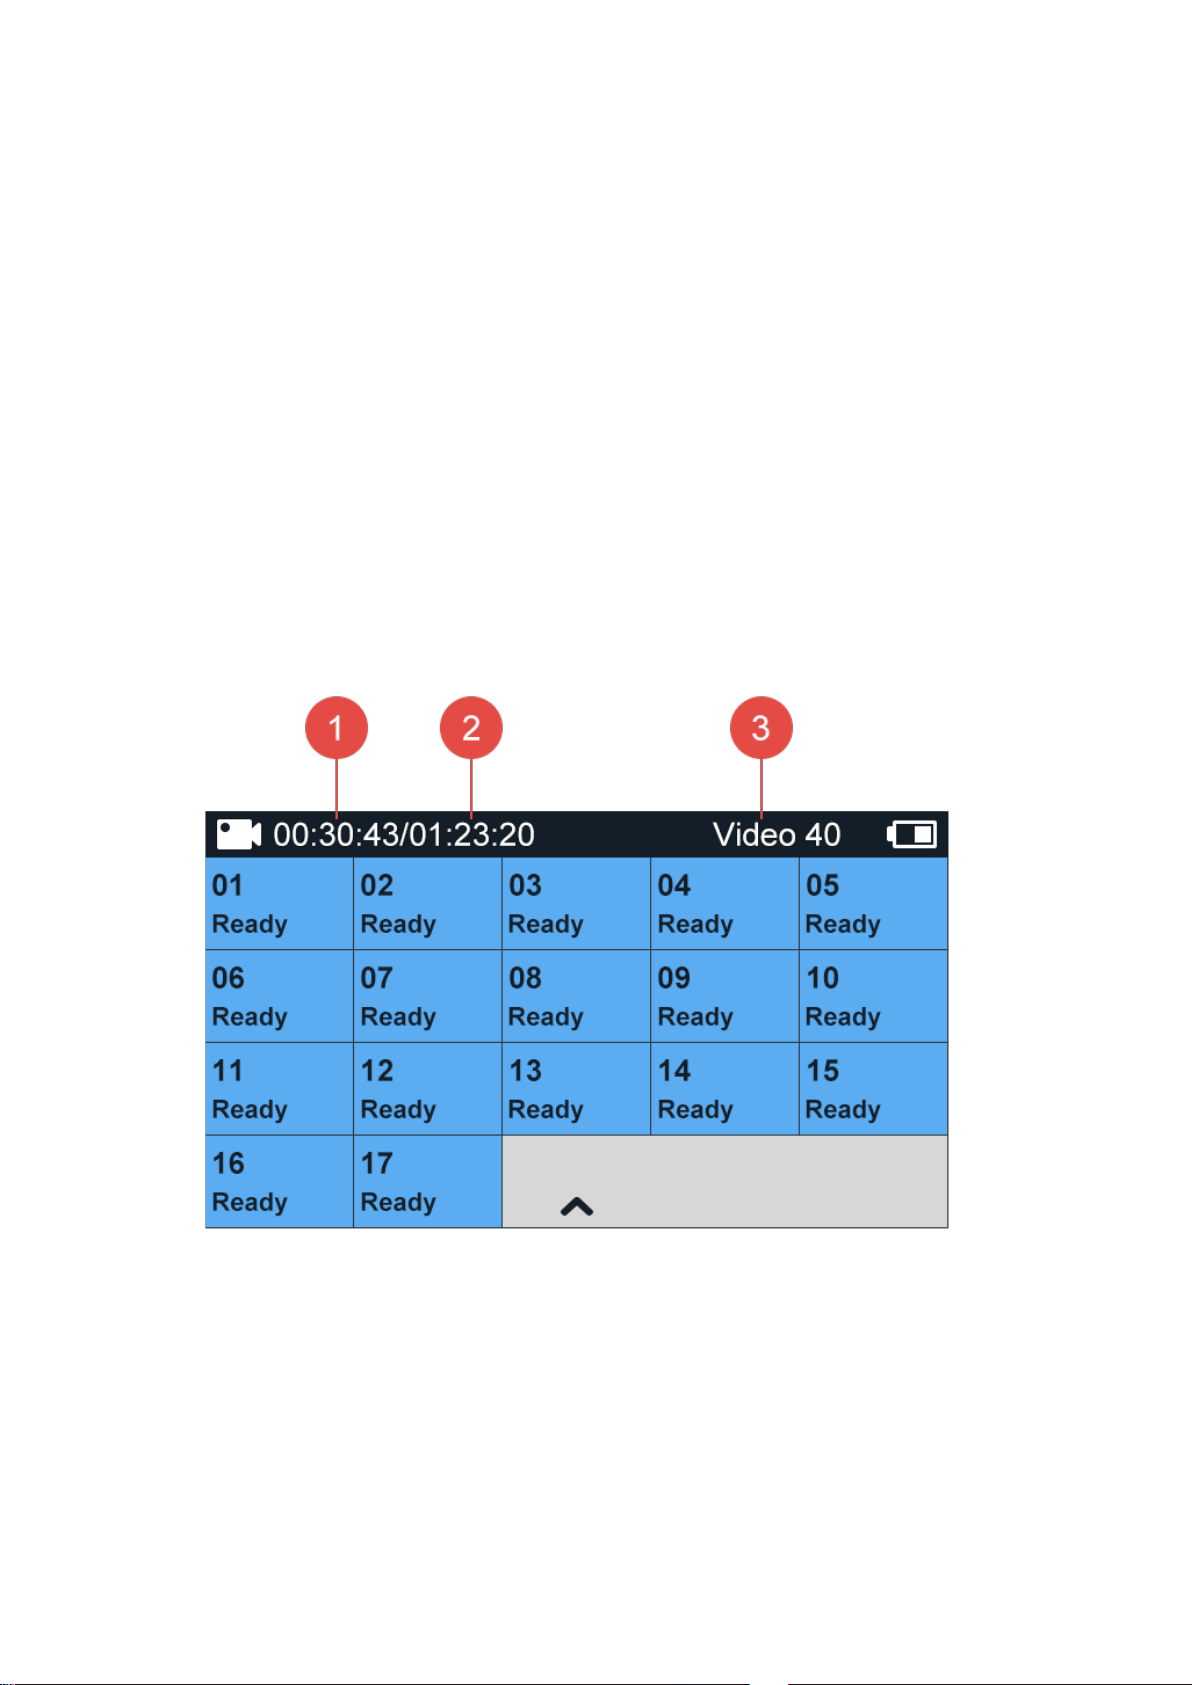
4.4 Indicators Displayed during Recording
1. Capture time
2. Remaining capture time
3. Number of video shots (See 4.5.1 Naming Conventions)
Page 43

4.5 Exporting Files to a Computer
N 1 0 1 0 0 4 6.mp4
Video Type
Camera ID
Part Number
Shot Number
You can only play back the videos by exporting the files from each unit
camera to a computer.
1. Power off YI HALO.
2. Remove the microSD cards from unit cameras.
3. Complete these steps for each microSD card.
● Insert the card to a card reader.
● Connect the card reader to your computer.
● Transfer the files to your computer.
● Delete the files from your card if needed.
4. Use Jump Manager to upload your media to the cloud for Jump Assembler
to stitch into a seamless VR video or photo. (See 4.5.1 Naming Conventions)
Notes:
● Before deleting the files, make sure to back them up.
● It is recommended to power off YI HALO first before inserting/removing
the microSD cards. Hot inserting/removing the microSD cards may cause
recognition issue or unintended consequences to the microSD cards.
4.5.1 Naming Conventions
YI HALO uses the following file naming convention when recording video.
[Video Type][Camera ID][Part Number][Shot Number].mp4
1. The first letter indicates the file type:
- N: Video
- T: Time Lapse Video
2. The second number indicates the camera ID.
- The numbers 1~9 represents camera #1 ~ camera #9. The letters A~G
represent camera #10~ camera #16. The letter H represents the up camera.
Page 44
For example, file ‘N1010046.MP4’ in which the second letter 1 indicates that
the video is captured by camera #1. File ‘NA010046.MP4’ indicates that the
video is captured by camera #10.
3. The third and fourth numbers indicate the “Part Number”
- If a video is less than 8 minutes, the third and fourth numbers in the name
will be ‘00’. If a video is 8 minutes or longer, it will be divided into new parts
every 8 minutes.
For example, file ‘N1000046.MP4’ in which the ‘00’ shows that the video is
less than 8 minutes. File ‘N1020046.MP4’ shows that it is the third part of the
whole video.
4. The rest of the numbrers indicate the number of shutter releases.
For example, file ‘N1010046.MP4’ in which the ‘0046’ shows that the video
was captured the 46th time you press the shutter button.
YI HALO uses the following file naming convention when taking still photos.
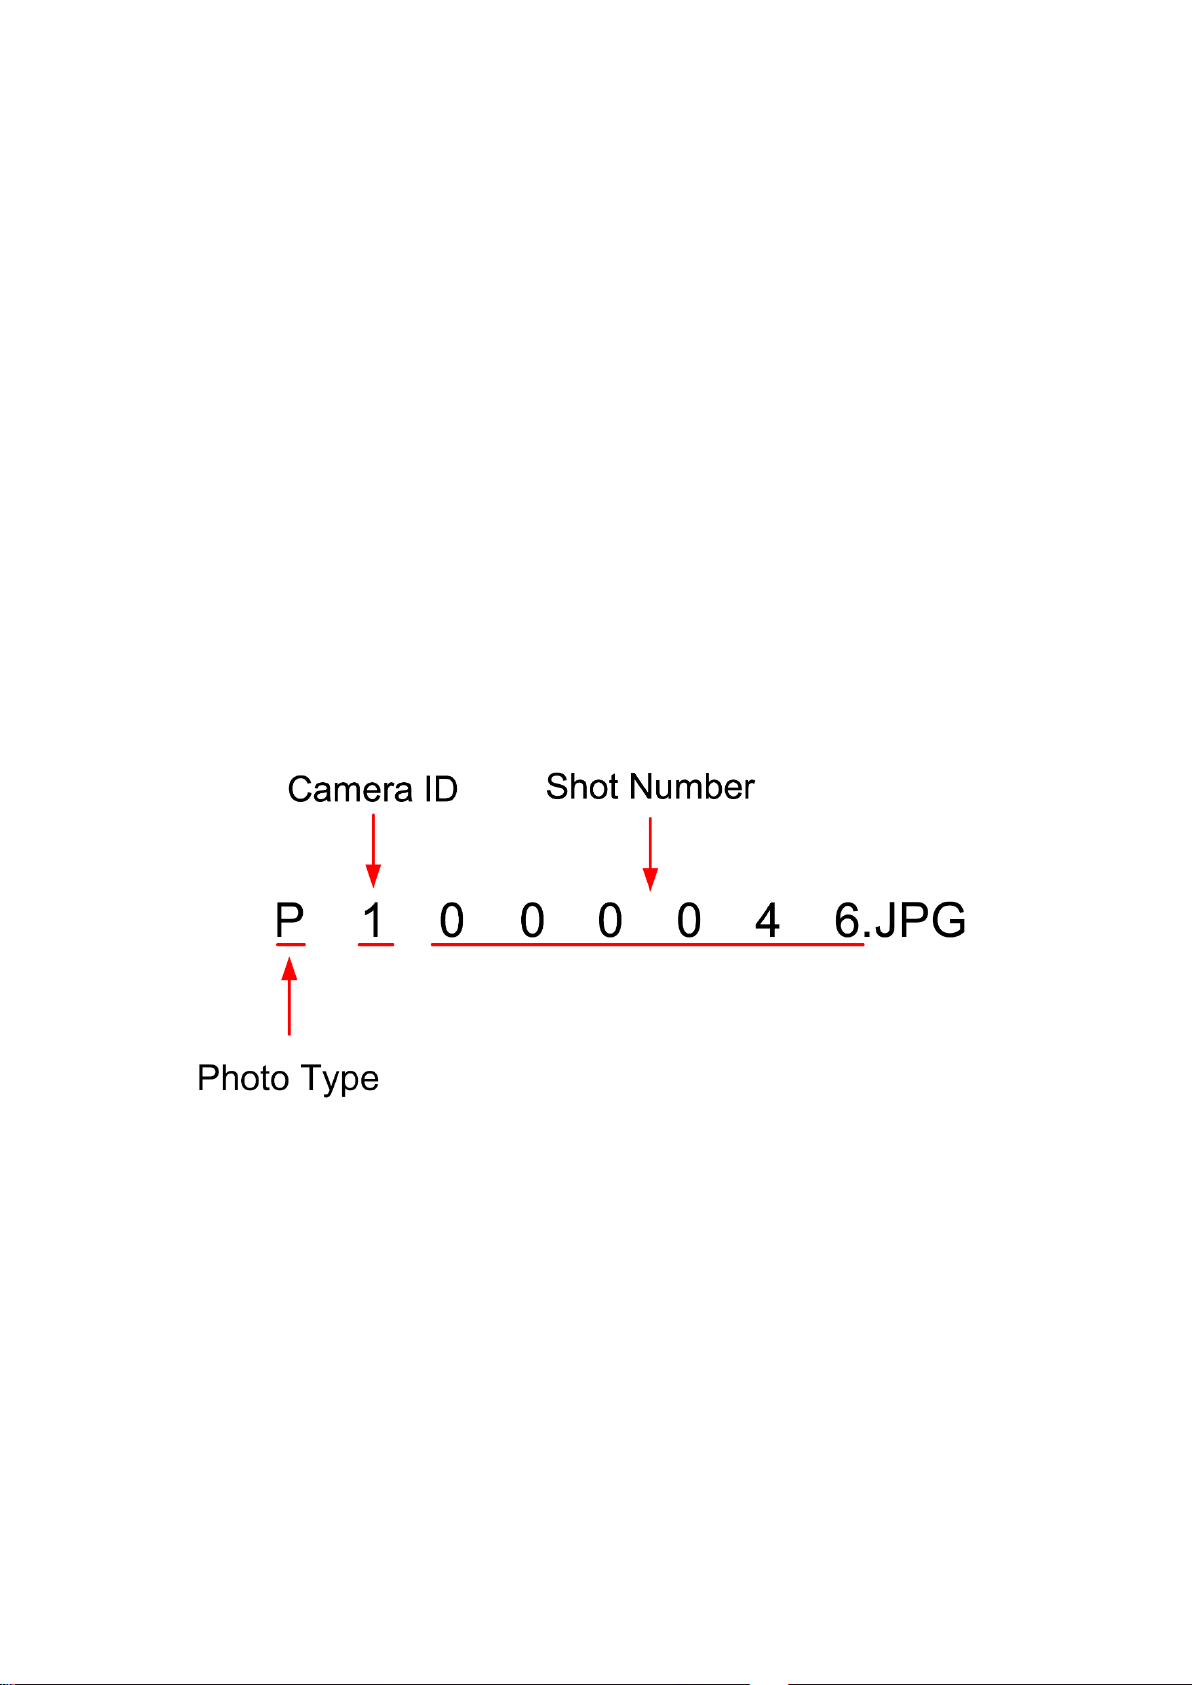
[Photo Type][Camera ID] [Shot Number].JPG
1. The first letter indicates the file type:
- P: Photo
2. The second number is the camera ID:
The Camera ID for Photo is the same as that for Video.
3. The rest of the numbers indicate the shot number.
The Shot Number for Photo is the same as that for Video.
Page 45
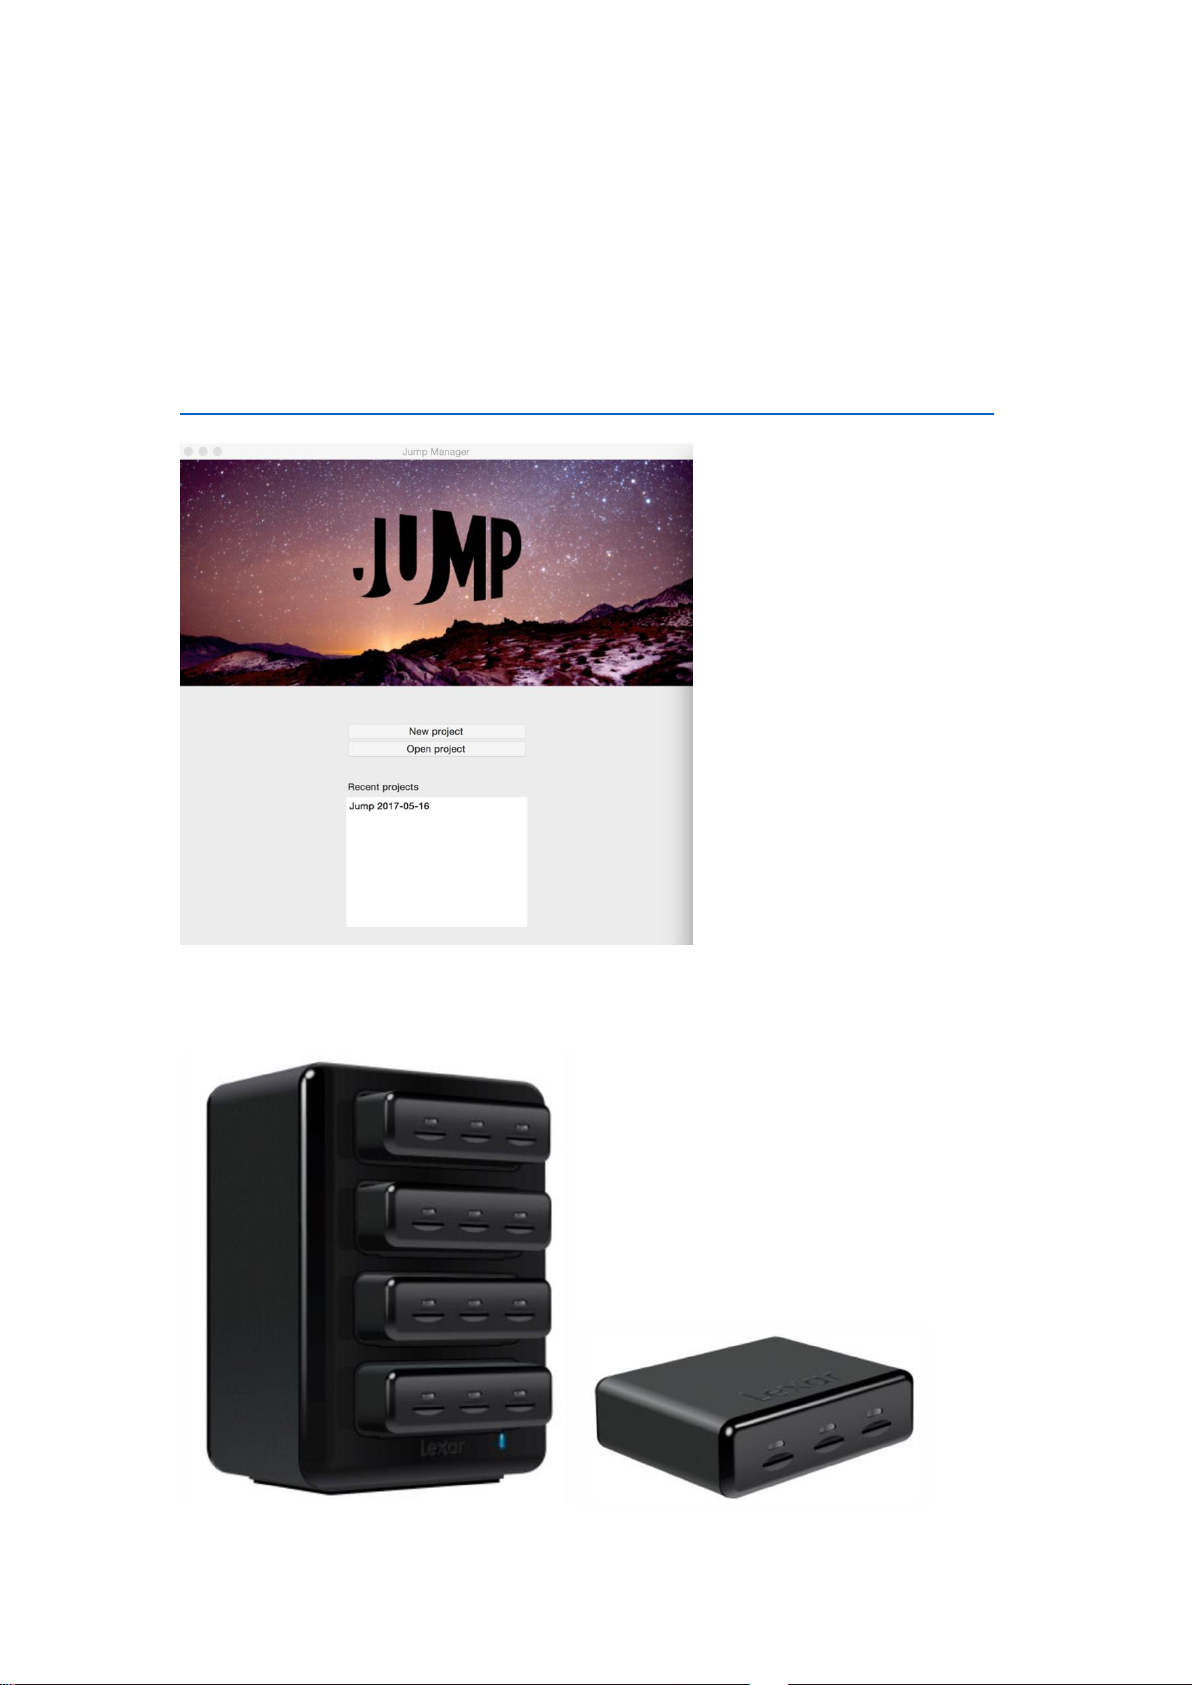
4.5.2 Jump Manager
Jump manager is a Mac-only desktop application that is the interface between
the YI HALO and Jump Assembler. Jump Assembler is a cloud-based system
for converting the raw footage captured by a Jump compatible camera into a
VR video.
To learn more about Jump Manager, see
https://support.google.com/jump/answer/6353511?hl=en&ref_topic=6353700
You can use Lexar Professional Workflow readers to transfer footage from
multiple memory cards at once.
Page 46
5. Remote Control
You can operate YI HALO remotely via an Android app or a Bluetooth remote.
5.1 YI HALO App for Android Phone
5.1.1 Connecting
1. Install the app
YI HALO app supports Android 4.4 and above.
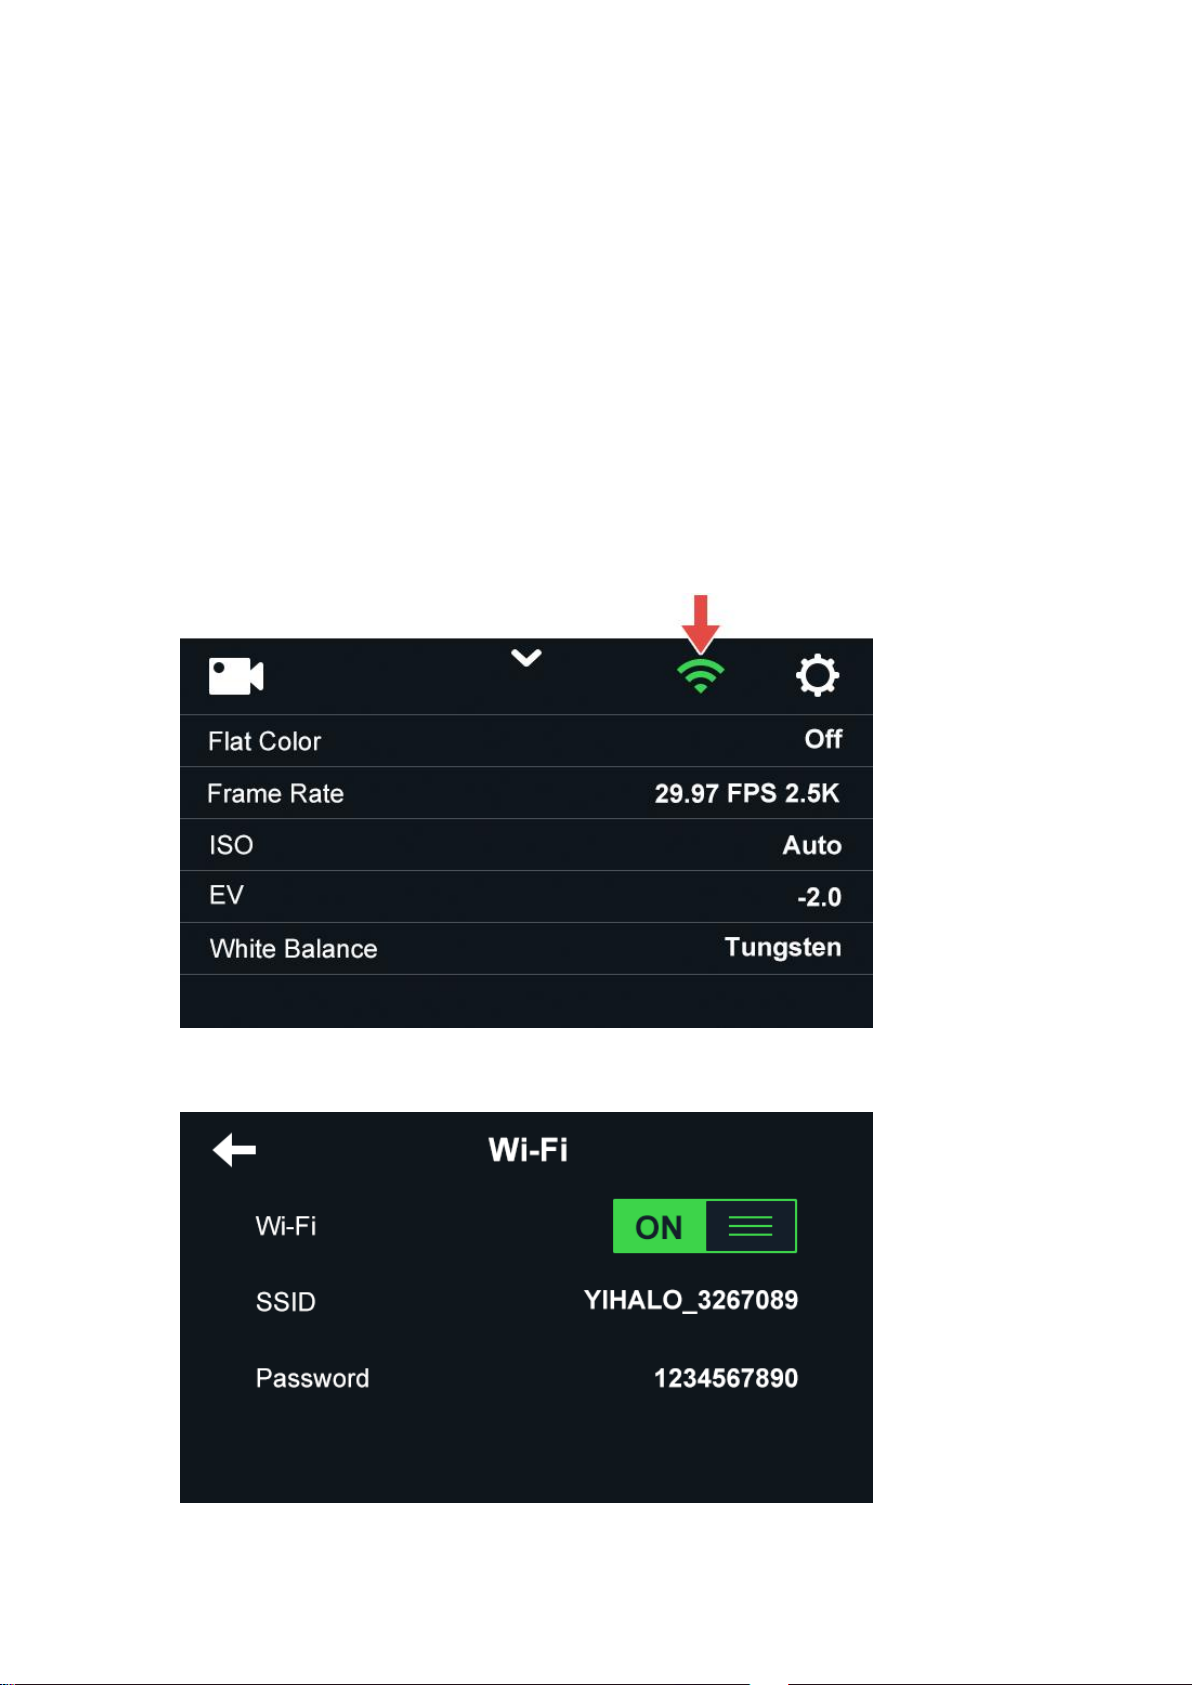
2. Ensure Wi-Fi is ON and the camera is nearby.
Swipe up or down the control panel to view setup. Tap the icon for Wi-Fi
settings
Tap the button to toggle Wi-Fi ON. The SSID and password are shown.
Page 47
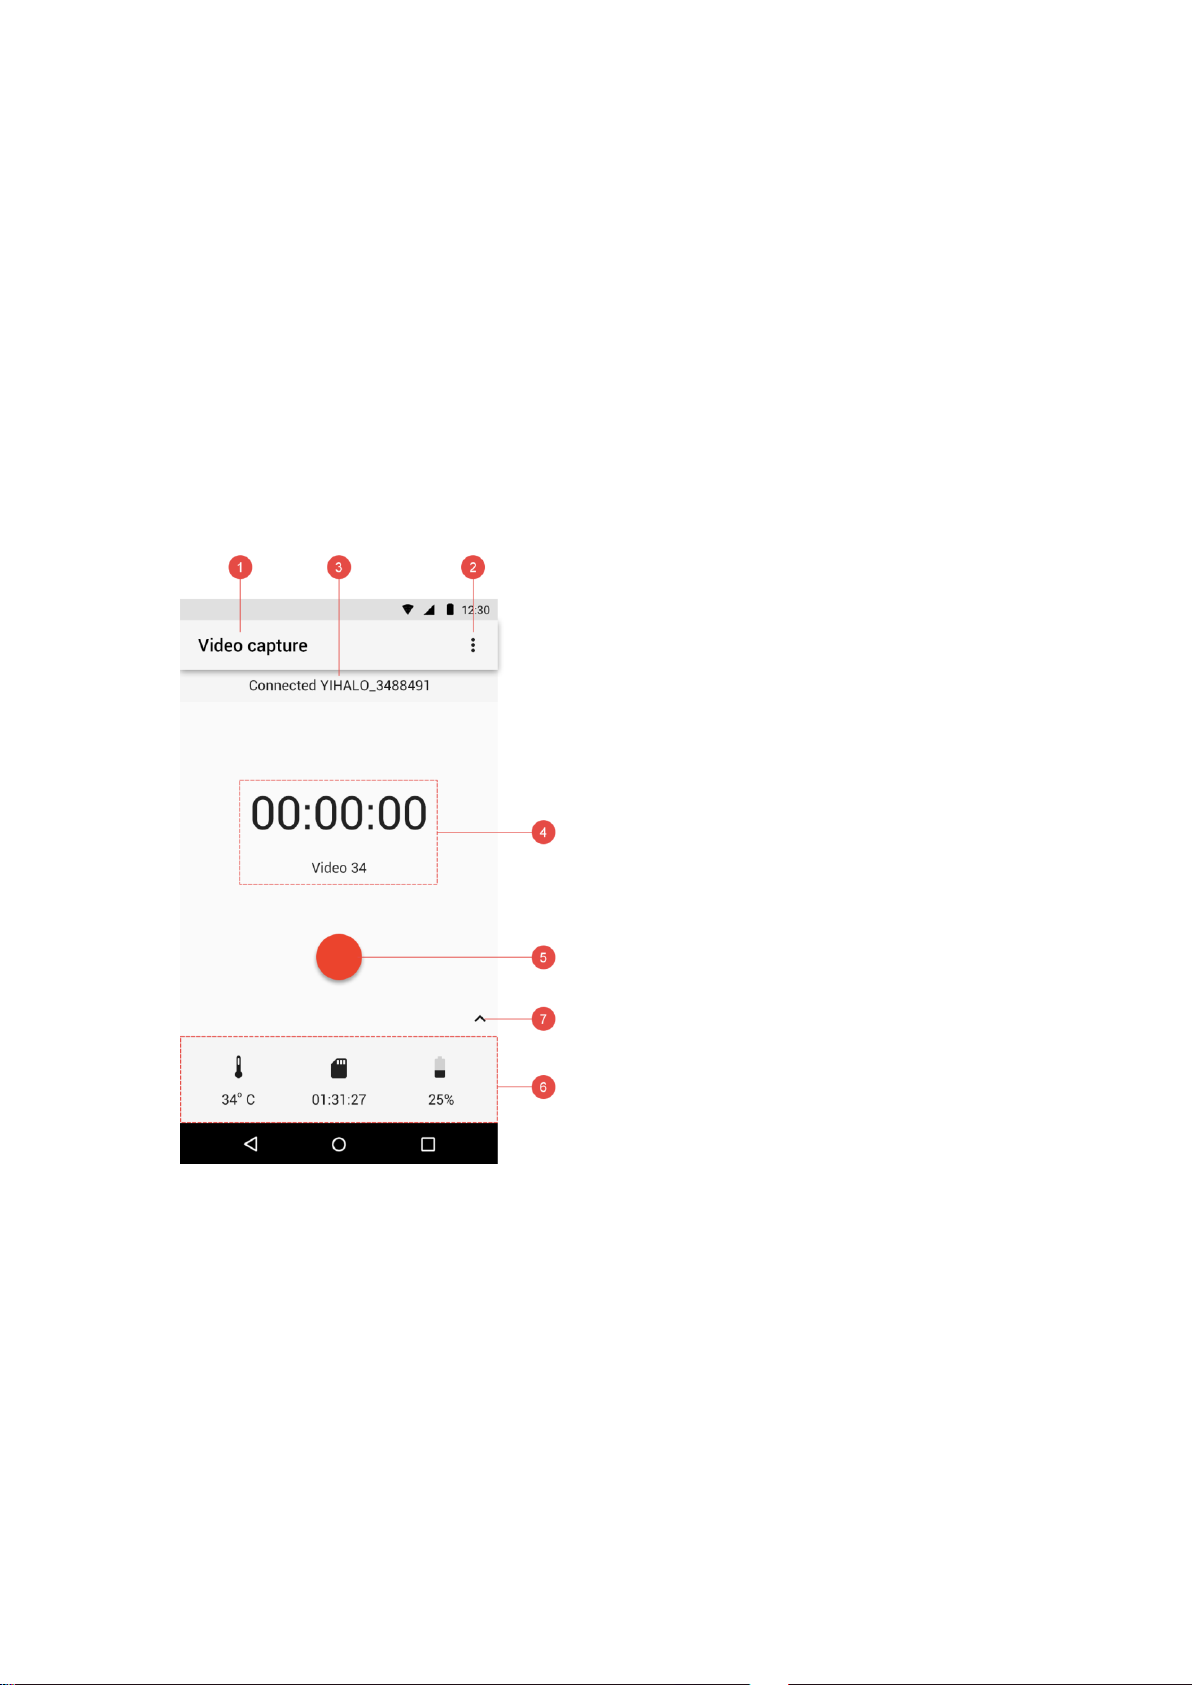
3. Open your app and scan for the camera
1. Capture mode
2. Action item menu
3. Connected device
4. Capture status
a. Capture time
b. Video/Photo count
5. Shutter button
6. Rig monitoring panel
a. Temperature
b. MicroSD card remaining space
c. Battery
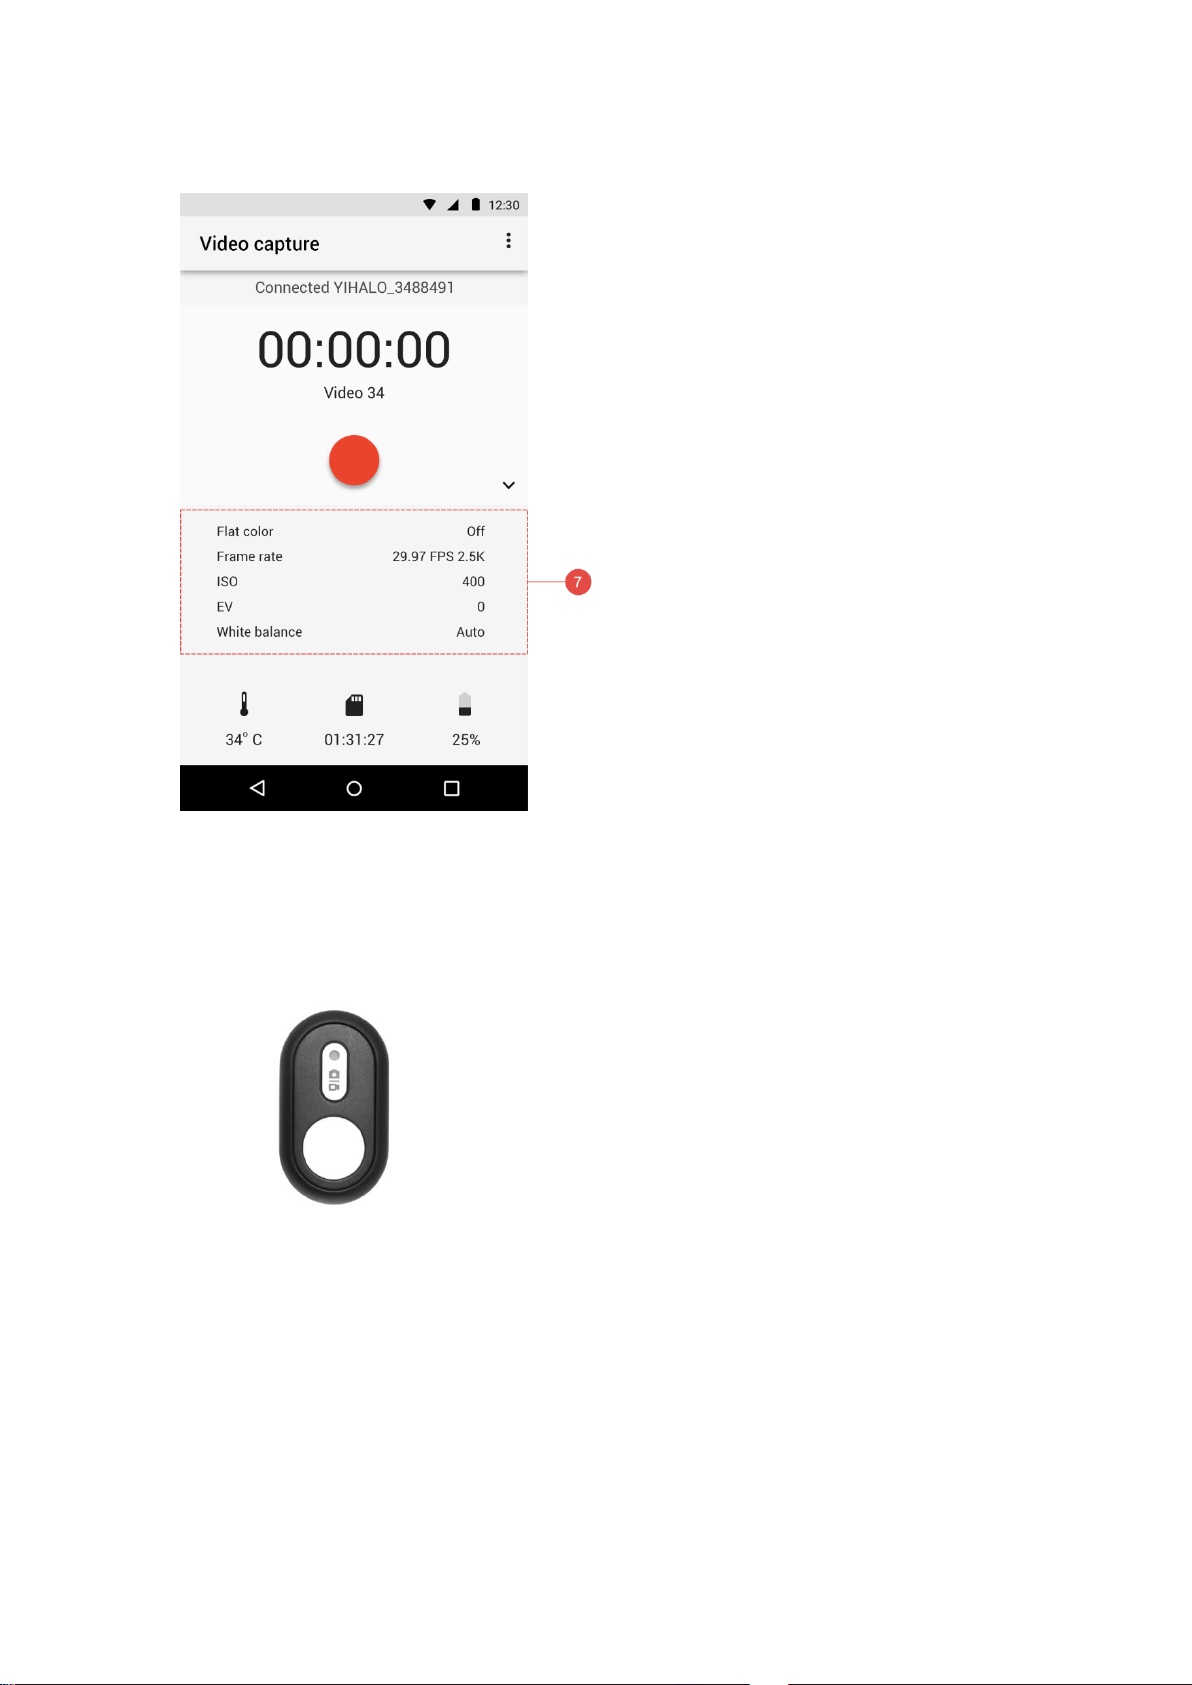
7. More information
4. Enter Wi-Fi password
The default password is 1234567890. You can change it from the app after
connecting successfully.
Notes:
● A rig can only be connected with one mobile phone. If you find the rig is in
use by another device, disconnect the other device and try again.
● If you change the Wi-Fi password, the next time you connect your phone
to the rig you need to firstly delete the previous Wi-Fi info from the phone
system setting.
5.1.2 Menu Map
Page 48
5.2 Bluetooth Remote
5.2.1 Pairing
1. Power on the rig.
2. Slide up the display to open the main menu after the auto-check.
3. Access the setting page by tapping this icon.
4. Find ‘Pair BT Remote’ bar and tap it.
Page 49
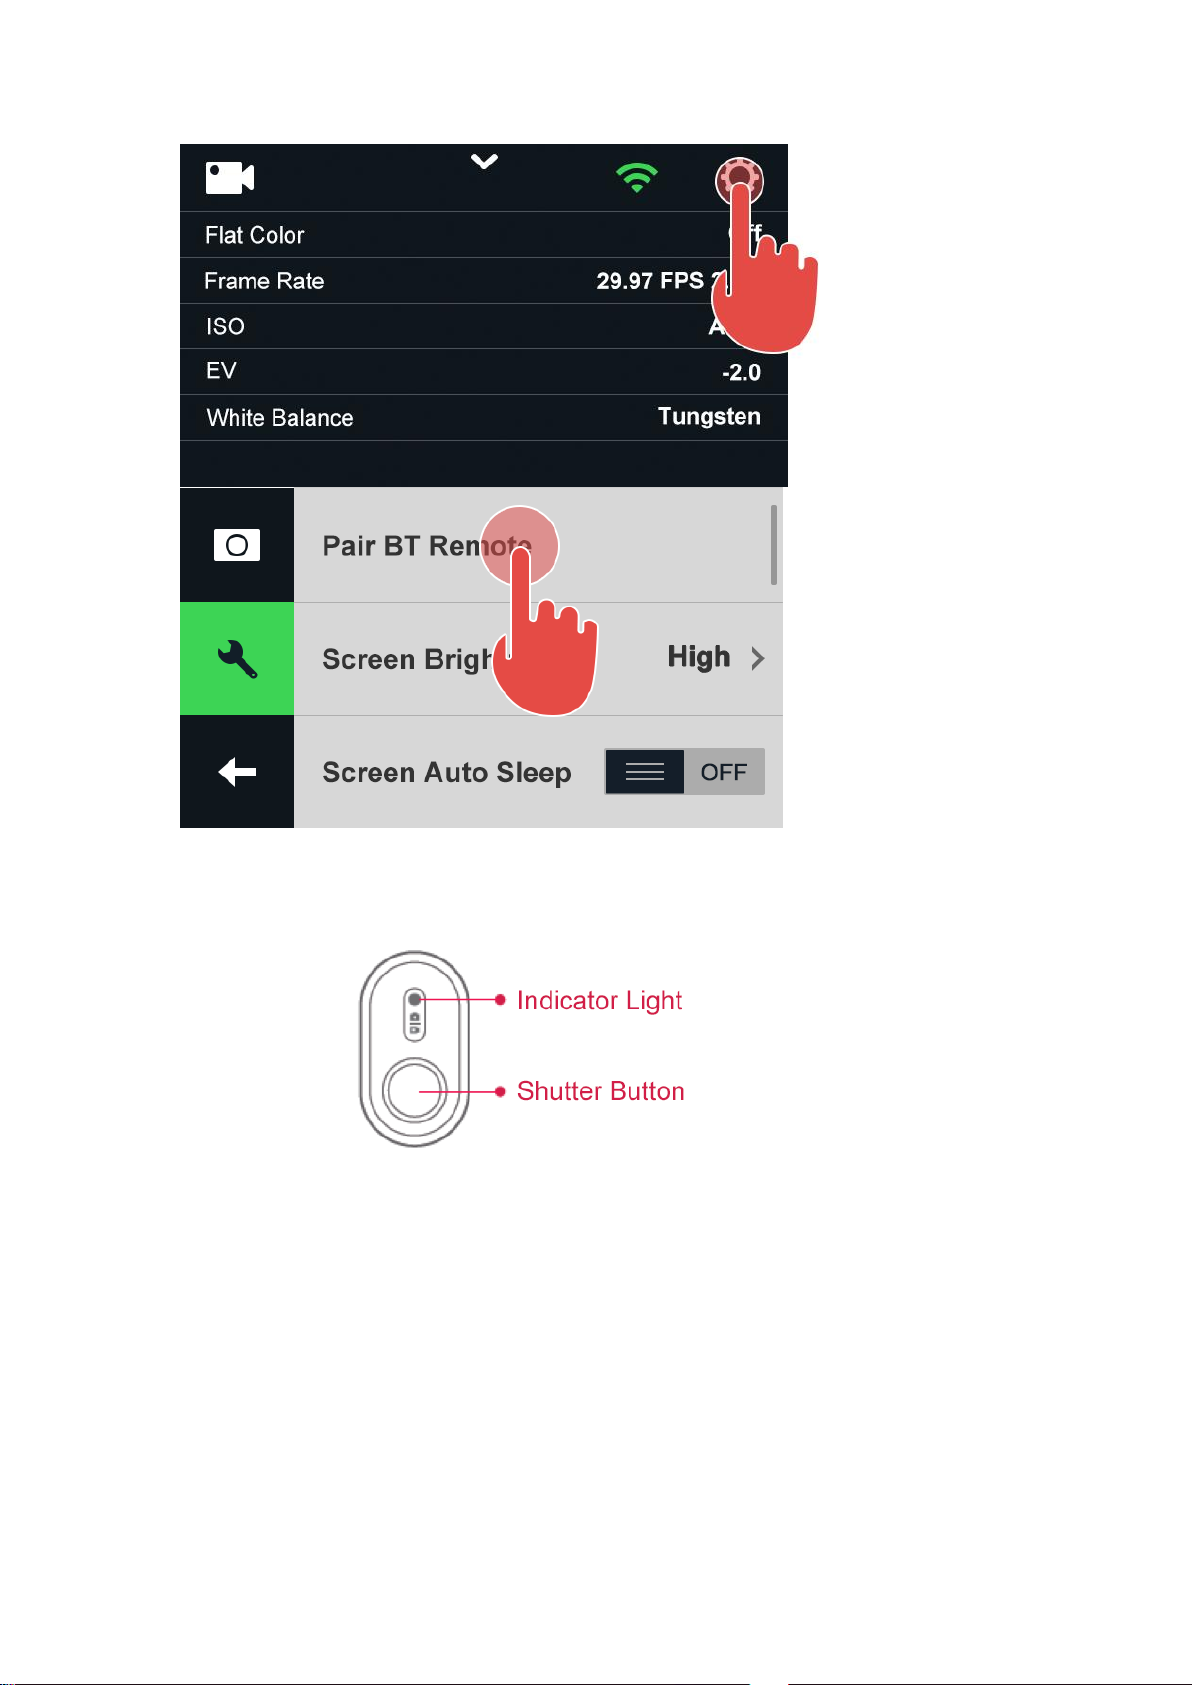
5. Press the shutter button on the Bluetooth remote. The pairing is successful
once you hear a beep and the indicator light turns blue.
5.2.2 Capturing
Video mode: Press the shutter button to start recording. Press it again to stop
recording.
Photo mode: Press the shutter button to take a photo shot.
Note:
● The Photo/Video mode switch button on the Bluetooth remote is invalid.
The current shooting mode depends on what you select on the rig or the
app.
Page 50
5.2.3 Battery Replacement
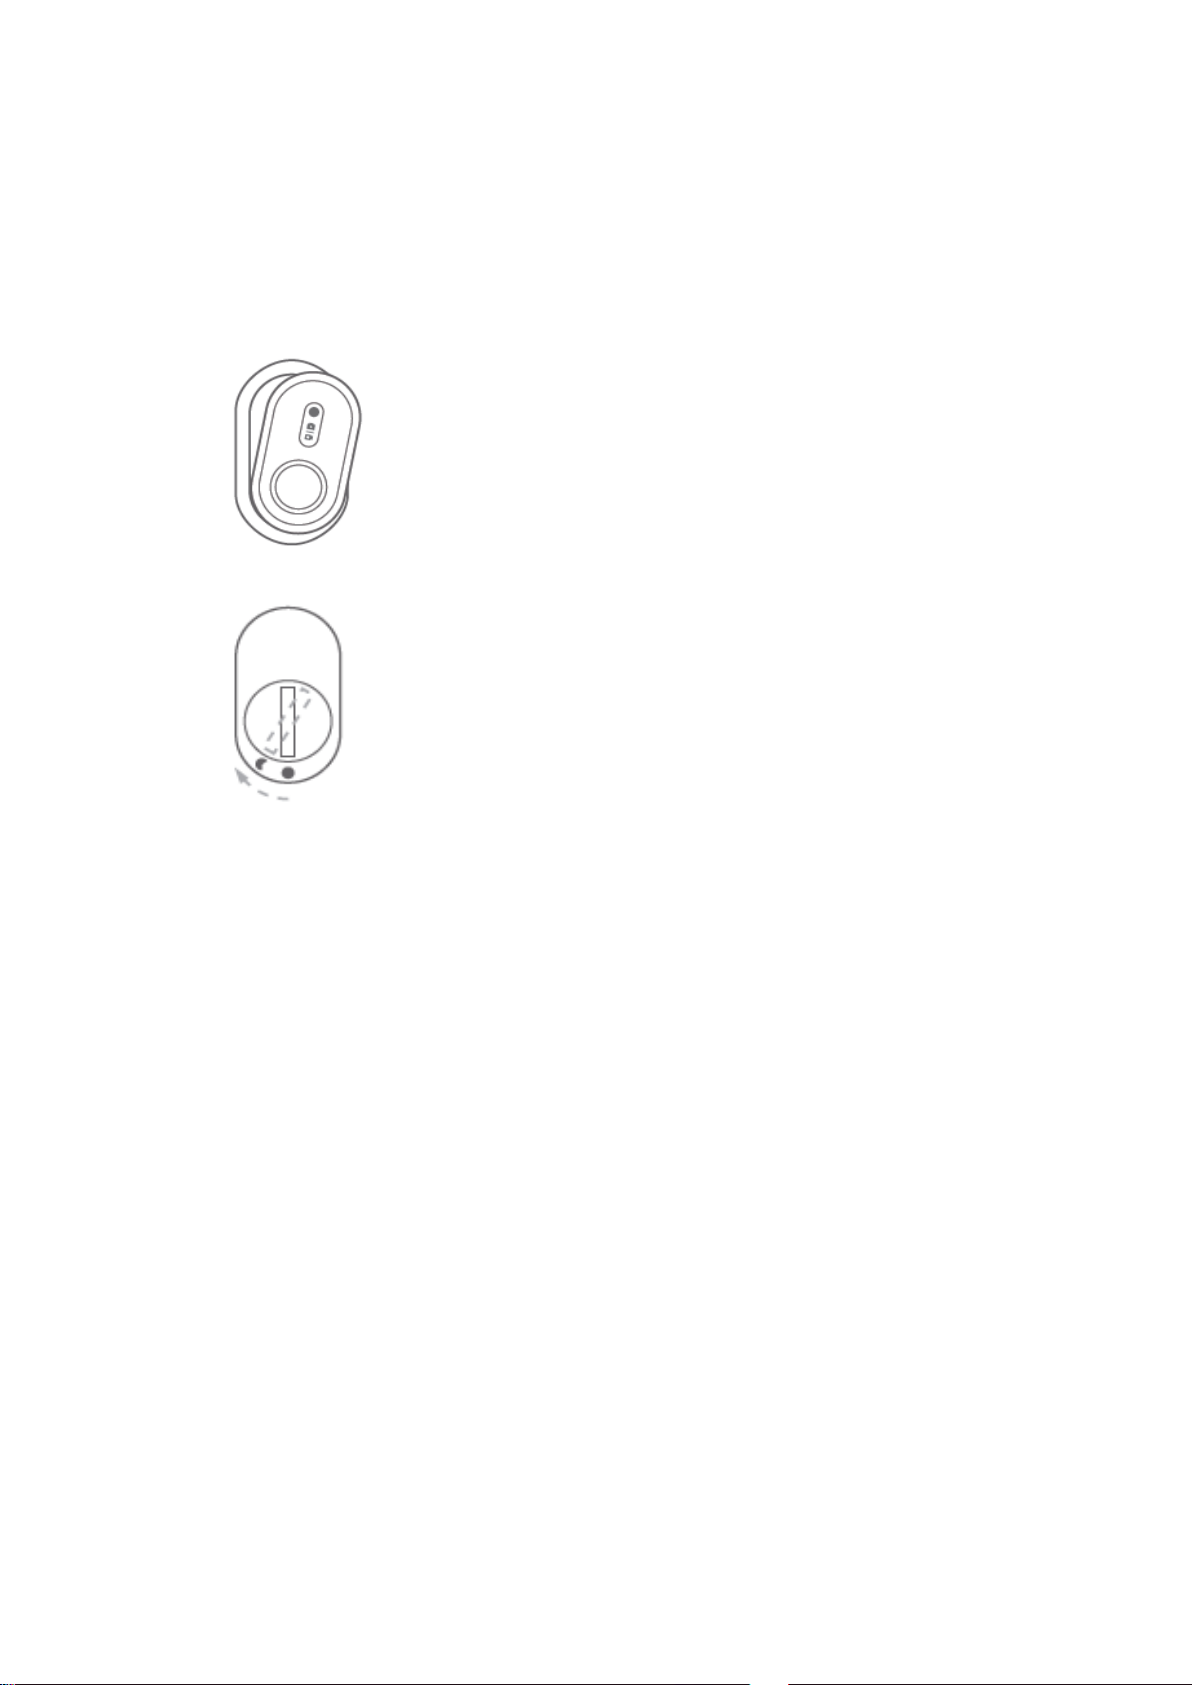
A 3V button cell battery is contained in the Bluetooth remote. Follow the steps
to replace the battery if it is out of power.
1. Remove the rubber case
2. Rotate the battery cap on the back clockwise.
6. Additional Information
6.1 Troubleshooting
If you have problems with your YI HALO, refer to this section. If the problem
persists, unplug the power supply and consult your device dealer.
My YI HALO won’t power on.
- Make sure the rig is connected to a battery or AC power supply.
The shutter button is not responsive to start recording.
- The rig may be operating other tasks, for example, auto checking,
syncing settings, updating firmware, etc. Check if all unit cameras are
displayed as ‘Ready’.
- The status of some unit cameras may be ‘Failed’. (See 4.5.1 Naming
Conventions)
The shutter button is not responsive to end recording.
- Hold the shutter button to shut down the rig. If it still fails, unplug the
power supply.
Page 51
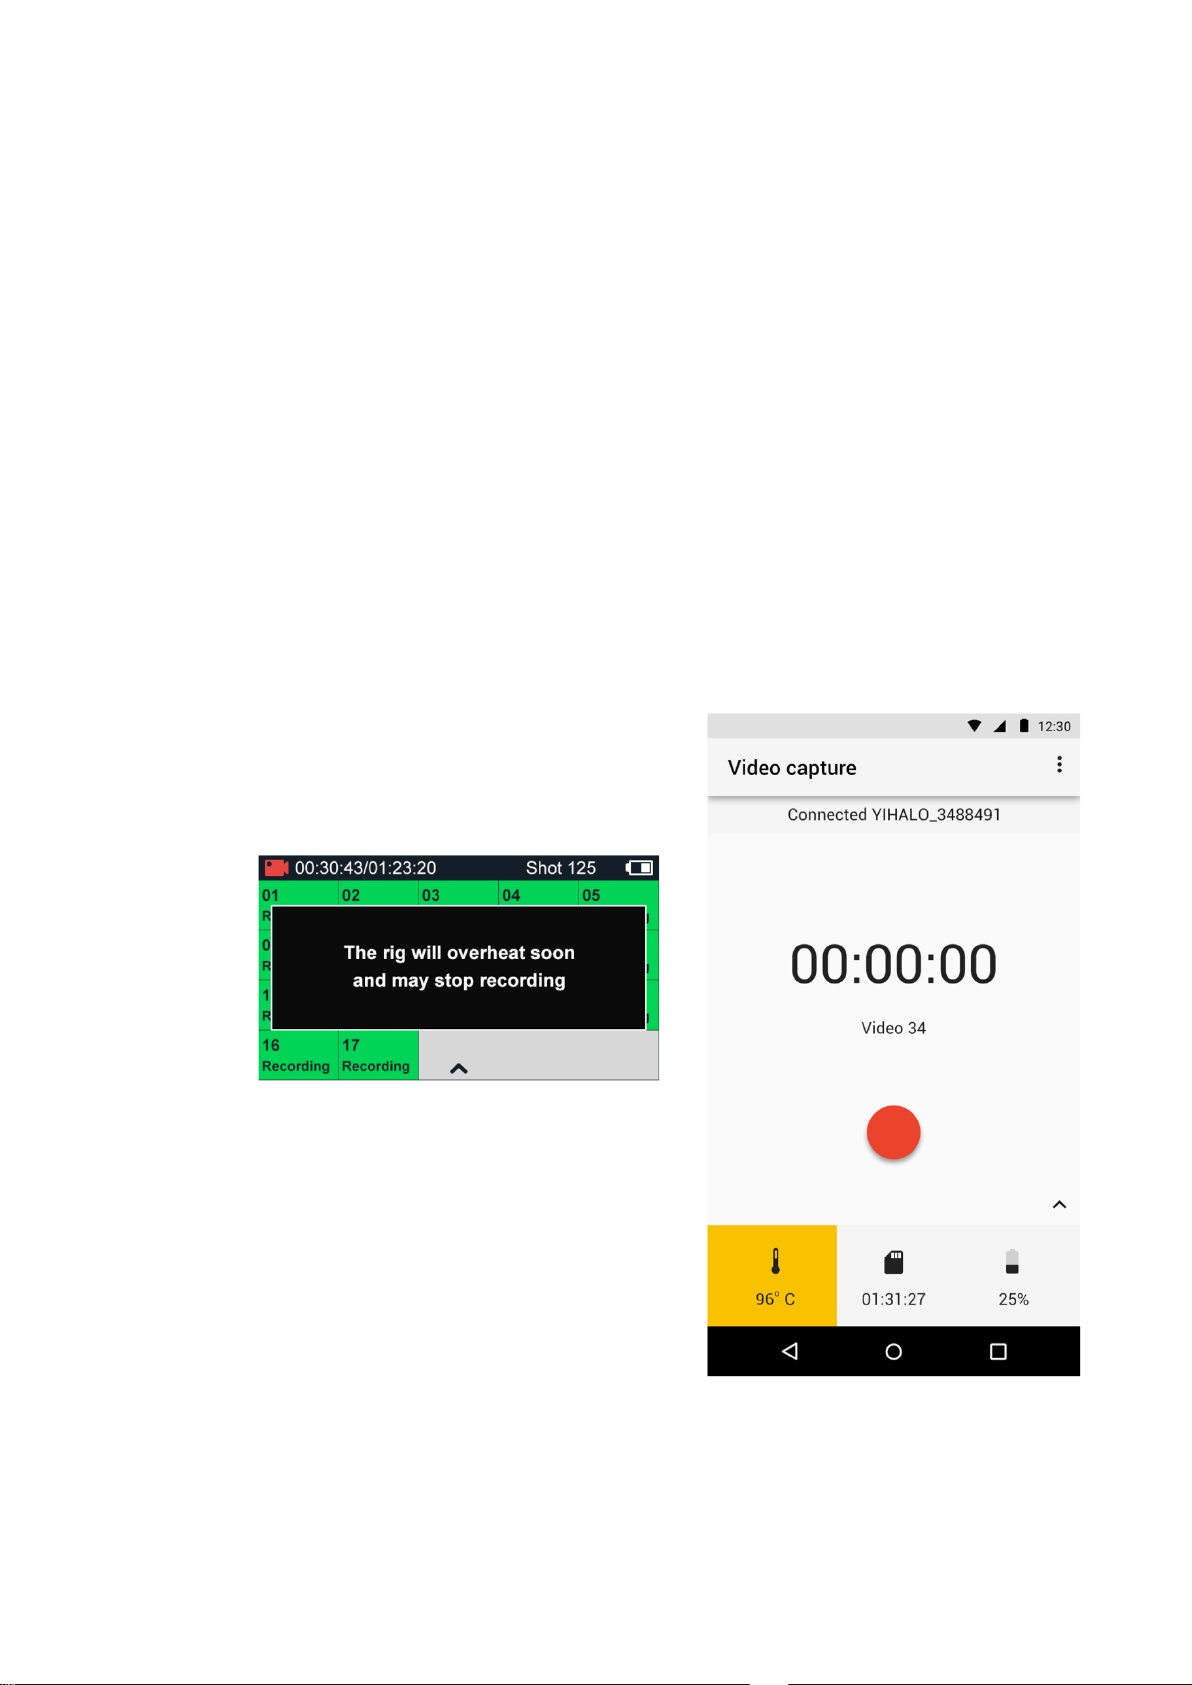
The rig stops recording automatically.
- The rig may be overheated. You need to shut down the rig for 10~30
minutes and put it in a cool place.
- The recording will be stopped when the available storage of any of the
microSD cards is less than 500MB. You need to replace another set of
microSD cards or free up space on the current set of microSD cards.
- The battery may run out of power and automatically shut off. Please
recharge the battery or connect to AC power supply.
- If power is interupted while recording, videos may not be played back.
To recover those videos simply restore power and reboot the rig.
The rig becomes hot during use.
- It is normal that the rig becomes hot when shooting. The rig can work
normally as long as the chip temperature does not reach
212°F (100℃). You will receive an overheat warning from controller
when the temperature reaches 203°F (95℃), and the thermometer
block on the app will turn yellow. If you keep using the rig, it will stop
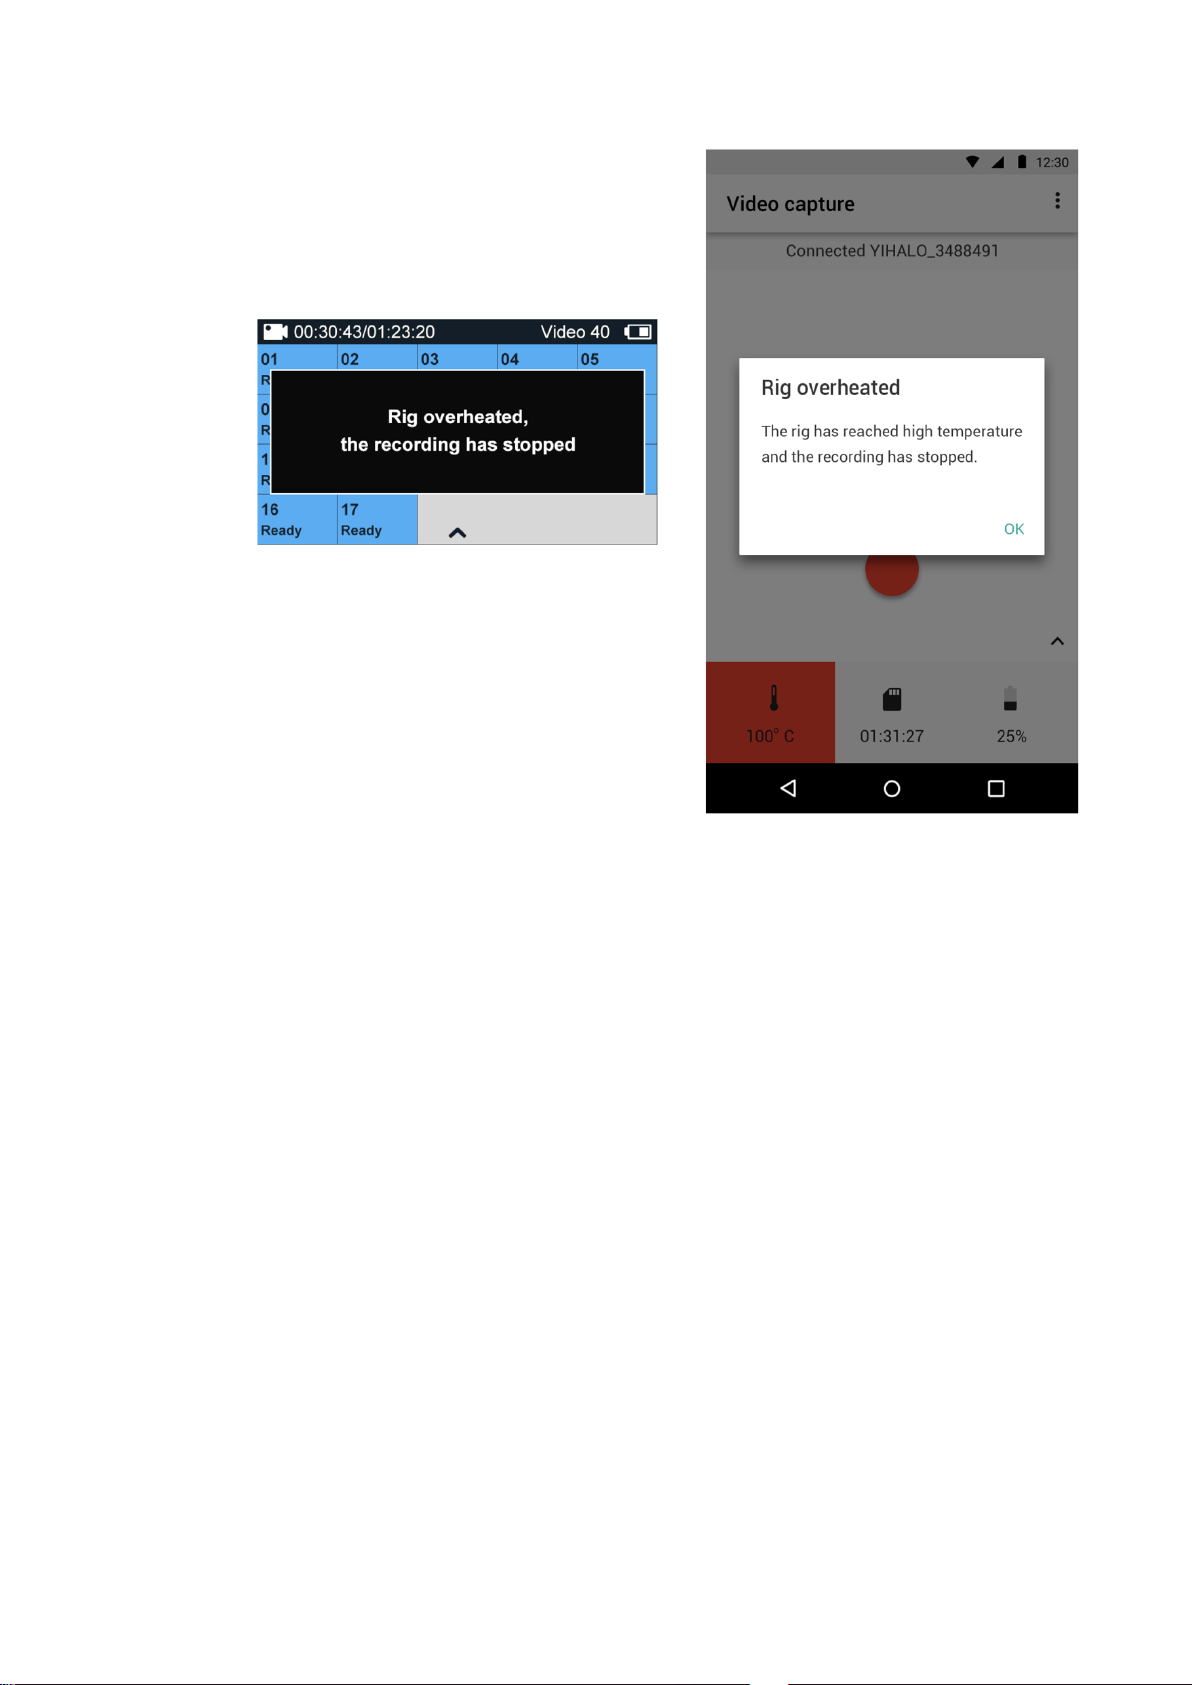
recording automatically when the temperature reaches 212°F (100℃).
Page 52
Solution:
- Stop recording and shut down the rig when you receive the overheating
warning. Put the rig to a cool place.
- Keep the rig away from direct sunlight and heat sources.
The app failed to find YI HALO camera.
- Check whether the Wi-Fi has been turned on.
- Your phone may be too far away from the camera. Take it closer.
- Check whether there are objects between camera and phone causing
interference.
- Check whether there is high radio frequency interference.
- Check whether there are other YI HALO rigs causing interference.
No video/photo captured when pressing the Bluetooth remote shutter
button.
- Check the light indicator on the remote. Red light indicates that the
remote is not paired with the rig.
- Check if the battery in the Bluetooth remote is out of power. Replace
the battery if it is.
Page 53

Camera firmware version is not matched after firmware update.
- Reboot the rig
- If the problem is still there, it should be that some of the unit camera
failed to update its firmware. Update the failed camera individually (See
2.7.2 Firmware Update).
Error Messages
Refer to this part if a message appears on the screen. The messages listed
here are in alphabetical order.
Bluetooth Pairing Timed Out
- You may not have pressed the shutter button on the Bluetooth remote
to pair remote.
- The Bluetooth remote cannot work if it is broken or the battery is
exhausted.
- The Bluetooth remote is too far away from the rig.
Camera Busy
- The camera is operating other tasks and cannot handle this command
at this moment.
Firmware Verification Failed.
- The firmware bin files in the microSD card are corrupted.
- Firmware Version Mismatch. Please update the camera firmware to the
latest version.
- The firmware version of one or several unit cameras are different from
others.
- The firmware of controller and unit cameras are different. Update the
mismatched camera individually (See 2.7.2 Firmware Update).
Low Battery
- You need to charge the battery or power the rig from the AC adapter.
No Firmware in SD card
- Cannot find a firmware file in the microSD card for update.
- The name of the update firmware file is incorrect.
No SD Card
- No SD card is detected by the unit camera. Check whether the
microSD card is inserted. Please use the recommended microSD card.
(See 2.2 Inserting Memory Cards).
Rig overheated, the recording has stopped.
- The chip temperature reaches 212°F (100℃). The rig stops recording
to protect itself. Cool down the rig for 10~30 minutes.
Page 54

SD Card Format Not Supported
- Re-insert the SD card and reboot the rig.
- If the problem still exists, switch the SD card with SD card from another
unit camera and reboot the rig.
- If the problem still exists, format the SD card with a YI HALO supported
format: exFAT or MS-DOS(FAT), insert the formatted SD card into the
unit camera and reboot the rig.
- If the problem still exists, replace with a new SD card and reboot the
rig.
- If the problem still exists, replace with a backup unit camera and reboot
the rig.
- If the problem still exists, please contact yihalo-
SD Card Error. Try to reinsert or format the SD card.
- The microSD card cannot be recognized or accessed. Check that if the
card is inserted correctly and not malfunctioning. Check if it is
formatted in a right file format. Use a recommended card.
SD Card Full
- Available storage of the microSD card is less than 500MB. The rig
stops recording. Delete some clips to free up some space or replace an
microSD card.
SD Card Almost Full
- Available storage of the microSD card is less than 1GB. You need to
pay attention to the free space.
SD Card Slow
- The performance of microSD card is not good.
- Use a recommended card.
SD Card Formatting Failed
- The microSD card has some problems and cannot be formatted from
the rig. You can try to use a computer to format it.
The rig will overheat soon and may stop recording.
- The chip temperature reaches 203°F (100℃). You can stop recording
and shut down the rig when you receive the overheating warning. Put
the rig to a cool place.
Unit camera ran into problems (-18), please reboot.
- Press the reboot button on the pop-up window to reboot the rig.
- If the problem still exists, unplug and plug back in the power supply
cable, then power on the rig by long pressing shutter button.
- If the problem still exists, power off the rig, loosen screws beneath the
top cover to unlock unit cameras, reseat the problematic unit camera,
then power on the rig by long pressing shutter button.
Page 55
- If the problem still exists, power off the rig, switch the problematic unit
camera with another unit cameras, then power on the rig by long
pressing shutter button.
- If the problem still exists, power off the rig, re-connect or replace the
USB cable of the problematic unit camera (please refer to 2.7
Replacing the Cameras for the replacing USB cable or unit camera),
then power on the rig by long pressing shutter button.
- If the problem still exists, please contact yihalo-
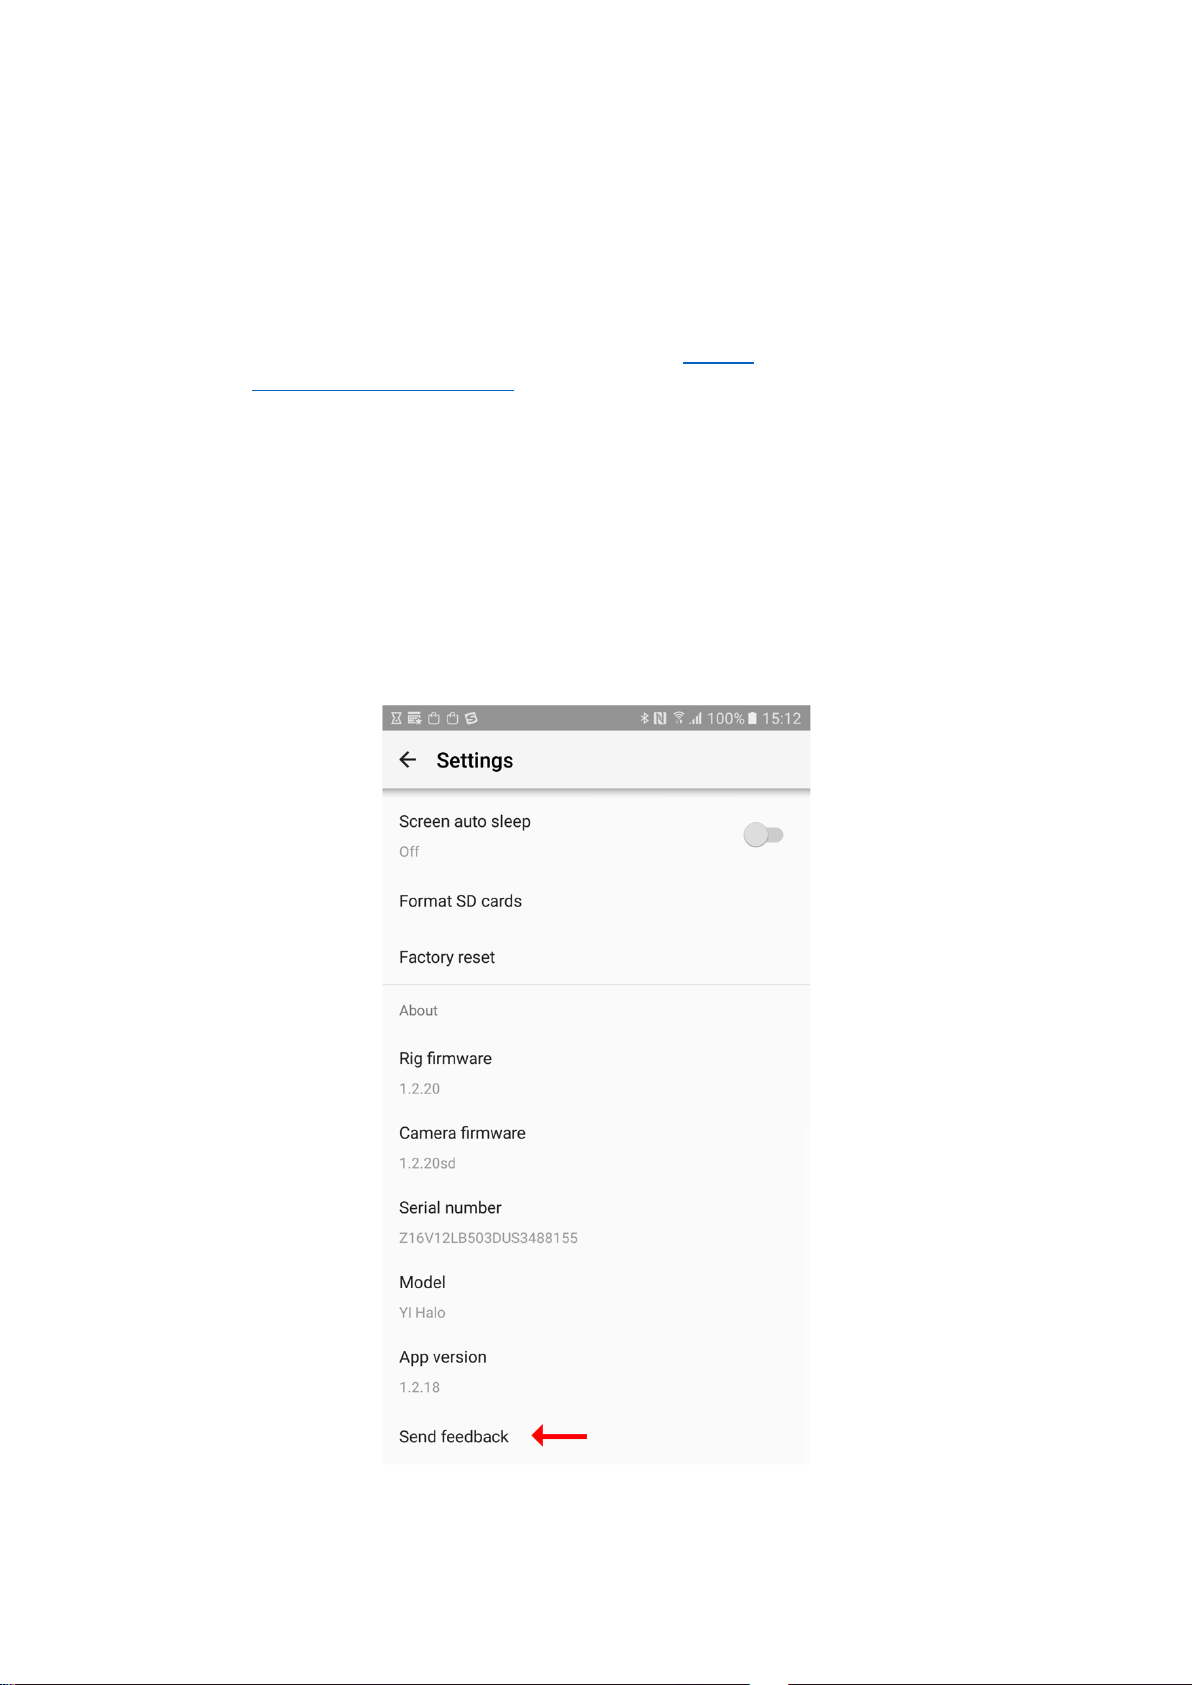
6.2 Logs and Submit Feedback Via the App
Log files are saved in the controller. Log files are important because they
provide information on how the cameras operate and the system status. This
helps our developers locate and solve problems.
When the YI HALO is connected to the App, tap ‘Send feedback’ in the
bottom left corner of the system settings page; log files will be collected from
the controller and sent to YI via Email during idle time. No photos or videos
will be sent to YI.
Page 56

6.3 Customer Support
Size
28.7cm X 28.7cm X19.2cm/11.3” x 11.3” x 7.6”
Weight
7.7lb/3.5kg with battery
Horizontal view unit
camera
16
Up view unit camera
1
LCD control panel
Yes
Level
2 bubble levels placed orthogonally
Tripod mount
1 x 3/8”-20 and 2 x 1/4”-16 aluminum mounting
points
Handle
Yes
Construction
PC/ABS
Color
Night Black
Protection case
Pelican 1610
Main processor
18 Ambarella A9SE75 chipset
Image sensor
17xSONY IMX377, 1/2.3"Exmor R CMOS sensor,
12 Megapixel, Native ISO 100
Lens
Lens F2.8 aperture / 155° wide-angle lens, 7G,
f=2.66±5%mm
Audio
Omni-directional microphone
Wi-Fi
Broadcom BCM43340
For further assistance, we are standing by for you at yihalo-
Product page: www.yitechnology.com/yi-halo-vr-camera
Telephone Technical Support: 1-425-454-0769
Service Hours: 9am - 5pm (Pacific Time)
6.4 Technical Specifications
6.4.1 Camera basics
6.4.2 Hardware
Page 57
LCD screen
2.2", 640*360 resolution touch screen, 330PPI,
250cd/m2 brightness, 30FPS, 160° FOV, 16:9
Clock synchronization
Yes
Battery
93Wh high density lithium polymer battery, battery
life 100 minutes in video recording
Power consumption
24V DC, 50W in video recording
Camera mode
Camera output resolution
Jump stitch output
resolution
Video
2.5K 29.97fps
17 2560x1920x29.97fps
8192x8192x29.97fps
Video
2.5K 25fps
17 2560x1920x25fps
8192x8192x25fps
Video
1440p 59.94fps
17 1920x1440x59.94fps
5760x5760x59.94fps
Video
1440p 50fps
17 1920x1440x50fps
5760x5760x50fps
Time lapse video
2.5K 29.97fps
17 2560x1920x29.97fps
8192x8192x29.97fps
Time lapse video
2.5K 25fps
17 2560x1920x25fps
8192x8192x25fps
Time lapse video
1440p 59.94fps
17 1920x1440x59.94fps
5760x5760x59.94fps
Time lapse video
1440p 50fps
17 1920x1440x50fps
5760x5760x50fps
Photo 12MP
17 4000x3000
8192x8192
Video format
H.264 codec, .mp4 format
MP4 metadata
Jump compatible
White balance
Auto, Native, Tungsten, Daylight, Cloudy
6.4.3 Capture mode
6.4.4 Video format
6.4.5 Image quality settings
Page 58
Video ISO
Auto, 400, 800, 1600, 3200, 6400
Photo ISO
Auto, 100, 200, 400, 800
EV
-2.0, -1.5, -1.0, -0.5, 0, 0.5, 1.0, 1.5, 2.0
Photo shutter
Auto, 2s, 5s, 10s, 20s, 30s
Color
YI Color, Flat Color
Metering
Center
Storage
microSD
Supported microSD cards
SanDisk Industrial 64GB
Lexar 1000x U3 32GB/64GB
SanDisk Extreme Pro U3 32GB/64GB
Supported Android versions
Android 5.0 and above
Recommended smart phones
Google Pixel and Google Pixel XL
Cooling system
Passive and fanless
Operating temperature
32°F-95°F
Storage temperature
-4°F-140°F
Waterproof
No, please do not use YI HALO in wet
environment
Dustproof
No, please do not use YI HALO in dusty
environment
Warranty
12 Month
6.4.6 Storage
6.4.7 YI HALO App
6.4.8 Thermal performance
6.4.9 Others
This device complies with Part 15 of the FCC Rules / Industry Canada
licence-exempt RSS standard(s). Operation is subject to the following two
conditions: (1) this device may not cause harmful interference, and (2) this
Page 59

device must accept any interference received, including interference that may
cause undesired operation.
Le présent appareil est conforme aux CNRd'Industrie Canada applicables aux
appareils radio exempts de licence. L'exploitation est autorisée aux deux
conditions suivantes : (1)l'appareil ne doit pas produire de brouillage, et (2)
l'utilisateur de l'appareil doit accepter tout brouillage radioélectrique subi,
même si le brouillage est susceptible d'en compromettre le fonctionnement.
Changes or modifications not expressly approved by the party responsible for
compliance could void the user's authority to operate the equipment.
This equipment has been tested and found to comply with the limits for a
Class B digital device, pursuant to part 15 of the FCC Rules. These limits are
designed to provide reasonable protection against harmful interference in a
residential installation. This equipment generates uses and can radiate radio
frequency energy and, if not installed and used in accordance with the
instructions, may cause harmful interference to radio communications.
However, there is no guarantee that interference will not occur in a particular
installation. If this equipment does cause harmful interference to radio or
television reception, which can be determined by turning the equipment off
and on, the user is encouraged to try to correct the interference by one or
more of the following measures:
● Reorient or relocate the receiving antenna.
● Increase the separation between the equipment and receiver.
● Connect the equipment into an outlet on a circuit different from that to
which the receiver is connected.
● Consult the dealer or an experienced radio/TV technician for help.
Under Industry Canada regulations, this radio transmitter may only operate
using an antenna of a type and maximum (or lesser) gain approved for the
transmitter by Industry Canada. To reduce potential radio interference to other
users,the antenna type and its gain should be so chosen that the equivalent
isotropically radiated power (e.i.r.p.) is not more than that necessary for
successful communication.
Conformément à la réglementation d'Industrie Canada, le présentémetteur
radio peut fonctionner avec une antenne d'un type et d'un gain maximal (ou
inférieur) approuvé pour l'émetteur par Industrie Canada. Dans le but de
réduire les risques de brouillage radioélectriqueàl'intention des autres
utilisateurs, il faut choisir le type d'antenne et son gain de sorte que la
puissance isotrope rayonnée équivalente (p.i.r.e.) ne dépasse pas l'intensité
nécessaire àl'établissement d'une communication satisfaisante.
Page 60

FCCID:2AFIB-YVR171
 Loading...