


User Manual
Model: PF10-5002
FCC ID: YNG-PF100001

Thanks for using YF GPS PF10-5002!
z YF reserves the rights of final interpretation of the manual.
z The product is subj ect to change without any further n otice. Please accept
our apology for your inconvenience.
z Please back up your information in the GPS navigator. YF assumes no
responsibility for any loss caused by mat e ri al loss.
z The manual might contain a few mistakes though it has been checked. If
mistakes are found, pleas e co nt act th e YF customer service center.

z Please read carefully the instructions in this manual and use only
accessories of YF to avoid unpredicted damage. Failure to follow the
instructions will invalidate warranty and might endanger personnel safety,
for which YF assumes no responsibility.
z Data of navigation electron ic maps might be inconsistent w ith actual traffic
signals due to trans portation development. Please foll ow traffic regulations
and signs and drive according to road situat ion.
z Operating the GPS navigator device while driving might cause serious
accidents. Please shorten your time in viewing the navigator and use the
voice prompt function. While drivin g, try to shorten you r time in operating
the navigato r, for example, inputting address es, changing settings or using
other functions. YF assumes no responsibility fo r accidents and loss due to
improper use.
z For safe driving, please pay attention to road and weather conditions as
well.
z For information of software update and upgrade, please go to our website
www.yfgps.com
.
z The pictures in the manual are subject to the material object.

Table of Contents
Chapter I Welcome................................................................................................. 1
Chapter II Basic Operation..................................................................................... 2
2.1 Appea rance........................................................................................... 2
2.2 Power Supply & Charging ....................................................................3
2.3 Power on............................................................................................... 4
2.4 Power off & Sleep................................................................................. 4
2.5 Reset..................................................................................................... 5
2.6 Fix the GPS Navigator.......................................................................... 5
2.7 Use T-FLASH Card...............................................................................6
2.8 Use Touch Screen..................................................................................6
2.9 Main Interface & Major Functions ........................................................ 7
2.10 Network Connection........................................................................... 8
Chapter Ⅲ GPS.................................................................................................. 10
Chapter Ⅳ Dial...................................................................................................11
4.1 Make Calls...........................................................................................11
4.2 Answe r Calls....................................................................................... 12
4.3 Contacts.............................................................................................. 13
4.4 Record ................................................................................................17
4.5 Favorite Contacts................................................................................ 18
Chapter Ⅴ SMS................................................................................................. 19
5.1 Read Message..................................................................................... 19
5.2 Create & Send Message...................................................................... 20
5.3 Save drafts.......................................................................................... 22
5.4 Manage Messages............................................................................... 23
Chapter Ⅵ Network ........................................................................................... 25
6.1 GSM................................................................................................... 25
6.2 Contact................................................................................................ 25
6.3 SIM Contacts...................................................................................... 26

Table of Contents
6.4 USSD.................................................................................................. 26
6.5 Pin ...................................................................................................... 27
6.6 Home p age.......................................................................................... 28
6.7 SMS Center.........................................................................................28
6.8 Carrier................................................................................................. 29
Chapter Ⅶ GPRS ............................................................................................... 31
Chapter Ⅷ Media............................................................................................... 32
8.1 Music Player....................................................................................... 32
8.2 Video Player........................................................................................ 36
8.3 Photo Browser .................................................................................... 38
8.4 E-book Reader.................................................................................... 41
9.1 FM Transmitter................................................................................... 47
9.2 Favorites............................................................................................. 48
9.3 Calculator ........................................................................................... 49
9.4 Unit..................................................................................................... 49
9.5 Games................................................................................................. 50
Chapter Ⅹ Settings............................................................................................. 51
10.1 Volu me.............................................................................................. 51
10.2 Backlight........................................................................................... 52
10.3 Language .......................................................................................... 53
10.4 Date & Time ..................................................................................... 54
10.5 Calibration........................................................................................ 55
10.6 GPS Info........................................................................................... 56
10.7 System Information ........................................................................... 56
10.8 USB Setting...................................................................................... 57
10.9 Restore Factory Setti n gs.................................................................... 59
10.10 Exp lorer.......................................................................................... 60
Appendix Troubleshootin g................................................................................... 60

1
Chapter I Welcome
Thanks for using the GPS PF10-5002 featured with navigation as the major
function as well as other function s like SMS, GPRS, GSM, audio play, video play,
flash play, photo browsing and e-book reading , et c.
9 SiRF Atlas-Ⅴ, dual-core CPU with high performance and low power
consumption
9 Friendly user interfaces for simple operation
9 Power management for longer and more stable operation
9 Data transmission with computers via Mini USB
9 Quality reception for accurate positioning and satisfactory navigation
service
9 Leisure partner with audio/video/amusement functions
9 Multi-touch(2 points) function and automatic rotation when browsing
photos
You may use the GPS navigator anytime anywhere, for example while driving,
walking or cycling. Its navigation and amusement functions will enrich your life
and work!
To fully exert the functions of GPS PF10-5002 and to understand the operation
details, please read the manual carefully.
You may see the follow ing supplemental information in the manual.
[Note]: Explanation of relevant subjects
[Relevant Information]: Extra information of relevant subjects
[Attention]: Precautions or warnings of relevant subjects. Please pay attention to
this information and follow the instructions to avoid devastating influence on
yourself and others.
This manual is applicable only to the GPS PF10-5002.

2
Chapter II Basic Operation
2.1 Appearance
1 Power key Power on/off the device.
2 Dial shortcut key Press on it to enter the Dial interface to make calls
3 SIM card slot Insert the SIM card.
4
Microphone For voice input
5 Earphone Jack Connect with the stereo earphon e, 3.5 mm
6
T-FLASH card
slot
Inserted with a T-FLASH card containing map
software, map data and user documents. Do not
remove it while operating the device. Reset the device
when the card is pulled out improperly.
7 USB port
Connect and communicate with computer through a
MINI USB cable and is used as the charging port.
8 LCD indicator
The indicator is red while the devi ce is being charged
and turns green when it is fully charged.

3
9 Speaker Sound is given out here.
10 Reset button Reboot the device.
2.2 Power Supply & Charging
Charge the GPS navigator fully with the charger before first use.
2.2.1 Power Supply
The GPS PF10-5002 can be powered by the built-in battery or external power
supply.
When the GPS navigator is unconnected to the charger, it is powered by the
Li-polymer battery. The battery capacity icon
in the system main
interface shows current residual battery capacity.
When the GPS navigator is connected to the charger, it is powered by external
power and the battery is charged.
[Attention] The GPS navigator adopts non-removable Li-polymer battery. To avoid
battery rupture, explosion, release of hazardous substance or burn, do not unpack,
pierce, strike on or discard the battery in fire or water.
The navigator has a working temperature of 0~50°C and storage temperature
-10~60°C. Do not expos e the device in excessive heat or ho t areas, for ex ample in
the car under strong sunlight. To avoid damaging the device, keep it away from
direct sunlight.
Follow local regulations while disposing the battery.
2.2.2 Charge by DC Charger
The GPS navigator must be charged with the DC charger before first use.

4
Plug the USB t erminal of th e charger into the USB po rt on the left side of the GPS
navigator and the other to the power socket to supply power and charge the GPS
navigator.
[Note]: The charging indicator light is red during charging. Do not unplug the
charge until the battery is fully charged and the indicator light turns green. Please
charge the GPS navigator when the battery is low or used up in succeeding use.
2.2.3 Charge by Car Charger
Plug one terminal of th e car charger into the USB port on the left s ide of the GPS
navigator and th e other to the charging port to supply p ower and charge the GPS
navigator.
[Note]: Plug in the car charger after the au tomobile is started to avoid d amage due
to current surge.
2.3 Power on
Press the power key o n the top of th e device and let go after two second s to power
it on and enter the welcome interface.
[Note]: Great humidity flu ctuation may lead to short circuit of the GPS navigat or.
Power on the navigator afte r it has accommodated to new environment.
2.4 Power off & Sleep
Press the power key and let go after two seconds when the power-off interface
prompts, and tap “Power off”. If
is selected, t he navigator will enter sleep
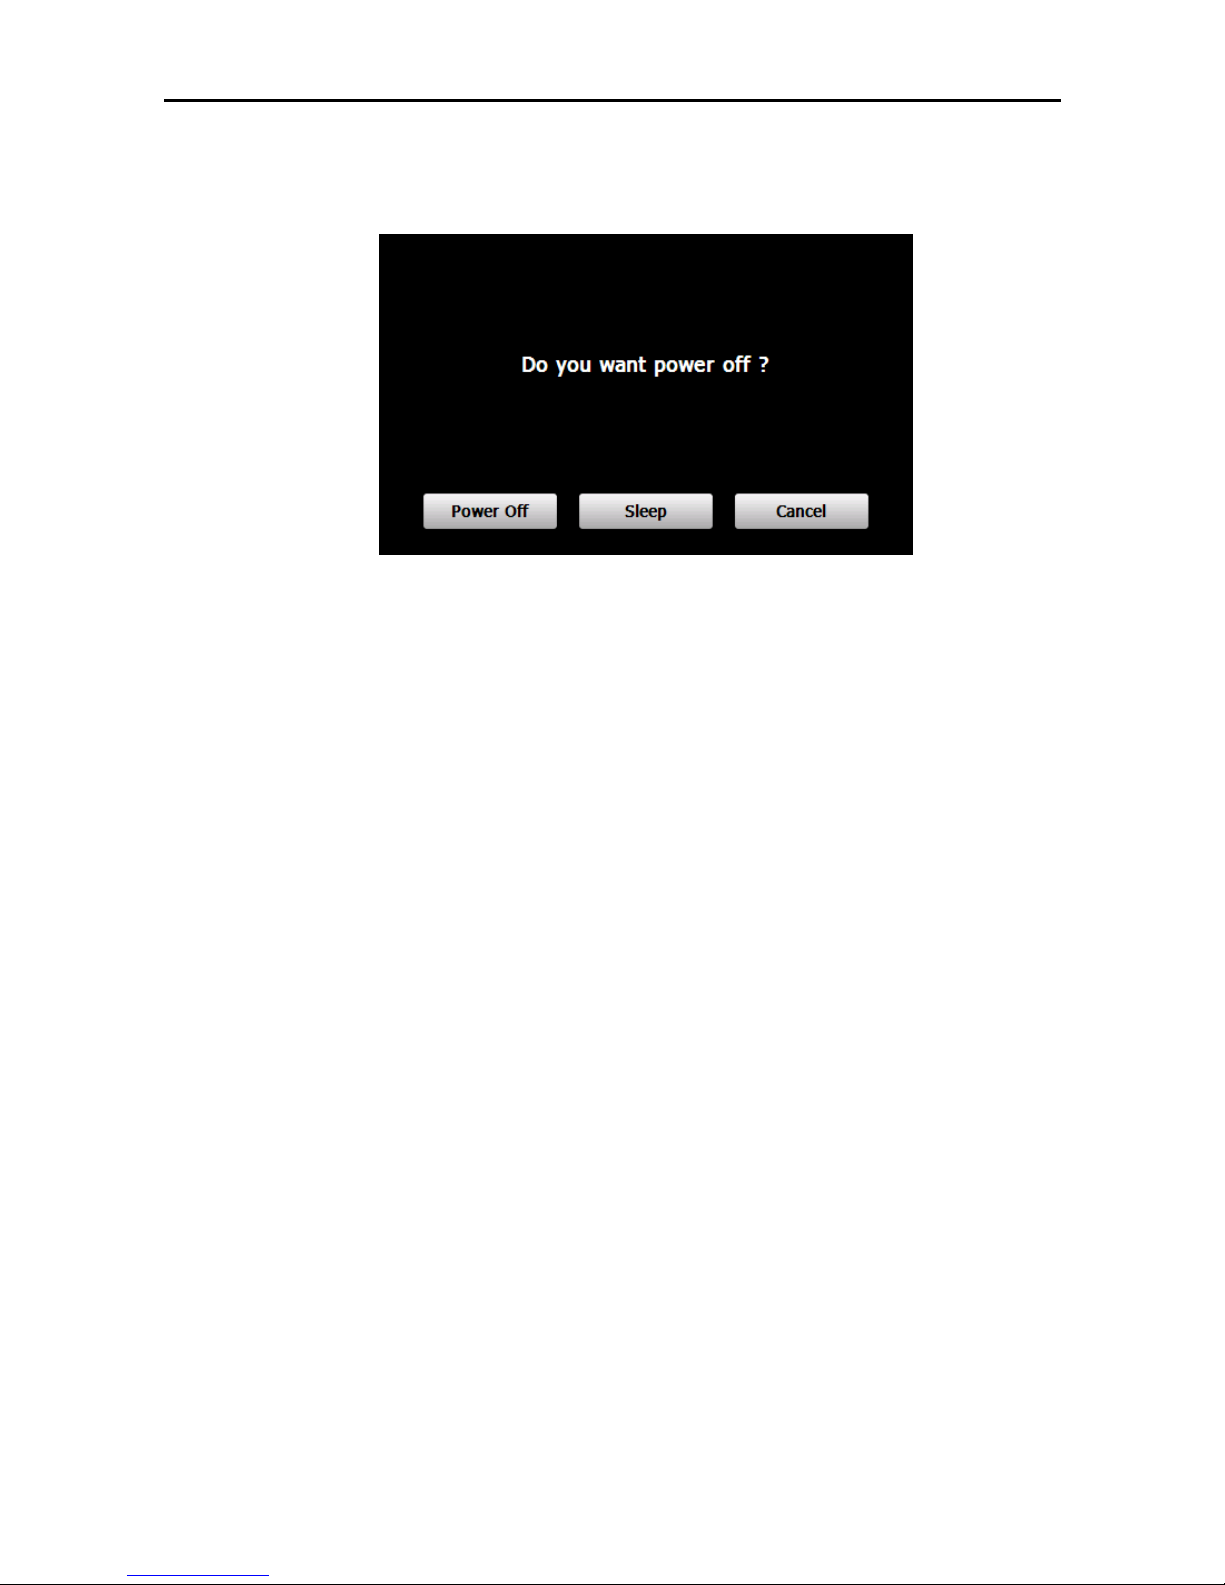
5
mode, and will automatically resume the state before entering sleep mode when it is
powered on again (refer to 2.3 Power on).
2.5 Reset
When the device has no response, press the reset button on the back side to reset
the system..
[Relevant Information] The following situations might lead to no response of the
system.
1. Failure of function activation with overlong execution;
2. Failure to power on/off the GPS navigator by pressi ng th e power key
[Note]: Loss of unsaved data may incurred when resetting the system. Please
backup your data timely.
2.6 Fix the GPS Navigator
The mounting kit is co mposed of a cradle and a bracket. To use the GPS navigator

6
in an automobile, fix it on the dashboard under the front windshield.
[Note]: Do not place t he GPS n avigator in p ositions obstructing t he driver’s vision,
for example at the steering wheel, pedal or gear lever. Do not place it without fixing
it or in the place of air bag or the area after the air bag is inflated.
While using the mounting kit, follow local regulations. YF will have no
responsibility for any penalty or damage resulting from traffic violation.
2.7 Use T-FLASH Card
You may copy mapping applications, map data and media files in a T-flash card.
Insert the card in the corresponding slot.
[Note]:
1. Do not take out the T-Flash card while a navigation program is being run or a
media file is being played.
2. To avoid drop or crash of the T-Flash card, do not exert he avy pressure on it or
bend it.
3. Avoid using or storing the T-Flash card in high temperature, high humidity or
direct sunlight. Keep the card away from liquid or corrosive substance.
4. Mind the direction whil e inserting th e T-Flash card to avoid damaging the slot or
the card.
2.8 Use Touch Screen
To protect the touch screen, do not operate it with acute objects. To cleanse the

7
screen, use soft clot h with water, isopropyl al cohol or glasses cleanser. Do not use
detergent containing ammonia.
2.9 Main Interface & Major Functions
Press the power key o n the top of th e device and let go after two second s to power
it on and enter the system main interface as shown belo w.
If the device is powered on with an SIM card inserted, the network operator’s name
will be displayed in the upper part of the system main interface, for example
“China UNICOM”; otherwise, “unregister” will be di splayed.
The meanings of the icons in the first line of the above interface are as follows.
Enable or disable the radio module. When “Enable
Radio” is not selected (refer t o 6.1 GSM), the device
will enter flight mode, and
and “unregister” will
be shown at the top of the interface.
Name of the netw ork operator
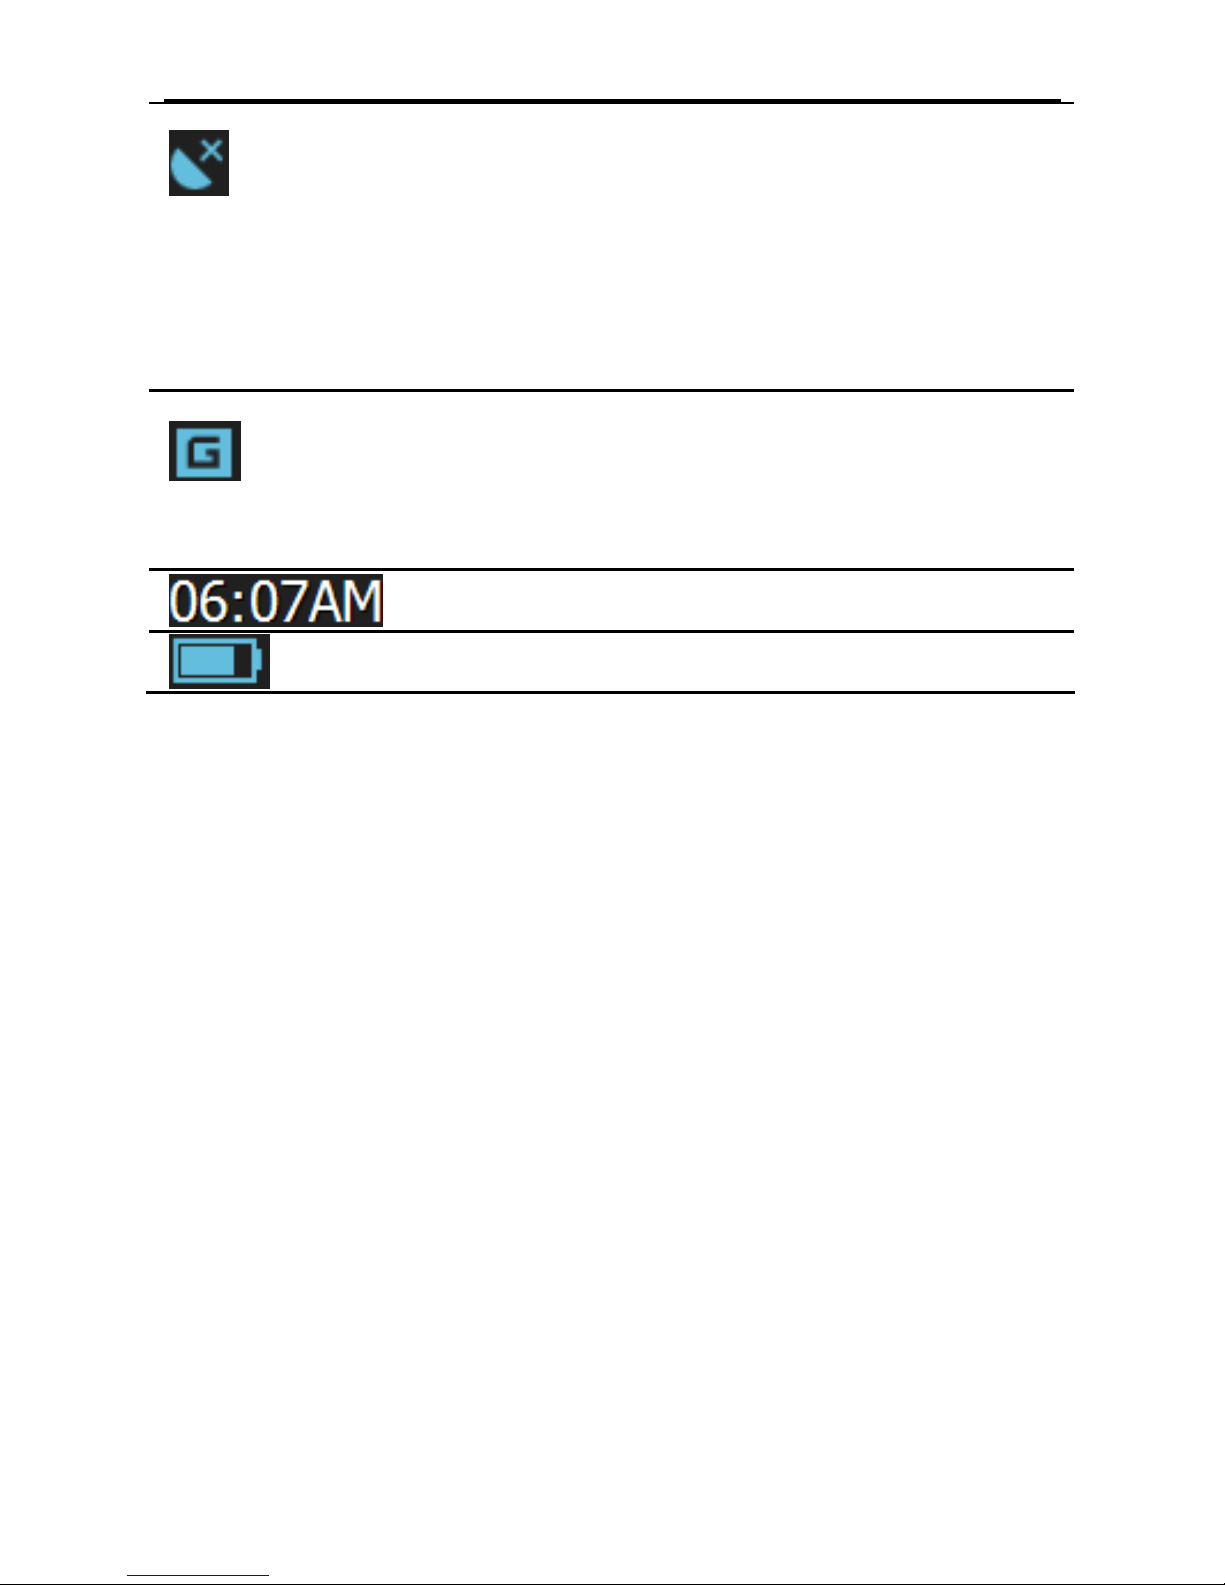
8
GPS information: display the signal state, TUC,
latitude and longi tude etc.
GPRS setting, including auto dialing, creating or
editing operator information. It is in grey when
disconnected to network.
Setting the system date and time
Display the battery capacit y
[Relevant Information]: In the following situations, the SIM card cannot be
registered to network after the device is powered on, and “unregister” will be
displayed instead of the networ k operat or na me.
1. No SIM card is inserted;
2. The Radio Module (refer to 6.1 GSM) is disabl ed;
3. PIN code is not input (when PIN code is enabled). Refer to 6.5 Pin.
2.10 Network Connection
You may make cal ls or send mess ages aft er connecting the dev ice to netwo rk. Take
the following steps to set up network connection:
1. Insert an SIM card;
[Attention]: This device does not support hot-plugging. Do not unplug/insert
the SIM card when the device is on.

9
2. Enable the Radio module (refer to 6. 1 GSM);
3. Input the PIN code if the Pin code is enable d for the SIM card (refer to 6.5
Pin).
[Relevant Information]: Enable PIN code for your SIM card on a mobile phone.
The initial PIN code p rovided by your service provid er and is modifiable. Note if
the PIN code is input for successes three times , the SIM card will be locked and a
PUK code is requir ed to unlock. Do remember your PIN code.
You may visi t and dow nload fro m the Int ernet aft er con necting th e device t o GPRS
network. Take the following steps to set up GPRS network connection:
1. Insert an SIM card supporting GPRS service;
2. Enable the radio functio n (refer to 6.1 GSM);
3. Input the PIN cod e wh en the device is po wered on i f it has been enabled (refer t o
6.5 Pin);
4. Enter the GPRS Setting interface (refer to Chapter
Ⅶ
GPRS) and tap
“Connect”.

10
Chapter Ⅲ GPS
For initial startup of the navigation program, operate the device in an open area
without obstructions.
Hold the device after powering it on till it receives signals from at least 4 satellites,
and then you may start using the navig at ion p rog ram as you wish.
Note: There are various ways t o s earch a location in the map or to plan your rout es.
See navigation user manual that guides you through the operating process.

11
Chapter Ⅳ Dial
When the device is connected to the network, tap on the system main
interface to enter the Dial interface as shown below.
4.1 Make Calls
Input a telephone number,
Backspace Tap to delete the last number or symbol
input
Dial Tap to dial a number
Besides, you may make calls by selecting a contact person from the phone book.
For details, please see the instructions of 4.3 Contacts be low.
When the call is put through, the following interface will be shown.

12
In the above interface, tap to enter the call Record interface (see 4.4 Record),
tap
to enter th e SMS interface (see Chapter
Ⅴ
SMS), tap to enter
the Contacts interface (see 4.3 Contacts), tap
to o pen the keypad to input
information, tap
to hang off, and tap / to turn down/ up the
volume.
4.2 Answer Calls
When there is an incoming call, the following interface will popup.

13
Tap to answer the call or tap to reject.
4.3 Contacts
Tap to enter the Contacts interface as shown below:
In the above interface, tap to add a new contact information in the Contact
Fields interface as shown below.

14
Ta p on to open the keypad, set cursor after a field and type in info rmation
as follows.
[Relevant Information] In the above interface, you may tap
on the
keypad to select from uppe r case, lower cas e, numb ers or swi tch betw een big and
small keypad.
Tap
to save the info, and then tap to exit.
To add more contacts, repeat the above steps and you will get the following

15
interface.
Select all Tap to select all contacts; tap again to
unselect all
Add contact Tap to add contact
Delete Tap to delete the selected contact(s)
View contact fields Select a contact and tap this icon to view
the contact fields as shown below
Add to the favor list Tap to add the contact to the favor list
SIM card contacts Tap to enter th e list of SIM card co ntact s
to copy them to the device as shown
below
In the Contacts interface, tap to view the contact fields as shown below.

16
Tap to edit the contact information, to call the contact or to
send a message.
In the Contacts interface, tap
to enter the Simcard Contacts interface as
follows.
Tap on a contact to select it or tap to select all the contacts, and tap to
copy them to the device.
 Loading...