

Page 1
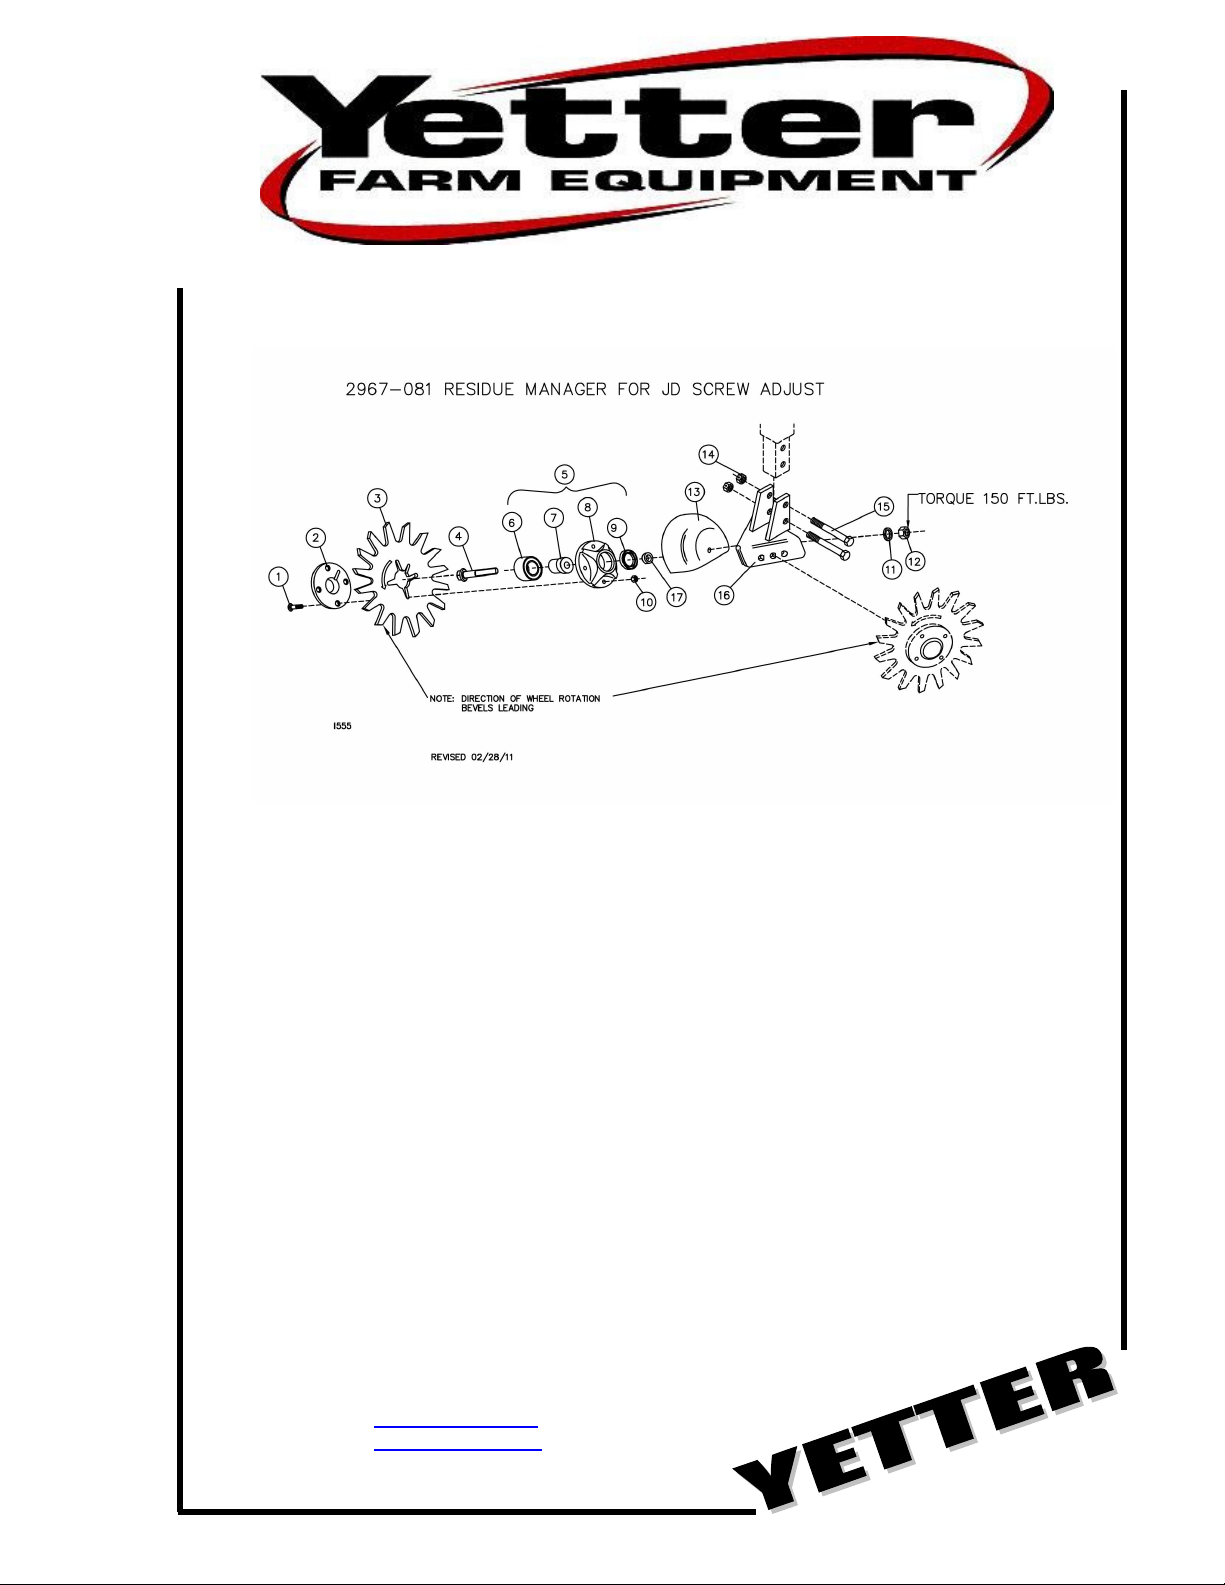
2967-081
RESIDUE MANAGER FOR JD SCREW ADJUST
2565-448 12/2011
Key Qty. Part No. Description
1 8 2505-208 5/16-18 X 1 1/2 Car. Bolt Gr. 5
2 2 2965-352 Hub Cap Casting, 4 Bolt, Black
3 2 2967-404 13” Taper Tooth Spoke Wheel
4 2 2570-742 ‘D’ Bolt Flange, 5/8-11 X 4” Gr. 8 ZYD
5 2 2965-128 Hub & Bearing Assy., 4 Bolt (Includes 7,8,9, & 10)
6 2 2570-594 Bearing, 2 Row NTN# DF0654L
7 2 2570-715 Bearing Insert, Trashmaster
8 2 2965-351 Hub Casting, Mach., 4 Bolt
9 2 2550-052 Seal, CR#13548
10 8 N10213 5/16-18 Hex Flange Serrated Nut
11 2 2525-451 5/8 Med. Lockwasher ZP
12 2 2520-452 5/8-11 Hex Nut ZP
13 2 2967-336 R.M. Shield, Painted, W/Hole
14 2 2520-357 1/2-13 Lock Hex Nut ZP
15 2 2502-316 1/2-13 X 3 1/2 HHCS Gr. 5 ZP
16 1 2967-257 JD Screw Adj. R.M. Bracket W.A.
17 2 2967-302 Spacer, 3/4”, ZYD
YETTER MANUFACTURING CO.
FOUNDED 1930
Colchester, IL 62326-0358
Toll free: 800/447-5777
309/776-3222 (Fax)
Website: www.yetterco.com
Email: info@yetterco.com
Page 2

INSTALLATION
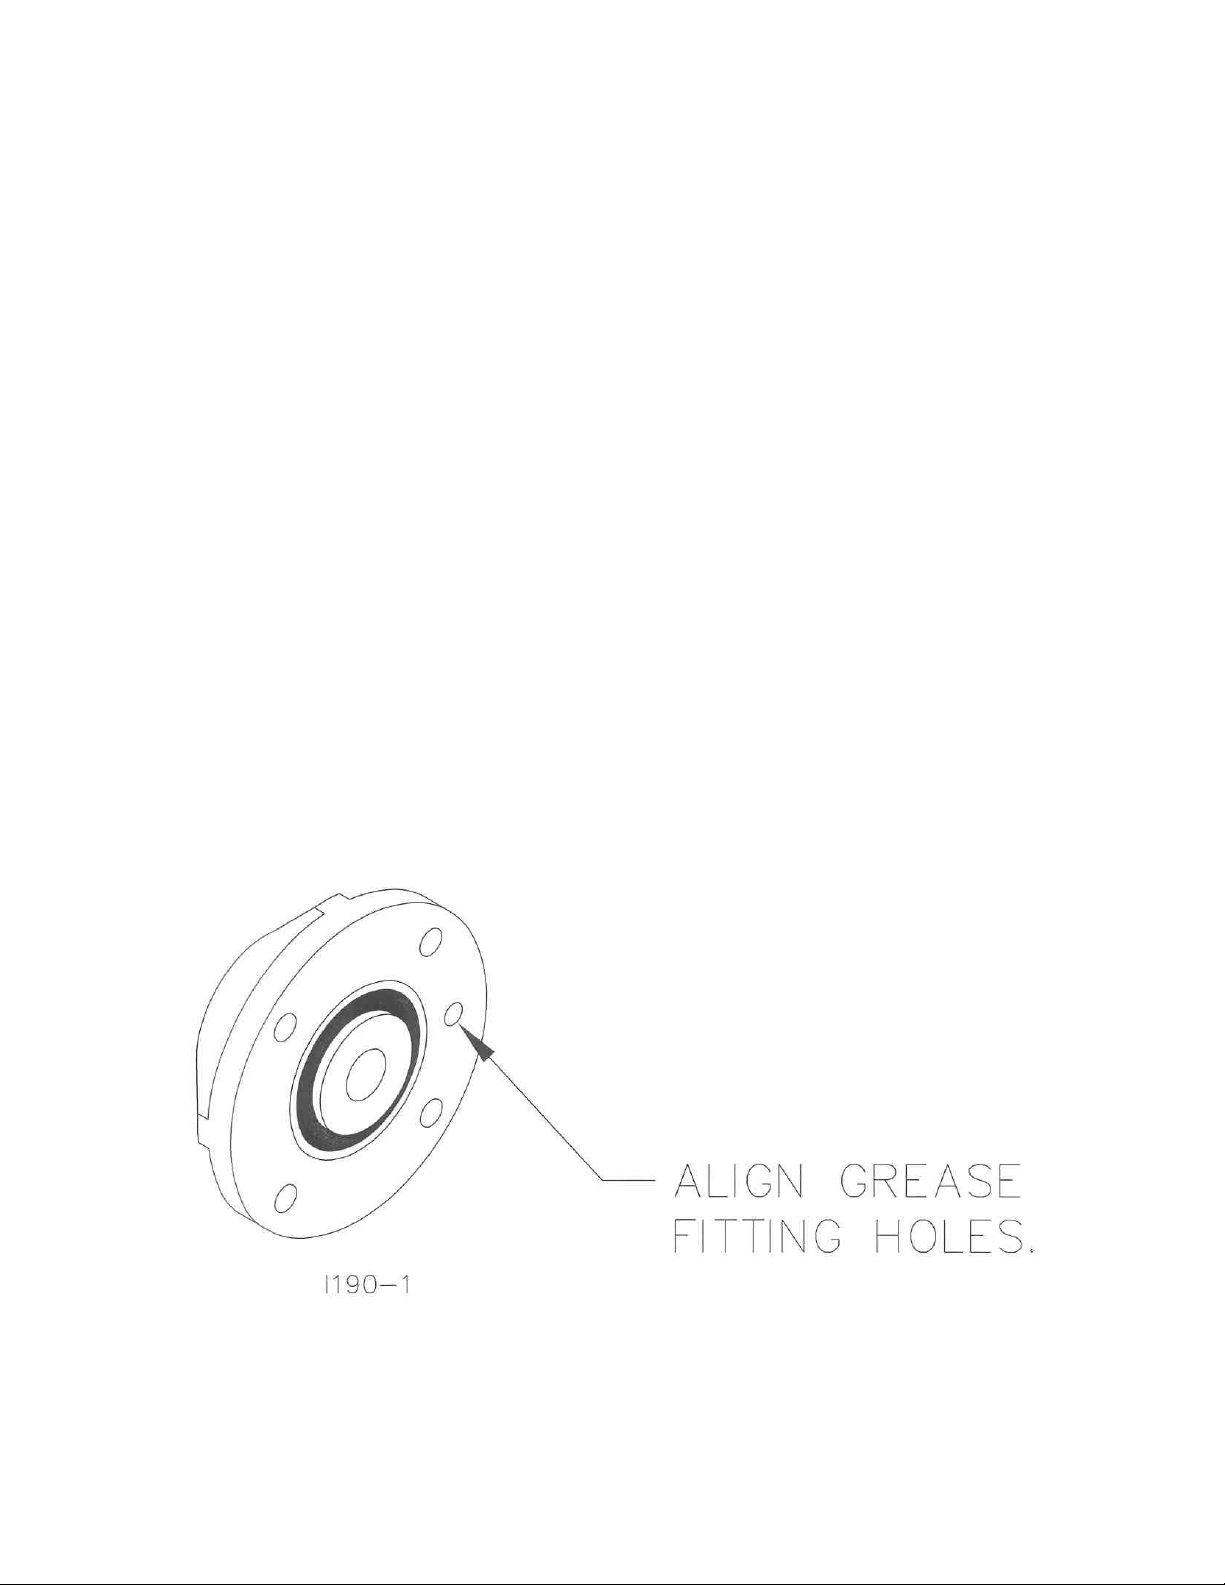
1. When assembling spoke wheel, bearing assembly and hub cap, be sure to
align the grease fitting hole with the hole in the spoke wheel with groove in
hub cap to assure proper greasing of wheel and hub assembly.
2. Be sure to install the 3/4” spacers and bearing shields when assembling
the spoke wheel and bearing assembly. Using the 5/8” lockwasher and
nut, secure the wheel to the bracket. Torque 150 ft.lbs.
3. Attach the spoke wheel assembly to the screw adjust bracket using the
two 1/2” x 3 1/2” bolts and lock nuts. Stagger spoke wheels so that half of
the rows have the left wheel leading and half of the rows have the right
wheel leading.
4. Fill hub and bearing assembly with general-purpose grease.
MAINTENANCE
After a few hours use, check all bolts to make sure they are tight.
2
Page 3
MAINTENANCE
BEARING ASSEMBLY AND LUBRICATION
Practice Safety
Understand and practice safe service procedures before doing work. Follow ALL
the operating, maintenance and safety information in the equipment operator
manual. Clear the area of bystanders, especially small children, when performing
any maintenance or adjustments. Keep work area clean and dry. Use adequate
lighting for the job. Use only tools, jacks and hoists of sufficient capacity for the
job.
Never lubricate, service, or adjust machine while it is moving. Keep hands, feet,
and clothing from power-driven moving and rotating parts. Disengage all power
and operate controls to relieve pressure. Lower equipment to the ground and
stop the engine. Remove the key. Wait for all moving parts to stop before
servicing, adjusting, repairing or unplugging.
Securely support any machine elements with blocks or safety stands that must
be raised for service work.
Keep all parts in good condition and properly installed. Fix damaged equipment
immediately. Replace worn or broken parts. Remove any buildup of grease, oil,
or debris.
Make sure all guards are in place and properly secured when maintenance work
is completed.
Assembly
3
Page 4

MAINTENANCE
NOTE: Be certain to align the grease fitting with the slot in the wheel and the
hubcap so that the grease can flow freely.
4
Page 5

MAINTENANCE
Grease must fill this
Hubcap cavity.
5
Page 6

MAINTENANCE
Lubrication
CAUTION: To help prevent serious injury or death to you or others
caused by unexpected movement, service machine on a level surface.
Lower machine to ground or sufficiently lock or block raised machine
before servicing. If machine is connected to tractor, engage parking
brake and place transmission in "PARK", shut off engine and remove
key. If machine is detached from tractor, block wheels and use shop
stands to prevent movement.
CAUTION: Do not clean, lubricate, or adjust machine while in motion.
Use grease based on NLGI consistency numbers and the expected air
temperature range during the service interval.
Use a multi-purpose lithium, water resistant, moderate speed, and NLGI
grade #2 grease.
Other greases may be used if they meet the following NLGI Performance
Classification: GC-LB
IMPORTANT: Some types of grease thickener are not compatible with
others. Consult your grease supplier before mixing different types of
grease.
Alternative Lubricants
Conditions in certain geographical areas may require special lubricants and
lubrication practices which do not appear in the operator's manual. If there are
any questions, consult Yetter Manufacturing Co. to obtain latest information and
recommendation.
PART #
2967-404 13” TAPER TOOTH R.M. WHEEL 1.12 OZ
2967-602 13” SHARK TOOTH R.M. WHEEL 1.12 OZ
2967-186 FLOATER WHEEL KIT W/R.M. WHEEL 2.08 OZ
2967-596 HEAVY DUTY OR BEVEL R.M. WHEEL W/
DESCRIPTION
FLOATER WHEEL KIT
OUNCES OF GREASE
2.40 OZ
Storing Lubricants
Your machine can operate at top efficiency only if clean lubricants are used.
Use clean containers to handle all lubricants.
Store them in an area protected from dust, moisture and other contaminants.
6
Page 7

MAINTENANCE
Lubrication Symbols
Lubricate with grease at hourly interval indicated on symbol.
Lubrication Intervals
IMPORTANT: The recommended service intervals are based on normal
conditions; severe or unusual conditions may require more frequent
lubrication.
Perform each lubrication and service procedure at the beginning and end of each
season.
Clean grease fittings before using grease gun, to avoid injecting dirt and grit into
the bearing. Replace any lost or broken fittings immediately. If a fitting fails to
take grease, remove and clean thoroughly, replace fitting if necessary. Also
check for failure of adjoining parts.
BEARING REPLACEMENT INSTALLATION
1. When assembling the spoke wheels, bearing assembly and hubcap, be
sure to align the grease transfer hole in the spoke wheel with the groove in
the hubcap and hole in the hub to allow grease passage.
2. Assemble the wheels, hubs and caps.
3. Grease the wheel/hub/bearing assembly.
7
Page 8

MAINTENANCE
Storing the Equipment
Store the machine in an area away from human activity
Store machine in RAISED position.
Install service locks on all wheel cylinders.
At the end of the season, the machine should be thoroughly inspected and
prepared for storage. Repair or replace any worn or damaged components to
prevent down time at the start of the next season. Store machine under cover
with all parts in operating condition.
• Clean machine thoroughly to remove all dirt, debris and crop residue,
which would hold moisture and cause rusting.
• Inspect machine for worn or broken parts. See your Yetter Farm
Equipment dealer during the off-season so that parts or service can be
acquired when machine is not needed in the field.
• Lubricate bearings as outlined in the Lubrication section
• Paint all parts which are chipped or worn and require repainting.
• Store machine in a clean, dry place with the planting unit out of the sun.
• If the machine cannot be stored inside, cover with a waterproof tarpaulin
and tie securely in place.
• Do not allow children to play on or around the machine
2565-448_REV_B • 12/11
8
 Loading...