

Page 1
Perfect Under Pressure.
TM
For more recipes, go to www.yedihousewareappliances.com
Have more questions? We’re here to help!
Email us at info@yedihouseware.com
Page 2

Pressure Cooker Safety is a Priority
Thank you for purchasing the Yedi Pressure Cooker. You will be happy to know we design
all our products with safety in mind. We have incorporated 10 built-in safety mechanisms
to assure pressure cooking is safe with your new Yedi Multi-Use Electric Pressure Cooker.
Here are the basic safety guidelines and cautions you should follow:
1. NEVER place face, hands or unprotected skin over the steam release valve when you are using your
Multi-Use Pressure Cooker for cooking or releasing pressure.
2. NEVER force the Multi-Use Pressure Cooker lid open. ALWAYS wait to open lid aer pressure is
released and float is in the down position.
3. Your Multi-Use Pressure Cooker is ONLY intended for counter top use. NEVER place the Multi-Use
Pressure Cooker unit near a hot gas or electric burner or inside your oven. NEVER expose it to direct heat
or an adverse environment.
4. The stainless steel parts of your Multi-Use Pressure Cooker surfaces get very hot and stay hot during
and aer cooking. DO NOT TOUCH any hot surfaces with bare hands and be sure to KEEP AWAY
FROM CHILDREN!
5. Always use the Perfect Under Pressure Multi-Use Pressure Cooker stainless steel removable inner
pot for cooking and be sure to confirm the lid is locked in place before pressure cooking. NEVER use
third party parts or accessories in your Multi-Use Pressure Cooker.
6. The Perfect Under Pressure Multi-Use Pressure Cooker is intended for household use ONLY and is not
intended for commercial or outdoor use. For safety, KEEP AWAY FROM CHILDREN
7. Your Multi-Use Pressure Cooker is ONLY intended for use in
North America. Your Multi-Use Pressure Cooker has a 3-prong grounding plug. ALWAYS plug in the
power cord into a grounded outlet.
8. Always aach the plug to your Multi-Use Pressure Cooker before plugging into a wall outlet. Press
CANCEL to ensure no programs are running before unplugging. ALWAYS unplug and let your Multi-Use
Pressure Cooker cool down before cleaning or storing.
9. NEVER immerse your Multi-Use Pressure Cooker base, black lid, cord or plug in water or any other liquid.
Have more questions? We’re here to help! Email us: info@yedihouseware.com
120v/60Hz electrical systems in
Page 3
Pressure Cooker Safety is a Priority
Thank you for purchasing the Yedi Pressure Cooker. You will be happy to know we design
all our products with safety in mind. We have incorporated 10 built-in safety mechanisms
to assure pressure cooking is safe with your new Yedi Multi-Use Electric Pressure Cooker.
Here are the basic safety guidelines and cautions you should follow:
10. ALWAYS use the side handles to carry your Multi-Use Pressure Cooker. Use extreme caution
when moving your Multi-Use Pressure Cooker containing hot liquid. NEVER move the pressure
cooker while is use.
11. NEVER use your Multi-Use Pressure Cooker to deep fry or pressure fry. This product is not built
with the necessary features to do so.
12. Keep the power cord from away from hot surfaces and NEVER let the cord hang over the edge
of a table or counter. NEVER operate your Multi-Use Pressure Cooker if the cord or plug is damaged,
or if the unit is damaged or is malfunctioning.
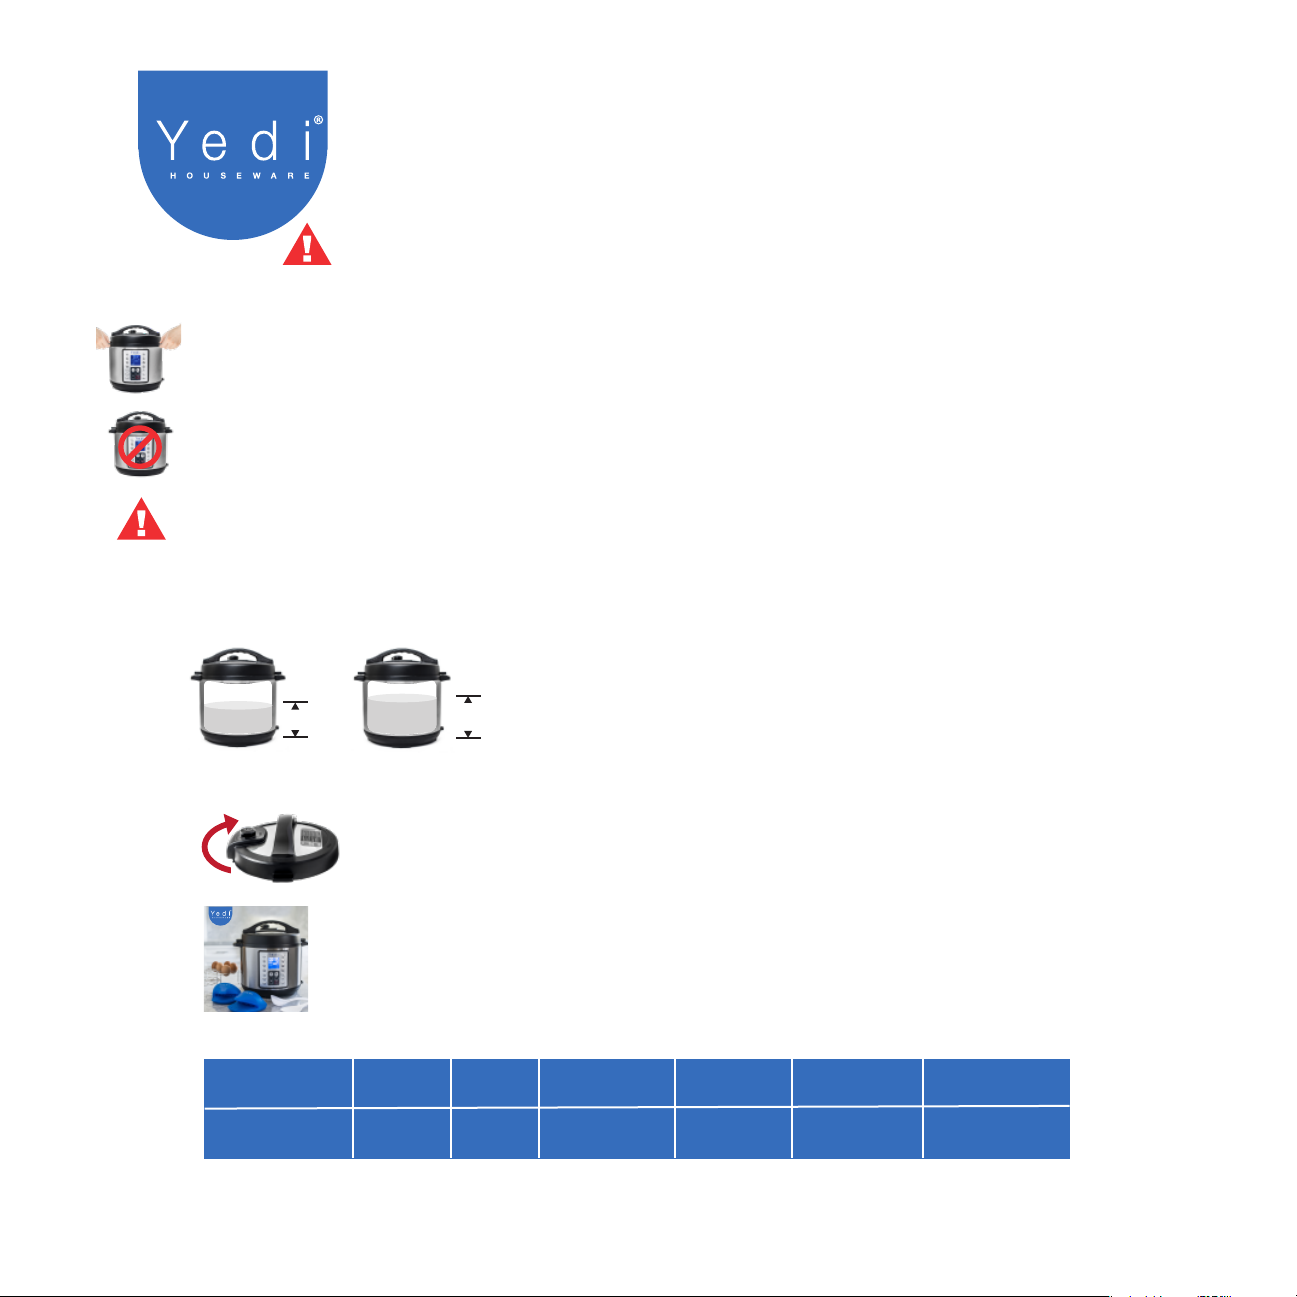
13. ALWAYS follow the maximum fill lines when pressure cooking. NEVER exceed the maximum fill lines.
For beans, rice and grains, use only 1/2 full. For all other items, 2/3 full is the maximum.
1/2 Full
Only
Beans, Rice and Grains
Everything else.
2/3 Full
Only
14. ALWAYS turn the steam release handle to SEALING before selecting pressure cooking programs.
Multi-Use Pressure Cooker
15. Certain foods (such as apple sauce, cranberries, pearl barley, porridge, cereal, split
RECIPE BOOK
Perfect
Under
TM
Pressure.
peas, pasta, noodles and rhubarb) can create foam or froth under pressure which can
potentially spuer, clog the steam vent or cause burns. ONLY cook those foods as
For more recipes, go to www.yedihousewareappliances.com
or download the Yedi Houseware app for iOS or Android
directed by our Multi-Use Pressure Cooker Recipe Book.
Yedi Multi-Use Pressure Cooker Specifications
MODEL VOLUME WEIGHT
GV001
POWER
SUPPLY
120V-
60Hz
RATED
POWER
CALIBER OF
INNER POT
1000W 6 QUART 6
DIMENSIONS
1
/
3
x 8
2
/
3
14
1
/
lb
2
13 x 12
1
/4 x 121/
2 in
Have more questions? We’re here to help! Email us: info@yedihouseware.com
Page 4
Pressure Cooker Your Introduction
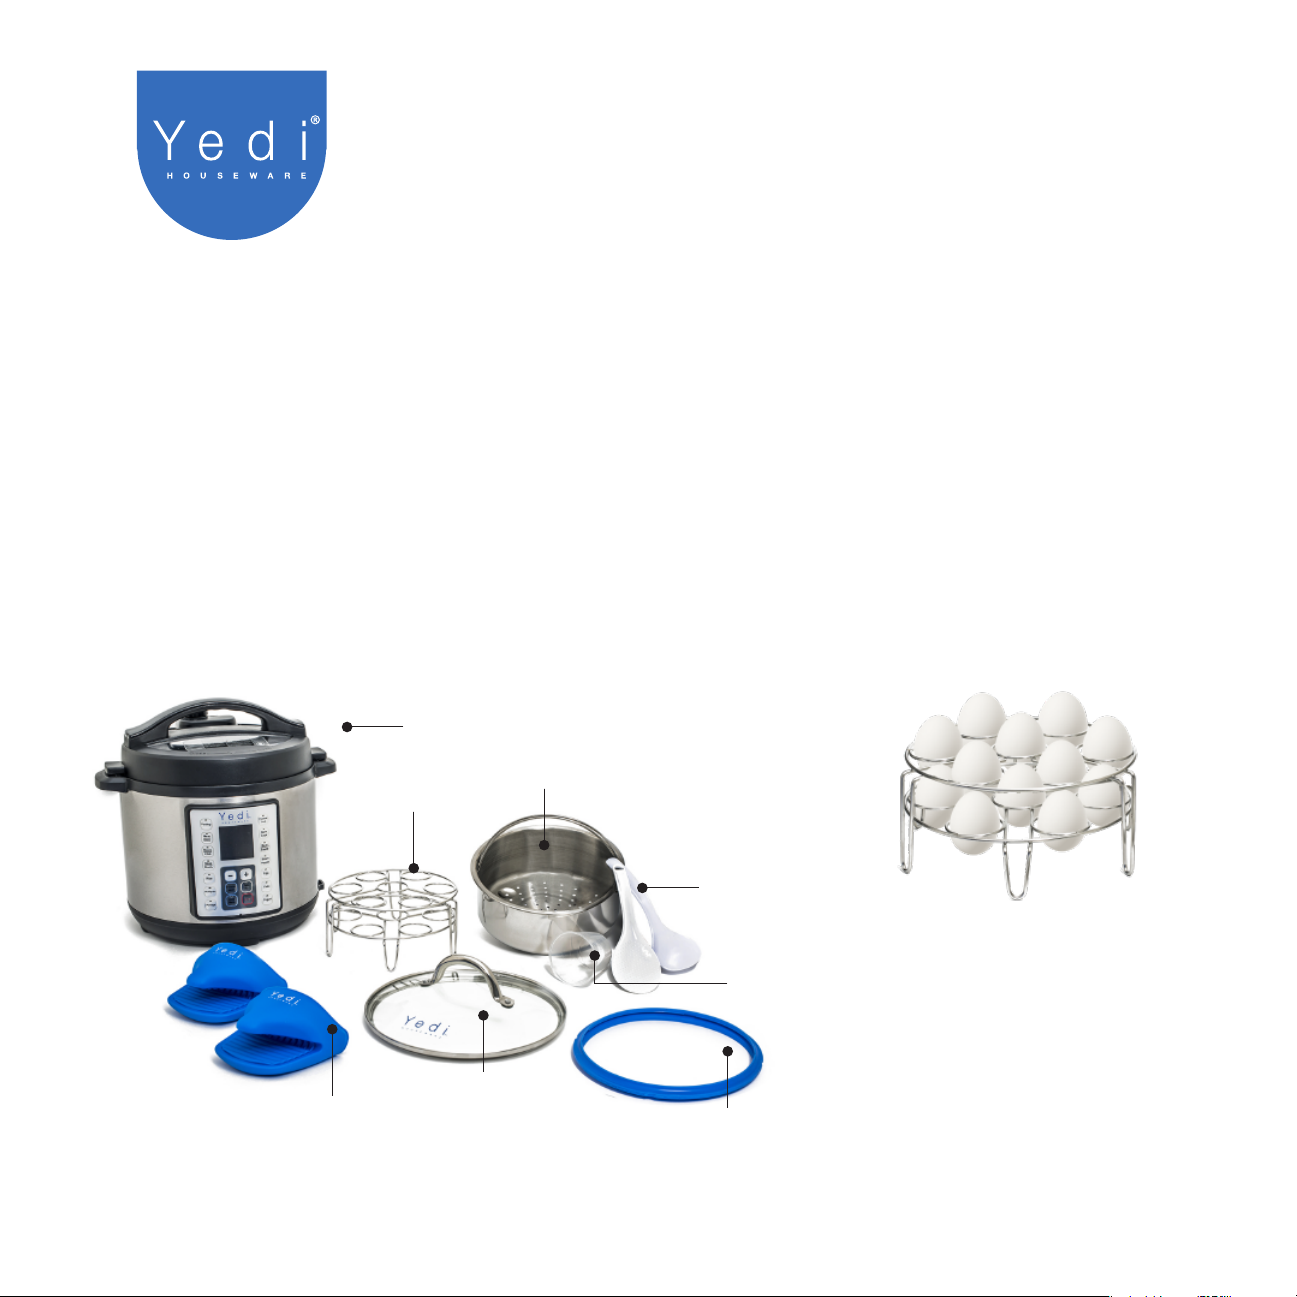
The Yedi Multi-Use Pressure Cooker is deigned with you in mind. This product is able to perform 10
functions in a single pot. Slow cooking, steaming, warming, rice cooking, sautéing/browning, cake “baking,”
pasteurizing and culturing yogurt are among its functions. Built to anticipate your every cooking need,
your new Yedi Multi-Use Pressure Cooker comes with a steamer basket, glass lid, 2 egg racks, an extra silicone
gasket (one gasket for savory dishes, one for sweet), silicone mitts to safely remove the inner pot, steam diverter,
a measuring cup, a rice paddle, a soup ladle, a color recipe book, quick reference sheets to get you started and
of course, the Multi-Use Pressure Cooker unit itself!
The words “pressure cooking” can sometimes cause concern, but thanks to the latest technology developments,
the Yedi Multi-Use Pressure Cooker is very safe. Our pressure cooker is designed to meet and exceed North
American safety and functionality standards. Pressure cooking with your Multi-Use Pressure Cooker is fast,
safe and easy. Once you get started, you won’t want to stop experimenting with your new pressure cooker.
The instruction manual will lead you through the step-by-step process of cooking with your pressure cooker
and all the other functions of your new Multi-Use Pressure Cooker.
Multi-Use Pressure Cooker
Steamer Basket
2 Egg Racks
Rice Paddle
&
Soup Ladle
Measuring
Cup
Glass Lid
2 Oven Mitts
Have more questions? We’re here to help! Email us: info@yedihouseware.com
Spare Gasket
HELPFUL HINT:
If you want to steam more than
six eggs, use both racks stacked
together, making sure the legs
are not aligned. Make sure the
rack legs are not touching each
other as they are stacked
with the eggs.
Page 5
Pressure Cooker Main Vessel Parts
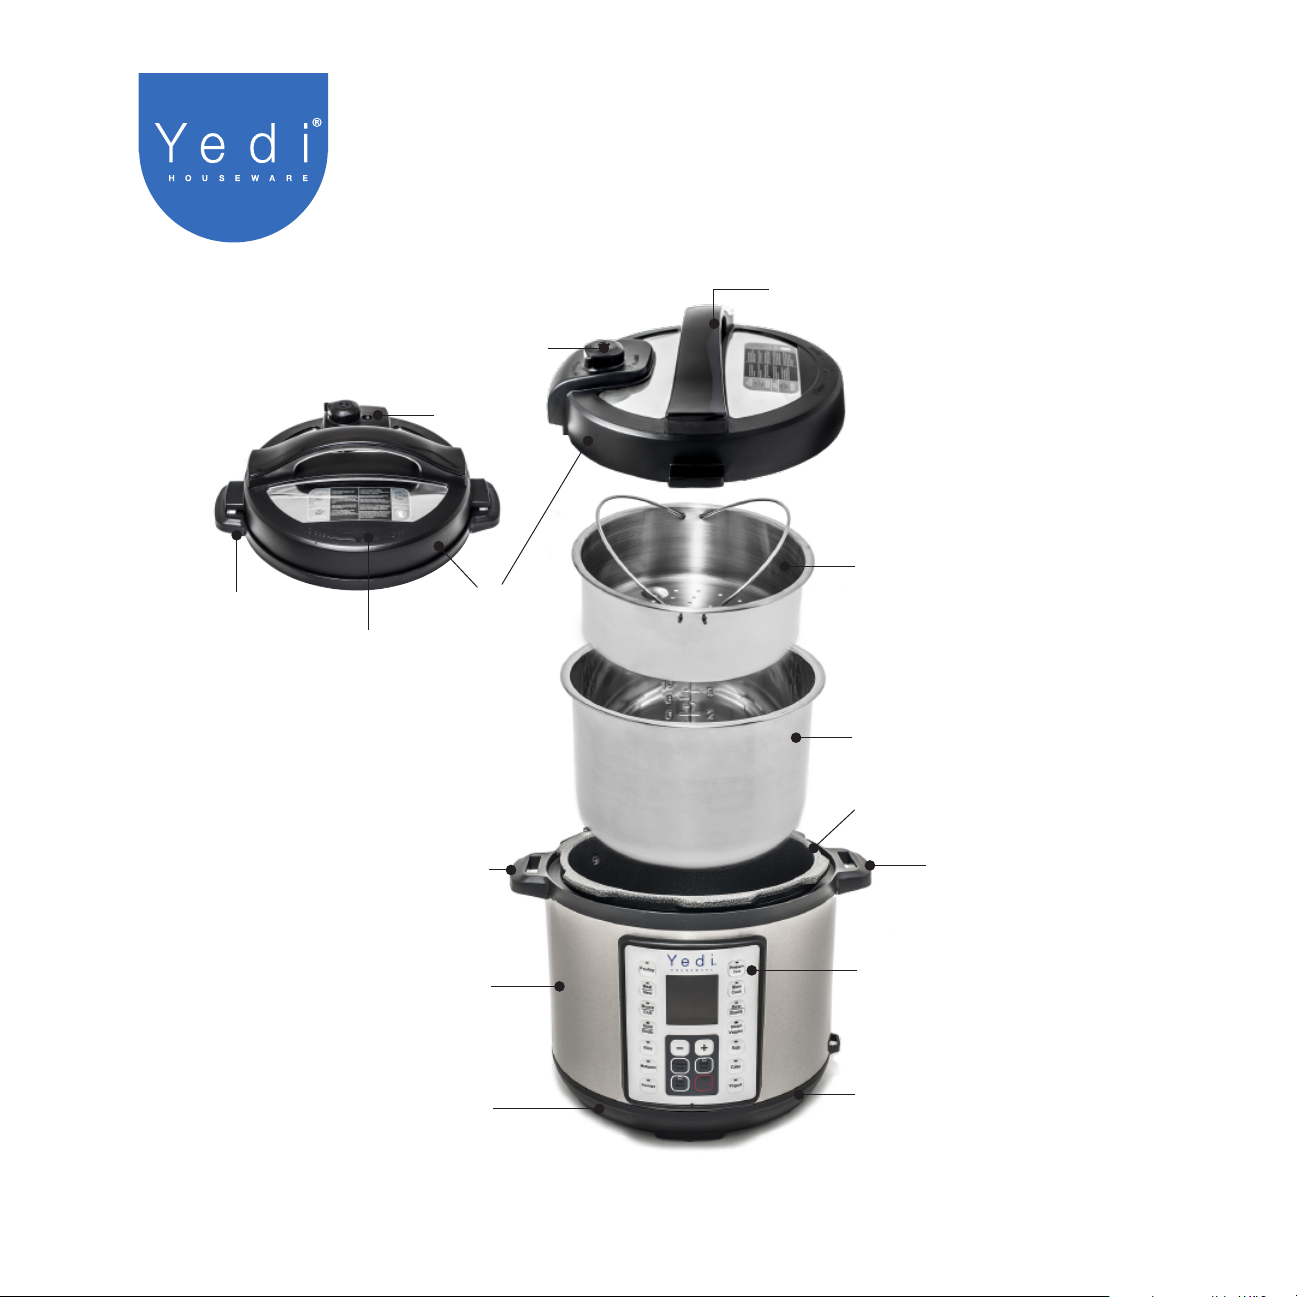
Your Yedi Multi-Use Pressure Cooker consists of three main parts. The main base has
the control panel, electrical components and the heating unit. Inside that is the stainless
steel inner pot. On top, is the locking lid with our built-in safety switch.
Lid Top Handle
Steam Vent and Handle
Float Valve
Steamer Basket
Lid Side Handle
Lid Positioning
Marker
Base Handle
Multi-Use Pressure Cooker Base
Heating Element
Have more questions? We’re here to help! Email us: info@yedihouseware.com
Lid
Stainless Steel Inner Pot
Base Exterior Pot
Base Handle
Control Panel with LCD Display
Base/Heating Unit
Page 6
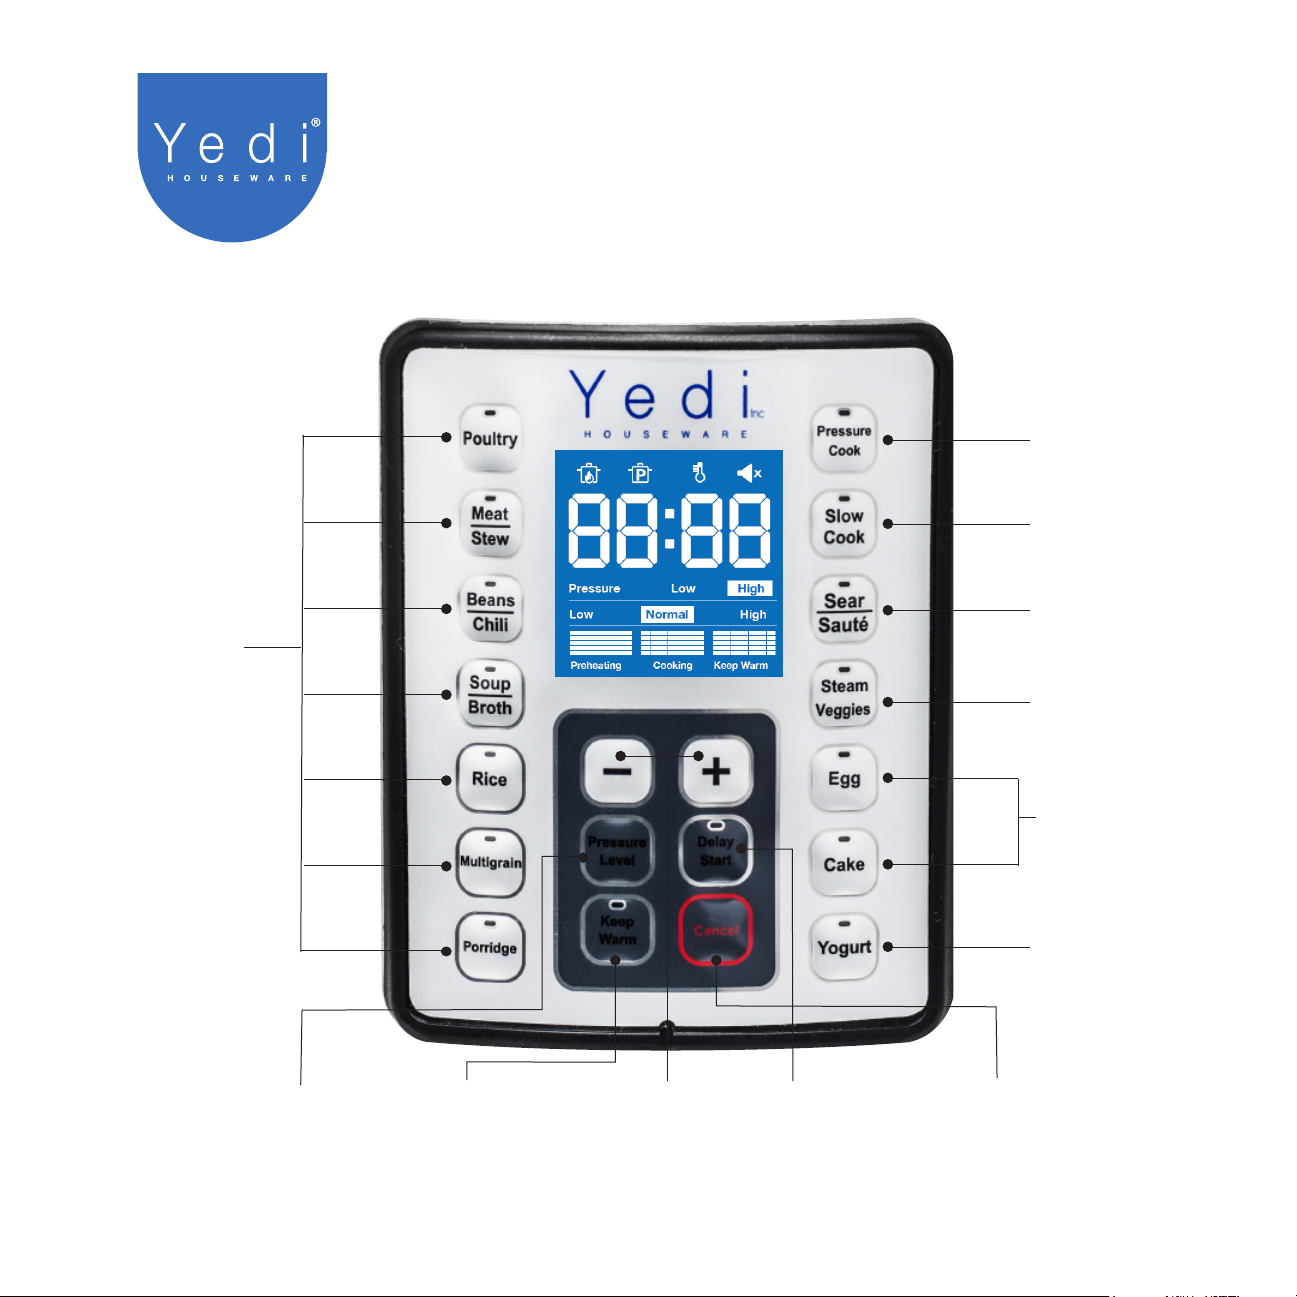
Pressure Cooker Control Panel
Your Yedi Multi-Use Pressure Cooker comes with built-in preset cooking functions
(called programs) for all kinds of ingredients, recipes, foods and cooking methods.
The control panel, which you will become very familiar with, consists of twenty buons
and a large LCD display. We recommend you understand the function of each buon
prior to using your new pressure cooker.
Manual Pressure
Cooking
Manual Slow
Cooking
(no pressure)
Preset Pressure
Cooking Programs
Adjust
pressure level
(low or high)
Toggle to
automatically
keep warm at end
of cooking cycle
Pressure
Level
Keep
Warm
Delay
Start
Reduce or add
time
Set amount
of time until
cooking program
starts
Heats Inner
Pot for
Sautéing
(no pressure)
Boils Water
for Steaming
Preset Pressure
Cooking Programs
Preset Yogurt
Program
Cancel the current
operation. LCD
screen will display
OFF
Page 7
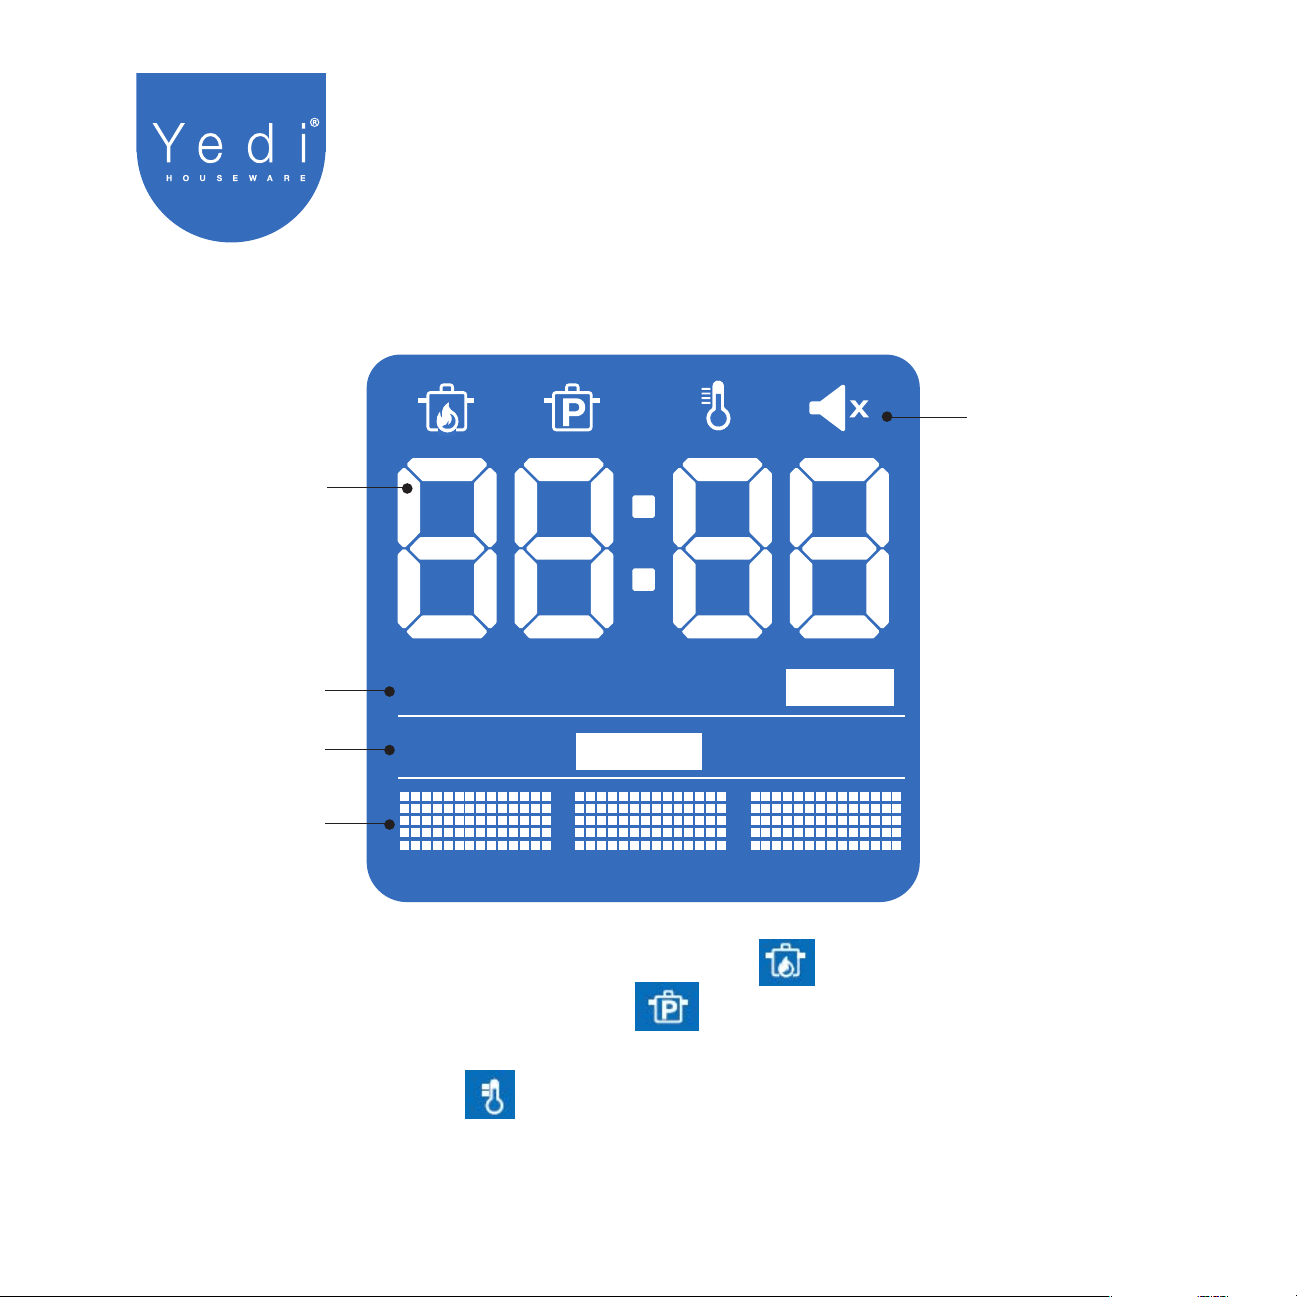
Pressure Cooker Control Panel (cont.)
The LCD display uses symbols, words and numbers to convey time, pressure levels,
mode, cooking progress and messages.
The LCD Panel
Sound
Indicator
Time & Message
Display
(Indicates cook time
or messages)
Pressure Level
Indicator
(Low or High)
Temperature &
Mode Indicator
(Low, Normal or High)
Status Indicator
((Displays current
stage: Preheating,
Cooking or Keep Warm)
Pressure
Low High
Normal
Low
High
Preheating Cooking Keep Warm
cooker is heating and cooking is in progress
cooker has come to pressure
cooker has finished cooking and entered keep warm
mode
Displays whether
sound is ON or OFF.
Safety alerts never
turn off.
To turn sound off:
1. Press CANCEL to
stop all programs. The
LCD screen will
display OFF.
2. Press and hold
the “-” buon or at
least 4 seconds. The
LCD screen will
display S OFF.
To turn sound on:
1. Press CANCEL to stop
all programs. The LCD
screen will display OFF.
2. Press and hold
the “+” buon or at
least 4 seconds. The
LCD screen will
display S ON .
Have more questions? We’re here to help! Email us: info@yedihouseware.com
Page 8

Pressure Cooker Control Panel (cont.)
88:88
88:88
88:88
88:88
88:88
88:88
88:88
Below are the most common messages your LCD display indicator shows you on your
Multi-Use Pressure Cooker.
Multi-Use Pressure Cooker is plugged in,
OF F
00:00
no programs are in use.
Multi-Use Pressure Cooker is preheating.
Time indicator displays
Cook Time,
and Keep Warm elapsed time. This will clear depending on
context.
Sauté/Sear preheating is complete and will display countdown time.
Yogurt program is complete
Delay Start
Pressure
Level
Keep
Warm
Delay
Start
Pasteurizing in progress
Lid is NOT LOCKED in place
NOTE: Did you press the wrong program?
You can press CANCEL to stop cooking at any time.
The program will cancel.
Page 9

Pressure Cooker Geing Started
Please remove all packaging and warning stickers from your Yedi Multi-Use Pressure
Cooker and all accessories before using. Make sure all parts and accessories are
accounted for, are not damaged and free of debris. M
siing tightly inside the lid. Wash the stainless steel pot, all accessories and the inside
of the lid prior to using. DO NOT IMMERSE the lid in water.
ake sure the silicone gasket is
If not already installed, align
the top of the condensation
collector at the rear of the
Multi-Use Pressure Cooker
with the guides and press in.
To lock the lid in place, align the icon on the lid with the at the top
of th
icon. If the sound is turned on and your pressure cooker is plugged in,
a small tone sounds to let you know the lid is secure.
To remove the lid aer pressure cooking, the cooking cycle must be finished
and all pressure inside the pot is released. If there is still pressure remaining
in the pot, it won’t allow you to open the lid. Hold the handle, turn the lid
counter-clockwise, and li. Another “tune” will sound when you remove the lid.
CAUTION
If not already installed, press
steam vent handle into
position on the lid.
NOTE: The steam vent handle
will not lock tightly in place,
it will fit loosely.
e Multi-Use Pressure Cooker base and turn the lid clockwise to the
NEVER aempt to force the lid open.
Have more questions? We’re here to help! Email us: info@yedihouseware.com
Page 10

Pressure Cooker The Water Test
Performing the water test is the first and best step in geing acquainted with your
Multi-Use Pressure Cooker. This confirms it is functioning correctly. Here are the easy
steps to follow.
1. Place the stainless steel inner pot into
the Multi-Use Pressure Cooker base.
Plug in your Multi-Use Pressure Cooker.
3. Lock lid in place and check
that the steam vent handle is
turned to sealing.
Have more questions? We’re here to help! Email us: info@yedihouseware.com
2. Pour 3 cups of water into the
stainless steel inner pot using the
provided measuring cup.
4. Select STEAM/VEGGIES
Page 11

Pressure Cooker Pressure Cooking
Your Multi-Use Pressure Cooker comes equipped with the following pressure
cooking programs:
Poultry, Meat/Stew, Beans/Chili, Soup/Broth, Rice, Multi-grain, Porridge, Eggs,
Steam/Vegetables, cake and Yogurt.
You can also manually input your own seings by using the Pressure Cook function.
Complete the following steps to run a pressure cooking program.
1. Place the steel pot inside the base and plug in your Multi-Use Pressure Cooker. The
LCD screen will display OFF.
2. Place your prepared ingredients in the pot, ensuring that there is at least 1 cup of
liquid in the recipe.
The Multi-Use Pressure Cooker requires steam, and therefore liquid to create pressure.
The minimum liquid requirement is the least amount of liquid your pressure cooker needs
to create enough steam to build and maintain pressure to cook. Generally this means
around 1 to 1.5 cups of liquid content. Liquid content also takes into account the water
content that is present in your ingredients (e.g.- tomatoes). When starting out, a safe
guideline to follow is 1 cup of liquid minimum. With experience, you’ll figure out the
correct amount of liquid to add for each recipe in order to build pressure. Oils and
oil-based liquids do not have sufficient water content to account for the required liquid
amount. Acceptable liquids include water, wine, beer, stock, broth and juice.
3. Lock the lid in place, turn the steam vent handle to SEALING and select your preset
program or pressure cook Adjust time and pressure according to your needs and recipe.
1. Lock Lid
2. Turn to “Sealing”
3. Select PROGRAM 3. Adjust TIME
(PRESS BUTTON AGAIN TO
ADJUST MODE)
(OPTIONAL)
Page 12

Pressure Cooker Pressure Cooking (cont.)
88:88
88:88
88:88
Your Multi-Use Pressure Cooker comes equipped with the following pressure
cooking programs:
Poultry, Meat/Stew, Beans/Chili, Soup/Broth, Rice, Multi-grain, Porridge, Eggs,
Steam/Vegetables, cake and Yogurt.
You can also manually input your own seings by using the Pressure Cook function.
Complete the following steps to run a pressure cooking program.
4. Aer 10 seconds, the Multi-Use Pressure Cooker will beep 3 times and your program
will start automatically. The LCD screen will display the time, pressure level, mode and
preheating status. Depending on the amount of ingredients and temperature, it may take
anywhere between 2 and 40 minutes to preheat and build pressure. As the cooker heats
and pressure builds, the float will rise. When pressure is reached, the status indicator will
finally display COOKING and the timer will begin.
NOTE: It is normal for some steam to release during the preheating phase.
5. When cooking is complete, the Multi-Use Pressure Cooker will beep several times and
switch to KEEP WARM. The LCD screen then displays the elapsed time. Aer 24 hours, the
Multi-Use Pressure Cooker automatically switches OFF.
00:10
Preheating
MEMORY FEATURE:
Cooking with your Yedi Pressure Cooker is full of personal choices. Everyone likes their
meals or food prepared differently (i.e.-tenderness, cooking time, texture). Our cooking time
tables are for your reference only. Please adjust to taste. Once you have experimented with
different meals and find the perfect seings, the Multi-Use Pressure Cooker will remember
and use them the next time you make the same food. Soup, stew, chili or whatever, your cooker
will remember your preferences and reuse those seings. You don’t need to adjust the seings
unless you want to change them for the next time.
CAUTION
Cook Time
Indicator
(SHOWS SELECTED TIME)
Never block the steam vent or try to open the lid while the Multi-Use
Pressure Cooker is running or when releasing pressure.
Keeps Warm
Elapsed Time
Indicator
(COOKING COMPLETE)
Page 13

Pressure Cooker Preset Programs
PROGRAM MODE WHY USE THIS MODE? COOKING TIME
POULTRY
(Pressure
Cooking)
MEAT/STEW
(Pressure
Cooking)
BEANS/CHILI
(Pressure
Cooking)
SOUP/BROTH
(Pressure
Cooking)
RICE
(Pressure
Cooking)
MULTI-GRAIN
(Pressure
Cooking)
PORRIDGE
(Pressure
Cooking)
PRESSURE COOK
(Manual
Pressure
Cooking)
SLOW COOK
(No Pressure)
SEAR/SAUTE
(No Pressure)
STEAM
(Vegetables,
Fish, meat)
EGG
(Pressure
Cooking)
LOW
NORMAL
HIGH
LOW
NORMAL
HIGH
LOW
NORMAL
HIGH
LOW
NORMAL
HIGH
LOW
NORMAL
HIGH
LOW
NORMAL
HIGH
LOW
NORMAL
HIGH
LOW
NORMAL
HIGH
LOW
NORMAL
HIGH
LOW
NORMAL
HIGH
LOW
NORMAL
HIGH
For smaller pieces (sliced, diced, shredded)
Larger pieces (whole parts)
Whole chicken
Meat will be mostly tender, some toughness
Meat cooked to tender throughout
Pulled pork-like tenderness
So enough for eating
Moderate soness
Mushy/broken down/soup-like
Clear broth
Hearty soups with meat and vegetables
Bone broth appropriate, extra flavorful
Al dente
Perfect white rice
Soer, more soup-like rice
Al dente wild rice, brown rice or mung beans
Perfect so wild rice, brown rice or mung beans
Suitable for tough or larger beans
Morning porridge with some texture
Perfect for steel cut oats
When mixing grains or beans into porridge
Using past experience
Using Recipes
Use like a crock pot
Use for browning (say onions) or toasting grains
Vegetable steaming (only)
Fish or seafood steaming
Meats (steaming)
So boiled eggs
Medium boiled eggs
Hard boiled eggs
10 minutes on HIGH
15 minutes on HIGH
25 minutes on HIGH
20 minutes on HIGH
35 minutes on HIGH
40 minutes on HIGH
25 minutes on HIGH
30 minutes on HIGH
40 minutes on HIGH
20 minutes on HIGH
30 minutes on HIGH
4 hours on HIGH
8 minutes on LOW
12 minutes on LOW
15 minutes on LOW
20 minutes on HIGH
40 minutes on HIGH
45 minutes pre-soak.
plus 60 minutes on HIGH
5 minutes on HIGH
20 minutes on HIGH
30 minutes on HIGH
Using previous times
Using Recipes
~4 hours
30 minutes
3 minutes on HIGH
10 minutes on HIGH
15 minutes on HIGH
4 minutes on HIGH
5 minutes on HIGH
6 minutes on HIGH
CAKE
(Pressure
Cooking)
YOGURT
LOW
NORMAL
HIGH
LOW
NORMAL
HIGH
Moist cake
Mildly dense, moist
Very dense cake such as cheesecake
See yogurt section for details
25 minutes on HIGH
40 minutes on HIGH
50 minutes on HIGH
24 hours
8 hours
Boil
Page 14

Pressure Cooker Searing and Sautéing
You can easily sauté ingredients in your Multi-Use Pressure Cooker before pressure cooking.
This eliminates the need to move from stove top to the pressure cooker, and removes the
need to wash other pots and pans. Follow these useful tips and steps to sauté.
1. Place the steel pot inside the base and plug in your Multi-Use Pressure Cooker. The
LCD screen will display OFF.
2. Select SEAR/SAUTÉ. Press SEAR/SAUTÉ again to change the temperature to either
L
OW (simmering or thickening sauces), NORMAL (default, browning or sautéing) or HIGH
(searing or stir-frying).
3. After 10 seconds the program will begin. Your Multi-Use Pressure Cooker will beep 3
times and the LCD screen will display ON to indicate that the Multi-Use Pressure Cooker is
preheating. The LCD screen will display 00:30 and begin counting down.
4. Add ingredients to the stainless steel pot and cook according to your recipe.
5. When you are finished using SEAR/SAUTÉ, press CANCEL. The LCD screen will display
OFF.
1. Open Lid 2. Press SEAR/SAUTÉ
CAUTION
3. Adjust Time
(PRESS AGAIN TO
CHANGE TEMP)
NEVER put lid on when using SEAR/SAUTÉ. As a precaution, warning
alerts will sound and the display will flash if the lid is put on during
SEAR/SAUTÉ. The Multi-Use Pressure Cooker automatically switches
to OFF aer 30 minutes as a safety feature if you do not press CANCEL.
(OPTIONAL)
Page 15

Pressure Cooker Slow Cooking
The SLOW COOK function is perfect for recipes and meals you want to cook over
an extended period of time.
1. Place the steel pot inside the base and plug in your Multi-Use Pressure Cooker. The
LCD screen will display OFF.
2. Add prepared ingredients into the stainless steel pot.
3. Lock the lid in place and turn the steam vent handle to VENTING.
4. Select SLOW COOK. Press SLOW COOK again to adjust temperature.
(Options are LESS, NORMAL (default), HIGH). Press +/- buons to adjust cooking time.
5. Aer 10 seconds the program will begin. Your Multi-Use Pressure Cooker will beep 3
times and the LCD screen will display ON to indicate that the Multi-Use Pressure Cooker
is preheating. When preheating is complete the LCD screen will display the remaining
cook time.
6. When cooking is complete, the Multi-Use Pressure Cooker beeps several times and
automatically switches to KEEP WARM. The LCD screen will now display the elapsed time
aer cooking is complete. Aer 24 hours, the Multi-Use Pressure Cooker will automatically
switch to OFF.
7. Press CANCEL and remove lid.
1. Lock Lid 2. Turn to Venting
3. Press Slow Cook
(PRESS AGAIN TO
CHANGE MODE)
4. Adjust Time
(OPTIONAL)
Page 16

Pressure Cooker Yogurt
Making yogurt is simple with your Multi-Use Pressure Cooker. All you need is some
milk and a bit of active culture. The process consists of two parts, 1) pasteurizing the milk,
and 2), culturing the yogurt.
Yogurt Pasteurize
1. Place the steel pot inside the base and plug in your Multi-Use Pressure Cooker. The
LCD screen will display OFF.
2. Pour milk into the steel pot according to your recipe.
3. Lock the lid in place and turn the steam vent handle to Sealing.
4. Select Yogurt. Press Yogurt again to switch to High; the LCD screen will display
5. After 10 seconds the Multi-Use Pressure Cooker will beep 3 times and the LCD
boil.
screen shows boil and starts preheating/cooking.
6. When cooking is complete the LCD screen will turn off.
Yogurt Culture
1. Stir active culture into warm milk according to your recipe. Return steel pot to MultiUse Pressure Cooker base.
2. Lock the lid in place. The steam vent handle can be turned to either Sealing or
Venting.
3. Select Yogurt: press Yogurt again until Normal displays with 8 hours timer on the
LCD screen. Use the +/- buttons to adjust cooking time.
4. After 10 seconds the Multi-Use Pressure Cooker will beep 3 times and the LCD
screen will display timer when cooking begins. (the yogurt timer will start at the time
selected and counts down.)
5. When cooking is complete, the LCD screen will turn off. Transfer yogurt to
containers and refrigerate as directed by your recipe.
1. Lock Lid
2. Turn to Sealing
3. Press Yogurt
4. Adjust to HIGH
(PRESS YOGURT AGAIN
TO SET TO NORMAL)
Page 17

Pressure Cooker Delay Start Times
Perfect for when you want to postpone the start time while you run errands, go for a run
or do some gardening. Put your ingredients in the Multi-Use Pressure Cooker but post
a later starting time. Complete the following steps to run DELAY START.
1. Place the steel pot inside the base and plug in your Multi-Use Pressure Cooker. The
LCD screen will display OFF.
2. Place your prepared ingredients in the pot.
3. Lock the lid in place and turn the steam vent handle to SEALING or VENTING
according to the program you need and select.
4. Press DELAY START. Use the +/- buons to set the number of hours you wish to delay
the start time. Press DELAY START again to set the number of minutes.
5. Aer 10 seconds the Multi-Use Pressure Cooker will beep 3 times and the DELAY START
timer will begin. Aer the timer is finished the Multi-Use Pressure Cooker will
automatically switch to your selected program and begin cooking.
CAUTION
DO NOT use DELAY START for foamy or thick foods (such as porridge
or oatmeal).
ALWAYS monitor cooking progress when working with foamy or
thick foods.
ALWAYS keep food safety in mind and do not leave meat out of the
refrigerator for longer than recommended FDA guidelines.
Page 18

Pressure Cooker Cleaning and Care
It is important to keep your Multi-Use Pressure Cooker clean and free of build-up.
Here are a f
condition.
ALWAYS unplug and let your Multi-Use Pressure Cooker cool to room temperature
before cleaning.
The stainless steel pot, silicone gasket, egg racks and steamer basket are all dishwasher
safe. Also, the measuring cup, ladle, and rice paddle are all top-rack dishwasher safe.
Remove the gasket by pulling it out and away from the inside of the lid. Aer washing
the gasket, return it to its original position by pressing it firmly into place. You can
soak the silicone gasket in vinegar for 10 to 20 minutes to remove any residual
scents. Wash with unscented soap aer soaking.
The anti-block shield (located on the underside of the lid) will need occasional
cleaning to remove blockages or debris. To remove the anti-block shield, grip on
either side and pull up. Wash with warm soapy water and dry with a so cloth.
To replace the shield, press it firmly back into place. Make sure it is placed back
correctly.
ew steps to keeping your Multi-Use Pressure Cooker in perfect working
Anti-Block Shield
Grip tightly
and pull out.
Clean the outer body of your Multi-Use Pressure Cooker with a damp cloth or
sponge. Check that the steam valve and float are free of debris or food particles.
Wipe the inner base rim with a dry cloth to prevent rusting.
Page 19

Pressure Cooker Troubleshooting
Here are some issues you may encounter. This doesn’t mean your Multi-Use
Pressure Cooker is broken, it only means there is an issue you need to resolve.
THE ISSUE POSSIBLE CAUSE(S) HOW DO I RESOLVE THIS?
The lid won’t close.
The lid won’t open.
Steam is leaking from
the side of the lid.
Steam is leaking from
the float for more
than 2 minutes.
Steam rises non-stop
from the steam vent.
The silicone gasket
is out of place.
The float is stuck in
the raised position.
There is pressure inside the
Multi-Use Pressure Cooker.
The float is stuck in the raised
position.
The silicone gasket is not in place.
The silicone gasket is damaged.
Food or debris is on the silicone gasket.
The lid is not locked.
There is food debris on the float
silicone seal on the inside of the lid.
The float silicone seal on the inside
of the lid is damaged or worn-out.
The steam vent handle is not in
a SEALING position.
Pressure control is failing.
Press gasket firmly into place.
Gently press the float down.
Wait for the pressure to release
naturally or turn the steam vent
handle to VENTING. When pressure
is fully released the lid will unlock.
Gently press the float down.
Press gasket firmly into place.
Replace the silicone gasket.
Clean the silicone gasket.
Re-position lid to lock properly in place.
Clean the float seal on the inside
of the lid.
Replace the float seal. Contact
customer support.
Turn the steam vent handle to the
SEALING position.
Contact customer support.
There’s not enough food and/or liquid
in the pot.
The float doesn’t rise.
The float is obstructed by the lid locking
pin. The lid is not closed properly.
Have more questions? We’re here to help! info@yedihouseware.com
Add water and ingredients according to
the recipe, doubling if necessary. Never
exceed maximum fill lines.
Reposition lid to lock properly in place.
Page 20

Pressure Cooker Troubleshooting
Here are some issues you may encounter. This doesn’t mean your Multi-Use
Pressure Cooker is broken, it only means there is an issue you need to resolve.
THE ISSUE POSSIBLE CAUSE(S) HOW DO I RESOLVE THIS?
LCD repeatedly flashes LID
LCD displays NoPr
LCD displays aa.
The Multi-Use Pressure Cooker
beeps intermiently.
The Multi-Use Pressure Cooker
makes clicking or light
cracking sounds.
The lid is not in the correct position
for the selected program.
The Multi-Use Pressure Cooker is
not coming to proper pressure
during preheating.
The inner pot overheated.
The Multi-Use Pressure Cooker
is over heating and has reduced the
temperature. Starch deposits at the
boom of the inner pot might be
preventing even heat distribution.
The power switching and expanding
pressure while changing temperatures
can cause those clicking sounds.
The outside base of the inner pot is wet. Wipe inner pot and inside of base dry
Lock lid in place of pressure cooking
programs. Remove the lid when
SAUTÉing.
Check for steam leaks and lid leaks
as indicated in previously listed
troubleshooting issues. If you are
cooking frozen food in the pressure
cooker, restart your selected program.
Press CANCEL. Check pot to make sure
it is not damaged or burned. Let pot
cool to room temperature before
running the program again.
Press CANCEL. Inspect and remove
any deposits on the boom of the
inner pot.
This is a normal sound.
before using your
Multi-Use Pressure
Cooker.
Have more questions? We’re here to help! info@yedihouseware.com
Page 21

Pressure Cooker Troubleshooting
88:88
88:88
88:88
88:88
88:88
Here are some issues you may encounter. This doesn’t mean your Multi-Use
Pressure Cooker is broken, it only means there is an issue you need to resolve.
THE ISSUE POSSIBLE CAUSE(S) HOW DO I RESOLVE THIS?
The Multi-Use Pressure Cooker may
have a faulty temperature sensor.
The Multi-Use Pressure Cooker may
have a faulty temperature sensor.
The temperature is too high. Inner pot
is not properly positioned or not
in the base.
The temperature is too high. Inner pot
contains no liquid.
The Multi-Use Pressure Cooker may
have a faulty HIGH temperature sensor.
The Multi-Use Pressure Cooker may
have a faulty LOW temperature sensor.
Contact customer support.
Contact customer support.
Place the stainless steel pot
properly in the base.
Remove the inner pot from the base
and let cool. Add ingredients to the
cooled pot and re-position pot
properly in the base.
Contact customer support.
Contact customer support.
Have more questions? We’re here to help! info@yedihouseware.com
 Loading...