

Page 1
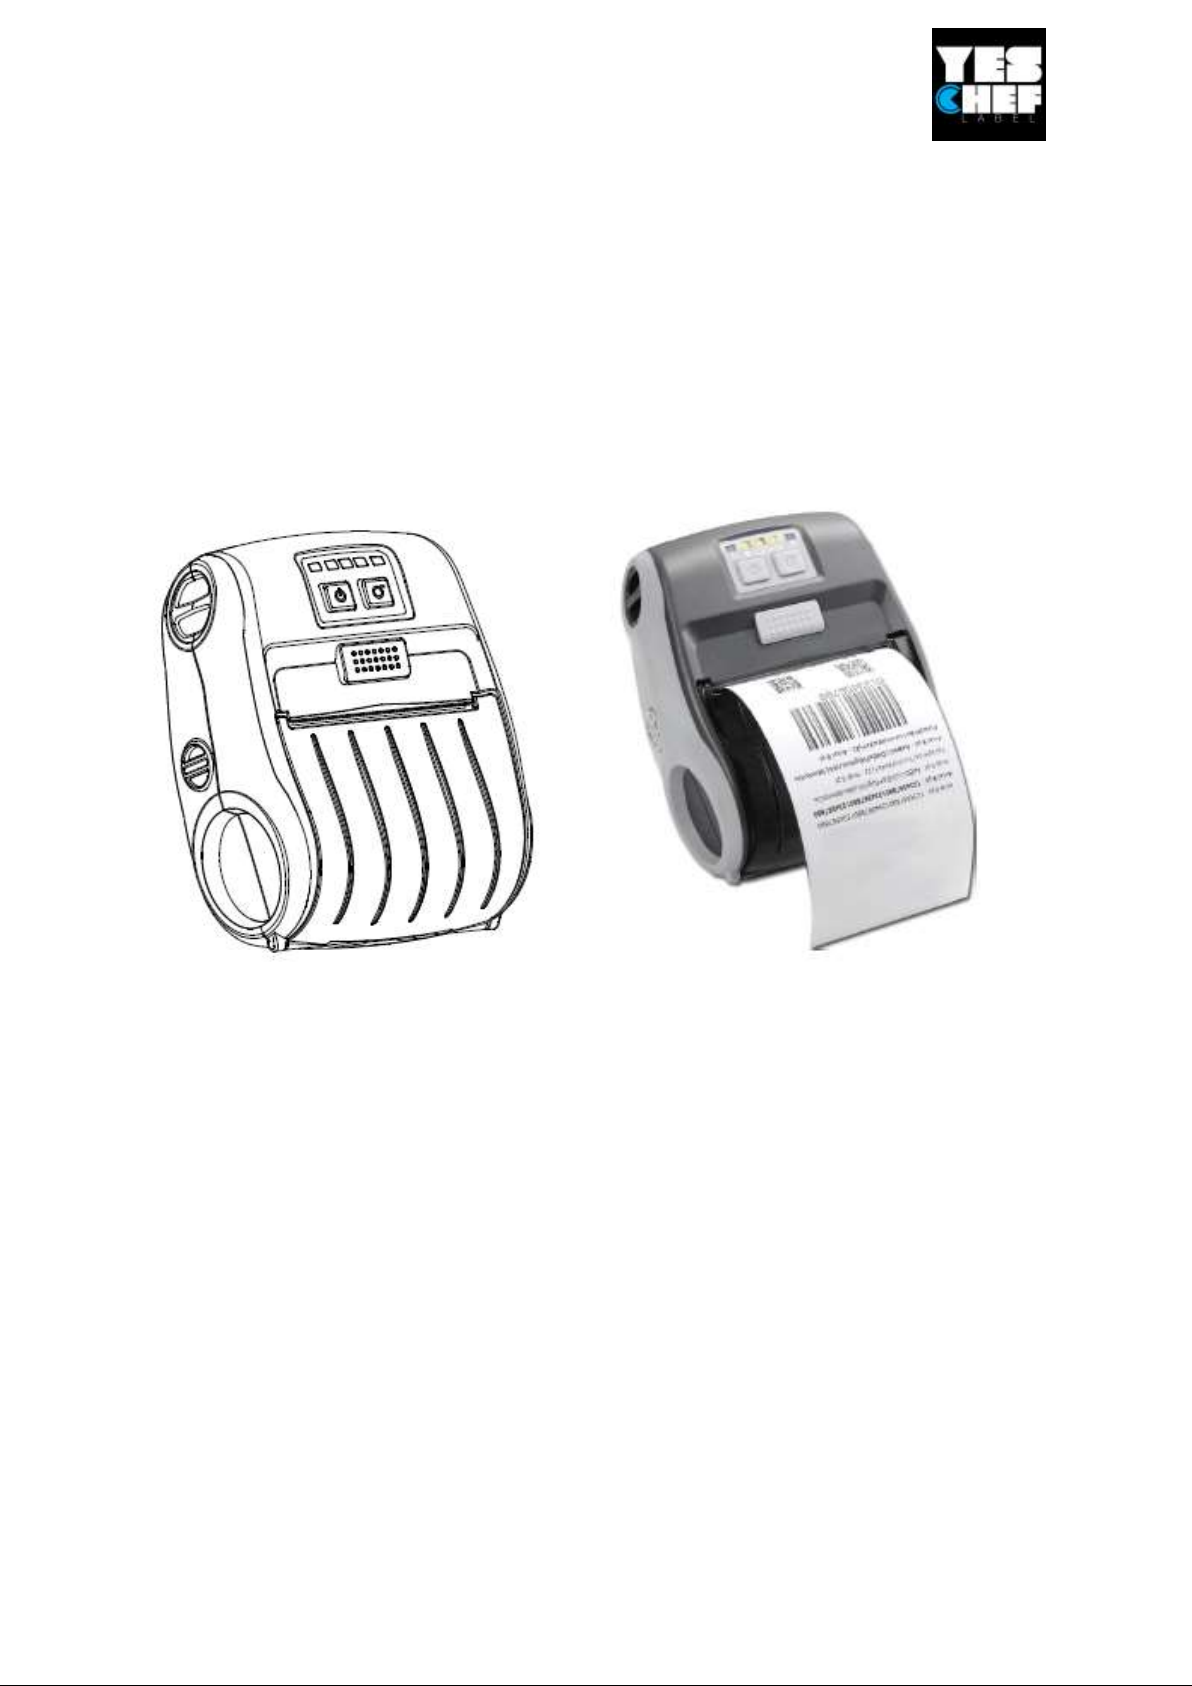
DIRECT THERMAL PORTABLE PRINTER
For YES CHEF LABEL Android Application
User’s Manual
Copyright Information
© 2012 TSC Aut o ID Technology Co., Ltd,
The copyright in this manual, the software and firmware in the printer described
therein are owned by TSC Aut o ID Technology Co., Ltd, All right s reserved.
CG Triumvirate is a trademark of Agfa Corporation. CG Triumvirat e Bold
Condensed font is under license from the Monotype Corporation. Windows is a
registered trademark of Microsoft Corporation.
All other trademarks are the property of their respective owners.
Information in this document is subject to change without notice and does not
represent a commitment on the part of TSC Auto ID Technology Co.
No part of this manual may be reproduced or transmitt ed in any form or by any
means, for any purpose other than the purchaser’s personal use, without the
expressed written permission of TSC Auto ID Technology Co.
This document is a manual how to start the printer. This document Is not recommended to use for repair
or hardware / software upgrade. If you have any technical questions regarding the printer installation and
configurations please send us an email to [email protected]
Page 2
Agency Compliance and Approvals
2014/30/EU(EMC), 2014/35/EU(LVD), 2011/65/EU(RoHS 2.0)
EN 55032 Class B
EN 55024
EN61000-3-2:2014
EN61000-3-3:2013
EN 60950-1
FCC part 15B, Class B
This equipment has been tested and found to comply with the
limits for a Class B digital device, pursuant to part 15 of t he FCC
Rules. These limits are designed t o provide reasonable protection
against harmful interference in a residential installation. This
equipment generates, uses and can radiate radio frequency
energy and, if not installed and used in accordance with the
instructions, may cause harmful interference to radio
communications. However, there is no guarant ee that
interference will not occur in a particular installation. I f this
equipment does cause
harmful interference t o radio or television reception, which can be
determined by
turning the equipment off and on, the user is encouraged to t ry to
correct the
interference by one or more of the following measures:
-Reorient or relocate the receiving antenna.
-Increase t he separation between t he equipment and receiver.
-Connect the equipment into an out let on a circuit different from
that to which t he receiver is connected.
-Consult the dealer or an experienced radio/ TV technician for
help.
This device complies wit h Part 15 of the FCC Rules. Operation is
subject to
the following two conditions: (1) This device may cause harmful
interference,
and (2) t his device must accept any interference received,
including interference that may cause undesired operation.
This Class B digital apparatus complies with Canadian ICES-003
Cet appareil numérique de la classe B est conforme à la norme
NMB-003 du Canada.
AS/NZS CISPR 22 Class B
AS/NZS CISPR 32 Class B
This document is a manual how to start the printer. This document Is not recommended to use for repair
or hardware / software upgrade. If you have any technical questions regarding the printer installation and
configurations please send us an email to [email protected]
Page 3
10 C.F.R. Section 430.23(aa) (Appendix Y to Subpart B of part
430)
TP TC 004/2011
TP TC 020/2011
LP0002
KN 32/35
IS 13252(Part 1)/ IEC 60950-1
This document is a manual how to start the printer. This document Is not recommended to use for repair
or hardware / software upgrade. If you have any technical questions regarding the printer installation and
configurations please send us an email to [email protected]
Page 4
Important safety instructions:
1. Read all of these instructions and keep them for later use.
2. Follow all warnings and instructions on the product.
3. Disconnect the power plug from the AC outlet before cleaning or if fault happened.
Do not use liquid or aerosol cleaners. Using a damp cloth is suitable for cleaning.
4. The mains socket shall be installed near the equipment and easily accessible.
5. The unit must be protected against moisture.
6. Ensure the stability when installing the device, Tipping or dropping could cause
damage.
7. Make sure to follow the correct power rating and power type indicated on marking
label provided by manufacture.
8. Please refer to user manual for maximum operation ambient temperature.
WARNING:
Hazardous moving parts, keep fingers and other body parts away.
CAUTION:
(For equipment with RTC (CR2032) bat tery or rechargeable batt ery pack)
Risk of explosion if batt ery is replaced by an incorrect type.
Dispose of used batteries according t o the I nstructions as below.
1. DO NOT throw the battery in fire.
2. DO NOT short circuit the contacts.
3. DO NOT disassemble the battery.
4. DO NOT throw the battery in municipal waste.
5. The symbol of the crossed out wheeled bin indicates that the battery should not be
placed in municipal waste.
The print head may be hot and could cause severe burns. Allow the print head to
cool.
CAUTION:
Any changes or modifications not expressly approved by the grantee of this dev ice could
void the user's authority to operate the equipment.
CE Statement:
This equipment complies with EU radiation exposure limits set forth for an uncontrolled
environment. This equipment should be installed and operated with minimum distance 20
cm between the radiator & your body.
All operational modes:
This document is a manual how to start the printer. This document Is not recommended to use for repair
or hardware / software upgrade. If you have any technical questions regarding the printer installation and
configurations please send us an email to [email protected]
Page 5

2.4GHz: 802.11b, 802.11g, 802.11n (HT20), 802.11n (HT40)
5GHz: 802.11a,
The frequency, mode and the maximum transmitted power in EU are listed below:
2400 MHz – 2483.5 MHz: 19.88 dBm (EIRP)
5150 MHz – 5250 M Hz: 17.51 dBm (EIRP)
5150-5350M Hz for Only indoor use
5470-5725M Hz for indoor/outdoor use
Restrictions In AZE Azerbaijan
National restrictions information is provided below
Frequency Band Country Remark
5150-5350M Hz
No license needed if used indoor and 5470-5725MHz power not exceeding 30mW
Hereby, TSC Auto ID Technology Co., Ltd. declares that the radio equipment type
[Wi-Fi] I EEE 802.11 a/b/g/n is in compliance with Directive 2014/53/EU
The full text of the EU declaration of conformity is available at the following internet
address: http:// w ww.tscprinters.com
RF exposure warning (Wi-Fi)
This equipment must be installed and operated in accordance with provided instructions
and must not be co-located or operating in conjunction with any other antenna or
transmitter. End-users and installers must be providing with antenna installation instructions
and transmitter operating conditions for satisfying RF exposure compliance.
SAR Value: 0.736 W/kg
RF exposure warning (For Bluetooth)
The equipment complies with FCC RF exposure limits set forth for an uncontrolled
environment.
The equipment must not be co-located or operating in conjunction with any other
antenna or transmitter.
Canada, Industry Canada (IC) Notices
This Class B digital apparatus complies w ith Canadian ICES-003 and RSS-210.
Operation is subject to the following two conditions: (1) this dev ice may not cause
interference, and (2) this device must accept any interference, including interference
that may cause undesired operation of the device.
Radio Frequency (RF) Exposure Information
The radiated output power of the Wireless Device is below the Industry Canada (IC) radio
frequency exposure limits. The Wireless Device should be used in such a manner such that
the potential for human contact during normal operation is minimized.
This dev ice has been evaluated for and shown compliant with the IC Specific
Absorption Rate (“SAR”) limits when installed in specific host products operated in
portable exposure conditions. (For Wi-Fi)
This dev ice has also been evaluated and show n compliant with the IC RF Exposure limits
under portable exposure conditions. (Antennas are less than 20 cm of a person's body).
(For Bluetooth)
Canada, avis de l'Industry Canada (IC)
Cet appareil numérique de classe B est conforme aux normes canadiennes ICES-003 et
RSS-210.
Son fonctionnement est soumis aux deux conditions suiv antes : (1) cet appareil ne
doit pas causer d'interférence et (2) cet appareil doit accepter toute interférence,
notamment les interférences qui peuvent affecter son fonctionnement.
Informations concernant l'exposition aux fréquences radio (RF)
La puissance de sortie émise par l’appareil sans fil est inférieure à la limite
This document is a manual how to start the printer. This document Is not recommended to use for repair
or hardware / software upgrade. If you have any technical questions regarding the printer installation and
configurations please send us an email to [email protected]
Page 6
d'exposition aux fréquences radio de l'I ndustry Canada (IC). Utilisez l’appareil sans fil de
façon à minimiser les contacts humains lors du fonctionnement normal.
Ce périphérique a été évalué et démontré conforme aux limites SAR (Specific
Absorption Rate – Taux d'absorption spécifique) par l'IC lorsqu'il est connecté à des
dispositifs hôtes spécifiques opérant dans des conditions d’utilisation mobile. (Pour le
Wi-Fi)
Ce périphérique a également été évalué et démontré conforme aux limites
d'exposition radio-fréquence par l'I C pour des utilisations par des opérateurs mobiles (les
antennes sont à moins de 20 cm du corps d'une personne). (Pour le Bluetooth)
NCC 警語:
經型式認證合格之低功率射頻電機,非經許可,公司、商號或使用者均不得擅自變更頻
率、加大功率或變更原設計之特性及功能。(即低功率電波輻射性電機管理辦法第十二
條)
低功率射頻電機之使用不得影響飛航安全及干擾合法通信;經發現有干擾現象時,應立
即停用,並改善至無干擾時方得繼續使用。
前項合法通信,指依電信法規定作業之無線電通信。低功率射頻電機須忍受合法通信或
工業、科學及醫療用電波輻射性電機設備之干擾。(即低功率電波輻射性電機管理辦法
第十四條)
This document is a manual how to start the printer. This document Is not recommended to use for repair
or hardware / software upgrade. If you have any technical questions regarding the printer installation and
configurations please send us an email to [email protected]
Page 7

Introduction
Few words from TSC
Thank you very much for purchasing TSC bar code printer.
Enjoy TSC’s reputat ion for cost -efficient , high durability printers with the Alpha-3R
economical printer. The Alpha-3R is a comfortable, light -weight printer capable of
working with any mobile printing application where you need quick, simple
receipts/labels on demand.
Our Alpha-3R is designed for a rough life, inside the IP54-rated protect ive case to
resist dust and wat er and with its rubber over-mold design prepared to take up to
a five foot fall and keep printing.
These small and light printers can be worn comfort ably for a full shift, without
interfering with the user’s tasks. Use USB, or optional Bluetooth, 802.11 a/b/g/n
Wireless or Serial to connect to a mobile computer or even a smart phone and
produce clear easy-to-read receipts hour after hour.
This document provides an easy reference for operating t he Alpha-3R.
The online version of the Programmer's manual, or more information can be
downloaded from service and support web site as an Adobe Acrobat Reader
file.
To print label formats, please refer to t he instructions provided with your labelling
software provider.
General Specifications
Physical dimensions 116 mm (W) x 148 mm (H) x 70 mm (D)
Enclosure Plastic enclosure with rubber over-mold
construction
Weight 550 g (1.21 lb)
Electrical DC 7.4V/ 2500 mA/ h rechargeable battery
Environmental condition
Operation: -10 ~ 50˚C (14 ~ 122˚F), 10 ~ 90% non-condensing
Storage: -40 ~ 60 ˚C (-40 ~ 140˚F), 10 ~ 90% non-condensing
Print Specifications Alpha-3R
Print head resolution 203 dots/inch (8 dot s/mm)
Printing met hod Direct thermal
Dot size 0.125 x 0.125 mm
(width x length) (1 mm = 8 dot s)
Print speed 2, 3, 4 ips selectable
(inches per second) Up to 4 ips
Max. print width 72 mm (2.83”)
Max. print length 2286 mm (90”)
This document is a manual how to start the printer. This document Is not recommended to use for repair
or hardware / software upgrade. If you have any technical questions regarding the printer installation and
configurations please send us an email to [email protected]
Page 8

Printout bias
Vertical: 1 mm max.
Horizontal: 1 mm max.
Media Specifications Alpha-3R
Media roll capacity 57 mm (2.25”) OD
Label: 55 mm (2.16”) OD
Media type Selected label
Media wound t ype Printing face outside wound
Media width Label: 2” ~ 3.07”
Media thickness Label: Fasson standard label media up to
0.14 mm (5.5 mil)
Media height Label: Min. 25.4 mm (1”)
Media core diameter 10.2 ~ 25.4 mm (0.4“ ~ 1“)
Unpacking and Inspection
This print er has been specially packaged to withstand damage during shipping.
Please carefully inspect the packaging and printer upon receiving the bar code
printer. Please retain the packaging materials in case you need t o reship t he
printer. Send us immediat ely a photo of the packing in case you notice something
ubnormal. Kindly send us any comments regarding the shipping process in
Unpacking the printer, t he following items are included in the cart on.
One print er unit
One Li-ion battery
One Windows labeling software/Windows driver CD disk w ith configurations. Do not
use it as we have already configure and test the printer for you.
One quick inst allation guide
One power adaptor
One belt clip
If any parts are missing, please contact t he Customer Service Depart ment at
This document is a manual how to start the printer. This document Is not recommended to use for repair
or hardware / software upgrade. If you have any technical questions regarding the printer installation and
configurations please send us an email to [email protected]
Page 9
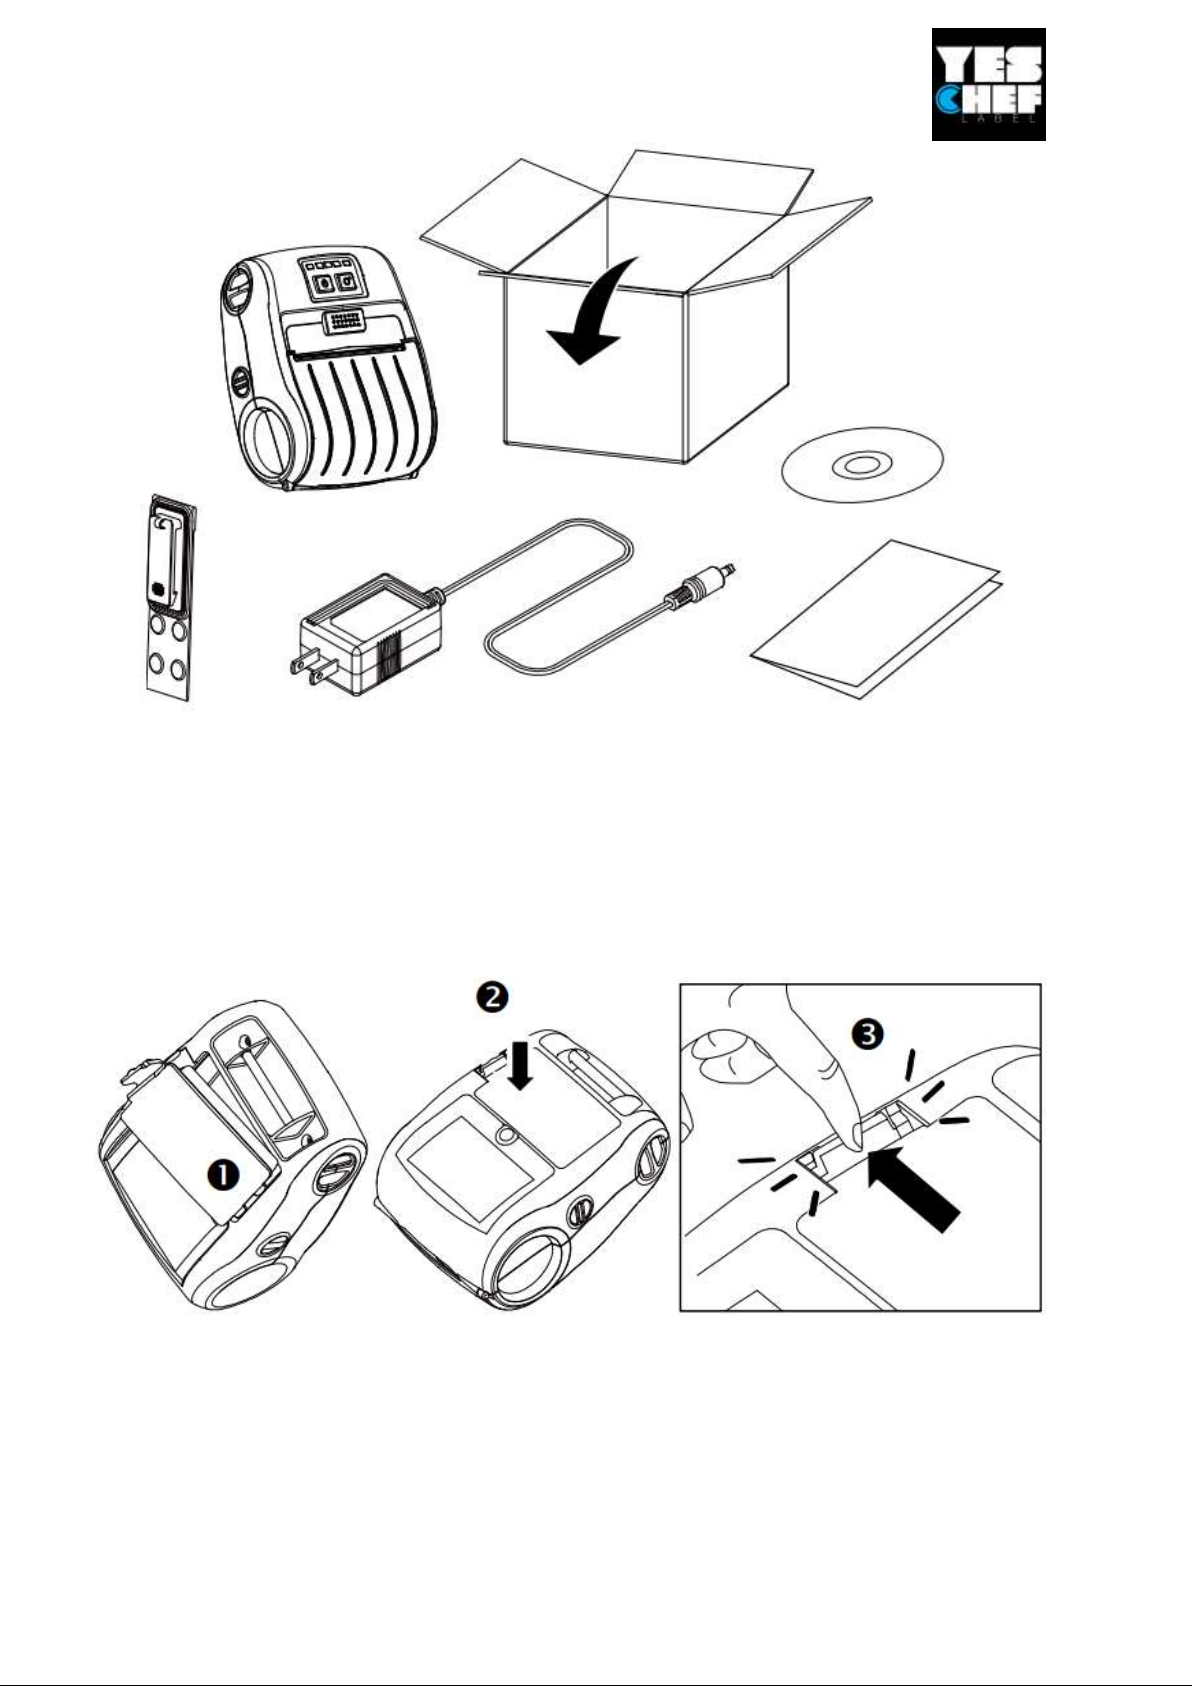
On the back side of the printer is located the battery place. Install the battery. Use the clip
as shown in the photo to remove the battery.
Battery safety warning:
DO NOT throw the battery in fire. DO NOT short circuit the contacts.
DO NOT disassemble the battery. DO NOT throw the battery in municipal waste.
The symbol of the crossed out wheeled bin indicates that the battery should not be
placed in municipal waste.
Place the DC cable in the printer and in the socket. In the front side of the printer you will
see the lights lighting. Three lights mean that the battery is 100% charged.
This document is a manual how to start the printer. This document Is not recommended to use for repair
or hardware / software upgrade. If you have any technical questions regarding the printer installation and
configurations please send us an email to [email protected]
Page 10
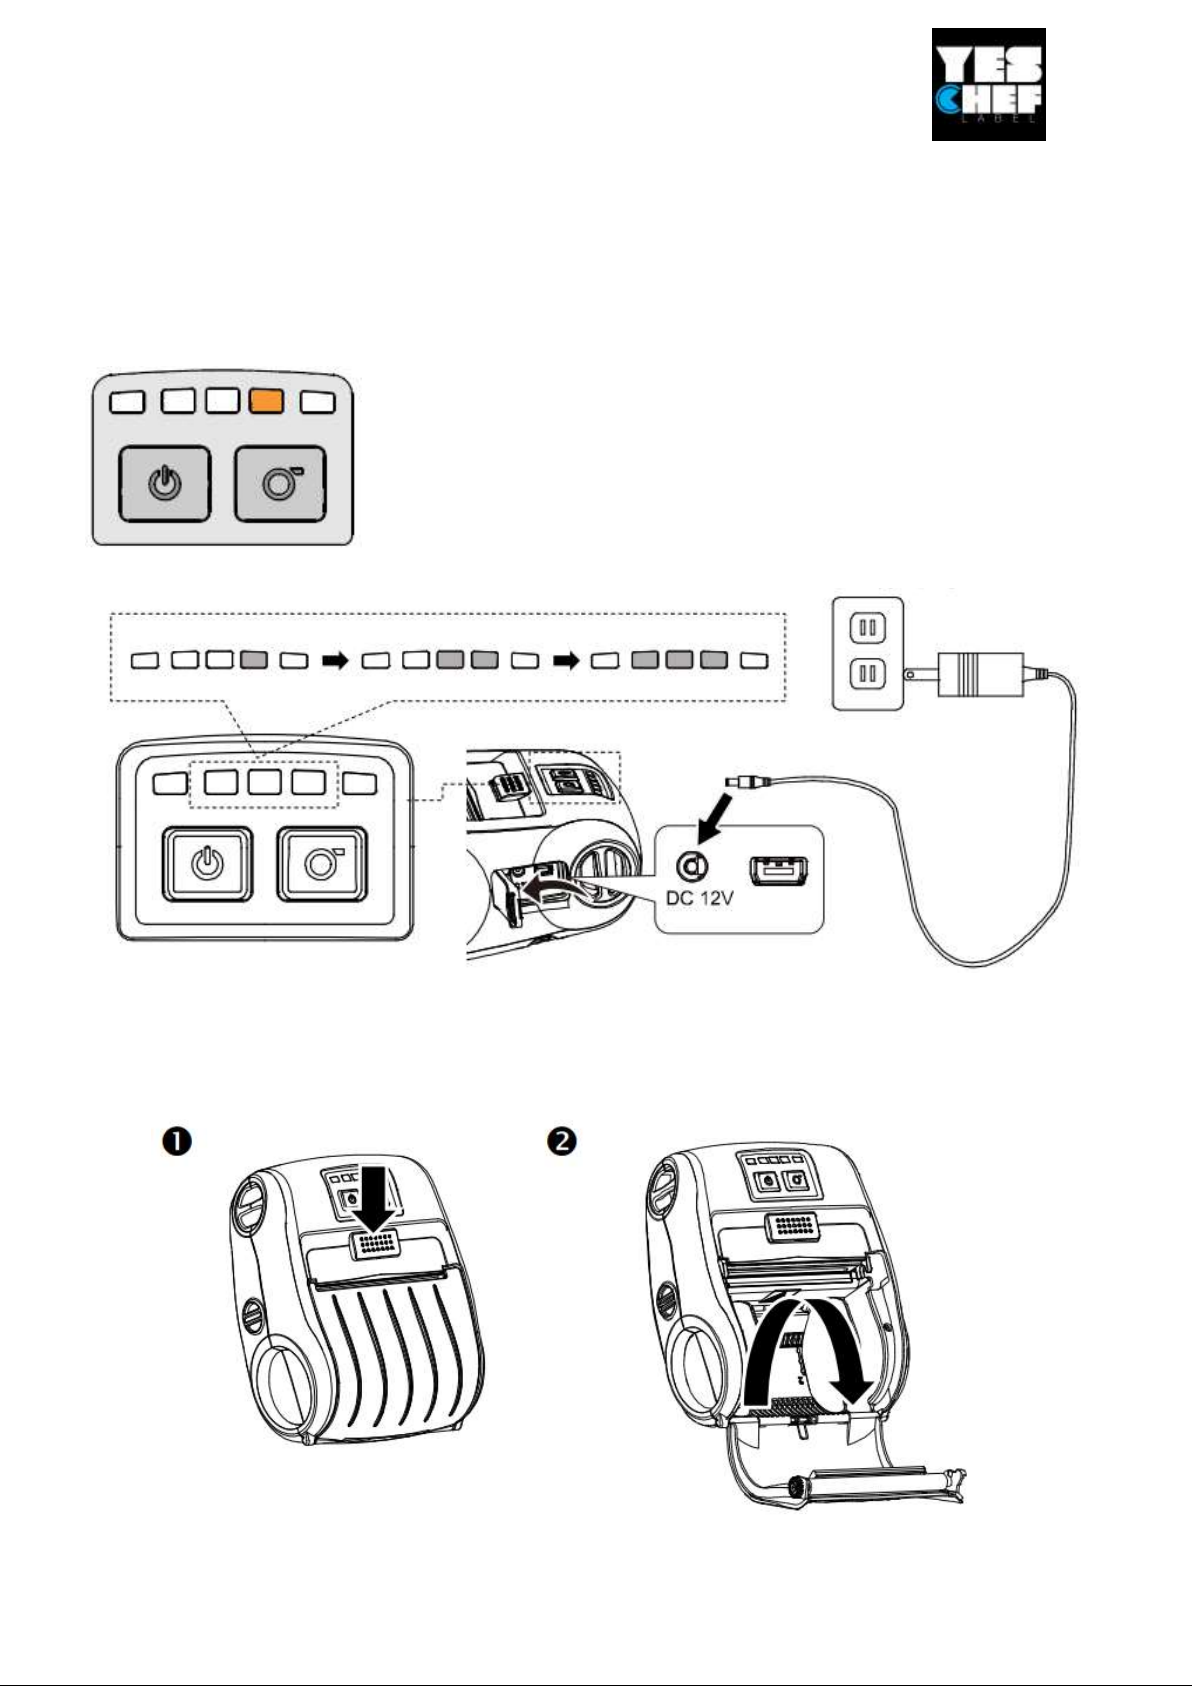
Note:
Please switch OFF printer power prior to plug in the power cord to printer power jack.
When the battery is charging, please do not remove the battery from the printer,
otherwise, please re-plug the power cord into a power outlet.
Charger works in 220/240 Volts sockets
When the battery is charging, the colour of battery status LED indicator is solid
amber.
Note: When charging over 4 ~ 8 hrs, the battery is completely
charged and the amber of LED indicator will be off.
In the front side of the printer click on the grey button to open the top cover and load the
labels
This document is a manual how to start the printer. This document Is not recommended to use for repair
or hardware / software upgrade. If you have any technical questions regarding the printer installation and
configurations please send us an email to [email protected]
Page 11
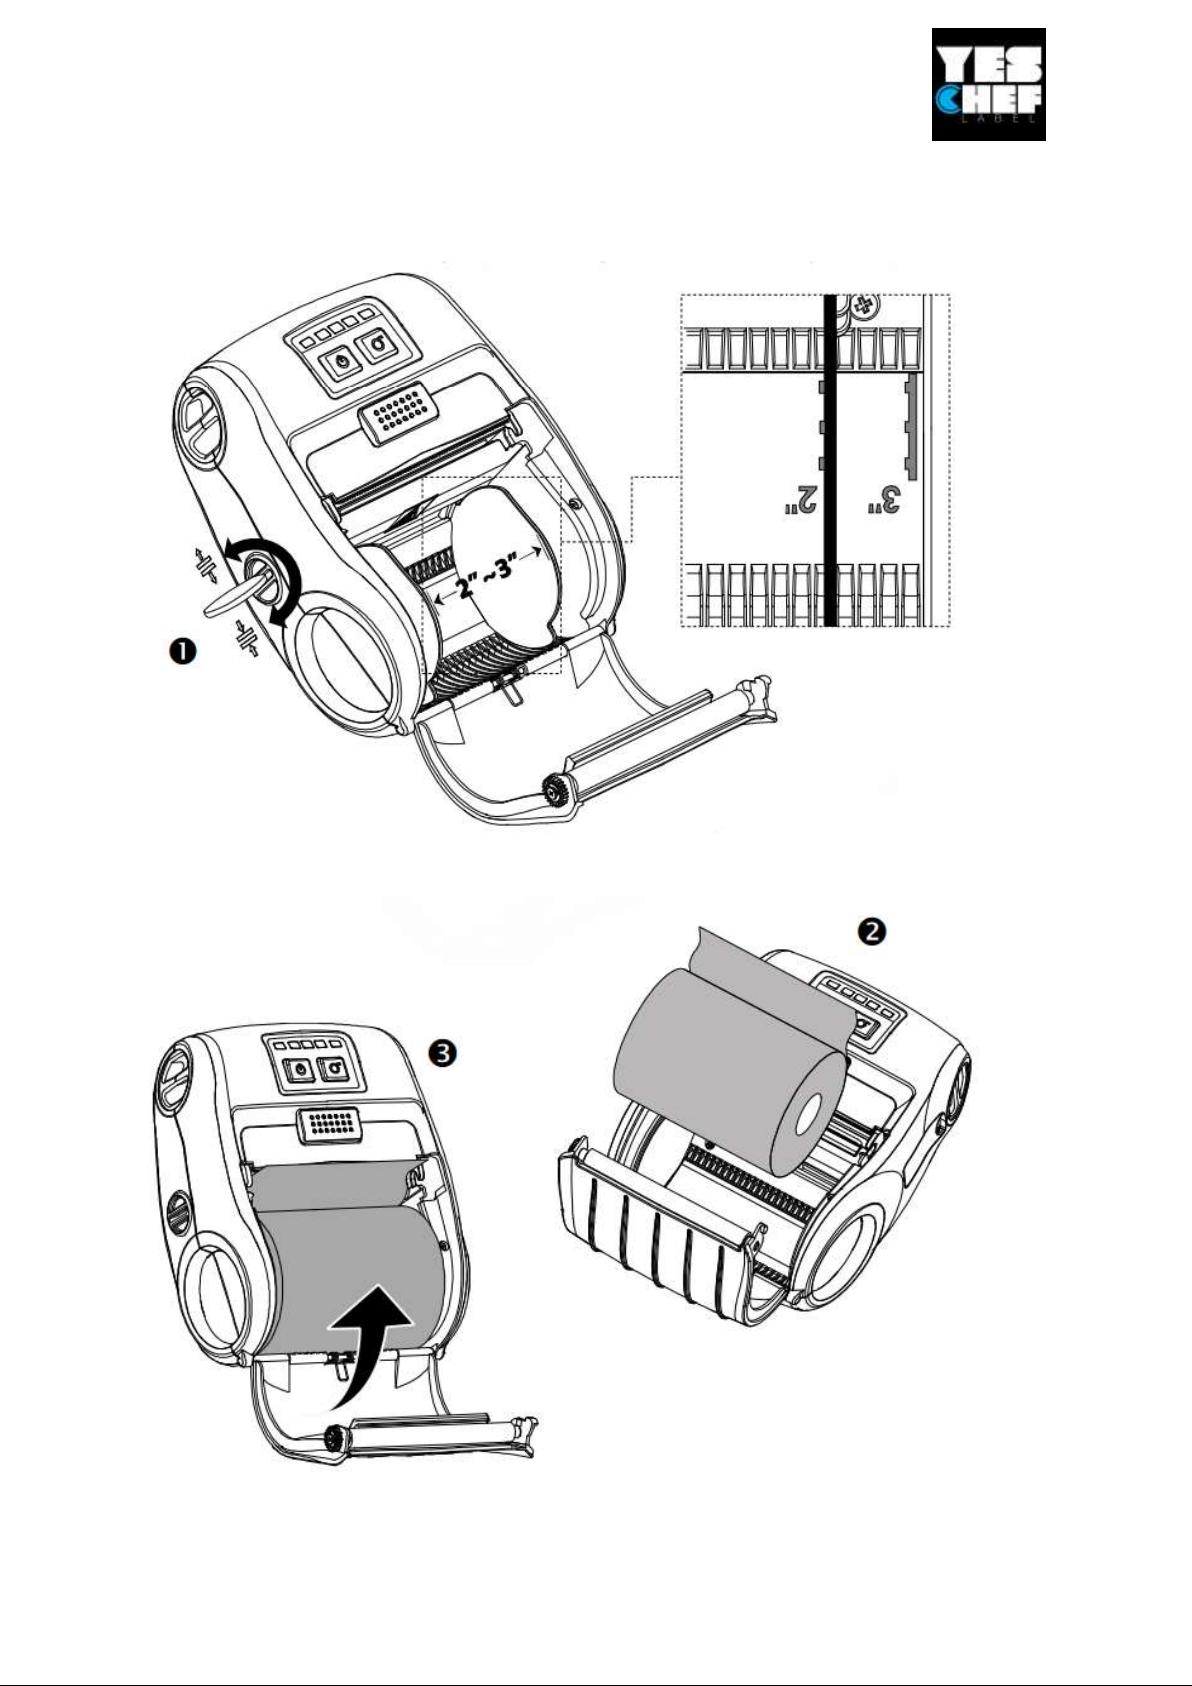
On the right side of the printer use a screw or a coin to turn the correct positioning for the
labels
Make sure you insert the labels correct side. You should be facing the label.
This document is a manual how to start the printer. This document Is not recommended to use for repair
or hardware / software upgrade. If you have any technical questions regarding the printer installation and
configurations please send us an email to [email protected]
Page 12
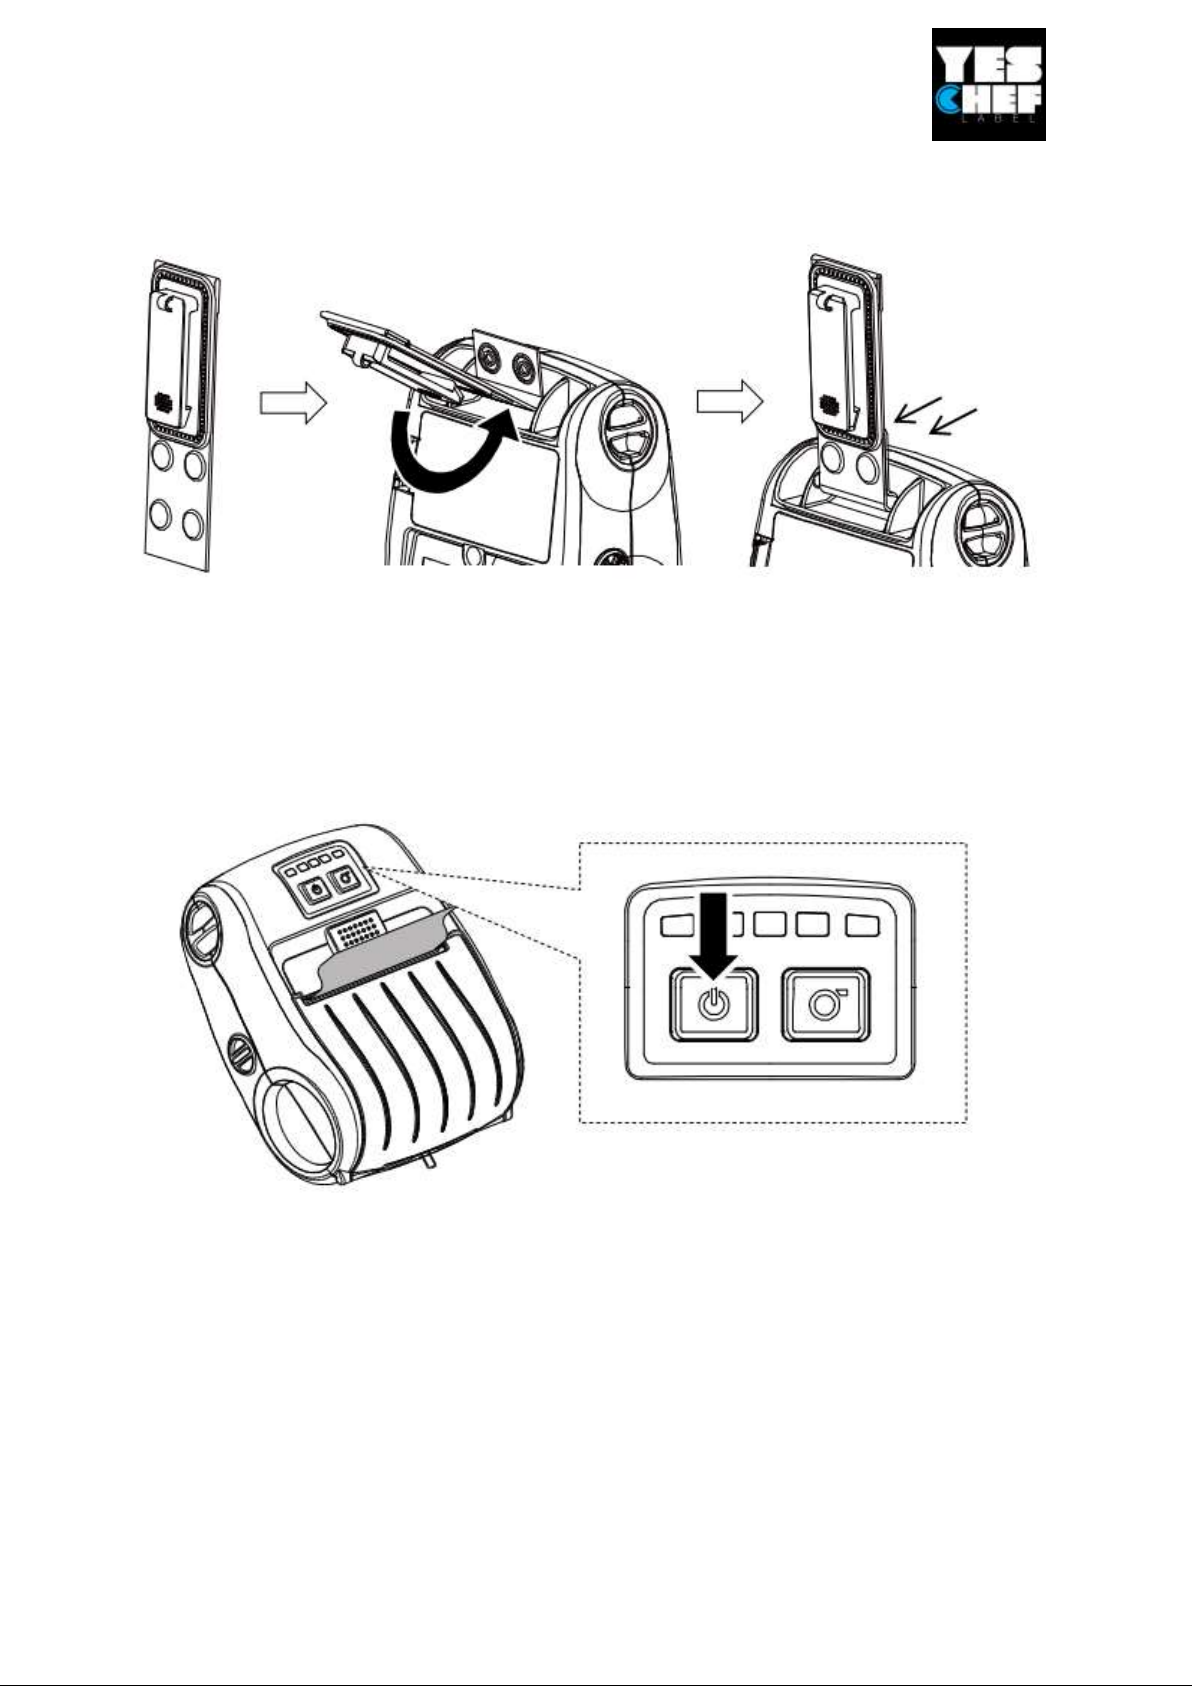
Insert the Belt Clip as shown in the photo below.
Click on the power button once the printer is fully charged. Recommend to charge the
printer for 6 hours before first use.
This document is a manual how to start the printer. This document Is not recommended to use for repair
or hardware / software upgrade. If you have any technical questions regarding the printer installation and
configurations please send us an email to [email protected]
Page 13
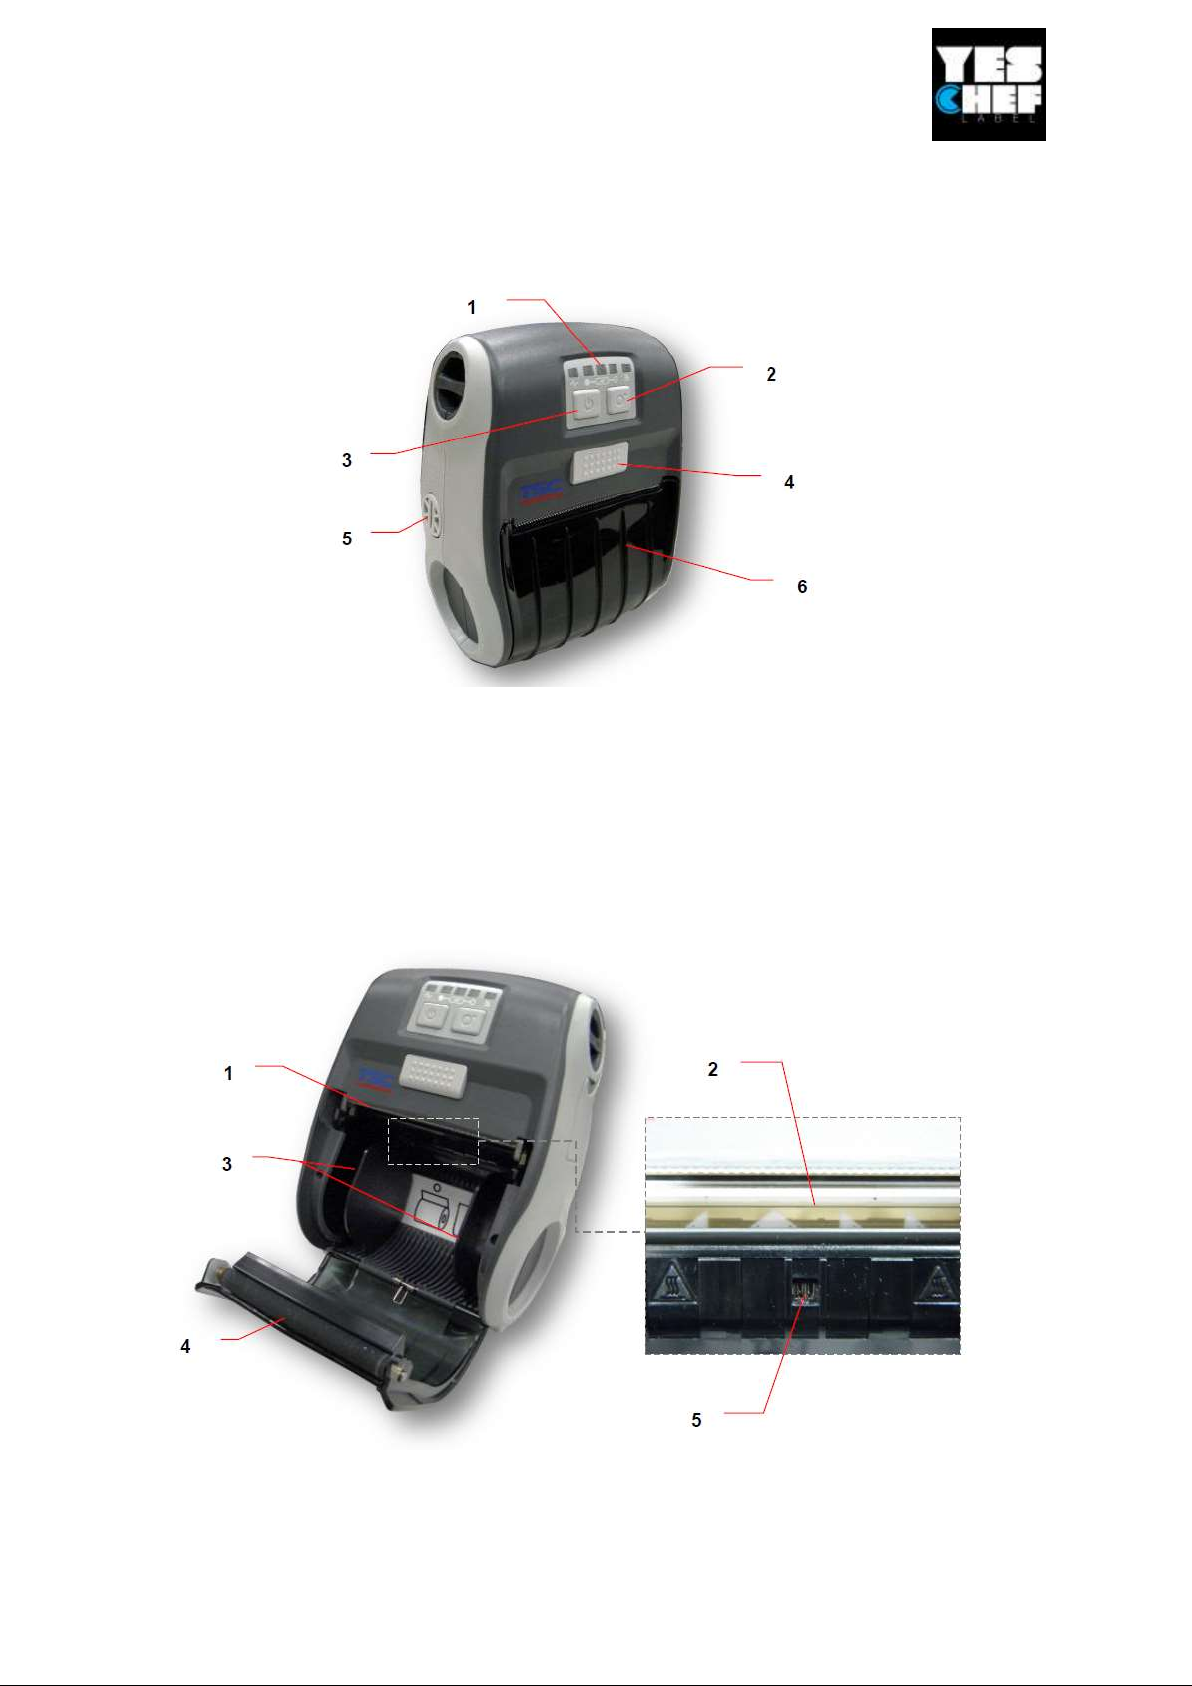
Printer Overview
1. LED indicator
2. Feed but ton
3. Power on/off button
4. Media cover release button
5. Media holder adjustment knob
6. Media cover
1. Tear edge
2. Print head
This document is a manual how to start the printer. This document Is not recommended to use for repair
or hardware / software upgrade. If you have any technical questions regarding the printer installation and
configurations please send us an email to [email protected]
Page 14
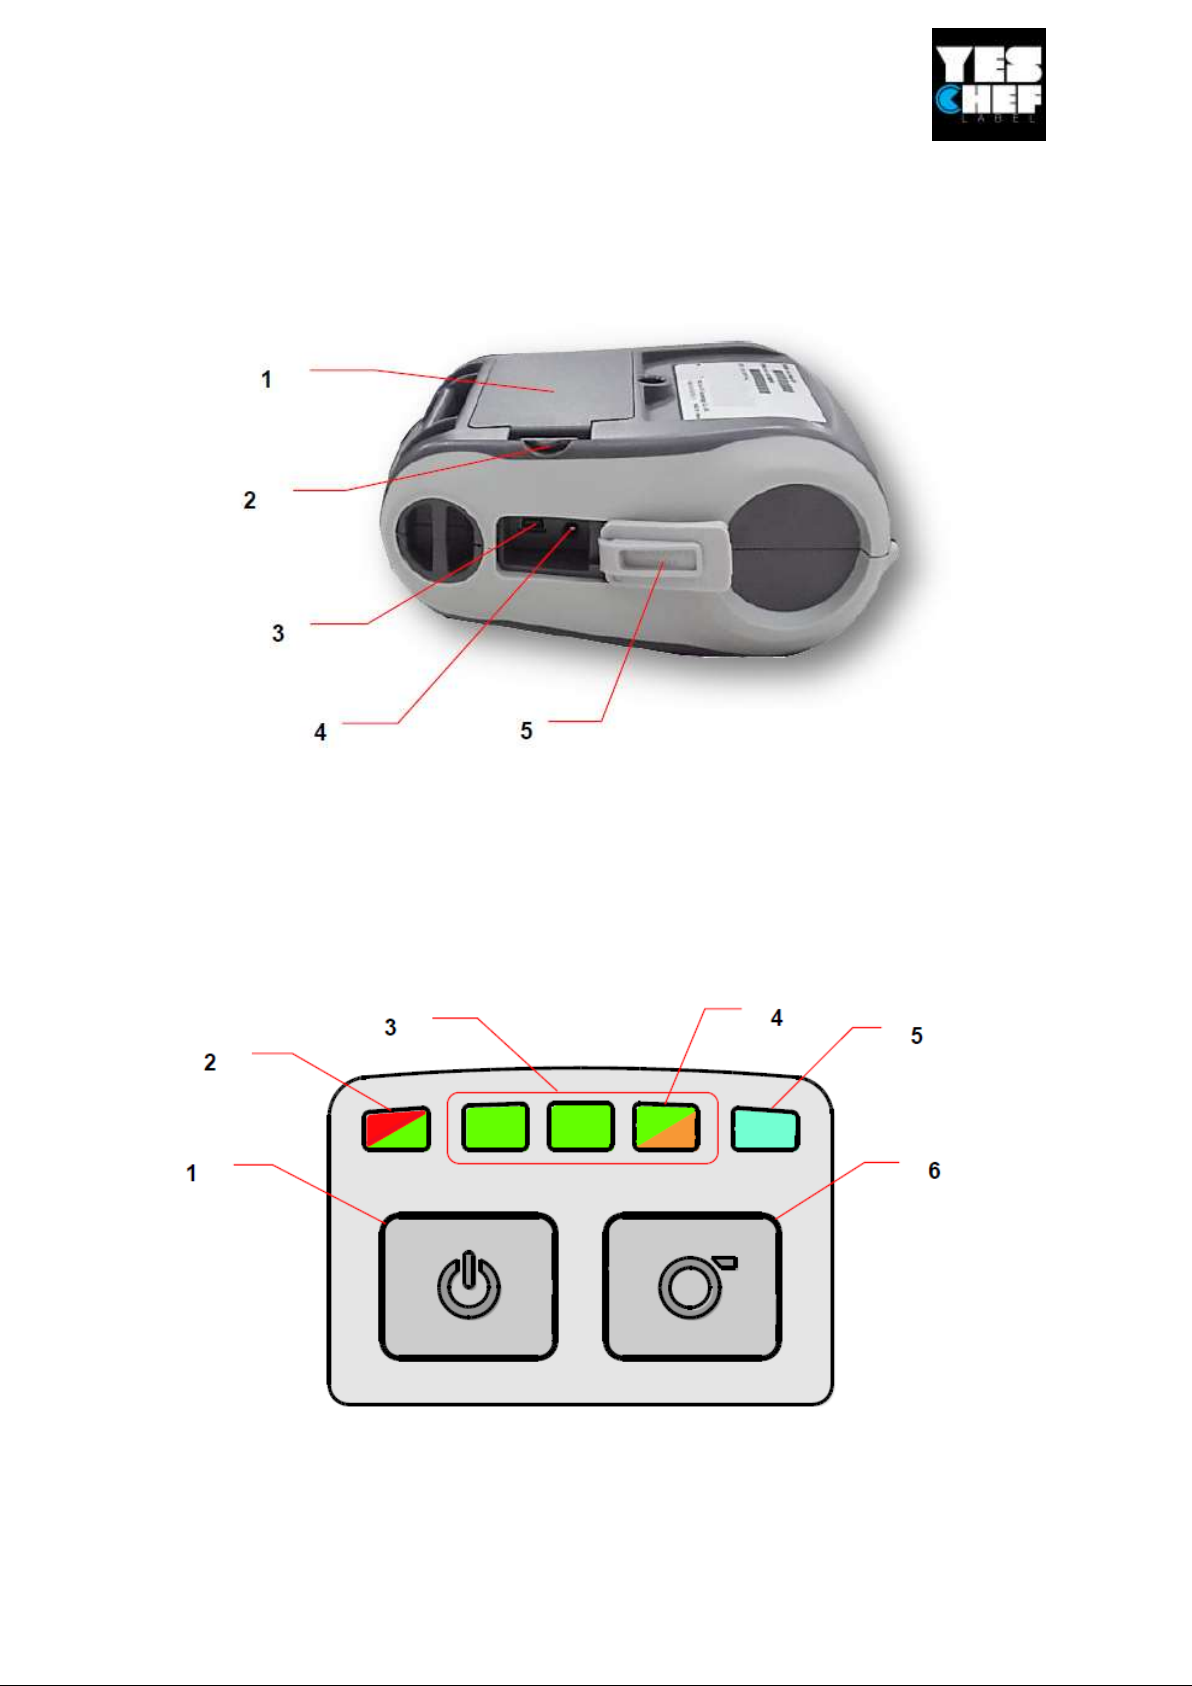
3. Media holder
4. Platen
5. Gap sensor
1. Li-ion battery
2. Batt ery open clasp
3. USB interface
4. Power jack
5. Interface cover
1. Power on/off button
2. Printer st atus LED indicator
This document is a manual how to start the printer. This document Is not recommended to use for repair
or hardware / software upgrade. If you have any technical questions regarding the printer installation and
configurations please send us an email to [email protected]
Page 15
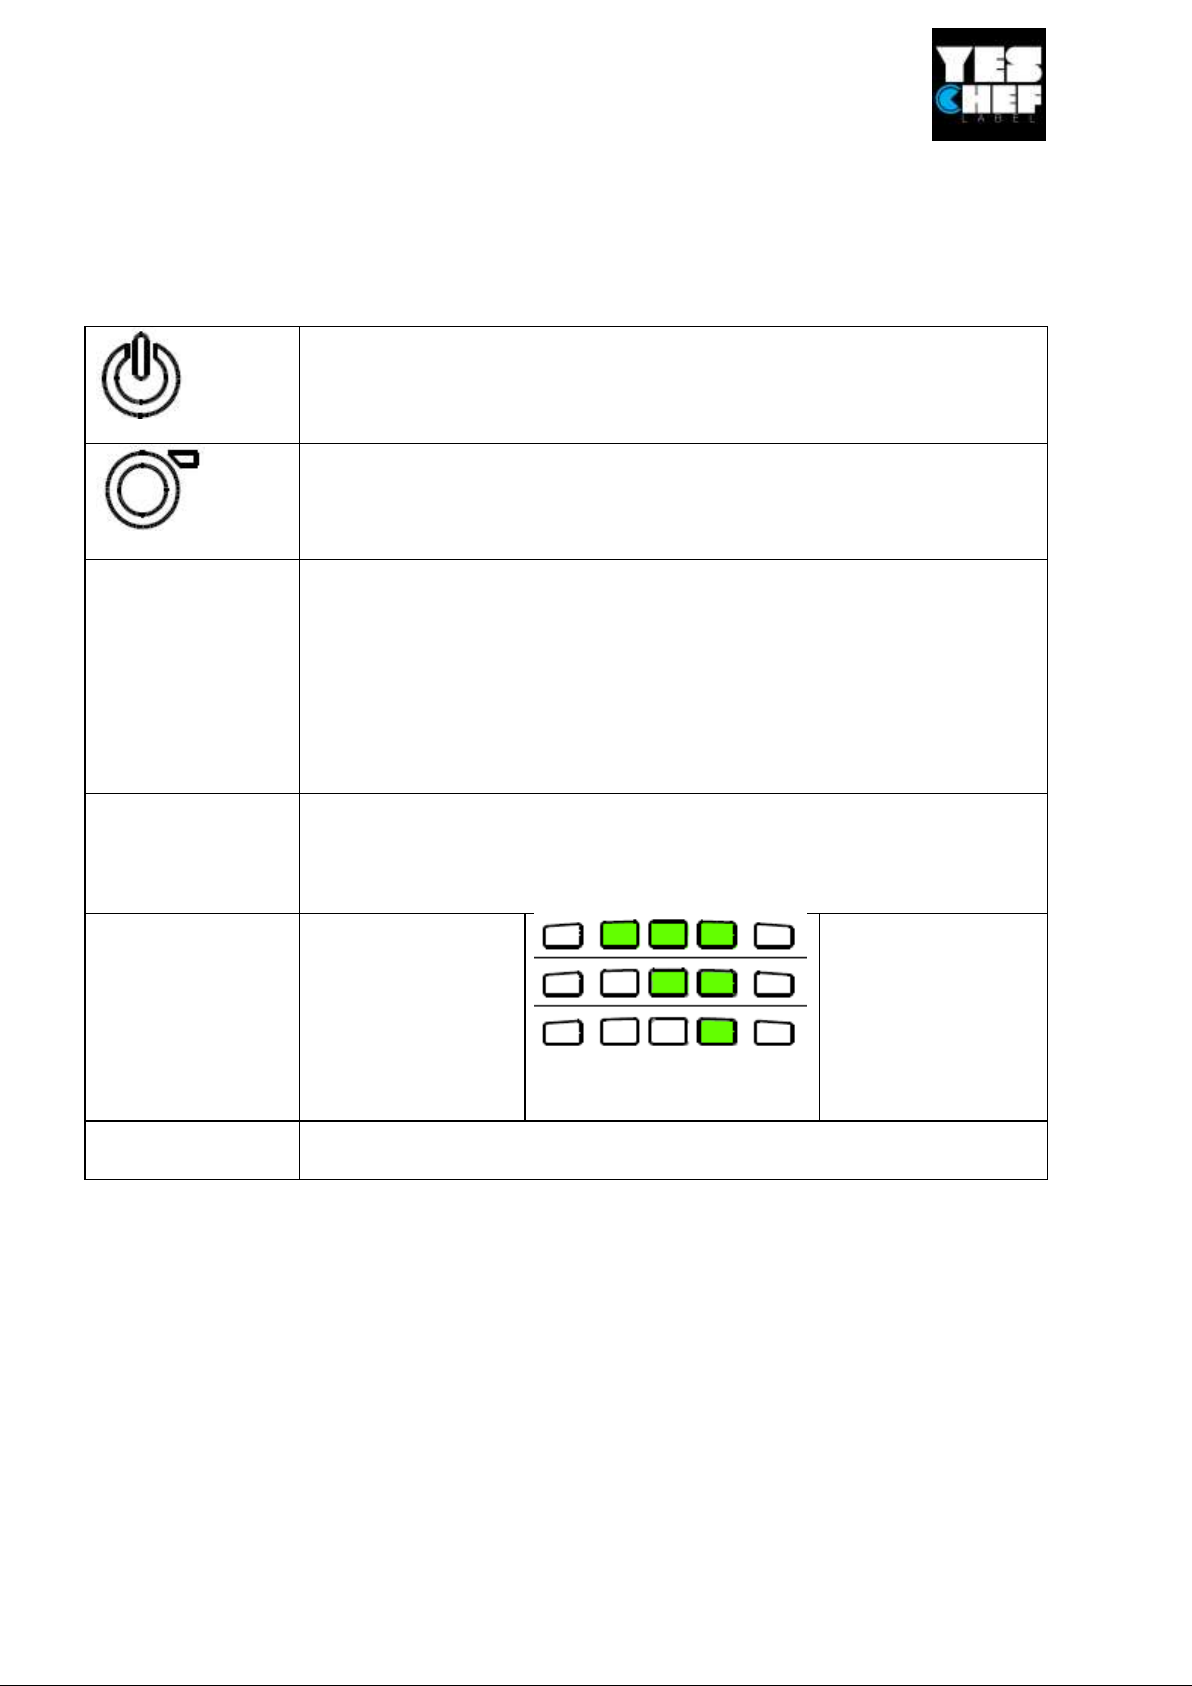
3. Batt ery charge level LED indicator
1. Press and hold for 2-3 seconds t o t urn on the printer.
2. Press and hold for 2-3 seconds t o t urn off the printer.
1. Ready status: Feed one label
2. Printing stat us: Pause the print job
Printer status
LED
indicator
Off Printer is ready
Green (blinking) Printer is paused
Red (solid) Media cover is open
Red (blinking) Printer error
Batt ery status
LED
indicator
Green (blinking) Recharge the bat tery
Amber (solid) Battery is charging
Batt ery charge
level LED
indicator
Green (solid)
Full charged
2/3 charged
level
1/3 charged
level
Bluetooth status
LED indicator
Blue (solid) Bluetooth device is ready
Blue (blinking) Bluetooth device is communicating
4. Batt ery status LED indicator
5. Wireless stat us LED indicator
6. Feed but ton
Connecting with Bluetooth
Default Name
BT-SPP
PIN 0000
Turn on the printer and make sure the Bluetooth of device is open and visible t o
other Bluetooth devices.
This document is a manual how to start the printer. This document Is not recommended to use for repair
or hardware / software upgrade. If you have any technical questions regarding the printer installation and
configurations please send us an email to [email protected]
Page 16
Troubleshooting
Power indi cator does not
il l uminate
* The battery is not properly
installed.
* The battery is dead.
* Reinstall the battery.
* Switch the printer on.
* Charge the battery.
The printer status from
DiagTool shows “Head
Open”.
* The printer carriage is open.
Please close the print
carriage.
The printer status from
DiagTool shows “Out of
Paper”
* Running out of media roll.
* The media is installed
incorrectly.
* Gap sensor is not calibrated.
* Supply a new media roll.
* Please refer to the steps on
section 3.4 to reinstall the
media roll.
* Calibrate the cap sensor.
The printer status from
DiagTool shows “Paper Jam”.
* Gap sensor is not set
properly.
* Make sure media size is set
properly.
* Media may be stuck inside
the printer mechanism.
* Calibrate the black mark
sensor.
* Set media size correctly.
Memory full
( FLASH / DRAM )
The space of FLASH/DRAM
is full.
Delete unused files in the
FLASH/DRAM.
* The max. numbers of DRAM is
256 files.
* The max. user addressable
memory space of DRAM is
256KB.
* The max. numbers of file of
FLASH is 256 files.
* The max. user addressable
memory space of FLASH is
2560KB.
Poor Print Quality
* Media is loaded incorrectly
* Dust or adhesive
accumulation on the print
head.
* Print density is not set
properly.
* Print head element is
damaged.
* Reload the supply.
* Clean the print head.
* Clean the platen roller.
* Adjust the print density and
print speed.
* Run printer self-test and
check the print head test
pattern if there is dot missing in
the pattern.
* Change proper media roll.
Missi ng printing on the left or
ri ght side of label
* Wrong label size setup.
* Set the correct label size.
Gray line on the blank label
* The print head is dirty.
* The platen roller is dirty.
* Clean the print head.
* Clean the platen roller.
Irregular printing
* The printer is in Hex Dump
mode.
* The RS-232 setting is
incorrect.
* Turn off and on the printer to
skip the dump mode.
* Re-set the Rs-232 setting.
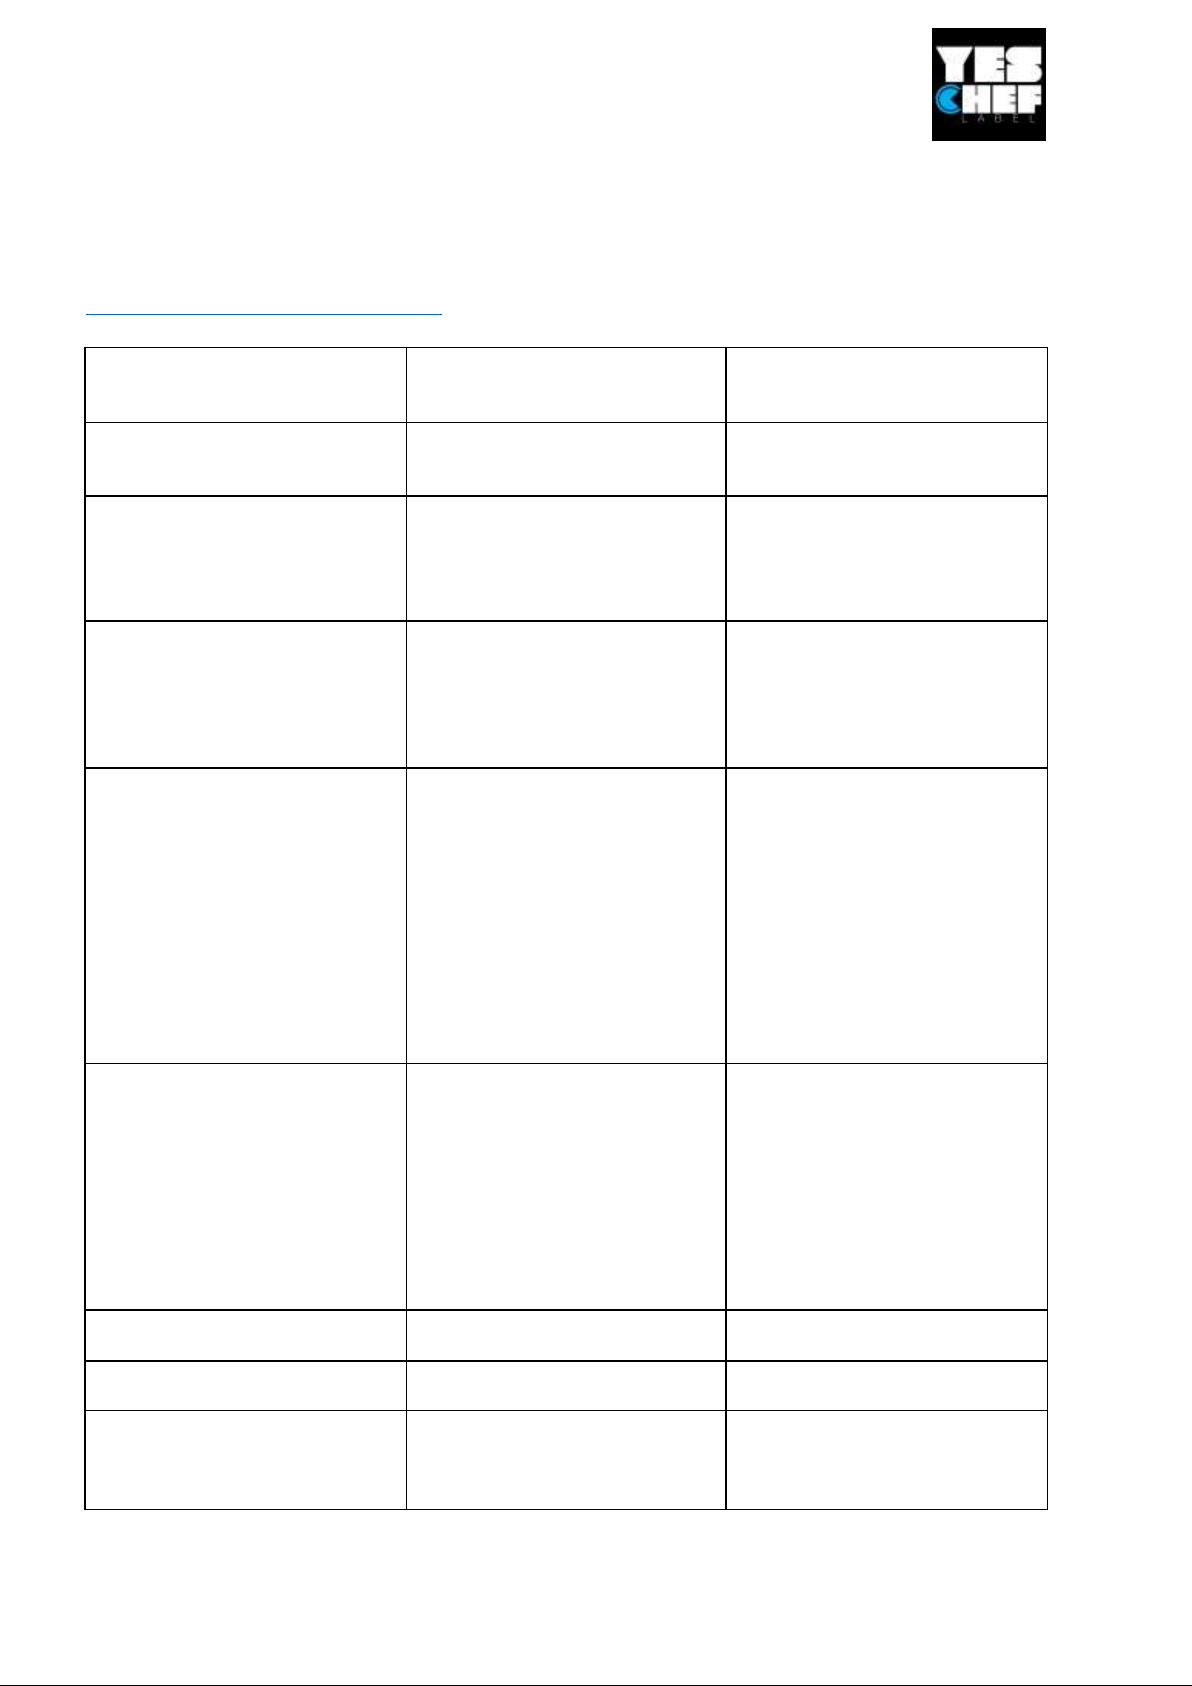
The following guide lists the most common problems that may be encountered when
operating this printer. If the printer still does not function after all suggested solutions have
been invoked, please contact the Customer Service Department at
This document is a manual how to start the printer. This document Is not recommended to use for repair
or hardware / software upgrade. If you have any technical questions regarding the printer installation and
configurations please send us an email to [email protected]
Page 17
Maintenance
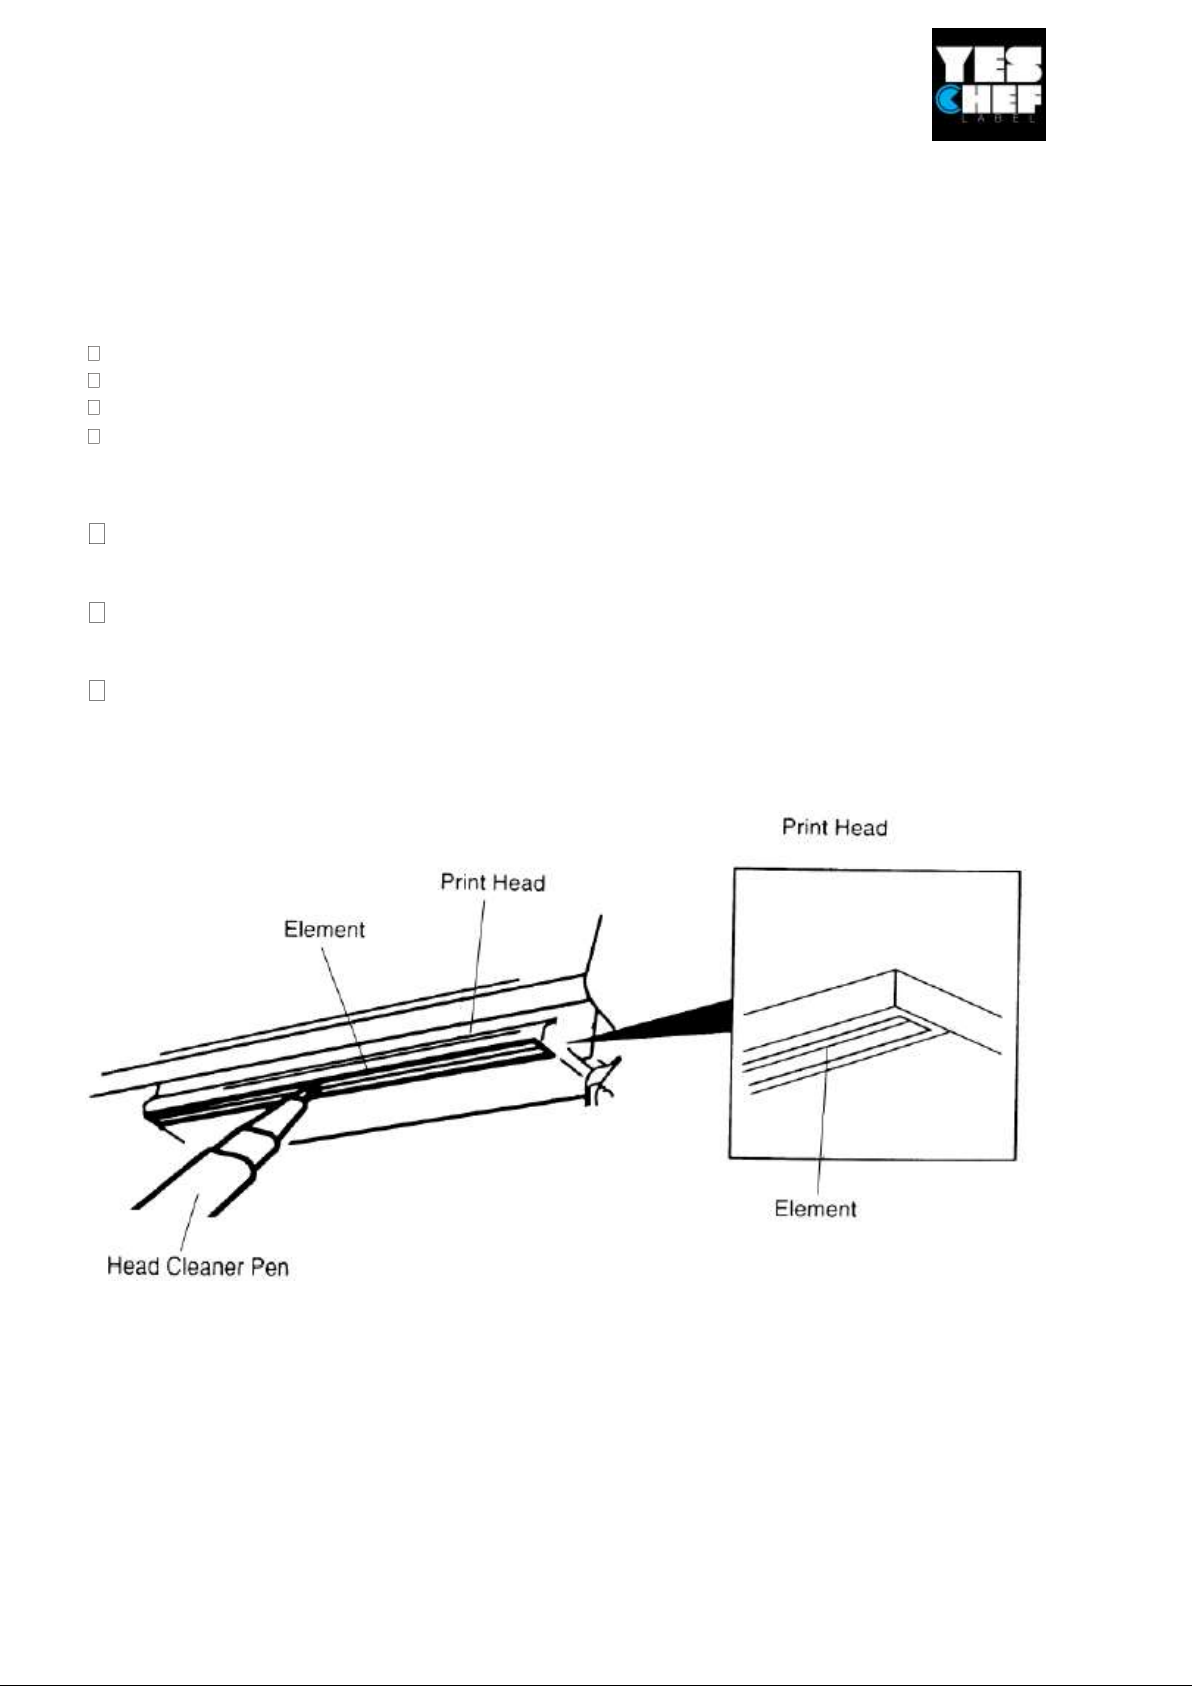
This session presents the clean tools and methods to maintain your printer.
Please use one of following material to clean the printer.
Cotton sw ab
Lint-free cloth
Vacuum / Blower brush
100% Ethanol or Isopropyl Alcohol
Note:
Do not touch printer head by hand. If you touch it careless,
please use ethanol to clean it.
Please use 100% Ethenol or Isopropyl Alcohol. DO NOT use
medical alcohol, which may damage the printer head.
Regularly clean the print head and supply sensors once
change a new ribbon to keep printer performance and
extend printer life.
Ready to print!
Thank you for purchasing our products.
This document is a manual how to start the printer. This document Is not recommended to use for repair
or hardware / software upgrade. If you have any technical questions regarding the printer installation and
configurations please send us an email to [email protected]
 Loading...