

Yeoman YM-W9001ERFL, YM-W9101ERFL, YM-W9102ERFL, YM-W9101ERLC, YM-W9102ERLC Installation Guide
...Page 1
Exmoor/Exe/Devon
Freestanding Stove
YM-W9001ERFL/YM-W9101ERFL/YM-W9102ERFL/YM-W9101ERLC/ YM-W9102ERLC/
YM-W9201ERFL/YM-W9202ERFL/ YM-W9201ERLC/ YM-W9202ERLC/ YM-W9201ERHC/
YM-W9202ERHC
Instructions for fitting
Smoke Control Kit
For use in GB (Great Britain).
This appliance has been certified for use in countries other than those stated. To install this appliance in these countries, it is essential to obtain the
translated instructions and in some cases the appliance will require modification. Contact Yeoman for further information.
IMPORTANT
This appliance will become hot whilst in operation, it is therefore recommended that a suitable guard should be used for the
protection of young children, the elderly or infirm. Do not attempt to burn rubbish in this appliance.
Please read these Instructions carefully before installation or use.
Keep them in a safe place for future reference and when servicing the fire.
These instructions must be used in conjunction with PM306
PM403 - Issue 2 (April 2010)
Page 2
USER INSTRUCTIONS
1. GENERAL
1.1 These instructions apply to the Yeoman products listed when
fitted with a Smoke Control kit.
NOTE: These appliances have been independently tested to
PD6434 and approved by DEFRA as an exempted appliance
allowing it to burn wood in Smoke Control areas when fitted
with this Smoke Control kit.
Product Code Appliance Smoke control kit
Part No.
YM-W9001ERFL Exmoor - Multi-Fuel YM-A9001SCKIT
YM-W9101ERFL Exe - Multi-Fuel at top,
1 door
YM-W9102ERFL Exe - Multi-Fuel at top,
2 door
YM-W9101ERLC Exe - Multi-Fuel low
canopy, 1 door
YM-W9102ERLC Exe - Multi-Fuel low
canopy, 2 door
YM-W9201ERFL Devon - Multi-Fuel at
top, 1 door
YM-W9201ERFL Devon - Multi-Fuel at
top, 2 door
YM-W9201ERLC Devon - Multi-Fuel low
canopy, 1 door
YM-W9202ERLC Devon - Multi-Fuel low
canopy, 2 door
YM-W9201ERHC Devon - Multi-Fuel high
canopy, 1 door
YM-W9202ERHC Devon - Multi-Fuel high
canopy, 2 door
YM-A9906SCKIT
YM-A9906SCKIT
YM-A9906SCKIT
YM-A9906SCKIT
YM-A9906SCKIT
YM-A9906SCKIT
YM-A9906SCKIT
YM-A9906SCKIT
YM-A9906SCKIT
YM-A9906SCKIT
2. RECOMMENDED FUELS
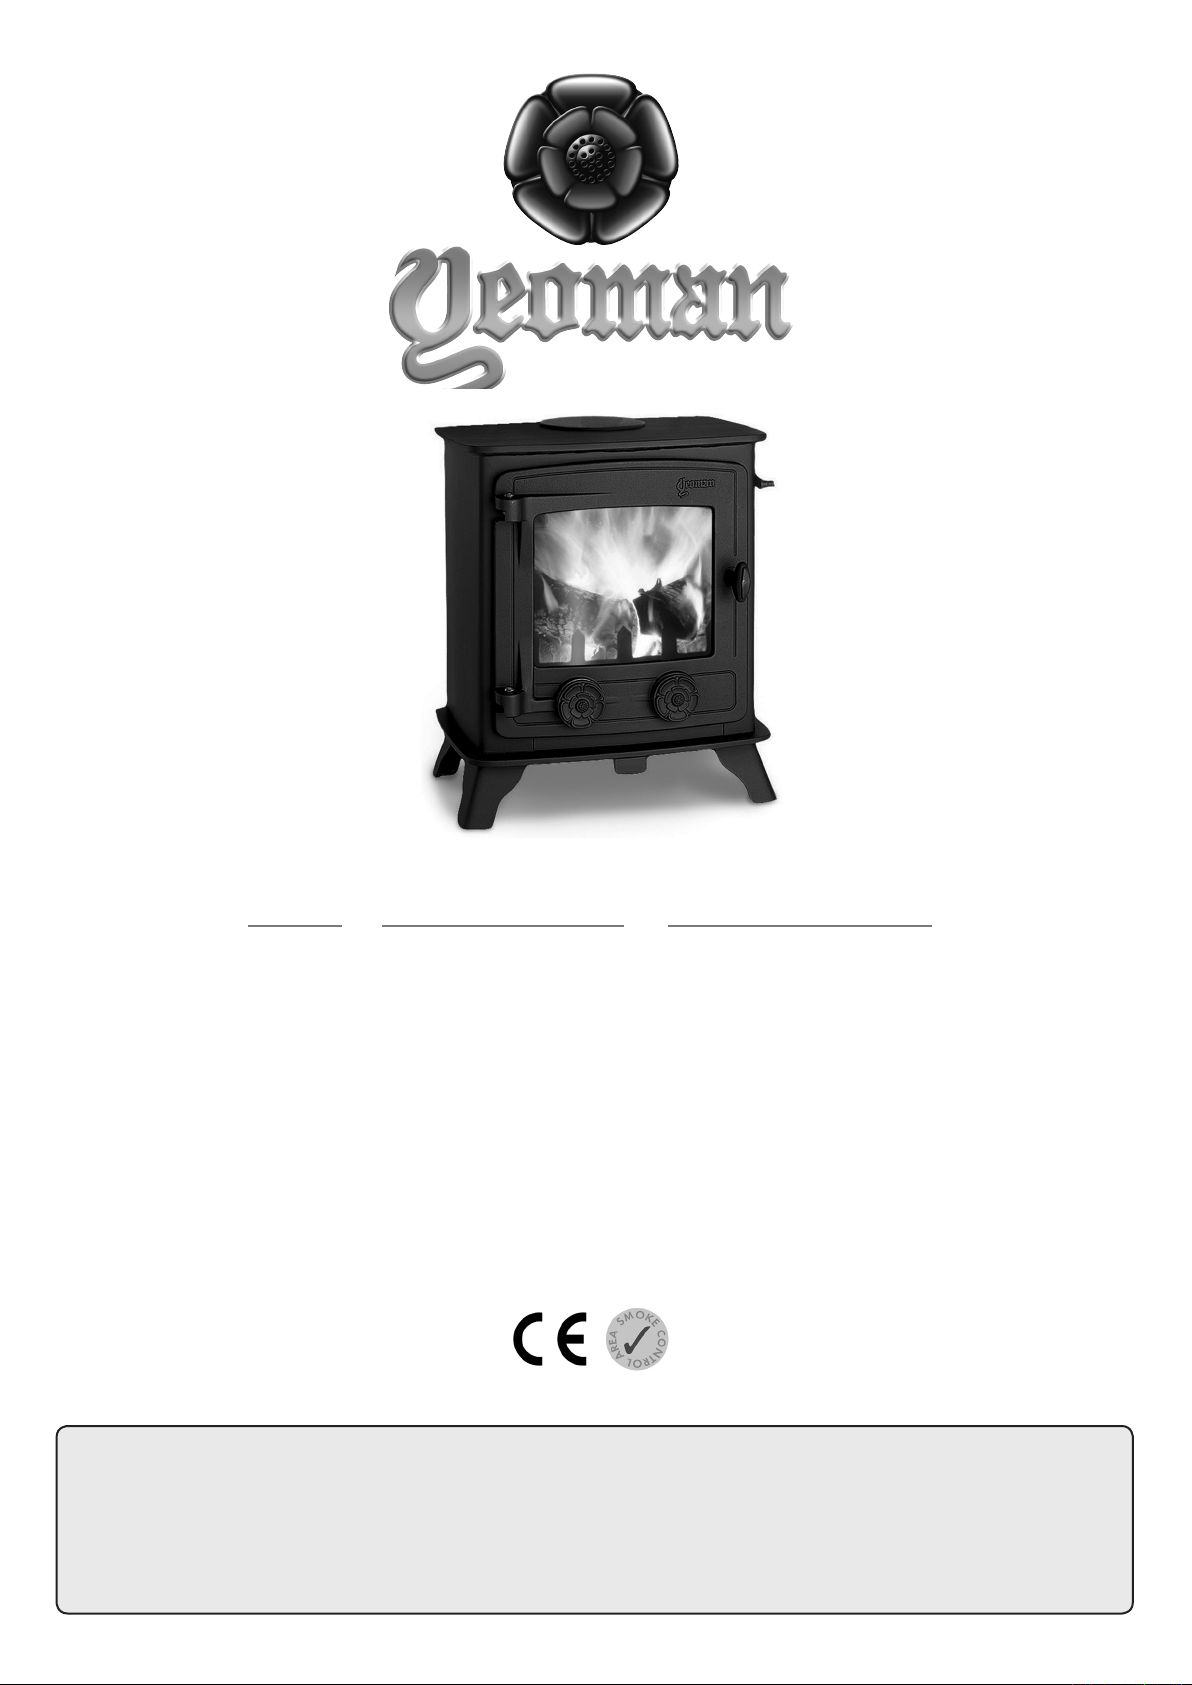
2.1 Wood Logs:
• Burn only seasoned timber with a moisture content of less
than 20%. To ensure this, allow cut wood to dry for 12 to
18 months.
Wood Length
Appliance Wood Length
All 300mm
Poor quality timber:
— Causes low combustion efficiency.
— Produces harmful condensation.
— Reduces effectiveness of the airwash and life of the
appliance.
Do not burn construction timber, painted, impregnated /
treated wood, manufactured board products or pallet
wood.
3. LIGHTING THE APPLIANCE
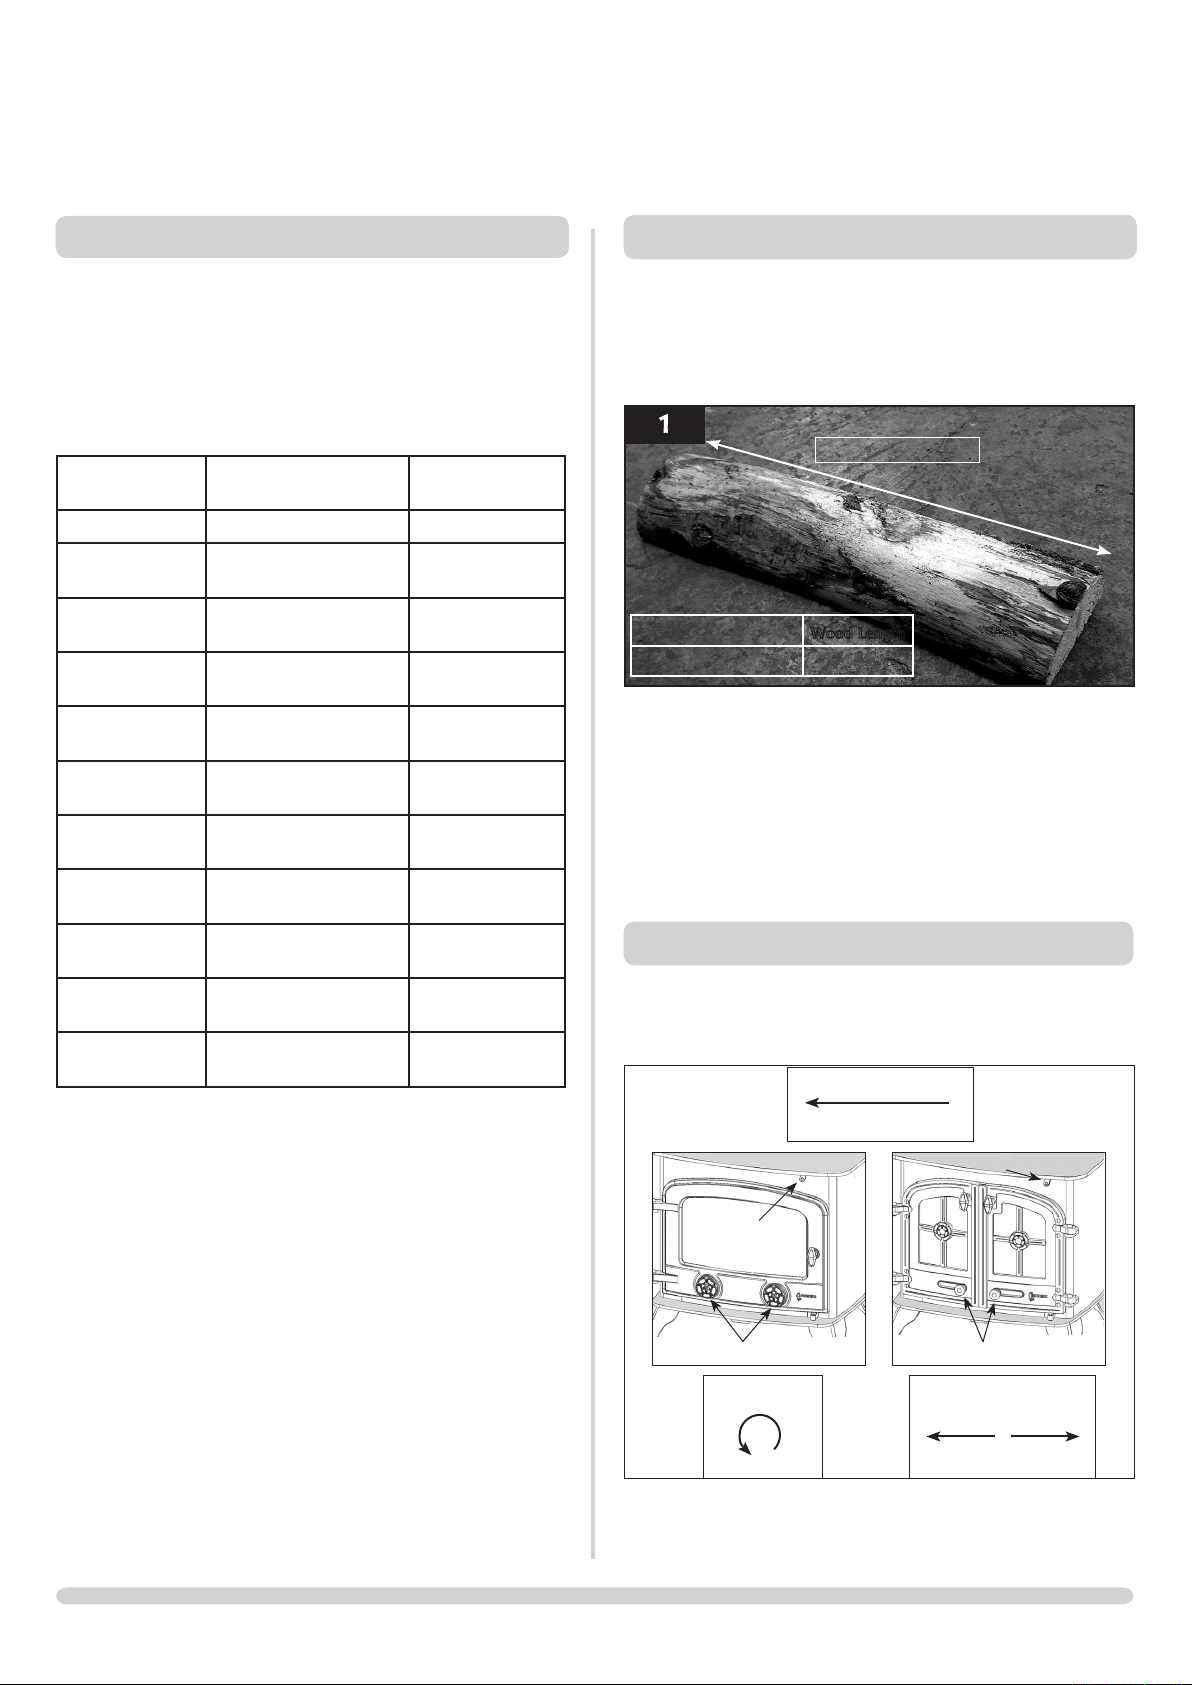
3.1 For best results:
• Set air controls, see Diagrams below.
Airwash Control
1.2 To meet the Smoke Control requirement this appliance must
be operated correctly in order to minimise the amount of
smoke produced.
1.3 Burn only dry wood or approved smokeless solid fuels.
1.4 These instructions must be left with the user and kept with
the original instructions they now supersede.
Open 100%
Airwash Control
Airwash Control
Primary Air Control
Single Door
Primary Control
Open 100%
PR7518
Primary Air Control
Two Door
Primary Control
Open 100% Open 100%
PR7519
2
Page 3
USER INSTRUCTIONS
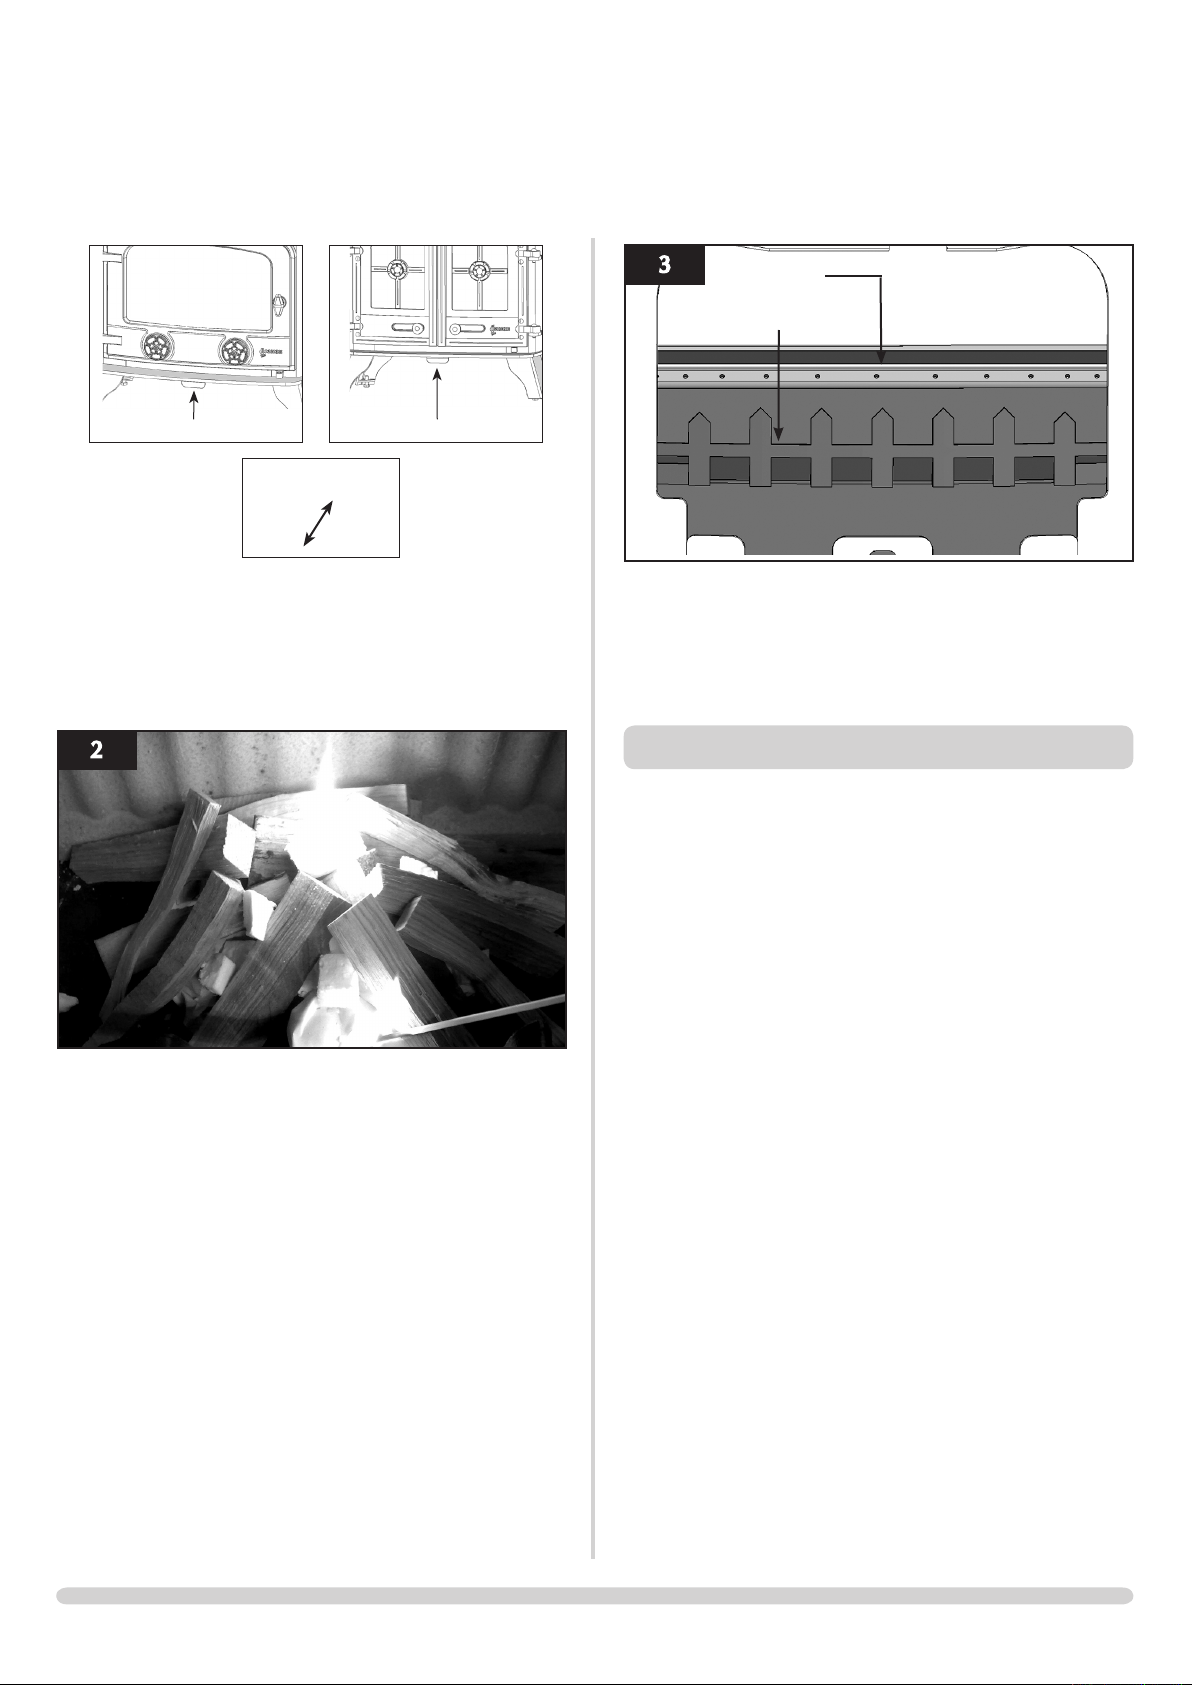
Air Inlets
Log Guard
Secondary Air Control
Do not burn wood with the secondary air control closed.
• Place firelighters or paper and dry kindling wood on the
grate.
• Light the paper or firelighters, see Diagram 2.
PR7520
Single & Two Door
Secondary Control
Open
Secondary Air Control
Close
(Back and forth)
PR7521
PR8252
• Close the door.
Do not leave the door open as this could over-fire and
damage the appliance.
Refuel as detailed in Section 5.
4. RUNNING THE APPLIANCE
4.1 Burning Wood:
• Leave the Secondary Air control fully open.
• Close the Primary Air control (multi-fuel versions only)
and use the Airwash to control the temperature.
• Wood burns best on a bed of ash (approx, 1” deep).
• Rake the embers evenly over the fire bed and open the
Airwash control fully for a few minutes before re-fuelling.
• Leave the door slightly open as the fire establishes.
• Add larger pieces of wood. Too many logs may smother
the fire.
• Leave the door open slightly until the larger pieces are
well alight.
Do not load fuel above the log guard and the second-
ary combustion inlets at the back of the firebox.
See Diagram 3.
4.2 Burn new logs at a high temperature for a few minutes
before adjusting the Airwash control. Refuel little and often
for clean, efficient burning.
4.3 Experience establishes settings to suit personal preferences.
4.4 Do not burn large amounts of fuel with the Airwash control
closed for long periods of time. This reduces the glass cleaning effect, causes tars and creosotes to build-up in the appliance and flue system.
4.5 When in use, burning the appliance at a high temperature
for a short period also reduces tars and creosotes.
3
Page 4

USER INSTRUCTIONS
5. REFUELLING THE APPLIANCE
5.1 • Open the Primary and Airwash air controls fully.
• Rake the embers evenly over the firebed to establish a
glowing firebed. If the firebed is low add a small amount of
kindling wood to help re-establish the fire.
• Stack the logs in an open arrangement, see Diagram 4.
Compact StackingOpen Stacking
Open stacking allows oxygen to easily reach every part of
the fire.
Compact stacking will make the wood burn slower as wood
can only reach the outside of the fire. This will cause the
fire to smoulder and produce smoke.
6. BURNING TIPS
6.1 Fuel Quality (Wood)
Use wood with a moisture content of less than 20%.
Seasoned logs have the bark beginning to lift and peel away
and cracks radiating from the centre. They feel lighter than
fresh cut wood of a similar size and sound hollow when
struck against each other. Logs should not feel damp or
have moss and fungal growths.
Symptoms related to wet wood:
— Difficulty starting and keeping a fire burning well.
— Smoke and small flames.
— Dirty glass and/or firebricks.
— Rapid creosote build-up in the chimney.
— Low heat output.
— Short burn times, excessive fuel consumption and
blue/grey smoke from the chimney.
• Burn at high output at high output for a short period
each day to avoid large build-ups of tars and creosote within the appliance and the flue system.
• Use Stovax Protector chimney cleaner to reduce this
problem.
5.2 After refuelling:
• Burn the new logs at high output for a few minutes
before closing the Primary Air control. Adjust the burn
rate using the Airwash control.
Do not close the air controls until the fire is burning well.
5.3 Experience establishes settings to suit personal preferences.
5.4 Do not burn large amounts of fuel with the Airwash control
closed for long periods of time. This reduces the glass cleaning effect, causes tars and creosotes to build-up in the appliance and flue system and will produce excessive amounts of
smoke.
5.5 When in use, burning the appliance at a high temperature
for a short period also reduces tars and creosotes.
5.6 When running the appliance:
• Refuel little and often for clean, efficient burning.
5.7 Wood burns best on a bed of ash (approx. 1§” deep).
A bright and clean firebox indicates the appliance is
burning well.
5.8 Do not load fuel above the log guard and the secondary
combustion inlets at the back of the firebox.
See Diagram 4.
4
Page 5

INSTALLATION INSTRUCTIONS
These instructions cover the fitting of the Smoke Control Kit
1. PARTS LIST
Product Code Appliance Smoke control kit
Part No.
YM-W9001ERFL Exmoor - Multi-Fuel YM-A9001SCKIT
YM-W9101ERFL Exe - Multi-Fuel at top,
1 door
YM-W9102ERFL Exe - Multi-Fuel at top,
2 door
YM-W9101ERLC Exe - Multi-Fuel low
canopy, 1 door
YM-W9102ERLC Exe - Multi-Fuel low
canopy, 2 door
YM-W9201ERFL Devon - Multi-Fuel at
top, 1 door
YM-W9201ERFL Devon - Multi-Fuel at
top, 2 door
YM-W9201ERLC Devon - Multi-Fuel low
canopy, 1 door
YM-W9202ERLC Devon - Multi-Fuel low
canopy, 2 door
YM-W9201ERHC Devon - Multi-Fuel high
canopy, 1 door
YM-W9202ERHC Devon - Multi-Fuel high
canopy, 2 door
YM-A9906SCKIT
YM-A9906SCKIT
YM-A9906SCKIT
YM-A9906SCKIT
YM-A9906SCKIT
YM-A9906SCKIT
YM-A9906SCKIT
YM-A9906SCKIT
YM-A9906SCKIT
YM-A9906SCKIT
1 Door Stove
Air Control Spacer
2 Door Stove
Primary Air Control Slider
2. SMOKE CONTROL KIT – FITTING
INSTRUCTIONS
2.1 To fit the Smoke Control kit:
• Remove internal parts - Log Guard / Baffle as detailed in
the main appliance instructions (PM306).
YM-A9001SCKIT:
1 x Airwash Slider
1 x Primary Air Spacer
1 x Instructions
YM-A9906SCKIT:
1 x Airwash Slider
1 x Primary Air Slider
1 x Instructions
Airwash Slider
Identification mark
3. FITTING AIRWASH SLIDER
3.1 To fit the Smoke Control kit:
• Remove the 4 x M8 fixing nuts and washers on the inside
of stove.
• Remove Top Plate or Canopy. Take care not to damage
the fixing studs.
Note: These parts are heavy.
5
Page 6

INSTALLATION INSTRUCTIONS
3.2 Remove Airwash Slider by undoing 2 x fixing bolts.
Fixing Bolts
Slider
3.3 Fit new Airwash Slider.
3.4 Check fixing bolts are tight and slider operates freely. The
distance the slider moves will now be reduced.
Rope Seal
Check fixing
bolts
4.2 Place the new Primary Air Spacers on fixing bolts on the
front of the stove.
Spacers
4.3 Refit the Air Control Spinners.
• Check the operation of the controls. A gap of
approx. 1mm should remain when the controls are closed.
1mm
3.5 Refit Top Plate or Canopy.
Check condition of rope seal and replace if required.
4. 1 DOOR STOVE - FITTING PRIMARY
AIR CONTROL SPACER
4.1 Open door.
Using a spanner to hold the fixing bolts if necessary, remove
the Air Control Spinners by unscrewing anti-clockwise.
Air Control
Spinners
Spacer
5. 2 DOOR STOVE - FITTING PRIMARY
AIR CONTROL SLIDERS
5.1 Open the doors.
• Remove the internal air control covers, see Diagram 10.
Control Cover
Fixing screws
6
Page 7

INSTALLATION INSTRUCTIONS
5.2 Remove the Primary Air Sliders by unscrewing the control
knobs on front of stove.
Note the position of the springs, control knobs, washers and
spacers.
Washer
Spring
Control
Knob
5.3 Fit new Primary Air Sliders.
Note: The sliders will not fully close the air inlet.
5.4 Replace control knobs and air control covers.
Check the operation of the sliders.
Spacer
Primary Controls (2 Door)
Hole when
closed
Airwash Control (1 Door & 2 Door)
ID mark
5.5 Refit internal parts - Log Guard / Baffle as detailed in the
main instructions (PM306).
Stoves with a smoke control kit fitted can be identified as shown:
Primary Controls (1 Door)
Spacer
7
Page 8

A division of Stovax Ltd
Falcon Road, Sowton Industrial Estate, Exeter, Devon, England EX2 7LF
Tel: (01392) 474500 Fax: (01392) 219932
E-mail: yeoman@stovax.com www.yeoman-stoves.co.uk
 Loading...