


OPERATION MANUAL
for
Independence 1.0.6

The information in this document is subject to change without notice and does not represent a commitment
on the part of yellow tools GbR. The software described by this document is subject to a License Agreement
and may not be copied to other media. No part of this publication may be copied, reproduced or otherwise
transmitted or recorded, for any purpose, without prior written permission by yellow tools GbR. All product and
company names are ™ or ® trademarks of their respective owners.
© yellow tools GbR, 2006. All rights reserved. 4th edition.

Table of Contents
Welcome
.................................................................................................................................... 10
Installation & Product Activation ............................................................................ 15
Independence system requirements ............................................................................... 15
Available Interfaces for Independence .......................................................................... 15
Installing Independence for Mac OS X ......................................................................... 16
Installing Independence for Windows XP .................................................................... 18
Yellow Tools Authorization Key ...................................................................................... 20
Yellow Tools Key Manager - Activating Independence ............................................. 21
Architecture & Operation ............................................................................................. 27
Projects, Layer Sets, Layers, Alternates, Sections & Zones .................................... 27
Zone ................................................................................................................................... 27
Section ................................................................................................................................ 27
Alternate ............................................................................................................................. 27
Layer .................................................................................................................................. 27
Layer Set ............................................................................................................................ 27
Project ................................................................................................................................ 27
General Operation .............................................................................................................. 29
Input Fields ........................................................................................................................ 29
Pull-Down Menus .............................................................................................................. 29
Buttons ............................................................................................................................... 29
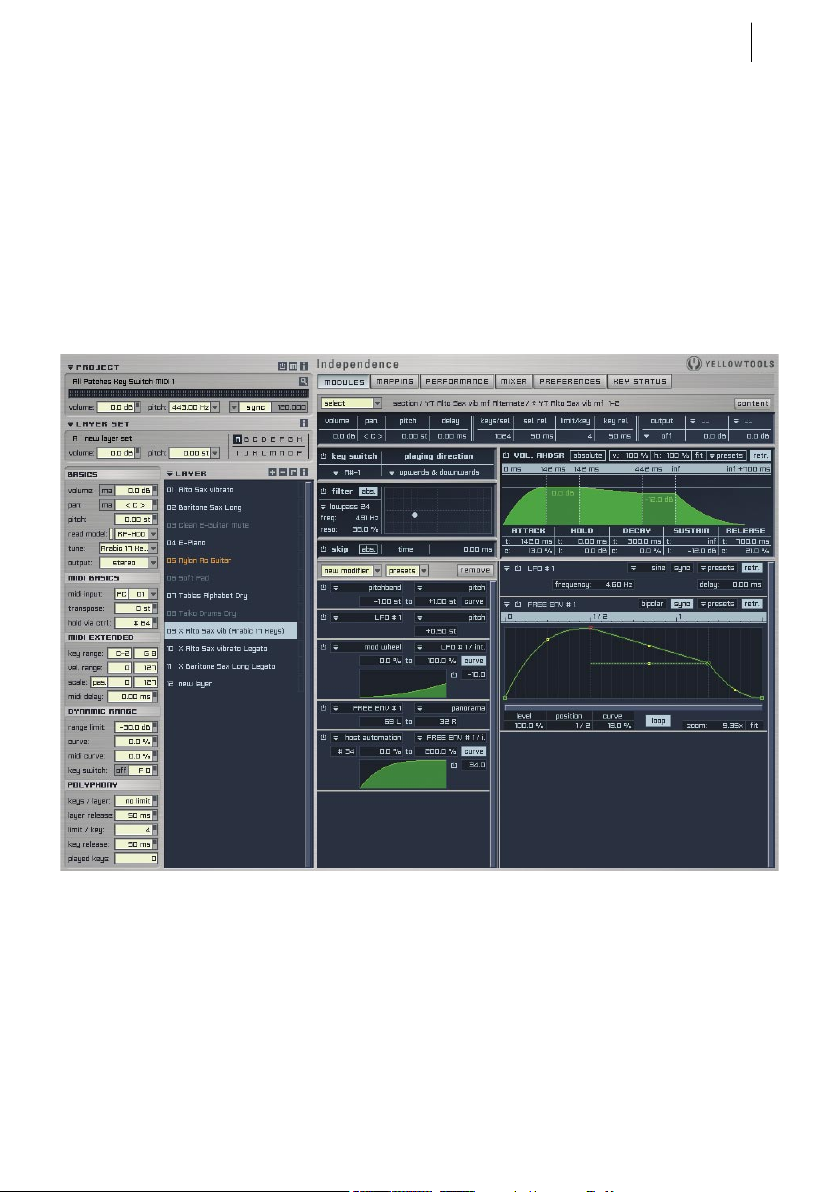
User Interface & Basics ................................................................................................... 30
Project Area .......................................................................................................................... 31
Layer Set Area ...................................................................................................................... 33
Layer Area ............................................................................................................................. 34
MIDI Programs ................................................................................................................. 38
Pre-cache ........................................................................................................................... 39
Auto-Mapping-Import ....................................................................................................... 40
X-Y-Z Mapping .......................................................................................................... 41
Multi Key Mapping .................................................................................................... 41
Chromatic Mapping ...................................................................................................
Basic Settings ..................................................................................................................... 43
Read Model ........................................................................................................................ 43
Tune Model ........................................................................................................................ 44
Dynamic Range Settings ................................................................................................... 47
Polyphony Settings ............................................................................................................ 49
One Key Mapping ...................................................................................................... 42
MIDI Basics Settings ......................................................................................................... 46
MIDI Extended Settings .................................................................................................... 46
42

Modules ..................................................................................................................................... 50
Module Editor ...................................................................................................................... 52
Output Settings .................................................................................................................. 52
Layer internal key switch .................................................................................................. 54
Playing Direction ............................................................................................................... 55
Filters ................................................................................................................................. 55
Skip ..................................................................................................................................... 56
Volume AHDSR ................................................................................................................. 57
Flexible Modifiers ................................................................................................................ 60
External Sources ............................................................................................................... 63
Fix Value ..................................................................................................................... 63
Velocity ........................................................................................................................
Release Velocity ..........................................................................................................
Random ....................................................................................................................... 64
Pitchbend .................................................................................................................... 64
Modwheel .................................................................................................................... 64
Mono Aftertouch (channel pressure) ........................................................................
Poly Aftertouch (key pressure) .................................................................................
MIDI Automation ....................................................................................................... 64
Host Automation ........................................................................................................ 64
Key Position (keyboard tracking) ............................................................................. 64
Key Down .................................................................................................................... 64
Internal Sources ................................................................................................................ 65
LFO (Low Frequency Oscillator) ............................................................................. 65
Free Envelope Unipolar / Bipolar .............................................................................
Step Modulator Unipolar / Bipolar .......................................................................... 69
Glide (Portamento) .................................................................................................... 70
Insert FX ..................................................................................................................... 71
Key Distance ............................................................................................................... 64
Key Up ......................................................................................................................... 64
AHDSR Envelope ....................................................................................................... 67
63
63
64
64
67
Mapping (Independence only) .................................................................................... 72
Working with Zones ........................................................................................................... 77
Select and move one or multiple Zones ............................................................................ 77
Copy one or multiple Zones .............................................................................................. 79
Resize a Zone ..................................................................................................................... 79
Invisible features ............................................................................................................... 80
Mapping parameters .......................................................................................................... 80
Creating Sections in the Mapping Editor ......................................................................... 83
Edit Preferences Menu ...................................................................................................... 84
Zoom Menu ........................................................................................................................ 85
Special Menu ..................................................................................................................... 85
Audio Files Browser .......................................................................................................... 86

Audio Editor ......................................................................................................................... 88
Audio Editor Parameters ................................................................................................... 90
Working with Slices ........................................................................................................... 92
Performance (Independence only) ........................................................................... 98
Overview ................................................................................................................................ 98
Operation (example) ........................................................................................................... 99
Alternate Mode parameters ............................................................................................. 101
Advanced Legato Mode parameters .............................................................................. 104
Legato Playing Techniques
Legato Start ........................................................................................................................ 107
Legato Option .................................................................................................................... 108
Legato Target ..................................................................................................................... 109
.............................................................................................. 105
Mixer (Independence only) ........................................................................................... 110
Content Editor: .................................................................................................................... 111
Group Editor: ....................................................................................................................... 112
Show/Hide Editor: ............................................................................................................... 113
Channel Display: ................................................................................................................. 114
Layer Channel ................................................................................................................... 114
Group Name ............................................................................................................... 115
BUS sends ................................................................................................................... 116
Audio Out selection pull-down menu ....................................................................... 117
Volume fader and graphic level meter ..................................................................... 117
Volume chart ............................................................................................................... 117
Panorama chart .......................................................................................................... 118
Layer Channels ..........................................................................................................
Custom Channel ......................................................................................................... 119
BUS Channels ............................................................................................................. 119
Output Channels ........................................................................................................ 119
Insert Button ............................................................................................................... 115
Solo and Mute button ................................................................................................ 117
Level indicator ............................................................................................................ 117
Channel types .................................................................................................................... 118
119
Preferences & Key Status .............................................................................................. 120
Preferences ............................................................................................................................ 120
Outputs ............................................................................................................................... 121
Default Root Key ............................................................................................................... 121
Use original BIT rate / Pre-convert to 32 BIT ................................................................. 121
MIDI CC defaults .............................................................................................................. 121
Sample auto find ................................................................................................................
Program Change ............................................................................................................... 121
Surround (Independence PSE only) ................................................................................. 122
121

Independence basic path ................................................................................................... 122
Current RAM overview ..................................................................................................... 122
RF-HDD (Read From Hard Disk Drive) .......................................................................... 123
Version overview ................................................................................................................ 123
Key Status .............................................................................................................................. 124
Insert Filters and Effects ................................................................................................ 125
Load, save & remove insert filters and effects ............................................................. 125
Equalizers .............................................................................................................................. 127
4 band parametric EQ ....................................................................................................... 127
6 band parametric EQ ....................................................................................................... 127
Vintage 3 band EQ ............................................................................................................ 128
Filters ...................................................................................................................................... 129
2D Filter ............................................................................................................................. 129
X-Filter ............................................................................................................................... 129
Filter Follower ................................................................................................................... 130
Low Cut Filter ................................................................................................................... 130
Multi Mode Filter .............................................................................................................. 131
Dynamics ............................................................................................................................... 132
Compressor ........................................................................................................................ 132
Limiter ................................................................................................................................ 133
Gater ................................................................................................................................... 133
Modulation ............................................................................................................................ 134
Chorus ................................................................................................................................ 134
Phaser ................................................................................................................................ 135
Vinylizer ............................................................................................................................. 136
Distortion ............................................................................................................................... 137
Time clipper .......................................................................................................................
Bit reduction ...................................................................................................................... 137
Dual band distortion .......................................................................................................... 138
Tube distortion ................................................................................................................... 138
Delay ...................................................................................................................................... 139
Delay .................................................................................................................................. 139
Filter Delay ........................................................................................................................ 140
Doubler .............................................................................................................................. 140
Echo ................................................................................................................................... 141
Helper ..................................................................................................................................... 142
Volume ............................................................................................................................... 142
Panorama ........................................................................................................................... 142
XY panorama .....................................................................................................................
Phase invert ....................................................................................................................... 143
Sample delay ...................................................................................................................... 143
Level meter ......................................................................................................................... 143
137
142

Reverb .................................................................................................................................... 144
Reverb ................................................................................................................................ 144
Reverb TWO ...................................................................................................................... 145
Special ..................................................................................................................................... 146
Origami LE ........................................................................................................................ 146
Origami LE Positioner ...................................................................................................... 149
Credits ...................................................................................................................................... 151
License Agreements ........................................................................................................... 152
License Agreement Software ............................................................................................ 152
License Agreement Sound Library ................................................................................. 154
Index ...................................................................................................................................... 155

10
CHAPTER 1
Welcome
Welcome
Thank you very much for purchasing INDEPENDENCE - your ultimate Sonic Workstation.
With the introduction of Independence, yellow tools once again sets new standards for sample based
instruments and offers by far the fastest, most powerful and easiest way of performing, customizing,
and creating authentic instruments on your computer.
Enabled by the fusion of innovative Virtual Instrument technology with state-of-the-art sampler
architecture, this sophisticated creativity tool meets the demands of music producers, filmcomposers, sound designers, songwriters and remixers.
Enhanced by a clear user interface, the flexibility of a full-modular structure, stunning effects and
filters and many unique features Independence is still easy to use and offers immediate access to a
fantastic and intuitive handling.
Independence comes with a vast 18 GB sound library of premium instruments. Next to a “best-of”
collection of the award-winning instruments from yellow tools products Independence also contains
totally new and specially optimized instruments.
Additionally Independence is fully compatible with all yellow tools Modular Virtual Instruments
and you can also import WAV and AIFF files (up to 32bit/192kHz). The amazing Auto-MappingImport feature lets you import your sound libraries and creates your custom mappings within just a
few seconds.
Independence is the first product that is based on yellow tools’ innovative Advanced Instrument
Technology (A.I.T.). In combination with RF-HDD ultra fast streaming and the Auto-RamCleaner you will experience an unmatched performance: Unlimited layers and samples, unlimited
polyphony, unlimited insert effects and filters, unlimited custom channels (internal virtual channels)
and BUS channels... Independence manages all this simultaneously and automatically in the
background.
So you can care about the really important things - making music!
yellow tools INDEPENDENCE 1.0
Manual
11
Independence comes with a multipage user interface that contains any controls and parameters you
need for authentic instrument performances, available in clearly designed categories for an intuitive
and user-friendly workflow.
One of the most powerful features of Independence is the MODULES EDITOR, in particular
the Flexible Modifiers. They let you customize your sounds and instruments at will as you can
connect any source with any destination. Tempo-synchronized LFOs, the use of any external MIDI
controller, randomizers and flexible free envelopes - Independence offers anything you need to
modify your music. The ingenious structure of the modifiers and the perfect integration into the user
interface enable a quick, easy and unmatched workflow.
12
CHAPTER 1
Welcome
With Independence’s clearly arranged MAPPING EDITOR it has never been so easy to create your
custom mappings in just a few seconds. The sophisticated editing options and the amazing graphical
representation enable you to edit multi-velocity instruments with any kind of x-fades, fade-ins,
fade-outs and individual curves for each fade. To facilitate the process of creating mappings for your
sounds, Independence includes an unique Auto-Import feature:
Independence recognizes the name-structure of multiple samples that belong together and offers in
addition the following import options for the files: multi key mapping (for melodic instruments),
one key mapping (for percussive instruments), chromatic mapping (loops and FX), and the unique
yellow tools import for auto recognizing Sections and Alternates.
The visual display of the audio files contains next to the waveform and the file name also all
information on sample rate, bit rate, file type, length, number of frames and file size.One of the most
innovative features of the Mapping Editor is the unique “Auto Groove Recognition”. In the Audio
Editor you can switch to the „Slice“ mode at any time. Using the „sensitivity“ settings you can adjust
the automatic groove recognition for the selected loop. Furthermore the Slice Editor allows many
more flexible and intuitive editing options: Zoom, fixing amd moving slice markers, manual deletion
and adding of slice markers and finally the frame accurate movement and adjustment of all slice
markers. To get the best possible overview about your current settings and adjustments you can simply
click on a slice to play back only this one, so you can always check the results of your adjustments
immediately... as usual for Independence all this is possible in real-time!!! For the first time it is now
possible to slow down your audio loop in its original tune up to 60% without loss of quality!
yellow tools INDEPENDENCE 1.0
Manual
13
The PERFORMANCE MODE of Independence is the „humanizer“ for your sampled instruments.
With up to 32 different variations per sample (Section) any static sounding performance is a thing
of the past. The playback of the alternate steps can be at random or also assigned individually. It
is the unique sample and file management architecture of Independence that allows such realistic
performances that are far away from previous sample based instruments.
Thus the typical “machine gun” effect definitely is a thing of the past.
To make these instruments sound even more authentically, Independence also offers an amazing
Advanced Legato Mode. The legato parameters can be assigned to each Section individually to
achieve an unmatched simulation of the realistic behavior of an instrument played with legato.
Separate start, option and target values enable you to perfect your legato sequence on the keyboard
up and down.
To achieve even more spectacular results you can combine the Advanced Legato Mode with
Independence’s Tune Model. More than 50 different presets of arabic, turkish, indian, historic and
many more tunes for your instruments. Furthermore you can also create your own tunes and add
them to your preset list.
14
CHAPTER 1
Welcome
The professional built-in MIXER of Independence allows you to edit, mix and finish your
instrument projects completely independent from your host.
You can assign UNLIMITED BUS channels to your project. For your individual settings each Layer
channel contains 5 BUS sends (selectable as pre and post). Furthermore you can add an unlimited
number of „Custom“ channels (internal virtual channels) which let you customize the Sections of
each Layer. Thus you can create additional virtual channels for an easier and more comfortable
editing of your Layer.
Especially for the mixer it is very important to have fast access to your tracks, pure control and a
best possible overview of your channels.
All these features, the individual assignment of your channels in groups and the quick show/hide
overview turn this Independence feature by far into the most professional and most powerful plug-in
mixer.

yellow tools INDEPENDENCE 1.0
Manual
15
Installation & Product Activation
Installing Independence is very easy.
The package contains 1 Software Installation CD-ROM and 3 Sound Content DVDs, a printed
manual, the yellow tools authorization key (depending on the version you purchased) and the
registration card with your serial number and Activation Code (Depending on the version you
purchased). Please register Independence immediately at our website after you‘ve opened the
package. As a registered user you get exclusive access to the yellow tools user area where you will
get free software updates and many more add-ons for Independence.
On the software CD-ROM you will find the software installers for your OS. The Content DVDs 1,
2 and 3 contain the sound content of Independence. For technical reasons we could not include the
sound library into the software installer.
IMPORTANT: Before you install the software from the CD-ROM please check out the yellow tools
website for available updates of Independence. So you can be sure that you will
install the latest version.
Depending on the version of Independence you purchased you maybe first have to activate the
software on your yellow tools authorization before you can use it.
If you purchased a BOX version the yellow tools authorization key is included in delivery.
If you first have to activate the software on your yellow tools authorization key, please use the
„Activation Code“ that is printed on your registration card. You can activate Independence with
the yellow tools key manager software that has to get installed separately and is available on the
software CD-ROM.
Independence system requirements
To use Independence 1.0.0 you need a computer with at least the following specifications:
MAC OS X: • PowerMac G4 1GHz, 512MB RAM
• MAC OS 10.4 or higher
• 18GB free hard disk space, DVD drive
• free USB port for yellow tools authorization key
• recommended: PowerMac G5 1.8 GHz, 1GB RAM
WINDOWS: • Pentium/Athlon XP 1.4GHz, 512MB RAM
• Windows XP
• 18GB free hard disc space, DVD drive
• free USB port for yellow tools authorization key
• recommended: Pentium IV/Athlon XP 3GHz, 1GB RAM
Available Interfaces for Independence
Mac OS X: VST 2.0, RTAS, AudioUnits, standalone
Windows: VST 2.0, RTAS, DXi, standalone

16
CHAPTER 2
Installation & Activation
Installing Independence for Mac OS X
Insert the Independence Installation CD-ROM and double-click “independence installer”.
To continue with the installation please read the information and agree to the license agreement.
You can now select your destination directory for Independence - please keep in mind that also the
Independence Sound Content (up to 18GB) has to get copied to the destination you select.
Select „Easy Install“ to install all components of Independence or "custom install" to install only
selected components.

yellow tools INDEPENDENCE 1.0
Manual
The installer will create the folder „yellow tools Independence“ on your hard disk. The standalone
version gets installed into this folder. All other interfaces get installed automatically.
You can now register Independence online at www.yellowtools.com.
After the software installation was finished successfully please quit the application.
17
To install the Key Manager, open the Independence Software CD-ROM on your desktop again.
Open the „Key Manager“ folder and double-click the installer application.
The installation of Independence‘s sound library can last a few minutes as you are copying several
GB of sounds. The sound library comes on three DVDs. There is no installer for the sound content
since you only have to copy the folders from the DVDs into the „Independence Basic Path“ folder
on your hard disk. Please insert the Content DVD 1 and follow the instructions of the „readme“ file.

18
CHAPTER 2
Installation & Activation
Installing Independence for Windows XP
Insert the Independence Software CD-ROM and double-click the Independence Installer”.
Please read the upcoming information and agree to the license agreement to continue. You can now
select your destination directory for Independence - please keep in mind that also the Independence
Sound Content (up to 18GB) has to get copied to the destination you select.
Select „Typical“ to install all components of Independence or "Custom" to install only selected
components.

yellow tools INDEPENDENCE 1.0
Manual
19
The installer will create the folder „yellow tools Independence“ on your hard disk. The standalone
version gets installed into this folder. All other interfaces get installed automatically or you get asked
if there should be more than one option.
You can now choose if you want to register Independence online at www.yellowtools.com.
The yellow tools Key Manager and the sound library of Independence are not part of this installer
and have to get installed separately.
After the software installation was finished successfully please quit the application. You can
now install the sound library and/or the Key Manager. To install the Key Manager, open the
Independence Software CD-ROM on your desktop again. Open the „Key Manager“ folder and
double-click the installer application.
The installation of Independence‘s sound library can last a few minutes as you are copying several
GB of sounds. The sound library comes on three DVDs. There is no installer for the sound content
since you only have to copy the folders from the DVDs into the „Independence Basic Path“ folder
on your hard disk.
Please insert the Content DVD 1 and follow the instructions of the „readme“ file.
As soon as the installation of the sound library is finished, Independence is installed on your
computer with the options you selected.

20
CHAPTER 2
Installation & Activation
Yellow Tools Authorization Key
It is because we want to be able to offer you high-quality sound-libraries, fast and knowledgeable
support, as well as continuous development of our software and sounds that we have to protect our
products against illegal piracy. Because we don‘t want to overcharge the honest customer in order to
make up for our losses, we have decided to implement the flexible yellow tools Authorization Key.
Besides functioning as a copy protection device, the Key also has the following advantages for our
customers:
You can save all your yellow tools authorizations on one robust Key and take all of your instruments
with you to sessions, home, on the road etc.
With the Yellow Tools Key Manager software you can additionally program and update the Key.
This flexible Key management gives the you the freedom to put certain authorizations on certain
Keys, move your products between the Keys, activate new products on your Keys etc.
Here is how the Yellow Tools Authorization Key works:
The Authorization Key gets plugged into a free USB port on your computer. Every Key has its own
serial-number and is capable of saving plenty of authorizations.
The yellow tools Authorization Key is compatible with Mac OS 9, Mac OS X and Windows. As
soon as a product is activated on one Key it can be used on all three platforms.The Authorization
Key allows you to use the yellow tools products on as many computers as you want. All you have to
do is plug-in your Key, and you can start making music!
Because you can save multiple authorizations on one Key you only need one Key for all of our
products. If you already possess a Key you can keep adding new authorizations of new products
from yellow tools.
To give you full control over your Authorization Key we developed the Yellow Tools Key Manager.
This software is available as free preference panel in your System Preferences (Mac OS X) and as
standalone application (Windows XP) and enables you to exercise the following options:
• Status of the Key and updates:
You get a read out of all products currently available on your Keys. Should there be an update
for your Authorization Key software, you can update your Key immediately.
• Activation of additional products via entering an Activation Code:
If you have purchased a new yellow tools product that includes an Activation Code, you can
enter this code here and activate your new product on your Authorization Key.
• Moving of authorizations between multiple Keys:
If you own multiple Authorization Keys, you can move certain authorizations to the Key of
your choice. This way you have the ability to use our products with greater flexibility among
multiple work spaces.
• If you don‘t want to program your Key online, you can also program the Key manually.
Programming the Key online is not in any way connected to the computer where you are installing
our products; the Key can be managed on any MAC OS X or WINDOWS XP computer you might
have, providing it has a USB port, internet connection and you installed the Yellow Tools Key
Manager.
IMPORTANT: TAKE GOOD CARE OF YOUR KEY! A LOST KEY WILL NOT BE REPLACED.
ONLY DEFECTED KEYS WILL BE REPLACED BY YELLOW TOOLS AT NO COST.

yellow tools INDEPENDENCE 1.0
Manual
21
Yellow Tools Key Manager - Activating Independence
Depending on the version of Independence you purchased, maybe the product activation on your
Authorization Key is required before you can use it. This activation can be done with the yellow
tools Key Manager and is a very comfortable and simple process.
The Yellow Tools Key Manager gets installed together with the Independence software installation.
To start the Key Manager please open the preference pane (Mac OS X) or the standalone application
(Windows XP)
IMPORTANT: WHEN YOU MAKE USE OF THE ONLINE PRODUCT ACTIVATION OR
MOVEMENT, NEVER DISCONNECT YOUR AUTHORIZATION KEYS
DURING THIS PROCESS. YOU WILL ALWAYS GET A CONFIRMATION
MESSAGE WHEN THE PROCESS IS FINISHED!
2
3
6
1
4
5
7
11
8
9
10
12

22
CHAPTER 2
Installation & Activation
1
Key Pull-Down:
Pull-down menu that includes all currently connected Yellow Tools Authorization Keys.
The Key Manager always reads out the currently selected key. Any operation you may execute
will always affect the selected Authorization Key.
2
Product Column:
List of all products that are currently saved on the selected Yellow Tools Authorization Key.
3
Company Column:
List of manufacturers of the products.
4
Status Column:
Shows the current status of each product. At the moment there are four different status types:
• „activated“: The product is usable without any restrictions.
• „... starts left“: The product is connected with a counter. When expired the product can not be
used anymore.
• „expires in ... days“: The product is connected to an expiration date. When expired the
product can not be used anymore.
• „has expired“: The product has expired and can not be used anymore.
5
Product Activation (online connection required!):
In this area you can activate additional products on the selected Authorization Key. For any
activation you need an „Activation Code“. If the product you purchased first has to get
activated on your Authorization Key, you will find this Code on your registration card. The
Code is NOT the serial number of the product and contains five sections, each with six
characters.
To activate a product please first select the Authorization Key on which you want to activate
the product. Now enter the Activation Code and please pay attention to the upper and lower
case of the characters. Before you start the activation please make sure your Authorization
Key is still connected to your computer and your computer is connected to the internet.
Click the „Activate Product“ button afterwards to start the online activation. If the activation
was successful the following message will show up and the product will now be listed in your
„Product Column“:

23
6
Product Movement (online connection required!):
yellow tools INDEPENDENCE 1.0
Manual
If you have several Yellow Tools Authorization Keys you can here move your
products between these Keys at will.
This process is also very easy: First of all click on the product (in the product list)
you want to move. Then select the destination key on which you want to move
the product in the pull-down menu of the Product Movement area.
The pull-down will only include connected and valid Keys for this process. Before
you start the activation please make sure your Authorization Keys are still connected
to your computer and your computer is connected to the internet. Click the „Move
Product“ button afterwards to start the online product movement.
If the movement was successful the following message will show up:
Now the product is no longer available on the currently selected Key and thus was
deleted from the Product List. Select the Destination Key from the Key Pull-Down
menu and you will see that the product you moved is now available on this Key.
7
„Update Key“ button (online connection required!):
If there is an update for your Authorization Key available just click this button
to start the online update. Before you start the online update please make sure
your Authorization Key is still connected to your computer and your computer is
connected to the internet. The following message will show up when the update is
finished:

24
CHAPTER 2
Installation & Activation
Whenever a Key update is possible you first have to pass this update before you can
continue with any other online process. If the „Update Key“ option is not available
your key is up to date.
8
„Register Product“ button (online connection required!):
This button will launch your web browser and load the yellow tools website where
you can register your products.
9
„Options“ button:
If your computer should require any custom proxy settings for the online connection
of the Yellow Tools Key Manager you can enter these details in the „Options“ area.
If you are not sure about the required information please contact your system- or
network administrators.
The „Options“ window also contains the details of the currently installed version
of the Yellow Tools Key Manager. The application number refers to the software
version installed on your computer, the webservice number refers to the currently
used webservice version installed on the yellow tools webservers.
10
„Save Key File (RTC)“ button:
If you do not want to make use of the online programing options of the Yellow Tools
Key Manager you can also manage your Key manually. The first step for this process
is the read out of the Key information into a file. These files are so-called RTC
files and contain the file extension *.rtc. Then you have to send this file via email to
our support, we activate the product and send the file back to you.

yellow tools INDEPENDENCE 1.0
Manual
EXAMPLE: If you want to activate a product on your Authorization Key manually, you
25
have to create a RTC file of the Key on which you want to activate the
product and then send this RTC file via email to the yellow tools support.
Please always add the serial number and the Activation Code of the
product you want to activate to your email. Only if we receive all these
details we are able to activate the additional product on your Key. Our
support will send an email back to you. This email contains the activated
file for your Authorization Key.
To create this file please select the Key you want to read out from the Key pull-down
menu and click the „Save Key File (RTC) button. The Key Manager for Mac OS X
will always save RTC files directly onto your desktop. The Windows XP version will
save RTC files always into your local „Key Manager“ program folder. The name
of the RTC file is always the serial number of the selected Key.
If the Key was read out successfully, the following message will show up - of course
with a different user name (Mac OS X):
The file that was created on your desktop looks like this - the number depends on the
serial number of your Authorization Key:
Send this *.rtc file together with the other required product information to
„authorization@yellowtools.com.

26
CHAPTER 2
Installation & Activation
Please read number
for all further information about the transfer of the file you
11
receive from our support back to your Authorization Key.
11
„Load Key File (RTU)“ button:
The yellow tools support center can now activate your product using the received
RTC file. Edited RTC files get saved as so-called RTU files. These files contain the
updated information, in this case the product activation.
In short: You send a RTC file and get back a RTU file and save it at the same location
as your RTC file.
The RTU file you will receive has the same name as your RTC file, only the file
extension changed to *.rtu.
Save the RTU file from the email onto your desktop (Mac OS X) or into your local
„Key Manager“ program folder, start the Yellow Tools Key Manager again, select
the Key you‘ve created the RTC file from and click the „Load Key File (RTU)
button. The following message will show up and the product was activated on your
Authorization Key successfully.
12
„Refresh“ button:
Click this button to refresh the Key Manager if you connected/disconnected
Authorization Keys during your session.

yellow tools INDEPENDENCE 1.0
Manual
27
Architecture & Operation
Projects, Layer Sets, Layers, Alternates, Sections & Zones
To give you any option for a personal customization of your instruments Independence is based on
an very sophisticated architecture and file management - but still very easy and intuitively to use.
Even as you can start playing Independence‘s premium instruments right out of the box without
being concerned why it sounds that incredibly authentic, it is still important that you know and
understand the hierarchy and structure of instruments in Independence.
Zone
The smallest but of course most basic element is the Zone. One Zone can be a sample of a multisampled instrument as well as an audio loop. Zones are shown in the Mapping Editor as single
quads which you can move and edit at will. If you use Independence‘s „slicer“ in the Audio Editor
you can additionally divide a Zone into several Parts (most commonly used with the auto-grooverecognition feature for loops). Parts of a Zone are marked yellow in the waveform display.
If you have a multi-sampled instrument which contains several articulations for the same note you
can combine several Zones that belong together into Sections.
Section
Sections are a group of Zones and thus very useful elements to edit multiple Zones simultaneously.
The Independence core library uses Sections mainly to combine the different articulations, dynamics
or playing styles of an instrument into groups for easier editing. Sections get created in the Mapping
Editor of Independence. Simply select one or multiple Zones you want to combine to one Section
and enter a new name for this Section.
Alternate
If each note of an instrument was recorded in multiple articulations you will have one Section
for each articulation. For an easier and much faster editing, you can now group all these Sections
to one „Alternate“. So an Alternate enables you to edit the parameters of an entire group of
Sections simultaneously with simply one mouse click. Alternates are also the basic elements for
Independence‘s Performance Mode. Here you create a new Alternate and then assign any of the
available Sections to this Alternate to make your instruments sound incredibly real.
Layer
„Layer“ is the most important item of Independence and the basic element that contains ALL
settings of an instrument, including all Module, Mapping and Performance settings.
See chapter „User Interface & Basics“ on page 34 for all details about Layers.
Layer Set
Each Independence Layer Set can contain an unlimited number of Layers. Use the Layer Sets for
an easier management and customization of groups of instruments that have some basic settings in
common. See chapter „User Interface & Basics“ on page 33 for all details about Layer Sets.
Project
Projects contain ALL settings of the integrated Layer Sets, Layers, Alternates, Sections and Zones.
See chapter „User Interface & Basics“ on page 31 for all details about Project.

28
CHAPTER 3
Architecture & Operation
For a better understanding of Independence‘s architecture, here an example:
Your Independence Project compares well to your song. The project contains ALL instruments and
sounds you want to use in this song.
Thus a reasonable layout of your Layer Sets is the subdivision into groups of instruments that
belong together:
Layer Set A: Drums
Layer Set B: Percussion
Layer Set C: Basses
Layer Set D: Guitars
Layer Set E: Saxophones
Layer Set D: ...
The Layers of Layer Set E (saxophones) are:
Layer 1: Alto Saxophone
Layer 2: Soprano Saxophone
Layer 3: Baritone Saxophone mf+f
Layer 4: Tenor Saxophone classic mouthpiece
Layer 5: Tenor Saxophone metal mouthpiece
Layer 6: ...
Layer 3 (Baritone Saxophone mf+f) contains the following Alternates:
Alternate 1: long notes f
Alternate 2: long notes mf
Alternate 3: vibrato notes f
Alternate 4: vibrato notes mf
Alternate 5: short notes f
Alternate 6: ...
Alternate 2 (long notes mf) contains the following Sections:
Section 1: long notes mf - articulation 1
Section 2: long notes mf - articulation 2
Section 3: long notes mf - articulation 3
Section 4: long notes mf - articulation 4
Section 5: long notes mf - articulation 5
Section 6: ...
Each Section contains multiple Zones (samples) of the respective articulation.
In general you do not have to group Zones into Sections or Sections into Alternates. You can also
create Sections only for an easier editing. Layer 4 (Tenor Saxophone classic mouthpiece) in the
example could also include Sections that are not part of any Alternate, like a single Section for noteoff samples, a single Section for FX, etc.

yellow tools INDEPENDENCE 1.0
Manual
29
General Operation
The operation of Independence is extremely intuitively and user-friendly. There are some basic
control that we will explain in the following overview:
Input Fields
These are the most common operating controls of Independence. We deliberately decided not to use
many different control types for the basic operation of Independence. Only the Mixer and the Insert
FX contain rotary knobs and faders. All other parameters get adjusted by the input fields.
There are several ways to use the input fields:
1.) With the keyboard:
Double-click on an input field, enter a new value and press the return key to activate the new
value.
2.) With the mouse:
Click and hold the mouse button on an input field. Keep the mouse button pressed and move
upwards to increase the value or move downwards to decrease the value. Release the mouse
button when you reached the desired value. The faster you move the mouse the faster the
parameter value of the input field will change.
If you use the mouse for adjusting your values, you can additionally use the following
keyboard short cuts:
• For a better finetuning, press and hold the „shift“ key before you move up or down.
• To reset the input field to its „default“ value, press and hold the „command“ key (Mac OS X)
or the „ctrl“ key (Windows XP) and click on the respective input field.
As soon as you start editing the value of an input field (whether with the keyboard or with the
mouse), the area of this input field and the value itself get displayed inversely:
Pull-Down Menus
Independence‘s „pull-down“ menus are labeled with a little triangle icon in front of the parameter
name. You can click anywhere on the name or the triangle to open the pull-down menu.
Buttons
Most of the buttons of Independence are self-explanatory. Nevertheless there are some special
buttons we want to mention separately:
• „content“ button:
The different Working Areas of Independence contain a „content“ button in the upper
right corner. Use this button to switch the left Layer parameter area into the Content
Browser display for the selected Layer. The Content Browser gives you an immediate
overview and choice of all available Sections and Alternates of the selected Layer.
• „bypass“ buttons:
Many of Indepencence‘s features and parameters have additional „bypass“ buttons
which enable you to deactivate your changes and settings temporarily. Thus you can
better compare the effect of your new settings with the prior/original ones.

30
CHAPTER 4
User Interface & Basics
User Interface & Basics
The user interface of Independence is divided into the basic part on the left and the different
working areas on the right. The multipage structure allows you to switch between the multiple
working areas immediately. For an even better overview some working areas allow an additional
„Content“ view which enlarges the working area to the entire width of Independence and hides the
Layer details on the left as long as activated.
4
1
2
3
5
1: Project Area with global volume settings, pitch settings in semitones or Hertz, sync selection
and content search option.
2: Layer Set Area with custom volume settings, pitch settings in semitones or Hertz and selection
between 16 Layer Sets (from A to P)
3: Layer Area with individual settings for each Layer. The position of the Layers can get changed
by drag‘n‘drop. Priority option for immediate solo playback of one Layer.
4: Working Area Selection for immediate switching between the main working areas „Modules“,
„Mapping“, Performance“, „Mixer“, „Preferences“ and „Key Status“.
5: Working Area that always shows the settings of the selected Layer patch.

yellow tools INDEPENDENCE 1.0
Manual
Project Area
An Independence Project contains ALL settings of the integrated Layer Sets, Layers, Alternates,
Sections and Parts. So any changes of the available parameters in this area will finally affect all
instruments you loaded. We decided to use the word „Projects“ instead of session or song to avoid
any confusion with the naming of your sequencer software.
31
MIDI panic/bypass MIDI-IN iconProject pull-down
Project Notepad (Infofile)
Project name Content searcher
Project volume
Project levelmeter
Project pitch Project sync
With the drop-down menu you can load or save your Independence Projects. You can also save a
Project as “autoload” file! Independence will then always start with the entire content and settings
of your Project automatically. Simply save (replace) your Project as the file “Autoload.ytip” in the
“basics” folder of your Independence Basic Path.
The MIDI-IN icon shows incoming MIDI signals and thus the existing MIDI connection of
Independence. If Independence should not work correctly during your work, you can use the „MIDI
panic/bypass“ button to mute and reset all note-on MIDI signals immediately.
IMPORTANT: ALL Project parameters affect the entire Independence instance!
The volume value assign the general volume for the entire Project. The pitch parameter is available
in semitones and Hertz and assigns the basic tone pitch. This is very useful as you can switch to a
„443“ or „448“ Hertz tune immediately, for example. The value range for semitones is set to +/- 60
and the value range for Hertz between 380 and 500. You can switch between the two options with a
click on the drop-down. If you only want to change the tone pitch of single Layers and not the entire
Project please read the chapters „Layer Set Area“ or „Layer Area“ on the following pages.
The sync parameter also offers two options: If you use Independence as plug-in in your sequencer
software an automatic synchronization connection gets established to guarantee the unobstructed
synchronization with your host. You will notice that always you change the tempo of your sequencer
software also the tempo in Independence will change to the same value accordingly.
Of course you can also select your custom tempo that is not connected to the tempo of your host at
any time even you are using Independence as plug-in. Click the „sync“ button and the mode will
switch to „tempo“. Now you can enter a custom value or use the mouse to adjust the value.
IMPORTANT: If you use Independence in the standalone mode and you want to use multiple
Modules or Insert Effects and Filters which need a tempo specification you have
to enter this value into the Project tempo display!

32
CHAPTER 4
User Interface & Basics
Since the size of your custom Projects, Layer Sets and Layers archive will grow continuously, the
internal Content Searcher of Independence will always help you to find exactly the Instruments you
are looking for - immediately and user-friendly. Click on the lens icon and the input field appears.
Now enter a search key (drums, for example)...
... and press the „return“ key to start the search function.
Now only the Projects, Layer Sets and Layers get listed in the appropriate pull-down menus which
exactly match to your search key. To disable the Content Searcher please click on the „X“ icon on
the right side of the input field and the Project, Layer Set and Layer pull-down menus will show
their original structure again.
The Project Notepad (infofile) is a small but nice feature. To save some custom details of your
Project (like creation date, modification date, in which session you use the project, etc.) click on
the „i“ icon and the notepad (infofile) will show up in the working area. Now enter your custom
information and click the „i“ icon again to close the notepad (infofile) and revert to your prior
screen.
IMPORTANT: If you do not use Independence as plug-in but in the standalone mode you always
have to save your Project before you close Independence. Otherwise all your
unsaved changes of the Layers get lost. Of course we included a warning dialog
to avoid accidental quitting.
In plug-in mode all your changes and settings get also saved in your session/song
of your sequencer software.

yellow tools INDEPENDENCE 1.0
Manual
Layer Set Area
Each Independence Layer Set can contain an unlimited number of Layers. Use the Layer Sets for
an easier management and customization of groups of instruments that have some basic settings in
common (e.g. A-Drums, B-Percussion, C-Basses, D-Guitars,...), since all settings in this area will
affect all Layers that are part of this Layer Set. At the moment Independence can manage up to 16
different Layer Sets - from „A“ to „P“.
33
Layer Set pull-down
Layer Set Notepad (Infofile)
Layer Set name Layer Set Selection
Layer Set volume
Layer Set pitch
With the drop-down menu you can load, save, delete, etc. your Independence Layer Sets. When
loading a Layer Set, the message „Locating Audio/Image files. Please be patient“ shows up in the
working area of Independence. After the loading process is finished the working area contains the
„Modules“ page and the name of your Layer Set gets displayed below the pull-down menu.
Depending on the Layer Set you‘ve loaded the Layer section now contains multiple Layer patches
which you can play immediately with your keyboard or other MIDI controller. You can switch
between the Layer patches with the mouse or also with the „key switch“ feature (-> page 48).
IMPORTANT: The Layer Set parameters apply to ALL Layers that are part of the selected
Layer Set!
The volume value assign the general volume for the entire Layer Set. The pitch parameter is
available in semitones and Hertz and assigns the tone pitch for the selected Layer Set. Like in the
Project Area this is very useful as you can now assign different tone pitches to your Layer Sets
immediately, but it will only affect the Layers that are part of this Layer Set and not all Layers of
the entire Project. The value range for semitones is also set to +/- 60 and the value range for Hertz
between 380 and 500.
The Layer Set Selection contains 16 letters - from „A“ to „P“. Each Layer Set can contain an
unlimited number of Layers. You can switch between the Layer Sets with a click on the wanted
letter. The currently selected Layer Set is displayed with the inverse letter and also shows this letter
before the name of the Layer Set.
As soon as a Layer Set contains one or multiple Layers, a black border gets added to the respective
Layer Set. Thus you will always have the overview used of Layer Sets.
Like the Project Area also the Layer Set area contains the useful notepad (infofile) editor. Use this
feature to take some notes for your Layer Sets.

34
CHAPTER 4
User Interface & Basics
Layer Area
„Layer“ is the most important item of Independence and the basic element that contains ALL
settings of an instrument inclusive any Module, Mapping and Performance settings!!!
As the Layers contain the sounds and instruments of Independence, this area finally offers the most
detailed setting options.
All settings on the left side of the Layer list always affect the selected Layer (marked in blue). If you
switch between the loaded Layers also the setting values will switch accordingly.
Layer pull-down
add/remove Layer
Layer Priority
Layer Notepad
(Infofile)
Basic Settings
MIDI Settings
Layer list
Dynamic Settings
Polyphony Settings
There are two different options to load a Layer:
For immediate loading use the Layer pull-down menu that shows all available Independence Layers.
The Layer you select gets loaded as new Layer into the Layer list.
The second option: Use the „+“ icon in the upper right corner to add a new empty Layer (the „-“
icon removes the selected Layer from the Layer list). Now click on the empty Layer you‘ve just
loaded and a second pull-down menu shows up. Beside the standard parameters like load, save,
delete, etc., this pull-down menu also contains the list of all available Independence Layers. The
Layer you select gets loaded into the Layer for which you opened the pull-down menu.

yellow tools INDEPENDENCE 1.0
Manual
35
When loading a Layer, the message „Locating Audio/Image files. Please be patient“ shows up in the
working area of Independence. After the loading process is finished the working area contains the
„Modules“ page and the name of your Layer switches from „New Layer“ into the name of the Layer
you‘ve loaded.
Depending on the Layer you‘ve loaded you can start playing the Layer with your keyboard or other
MIDI controller immediately. Some Layers maybe include already prepared controller features like
„key switch“ (-> page 46) or other controller commands.
IMPORTANT: If you load a Layer using the Layer pull-down menu, Independence will
automatically create a new Layer. If you add a new empty Layer and use the
Layer internal pull-down menu you will load the instrument into the currently
selected Layer.
So: Use the Layer pull-down menu to create a NEW Layer for the selected
instrument and use the Layer internal pull-down menu to REPLACE the currently
selected Layer.

36
CHAPTER 4
User Interface & Basics
Next to the Layer name there are two small arrows that allow fast switching between the available
Layers:
The direction corresponds to the structure of your Layer patches in the Layer pull-down menu, so if
you click the arrow that points upstairs, the current Layer gets replaced with the next Layer ABOVE
the currently loaded Layer in the Layer pull-down menu. The arrow that points downstairs works the
other way around: the current Layer gets replaced with the next Layer BELOW the currently loaded
Layer in the Layer pull-down menu.
As soon as you change any of the editing parameters of the Layer and then click an arrow to switch
to the next Layer, a warning message will show up to avoid the accidental loss of your unsaved
changes.
IMPORTANT: When you switch between Layers with the arrows, your MIDI input channels
get retained to enable continuous playing.
Next to the switch arrows there is a little but very useful level meter that shows the current volume
of the Layer, so you do not always have to switch to the Mixer page.
To delete one or multiple Layers simultaneously press and hold the „shift“ key, click on the Layers
you want to delete and click the „-“ icon afterwards. A warning message will show up to avoid the
accidental deletion of your Layers.
Like the Project Area and the Layer Set area also each Layer contains the useful notepad (infofile)
editor. Use this feature to take some notes for your Layers or visit the author website.

yellow tools INDEPENDENCE 1.0
Manual
37
To „mute“ a Layer, press and hold the „alt“ key and click on the desired Layer you want to mute.
The color of the Layer name switches from light blue to dark blue and thus the „mute“ status also
gets displayed graphically.
The Layer Priority button „p“ is a kind of enhanced „Solo“ button.
This feature will help you to avoid the permanent selection and deselection of different Layers in
order to achieve different „solo“ settings.
Select one Layer (or press and hold the „shift“ key to select multiple Layers) and click the „p“
icon. The background color of the selected Layer(s) switches from light blue to orange and thus the
„priority“ status also gets displayed graphically. Now just the orange colored Layers are audible. As
long as the priority option is activated you can add and remove Layers with the held „shift“ key and
your mouse or also select a new Layer. To disable the priority function please click on the „p“ icon
again and all Layers get restored to their standard color and basic status.
As already indicated above, Independence generally shows the status of a Layer in different colors.
• active Layer: light blue Layer name
• selected Layer: light blue background
• priority Layer: orange background
• muted Layer: dark blue Layer name
• keys witch Layer: orange Layer name
Here are some examples how the Layers can look like:
- active Layer
- active and selected Layer
- active Layer
- muted Layer
- active Layer with key switch
- active Layer
- active Layer
- active and selected Layer
- muted and selected Layer
- active and selected Layer with key switch
- active Layer (but muted)
- active „priority“ Layer
- active Layer (but muted)
- muted Layer
- active Layer (but muted)
You can easily change the order of the Layers per drag‘n‘drop. Click on the Layer number and drag
it to the desired position.

38
CHAPTER 4
User Interface & Basics
MIDI Programs
The MIDI programs feature can be used as powerful remote control for Independence and all
included Layers.
If you are used to work with multiple computers you can install Independence on a separate
computer without connected monitor, for example, and control it with your host application on
another computer. To switch between different Layers you do not even have to touch Independence
on the second computer: you can easily and comfortable switch simply with the “program change”
option of your host application.
Another advantage of this feature is the compatibility to MIDI files (format 1):
As soon as you load a MIDI file that includes a “program change” number into your hardware or
software sequencer, Independence will load the corresponding Layer patch automatically!
Finally “MIDI Programs” turns Independence into a powerful workstation for live performances:
You can switch between the currently loaded Layer patches directly with your MIDI keyboard
without any additional loading time (precaching activated!).
To save a Layer patch as a MIDI program you first have to load the desired Layer patch into
Independence. After the Layer was loaded please open the Layer internal pull-down menu (click on
the Layer name) and select the option “save layer as midi program”:
Now a new window comes up where you can enter the following information:
• Layer Name: Enter a name for the MIDI program patch.
• Bank Number: Enter the number of the MIDI bank in witch you want to save the Layer.
If the bank number you enter does not exist yet, Independence will create a
new bank accordingly.
• Program Number: Enter the number of the MIDI program. This is finally the “remote ID”
of the Layer. As soon as your MIDI keyboard or hardware/software host sends
this number to Independence, the Layer gets loaded and activated.

yellow tools INDEPENDENCE 1.0
Manual
39
Of course you can also load the Layers with the “midi programs” option in the Layer pull-down
menu. Use this menu also for an overview of all your existing banks and MIDI programs.
Independence can manage up to 16,383 different banks. Each bank can contain up to 128 different
MIDI programs, from 0 to 127 - so a maximum of more than 2,000,000 assignable MIDI programs!
Pre-cache
Independence is a sample-based workstation. So you have to keep in mind that Independence has
to manage several gigs of audio files simultaneously. This causes continous loading and unloading
processes - which finally take time...
To accelerate this process and thus your work, we integrated a powerful “pre-cache” option.
All Layers that are part of the pre-cache option you select, get pre-loaded into Independence and are
available immediately when you activate them - without any additional loading time.
“Pre-cache” is extremely usable for any kind of live perfomance with Independence: Simply select
your pre-cache option and you can witch between several gigabyte large instruments immediately!
IMPORTANT: The usability of the ”Pre-cache” feature does not depend on the power of your
computer. It does NOT use additonal RAM like streaming or other resources of
your computer when activated!

40
CHAPTER 4
User Interface & Basics
Auto-Mapping-Import
Beside the massive core library of 18GB and the compatibility to all yellow tools Modular Virtual
Instruments and upcoming premium yellow tools sound libraries, Independence also offers a unique
Auto-Mapping-Import option for AIFF and WAV files, so you also can use your own samples and
sampling libraries in Independence.
The „Audio File Browser“ (refer to chapter „Mapping“, page 86) allows the import of audio files
directly from the Independence user interface. Additionally you can also use the „import audio files“
option from the Layer pull-down menu.
You can import single or multiple samples and map them automatically to your keyboard in 2 simple
steps: First select the audio files you want to import and then choose the mapping structure.
The condition precedent to the Auto-Mapping-Import is a uniform naming structure of the audio
files you want to import and map. These structure depends on the mapping type and is explained
on the following pages. To start the Auto-Mapping-Import, click on a Layer to open the pull-down
menu and select „import audio files“. Now select one or multiple audio files you want to import and
click on the „open“ button to continue.
After the selection of the audio files the following window shows up:
The Auto-Mapping-Import offers the following four different mapping structures:

yellow tools INDEPENDENCE 1.0
Manual
X-Y-Z Mapping
This mapping option will import and map entire instruments including multiple velocities per
note and recognizes any available Sections/Alternates. All information regarding the mapping are
included in the filename. A valid name could be: „Concert Guitar XC2 Y04 Z02“.
The „X“ assigns the key on your keyboard or other MIDI controller, the „Y“ assigns the velocity
zoning and the „Z“ assigns the Section/Alternate for the audio file.
The information included in the audio file of our example:
XC2 = the audio file gets mapped on „C2“
Y04 = the audio file gets mapped as fourth velocity split on C2
Z02 = the audio file is part of the second Section/Alternate
Normally the last velocity (e.g. Y12) is the loudest audio file. Nevertheless you can click the
checkbox „first velocity is the loudest“ in case this should apply to your import. If you also want
to create one Section/Alternate even for each individual velocity, simply click the appropriate
checkbox.
41
Multi Key Mapping
This mapping option is the most typical for the import of other sampling libraries.
In most cases the file names of sampling libraries already contain the key/note. Thus this mapping
option looks at a „note“ assignment at the end of the filename, like „C2“, „D#4“, etc.
The Multi Key Mapping can import multiple audio files of the same note (e.g. long notes and slides
of each note) and will always assign the full dynamic range (velocity 0 to 127) to each of them.
Thus they get mapped on the same key and overlap. In this case you can select „create Sections
automatically“. After the import you can finetune the mapping by editing the individual Sections
- assign different velocity ranges for each section, for example.

42
CHAPTER 4
User Interface & Basics
Chromatic Mapping
This mapping option is recommended for the import of audio loops or FX samples.
All selected audio files get mapped successively, starting at the assigned key note. The velocity
range for each audio file is always 0 to 127. If you additionally want to create one Section for each
key, simply click the appropriate checkbox.
One Key Mapping
This mapping option is recommended for the import of sounds „key by key“ and enables you to
import multiple audio files that are separated by their velocity splits per note - mostly drums or
percussive instruments. Thus this mapping option „looks“ at a „velocity“ assignment at the end of
the filename, like „02“, „15“, etc.
As already mentioned, normally the last velocity (e.g. 12) is the loudest audio file. Nevertheless you
can click the checkbox „first velocity is the loudest“ in case this should apply to your import. If you
additionally want to create one Section for each key, simply click the appropriate checkbox.
TIP : Beside the Auto-Mapping-Importer there is also the „Independence Edition“ of the sampler
disc and file format converter „Translator“. With this software from Chicken Systems you
can convert other hardware and software sampler formats to the Independence format.
For immediate access and best possible overview, the most important Layer editing parameters are
available on the left side of the Layer list. These parameters are classified into five main categories.
These are:

yellow tools INDEPENDENCE 1.0
Manual
Basic Settings
Here you can assign the volume, panorama and pitch settings for the selected Layer.
Use the “MA” (MIDI Automation) buttons to activate the default MIDI automation for “volume”
and “panorama”.
Read Model
43
The Read Model is a very important feature and allows you to switch between RAM (RF-RAM)
and hard disk (RF-HDD) as memory for all loaded sound samples. The yellow tools RF-HDD
technology enables you to load and play instruments completely independent from their physical
size - even if this size is bigger than your available RAM. Only a small part of the beginning of each
required audio file gets loaded into RAM and the rest remains on the hard disk. The entire audio
file only gets reloaded if required. This is a very complex technology which allows an enormous
performance and a so far unreached loading rate. You can adjust the parameters of the Read Model
in Independence‘s preferences (-> see „Preferences“ chapter on page 120). To switch between the
two read models please click on the pull-down menu and select your preferred model.
Next to the read models you can also activate and reset the Auto-RAM-Cleaner. This feature allows
a very special optimization of the performance of your computer resources.
In practice it often happens that many Zones of a loaded instrument remain unused and thus only
require unnecessarily RAM. At this point Independence‘s Auto-Ram-Cleaner becomes active:
When you finished the editing of a Layer, simply click on the read model pull-down menu and select
one of the following options:
A: If you activate the Auto-Ram-Cleaner, Independence automatically unloads all unused sound
samples of the Layer, so only the sounds you used remain in the memory. To activate the
Auto-Ram-Cleaner simply click this option again.
B: To give you still the flexibility of any subsequent editing you can reset the Auto-Ram-Cleaner at
any time and all sound samples of the Layer get reloaded.
If the Auto-Ram-Cleaner is active, the number of the respective Layer gets shaded.

44
CHAPTER 4
User Interface & Basics
TIP 1: If you only want to add a few additional Zones, deactivate the Auto-Ram-Cleaner shortly
and play back your song again in your sequencer software or play with your MIDI
keyboard only the additional Zones. Afterwards activate the Auto-Ram-Cleaner again.
TIP 2: If you switch to the Mapping page afterwards you will notice that only the used Zones
are visible and all unused Zones got unloaded. If you still want to make the unloaded
Zones visible please click on the „select“ pull-down menu of the Mapping Editor, click
on „edit preferences“ and select „show cleaned up zones“. Now also the unloaded
Zones are visible, but marked in red.
Tune Model
The Tune Model pull-down menu is a very unique feature of Independence. Different culture very
often have different tunes for their instruments. To give you the flexibility to adjust any instrument
to any tune model Independence already offers more than 50 different models for Arabic, Historic,
Indian, Chinese and Turkish tunes. Of course you can also create your own, custom tune models. If
you select „edit“ from the drop-down menu the left working area of Independence switches to the
Tune Model page.
Now the Tune Model Editor will show up in the working area and contains the basic tune models
on the left and the alternative tune models (muted by default) on the right side. You can select the
root key for the tune model in the appropriate pull-down menu in the upper left corner. The order of
your keys will change accordingly. Use the „active keys“ input field to adjust the range of your tune
model. All keys beyond this range still get displayed but muted (displayed in darker blue). If you
want to assign different tunes that depend on the playing direction, simply deactivate the „bypass“
button for the alternative tune model and select the preferred playing direction for the alternative
tune model in the upper pull-down menu. Use the „reset“ button in the upper right corner to reset the
tune model to its default values.

yellow tools INDEPENDENCE 1.0
Manual
45
If you want to save your custom tune model, click on the „select“ pull-down and select „save as“. To
exit the Tune Model Editor, click on the „exit“ option in the pull-down menu.

46
CHAPTER 4
User Interface & Basics
Use the Output pull-down menu to assign if the selected Layer gets displayed as MONO, STEREO
or SURROUND (incl. all surround formats) channel in the Independence Mixer. The output
channels get assigned in the Mixer area. For the support of Surround Channels, the „Independence
Pro Surround Extension“ is required.
MIDI Basics Settings
In the MIDI input pull-down menu you can assign the MIDI input channel for the selected Layer.
Use the “PC” (Program Change) button to activate/deactivate the program change feature.
The transpose parameter accepts values from -60 semitones to +60 semitones to adjust the Layer
position to your keyboard. Hold via controller assigns on which controller number your keyboard
should react to the pressed sustain pedal. You can manage up to 127 different and freely assignable
MIDI controllers for each Layer. The default value is set to #64.
MIDI Extended Settings

yellow tools INDEPENDENCE 1.0
Manual
47
Use key range to adjust the range of incoming notes that the selected Layer is allowed to receive.
This way you can adjust the playable area of the Layer on the keyboard since all notes outside this
range get ignored.
Vel range (velocity range) allows you to limit the playability of the sound via the velocity of the
notes. The sample will only get played if the velocity of the Note-On MIDI message is in the range
that was defined in the vel range section. Thus you can limit the Layer patch vertically.
This feature is very useful when combining and playing multiple Layers.
EXAMPLE: You want to create a custom Alto-Saxophone Multi with the playing styles “mezzo-
forte” and “falls”. In the first Layer you load the Alto-Sax mezzo-forte and limit
the Vel Range from “0-120”. In the second Layer you load the Alto-Sax falls and
enter the Vel Range “121-127”. Now you can play a mezzo-forte Alto-Sax in the
range 0-120 and above the velocity 121 you play the appropriate falls.
With scale you can adjust how the dynamic range of the falls in Layer 2 scales inside its newly
defined velocity range. In the example mentioned before, the falls will only be played with velocities
121 to 127. Scale allows you to play the falls with its full dynamic range from 0 to 127. Scaling the
vertical range this way is very useful when the new range is very small, but you still need a great
dynamic range in it. Additionally you can choose between an “active” (act.) or a “passive” (pas.)
status for the scale you assigned.
The “active” status for the second Layer means, that although you assigned the range from 121 to
127 velocities, the Layer gets played with a volume level that corresponds to its full volume range as
if it was mapped from 0 - 127. So you will also get the volume level of 121 to 127 for this range.
So the two different Layers get an optimum fade for their points of contact.
The “passive” status will play back the sounds of the second Layer in its full volume range, from 0
to 127 - and thus fade in.
If you want to give your performance more human touch you can add a MIDI delay in milliseconds
to your instruments. This is very useful if you have several percussion Layers, for example, and you
do not want to play them all “on the spot” - what is completely impossible for live performances.
Dynamic Range Settings
All Notes are mapped to a volume level that is derived from their velocities. This sets the basic
volume of a tone. The range limit parameter enables you to adjust the dynamic range of the
instrument in dB. Additionally you can adjust the curve of the range limit.
Some keyboards or other MIDI controllers can only send very low or very high velocities if you
press them very gently or very hard. Midi curve allows you to compensate your MIDI controllers

48
CHAPTER 4
User Interface & Basics
behavior and adjust it so it fits the instrument.
Use the key switch pull-down menu to assign activator-notes to a Layer. Playing this note activates
all sounds and unmutes their MIDI-input, while all other sounds with nonmatching activator-notes
are MIDI-muted. It’s basically a ”remote-control” for the MIDI-mute switches. This feature is very
useful for fast and flexible linking of different Layer patches that you want to use in a session.
Next to the standard selection of a note that assigns a key switch we also included a “learn” function
that helps for an easier assignment of the key switch note. Click on the key switch pull-down menu
and the following list shows up:
Select the “learn” option and press the desired note on your keyboard (or other MIDI controller)
afterwards. Now this note is your key switch note for the selected Layer and it is also shown in the
key switch display accordingly.
IMPORTANT: For a better overview all names of Layers that include a key switch note are
displayed in orange.
TIP: If you want to deactivate a key switch temporarily, use the on/off button. This way your
assigned key switch note gets obtained and not lost .

yellow tools INDEPENDENCE 1.0
Manual
49
Polyphony Settings
The performance of your instruments can be optimized by setting the maximum allowed voices
here. There is always an internal limit - due to the power of your computer - that you can never
cross. Nevertheless Independence has NO internal limitation (no limit) of played keys per Layer or
played keys in general, but each value underneath this ”physical” limit can be specified as a new
limit for the Layers or the key. Should you ever cross this ”soft” limit when playing the instrument,
then Independence will terminate the oldest note with the specified release time. You’ll be able to
hear more notes than you specified in the limit, but only until the old note finishes its release and is
switched off.
To adjust Independence best possible to the power of your computer you can here set the maximum
number of keys per layer incl. the layer release time that is used to fade out old notes that are
switched off by the keys per layer limit.
Independence does not only offer a ”horizontal” limit, but also a ”vertical” polyphony limit per key,
meaning that you can save even more CPU power. This feature also helps you emulate the
behavior of a live played instrument since it removes notes that would sum up in an unrealistic
manner. As an example, when playing a Sourdo you won’t be able to hear the first beat anymore
after playing the fourth one. Independence enables you to adjust exactly this behavior via the limit
per key feature - also including the adjustment of the key release time.
Independence has NO internal limitation of played keys per Layer or played keys in general.
Below the key release parameter is the played keys display. It shows the overview about your
currently played keys on your keyboard or the incoming MIDI notes from your sequencer software.
Some more details about the key polyphony: We have integrated this new way of computation
for a substantial improvement for the user: Independent from how you maybe want to adjust your
polyphony settings to save CPU power, for example, you never have to worry about if your Layers
are mono, stereo or surround - or even which surround format, but you just have to enter a value to
assign the maximum allowed number of simultaneously played keys.
Possible Confusion: If you load a stereo Layer patch and press and hold 5 keys simultaneously
afterwards, the „played keys“ display will show only the value „5“ - your currently played keys. In
fact at this moment ten voices get played internally (five times two channels!). If we talk about a 5.1
surround Layer patch this internal number of played voices even triples!
This way it may happen that your computer gets enormously stressed by a big session, although just
500 incoming notes from your host get displayed, for example. In fact this means 1,500 channels if
this is an internal surround 5.1 format. If there are furthermore some Zones in the Mapping Editor
which overlap - with an x-fade between two Zones, for example - the effective number of internal

50
CHAPTER 5
Modules
Modules
Next to the standard parameters you will notice at first sight, Independence‘s Modules page contains
many worldwide unique and sophisticated features!
This page is subdivided into two main parts that allow a fast and intuitive workflow: The Module
Editor in the upper part and the Flexible Modifier Editor in the lower part.
Depending on the Layer patch you load maybe not all parameters/input fields will be visible from
the beginning and it is also possible that your content browser will show more or less Sections or
Alternates.
For a better understanding of the following explanations please load the Layer „Acoustic Guitar
Chords“ from the Independence Core Library.
IMPORTANT: ALL parameters of this page beside Polyphony Range and Outputs get fully
automated with internal modifiers, internal modules, any kind of external MIDI
controllers, or directly with your sequencer software. All details about
automation are explained in this chapter on page 64.

yellow tools INDEPENDENCE 1.0
Manual
51
The upper „select“ pull-down menu allows you an immediate switch between your available
Sections/Alternates of the Layer and your entire Layer. So you easily can edit settings that only
affect parts of your Layer or also edit the settings for the complete Layer.
The „select“ pull-down menu is designed very clearly and also enables you to select/deselect the
available Sections or Alternates in groups. To select a group, click on the pull-down menu, choose
the desired selection and release the mouse button afterwards.
IMPORTANT: After you have selected one or multiple Layers, Sections or Alternates, ALL
available editing parameters on the Module page will exclusively affect this
selection! This kind of subdivision of the editing parameters allows the most
accurate and most detailed possibilities for manipulation and editing.
For a better overview of the available Sections and Alternates you can open the user-friendly
„Content Browser“ in addition. Click on the „content“ button in the upper right corner of the
Modules page and the Content Browser will open on the left side and overlap the Layer list and
the Layer parameters. Beside the selection of one or multiple Sections/Alternates (press and hold
the „shift“ key for multiple selection) for faster editing, this browser also shows additional and
important information of each available Section and Alternate, like used key switches with „(C#0)“,
used insert effect with „i“, used modifiers with „m“, etc.

52
CHAPTER 5
Modules
Module Editor
Beside the standard and self-explanatory editing parameters like volume, panorama, pitch and delay
you additionally have the possibility to assign a very custom polyphony limitation that will only
affect your selected Sections or Alternates.
EXAMPLE: To achieve the so-called „hihat effect“ with a self created drum kit, select your
hihat Section in the „select“ pull-down menu or the Content Browser.
Enter the value „1“ into the input filed „key/sel.“ (keys per selection). Now play
the hihat Zones on your keyboard (or another MIDI controller) and you will
notice that always when you play a new note the prior one gets interrupted.
In addition you can assign the fade-out time for the prior note with the „sel. rel.“
(selection release) parameter.
Output Settings
The Output Settings are located on the right side of the first parameter bar. Here you can
immediately route your existing selections to so-called „Custom Channels“ (internal virtual
channels) or assign them to existing or new BUS Channels.
Independence can manage an unlimited number of Custom Channels. These channels enables you to
subdivide a Layer into multiple internal add-on channels which you then can edit individually with
additional modifiers or insert filter and effects.
IMPORTANT: Currently it is not possible to route a Layer directly to a Custom Channel. You
can only route one or multiple Sections and Alternates of a Layer!
Now select one or multiple Sections or Alternates in the „select“ pull-down menu or the Content
Browser. Afterwards an additional pull-down menu beyond the output headline gets displayed.

yellow tools INDEPENDENCE 1.0
Manual
53
This pull-down menu contains a list where you can select the desired Custom Channel for your
selection.
TIP: You can route your Sections or Alternates to a certain new or already existing Custom
Channel, or even each Section/Alternate to a separate Custom Channel to execute
any further editing much clearer.
Right beside the output headline you will find two additional Bus send pull-down menus. Here you
can immediately assign your selection to an existing or new BUS - of course you can also manage
this assignment in the Independence Mixer.
To create a new BUS channel click on the pull-down menu beside the output headline:
Select the type of BUS channel, like Mono, Stereo or Surround BUS (to create a surround BUS
channel the Independence Pro Surround Extension is required). Of course you can also select an
already existing BUS channel.
IMPORTANT: Independence allows an unlimited number of BUS channels!
The „pre“ and „post“ options in the pull-down menu assign, if a signal gets routed with its original
volume settings (PRE) or including the current value of the volume parameter and thus changes the
volume of the existing BUS channel accordingly (POST).
If you assign the BUS channel for the first time, always the POST option is selected automatically.
Of course you can change this setting at any time.
TIP: You can also bypass the BUS channels by clicking the desired BUS SEND with the held
„alt“ key.

54
CHAPTER 5
Modules
The left part below the basic parameters of the Module Editor contains the Layer internal key
switch, the playing direction feature, the filter section and the „skip“ feature.
Layer internal key switch
Beside the main key switch function in the Layer Set Area Independence also offers an additional
Layer internal key switch that enables you to switch even between your Sections and Alternates of
a Layer immediately - without affecting the main key switch of the Layer! This way you can switch
between multiple e-bass Layers with the Layer key switch, for example, and simultaneously switch
inside the Layer between the different playing techniques, like long notes, vibrato notes, tappings,
8th notes, slides, etc. - provided that these playing techniques exist as individual Sections/Alternates.
To create an internal key switch select one or multiple Sections or Alternates in the „select“ pulldown menu or the Content Browser. Assign the desired key switch note to your selection afterwards.
Next to the standard selection of a note that assigns a key switch we also included a “learn” function
that helps for an easier assignment of the key switch note. Click on the key switch pull-down menu
and the following list shows up:
Select the “learn” option and press the desired note on your keyboard (or other MIDI controller)
afterwards. Now this note is your key switch note for the selected Layer and it is also shown in the
key switch display accordingly.
Use the „bypass“ button to deactivate the key switch function temporarily.

yellow tools INDEPENDENCE 1.0
Manual
55
Playing Direction
The playing direction feature lets you assign the playback of a Section or Alternate depending on the
playing direction on your keyboard.
• Upwards & Downwards: The selected Section/Alternate always gets played.
• Upwards: The selected Section/Alternate only gets played, if the next coming note is above the
prior one.
• Downwards: The selected Section/Alternate only gets played, if the next coming note is below the
prior one.
This feature combined with the Tune Model lets you individually assign which note should create an
additional tune and when the note should do it.
Additionally you can use „playing direction“ to assign a duplication of notes to your keyboard.
Filters
Meanwhile filters is a very common item and their function needn‘t get explained more detailed.
Nevertheless the Independence filters has been extended by some additional features. To activate the
filters please click on the „bypass“ button to the left of the filter headline and click on the pull-down
menu to select a filter with its properties:
Among the pristine sound you can use the spot inside the 2D panel to edit both parameters,
frequency cutoff and resonance, simultaneously. This is very useful in practice but of course you can
also edit both parameters individually in their input fields.
The special feature of this filter section is the „absolute“ function. Here an example what it does:
If you activate filters for an entire Layer patch, the settings will always affect all included Sections
and Alternates. Additionally to these general settings you can select one or multiple Sections or
Alternates and assign custom frequency cutoff and resonance values exclusively to this selection.
Independence will then „add“ these individual values to the general values of the entire Layer and
recalculate new values internally (relative).
If you, on the other hand, want to „separate“ your current selection from the general Layer filter
settings and assign individual filter types and settings to your selected Sections or Alternates, click
the „abs.“ button. Now the general Layer filter setting get ignored for your entire selection.

56
CHAPTER 5
Modules
EXAMPLE: A Layer patch with 2 Sections is selected and the filter section is activated. The
current resonance value is „40%“. You now select the first Section and set the
resonance value for this Section to „75%“. As the „abs.“ button is not active, the
general Layer filter settings get included and the “40%” now get calculated as
a “100%” range. Thus the recalculated resonance value for the first Section will
be 70% and for the rest of the Layer the value will be 40%.
When you activate the „abs.“ button for the first Section, the general Layer filter
settings get ignored and the resonance value for the first Section now will be 75%,
for the rest of the Layer it will be 40%.
To deactivate the „filter section“ please use the „bypass“ button to the left of the filter headline.
If you want to assign a dynamic filter performance to your selection, whether by external controllers
like velocity, modwheel, MIDI/host automation, etc., or by internal modules like Free Envelope,
Step Modulator, AHDSR Curve, etc., please refer to page 63.
Skip
Skip is a very simple but also a very useful feature.
The general play back start position for each sample always gets assigned in the Audio Editor.
Additionally you can use „skip“ to move the start position of one or multiple Sections or Alternates
(and all included Zones) with the editing of only one parameter. We extended this parameter with
two decimal places for the first 100 milliseconds which allows you to edit the start position frame
precisely even for a sample rate of 96 kHz.
Use the „skip“ feature to give your performances a more natural feel. A group of live musicians will
rarely hit a note exactly at the same time, for example. „Skip“ lets you adjust this delay between the
instrument and allows you to simulate slight imperfections of live performances.
To deactivate the „skip“ feature please use the „bypass“ button to the left of the skip headline.
IMPORTANT: Like the filter section also the „skip“ parameters can be used with „absolute“ or
„relative“ settings. Please refer to the explanations in the filter section.

yellow tools INDEPENDENCE 1.0
Manual
57
Volume AHDSR
The right part below the basic parameters of the Module Editor contains the Volume AHDSR feature
(Volume Attack, Hold, Decay, Sustain, Release Curve).
When a mechanical musical instrument produces sound, the relative volume of the sound produced
changes over time. The way that this varies is different from instrument to instrument. For instance,
a pipe organ, when a key is pressed, plays a note at constant volume, the sound ending virtually
as soon as the key is released. The sound of a guitar, by contrast, is loudest immediately after it
is played, and fades with time. Other instruments have their own characteristic volume patterns.
The AHDSR envelope is a way to specify the appropriate behavior for a „voice“ created by the
synthesizer. Although usually applied to volume, it is also common to control other sound elements
such as filter frequencies or oscillator pitches via AHDSR envelope.
The AHDSR envelope is specified using four parameters:
• Attack: How quickly the sound reaches full volume after the sound is activated (the key is
pressed). For most mechanical instruments, this period is virtually instantaneous.
• Hold: How long the envelope stays at full volume before entering the decay phase.
• Decay: How quickly the sound reduces in volume after the initial peak and hold time.
• Sustain: The „constant“ volume that the sound takes after decay until the note is released. Note
that this parameter specifies a volume level rather than a time period.
• Release: How quickly the sound fades after the end of the note (the key is released). Often, this
time is very short. An example where the release is longer might be a percussion
instrument like a glockenspiel, or a piano with the sustain pedal pressed.
With the VOL. AHDSR curve you can adjust the time flow and simultaneously the volume flow of
your Layer, Section or Alternate.
Generally the AHDSR curve is used in „retrigger“ mode. This means that for each newly-played
Zone the curve always starts from the beginning again. You can switch off this mode at any time
with a click on the „retr.“ button in the upper right corner.
Any time related parameters also contain additional curve (in %) or volume settings (in dB) to
enable an even finer adjustment.

58
CHAPTER 5
Modules
Use the „v.“ (vertical) and „h.“ (horizontal) zoom options to customize the view of the curve. Beside
these input fields you can also frame the part of the curve you want to zoom in with your mouse.
To move an already horizontally zoomed-in view, press and hold the „shift“ key, click with the
mouse on the curve and drag it to the left or to the right. Click the „fit“ button to return to the
general view.
IMPORTANT: Independence‘s Volume AHDSR allows even positive volume values amounting
to additional 12dB for the „Hold Level“ and „Sustain Level“ parameters.
Please use these settings very carefully since this can possibly cause unwanted
overmodulation of your Layers, Sections or Alternates! Positive volume values
get displayed in red immediately.
You can save all your parameter settings as individual preset or also assign them by „copy & paste“
to other Layers, Sections or Alternates.
To save your settings click on the „presets“ pull-down menu and the select the „save as“ option. A
dialog will show up where you can enter your desired name for your preset.
If you click on the „presets“ pull-down menu next time, your preset will show up in the list.
Beside the „save as“ option you can also assign your current VOL. AHDSR settings to other Layers,

yellow tools INDEPENDENCE 1.0
Manual
59
Sections or Alternates without having to save your changes before. To copy your current settings
click on the „presets“ pull-down menu and select the „copy“ option. Now select your Layer, Section
or Alternate you want to transfer these settings, click on the „presets“ pull-down menu again and
select the „paste“ option afterwards. You will notice that ALL parameter settings of the current
VOL. AHDSR have changed to the values of your prior curve.
To deactivate the „VOL. AHDSR“ please use the „bypass“ button in the upper right corner.
IMPORTANT: Like the filter section also the „VOL. AHDSR“ curve can be used with
„absolute“ or „relative“ settings. Please refer to the explanations in the
filter section.
TIP: You can also use Independence’s Flexible Modifiers to assign full-dynamic modification to
your Filter, Volume AHDSR and Skip settings.

60
CHAPTER 5
Modules
Flexible Modifiers
With Independence‘s Flexible Modifiers and their modules you can assign additional and specific
modifications to your Layers, Sections and Alternates during your playing.
These modifications can get generated well directed or also at random. The Flexible Modifier Editor
is a really powerful and creative part of Independence!
EXAMPLE: By means of a „LFO“ (internal modulator) as „source“ and „pitch“ as
„destination“ you can create a vibrato. Simultaneously you can assign the
intensity of the modification, with the „modwheel“ controller as „source“ and the
„LFO intensity“ as „destination“, for example. With this combination you will
create a typical synth vibrato. If you, however, select „volume“ instead of „pitch“
as destination for the first modifier, you will create a typical tremolo.
Independence offers an unlimited number of possible combinations of all types and in any order.
The concurrent access to the same parameter guarantees the total flexibility in all respects.
Independence‘s Modifiers are subdivided into two groups:
• External Sources: Incoming MIDI commands like velocity, pitchbend, modwheel or any other
MIDI CC command from your keyboard or from your sequencer application via
MIDI and host automation.
• Internal Sources: These are the Independence internal modules like LFO, Glide, Step Modulator,
AHDSR Curve and Free Envelope.
Let‘s take a closer look at all internal and external Modifiers:

yellow tools INDEPENDENCE 1.0
Manual
61
Click on the „new modifier“ pull-down menu. All these sources are available all along for one-time
or multiple use.
As soon as you select one of the Modifiers - pitchbend, for example - a small box gets added the
Modifier window below the pull-down menu.
With this first step you‘ve selected your „source“. To assign the „destination“ please click on the
appropriate pull-down menu and select „pitch“, for example.
If you now play the instrument and simultaneously move the pitchbend wheel of your keyboard up
or down you will accordingly change the pitch of the instrument in real-time.

62
CHAPTER 5
Modules
Use the two parameters below the „source“ and „destination“ pull-down menus to assign the range
for the modulation. Additionally you can even adjust the character of the curve for this modulation
and thus the progression of the fading between the minimum and maximum values of the defined
range. To open and edit the curve settings of the modifier, click the „curve“ button and adjust the
parameters accordingly.
IMPORTANT: Some Flexible Modifiers contain additional internal modules, like LFO, Free
Envelope, Step Modulator, etc.
These modules get displayed in the right part of the Flexible Modifier Editor:
Primarily you will get a list of all basic destinations for your Flexible Modifiers.
As soon as you add a Flexible Modifier that contains an additional internal
module, the list of available destinations automatically gets extended by this
module.

yellow tools INDEPENDENCE 1.0
Manual
63
Next to the „new modifier“ pull-down menu, the Flexible Modifier Editor also contains a „preset“
pull-down menu which allows you to load, copy and manage unlimited Modifier presets:
Beside the typical „save as“ option this „presets“ menu offers a lot more. Use the copy/paste option
to transfer all Modifier settings from your currently selected Layer to another Layer, Section or
Alternate without having to save your changes before.
There are two different types to load a Flexible Modifier preset:
• „append“: The selected preset gets ADDED to your current Flexible Modifier list.
• „replace“: The selected preset REPLACES ALL currently loaded Flexible Modifiers.
The „rebuild menu“ option refreshes the entire „preset“ list, so you do not have to restart
Independence if you copy or move preset files into the Independence Data folder on your hard disk
during your work.
TIP: If you regularly use an external MIDI controller with the Flexible Modifiers, you can
save all your settings as Modifier presets. Thus you do not have to create your basic
setup again and again anew.
External Sources
Independence contains the following External Sources:
Fix Value
The only entirely static Modifier of Independence that routes the incoming MIDI note-on commands
from your controller to the selected destination.
Velocity
The value of the selected Flexible Modifier destination is depending on the velocity value of the
incoming MIDI command.
Release Velocity
Only supported by a few MIDI controllers, mostly keyboards. The value of the selected Flexible
Modifier destination is depending on how fast you released the key of your keyboard.

64
CHAPTER 5
Modules
Random
Any incoming note-on MIDI command generates a random value within the assigned Flexible
Modifier destination range.
Pitchbend
The value of the selected Flexible Modifier destination is depending on the position of the pitchbend
controller of your keyboard (mostly a wheel or a joystick).
Modwheel
The value of the selected Flexible Modifier destination is depending on the position of the
modwheel controller of your keyboard (mostly a wheel or a joystick).
Mono Aftertouch (channel pressure)
The value of the selected Flexible Modifier destination is generated by pressing a key that has
already been pressed.
Poly Aftertouch (key pressure)
It works just like „Mono Aftertouch“, however, for each key separately.
MIDI Automation
Here can freely select from 128 MIDI CCs (Continuous Controllers) and assign them to a Flexible
Modifier destination.
The “L” button activates the “MIDI learn” function. If you click on this button and then move an
arbitrary controller, Independence will take the CC number and the current position of the value
automatically.
Host Automation
Enables the direct automation of Flexible Modifier destinations by your sequencer software.
Key Position (keyboard tracking)
The value of the selected Flexible Modifier destination is depending on the position of the key
within the entire range of your keyboard (or other MIDI controller).
Key Distance
The value of the selected Flexible Modifier destination is depending on the distance between the
prior and upcoming key of your keyboard (or other MIDI controller).
Key Up
It works just like „Key Distance“, however, only for keys within the playing direction upwards.
Key Down
It works just like „Key Distance“, however, only for keys within the playing direction downwards.

yellow tools INDEPENDENCE 1.0
Manual
65
Internal Sources
Basically each internal Flexible Modifier of Independence contains its own „preset“ pull-down
menu, so beside the overall presets for your Flexible Modifiers you can additionally manage the
presets for each single Internal Modifier individually. Also these „preset“ pull-down menus contain
the copy/paste option for the immediate transfer of your settings to other internal Flexible Modifiers
without having to save them before.
Additionally you can minimize the display of each internal Modifier simply with a click on the
open/close triangle in the upper left corner of each Modifier. Even in closed mode you still have full
control over the basic parameters of the internal Modifiers.
LFO (Low Frequency Oscillator)
In addition to the main oscillator(s) of a synthesizer, which is responsible for the creation of
the audio signal itself, an LFO is an additional oscillator that operates at a comparatively lower
frequency (hence its name), that modulates the audio signal, thus causing a difference to be heard
in the signal without the actual introduction of another sound source. Low Frequency Oscillation
as a concept was first introduced in the modular synths of the 1960s and 70s — often its effect
was ‚accidental‘; such were the extensive capabilities of a modular synth operator to patch the
instrument to create a vast array of different configurations. They have since appeared in some form
on almost every synthesizer, and more recently other electronic instruments such as samplers have
included them, to augment their capacity for sound alteration.

66
CHAPTER 5
Modules
The principle behind low frequency oscillation as a means of modulating a signal, as opposed to
adding to it, is that its frequency is lower than the audible frequency of the human ear (20Hz–
20kHz) i.e., the frequency is low enough so that it isn‘t heard as a tone.
A low frequency oscillator can be routed to control a variety of different parameters, for example
the frequency of the audio oscillator, the phase, panning, filter frequency, or the velocity of the
synthesizer’s output. For instance, when routed to pitch, an LFO serves to simulate vibrato, and
when an LFO modulates amplitude (volume), it creates tremolo.
On most synthesizers and sound modules, there are several different ways in which the user can alter
the effect produced by the LFO. These may include a variety of different waveforms, a rate control,
routing options (as described above), a tempo sync feature, and an option to control the amount by
which the LFO will modulate the audio signal.
Electronic musicians use LFO for a variety of applications, ranging from adding simple vibrato or
tremolo to a melody, to more complex applications such as triggering gate envelopes. Differences
between LFO rates also account for a number of commonly heard effects in modern music
- for instance, a very low rate can be used to modulate filter frequency, thereby providing the
characteristic gradual sensation of the sound becoming clearer or closer to the listener. Alternatively,
a high rate can be used for bizarre ‚rippling‘ sound effects (indeed, another important use of LFO
would be for various sound effects used in films). However, these effects are difficult to describe,
instead they are more understandable simply when heard.
You can choose between the following waveforms: sine, triangle, square, saw and random.
The „retr.“ (retrigger) button lets you select if you want to start the LFO progression always from
the beginning for each newly played note.
The LFO parameters in detail:
Frequency:
Here you can assign the number of waveform repetitions per second and thus the tempo of the LFO
in hertz. 1.00 Hz = one complete waveform repetition per second.
Sync:
Use this option to synchronize the tempo of your LFO to your host application or to Independence
internally. If activated, the frequency input field will change into a pull-down menu where you can
specifically select the kind of synchronization.
Delay:
Here you can assign a delay to your LFO. Combine this option with an additional AHDSR curve to
create a fade-in of your LFO.

yellow tools INDEPENDENCE 1.0
Manual
AHDSR Envelope
This internal Flexible Modifier lets you adjust a specific modulation envelope for the selected
destination.
Since all parameters and options are the same as for the basic AHDSR envelope in the Module
Editor, please refer to page 57.
Free Envelope Unipolar / Bipolar
67
Free Envelope enables you to create the entire progression of an upcoming modulation in advance.
In contrast to the AHDSR envelope, that is editable with a maximum of 10 parameters, Free
Envelope allows an unlimited number of freely assignable markers.
IMPORTANT: A Free Envelope marker also always contains a „level“ and a „position“ value.
Additionally you can use the „curve“ parameter to adjust the character how
the marker should be reached.
Add markers:
To add a marker to your Free Envelope, simply click on the position in the editing display where
you want to add the marker.
Delete markers:
To delete an existing marker, click on the marker „shortly!“ (Otherwise you will select the marker).

68
CHAPTER 5
Modules
Edit/Move markers:
Basically you can edit the „level“ and „curve“ parameters by entering values into the input fields or
using your mouse (click and hold the value and drag up or down) as usual.
In addition you can edit and move the markers with simply with your mouse. Therefore click
and hold the marker you want to edit and drag it to a new position. The „level“ and „position“
parameters will change accordingly.
If you want to move multiple markers simultaneously, press and hold the „alt“ key before you select
a marker. Now also all markers to the right of the selected marker get selected (red color) and you
can move them to the new position.
To keep the assigned distance between two markers you want to move, simply click and hold the
green connecting line between the 2 markers (the color changes into red). If you then drag the two
selected markers to a new position you will notice, that their (time) distance will not change.
TIP: For the fine-tuning of markers you can also press and hold the „shift“ key before you
select a marker. If you now move the marker any changes will be made decimal places
accurately.
You can generally assign if the Free Envelope gets display „unipolar“ or „bipolar“. The only
difference is, that in „bipolar“ mode also negative values of markers get displayed, what makes you
work much easier if the assigned range for your Flexible Modifier destination contains negative and
positive values.
EXAMPLE: Your Flexible Modifier destination is „pitch“ and the assigned range is from „0“
to „+10“ semitones. Thus the unipolar Free Envelope is quite enough, since the
„level“ value „0%“ corresponds to „0“ semitones and the value „100%“
corresponds to „+10“ semitones.
If you now assign the „pitch“ range from „-10“ to „+10“ and still work in the
unipolar mode, you have to keep in mind that now the „level“ value „0%“ means
„-10“ semitones, the „level“ value „50%“ means „0“ semitones and the „level“
value „100%“ means „+10“ semitones. This makes it quite difficult since you
always have to think about the value range.
If you switch to the bipolar mode, the Free Envelope display will also include
negative values. In our example now the „level“ value „0%“ means „0“ semitones,
„-100%“ means „-10“ semitones and „100%“ means „+10“ semitones.
Use the „sync“ button to synchronize the Free Envelope to your host application or to Independence
internally. If activated, the upper timeline of the editing display and the „position“ value will change
accordingly. The minimal valid value for the sync option is 1/128.
The „retr.“ (retrigger) button lets you select if you want to start the Free Envelope progression
always from the beginning for each newly played note.
The „loop“ button activates the permanent loop within the two fixed loop markers, visible by the
two horizontal dashed lines.

yellow tools INDEPENDENCE 1.0
Manual
69
To zoom in/out the current view of your Free Envelope, simply enter the wanted zoom factor in the
input field or change the value with your mouse. Use the scroll bar to scroll to the wanted position.
To return to the basic view of your entire Free Envelope, click the „fit“ button.
TIP: Beside the scroll bar you can also use the blue timeline to scroll pixel accurately to
the wanted position of your Free Envelope. Simply click and hold any position in the
timeline with your mouse and drag to the left or right.
Step Modulator Unipolar / Bipolar
The Step Modulator enables you to create a so-called „stepped“ modulation. In practice this internal
Flexible Modifiers is commonly used with „pitch“ or „cutoff filter“ as destination, in order to
achieve typically „hashed“ progressions.
Independence‘s Step Modulator is extended to 128 steps to enable an even more accurate setup.
Additionally you can also switch between the „unipolar“ and „bipolar“ view of your settings (see
chapter „Free Envelope“).
To draw or edit the progression, simply click (and hold) on the respective bar in the Step Modulator
editing display. Now can adjust the level of the bar by dragging it up or down. To edit multiple bars
simultaneously, keep the mouse button pressed and move your mouse to the left or right.
IMPORTANT: For an easier adjustment of your progression you can edit the parameter
settings of the Step Modulator even during the play-back of the sequence
in real-time.
Let‘s take a closer look to the parameters of the Step Modulator:
„loop“ pull-down menu:
Here you can select between three different loop modes:
• loop: continual repeat of your sequence; always from the beginning.
• loop FB (loop forward/backward): continual repeat of your sequence; however, in each case
from the beginning to the end and then reverse.
• no loop: one-time play-back of your sequence to the end.

70
CHAPTER 5
Modules
Use the „sync“ button to synchronize the Step Modulator to your host application or to
Independence internally. If activated, the „frequency input field will change into a pull-down menu
where you can select the different sync options. Additionally the „input quant.“ button for the MIDI
input quantization will appear bottom left in the Step Modulator window.
Use the „retr.“ button, the „presets“ pull-down menu and the „bipolar“ button as already explained
in this chapter.
Steps:
Use the „steps“ input field to adjust the number of used steps. The maximum number of available
steps is 128.
Frequency:
Here you can assign the tempo in hertz. 1.00 Hz = one complete Step Modulator sequence per
second.
X-fade:
Here you can assign a smooth transition for two successive steps.
TIP: If you enter quite large values for the x-fade parameter you will get an extreme
smoothness between the steps in order to achieve very nice and interesting sequence.
Delay:
Here you can assign a delay to your Step Modulator. Combine this option with an additional
AHDSR curve to create a fade-in of your Step Modulator.
Shuffle:
Self-explanatory ;-)
Glide (Portamento)
In current usage, portamento is making a continuous „slide“ up or down in frequency from a
previous note, rather than a discrete change from one note to the next. This is most commonly
encountered on string instruments, such as the guitar or violin, which can produce a continuous
range of frequencies rather than being limited to the chromatic or diatonic scale, and impossible on a
fixed-pitch instrument like the piano.
Portamento can often be generated automatically on synthesizers, where a parameter setting can be
used to control the speed at which an oscillator moves to a new pitch. Often this parameter is called
„glide“. Alternatively, portamento effects can be produced manually by a skilled player by the use
of the pitch wheel at the side of most synthesizer keyboards. Synth lines with lots of portamento
defined West Coast G funk of the mid 1990s, and continue to be a distinctive part of electronic
music today.

yellow tools INDEPENDENCE 1.0
Manual
71
In MIDI sequencing, portamento can be generated by using a channel message that creates a sliding
effect by smoothly changing pitch from the last note played to the pitch of the currently playing
note. Additionally Independence allows to use also other destinations beside „pitch“ what can be
very useful and also sounds quite interesting.
The available „glide“ parameters of Independence are:
Legato button:
If activated, the „glide“ function is only used if two or more played notes overlap each other.
Time:
Assigns the time for the change from one note to the next.
Chromatic button:
If you activate this button, the distance between the played note to the next gets calculated and the
time of your „glide“ gets extended accordingly.
EXAMPLE: Your current time for the „glide“ is set to 100ms. If you now activate the
„chromatic“ button and first play C3 and afterwards D#3, the new calculated
time for the glide will be 300ms.
Key Limit:
Here you can limit the „chromatic“ parameter and assign the maximum considered distance range
for two successively played notes.
If you set this value to 5 semitones, for example, the recalculated time for the glide will never be
larger than these 5 semitones, even if the effective distance between the two played notes may be
larger than 5 semitones.
Curve:
Self-explanatory ;-)
Insert FX
In the right upper corner of the Flexible Modifier Editor there is an additional „insert FX“ button.
When activated the internal Flexible Modifier window will change to the insert effects page. Here
you can assign all available insert filters and effects of Independence also to any Layer, Section or
Alternate - completely independent from the insert FX settings in your Mixer page. In contrast to the
Mixer (these insert FX settings only get saved in Projects) all the insert FX settings of the Modules
page automatically get saved in you Layer patch and thus are available immediately after reloading
the Layer at a later date.
The functionality and operation of this „insert FX“ section corresponds to the operation in the Mixer
page. Since Independence contains very extensive insert filters and effects please refer to chapter
„Insert Filters and Effects“ on page 123 for all further details.

72
CHAPTER 6
Mapping
Mapping (Independence only)
Welcome to the core of Independence!
This page of Independence contains the basic structure and settings that allow all succeeding editing
in the first place. The principle is very simple and explained in a few basic steps.
Before we take a closer look to this page, a few words about MIDI and Mapping at first:
A MIDI controller (e.g. keyboard) sends any information with a so-called „MIDI protocol“ which
is based on a vertical and horizontal matrix, each with 127 partitions (= velocities) - from 0 to 127.
The horizontal partitions are the keys from your keyboard and thus each note can also get defined as
number (e.g. C3 = MIDI note 63). The vertical partitions contain different additional information for
each key, like multiple samples with different dynamics of the note.
Thus each information sent from the keyboard is always linked to exactly one Zone (-> chapter
„Architecture & Operation“ on page 27) in your Mapping matrix.
Basically a Zone is the simply displayed position of an audio file and a Zone can always only
manage one audio file. Please load a Layer from the Independence Core Library as explained in the
chapter „User Interface & Basics“ on page 34 and switch to the Mapping page.
The Audio Editor (the upper window) will be empty at this moment - we will explain this part of the
Mapping page later. The window below is the Mapping Editor and contains the mapping matrix of
the instrument you loaded. Each Zone is shown as a small blue box. The more Zones are displayed
in this window the more different dynamic steps or articulations are available for the instrument.
Now play a few notes with your keyboard (or any other MIDI controller). If not disabled in the

yellow tools INDEPENDENCE 1.0
Manual
73
„select“ pull-down menu you will recognize that the incoming MIDI signal gets displayed as a small
light blue line in the Mapping Editior. As soon as you play a key in a velocity which is connected to
a Zone, an audio file gets played back. That‘s it.
This structure of the Mapping Editor decides if and how an audio file gets played back. Also
considered will be all the different parameter settings like volume, panorama, root key, etc.
This layout is essential and also very important. Independence‘s Mapping Editor enables you to
create your custom mappings intuitively, ultra-fast and in a clearly arranged environment!
If you open the “Content Browser” the left side of Independence will switch and you will get a
detailed list of all currently available Sections and Alternates of your selected Layer. You can now
select the Section or Alternate you want to edit either in the content browser or with the “select”
pull-down menu of Mapping Editor.
On the left side you can easily “mute” Sections. Simply press and hold the “Alt” key and click on
the Section you want to mute. If there are Sections and/or Alternates that include an internal Key
Switch, the assigned key gets displayed right beside the name of the Section/Alternate. The color
of the currently activated Key Switch gets displayed in orange. For an even better overview, all
currently available key switch notes are also displayed in the Mapping Editor - as grey Zones from
0 to 127. If there are multiple key switches on the same note the color gets brighter the more key
switches are on the same note.

74
CHAPTER 6
Mapping
To offer easiest and fastest access to all your 3rd party libraries, your own instruments, audio files
and loops we integrated the sophisticated „Audio Files Browser“. This feature does not only work
as a simple browser but also includes powerful options to create the mapping of your files already
while you import them automatically. Please refer to page 84 for more details.
Now click and hold any Zone of the currently loaded Layer Patch. The selected Zone becomes
orange and in the upper window an audio waveform shows up immediately. The waveform is the
graphical visualization of the audio file that is included in the Zone. Now drag the Zone with your
mouse to a position of your choice, e.g. C6, and release. Always you play C6 now on your keyboard
(or any other MIDI controller) the Zone you‘ve just moved will play back.
With this Mapping Editor and all the available parameters you can always decide about position,
layout, possible overlaps, tone pitch (root key), volume, panorama, etc. of all your Zones. For a
better fine tuning of your Zones you can zoom in the Mapping Editor matrix totally free in the
vertical and horizontal axis. Therefore use the „+“ and „-“ icons down right of the Mapping Editor
window. To switch back to the original view just click on the spot in the corner.
For immediate access to the sounds Independence‘s Mapping Editor also contains an enhanced
keyboard at the bottom which is very useful for quick checks of any changes you made on this
page. You can click on the keys of the virtual keyboard to play back the Zone. This keyboard also
recognizes different velocities. The more at the top you click on the key the higher velocity gets
played back. The same the other way round: The lower you click the key the lower velocity gets
played back.

yellow tools INDEPENDENCE 1.0
Manual
75
To accelerate the editing and adjustment processes in the Mapping Editor there are many versatile
features available. If you click on the „select“ pull-down menu of the Mapping Editor the following
menu will appear:
This vast number of intuitively usable editing options accelerates your custom editing of the
mapping matrix enormously and also allows maximum flexibility during your work. Nevertheless
you still have the required user-friendly overview about everything important.

76
CHAPTER 6
Mapping
Beside this main „select“ pull-down menu you can also use a „hided“ additional pull-down menu
inside the Mapping window. This menu only contains the most important commands you will
need permanently. To open this menu hold the CTRL key (Mac OS X and Windows XP) and click
somewhere in the Mapping window. The following menu will show up:
Apart from a few new commands both pull-down menus are in principle self-explanatorily. The
few exceptions that are maybe not understandable at first sight get explained on the following pages
in this chapter. Because nearly everything in the Mapping Editor affects one or multiple Zones we
first want to take a closer look to all the basic operations regarding size and position of Zones and
explain the further parameters afterwards. There are multiple ways to adjust the size and position of
one or multiple Zones. Please load one Layer patch from the Independence Core Library and switch
to the Mapping page again.

yellow tools INDEPENDENCE 1.0
Manual
77
Working with Zones
Select and move one or multiple Zones
To select multiple Zones, hold and press the „shift“ key and either create a border around the desired
Zones using your mouse (click, hold and release when finished) or click all the Zones you want to
select separately one after the other. To move the selected Zones click and hold the selection and
drag it to the new position. If you drag the selection horizontally out of the visible area, the Mapping
Editor display scrolls automatically. When selecting Zones you will see an additional „Info Border“
around your selection. This border always displays the current position, the key range and the
velocity:
If your mapping contains multiple Zones that overlap, the intensity of the color of selected and
unselected Zones display the area where they overlap.

78
CHAPTER 6
Mapping
As you can see, the intensity of the color of the Zones always also displays the areas where Zones
overlap. Additionally you can see, that the parameter display of the Mapping Editor always depends
on your current selection. If no Zone is selected, the parameter display is empty (see prior page). If
one Zone is selected, all parameters get displayed and if multiple Zones are selected , only the Zone
independent parameters get displayed.

yellow tools INDEPENDENCE 1.0
Manual
79
Copy one or multiple Zones
To copy one or multiple Zones just select your desired Zone(s), hold the ALT Key (Mac OS X and
Windows XP) and drag the selection to the new position. You will see that not the selection gets
moved but a copy - your selection still remains at the original position. Beside the ALT Key you can
also use the „Copy“ and „Paste“ commands from the „select“ pull-down menu.
Resize a Zone
To resize a Zone Independence offers multiple options.
First click on the Zone you want to resize. Now move your mouse pointer to one of the 4 corners
or one of the four borders. As soon as you move over one of the corners/borders, the mouse pointer
will switch to its editing status and also change its look.
On the corners of the Zone the mouse pointer will look like this:
Now you can click and hold with the mouse on this corner and drag/stretch the Zone to the desired
size. Using the corners of a Zone you can scale the Zone in the x- and y-axis simultaneously.

80
CHAPTER 6
Mapping
On the borders of the Zone the mouse pointer looks like this (upper border, for example):
You can now resize the Zone in the direction of the arrow. Using the borders of a Zone you can scale
the Zone either in the x-axis OR the y-axis.
HINT: If you select one or multiple Zones, then click on the left or right border of the selection
and then press and hold the SHIFT Key (Mac OS X and Windows XP) before you resize
your selection horizontally, any overlap of Zones is blocked. The mouse pointer
will change its color from blue into white during this process.
Invisible features
„Zone Positioner“:
If you select one or multiple Zones and drag them to a position that abuts horizontally or vertically
to a border of the Mapping window, the selected Zones do not overlap immediately but snap in first.
Only with a stronger movement of the mouse the Zones begin to overlap.
The same applies to the horizontal movement of one or multiple zone. To avoid incessant changes
of the vertical position during a horizontal movement or copy of multiple Zones you have to move
your mouse pointer with a larger vertical distance from the original position to move the Zones also
vertically. Of course this works the same way for the stability of vertical movements of Zones.
The drag‘n‘drop functionality and the keyboard shortcuts enable you to create, edit and customize
the mapping of your instruments in just a few seconds. Just try all the different features we
explained so far: copy and paste Zones, move them, resize them and let them overlap and you will
recognize how easy-to-use, intuitively and user friendly the work with Independence‘s Mapping
Editor is!
Mapping parameters
Root Key:
Sets the basic tune of one or multiple Zones. If you load a tonal instrument (guitar, for example) all
Zones must have the same Root Key so the instrument is playable in its original tune. Of course you
can also assign different Root Keys to different Zones.

yellow tools INDEPENDENCE 1.0
Manual
Key Range:
Sets - as the name implies - the range of one or multiple Zones and thus the start and end position.
Vel Range (Velocity Range):
Some instruments are sampled in different dynamic steps. In order to arrange these steps you can
use this two parameters field to assign the upper and lower limit for one or multiple Zones.
Volume:
Assigns the volume for one or multiple Zones.
Panorama:
Assigns the parameter settings for one or multiple Zones.
Pitch:
Assigns the pitch for one or multiple Zones.
Top Fade:
If you do not want that one or multiple Zones end abruptly you can use this feature as a kind of
smooth release of the Zone(s). Thus Top Fade assigns the upper fade-out limit.
Top Curve:
Assigns the curve character of Top Fade.
Bottom Fade:
The opposite of Top Fade and thus the fade-in limit.
81
Bottom Curve:
Assigns the curve character of Bottom Fade.
Here you can see how „fades“ get displayed in Independence:

82
CHAPTER 6
Mapping
HINT: If you combine Top Fade and Bottom Fade you can create a so-called X-Fade which
allows the smooth fading between one or multiple Zones.
HINT 2: If you select one or multiple Zones, then click on the upper or lower border of the
selection and then press and hold the SHIFT Key (Mac OS X and Windows XP)
before you edit your selection vertically, you can create a X-Fade between the selected
Zones automatically. The mouse pointer will change its color from blue into white
during this process.
Solo:
If you want to hear only one or a few Zones during your work, just make your selection and switch
to the „solo“ mode. Now you will only hear the selected Zones, all others are muted.
Mute:
Works like „solo“ - just the other way round: All selected Zones get muted.
Reverse:
If activated, the selected Zone(s) get played back reversed.
Playback Mode:
Independence offers 5 different playback mode:
- sample: In this mode the sample gets played back only as long as you push and hold the key of
your keyboard. When you release the key the playback will stop. Loop markers get ignored.
- loop forward: Here loop markers are considered and the sample gets played back and looped as
long as you push and hold the key. When you release the key the playback will stop.
- loop forward/backward: An extended loop mode which causes an continuous switch between
the forward and backward play back direction of the selected Zone, referring to the loop start and
end markers.
- one shot: In this mode the sample always gets played back to the end - independent from the
moment you release the key.
- note off: This playback mode only plays the sounds when the key of your keyboard gets released.
- fg mode: The Flexible Groove mode (fg mode) is a very unique feature and gets explained
together with the “Slice Mode” in the Audio Editor.

yellow tools INDEPENDENCE 1.0
Manual
83
Additionally to the „Loop“ mode you can assign the behavior of the loop in Independence‘s Audio
Editor. More details about this feature will follow later in this chapter.
Tracking button:
This button lets you select if the tune of the sample(s) gets changed or not when you move one or
multiple Zones in the Mapping Editor.
TIP 1: If you do not want to change the basic tune of instruments you move, just switch the
Tracking button off.
TIP 2: If you do not want to change the tune when you move one or multiple Zones which
already have an own (and correct) basic tune, just switch on the „Auto Move Root Key“
option in the Mapping Editor preferences („select“ -> „edit preferences“).
TIP 3: If you select multiple Zones with different parameter settings ONLY the parameters get
displayed which are identical for all selected Zones. All other parameters are displayed
with „--“ in the input field. If you now edit one of the visible parameters it will affect
ALL selected Zones, of course. If you edit one of the „invisible“ parameters you have
two options:
1.) If you edit the value with your MOUSE POINTER, the new value gets ADDED to the
respective values.
2.) If you enter the new value with your KEYBOARD, all different values of the Zones
get OVERWRITTEN and the value you entered gets assigned to all Zones.
Creating Sections in the Mapping Editor
As we already explained in the chapter „Architecture & Operation“ on page 27 a Section consists
of ONE or Multiple Zones. In short: A Section is a logical group of Zones that allows to edit their
respective parameters altogether.
EXAMPLE: If you select all Zones of a snare drum which is part of a drum kit Layer Patch
and create one new Section of all these Zones, you can switch to the Module Page
and assign one new Custom Channel to this Section. Now you are able to edit the
„snare drum“ Section individually with any additional insert effects and filters,
without affecting the entire drum kit Layer patch that contains the snare drum.

84
CHAPTER 6
Mapping
NOTE: If your editing mainly affects an entire Layer patch you do not need to create individual
Sections from Zones of this Layer. Sections are essential if you want to edit basic, logic
groups of Zones of a Layer patch separately from other Zones.
To create a new Section please select one or multiple Zones with the pressed shift key and your
mouse. When finished click the „select“ pull-down menu and select „create new section“. Now enter
an arbitrary name for your new Section and press the return key.
TIP : Always use well-defined names for your Sections! This makes the management of your
Sections much easier.
If you select multiple Zones and you want to create a separate Section for each selected Zone, you
can use the option „Create Section for each selected Zone“ in the „select“ pull-down menu. This will
create a new Zone for each of the selected Zones an name them automatically.
All other pull-down menu parameters which affect Zones or Sections - like Delete, Move to Section,
etc - are self-explanatory.
Edit Preferences Menu
„show audio file name“:
Shows next to the Section name also the name of the audio file above the Mapping Editor.
„auto move root key“:
Enables to move one or multiple Zones without Root Key so the basic tune will not get changed.
„show playing zone“:
Shows the entire Zone that gets played.
„show note on velocity“:
Shows ALL played notes incl. their velocity in the Mapping Editor with a thin blue line.
„show unloaded zones“:
Shows all Zones which are currently not loaded into the RAM if the „Auto-Ram-Cleaner“ option is
activated. This feature will show all these Zones in red color.

yellow tools INDEPENDENCE 1.0
Manual
85
IMPORTANT: For the best overview of all your Sections always use the „Content“ browser of
the Mapping Editor. This browser gets displayed on the left side and enables
next to the overview also the direct selection of one ore multiple Sections and
additional information about possibly activated Modifiers/Modules and Insert
Effects. A Section which already includes an Insert Effect, for example, gets
marked with an „(i)“, activated modifiers with a „(m) on the right side of the
Content Browser.
Zoom Menu
Beside the graphically displayed „scroll“ and „zoom“ options in the Mapping Editor you can also
choose between different horizontal and vertical zoom types in this pull down.
Special Menu
The option „update selected file(s) information“ is very useful to undo your changes and reset the
original values of one or multiple audio files to their default values - loop markers, file length, etc,
for example.
After the selection of this option the file information of all selected audio files (Zones) get read in
again and reset to their default values accordingly:
Thus you can edit and experiment with your audio files without the risk of loosing their original
settings.

86
CHAPTER 6
Mapping
Audio Files Browser
As already mentioned on page 72 Independence includes an intelligent audio files browser to
offer immediate access to all your 3rd party libraries, your own instruments, audio files and loops.
Furthermore you can use the „pre-listen“ function to listen to your audio files before you import
them. The Audio Files Browser shows the content of the “audio files” folder from your currently
selected Independence Basic Path.
To open a folder simply click the small arrow. If you double-click a folder you will switch into this
directory. To switch back to the upper level use the “arrow” button top right. With a click on the
“home” button you will switch to the first level of the “audio files” folder and automatically refresh
the entire folder structure. To start the “pre-listen” playback of a file hold the “CTRL” key (Mac
and Windows) or activate the “auto” button and click on the file. To stop the playback simply click
again. You can select one or several files with your mouse using the “shift” key (Mac and Windows)
and the “Command” key (Mac) or the “Strg” key (Windows).

yellow tools INDEPENDENCE 1.0
Manual
87
The import works in three simple steps:
• Select the audio files (single files, groups of files, complete folders and directories)
• Select your preferred auto-mapping style
• Select your root key
After the selection of the audio files you want to import you can use the „options“ pull-down menu
at the bottom of the browser to choose between several options for the auto-mapping (the available
options are explained in the chapter “Auto-Mapping-Import” on page 38):
Depending on the selection of your preferred auto-mapping style you can now select the root key for
your mapping:
Independence recognizes all audio files that belong together and maps them automatically with the
options you‘ve selected. Of course you can rerun this import process as many times as you want
- even within the same Layer patch - and thus create your custom mappings quite simply, fast and
flexibly.

88
CHAPTER 6
Mapping
Audio Editor
Independence‘s built-in Audio Editor is a very versatile tool with a huge collection of totally new
features and functions.
IMPORTANT: In the Audio Editor you can only edit the currently selected Zone! Editing of
multiple selected Zones is not possible because the Audio Editor affects always
only one audio sample.
Select one Zone with your mouse in the Mapping Editor. Now the Audio Editor displays the selected
Zone in the upper part of the Mapping page. This graphical display is called „Audio Waveform“ and
corresponds exactly to the real audio course of your selected Zone.
Independence‘s Audio Editor contains two different types of markers: Start/End markers (yellow)
and Loop markers (green). In the general mode each Zone always contains one yellow Start marker
and one yellow End marker. If there is any „loop“ option selected, two green loop markers get added
to the Zone (start & end). In the „Slice Edit“ mode multiple additional Start markers get added,
depending on your settings.
By the means of the Audio Editor you get detailed insights into your Zone and thus into your audio
file.

Please click the „select“ pull-down menu of the Audio Editor.
yellow tools INDEPENDENCE 1.0
Manual
89
Beside the many important „show“ options about the details of the selected Zone - like name,
sample rate, bit rate, audio format, length, number of frames and filesize - you can also select your
preferred display type for the selected Zone.
This way you can always decide if the Zone gets displayed with all its channels or only with the
channels you selected. This feature is extremely helpful if you work with surround files which
contain multiple channels.
IMPORTANT: To play back and edit surround files in Independence you need the Pro Surround
Extension (PSE) for Independence. Check out more details about this extension at
www.yellowtools.com .
The „slice edit“ option is a very powerful and extensive feature and gets explained at the end of this
chapter.

90
CHAPTER 6
Mapping
Beside the graphical waveform display, Independence‘s Audio Editor also shows the different
marker positions (Start/End and Loop Start/End) of the selected Zone and enables you to edit all
these markers on the spot.
Click and hold the yellow triangle of a marker with your mouse, e.g. Sample Start Marker. Now
drag the marker to a new position and you will see how the „s. start“ value will change accordingly.
This is very user-friendly and easy customization of your markers and works the same way for all
marker types of Independence.
Audio Editor Parameters
„s. start“ (sample start):
Assigns the play back start position of your selected Zone in frames.
„s. end“ (sample end):
Assigns the play back end position of your selected Zone in frames.
„volume“:
Assigns the volume of your selected Zone.
„panorama“:
Assigns the panorama ratio of your selected Zone.
„pitch“:
Assigns the pitch of your selected Zone.
„h. zoom“:
Horizontal zoom of your selected Zone.
„v. pitch“:
Vertical zoom of your selected Zone.
„fit envelope“:
Immediate view of the entire waveform of the selected Zone.

yellow tools INDEPENDENCE 1.0
Manual
91
„show“ pull-down menu:
This pull-down menu enables the frame precise zooming in to the following positions:
Start Marker, End Marker, Start Loop Marker (if available) and End Loop Marker (if available)
„play“:
Plays back the selected Zone including all parameters.
„stop“:
Stops the play back of the selected Zone.
TIP 1: To zoom-in or out simultaneously during the horizontal movement of a marker press
and hold the „shift“ key while moving the marker. To stop the zoom operation but still
move the marker just release the „shift“ key and proceed the movement of the marker.
TIP 2: To zoom-in just a specific selection of the Zone just create a border (press and hold the
mouse button) around the part of the waveform you want to zoom-in. After you release
the mouse button, the framed part gets shown in the full size of the waveform display.
TIP 3: There are two different ways to scroll the waveform display: With the scrollbars or
with the mouse, when you press and hold the mouse button in the blue time bar, to
scroll pixel accurately.

92
CHAPTER 6
Mapping
Working with Slices
„Slice Edit“ is an additional feature of Independence‘s Audio Editor which allows you to separate
the selected Zone into multiple single „Parts“, also known as “Automatic Groove Recognition”.
Maybe you have already made some experiences with this kind of functionality but you can sure
that Independence contains some additional surprises.
In general the „edit slice“ mode is used to separate an audio loop. Combined with the simultaneous
export of MIDI files this allows to change the tempo of the loop without changing its tone pitch.
For a better understanding please load any audio file (a drum loop, for example) with the „Import
Audio File“ option of the „Layer“ pull-down menu. For the automatic import please choose
„Chromatic“ and afterwards „C1“ as start note. Switch to the Audio Editor again.
Now select the Zone on C1 you‘ve just loaded. The audio waveform of this Zone gets displayed in
the Audio Editor immediately.
Now your screen will look like this:

yellow tools INDEPENDENCE 1.0
Manual
93
Now open the „select“ pull-down menu and select the „slice edit“ option.
A new parameter on the upper right side of the Audio Editor will show up: „sensitivity“!
This parameter defines how sensitive the Independence internal search function responds to dynamic
changes of the audio file.
Scroll or enter a new value for „sensitivity“ and the number of markers will change accordingly.
Of course you can edit this separation which is based on the automatic dynamic recognition also
afterwards at any time
Just edit the „sensitivity“ parameter until you are content with the result. If you can not get an ideal
separation of your file you can of course readjust the markers, add new markers or delete unwanted
markers at will.

94
CHAPTER 6
Mapping
To enhance this fine tuning and overview we‘ve integrated a multiplicity of additional useful
features. In the „Slice Editor“ mode the Audio Editor is separated into two horizontal, equal parts:
Upper part:
The upper part includes the marker editing functions.
As soon as you work in the Slice Mode, one red colored Start Marker and one red colored End
Marker get displayed. These two markers contain the area for the subsequent export. The Start
Markers of the Slices get displayed in yellow color.
To add „start markers“ just click into the upper part of the audio waveform - a new yellow marker
gets added. To delete a start marker please press and hold and the „alt“ key and click on the marker
you want to delete. To move a start marker just click and hold the yellow triangle of the marker and
move it to the left or to the right. If you want to lock a start marker press and hold the „shift“ key
and click on the wanted marker.
Lower part:
The lower part includes the zoom and play back functions.
Click and hold the mouse button in the lower part of the audio waveform and drag a border (orange
colored) around the part you want to zoom in. After you release the mouse button, the selected part
of the Zone gets shown in maximum display size.
To play back a part between two markers, click on the audio waveform in the lower part of the
Audio Editor display.
TIP: To move and zoom-in a marker at the same time: Click and hold the mouse button on
the wanted marker and move it to the left or right. To zoom-in simultaneously now press
and hold the „shift“ key additionally and move your mouse up or down.
This way you will zoom-in and out respectively. If you reached your wanted view only
release the „shift“ key and you still can edit the position of your marker.
You can proceed this function multiple times successively and when you release the mouse
button, the display will zoom-in or out back to its original view.

yellow tools INDEPENDENCE 1.0
Manual
When you are comfortable with the marker positions, open the „select“ pull-down menu and select
the „slice and MIDI file export“ option.
The following dialog window is shown up:
95
Here you can choose the start note for the future mapping (all further parts get mapped
chromatically upwards from this note) and select if new Sections for each Zone get created. The
tempo gets calculated automatically by entering the number of bars. To finish, click the „Export“
button and save your MIDI files on your hard disk.
Simultaneously with the export of your MIDI files the “playback mode” switches into “fg mode”
(Flexible Groove mode) automatically.
Using this mode it is possible to slow down your audio loop in its original tune up to 60% without
loss of quality!
Of course you can also change and adjust the tune of your loop anytime at will.

96
CHAPTER 6
Mapping
Now you can load/import all these MIDI files into your sequencer software and thereupon the
Mapping Editor will look like this:
If you now click on the new Zones in the Mapping Editor you will recognize that instead of the
entire file only one „Part“ is displayed with start and end markers. Each further Zone belongs to one
further Part.

yellow tools INDEPENDENCE 1.0
Manual
97
Now you can play back the imported MIDI file in your sequencer software and change the tempo
if required. The loop gets adjusted to the new tempo automatically. Of course you can change the
playback sequence of the Parts in your host application or in the Independence Mapping Editor at
any time!
IMPORTANT: The „Sensitivity algorithm that is integrated into Independence is optimized to
any audio file format.

98
CHAPTER 7
Performance
Performance (Independence only)
Overview
With our sound design and sample library experiences of many years we came to the point where
we recognized the need to break new ground with the development of our new technology. No
sooner said than done and so we present a worldwide unique and sophisticated Performance Mode
with forward-looking features. As already explained in the chapter „Mapping & Audio Editor“ on
page 71, Independence‘s instruments are based on a very detailed classification, arrangement and
operation of the containing audio files. This high-performance structure allows the amazingly real
playability of the instruments on your keyboard. Although the instruments of the Core Library and
also the additional instruments specially developed for Independence are already exceptionally
playable on the spot, this Performance Mode enables you to customize your instruments at will and
give them a remarkable „human touch“.
What is it that make sample based instruments sound even more authentically? It is the availability
of multiple alternatives of the same sound. Playing an instrument live you will never hear exactly
the same sound twice, even if the musician plays the same note multiple times.
Simulating this „live feeling“ is the major task of the Perfomance mode: Managing and combining
up to 32 alternatives of the same sample automatically for the most authentic perfomances ever!
The Performance Page is divided into two parts. The „Alternate Mode“ in the upper part and the
„Advanced Legato Mode“ in the lower part. After reading this chapter you will understand why both
features are located on this page.

yellow tools INDEPENDENCE 1.0
Manual
99
Operation (example)
Before we however begin to explain all available parameters on this page with all details, let‘s start
with an example:
Let‘s assume you loaded a new Layer which contains two different Zones (Samples) - a Conga,
for example. Both Zones do not contain different velocity samples but alternative hits of the same
velocity. So BOTH Zones get layered on the same key (e.g. C#3) AND the same velocity (e.g. 0 to
127), in short: one upon the other! These Zones are named „Conga1“ and „Conga2“, for example.
As already explained in the chapter „Mapping and Audio Editor“ (-> page 81) all Independence
internal editors only communicate with „Sections“, so you now have to switch to the „Mapping“
page and create a new Section for each Zone respectively.
After this is done return to the „Performance“ page, click on the „select“ pull-down menu and select
the „ New Alternate“ option:
Now enter a name for the Alternate right beside the „select“ pull-down (e.g. Conga Alternate) and
confirm with the „Return“ key to instance the new Alternate. As this Alternate is still „empty“ you
now have to select the Sections you want to use for this Alternate. Therefore click on the „Basic
Step“ pull-down „1“. All available Sections get displayed - in this case the Sections „Conga1“ and
„Conga2“. Select the Section „Conga1“...

100
CHAPTER 7
Performance
... and afterwards click on the „Basic Steps“ pull-down „2“ and select the Section „Conga2“.
If you now play C#3 on your keyboard/MIDI controller multiple times successively you will see and
hear that each time you play C#3, the Sections get played back alternatively.
That‘s it - you now have the basic knowledge about the functionality of Alternates.
NOTE: This is a very simple example for the Alternate Mode that explains just the basics for a
better understanding of the following details.
If you perform instruments of the Independence Core Library you will see that this
feature is used very often and also very extensively.
If you load the Layer patch „Alto Sax Jazz Vibrato mf“ from the Independence Core
Library, switch to the Performance Page and play the saxophone on your keyboard, you
will see that the numbers of the „Basic Steps“ are changing their color and position
permanently and at random. This shows that an Alternate is currently in use.
 Loading...