

Page 1
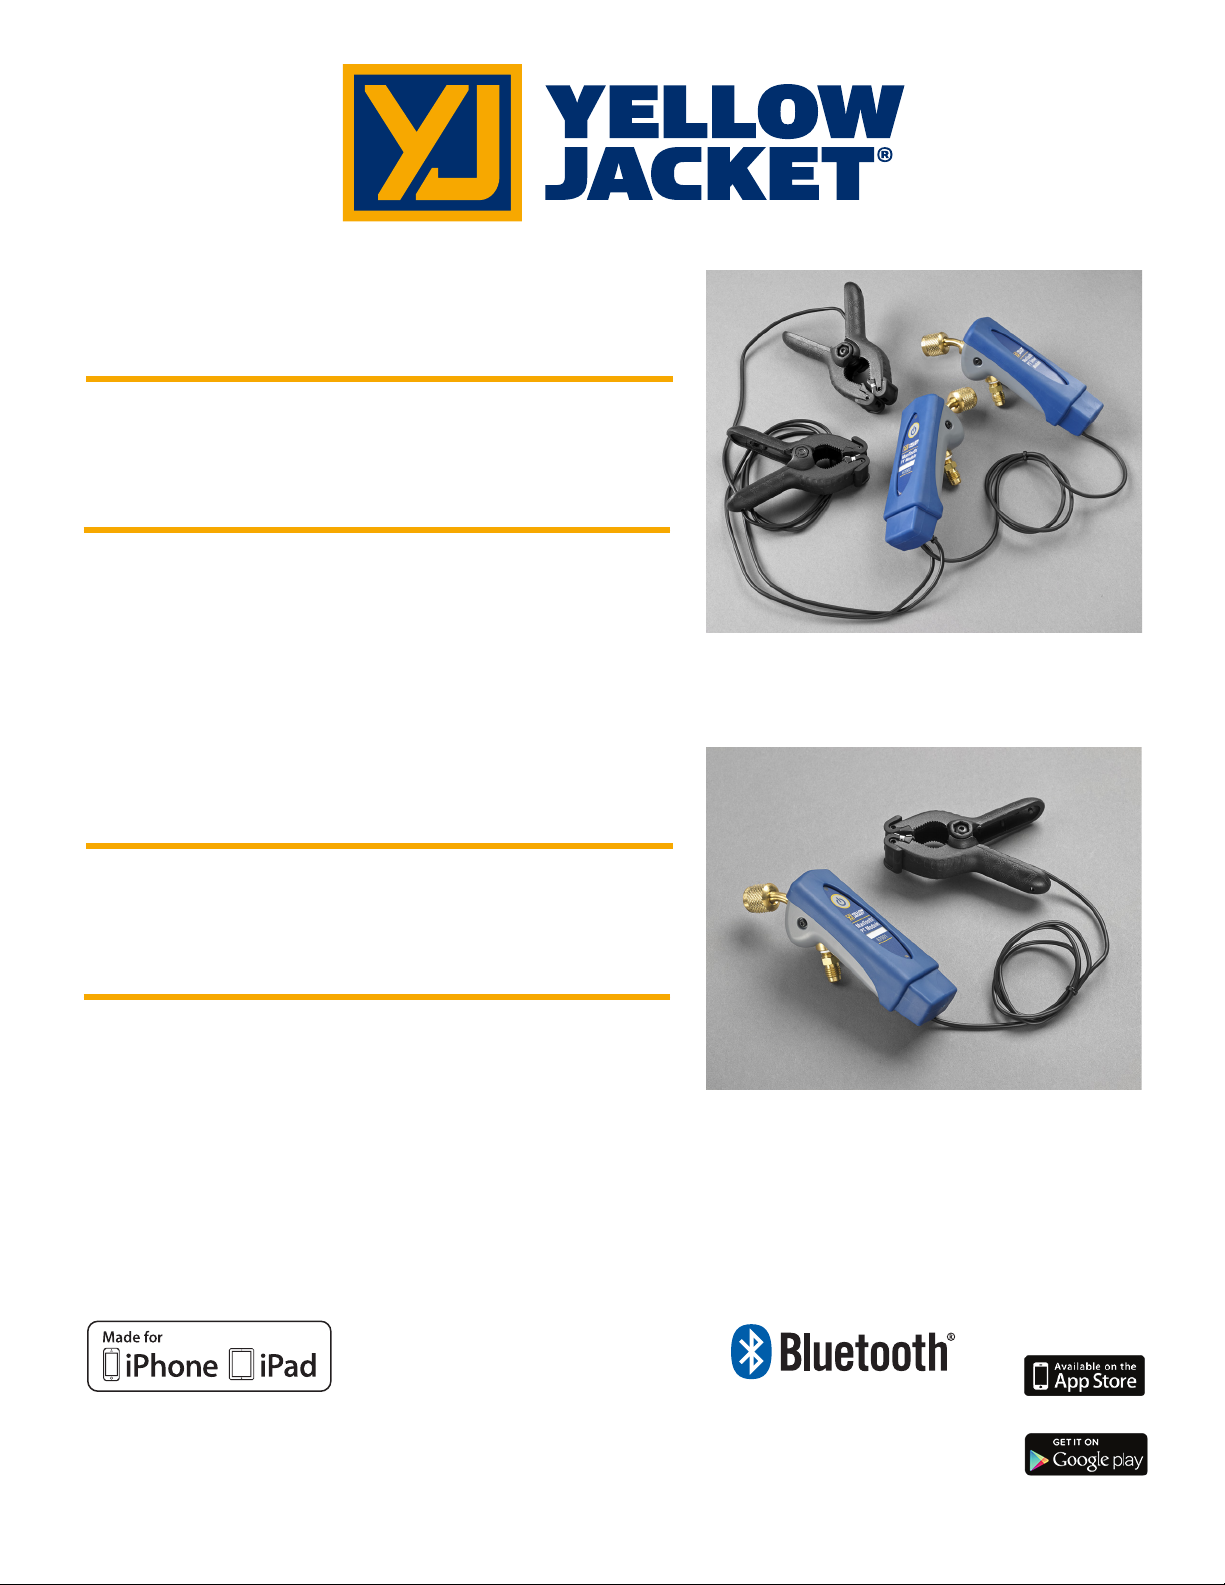
ManTooth™ Dual Pressure
Wireless Digital P/T Gauge
ManTooth™ Single Pressure
Wireless Digital P/T Gauge
User’s Manual
Made for iPhone 6 Plus, iPhone 6,
iPhone 5s, iPhone 5c, iPhone 5, iPhone 4s,
iPhone 4, iPad Air 2, iPad Air, iPad mini 3,
iPad with Retina display, iPad (4th generation),
iPad (3rd generation), iPad 2
“Made for iPhone” and “Made for iPad”
mean that an electronic accessory has been
designed to connect specifically to iPhone,
or iPad, respectively, and has been certified
by the developer to meet Apple
performance standards. Apple is not
responsible for the operation of this device
or its compliance with safety and regulatory
standards. Please note that the use of this
accessory with iPhone, or iPad may affect
wireless performance.
iPhone, iPad and Retina are trademarks of Apple Inc.,
registered in the U.S. and other countries. iPad Air
and iPad mini are trademarks of Apple, Inc.
Android and Google Play are trademarks of Google Inc.
The Bluetooth® word mark and logos are registered
trademarks owned by Bluetooth SIG, Inc. and any use
of such marks by Ritchie Engineering is under license.
Other trademarks and trade names are those of their
respective owners.
Page 2

Before You Start
Contacng Ritchie
To order accessories, receive assistance, or
locate the nearest YELLOW JACKET distributor.
Corporate Office and Mailing Address:
Ritchie Engineering Co, Inc.
YELLOW JACKET Products Division
10950 Hampshire Avenue South
Bloomington, MN 55438-2623 U.S.A.
Phone: (952) 943-1300 or (800) 769-8370
Fax: (800) 769-8370
E-mail: [email protected]
www.yellowjacket.com
Safety Informaon
Use the instrument only as specified in this
manual. Otherwise, the protecon provided by
the instrument may be impaired. Refe
safety informaon.
A Warning idenfies condions and acons
that pose hazards to the user. A Cauon
idenfies condions and acons that may
damage the instrument or the equipment
under test.
Warning
To avoid personal injury or death, follow these
guidelines:
Most governments and legal authories
•
require that HVAC technicians be
trained and cerfied in the safe and
proper operaon of HVAC tools, such as
this instrument. Since this tool may be
connected to many types of equipment
through a limitless combinaon of hoses
and fings, proper training is the most
r to the
important element of using this tool
safely.
Read the enre Users Manual before
•
using the instrument.
•
Use the
this Users Manual, otherwise the
protecon provided by the equipment
may be impaired.
•
Do not use the instrument if it is
damaged. Before you use the
instrument, inspect the case. Look for
cracks or loose components.
•
The instrument contains no internal
user serviceable parts
•
Do not open the instrument.
•
Have the instrument serviced only by
Ritchie Engineering Co. or authorized
service centers.
•
Do not use the instrument if it operates
a
bnormally. Protecon may be
impaired. When in doubt, have the
instrument serviced.
•
Do not operate the instrument around
explosive gas, vapor, or dust.
•
Various refrigerants have been
intenonally excluded for very
significant safety reasons.
•
Never use refrigerants in this
instrument that are not listed in the Setup menu.
•
The refrigerant database in this unit
may include refrigerants classified as
flammable. If such refrigerants are
selected, the operator may need
addional cerficaons and/or
Consult your government and legal
authority and comply fully with all
requirements.
•
Always wear eye and skin protecon
when working with refrigerants.
Escaping refrigerant vapors will present
a freezing danger. Do not direct
instrument only as described in
training.
2
Page 3

refrigerant vapors venng from hoses
towards the skin.
Maximum Working Pressure: 700 psia
•
(4.83 MPa)
Because this instrument allows for
•
various inputs including electrical and
mechanical, care must be taken to
observe any ways that an electrical
shock hazard could develop. Example:
Wet or humid condions, along with a
sensor, could allow an electrical path
across the instrument. Keep all
interconnected equipment clean,
organized, and in proper condion. Do
not use the instrument if
qualified to recognize potenal
electrical faults.
you are not
Cauon
To avoid damage to equipment, follow these
guidelines:
Do not allow pressures beyond the
•
specificaons listed in this manual.
Do not aempt to introduce liquid or
•
samples heavily laden with oil into the
instrument.
Read and observe instrucons and
•
specificaons related to the baeries
used in this instrument that may cause
damage to it.
Do not use this instrument on systems
•
containing leak sealing chemicals. These
leak sealants can collect and harden in
the instrument, causi
damage.
Only use this instrument with the
•
protective boot in place as this protects
the charging port and temperature
probe connecon ports from unwanted
contaminants.
Do not use damaged USB chargers to
•
recharge the ManTooth PT Module as
ng permanent
this could damage the circuitry and/or
baery.
Only use with refr
•
use with the ManTooth PT Module. Use
of unapproved refrigerants may cause
damage to the ManTooth PT Module. A
complete list of a
can be found in the ManTooth RSA app
in the “Select Refrigerant” opon.
igerants approved for
pproved refrigerants
Geng Started
The ManTooth PT Module is a precise
instrument to accurately measure and report
the crical informaon needed to service
refrigeraon and air-condioning equipment.
The ManTooth PT Module reports the system
informaon directly to your smartphone or
tablet by means of a class 1 Bluetooth v.2.1
radio. The ManTooth PT Module is compable
with any iOS device run
Android devices running Android 4.0.3 (Ice
Cream Sandwich) or later.
Before you use your ManTooth PT Module for
the first me you should make sure that it is
fully charged. You will also need to download
the free ManTooth RSA Pressure/Temperature
App from the Apple App Store for iOS devices
or the Google Play store for Android devices.
You can either use the QR code links that are
on your ManTooth PT Module packaging,
follow the links that are available on
ellowJacket.com, or just search for Yellow
Y
Jacket ManTooth in either app store.
ning iOS 7.0 or later and
Pairing
To display service readings your ManTooth PT
Module must be connected via Bluetooth to an
iOS phone or tablet running iOS 7.0+ or an
3
Page 4
Android phone running Android 4.0.3+
Apple iOS Android
Apple iOS Android
(Ice Cream Sandwich or later). To connect your
ManTooth PT Module to your phone or tablet
the two must first be paired to one another.
The pairing of the module to your device is
done in your phone or tablet’s sengs.
**Note** you only need to pair your ManTooth
PT Module the first me you connect it to your
phone or tablet, however, if you force your
phone or tablet to “forget” your ManTooth PT
Module you will need to
ManTooth PT Module can be paired with
mulple devices at the same me. However, it
can only be connected and sending readings to
one phone or tablet at a me.
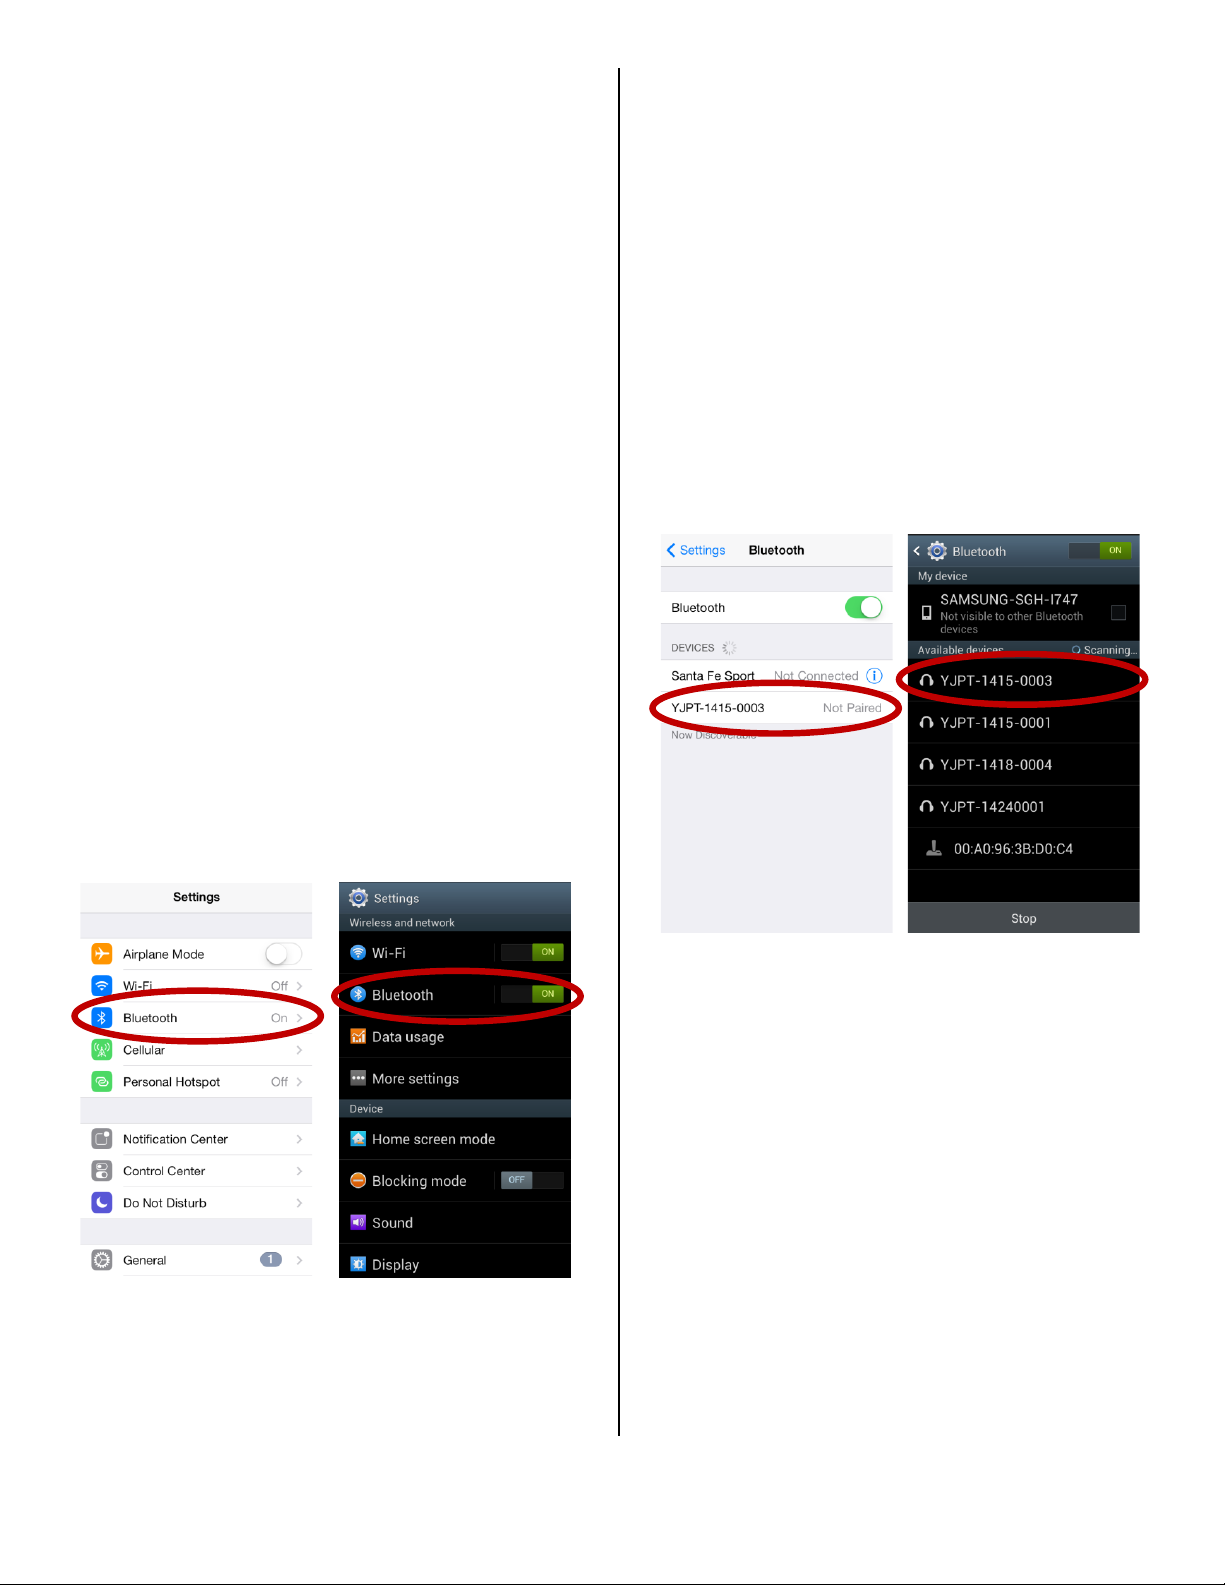
To pair your ManTooth PT Module you first
need to open the sengs menu on the phone
or tablet you wish to pair to your ManTooth PT
Module. Next tap on “Bluetooth” to enter the
Bluetooth sengs. Be sure to turn your phone
or tablet’s Bluetooth radio on if it is not already
on.
re-pair. **Note** your
PT Module” on the label not the one that says
“ManTooth PT Tether Module”. The module
will go through a brief start up sequence then
the light on your ManTooth PT Module should
start to blink blue. This means that your
ManTooth PT Module is searching for available
Bluetooth
are using an Android phone, tap on “Scan”
at the boom of the screen to scan for
available devices. Apple iOS devices should
automacally scan for available Bluetooth
devices.
devices to connect with. Next, if you
Next turn your ManTooth PT Module on by
pressing and releasing the power buon on the
main module. If you have a 67002 dual unit the
main module is the one that says “ManTooth
Your ManTooth PT Module should then show
up as an available device to pair with on your
phone or tablet’s screen. This may take up to
30 seconds.
**Note** Your ManTooth PT Module’s name is
the same as the serial number and is printed on
the main module’s label just above
number (67001 or 67002).
Once your ManTooth PT Module shows up as
an available device tap on it’s name to pair it
with your phone. On Android systems a
“Bluetooth pairing request” alert may pop up
asking to confirm the passkey tap on “OK” to
connue.
the model
4
Page 5
Apple iOS Android
Android
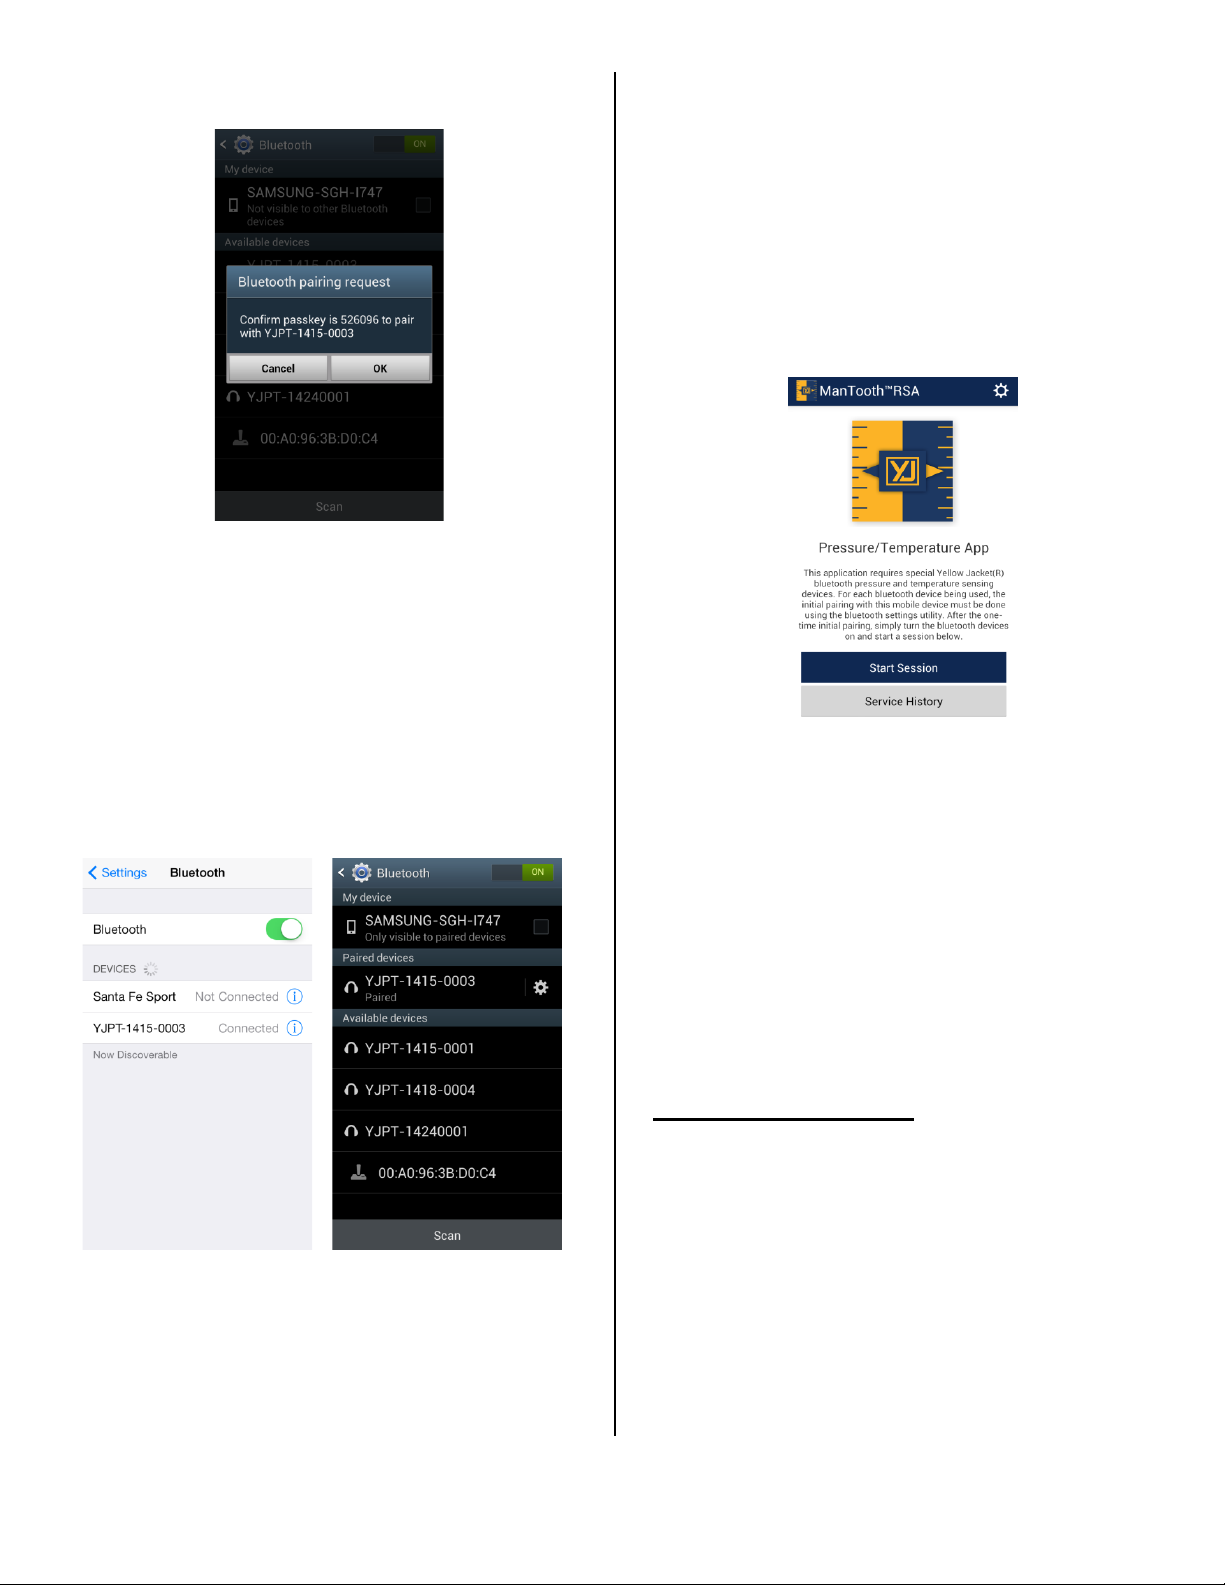
Aer pairing your Apple iOS phone or tablet to
your ManTooth PT Module it should show up as
either “Connected” or “Not Connected” rather
than “Not Paired” on the Bluetooth sengs
screen. On Android devices under the “Paired
devices” secon on the Bluetooth sengs
screen.
Connected” the light will connue to blink blue.
This is normal.
ManTooth RSA App
This secon will go over the various funcons,
sengs, and procedures of the ManTooth RSA
Pressure/Temperature App.
If you have not already downloaded the Yellow
Jacket ManTooth RSA Pressure/Temperature
App go to either the Apple App Store or the
Google Play Store now to download the free
app. You can either use the QR code links that
are on your ManTooth PT Module
follow the links that are available on
YellowJacket.com, or just search for Yellow
Jacket ManTooth in either app store.
packaging,
On Apple iOS devices once your ManTooth PT
Module is paired if it is listed as “Connected”
the light on the module will glow a solid blue.
However, on all Android devices or if your iOS
device lists your ManToo
5
th PT Module as “Not
General Sengs
The General Sengs menu is where you can set
up and change various funcons of your
ManTooth RSA app to personalize it for your
specific needs.
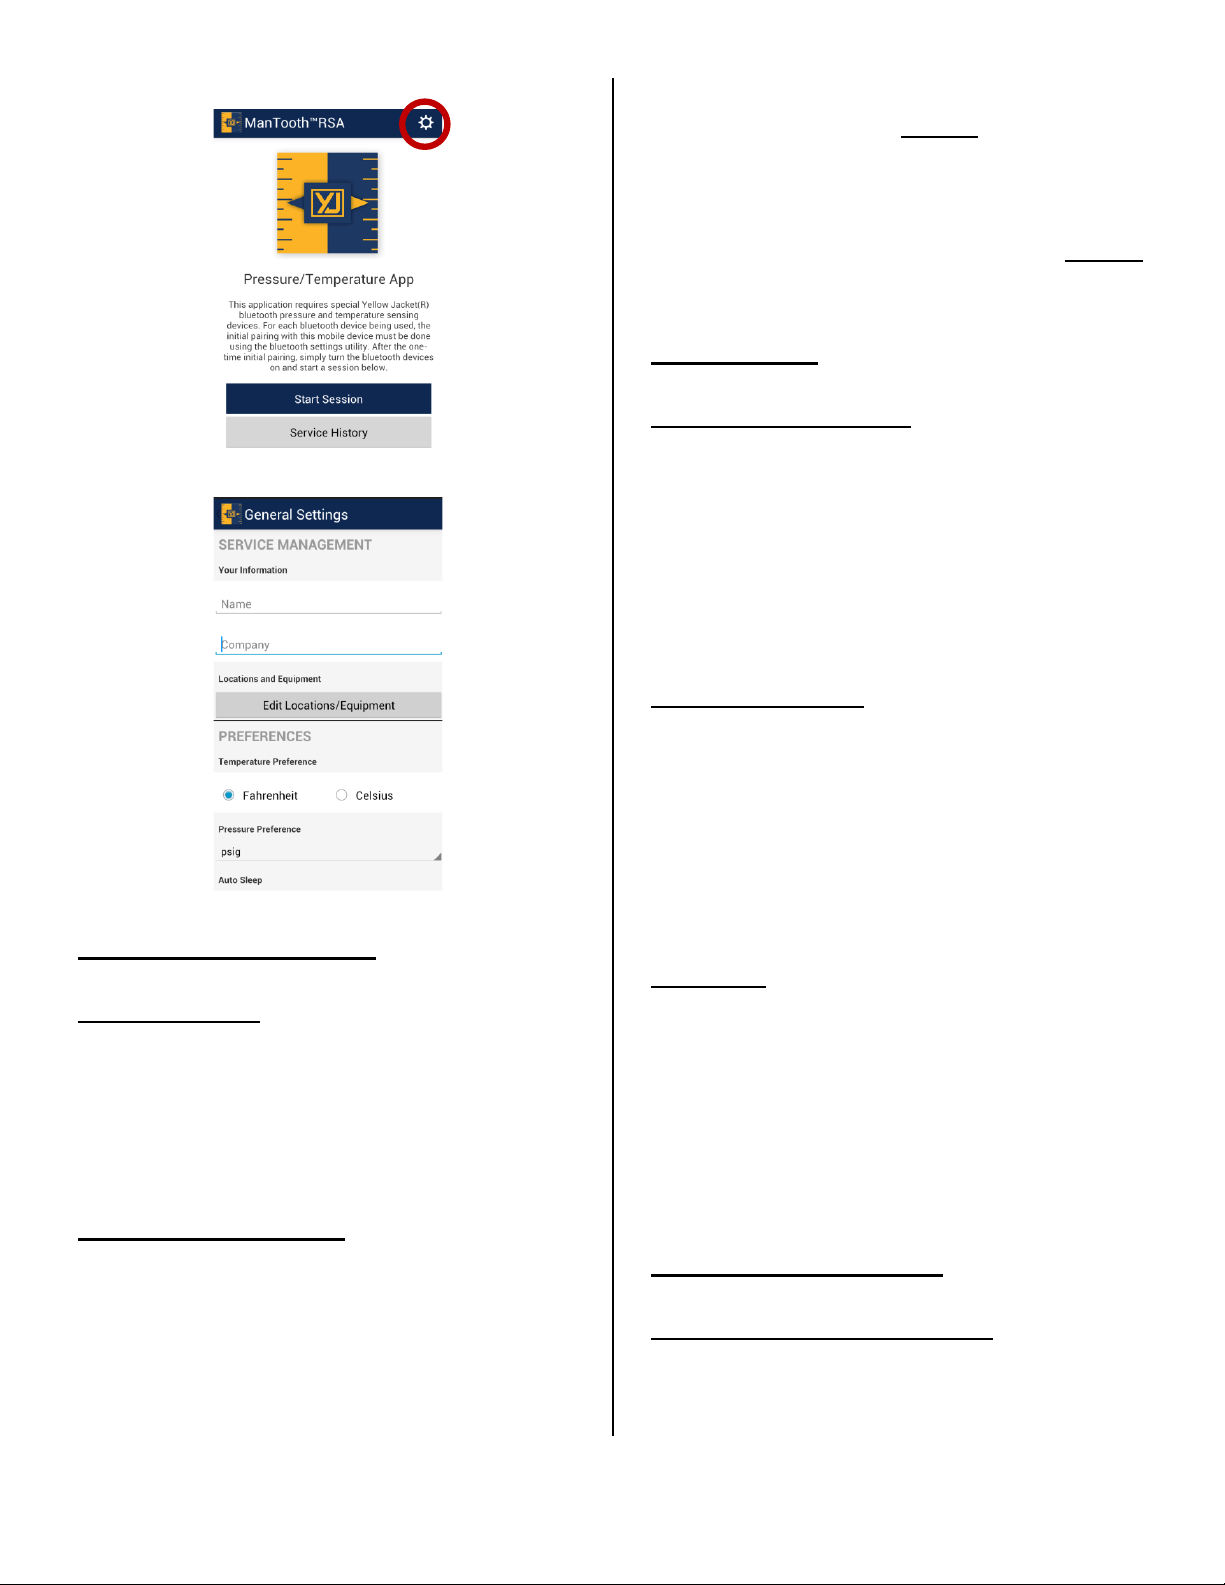
To access the general sengs on the first
screen available upon opening the ManTooth
RSA app tap on the gear in the upper right
corner of the screen.
Page 6
Service Management
Your Informaon
Here you can set your own name and your
company name. This informaon will
automacally appear in the e-mails containing
the system readings which you can send
directly from within the app.
Locaons and Equipment
Here you are able to create new locaons, add
addional units to exisng locaons, remove
units from locaons or completely remove
exisng locaons. **Note** If you delete an
enre locaon all screen shots associated with
this locaon and any equipment at this locaon
will all be deleted. Deleted locaons and
associated screen shots can not
Similarly if you delete equipment from a
locaon the screen shots associated with that
equipment will also deleted. Deleted
equipment and associated screen shots can not
be retrieved.
be retrieved.
Preferences
Temperature Preference
Set the units that the temperature readings
from the temperature sensors, Vapor
Saturaon, Liquid Saturaon, and the values for
Superheang and Subcooling are displayed in.
Opons are degrees Fahrenheit (°F) or degrees
Celsius (°C). Default temperature units are
degrees Fahrenheit (°F)
Pressure Preference
Set the units that the pressure readings are
displayed in. Available units are bar, pounds per
square inch absolute (psia), pounds per square
inch gauge (psig), kilopascals (kPa),
Megapascals (MPa), and kilogram per square
cenmeter (kg/cm^2). The default pressure
units are pounds per square inch gage (psig)
Auto Sleep
This opon will disable your phone or tablet’s
automac sleep funcon so that while you are
in a session taking readings your phone or
tablet will not automacally go to sleep which
could disrupt your session and readings. The
default auto sleep seng is Override Auto
Sleep = Off.
Device Management
Power Down Connected Devices
This is another way of shung off your
connected ManTooth PT Module(s) if you are
not near enough to your module(s) to press the
6
Page 7
power buon(s) and want to turn the power
completely off.
Calibrate Device Readings
This gives you the opon to adjust the
calibraon of your ManTooth PT Module’s
pressure readings or temperature readings
away from the factory defaults.
Restore Factory Defaults
This will clear any calibraon adjustments that
have been done on the ManTooth PT Module
since it le the factory.
Auto Off
This slider gives you the opon of having your
ManTooth PT Module automacally turn itself
off aer a designated period of me. It can be
set anywhere from 1 to 90 minutes. Aer the
ManTooth PT Module has been connected for
the specified auto off me an alert will pop up
asking if you would like to reset the auto off
mer if you wish to reset the mer simply tap
anywhere on the screen. Also included is an
auto off never seng. Moving the slider all the
way to th
never. Default is Auto Off = 5 min.
e le will set the auto off mer to
Geng Back to the Previous
Screen
To return to the previous screen from the one
you are currently viewing tap on the icon in the
upper le hand corner. This funcon is the
same in all of the screens in the ManTooth RSA
App.
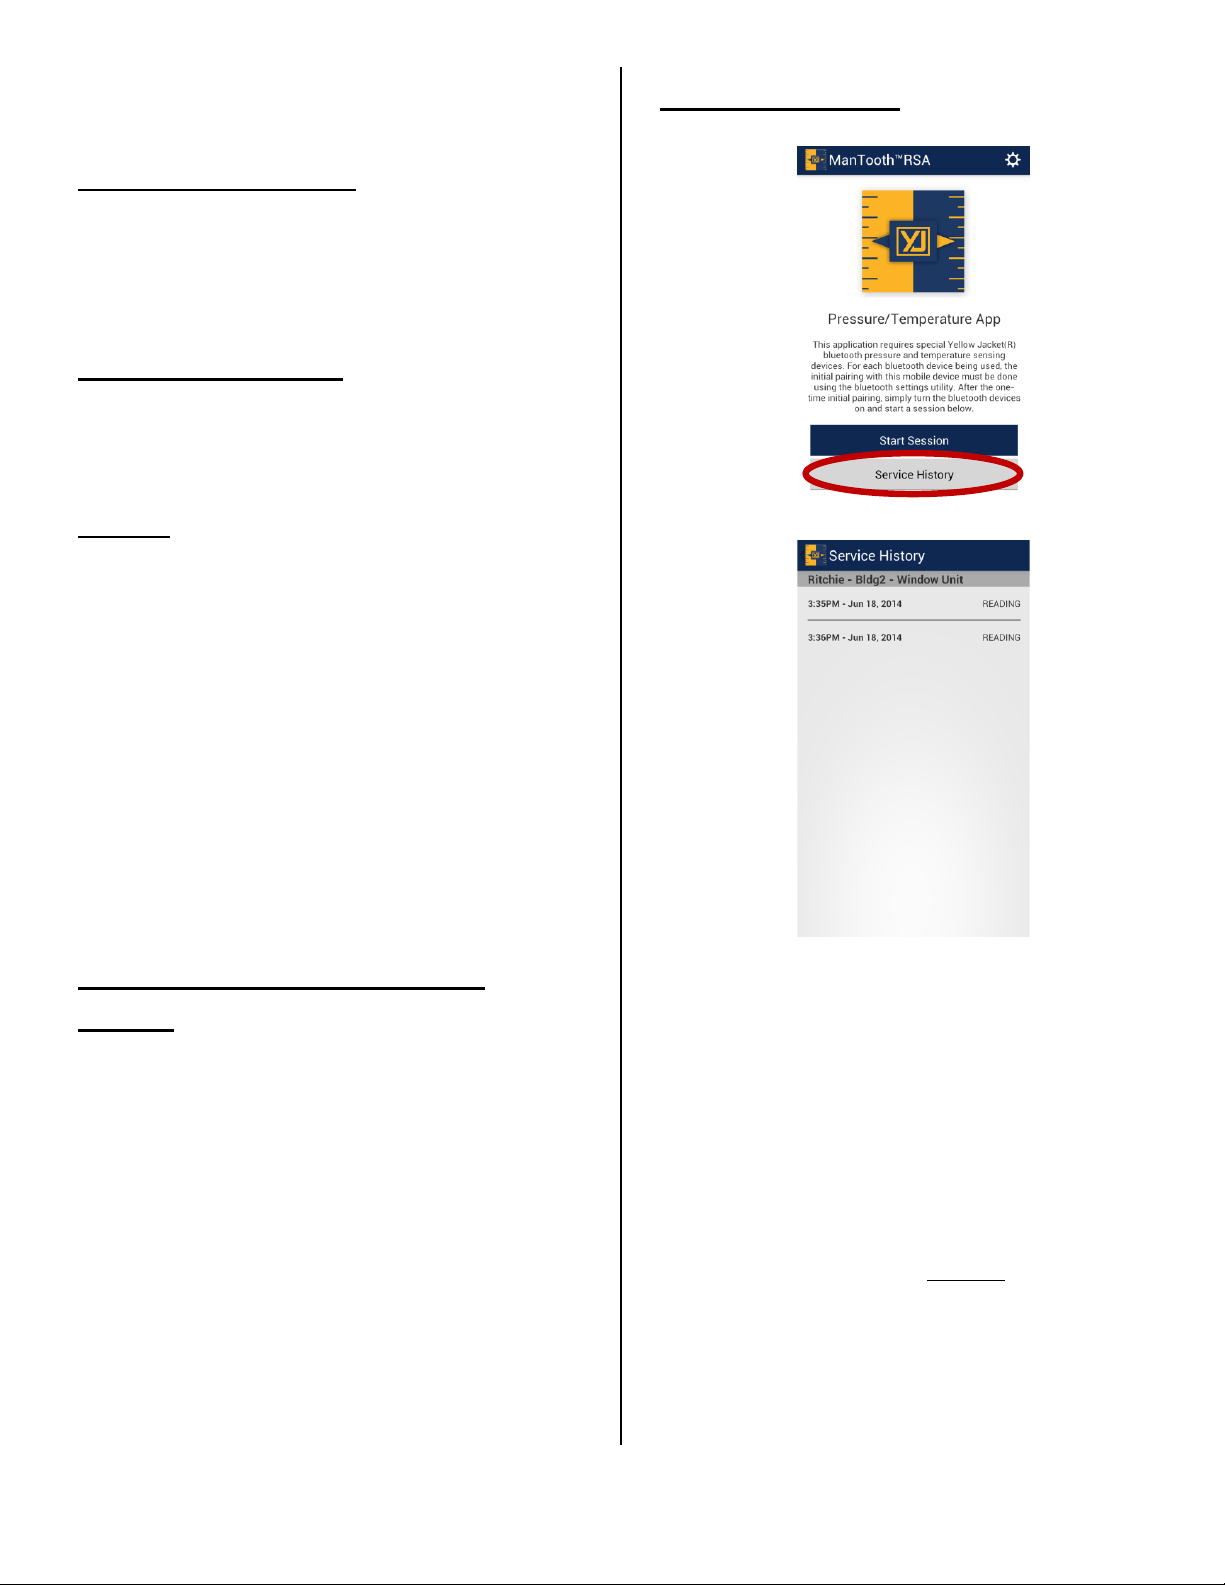
Service History
In service history you are able to browse
through data that was saved during previous
service sessions. Saved data is organized
alphabecally by locaon then by each
locaon’s equipment finally by date and me
the data was taken. If you tap on the desired
service history reading you can see the reading
that was taken and either email the reading to
someone or delete it. Remember once you
have deleted a reading it can not
be retrieved!
7
Page 8
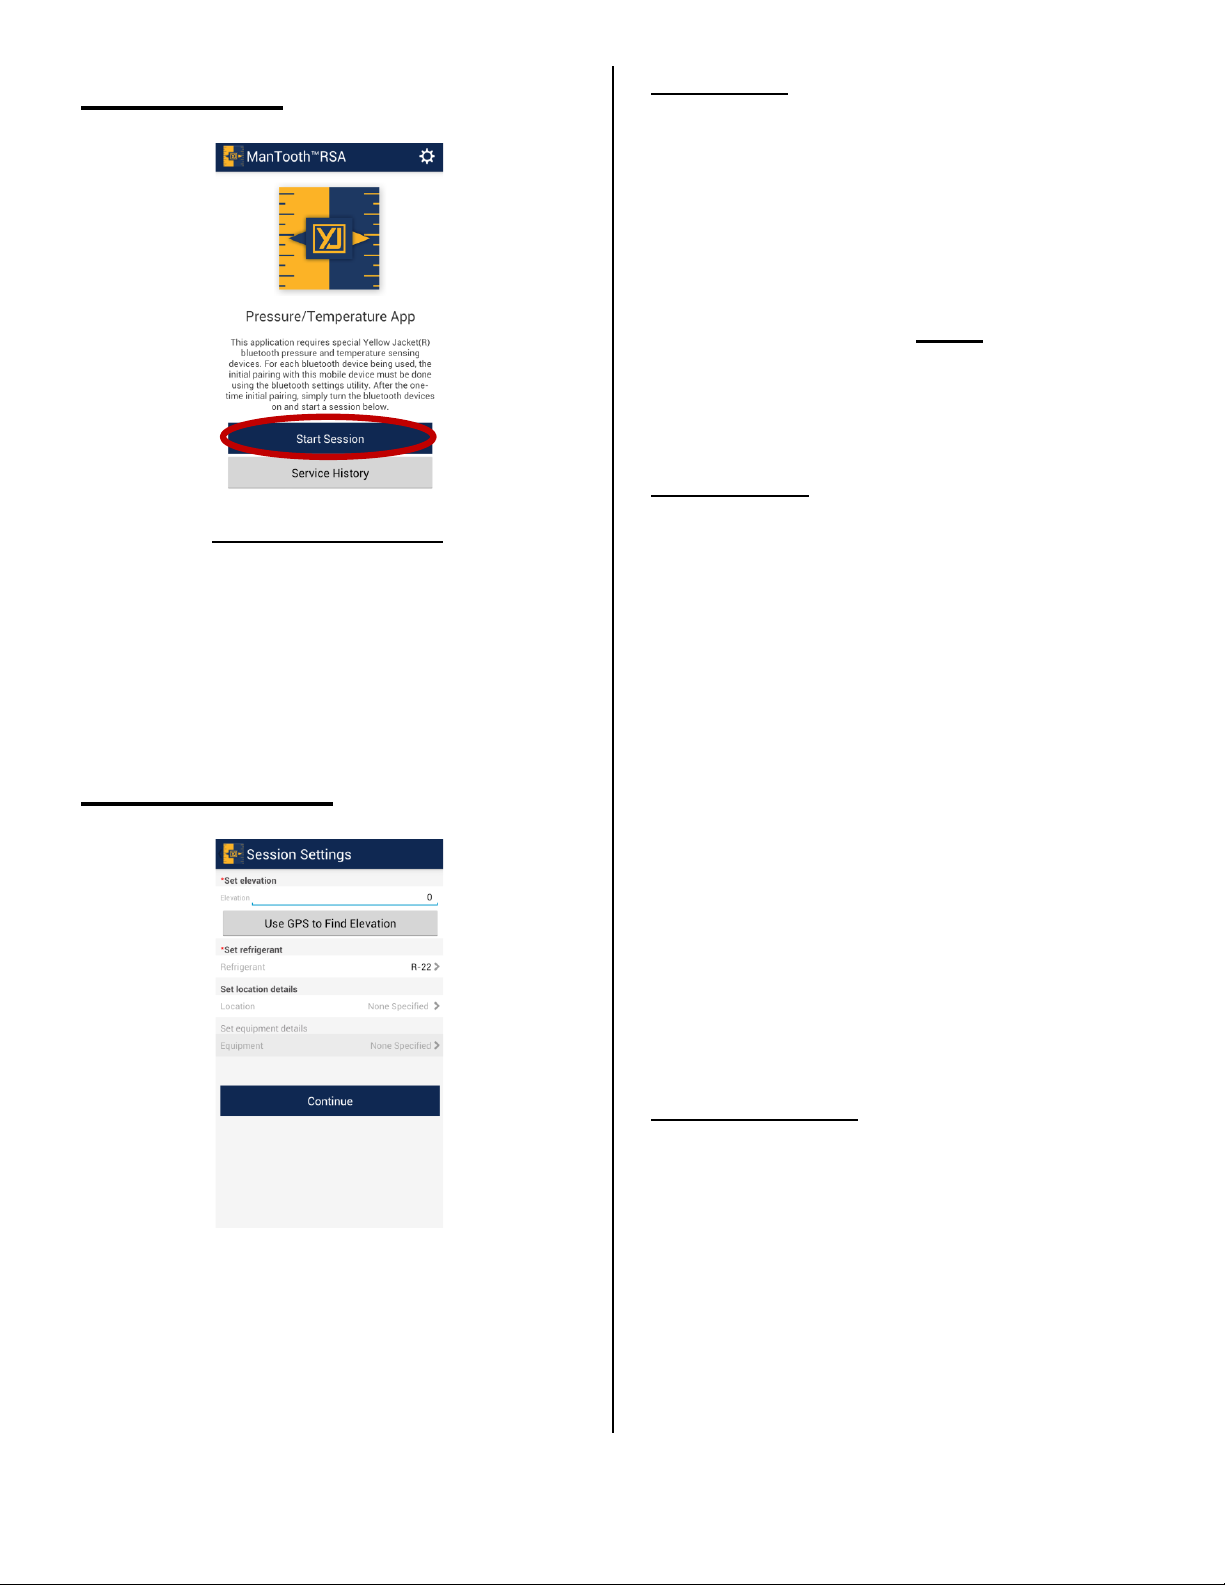
Start Session
Sessions are where you connect your phone or
tablet with your ManTooth PT Module to see
and collect system readings. To begin a new
session tap on “Start Session” in the App home
screen.
Session Sengs
Using the correct sengs that are specific for
the current system you are servicing will ensure
the best possible pressure readings as well as
liquid and vapor saturaon values.
Set Elevaon
Seng the elevaon will enable your
ManTooth RSA app to correct for elevaon
pressure variaons allowing for more accurate
pressure readings. You may either use your
phone or tablet’s built in GPS to determine
your elevaon or input the elevaon manually
by taping on the elevaon and entering your
elevaon above sea level in feet
“Use GPS to Find Locaon” funconality may
not work on all devices especially those without
cellular service.
Set Refrigerant
To set the refrigerant for the current session
tap on “Refrigerant” then scroll through the list
of almost 100 NIST refrigerants and select the
refrigerant corresponding to the unit you will
be servicing. If you accidently select an
incorrect refrigerant do not worry you can also
change the refrigerant later in the readings
screen. Seng a refrigerant is mandatory
before moving to the next screen.
. **Note**
************WARNING************
Refrigerants classified as flammable are in red
text. If such refrigerant
operator may need addional cerficaons
and/or training. Consult your local government
and legal authority and comply fully with all
requirements.
***************************************
Set Locaon Details
If you want to organize your saved data in
session history you can enter the locaon
informaon for the current service session. This
informaon will show up in the service reports
you can email and is how the service history
will be organized. Here you have the ability to
either add a new locaon or select an exisng
locaon. Once you have designated a locaon
you can also designate what equipment is being
serviced during the session. Locaons can have
s are selected, the
8
Page 9
mulple pieces of equipment associated with
Apple iOS Android
them so you can keep track of each individual
unit at locaons that may have more than one
system. Saved session data will be saved to
“Session History” in the app’s main menu and
sorted first alphabecally by business name or
customer last name, then alphabecally by
assigned equipment name, and lastly by the
date and me the data was saved. **Note**
Locaon details are oponal. Any saved session
data without an assigned locaon will be saved
under “No Locaon” and appear at t
the Service History list. The “No Locaon” data
will be sorted simply by date and me. You can
not assign a locaon to data at a later me.
he end of
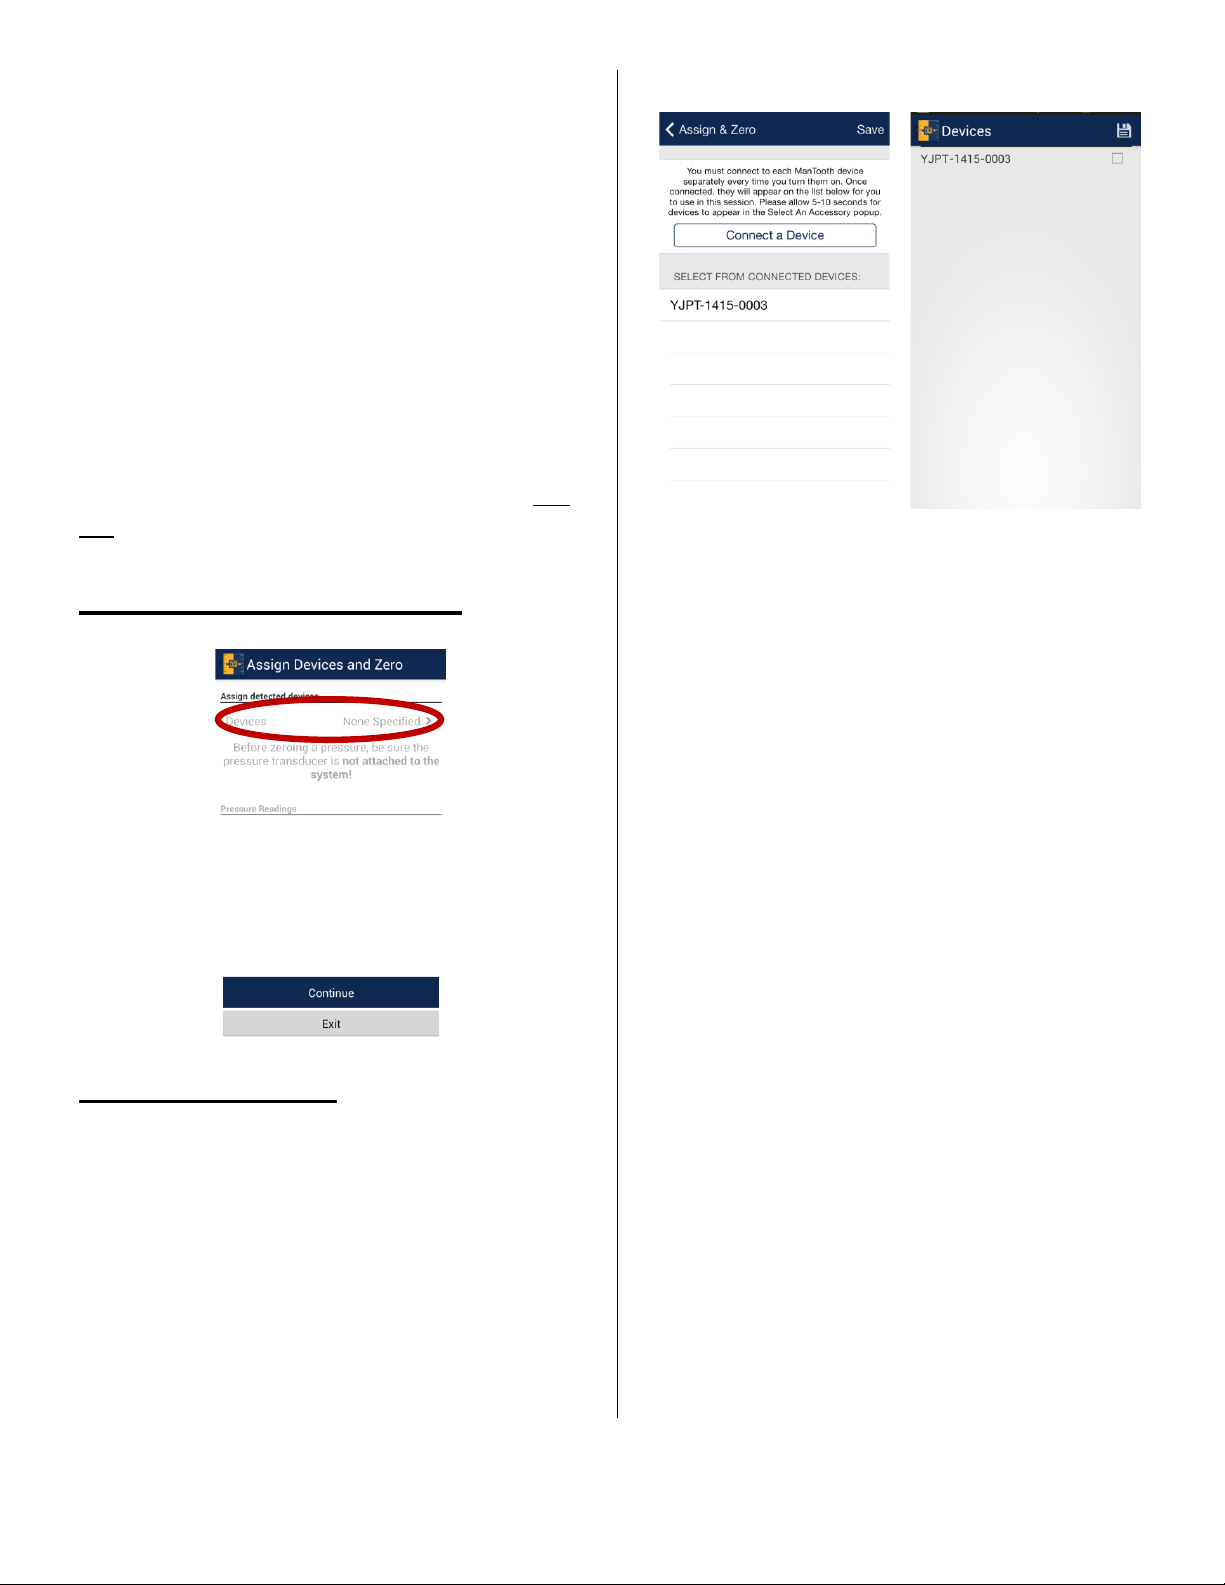
Assign Devices and Zero
Assign Detected Devices
Now you are ready to connect your ManTooth
PT Module to your current session. To connect
your module first tap on “Devices None
Specified”, this will take you to the next screen.
Tap on the ManTooth PT Module(s) that you
wish to connect to your session from the list of
devices that are displayed. Remember your
Module’s name is the serial number printed on
the main label and should take the form of
YJPT-XXXX-XXXX. Next tap the save icon in the
upper right corner of
module(s) to the session. **Note** On iOS
devices you must tap on “Connect a Device” to
first connect your device to your phone or
tablet and then select it under the “Select From
Connected Devices” heading to fully connect it
to your session. **Note** to connect to your
ManTooth PT Module(s) your module(s) must
be on and searching for a connecon (where
the blue light is blinking).
the screen to save the
9
Page 10
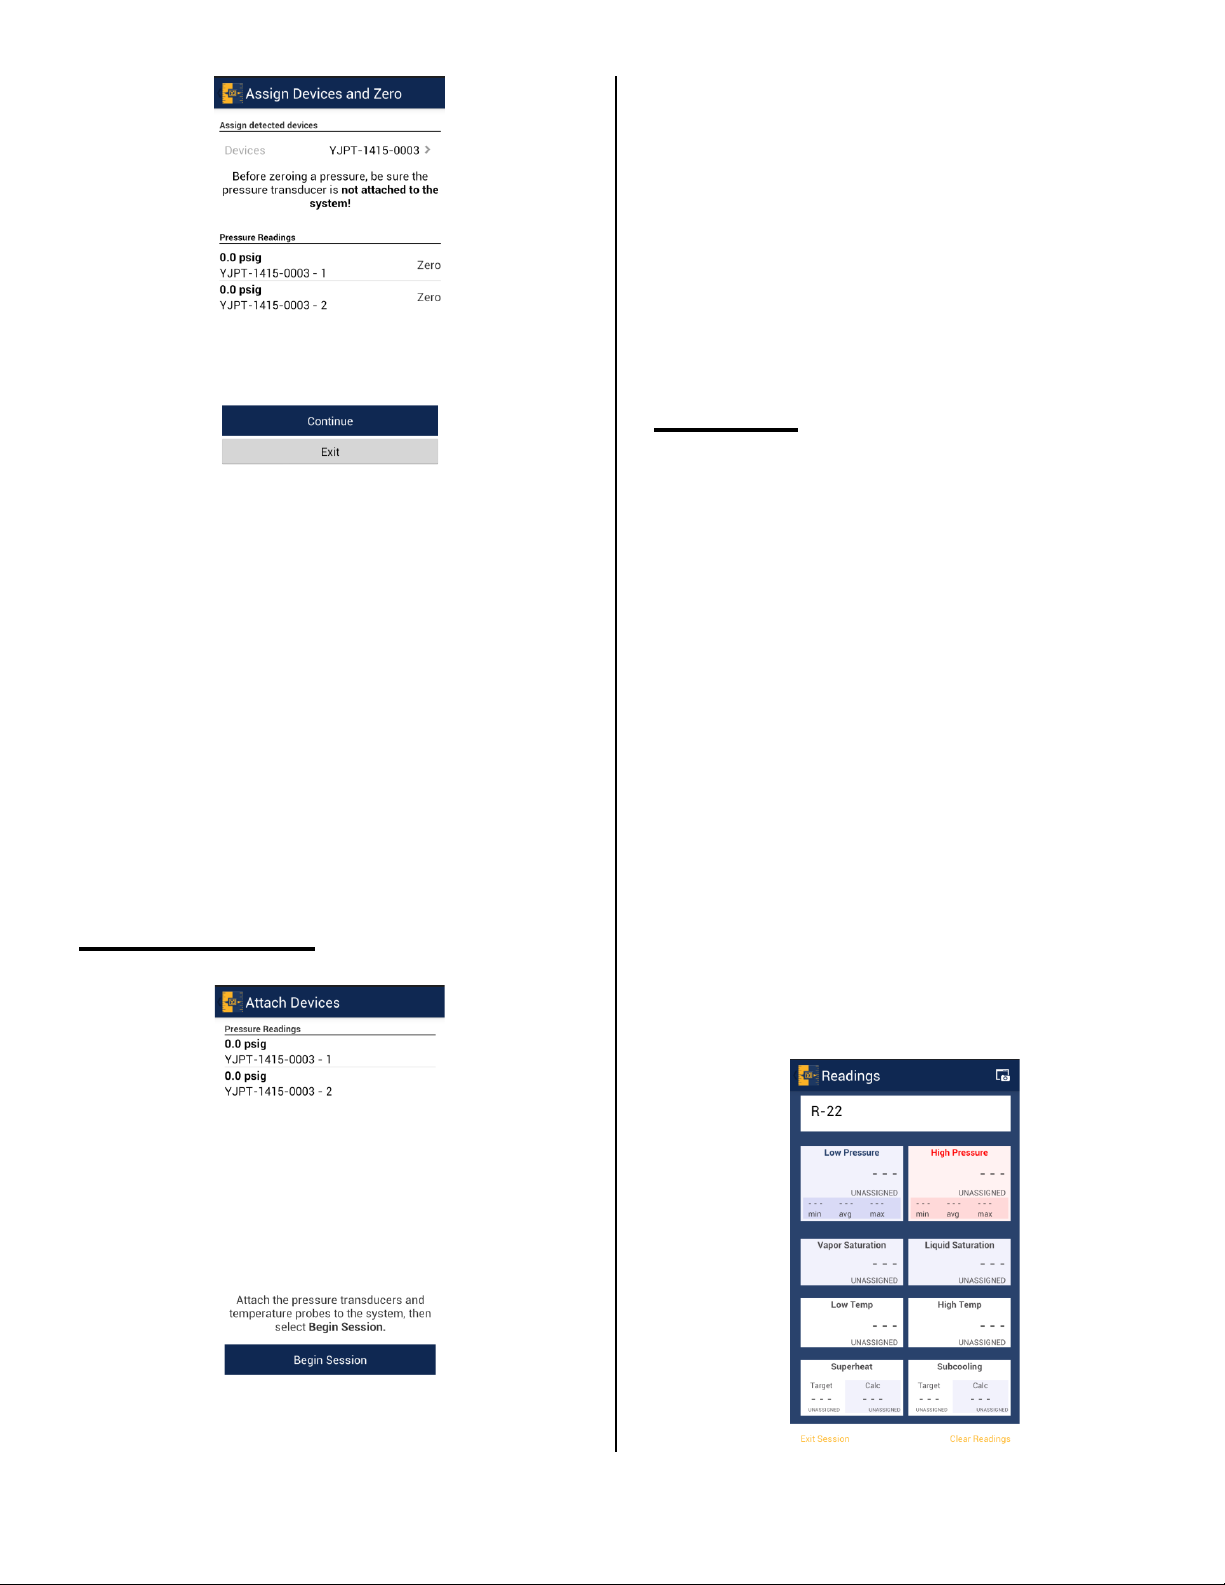
Before starng the session you have one more
chance to check to make sure that the pressure
transducers are zeroed. While in the “Aach
Devices” screen is the appropriate me to
connect your ManTooth PT Module to your
system. Connecng the ManTooth PT Module
to the system before beginning your session
will also ensure that the average, minimum,
and maximum readings are accurate.
Readings
Aer you save your module(s) to the session
they will be displayed at the top of the screen
under “Assign Detected Devices”. The pressures
from the connected module(s) will be displayed
at the boom of the screen. To zero the
pressure transducer readings tap on “Zero”
next to the corresponding pressure. **Note**
It is recommended that you zero the pressure
transducer(s) at the beginning of each new
session before connecng your ManTooth PT
Module to a system. This will ensu
accurate device readings.
re the most
Aach Devices
The readings screen will display the pressures
and temperatures as measured by the
ManTooth PT Module, display the liquid and
vapor saturaon values, as well as calculate and
display the superheat and subcooling values.
The first me you connect your ManTooth PT
Module to a new phone or tablet you will have
to assign the pressure transducers and
temperature sensors. These assignments are
not permanent and can be changed at anyme.
**Note** the pressure transducer in every
ManTooth P
capable of accurately reading pressures up to
700 psia (48.3 bar) and therefore can reliably
be used on either the high or low side.
T Module (main or tethered) is
10
Page 11
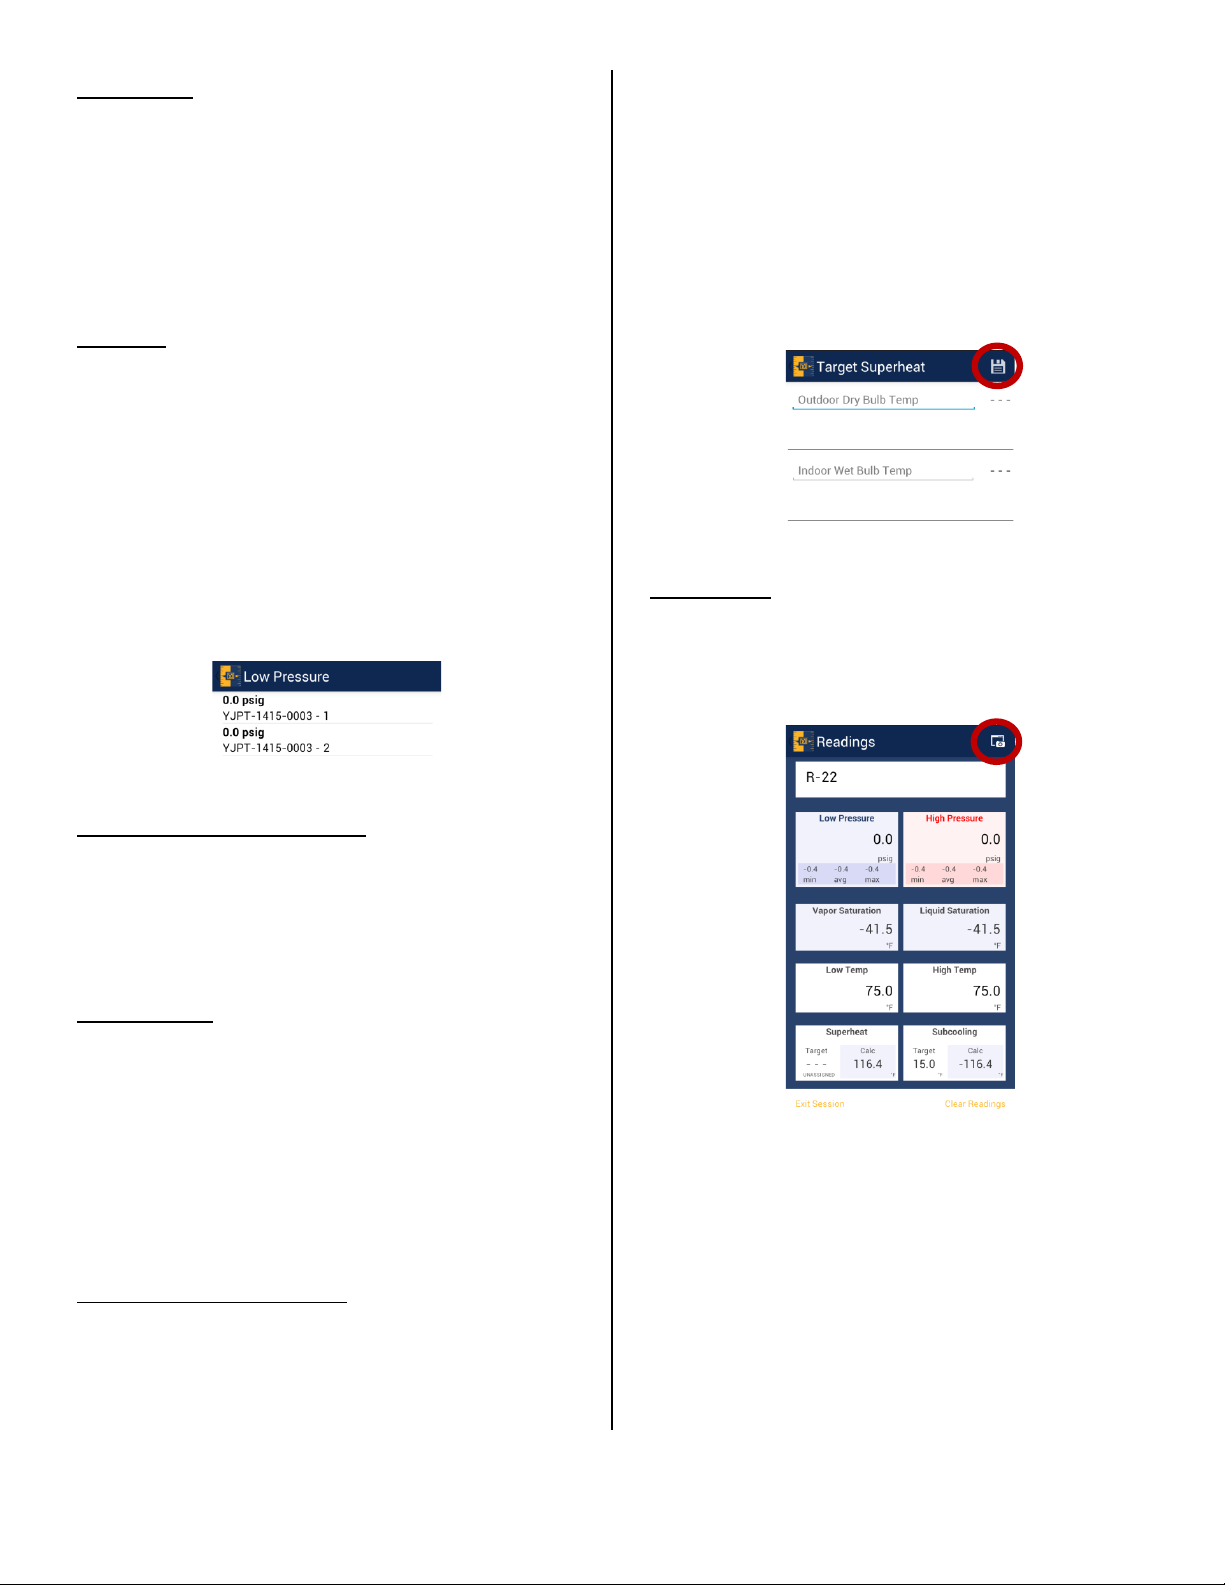
Refrigerant
The refrigerant for the session can be changed
by taping on the refrigerant and selecng the
refrigerant that is in the equipment you are
currently working with. If you forgot or selected
the wrong refrigerant in the Session Sengs
this is where the refrigerant can be changed.
Pressure
To assign pressure readings to either the high
or low side simply tap on the box that contains
the value you wish to assign and select the
sensor that you want to assign to that spot.
**Note** on dual units with 2 transducers the
main unit is #1 and the tethered unit is #2. If
you are using two single units reference the
device name/serial number to determine which
pressure is associated with which device.
superheat enter the outdoor dry bulb
temperature and the indoor wet bulb
temperature. The app will then take this data
and automacally calculate the target
superheat value. Once you have entered the
necessary informaon save the values by taping
on the save icon in the top right cor
screen
Saving Data
To save the data currently on the screen tap on
the screen shot icon on the top right corner of
the readings screen.
ner of the
Liquid and Vapor Saturaon
Liquid and Vapor Saturaon values are
calculated automacally by the app based on
the measured pressure and the refrigerant
selected.
Temperature
To assign temperature readings to either the
high or low side simply tap on the box that
contains the value you wish to assign and select
the sensor that you want to assign to that spot.
**Note** the label on the ManTooth PT
Module denotes which temperature port is T1
and which is T2 for easy reference.
Subcooling and Superheat
To set the subcooling and superheat values tap
on the “Subcooling” or “Superheat” box and
enter the data requested. For subcooling just
enter the the desired value for subcooling. For
11
Page 12
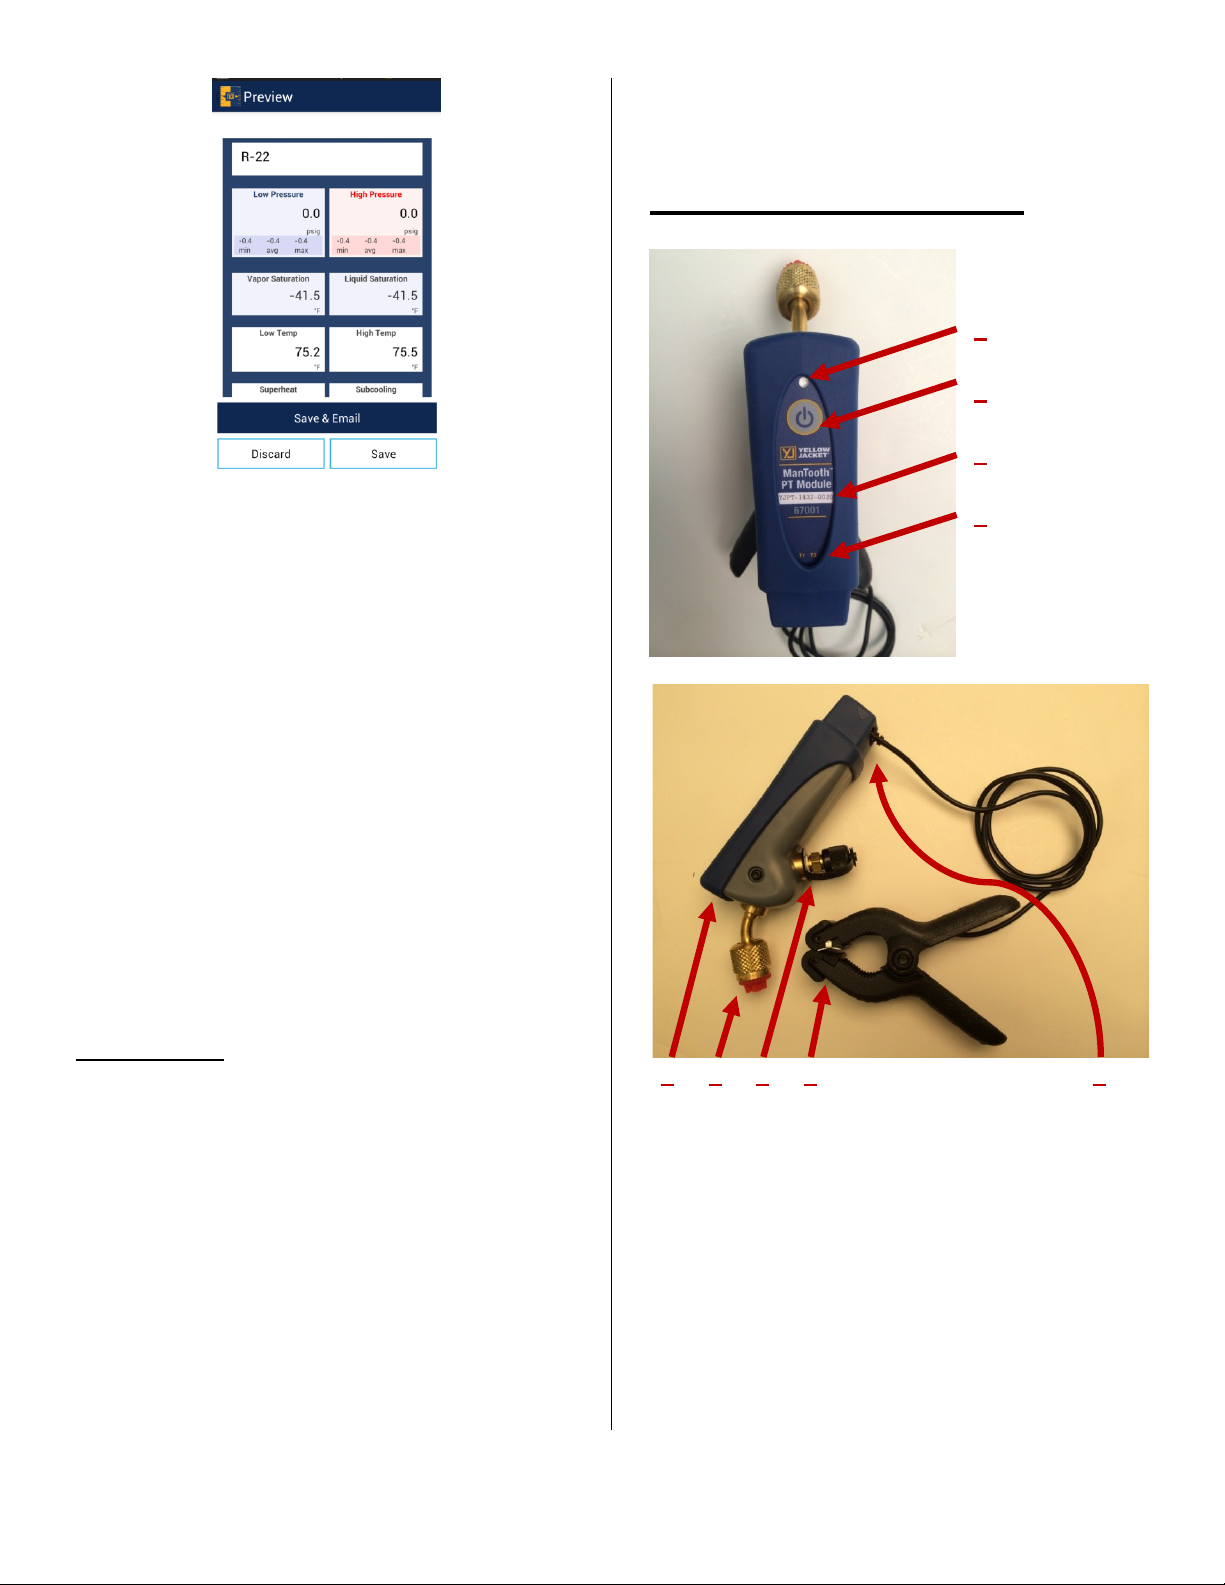
Once you choose to save the data you will be
given the opon to save and email which will
save it to your session history and imbed the
data into an email report for you to send to
whoever you want, discard the snapshot you
just took, or just save it to your session history
for later reference and use. **Note** the
phone or tablet you are using must be
connected to cellular service or WiFi to send
emails. If your phone or tablet does not have
the proper service to send an email whe
screen shots are taken you can save the data
and then access it at any me from the
“Session History” secon on the app’s home
screen. Any saved service data can be emailed
from within “Session History”.
Other Buons
At the boom of the readings screen there are
two addional buons.
The first is labeled “Clear readings” This will
clear the minimum, maximum, and average
readings of the session. This funcon is
especially useful for determining system
stability.
The other opon is “Exit Session”. This will not
only exit the readings screen but will take you
n the
all the way back to the home screen of the
ManTooth RSA app.
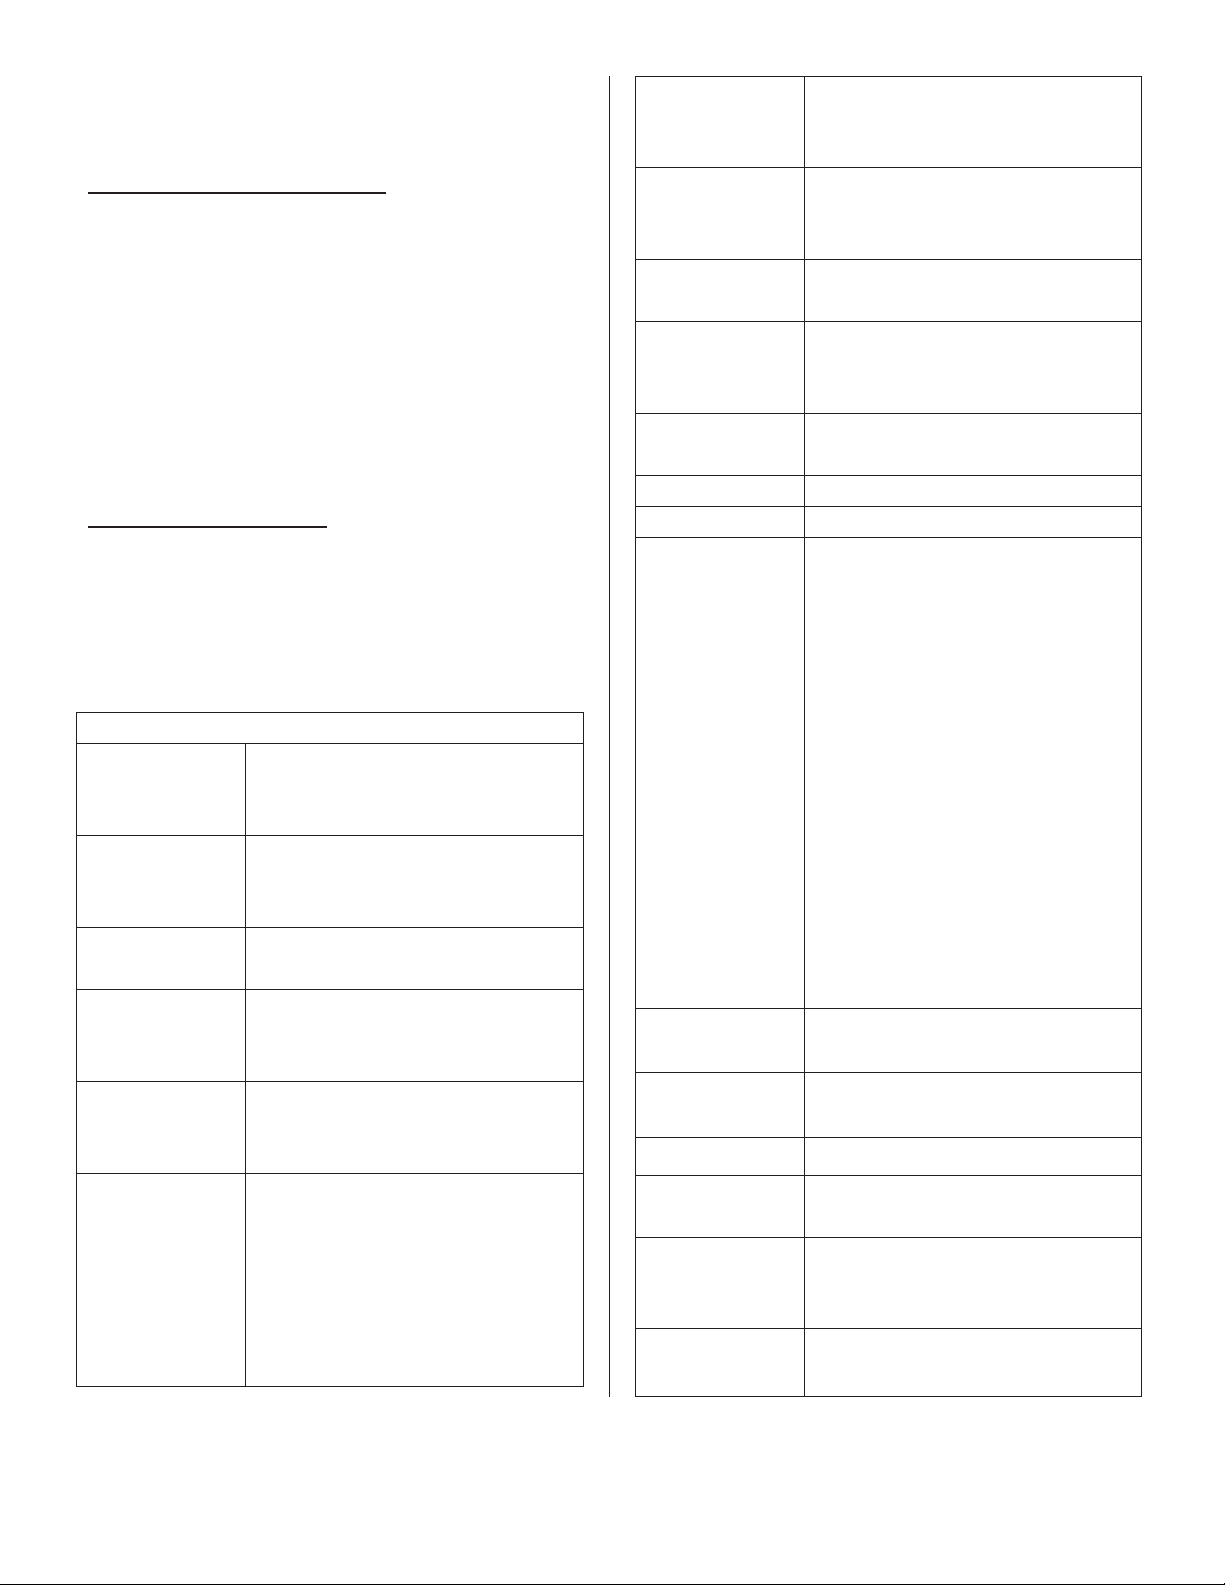
ManTooth™ PT Module
1
2
3
4
6 7 8 9
5
1: Status Light
2: Power Buon
3: Device Name
4: Temperature Probe Indicators
5: Micro USB charging port
6: ¼ inch flare fing pressure transducer
connecon
7: ¼ inch flare fing with Schrader core
pressure transducer connecon
12
Page 13

8: ManTooth thermistor temperature clamp
9: Temperature probe jacks
**Note** On 67002 tethered units numbers 14, 5, and 9 are on the main unit only. The
tethered unit is only equipped with the flair
fings for measuring refrigerant pressure and
adjusng charge.
Status Light
The mul-colored LED indicates the status of
your ManTooth PT Module.
Blinking Blue: The module is on and searching
for a Bluetooth connecon. This will connue
from when you turn on your ManTooth PT
Module unl you connect to it within the
ManTooth RSA Pressure/Temperature app.
**Note** If your ManTooth PT Module looses
connecon to your phone or tablet it will
automacally revert back to this searching for a
connecon mode.
Solid Blue: The module is on an
a phone or tablet via Bluetooth.
Solid Green: The module is connected to a
power source via the Micro USB port and is
charging. **Note** once the unit is fully
charged the green light will turn off.
Blinking Red (Short): The module will blink
short flashes of red to indicate that it is sending
data to a connected device. This will occur
while the light is solid blue.
Blinking Red (Long): The module will flash long
blinks of red when the baery level is below
of total life remaining.
10%
Power Buon
To turn your ManTooth PT Module on or off
push and release the power buon once.
d connected to
Device Name
Your ManTooth PT Module’s name is displayed
right on the label for easy reference. The name
takes the form of YJPT-XXXX-XXXX. The device
name serves as your ManTooth PT Module’s
name within the ManTooth RSA app, its serial
number, as well as its Bluetooth name that will
appear on your phone or tablet when pairing.
Temperature Probe Indicator
On the label of the ManTooth PT Module T1
and T2 are printed onto the label to indicate
which temperature port on the back of the
device corresponds to temperature port 1 (T1)
and temperature port 2 (T2).
Micro USB Charging Port
The ManTooth PT Module is designed to be
charged using any standard Micro USB charging
cord and corrisponding USB charger.
¼ Inch Flare Fing Pressure Transducer
Connecon
The flare fing on the front of the ManTooth
PT Module directs to the pressure transducer
with a working pressure range of 0-700 psia.
The fing is equipped with an “Adjust-a-Valve”
opener and sized to fit most system access
ports for easy access to most AC and
refrigeraon units. The compact size of the
ManTooth PT Module and no hose connecon
system reduces charge loss that can occur from
hoses used in charging through a standard test
and charge manifold. Adapters to
ManTooth PT Module to other size access ports
are available from Yellow Jacket.
¼ Inch Flare Fing With Schrader Core
Pressure Transducer Connecon
The Schrader core fing on the ManTooth PT
Module allows for recovering refrigerant,
adding charge, or removing charge all without
connect the
13
Page 14
disconnecng your ManTooth PT Module from
Instrumentaon Specificaon
Pressure
0.1 psi, 0.1 bar, 1 kPa, 0.01
Pressure
0.5% of full scale at 25°C
Working
0 to 700 psia (48.3 bar)
Proof
Tolerable pressure without
Burst Pressure
Tolerable pressure without
Temperature
Sensing element
Temperature
0.1
Temperature
±0.2°C (±0.36°F)
Working
-4°F to 160°F Limited by
Storage
-4°F to 160°F
Working
0 to 95% RH (non-condensing)
IP Class
IP 50
Baery Life
10+ hours connuous
Range
Up to 400 feet
Bluetooth
Class 1 Bluetooth 2.1 Radio
Size
6” long x 1.6” wide x 2.3” thick
Weight
0.5 lbs (225 grams)
Superheat
Automacally calculated by
Max. and Min.
Displays and records the
Refrigerant
98 NIST refrigerant profiles
the system.
ManTooth Thermistor Clamp
The thermistor pipe clamp probe is capable of
clamping to and measuring the temperature of
pipes ranging in size from ¼ inch to 1 ⅜ inches.
The probe is capable of measuring with an
accuracy of 0.2°C from 0°C to 70°C with a full
range of -40°C to 130°C. For best long term
stability of your thermistor pipe clamp probe
avoid storing it at temperatures exceeding 75°C
(167°F).
Thermistor Probe Jacks
Each ManTooth PT Module is equipped with 2
temperature probe jacks for use with
ManTooth Thermistor Clamps.
Sensing
MPa, 0.01 kg/cm^2
Resoluon
sensing
accuracy
1% of full scale 55°F to 130°F
2% of full scale -40°F to 248°F
Pressure
Display
Resoluon
Accuracy
(Instrument)
Temperature
Temperature
humidity
°F or °C
baery
For best baery performance
do not store at over 100°F
Limited by Phone or Tablet
Bluetooth radio strength
*Note – As with any radio technology,
when you start to add obstrucons
between the transmier and the receiver,
the ulmate range may decrease as
different objects interfere with the radio
signal in different ways. The more
obstrucons you add between the phone
and the ManTooth, the weaker the signal
may become aer it has passed through
or around the obstacles. This could
ulmately lead to a shorter maximum
range. The ManTooth ulizes the highest
Bluetooth radio transmier signal
strength available to ensure the best
possible range of your ManTooth, however,
each situaon will be slightly different
depending on the environment/
surroundings within you are working.
Pressure
internal damage
1000 psia
loss of seal
1500 psia
Sensor Range
(instrument)
-40°F to 266°F
(-40°C to 130°C)
Max Cord temp
176°F (80°C)
Max Clamp Temp
203°F (95°C)
14
Radio
and Subcool
Pressures
Database
(15.3 x 4 x 5.8 cm)
the ManTooth App
maximum and minimum
pressures
included; upgradeable
Page 15

System
Very small internal volume
Pressure
Simple single buon zeroing at
Elevaon
Enter elevaon at the start of
Baery
Rechargeable LiPo baery for
Share
Screenshots
Screenshot feature allows you to
save pressure and temperature
readings from your sessions which
can be automacally organized by
locaon and unit being serviced.
Temperature
Sensors
Pressure
Transducers
aachment
Zeroing
Compensaon
Capable of measuring two
temperatures using high accuracy
NTC thermistors
67001 - One pressure transducer
67002 - Two pressure transducers
minimizes refrigerant loss
during system analysis.
Standard manifolds and hoses
can lose over 50 mes more
refrigerant with each
connecon
the start of each session
the session for effortless psia
compensaon
long baery life and excellent
recharging capability for the
life of your ManTooth
15
Page 16

Warranty Policy
The YELLOW JACKET ManTooth Wireless Digital
P/T Gauge from Ritchie Engineering Company,
Inc. is guaranteed to be free from material and
workmanship defects for a period of two years.
All other YELLOW JACKET products included
in this package are guaranteed to be free from
material and workmanship defects for a period of
-
one year. These guarantees do not cover prod
ucts that have been altered, abused, misused or
improperly maintained.
-
Not all catalogued products are stocked and eli
gible for return. Please check with your YELLOW
JACKET representative or the factory for more
information.
All returns must have an RGA number and proof
of purchase/copy of invoice. Please obtain an
RGA number from Ritchie Engineering Customer
Service by calling 800-769-8370.
All returns must be pre-paid.
Ritchie Engineering Co., Inc.
YELLOW JACKET Products Division
10950 Hampshire Avenue South
Bloomington, MN 55438 U.S.A.
Phone: (800)769-8370 or
(952)943-1333
Fax: (800)322-8684
E-mail: [email protected]
Web: www.yellowjacket.com
©2014 Ritchie Engineering Co., Inc.
 Loading...